Tiki Central / Tiki Carving
New stuff added!!
Pages: 1 2 3 4 5 6 7 8 9 10 11 12 13 14 15 16 17 18 19 20 21 22 23 24 25 26 27 28 29 30 31 32 33 34 35 36 37 38 39 40 41 1,965 replies
|
M

McTiki
Posted
posted
on
Tue, Feb 27, 2007 12:04 PM
Wow Aloha! The Canibal is a beautiful carve! It flows very nicely (something I'm trying to achieve) Nice ! Love the flips too! Mahalo McTiki |
|
S

surfintiki
Posted
posted
on
Tue, Feb 27, 2007 2:22 PM
WOOOO Yeah! That is O-riginal! That is a great piece, a keeper for sure. I love the subtle use of color, especially in the skull on top. Reeeeally smooth. Super nice work. |
|
A

AlohaStation
Posted
posted
on
Wed, Feb 28, 2007 7:51 AM
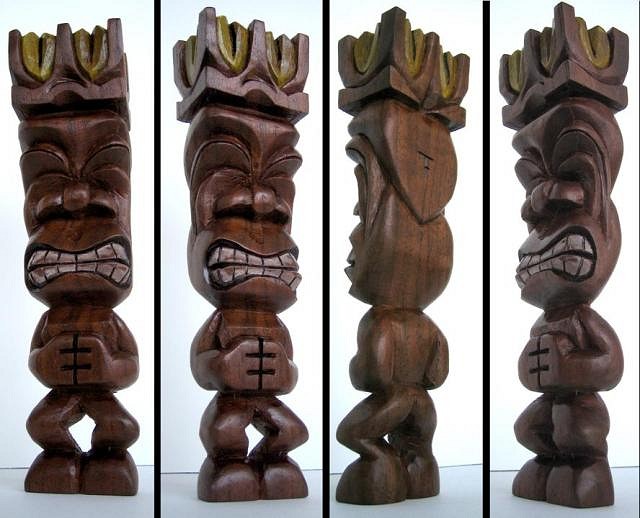
Here's the other tiki I promised. Carved from a piece of Black Walnut that Benzart so generously gave me. He's 7.5" tall and took me forever to finish - why? - I don't know. I started carving this guy at the beginning of DECEMBER and then got distracted. I really like carving the Black Walnut - it has a beautiful grain that is very firm but still easy to carve - very similar to Cocobolo which I am allergic to. There will be a lot more stuff coming with this wood. Enjoy.
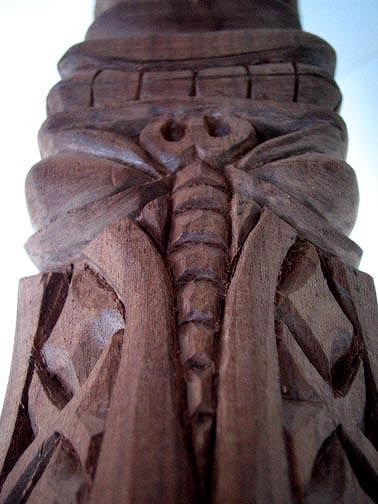
Here's a sneak peek at the next project.
|
|
LLT

little lost tiki
Posted
posted
on
Wed, Feb 28, 2007 8:03 AM
Wowza Alohastation! Your Crown Tiki kicks Major Butt! I love his expression! Glad you could find a wood that you really are delighted with (and not allergic to!) Your new fellow with the X in the eyes looks like it will just as beautiful as your crowned tiki! Props all around! [ Edited by: little lost tiki 2007-02-28 12:27 ] |
|
F

flynny
Posted
posted
on
Wed, Feb 28, 2007 8:11 AM
Errr, is there any chance I could wangle getting you to make for me in the draw :) |
|
M

mieko
Posted
posted
on
Wed, Feb 28, 2007 10:21 AM
Nice work! 7.5"? He looks much bigger than that. :) How thick was the piece of wood you used? What kind of finish did you put on this guy? I just got some walnut myself and am looking forward to having something that doesn't need stain to look good, but want to think about a nice finish for it. I love how this guy isn't too glossy, he looks really great. |
|
M
McTiki
Posted
posted
on
Wed, Feb 28, 2007 12:25 PM
Very nice Aloha. Mahalo McTiki |
|
V

VampiressRN
Posted
posted
on
Wed, Feb 28, 2007 6:58 PM
I am drooling over page 19....those are just awesome. I love the evil and the nice ones. :) |
|
F

FreddieBallsomic
Posted
posted
on
Wed, Feb 28, 2007 7:28 PM
Every carving, AS, Your shizzle is gettin better and better, with more detail and creativity....Just keep doin your thing, with your imagination,and it will be slammin'....Lookin forward to some coors lights at some point... |
|
A
AlohaStation
Posted
posted
on
Thu, Mar 1, 2007 6:53 AM
Thanks for all the comps everyone. My carving techniques are getting better, but in many ways I still feel like a newby. The carving and creating have always been the easy part - what really kicks my ass is the FINISHING. I hate sanding and painting and sealing. Making a cut in the wood is so definitive, while the process of finishing takes a bit of patience and luck. Shellac, lacquer, polyurethane, epoxy, acrylics, stains... There are so many variables in woodworking that its mind-boggling. I can knock ouut a carving in no time, but to finish it - holy crap! I'll keep posting my results here to hopefully help other people. LLT - Thanks. I have always been a good illustrator and I feel that has helped alot with getting my carving to have a little life. You can't imagine how happy I am not to have a reaction with this wood! Carving really brought me back after suffering from creative burnout a few years ago. flynny - I have something a little old school planned for the swap. mieko - The wood was abot 2" thick at the top and 1" at the bottom - more like a wedge/scrap. I used a spray lacquer for the finish - great stuff because you have alot of control on how shiny you get it. More coats makes it shinier. I love working with the dark woods not only for the color but the feel. However, I suggest that anyone just starting should buy a hunk of Basswood and practice with that - It helped me alot! fBalls - Anytime, my friend. June is getting closer!! |
|
H

haikai
Posted
posted
on
Thu, Mar 1, 2007 8:03 AM
Perfect! |
|
C

Clarita
Posted
posted
on
Thu, Mar 1, 2007 8:57 AM
Great thread Aloha! I see a Lot of style and creativity, Love the pens too, Congrats!! |
|
S
surfintiki
Posted
posted
on
Thu, Mar 1, 2007 5:04 PM
Yeah, I love your style. Hmmm, oh Bennnnzart, I need a piece of black walnut!! |
|
A
AlohaStation
Posted
posted
on
Mon, Mar 5, 2007 11:28 AM
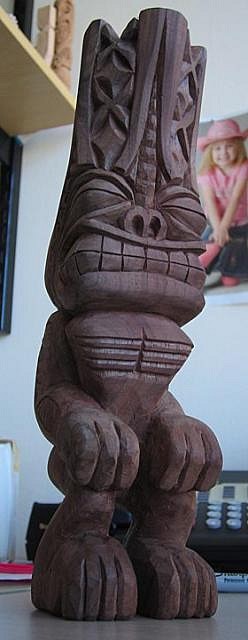
Here is the next tiki in progress. Lono - almost finished, still needs some cleanup and sanding. I will probably give him the same treatment as the Crowned Tiki (light color highlights then clear coated. I really like this little guy!
|
|
QK

Queen Kamehameha
Posted
posted
on
Mon, Mar 5, 2007 1:26 PM
How tall is the lono, the detail is amazing! Amy |
|
K

kirby
Posted
posted
on
Mon, Mar 5, 2007 2:17 PM
sweet style...I dig... |
|
M
McTiki
Posted
posted
on
Mon, Mar 5, 2007 2:55 PM
Stop already! (unless one of these babies are waiting for me at home!) Beautiful carvings Aloha! Mahalo McTiki |
|
M

MooneyTiki
Posted
posted
on
Mon, Mar 5, 2007 5:29 PM
Aloha AlohaStation!!!!!! |
|
H

hewey
Posted
posted
on
Mon, Mar 5, 2007 5:31 PM
I really like your style :) Nice work, so detailed |
|
B

Benzart
Posted
posted
on
Mon, Mar 5, 2007 7:59 PM
AS, He is A Really Cool, Happy looking Lono. Excellent work. |
|
F
FreddieBallsomic
Posted
posted
on
Mon, Mar 5, 2007 9:59 PM
Yo, Tom....That Lono is ,"all in the family." Korn style, Homes! Looks, great. Balls |
|
A
AlohaStation
Posted
posted
on
Tue, Mar 6, 2007 8:32 AM
Thanks for compliments. He is 10" tall and carved out of Black Walnut. I have been wrestling the idea of carving all the way thru the crown - it is hollow but not that thin. There are a few cracks around the top of the crown that were already there when I started carving - so I'm not sure if the wood can take the stress. That will probably be a decision made on the fly. i should be done carving on this guy soon - now comes the hard part for me - finishing. |
|
A
AlohaStation
Posted
posted
on
Tue, Mar 13, 2007 6:42 AM
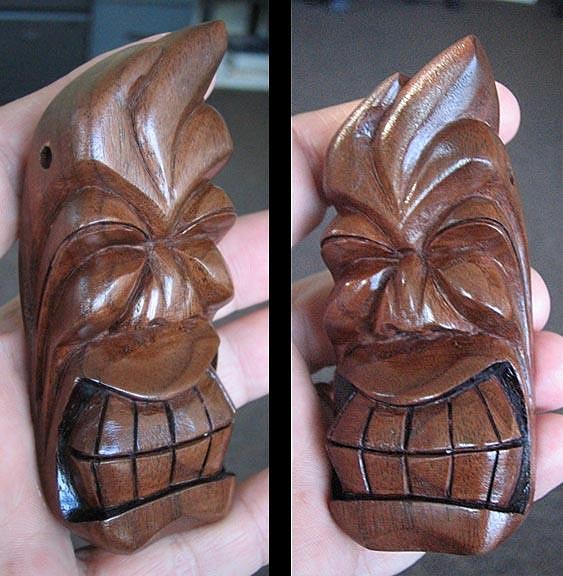
Here's a quickie done in a few hours with a scrap piece of wood. Almost 4" tall - the wood is just beautiful. Enjoy.
|
|
F

finkdaddy
Posted
posted
on
Tue, Mar 13, 2007 7:07 AM
Wow, AlohaStation, your work looks really nice! Everything has a ton of personality and life. I'm very impressed, especially with that last Lono! |
|
B
Benzart
Posted
posted
on
Tue, Mar 13, 2007 11:10 AM
AS, These Quickies Always turn out great and this guy did too. Your Lono looks really great. For carving thru the crown, you might try a wide hole drilled down from the top then it would be easier to carve thru the wall. Think on it. You can use a drill press to do it easily. Come on up if you don't have one, or Come on up Anyway, we're Due! |
|
A
AlohaStation
Posted
posted
on
Tue, Mar 13, 2007 4:47 PM
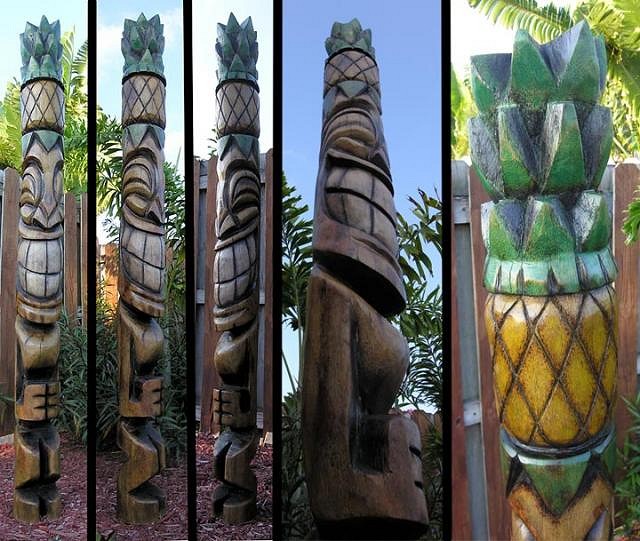
This guy wasn't a "quickie" - had a really hard time finishing this one. my ADD must have kicked in because I've been working on so many other projects since starting him at the TikiJam. He's almost 7' tall and carved from a sabal palm (my last piece - if any one in S.FL is holdin??). My wife loves this guy - so my plan must have worked! :D She wanted tiki that was very inviting. I love the pineaple - you'll be seeing more of those!!
Benz - I would love to come up, schedule permitting. I am looking forward to meeting you new neighborish - Finkdady. [ Edited by: AlohaStation 2007-03-13 16:52 ] |
|
ST

Surf tiki
Posted
posted
on
Tue, Mar 13, 2007 8:13 PM
He looks like someone that you would always make sure is invited to whatever party your're having. Really, really cool. Love the use of color!! |
|
T

tikitammy
Posted
posted
on
Wed, Mar 14, 2007 2:05 PM
I love the concept of a friendly tiki! Your wife must be thrilled. The stain job looks wonderful, you must have really worked hard to achieve this look. What is your secret? |
|
F
flynny
Posted
posted
on
Wed, Mar 14, 2007 2:11 PM
Aloah |
|
H
hewey
Posted
posted
on
Wed, Mar 14, 2007 6:23 PM
He looks VERY happy, no wonder your wife is happy :) |
|
A
AlohaStation
Posted
posted
on
Thu, Mar 15, 2007 7:43 AM
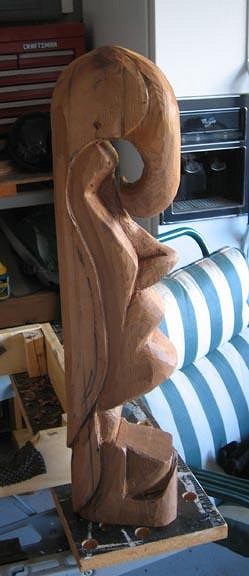
Thanks for the compliments. He loves great standing next to bar. tikitammy and flynny - The finish is very easy! Let me start by saying that I take every shortcut possible when finishing. First, for color, I start with cheapo acrylic paints and extremely water them down. I have found that palms are VERY absorbant, so the pigment wil actually soak into the soft wood. My colors are so thin that it often takes 2 coats to get the right "tint". Burn the wood next with an acetalene torch wherever shadows are desired. Sand off the excess burned areas (takes a few minutes with an electric sander). Make sure that when burning an area with color not to overburn - sanding will take the paint off QUICKLY. Do any touchup with black paint (mostly in the deep cracks). Then Polyurethane! Palm with soak up the first coat of poly changing the color of the wood - from a cream color to the rich brown - no stain was used of this piece. Now its on to the next piece. With great anticipation I dove into the next piece. Paipo graciously gave me permission to replicate his Bird Moai. I thought that I had the perfect piece of wood - an old Cedar ceiling beam, its beautiful!!! After starting on this I am wondring if that was the right choice. The wood is firm and chips EASILY. What you see only represents about an hour of work - so I ask - should I continue and possibly have a catastrophic accident or do a smaller version with different wood? Has anyone carving dried Cedar?
|
|
J

JohnnyP
Posted
posted
on
Thu, Mar 15, 2007 9:08 AM
Dried cedar is very fragile and chips and splits easy, but don't give up on this piece. You can sand and grind cedar very well, instead of using chisels to shape it use an angle grinder and drum sander. When you switch to sharps to do the detail work watch the grain and carve with it or you will break it. This will be a spectacular piece. JP |
|
H

Howland
Posted
posted
on
Thu, Mar 15, 2007 11:02 AM
That's going to be BADA$$, AS. I can't wait to see how it turns out. |
|
C
Clarita
Posted
posted
on
Thu, Mar 15, 2007 1:48 PM
|
|
B
Benzart
Posted
posted
on
Thu, Mar 15, 2007 3:01 PM
AS, on the dried cedar you Must hav extremely sharp tools and always cut with the grain. Also you should use power tools as Much as possible. Yes it is chippy but very carvable. Just take your time. It is Going to be a Great piece. |
|
A
AlohaStation
Posted
posted
on
Fri, Mar 16, 2007 6:32 AM
JohnyP and Benz - Thanks for the tips. So, I dug into it last night with the angle grinder and WOW! The cedar just melts away like butter revealling a grain that just needs to be seen. Will have something to show this weekend. Clarita - Its my shame to say once again - finishing is not my favorite. Needs alittle bit more sanding and a clear coat. The real problem is that once I start getting ready to finish it , I find more to do to it. |
|
P

Paipo
Posted
posted
on
Fri, Mar 16, 2007 1:46 PM
Good to see some expert advice has got you back on track with this guy - he's looking very promising so far AS. That is what I come here for. So from what Johnny and Benz are saying, it is quite feasible to carve smaller pieces entirely using rotary tools? Cause that would probably be a much easier transition for me than trying chiselwork (which I have already had pretty poor results with). |
|
B
Benzart
Posted
posted
on
Sat, Mar 17, 2007 8:27 PM
Paips, you can do 100% of your small wood carving with power rotary toolz if you want. MY Motto is whatever tool will remove the wood the Fastest is the way to go. There are some fantastic bits that will work wonders in your handpieces. |
|
A
AlohaStation
Posted
posted
on
Sun, Mar 18, 2007 6:53 AM
Paipo - Rotary tools are how I got started carving. I had a dremel and an idea and went to town. Even my most recent carvings are done with some type of rotary too. Bits for removing large mass, sanding drums for shaping and refining - you can definatley carve wood easily with what you have. thedifference is the amount of dust! no water, so the dust will fly - make sure you wear some type of mask. Here's an update (All this was done friday night, because I spent the day on the beach with the family and some unexpected surf!). This is definatley a "sandpaper" piece. Carving does not produce the same quality with the wood. The bad part is that I won't be able to put as much detail into it as I first wanted.
|
|
A
AlohaStation
Posted
posted
on
Wed, Mar 28, 2007 7:36 AM
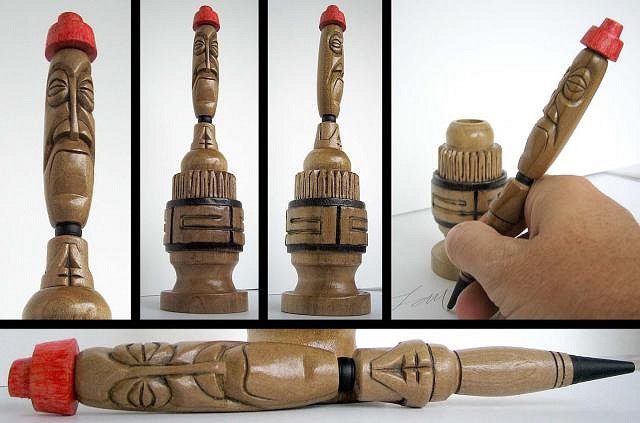
Here's an update. The Bird-Moai has been abducted! Not to worry - my mother-in-law saw this guy and loved him. He will doing a tour of duty protecting plants at several flower shows thoughout SFL. He is not done, but very close - I get him back in a few weeks and will post images. For the Tiki Swap I created a new moai-stylized pen. It is actually a recreation of another pen that I did that did not turn out as well. Its been a while since I've done a pen, and it felt pretty good working so small. The wood is a mystery - just a piece that was in my wood bin. Carved very nice and has a golden hue to it. I didn't spend alot of time on the base and I feel that it shows?? The way that the pen works is you twist the head and the pen tip comes out. Takes standard ink refills.
|
|
M
McTiki
Posted
posted
on
Wed, Mar 28, 2007 7:39 AM
Jeeez Aloha! That's the coolest writing utencil I beleive I have ever seen! Great work! Mahalo McTiki |
|
C
Clarita
Posted
posted
on
Wed, Mar 28, 2007 7:55 AM
Very nice! The pens are getting better and better! Congrats! |
|
F
flynny
Posted
posted
on
Wed, Mar 28, 2007 8:30 AM
As per the swap thread, excellent stuff, you should bring out a matching desk set then a whole range of stuff, superb. |
|
B
Benzart
Posted
posted
on
Wed, Mar 28, 2007 12:46 PM
Aloha what a Sweet deal. I Love that pen. You haven't done one in awhile have you? |
|
QK
Queen Kamehameha
Posted
posted
on
Thu, Mar 29, 2007 2:31 PM
Cool and different, love it! Amy |
|
H
hewey
Posted
posted
on
Thu, Mar 29, 2007 3:32 PM
That pen is sweet! :D |
|
A
AlohaStation
Posted
posted
on
Thu, Mar 29, 2007 4:30 PM
The pen turned out really nice. Thanks for comps. Clarita - this was the first pen I've done in a while and it was fairly easy because I had made a similar pen a short time before. |
|
F
finkdaddy
Posted
posted
on
Thu, Mar 29, 2007 4:34 PM
I don't know why, but your new pen reminds me of someone giving me a job interview. It's something to do with the way his mouth and eyes look, and especially his hands! Wipe that smug look off your face, you SOB! I'm not an idiot, I just need a job! :x Nice job by the way. |

Pages: 1 2 3 4 5 6 7 8 9 10 11 12 13 14 15 16 17 18 19 20 21 22 23 24 25 26 27 28 29 30 31 32 33 34 35 36 37 38 39 40 41 1965 replies