Tiki Central / Other Crafts
Tiki-On-A-Budget
Pages: 1 2 3 4 5 6 7 8 343 replies
|
TGT

The Granite Tiki
Posted
posted
on
Tue, Aug 8, 2006 2:24 PM
Many of us here at Tiki Central are poor. I mean, relatively poor, we do own computers so we're not on the verge of starving. Some of us are poor, AND live in areas where affordable Tikis and Tiki Decor are hard to come by. So now and then we are forced to get creative. Case in point, I called my home Tiki Lounge, "The Granite Tiki Lounge" Which posed two problems for me right off the bat. Where will I find a granite tiki? And how will I afford it, even if I found it?!?! The answers were found at The Christmas Tree Shop, IParty, and Home Depot.
The first picture is a Tiki I bought at the Christmas Tree Shop (I don't remember the price but it was cheap) spray painted with a faux granite spray paint. The second, is a broken Moai from a set of lawn spike lights given the same treatment.
I know I've seen at least one other instance of people here at Tiki Central bettering their store bought Tikis in this fashion, and I hope more examples of this type of Tiki-On-A-Budget will be posted here. I've got a few more things I've done which I'll post in the days ahead. [ Edited by: The Granite Tiki 2006-08-08 14:26 ] |
|
P

pappythesailor
Posted
posted
on
Wed, Aug 9, 2006 7:51 AM
I can't afford the faux granite spray. I had to get by with faux talc. My tiki's nose doesn't shine so much anyway. |
|
SBOS

Suffering Bastard of Stumptown
Posted
posted
on
Wed, Aug 9, 2006 8:18 AM
I will note that this is not ALL us poor New Englanders do. I know that Granite, Tikisgrl, myself and others have founds lots and lots of good mugs at thrift stores, flea markets and estate sales. However, there are no sources of anything new other than the aforementioned chain stores and anything that Accoutrements might put out. Well, that and getting freebies from the Kowloon. :) Apparently though, I have a tiki carver in Maine (who probably also does bears and eagles out of stumps) that I need to go check out. ..sbim |
|
TGT
The Granite Tiki
Posted
posted
on
Wed, Aug 9, 2006 9:24 AM
And I missed the Kowloon giveaway night! I had to pay for mine!!!! |
|
SBOS
Suffering Bastard of Stumptown
Posted
posted
on
Wed, Aug 9, 2006 9:52 AM
We tipped very well. ..sbim |
|
T

ToonToonz
Posted
posted
on
Wed, Aug 9, 2006 5:04 PM
Aren´t there are lots of great carvers, mug designers/makers and other Tiki artists offering lots of new Tiki items here at Tiki Central? I see really great, new (original and one-of-a-kind) Tiki works of art presented at Tiki Central all the time. You want new, original and top quality Tiki art, carvings and decorations - Tiki Central has artists making it! :) |
|
SBOS
Suffering Bastard of Stumptown
Posted
posted
on
Wed, Aug 9, 2006 5:12 PM
Check the title of the thread. Tiki on a BUDGET. There are great folks here making great new stuff. But for the most part it costs a lot. And when you live close to the makers, you can find deals. When you don't live close to the makers, you can't access those deals. Plus, shipping is a bitch on the larger things. And in terms of finding stuff, since there always was more tiki on the west coast, it's easier to find at estate sales/thrift shops/flea markets there than it is here. The only good thing here is that there are fewer people looking for it. ..sbim |
|
G

GROG
Posted
posted
on
Wed, Aug 9, 2006 9:18 PM
One of these days GROG have to move out of the stone age and get a digital camera so GROG can post some examples of what GROG has done to make cheap, but nice looking tiki decorations, and the relatively easy process for doing such. |
|
TGT
The Granite Tiki
Posted
posted
on
Wed, Aug 9, 2006 9:25 PM
ToonToonz, if you can find me a carver who can carve a granite tiki for me, for under $30. PLEASE SEND ME HIS INFO!!! :) In the meantime, show us your Tiki-On-A-Budget creations here. |
|
T
ToonToonz
Posted
posted
on
Thu, Aug 10, 2006 2:38 AM
I don´t know anything about carving or granite, so sorry I can´t help you. Tiki-On-A-Budget creations? Just depends on what your budget is. :) I don´t offer any, but many painters here offer very reasonably priced prints. [ Edited by: ToonToonz 2006-08-10 02:40 ] |
|
TGT
The Granite Tiki
Posted
posted
on
Thu, Aug 10, 2006 9:14 AM
Yes, Toontoonz, there are many affordable pieces of art available here at Tiki Central, and I am the proud owner of Doug Horne's "Tiki Girl" print. But this is a thread to exchange ideas about how to turn something that may be "un-tiki" (or any degree between cool tiki, and uncool tiki) on it's own into something creative and tiki without spending a lot of money. This thread is certainly not meant to take away from the great carvers and artists here at Tiki Central, it's to help some of us decorate well, in the meantime, while saving our pennies to buy something BIG in the future! :) |
|
T
ToonToonz
Posted
posted
on
Thu, Aug 10, 2006 9:52 AM
Spray paint works wonders on everything! :) |
|
T
ToonToonz
Posted
posted
on
Thu, Aug 10, 2006 11:34 AM
Here´s a paint-it-yourself, 6.3 x 7.1 inch tiki print signed by ToonToonz! :)
Click on the graphic above and a full-size .pdf file opens, ready to print it out and paint or color however you want. |
|
TGT
The Granite Tiki
Posted
posted
on
Thu, Aug 10, 2006 2:07 PM
That's the spirit Toontoonz!! And speaking of spray paint... When I realized my outdoor bar desperately needed a working sink, I grabbed a bathroom vanity sink that was sitting in my garage when I bought the house, grabbed some thick lumber that was also left over when the previous owner built a fence, dug a deep trench for the garden hose, bought an adaptor to hook the garden hose to the sink fixtures, built a sturdy frame from the lumber, and finally, made a quick stencil of a design I found on one of my shirts, and spray painted the parts of the sink and frame that wouldn't be covered by grass skirting.
(Here are some bigger pics that I'll just put a link to so as not to stretch out the thread) http://www.carlayotte.accountsupport.com/Tiki%20Concerns/ZOutdoor9.JPG http://www.carlayotte.accountsupport.com/Tiki%20Concerns/ZOutdoor10.JPG I should mention that as this is an outdoor bar in New Hampshire, it all needs to be taken down in late fall! So if it has a disposable air about it, you'll understand! :wink: [ Edited by: The Granite Tiki 2006-08-10 14:11 ] |
|
R

rwhgeek
Posted
posted
on
Thu, Aug 10, 2006 6:36 PM
This thread rocks. I love tweaking exsisting stuff and trying to make it tiki. This is a light I made. I used a cheap patio light as a mold for the cement. I will post pictures of a bar I built later and some modifications to a Target bamboo fountain I got on sale. |
|
F

FroggieTiki
Posted
posted
on
Thu, Aug 10, 2006 8:40 PM
In rural Louisiana, tiki is rare in any form...even the cheesy plastic bargin store stuff is hard to find. I'm slowly building a collection of 'real' carvings and mugs (and trying my hand at carving), but it's also fun to rework the cheap stuff into something useable. Here are my first two attempts: Plastic flaming Tiki from Big Lots ($5.99 on clearance): After a basecoat of plastic primer and some granite spray paint:
Resin Target Tiki ($8.00 on clearance):
FroggieTiki |
|
TGT
The Granite Tiki
Posted
posted
on
Thu, Aug 10, 2006 9:06 PM
Wow! The Flaming Big Lots Tiki wins the award for most improved upon! That original blue color turned me off to buying one when my Big Lots had them. |
|
L

LavaLounger
Posted
posted
on
Fri, Aug 11, 2006 7:06 AM
Terrific job, Froggie!! Oh man, they had those nasty blue and purple plastic flaming tiki heads on sale here and I waltzed right on by....aGHHHHH, now I wish I'd bought about 5 of them! Dam! LavaLounger |
|
T

Thortiki
Posted
posted
on
Fri, Aug 11, 2006 7:56 AM
Flame on really like that big lots piece!!!! |
|
F
FroggieTiki
Posted
posted
on
Fri, Aug 11, 2006 10:34 PM
Thanks, glad you all like the plastic tiki remake! I'm still kicking myself for not grabbing the purple flaming tiki while they were on clearance (d'oh!). They're made to be stacked into a flaming tiki totem pole. Oh well, maybe next year... |
|
ETF

Eleio the fleet
Posted
posted
on
Sat, Aug 12, 2006 12:35 AM
I'll have a go.
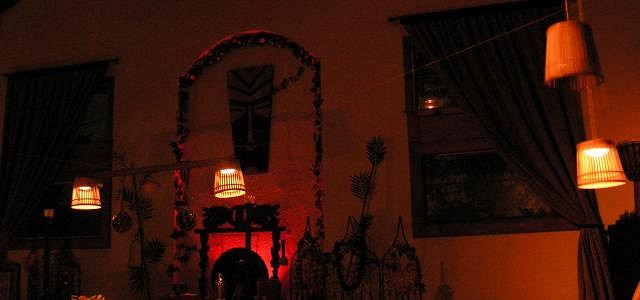
The hanging lamps were actually woven waste paper baskets I purchased at the local dollar store ($1 ea. of course). I then also purchased tap lights at the same store (same price), attached to the bottom of the baskets with sticky back velcro. A small package of sticky back will run around $2, but can cover at least two lights. If you're budget conscious and also plan to hang multiple lights, I recommend the 10ft. (if memory serves) package. Then there was the twine, which set me back about $3-$4 for 100 (if memory serves) feet. Oh and batteries=$2 each light. The lights pictured ran me about $5 each. I bought some extra, which I plan to try a mini fish trap light, in the future. Positives: Since the lights are battery powered, they can be hung anywhere and don't require any wiring. They throw off a decent amount of light and seemed to be an effective answer to "down and dirty, yet cheap" tiki lighting. Negatives: Recommendation: I still would advise this style of lighting for parties on a budget and if you have an aversion to wiring lighting (like me). I would recommend that you purchase the usually more reliable $3-$4 tap lights at your local Target, Wally World, etc. I'm not sure, but you may even be able to change the bulbs in those versions. I use rechargeable batteries and have a 20-minute charger for my camera, so I think I'll be purchasing more rechargeable batteries over the next year. Hope that helps. Mahalo! -Eleio [ Edited by: Eleio the fleet 2006-08-12 00:39 ] |
|
TGT
The Granite Tiki
Posted
posted
on
Sat, Aug 12, 2006 1:42 AM
Great work! Another cool thing about "Tiki Lighting" is that it's okay to be dim! In fact, it's preferred! So inexpensive (and less dangerous for those of us who really shouldn't be playing with electricity and Mai-Tais at the same time) battery powered lights fit the bill. |
|
R
rwhgeek
Posted
posted
on
Sat, Aug 12, 2006 7:36 AM
Here we have a small tiki bar built from Ikea shelving, fabric covered plywood for the walls, mounted on wheels since it was built for a small apartment. Yes I know the masks are not tiki but I thought they worked and added light up eyes. The lamp on the left was made from a chipped mug and I added some cheap coasters to the lampshade. |
|
ETF
Eleio the fleet
Posted
posted
on
Mon, Aug 14, 2006 12:31 PM
Nice improvisation! I especially like the lamp. |
|
K

kingstiedye
Posted
posted
on
Mon, Aug 14, 2006 12:35 PM
great work and creativity by all. i'm really enjoying this thread. |
|
H

hiltiki
Posted
posted
on
Mon, Aug 14, 2006 5:14 PM
I just found this thread, I find it very interesting. Keep those pictures coming, I love how you have changed the actual pieces to something so different and great looking. There should be a book on this subject matter, "Creating tiki on a budget". |
|
ST

Surf tiki
Posted
posted
on
Mon, Aug 14, 2006 7:29 PM
Wow, you're like Marquesian Stewart. I am all about doing this stuff for as cheap as possible. |
|
TGT
The Granite Tiki
Posted
posted
on
Mon, Aug 14, 2006 9:44 PM
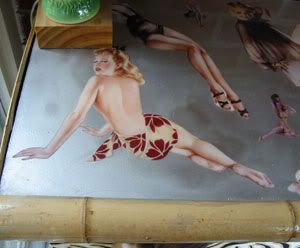
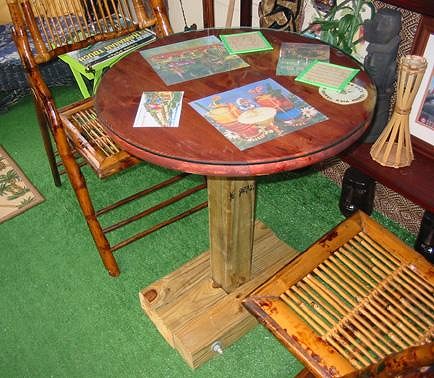
Here's a trick that everyone probably knows already, but there's a nice story that goes with it. Upon our first visit with a realtor to the house we bought, we considered it a good omen that the only piece of furniture left from previous owners was the table seen below, and now it sits in the middle of our Tiki Lounge, the longest occupant currently living in our house!
I printed out a bunch of postcards from the computer and placed them under glass and a Scorpian bowl.
[ Edited by: The Granite Tiki 2006-08-14 21:47 ] |
|
K

kctiki
Posted
posted
on
Wed, Aug 16, 2006 4:18 AM
Regarding lighting that doesn't require electrical wiring, I saw where people were using glow sticks inside paper lanterns for a big lantern festival in Canada. It looked great in the photos. Being a tightwad by necessity, I'm really enjoying this thread. Believe me, if I had any spare cash at all, I'd be filling my house with the works of all the phenomenally talented Tiki Central artists. |
|
ETF
Eleio the fleet
Posted
posted
on
Wed, Aug 16, 2006 11:07 PM
I like your use of imagery for the table Granite. Very cheap and very clever. Regarding using glow sticks for tiki lighting. I like your idea, kctiki, especially since it takes the light and battery elements out of play. I must admit that I don't have much experience with glow sticks, so when the local dollar stores in my area start carying them (should be around Halloween), I'll have to pick up a few and try it. [ Edited by: Eleio the fleet 2006-08-16 23:40 ] |
|
T

Tikisgrl
Posted
posted
on
Thu, Aug 17, 2006 5:56 PM
Went to Ikea today & bought one of these, marked down to 2.99 plus tax:
Kinda neat they had lemon yellow & lime green for wall or table... It has to be plugged in but it has a nice glow. Tikisgrl |
|
D

dogbytes
Posted
posted
on
Fri, Aug 18, 2006 3:46 PM
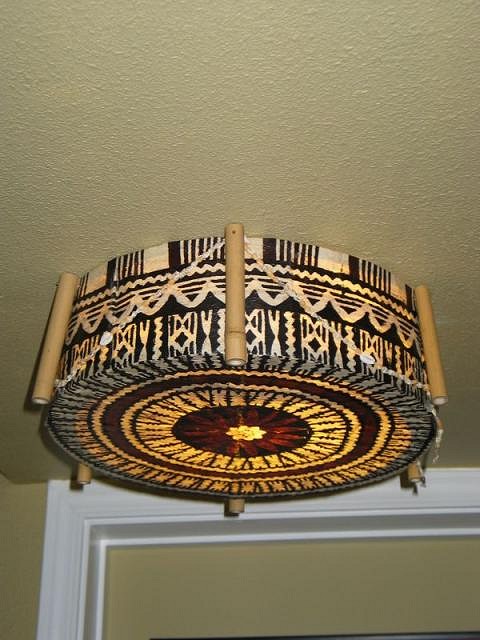
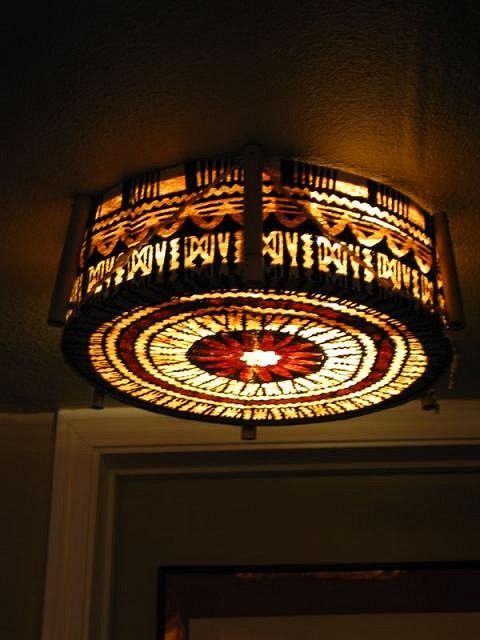
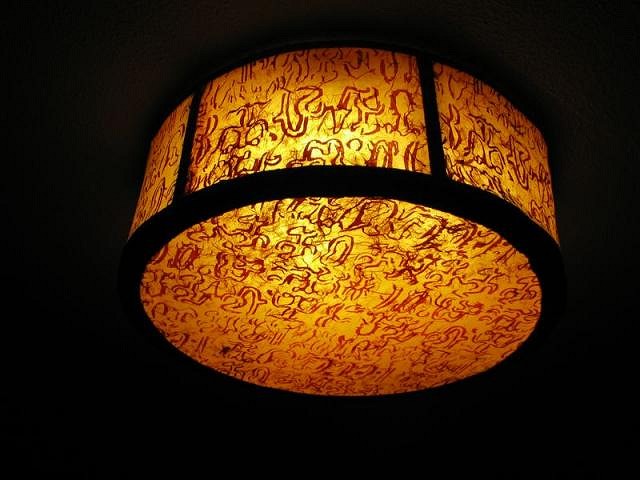
one of my first projects was Tapa Lamp step by step instructions were easy to follow! unfortunately shutterfly has eaten Al-ii's photos.
also made one with cool rongorongo patteren handmade (but not by me) mulberry paper (photos stolen from Sabina's website from when she visited us last year) |
|
D
dogbytes
Posted
posted
on
Sat, Aug 19, 2006 12:28 AM
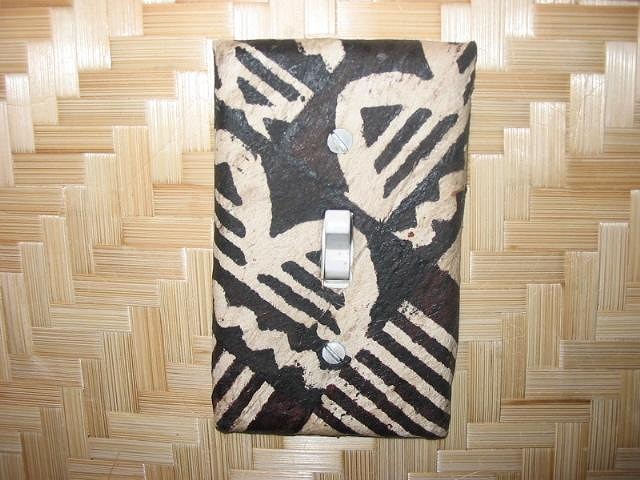
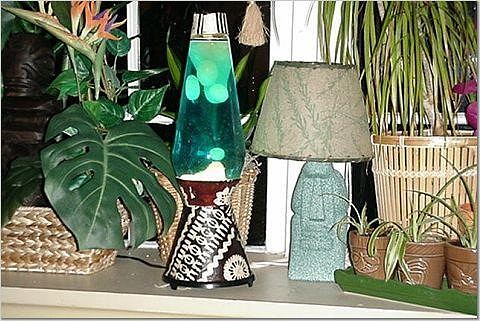
Don't throw away any scraps of tapa from your lamp project! a bit of Mod Podge and you can tikify many things: electrical switchplate covers: lava lamp also, used fleckstone spray paint to cover a TJMaxx Suffering Bastard Bottle, and stuck a battery-operated candlestick (from dollar tree) and an old lampshade to make a nifty lamp! |
|
D
dogbytes
Posted
posted
on
Sat, Aug 19, 2006 1:14 AM
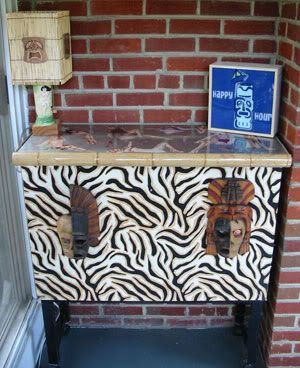
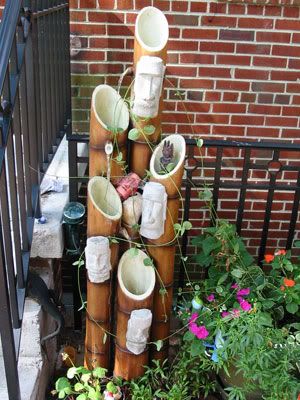
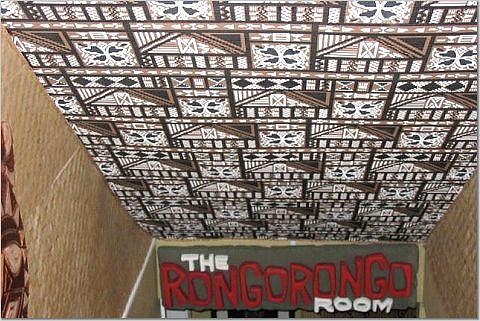
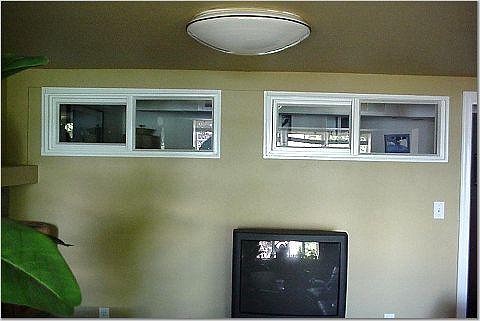
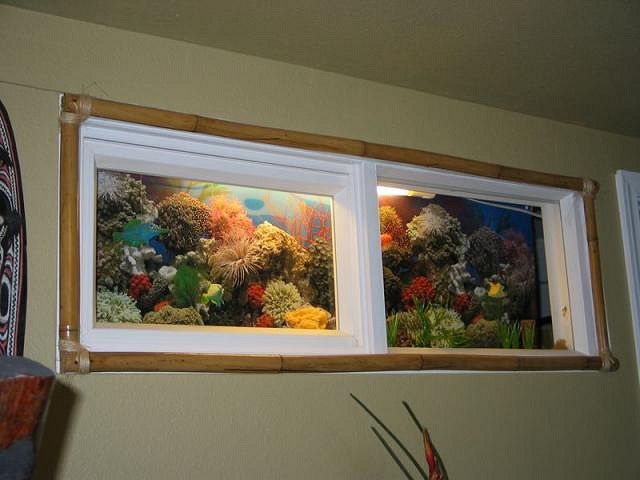
i really like this Thrifty Thread ~ i looked around the Rongorongo Room and realized, i have some ideas to offer! wrap kiddie hula skirts from Oriental Trading Co (5 bucks each) around plain barstools for an instant tropical look! Tapa patterned Corobuff (48" wide) is only 95 cents/foot! and its easy cut (there are guide lines on the back!) and easy to staple to the walls/stairwells. Transform windows into faux fishtanks ~ Frame with split bamboo. installed cheap fluorescent lights from Ikea ~ plastic fish hung from fishing line. Marine Aquarium Backgrounds are 2.50/foot. also a great place for those single S&Ps or broken mugs before: after: |
|
V

velveteenlounge
Posted
posted
on
Sat, Aug 19, 2006 7:11 AM
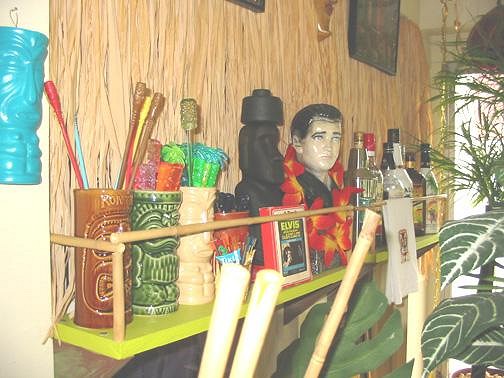
I LOVE this thread! Not only are we on a budget, but tiki sightings in our area are few and far between. Good thing we like being crafty! Here are a few of my favorite cheap projects we've done. Our tiki room is our enclosed porch. These shelves are in front of the windows leading to our living room:
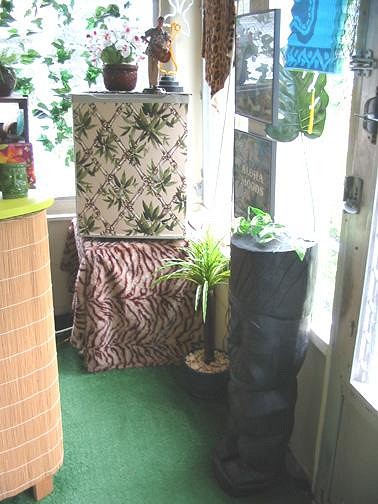
For this one I glued some vintage bamboo fabric from my mother-in-law directly onto our fridge with Elmers. Two years later it's holding up great!
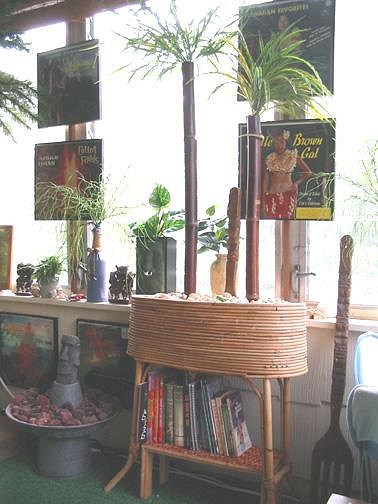
We rescued this planter from my mother-in-law's garage. We got the bamboo to make the palm trees on sale at Pier 1 and the "palms" at Jo-Ann Fabrics (on sale, natch!). The "fire pit" next to it was inspired by the fire pit in the book "Pad." I used lava rocks and the moai is from Archie McPhee:
Our version of the glass-topped table:
Have I mentioned how much I love this thread? :wink: Granite Tiki, we had those same outdoor lights you have and the strand was destroyed by some cats who chose our garden in which to have a fight. I managed to rescue three of them. I'm going to steal your idea to spray them with Fleck Stone today! Thanks! |
|
V
velveteenlounge
Posted
posted
on
Sat, Aug 19, 2006 11:21 AM
By the way, I love what you did with that lava lamp, Dogbytes. I have a place in need of a little ambient light in my bar and I'd been thinking a lava lamp would be perfect and fabric is a great way to get rid of the silver base. |
|
TGT
The Granite Tiki
Posted
posted
on
Sat, Aug 19, 2006 4:10 PM
I've got a silver base to a Volcano Lamp from Walgreen that is crying out for that treatment! dogbytes, I believe I saw that faux fish tank when you first posted it in another thread, but I obviously didn't read it, because I thought it was real!!! I thought, "oo, it'd be nice to have a fish tank, but I could never afford something like that!!!" Great work! [ Edited by: The Granite Tiki 2006-08-19 16:13 ] |
|
ETF
Eleio the fleet
Posted
posted
on
Sat, Aug 19, 2006 5:12 PM
The entrance to my basement seems very similar to yours Dogbytes. I like the stairway treatment and the fishtank idea, in particular. |
|
ETF
Eleio the fleet
Posted
posted
on
Tue, Aug 22, 2006 12:26 AM
OK Folks, I've been very intrigued by this subject and compliment everyone who has contributed. In my effort to further help enhance this thread, I've put together the following "how-to" article. The project described is intended for personal use only. Your feedback is more than welcome. So you've spent all your cash on creating some decent tiki decor, but (gasp) you realize that you have no exotic art. I’ve been there, so here is how I made some decent framed tiki art for very little $. Project: Cheap Bamboo Framed Tiki Art The breakdown: Supplies/Cost/Suggestion on where to find SUPPLIES -Low melt glue gun/$5-$7(glue sticks generally run an additional $1-$2 for a pack of 2 doz.)/local craft store. Cost per project: For the same reasons as the saw, I’ll assign a cost of $.25 per frame. -Picture Wire/$5 (one spool can be used for dozens of these small frames)/local hardware store. I prefer picture wire over cord or twine for hanging items, because I feel it can be more forgiving. -Sticky Back EVA Sheet/$1 for a 9” x 12” sheet/Hobby Lobby. I’ve found that this foam works very well as a cheap method of backing photos. For ametures, glue spray can damage the art or adhere unevenly, which can create very noticeable air bubbles. -8’ length of ½” bamboo pole/$2-$3/Cost Plus or another import store. Depending on the dimension of the art you intend to use, one pole can be used to make 2-3 frames -Tiki Art/I purchased Shag’s Tiki Drinks at Half.com for $5/Besides the art on the drink cards, some art can be accessed on the web or you could even use tiki magazine and album covers. -A good scanner-printer or access to cheap color copies/copy stores generally make color copies for $1 each. -A razor blade-box cutter-penknife/$1/Hobby Store. Used to trim the photo, backing or mounting foam and excess glue. Estimated cost per project: $4.45 CONSTRUCTION Now that you have your supplies, here’s what to do: First, understand that the size of your framed art is largely dependent on the dimensions of the size of print you can produce. For Cheap Tiki purposes, I’m assuming that you don’t have the $ to buy a full sized print. My printer will create 8 ½” x 14” images, so that’s my limit, minus about ¼” inch around the perimeter (explained later). Not the best for a single, stand alone piece, but because of this limitation, I’ve had very positive results with creative groupings of 2-3 framed pieces. 1.Get your art. Web images tend to pixilate if you blow them up large enough to print, so I generally use art that I can scan and print. 2.Mount the art to the backing foam. Apply the photo slowly onto the sticky back foam and use your hand or something flat to ensure the whole image is adhered to the foam. Air bubbles are not your friend! After the picture has been mounted to the foam, use a razor blade or penknife to cut off all but ¼”-½” of the excess foam. 3.Cut your bamboo. I chose to make my frames out of fully round bamboo, but you can certainly split it if you want. I just wanted a more primitive look. Also, for that primitive look again, I didn’t cut my frame pieces at angles. If you plan to do similar, make sure to factor in the width of the bamboo when deciding the length of the frame pieces. Anyway, I simply marked my cutting points, secured the pole with a “C” clamp (not too tight or the pole with split) and used my jigsaw. One thing to mention is that I held the piece being cut off and pulled it a little towards me (not enough to pinch the blade) just before the blade completed the cut. The cut was always cleaner as a result. 4.Lay the frame out. Place your foam mounted picture on a flat surface and place your frame pieces out accordingly. Try not to get the exposed sticky back too dirty, you’ll need that adhesion later. Make sure to lay the bamboo out so that it hides any of the backing foam. Mark and trim the bamboo, as needed. 5.Glue the frame together. Don’t skimp and don’t let the glue cool too much before attaching the frame pieces. If you don’t achieve a good bond at this point, the weight of the frame will slowly pull itself apart and you’ll have to re-glue a part or all of the frame again. After cooling, carefully trim off any visible glue, with a razor blade (your fingernail is sometimes best for this). 6.Frame your art. Lay the frame down over the art, so that none of the backing is visible, and gently press it down so that it adheres to the sticky mount. Turn the framed art over and press the foam directly to the frame and trim off any backing that can be seen from the front. I would also suggest running a very thin bead of hot glue along the outer edge of the backing. The mount looses some of it’s stickiness over time and sometimes separates from the frame. The glue seemed to address that problem. 7.You’re almost there. Now you need some method of hanging your art. While the frame is still flat and with the back facing up, take a small length of the picture hanging wire, making curls on each end, and glue the curls to the foam mount (curled wire doesn’t slip out of the cooled glue). When positioning the wire, keep in mind that you want a certain amount of bend in the middle for the nail. I’ve found that hot glue bonds very well with this type of foam and recommend this method for these art pieces, so long as the overall size of the frame doesn’t exceed 8 ½” x 14”. You’re done! Now hang your new tiki art and enjoy! -I made several of these framed pieces for my home, over a year ago, and though I've had to re-glue a few corners, most of my frames have held together very well and the art still looks good. [ Edited by: Eleio the fleet 2006-08-22 00:40 ] [ Edited by: Eleio the fleet 2006-08-22 08:39 ] |
|
TGT
The Granite Tiki
Posted
posted
on
Tue, Aug 22, 2006 10:33 AM
Great post Eleio the fleet! I've attempted to make my own frames from bamboo before, and failed miserably! I can't wait to follow your plan! |
|
T

twitch
Posted
posted
on
Tue, Aug 22, 2006 7:39 PM
Woo! Good how-to post. Often thought of ripping apart my 'Bottomless Cocktail' book to do this, but didn't imagine it looking too good (plus the ripping-apart-of-the-Shag-book thing isn't too appealing; but it's a toss-up between that or blowing 3/4 of an ink-tank printing a scan!). Now I'll have to give it a go. |
|
ETF
Eleio the fleet
Posted
posted
on
Tue, Aug 22, 2006 7:59 PM
Thanks for the kind words Granite and Twitch! I'm really enjoying this subject. Regarding your comment about the animal print Twitch. I didn't think of it until you made mention, but I do think there a leopard skin design for this foam. Not sure how I'd apply it yet, but I'm sure it would work. Excellent suggestion! |
|
QK

Queen Kamehameha
Posted
posted
on
Tue, Aug 22, 2006 8:19 PM
This is a terrific thread with very creative ideas. You all have done some very very cool things. Me, I like to do mosaics, but they can be expensive if you buy all those little tiles from the craft store, so I go to home depot and buy or get their chipped or broken tiles. They usually have a bin of them in the back, and sometimes they just let you have them. You might have to fill in with some of those 4cent bathroom tiles, but overall this is a very cost effective method. The tile cement is the largest investment I did this whole mosaic(20 feet wall) with broken or chipped tile from HD. Cost about 75.00 complete. Drew the picture from two pictures I found online, using a sharpie, then broke up the tile and glued to the wall. Then you grout. I have done table tops for under 5.00.
[ Edited by: Queen Kamehameha 2006-08-22 20:27 ] |
|
D
dogbytes
Posted
posted
on
Tue, Aug 22, 2006 8:25 PM
whoa Queen K ~ thats one big mosaic! beautiful..how many hours did it take to fill in and grout? |
|
QK
Queen Kamehameha
Posted
posted
on
Tue, Aug 22, 2006 8:41 PM
wow that was fast! Well, I was unemployed at the time, so I had the time.....but all in all it took two full weeks, 4 -6 hour days. 1 hour to grout that was the easy part. All in all, better to do smaller items first....lol A [ Edited by: Queen Kamehameha 2006-08-22 22:19 ] |
|
CS

Capt'n Skully
Posted
posted
on
Sat, Aug 26, 2006 6:51 PM
Great thread and even better ideas! I don't know if you have a Dollar Tree store nearby, but they have some small tiki figures (at least they did about a month ago). Suprisingly fun ones, too. Obviously at the low low price of a buck each. |
|
V
velveteenlounge
Posted
posted
on
Sun, Aug 27, 2006 10:58 AM
Ours had them last year and I picked up about 20. They are indeed surprisingly good for $1. It's a good idea to use some "fun tack" on the bottom, since they apparently break easily if they hit the ground. |
|
TGT
The Granite Tiki
Posted
posted
on
Sun, Aug 27, 2006 4:29 PM
Here's a link to a pre-Tiki-On-A-Budget thread that ZuluMagoo posted regarding a great project involving those Dollar Tree Tikis http://www.tikicentral.com/viewtopic.php?topic=16021&forum=2&hilite=wreck%20kona' [ Edited by: The Granite Tiki 2006-08-27 16:32 ] |


 suffering bastard lamp
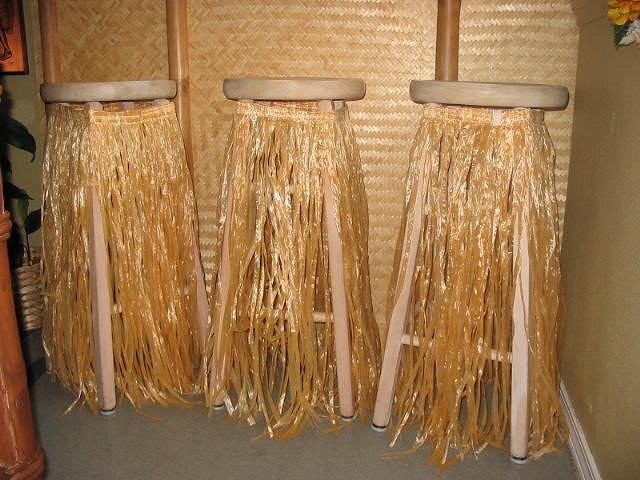


