Tiki Central / Other Crafts
Tiki-On-A-Budget
Pages: 1 2 3 4 5 6 7 8 343 replies
|
PM

Pakalolo Man
Posted
posted
on
Fri, Feb 22, 2008 5:07 PM
Aww, man I'm going to do this tomorrow!! A little shop three buildings down sells these atrocious plastic tikis. I was turned off when I first saw 'em but now I can't wait to buy one!! Musubi Mom- what ratio of cement, peat moss, and vermiculite did you use? Those look awesome!! -Pakalolo Man |
|
B

beadtiki
Posted
posted
on
Sat, Feb 23, 2008 5:41 PM
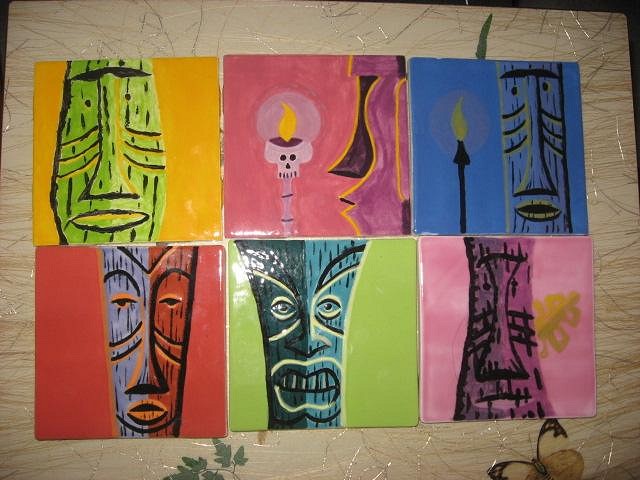
Tiki on a budget! I can dig that! I'm working on a Tiki bar and we bought this cheap-o bar on Craigslist, found free bamboo half-rounds that had been torn off the outside of an old Pan-Asian restaurant and then came up with the idea of tiling the counter. Not just any tile - I've been printing up SHAG Tiki pics, resizing them to 4.25" x 4.25" and taking them to a local pottery painting place (you know, where you paint on bisque figurines or whatever). It's a family project; my daughter has done 1 so far, my husband has done 3 and I've done the rest. The picture here represents just the first few we have done. P.S. My husband's is the "pickle" (top left) and my daughter's is the one with the leaf (bottom right). |
|
MM

Musubi Mom
Posted
posted
on
Sat, Feb 23, 2008 7:41 PM
Thanks Pakalolo man, the recipe is basically 1 part white cement to 2 to 3 parts something else. Sometimes I use just vermulite and sometimes peat moss and/or perlite. To fill up the mold with the legs it takes about 14 8oz cool whip bowls of the ingredients. Any mixture that dilutes the cement more than 5 to 1 gets too weak. It takes about 24 hours to set up enough to remove from the mold. Use a board about the tiki size and flip the mold over. The first couple of days you can chisel the lines deeper and wash gently with a brush and water to expose the vermulite. Leave the tiki laying on the board for a week or two. Curing takes about 4 weeks and can be done in a bucket of water to make the concrete stronger. |
|
D

Davez_tikiz
Posted
posted
on
Sun, Feb 24, 2008 8:01 AM
Musubi mom, those are so cool! I'm definitely going to try it... and I have a couple of those molds already. Can you tell us from left to right on your pic of the 5 tikis which product you mixed with to get each color? I really like the dark one (peat moss?), and my wife really likes the orange one. Dave |
|
D
Davez_tikiz
Posted
posted
on
Sun, Feb 24, 2008 10:05 AM
Looked around a little bit and found some forums on something called "hypertufa". Is this the same thing- the cement/peat/vermiulite mix? |
|
MM
Musubi Mom
Posted
posted
on
Sun, Feb 24, 2008 10:47 AM
Hi Davez, yes the recipe is hypertufa. There is a lot of info out on the web. To get the various colors I used concrete color powder in black, tan and adobe. It only takes about 3 -4 tablespoons of powder to get the colors in the pic.You can also paint the finished tiki with any water based craft paint then seal with a concrete sealer. The tikis I painted 5 years ago still look great. The peat moss doesn't add much color it just makes the mix an off white color. From the left is tan, adobe, black, no color and not enough black powder. |
|
D
Davez_tikiz
Posted
posted
on
Sun, Mar 2, 2008 10:40 AM
thankns for the info... got the stuff and started today... I'll post some pics. Made one major mistake... forgot to spray the mold with Pam.... should be interesting to see how big of a problem that will be when it comes time to remove it :( |
|
D
Davez_tikiz
Posted
posted
on
Sun, Mar 2, 2008 1:51 PM
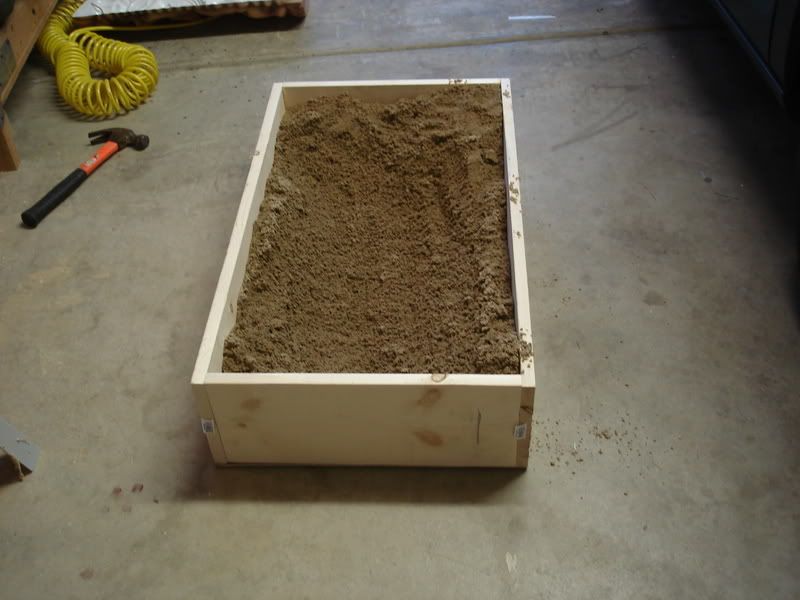
Here's some progress pics from today... First made the box with some 1 x 8s, added some construction sand.
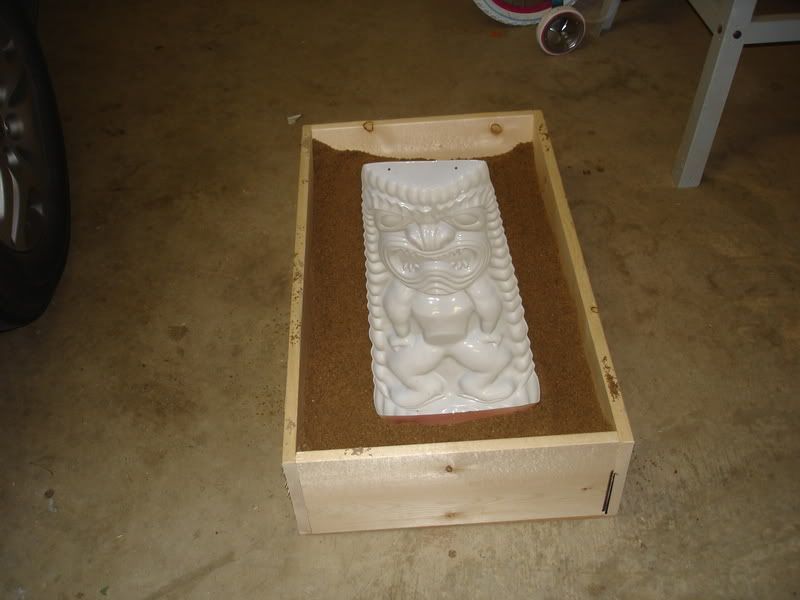
then put the vaccuum mold in and built the sand around it
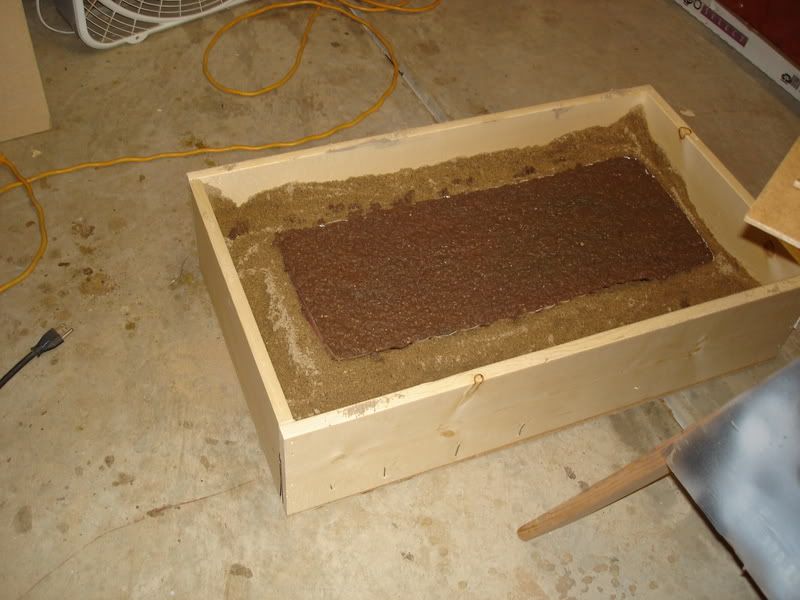
Then mixed up the stuff...1 pt. portland cement, 1 1/2 vermiculite, and 1 1/2 peat moss. Added some liquid red coloring and added to the mold (forgot to spray with pam or add vaseline :( )
|
|
D
Davez_tikiz
Posted
posted
on
Wed, Mar 5, 2008 6:32 AM
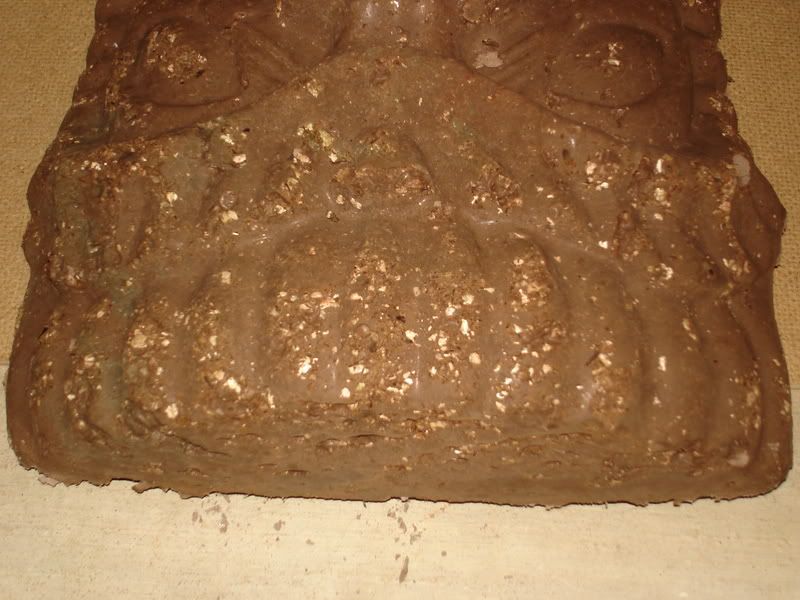
Ok... two days later. The tiki came out of the mold easy enough. Here's some pics. It looks really brown, and the vermiculite os kind of obvious.
These pics are kind of cruddy... took em too early in the morning. I'll take better ones. I'd like to figure out what I did wrong. |
|
TZ

Tiki Zen
Posted
posted
on
Wed, Mar 5, 2008 10:01 AM
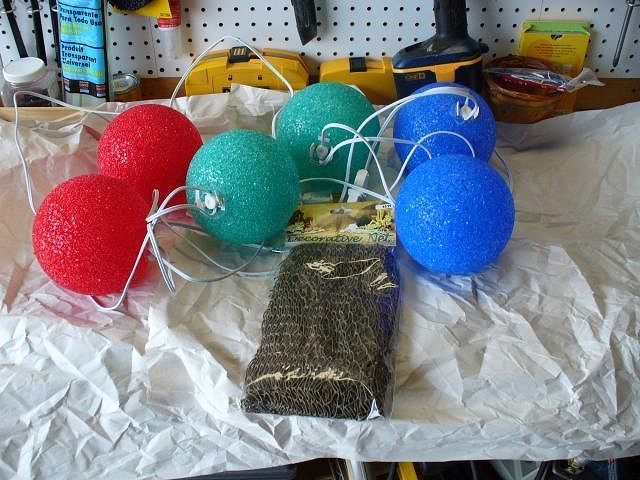
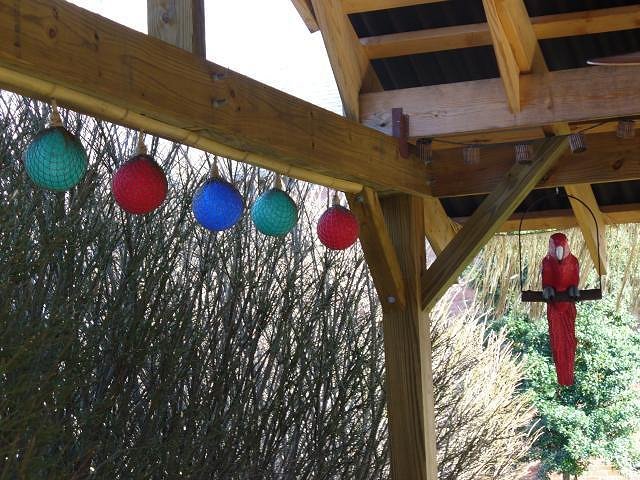
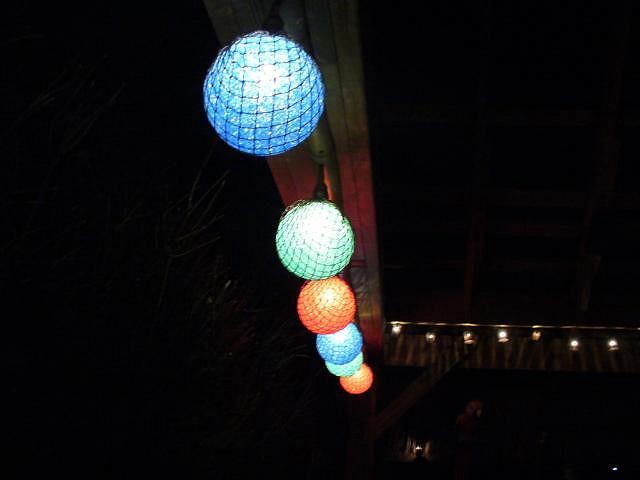
Glass float-style lights made from close-out christmas lights and craft store decorative netting. Posted earlier in another thread, but thought I'd put it here as well, for the budget-minded.
Covered the cord with twine and used split bamboo as a cover.
|
|
P

pappythesailor
Posted
posted
on
Wed, Mar 5, 2008 10:38 AM
Great idea! |
|
H

hewey
Posted
posted
on
Wed, Mar 5, 2008 7:24 PM
Ditto - they look really cool :D |
|
TZ
Tiki Zen
Posted
posted
on
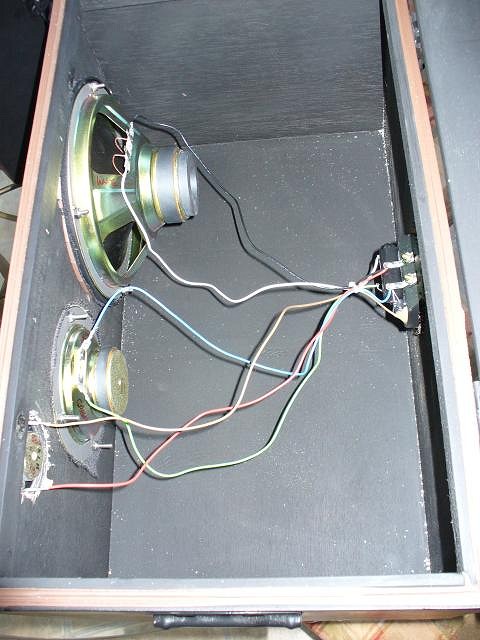
Thu, Mar 6, 2008 9:41 AM
While I'm at it - some "pirate chest" speakers a friend built for us using home decor chests:
He installed a gasket between the lid to improve the sound, and quick-connects on the back for the speaker wires. |
|
B
beadtiki
Posted
posted
on
Thu, Mar 6, 2008 1:58 PM
Tiki Zen - I REALLY like the float lights you created - who woulda thunk it?! |
|
MM
Musubi Mom
Posted
posted
on
Sat, Mar 8, 2008 11:55 AM
Hi Dave, The color of your tiki will change as it dries out. It probably won’t be red though. I’ve had better luck with the powder colors. Vermculite comes in different sizes. Fine, Medium and Coarse. You might like the fine grade better. When you fill your mold you need to smush and pat the cement into all the nooks and crannies. If you pat the cement while filling the mold the vermculite will float up and away from the surface of the tiki which is the bottom when you are filling it. Don’t give up, I know you have more cement and the tikis make great Christmas presents. Musubi Mom |
|
J

jpmartdog
Posted
posted
on
Thu, Apr 3, 2008 3:25 PM
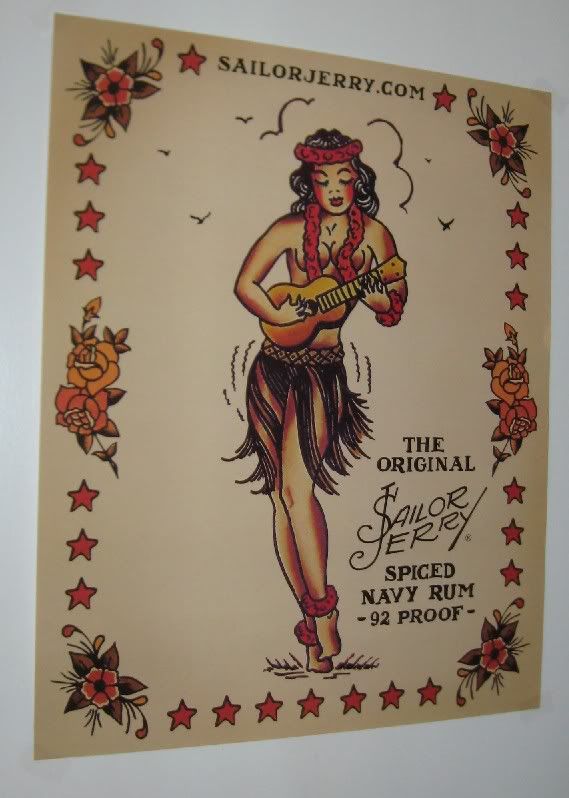
Aloha.... for those of you in desperate need of Tiki bar art, I picked up this cool FREE poster from the NH State Liquor store. Sailor Jerry spiced Rum is giving them away - just tear 'em off the cardboard point of purchase display.. and its yours. It would look quite nice in a wood frame. |
|
ST

Surf tiki
Posted
posted
on
Thu, Apr 3, 2008 7:39 PM
Killer poster, and I just finished the last of my Sailor Jerry tonight. Even more reason to go to the ABC store tomorrow. |
|
P
pappythesailor
Posted
posted
on
Thu, Apr 3, 2008 8:12 PM
Dang. I was just there last week... Good score, though. |
|
T

TikiPhil
Posted
posted
on
Thu, Apr 3, 2008 10:29 PM
|
|
BTP

blindy the pirate
Posted
posted
on
Mon, Apr 7, 2008 12:56 PM
It rained here all weekend, and I wanted a tiki fix. I made these out of old shampoo bottles. The one on the left is a totem made up of various faces I had drawn and the right one is a shag tiki with a fez hat. |
|
TGT

The Granite Tiki
Posted
posted
on
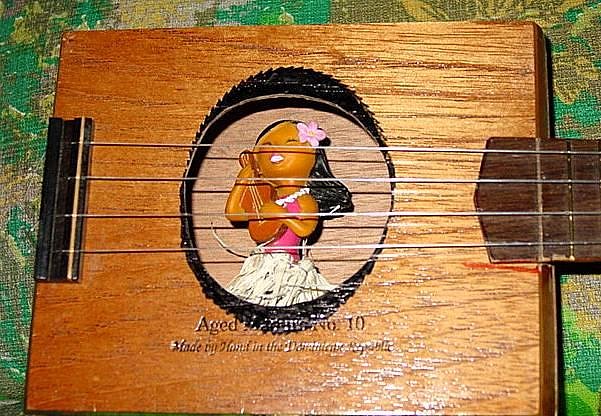
Tue, Apr 15, 2008 10:17 PM
I had a couple of old broken ukes lying around, a whole bunch of empty cigar boxes, a dollar store spring mounted bobbing hula girl, a glue gun, a dremmel, and a nice warm Spring day out in the backyard to work. Here's what I came up with, and it plays better than a few of the crappy ukes I've got lying around here!
She dances while I play! |
|
P
pappythesailor
Posted
posted
on
Wed, Apr 16, 2008 6:55 AM
Good stuff, Granite. Very creative. |
|
I

ivanchan
Posted
posted
on
Wed, Apr 16, 2008 7:38 AM
Some great ideas! I think where there's a will, there's a way--some of us use paintings (like moi) and others take up carving ourselves to create things that we can't afford to buy. Altering what we do buy (like with the granite spray paint) is great. Mother Necessity! I. |
|
B
beadtiki
Posted
posted
on
Wed, Apr 16, 2008 3:40 PM
Don't be carving yourselves! LOL Sorry - I can't help but find humor in everything! [ Edited by: beadtiki 2008-04-16 15:41 ] |
|
W

woofmutt
Posted
posted
on
Sun, May 4, 2008 10:32 AM
This is MadDogMike's project from his post Tiki Pitcher. MadDogMike's original post: There is a plastic pitcher at Party City and several other places (previously mentioned in different threads). I bought one for $8 but it was just too ugly to bring to the table! I painted it tan (outside only) with the spray paint for plastic, then wtbrushed brown acrylic paint over it and wiped off the excess. When it's dry, I'll give it a clear coat spray. I doubt that it will be (dishwasher) safe but it should be OK to handwash. Here is before and after, it won't win any awards but it's better than nuthin'.
----------------------------------------------------------------------------- I took the liberty of re-posting MadDogMike project here because the Tiki-On-A-Budget thread is a an excellent resource. I like seeing all the good low cost ideas together. MadDogMike's project came off real well and is a good example of what can be done with all the craptacular Teekeeee-Parteeee! stuff out there. It'd be really easy to hit one of these Teekeeee-Parteeee! decorations with a fake wood grain on top of the base coat. It's a skill even the most clueless TV makeover show participant can master so should be a piece of coconut cake for folks as wonderful as ourselves. For the extra lazy (such as yours truly) a well sprayed coating of rattle can flat black can work wonders on the lousiest Teekeeee-Parteeee! decoration or poorly carved piece from the Phillipines. The paint technique MadDogMike used is a simple one that can yield excellent results. It works well on furniture too, and can give instant age to some ugly or plain pieces. (In the late 60s-70s it was called "antiquing'. Usually a wood stain wash was used over the base color and the technique was responsible for ruining many actual antiques.) "Natural" paint tones work great, but there's lots of combinations to consider. Black over deep colors looks great. Fluorescent base colors with a black wash can have that high priced low brow look. I use this this technique when I paint my original pieces. I usually use a black wash over the base color, like this piece:
A white/off white wash over black or gray can yield an aged stone appearance:
(Both of these swell photos were posted by Selector Lopaka.) Speaking of Tiki-On-A-Budget: Like most my Stuff & Junk Like That these pieces were made with thrift store found materials and inexpensive craft acrylics. The savings are passed on to YOU! |
|
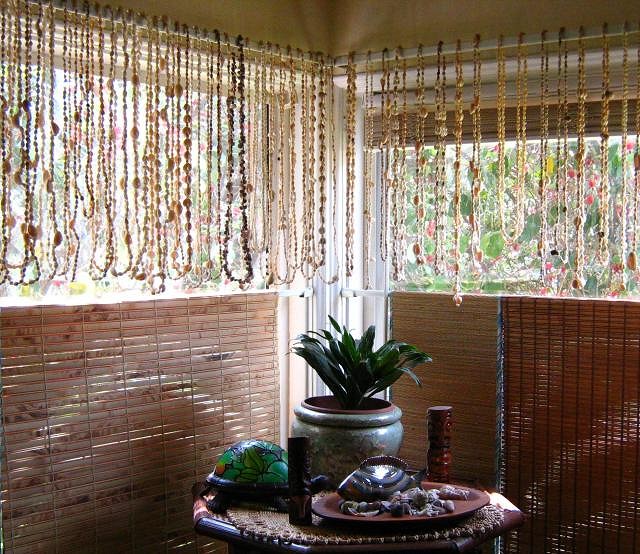
MB

Mr&Mrs BPHoptiki
Posted
posted
on
Sun, May 4, 2008 1:46 PM
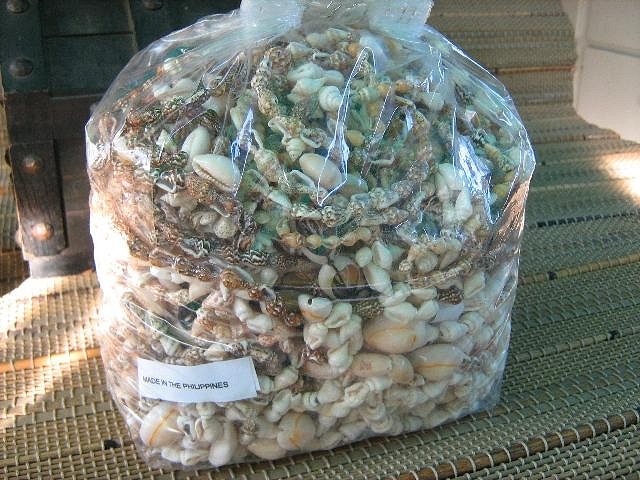
$7 bag of shell necklaces from the thrift store... MrsHoptiki |
|
V

VampiressRN
Posted
posted
on
Sun, May 4, 2008 6:26 PM
Hey that shell window valence is dabomb Mr/Mrs. What a fabulous idea and I'll bet the filtered light is really nice!!! Great job. :) |
|
MB
Mr&Mrs BPHoptiki
Posted
posted
on
Sun, May 4, 2008 6:38 PM
:DThanks Vamp! MrsHoptiki |
|
TGT
The Granite Tiki
Posted
posted
on
Mon, May 5, 2008 3:13 AM
Ahh, it's Spring and the Tiki-On-A-Budget thread has been reactivated with fresh creativity! Nice stuff! Back when I went on my first Big Lots/Dollar Tree etc. Spring Shopping spree where I found that Dollar Tree Hula Girl (in the above cigar box uke)I also stumbled upon this at Big Lots.
It's about 8 inches wide, what do you think I plan to do with it? :) When I finally get to it, I'll post pics. (still searching Tiki Central for other similar projects for "raw ingredients") |
|
N

Naneki
Posted
posted
on
Mon, May 5, 2008 12:33 PM
Ooh! Ooh! {wildly waves hand in air} Make a puffer fish thing? |
|
TGT
The Granite Tiki
Posted
posted
on
Mon, May 5, 2008 12:40 PM
Exactamundo! |
|
P
pappythesailor
Posted
posted
on
Mon, May 5, 2008 1:28 PM
I can't help it. Too much Beavis and Butthead as a kid. |
|
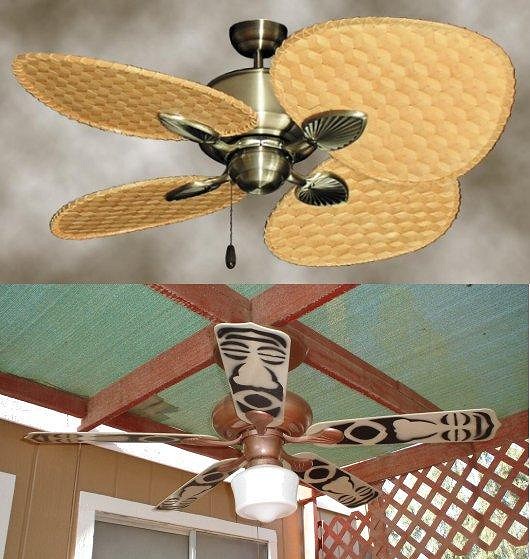
M

MadDogMike
Posted
posted
on
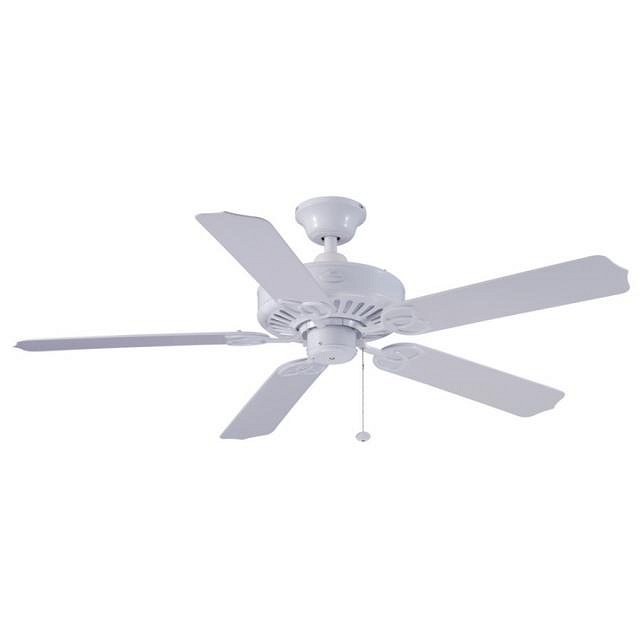
Tue, May 6, 2008 8:23 AM
I was too cheap to spend $400 for a tropical-themed ceiling fan (top picture)for my "lanai" so I stenciled tikis on the fan blades of a $30 fan instead (bottom picture). It was white, I painted it hammered copper instead, the fan blades are ABS plastic (avail at Lowe's) so they don't warp outside. |
|
S

sparklegem
Posted
posted
on
Tue, May 6, 2008 8:50 AM
I like your tiki fan much better then the tropical themed fan! It looks super great! |
|
MB
Mr&Mrs BPHoptiki
Posted
posted
on
Tue, May 6, 2008 9:33 AM
Great idea MadDogMike. For the light you could buy a wicker basket (our thrift store always has tons of them)cut a hole in the bottom and mount it over the light for a lamp shade. You could decorate the shade with shells, tapa fabric or what ever. MrsHoptiki |
|
M
MadDogMike
Posted
posted
on
Thu, Jun 5, 2008 1:23 PM
10 wood bordered plates, dollar store - $10 There are those few who learn from observation. The rest of us need to piss on the electric fence and find out for ourselves. [ Edited by: MadDogMike 2008-10-05 19:33 ] |
|
W
woofmutt
Posted
posted
on
Sun, Jun 8, 2008 7:50 AM
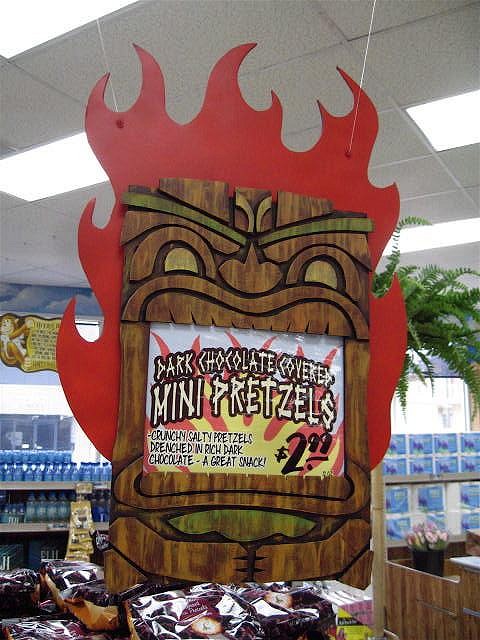
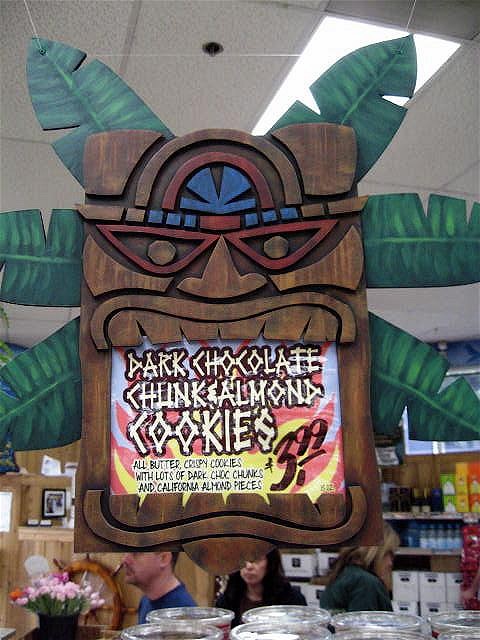
In the Trader Joe's Turning Into Tiki Joe's thread bigbrotiki posted a pile of photos from a couple California Trader Joe's. I though these two signs from the Burbank, California Trader Joe's were good inspiration for Tiki On A Budget projects:
Tikis like this could be recreated with plywood or medium density fiberboard (MDF). With a basic design drawn on the board and a jig saw it'd be pert near the same as coloring within the lines. If you don't have a jig saw (or were lousy with coloring books) this sort of design could be made with foam board (the paper sided type). An advantage to foam board is it's light weight and can be hung easily on sheetrock walls. A disadvantage is you'd have to cover all the white foam edges. Many water based paints won't stick to foam so you may have to do a coat of primer first. If you don't have the paint technique skills to recreate wood grain, age, or shading, solid colors (Tiki Central approved ones, of course) would work on these designs. (If you just think you don't have the skills give it a whirl anyway. You may surprise yourself and end up with one less thing to whine about.) Contact paper with a wood grain pattern would be a simple low skills option as well. This basic technique would also work for that fantastic Tiki bar sign you dream about but can't afford and elaborate door or room trim. |
|
M
MadDogMike
Posted
posted
on
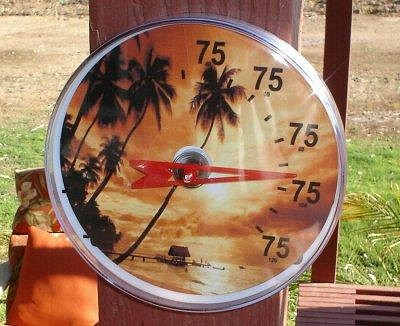
Sat, Jun 21, 2008 8:29 AM
It was 116 degrees on the Lanai yesterday but today I'm predicting a balmy 75 degrees. Accurite thermometer is $2.50 at WalMart, the clear cover removes easily and the face is just the right size for a CD label. I printed a new face and stuck it on, it feels cooler already. (It's actually 95 degrees and it's only 8AM) |
|
S

sungod
Posted
posted
on
Sat, Jun 21, 2008 9:16 AM
Joanns' 50% off on some tiki items: tiki bar sign, welcome sign, all items for a luau. |
|
M
MadDogMike
Posted
posted
on
Tue, Jul 1, 2008 2:47 PM
FAUX ROCK - I needed something to protect and hide the electrical cords to my Spitting Tiki water feature. Lowe's had faux rocks for $40 but instead I bought a $3 bag of concrete mix instead and globbed it over a piece of styrofoam. Before and after pix |
|
T

teaKEY
Posted
posted
on
Tue, Jul 1, 2008 2:53 PM
ROCK ON! Looks like a great rock and cleans things up a lot |
|
K

KreepyTiki
Posted
posted
on
Wed, Jul 2, 2008 12:32 AM
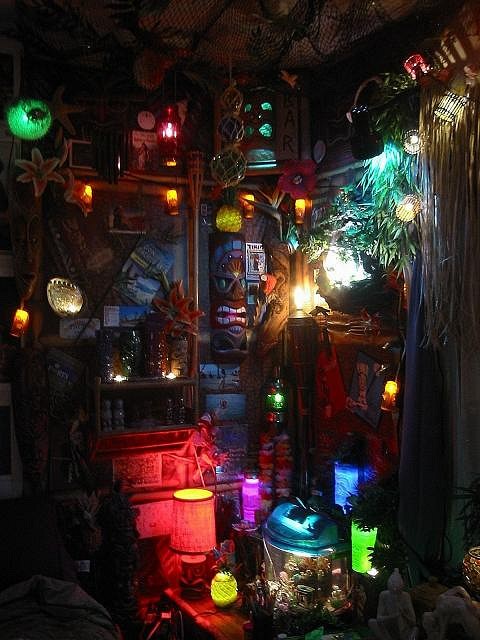
Since it completely relates to Tiki-On-A-Budget, please check out my recent thread here: http://www.tikicentral.com/viewtopic.php?topic=28843&forum=18 As you'll see, I was going for a combined Bamboo-Ben/Tiki-Ti bar style makeover of my bedroom, transforming it into the 'Paradise Cove Tiki Lounge', and it took over a year to do because, A) I don't have a lot of capital to work with so it took time to save up enough to buy various things and materials both via eBay and Oceanic Arts, etc., and, B) because, to do it right and get the finished effects I dreamed of, took a lot of time in terms of planning & execution. But I'm quite happy with the end result which, I can safely say, looks a lot more expensive than it actually was. For example, because I live in a rented apartment, even if I COULD afford a Bamboo-Ben remodel, I would have been extremely leery of putting up that much actual thatch, matting and bamboo, etc. So I saved a ton of time and money by utilizing various tricks which, in the naturally dark lighting of my finished lounge, seems nearly undetectable in terms of being faux-tiki rather than the real deal. And to best demonstrate what I mean, I'll post two photos here of just one corner of my lounge:
This first pic was taken with a flash and clearly shows the artificial detail of the plastic party-decoration wall-covering I utilized and then disguised by layering with actual 3-D objects -- menus (mostly photo-copied), shells, a Tiki-Torch, dried star-fish, strings of tiki-lights,etc. And this looks more believable in the photo than it did in person, where you could plainly see that the wall-covering was actually like one big painting. But now here's the exact same corner taken WITHOUT a flash in the actual lighting of the finished space...
Slight difference, eh? And since the room is ALWAYS seen only with this special lighting, the non 3-D wall covering is no longer a real issue. Basically, the final "effect" is all that really matters -- the illusion is all! And since the illusion is pretty darn natural-looking, it basically doesn't matter matter HOW it was actually achieved, or how LITTLE it actually cost. In other words... :tiki:-On-A-Budget triumphs again! :) Cheers! :drink: |
|
TGT
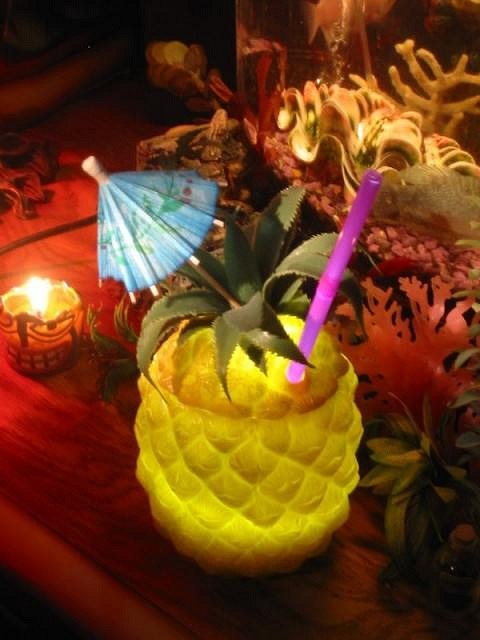
The Granite Tiki
Posted
posted
on
Wed, Jul 2, 2008 7:18 AM
Nice! I've had a roll of that wall treatment hanging around, and I use it here and there for temporary things, but I always knew it could be used in a more permanent and cool way! Great transformation, and if you ever move, I'm sure you'll still get your deposit back! :) Did I see one of those plastic pineapple drink cups with the straw hole you can buy at Target, transformed into a light? |
|
M
MadDogMike
Posted
posted
on
Wed, Jul 2, 2008 8:09 AM
Very nice Kreepy, very effective use of available materials. It looks a bit "full", is there room enough to actually walk around :) |
|
K
KreepyTiki
Posted
posted
on
Wed, Jul 2, 2008 8:48 AM
Yep -- that IS one of those plastic drink pineapples w. straw-hole turned into a light! And, yep again -- there IS actually room to walk around! Though, still being my bedroom (as well as my office), the majority of floor space is taken up by the bed, bed-side tables and desk. |
|
TGT
The Granite Tiki
Posted
posted
on
Wed, Jul 2, 2008 9:28 AM
"Yep -- that IS one of those plastic drink pineapples w. straw-hole turned into a light! " I'd love to see exactly how you did it, materials used etc. (ya know, so I can run out and do it immediately) :) |
|
K
KreepyTiki
Posted
posted
on
Thu, Jul 3, 2008 7:19 AM
Well, Granite, if you're referring specifically to the plastic pineapple light, I can tell ya how I did that quite easily. I simply put one of those stick-up, battery-operated, one-click LED push-lights inside the pineapple and left it turned on. Then I positioned a fuschia straw in such a way that it acts as a conduit for the light (much the way fibre-optics work), and that;s really all there is to it. The tricky part is positioning the straw so it lights up.
Hope that answers your question. Cheers! :drink: [ Edited by: KreepyTiki 2008-07-03 07:22 ] |
|
V
VampiressRN
Posted
posted
on
Thu, Jul 3, 2008 9:33 PM
Convert your cheesy minimalistic ceiling fan into a.......... TROPICAL BANANA PALM LEAF COOLER!!! (I could shoot myself for not taking a picture of the fan I did in my old house...but it turned out great and was actually a selling point in my house.) Here is what did...I purchased large silk Banana Palm Leaves and glued them onto my ceiling fan blades...some painting and whalaaa...instant tropical breeze. :) REQUIREMENTS PROCESS FATIMA BLUSH: Oh, how reckless of me. I made you all wet. [ Edited by: VampiressRN 2008-07-03 21:38 ] |


