|
V

VanTiki
Posted
posted
on
Tue, Jan 23, 2007 11:02 AM
Hey - I'll throw in my 2 cents on tinting casting resin/urethanes - a little goes a long way! I'd add just a drop or 2 to a "big-gulp" sized batch. Too much can affect the setting of the resin (but I've only heard this - never experienced it). Most importantly, you need to tint a small batch, mix it, and let it set up before you can see the final color. Most casting urethanes change color when they set - so it can be tricky to tint them when you are adding color in the liquid state. Also - mix the tint in well - I usually would fully mix the tint into the A (or B) cup before mixing the resin together. If you try to add tint and mix the AB together in one go you may end up with unmixed globs of tint while racing the "set up" clock! Write down how much tint you are adding and the batch size, so you can compare notes later. Good luck! |
|
B

Benzart
Posted
posted
on
Tue, Jan 23, 2007 12:13 PM
TDav, This has been an Awesome bunch of information nad the Hula girl is realy so Life like she is Unbelievable. Excellent stuff, Big Mahalos |
|
C

Clysdalle
Posted
posted
on
Tue, Jan 23, 2007 3:10 PM
thanks for the info dave.....lets keep these threads comin!! Just ordered all my stuff...should be here intime for the weekend!! |
|
P

pdrake
Posted
posted
on
Tue, Jan 23, 2007 7:42 PM
okay, i'm really trying here. believe it or not, there are practically no casting supplies available in vegas. dick blick has very expensive silicone and 2 part resin. michael's has 2 part, polyester resin (stinky). that's it, i had to go to a boat store and get tinting gel for gel coat to get color. it's pretty crude, but it's kind of working. time to mold up . . . .
first mold poured . . . .
have to make a new original to mold from for piece 2 . . .
pulled the molds off the bases, i tried to save them to make another mold so it's quicker to cast multiples. i think i succeded with one.
originals pulled from molds . . .
row of color . . . hard to get it right.
|
|
B

Bowana
Posted
posted
on
Tue, Jan 23, 2007 8:32 PM
Capt'n Skully: Rock on! pdrake: A crazy friend of mine experimented with mixing enamel paint into resin and it appeared to work. I've not tried it myself, and I'm not sure just how much paint he used, but I was amazed at how dark the resin was. Be careful using tint (or enamel paint!). Adding too much trying to get a dark color will cause your mix not to set right. I've had success getting dark colors with polyester resin, but not urethane. Polyester sets up clear so it takes the tint more to it's true color. Urethane sets up white, so it's like adding a ton of white paint to a single drop of color. I've gotten medium dark colors before, but that was because I pushed the tint content as far as I dared. Experiment and let us know how it comes out. (I just noticed your second post, Perry. Looks like you've got a handle on things. The darkest of your castings might be the limit. Dare to take it to the next level?!) VanTiki: You are correct, sir! Benz: Thanks for checking in! Clysdalle: Awesome! You'll be a master mold maker/caster in no time!
[ Edited by: Tikidav 2007-01-23 20:38 ] |
|
P
pdrake
Posted
posted
on
Tue, Jan 23, 2007 8:37 PM
i have a piece curing from the clear stuff. it looks like it will take some experimentation to see how much mek to add to get it to cure properly. i hope i didn't ruin that mold. it's been an hour and it's not set, so i'm not holding out hope for it. thanks so much for all your help and encouragement. |
|
B
Bowana
Posted
posted
on
Tue, Jan 23, 2007 8:42 PM
Polyester takes a while. Hopefuly you got casting resin, and not laminating resin like I did once. |
|
P
pdrake
Posted
posted
on
Tue, Jan 23, 2007 8:56 PM
d'oh! i got clear cast. i've done quite a bit of fiberglass work, so i knew that rocky road. i'll never use polyester for fiberglass again since i found west. |
|
M

Moki
Posted
posted
on
Wed, Jan 24, 2007 2:03 PM
Thanks for all the info Dave. I just placed my order too. Should be having some fun this weekend. |
|
M
Moki
Posted
posted
on
Thu, Jan 25, 2007 6:44 PM
My supplies showed up today. Yay!!! I'm ready to go.... I've read and re-read the tread and I feel like I'm as prepared as I'll ever be. Tomorrow is the final exam. I'll let you know how it goes. Thanks to everybody for all the great tips on this thread. |
|
B
Bowana
Posted
posted
on
Thu, Jan 25, 2007 8:02 PM
You are welcome! I'm glad to see people taking the bull by the horns and trying it out. Post your results! I wanna see! :) |
|
P
pdrake
Posted
posted
on
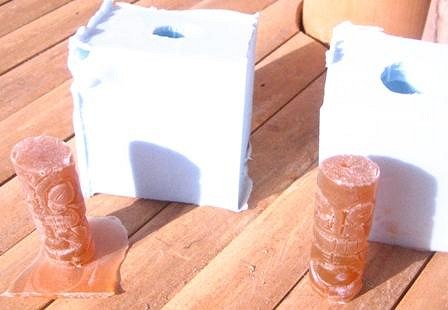
Thu, Jan 25, 2007 8:23 PM
|
|
M
Moki
Posted
posted
on
Fri, Jan 26, 2007 2:07 PM
Here's my progress today.... Then I made a box (I didn't have enough lego's) Placed the original carving in (Thanks Mieko) Then I mixed up the blue goo and poured it in. The directions said it would take 24 hours to set and another 48 hours before I could use the mold. Do I REALLY have to wait that long?? I was hoping to pour some resin this weekend. So far, so good. [ Edited by: Moki 2007-01-26 15:31 ] |
|
B
Bowana
Posted
posted
on
Fri, Jan 26, 2007 5:12 PM
pdrake: Cool! Those look nice and dark. How did you do it? Is it the clear resin you were using? Moki: One thing I have not covered in this thread is the topic of silicone. I noticed that there are some bubbles in your mold. They may be only on the top (as air rises), or they could be throughout the mold and maybe in contact with the piece. Ordinarily one would put the silicone into a vacuum chamber to eliminate any air mixed into the silicone before pouring it into the mold. If you don't have a vacuum (and most people don't), you can break up air bubbles in the mix by pouring it slowly and in a very thin stream into the mold. |
|
M
Moki
Posted
posted
on
Fri, Jan 26, 2007 6:25 PM
Thanks for letting me know we can pour tomorrow. Mr.NoNaMe is on his way over to make his mold and we are really anxious to keep going. When I worked in a dental lab many years ago, we used a vibrating plate to bring the bubbles to the surface. Since I don't have that tool anymore I improvised and used my back massager instead (it really is a back massage!! Get your minds out of the gutter guys :wink: ). Hopefully it worked. I'll post tomorrow after we seperate the mold. Fingers crossed!! |
|
M
Moki
Posted
posted
on
Sat, Jan 27, 2007 2:39 PM
Well, here it is. The mold seems to be ok. Only little hiccup I had was I didn't make enough silicone to cover the tiki with as much I felt it needed to be. So I made another small batch immediately. It was slightly lighter in color (less activator) even though I used my postal scale. That area is still a little soft even after 24 hours of cure time, so I'm letting it set another day before I do any resin. I don't see any major air bubbles, maybe just one or two little pin point size ones. I'll post another update once we have a resin one done. |
|
MN

Mr. NoNaMe
Posted
posted
on
Sat, Jan 27, 2007 7:14 PM
I couldn't wait!! AARRRRGGHHHHH!! I only peeled the foam board back a little. I saw an air bubble and gave it a shove with the hook knife. It was a bit (very little) sticky/wet at 22 hours. I'll have to wait (EERRRRRRRR!!) until Monday morning. |
|
B
Bowana
Posted
posted
on
Sat, Jan 27, 2007 8:51 PM
Moki and Mr. NoNaMe: That is so cool that you are making your own molds. Tiki smiles upon you! Room temperature and humidity affect the cure time of silicone. Colder weather like we are having right now makes it set slower. However, 22-24 hours setting time should not be happening. Don't put in any less than 10% of the catalyst. I like to go a little bit higher when the weather is cold. 12-15% so it doesn't take forever. Be warned though, that if you go too high on the catalyst it will lessen the life of your mold. You can speed up the setting time by putting your molds out in the sunlight, or next to a heater for an hour or so depending on how goopy. |
|
M
Moki
Posted
posted
on
Sun, Jan 28, 2007 10:19 AM
We have lift off!!! I think they look great. Man that resin sets up fast and boy it gets warm too!! There are lots of little bubbles just under the surface. They don't seem to affect anything, but they looks weird. It's kinda cold in the garage. I'm wondering if that has anything to do with it since the resin says to use above 70 degrees. Now we just need to paint them. Any suggestions as to what kind of paint to use? I'm off to create my army, which will only be as large as my bottle of resin will allow. I can see a reorder in my future. |
|
M
Moki
Posted
posted
on
Sun, Jan 28, 2007 3:29 PM
The beginning of the 'OnaTiki army. We experimented a little with the paint and came up with something that we're happy with. Thanks again for all your help. I think we're hooked!! |
|
4

4WDtiki
Posted
posted
on
Sun, Jan 28, 2007 5:32 PM
Those are lookin' good! |
|
MN
Mr. NoNaMe
Posted
posted
on
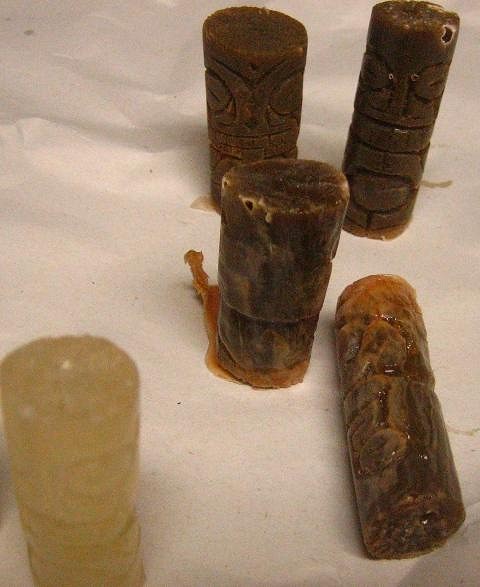
Mon, Jan 29, 2007 5:06 PM
Here is my attempt. Pretty good I'd have to say. A little bubbly, but no big deal. Kinda rootbeer colored. Signature? I ain't signin nothin! [ Edited by: Mr. NoNaMe 2007-01-29 17:06 ] |
|
B
Bowana
Posted
posted
on
Mon, Jan 29, 2007 8:01 PM
SUCCESS!! Nice job, Moki and Mr. NoNaMe! The bubbles under the surface happens to me too sometimes. It might be the cold weather, not sure. Anybody out there have an answer for us? Remember to dust the mold with baby powder or talc to avoid surface bubbles. I always give my castings a scrubbing with some warm water before painting in an attempt to clean off anything that might keep the paint from sticking. You can use primer as a base coat (I use Krylon), then you can drybrush or put an antique over it with enamel or acrylic. I've used shoe polish as an antiquing/wash. Clysdalle, how are you doing?
[ Edited by: Tikidav 2007-01-29 20:04 ] |
|
M

mieko
Posted
posted
on
Mon, Jan 29, 2007 8:33 PM
Oh my gosh, oh my gosh! They look sooooo gooooood! I don't know how you are painting them, but they look great! Wow. I didn't see this thread till today. :) I wanna come visit the army. :) I'll give ya a call. Hey Mr. NoNaMe, which ones did you cast? I can't quite tell, but is the left one the one that has the tiki mug? If so, I'm calling dibs on one. :) |
|
MN
Mr. NoNaMe
Posted
posted
on
Mon, Jan 29, 2007 8:53 PM
I'mmm melllltiiiinnnggg So, #2 has some melting issues. I think there is a little too much tint and maybe some pre-used somethin or other got in there as well. :) Really, I don't know how it happened. Signature? I ain't signin nothin! [ Edited by: Mr. NoNaMe 2007-01-29 20:54 ] |
|
B
Bowana
Posted
posted
on
Mon, Jan 29, 2007 9:44 PM
Erik, the glue stick casting is a result of not having equal amounts of A and B. The marbleized melllllllllllting! effect in the others is from not mixing thoroughly. The large bubbles are from pouring after the resin has begun to set. Try it this way: The reason for the third cup is because if you were to dump A into the B cup (or vise versa) and mix it, you would have more of the side that was already in the cup. Ratio is very critical when mixing very small batches. Your Tiki pendants are very cool! They so deserve to be cast correctly. Hope this helps you. |
|
M
Moki
Posted
posted
on
Mon, Jan 29, 2007 10:10 PM
Erik, Good job!! I've been anxiously awaiting pictures. We were wondering what they would look like without any tint. It's a cute little glue stick :wink: I had one batch go south and all melty too. I think I didn't mix it well enough. Lesson learned. Show us more when you get them painted. Now where is Clysdalle!?! Hello....... |
|
C
Clysdalle
Posted
posted
on
Tue, Jan 30, 2007 8:13 AM
hahahah.......great stuff guys.....still waiting for my damn crap to show up!!!! UPS where are youuuuuuu!!!! I feel like I'm falling behind...save yourselves......gooooooooo As soon as my junk gets here I'll photo the process of my "adventure"...this thread is sooo great, I feel like everyone is making the mistakes for me :wink: - now how and I going to mess up??? |
|
MN
Mr. NoNaMe
Posted
posted
on
Tue, Jan 30, 2007 8:19 AM
Well, I couldn't find my "back massager" this morning, so I just had to shake it with my hand. The fresh mold I just poured! You know, to get the bubbles out. Sheesh. :) I'll have to dig around for that 15 year old engraver/etcher that is somewhere in the garage. |
|
C

Clarita
Posted
posted
on
Wed, Jan 31, 2007 9:57 AM
Aloha Tiki Dav great thread pal!! Greetings! Sorry for not being around lately... |
|
HOK

HOUSE OF KU
Posted
posted
on
Wed, Jan 31, 2007 10:57 AM
|
|
F

finkdaddy
Posted
posted
on
Wed, Jan 31, 2007 7:22 PM
This thread is so increadible. Just tons of useful tips and a huge amount of participation! Here is my first solo attempt with resin: Fridge Tangs |
|
M
mieko
Posted
posted
on
Wed, Jan 31, 2007 8:19 PM
octopus? I LOVE Octopods... can't wait to see them. |
|
C
Clysdalle
Posted
posted
on
Wed, Jan 31, 2007 8:32 PM
I just did my mold tonight...messed up and didn't mix enough so I had to haul ass and mix more and add it....should not be a problem. I guess it sets in 4 hours...so tommorrow morning it will be like xmas as I sneak out to the studio at first light and see how bad the damage is. Hopefully I'll be casting tomorrow night! |
|
MN
Mr. NoNaMe
Posted
posted
on
Wed, Jan 31, 2007 8:52 PM
Molds in fours is not happening! I'd give it 24+ hours in these current temps. Casts are ready in 10 minutes, but still bendy. This is for my finger size pendants. Pod?? Ain't it pie? That is just gross. One, I hate calamari. You just eat something like that in desperation. Not because it is good. I had this weird bento lunch, blechh!! Pie on the other hand..... peach or apple or even minced meat.... is this the food network chat room...? I'll try to come up with pics of the painted pendants. They are a bit cartoony. |
|
B
Bowana
Posted
posted
on
Thu, Feb 1, 2007 7:27 AM
Clysdalle: What kind of silicone did you get that sets in four hours? (and did it?) Mr.NoNaMe: Did your "back massager :)" work getting the bubbles out? Yes, please post your pendants no matter how cartoony. How about some calimari pie?! |
|
C
Clysdalle
Posted
posted
on
Thu, Feb 1, 2007 8:30 AM
Hey Tikidave, The stuff I used was this http://www.ares-server.com/Ares/Ares.asp?MerchantID=RET01229&Action=Catalog&Type=Product&ID=82083 from micro mark....it was in somebodies post about resin casting before this holy grail of a post was written. Now I poured it at 8pm...and then I fell asleep so I can't say it was done in 4 hours...but when I checked this morning at 6am it was bone dry and I was able to remove it from my carving. So I guess that stuff works...and had no smell either. Ok, now I'm going to cast tonight but I have a few questions...I notice that I got most of the air bubbles out with a sander but I have 2 small bubbles I can see that will cast like little pimples when I toss in the resin. Now my question is...do I try and fill the small holes now (and how) or do I just cast and then cut and sand them off after? I'm going to paint and stain the finished resin if that makes a difference. -clys |
|
M
Moki
Posted
posted
on
Thu, Feb 1, 2007 12:57 PM
Not that I'm an expert by any stretch of the imagination, but we had a few small bubbles that left little "pimples" on the finished resin piece. I was able to remove them with the tip of my exacto blade and a little sand paper. Once they were painted you didn't really notice them (I still do, but that's because I know where they were. Nobody else notices them) Post some pictures!!! :) Edit for damn spelling error!!! [ Edited by: Moki 2007-02-01 12:58 ] |
|
B
Bowana
Posted
posted
on
Thu, Feb 1, 2007 2:05 PM
Clysdalle: You can fill the bubbles in the silicone, but it's probably not worth it. You would have to mix a small batch of silicone with a filler like Cabosil, and a fast catalyst. Mix enough Cabosil into it to make it thick, then fill the holes with it. Sort of like sculpting in silicone which is dang near impossible. There's a danger of the patches not sticking once you start pulling castings out as well. Your best bet is to do like Moki and pop the BB bubbles out of each casting with an X-Acto. |
|
C
Clysdalle
Posted
posted
on
Thu, Feb 1, 2007 2:12 PM
Sounds like I'll just pop the pimples like a high schooler before prom!!! i'll post up some pics tonight after I give it a go! |
|
C
Clysdalle
Posted
posted
on
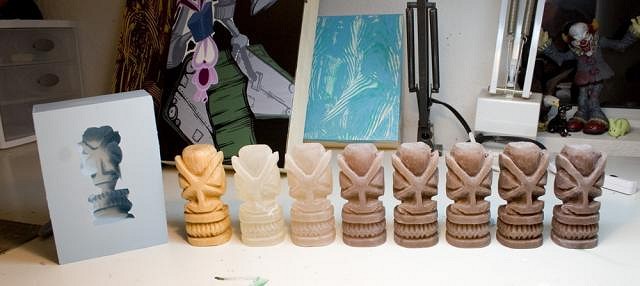
Thu, Feb 1, 2007 8:43 PM
Ok, just used up all my resin already damnit.....so here they are ...7 dwarfs....I didn't have any silicone spray but I could not wait....so I used some talc since I was going to paint all of them anyway.... was pretty fun and easy minus the pimples...but they will be easy to hide...
Hope to get a few painted up and pretty this weekend... |
|
M
Moki
Posted
posted
on
Thu, Feb 1, 2007 9:40 PM
YAY!!!! They look great!! We ran out of resin the first day too. That was a bummer. When we re-ordered, we got two gallons. Should be good for a while now. Wanna do a pendant trade?? We won't be able to make the February Chop, so if you still have any left, we can swap in March. Can't wait to see them painted. |
|
B
Bowana
Posted
posted
on
Fri, Feb 2, 2007 7:17 AM
Looking good, Clys! I see you got a transparent one too. That will still happen to me too on occasion, even though I would swear up and down that it was an even mix! Did you add tint to any of them? I like the color of the one on the far left. |
|
C
Clysdalle
Posted
posted
on
Fri, Feb 2, 2007 7:29 AM
The one of the far left is wood hahahahah......yea, I added tint to the others....as you can see I added more and more as I went to get an idea for future casting. I'm going to sand and custom paint them this weekend. Need to order more resin and mold materials now....thanks for your helf tikidav and everybody who added to his thread. I wish everything I want to try was in life had a picture step by step thread for it! well almost everything :wink: |
|
B
Bowana
Posted
posted
on
Fri, Feb 2, 2007 7:40 AM
Oh that's the original! :oops: Hee hee! Be sure and post the finished painted ones! I'm glad this thread has been helpful to you. You can go even smaller next time on your mold box and save yourself some $$ on silicone. Your castings will be easier to pop out too. |
|
C
Clysdalle
Posted
posted
on
Fri, Feb 2, 2007 7:48 AM
I was trying to figure out how much smaller I could go.....about an 3/4 inch from the edge of the original? as a rule of thumb? |
|
C
Clysdalle
Posted
posted
on
Fri, Feb 2, 2007 7:49 AM
hey Moki, I'm down with a trade for sure! I'm going to get more resin and try to get a few more out of this run...so they should be painted and ready to roll in time for march! |
|
C
Clarita
Posted
posted
on
Fri, Feb 2, 2007 1:44 PM
About this you can try putting plasticine one that do not contain Sulpher to cover the pimples in your mold before casting... Tiki Candle Maker [ Edited by: Clarita 2007-02-02 13:52 ] |