Pages: 1 2 3 4 5 6 7 8 9 10 11 12 13 14 15 16 17 18 19 20 21 22 23 24 25 26 27 28 29 30 31 32 33 34 35 36 37 38 39 40 41 42 43 44 45 46 47 48 49 50 51 52 53 54 55 56 57 58 59 60 61 62 63 64 3,035 replies
|
WC

Will carve
Posted
posted
on
Sat, Oct 11, 2014 3:47 AM
I thought that chicken had a portobella mushroom bra. |
|
M

MadDogMike
Posted
posted
on
Fri, Dec 26, 2014 3:56 PM
|
|
D

danlovestikis
Posted
posted
on
Fri, Dec 26, 2014 4:22 PM
That's a beautiful family. Wendy |
|
H

hang10tiki
Posted
posted
on
Sat, Dec 27, 2014 6:55 AM
Great card |
|
T

TikiAno
Posted
posted
on
Sun, Dec 28, 2014 10:58 PM
Awesome (just saw this, a bit late)... |
|
M
MadDogMike
Posted
posted
on
Tue, Jan 27, 2015 7:54 PM
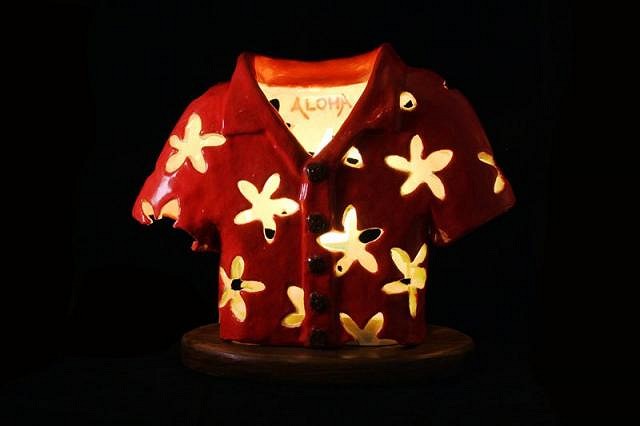
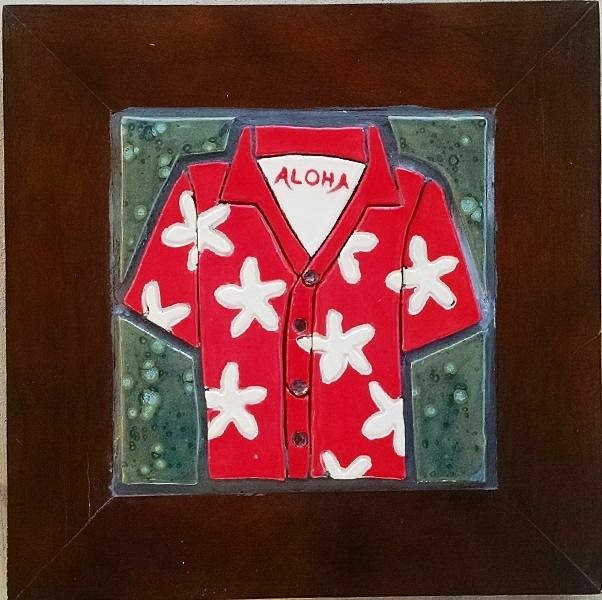
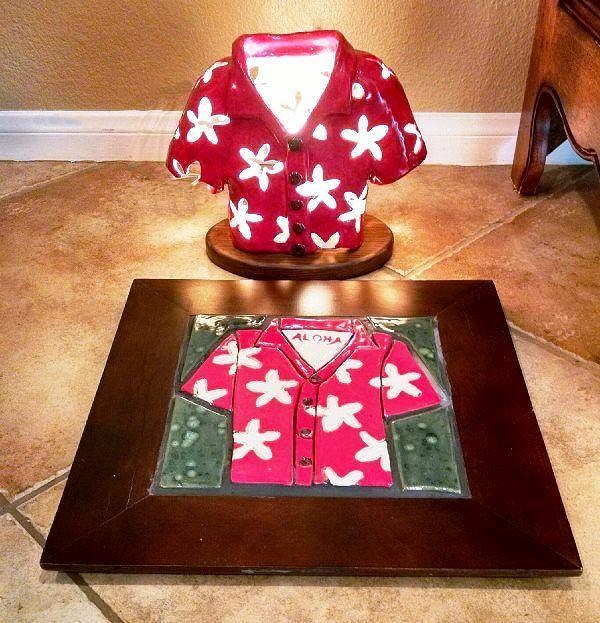
Matching lamp and mosaic for the Hawaiian Shirt Art Swap |
|
T
TikiAno
Posted
posted
on
Tue, Jan 27, 2015 10:03 PM
Mike, love these. |
|
WC
Will carve
Posted
posted
on
Wed, Jan 28, 2015 5:15 AM
The lamp is out standing. |
|
H
hang10tiki
Posted
posted
on
Wed, Jan 28, 2015 7:06 AM
Awesome bro |
|
D
danlovestikis
Posted
posted
on
Wed, Jan 28, 2015 10:19 AM
Over the top great ideas and beautifully executed. Bravo, Wendy and Dan |
|
M
MadDogMike
Posted
posted
on
Tue, Feb 17, 2015 3:15 PM
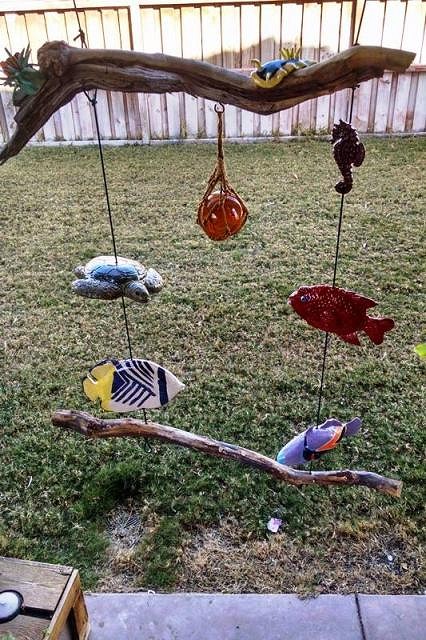
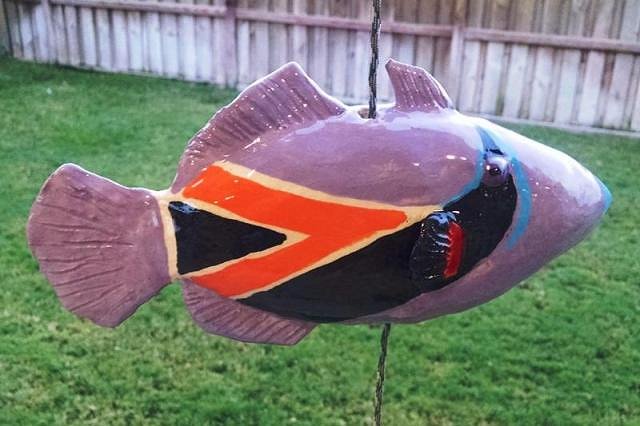
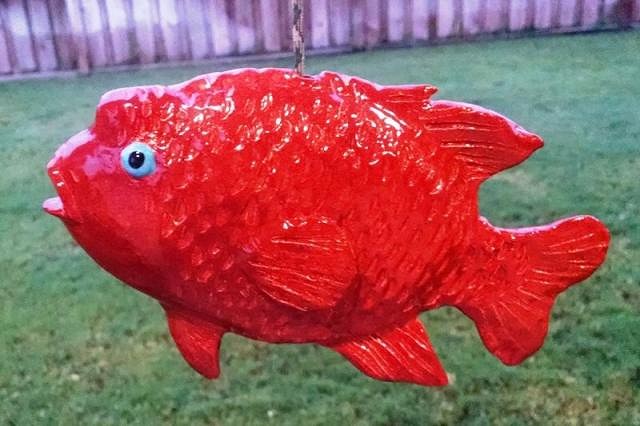
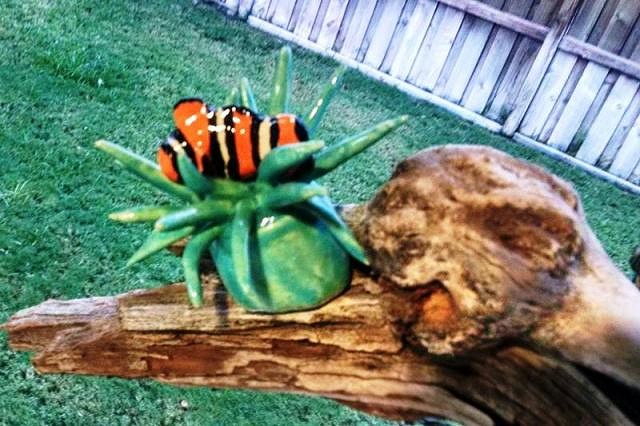
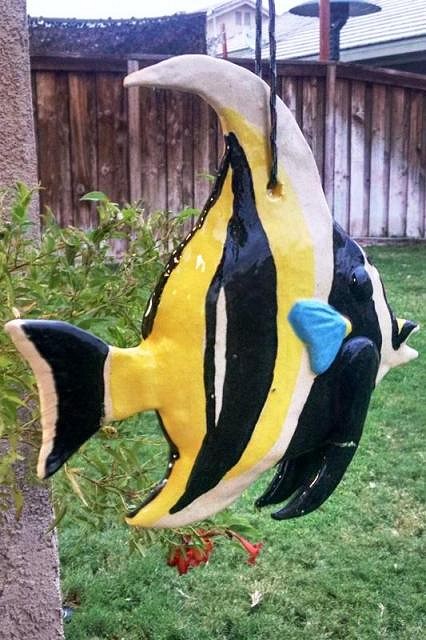
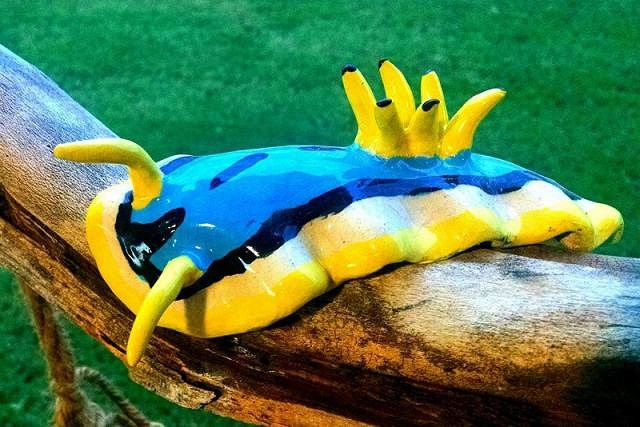
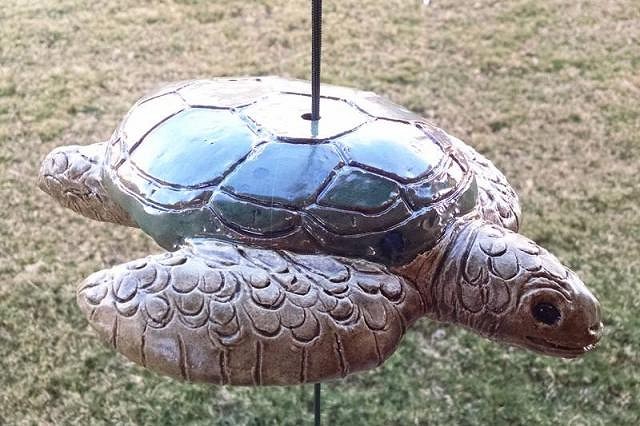
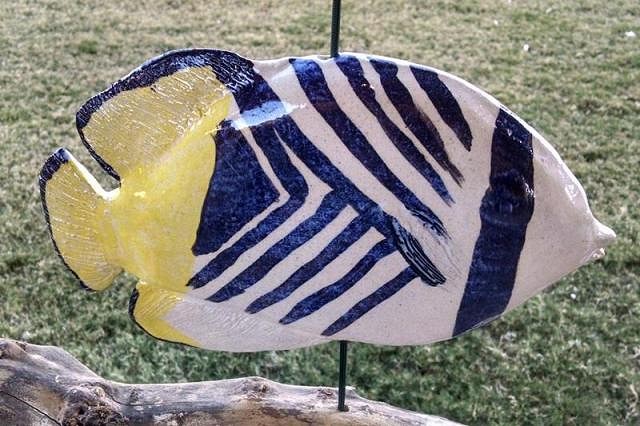
Inspired by our reef trips off Oahu (and Catalina Island) last summer, a 3x5 foot ceramic fish hanging. The fishes and turtle were paper clay slabbed over a styrofoam form which burned up when fired. The "driftwood" is actually the opposite of driftwood - tumbleweed branch. This was a joint project with my wife and I, she sculpted and glazed the sea turtle and the sea horse. She is as talented as she is beautiful
|
|
H
hang10tiki
Posted
posted
on
Tue, Feb 17, 2015 3:56 PM
Awesome you two |
|
WC
Will carve
Posted
posted
on
Wed, Feb 18, 2015 5:20 AM
Mike, |
|
R

RVICTOR
Posted
posted
on
Wed, Feb 18, 2015 5:29 AM
Maddog - Very creative. I really like the idea. |
|
C

cy
Posted
posted
on
Thu, Feb 19, 2015 3:46 PM
A cool combination piece guys, nice! |
|
T
TikiAno
Posted
posted
on
Thu, Feb 19, 2015 10:40 PM
Ha ha ha!!!! |
|
B

Beachbumz
Posted
posted
on
Fri, Feb 20, 2015 12:11 PM
Loving The Fish Hanging Mike!! My mom in law makes something very similar using drift wood she finds and shells and always adds a nice netted float to the bottom too.. :) |
|
M
MadDogMike
Posted
posted
on
Wed, Apr 1, 2015 6:13 AM
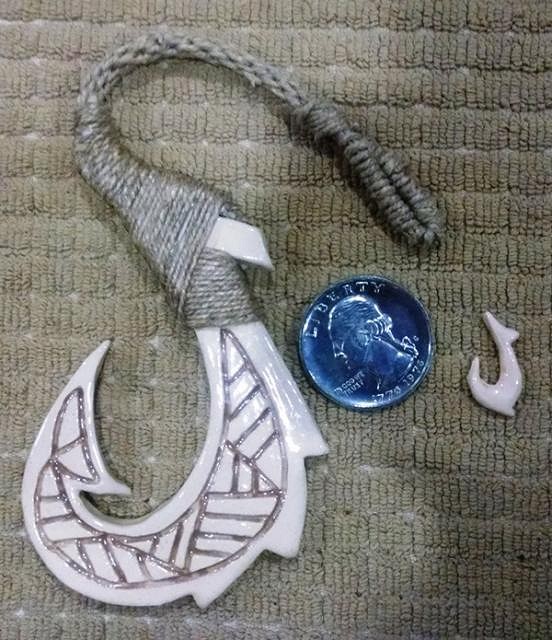
Thanks for the comments friends. Yes Will, I'm probably contagious! :lol: I have been wanting to carve a Hei matau (fish hook) so I picked up some cow bone at PetCo and went to town with the Dremel. About 3 inches tall with Kumihimo braid lashing made from jute thread. I had some bone left over so I made a tiny hook (about ¾ inch) for catching anchovies :wink: |
|
D
danlovestikis
Posted
posted
on
Wed, Apr 1, 2015 6:40 AM
You are wonderful with precision twine roping. I liked your ship in a bottle on fb too! Wendy |
|
C
cy
Posted
posted
on
Wed, Apr 1, 2015 7:48 AM
Nice Mike! |
|
H

hiltiki
Posted
posted
on
Wed, Apr 1, 2015 8:06 PM
Nice, you are so talented in every thing you do. |
|
M
MadDogMike
Posted
posted
on
Wed, Apr 1, 2015 8:19 PM
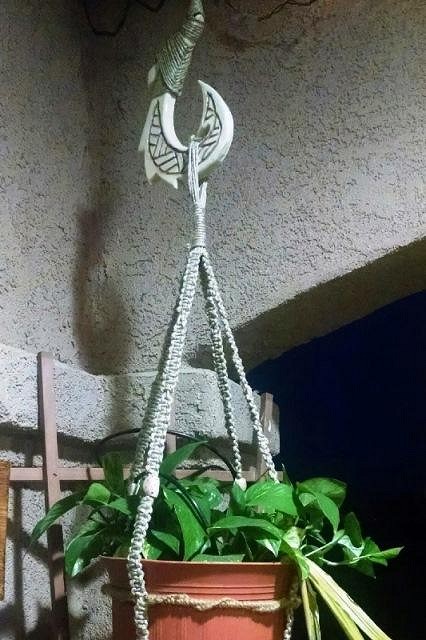
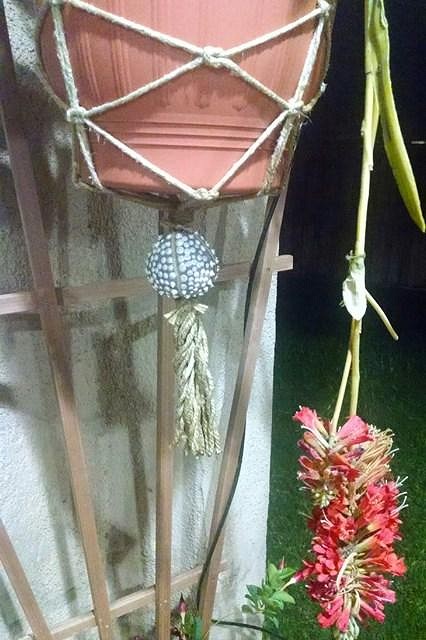
Not really! LOL The quarter is a jumbo 3 inch coin, the little hook is just a quick ceramic throw-away about 2 1/2 inches tall. The big hook is ceramic about 10 inches tall, it holds a macrame plant basket :wink: That was the first time I have done any macrame in 40 years but it was just like riding a bike :lol: Bought an inexpensive Kumihimo disk which makes a cool round 8 strand braid. The macrame incorporates cowrie shells and the piece at the bottom is a ceramic sea urchin shell. |
|
M
MadDogMike
Posted
posted
on
Thu, Apr 2, 2015 9:08 PM
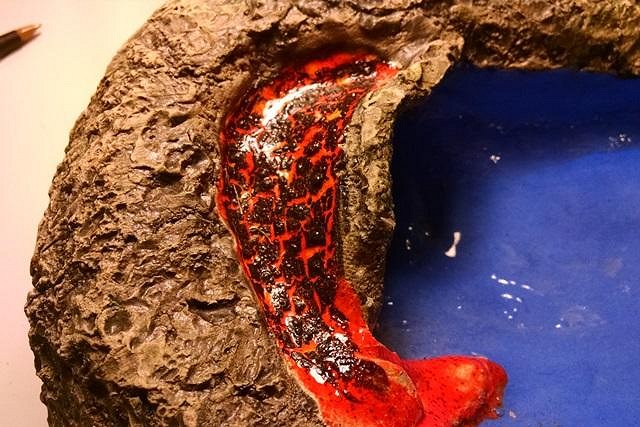
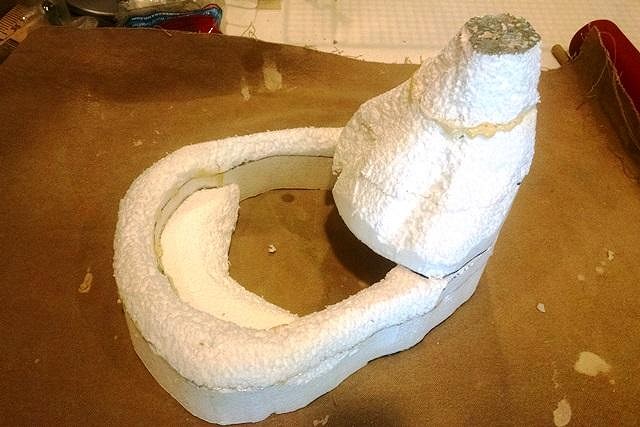
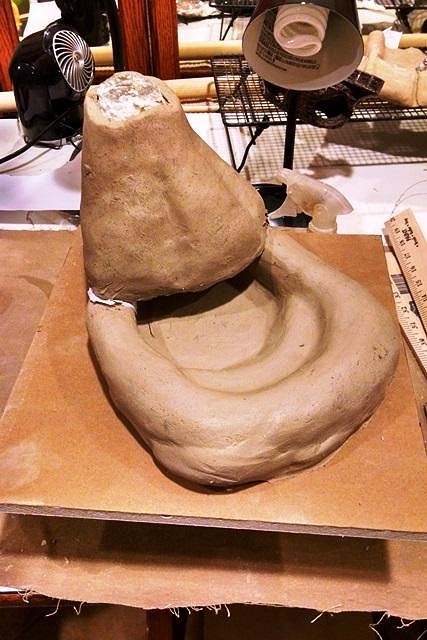
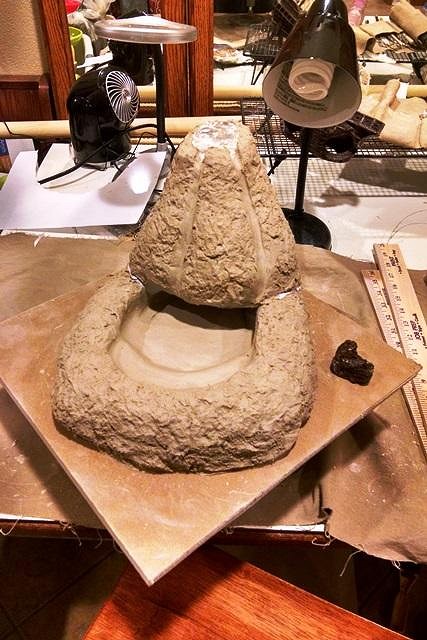
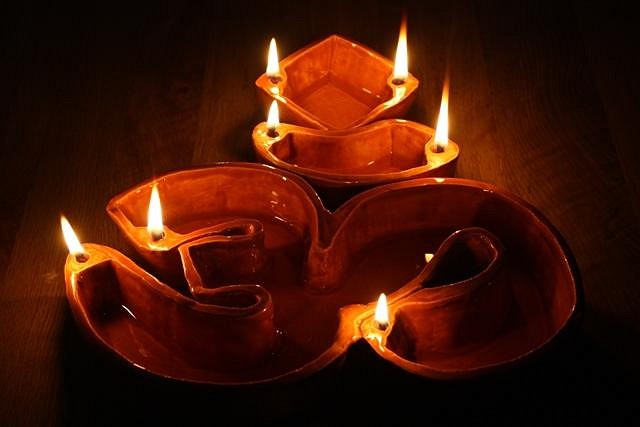
I made a new type of volcano bowl, more low and flat than the traditional volcano bowl. It is actually a water dish for our new iguana enclosure :wink: Tried something new for the "lava", Amaco black Arroyo glaze over Mayco Wildfire Jungle Gems glaze. Looks like the lava has partialy cooled and formed a crust over the top but you can still see the glowing orange in the cracks. Also has a cool texture. CLAY OVER STYROFOAM TUTORIAL I aways use paperclay for this technique, it shrinks less than regular clay as it dries and is less likely to crack against the foam core. Roll the paperclay into a slab the desired thickness and cover the foam core. Trim excess and add pieces to cover foam as needed. Press the clay against the foam but be careful not to press too much as it will thin the clay. After the clay has dried and firmed up a bit, texture the clay as desired. I tried something new for a rock texture this time. I usually take a piece of lava rock and "pounce" it into the clay. But you have to keep turning the rock or the texture starts to look too much the same. This time I took a roundish lava rock and rolled it around on the clay in several different directions, made a more believeable rock texture. OPTIONAL STEP - With or witout dissolving the foam, it is ready to fire once the clay is completely. Hopefully your kiln is outside because it is going to stink and release some possibly toxic fumes. The foam will burn up leaving nothing but ashes. One caveat is that the inside of the piece (that was against the foam) will have a rough texture. Depending on your design, you might be able to smooth the inside some if you disolve the foam out? Now the piece is bisque fired and can be treated in the normal fashion. Have fun! Here are some other pieces I have made using this technique. |
|
R
RVICTOR
Posted
posted
on
Fri, Apr 3, 2015 6:43 AM
MadDog - The planter is the coolest. Your totally have a hit with that brother. Great job! |
|
D
danlovestikis
Posted
posted
on
Tue, Apr 7, 2015 1:47 PM
Wow so much fun projects to look at I'm in awe. I would never have thought you would use the hook that way. How perfect for you yard. The turtle is perfect. The volcano project outstanding. You are such a creative man. Thank you for sharing. I have a glaze that does that but so far it hasn't worked as well as yours. I think I need to do more than 3 layers. Keep up the great work. Wendy |
|
L

LoriLovesTiki
Posted
posted
on
Tue, Apr 7, 2015 6:01 PM
Your creativity is amazing! That volcano bowl is great!!! |
|
M
MadDogMike
Posted
posted
on
Tue, Apr 7, 2015 8:40 PM
Thank you Robert and Lori |
|
M
MadDogMike
Posted
posted
on
Sat, Aug 15, 2015 7:18 AM
Enchanted Tiki Room Art Swap piece, a ceramic bottle inspired by the TamTam slit gong outside the ETR.
In return I get this awesome piece from Cy. Headed up to Tiki Oasis today to exchange :D |
|
M
MadDogMike
Posted
posted
on
Fri, Aug 28, 2015 6:39 AM
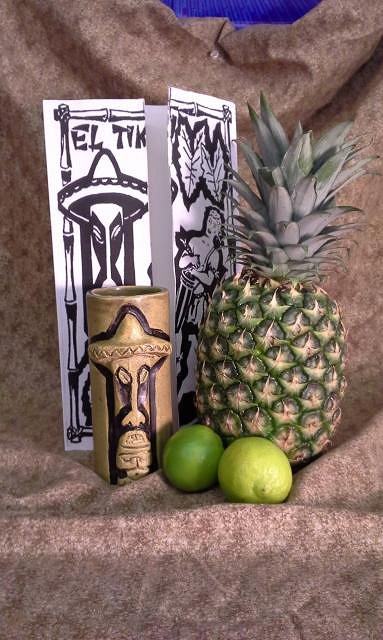
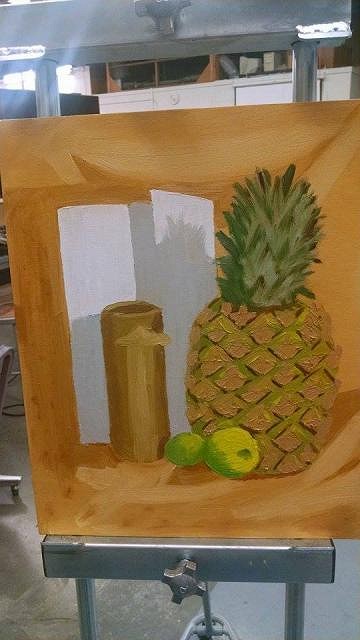
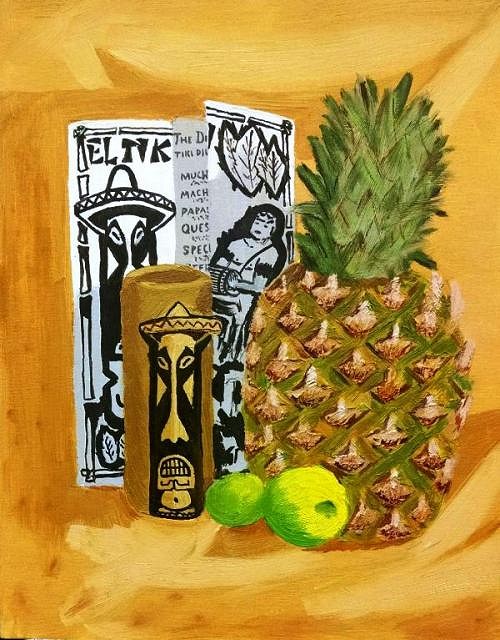
I have gotten fairly proficient at ceramic sculpture but have always struggled with any type of drawing or painting so I decided to take an oil painted class offered at the community college. Our first assignment is a still life so I'm working on "Still Life with a Tiki Mug" This is a beginning class but the instructor spent about 30 minutes talking about oil paints and color mixing then said "Get your canvases and start painting". I had anxiety standing in front of that blank canvas :lol: Photo of my still life scene. El Tiki mug and menu, pineapple and 2 limes. Progress after the first night Last night's progress I like the shadows and shading, not so happy with the pineapple yet. |
|
H
hang10tiki
Posted
posted
on
Fri, Aug 28, 2015 12:50 PM
Lookin good sir |
|
S

swizzle
Posted
posted
on
Fri, Aug 28, 2015 6:48 PM
So very true Mike, but they are only 'mistakes' to YOU. As to when you are "done", only you can answer that. In general most artists are never happy with their work and you can keep trying to fix areas you don't like but then when you are finally satisfied then you will see another section that then needs 'improving' and you will just keep going and going until you convince yourself that it looks nothing like how you wanted, and then hate the piece. It's best to call it quits when you first think to yourself that it's "done", and then put it aside and start on a new piece. At least that's the way i see it. Nice start by the way. I could never get the hang of oil paints. |
|
M
MadDogMike
Posted
posted
on
Fri, Aug 28, 2015 10:50 PM
Thank you Jon :) WOW! :o Swizzle! That is so very profound and great advice. I will take it, thank you! |
|
H
hiltiki
Posted
posted
on
Sat, Aug 29, 2015 11:29 AM
The hardest thing about drawing or painting for me are the shadows. I could never get those right, I guess I see everything in two dimension. Great start Mike keep us posted. |
|
D
danlovestikis
Posted
posted
on
Mon, Aug 31, 2015 7:39 AM
Swizzle is right. One painting can take a lifetime if you don't just say it's done and stop. There will always be places that can be tweaked but stopping is good. Just step back and see if you can say, I'm satisfied. ===================================== I think I've found MadDogMikes doppelganger! Here's are dearest friend at work. Here's your look-a-like! I found him on the show Dating Naked!
MDM what do you think? Long lost son? ================================ Wendy |
|
M
MadDogMike
Posted
posted
on
Mon, Aug 31, 2015 11:40 AM
He's too young to be my twin. I don't have any random children (as far as you know) but he does look a lot like me! :lol: |
|
D
danlovestikis
Posted
posted
on
Mon, Aug 31, 2015 3:46 PM
He has your sweet personality and charm. He's also considerate and sensitive like you with your funny streak. Are you sure he's not yours? Wendy |
|
M
MadDogMike
Posted
posted
on
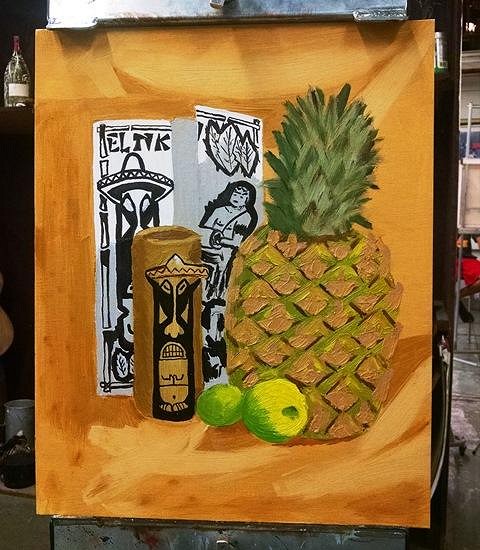
Tue, Sep 1, 2015 9:44 PM
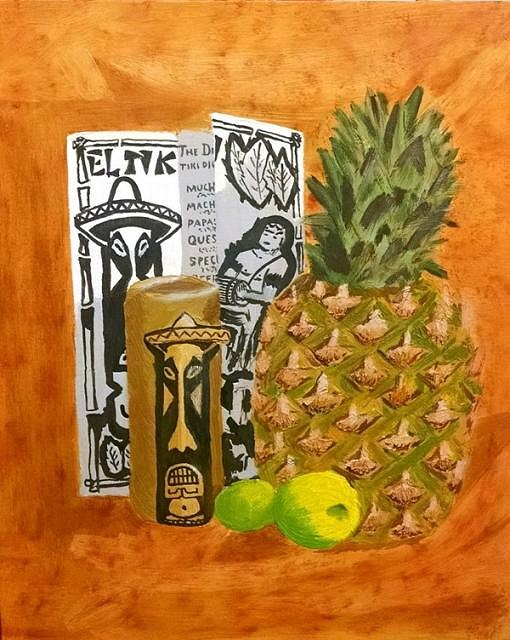
Thank you Hilda and Wendy :) Another night's work on my painting. Tonight I spent two and a half hours doing nothing but black with a little brush. That sure makes palette and brush clean-up easy! I'm learning that the proportion errors that you make early come back to haunt you later. Now there are several areas I'm not happy with :lol: |
|
D
danlovestikis
Posted
posted
on
Wed, Sep 2, 2015 1:32 PM
When I first looked at it I thought it was the set up and not your painting. The tiki mug is outstanding. It all looks good. You are showing us another amazing talent that you possess. Keep going, I am so impressed. Wendy |
|
M
MadDogMike
Posted
posted
on
Thu, Sep 3, 2015 6:36 AM
Thank you Wendy. There are several places I am not happy with but overall I thinks it's not bad for a first try at real painting. We still have 4 class sessions to work on it (about 10 painting hours) - I might be able to fix some of those areas or else mess it up really bad! :lol: |
|
M
MadDogMike
Posted
posted
on
Thu, Sep 3, 2015 9:49 PM
Added some writing on the inside of the menu and worked on the pineapple a bit. Decided I really didn't like the mug, the proportions were all off. So I covered the center and will hit it again Thursday :lol: |
|
D
danlovestikis
Posted
posted
on
Fri, Sep 4, 2015 12:10 AM
I love step by step paintings. This is a real fun one. I think you are doing a wonderful job. It will be fun to see how you improve the mug, especially since we have one, thank you. Wendy |
|
M

MaukaHale
Posted
posted
on
Fri, Sep 4, 2015 5:43 AM
It looks good. Its starting to get some definition! |
|
M
MadDogMike
Posted
posted
on
Tue, Sep 8, 2015 10:00 PM
Thank you Wendy & MaukaHale
|
|
T
TikiAno
Posted
posted
on
Wed, Sep 9, 2015 3:36 PM
Go Mike go! Or, shall I call you, "MadDog Mikelangelo"? Great painting- no surprise there, ya big show off. :) :) |
|
M
MadDogMike
Posted
posted
on
Thu, Sep 10, 2015 8:43 PM
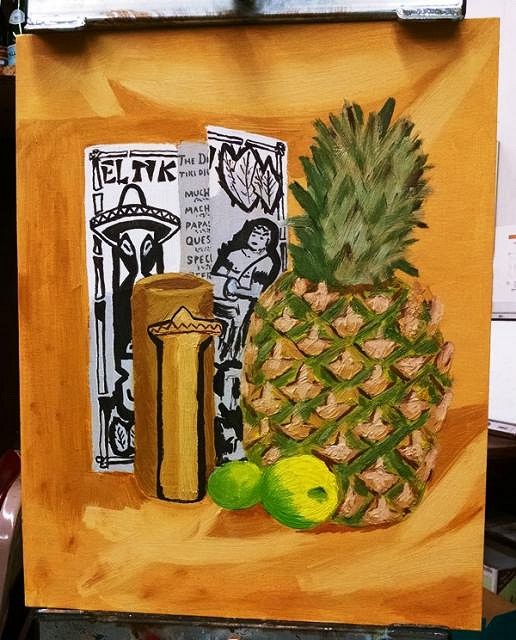
"MadDog Mikelangelo" :lol: Thanks TikiAno! All in all, I'm not severely disappointed with my first painting, that's not so bad :D I guess the nice thing about a class is that it helps you determine when you're "done". I was officially done with this painting by the end of tonight's class. Plenty of things I don't really care for (the small floating lime, for instance), but I'm not sure adding any more paint would fix them
When you hurry through life, you just get to the end faster. [ Edited by: MadDogMike 2015-09-10 20:45 ] |
|
Z

zerostreet
Posted
posted
on
Fri, Sep 11, 2015 4:16 PM
Nice Job Mike! I think a touch of shadow underneath those limes would help ground them :D But really, nice job for a first painting! |
|
M
MadDogMike
Posted
posted
on
Wed, Sep 16, 2015 11:02 PM
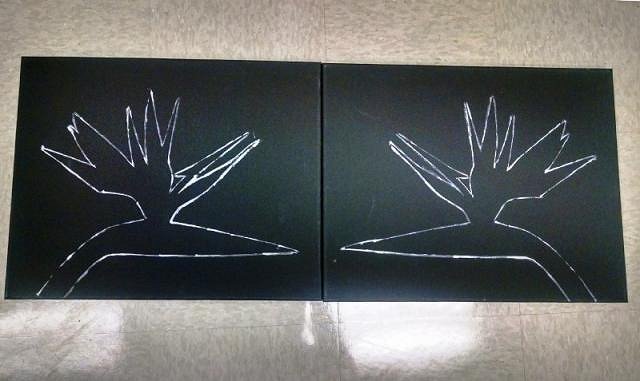
Thanks Robert, I will try adding a bit more shadow. Next project - we are supposed to pick a subject from nature and paint it, then do the same subject on another canvas with a color shift - complimentary colors, monochrome, etc. I wanted to do mirror images on black canvas. So that they will be close to identical in form I cheated a bit - I sketched out the flower on posterboard, cut it out, and traced it to my canvases. Hope I don't get it too much trouble with my instructor over that :lol:
|
|
D
danlovestikis
Posted
posted
on
Thu, Sep 17, 2015 3:30 AM
I think small tricks that speed things up or make them uniform, etc. etc. are wonderful. This is fun, Wendy |


Pages: 1 2 3 4 5 6 7 8 9 10 11 12 13 14 15 16 17 18 19 20 21 22 23 24 25 26 27 28 29 30 31 32 33 34 35 36 37 38 39 40 41 42 43 44 45 46 47 48 49 50 51 52 53 54 55 56 57 58 59 60 61 62 63 64 3035 replies