Pages: 1 2 3 4 5 6 7 8 9 10 11 12 13 14 15 16 17 18 19 20 21 22 23 24 25 26 27 28 29 30 31 32 33 34 35 36 37 38 39 40 41 42 43 44 45 46 47 48 49 50 51 52 53 54 55 56 57 58 59 60 61 62 63 64 3,035 replies
|
C

cy
Posted
posted
on
Fri, Sep 14, 2018 12:09 PM
Great new works Mike, the skull is killer! |
|
H

hang10tiki
Posted
posted
on
Fri, Sep 14, 2018 8:37 PM
I like it |
|
M

MadDogMike
Posted
posted
on
Sun, Sep 16, 2018 2:03 PM
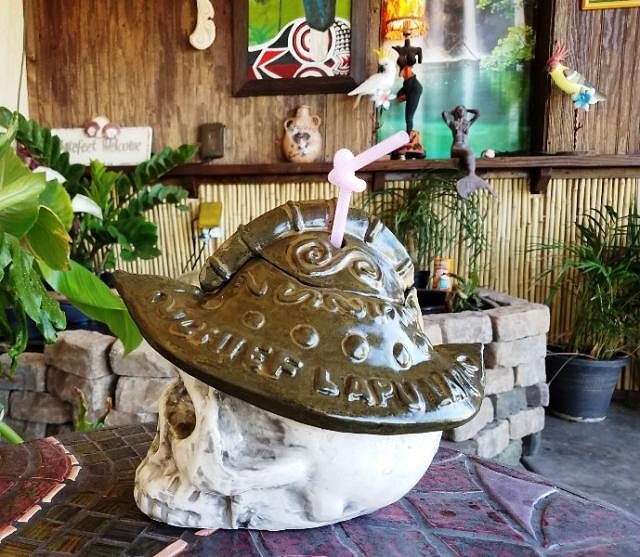
The Chief Lapu Lapu survived the kiln |
|
H
hang10tiki
Posted
posted
on
Sun, Sep 16, 2018 4:26 PM
Outstanding Mike |
|
S

swizzle
Posted
posted
on
Sun, Sep 16, 2018 6:14 PM
Looks good Mike. Did the helmet glaze end up the colour you wanted after re-firing? |
|
M
MadDogMike
Posted
posted
on
Sun, Sep 16, 2018 7:14 PM
Thanks Jon & Robbie. No, the color didn't really change any. I was hoping for some glaze breaks but they didn't happen. Still a nice color that looks like old, aged bronze. |
|
H
hang10tiki
Posted
posted
on
Sun, Sep 16, 2018 7:24 PM
When will the 1st cocktail be poured??? |
|
M
MadDogMike
Posted
posted
on
Sun, Sep 16, 2018 7:45 PM
There was one in there for the pic, quite tasty :D Chief Lapu Lapu |
|
M
MadDogMike
Posted
posted
on
Sat, Sep 22, 2018 7:19 PM
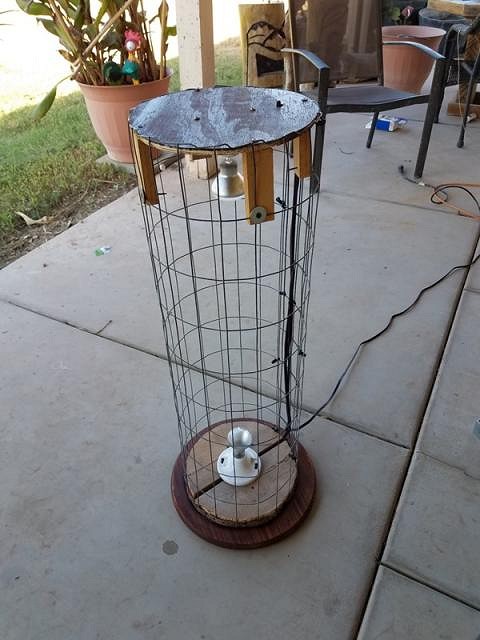
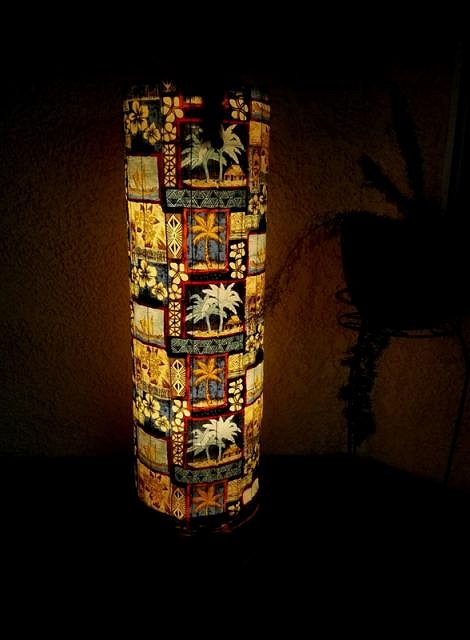
I made a Tiki floor lamp today. I made a column 12 inches across and 3 feet tall out of fencing wire. I gave it a 45 watt floodlight top & bottom and added a dimmer switch. Then slid a Tiki fabric sleeve over it. I can swap out the fabric sleeve to fit my mood or season if I want.
|
|
H
hang10tiki
Posted
posted
on
Sat, Sep 22, 2018 7:53 PM
Drink- good |
|
WC

Will carve
Posted
posted
on
Sun, Sep 23, 2018 5:48 AM
That's real cool with |
|
H

hiltiki
Posted
posted
on
Sun, Sep 23, 2018 8:48 AM
Love it. |
|
M
MadDogMike
Posted
posted
on
Mon, Oct 8, 2018 8:53 AM
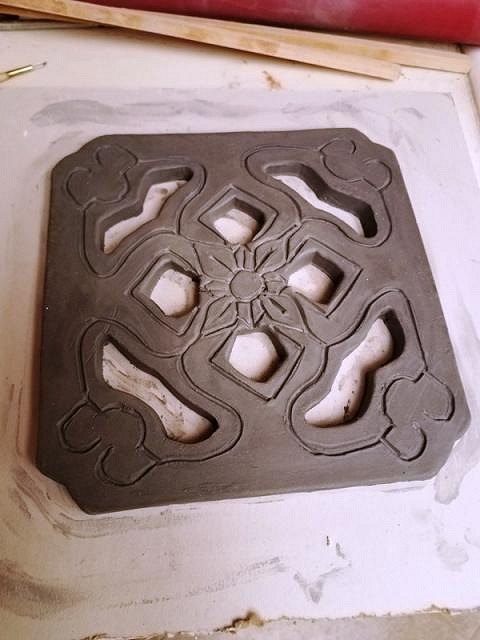
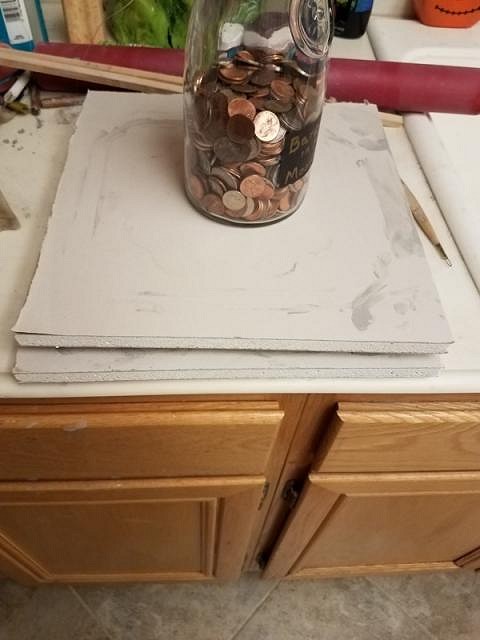
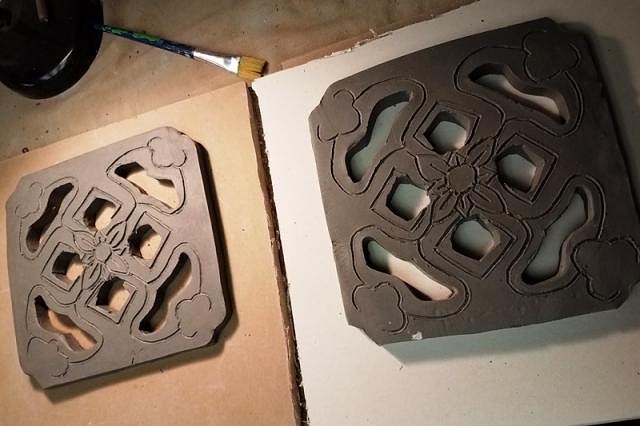
Thanks guys :D New project - I want some jade Chinese tiles but I don't want to pay $100 each for them and I need some 8 inch tiles instead of the standard 12 inch tiles. I've got a white wall, I want to cover some of it with more wood paneling & bamboo and I want to put tiles over the window. I made a template for the outside and the cut-outs, rolled out a slab of clay, and cut around the template. Then I engraved the lines in. The lines are all done freehand so they are not perfectly symmetrical but that's OK I put the tile between two pieces of wallboard with a weight on top to dry. It's supposed to help prevent warping and let it dry flat. If it works out I'll need to make several more. |
|
BB

Bam Bam
Posted
posted
on
Mon, Oct 8, 2018 10:58 AM
Nice! And, love the floor lamp. I'll have to remember that when I have the space. |
|
PP

Prikli Pear
Posted
posted
on
Mon, Oct 8, 2018 11:49 AM
Very cool, Mike! I will be watching to see how this tile experiment goes. I've just come to the realization that I need 6-8 for a project in the Lagoon. Alas, there are no very old Chinese restaurants near me sporting jade tiles slated for demolition in the near future. |
|
H
hang10tiki
Posted
posted
on
Mon, Oct 8, 2018 1:31 PM
Sweet Always thinking Can’t wait |
|
H
hiltiki
Posted
posted
on
Mon, Oct 8, 2018 4:08 PM
Clever idea to make your own, I have always liked the not so perfect artwork. |
|
M
MadDogMike
Posted
posted
on
Sat, Oct 13, 2018 7:44 PM
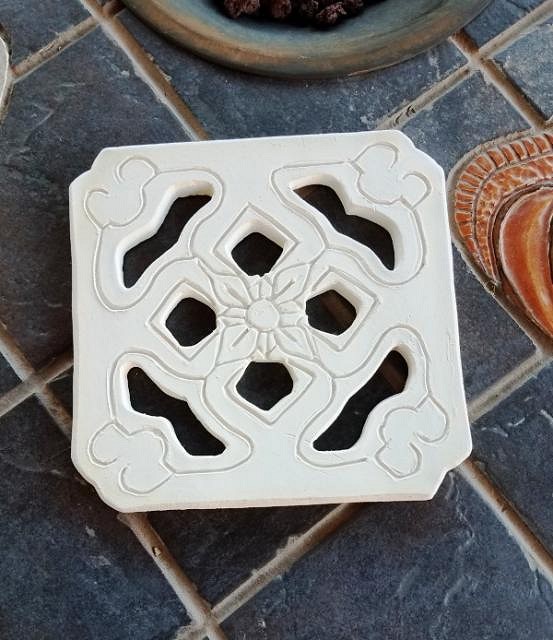
Thanks guys! Jayme, those tiles are available on e-Bay but they don't come cheap :( Bisque firing came out well. I'm waiting for some firing supplies to come in so I won't be able to glaze fire for a week. Time to start cranking out 5 more. |
|
H
hang10tiki
Posted
posted
on
Sat, Oct 13, 2018 8:14 PM
U stud |
|
D

danlovestikis
Posted
posted
on
Sun, Oct 14, 2018 7:12 AM
What fun to see what you are up too. The lamp is so well done with it lit from top to bottom. The tiles are terrific and using wall board so that they would dry throughout was a brilliant idea. You rock all your projects. Wendy |
|
M
MadDogMike
Posted
posted
on
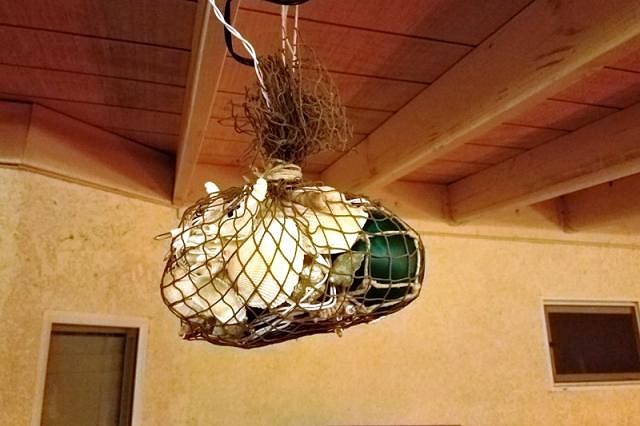
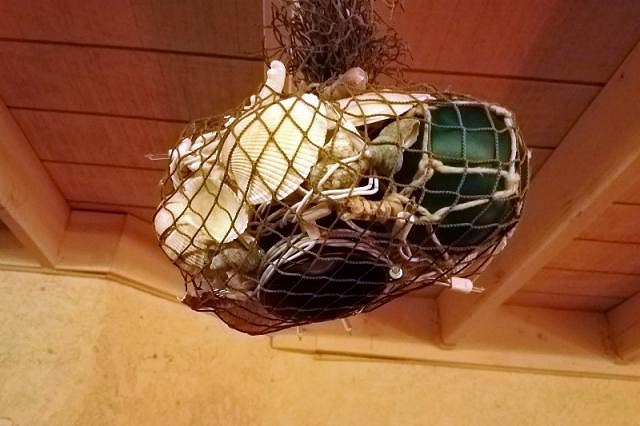
Mon, Oct 15, 2018 9:43 PM
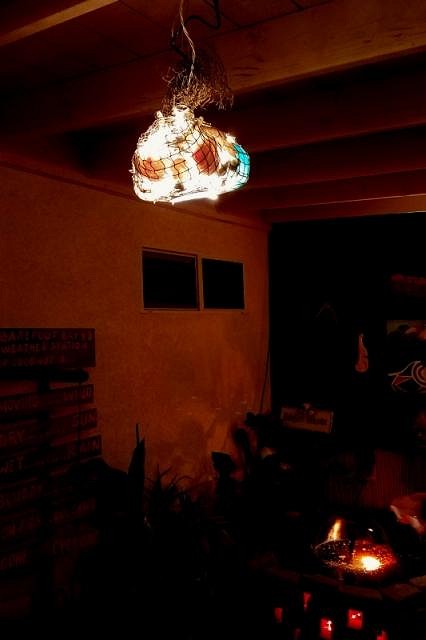
Thank you Jon and Wendy. I've been having fun being creative again, haven't been doing enough of that recently. Built a lamp tonight, a net full of shells with a blue fish float. It it lit with a string of white Christmas lights, also has a can light in the center pointing down. I also found out that lamps can be difficult to photograph
|
|
D
danlovestikis
Posted
posted
on
Tue, Oct 16, 2018 9:07 AM
Wow, I can see these becoming the rage. They'll be showing up in homes around the world. This is a wonderful creative idea. You are such a treasure. Wendy |
|
C
cy
Posted
posted
on
Tue, Oct 16, 2018 5:59 PM
Another cool light Mike! |
|
M
MadDogMike
Posted
posted
on
Wed, Oct 17, 2018 10:18 AM
Thank you Wendy and Cy 2 more tiles in the works. I'm not sure how a mold would work out for these? Because they are not hollow I don't think a slip mold would work. I suppose you could make a giant sprig mold but it might be hard to get the tile out. I am thinking about some sort of a stamp for them. Maybe Plexiglas base with puff paint or smooth cord glued to the Plexiglas. Plexiglas would allow alignment on the clay and you can set the Plexiglas over a printed paper to make the lines. Roll out the clay to desired thickness, set the stamp on top, press it down to make the impressions, remove the stamp, cut out on the marks, clean up and done. Might work. I could use this technique to make my little jade tile coasters I have always wanted :D
I just found out that MD 20/20 stands for Mogen David and not for Mad Dog. My TC name AND my teenage years are a sham :( [ Edited by: MadDogMike 2018-10-17 10:27 ] |
|
PP
Prikli Pear
Posted
posted
on
Wed, Oct 17, 2018 1:39 PM
That looks great, Mike! I'm not moldmaker/sculptor, but these are so small, couldn't you just do a slip mold and let the slip solidify all the way through? I know Horror In Clay is doing full-size tiles using resin in molds. Not sure what's involved with that, though. |
|
M
MadDogMike
Posted
posted
on
Thu, Oct 18, 2018 6:51 AM
Thanks Jayme! Cheeky Tiki in the UK is making and selling them, I'm sure they are using a mold of some sort but I don't know what. With slip casting, the slip had quite a bi of water in it. As it dries and the water is absorbed into the plaster, the remaining clay takes up less volume (shrinks). You would have to top off the mold a couple of times as it dried. I think you could not have straight sides on the tiles, the mold would need to be tapered a bit (larger at the top than at the bottom) Resin could be a good solution, they are usually cast in flexible silicone molds. It would look a little different, a little monotone. Ceramic glaze thins over the high spots and pools in the low spots giving it color variation and shading. |
|
D
danlovestikis
Posted
posted
on
Thu, Oct 18, 2018 8:09 AM
You are MadDogMike and no other connection has ever entered my mind. I could never just call you Mike. Wendy |
|
H

Hamo
Posted
posted
on
Thu, Oct 18, 2018 6:51 PM
Can't wait to see how your tiles turn out, Mike. And I agree about the coaster idea; it looks incredible in that picture. So if you ever figure out how to mass produce your own, count me in.... |
|
M
MadDogMike
Posted
posted
on
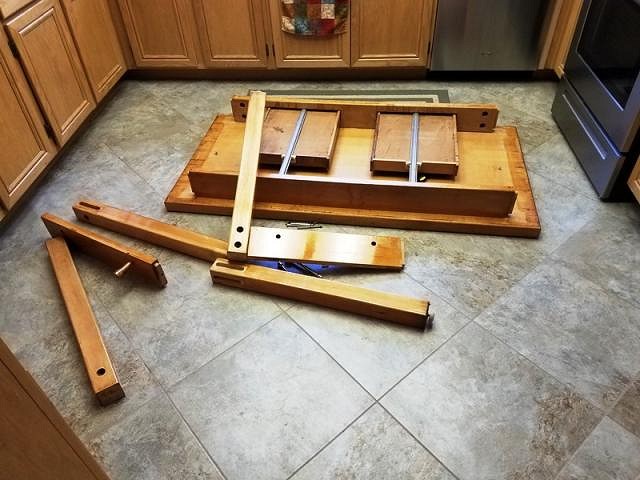
Sun, Oct 21, 2018 4:16 PM
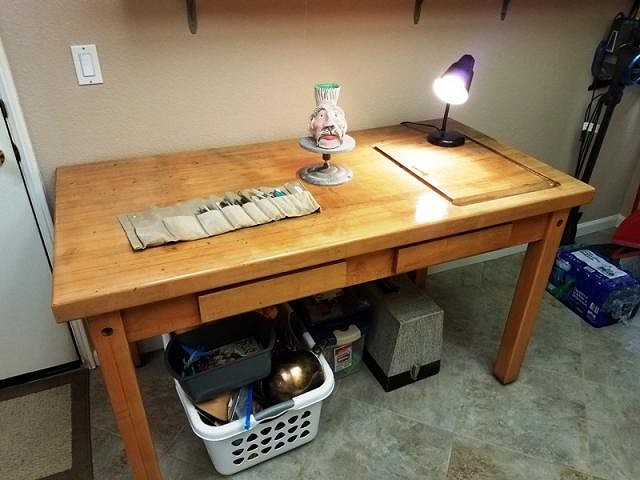
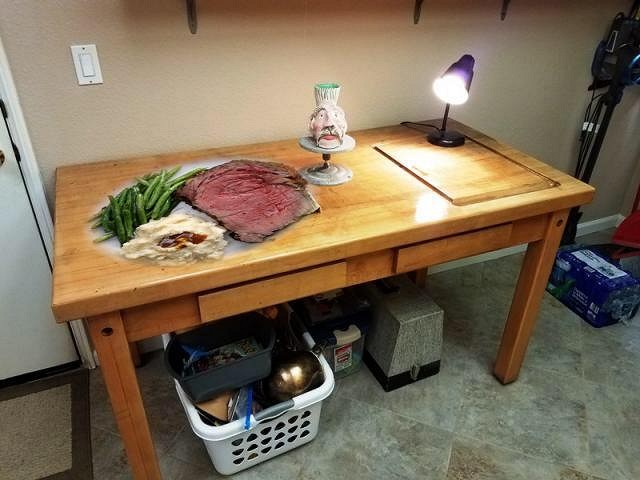
Wendy, I am honored to be MadDog :D Clay Table! No, not a table made out of ceramic. A table to do clay on :lol: Someone gave me a maple block table a few years back but it was pretty weathered. Then I used it outside as a workbench which didn't help it any. But it was perfect for clay work - good height and solid wood. So I sanded it down and re-finished it. Of course it wouldn't fit through the door so I had to tear it apart :lol: It even has a carving station at the far end in case I want to nibble on Prime Rib while I play with clay :wink: |
|
D
danlovestikis
Posted
posted
on
Sun, Oct 21, 2018 7:21 PM
You really made the table look good. A perfect workspace. Wendy |
|
H
hang10tiki
Posted
posted
on
Sun, Oct 21, 2018 8:35 PM
Tiles Looking good Man Man Time for a meal
|
|
M
MadDogMike
Posted
posted
on
Mon, Oct 22, 2018 7:45 PM
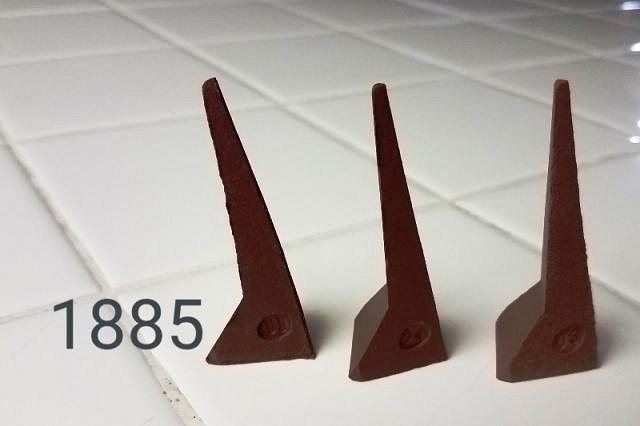
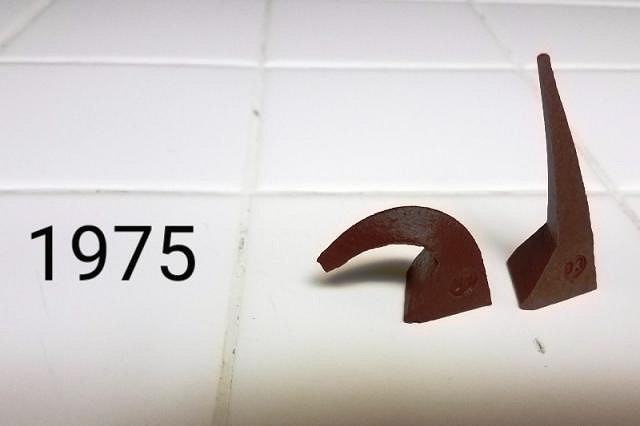
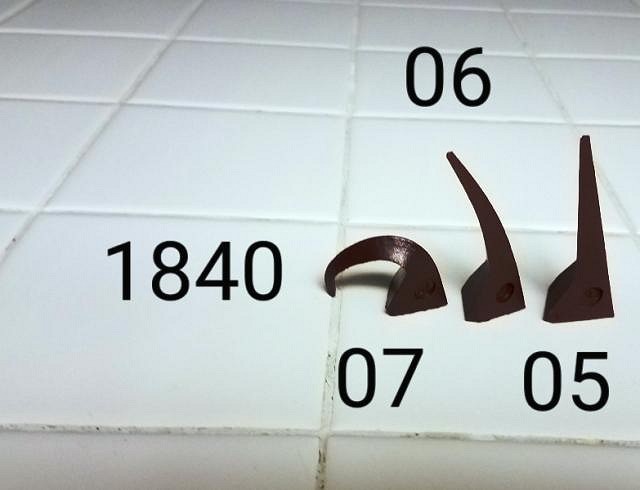
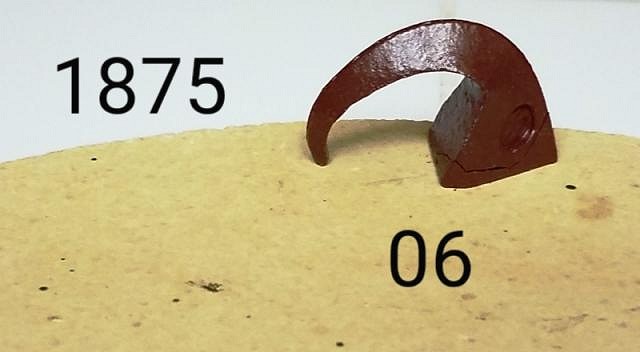
Thanks Wendy. Jon, you got PS skilz!!! :o Here's the deal - I WANT a new $1000 kiln. I guess I could AFFORD a $1000 kiln. But I just cant JUSTIFY a $1000 kiln because ceramics is just a hobby for me :lol: My KilnSitter (that turns off the kiln when it's hot enough) isn't working so I have been using a pyrometer (thermometer). But the last few items I fired developed hundreds of little holes in the glaze. I suspected the bisque firing wasn't hot enough and didn't drive out all the gasses. Then when I glaze fired it continued to release gas causing the bubbles. So I tested my theory with some Orton cones. I have been firing to 1800F for Cone 04. With 05, 04, and 03 cones, the middle cone (04) should have bent down and the tip touched the kiln floor. But at 1885F, the coldest cone (05) is just starting to soften. Sure enough, the kiln was too cold So I bumped it up to 1950F and it fired to a perfect Cone 05, but still a little too cold I put in my 2 new tiles and fired to 1975. Perfectly fired at Cone 04 (the tip of the 04 was missing to start, I didn't put in an 05 because I already knew it would melt at 1975F). If everything remains constant, that should be a good temp to fire to. One of the tiles cracked in the kiln. I'm patching it with some Magic Mender and will glaze them soon. You can see three more Orton cones in the middle, 07, 06, and 05. Will use those to test my 06 glaze temperature. |
|
T

tikiskip
Posted
posted
on
Wed, Oct 24, 2018 7:05 AM
"As majestic as the cascading waters of a drain pipe, MD 20/20 is bottled by the 20/20 wine company in Westfield, New York. This is a good place to start for the street wine rookie, but beware; this dog has a bite to back up its bark. MD Stands for Mogen David, and is affectionately called "Mad Dog 20/20" "I WANT a new $1000 kiln. I guess I could AFFORD a $1000 kiln. But I just cant JUSTIFY a $1000 kiln" My Mom used to say we don't work for what we need, we work for the things we want, if we only worked for what we need that would be a pretty sorry life. Always thought you being called Mad Dog was like calling Mickey Rooney Bad a$$ Mickey. |
|
D
danlovestikis
Posted
posted
on
Wed, Oct 24, 2018 7:24 AM
Hi MDM, I've had a few pieces where the glaze got holes from bubbles. Mine happened because the glaze was still damp and the water boiled. I always have a 20 minute hold at the end of my bisque fires for maximum shrinkage. Anyway I just put on more glaze let it dry completely and fired it again and it would come out perfectly. You can save your art! Wendy |
|
M
MadDogMike
Posted
posted
on
Wed, Oct 24, 2018 9:54 AM
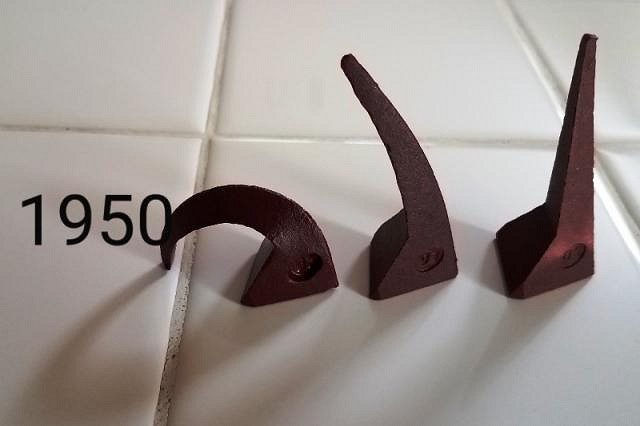
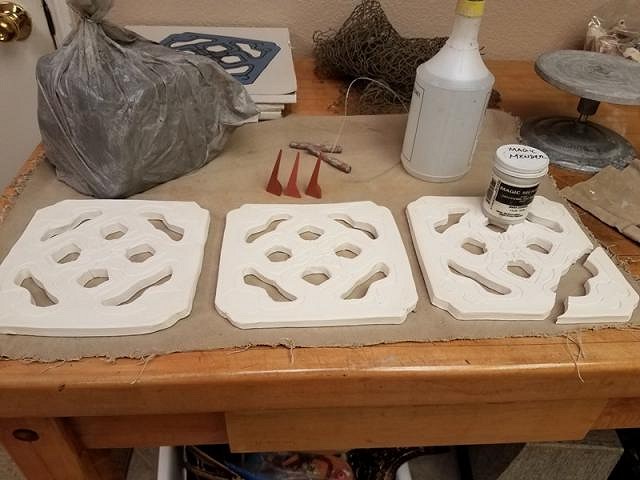
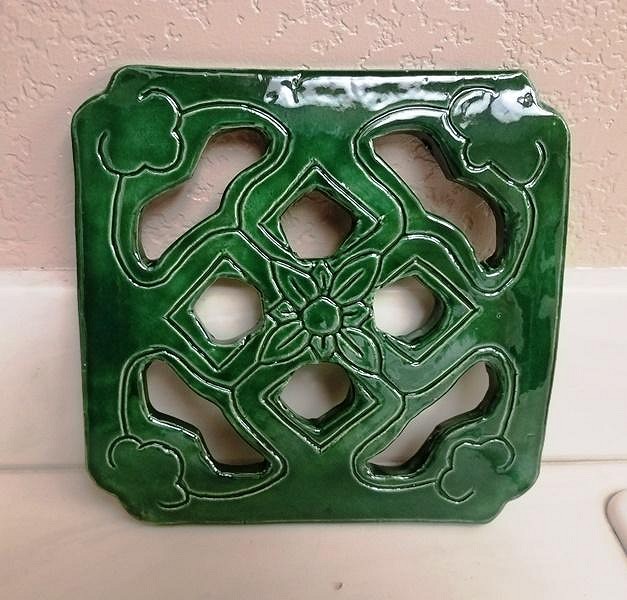
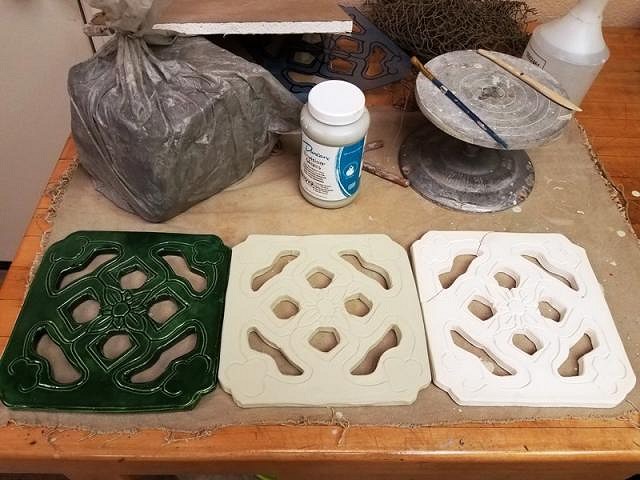
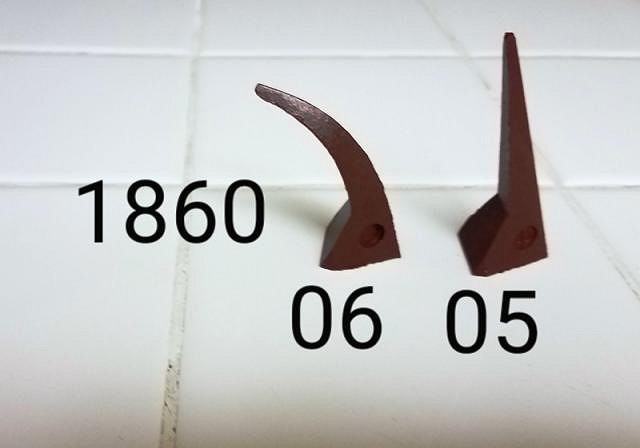
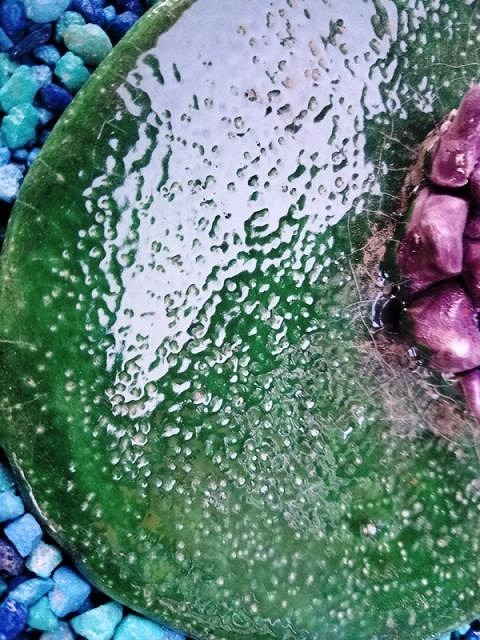
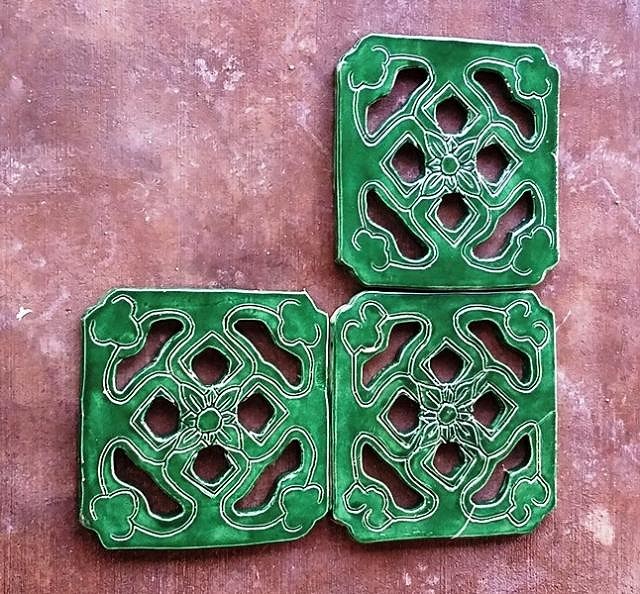
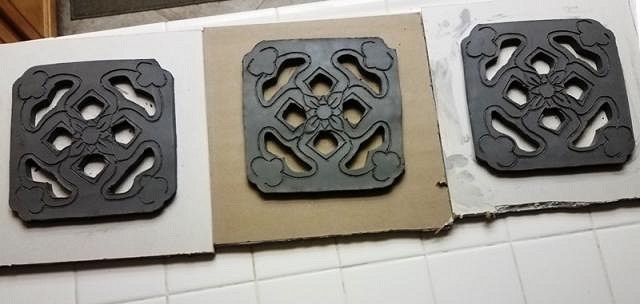
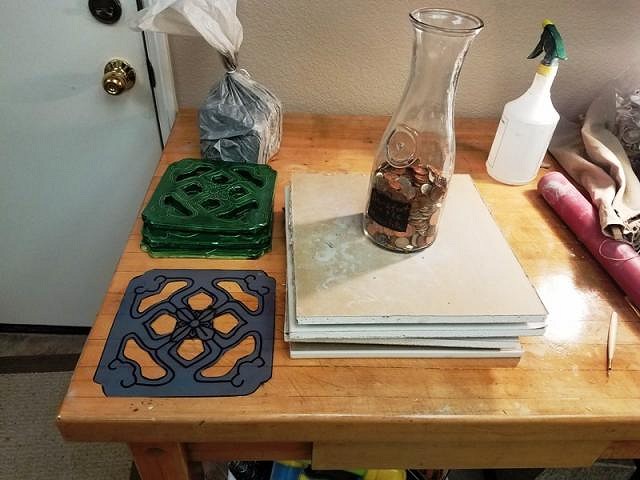
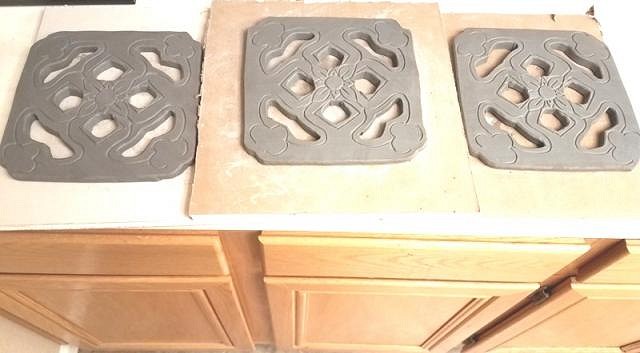
That is Profound! I like it, your mom was a pretty smart cookie "Always thought you being called Mad Dog was like calling Mickey Rooney Bad a$$ Mickey. Now I get it." :lol: :P :wink: Wendy, these bubbles were EXTREME - I'll post a pic later. My last firing went well, hopefully I have figured out now One tile DONE!!! 7 more to go Here's all eight tiles. One done, one glazed but not glaze fired, one bisque fired but not glazed, and 5 still as clay in the bag :lol: More kiln nerd stuff: When I glaze fired the tile above, I put in 06 and 05 cones. At 1860, it was still not quite hot enough for 06. Next firing I'll go to 1875 and it should be just about perfect |
|
H
hiltiki
Posted
posted
on
Wed, Oct 24, 2018 12:12 PM
Love your green tile, came out great. |
|
H
Hamo
Posted
posted
on
Wed, Oct 24, 2018 10:06 PM
Wow; great job, Mike. That tile looks like the real thing. |
|
M
MadDogMike
Posted
posted
on
Thu, Oct 25, 2018 1:59 PM
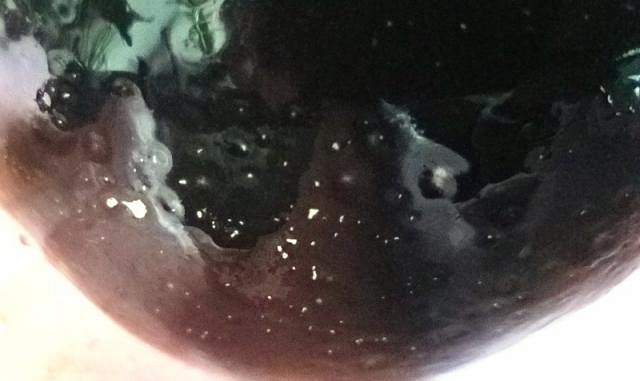
Hilda and Hamo thank you. I think I have it dialed in, now to crank out 5 more! The other 2 are glaze firing in the kiln right now Wendy, these are the bubbles I was talking about - thousands of tiny bubbles. Those are good in your wine but not so much in your glaze :lol: I'm pretty sure it was caused by bisque firing too low. Didn't have any trouble on this last tile. |
|
D
danlovestikis
Posted
posted
on
Thu, Oct 25, 2018 3:02 PM
I had those bubbles show up on the inside of a Tiki Bob bowl. I just added more glaze and fired again and they all disappeared. It's worth a try. Wendy |
|
H
hang10tiki
Posted
posted
on
Thu, Oct 25, 2018 7:43 PM
Mad Dog- great tile As far as all the kiln technology with the Orca dorsal fins
|
|
M
MadDogMike
Posted
posted
on
Fri, Oct 26, 2018 11:27 AM
3 done, either 3 or 5 to go. The Magic Mender repaired crack shows on the bottom right but that's OK - It looks like it's 100 years old Jon, those Orca fins are actually the antithesis of "kiln technology". They were developed in the 1800s for when you don't have a high tech kiln :lol: But this fired just about right, I think I'm good now. |
|
D
danlovestikis
Posted
posted
on
Fri, Oct 26, 2018 12:00 PM
The tiles are so cool and the crack is fun. Good job. Wendy |
|
H
hang10tiki
Posted
posted
on
Fri, Oct 26, 2018 7:05 PM
Ohhhhh So this is good
But
|
|
D
danlovestikis
Posted
posted
on
Sat, Oct 27, 2018 6:50 AM
hang10tiki Ouch! |
|
M
MadDogMike
Posted
posted
on
Mon, Oct 29, 2018 1:07 PM
Working on another batch, decided to time myself to see how much time I actually spend on them. Do you ever do that Wendy? So far I'm at about 50 minutes to roll, cut, and engrave 3 tiles. Still some clean-up to do, bisque firing, glazing, and glaze firing. I suspect I will end up about 45-60 hour each to make these, not too bad.
|
|
D
danlovestikis
Posted
posted
on
Mon, Oct 29, 2018 3:47 PM
These are so cool. I have never written down the number of hours until this past week. I could guess though. I started a new black velvet. I am writing down my start and stop times and how long that is. I will add it up at the end. |
|
M
MadDogMike
Posted
posted
on
Mon, Oct 29, 2018 6:42 PM
Wendy, in our hearts I think we don't want to know how much we spent on a project. Since I am just doing it for fun, it doesn't matter much. On a commission I would be afraid I end up making 50 cents an hour :lol: I guess this is as good as a place as any to keep track of my time since I can't lose it posted here :D
|
|
D
danlovestikis
Posted
posted
on
Mon, Oct 29, 2018 7:07 PM
How many can you fire at a time? |


Pages: 1 2 3 4 5 6 7 8 9 10 11 12 13 14 15 16 17 18 19 20 21 22 23 24 25 26 27 28 29 30 31 32 33 34 35 36 37 38 39 40 41 42 43 44 45 46 47 48 49 50 51 52 53 54 55 56 57 58 59 60 61 62 63 64 3035 replies