Pages: 1 2 3 4 5 6 7 8 9 10 11 12 13 14 15 16 17 18 19 20 21 22 23 24 25 26 27 28 29 30 31 32 33 34 35 36 37 38 39 40 41 42 43 44 45 46 47 48 49 50 51 52 53 54 55 56 57 58 59 60 61 62 63 64 3,035 replies
|
M

MadDogMike
Posted
posted
on
Wed, Oct 8, 2008 7:07 AM
Looks like the repair worked! Mixed ground up, bisqued porcelain (same as the mug) with enough glaze to make a thick paste and pushed it into the crack. When dry, I painted one more coat of glaze over it and fired it again. The porcelain powder doesn't shrink since it's already fired and the glaze serves as a flux. I borrowed a kilowatt-hour meter from my electric utility company to determine my firing cost. The good news is that a 5 hour glaze run cost me about 60 cents! (4.6 kWh x $0.13) Good thing it's cheap, I've logged 25 firings since July. The bad news is that it melted the $200 meter! We'll see how that goes when I return it today :lol: [ Edited by: MadDogMike 2008-10-08 09:54 ] |
|
M
MadDogMike
Posted
posted
on
Sat, Oct 11, 2008 6:21 AM
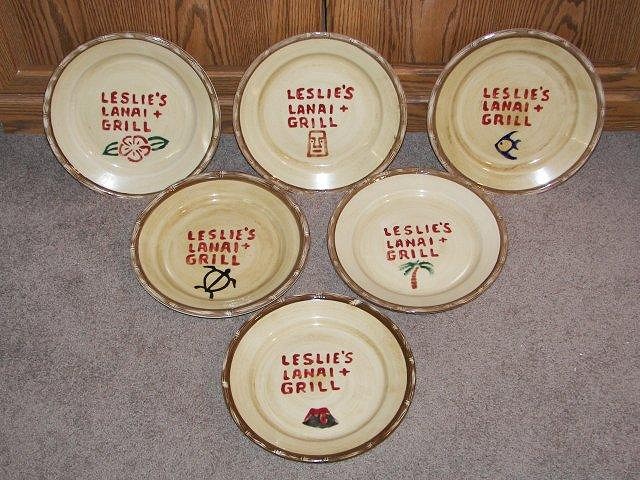
I picked up some dollar store plates with a bamboo/wood border for a buck each. Then decorated them with glaze and fired them, now my wahine has personalized plates for her lanai. There's a hibiscus, tiki, fish, honu, palm tree, and volcano. The weather is getting nice here in the desert, it's getting time for dinner on the lanai.
|
|
M
MadDogMike
Posted
posted
on
Mon, Oct 13, 2008 8:32 PM
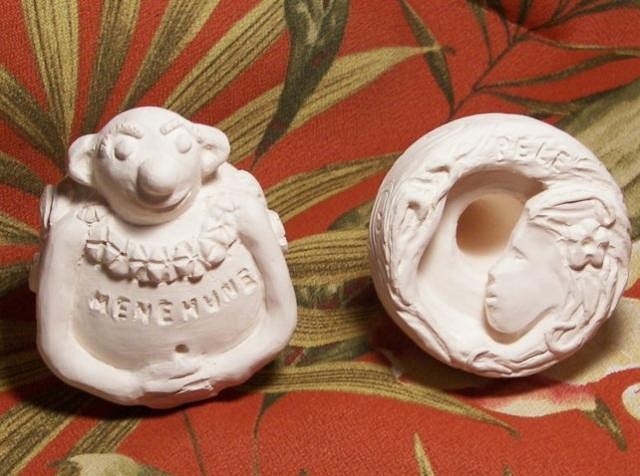
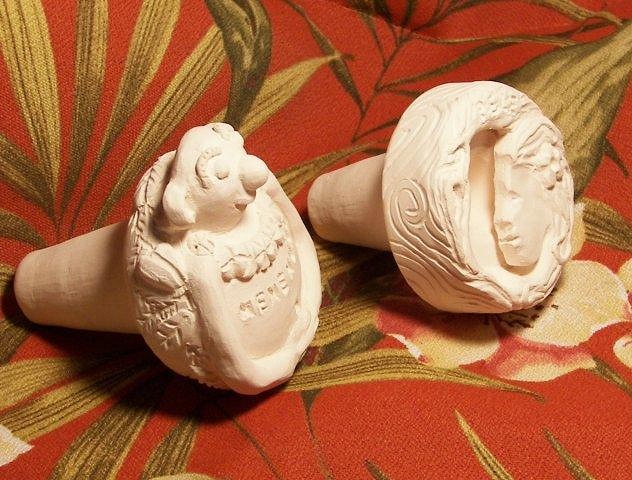
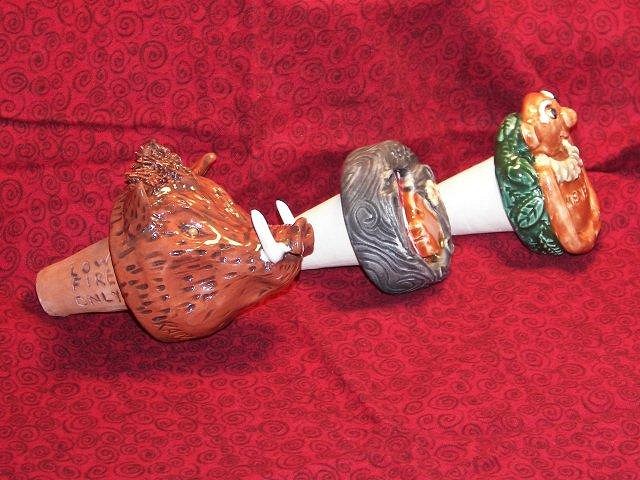
I was intrigued with the concept of kiln gods/kiln watchers. Who better for a kiln goddess than Pele, the volcano goddess? And while I was at it I made a Menehune (Hawaiian leprechaun). These are made of high fire Coleman porcelain, already low-fire bisqued. I think I will high fire them then low fire glaze them, just because I have low fire glazes and am familiar with them. Maybe if they turn out good I'll submit them for Skutt's Peep Plug Show :)
|
|
B

BeezleBug
Posted
posted
on
Wed, Oct 15, 2008 9:54 PM
Cool ideas. Were there any issues with firing the plates since they were already glazed and fired a long time ago? Also, I'm curious to hear what kind of kiln you're using. Seems like they're all crazy-expensive. |
|
M
MadDogMike
Posted
posted
on
Thu, Oct 16, 2008 2:04 PM
Beezlebug, I had one plate out of 7 crack during firing, other than than there were no problems. They had glaze on the bottom so I had to put them on a "stilt" and I had to fire them one at a time (but my firing cost is only 60 cents) My kiln is an 110 volt Olympic 129 which means it's 12 inches wide and 9 inches deep. It's a little small but it will fit 9 mugs at a time (about soda can diameter). Plus I don't have to wait two months to get a kiln full. I bought it used for $150. Check craigslist or find potters in your area and ask around. Many people start out with a small kiln and then either quit doing pottery or else buy a bigger one so they want to sell one. Good luck and HAVE FUN :) |
|
C

Cammo
Posted
posted
on
Fri, Oct 17, 2008 7:21 AM
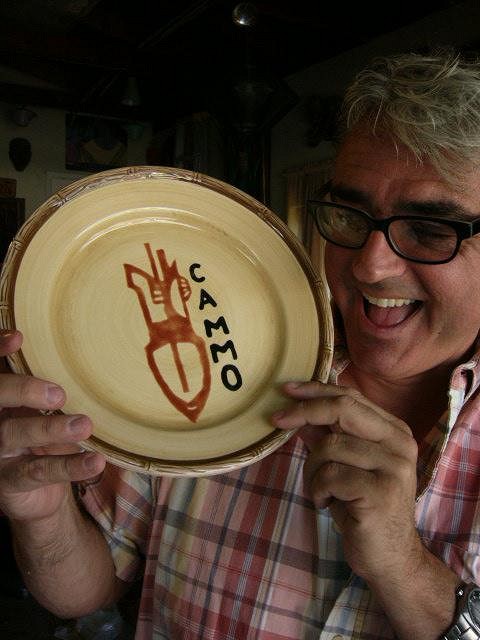
Holy Coco-Nuttio, these are GREAT!!!!! You dog you! How cool is it to munch off these??? This is the greatest idea I've seen for a long time on TC! And the little kiln guys are so cool, too, great thinkin' guy!
|
|
B

Babalu
Posted
posted
on
Fri, Oct 17, 2008 10:31 PM
Yeah Mad Doggie! Them peep hole plugs are the coolest brother! I can see some amazing progress in you my friend. I sure wished we were both going to NCECA...the work you would see there would just blow your mind. I would love to show you around one of these conventions. Maybe next year...yeah, maybe next year you and I should fly. |
|
C

coruscate
Posted
posted
on
Fri, Oct 17, 2008 10:59 PM
Nice peep hole plugs! Going back a few threads about the crack. That sure looks like an S crack. This is way more common on wheel thrown stuff where you work wetter while spinning the clay than with slip cast or hand built. If you get a section real wet, especially when working and smoothing with wet fingers or an elephant ear sponge, you expand the volume of the clay when adding the water to it. When it dries it shrinks in volume because the water has left, leaving the S crack. The best way to avoid this on your hand built is to wrap it snug in light plastic (like dry cleaners use)and keep it out of the light. It slows down the drying, but more important it equilabrates the moisture throughout the peice AND then it slows down the drying. This way you don't have things shrinking at substantially different rates which results in different adjacent volumes that pull and stretch and sometimes crack. Also, it doesn't hurt to post a kiln god with a good vibe on your firing :) |
|
L

Liana
Posted
posted
on
Sat, Oct 18, 2008 12:24 AM
Okay, this is going to sound real dumb.. what are those peep plug thingies?..How do you use them?.. What do they do?.. Liana. |
|
M
MadDogMike
Posted
posted
on
Sat, Oct 18, 2008 8:52 AM
Cammo, Babs, Coruscate thanks for the words of encouragement. You guys ROCK! I want to glaze the kiln plugs NOW but need to wait until they are high fired (see note about patince below) Cam, you've go some wild stuff bisqued, can't wait to see it glazed. I'd love to check out the NCECA, maybe one year soon it will be in SD or LA. I hope they don't do a bunch of abstract "art" stuff where they thow a gob of clay against the wall and call it art. :lol: (I'm not real big into abstract, my art teacher and I have been having discussions about that) Coruscate, that sounds like the voice of experience. I like the explaination about the moisture equilibrating, that makes sense. Yes, I did allow it to dry too fast - I'm am trying to learn patience but it takes so damn long to learn :D Liana - kilns have holes in the side to allow moisture to escape and various other reasons. They are plugged with a kiln plug during portions of the firing. The stock plugs are rather boring, this is just an effort to make them a little more intersting. Plus, the kiln gods attached to the plugs help watch over the items in the kiln to help prevent accidents and breakage (ancient Japanese tradition) |
|
C
coruscate
Posted
posted
on
Sat, Oct 18, 2008 10:38 AM
Glad to offer some help, you're doing great stuff. I come at this knowledge through doing lots of wheel thrown and hand built work as a potter--but I apprenticed under two potters who were very experienced and generous with their knowledge and feel oblidged to share. So, I hope this isn't too long, but here is some more clay knowledge sharing: I forgot to note that if the clay gets really wet it starts to separate naturally and "slake" appart. You probably heard this before, but it really helps to wedge your clay thoroughly so that natural alignments of the minerals through gravity and chemistry are mixed and also homogenized, as are the dry and wetter spots from the inside to the outside of the clay lump and any air pockets are usually compressed or released (air bubbles = bad)when wedged properly for mixing and de-airing. Also, having thin walls that come down to thick bottoms means things dry at different rates and heat up and cool down at different rates and this can be too much for the clay and crack at the intersection of thick and thin to release the tension. When I throw a pot, the base is almost always thicker than the walls, so while it is still leather hard I trim a foot into it. The trimmed foot helps it suffer less stresses by making the base a similar thickness to the walls (therefore similar drying/shrinking rate) and the foot also adds functionally and aesthetically to the pot sitting level on a table. You might look at your hand built pieces the same way and trim out a foot or remove little plugs of clay, or simply poke a few holes out of the users view so that the thick areas dry and heat more similarly to the thin areas. One of the wettest things I do is pull handles. If the clay is well wedged, then I can pull and stretch (like milking an extrusion) the clay and it still doesn't come apart. If you don't have the luxury of a cool damp greenware room, wrapping the newly made wetter handle attached on a slightly drier mug tightly with a bit of light plastic helps the moisture between two clay parts that are joined together equilabrate and stay together through the firing When in the firing, the goal is to get the clay near vitreous. Kinda like a cube of velveeta cheese in the microwave. You want to get it so hot that it melts, but not so hot that it changes its shape and slumps or pools. Because clay is very flexible in this vitreous state, stress or tension in the clay tends to try to relax itself like a tired stretched muscle in a hot tub. Quickly and forcefully spun pots tend to unwind in the opposite direction they were spun on the wheel. Clay that is stretched and joined in hand building wants to relax back in the direction opposite from how they were stretched. If the bond at the location where those two stretched pieces came together was additionally weakened by stresses from unequal volume changes due to quick drying, they tend to pull apart and crack there in the firing. Patience is not something you learn in clay work, it is thrust upon you --or else your end up with lots of Tiki-mosaic material :) P.S. --Before I forget, see if you can go to "Feats of Clay" held at the old Gladding McBean factory near Lincoln California next June, I am often blown away by the non-Tiki ceramic work that is absolutely inspiring for the creative clayworker. |
|
M
MadDogMike
Posted
posted
on
Sat, Oct 18, 2008 5:04 PM
Coruscate, great technical tips, thanks so much! Now when are you going to post some of your Tiki inspired works? :P I did a search but didn't find anything :( EDIT - I had to look up "coruscate" and "Ke nono au, e kala mua mai, i keia manawa ho'i" - nice! :) There are those few who learn from observation. The rest of us need to piss on the electric fence and find out for ourselves. [ Edited by: MadDogMike 2008-10-18 17:08 ] |
|
C
coruscate
Posted
posted
on
Sat, Oct 18, 2008 9:35 PM
Good point, I need to walk my talk eh? I appreciate the gentle kick in the butt to do that. Believe me I can't wait. For the past two years I've been listening and watching all the fantastic folks here, soaking it up and letting it influence me and only recently joined to contribute and share back. I'll post sketches in the next couple months of a series of mugs I've been thinking about. Slipcasting some mugs is my reward for finishing the final edits this month on my Masters Thesis for publishing. Also, during these troubled economic times, I bought a house last week and I will be focusing on mundane things like settling in to a new town and little things to fix before the rainy season. About the only thing remotely Tiki I've done is make an altar set for a Catholic missionary (that's a serious remote stretch to connect to Tiki, but one of my favorite cocktail is the Missionary's Downfall, obviously he will be "serving" wine in his.) Here are some pics from that project: http://www.flickr.com/photos/palustrine/sets/72157594252972923/ (There are some nice peep hole pictures in that by the way.) |
|
M
MadDogMike
Posted
posted
on
Sun, Oct 19, 2008 7:56 PM
Yeah, I hate it when responsibilities get in the way of fun :( Great looking communion set. (nice tye-dyed shirt too :D) |
|
M
MadDogMike
Posted
posted
on
Mon, Oct 20, 2008 9:38 PM
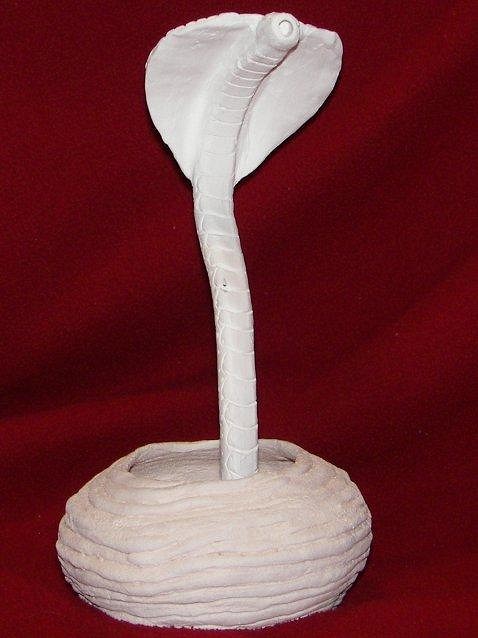
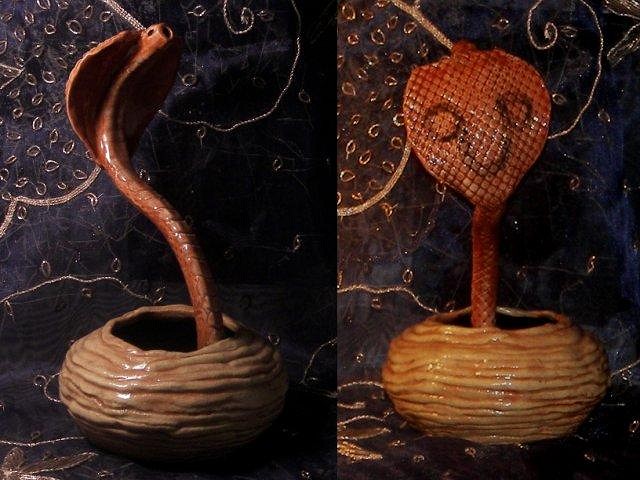
It's really not tiki, but here it is anyway. A cobra in a basket, inspired by Babalu's awesome cobra series. The cobra is hollow so you use it like a straw and suck the drink from his head! I formed the snake around a piece of cotton rope which burned out during the bisque firing. I will high fire it to vitrify the porcelain so the inside of the "straw" doesn't need to be glazed, then low fire glaze it. Will hold about 12-14 ounces. |
|
B
Babalu
Posted
posted
on
Mon, Oct 20, 2008 9:56 PM
Nice snakey there Mad Doggie! :) Dude, if you fire that clay so hot that you vitrify it...I don't think you will be able to do a low fire after. When you say vitrify...how hot are you talking? |
|
M
MadDogMike
Posted
posted
on
Tue, Oct 21, 2008 6:29 AM
Maybe vitrify is the wrong word. I know there's a point (cone 10?) where unglazed porcelain is food safe because water absorption approaches 0%. The inside of the snake is not smooth and I don't think I can glaze it adequately without plugging the hole. I thought you could layer glaze at any temp as long as you didn't exceed the temperature capability of your lowest material - OK to low fire glaze over high fire clay or high fire glaze, but not to high fire glaze over low fire clay or glaze. Isn't it the same as using a cone 018 gold overglaze over a low or high fired glaze? Looks like I may need to try some test tiles :) |
|
C
coruscate
Posted
posted
on
Tue, Oct 21, 2008 9:01 AM
Maddogmike, I think you are on the right track. Of course you should test you glaze and porcelain if you're going to cone 10 to make sure they fit (shrink and contract at the same rate) correctly and avoid crazing. You might want to consider a support wire armature. Otherwise you can glaze low fire in and out. If you low fire glaze after going to vitreous, you need to change the body of the glaze for that purpose because it tends to "crawl" off the surface. |
|
B
Babalu
Posted
posted
on
Tue, Oct 21, 2008 10:14 AM
Coruscate, Good sound advise. Do you play in clay too? I would love to see some of your work if you do. I also see your into vintage travel trailers as well...YAY! glad to see I'm not the only one :) I've got a 1947 Aero Flite Falcon that I am restoring.... |
|
C
coruscate
Posted
posted
on
Tue, Oct 21, 2008 12:07 PM
Babalu, Yep, another mud monkey! You guys do great stuff down at the other end of the state. Green with envy at the playspace you've set up. I've mostly spun my clay for the past couple decades and have taken a hiatus from lots of living for the past couple years (see lament above and link to last bit of clay work) but it paid off with a job I like with the National Park Service and my first very own garage (the house is just an excuse to own a garage, right?). That is a sweet model of trailer you got, can't wait to see pictures of yours. Hopefully I'll get a chance to meet you guys when my wahine and I road trip with the Tiki-Lander for the next Tiki-Oasis in August or the 2009 ESRI user conference in July. Perhaps you'll have more of your trailer restored and be doing some camping in it. |
|
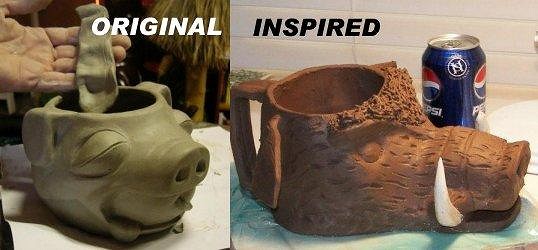
M
MadDogMike
Posted
posted
on
Thu, Oct 23, 2008 8:05 AM
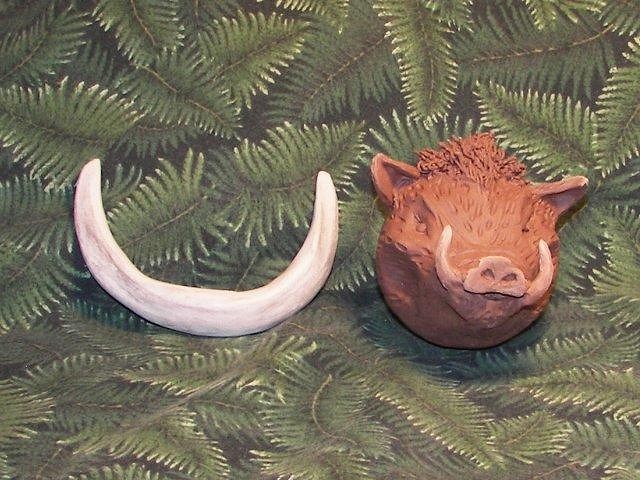
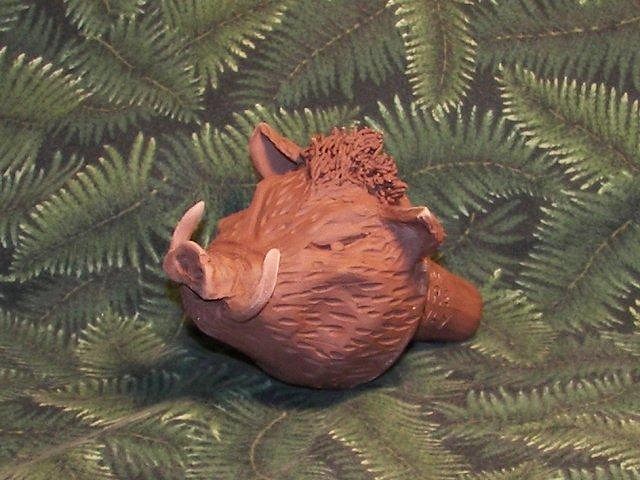
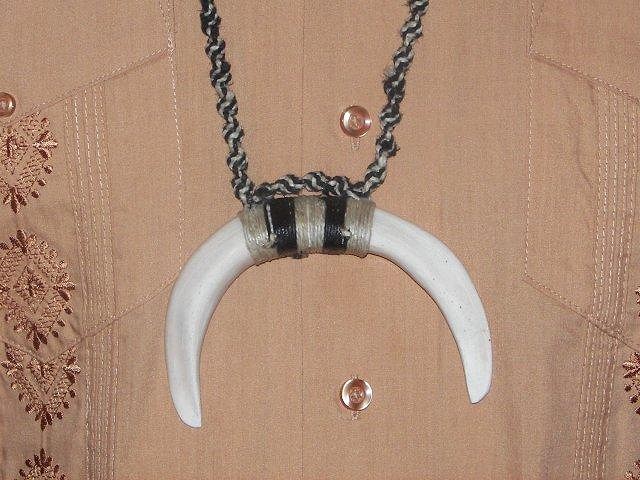
Inspired by my Hawaiian mythology research and encouraged by Squid's "Luau Pig" mug, one of my future projects will be a mug of Kamapua'a, the wild boar god. So I did a little study to prepare for it- a Kamapua'a kiln plug. He's made out a brown clay that I haven't tried firing yet so I don't know what color he will be. I'm hoping to just glaze his tusks and eyes, leaving everything else natural brown (maybe a matte black wash to accentuate the texturing) I used a mini clay extruder to make the hair on top, we'll see if it survives. The other Kamapua'a study is the ceramic boar tusks on the left in the first picture. I haven't done any macrame since the 70's (groovy!) but I'm going to attempt a cheap knock-off of PakoloLolita's awesome boar tusk pendants. These tusks are pulled from clay and have a triangular cross-section like real tusks, they are 4 1/2 inches point-to-point. |
|
C
Cammo
Posted
posted
on
Thu, Oct 23, 2008 9:27 AM
I like Squid's mug, but this looks shall we say, PORKIER! Somebody put a leash on this Mad Dog! |
|
M
MadDogMike
Posted
posted
on
Sat, Oct 25, 2008 8:36 AM
Thanks Cammo! Here's my latest ceramics class project, the obligatory teapot. It's not tiki but it's fun anyway. |
|
O

OceaOtica
Posted
posted
on
Sat, Oct 25, 2008 11:36 AM
cool maddog! really dig it. |
|
B
Babalu
Posted
posted
on
Tue, Oct 28, 2008 6:45 AM
Mad Dog....You are just plain on fire! Your work has improved 110% in just a few week! How do you do it? |
|
M
MadDogMike
Posted
posted
on
Tue, Oct 28, 2008 5:24 PM
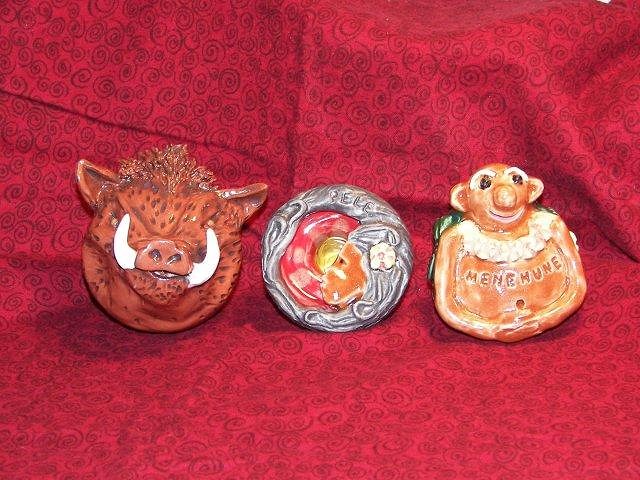
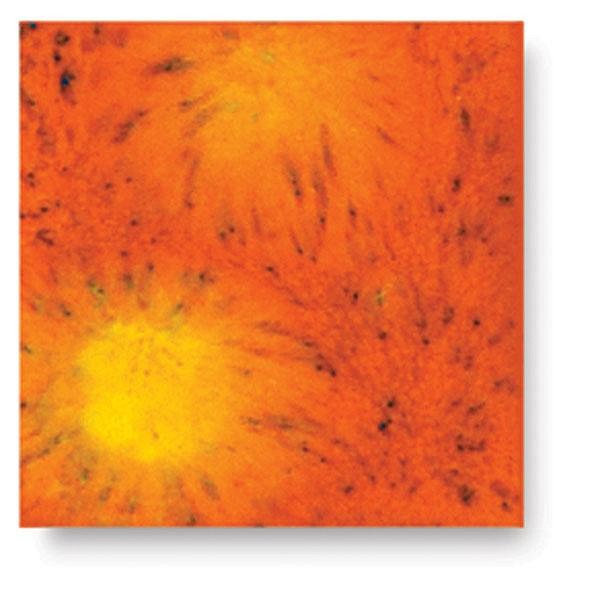
Well, I hate to advocate weird chemicals, alcohol, violence or insanity to anyone... but they've always worked for me :lol: Thanks Babala and OceaOtica. Here's the kiln plugs I've been working on. The Kamapua'a (Boar god) is made of a brown lowfire clay so I'll have to be sure I never use it in a highfire kiln. The pictures aren't that great but I like the way the Kamapua'a and the Menehune turned out. The Pele Volcano goddess didn't turn out quite like I wanted but I cast her from a mold so I get to try again until I get it right :) I wanted the background behind her to look like lava that didn't happen. I ordered some clear black glaze for her hair and some Mayco Jungle Gem Wildfire (below) for the lava background.
|
|
M
MadDogMike
Posted
posted
on
Wed, Oct 29, 2008 10:12 PM
Finished my Cobra Venom mug and Boar Tusk pendant. The cobra sagged a little during high firing so it's not pointing in the same directionas it was in the orginal picture above. The hole in the snake trick worked out well, people at work grossed out seeing me suck my Pepsi out of a snake's face. The boar tusk pendant is a cheap ceramic rip-off of PakoloLolita's real ones. I'm not the macrame artists that she it, mine's pretty simple. |
|
B
Babalu
Posted
posted
on
Wed, Oct 29, 2008 10:29 PM
|
|
M
MadDogMike
Posted
posted
on
Thu, Oct 30, 2008 6:27 AM
|
|
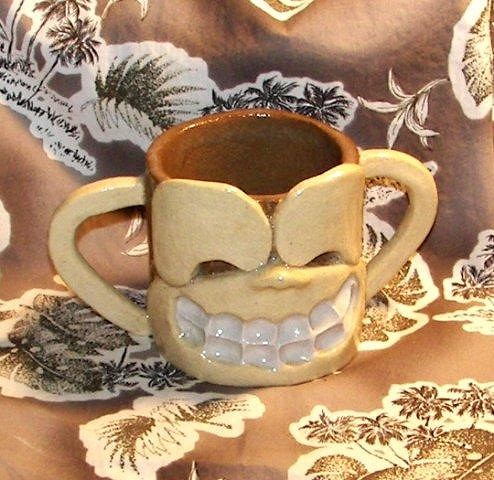
M
MadDogMike
Posted
posted
on
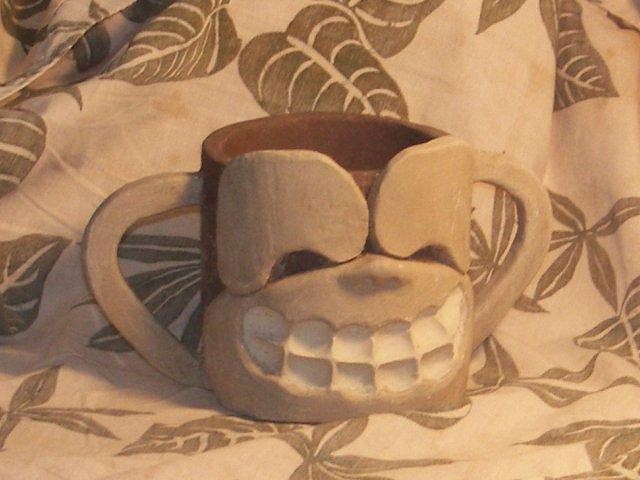
Sat, Nov 1, 2008 9:51 AM
Here's a monkey coffee mug I'm working on (ssshhh, it's a Christmas gift for my sister-in-law) Made from 3 different high-fire clay bodies; dark brown WC373, yellow-tan Soldate 60, and white Coleman procelain. I plan to only clear glaze it so the natural colors of the clay show. I've got access to a high fire kiln this semester, figured I might as well take advantage of it. |
|
B

Bowana
Posted
posted
on
Sat, Nov 1, 2008 10:21 AM
Hey Madman! Love the Muggy Monk!! Monkey Mug I mean. I won't tell her. :) Bowie |
|
LLT

little lost tiki
Posted
posted
on
Sat, Nov 1, 2008 11:57 AM
the ear handles are classic! |
|
M
MadDogMike
Posted
posted
on
Mon, Nov 3, 2008 9:32 PM
OK, I thought you guys were my friends...how come no one told me this hat was ugly? I guess it's my own fault, I bought a cheap $5 hat because I didn't want to ruin a good one :) This hat must look 3 times better 'cuz I paid 3 times more for it :lol: There are those few who learn from observation. The rest of us need to piss on the electric fence and find out for ourselves. Edited to add music link :) [ Edited by: MadDogMike 2008-11-06 09:56 ] |
|
M
MadDogMike
Posted
posted
on
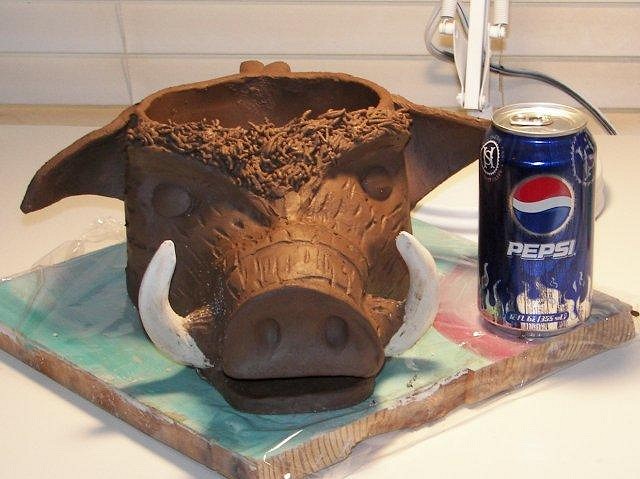
Wed, Nov 5, 2008 6:55 AM
I set out last night to make a Kamapua'a (wild boar god) mug but I overestimated the scale a wee bit and now I've created a MONSTER! Looks like it will hold 2 or 3 quarts! I guess it's a Kamapua'a bowl instead of a mug :) Slabformed from dark brown high fire clay with porcelain tusks, I still have detail work to do on it. It will shrink 15% when I highfire it, hopefully it will shrink down to a manageable size. |
|
L
Liana
Posted
posted
on
Wed, Nov 5, 2008 1:28 PM
Mike, that monkey mug is cool as!! |
|
W

woofmutt
Posted
posted
on
Wed, Nov 5, 2008 3:44 PM
The boar's head is a swell idea* and well executed. It really doesn't look like it needs detail added. I'd drop the handle. It detracts from the design and is possibly not gonna be functional (unless yuh carefully figgered out the balance). But more importantly it'd look much cooler liftin' the boar's head with two hands to drink outta it. *This is where the smarty pants point out alla boar's head mugs I ain't aware of. |
|
B
Babalu
Posted
posted
on
Wed, Nov 5, 2008 4:27 PM
Mad Doggie!! You are sooo turning and burning!! I agree with Kinny that the Monkey handle ears are epic...I also agree with woofy...loose the boar handle on this one, or the next. The boar in and of it's self looks tight! See ya tomorrow man. |
|
O
OceaOtica
Posted
posted
on
Wed, Nov 5, 2008 5:49 PM
i will chime in on the handle, think it should go, call it a bowl if it seems too large. nice work man! have fun glazing the hair, looks like you will be checkin your glaze passes over with a fine toothed eyeball. Look forward to seeing it done. |
|
GT

GO TIKI
Posted
posted
on
Wed, Nov 5, 2008 6:02 PM
Very cool Mike, You got some Great idea's, Mahalo! Gogo |
|
M
MadDogMike
Posted
posted
on
Wed, Nov 5, 2008 6:44 PM
Bowana, LLT, Liana, Woofie, Babs, Cass, & Gogo - thanks for the dose of "Rah! Rah! Rah!" :) Woof, Babalu & Cass thanks so much for the "constructive criticism". I decided you are right, that handle really wouldn't be functional and there was no "drinkable edge" (I was going to use a straw). I whacked the handle off and doubled the thickness of the ears since they will end up being de facto handles, now there's a "drinkable edge" on the back of the head. Cass, glaze shouldn't be too bad, I'll do a black wash and a clear glaze so the color of the clay shows. The Kamapua'a kiln plug I did (page 5) was a "test tile". Thanks again all. |
|
M
MadDogMike
Posted
posted
on
Sat, Nov 15, 2008 9:15 PM
Lil Lost Tiki once posted "Inspiration is free, spread it around". When something I make is inspired by a creation posted on TC, I like to give that artist credit. This, however, is not "inspired by" but rather "ripped off from" Go Tiki and posted with his permission. I needed a slab-formed project for my ceramics class and thought Gogo had a good idea. I poured a plaster bat in the bottom of a big basket then rolled a slab of clay over it to give it basket texture. Gogo slipcasted his and they have a lot more detail, you can find them here
|
|
C
Cammo
Posted
posted
on
Sun, Nov 16, 2008 6:26 AM
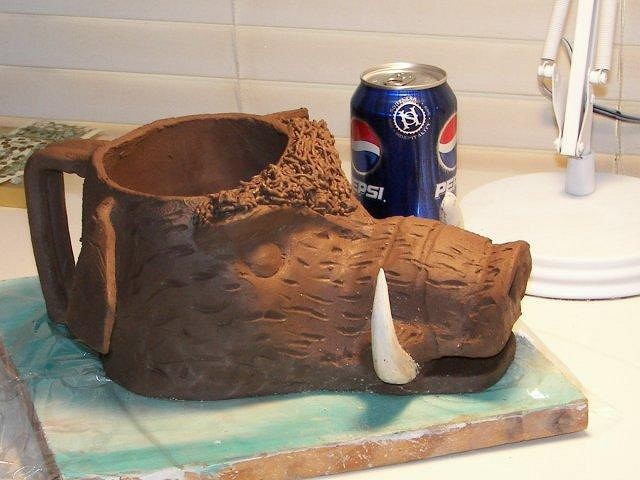
NICE boar head, I'm not suggesting anything cause it's probably already dry! I suggested a few changes to Little Lost Tiki's work at the recent Chop and he just about dumped a jar of india ink on my head. Anyway, love the clay color, the white tusks, etc. The kiln plug you sent Babs is killah, AND the new hat! You may actually out-Tiki-Guy Buzzy. |
|
M
MadDogMike
Posted
posted
on
Sun, Nov 16, 2008 8:12 AM
Thanks Cammo. I just pulled the boar head from the bisque firing this morning, it measures out at only 48 ounces (that's BigGulp size, I think I'll take it into 7/11 for a refill :lol: ) But if you have any improvement suggestions fire away, I'm 120 miles away and I don't even own any India ink! Actually, I plan to make a smaller version of this mug so I'm open to suggestions.
I could never "out-tiki" Buzzy, partially because I don't own any sock-garters and I won't pose in my BVDs |
|
O
OceaOtica
Posted
posted
on
Sun, Nov 16, 2008 9:05 AM
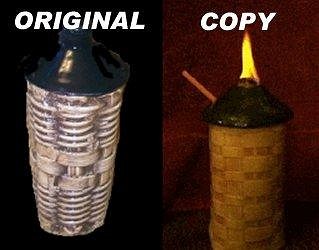
MadDog, Beautiful torch mug! Hey man, i would rename the title, cut the rip off, its unfair to your talents. GoGo did a cool mug, but it was done years before him by Tiki King, was an idea passed around after that, and was one of the designs in 2003 that we were going to put out under `Ona Tiki. I may bring my design of a torch mug back someday cause its a great concept. I really appreciate your concern of misrepresentation, or design stealing, and taking that one step further by contacting Dani, but i would still call your post inspired by or something to that effect. |
|
B
BeezleBug
Posted
posted
on
Sun, Nov 16, 2008 9:47 AM
I agree with OceaOtica. I think a mug is only a "rip-off" if due credit isn't given or if it violates some very specific copyright. Otherwise, it's "inspired by" or "an ode to." In any case, the torch mugs are very cool. |
|
B
Babalu
Posted
posted
on
Sun, Nov 16, 2008 11:20 AM
Hey Mike...Great work brother. Your plates were a huge hit over here. Only thing I can think of to say on your next piggys mug is to back off a little on the length of the snout...Even though a real pigs nose may be proportionate to what you did prior, the mug may be more user friendly if you back it off just a bit |
|
M
MadDogMike
Posted
posted
on
Sun, Nov 16, 2008 2:01 PM
Babs, glad they enjoyed the plates. I think you're right about the nose length, it's a little unwieldy (OK, more than a little :) ) OceaOtica & BeezleBug, thanks. I guess the line between "inspired" and "copied" is a personal opinion. I made a few mugs that were very similar to previous mugs, but was unaware at the time of the previous mugs. Now I try to research my ideas a little better so I'm not embarrassed like that again. I knew about the previous torch mugs and really didn't change anything about them, I consider that a copy. |
|
M
MadDogMike
Posted
posted
on
Sun, Nov 16, 2008 9:59 PM
Finished firing the clear glaze on my monkey mug. High fired, 3 clay bodies - porcelain (teeth), Soldate 60 (face), and WC373 (mug). I love the chocolate brown WC373!
|


Pages: 1 2 3 4 5 6 7 8 9 10 11 12 13 14 15 16 17 18 19 20 21 22 23 24 25 26 27 28 29 30 31 32 33 34 35 36 37 38 39 40 41 42 43 44 45 46 47 48 49 50 51 52 53 54 55 56 57 58 59 60 61 62 63 64 3035 replies