Pages: 1 2 3 4 5 6 7 8 369 replies
|
UT

uncle trav
Posted
posted
on
Sat, Mar 9, 2013 3:26 PM
Thank you for the compliments. I'm doing a bit of pre-shellacking to seal the soft balsa wood. This will get rid of any light colored wood and also give a good surface to apply the thatch to. Another wait time for this stuff to dry. |
|
UT
uncle trav
Posted
posted
on
Sun, Mar 10, 2013 6:21 AM
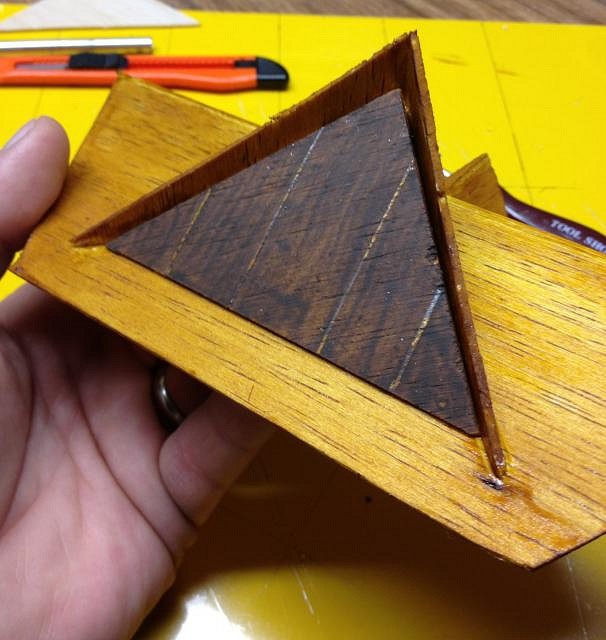
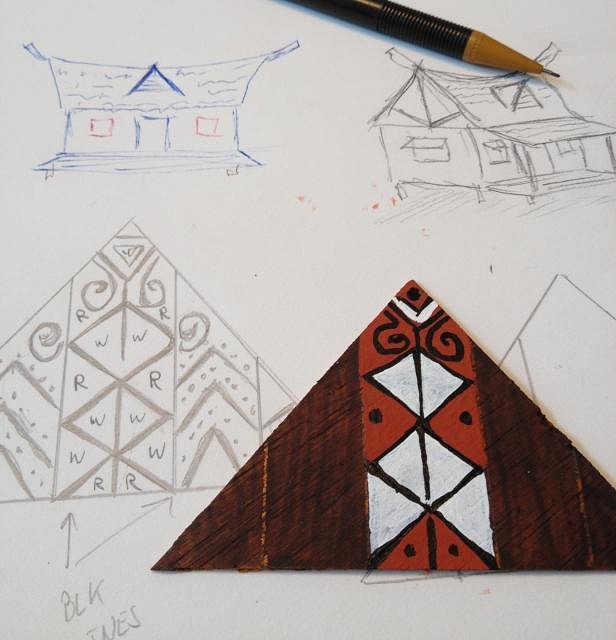
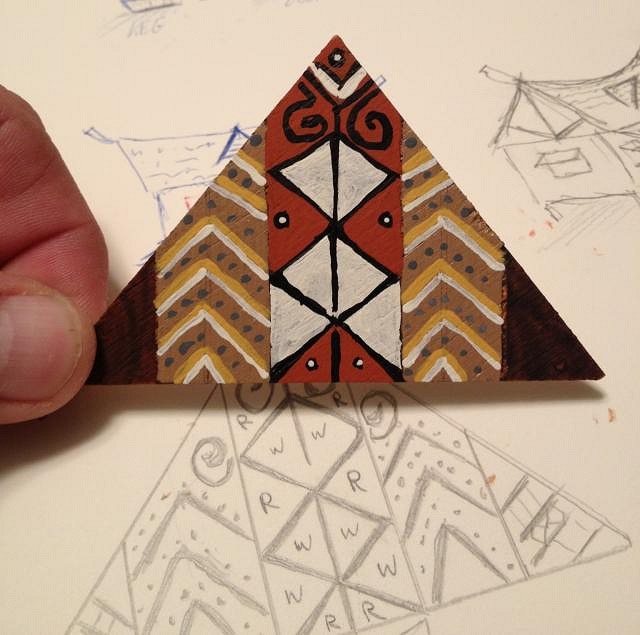
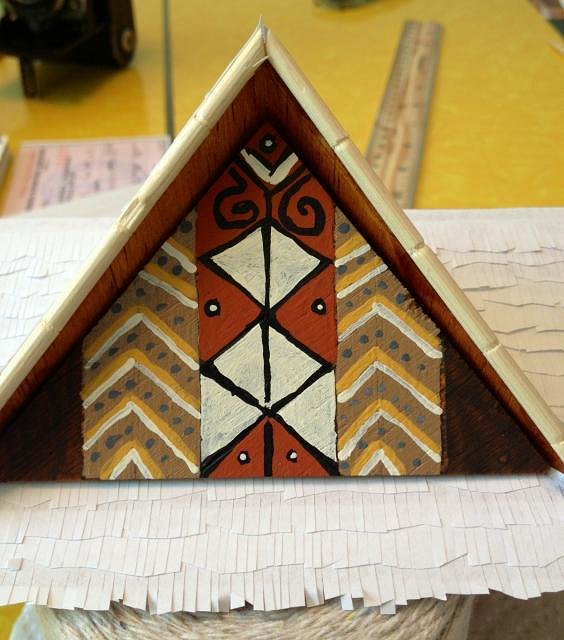
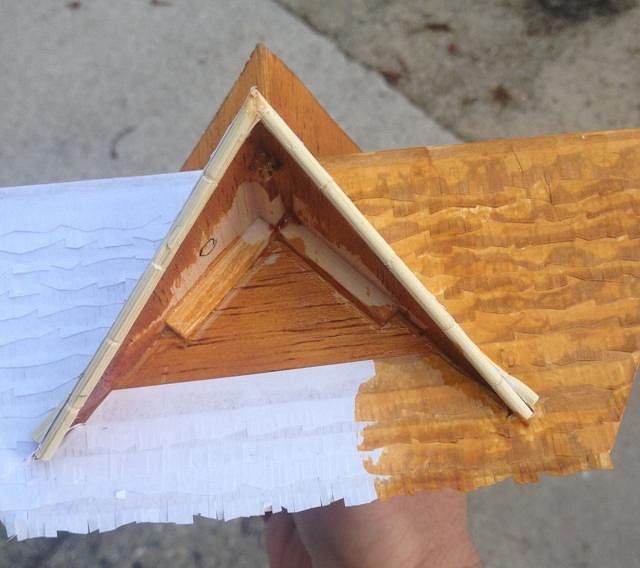
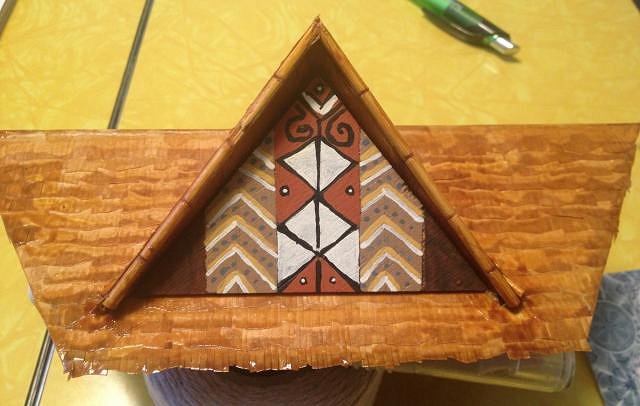
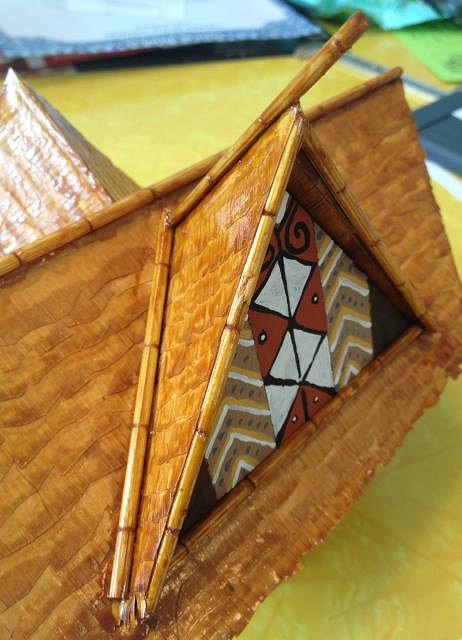
I am starting to do some of the detail work on the gables on the roof. The inside of the gables will be closed off. I am thinking of painting the flat fronts of the gable with some type of New Guinea inspired design and further detailed in real bamboo. Still a long way to go on this one. |
|
BK

Big Kahuna
Posted
posted
on
Sun, Mar 10, 2013 7:14 AM
Loving it, Trav! Are you buried in snow, too? |
|
UT
uncle trav
Posted
posted
on
Sun, Mar 10, 2013 7:21 AM
Haha BK, I have sun and 45 degrees, tulips are even popping up in the flower garden....for now. |
|
BK
Big Kahuna
Posted
posted
on
Sun, Mar 10, 2013 7:24 AM
I've got 18" of white crap, but it's going to be in the 50's all week. We'll be swimming by Wednesday! |
|
UT
uncle trav
Posted
posted
on
Sun, Mar 10, 2013 2:00 PM
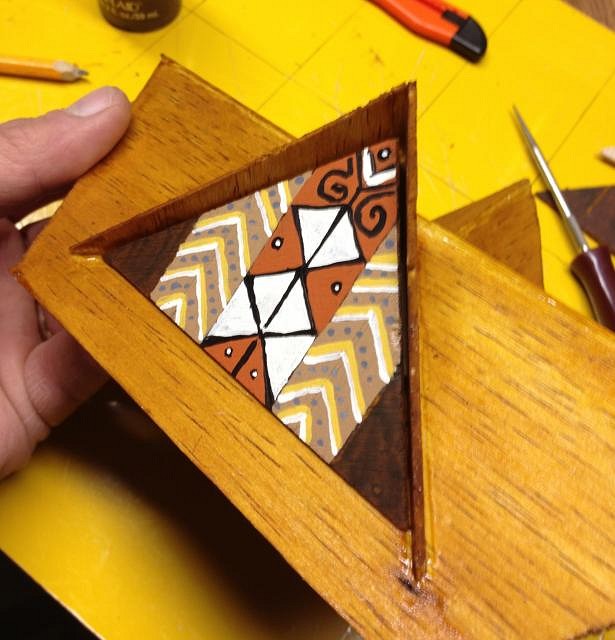
Got a little ambitious today and broke out the paints. Working on one of the gables. Still more to do. |
|
BK
Big Kahuna
Posted
posted
on
Sun, Mar 10, 2013 2:08 PM
OOOOOOOOOOO! |
|
UT
uncle trav
Posted
posted
on
Sun, Mar 10, 2013 5:42 PM
Thanks BK!! Did a bit more work. Not as steady with a tiny paint brush as I used to be. |
|
UT
uncle trav
Posted
posted
on
Mon, Mar 11, 2013 1:50 PM
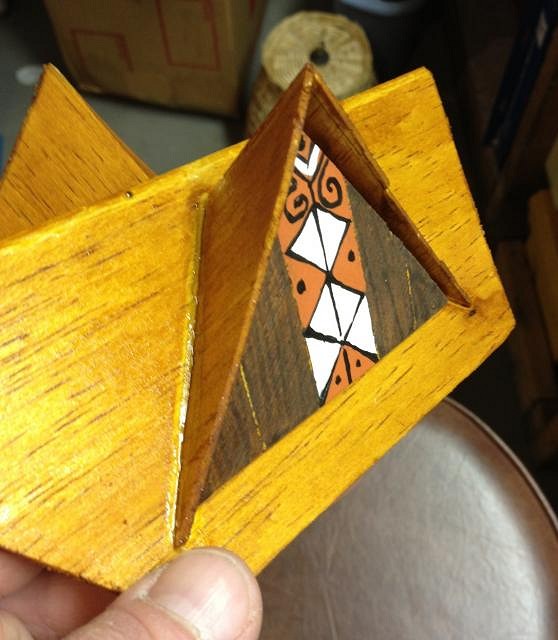
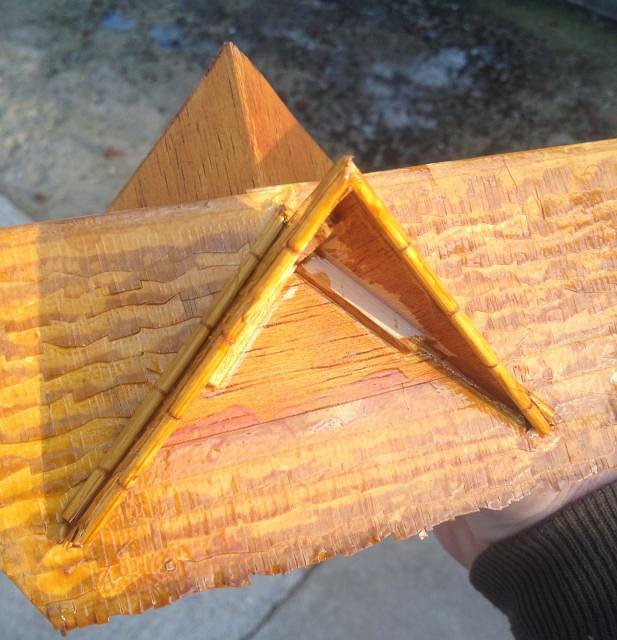
Another dry fit to see how things are progressing. |
|
UT
uncle trav
Posted
posted
on
Tue, Mar 12, 2013 7:07 AM
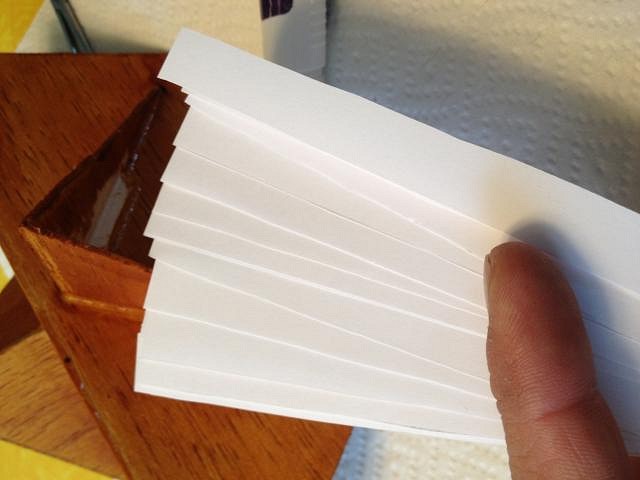
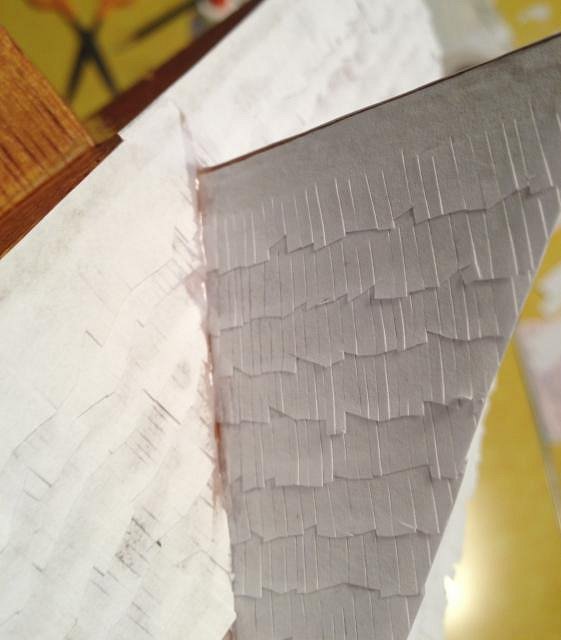
Both of my crew members at work have the flu so I have a free day to work on the hut. I am starting to thatch the roof. As with my other builds this is done with literally hundreds and hundreds of tiny cuts along paper strips by hand. The thatch will be stained after it is all applied. Thanks for taking a look.
|
|
H

hang10tiki
Posted
posted
on
Tue, Mar 12, 2013 7:44 AM
Uncle thatch- lookin good... Jon |
|
M

MadDogMike
Posted
posted
on
Tue, Mar 12, 2013 8:05 AM
Those PNG gables look great Trav! Hope you enjoyed your day off. |
|
UT
uncle trav
Posted
posted
on
Wed, Mar 13, 2013 5:03 PM
Thanks guys. Home again so I was able to thatch one side of the roof. Still a bunch of detailing to do.
|
|
C

Canvas
Posted
posted
on
Wed, Mar 13, 2013 8:10 PM
Such detail! Such dedication! |
|
UT
uncle trav
Posted
posted
on
Thu, Mar 14, 2013 9:07 AM
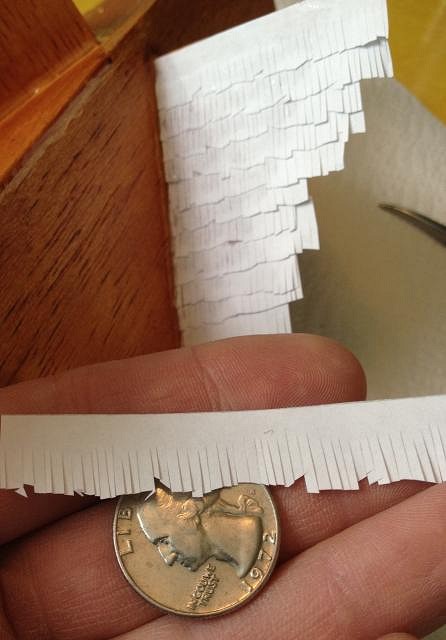
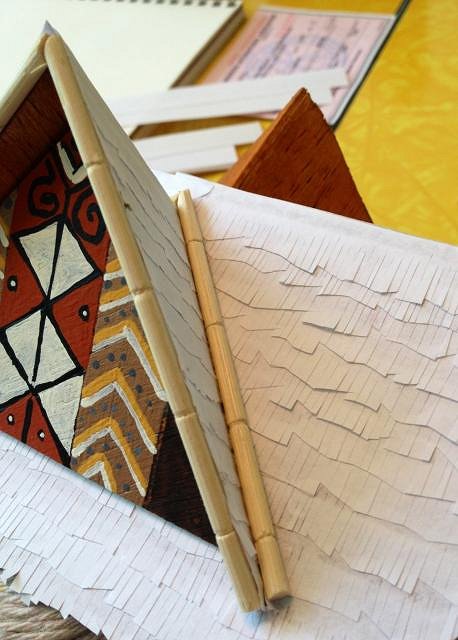
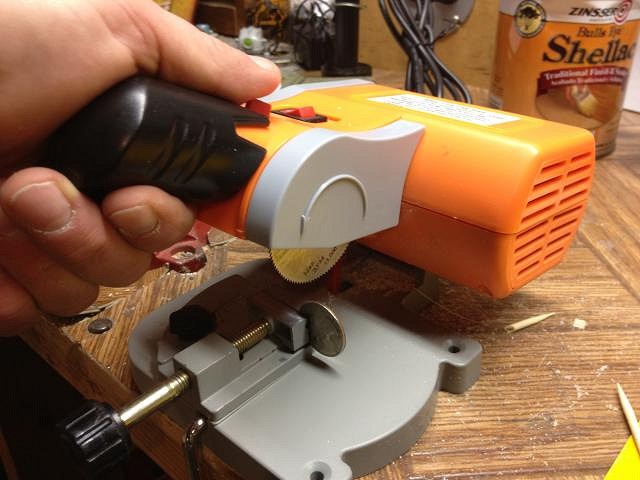
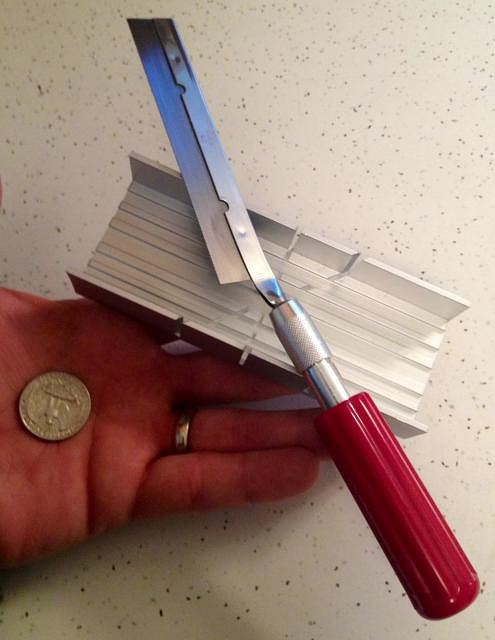
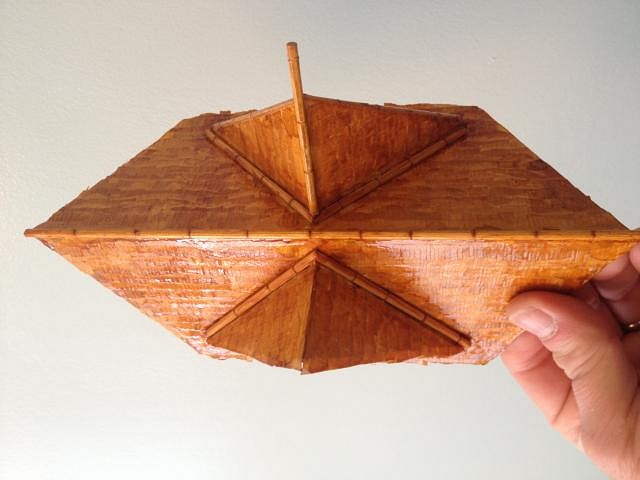
Here's yet another update. Thatch is done on one side of the roof. Bamboo detailing is going on today and the gable is still just a dry fit. I have finally made a major upgrade to my shop. I purchased a miniature chop saw to cut the bamboo as this makes a nice clean cut. The saw blade is two inches in diameter, the quarter is just for a size reference. All of my other cuts are totally hand done. Thanks for stopping by.
|
|
D

danlovestikis
Posted
posted
on
Thu, Mar 14, 2013 9:31 AM
My hands aren't as steady with a small paintbrush either. However your painting looks perfect. I love all the steps and all your buildings. Wendy |
|
W

WaikikianMoeKele
Posted
posted
on
Thu, Mar 14, 2013 7:26 PM
Uncle Trav, |
|
H

Heath
Posted
posted
on
Thu, Mar 14, 2013 9:43 PM
Where did you find that chop saw??? |
|
H
hang10tiki
Posted
posted
on
Thu, Mar 14, 2013 10:23 PM
Looking good Uncle Jon |
|
M
MadDogMike
Posted
posted
on
Fri, Mar 15, 2013 5:56 AM
Mini chopsaw? Cool! Progressing nicely Trav |
|
UT
uncle trav
Posted
posted
on
Fri, Mar 15, 2013 7:06 AM
Thanks for all of the nice words everyone. It honestly means a lot. I'm putting a bunch of detail into this hut so again I'm trying some new ideas out. The mini chop saw is available from a company called Micro Marc that caters to miniature builders and has a great website. Thanks again. |
|
UT
uncle trav
Posted
posted
on
Sun, Mar 17, 2013 5:01 PM
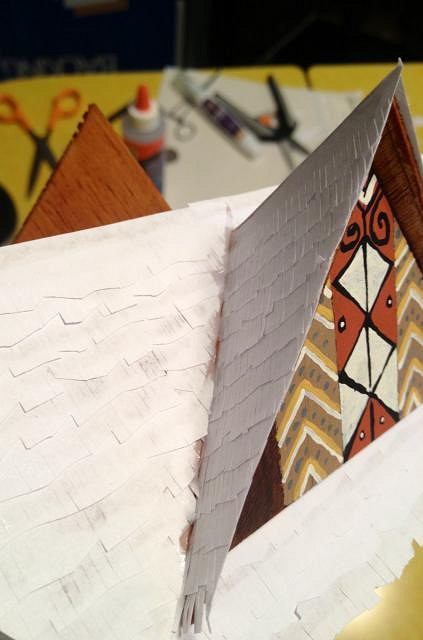
I was able to get a bit more done. Shellacking and more thatch.
|
|
W
WaikikianMoeKele
Posted
posted
on
Sun, Mar 17, 2013 6:19 PM
Uncle Trav, |
|
BK
Big Kahuna
Posted
posted
on
Sun, Mar 17, 2013 7:10 PM
Love it, Trav! |
|
UT
uncle trav
Posted
posted
on
Mon, Mar 18, 2013 7:37 AM
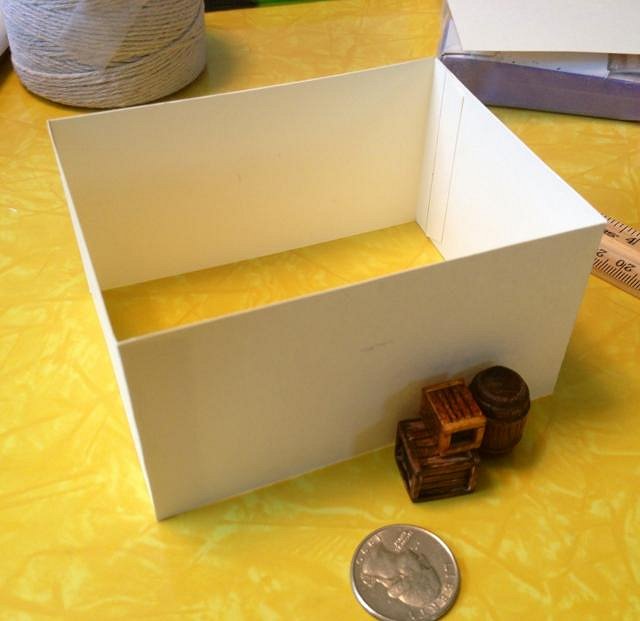
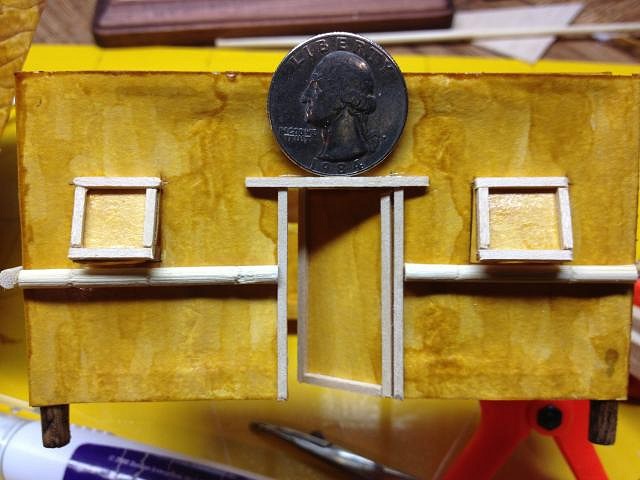
Thanks guys. Here is how the main body of the hut starts. That's heavy card stock. Now the fun starts with a bunch of head scratching to come up with a good design for the body. Thanks. |
|
UT
uncle trav
Posted
posted
on
Tue, Mar 19, 2013 6:53 AM
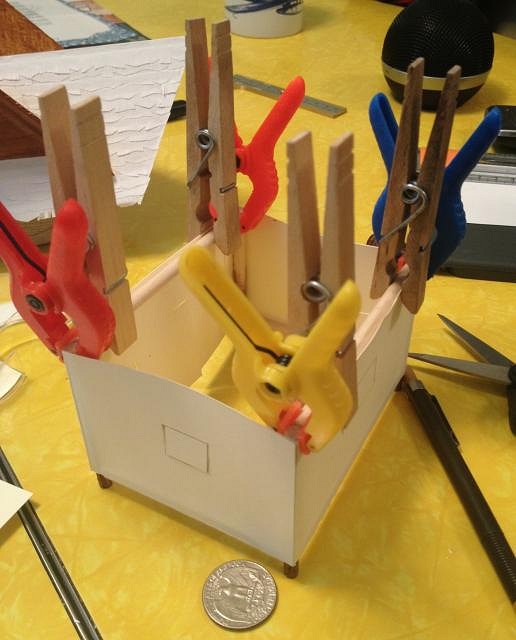
Another long wait for the glue to dry. I am making the body of this hut stronger than usual to support the weight of the new wood roof. The body of the hut is still mainly card stock but the interior will have a wood frame. The new mini chop saw works like a dream. I used a mini hand saw in the past but that thing made my hands ache after a while. Thanks for stopping by.
|
|
M
MadDogMike
Posted
posted
on
Tue, Mar 19, 2013 7:49 AM
Really coming together Trav, that roof is looking primo! |
|
D
danlovestikis
Posted
posted
on
Tue, Mar 19, 2013 9:26 AM
Love love love the photos and this building. Wendy |
|
H
hang10tiki
Posted
posted
on
Tue, Mar 19, 2013 7:03 PM
Killer |
|
UT
uncle trav
Posted
posted
on
Wed, Mar 20, 2013 1:37 PM
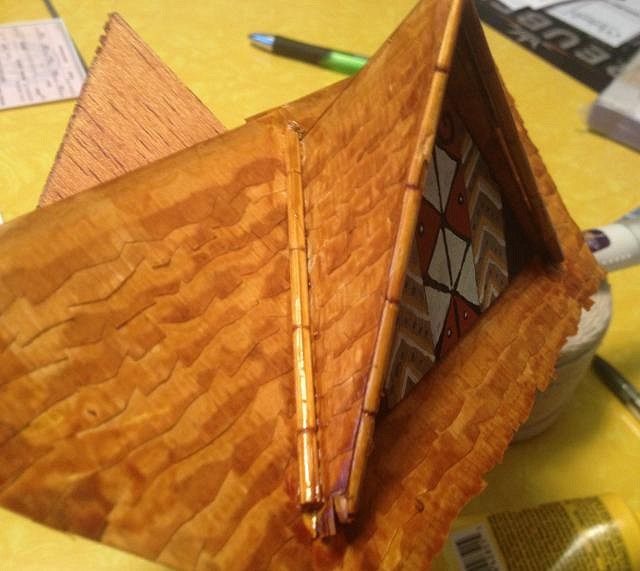
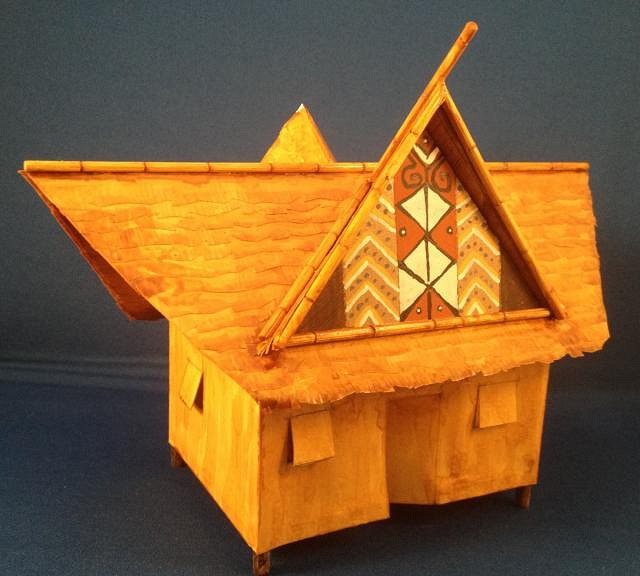
Thanks for the encouragement guys. Added a couple of bamboo ridge poles and a bamboo detail to close off the gable end. Real bamboo skewers hand detailed to look the the big stuff.
|
|
UT
uncle trav
Posted
posted
on
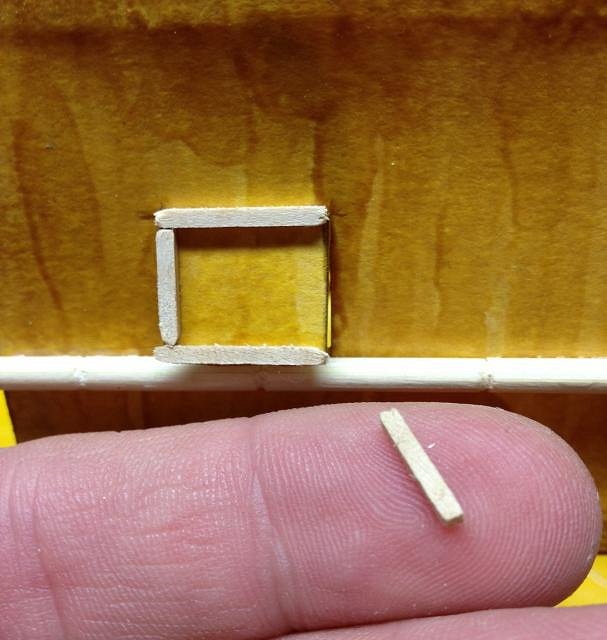
Wed, Mar 20, 2013 3:02 PM
That second photo should be flipped ninety degrees. The dimensions are all equal, the pic makes it look strange. |
|
T

tikilongbeach
Posted
posted
on
Wed, Mar 20, 2013 5:22 PM
Wow, it looks great! |
|
UT
uncle trav
Posted
posted
on
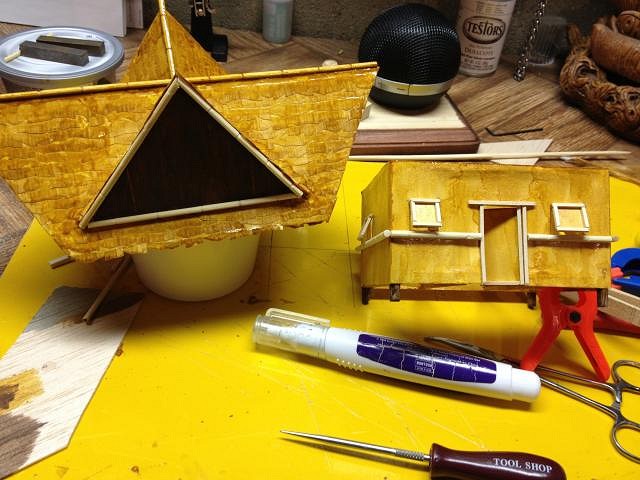
Fri, Mar 22, 2013 2:56 PM
A bit more done. The ol' trader is a ways away from moving in though. Still a ton of detailing to do to this little hut. Just a sneak peek for now. Thanks |
|
W
WaikikianMoeKele
Posted
posted
on
Fri, Mar 22, 2013 3:33 PM
Lovely to see all standing up. Can't wait to see what appears next! |
|
UT
uncle trav
Posted
posted
on
Sun, Mar 31, 2013 3:44 PM
I was able to do a bit more work on the hut this weekend. None of my cuts are perfect but what self respecting trader would set up shop in a prefab cookie cutter hut? Still a long way to go on this one. Really getting tiny again.
|
|
H
hang10tiki
Posted
posted
on
Sun, Mar 31, 2013 3:49 PM
I need a life size UnKle Trav hut next to my pool :) Jon |
|
L

littlegiles
Posted
posted
on
Sun, Mar 31, 2013 7:30 PM
Amen Jon, I agree 100%. I have the perfect space for it too. The hut is looking amazing. I complain working in 1:12 scale and you are working on something much smaller. If you ever have any "miniature" questions, let me know. I might can help you out. Been working with miniatures for about 15 years. Your huts are truly pieces of art. Dale |
|
T

tigertail777
Posted
posted
on
Mon, Apr 1, 2013 3:06 PM
Wow! That IS tiny! At first with that quarter I thought I was in Batman's old lair. :wink: Great stuff, love watching the progress! |
|
M
MadDogMike
Posted
posted
on
Mon, Apr 1, 2013 6:43 PM
Not to worry about those "less than perfect cuts". The real hut was built using a sawfish bill for a saw :lol: Great progress Trav. |
|
RH

Robb Hamel
Posted
posted
on
Mon, Apr 1, 2013 6:48 PM
I think your cuts are just fine!! If the were absolutely perfect, it would be boring. |
|
UT
uncle trav
Posted
posted
on
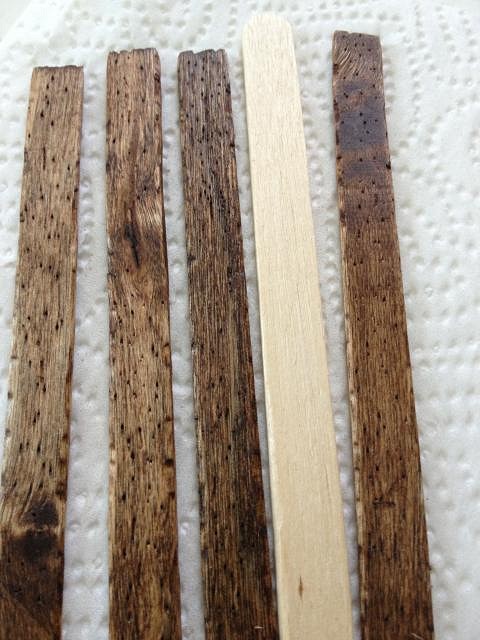
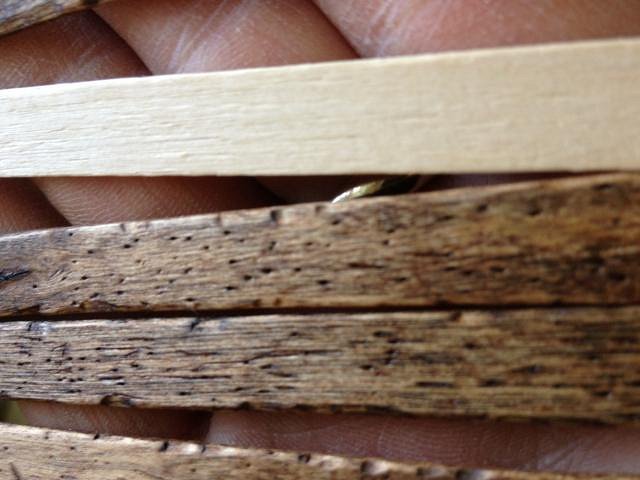
Thu, Apr 4, 2013 1:33 PM
Thanks so much for all of the kind words. I'm trying to come up with an idea for the floorboards of the hut. I dug into the miniature lumberyard and found some popsicle sticks. With a bit of cutting, distressing and staining this is what I came up with. Not sure if this will end up being the final floor or not but good practice. Thanks again for taking a look.
"Anyone who has ever seen them is thereafter haunted as if by a feverish dream" Karl Woermann [ Edited by: Uncle trav 2013-04-05 03:09 ] |
|
BK
Big Kahuna
Posted
posted
on
Thu, Apr 4, 2013 1:38 PM
Love 'em, Trav! |
|
L
littlegiles
Posted
posted
on
Thu, Apr 4, 2013 1:42 PM
Those are some mighty fine looking floor planks. Great job. |
|
UT
uncle trav
Posted
posted
on
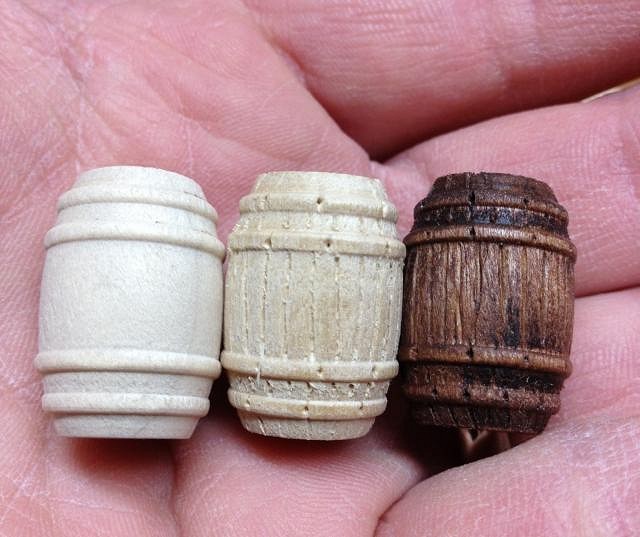
Thu, Apr 4, 2013 3:35 PM
Thanks guys. Making another barrel. Here's a start to finish shot. |
|
L
littlegiles
Posted
posted
on
Thu, Apr 4, 2013 4:35 PM
You are really getting some amazing detail work done on those tiny things. Well done. Dale |
|
W
WaikikianMoeKele
Posted
posted
on
Thu, Apr 4, 2013 4:47 PM
Uncle Trav, |
|
H

hiltiki
Posted
posted
on
Thu, Apr 4, 2013 5:18 PM
Amazing job. Love everything you have done so far. |
|
H
hang10tiki
Posted
posted
on
Thu, Apr 4, 2013 9:30 PM
Great flooring idea Jon |