Pages: 1 2 3 4 5 6 7 8 9 10 11 12 13 14 15 16 17 18 19 20 21 22 23 24 25 26 27 28 29 30 31 32 33 34 35 36 37 38 39 40 41 42 43 44 45 46 47 48 49 50 51 52 53 54 55 56 57 58 59 60 61 62 63 64 65 66 67 68 69 70 71 72 73 74 75 76 77 78 79 80 81 82 83 84 85 86 87 88 89 90 91 92 93 94 95 96 97 98 99 100 101 102 103 104 105 106 107 108 109 110 111 112 113 114 115 116 117 118 119 120 121 122 123 124 125 126 127 128 129 130 131 132 133 134 135 136 137 138 139 140 141 142 143 144 145 146 147 148 149 150 151 152 153 154 155 156 157 158 159 160 161 162 163 164 165 166 167 168 169 170 171 172 173 174 175 176 177 178 179 180 181 182 183 184 185 186 187 188 189 190 191 192 193 194 195 196 197 198 199 200 201 202 203 204 205 206 207 208 209 210 211 212 213 214 215 216 217 218 219 220 221 222 223 224 225 226 10,816 replies
|
D

danlovestikis
Posted
posted
on
Thu, Jun 13, 2019 9:24 PM
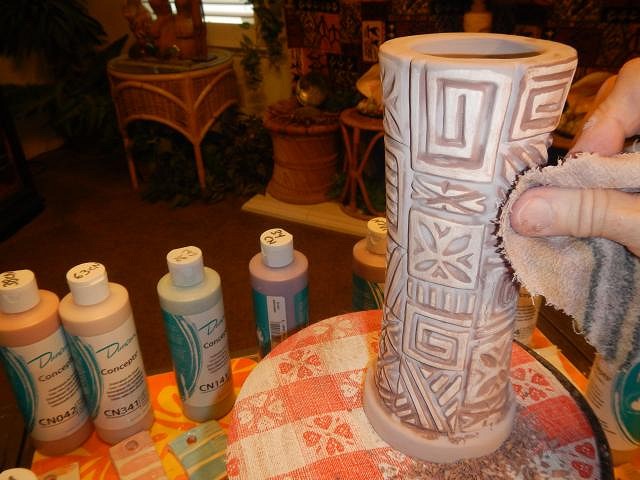
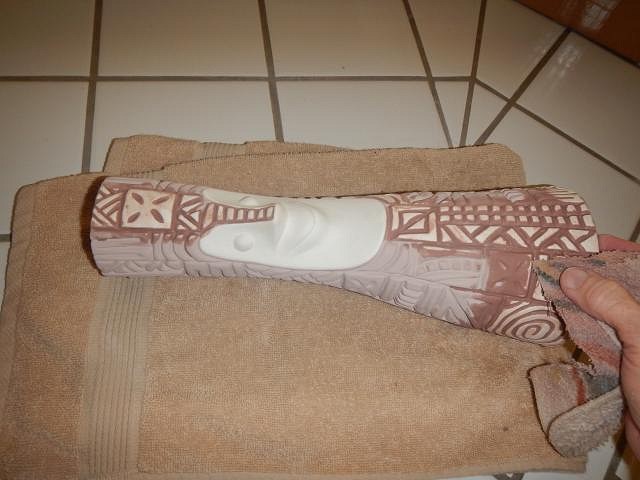
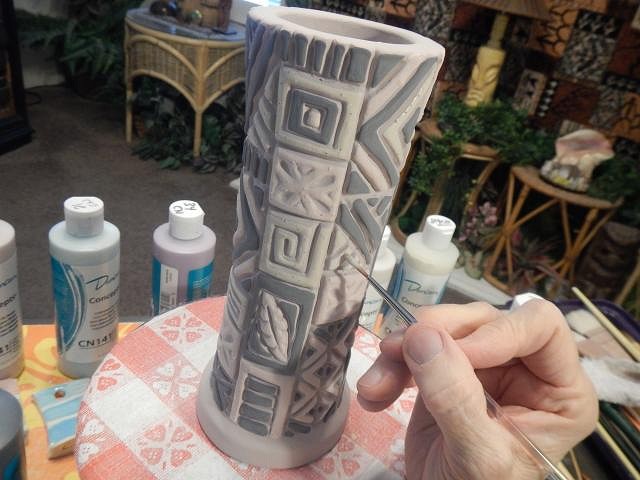
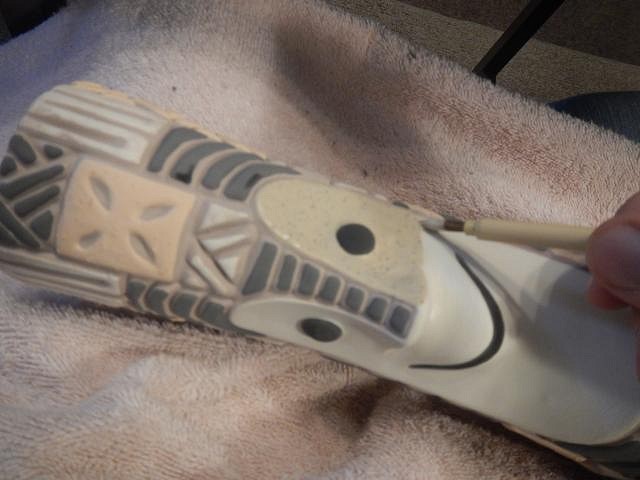
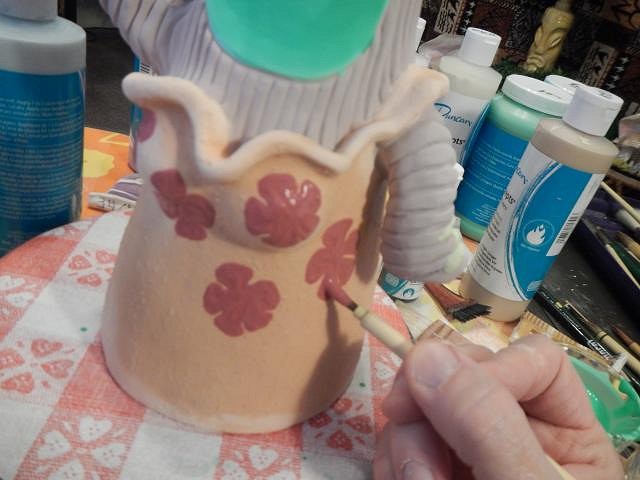
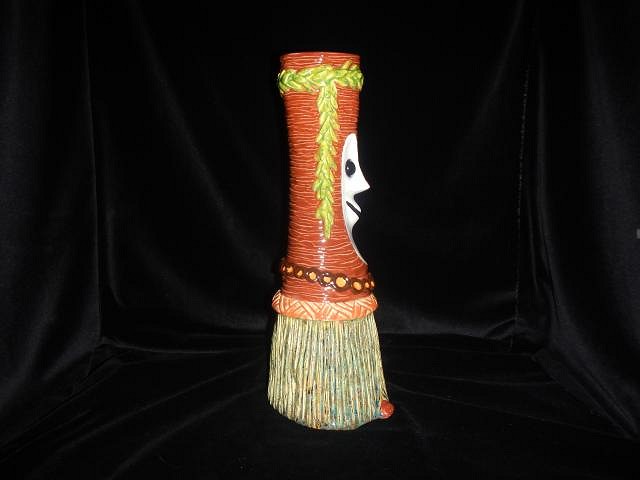
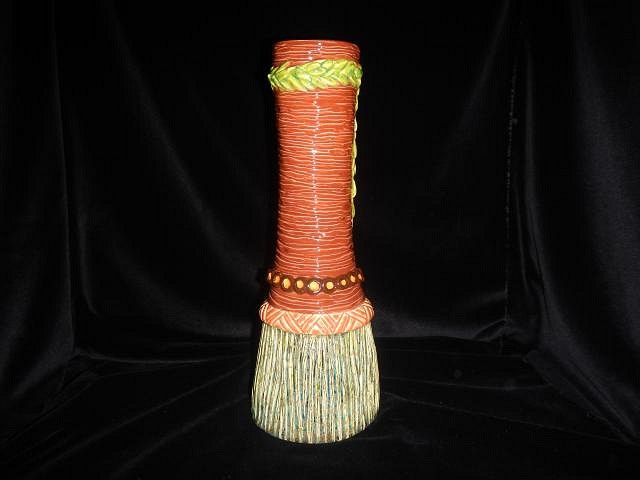
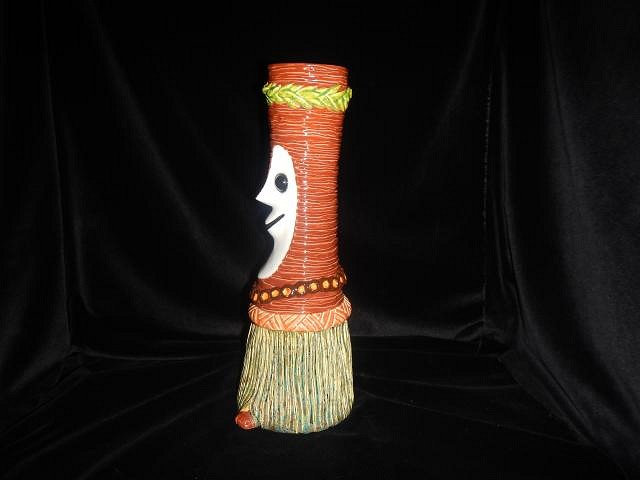
hang10tiki I bet you do! Pretty flower, love the color too. ============================ More catch up glazing photos these were taken 5/8/19 through 5/12/19. To glaze the tapa designs I hand carved on these mugs I have to glaze them in brown and then wipe it back off the raised areas. Then I paint the designs with three additional colors black, orange and spotted cream. The background is red/brown like a Tiki Bob. I worked hard on Hula Bob but in the end he was destroyed by a huge long crack across the bottom. I don't know why. Bird lover Tiki Bobbette had a bird nest in her lower hand. I took a photo later on that I will share.
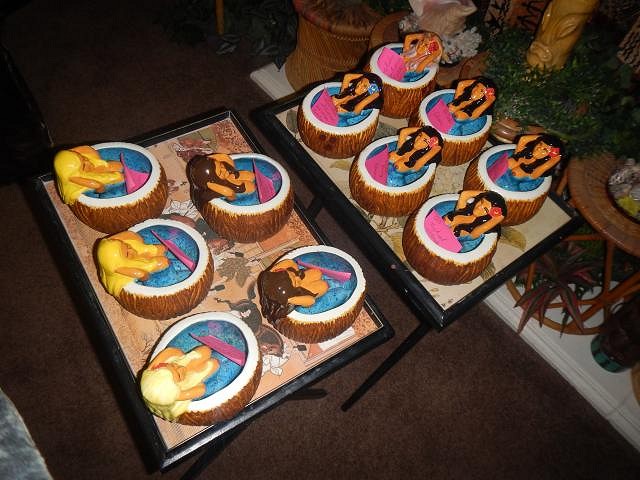
Of all the Hot Tub Hula Girls only one will need a third glazing and firing. The rest are as good as I can do. Good night, Wendy |
|
D
danlovestikis
Posted
posted
on
Fri, Jun 14, 2019 10:02 AM
There's no way to know what has happened to cause Hula Bob to crack. Maybe because the clay wasn't all the same thickness. Maybe it was because the glaze wasn't. Maybe a small air pocket that didn't burst during the bisque fire but did during the glazing firing. Maybe it was because my kiln started firing too hot. I had to exchange the thermal couple and even then an 06 fire had to be done at 07. Oh well. One wish that can't hold water, or any other drink.
So sad. Dan took him and is going to display him. Cheers, Wendy |
|
H

hang10tiki
Posted
posted
on
Sat, Jun 15, 2019 11:48 AM
Ouch |
|
S

Sandbartender
Posted
posted
on
Sat, Jun 15, 2019 12:18 PM
That's a damned shame. Hula Bob is absolutely lovely. I wonder if a tile bit would work turning him into a small table lamp? |
|
D
danlovestikis
Posted
posted
on
Sat, Jun 15, 2019 1:35 PM
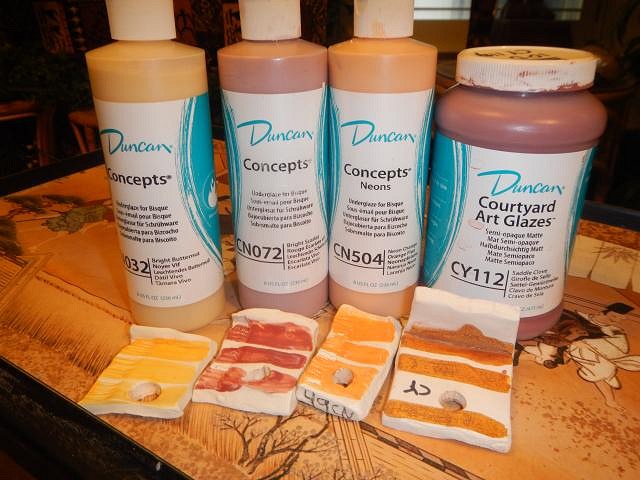
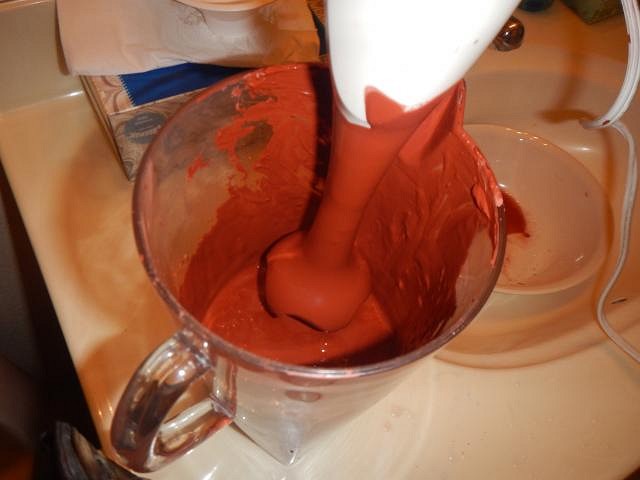
hang10tiki life is full of surprises but with ceramics you just wait for the shoe to drop now and then!!! Sandbartender I like making tiki lamps, sold two today. This one is ready to crack up the side so it's just looking good in our dining room which is now a Tiki Bob room. ====================================== I'm making headway. These glazing catch up photos are from 6/6/19 to 6/7/19. Two wishes for Fred Ferrer that were the right size to fill the kiln the rest of the way. Here is the start of glazing the first piece. All the pieces we scrubbed in ice water in the winter have had glaze skips. So we are scrubbing them again in much warmer water and with hands that are not frozen. I hope it's better. I chose these glazes to use for both pieces. First I glazed the inside and then cleaned where it got some from pouring it out. I glazed the bottom of the top opening in black lava so a rum sugar cube could be set on fire here. Or dry ice. Layer number one. I wanted these lines to be dark so they get extra layers. I had hundreds of tiny glaze skips. I had to search for them from every angle and then paint them out. This next layer will be one for most of the mug but two on the lines. First coat is done and must dry before I continue the next day. Here it is with a flash. The next day I did another layer everywhere except where the tiny dotted areas are. I didn't want the glaze to fill them in. I did more around the eyes and then a forth layer on the lines. Not done yet. Cheers, Wendy |
|
D
danlovestikis
Posted
posted
on
Sat, Jun 15, 2019 1:56 PM
We sold this hula girl to Trey Goodwin in Tennessee. It didn't arrive on time so we checked the tracking number. She escaped and went to Hawaii.
ProcessedIn transitDelivered She just had to see Hawaii before moving to her new home back East! Imagine that. She did arrive safely today. Wendy |
|
H
hang10tiki
Posted
posted
on
Sat, Jun 15, 2019 2:20 PM
That’s awesome |
|
H
hang10tiki
Posted
posted
on
Sun, Jun 16, 2019 5:15 AM
Morning
|
|
D
danlovestikis
Posted
posted
on
Mon, Jun 17, 2019 8:40 AM
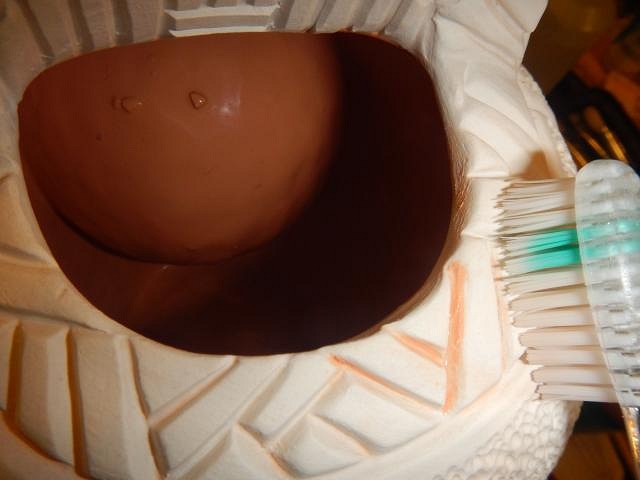
hang10tiki I sure do like that view. What a great start to the day. =============================== More glazing catch up photos these were taken from 6/7/19 to 6/8/19 Both these pieces are the wish of Fred Ferrer. I continued on with more coats and then it was time to do the insides of the mouths. I used an off red CN Duncan under-glaze to start.
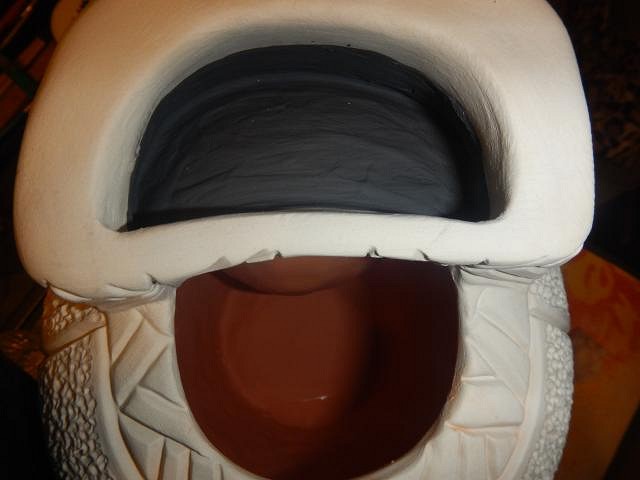
When it was completely dry I did layers of a neon orange CN Duncan under-glaze. I did some touch ups and more layering.
This one photo is from 6/10/19. I skipped ahead for this one photo to show the skips. It seems I can't avoid them right now. I will soon touch them up and fire again. May all your mornings start with a beautiful sky. Wendy |
|
H
hang10tiki
Posted
posted
on
Mon, Jun 17, 2019 9:49 AM
He looks very happy |
|
H

Hamo
Posted
posted
on
Mon, Jun 17, 2019 8:34 PM
That hula girl may have taken a detour to Hawaii, but Tiki Bob came directly to Colorado without stopping. Thanks, Wendy!
|
|
D
danlovestikis
Posted
posted
on
Mon, Jun 17, 2019 9:54 PM
Hamo aka Seth, I once again didn't associate the two of you as one person. I thought I knew two really nice guys! Now you are fused together in my mind, at least for a week! I'm really happy you received the mug and you and he smiled at each other. Wendy |
|
D
danlovestikis
Posted
posted
on
Tue, Jun 18, 2019 6:33 AM
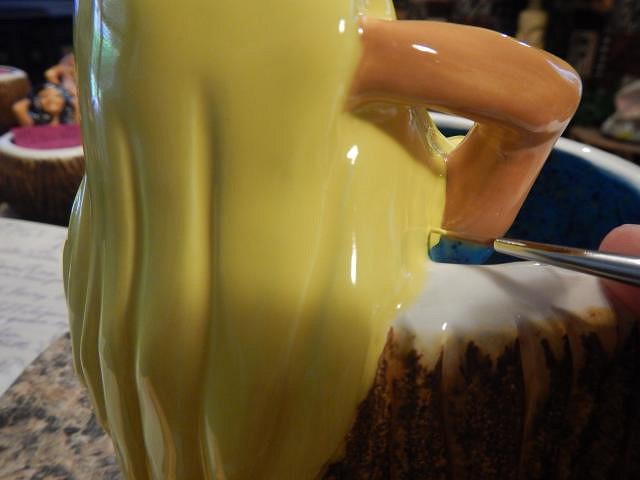
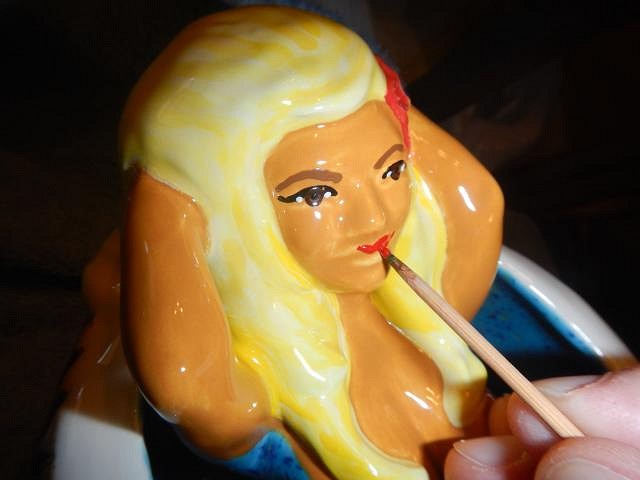
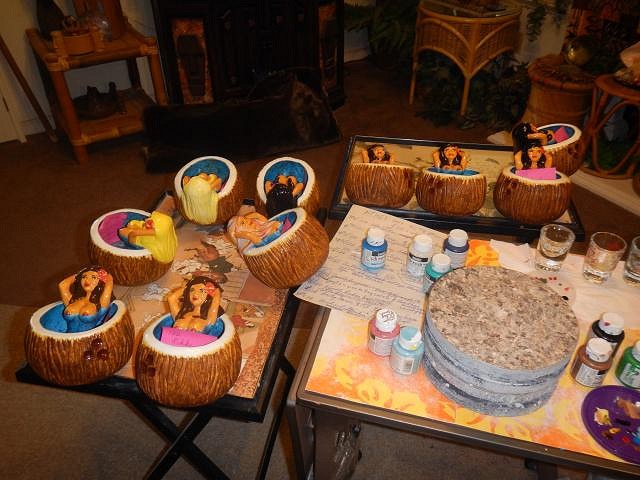
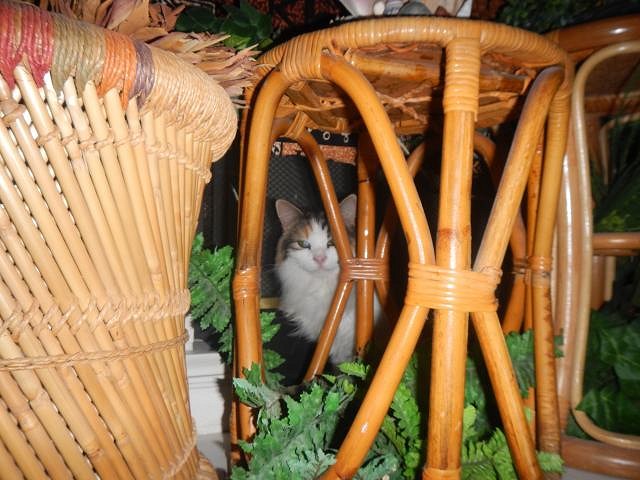
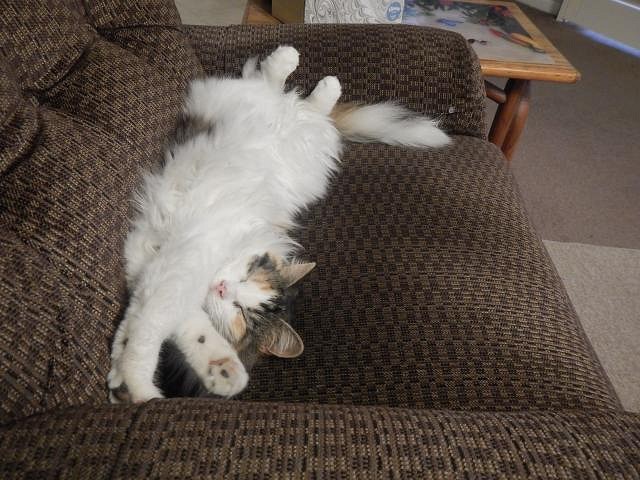
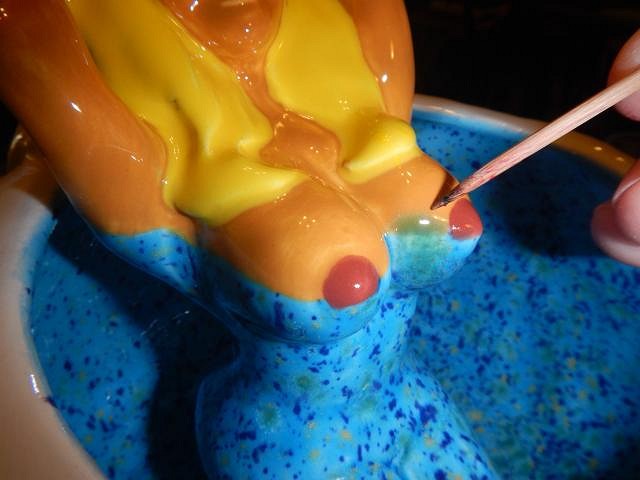
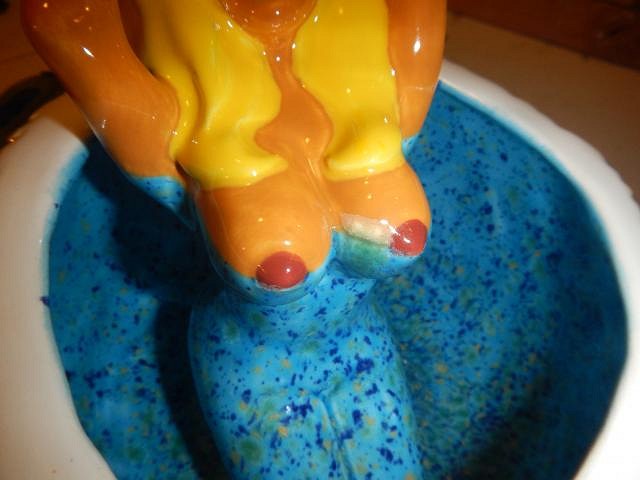
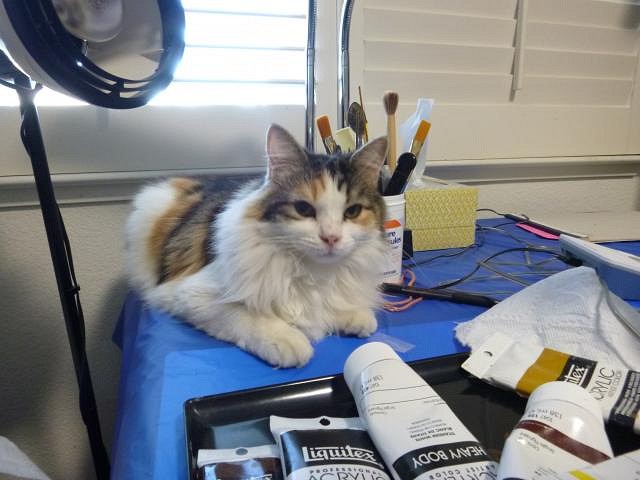
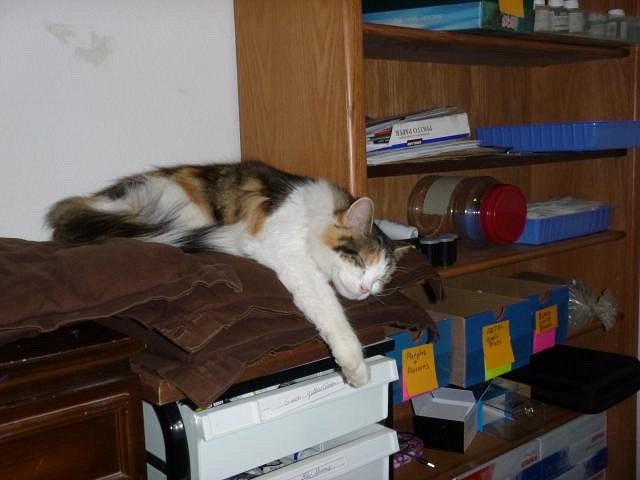
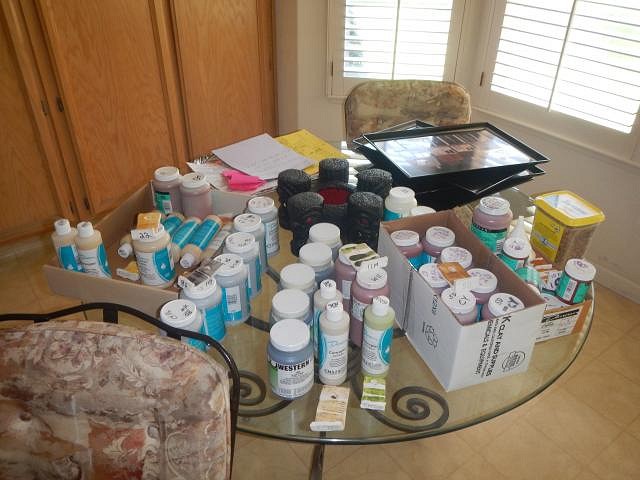
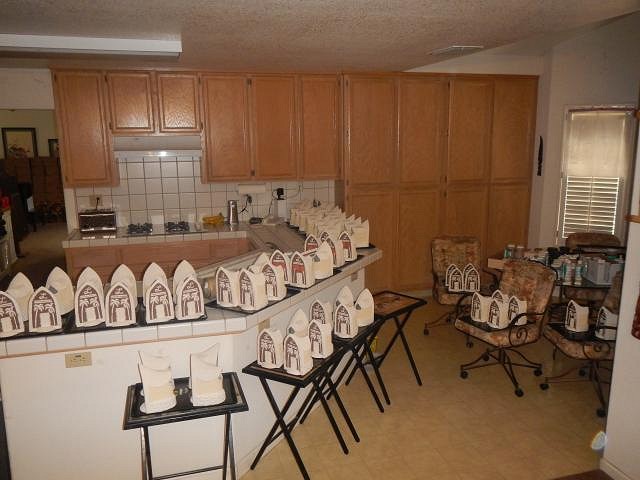
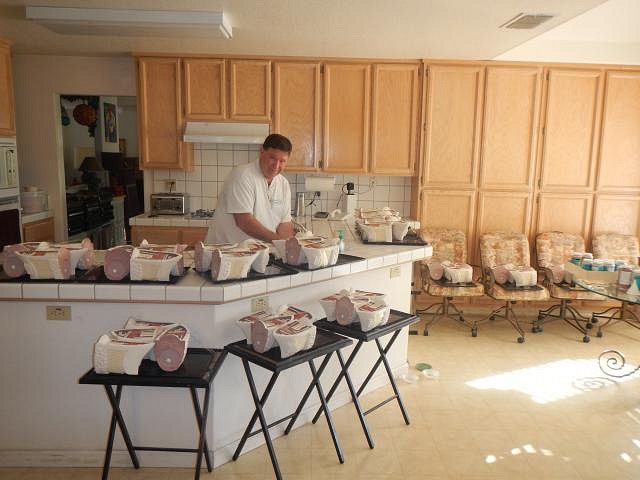
The last of the glazing photos until I start to glaze again. These were taken from 6/9/19 to 6/10/19. Since I am having major skip problems we are re-scrubbing everything before I glaze. Dan does all the heavy lifting for me. After scrubbing they go into the house again and are covered with plastic to keep the dust off. One spec is a problem. These are the last of all the bisque to be scrubbed and glaze but that is still a ways off. I have eleven Hot Tub Hula Girls made. I have pink notes inside each mug that tells me the number of the mug, the hair, eye and lip color. I use enamel paint to do these touch ups and detail work. Then the mug bakes in the home oven. These areas have to be protected from hot water and hot drinks. Cold will not remove the paint, hot liquids will. I tip each one as I finish. Scrabble is visiting and keeping me entertained. I use a skewer stick to paint these details because it is more controllable than a brush. Scrabble got tired of watching and took a nap in Dan's chair. This is the first time a crystal in the glaze was large enough that it moved up and made a defect. I'm glad I found it before I did the enamel. I used a dremmel to remove the glaze. This one mug will need to be glazed and fired again. At least it wasn't a skip! There are other projects to show soon, Wendy |
|
H
hang10tiki
Posted
posted
on
Tue, Jun 18, 2019 7:35 AM
Blushing |
|
D
danlovestikis
Posted
posted
on
Wed, Jun 19, 2019 7:09 AM
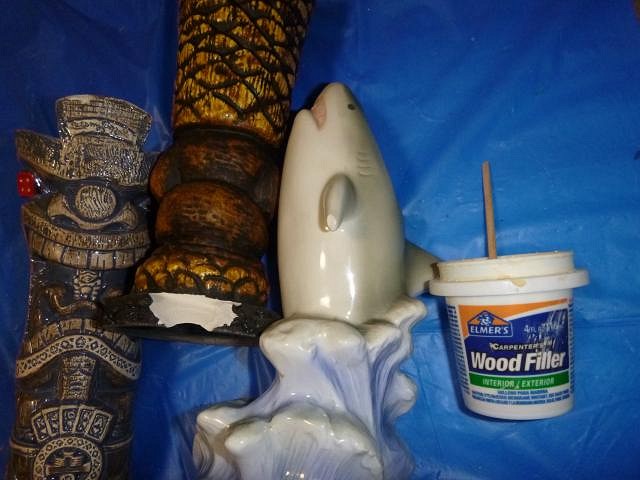
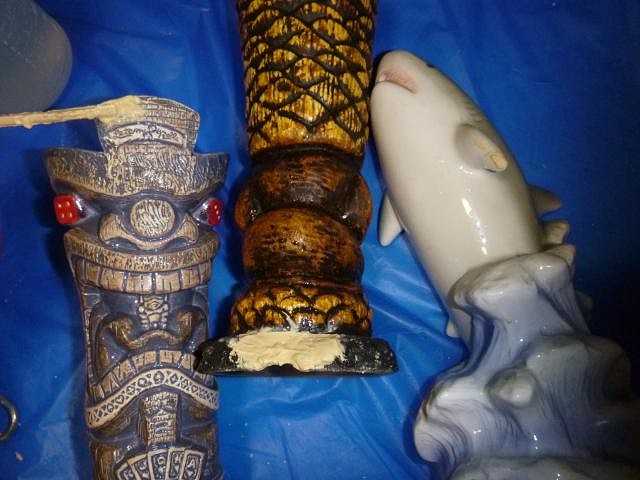
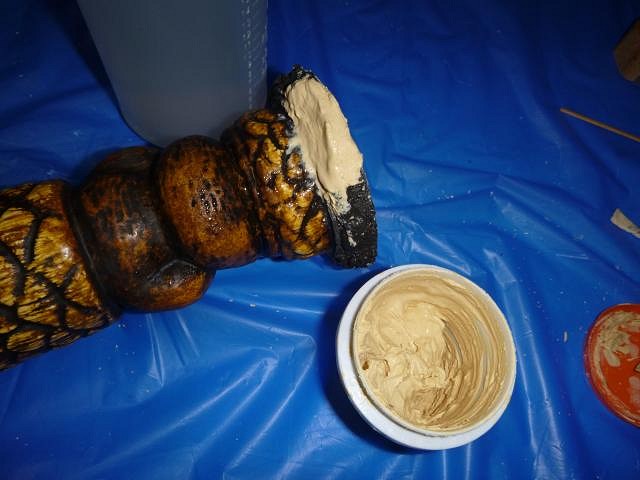
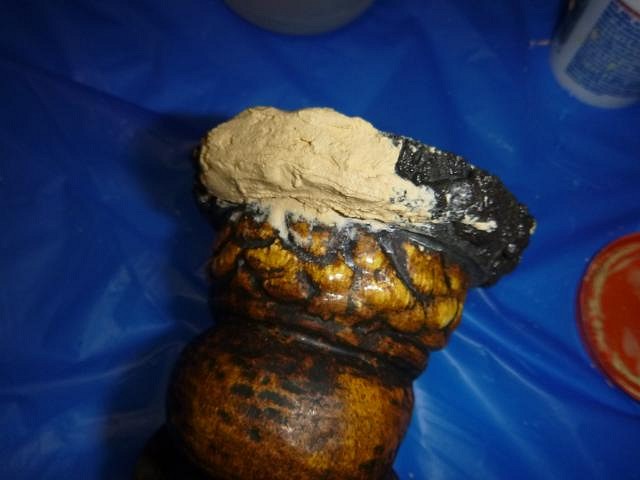
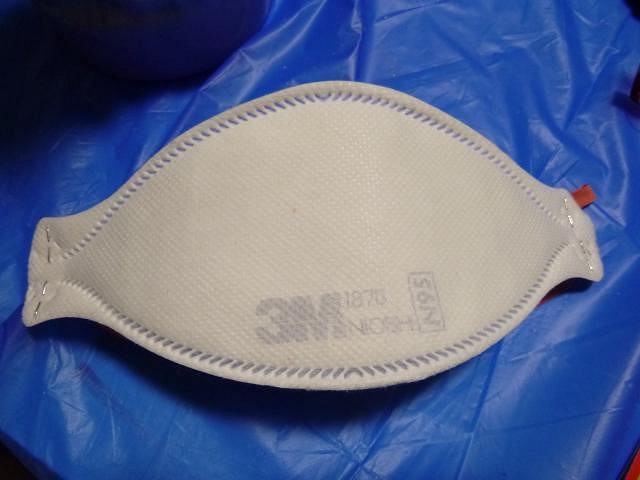
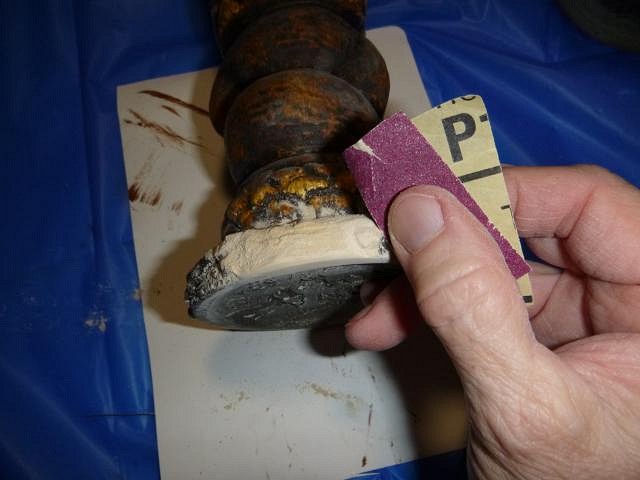
hang10tiki you are so cute. ===================== Moving on from the catch up photos to favors for a friend photos. My life in tiki art began with repairing chipped or broken tiki mugs for Dan. It moved into the shouldhavebeen bowls and then to real ceramics. I have never forgotten my roots in repairs. Neither have many of my friends. My friend Vance Klinke had two accidents. The first while matting the walls of his tiki room he was tripped by matting that caught his foot. He fell forward and knocked three mugs off his shelf. Here's the damage. The first is a mug from Frankie's in Las Vegas and is by Crazy Al. It has a top lip chip. The next is the Gilligan's Island tiki by Gecko and it has the largest chip at the base. The shark is from Mandalay Bay in Las Vegas and is sentimental for him and just had fin chips. This would have been a sad loss. The best repair substance is this Elmer's Wood Filler. I have used it for years. It does tend to dry out so I keep it in a plastic bag. I also add water and stir it each time it's used and then I leave a thin layer of water on top when I'm done. I wet the chip to start the "capillary action". This helps the filler to stick. I will do many layers letting each dry in between. I don't hurry this process. I may take a week or more to build up the area. Another layer days later and then again. On and on. I also check and add it to the bottom. This still needed some at the edge. I finally reached the last layer. I let it dry completely. Even on small repairs you must wear a face mask that is dust proof. Then I start to sand and shape. I even used a tiny screw driver to dig at the filler to form the texture. Duncan makes a lot of ceramic paints and stains. I used pewter and then some acrylic black to make the color as close as I could to Geckoz's. I did the same on the large repaired area. It's left alone to dry. Next I finished filling and drying the Crazy Al repair. It was sanded and I carved texture and then I painted it. These were all easier to blend because of the rough surfaces. I also coated this with clear finger nail polish so that it had the shine at the top lip of the mug. All done and ready to go. The repair that wasn't well hidden was the shark. Smooth and glossy surfaces are fine but making the paint added invisible isn't possible. I will try to return later to show the steps for his next accident. Wendy |
|
H
hang10tiki
Posted
posted
on
Wed, Jun 19, 2019 8:41 AM
Good as new |
|
D
danlovestikis
Posted
posted
on
Thu, Jun 20, 2019 7:28 AM
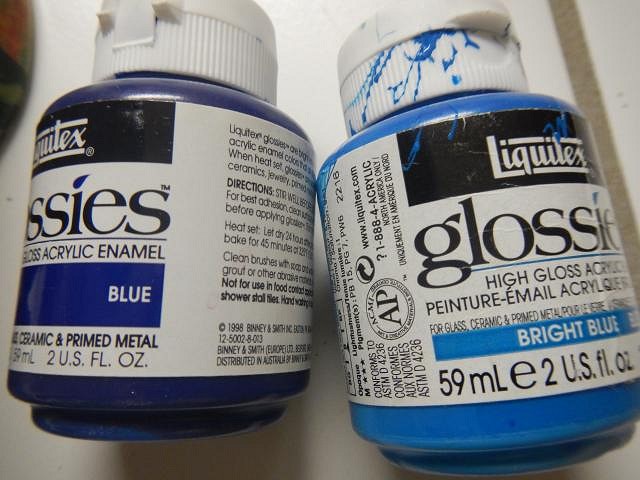
hang10tiki thank you for thinking that. ============================ Well my friend picked up his repaired mugs but dropped off one more. This time he had a shelf fall off the wall. This one Crazy Al mug was chipped. So back to work. Three chips. Two on the lid and one at the top of the opening on the skull. I got out the same putty We no longer have this mug so I had to guess the shape I was building. I would build it, let it dry and then add some more. I kept doing touch ups over a couple of weeks until I thought it looked right. Close at this point. Face mask on every time I sand. I ran the sandpaper back and forth until the top was matched. I found all the paint colors that I thought it would take and then stirred each one with a wooden skewer. Now it was time to paint and match. Doing thin layers and letting them dry each time. This is a rough style of glazing so I used my fingers a lot to blotch the paint on. All done except for a layer of clear sealant. Then he gets to pick it up and give me a hug. Those Glossie Paints are no longer manufactured. They are like gold to me. I could have done this repair with regular acrylic paints and then sealed it but enamel is preferred. You can also use automotive pin-striping paint. I have that too. Cheers, Wendy |
|
H
hang10tiki
Posted
posted
on
Thu, Jun 20, 2019 1:29 PM
Another great fix by the master |
|
G

GROG
Posted
posted
on
Thu, Jun 20, 2019 3:33 PM
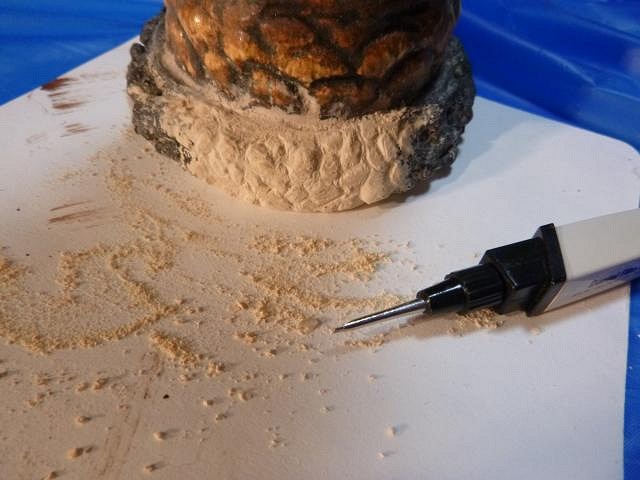
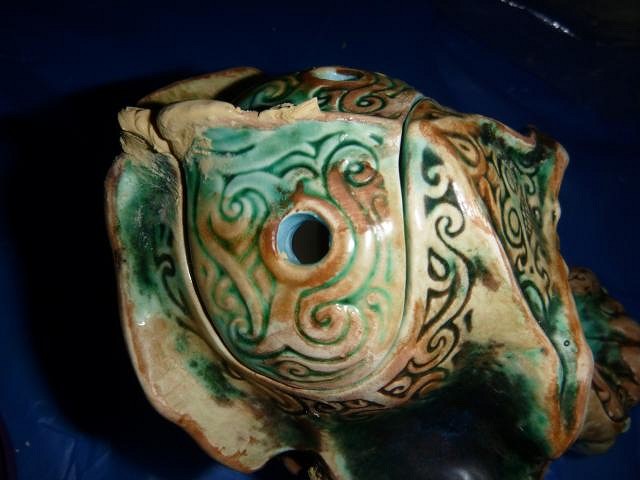
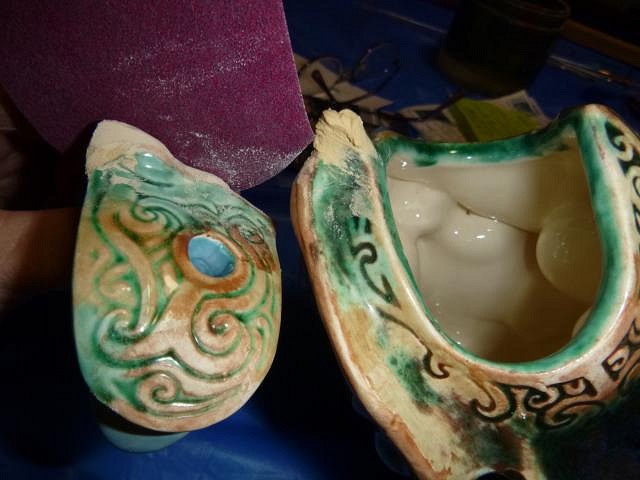
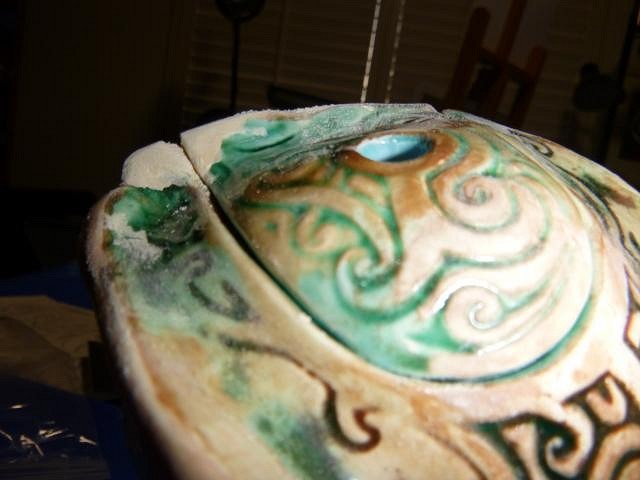
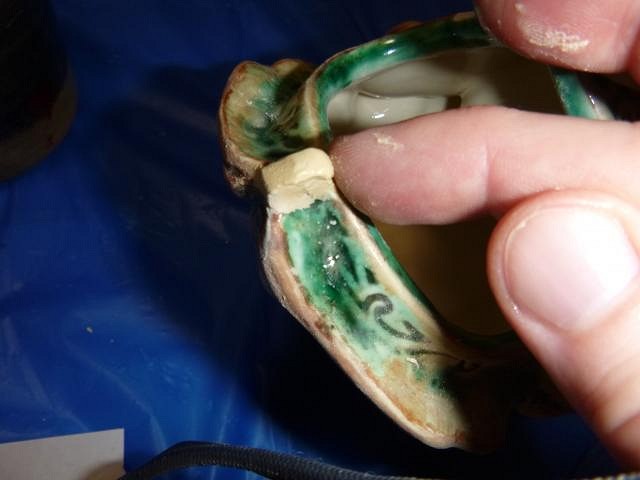
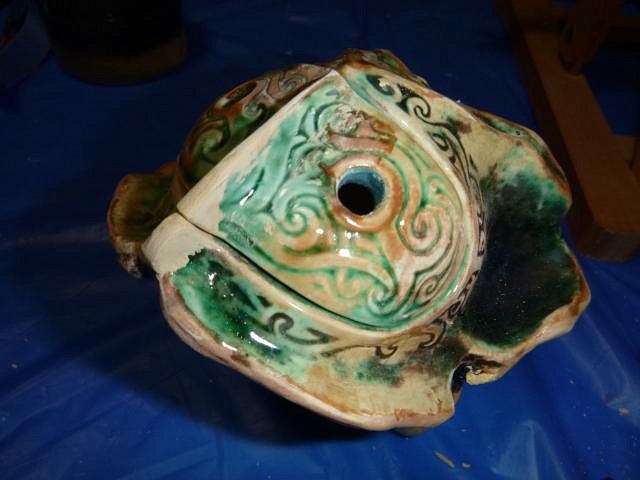
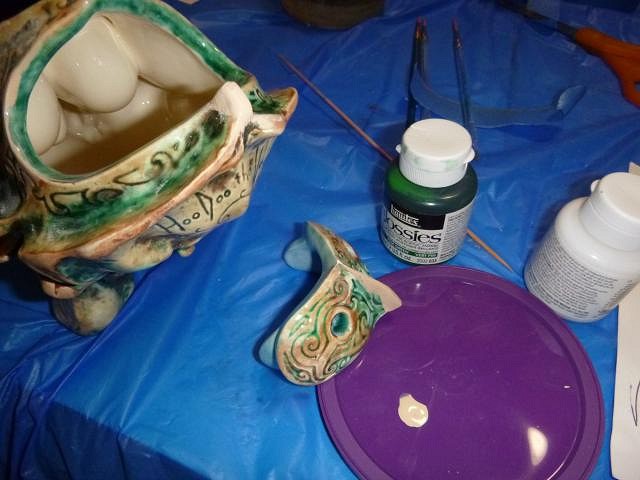
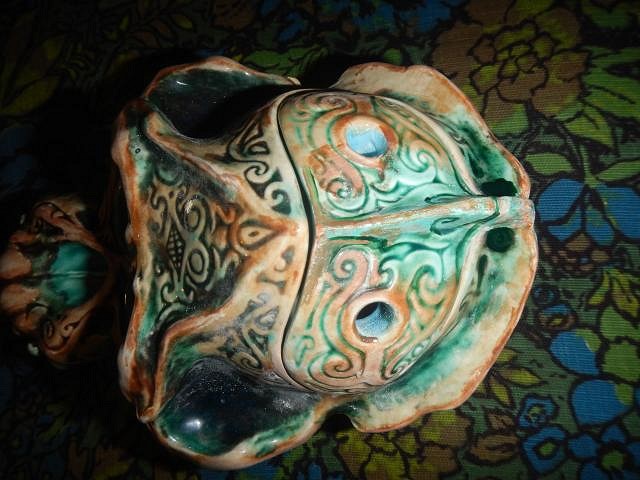
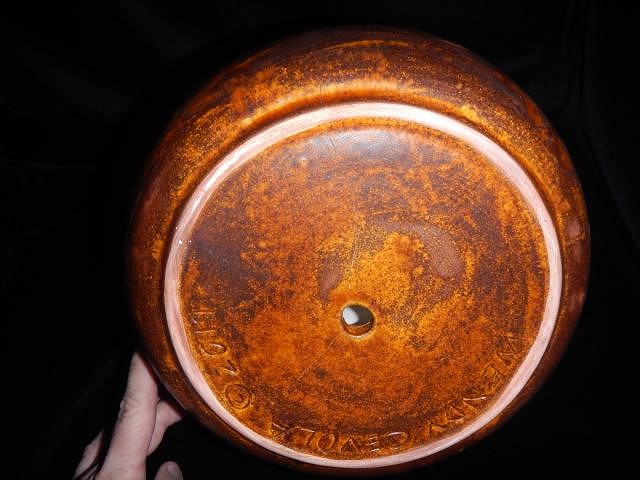
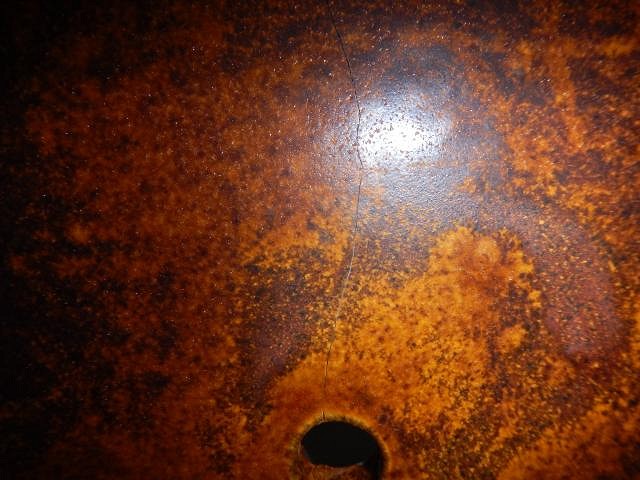
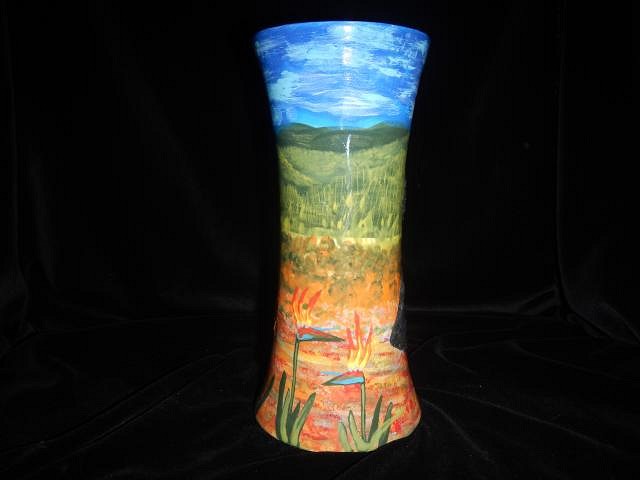
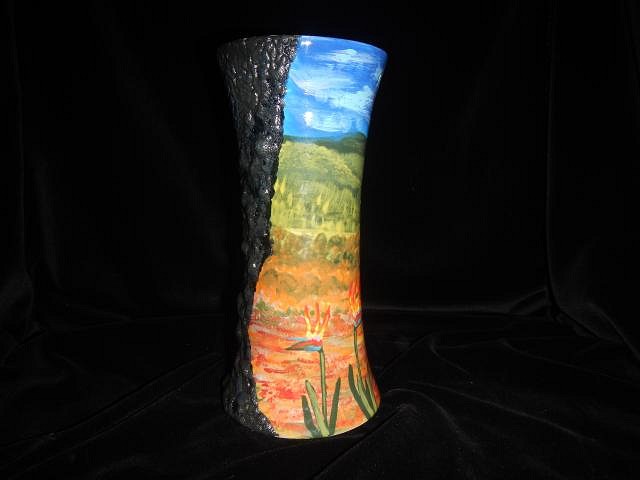
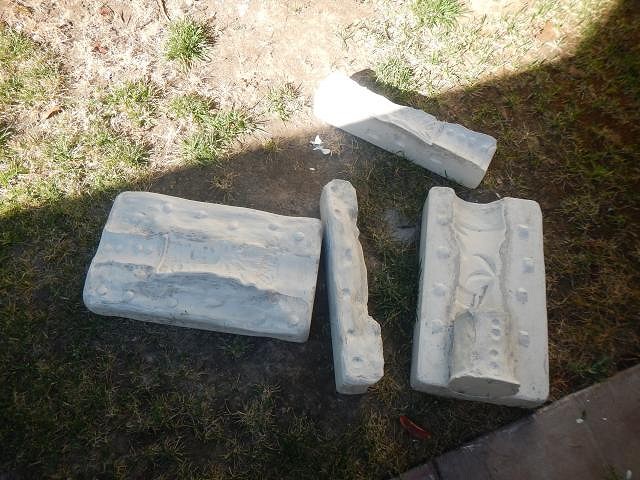
Judging by what you did with these other pieces, this should be an EASY fix for you. :D When taking photos I like to also take a photo of the bottom. This is when I saw a very long crack. Once I saw it I then could feel it. The bowl is a total loss. |
|
H
hang10tiki
Posted
posted
on
Fri, Jun 21, 2019 9:24 AM
Sad about Grog crack |
|
G
GROG
Posted
posted
on
Fri, Jun 21, 2019 9:41 AM
This crack in Wendy' bowl. GROG' crack in underglaze. Hopefully cover it with glaze and come out OK. Thanks Hang10". |
|
D
danlovestikis
Posted
posted
on
Fri, Jun 21, 2019 3:18 PM
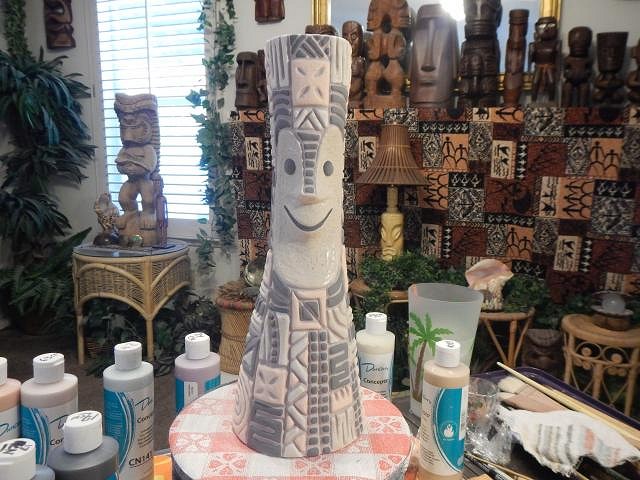
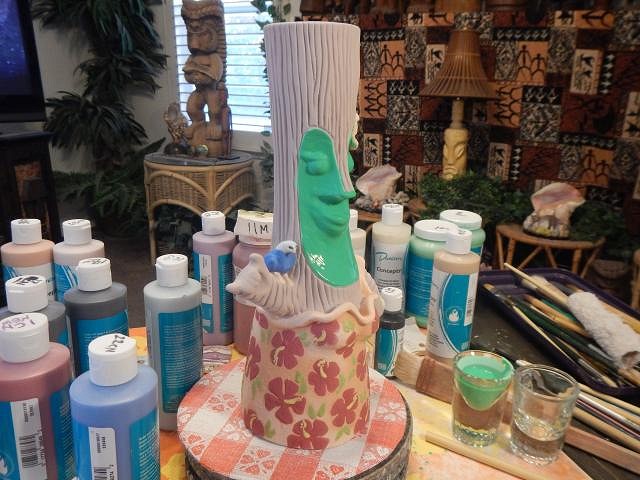
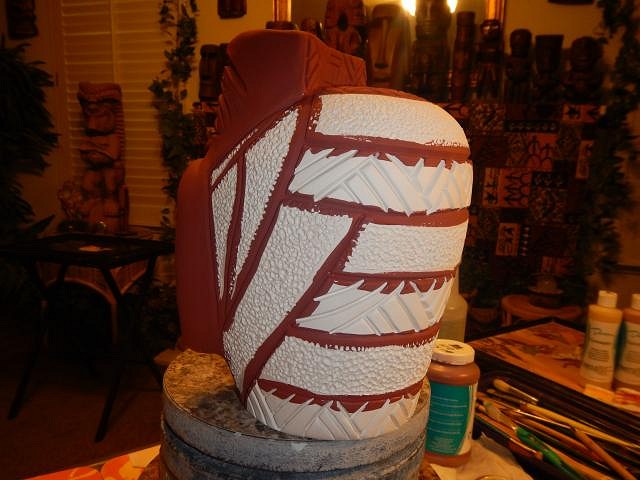
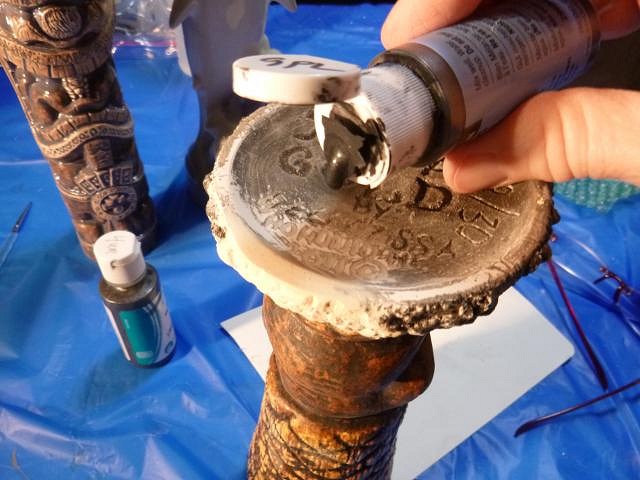
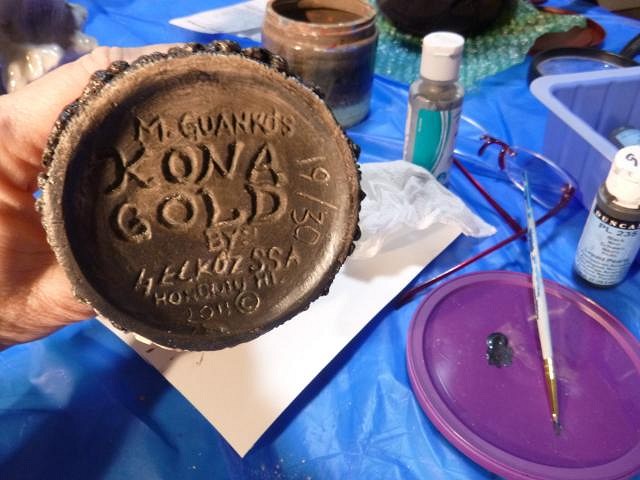
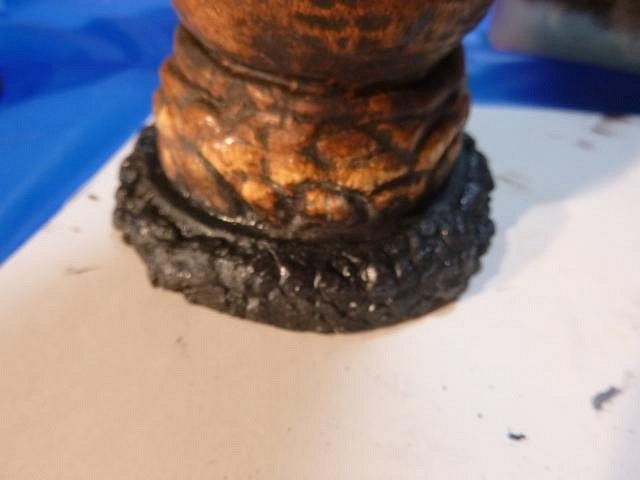
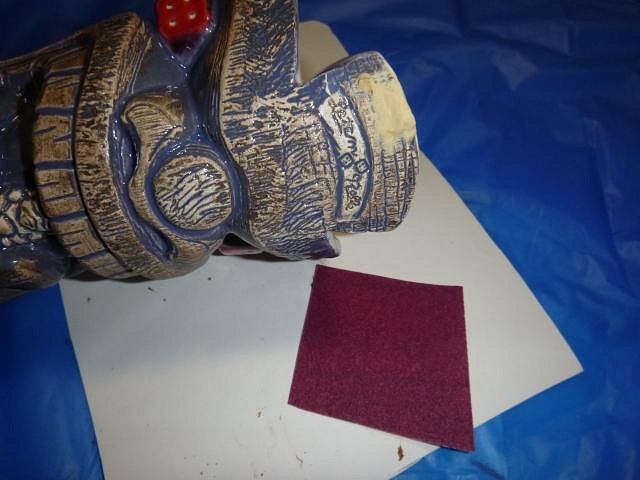
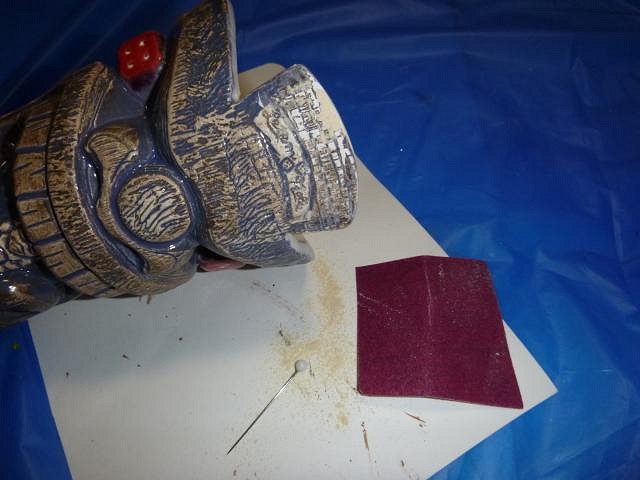
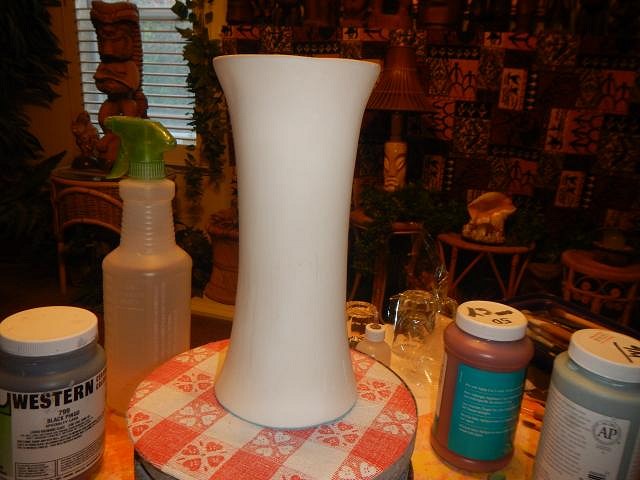
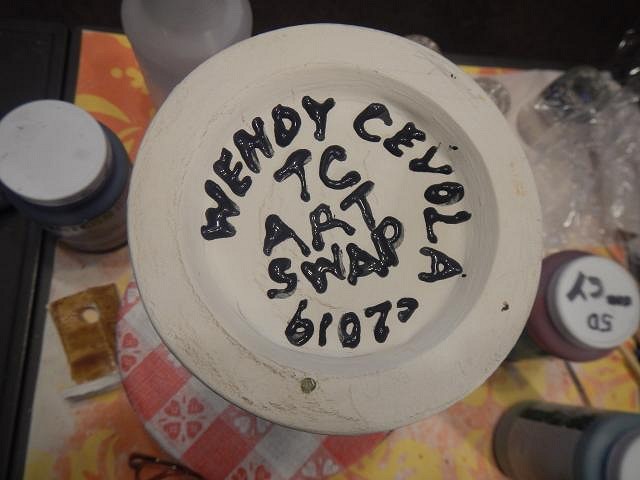
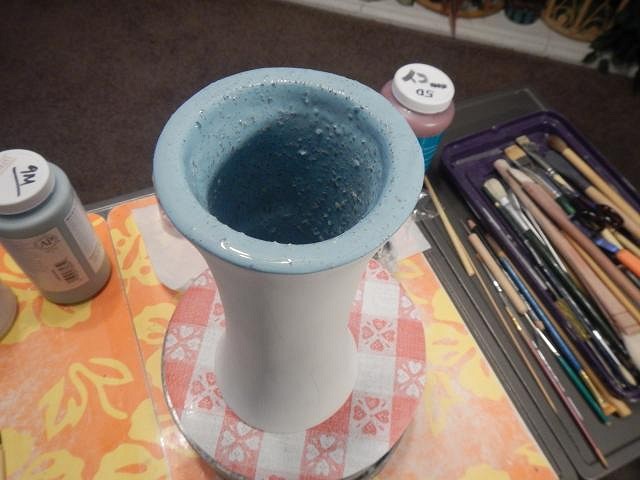
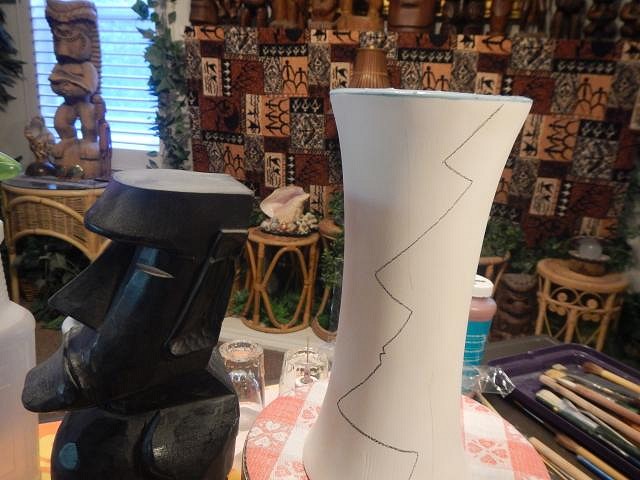
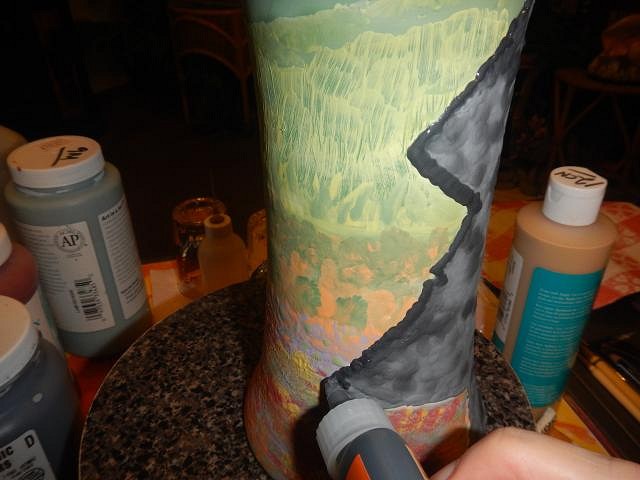
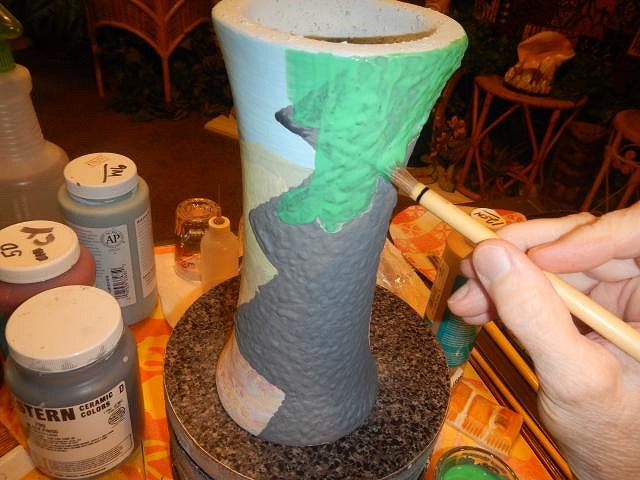
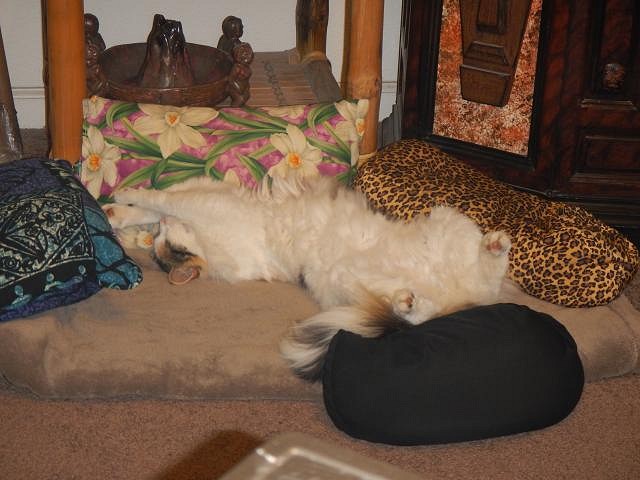
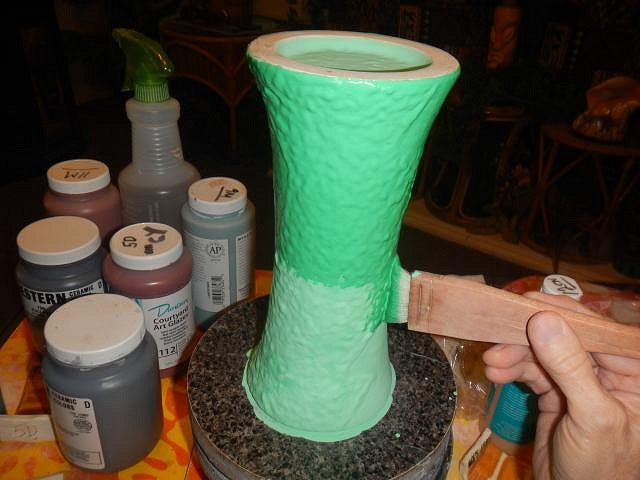
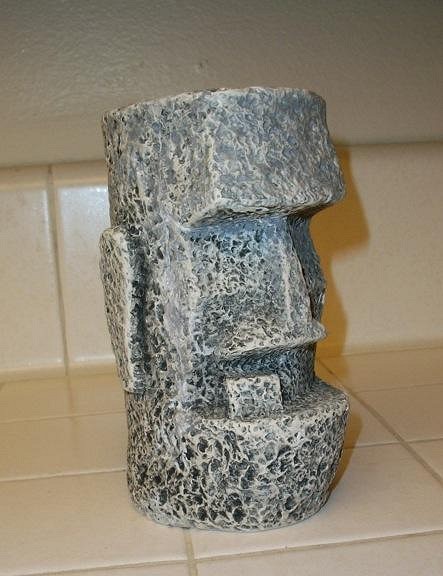
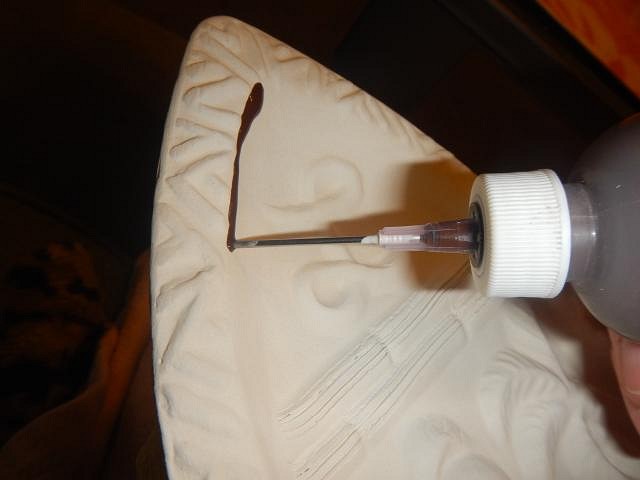
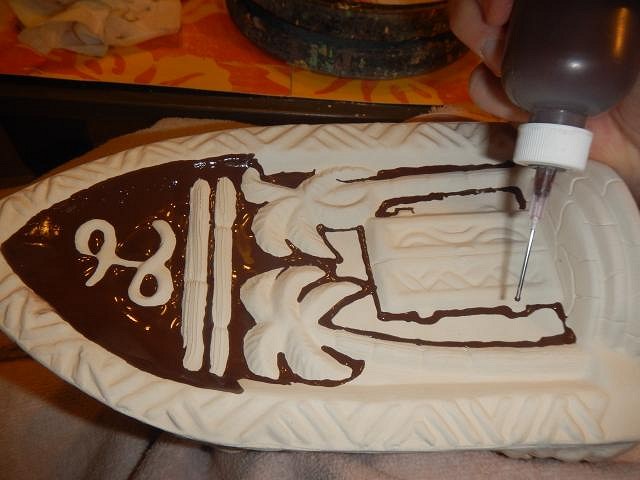
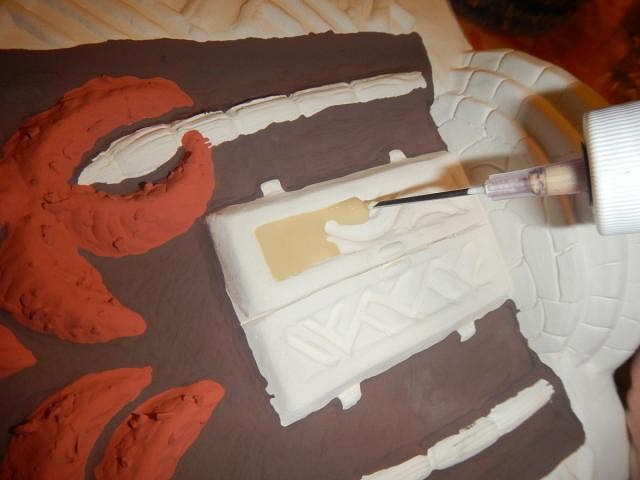
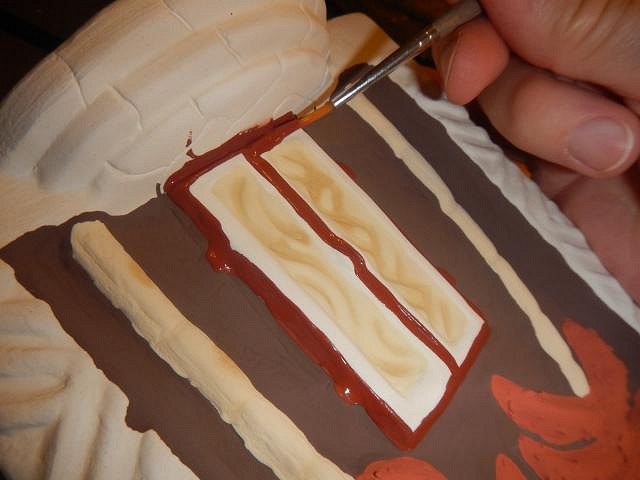
GROG you can hide them but you can fix them. So for the show I just put tape over the crack so no one gets cut. But thank you for the vote of confidence. hang10tiki GROG and I are adding entertainment value to the show with out mishaps. GROG I'm still hoping you were able to really fix your bowl. =================================== I started work on the Swap mug on 5/23/19 and I got this far by 5/24/19. This was actually the sculpt I did fired and then used to make a fogcutter mold. So it's the only one this large. I used those little bottles of black under-glaze to label the bottom. I glazed the inside with my favorite Blue Caprice Mayco Jungle Gem. I bought this Moai from a exchange teacher in Chile. I used him for the more modern Moai style for my mug. I used a couple of the little bottles to do some layers for the Moai. I also made it lumpy like rock. Next I picked out all the rest of the under-glaze colors I was to use on the background. I painted the rolling hills of Easter Island. I used Dan's toothbrush to work the glaze into a different appearing texture. I had a bit of colored glaze go on the Moai so I used more of the black to keep the edge black. The perspective may be off but I wanted some pretty Bird Of Paradise flowers on the mug. When all of these glazes were dry I did my first coat of Clear Brilliance glaze by Duncan. They do two but this one is the best. Scrabble watched for hours and then conked out. I ended up doing three layers of the clear. Not bad for two days work. Wendy |
|
D
danlovestikis
Posted
posted
on
Sun, Jun 23, 2019 10:01 AM
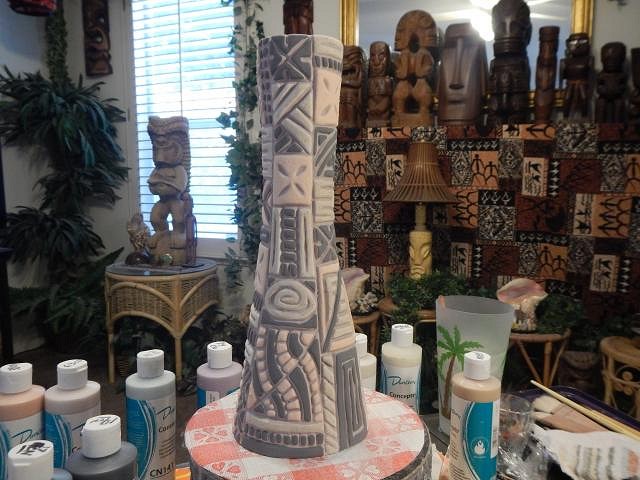
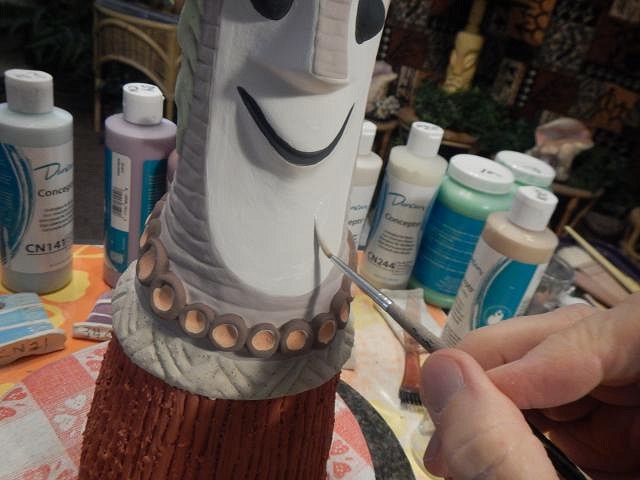
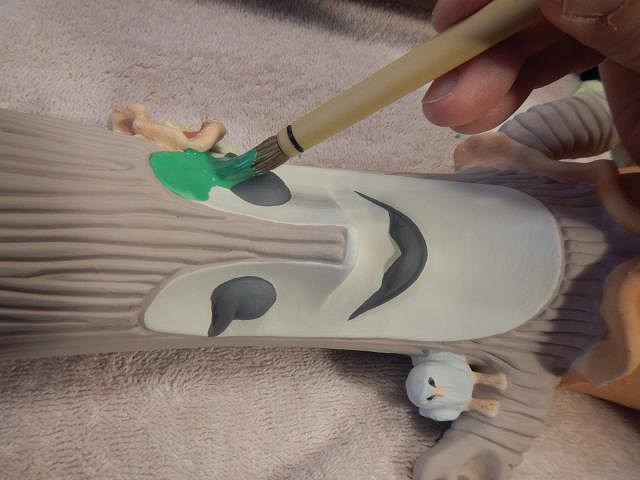
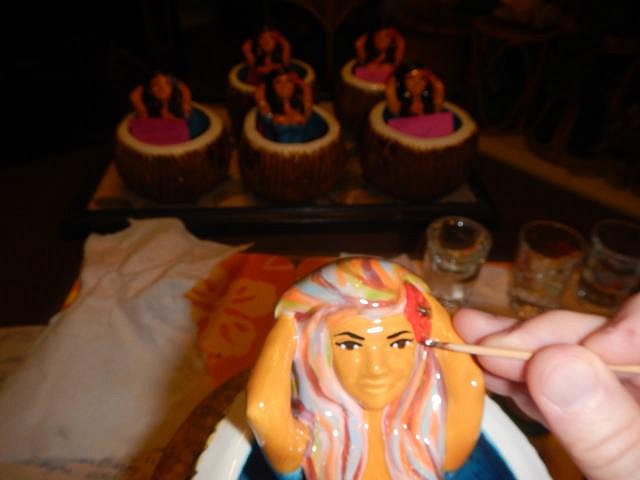
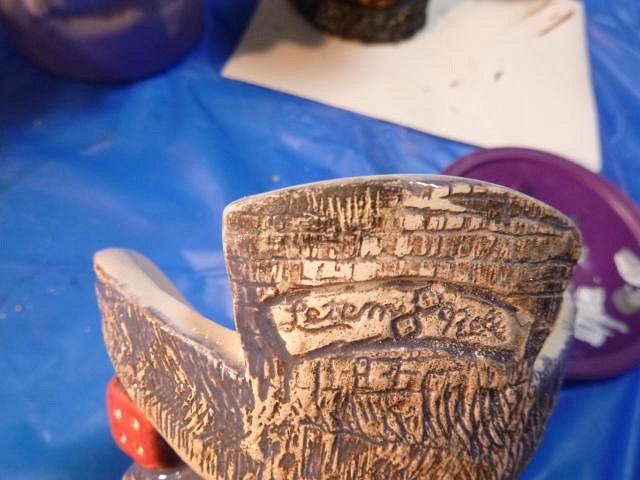
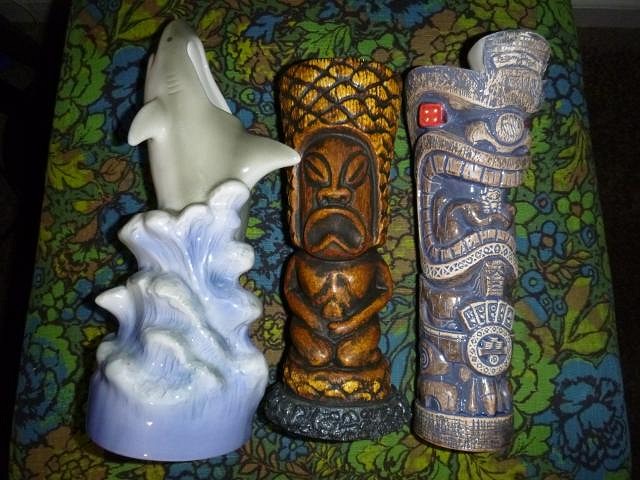
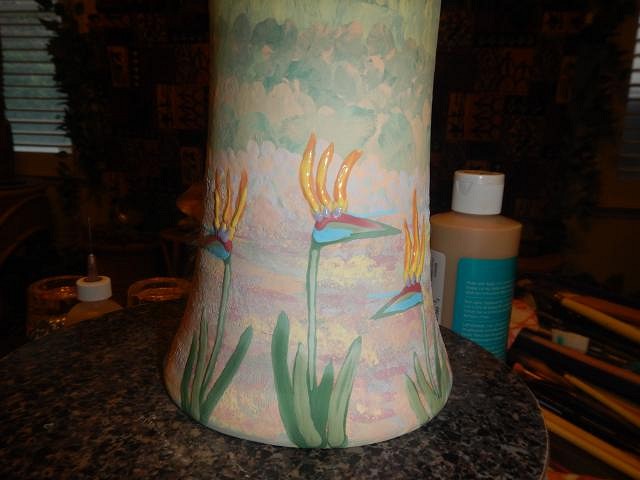
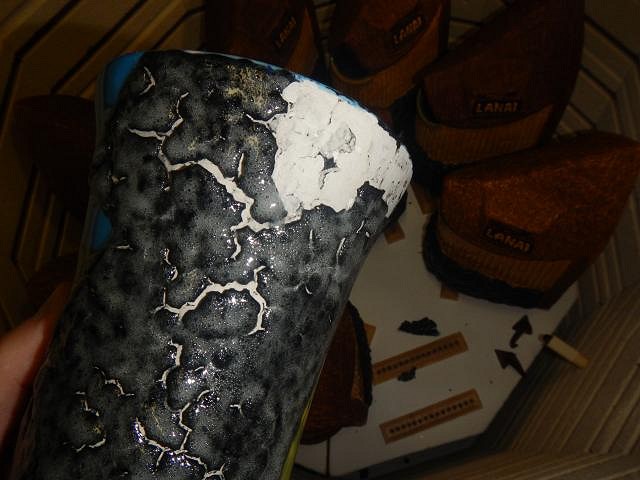
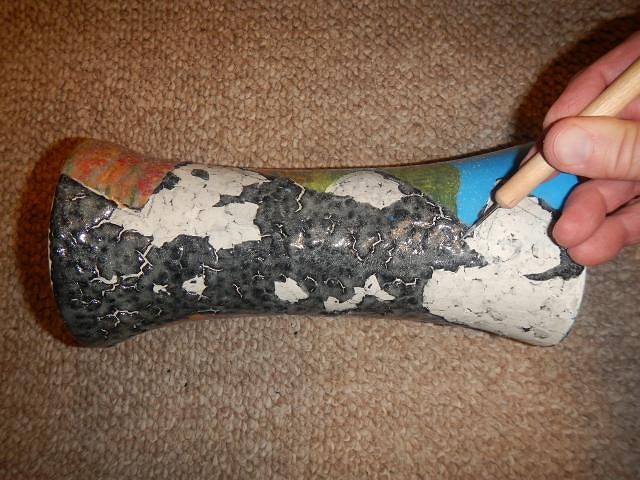
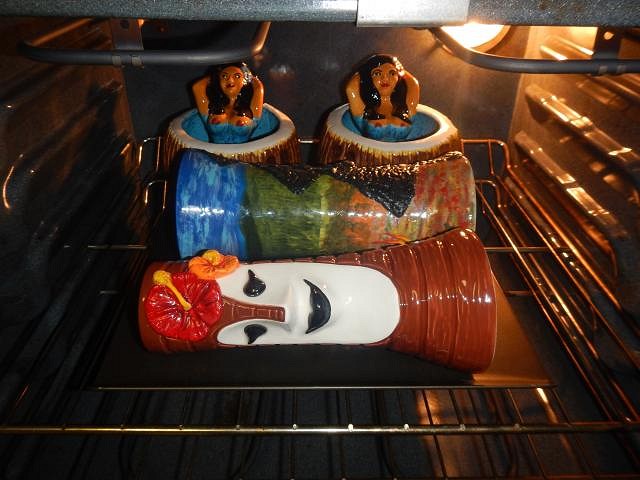
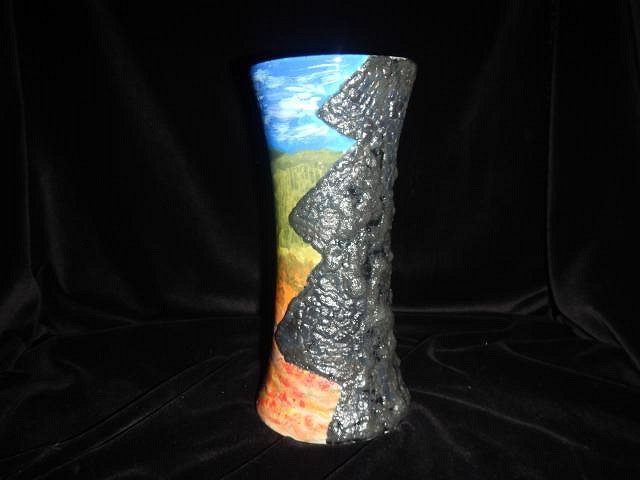
The making of the art for the July Tiki Art Swap by MadDogMike continues. This is the product I used to do the Moai on the bisqueware fogcutter mug. I think it needs to go on a glazed surface. It did not work on bisque. It fell off in the kiln. The parts that stuck I removed or tried to remove with a pick. Once I got off all that would come off I re-glazed it with Black Pingo which is just a great glaze. I did a second layer and Then I let it dry. All of a sudden glaze fell from the sky leaving a large defect here and here. So I used the pick to make sure nothing else was loose and then I re-glazed the sky. Just before I put it in the kiln I decided to re-glaze the Birds Of Paradise. I let them dry then into the kiln. A few days later when out of the kiln I rubbed the mug all over. The only defects were two tiny spots at the lip. I got out the right colors and I painted these until they disappeared. Even though I think it's fine to use and long as the edge isn't scrubbed or subjected to hot water, this mug could be called a painting. 24 hours later it went into the home oven to set the paint. I had jazzed up the flowers on this Tiki Bobette so in she went to. Hot Tub Hula Girl faces are always done in enamel. Sometimes I do an eyebrow 14 times before it looks good with the opposite one. Here is the Finished Swap mug. I also did some more enamel clouds in the sky to blend the colors better.
I'm all done and ready to ship it to my Swap buddy. I hope no one else ran into to many problems. Cheers, Wendy [ Edited by: danlovestikis 2019-06-23 10:03 ] |
|
M

MaukaHale
Posted
posted
on
Sun, Jun 23, 2019 9:07 PM
Hi Wendy, I haven't run into any problems yet. I'm still in the early stages. Your finished mug came out really well! I like the sparkles on the inside. It makes you think twice about what you're drinking on the inside!
[ Edited by: MaukaHale 2019-06-23 21:10 ] |
|
D
danlovestikis
Posted
posted
on
Wed, Jun 26, 2019 7:46 PM
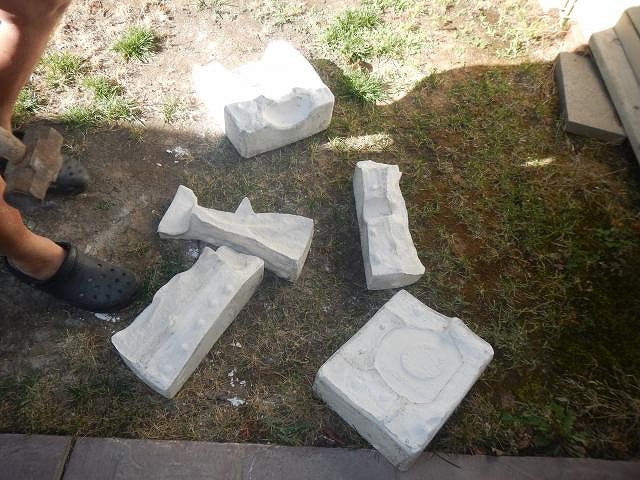
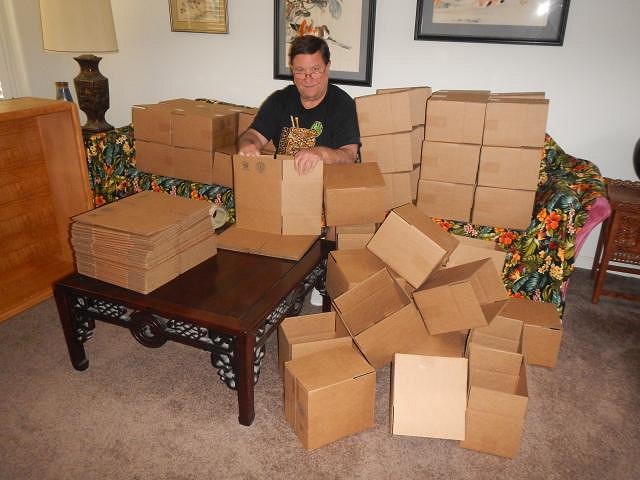
MaukaHale good to see you here and on fb. ========================= I've never reached the goal of 100 Crawl mugs for each year. It could be that I just break up the molds too soon. Today was one of those days. First the 2018 Volcano Waikiki mold was destroyed. I did save the tiki piece in case I want to make cast a necklace from it' The pieces are ready to go into the garbage can. Next we destroyed the 2015 Bali Hai Crawl mug. We just split all the pieces in half and then obliterated my name on the bottom piece. I think I'm good for now. I need to just keep molds that I continue to work with. It's hard to let go but I did! Wendy |
|
D
danlovestikis
Posted
posted
on
Thu, Jun 27, 2019 9:01 PM
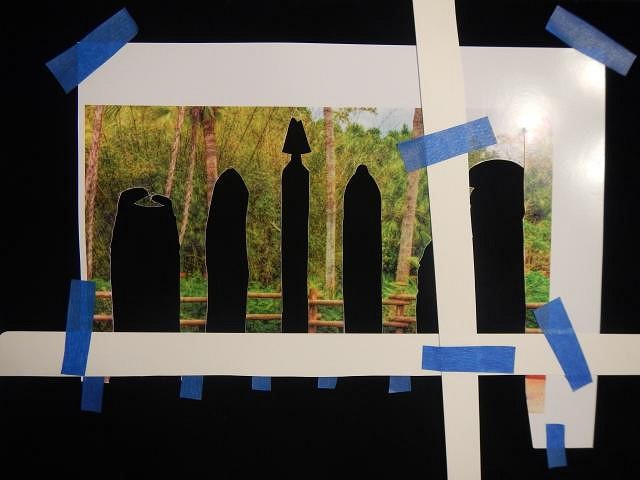
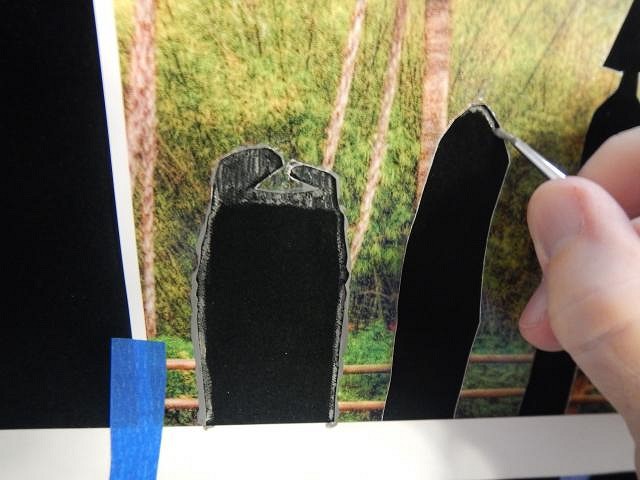
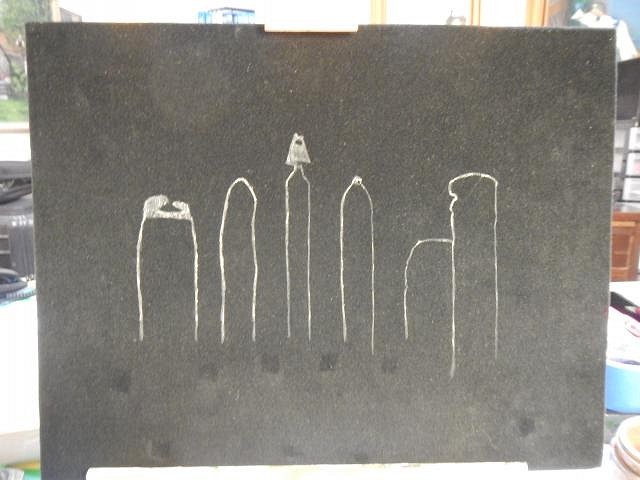
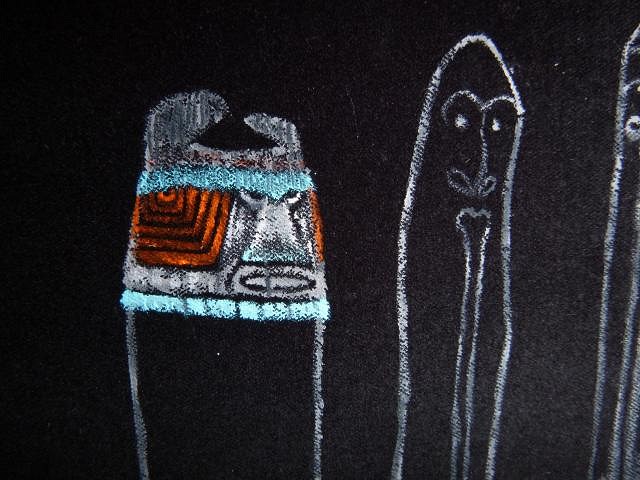
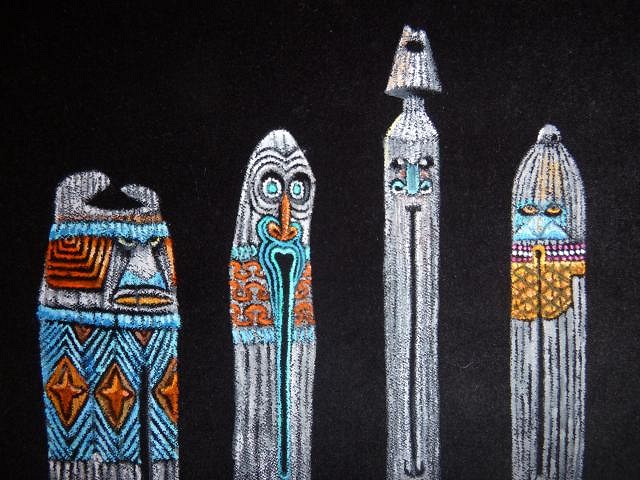
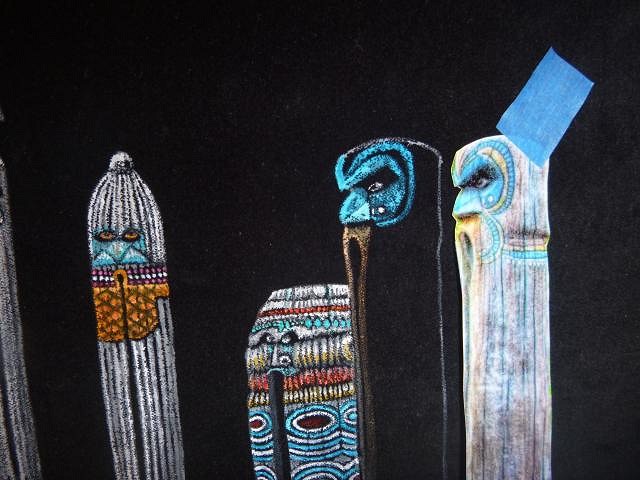
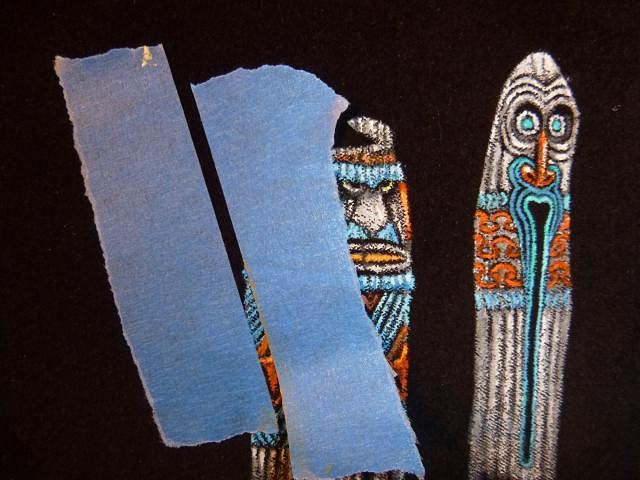
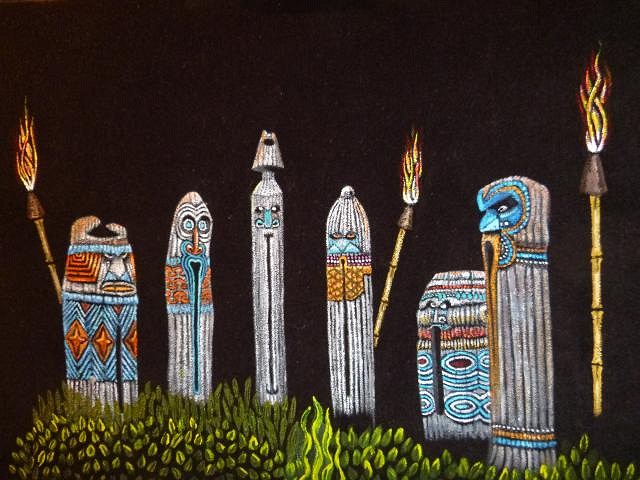
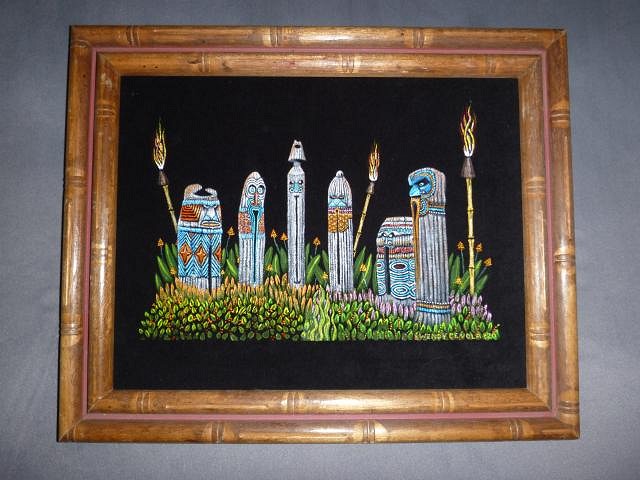
Back to the Wish List #8. This wish is for the Disney Tikis in Florida. That's the only wish I get for the Black Velvets. This time it's for all 6 of the tikis. I only paint at night if I have energy after a day of clay or glazing. These photos were taken over two months from 10/21/18 until 12/21/18. Yep slow going. Some painters can just paint but when I'm doing a copy of something that exists I use a lot of craft to get them close to the original. I start by printing a photo that was sent to me by the wisher. I cut out the tikis. Then using the grey paint color of the tikis I do an outline. You can't remove paint from velvet so no errors allowed. Now that I have the outlines done I've removed the photo. To be able to see the paint which in the beginning soaks into the velvet I use a lot of very bright lights. Yes I work in a hot room.
I tape the photo next to where I am painting to help me get it right.
These are after many layers but not all of the layers that eventually will be on them. More photos to come. hang10tiki has one of my mugs that I did for a swap. It's the second tiki up there. Cheers, Wendy |
|
H
Hamo
Posted
posted
on
Thu, Jun 27, 2019 9:12 PM
Whew! When's the next vacation? You deserve a break. |
|
D
danlovestikis
Posted
posted
on
Fri, Jun 28, 2019 8:40 PM
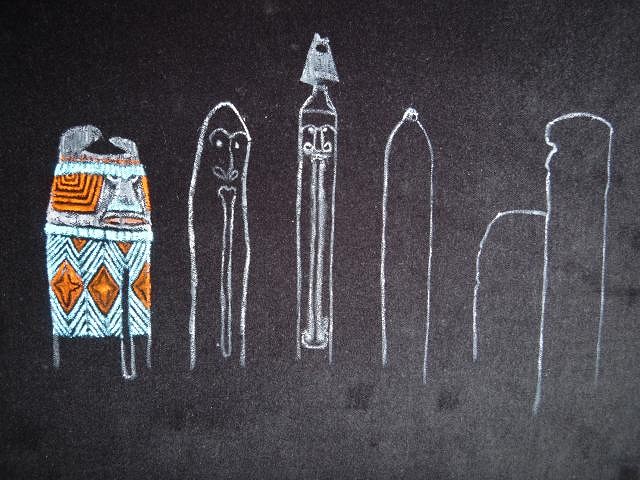
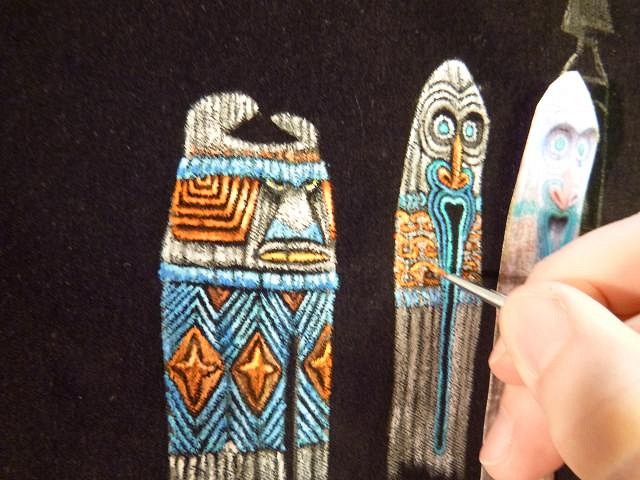
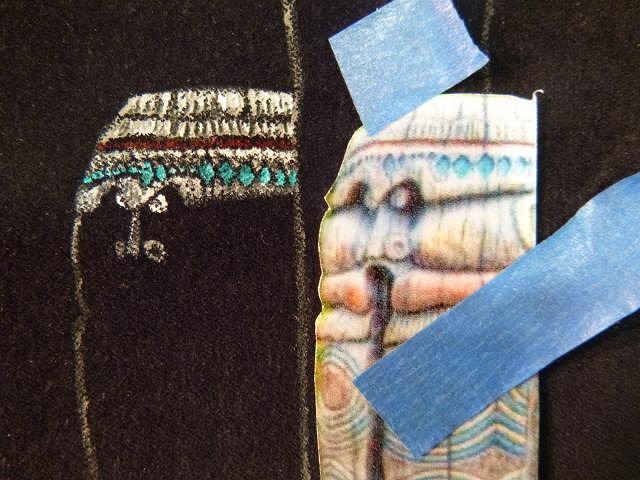
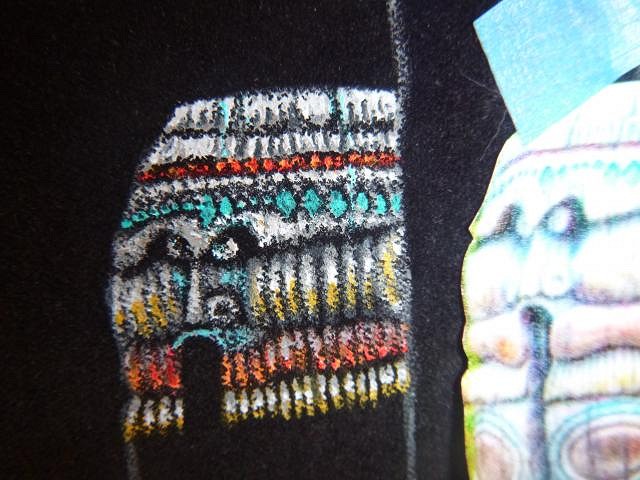
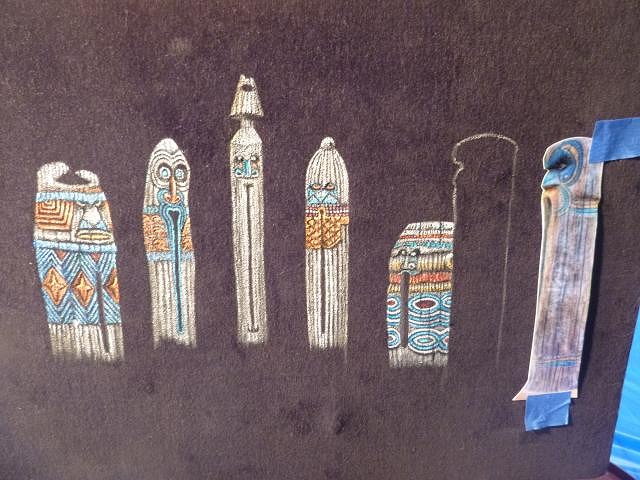
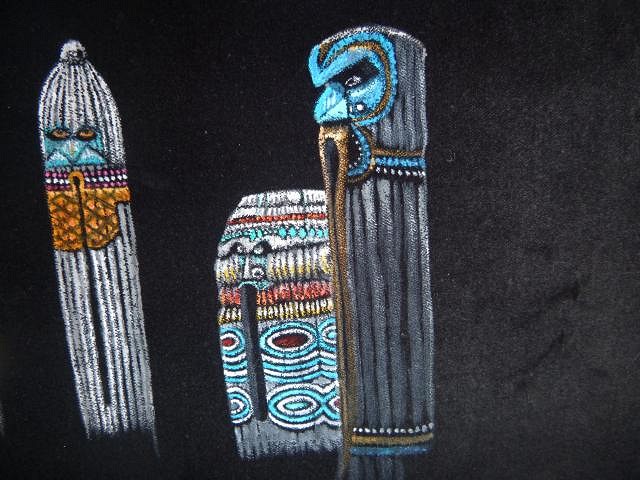
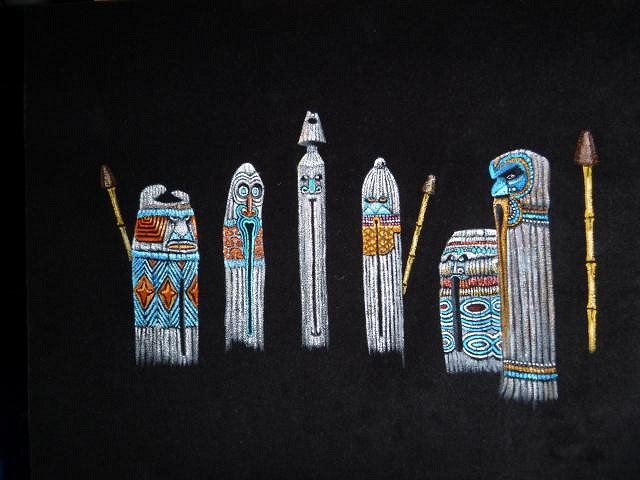
Hamo, noooooooooooo I need to work to keep a healthy brain. Actually we are just back from a quick trip to Oregon to see my sister and her family. I just caught up on posting photos at night when in the hotel. Oregon is beautiful. We toured the Harry and David factory and saw them making a packing up all their terrific food products. We like factory tours. ==================================== Continuing on with the Black Velvet Steps. There's been a change. This will be my entry into the Tiki Oasis 2020 Art Show. It had been a friends wish but I'm so slow that things have changed. It worked out beautifully for both of us. I'll do another for him at a future date. These steps occurred between 1/8/19 and 4/25/19. Here are the tikis that I am attempting to copy. That's the hard part and none are spot on, just close. I keep on taping the tiki photo of the one I'm working on very close to where I'm painting. One color and layer at a time as it builds up. Flash photography makes the velvet look muddy. It's really stark black. Finally it's time to start on the last tiki. Layer after layer as it lightens up. Some areas require more layers and colors than others. I just Keep checking all the tikis against the photo. I may still need to do more but now is the time to move on to other parts. Cheers, Wendy |
|
H
hang10tiki
Posted
posted
on
Sat, Jun 29, 2019 8:19 AM
Dang Awesome |
|
D
danlovestikis
Posted
posted
on
Sat, Jun 29, 2019 3:27 PM
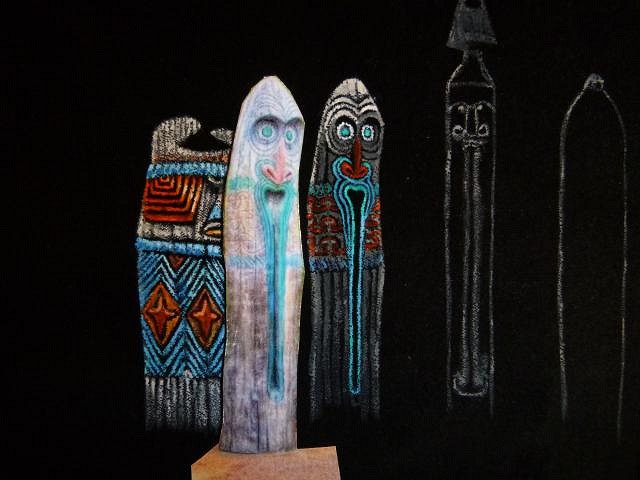
hang10tiki beat you to what? Thank you for the very nice comment. ===================================== More steps on the Tiki Oasis 2020 Art Show Black Velvet painting of the Disney Liki Tikis. Next up is the painting of the tiki torches. I use painters blue tape. This way I can do a straight line. When I remove the tape I then can add the bulges at each connection. Next it was time to light the torches. Wishing you all a wonderful Saturday, Wendy |
|
H
hang10tiki
Posted
posted
on
Sun, Jun 30, 2019 9:57 AM
Beat me to it Awesome W |
|
D
danlovestikis
Posted
posted
on
Sun, Jun 30, 2019 10:36 AM
hang10tiki you are going to do black velvet paintings of these tikis? That would be fun. Wendy |
|
H
Hamo
Posted
posted
on
Sun, Jun 30, 2019 1:59 PM
Good luck with jury duty. That wasn't quite the break from work I was suggesting, so I hope it doesn't keep you from making tikis for too long. |
|
D
danlovestikis
Posted
posted
on
Mon, Jul 1, 2019 8:07 PM
Hamo it's going well so far. I call after 5 PM tomorrow to see if the need me. I'm hoping that the 4th of July is a holiday for the courts. I would always do my duty and be a juror but Dan and I are just wasting our time because they will never take us because of friend and family police connections. We go until they kick us out. I worked on tikis all day. ========================================= More steps are completed on the Tiki Oasis 2020 Black Velvet Painting. These photos were taken from 5/24/19 to 6/26/19.
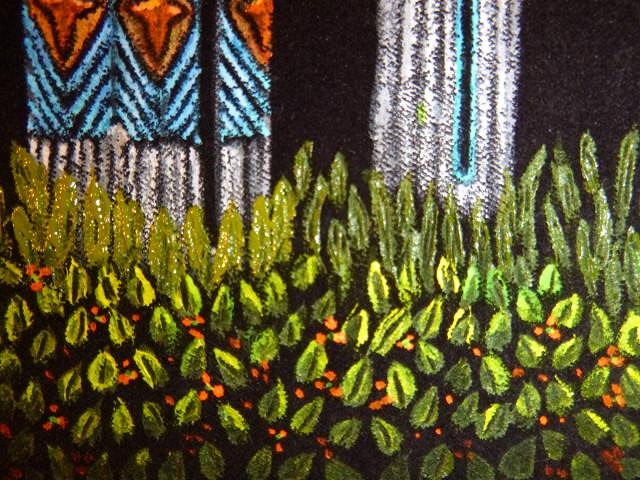
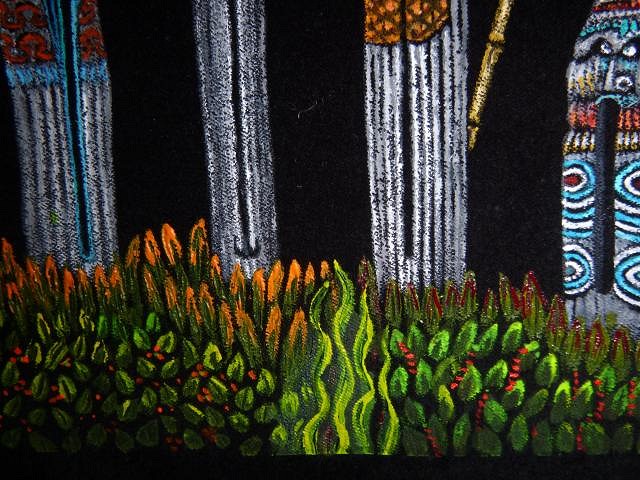
Scrabble is wonderful company. She likes to hang out with me and that makes my day special. I just keep returning to the same leaves and adding more color or flowers. Thank you for watching, Wendy |
|
D
danlovestikis
Posted
posted
on
Tue, Jul 2, 2019 8:20 AM
Yesterday was Bowl-O-Rama at the Tong Hut. Mahalo Tiki aka Nelson Parker was vending there and sent these photos.
I hope to have a bowl for him next year without a long crack in the bottom! Wendy PS anyone else have photos to post [ Edited by: danlovestikis 2019-07-02 08:24 ] |
|
G
GROG
Posted
posted
on
Tue, Jul 2, 2019 9:18 AM
GROG looked at your bowl at the art show. You can fix it. Put some more clear glaze on the inside, and make it nice and thick on the crack, and refire that sucker. After it's fired and no longer leaks. Then do your wood putty and paint fix on the outside and you're good to go. GROG fix GROG' mug by reglazing the inside with a good coat of clear glaze and it doesn't leak at all, Somehow the liquid still ends up leaving the mug and GROG have to keep refilling it. :D From the Tiki Mug Misfortunes thread:
|
|
D
danlovestikis
Posted
posted
on
Wed, Jul 3, 2019 6:33 PM
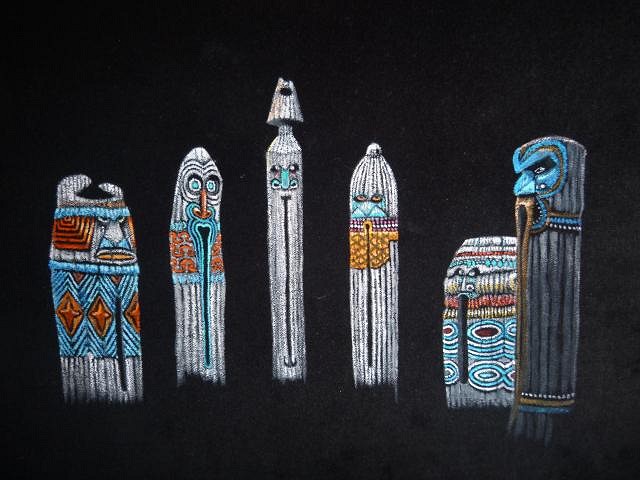
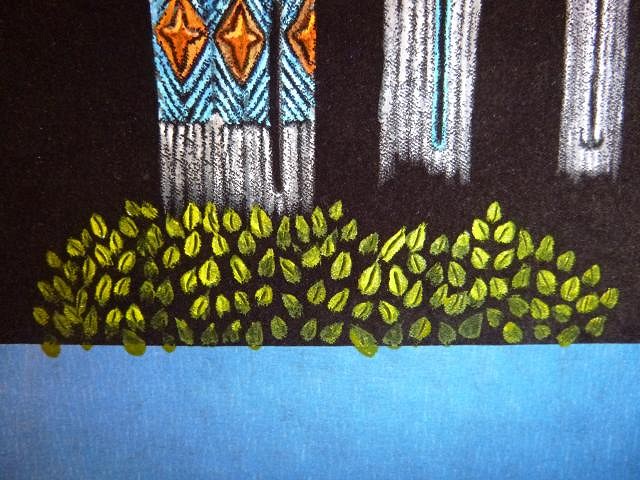
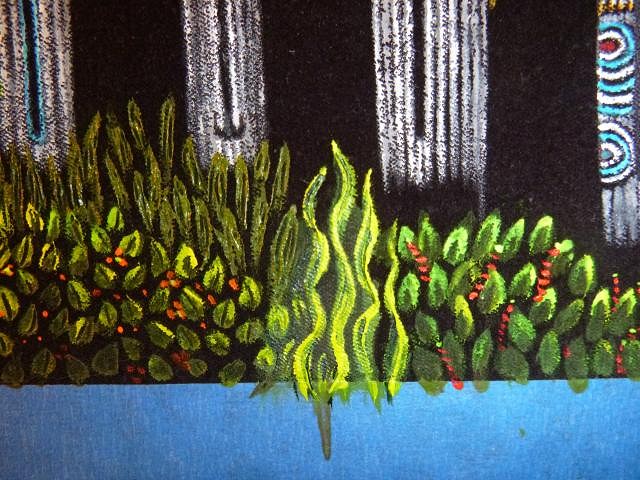
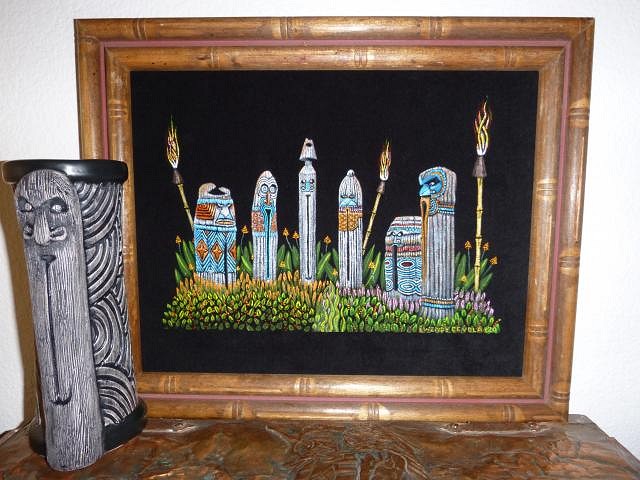
GROG, I will keep that in mind. Since I painted the face with enamel I would have to remove that first. Thank you for the information. Wendy ===================================== For now the painting is finished. I am also finished with working under the good graces of the Disney people. Since I was told it was thought of as advertising unless you start doing runs I've been OK with it but now it's time to stop. I will not do any more of these paintings of their tikis or make mugs of their tikis. I have people on the waiting list that will not get their wishes which is how this all started. I do this art as a fun hobby and after 8 paintings it is time to move on. Here is my finished piece for Tiki Oasis 2020. However that's a long way off so it's possible I might tweak it at some point. These photos were all taken on 7/1/19. Scrabble was a constant companion while I worked. She did fall asleep a lot. I looked at this for a long time and first I did the leaves and then I added the some flowers. Framed. I got out the mug from where I hid it last year. They will go as a set. Farewell dear friends, maybe one day I will see you in person. Now it's back to working on my ceramic projects. Wendy |
|
H
Hamo
Posted
posted
on
Wed, Jul 3, 2019 11:56 PM
Great video with Ray, Wendy (and love Dan's little "cameo" at the beginning...)! |
|
H
hang10tiki
Posted
posted
on
Thu, Jul 4, 2019 4:54 PM
Your painting is awesome And no Cheers |
|
H
hang10tiki
Posted
posted
on
Thu, Jul 4, 2019 4:56 PM
And Great video |
|
D
danlovestikis
Posted
posted
on
Fri, Jul 5, 2019 8:52 PM
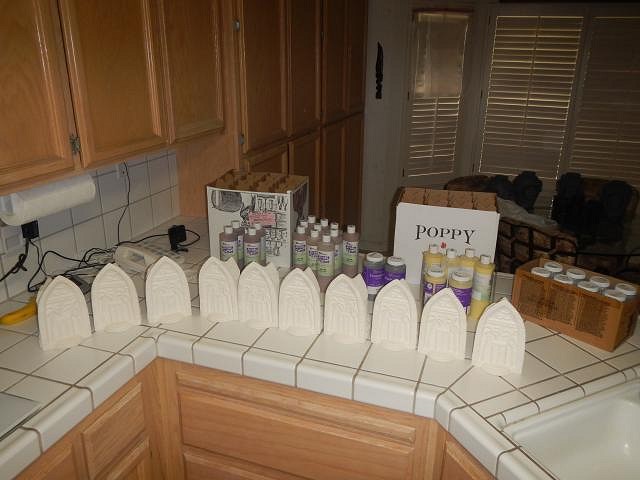
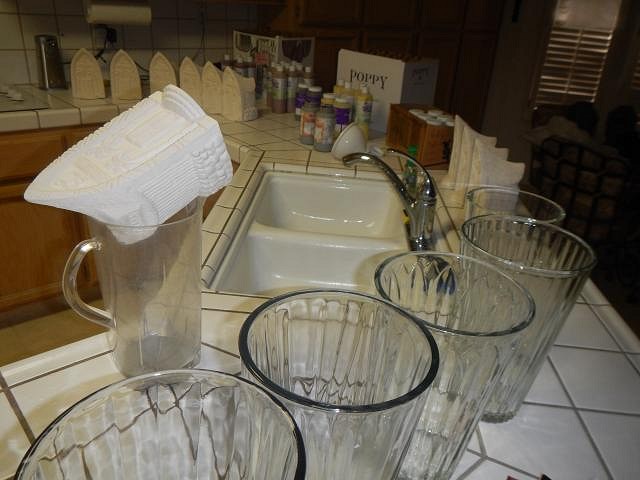
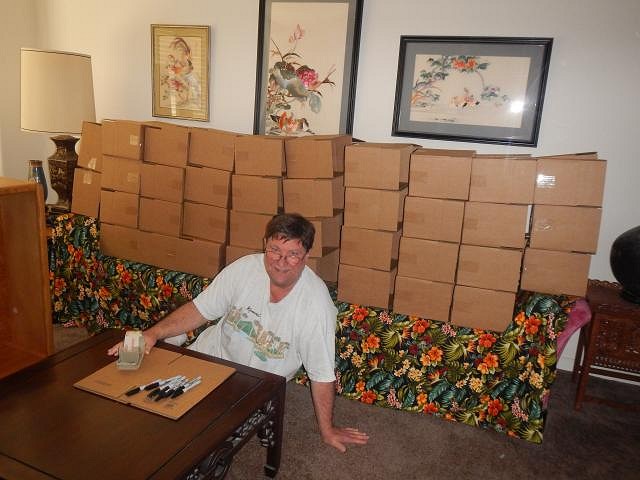
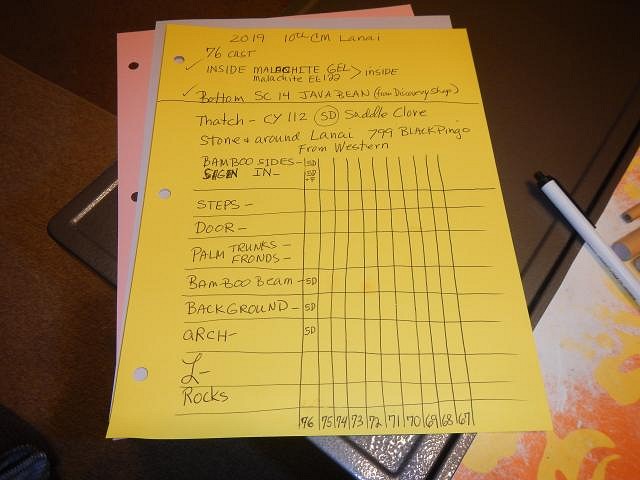
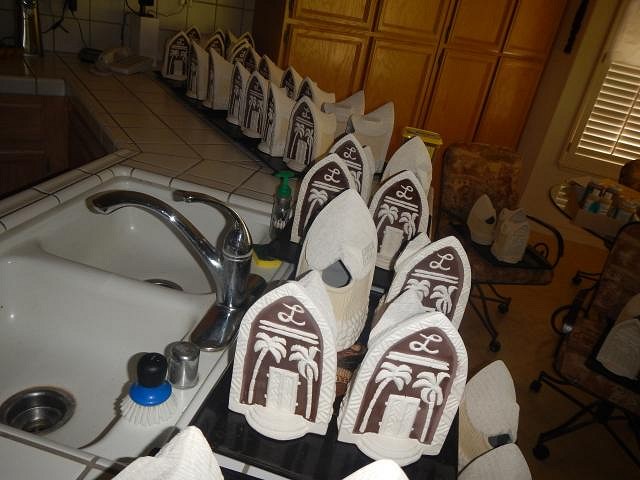
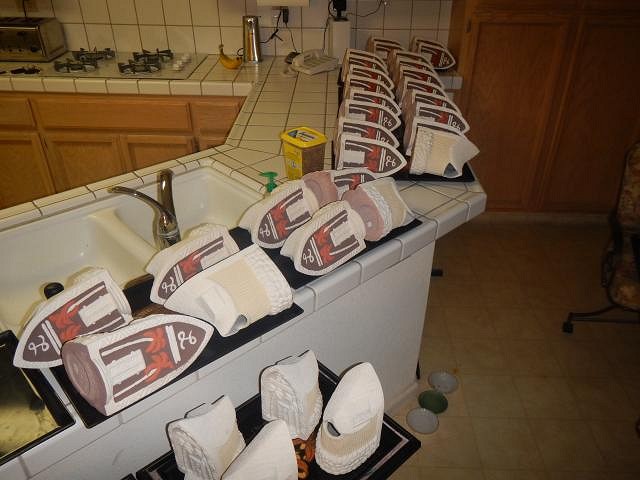
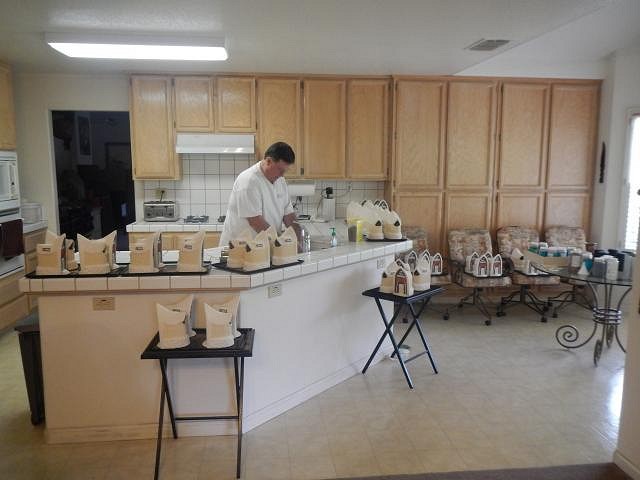
Hamo I laughed when I saw that and a while later our neighbors cat Scrabble walked across too. hang10tiki I would send anyone the best photo. Then you can put it on a thumb drive and take it to Kinko's and have it printed in any size. That would be free from my end and only a few dollars at theirs. I'm glad you like it. hang10tiki Thank you and thank you Hamo for posting the link. I hadn't thought to do that. I copied it and now it's also under Gallery. =================================== It is now time to begin the photos to show the glazing of the crawl mug. There's so much to the story that I have removed all the glaze testing photos for now. I will just show what I did to get the run done. These photos were taken April 5, 2019 through April 11, 2019. Just a few photos of so many steps taken on those days. So much clean up that doesn't show at all. I get all the glaze and mugs set up to go. First all the mugs had water run inside and out so that the glaze would stick. Then I poured in the glaze let it sit for 30 seconds and then poured it back out. Dan started putting the boxes together so that we would be able to keep working at all times. Eventually all 76 mugs had the inside portion done. On a different day it was time to do all the bottoms. These mugs got carried all over the house while in progress. Dan finished putting the boxes together and then numbering them. I leave a box on the bottom unglazed so I can number the mug in this spot. More insides are done. Now I prepped for the glaze tests by making a chart so I can keep track of what glaze was used where. I can see now why there have been so many mugs that are all brown. This is most of the mugs. On their sides so the the bottoms can dry. It's good to start posting photos of the crawl mug while I continue to glaze the Wish List items. Cheers, Wendy |
|
D
danlovestikis
Posted
posted
on
Sat, Jul 6, 2019 10:14 AM
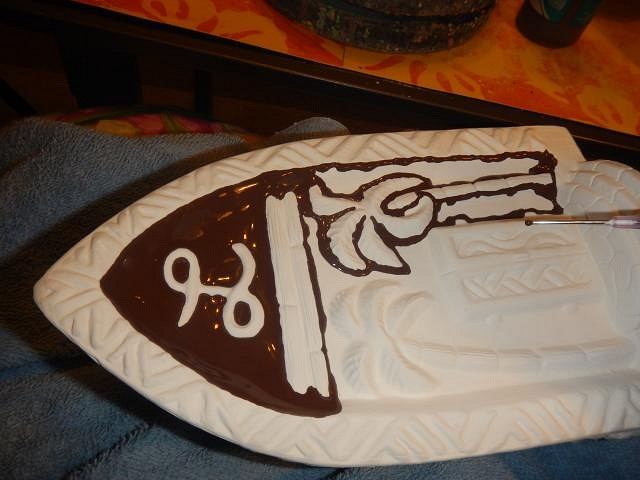
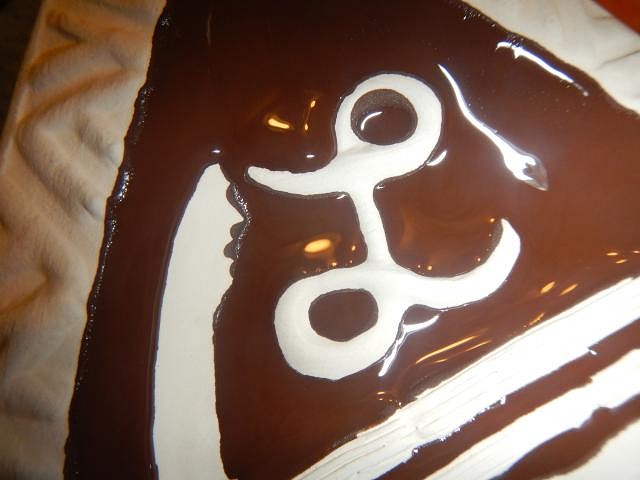
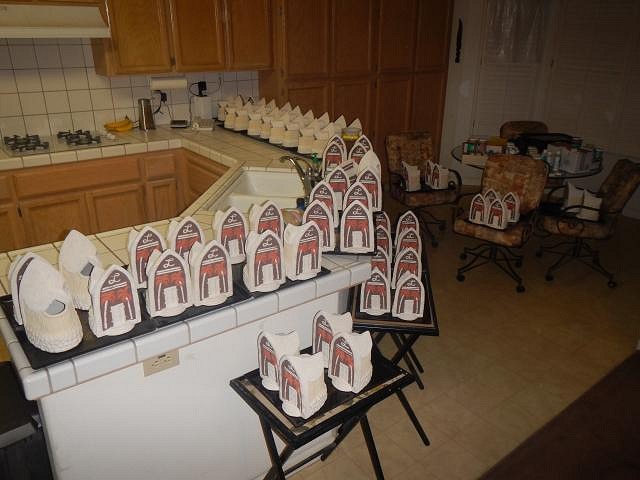
More photos of the steps to glaze the Sac Ohana Tiki Bar Crawl 2019. These were taken from 4/18/19 though 5/12/19. So while it looks fast in photos it wasn't and my kitchen was a tiki factory for a long time. All the clichés are true. One foot in front of the other, one step at a time, never give up. It's all worth it. In the end I get smiles, hugs and oh yes a payday! This mug required many glazes and types of glazes. I had a list like this for every test mug. Notice Scrabble taking a nap? I love this cat. I started off with a Duncan In glaze called Baroque Gold. It's used to show detail. Do a layer let it dry and do another layer. A couple of weeks later I had them all double layered and drying. During the tests I had tables of glazes that I tried out on this mug. I finally got it right. I used a CN brown glaze by Duncan for the front. I also decided not to use a brush but to use a squeeze bottle. It was much faster. I filled up the front with the glaze but I had to keep it on it's back until they dried so that the glaze didn't run. By 5/12/19 I had a lot of fronts with the brown glaze in place. We have only just begun. Dan doesn't do glazing, he is my heavy lifter. Wendy |
|
D
danlovestikis
Posted
posted
on
Sun, Jul 7, 2019 8:47 AM
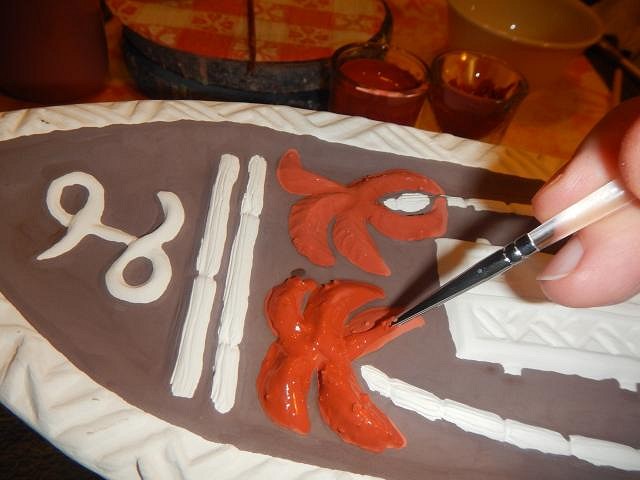
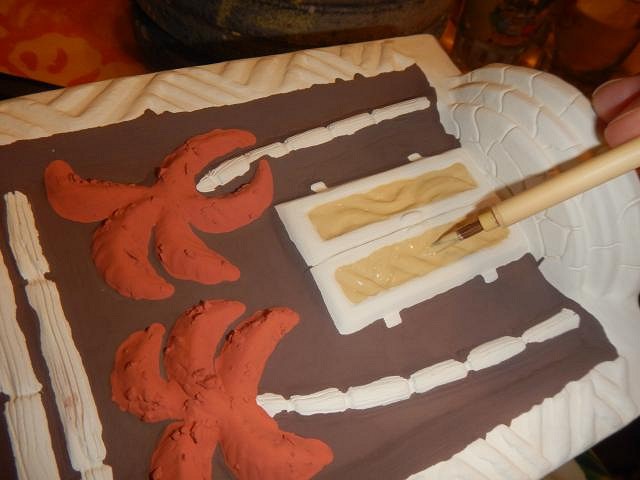
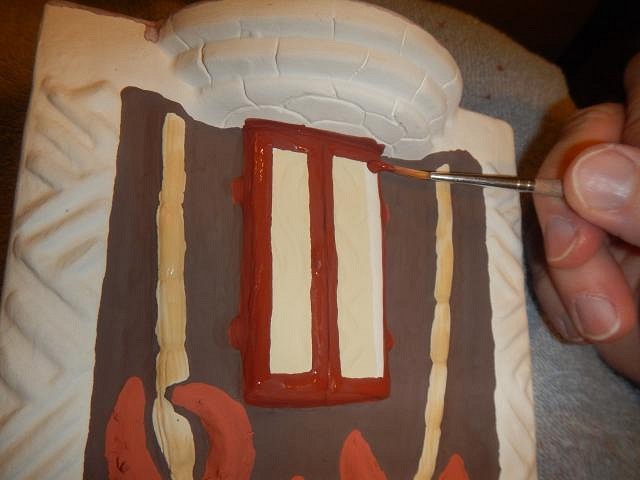
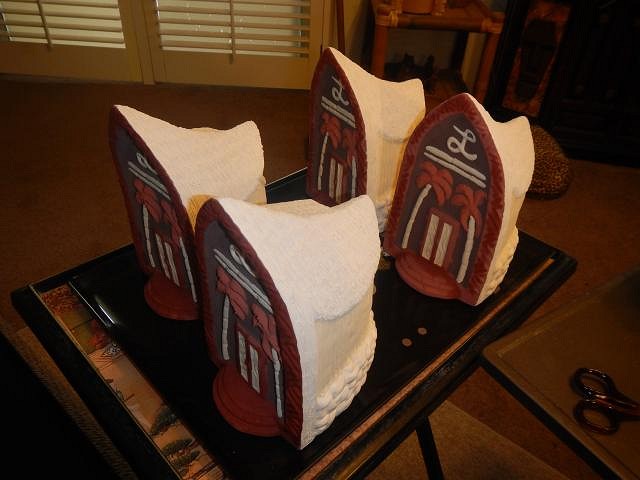
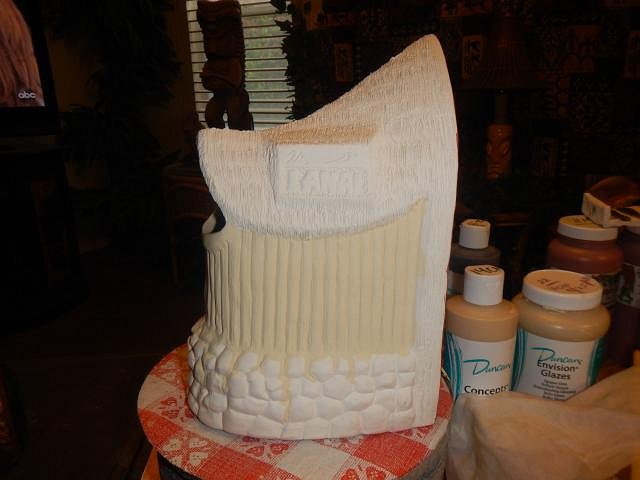
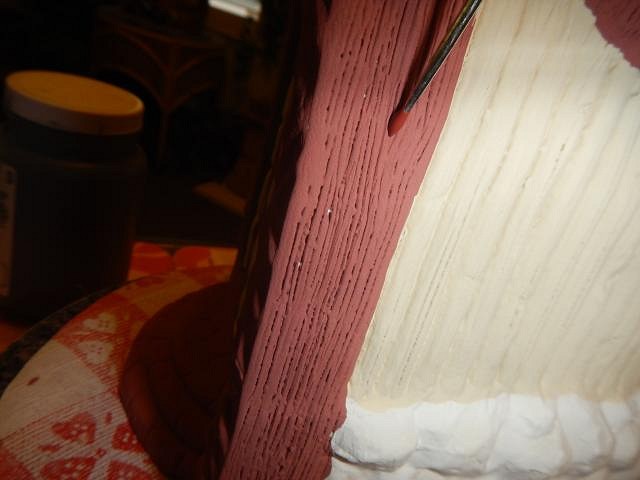
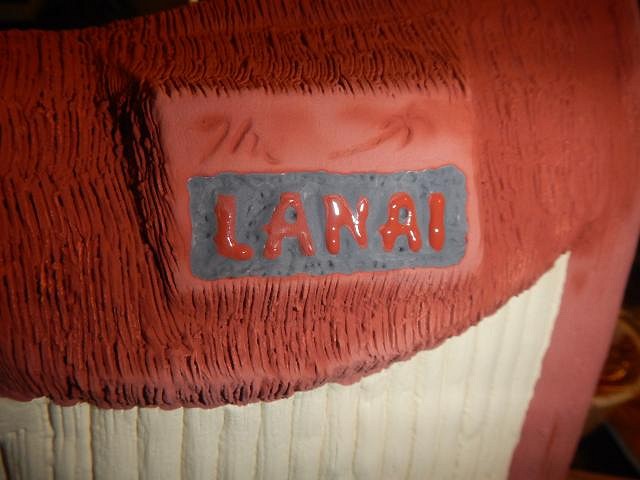
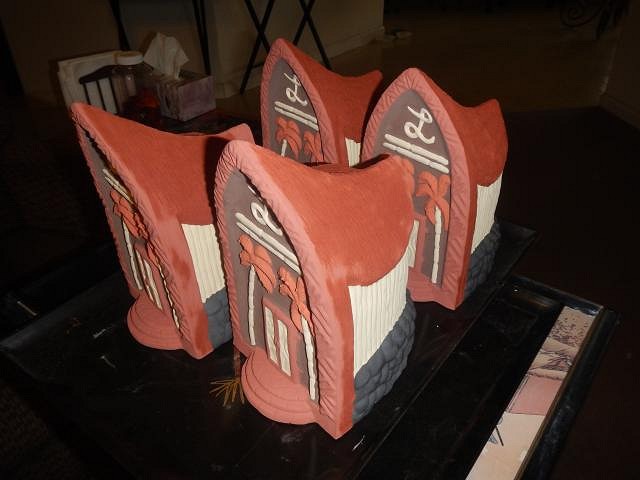
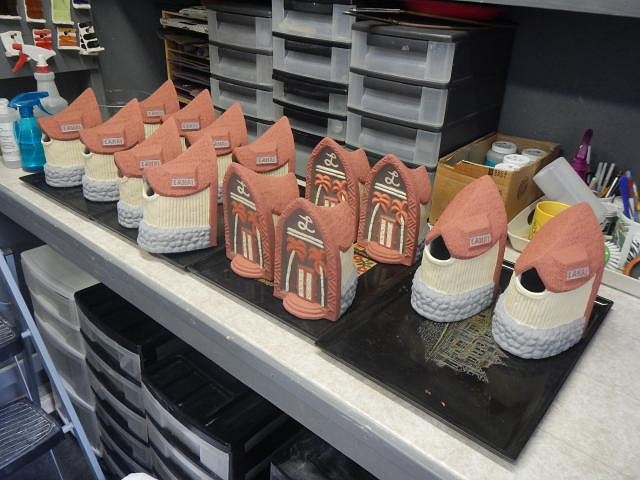
More work to show. These photos were taken 5/13/19 through 5/16/19. You can get a lot done if you work 14 hours a day. Continuing on with doing more of the brown glaze on the front of the mugs. Each of these had to dry on their backs until they could be put upright without running. I do one really thick layer so that one will be enough. That's why it take a long time to dry. Palm fonds were done with a Jungle Gem Mayco Glaze. These next three photos show how many times one mug is carried to the glazing table and then back to the kitchen. I had to become a weigh lifter. Each mug is around 3 to 4 pounds. When the palm fronds were finished on all the mugs I moved on to do the door with a IN Duncan glaze which shows detail. Then I did the bamboo beams and the palm trunks. The last using that glaze was the L for Lanai. Thank you for watching the steps for my last Sacramento Crawl mug. This is the tenth and the hardest to glaze of all I've made. Cheers, Wendy |
|
S
Sandbartender
Posted
posted
on
Sun, Jul 7, 2019 10:06 AM
Wow, I can't wait to see that glaze once it's kilned. It looks great raw! |
|
H
Hamo
Posted
posted
on
Sun, Jul 7, 2019 5:07 PM
You two are retired. You should only have to work 10 hours per day. |
|
D
danlovestikis
Posted
posted
on
Mon, Jul 8, 2019 9:11 AM
Sandbartender I was happy how it looked raw. I should have left it that way! The story will unfold. Hamo that sounds wonderful, how about some days off too! ======================================== More steps on the Sacramento Crawl mugs. Ideas evolve and we keep on making progress. I collect Couroc Trays. They are sturdy works of art that are perfect for carrying my supplies and my projects. In this photo after glazing the doorways I taped the mugs in place so they would stay in this position while drying. If Dan is with me I have him hold the first three and then I transfer those and the last one to a tray. I tape them and then he carries the tray to the kitchen to add to those I've already done and to bring me new ones. When I find a jar of glaze that has dried out I put it in a bowl, add water then I use one of these drink mixers that I've found in a thrift shop. They do a great job of blending the glaze back to the right consistency. After using a brush on a few doors it occurred to me to get out the squeeze bottle so I could do them faster. Next it was time to work on all the doorways, lanai and the trim around the outside.
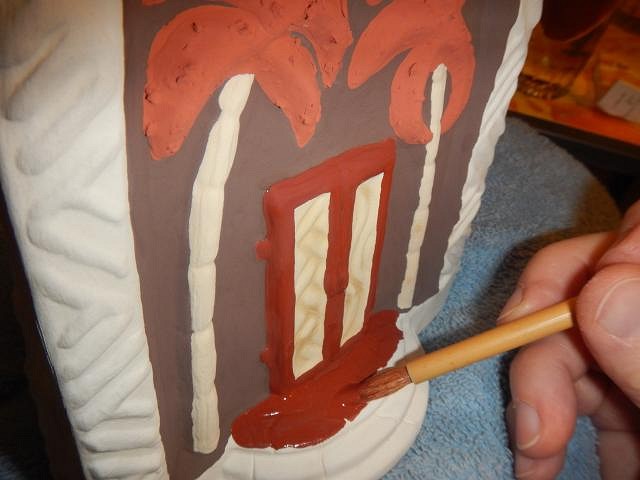
Four done and so many more to go. Also remember it's two or three times each area is glazed in these colors. Weight lifting for Dan and I is all about the mugs, Wendy |
|
D
danlovestikis
Posted
posted
on
Wed, Jul 10, 2019 8:47 AM
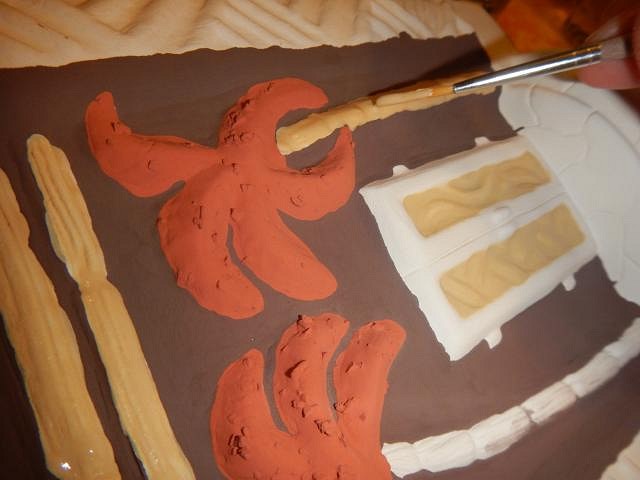
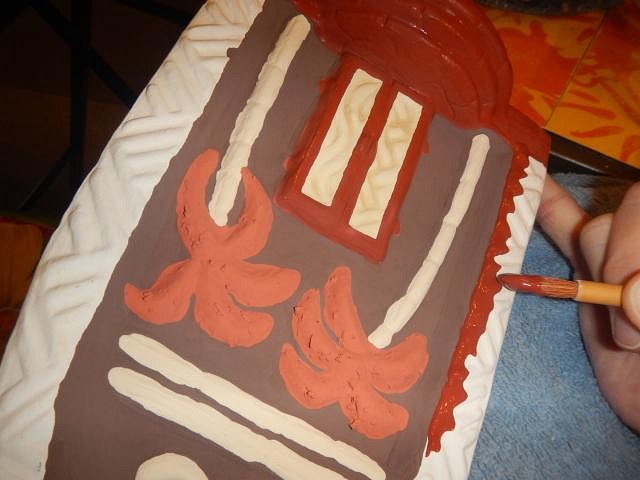
More steps accomplished. Photos 5/16/19 to 5/21/19. Some of the yellow In glaze ran down into the rocks at the bottom. This will cause me a problem in the future. Time to use the squeeze bottle again. It's so much better than a brush. I did the area around the LANAI sign. Dan is always the star of my show because I control the camera. Next up was to start on the thatch roofs using CY Saddle Clove glaze by Duncan. I tired to make this mug easy. I failed. I just kept at it one by one. When they dried I would go over each roof and where I found tiny skips I re-glazed in those tiny places. I hope you are all having fun going though the steps with me, Wendy |
|
D
danlovestikis
Posted
posted
on
Fri, Jul 12, 2019 9:36 AM
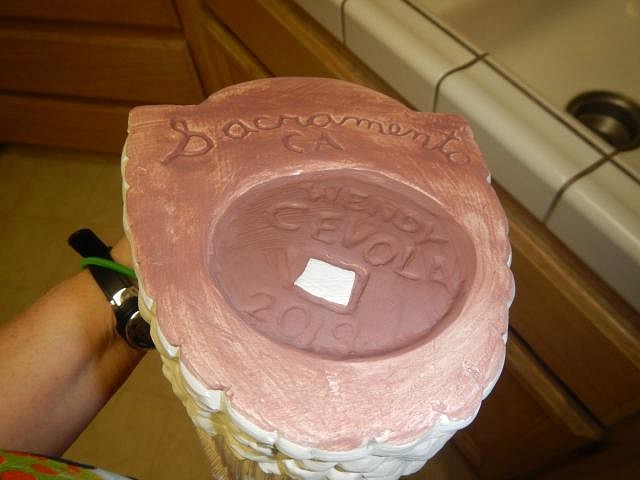
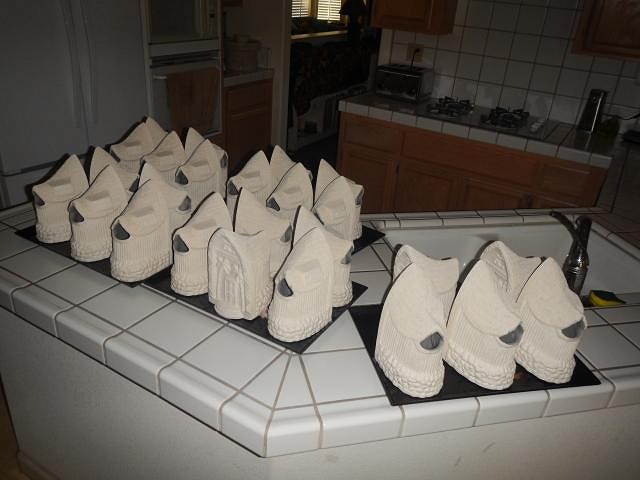
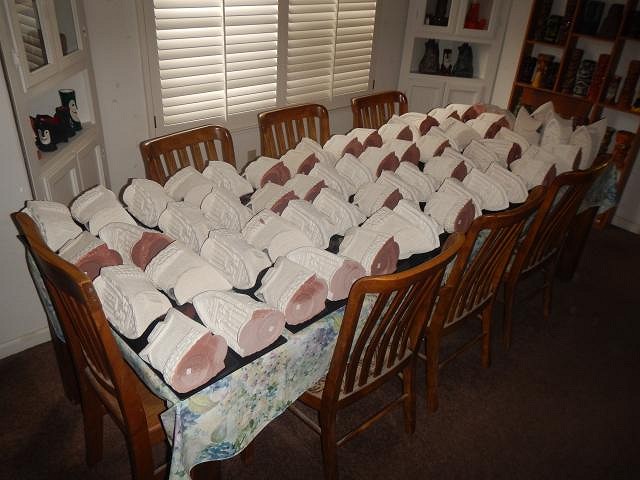
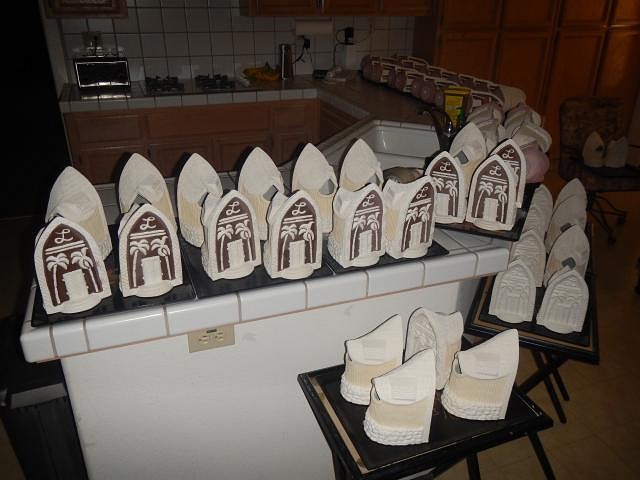
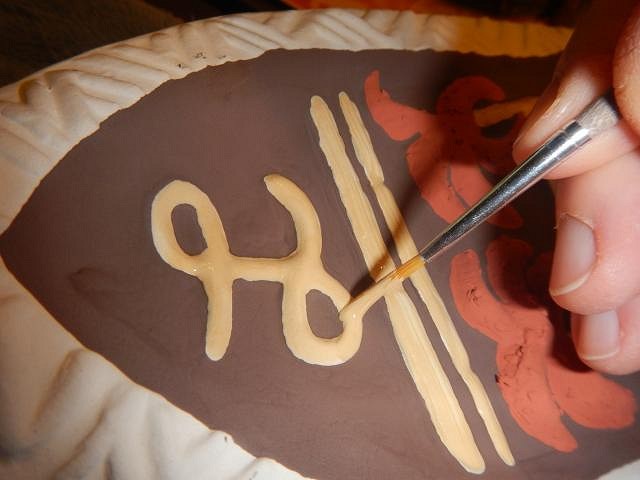
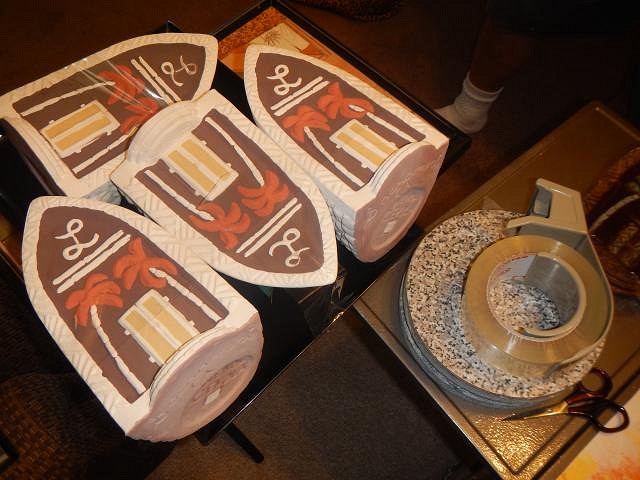
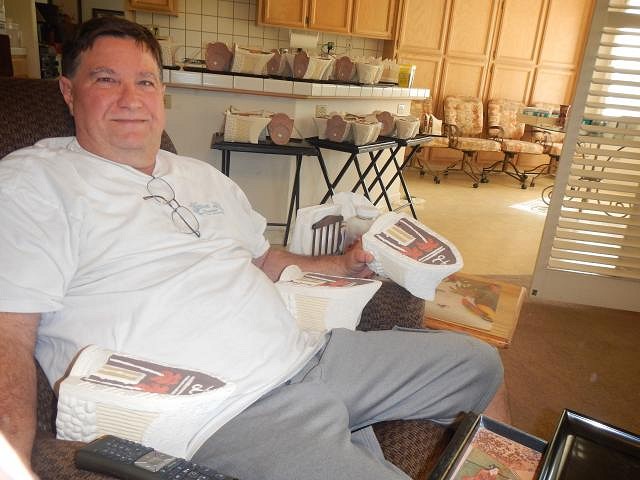
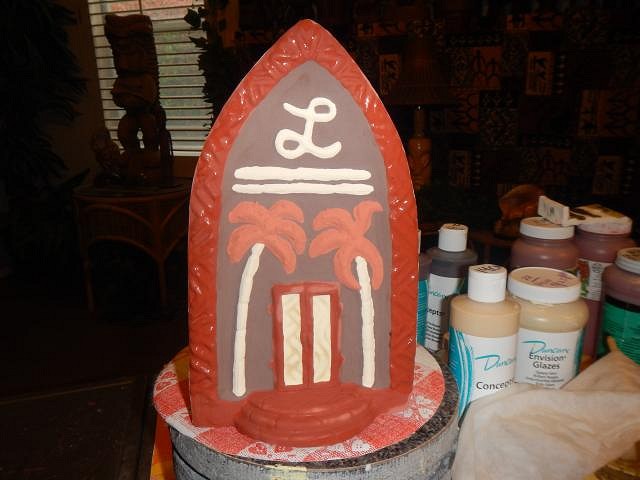
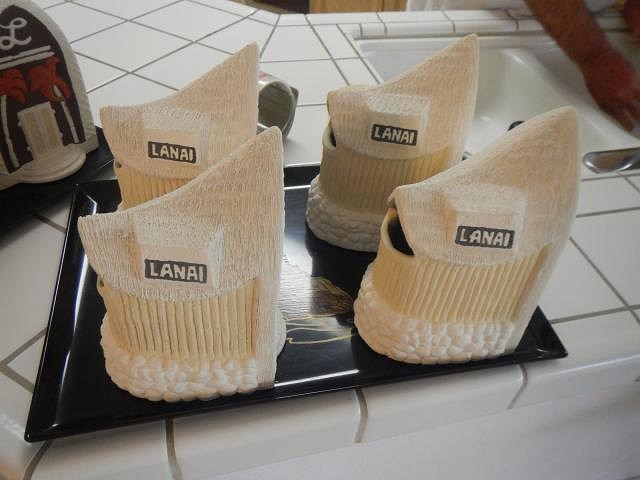
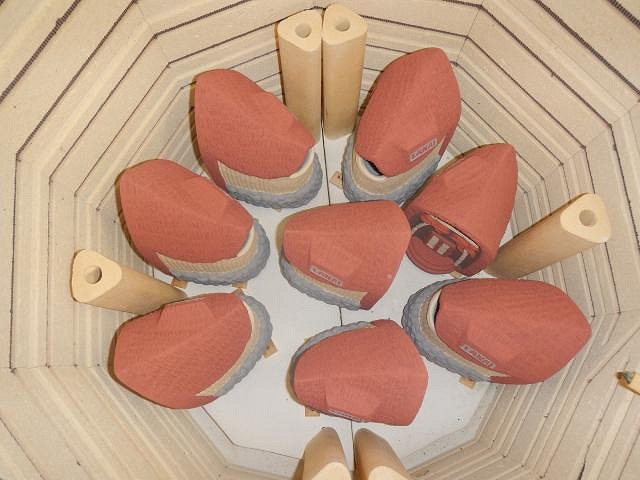
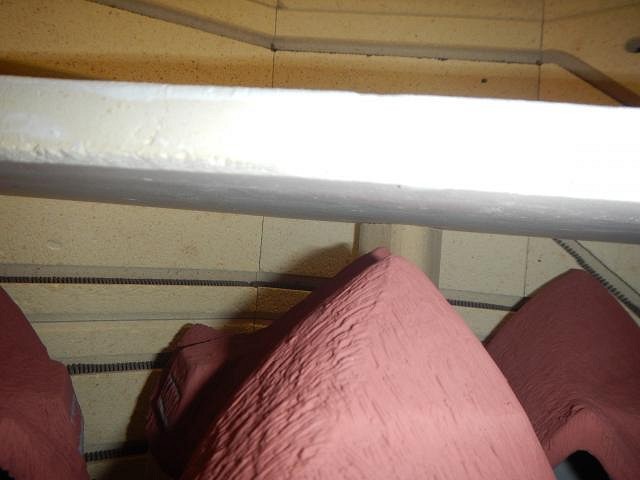
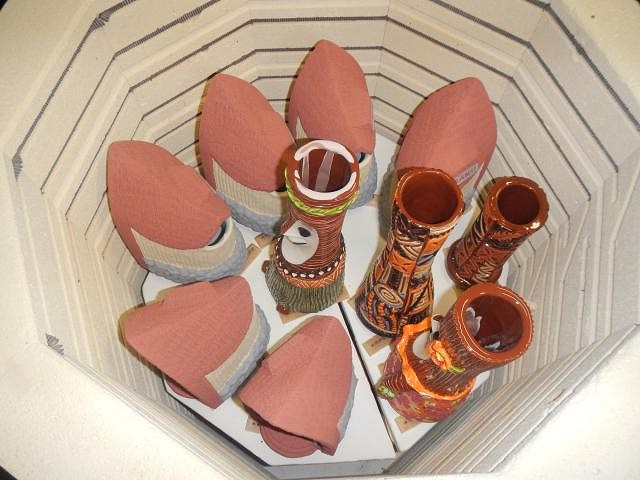
These progress photos of the Sacramento Crawl mug were taken 5/16/19 to 5/17/19 however I missed taking photos of the work for some steps. I just got tired. I glazed the name of the mug LANAI on all of the run after the black background dried. Next I did two layers of black pingo on the rocks at the bottom on all of the run. The first set of completely glazed mugs went out to dry. Horrors the pingo cracked. That means that I dried it too fast. Now there will be skips at the bottom. More work but easy to fix with elbow grease. I loaded the bottom and then put in the first shelf. I used my camera to check to make sure none of the roof tips were touching the shelf. Then I loaded the top layer. So now I'm on the way with the first load of crawl mugs ready to fire the first time. Wendy |


Pages: 1 2 3 4 5 6 7 8 9 10 11 12 13 14 15 16 17 18 19 20 21 22 23 24 25 26 27 28 29 30 31 32 33 34 35 36 37 38 39 40 41 42 43 44 45 46 47 48 49 50 51 52 53 54 55 56 57 58 59 60 61 62 63 64 65 66 67 68 69 70 71 72 73 74 75 76 77 78 79 80 81 82 83 84 85 86 87 88 89 90 91 92 93 94 95 96 97 98 99 100 101 102 103 104 105 106 107 108 109 110 111 112 113 114 115 116 117 118 119 120 121 122 123 124 125 126 127 128 129 130 131 132 133 134 135 136 137 138 139 140 141 142 143 144 145 146 147 148 149 150 151 152 153 154 155 156 157 158 159 160 161 162 163 164 165 166 167 168 169 170 171 172 173 174 175 176 177 178 179 180 181 182 183 184 185 186 187 188 189 190 191 192 193 194 195 196 197 198 199 200 201 202 203 204 205 206 207 208 209 210 211 212 213 214 215 216 217 218 219 220 221 222 223 224 225 226 10816 replies