Pages: 1 2 3 4 5 6 7 8 9 10 11 12 13 14 15 16 17 18 19 20 21 22 23 24 25 26 27 28 29 30 31 32 33 34 35 36 37 38 39 40 41 42 43 44 45 46 47 48 49 50 51 52 53 54 55 56 57 58 59 60 61 62 63 64 65 66 67 68 69 70 71 72 73 74 75 76 77 78 79 80 81 82 83 84 85 86 87 88 89 90 91 92 93 94 95 96 97 98 99 100 101 102 103 104 105 106 107 108 109 110 111 112 113 114 115 116 117 118 119 120 121 122 123 124 125 126 127 128 129 130 131 132 133 134 135 136 137 138 139 140 141 142 143 144 145 146 147 148 149 150 151 152 153 154 155 156 157 158 159 160 161 162 163 164 165 166 167 168 169 170 171 172 173 174 175 176 177 178 179 180 181 182 183 184 185 186 187 188 189 190 191 192 193 194 195 196 197 198 199 200 201 202 203 204 205 206 207 208 209 210 211 212 213 214 215 216 217 218 219 220 221 222 223 224 225 226 10,816 replies
|
J

JenTiki
Posted
posted
on
Thu, Feb 5, 2015 8:49 AM
I think you should call him Bling Bob! |
|
D

danlovestikis
Posted
posted
on
Thu, Feb 5, 2015 11:00 AM
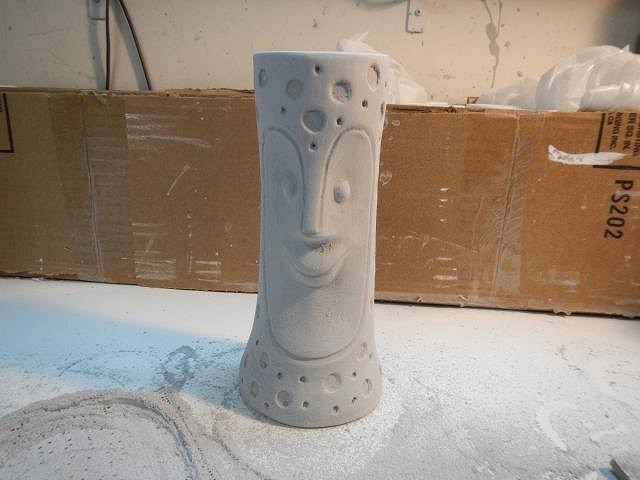
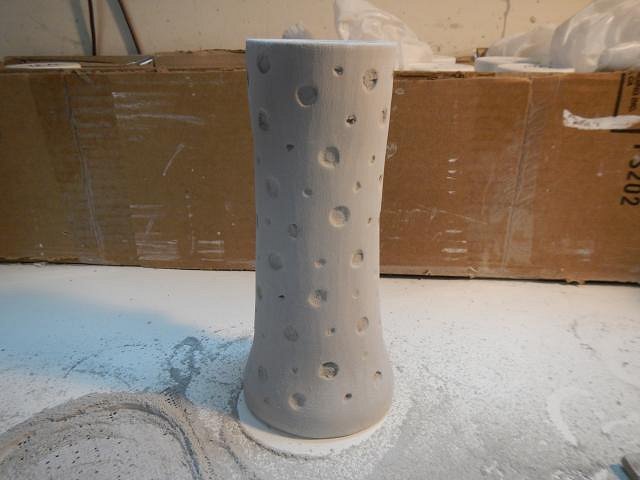
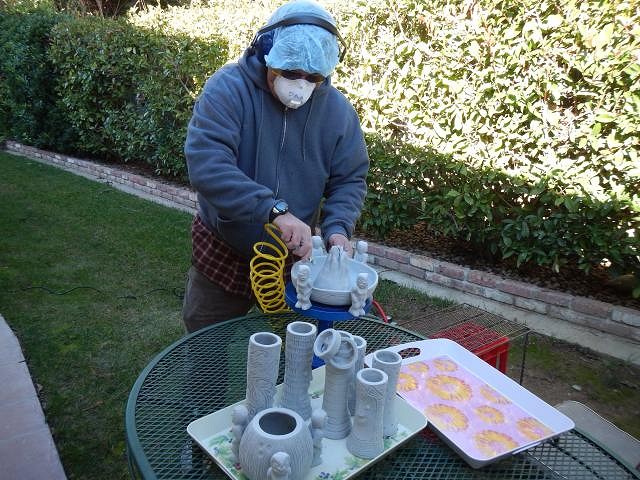
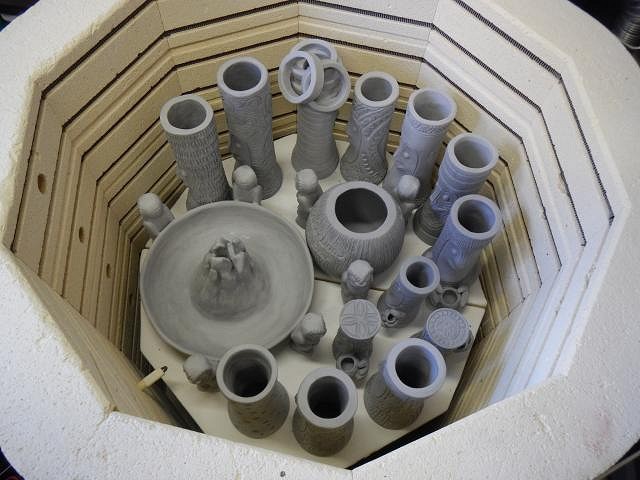
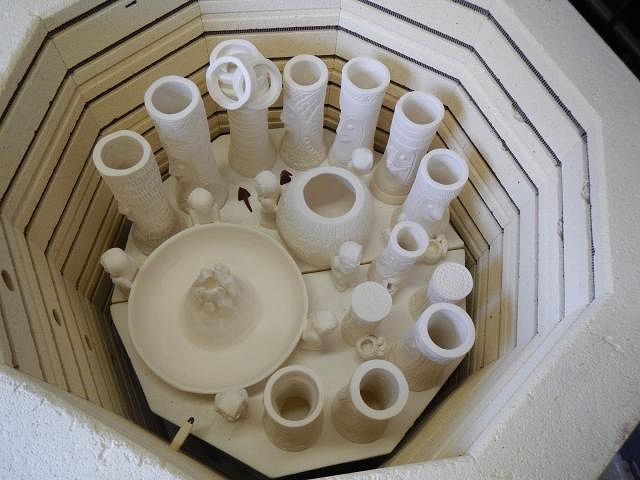
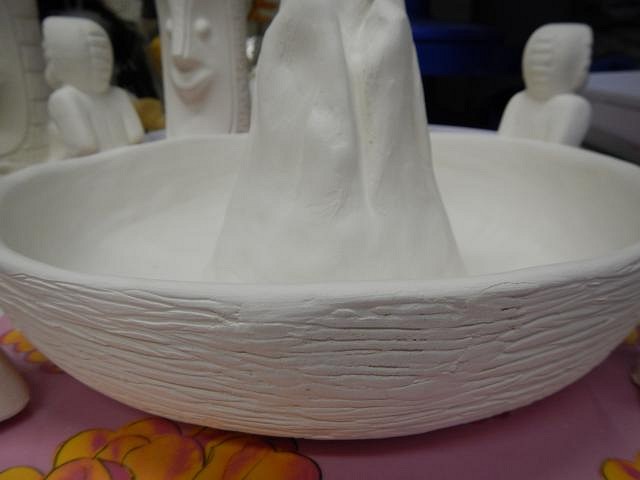
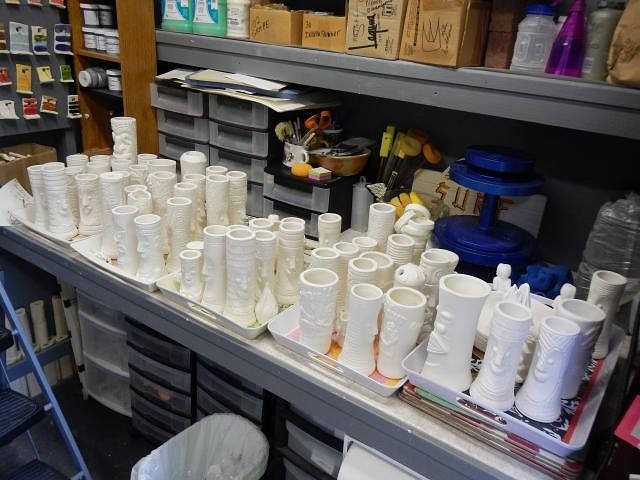
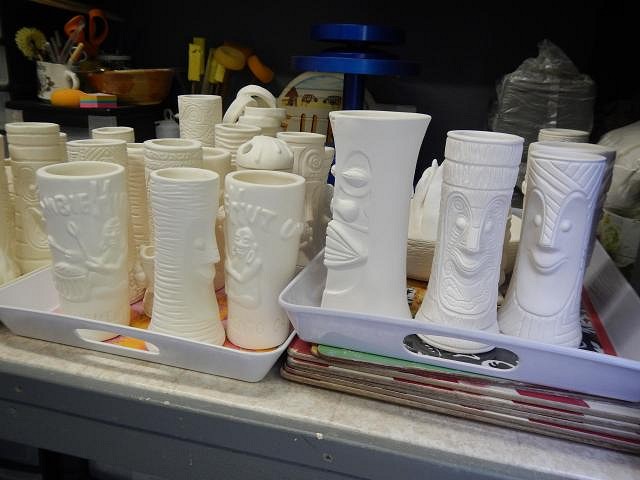
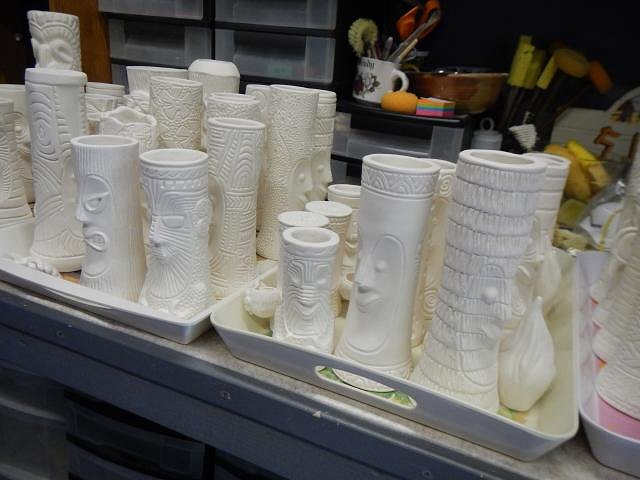
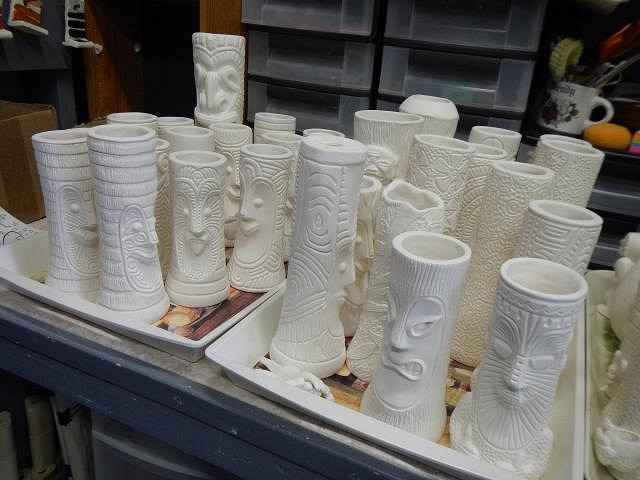
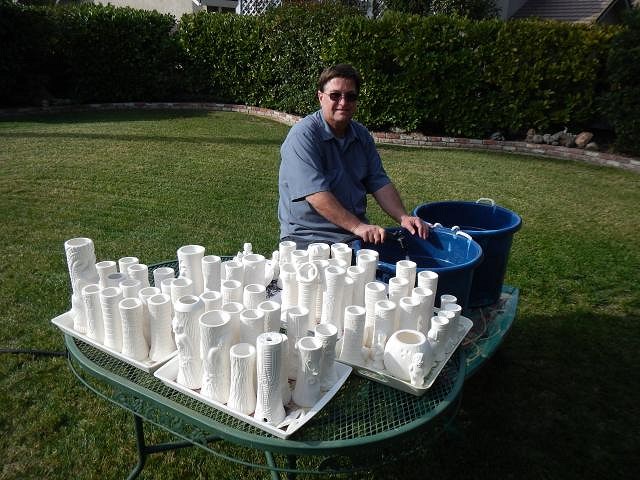
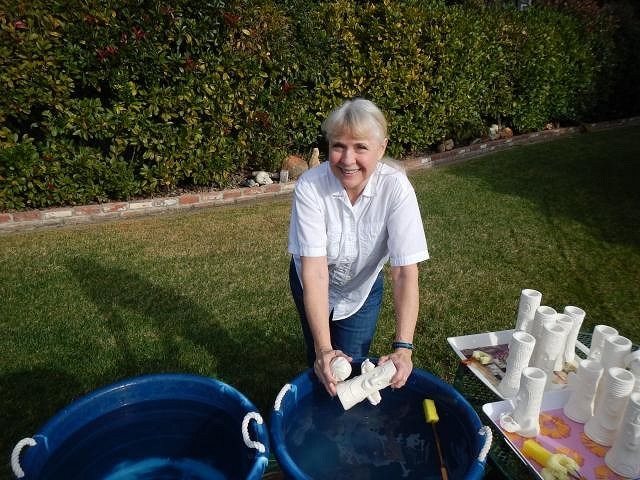
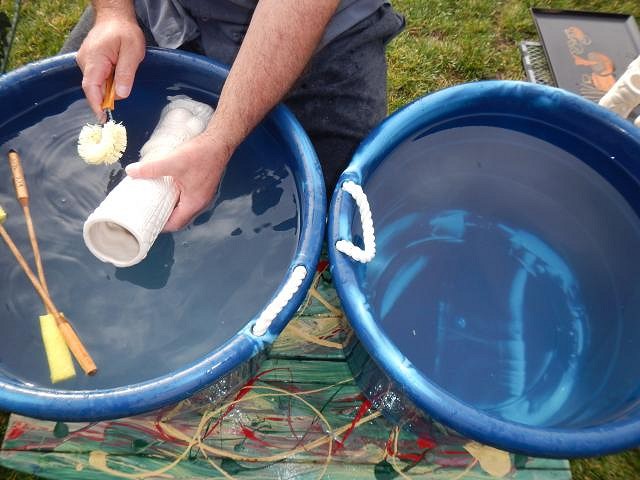
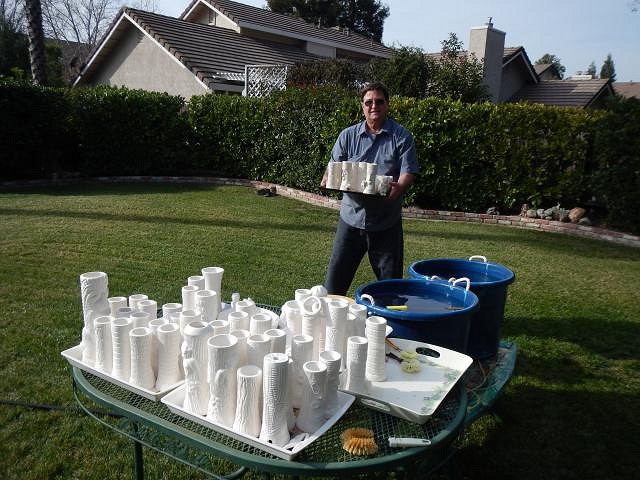
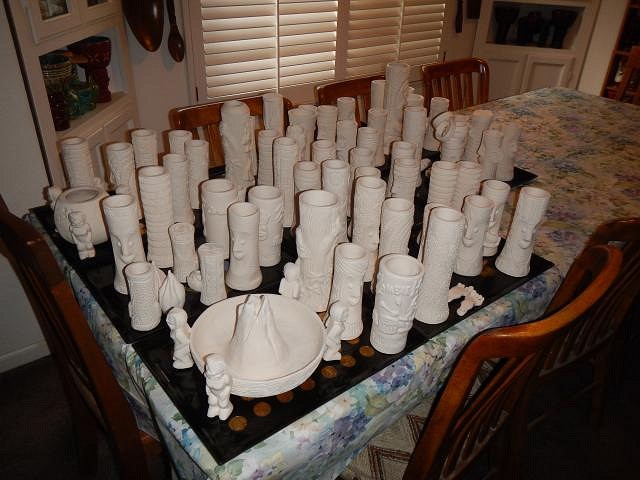
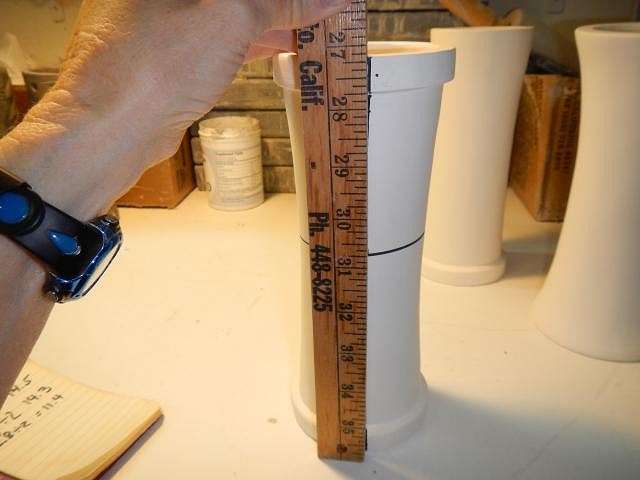
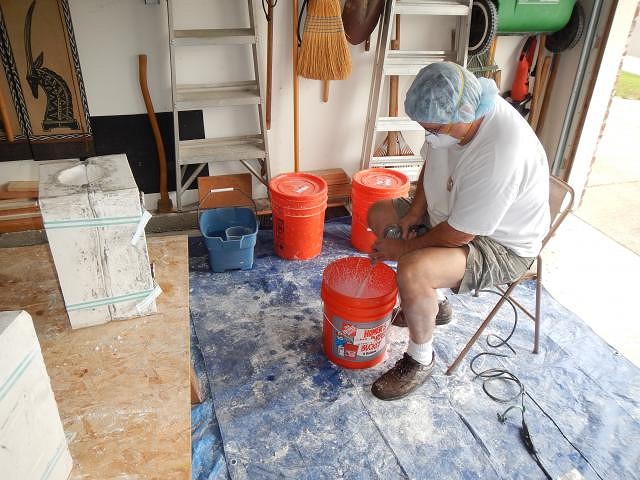
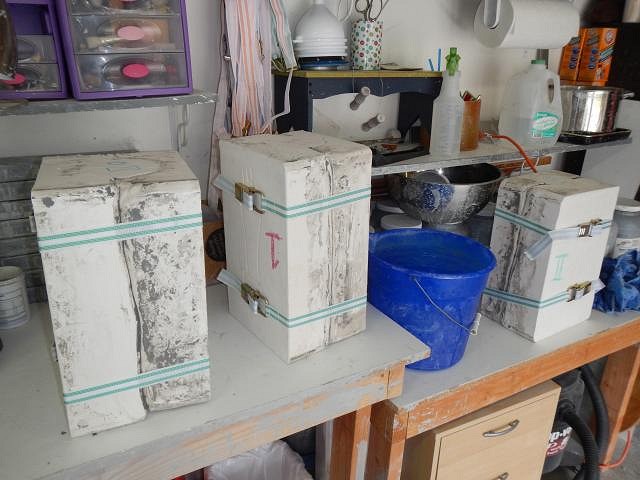
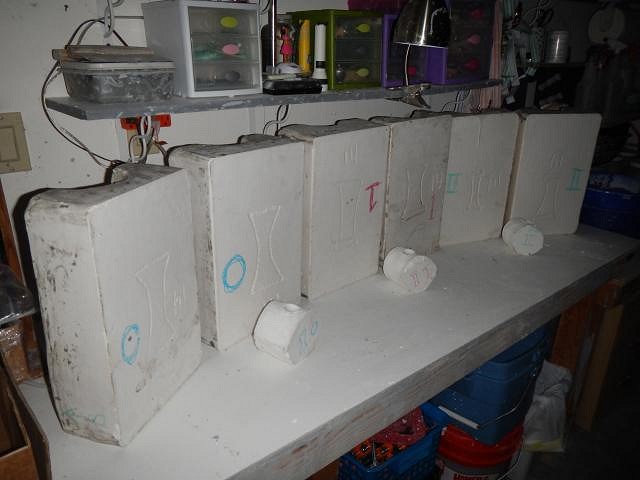
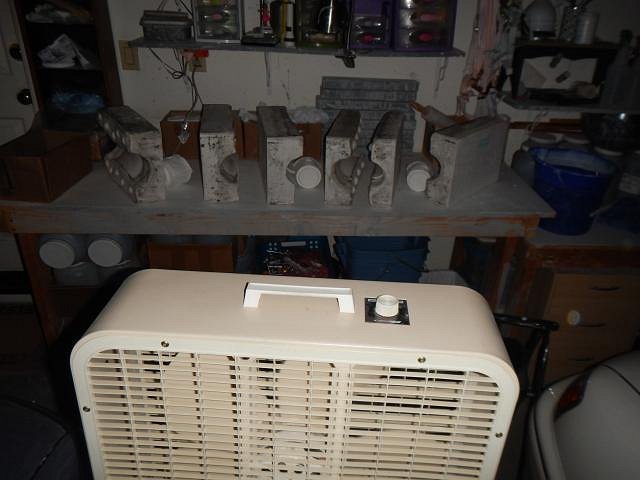
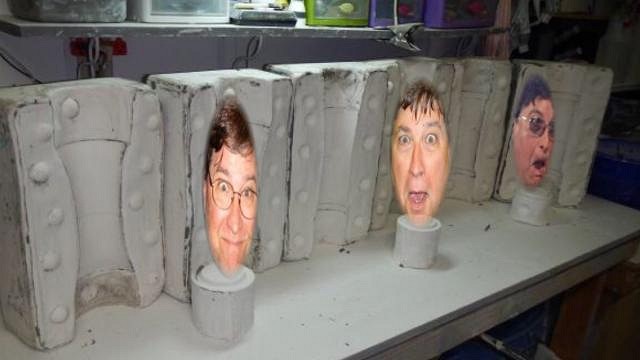
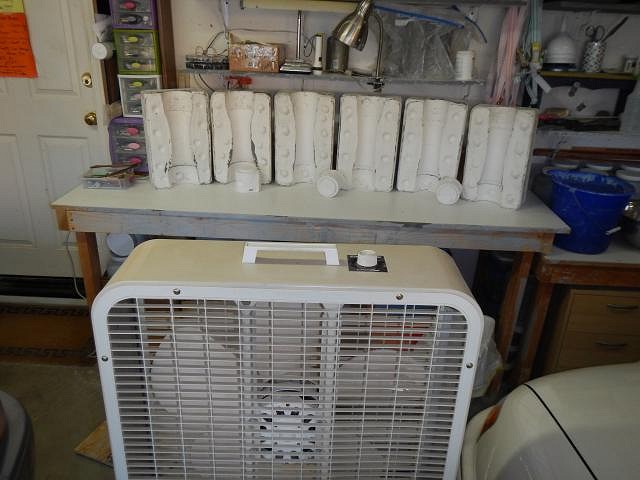
LoriLovesTiki that could be an idea for another future Tiki Bob! IDoVoodoo thank you so much. I love to play with Tiki Bob when I'm not working on a Wish List. I do them in-between projects. Right now they were made to fill the kiln. Some of them have found homes. TikiAno what I can say about Tiki Bob losing his head is that the inside and the inner part of the rings will all match. Blood Red...maybe. JenTiki that's a good one. I'm so bad at naming mugs that I've stopped putting names on the bottoms. I let the owners name them. I like Bling Bob that's cute and Bob's cute. ========================================== Progress on the "fill the Kiln" and Wish List #5 projects. Dan's still out in the below 50 degree weather to use the air compressor to blow off all the dust from sanding. It was really fun to see that when the last one was dusted the kiln was perfectly filled and ready to fire. I checked the garage shelves one more time to make sure I hadn't lost a Bob someplace. Nope they are all in the kiln. The Bisque Fire is done and the lid is up after they cooled down to outdoor temperatures, more than 24 hours. First out was the bowl to see if filling the hole with paper clay worked. I was happily surprised that it did work. So is Dan since he gets this bowl. I unloaded the kiln and now these joined the first batch I'd fired a while back. Do you see your mug? They are all here and none had a problem. Not one explosion from trapped gas! Now it was time to take all of these out into the yard for scrubbing. ebTiki I've spotted your Bob, how's your arm? It's so cold out that we went to the sunniest spot. Less than 50 degrees out but I'm ready to get all wet by hard scrubbing each mug inside and out. One ice water bucket to scrub in and one to rinse in. The rinse bucket should have clear water until the end if I'm doing a good job of scrubbing. Each time I finish a tray full Dan carries it into the dining room table. They are all here. They are Wishing to be glazed but they must wait until all the other Wishes are further along. I've covered these with plastic sheets to keep them safe from dust. Hows that a weeks worth of work in one post! Cheers, Wendy |
|
L

LoriLovesTiki
Posted
posted
on
Thu, Feb 5, 2015 4:33 PM
That's an excellent week's worth of work! Well done, now go do something fun. :) |
|
H

hang10tiki
Posted
posted
on
Thu, Feb 5, 2015 7:47 PM
Wow :) |
|
W

Woodtiki
Posted
posted
on
Thu, Feb 5, 2015 9:35 PM
Wow, yes a lot of work! Good thing we don't have east coast winters. Save #2 carved bob for me please! If he's not claimed yet. |
|
D
danlovestikis
Posted
posted
on
Fri, Feb 6, 2015 10:55 AM
LoriLovesTiki we will definitely do something fun and we'll share it in a couple of weeks. hang10tiki we wish you lived behind us. What fun we could have. Woodtiki #2 is saved for you. I saw the PM and I'll make note of the colors. ===========================================
|
|
TT

Tyber Tiki
Posted
posted
on
Fri, Feb 6, 2015 3:39 PM
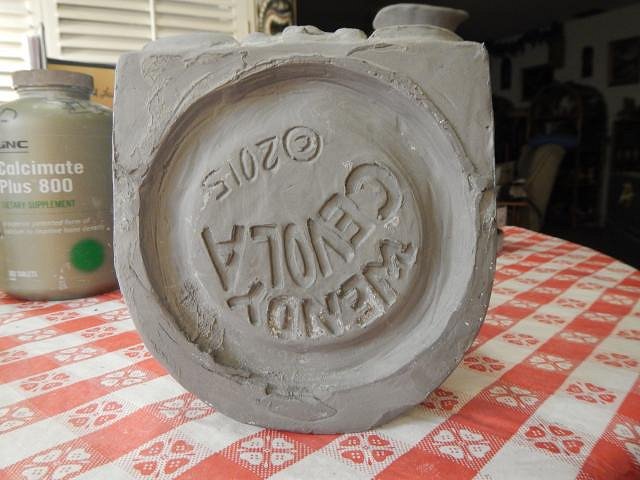
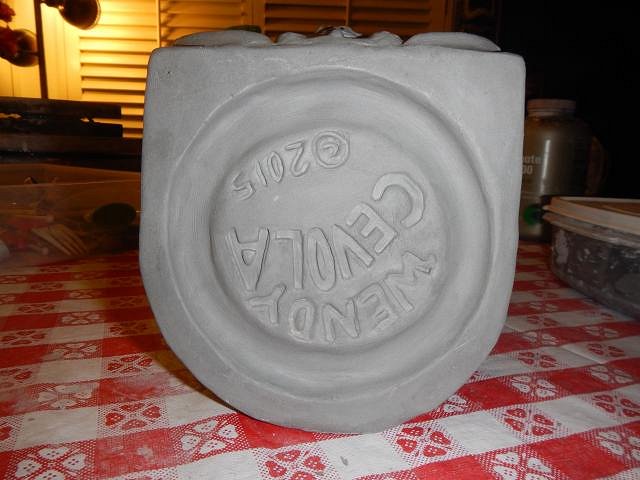
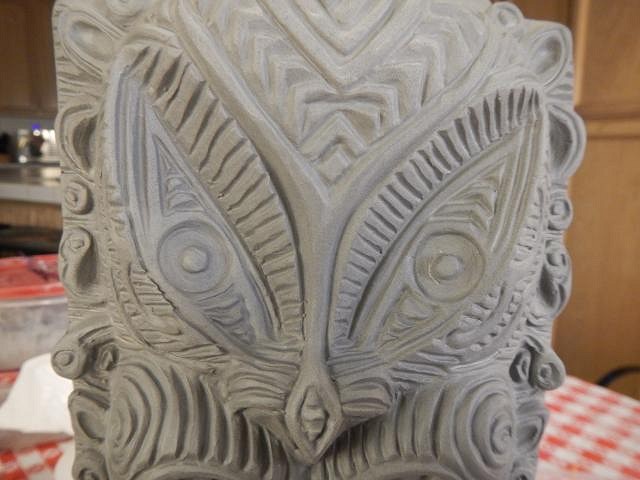
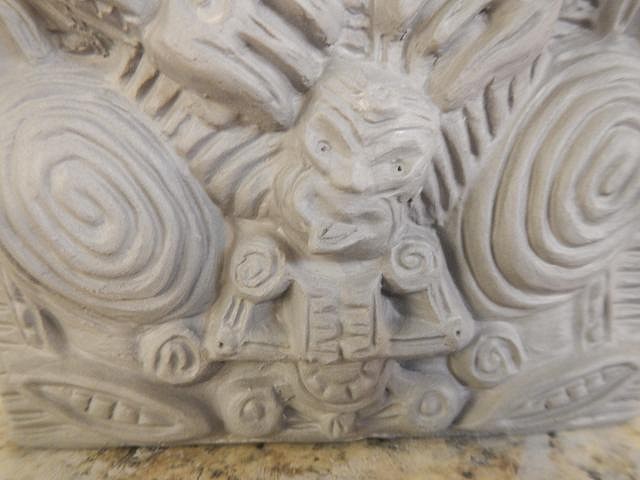
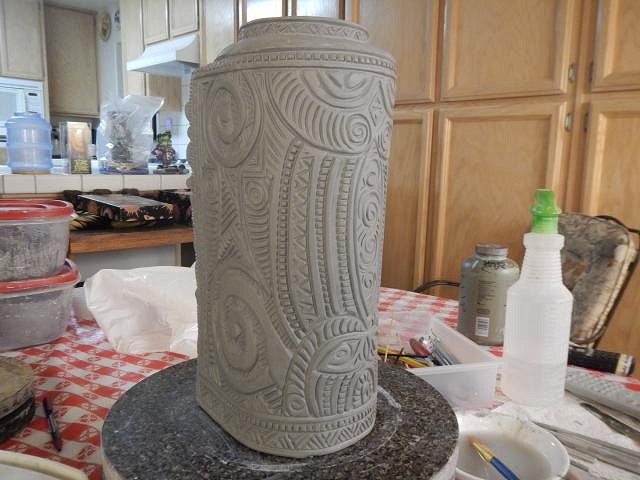
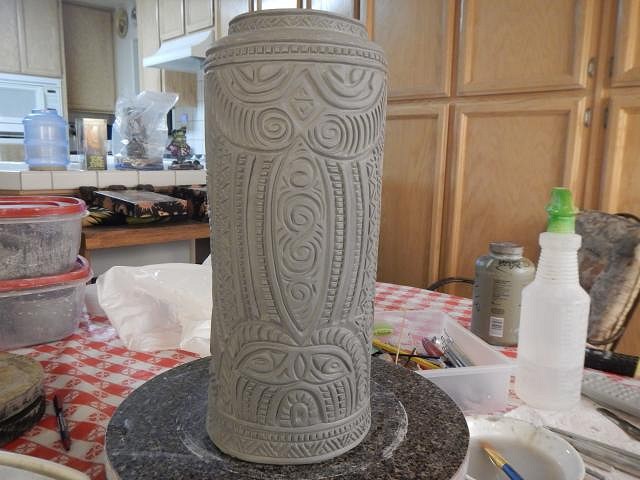
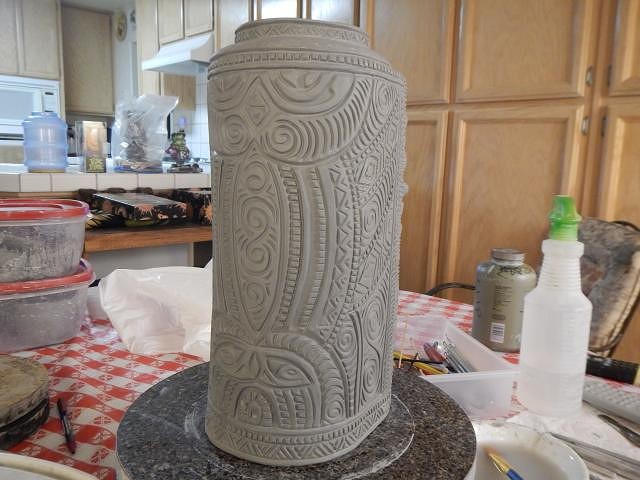
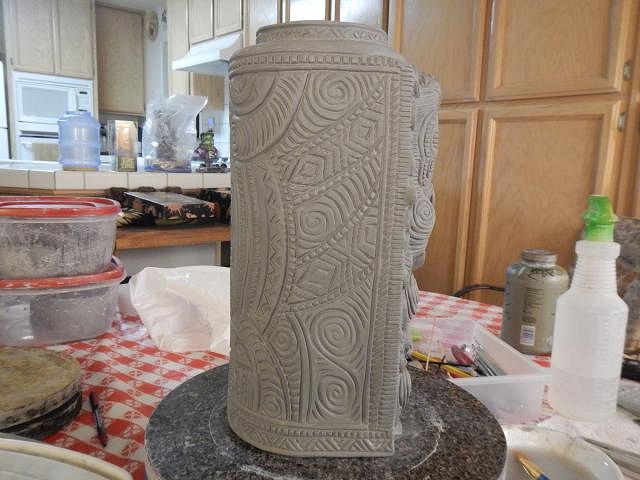
Hi Wendy, Just catching up on the thread after traveling all week. Wow, what an unbelievable amount of progress! Your Tiki Bobs look exceptionally beautiful and unique. Any chance Small Tiki Bob #9 is still available? if so, please mark me down for #9. The Huge Maori Mug continues to impress. The details are mesmerizing...and I think I've spent the last 30 minutes just staring at all of the fine details in the photos....looks great! Thanks! Tyber Tiki |
|
P

PockyTiki
Posted
posted
on
Sat, Feb 7, 2015 7:12 AM
I'll tell ya what, consistently drooling over these awesome sculpts makes me look forward to conquering a new 30" canvas. Good stuff. |
|
D
danlovestikis
Posted
posted
on
Sat, Feb 7, 2015 10:31 AM
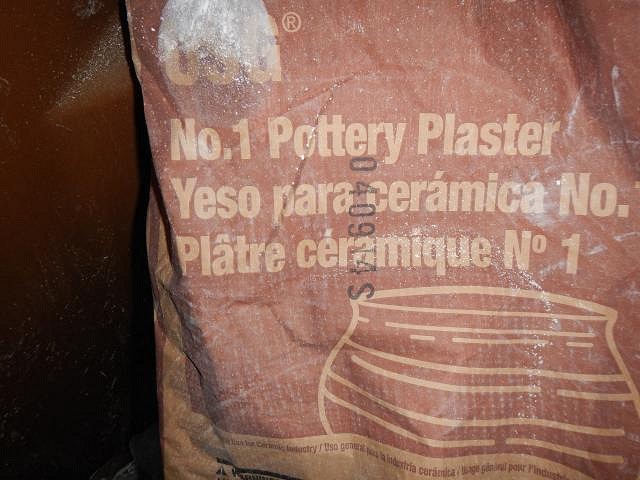
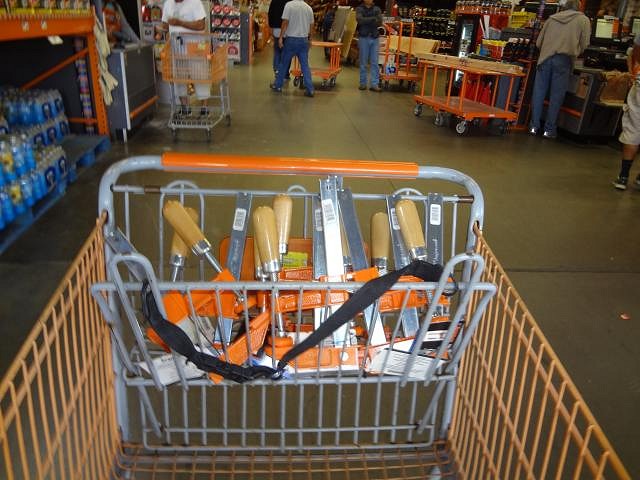
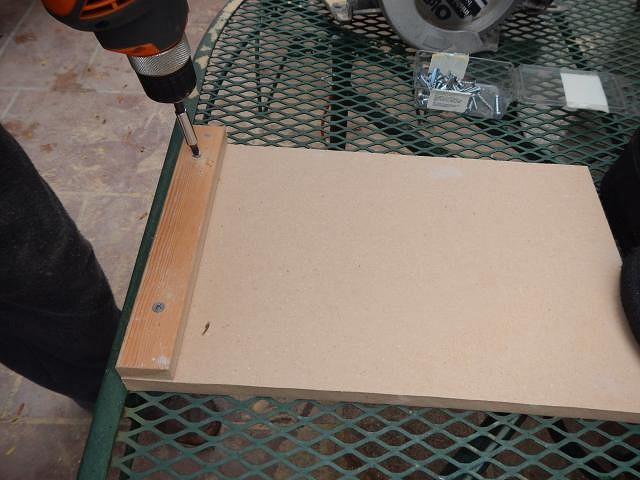
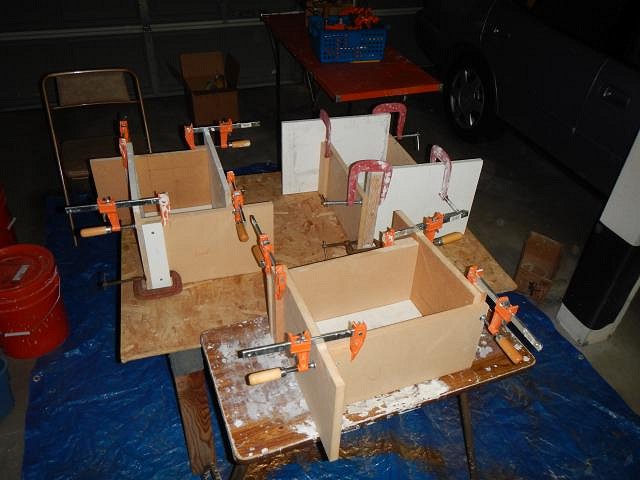
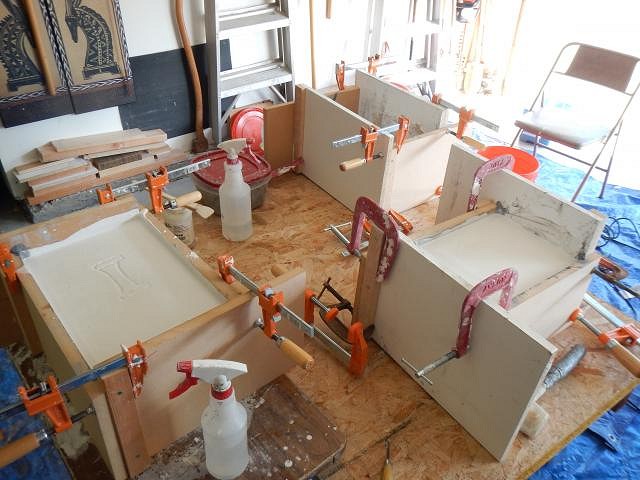
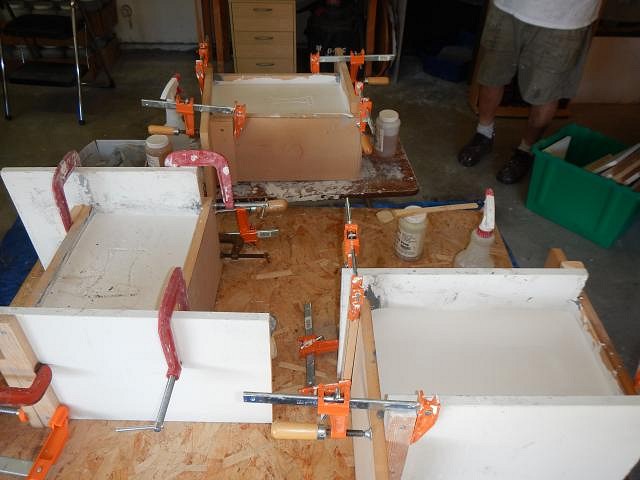
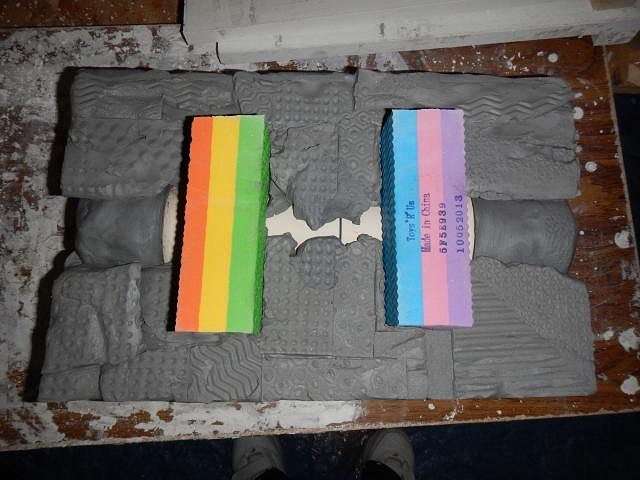
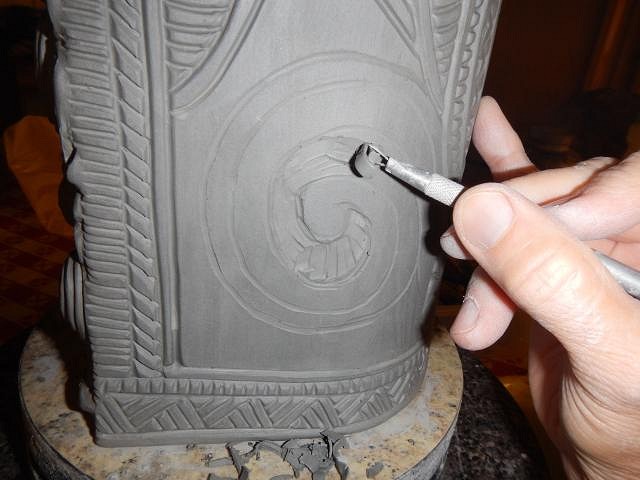
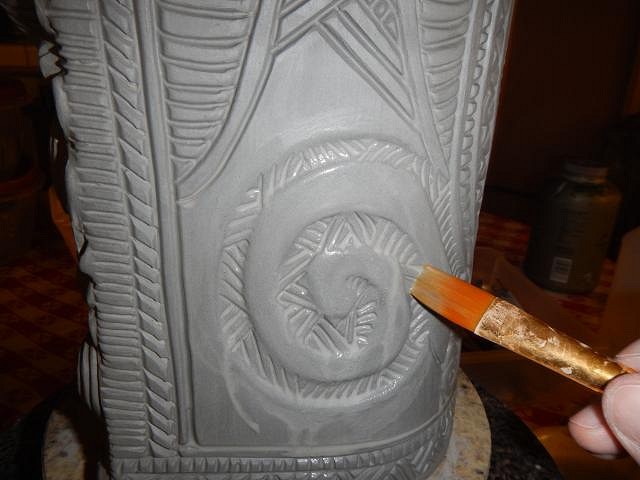
Tyber Tiki I have put your name on #9, thank you. But just to be sure that you saw that it is a statue and now a small mug. I've been going through a bunch of Maori books to find the right style of carving for the back. If you have any preference or photos send them to me right away! I like having you transfixed by your HUGE mug! PockyTiki it is so true that seeing art inspires art. You better start a step by step thread for your painting. If you have a thread start adding to it. Post a link to your art HERE. This is a place to share. I like your response to my art but you better stop when you are painting! ======================================================================== A very long time ago...2010...I didn't know how to make molds so I had Gecko and Babalu help me so that I could make runs of mugs. Now that a friend of kingstiedye Mike L. has taught us how to make them I share what I've learned over and over again. Repetition is the best way to learn. Dan and I have finally gotten it down so that we don't have massive leaks and other problems. So I'm once again sharing. These molds were made a couple of months ago and I saved the photos to put up when I have taken time off to relax. Yep we don't make tikis every single day. We try but it's important to have down time. A while back I made three mugs by hand. They are blanks that I can alter just like Tiki Bob. I can make them into drums or add tikis to the sides, anything is possible. But first I must mold these three mugs so that I have the blanks to play with. This will be our first time to do three molds at the same time. We took three days to do it. First we bought the best plaster there is for mold making. Then we went to Home Depot to buy more clamps and some wood. This is an older photo from when I first found the perfect blocks at ToysRUs. I used them to make the HUGE Maori mold. I marked all the piece to the sizes I needed and Dan earned another mug by cutting them for me. One too many interruptions for photos! We then cut these strips of wood and screwed them onto one end of each piece. These are for the clamps. Just in case it would make the wood absorb less water I sprayed them all with varnish. They was an experiment. I put the three molds together and then I realized that I would have enough blocks to fill the bottoms. We went back to ToysRUs and bought all they had! Back home again we made a table from saw horses and a big piece of plywood. This was the end of DAY ONE. We have the molds ready and now I'll go to work so we can make 3 molds at once. I hope this will help someone realize their dream. I've found mine with all of you, thank you. Cheers, Wendy |
|
H
hang10tiki
Posted
posted
on
Sat, Feb 7, 2015 9:29 PM
Wow Treg is in town
Zombies 3 rum scum 9th island Cheers to you two.... |
|
D
danlovestikis
Posted
posted
on
Sun, Feb 8, 2015 10:22 AM
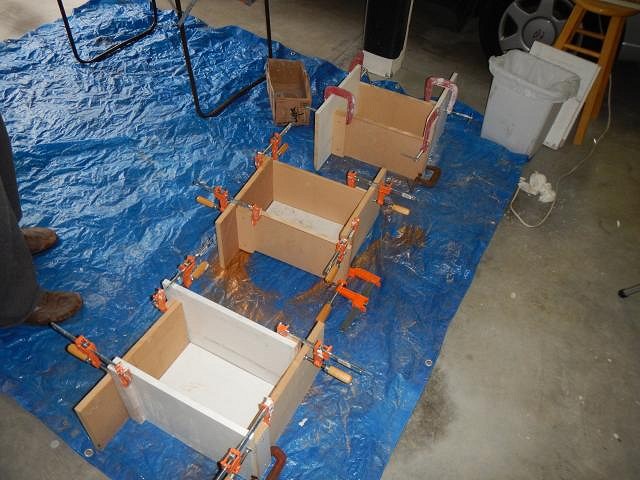
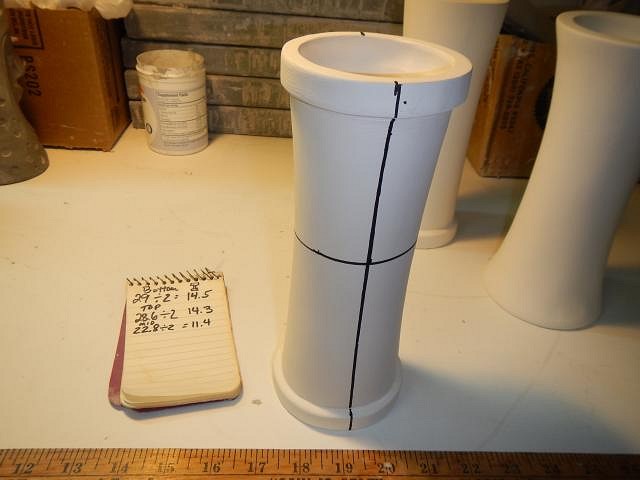
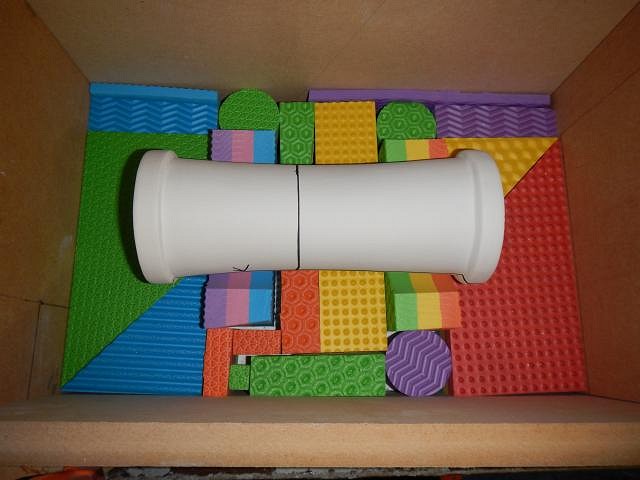
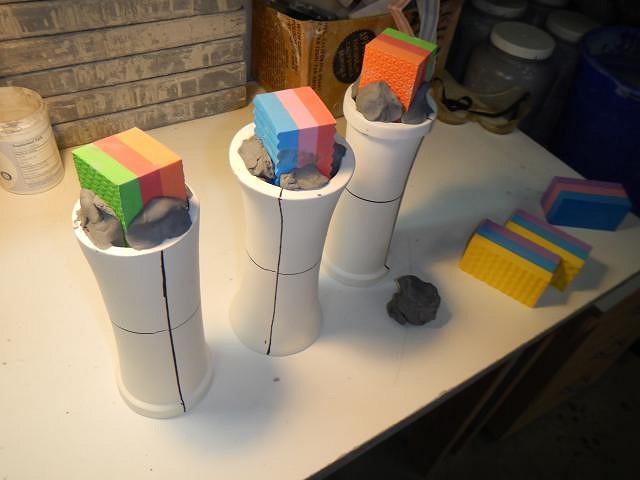
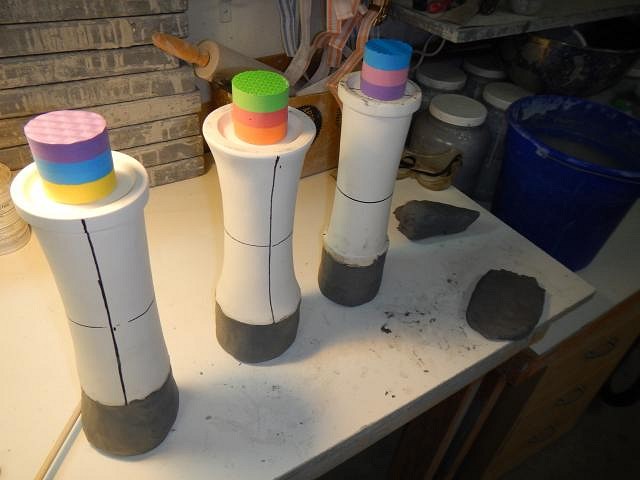
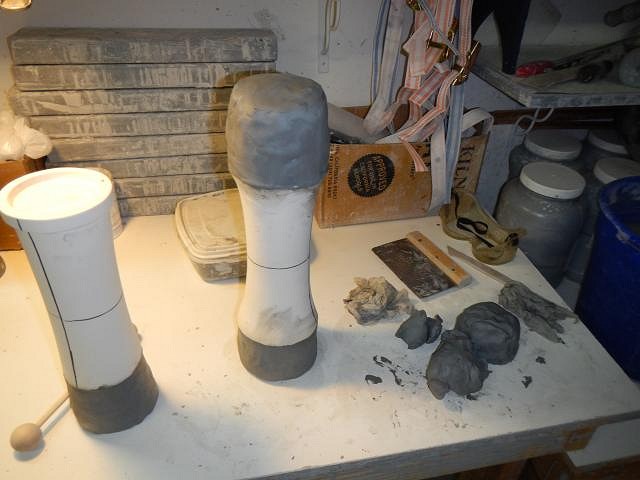
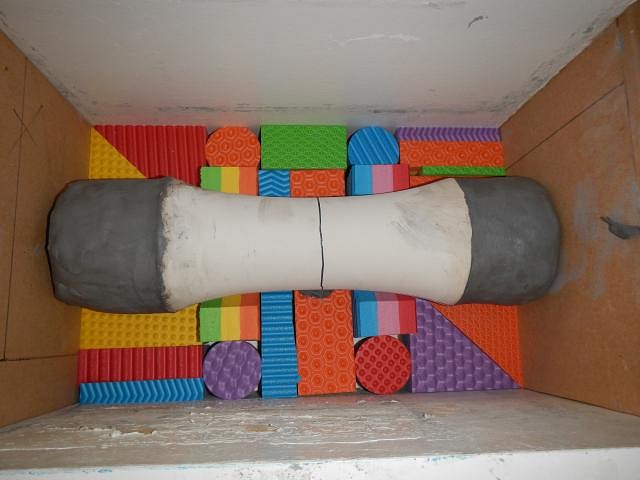
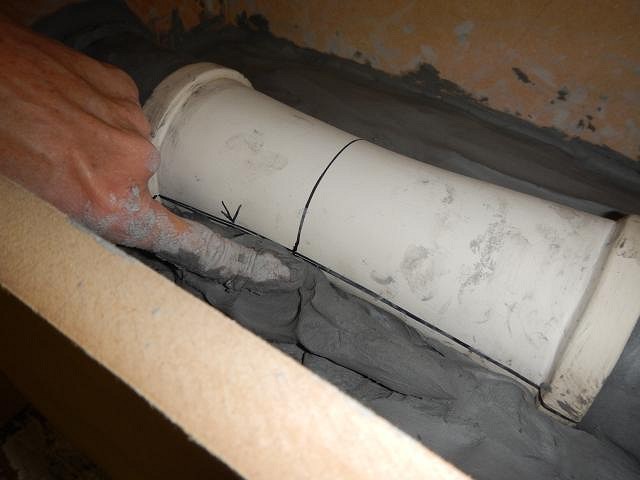
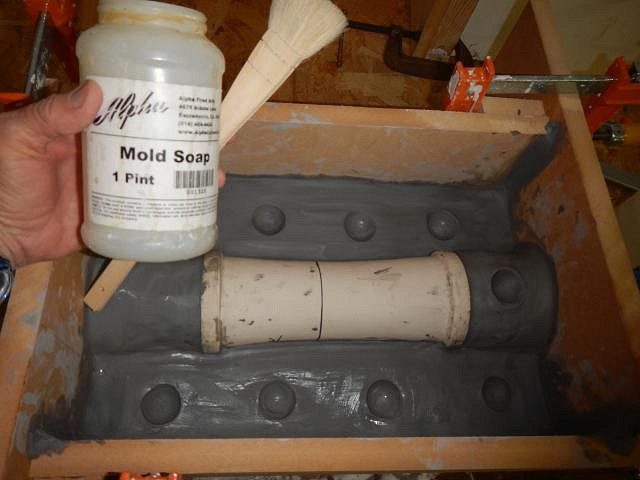
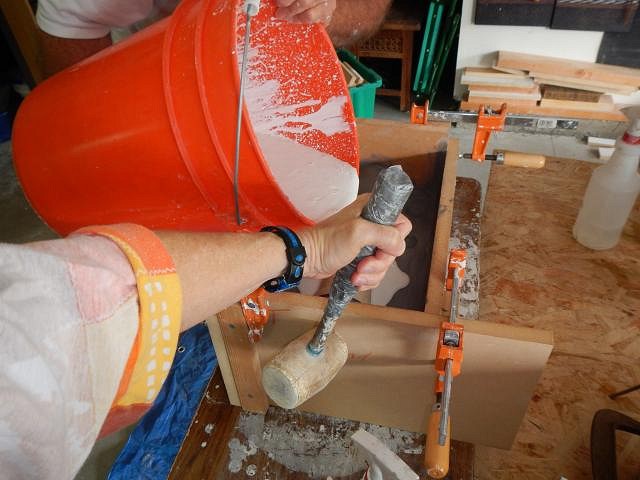
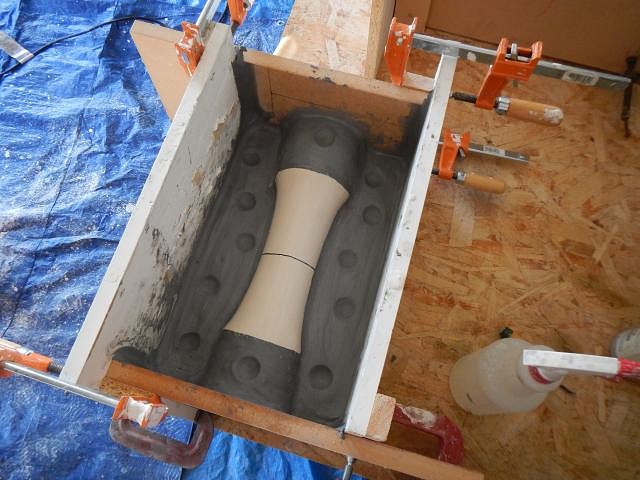
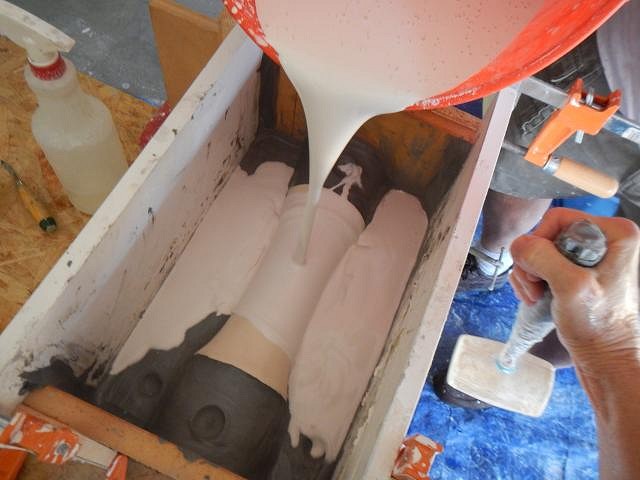
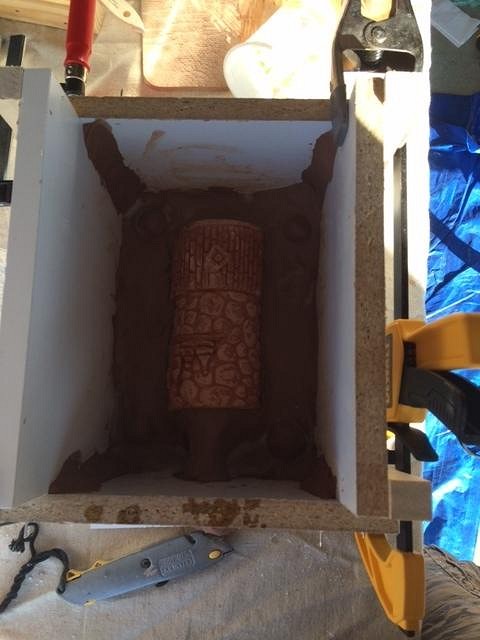
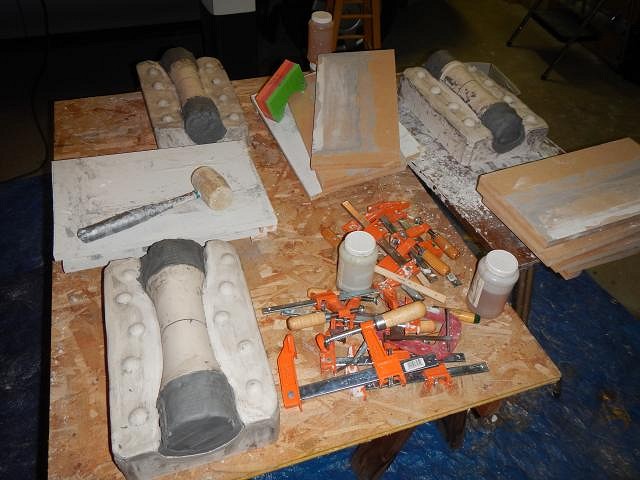
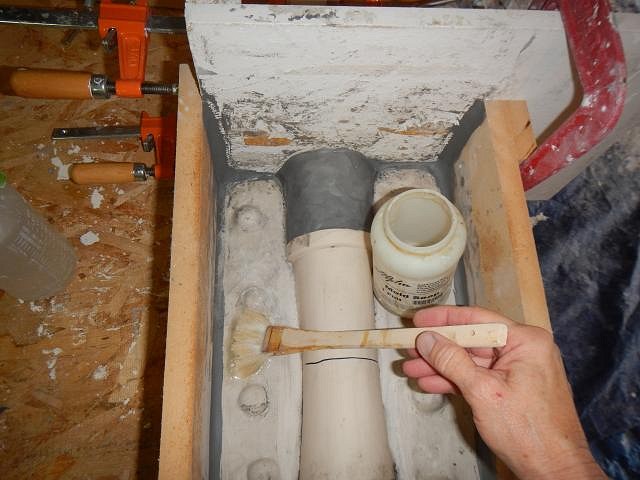
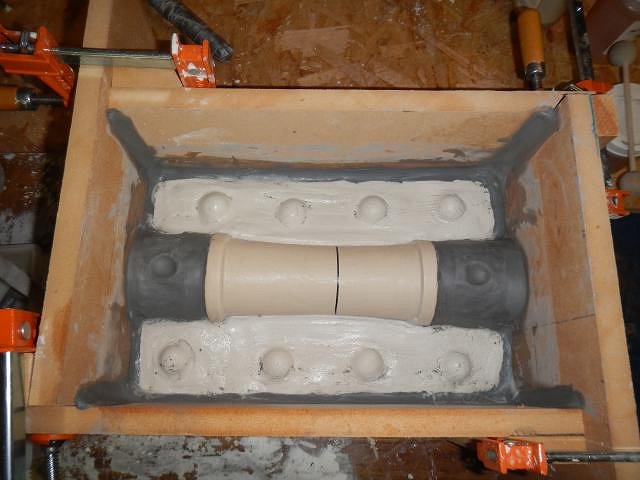
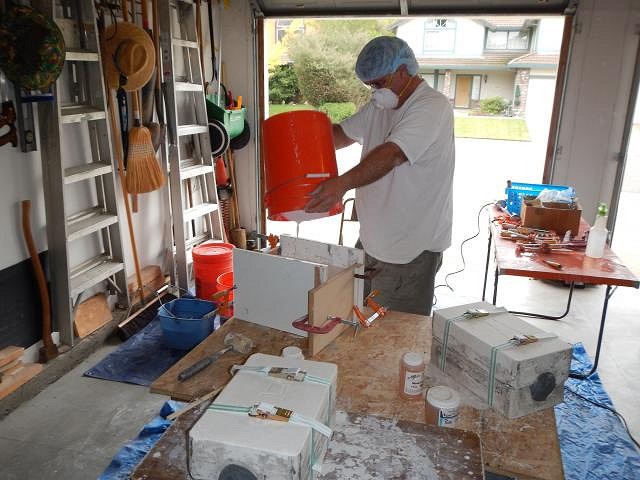
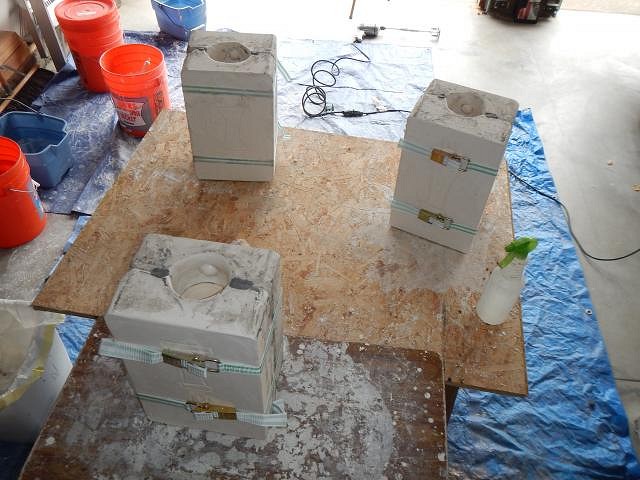
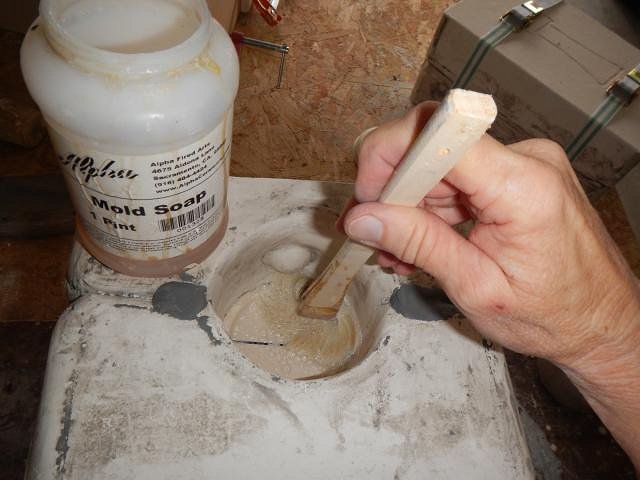
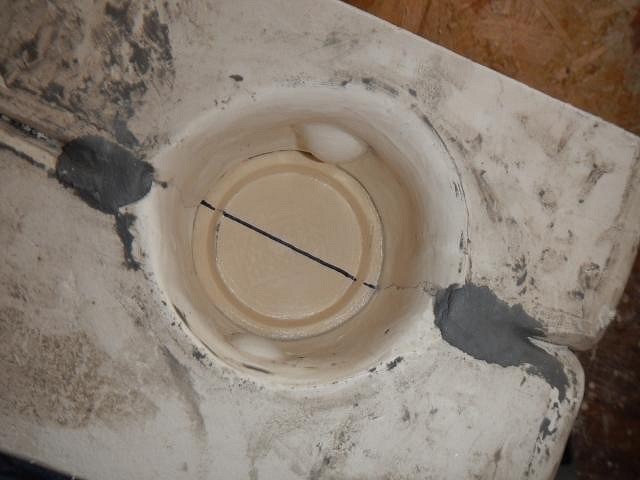
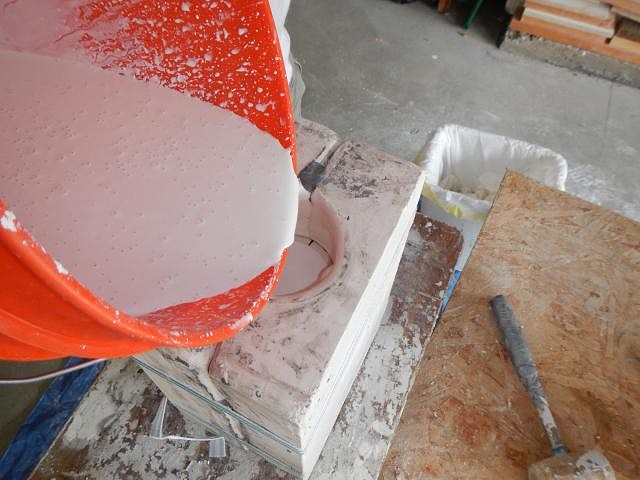
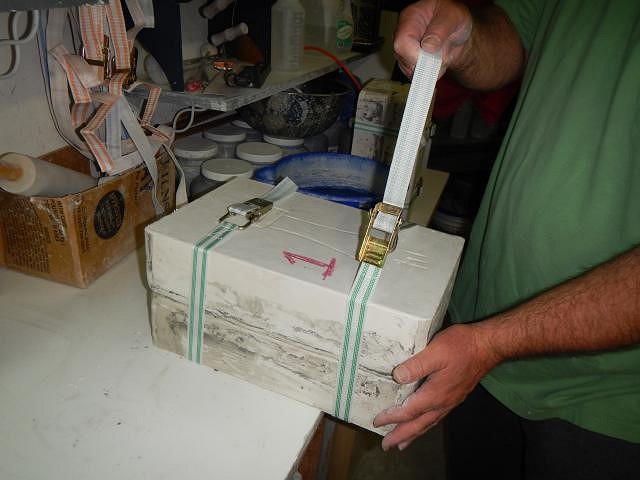
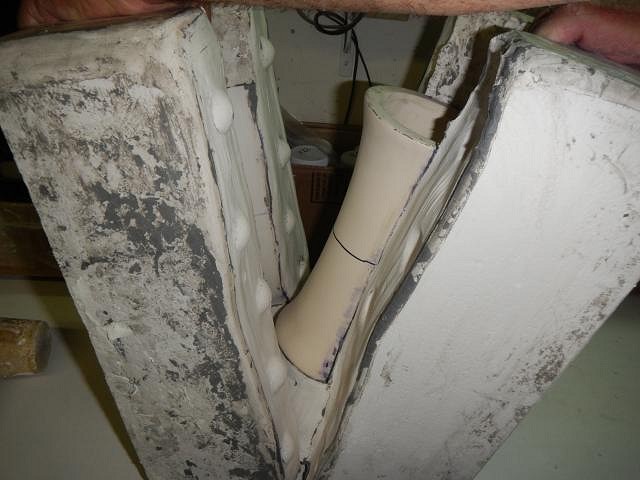
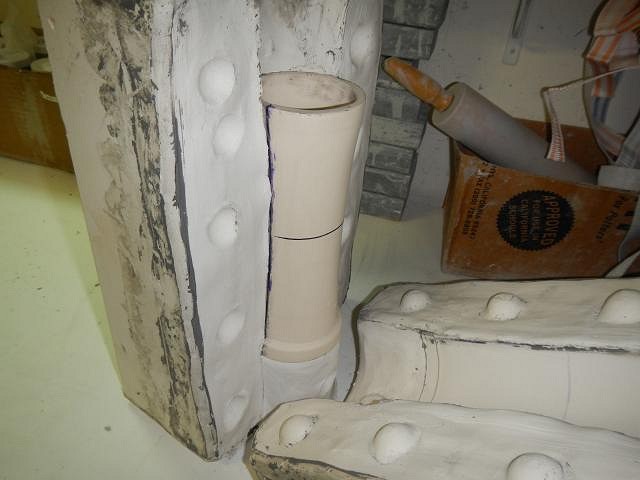
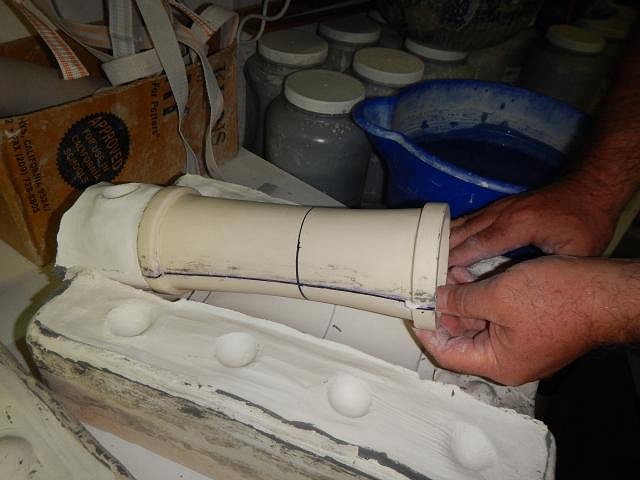
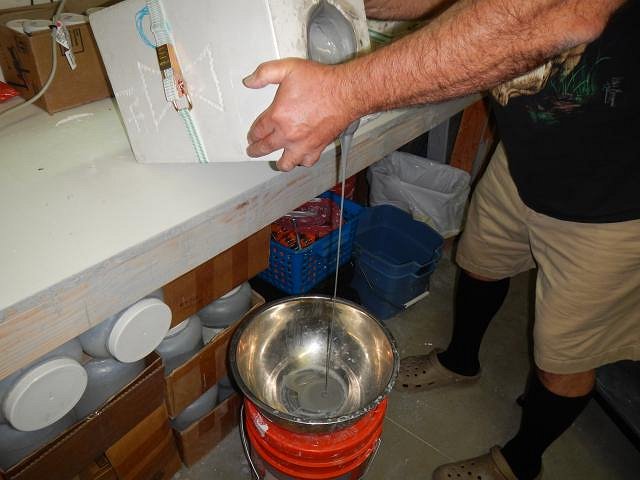
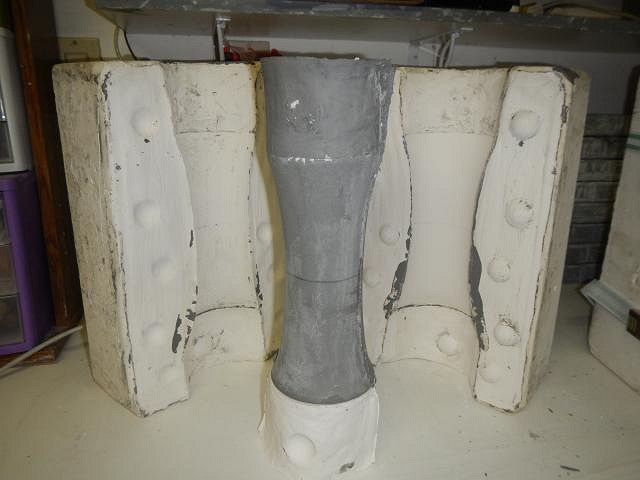
hang10tiki that really dark photo took some close up inspection. Good to see Janelle was keeping an eye on you men! ====================== Day Two of making 3 molds at once. I only need to make each a 3 piece mold. Two sides and a bottom piece. To do that I must find the exact halfway point of each mug and to mark it so I can work the clay when it's in the box. I'm sure there is an easier way but I don't know it. I measure around three parts of the mug. I make one straight line top to bottom. From this line I measure around half way. Then I draw the last line straight up. Next I get out the blocks and as needed I cut them to fit even better. One. Two. Three. Dan made snakes for me to run up the joints. First I use blocks so I can use less clay. This formed piece at the top of the mug will be the opening in the mold in which to pour in the slip when the mold is done. Working on the bottoms. This piece will eventually be removed and a piece will be poured to make a bottom. It fits. Now I will add clay and bring the clay to the half point lines on each side of the mug. Both sides are done and Dan made so many snakes that I had plenty to run up the joints on all three molds. This is a bisque mug so I had to saturate it with a lot of mold soap so the new plaster mold wouldn't fuse to it. I put the indentations for locks into the clay. Dan's ready to mix. I do the measuring and it's just right. We poured it into the first mold and then cleaned up. One done. When the plaster was hard I carved an outline of what the mug looks like. Poured. Cleaned up. Two done. The third one is prepped. The plaster is poured. All three are done and so are we. It's a very long day. Each mold has one piece done. Tomorrow we will do two pieces each and finish the molds. I hope this helps and the fear of mold making is going away for all of you who want to do this. Cheers, Wendy [ Edited by: danlovestikis 2015-02-08 10:24 ] |
|
T

TikiAno
Posted
posted
on
Sun, Feb 8, 2015 3:42 PM
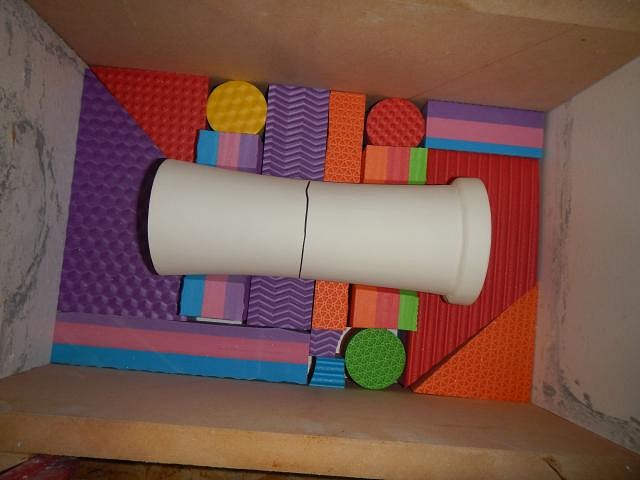
Busy, busy! Well, I should have checked your thread for today's update- I started on my first mold today, using one of your step by steps from a while back (and Babalu's). I'll let you know how they turn out, but here's the pre-pouring look:
Fingers are crossed. I put four locks for one mug- I noticed you put quite a few in the last round of molds- should I be nervous that I only added four? Thanks for all! |
|
H
hang10tiki
Posted
posted
on
Sun, Feb 8, 2015 4:04 PM
Go Wendy Go :) |
|
P
PockyTiki
Posted
posted
on
Sun, Feb 8, 2015 4:27 PM
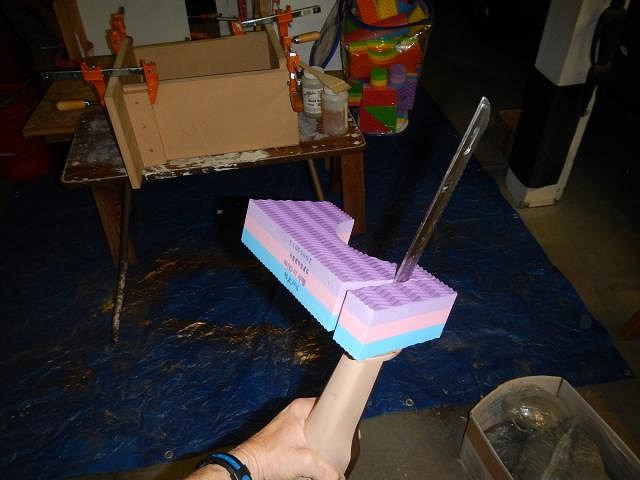
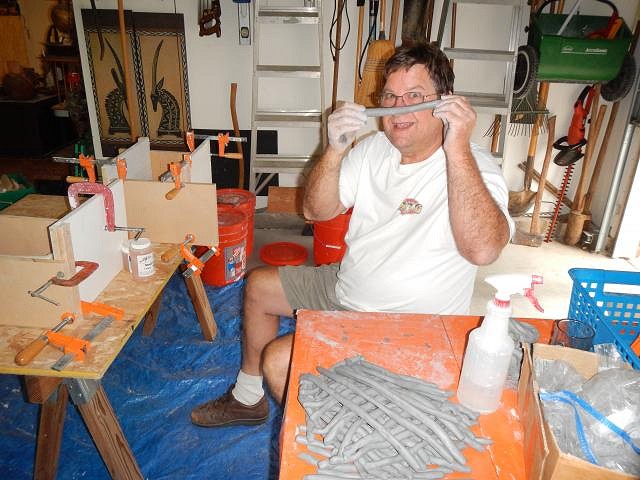
Seeing all those little pieces of cut up foam reminded me how I and many others used to cast bootleg resin action figures. (Yes, that's an actual thing) With legos! Just by piecing together a bag of legos, you can easily form a nice box for casting in...just make sure you tape it up or somethin cuz there is the possibility of it leaking...then again I'm a total cheapo and liked making the most of what I had. Also, good stuff as always. |
|
D
danlovestikis
Posted
posted
on
Mon, Feb 9, 2015 9:37 AM
TikiAno looks good. It will be fun to watch you do a run of mugs. hang10tiki go go go! OK maybe we'll go to Maui. Thank you for the suggestion. PockyTiki fun memories. I never played with Lego's but I wish I had. My main toy was clay and look what that did to me! ==================================== Back with photos shortly. |
|
D
danlovestikis
Posted
posted
on
Mon, Feb 9, 2015 10:02 AM
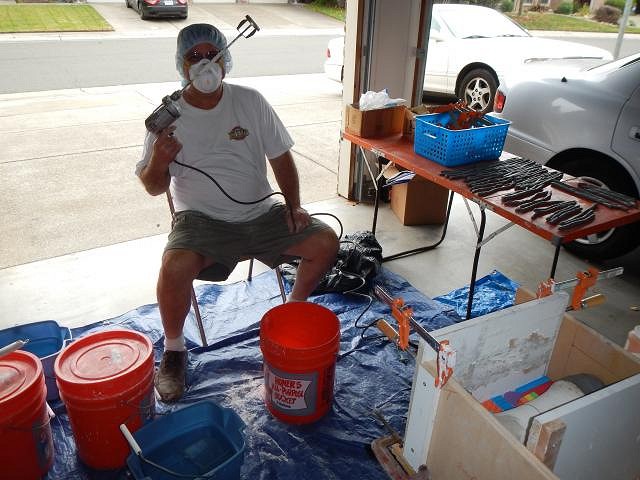
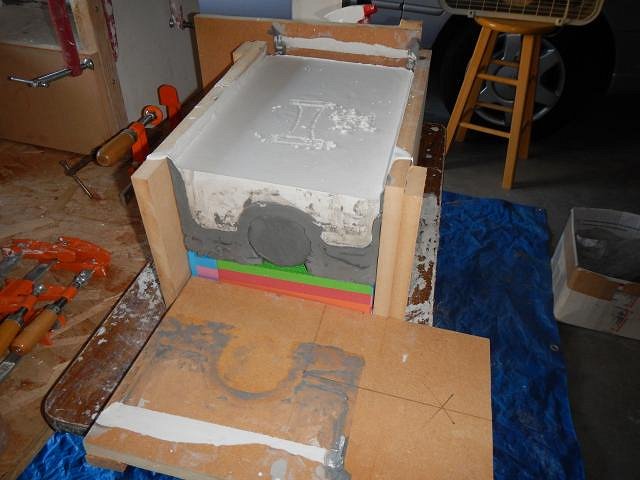
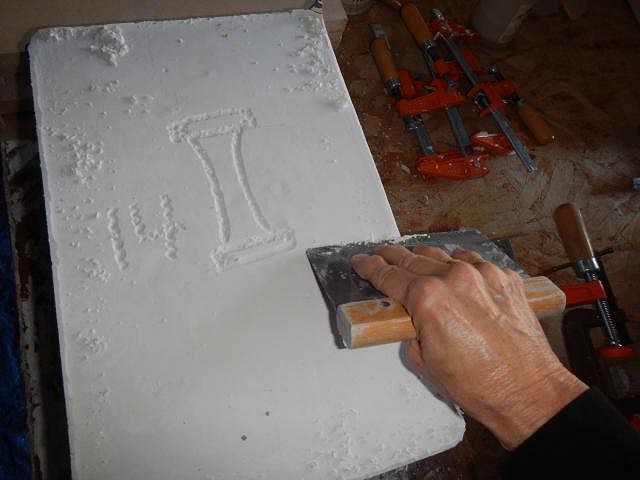
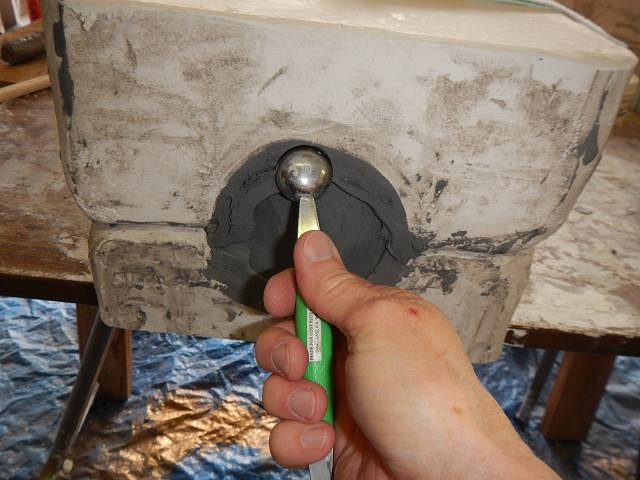
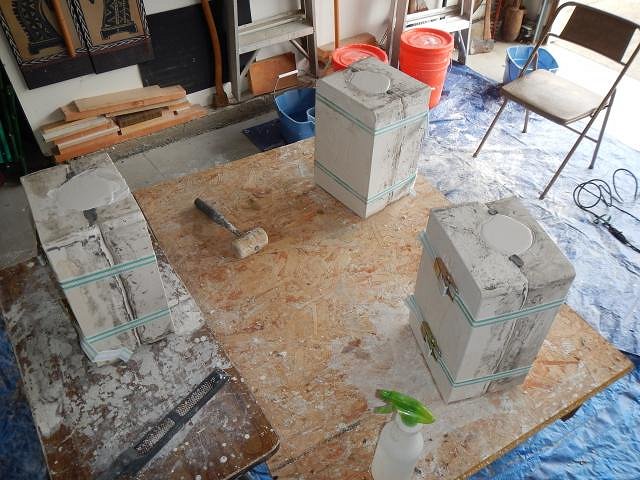
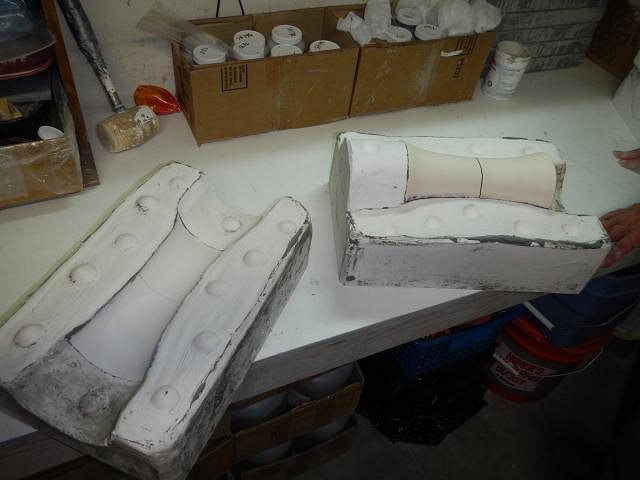
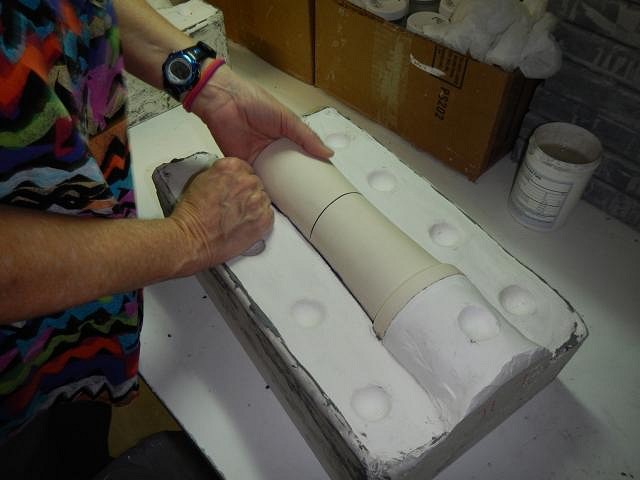
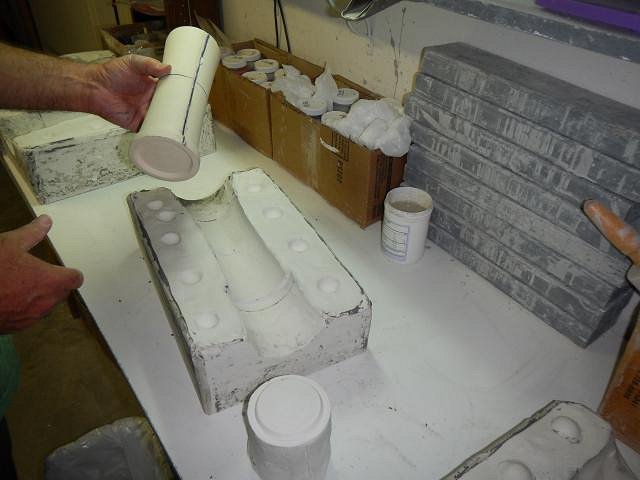
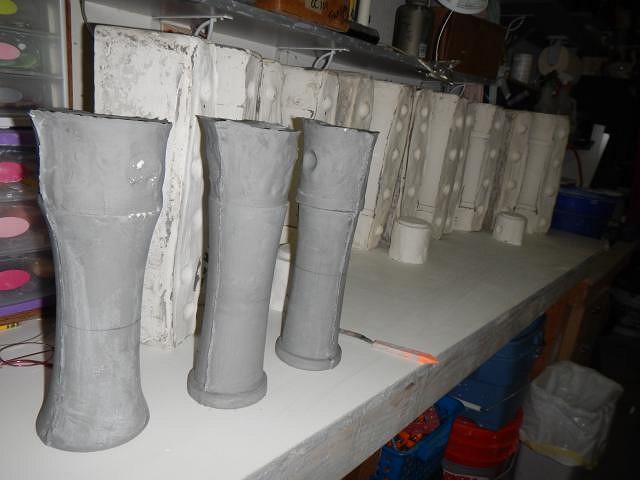
The Third and Last day to make the THREE fogcutter mug molds. Three styles and I'll be set for doing custom mugs. I removed all the boxes from each mold. I scraped all the sharp edges until they were rounded. I had already drawn the shape of the mug on the plaster for a label. All three have one mold piece done. Today I will do two more pieces on each mold. To start We put on a strap so Dan could turn them over with out it all falling apart. Taking off the bottom shows the artful arraignment of the blocks. Once all of them were flipped I started removing all the blocks. I used my vegetable chopper again to cut off blocks of clay. These go into tubs, get spritzed with water and saved for next time. All three have had this done and now I've put them into the mold boxes again and I've started to heavily mold soap them. I'm doing it 4 times with wiping gently between coats. The snakes are in place and it's ready to pour in the wet plaster right down to the last drop. Clean up and then do it again 2 more times. However this photo shows we are on the last one. The other two have the boxes removed and are now just strapped together. Now I need to dig out the clay which is covering the bottom of the mug. I've exposed the block. All the clay is removed. Upended the three are now ready to mold soap and to pour the last piece. 4 layers of mold soap wiping after each one. Dan's mixing the plaster. This time we can do all three pours because the amount is so much smaller. I make a dam of clay at the mold pieces joints so that plaster can be filled as much as possible. Slowly pouring it in works best. All three of them are done being filled. Dark crayon colors work best for numbering pieces or drawing the mugs. I carve and do the crayons. Here I carved on the last mold piece that has firmed up. The three have been set aside so we can clean up the garage. Dan finished before I remembered to take his photo so I took the picture without his face mask on. NEVER work without a face mask or you will ruin your lungs. Don't ever sweep up your mess, just mop it up. Dust, especially plaster dust will stick in your lungs and never come out. ============================= Tomorrow I will post photos of opening the molds. Cheers, Wendy |
|
T
TikiAno
Posted
posted
on
Mon, Feb 9, 2015 10:19 AM
Okay, I should have waited until today to make a mold (after yesterday and today's posts)! Ack. Okay, I realize I didn't use enough mold soap (as many coats), thus the mug is being stubborn and not coming out.... grrrr. Look forward to seeing the molds opening up! |
|
H
hang10tiki
Posted
posted
on
Mon, Feb 9, 2015 8:44 PM
Wait :) That was a lot of work in today's show Ano- hope it comes out ok |
|
W
Woodtiki
Posted
posted
on
Mon, Feb 9, 2015 8:55 PM
Three molds in three days, looks like you guys have it down. That mondo Maori is amazing! The carving is spectacular, can't wait to see it all glazed! |
|
T
TikiAno
Posted
posted
on
Tue, Feb 10, 2015 9:22 AM
I now need a time machine to go back to right before I started to try to make my own molds. Ha! Well, I did get a few things out of the kiln. The mug pictured, not Tiki Ari....
I'll try to post some photos on my thread at some point later, have to run to work now! |
|
D
danlovestikis
Posted
posted
on
Tue, Feb 10, 2015 10:14 AM
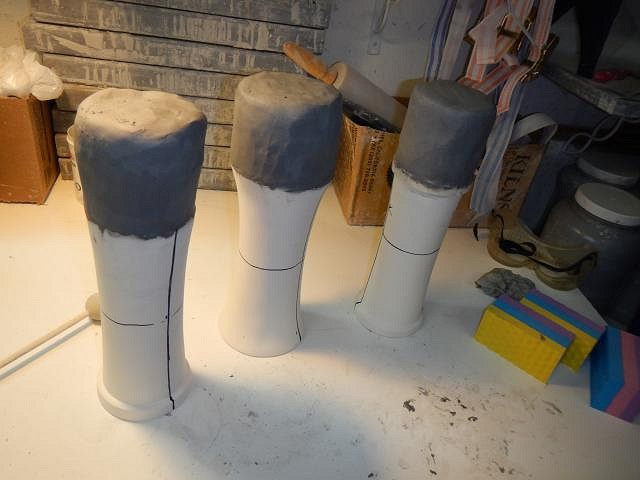
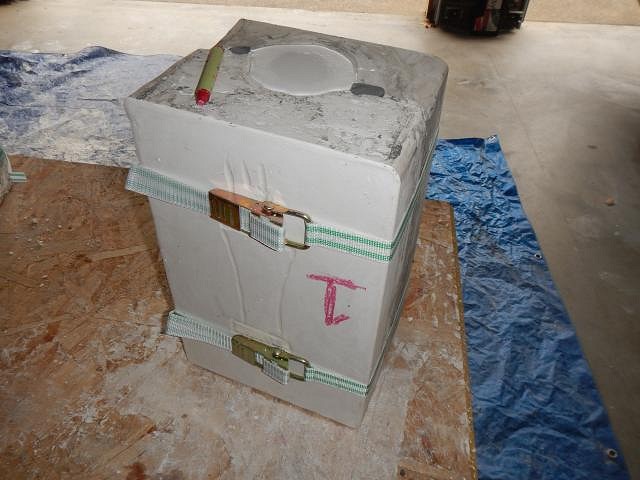
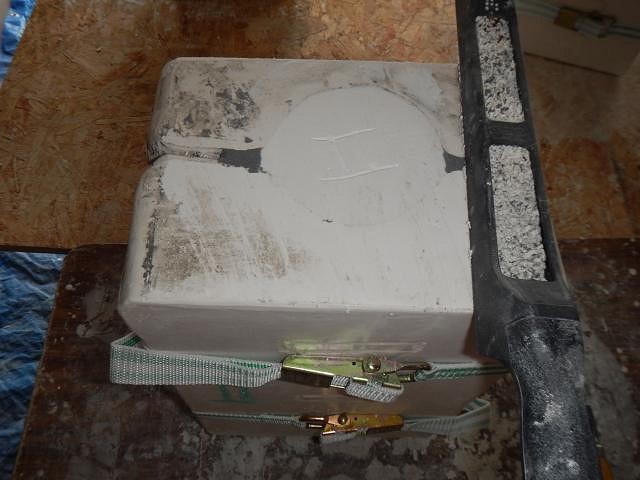
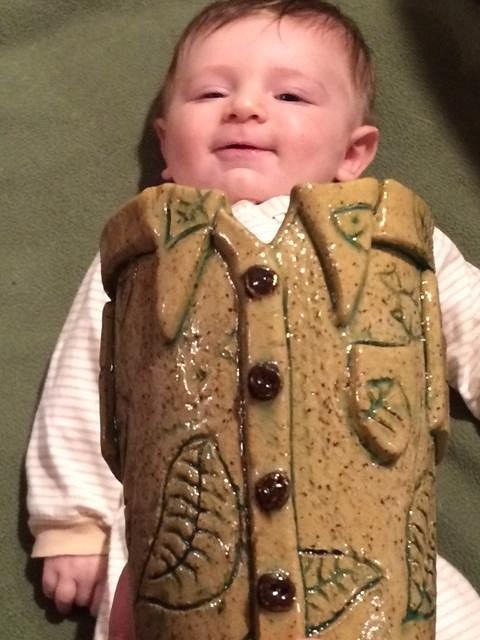
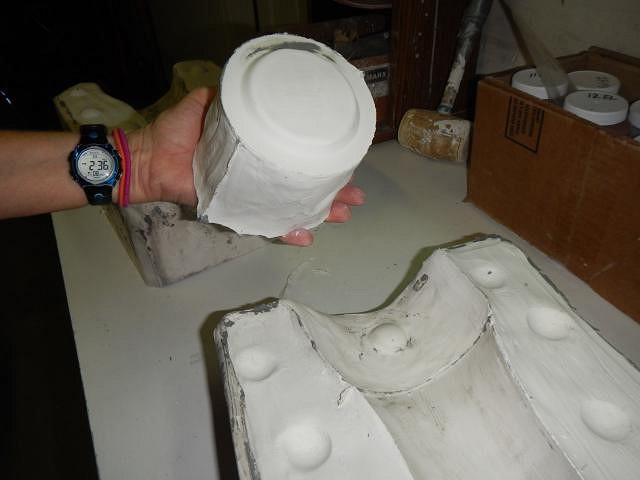
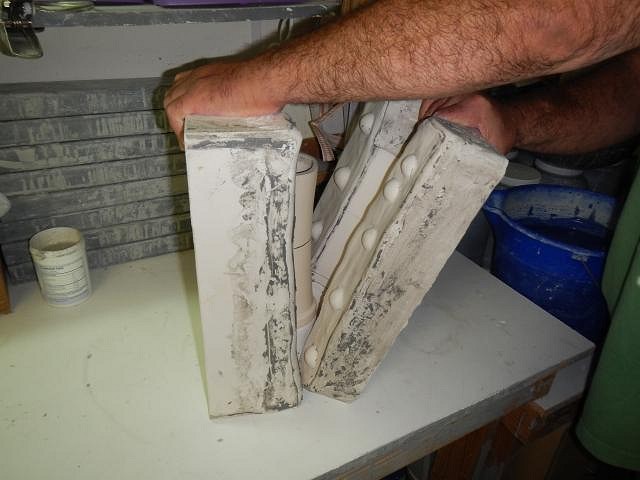
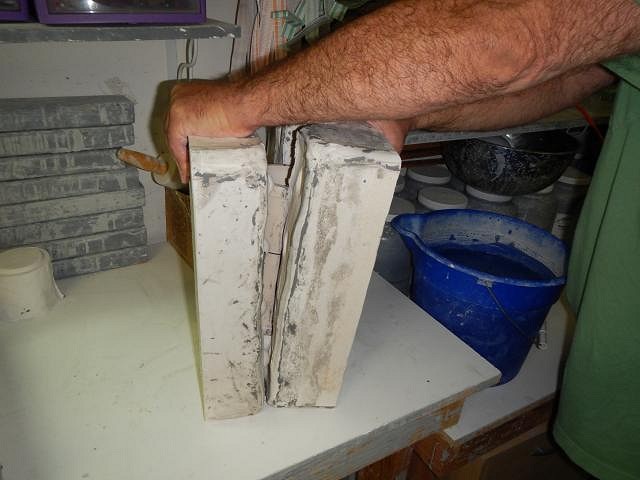
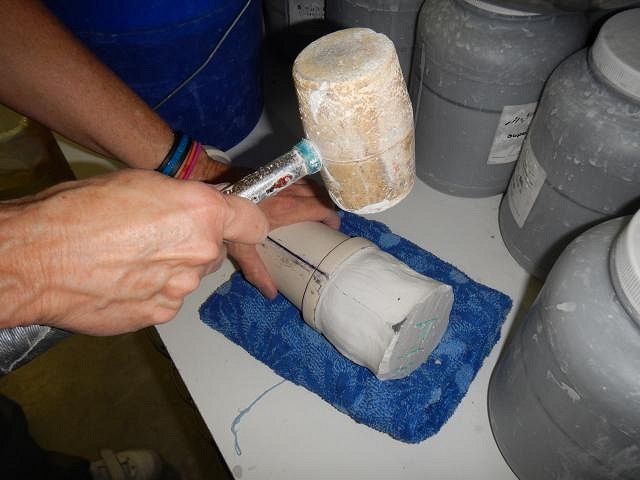
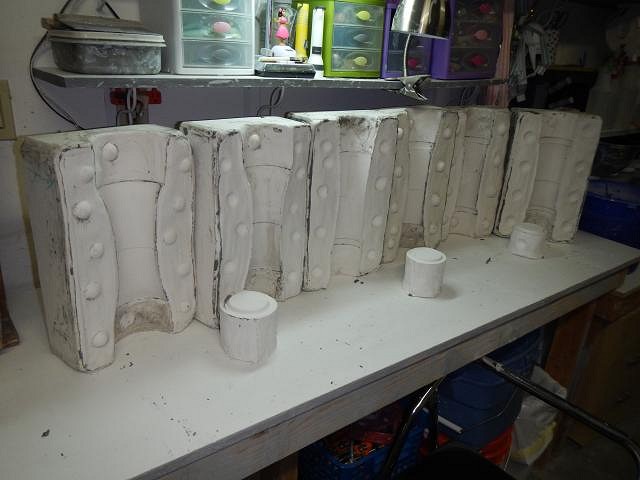
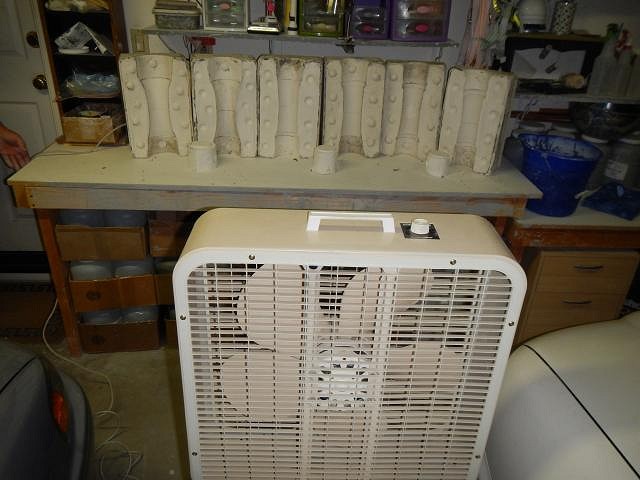
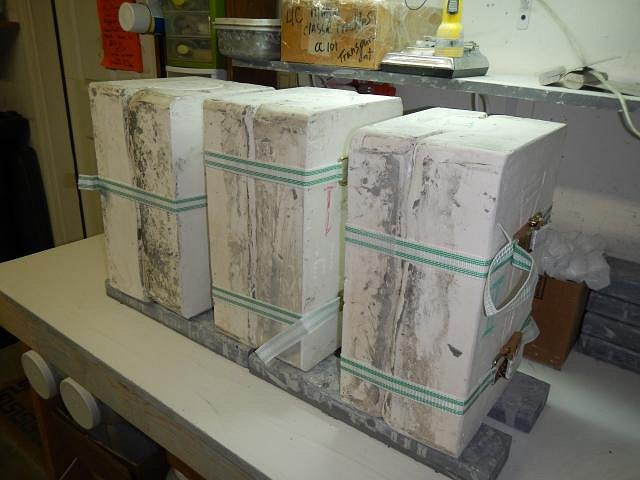
TikiAno next up opening the molds just for you! I'm sorry that you are having problems with your mold. We went through all the mis-steps when we started. We expect glitches to occur in all parts of our lives. You just say, "OH WELLLLLLLL!" and keep on going. hang10tiki ah if only it were that simple! Every day of mold making is a very busy day but it gets easier with practice. Woodtiki hi Woody, I think we have it down doing it "our" way. I'm sure there are those who do much better. Example our molds weigh a dozen pounds more that most. I'm enjoying the HUGE Maori. I have a lot of carving yet to do. I have to take breaks so I don't get muscle knots! I'm so happy that Tyber Tiki and everyone else likes it so far. TikiAno I love the glaze on Tiki Ari's shirt. This is a wonderful Tiki/Baby photo. One to enjoy over and over again. ========================================== Today was extra special with so many messages, thank you all. ========================================== I open the molds the very next day. This is when I find out if I marked the halfway point to perfection or didn't and the molds will not pull loose. Dan removed all the straps. It's good to have two people open them so nothing falls to the floor. The first one pulled apart easily. I lay the pieces down and the mug pulled out. The end piece came out easily too. One down and the second one to open. You can see how the end piece is nice and tight at the bottom. We lay it down and It all pulled apart! Two down. Number 3 is opened and the mug is pulled out. The end is stuck hard to the mug. Dan and I together couldn't pull it apart. I put a folded towel down and got my rubber mallet. I whacked it a good one and off it came. No damage. 3 good molds in 3 days. Now I put them in a row to dry in front of a fan 24 hours a day 7 days a week. Once a day I rotate to a different side facing the fan. Here it's the backsides. Here it is the ends that are drying. It took two weeks to dry these molds. It would have been faster if it weren't winter. Tomorrow the molds will be poured and I'll share photos of the outcome. Thank you for the messages and views, cheers, Wendy |
|
R

RVICTOR
Posted
posted
on
Tue, Feb 10, 2015 12:28 PM
Wendy & Dan - Question: This may be a dumb question...but when do you use the water bottle and what for? Keeping the clay wet? Anything else? |
|
H
hang10tiki
Posted
posted
on
Tue, Feb 10, 2015 5:31 PM
Ano- great "Mug Shot" Wendy- love the last 3 "mugs"
Worst sound ever, slurp of an empty tiki mug through my straw!!! [ Edited by: hang10tiki 2015-02-10 17:31 ] |
|
L
LoriLovesTiki
Posted
posted
on
Tue, Feb 10, 2015 5:55 PM
Tiki Ano - so exciting that you're making your first mold, even if you're running into some problems it's still very cool. I'll expect that everyone on this thread gets a chance for your first run for our collections! Wendy & Dan, excellent tutorial, as always. Some day I hope to follow your steps and make my own. But first I need to make a mug in order to mold it. What's the best for making the artist's proof? |
|
D
danlovestikis
Posted
posted
on
Tue, Feb 10, 2015 6:39 PM
LoriLovesTiki it all comes down to undercuts. There can't be any. It's easiest to make a three piece mold so if you do a design on the front and a design on the back but nothing on the sides then it will mold really easily. You can mold it just like these fogcutter mugs. Then after you have made the mold and cast the pieces you can add clay or do more carving on the sides. Then each mug will be special. Doing that is fun, just like adding hands to Tiki Bob. Wendy |
|
D
danlovestikis
Posted
posted
on
Wed, Feb 11, 2015 10:09 AM
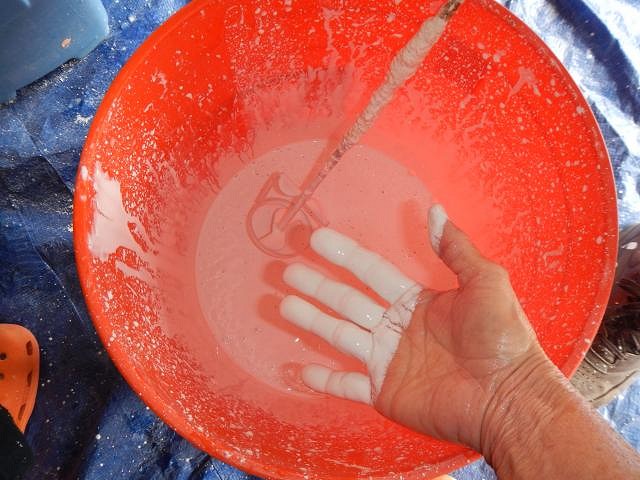
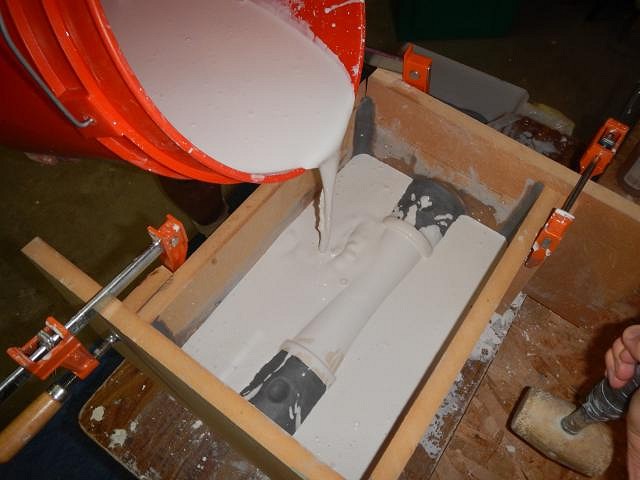
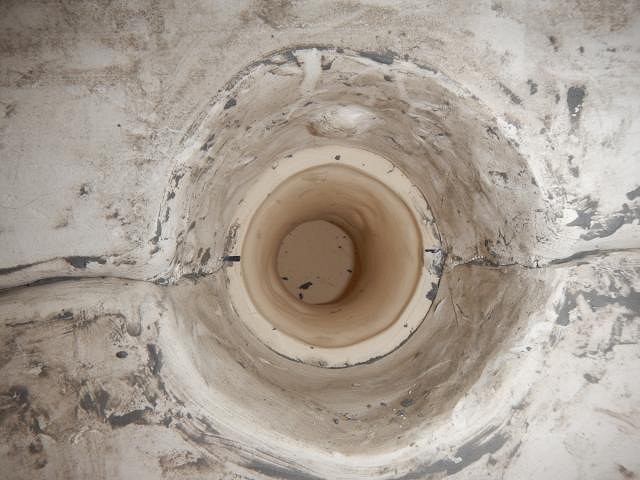
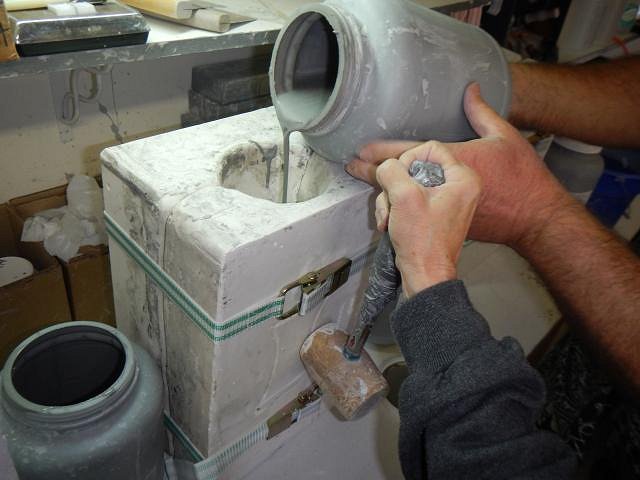
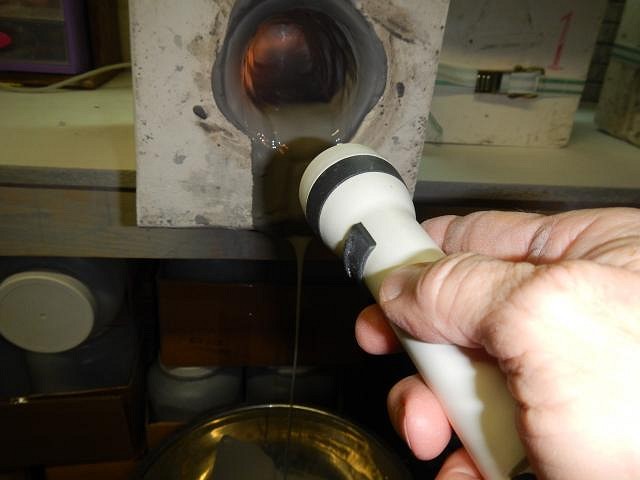
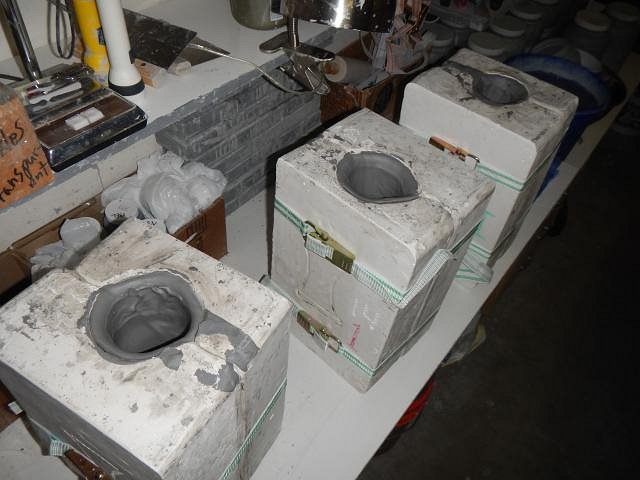
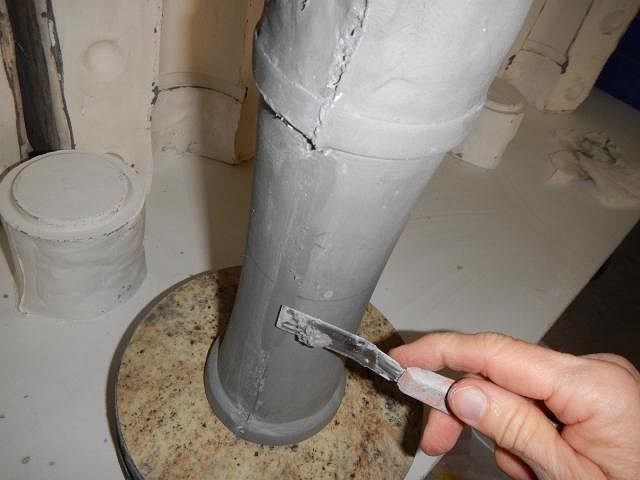
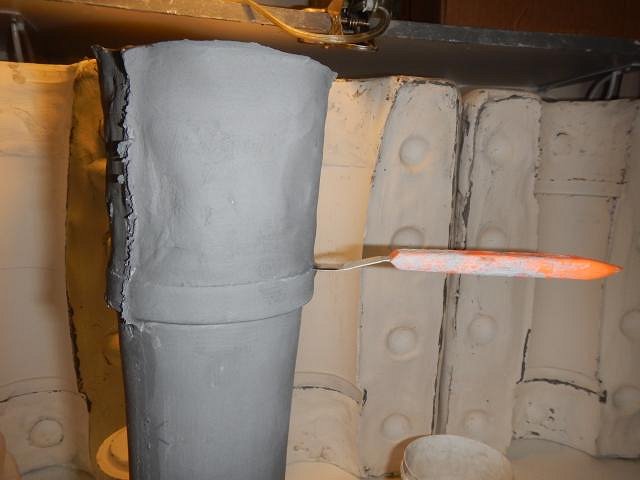
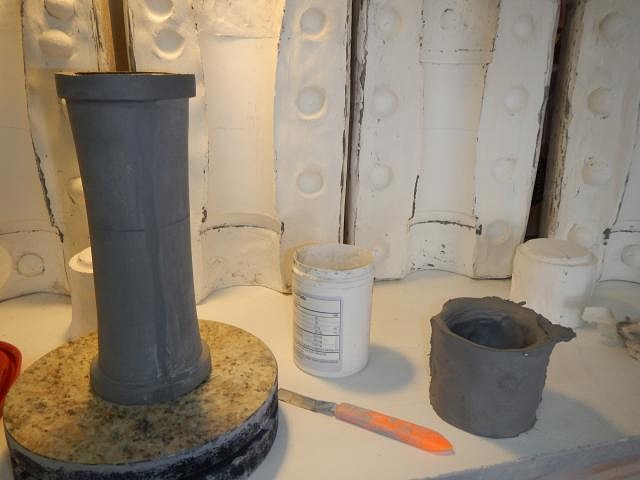
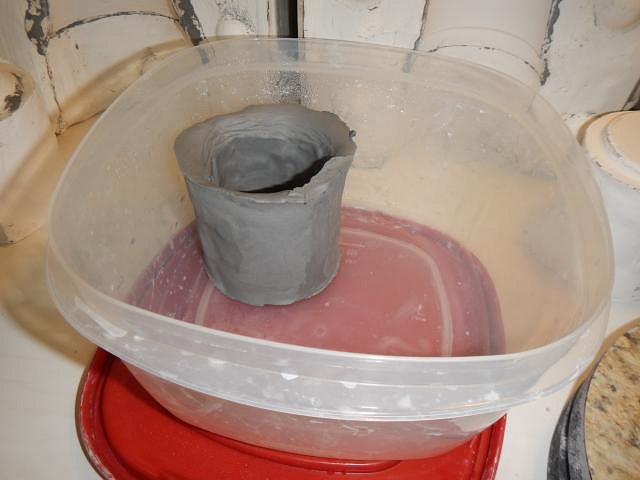
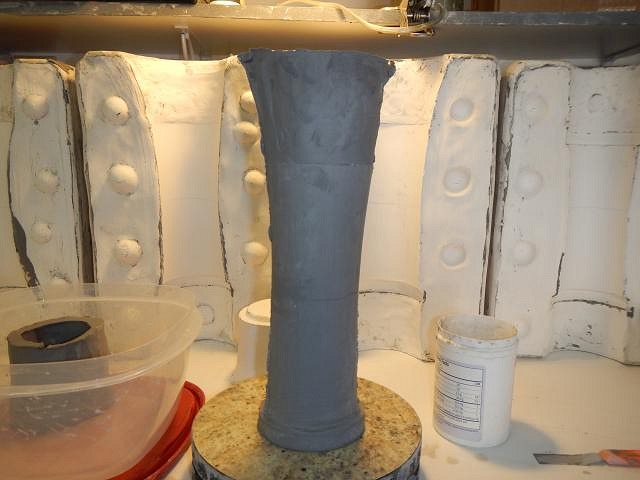
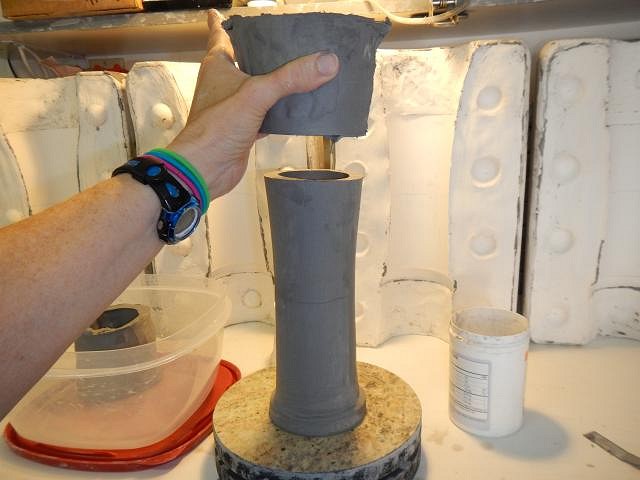
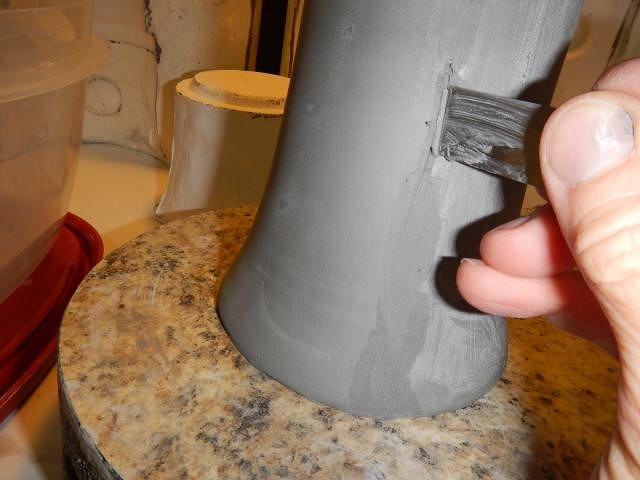
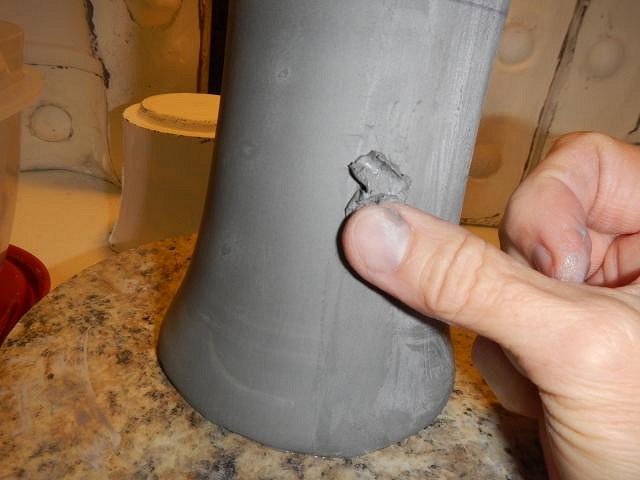
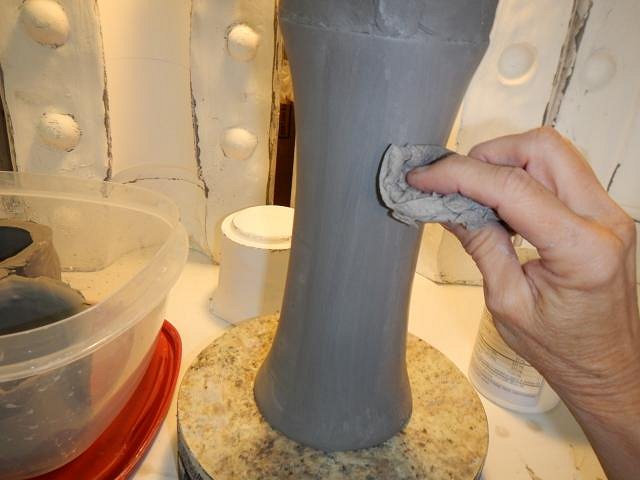
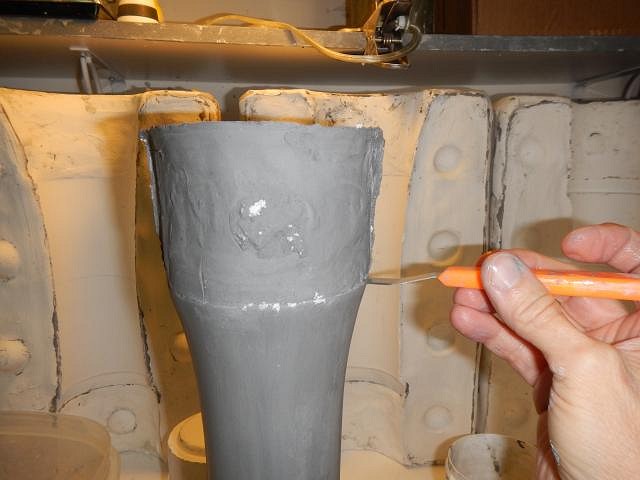
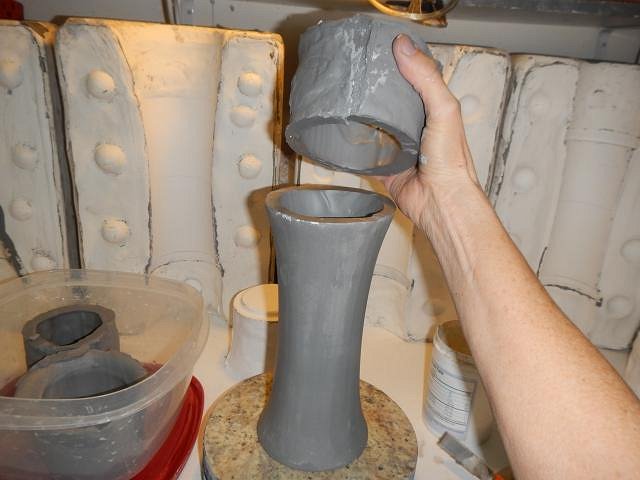
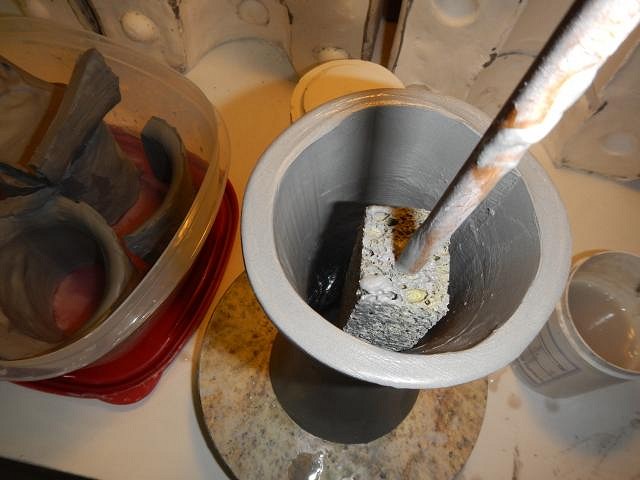
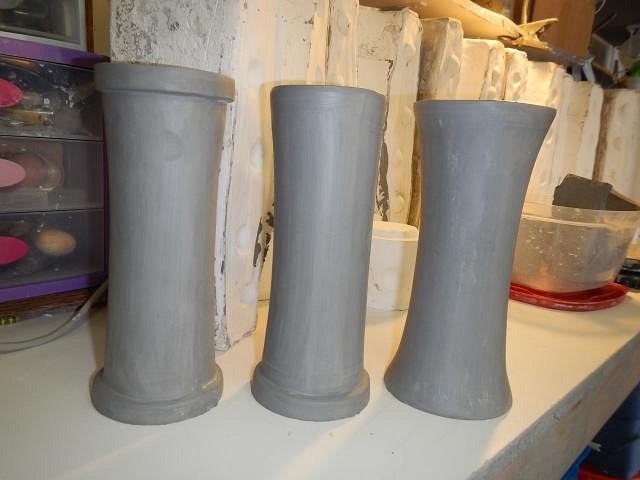
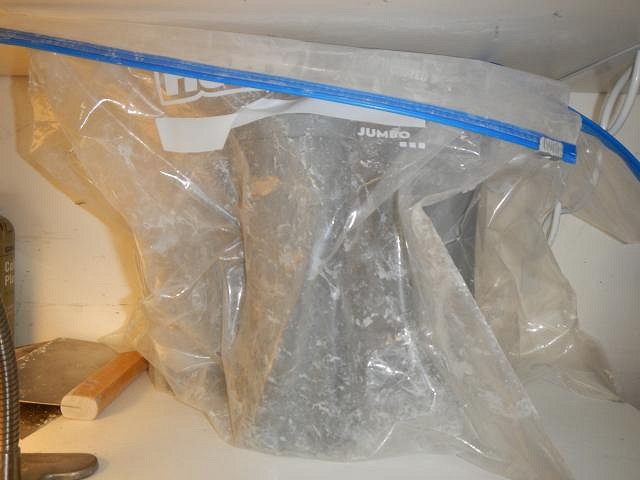
Yesterday I showed the molds being finished and put in front of the fans to dry. A couple of weeks and the fan did the trick and the molds are ready to pour and to turn out some new fogcutter blanks. We pour in the slip while I pound the side to remove air bubbles. Two hours later it's time to pour out the still fluid slip to make the mug hollow. I always check to make sure that none is hanging up in the bottom. After we did this with all three they are left upside down overnight. The next day we turned them over and it's time to open them. The first one out is the rim less mug. This mug is requested by Professor G on the Wish List. It will have palm trees added all the way around and then super carved. He ordered 2 so I'll be pouring more. Here all three types are out of the molds. Success! Now using my favorite tool the label scrapper. These are sold on line with the title. I scrap off the mold lines and I cut off the tops. This variety has the band at the top and bottom. One done. I remove any plaster stuck on the clay and I save to use any that I cut off of the mugs. This next style has the band only at the bottom. I scrap the sides. I cut off the top and smooth it with a wet paper towel. Now it's time to clean up Professor G's mug. I scrapped down this side and then when I rotated to do the other side I found a piece of mold plaster stuck in the side. It's really important to dig in and to make sure that all the air is removed. I carefully press in the sides removing the air and then I add clay to fill in the dent. Now I finish the sides off by smoothing with a wet paper towel. I cut the top off. Lifted it off and saved the clay in the container. Sometimes the insides of mugs have drip lines. These can be sanded out later or rubbed out now with a sponge on a stick. I have three good mugs waiting to be altered and carved. For now they each go into a large size Hefty bag. The molds are put in position and the fan is turned back on. Now they'll dry over night and be ready to pour the next day. ================================================Tomorrow is a day off for us so I won't be here posting. By Friday I'll be hard at work on Wish List #5 and on the Sacramento Crawl mug for 2015. It takes me 6 months to get the crawl mug made because I will make one mold and have to cast every day for 2 months to make enough. It's time to work really hard. This is when the fun photos begin again. Cheers, Wendy ================================================ |
|
T
TikiAno
Posted
posted
on
Wed, Feb 11, 2015 11:37 AM
Cool! The Wendy & Dan MoldMaking Educational Channel is my favorite! |
|
WC

Will carve
Posted
posted
on
Thu, Feb 12, 2015 4:20 AM
Real cool watching the process. |
|
H
hang10tiki
Posted
posted
on
Thu, Feb 12, 2015 11:18 AM
And the work continues |
|
D
danlovestikis
Posted
posted
on
Thu, Feb 12, 2015 10:13 PM
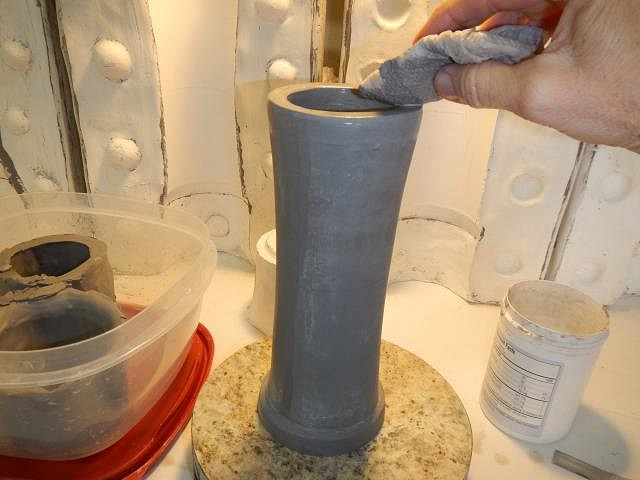
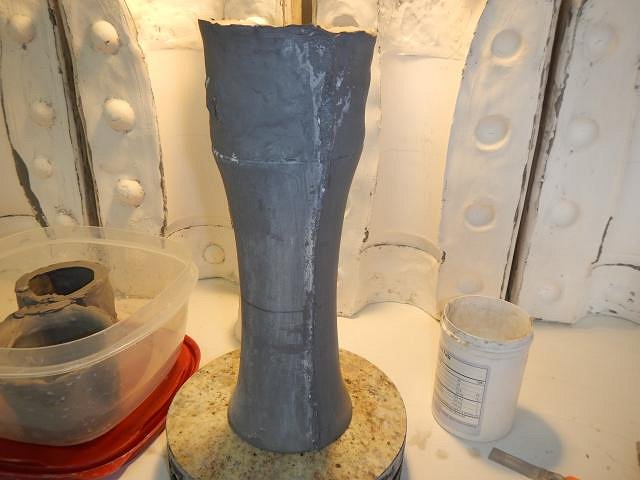
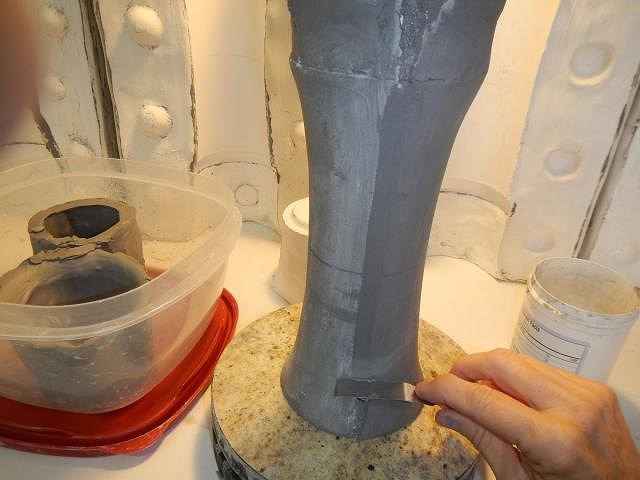
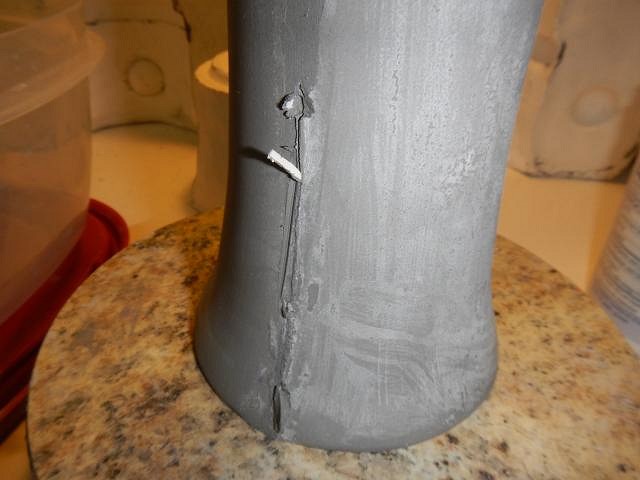
Tiki Friends I'll share a secret. We have not been home for the last 17 days. We went to Maui to visit Maui Rob and Beachbumz. We love their art and they are shipping our purchases to us soon. I'll be sharing photos of our visit with them and highlights of our trip. I posted each day photos that I'd saved for just such an occasion. We didn't have a house sitter this time and so I thought it wise to not mention our trip until we were back home. We have just been here unpacking for a short time so I'll answer the messages and then we are going to crash. ================================== TikiAno I always post the mold making sessions because making a mold is what stopped me from doing my own ceramics for so many years. Now we are to the place where it's busy work but we don't yell and scream any more. I almost always figure out something better or new. I'm glad that it's still appreciated. I could have been surfing rather than posting! Will carve you are so right. This was the first time we made 3 different molds all at the same time. We were super happy that my measurements worked so that the molds didn't have to have the mugs cut out of the pieces. hang10tiki I really miss the photoshopping from you, Tiki Ano and lunavideogames while we were gone. If we have a house sitter for the next trip I'll be sure to let you men know. GROG where are you? ====================================== Photos soon. It's good to be home. I missed the clay. Wendy |
|
H
hang10tiki
Posted
posted
on
Fri, Feb 13, 2015 1:03 PM
17 days Maybe 1 or 2 of them will get photo chopped :) Hope you had fun |
|
L
LoriLovesTiki
Posted
posted
on
Fri, Feb 13, 2015 2:43 PM
Glad you got to see Rob & Scott! I'm sure you had a blast in Hawaii! 17 days there sounds heavenly. Can't wait for photos and recaps. You did an excellent job not letting anyone know you were away. Well done! |
|
D
danlovestikis
Posted
posted
on
Fri, Feb 13, 2015 11:07 PM
hang10tiki the best part of our trip was the visit with Rob and Scott. The best tiki treasures were found in their homes. We managed to snag a few. Photos soon. LoriLovesTiki I worked all day on the HUGE Maori mug/lamp. I've run out of energy to post photos. We did have a great trip but 17 days for Maui was too long for old folks. Oahu, now I could stay there for 2 months and never run out of places to go. I'm off to bed, we still are catching up on all the stuff that needs to be done after returning. ================================ I'm so happy to be back to working on the Wish List. I thought about it the whole time we were gone. Until tomorrow, Wendy |
|
D
danlovestikis
Posted
posted
on
Sat, Feb 14, 2015 10:43 AM
RVICTOR sorry I missed your question and hang10tikis photoshopped picture on my three new mugs.
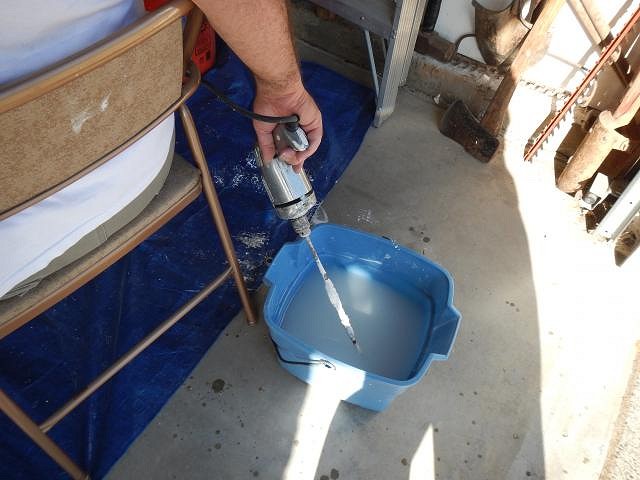
hang10tiki I wish these were done in time for valentines day so I could kiss each one of them. OH yes I have the original! RVICTOR I have bottles of water to add to the clay slip. Once water gets hot in a car you shouldn't drink it so I put it in the slip to make it the right consistency. Or is you are asking about the spray bottle I use it for keeping my casts wet while I super carve them. Because they can be out in the air for 8 hours I don't want any one part to dry faster than another because the clay shrinks as it dries and that can cause it to crack. If you add on clay then you must really slow down the drying process to prevent that from happening. I have a vacation photo that reminds me of your swap mug. I'll eventually share it. =========================== I'm working on photos to show right now. Wendy |
|
H
hang10tiki
Posted
posted
on
Sat, Feb 14, 2015 8:53 PM
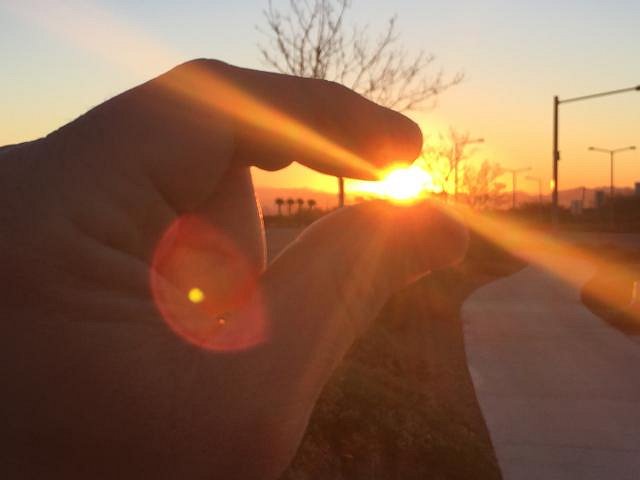
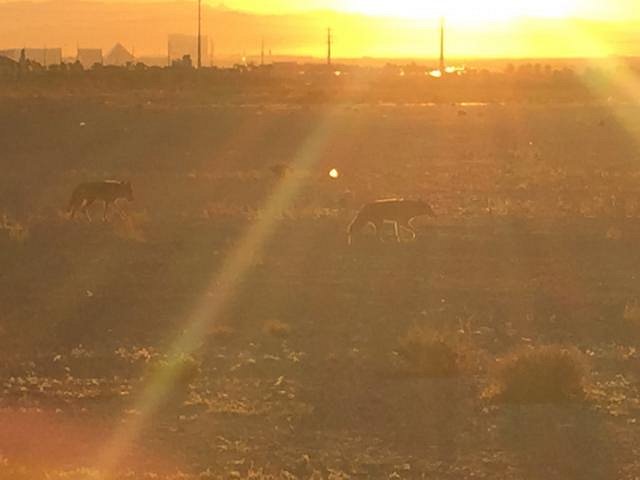
I forgot to post a photo from this mornings walk
Then these two coyotes ran past us
Can't wait to see your vacation photos... |
|
D
danlovestikis
Posted
posted
on
Sat, Feb 14, 2015 9:32 PM
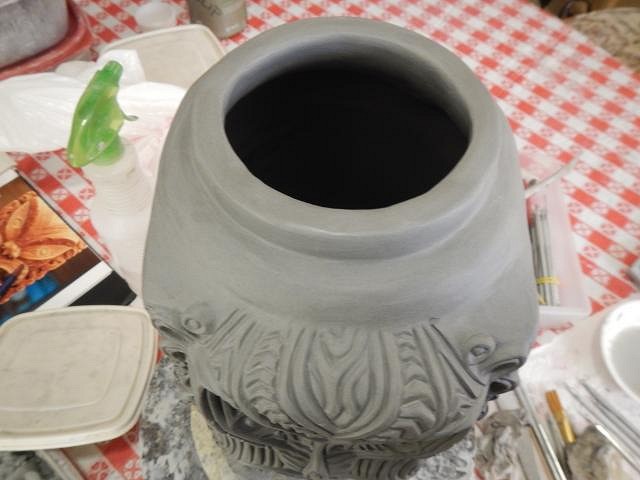
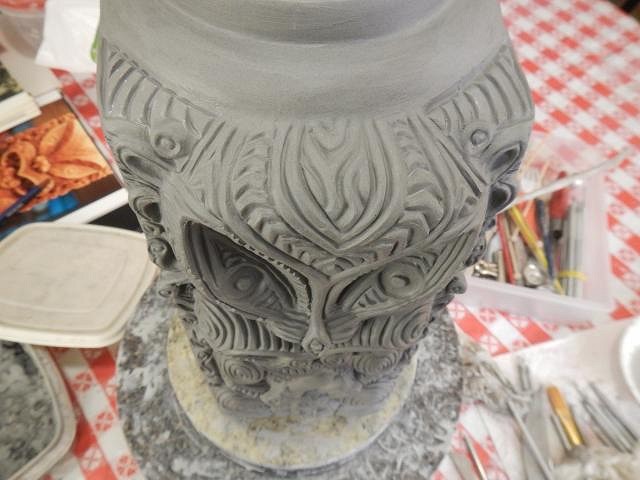
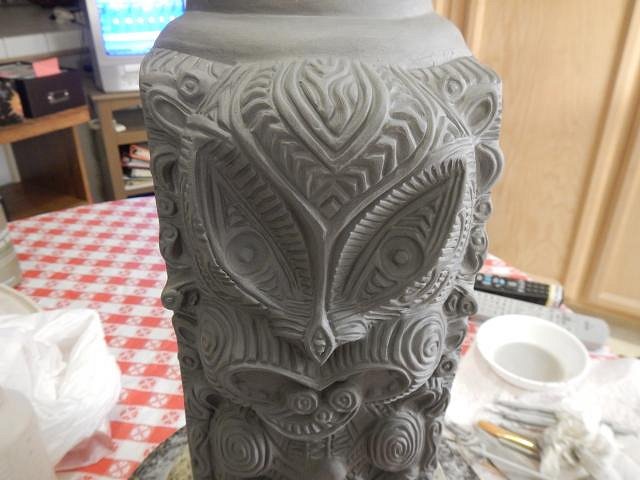
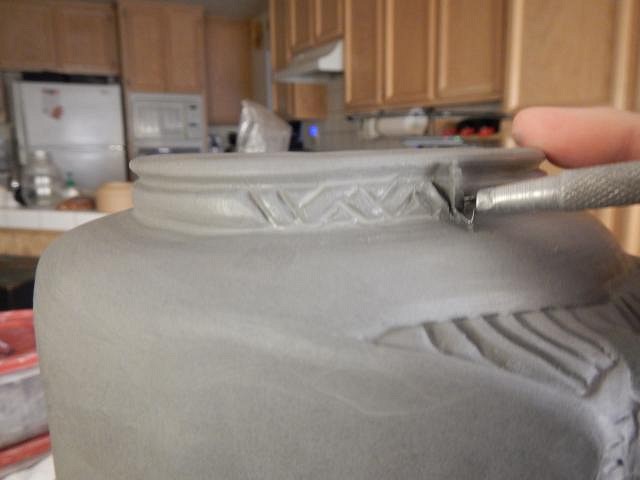
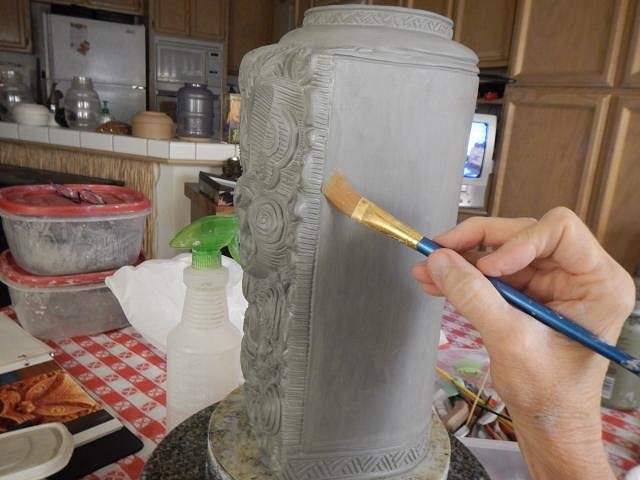
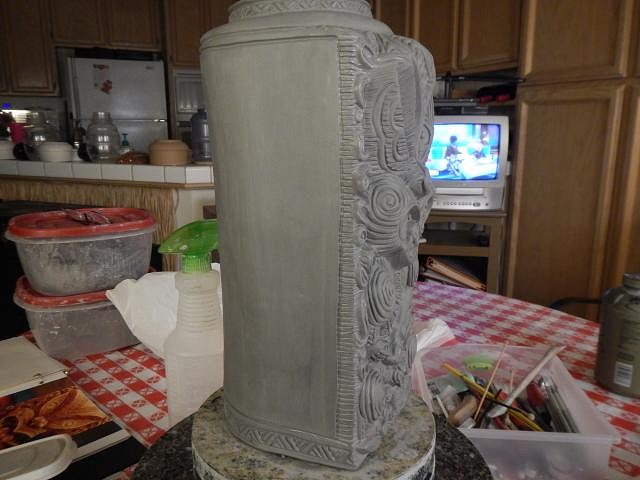
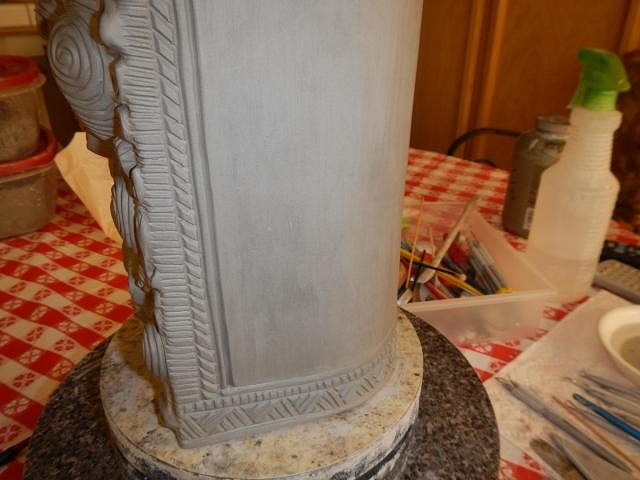
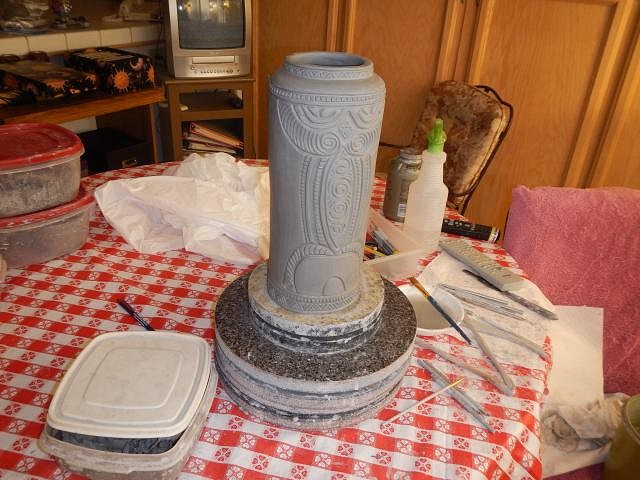
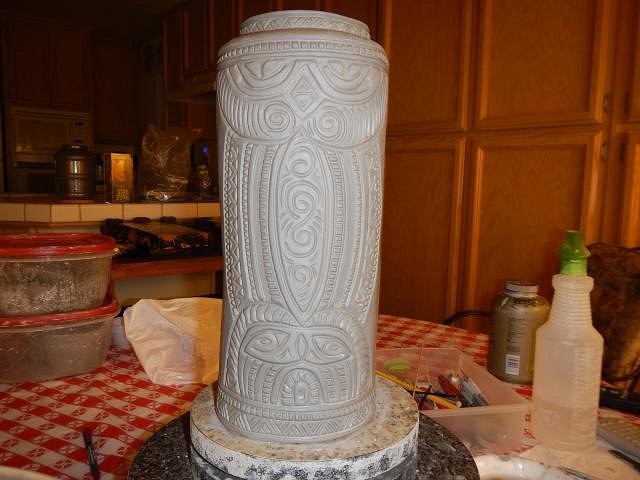
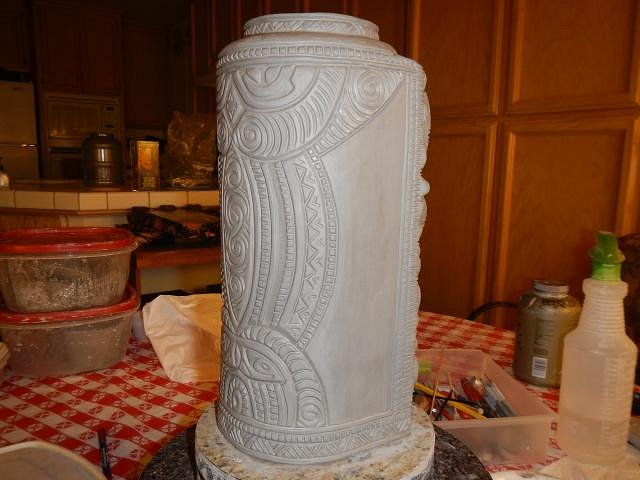
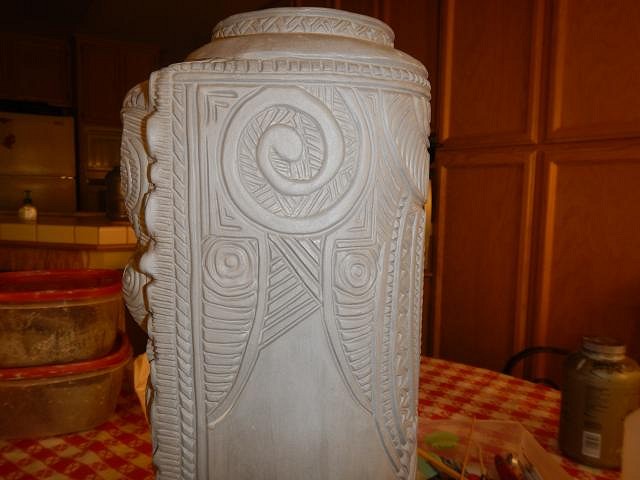
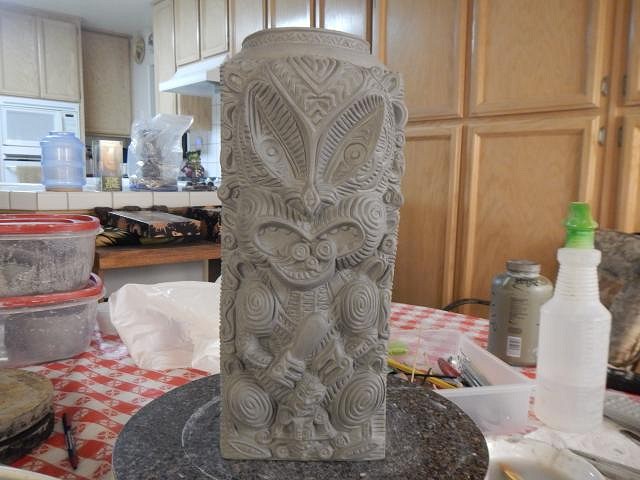
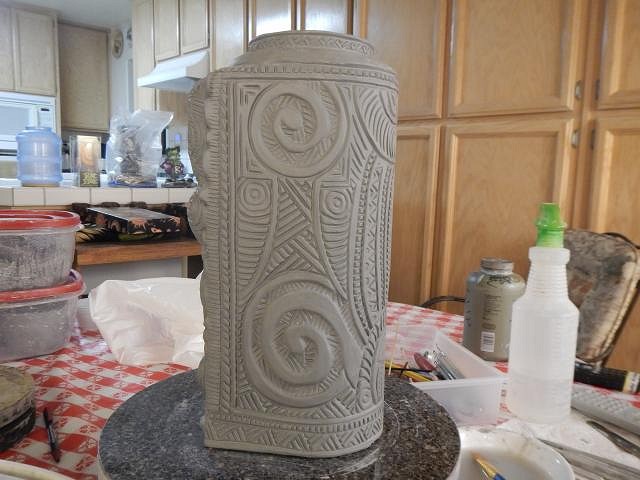
hang10tiki I hope you carry a walking stick. Fun sun shot too. I got the vacation photos ready to post. But first let's have a contest. HOW MANY PHOTOS DID I TAKE ON MY VACATION THAT LASTED 17 DAYS? THE CLOSEST GUESS THAT COMES UP FIRST WILL GET A SHOT GLASS FROM THE CHEERS BAR IN BOSTON. This contest ends midnight Sunday 2/15/15. ========================================================== Tyber Tiki's HUGE Maori mug/lamp is now finished. As soon as we got home I went to work on it. Now it needs to slowly dry.
Now I'll be on pins and needles until I hear how you all feel about how I finished this one off. My largest project ever. Cheers (like the bar), Wendy [ Edited by: danlovestikis 2015-02-14 21:34 ] |
|
M

MaukaHale
Posted
posted
on
Sat, Feb 14, 2015 10:10 PM
170 pictures. |
|
I

IDoVoodoo
Posted
posted
on
Sun, Feb 15, 2015 1:23 AM
89 pictures. |
|
PG

Professor G
Posted
posted
on
Sun, Feb 15, 2015 4:45 AM
I don't see how any piece of art, under the guidelines you were given, could be much, if any, better. I will retreat from my position that that thing is going to need wheels now that I know there's a lamp option and it won't need to be terribly portable. Beautiful work as usual from the Cevola Combo. The total of shots from my last trip to Zambia was 637 on a two week trip. I understand that I take a lot of shots, but, nevertheless, I'll use that as my guess. Have a lovely Sunday and I'm glad y'all are back safe and sound. |
|
T
TikiAno
Posted
posted
on
Sun, Feb 15, 2015 5:36 AM
Welcome back, Cevolas! Holy Maori! That is amazing. Wendy, please send Dan over to help pick my mouth up off of the floor after looking at the latest photos. I vote for 350 photos on this trip. No, a 17 day trip? 401 photos. Jon, if the coyotes start turning towards you, run faster. :wink: |
|
TT
Tyber Tiki
Posted
posted
on
Sun, Feb 15, 2015 2:58 PM
Welcome Back Wendy! The huge Maori is absolutely gorgeous and I love what you've done with the backside...it looks amazing!!! This mug has turned out so much better than I every imagined and I will be super proud to display this as the center piece of my growing collection. I'm guessing 510 photos, as there are just so many cool and beautify things to photograph on Maui. Tyber Tiki [ Edited by: Tyber Tiki 2015-02-15 14:59 ] |
|
D

domin
Posted
posted
on
Sun, Feb 15, 2015 4:43 PM
my guess would be 478 for the pics. as for the mug, it is amazing. im almost more impressed with the design work on the back than with the front, almost, the whole thing is just wow. |
|
S

SewTiki
Posted
posted
on
Sun, Feb 15, 2015 6:22 PM
Wow, awesome mug! |
|
H
hang10tiki
Posted
posted
on
Sun, Feb 15, 2015 6:28 PM
WOW Hmmmmm I'll say 700 I think I took 1,000 on our last trip to Oahu in 7 days :) Ps- Can't wait to see you post all 700 photos you took :) |
|
D
danlovestikis
Posted
posted
on
Mon, Feb 16, 2015 9:14 AM
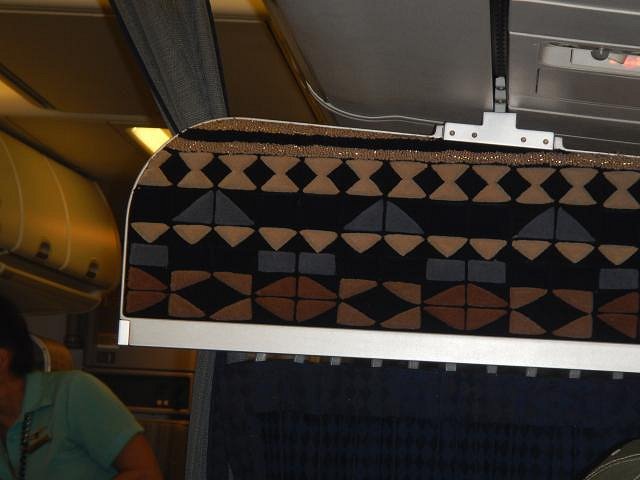
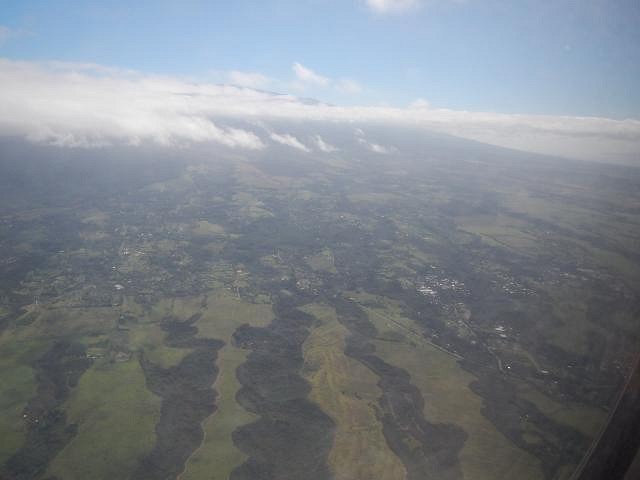
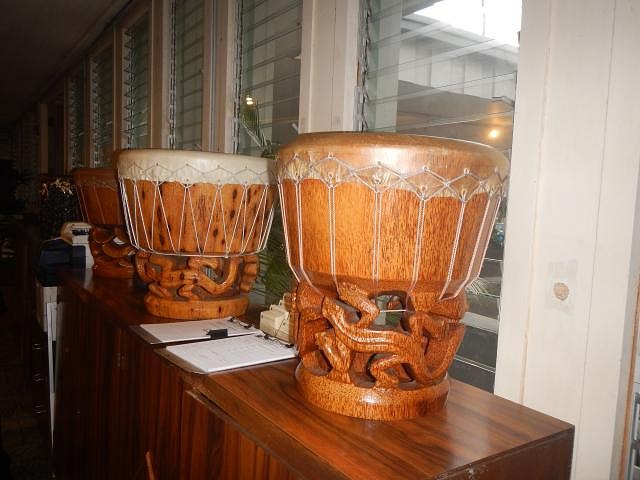
MaukaHale 170 pictures IDoVoodoo 89 pictures Professor G 637 pictures. TikiAno 401 photos Tyber Tiki 510 photos I am so happy that I fulfilled your Wish. I'm also glad that you challenged me with this project. domin 478 photos I did the back as if it were one of my supercarved Tiki Bob's only this was the size of 5 Bob's. Thank you for posting. I live for these comments. They bring me a lot of joy. SewTiki 1,050 pics I have a lot in common with you and Jon, this is just one thing of many. hang10tiki 700 photos. =================================== I did this whole list and then erased it by accident. So here we go again. The WINNER IS SewTiki with 1,050 because I took 1,076 photos. That was so close. SewTiki you should keep entering contests! From past contests I'm still holding: LoriLovesTikis shell necklace When the Wish List is done all the prizes will ship with their orders. ================================================== Now for our trip to Maui Hawaii. We haven't been there since 1998. We are staying at the same hotel as last time. We flew Alaska Airlines and the leg room was far better then our last trips on American Airlines. Not exactly the pattern but it had the same feel. Approaching the island of Maui. I was guessing this is Haleakala. Farm land everywhere and not many tropical rain-forests. We checked Kaanapoli Beach hotel where they displayed a collection of drums just like Buzzy carves so well. These photos are of the grounds of the hotel where there is a tiki bar and snack bar.
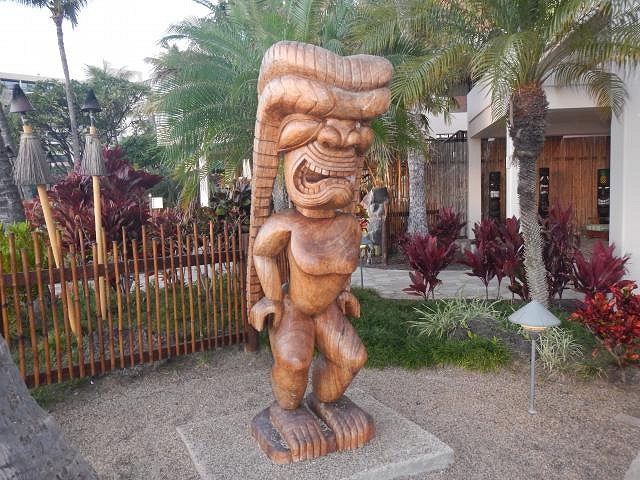
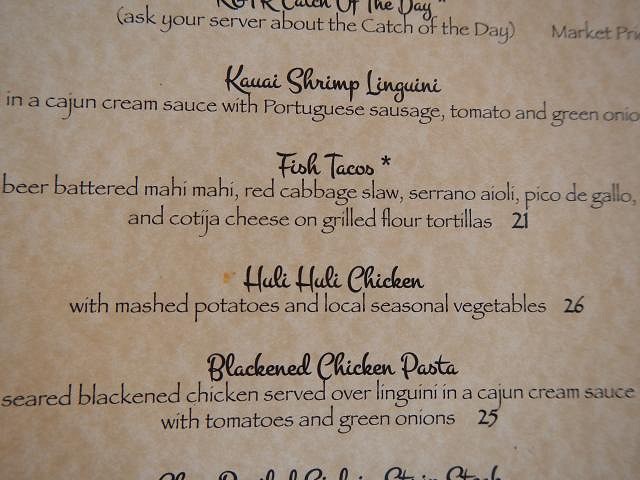
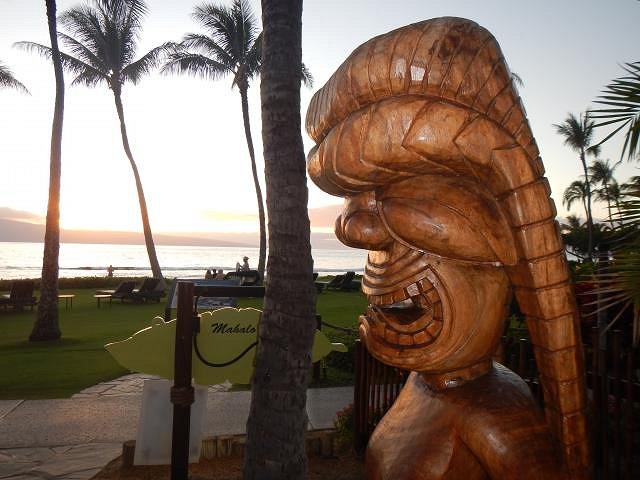
We were impressed with the number of tikis now used in decorating all the hotels. Right off the bat it was sticker shock. On our last trip Huli Huli chicken was on every menu for $6.99. Along Kaanapoli Beach there are many restaurants where you can have a meal and watch the sunset. Tiki Torches just make the ambience so much better.
Now it was goodnight and time to relax and read. Now it's time for lunch and then to work clay until tonight. Cheers, Wendy PS Tiki Wahine I've started your Tiki Bob Marley [ Edited by: danlovestikis 2015-02-16 22:40 ] |
|
S
SewTiki
Posted
posted
on
Mon, Feb 16, 2015 12:53 PM
Wow PS- Jon is so jealous SewTiki :) |
|
L
LoriLovesTiki
Posted
posted
on
Mon, Feb 16, 2015 2:23 PM
Wendy, You've just gotten started and already I'm drooling over your pictures from Maui! Love the sunset and palm trees! It's 20 degrees in NJ with a windchill of 10 and overnight it will be down to an actual temp of 2 degrees. The hubby and I are headed to Miami, Key West and the Bahamas for a quick trip next weekend and leaving the kids and dogs home and I CAN'T wait for warm weather! |
|
H
hang10tiki
Posted
posted
on
Mon, Feb 16, 2015 7:43 PM
Awesome photos so far What? My wahine won lol U guys rock Time for some fun...
[ Edited by: hang10tiki 2015-02-16 22:03 ] |


Pages: 1 2 3 4 5 6 7 8 9 10 11 12 13 14 15 16 17 18 19 20 21 22 23 24 25 26 27 28 29 30 31 32 33 34 35 36 37 38 39 40 41 42 43 44 45 46 47 48 49 50 51 52 53 54 55 56 57 58 59 60 61 62 63 64 65 66 67 68 69 70 71 72 73 74 75 76 77 78 79 80 81 82 83 84 85 86 87 88 89 90 91 92 93 94 95 96 97 98 99 100 101 102 103 104 105 106 107 108 109 110 111 112 113 114 115 116 117 118 119 120 121 122 123 124 125 126 127 128 129 130 131 132 133 134 135 136 137 138 139 140 141 142 143 144 145 146 147 148 149 150 151 152 153 154 155 156 157 158 159 160 161 162 163 164 165 166 167 168 169 170 171 172 173 174 175 176 177 178 179 180 181 182 183 184 185 186 187 188 189 190 191 192 193 194 195 196 197 198 199 200 201 202 203 204 205 206 207 208 209 210 211 212 213 214 215 216 217 218 219 220 221 222 223 224 225 226 10816 replies