Pages: 1 2 3 4 5 6 7 8 9 10 11 12 13 14 15 16 17 18 19 20 21 22 23 24 25 26 27 28 29 30 31 32 33 34 35 36 37 38 39 40 41 42 43 44 45 46 47 48 49 50 51 52 53 54 55 56 57 58 59 60 61 62 63 64 65 66 67 68 69 70 71 72 73 74 75 76 77 78 79 80 81 82 83 84 85 86 87 88 89 90 91 92 93 94 95 96 97 98 99 100 101 102 103 104 105 106 107 108 109 110 111 112 113 114 115 116 117 118 119 120 121 122 123 124 125 126 127 128 129 130 131 132 133 134 135 136 137 138 139 140 141 142 143 144 145 146 147 148 149 150 151 152 153 154 155 156 157 158 159 160 161 162 163 164 165 166 167 168 169 170 171 172 173 174 175 176 177 178 179 180 181 182 183 184 185 186 187 188 189 190 191 192 193 194 195 196 197 198 199 200 201 202 203 204 205 206 207 208 209 210 211 212 213 214 215 216 217 218 219 220 221 222 223 224 225 226 10,816 replies
|
D

danlovestikis
Posted
posted
on
Wed, Sep 2, 2015 9:25 PM
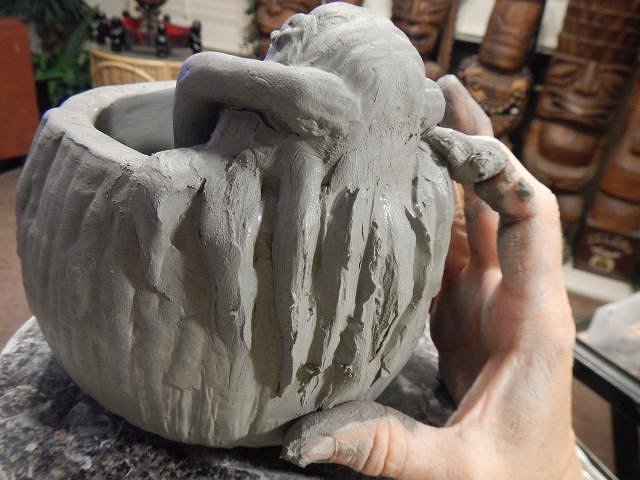
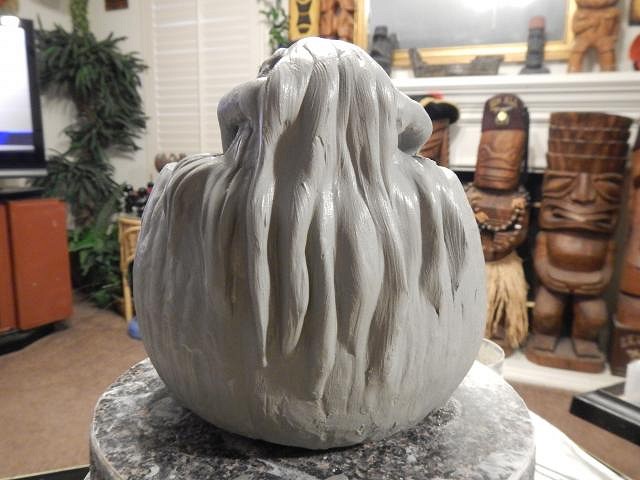
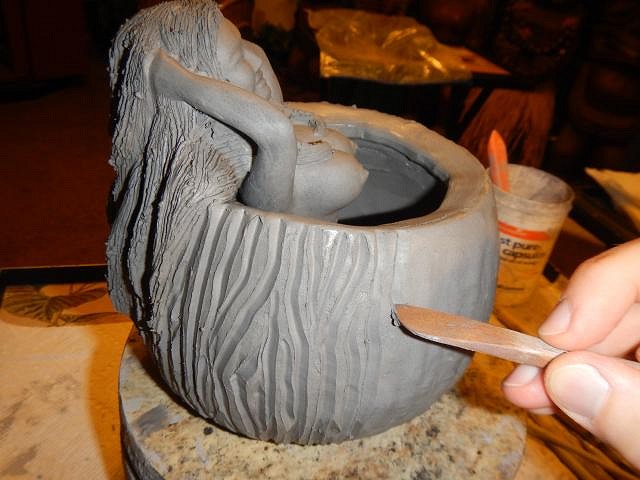
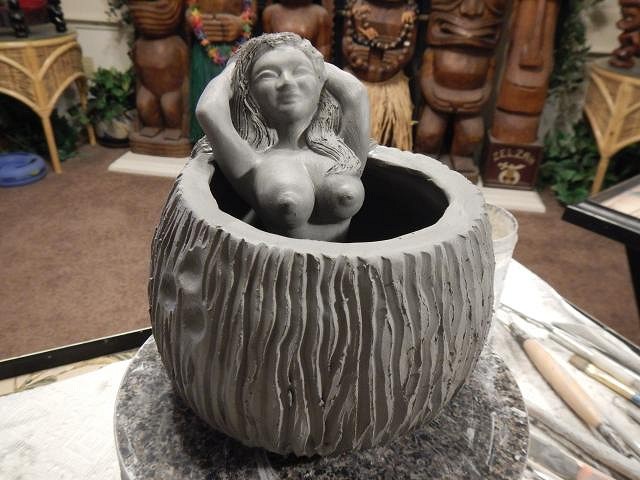
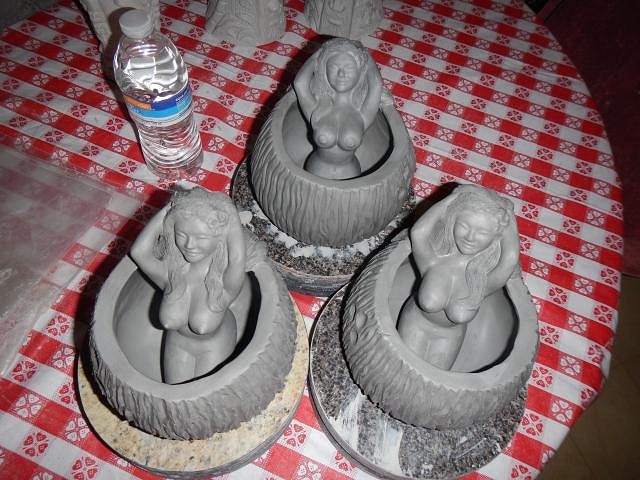
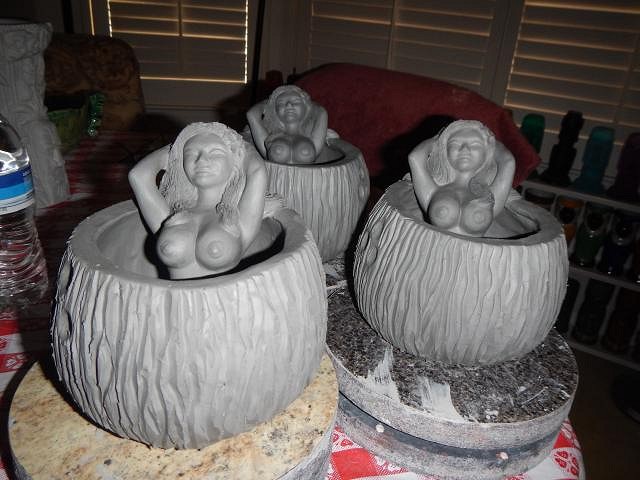
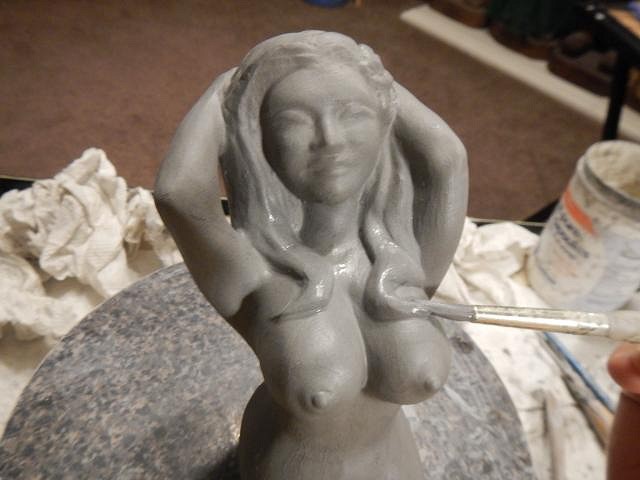
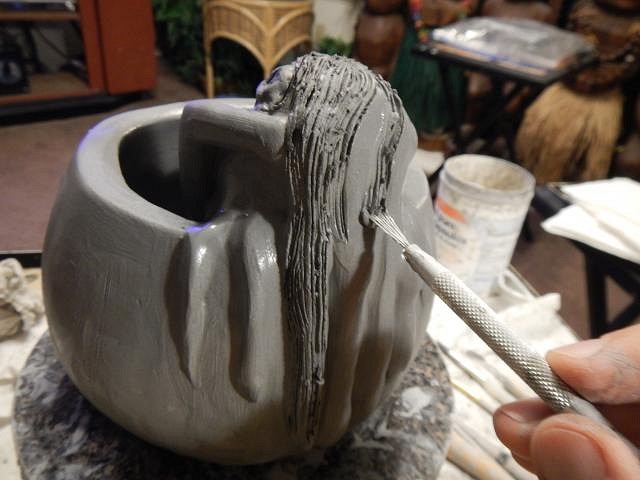
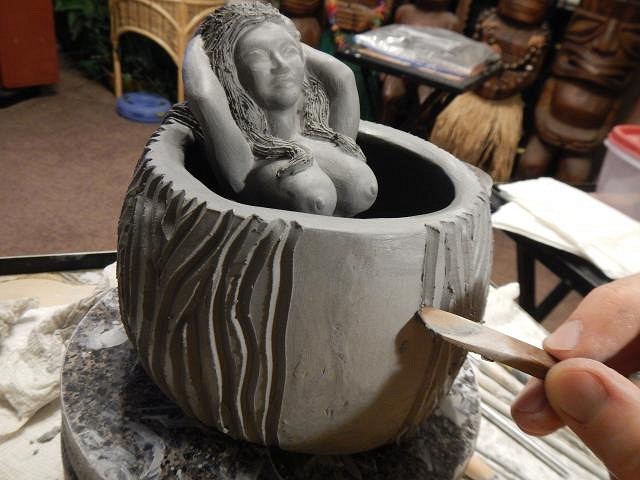
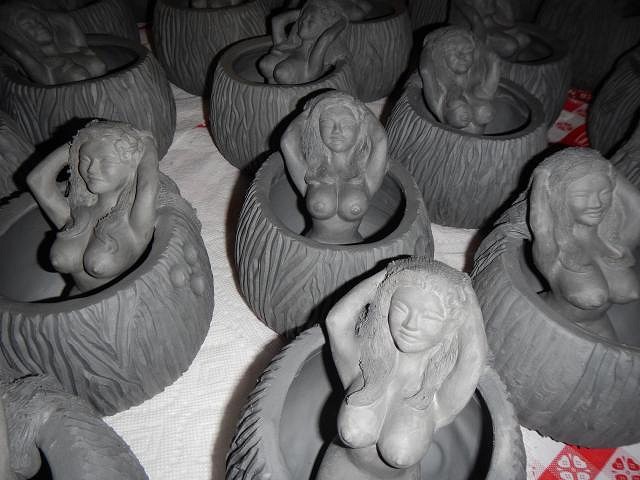
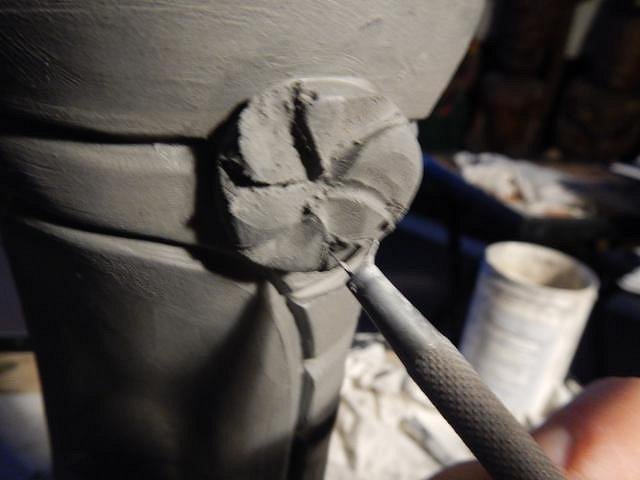
creepykbear thank you for this wonderful post. No question about it I do this art so I can read fun messages. I think he'll enjoy the rest of the process. They are drying with a whole bunch of Hot Tub Hula Girl mugs and they'll all go into the kiln together. hang10tiki what have you been up to? ============================ Wish List Progress Report. Every day right now I'm working on the Hot Tub Hula Girl mugs. They will help to fill up the kiln so I can fire those 3 crawl mugs and the anniversary mugs. I'm working in the family room in front of the TV. It keeps me company. Sometimes I find that my casts have fallen over and need some repairs. This poor nose was an easy fix. To each hula girl I add some strand of hair over her ample chest. I add some sticky clay and push her into the coconut hot tub to stick. I then add the three dents. The next part is to add all this hair running over the rim and down the back of the coconut. I smooth it out and then I carve in wavy lines to the hair and to the coconut. Every one is different because of the hand carving. One done. Then three. Only 21 more to go!
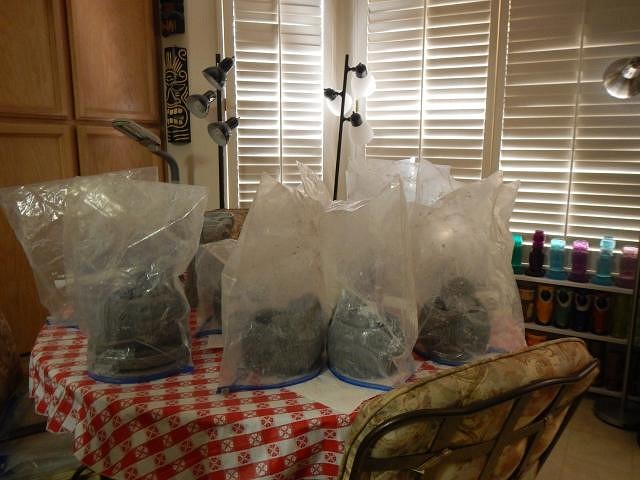
They will be in and out of bags for a couple of weeks so that nothing cracks as it dries. Drying very slowly prevents that from happening. When I have all of these done I'll be back to the individual projects. Always something fun waiting to be made. Thank you, Wendy |
|
T

TikiAno
Posted
posted
on
Wed, Sep 2, 2015 9:27 PM
Two weeks later....
|
|
D
danlovestikis
Posted
posted
on
Thu, Sep 3, 2015 8:26 PM
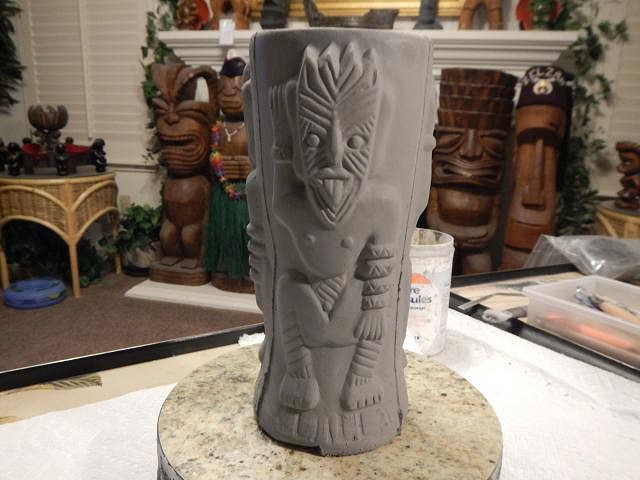
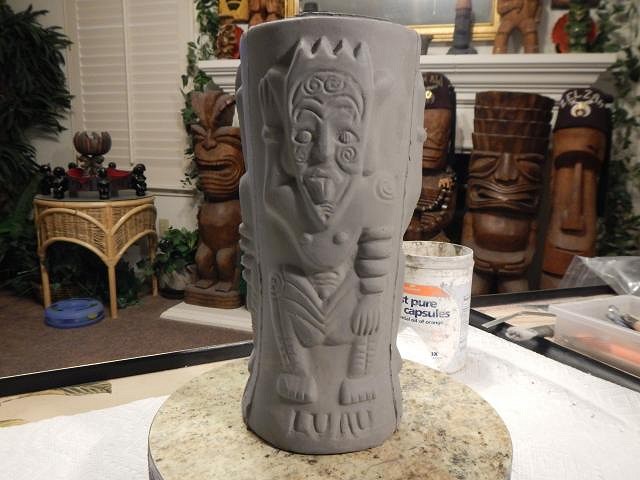
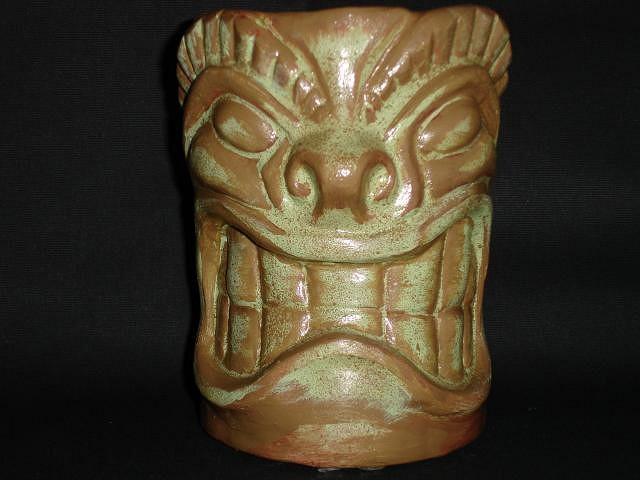
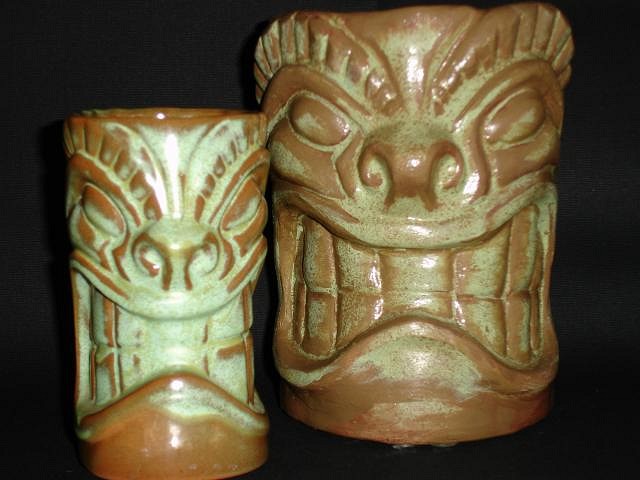
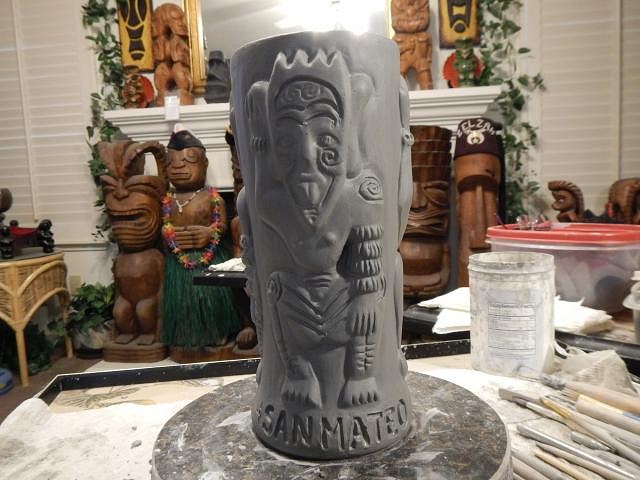
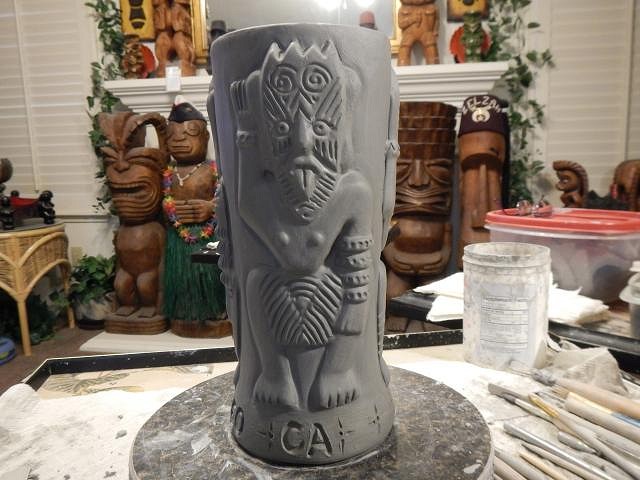
Tiki Ano you've got Dan considering growing it that long. NOOOOOOOOOOOOOOOOOOOO! He looks like a skunk. ============================ Progress Report Wish List #6 This a very rare mug from the Lanai in San Mateo, California. There is a thread for it here on TC if you want more information.
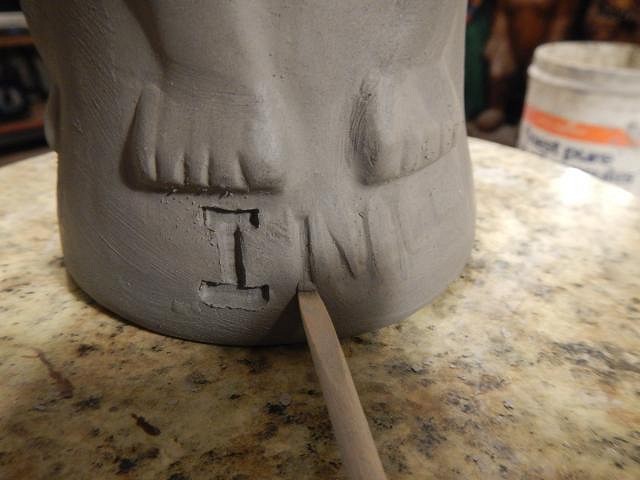
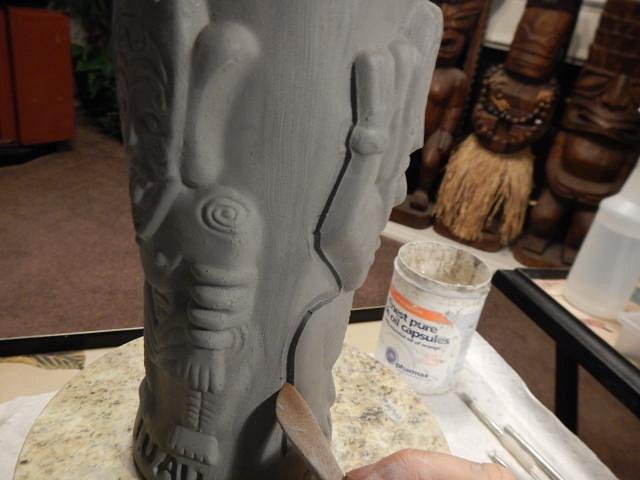
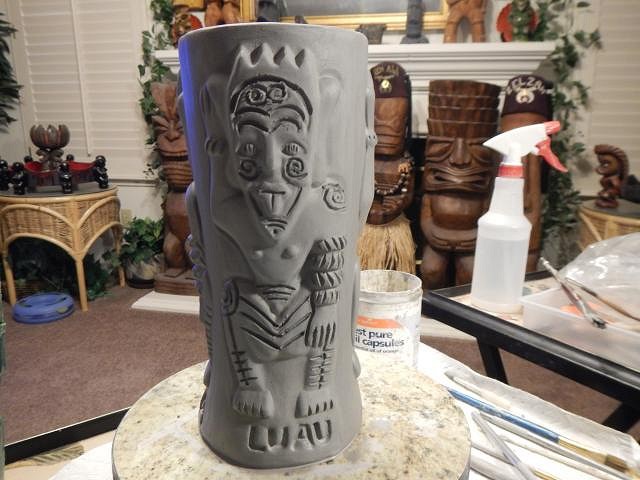
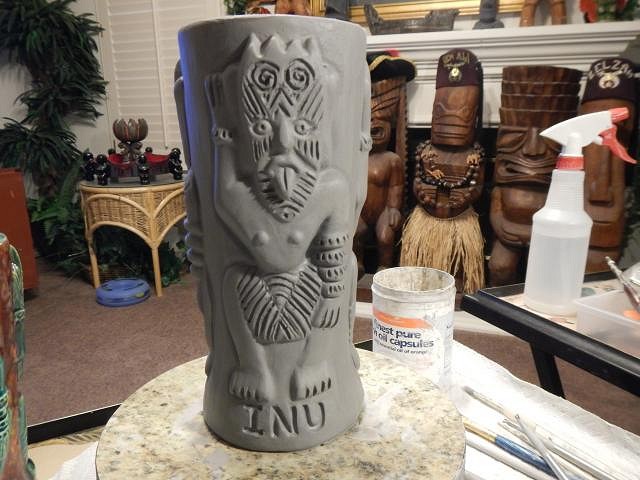
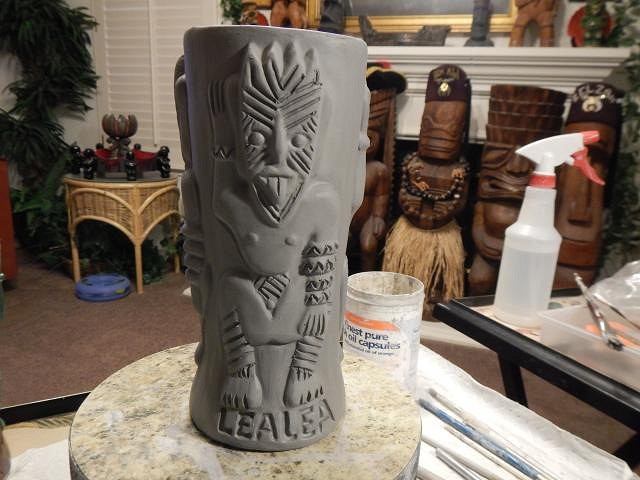
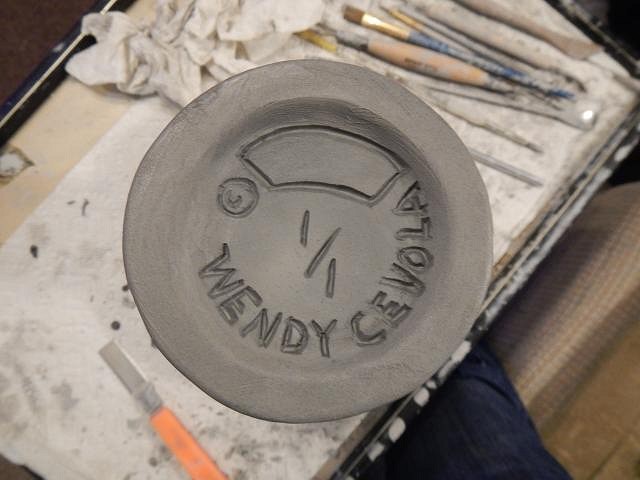
I did this tribute mug for the Lanai back in January 2010. I made around 35 of them and most are in Dan's collection. Jessica who is married to Woody Miller saw them when visiting here and requested one be made for her during this Wish List. I made my own version with three differently decorated tikis. I called it my Eat Drink and be Merry mug using Hawaiian words that matched best. Here is how the mug looks out of the mold. I don't just clean up the mold lines. I want each mug I make to be the best that it can be. So... I start by re-carving the words. Then I cut into the clay around each tiki. Then using sculpting cutting tools I deepen every line.
She will pick her colors making it a 1/1 mug. One more Wish carved and I can start another tomorrow. Cheers, Wendy |
|
R

RVICTOR
Posted
posted
on
Fri, Sep 4, 2015 8:44 AM
I like that one Wendybird. |
|
H

hang10tiki
Posted
posted
on
Fri, Sep 4, 2015 7:31 PM
Ano- great picture of Dan-0 Wendy- not much going on here Like the new mugs Keep up the great work! :) |
|
D
danlovestikis
Posted
posted
on
Sat, Sep 5, 2015 9:11 AM
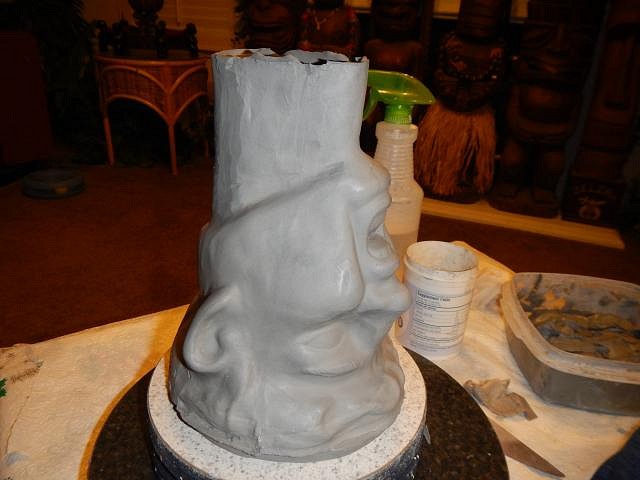
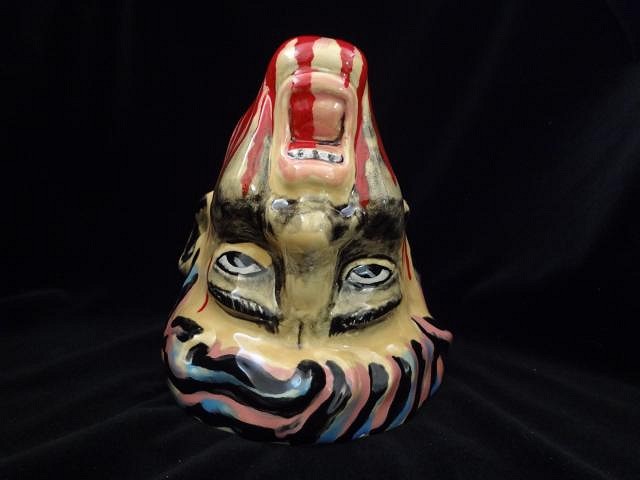
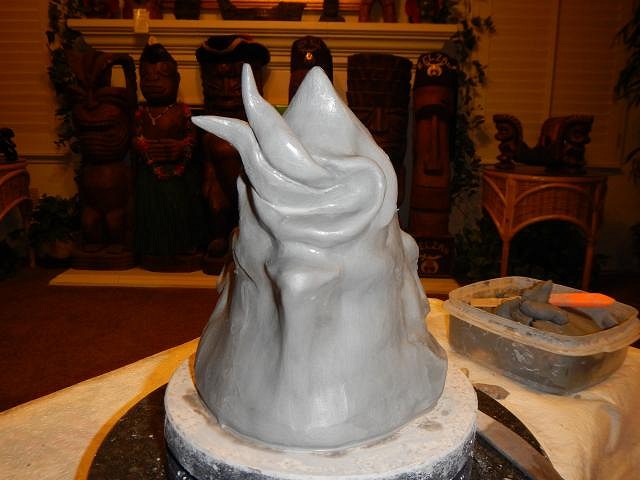
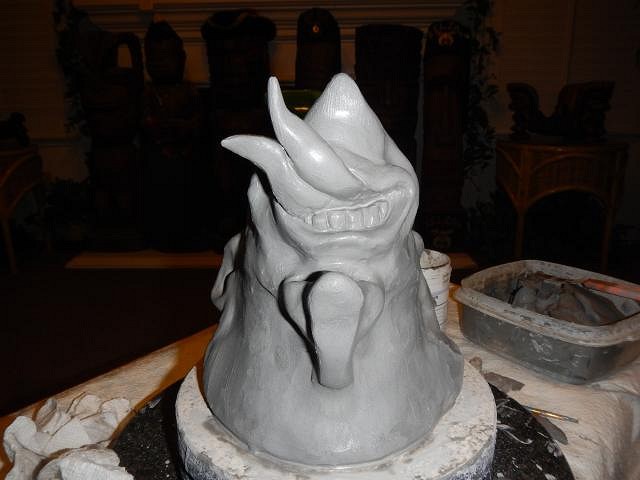
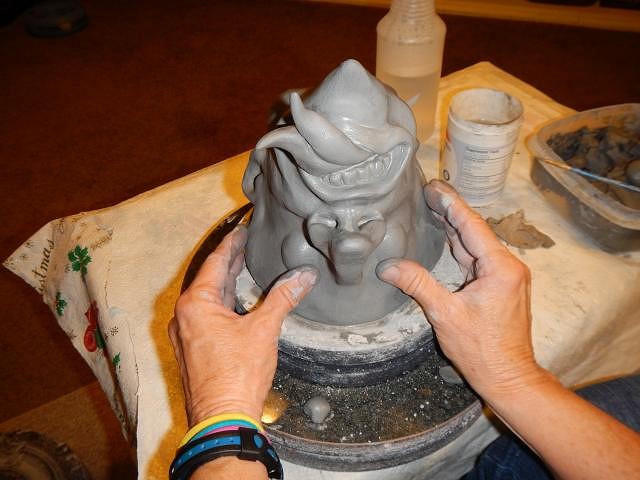
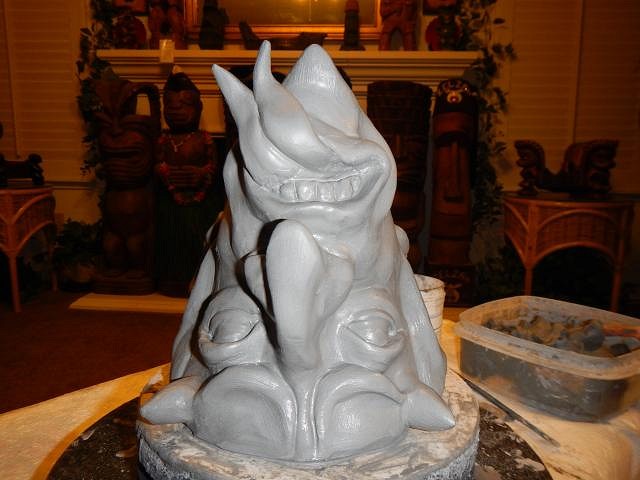
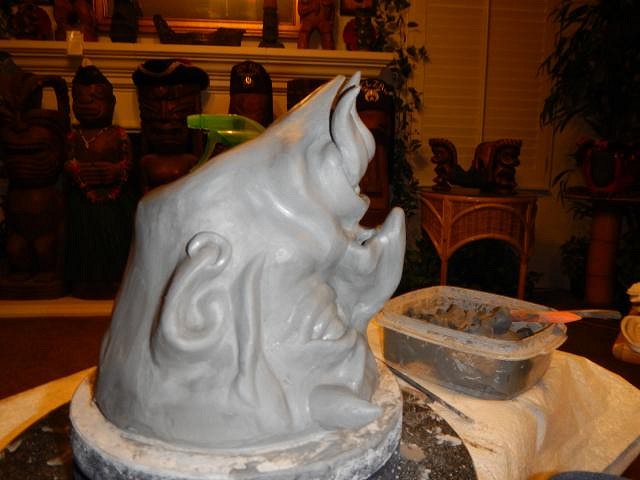
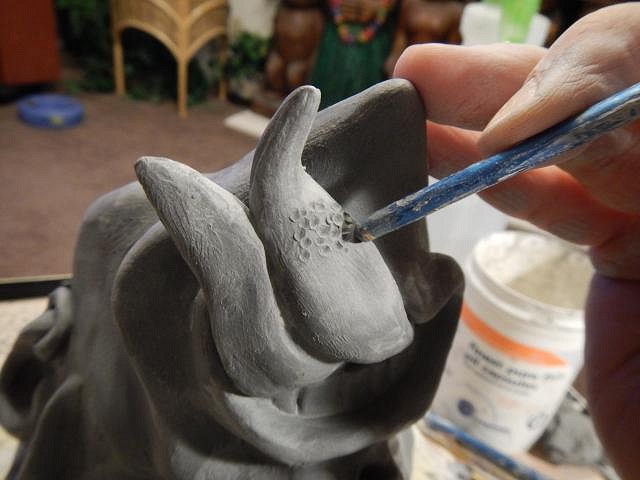
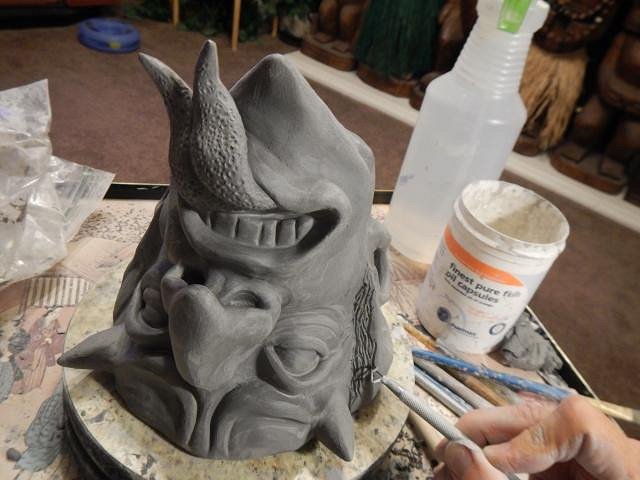
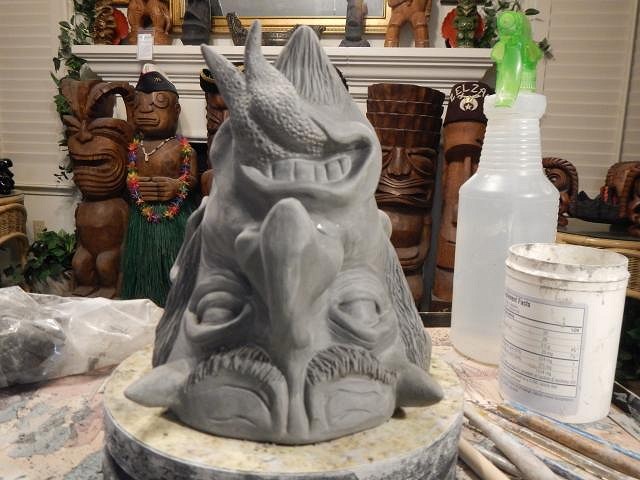
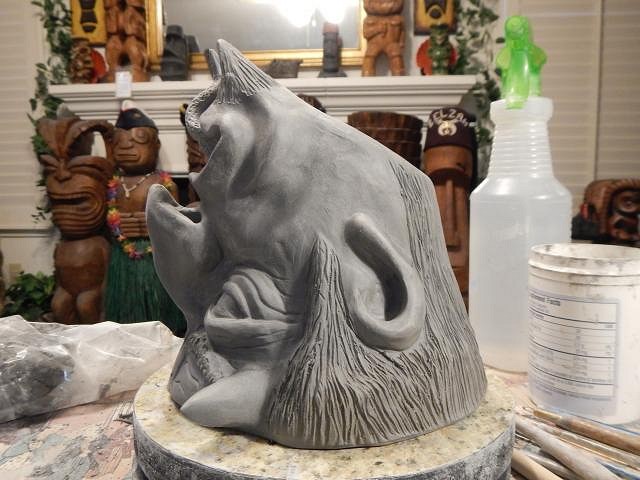
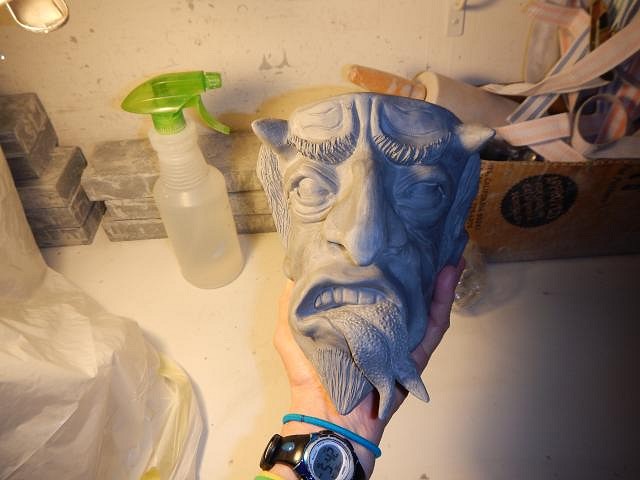
RVICTOR it's a lot of re-carving but it's worth the effort to turn out a good mug. hang10tiki I bet you go to the Golden Tiki soon. Photos PLEASE! ========================= Every year at Halloween I see so many fun things posted but I've not done one on that theme. So this summer I did one so that I wouldn't be left out. I took my Ren Clark severed head mold and altered it into a severed devil head. Here's how I did it. A few years back I sculpted the Ren Clark head while looking at an original. After glazing they look like this. By the way I have a few for sale at $200 each. I thought it would work for making my Severed Devil head. I stared by adding a split tongue. Next came the chin, teeth and nose. Then the eyes were enlarged. Then I finished off the eyes, eyebrows and horns. Side view. Taste buds and then hairy detail.
When I do the sanding I plan to greatly age his skin. This will be fun to glaze along with the Wish List #6. This will be one time I have something done for Halloween. He is also for sale for $275. Playing with clay is so much fun. Wendy [ Edited by: danlovestikis 2015-09-05 09:29 ] |
|
K

kingstiedye
Posted
posted
on
Sat, Sep 5, 2015 10:28 AM
severed satan is awesome! |
|
K
kingstiedye
Posted
posted
on
Sat, Sep 5, 2015 10:30 AM
or beheaded beelzebub! |
|
K
kingstiedye
Posted
posted
on
Sat, Sep 5, 2015 10:32 AM
decapitated demon. ok, i'm done. |
|
S

swizzle
Posted
posted
on
Sat, Sep 5, 2015 6:48 PM
Lucifer's lost head? That is fantastic Wendy. |
|
H
hang10tiki
Posted
posted
on
Sat, Sep 5, 2015 8:11 PM
Awesome sculpt As u request
|
|
T
TikiAno
Posted
posted
on
Sun, Sep 6, 2015 12:54 AM
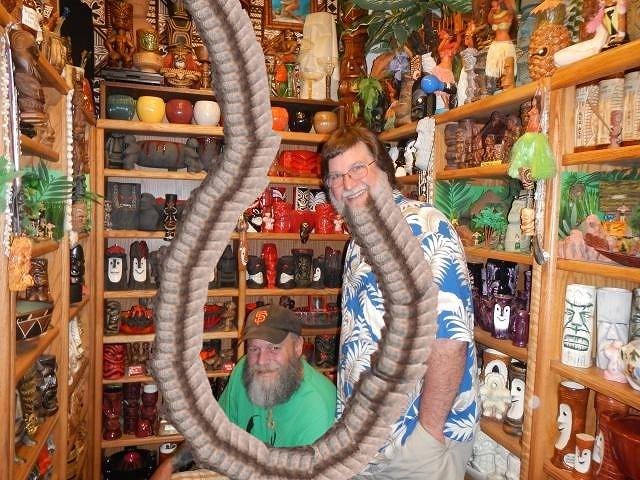
Wendy, love the new severed head. Jon, now I'm jealous. Waitaminute, Dan's beard keeps on growing.... where will it go next????
News reports online report that Dan's beard has made its way to India already? Is this possible?
[ Edited by: TikiAno 2015-09-06 01:02 ] |
|
H
hang10tiki
Posted
posted
on
Sun, Sep 6, 2015 7:11 PM
Good 1 ano |
|
D
danlovestikis
Posted
posted
on
Sun, Sep 6, 2015 8:36 PM
kingstiedye see below. Men those were so good that the head sold to my dear friend in Pearl City, Freddie. Thank you for the fun. hang10tiki I'm going to beg for a trip to see you, SewTiki and the Golden Tiki. Vegas Rocks! TikiAno oh that is so funny. Dan loves that his beard reached India. It was great to see you at Oasis and Tiki Ari on fb. hang10tiki (: ============================ Guess what. I did work on the Wish List #6 today but what I want to show is the wonderful tiki find that happened. We have 5 Coco Joes and have been searching for the last one for a year. We found it today! The only one they had for sale was the one we were missing. The Poi Pounder in Dan's hands makes him a happy man.
Now on display in Dan's garage dusty man cave.
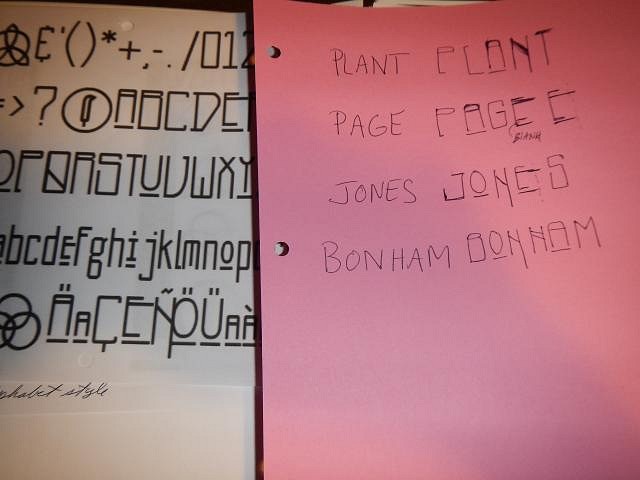
======================== Progress Report Wish List #6 Bullet aka kingstiedye can you tell what I'm working on. Yes I'm starting your Wish tomorrow. If I don't understand how this alphabet works with the lines under some letters you better tell me quickly or it will be too late.
Cheers, Wendy |
|
T
TikiAno
Posted
posted
on
Sun, Sep 6, 2015 9:30 PM
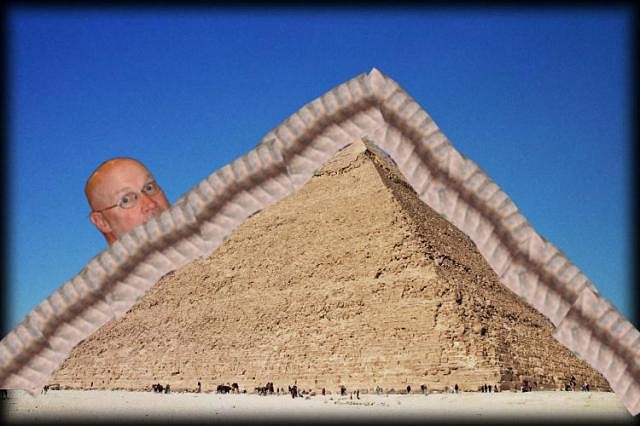
Looking forward to see the Zeppelin mug! Breaking news: Dan's beard (#DansBeard) has made its way to Egypt. Sources are unclear, this might be another one of those "Pyramid Schemes...."
|
|
K
kingstiedye
Posted
posted
on
Sun, Sep 6, 2015 9:37 PM
hoo boy! i'm stoked! sent an email about the lettering. call me in the morning if you want. |
|
D
danlovestikis
Posted
posted
on
Tue, Sep 8, 2015 7:44 AM
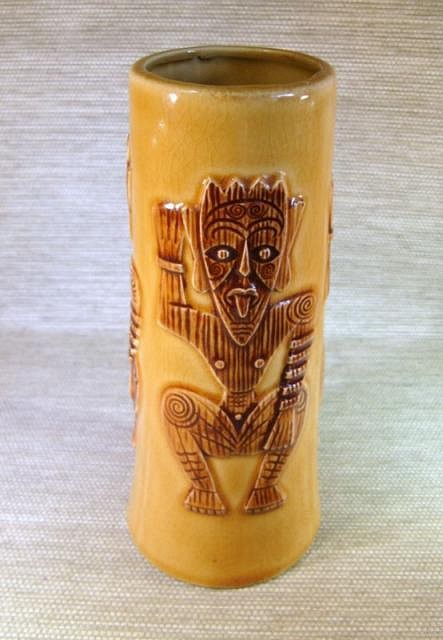
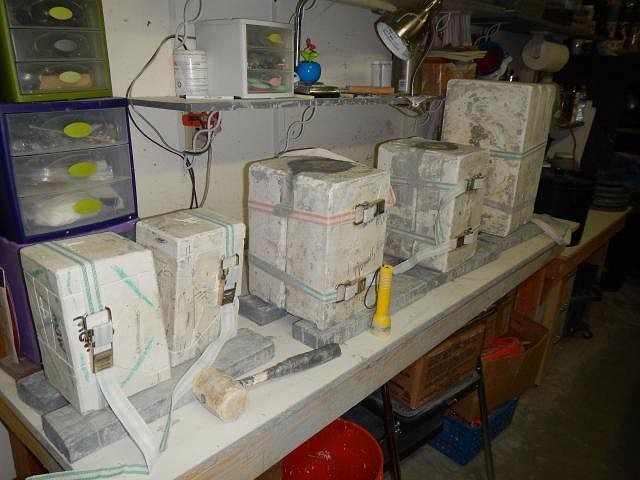
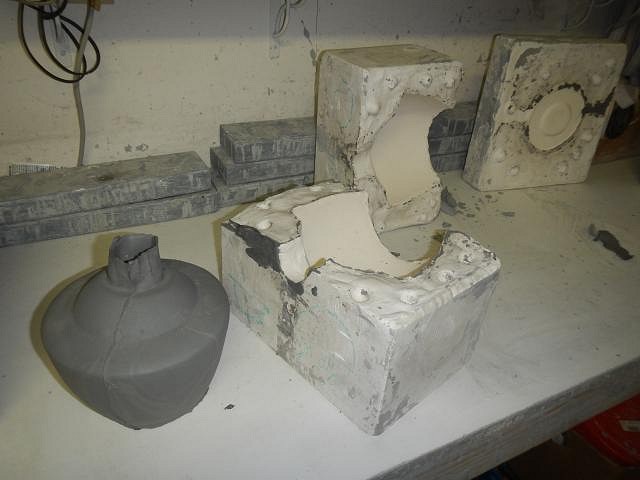
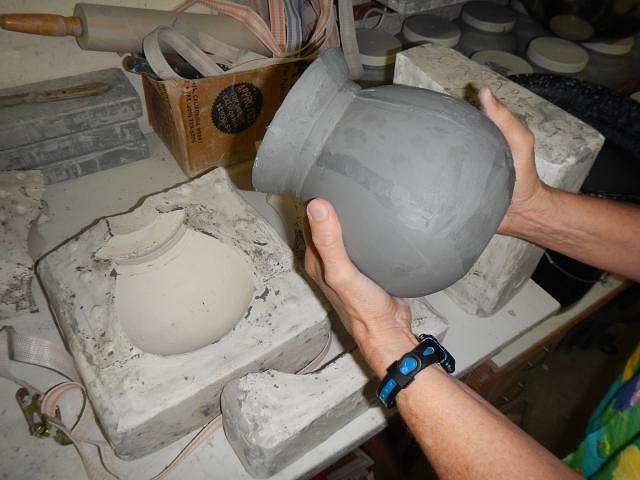
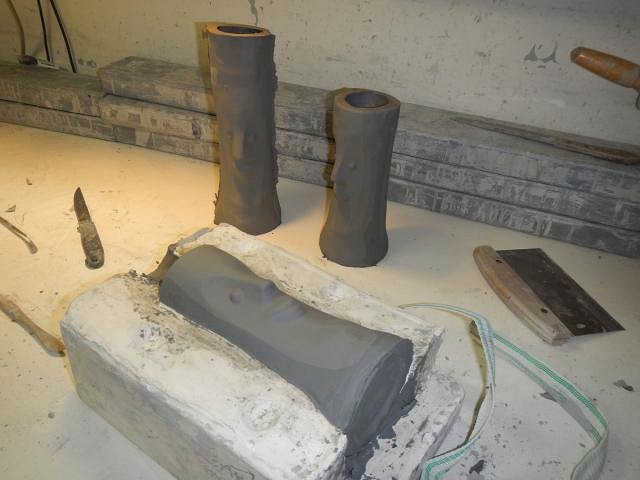
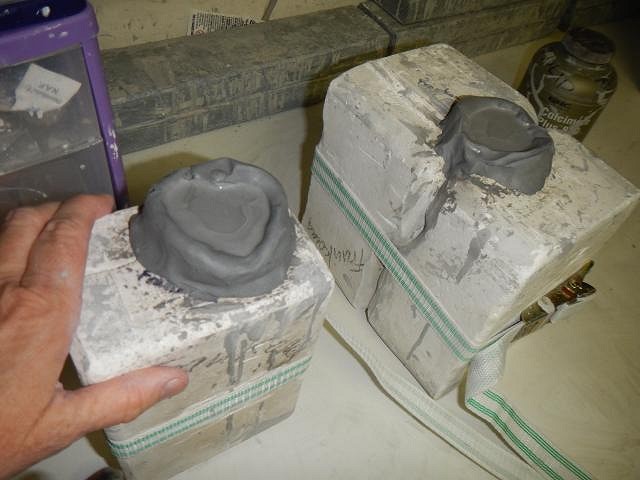
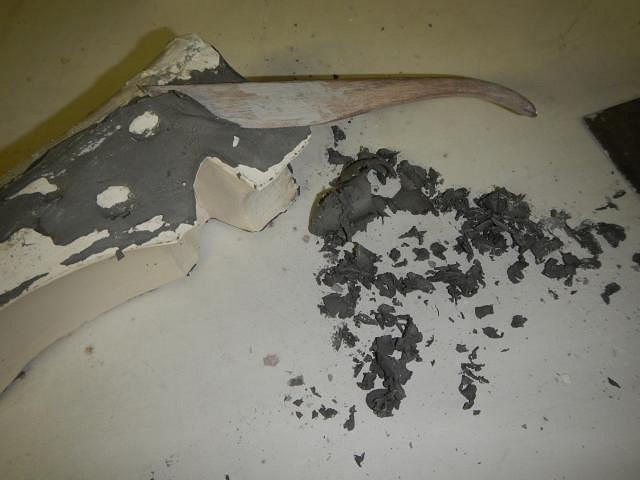
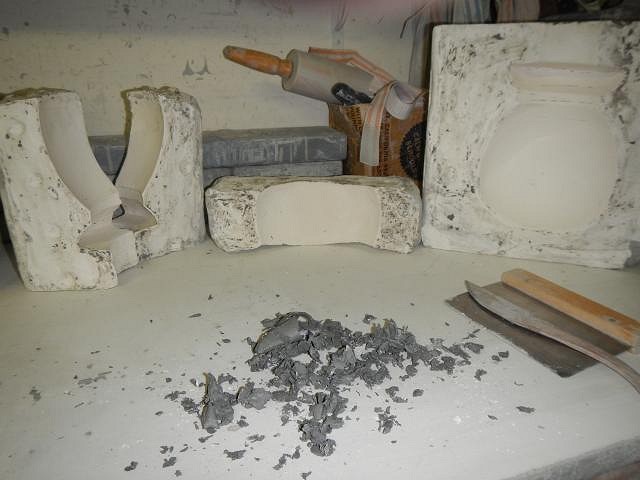
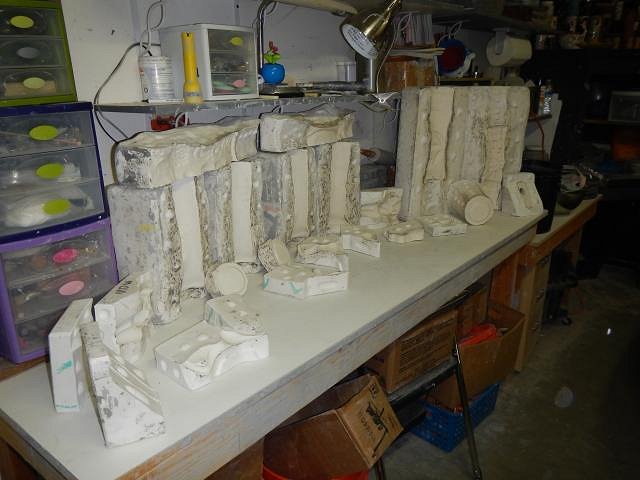
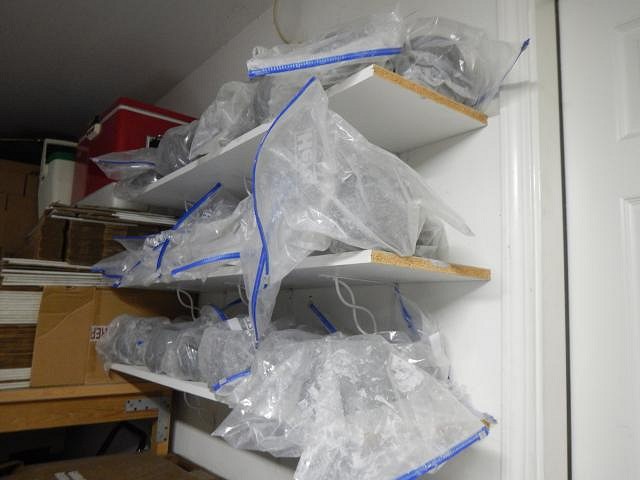
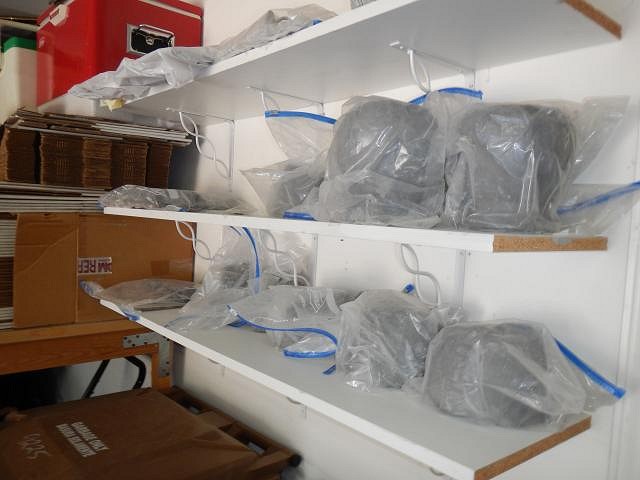
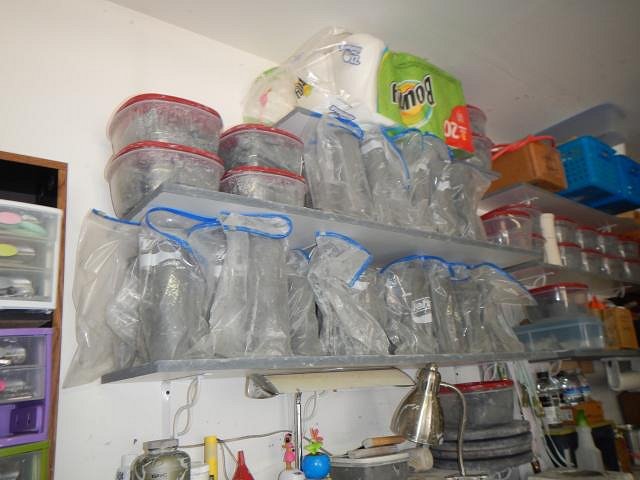
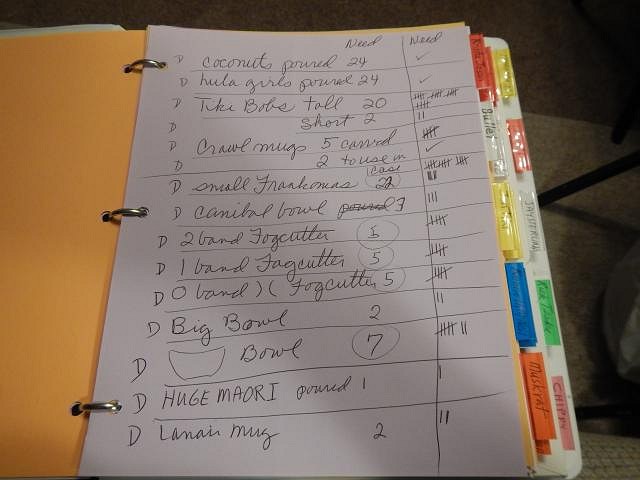
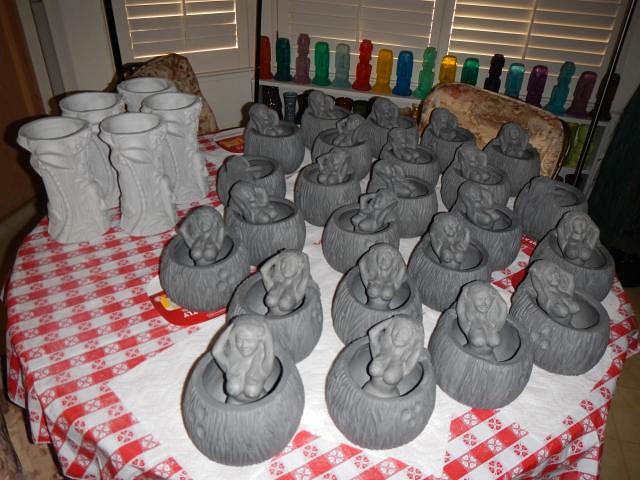
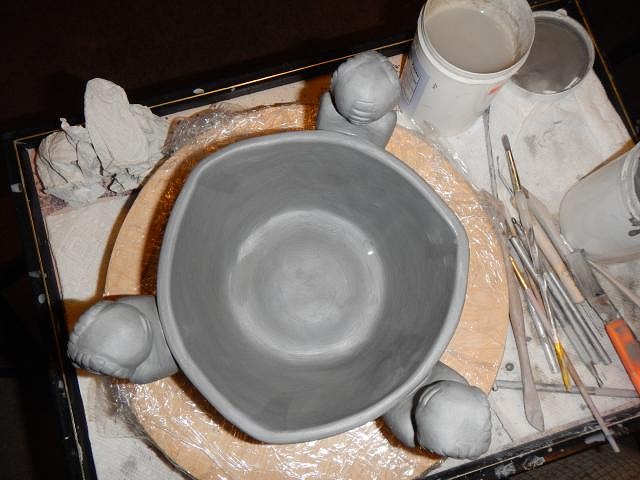
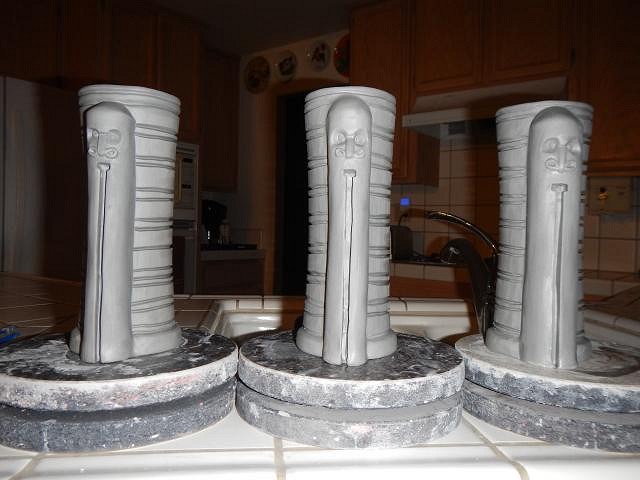
TikiAno I always wanted to see the pyramids. I'm happy that at least Dan's beard got there. kingstiedye your mug is underway and it's a doozy! ====================== Progress Report on Wish List #6. After weeks of pouring I have called a time out. That means that I will just concentrate on making things rather that getting ready to make orders. I hope that I counted everything and that we have all I need on the shelves. I alter this cast for Frankoma bowls. This one if for the cannibal pot orders. Good ol' Tiki Bob is always requested. Here's a trick. For the small Frankoma Tikis I had to go and add more slip every 15 minutes for one hour. On the last cast I decided to make a dam and to see if that would keep enough slip going into the mold. It did. Next time I'll use my new trick. This makes sure that the feet are as thick as the head. I have some molds that are very leaky. I plug around the outside seams so that the slip stays in but after I remove the cast I have to clean up the molds. They need to be very clean or they won't fit together the next time. I dry them out before storing them. This was my full shelf of coconuts and hula girls for the Hot Tub Hula Girls. They are now all in the house. I needed to make room for all of these casts and all of these casts. This is how I keep track of what I've made so that I don't have to keep counting them all over and over again. This is also the binder where I keep all the Wish photos and instructions. ========================== From now on I'll be working all the Wishes. Wendy [ Edited by: danlovestikis 2015-09-08 07:45 ] |
|
T

tikiskip
Posted
posted
on
Tue, Sep 8, 2015 1:02 PM
Severed Devil head looks a bit like Bam Boo Ben. Hey bet these would be good for lettering. |
|
H
hang10tiki
Posted
posted
on
Tue, Sep 8, 2015 2:29 PM
Dan-0 Congratulations on finding the last one to complete the set |
|
I

IDoVoodoo
Posted
posted
on
Tue, Sep 8, 2015 9:43 PM
WOW! Love! |
|
T
TikiAno
Posted
posted
on
Wed, Sep 9, 2015 3:56 PM
Wow. Can't wait to see the wish list happen. I suppose I need to figure out a wish list item one of these times the list opens up, huh.... ? In any case, with all this excitement, it seems something hasn't been spotted yet in the water... (I think we need a bigger boat).
Thankfully, our aquatic friends can trim Dan's beard since everyone else lives in fear and/or awe of it.
|
|
D
danlovestikis
Posted
posted
on
Thu, Sep 10, 2015 8:30 PM
tikiskip thank you. Freddie Coester snagged it and has told me how to glaze it so it shows the life force draining out! I think Bamboo Ben has a nicer nose. hang10tiki that was so fun. IDoVoodoo Love what? Dan's beard? TikiAno Dan's handsome as shark bate. That's his favorite so far. ===================== Yesterday morning Dan and I drove to Medford, Oregon for a super short family reunion. It lasted 5 hours and then today we drove back home. I'll be posting photos to catch up on the Wish List tomorrow. Now I'm beat and ready to crash. Cheers, Wendy |
|
D
danlovestikis
Posted
posted
on
Fri, Sep 11, 2015 8:19 AM
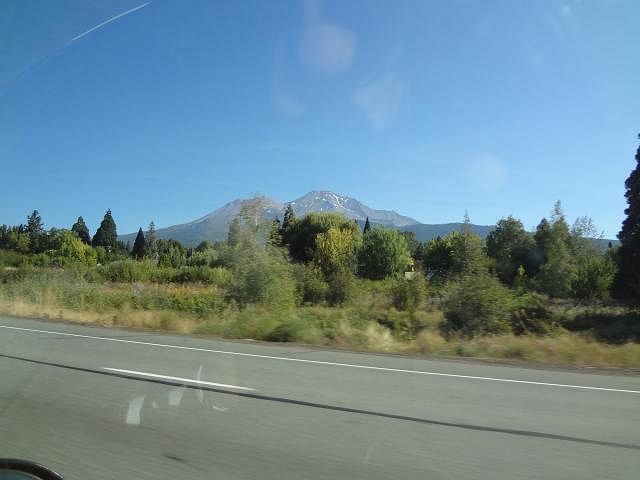
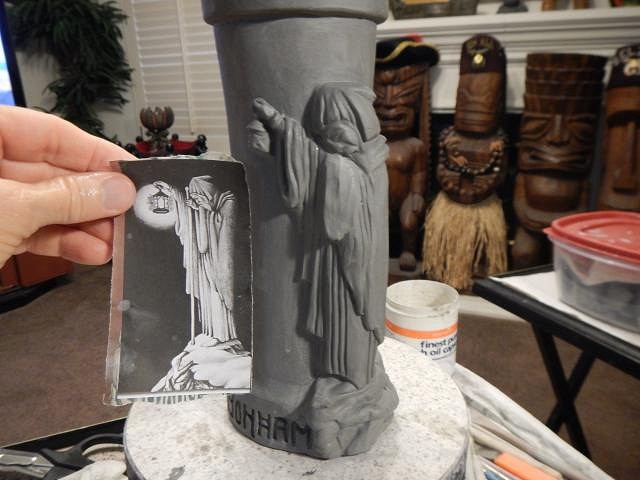
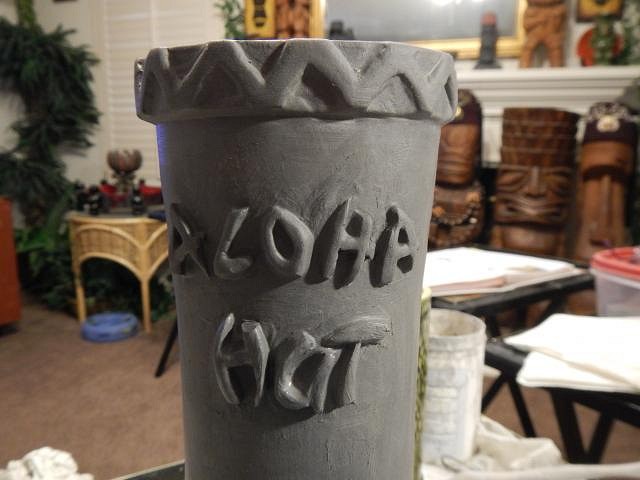
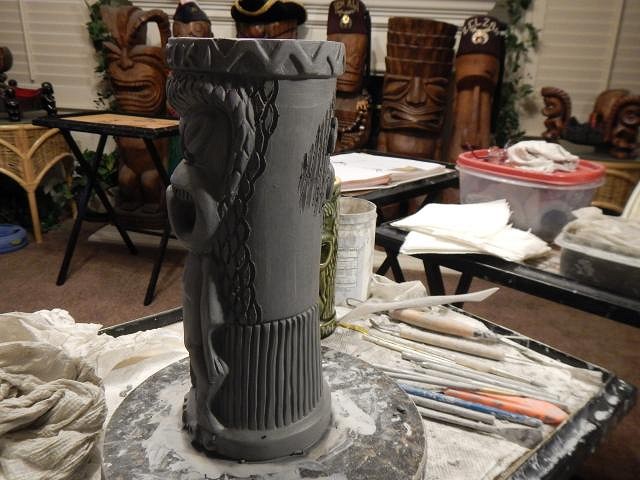
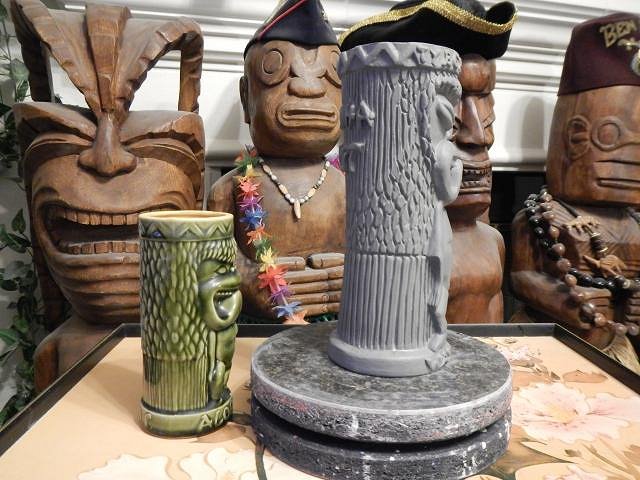
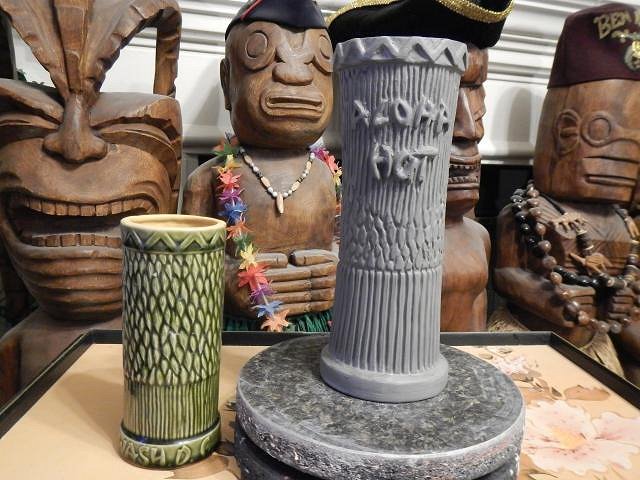
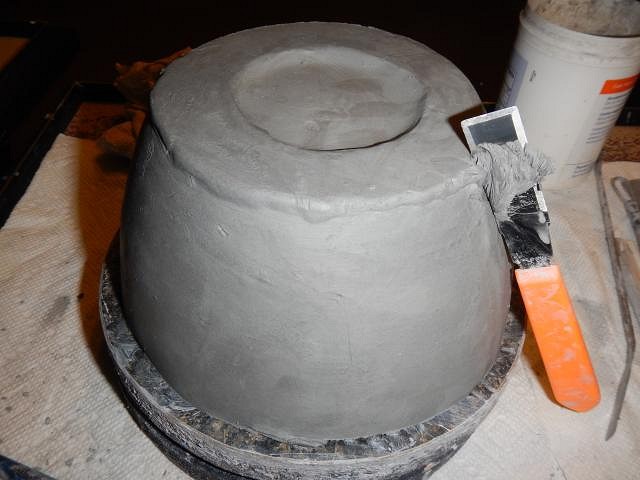
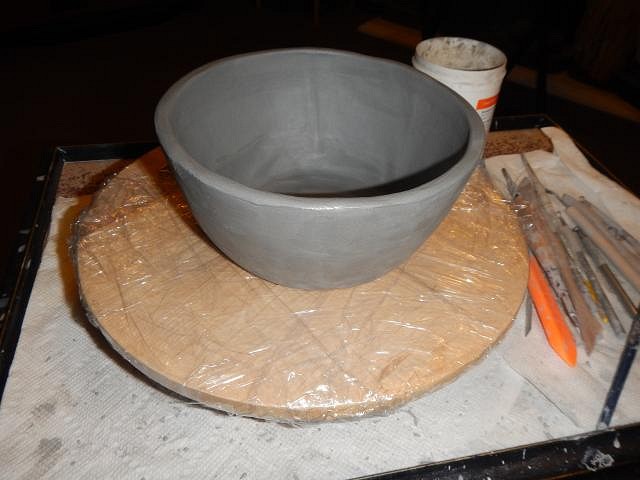
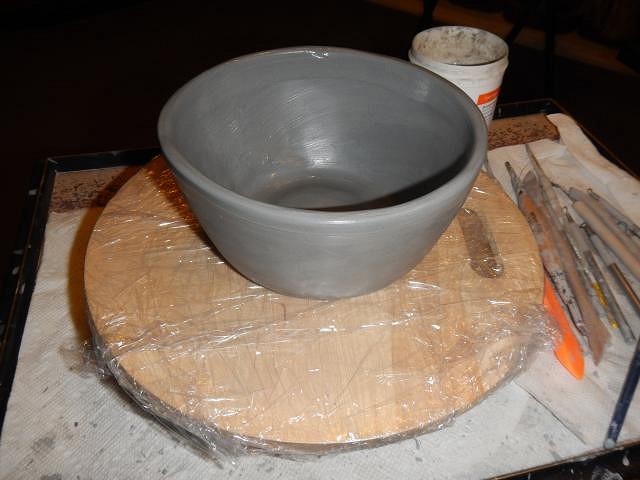
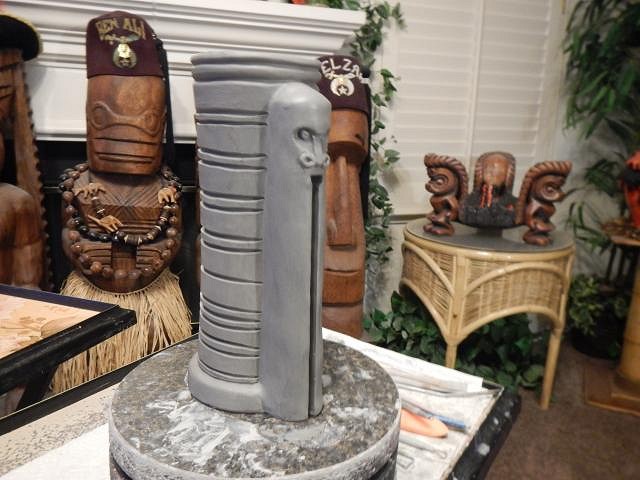
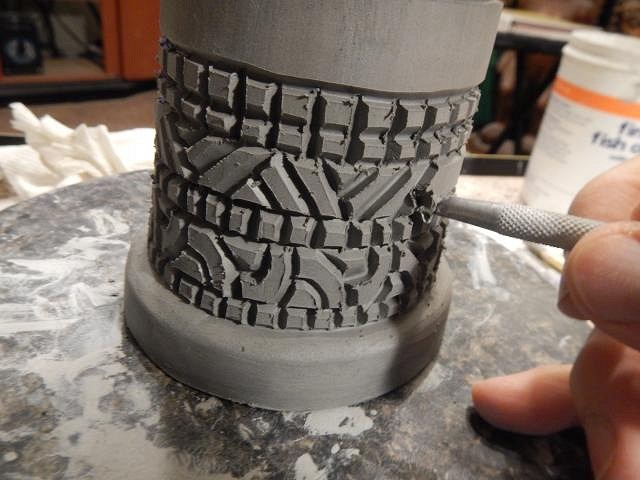
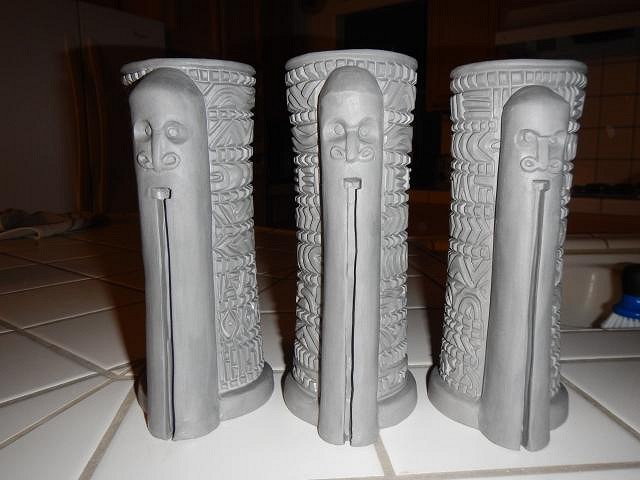
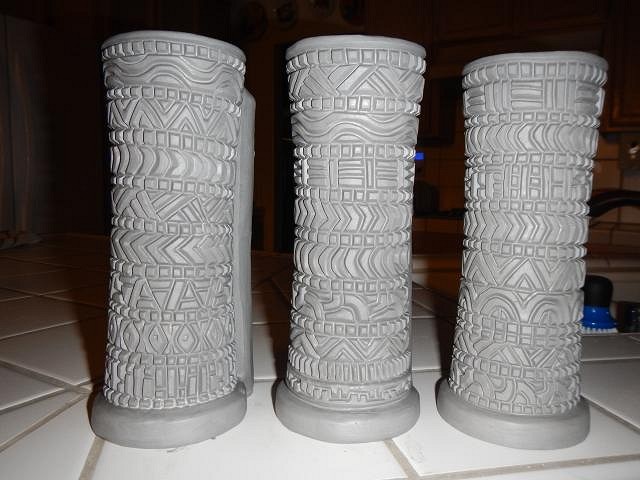
Hi Friends, here's our super fast 2 day trip. We drove past Mount Shasta and the lake. The water level in the lake was shockingly low and so little snow on the the mountain it looked parched. We were there for a 5 hour long family reunion to see the newest addition to our family and her brother who is now 2. I hugged everyone and we told stories. The next morning we headed home. We did stop to look for tikis in Redding, California but didn't buy any since we had these. We already miss our family but were so happy to have this time. Now it's back to the Wish List projects. =================================== kingstiedye aka Bullet here's your first update. Carving letters into clay is hard. To make it easier I gave myself more space. I cleaned up this fogcutter mug and then I widened the bands on the top and bottom. Here are the pictures that Bullet requested be used for the front and back of the mug. I started with the back. I held the picture to the clay and pressed in an outline. I carved it using a wooden stick that I sanded into shape and smoothed each design with a wet paintbrush. This is the backside of the mug. Next I will tackle the front side as shown in the other photo. I like to be challenged and this is a good one. Cheers, Wendy |
|
K
kingstiedye
Posted
posted
on
Fri, Sep 11, 2015 9:15 AM
that looks amazing, wendy! [ Edited by: kingstiedye 2015-09-11 09:16 ] |
|
Z

zerostreet
Posted
posted
on
Fri, Sep 11, 2015 4:14 PM
Impressive Wendy!! Looking forward to seeing this one complete! |
|
D
danlovestikis
Posted
posted
on
Sat, Sep 12, 2015 8:36 AM
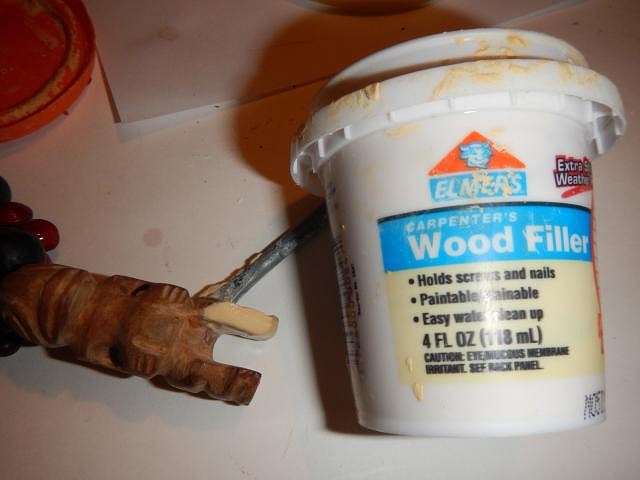
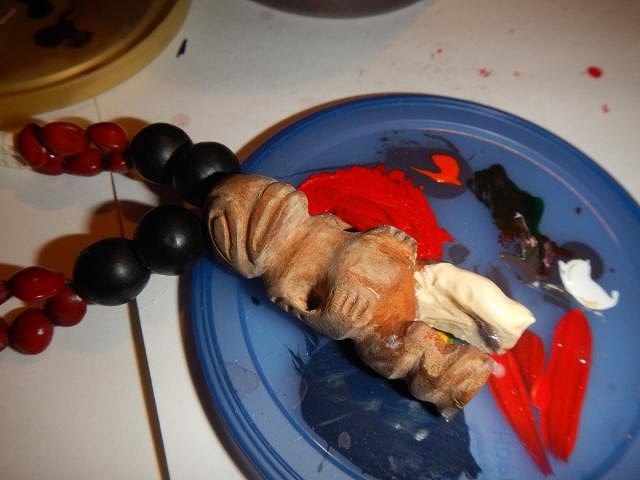
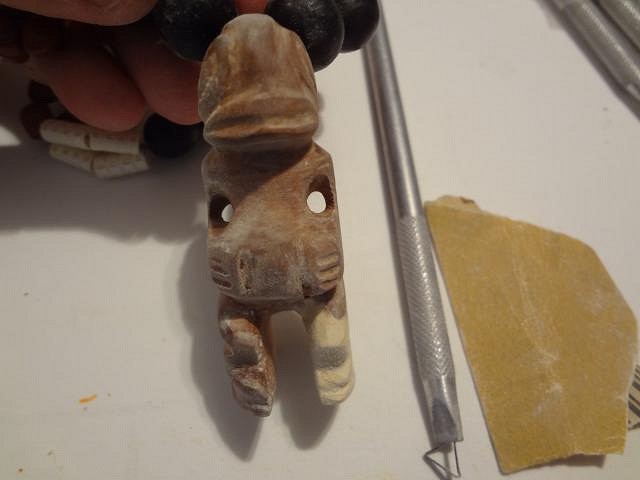
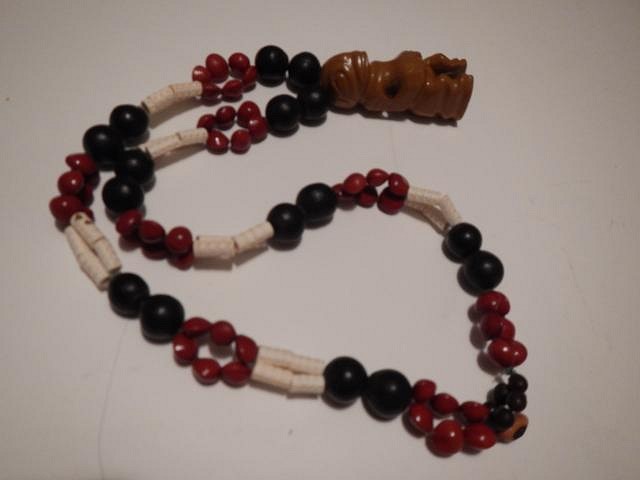
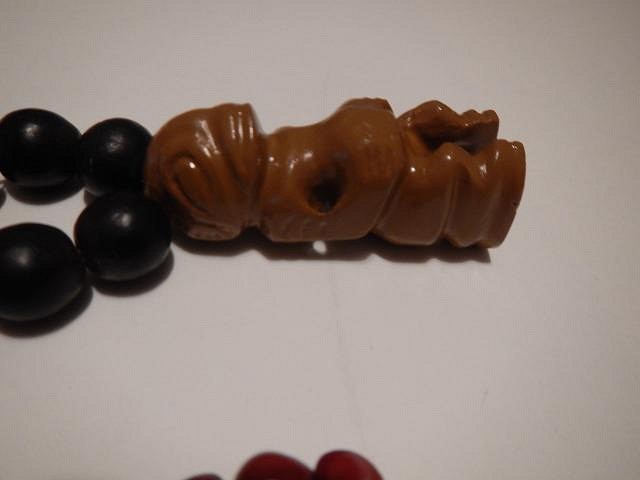
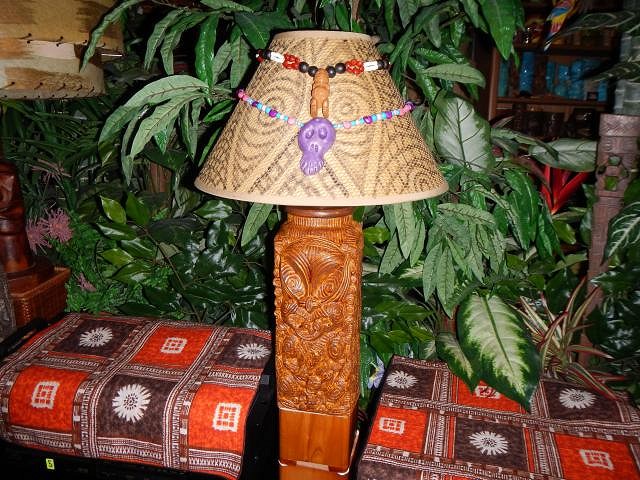
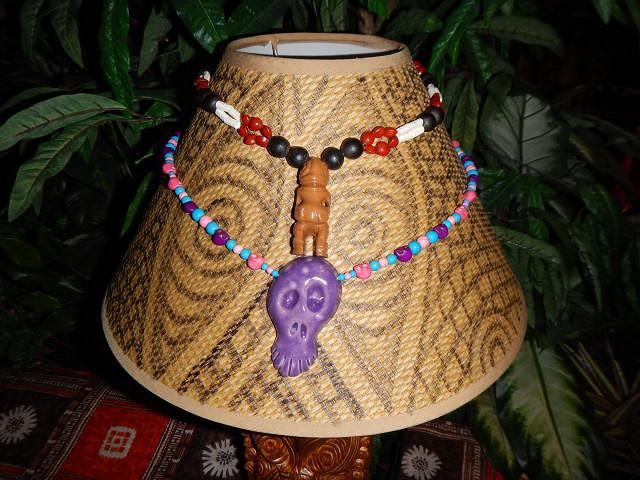
kingstiedye you design great mugs. That was the easy part. See below for more. zerostreet Bullet challenged me with tiny hands and other parts. Clay is a fun way to play. =========================== First here's a small project I completed. On a trip in a thrift store for $1.98 I found a broken tiki necklace. One leg was missing and it didn't have enough beads so it wouldn't go over my head but Dan said if I would fix it he would put it someplace fun. Missing leg. Using Elmer's wood filler to build the leg. I did it with layers drying between them so that it wouldn't crack. Sanding the detail into the patch worked better than using the carving tool. I just folded the sandpaper in half and used the edge. Liquetex Glossies worked well to cover the whole tiki.
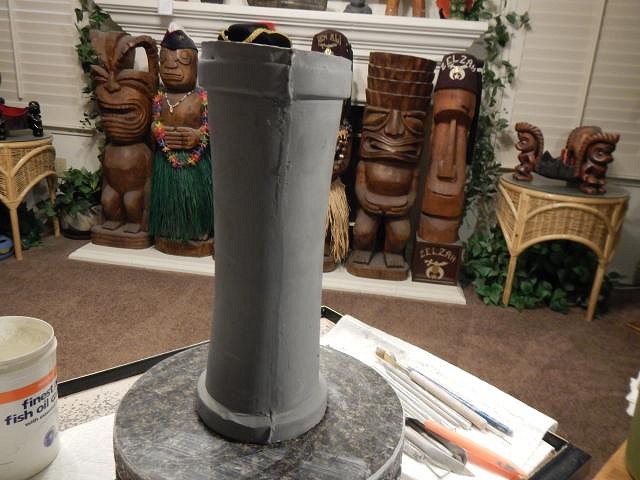
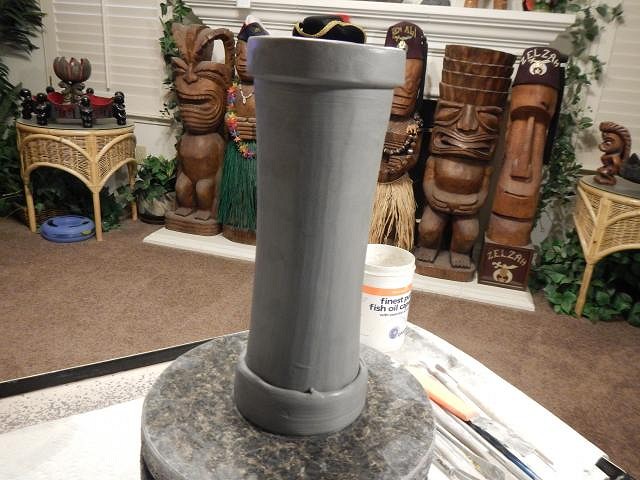
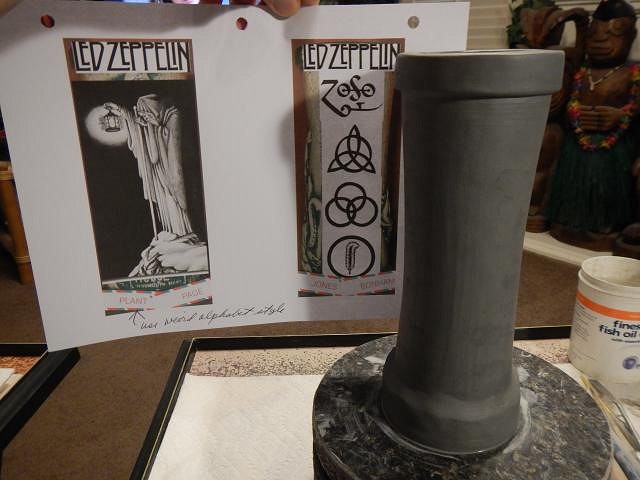
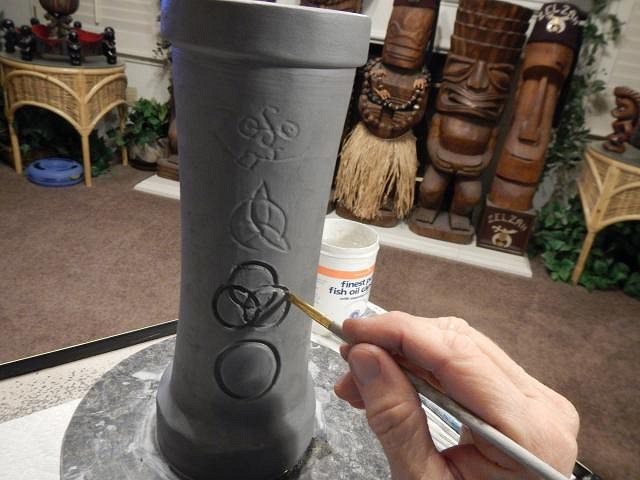
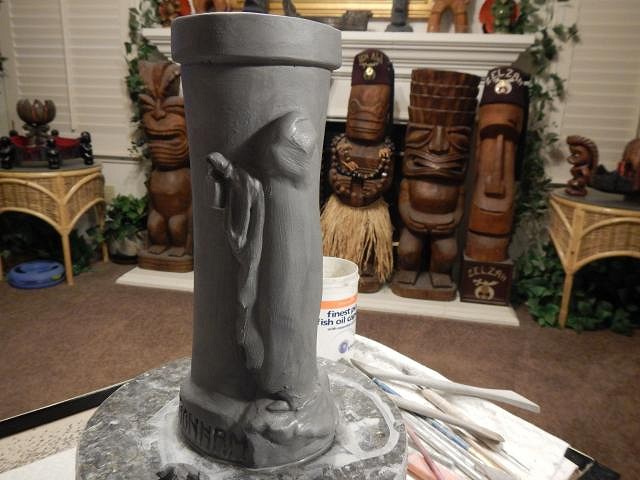
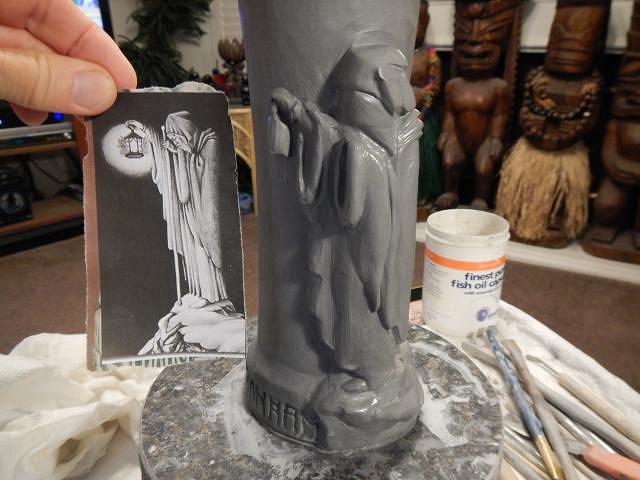
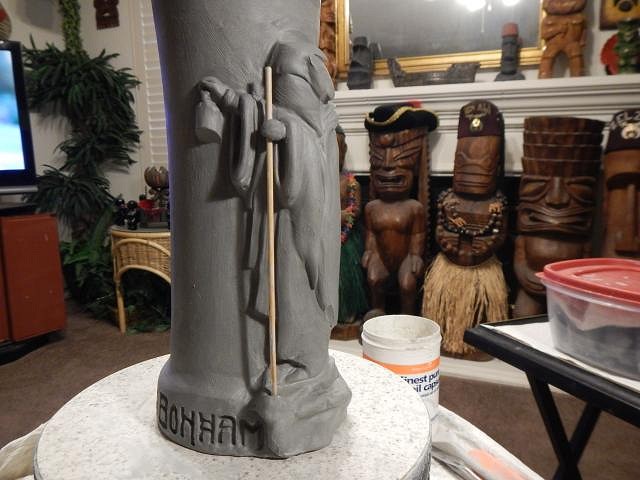
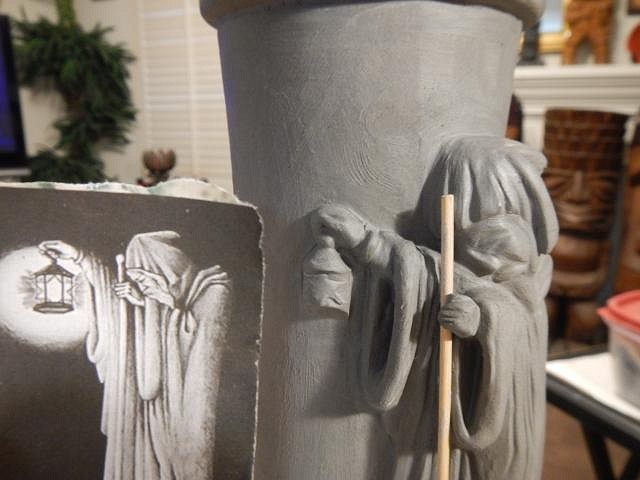
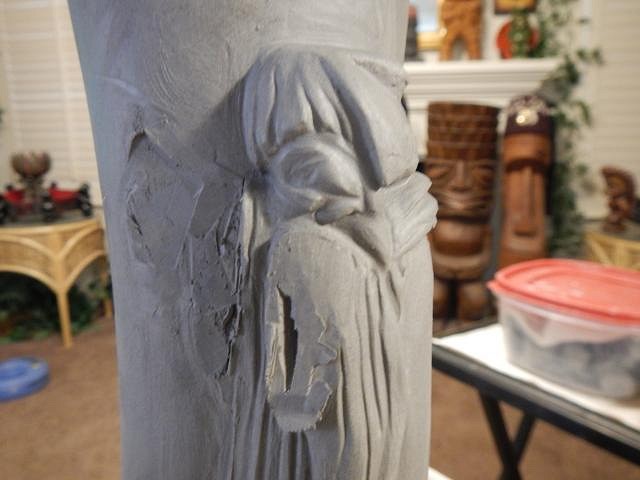
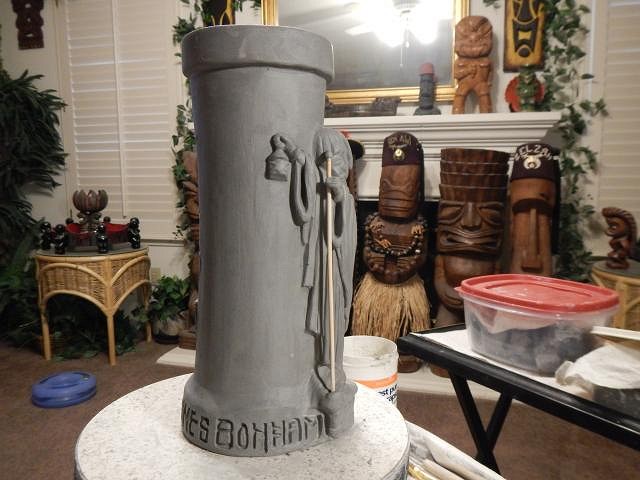
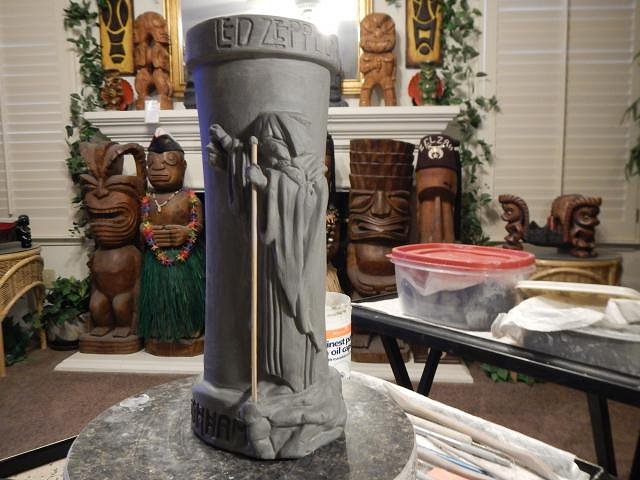
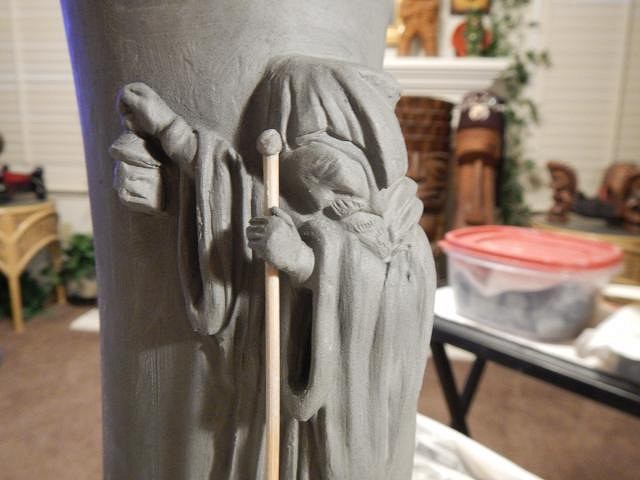
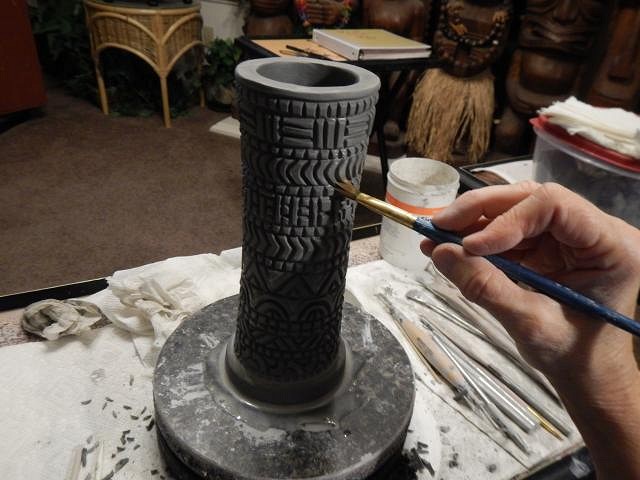
Dan hung the necklace on the lamp I had made for him. The Skull necklace was a present from Swizzle aka Robbie Toth. He gave it to me when we found each other at Tiki Oasis. We made the trip to see him and were rewarded with this excellent necklace that he had made. He even strung the beads. Thank you Robbie. ===================================== Update on Wish List #6. I'm working on kingstiedye's Led Zepplien mug. My next part involved taking a flat image and making it 3D on the other side of the mug. I started by building up the clay in a shape similar to what was in the photo. I had to let the clay base sit overnight to firm up so meanwhile I carved all the bands names along the base. Now I just go back and forth adding more and more small bits of clay to build the man, his robe, the lantern. I am using a stick for his walking staff. It will be painted to match the mug. I made a hole for the end of the staff so that it can have a bit of glue to hold the staff more permanently when finished. I keep checking the picture as I add clay and remove clay. I build up a rock to hide the bottom of the staff. Now he has a hand, a face and a star on the lantern. I asked Dan to come and critique the mug so far. He noticed that both arms were lower than in the photo. He was so right so I did an amputation. I should have more to show tomorrow. It's wonderful how clay can be worked over and over again to get it right. Black Velvet paintings are set in stone. I hope to do some of those this winter. Cheers, Wendy |
|
H
hang10tiki
Posted
posted
on
Sat, Sep 12, 2015 12:31 PM
That looks awesome |
|
K
kingstiedye
Posted
posted
on
Sat, Sep 12, 2015 1:45 PM
I was getting more excited every picture til his arms got chopped off! oh well, you're definitely on the right track! |
|
R
RVICTOR
Posted
posted
on
Sat, Sep 12, 2015 10:39 PM
Wendy makin roadie mugs....nice. You may be onto something there... |
|
D
danlovestikis
Posted
posted
on
Sun, Sep 13, 2015 8:19 AM
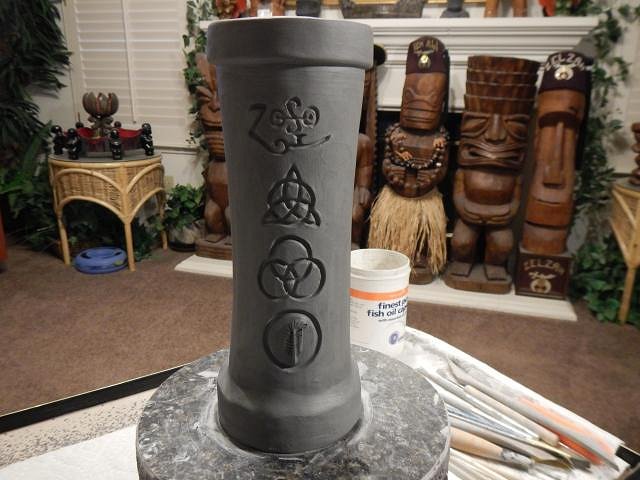
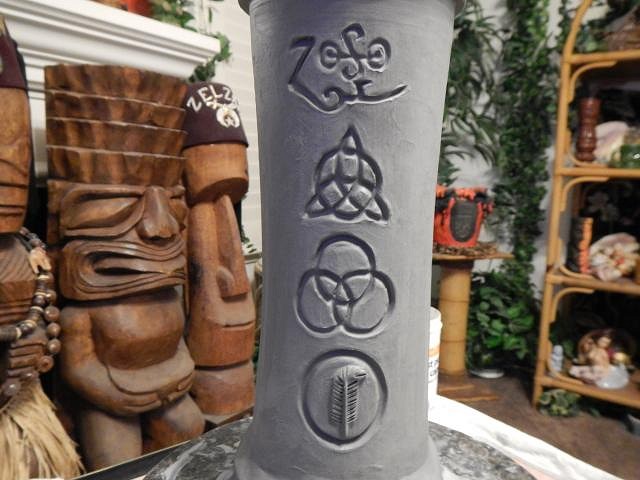
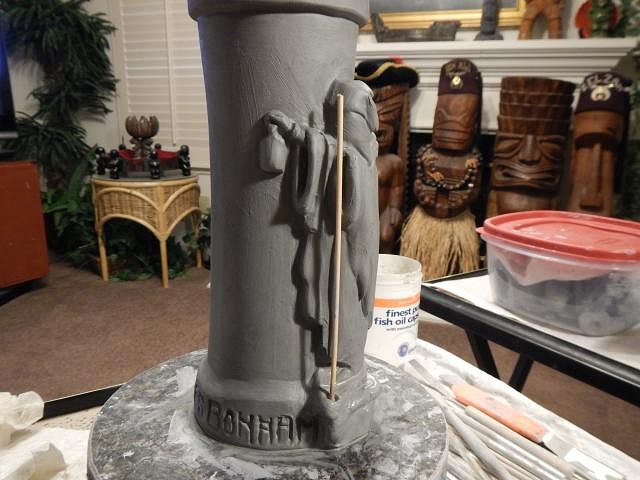
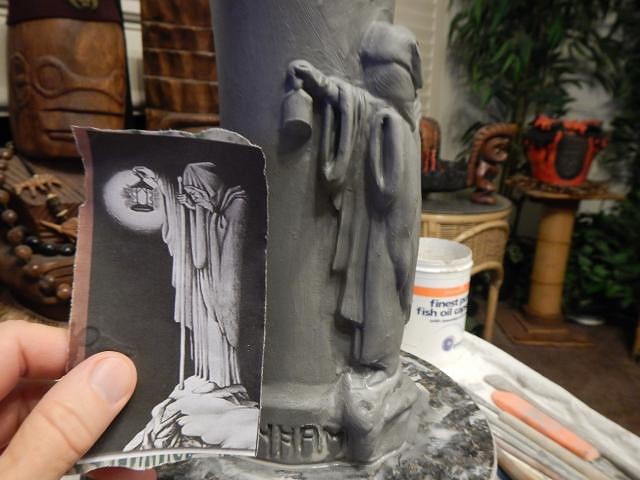
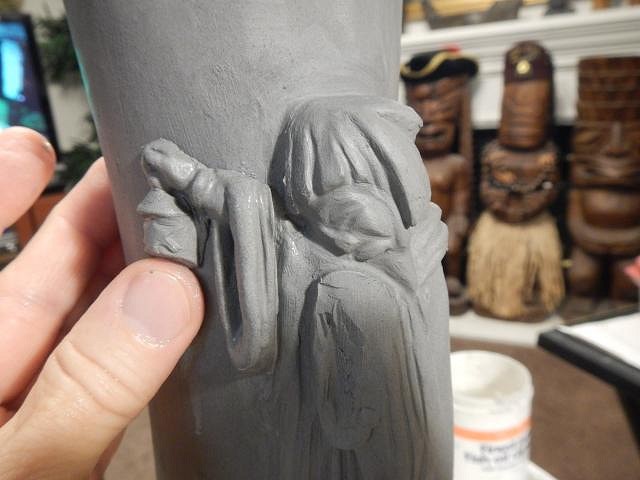
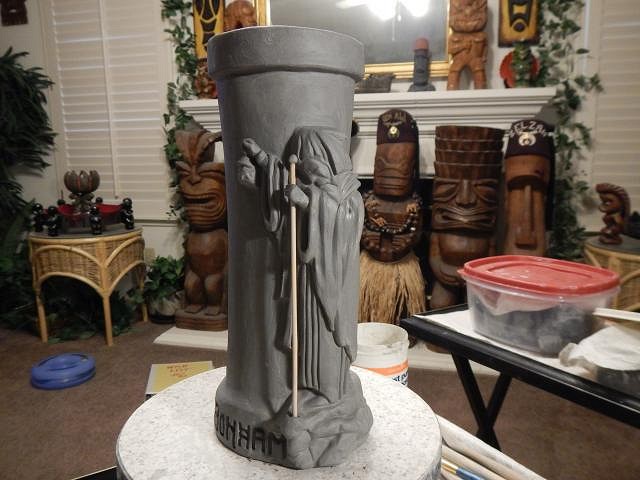
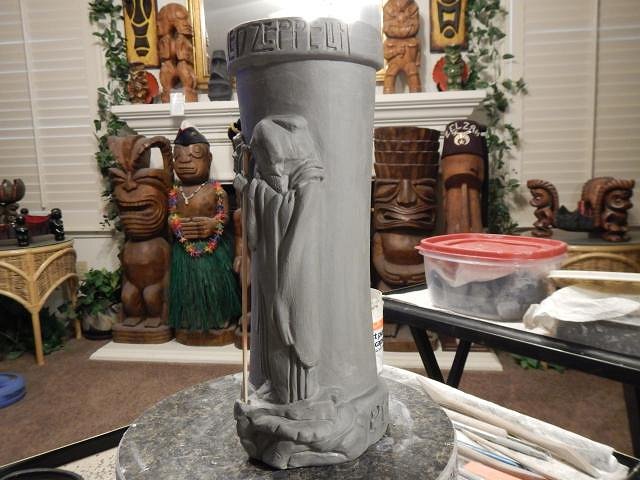
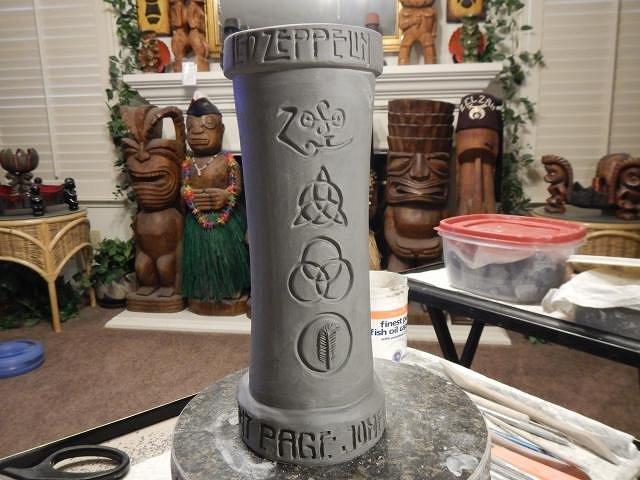
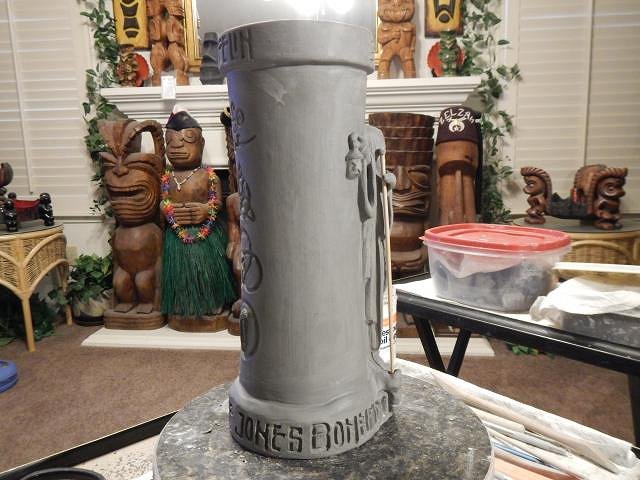
kingstiedye I need to get this right. If this doesn't work out you'll need to come over so we can do it together. RVICTOR it would be the road to the jail house if I did more than a couple. ============================== Wish List #6 progress report. The mug for kingstiedye aka Bullet. The arm I sheared off was able to be glued back on with slip. Now it's in the right place. Dan has a good eye. I carved in many of the fabric folds and then I re-made the left arm and hand. Starting with Bonham's name here's the mug as we circle each side.
Magically the name Led Zeppelin has appeared at the front top.
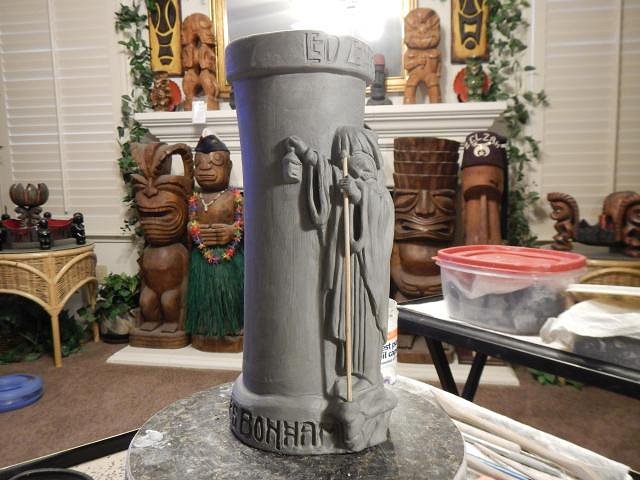
Working with such tiny detail is a challenge. A wet paint brush really helps. The bottom. Bullet has requested some interesting detailing on the rest of the mug that has to wait until it dries. He came up with an idea that is fresh and has taught me something to use in the future. When I get to that point I will of course share what he has invented. I hope you like his design. Cheers, Wendy |
|
H
hang10tiki
Posted
posted
on
Sun, Sep 13, 2015 8:40 PM
Lookin good |
|
D
danlovestikis
Posted
posted
on
Mon, Sep 14, 2015 8:55 AM
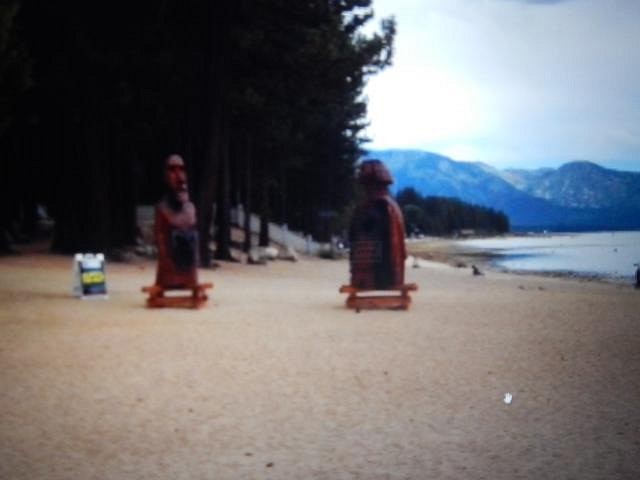
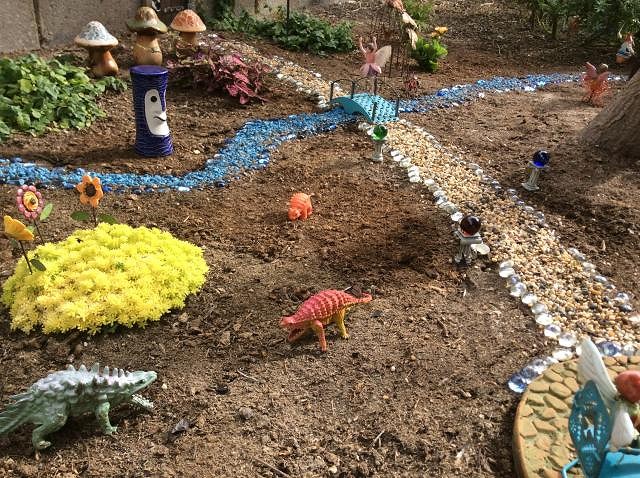
hang10tiki thank you. It's really nice to know who is looking. I met many people at Tiki Oasis who said they watch but never comment. I wish they would. I always think of comments of my reward for spending time posting. You have rewarded me more times than I have pages. You are appreciated along with all the "you know whose". ============================== First I saw these statues on the way to Davis, CA. They were in a trailer headed to Burning Man. Dan and I later saw them parked out in the desert near Reno, NV. Now I found this recent photo where they were taken to Lake Tahoe. They sure get around. Polynesian Paddy has a spot in his back yard for his grandkids to play. I sent him a Tiki Bob to add to the fairy land. ============================== Progress Report Wish List #6 Back to the Hot Tub Hula Girl mug Just a recap. Before the girl is added to the coconut hot tub I add hair to her chest. That doesn't sound right.
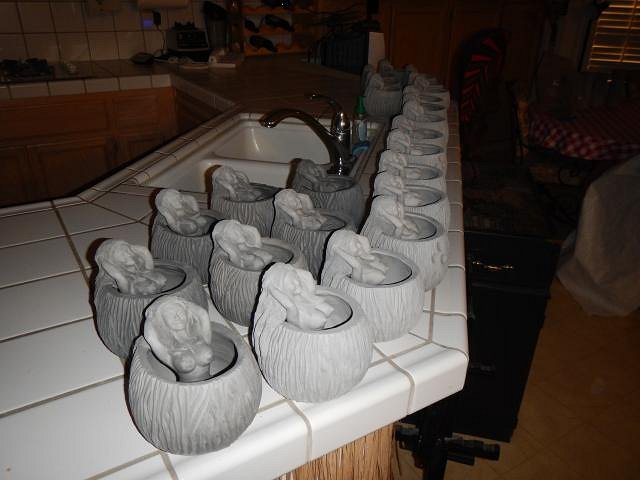
Then I add to her hair to extend it over the back of the tub and add some texture. Then I carve all the detail into the coconut. I made mugs 7 to 30. The first run was 1 to 6. They have been drying for 2 weeks slowly under a plastic table cloth. Now they are firmed up and I can add all the carving to the bottom. As I did each one I lined them up in the kitchen. When I finished the bottoms I lay them on their sides to continue drying under the plastic table cloth. I cover and uncover all day long while I work on other projects. The Wish List is not yet dented but I'm working hard on it. Cheers, Wendy |
|
B

bkrownd
Posted
posted
on
Mon, Sep 14, 2015 3:41 PM
Makes me want to start making my own mugs! :D |
|
D
danlovestikis
Posted
posted
on
Tue, Sep 15, 2015 8:49 AM
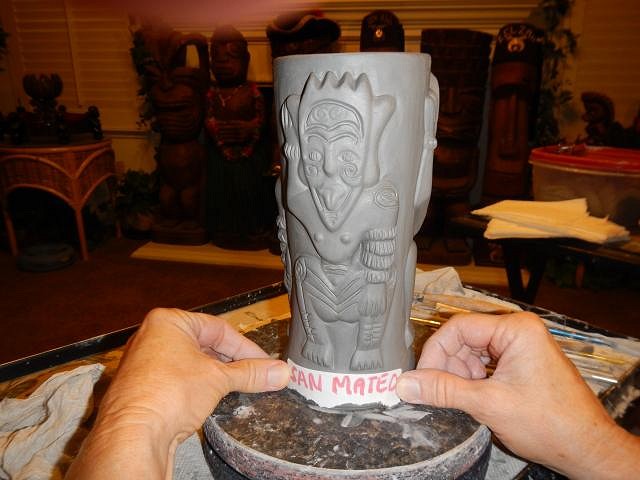
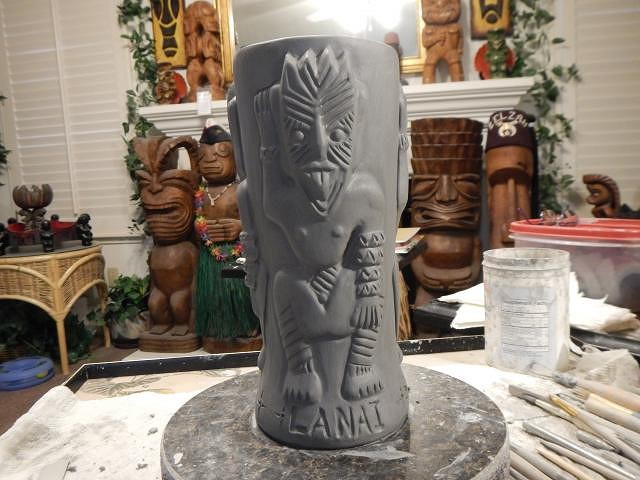
bkrownd living in Hilo you are surrounded by inspiration. If you can't do ceramics you can start as I did making thinkgs our of Sculpey clay. Here's an example of one of the first mugs I made with Sculpey. I bought Sculpey on sale that's why it's in such crazy colors. Painted with enamel. After awhile it became sticky. Spraying it with ceramic sealer took care of that problem. Here it is next to a real Frankoma mug. Yep I made a super big one. Sculpey can be baked to harden, for that I bought a convection oven and used it outside. You can't use your indoor oven because Sculpey is oil based and would ruin your indoor oven and the fumes would poison you. They ovens can be found for $100 on sale. ====================================== Progress Report Wish List #6. This is for Howard Dinits. I met him through facebook. He lived near the Lanai just as Woody's wife did so I've made mugs for both of them. For his version I removed the Eat Drink and Be Merry words and replaced them with the name of the place. The original mug had no words at all.
One project at a time. It's fun to go through the binder and select what I'll work on. It's time to do that again! Cheers, Wendy |
|
L

lunavideogames
Posted
posted
on
Tue, Sep 15, 2015 11:38 AM
Cool stuff as always Wendy! I owed you some pictures... I still owe you a couple more pictures, hopefully they will come soon. Keep up the great work!!! |
|
D
danlovestikis
Posted
posted
on
Wed, Sep 16, 2015 9:37 AM
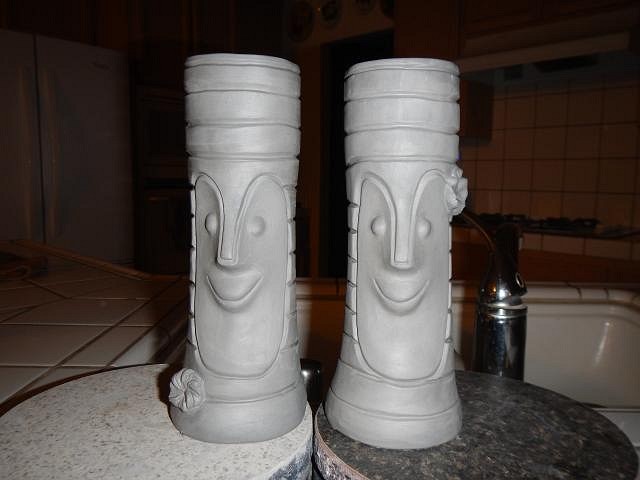
lunavideogames at the time those were some of the craziest mugs I'd ever made. I was thrilled when they didn't explode in the kiln. I've been using the same techniques ever since. Thank you so much for the photos. It's a blast for me to see those mugs again. =========================== Time to update the Wish List #6 projects. First off are two simple secret mugs for a wedding. A hibiscus flower in the near the face of the bride and one one the front of the groom. Their names are large on the backs but I can't show them or who these were made for because they will be a surprise. When in Maui I bought this wood carving that I could use as a reference for the flower.
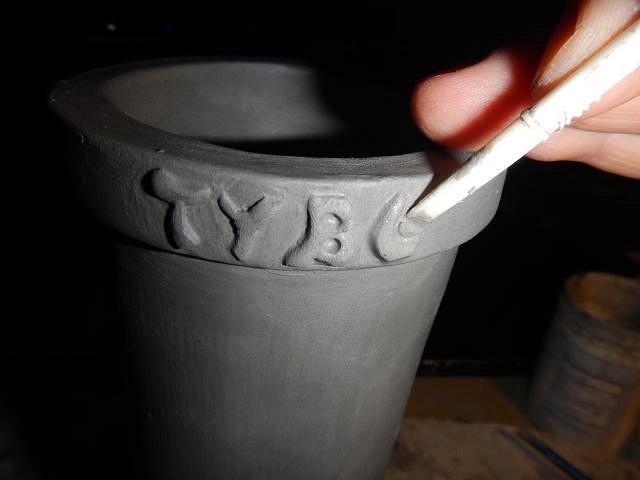
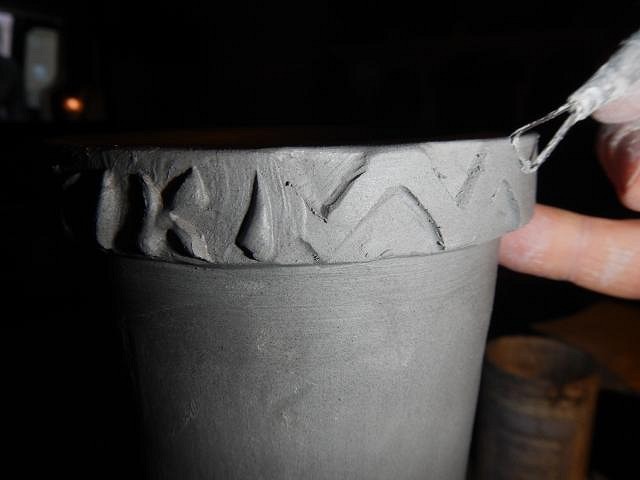
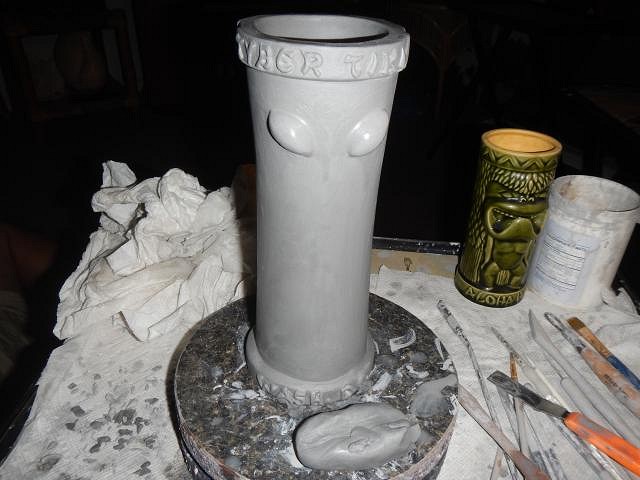
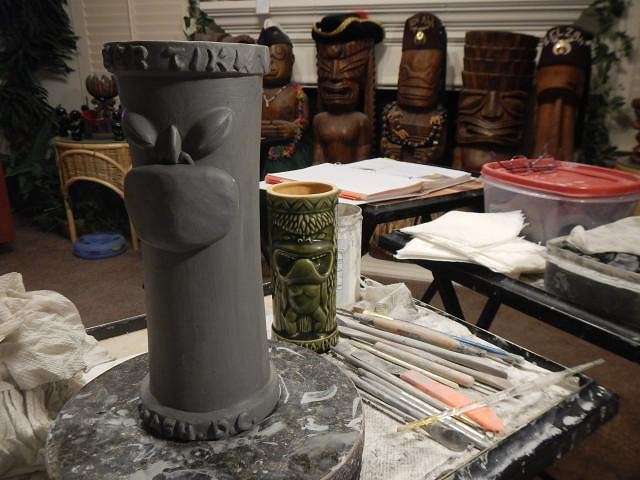
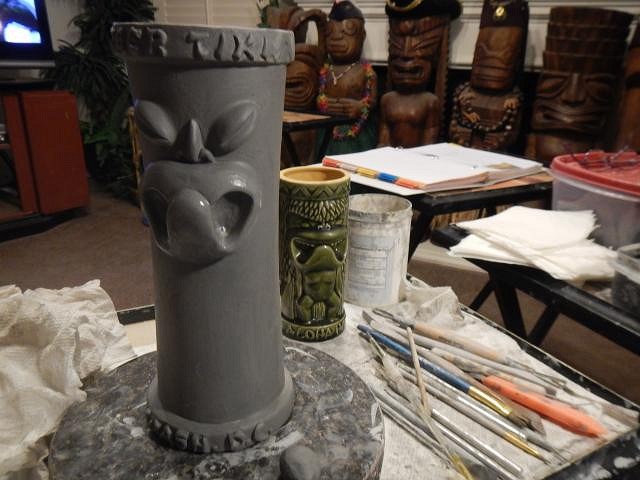
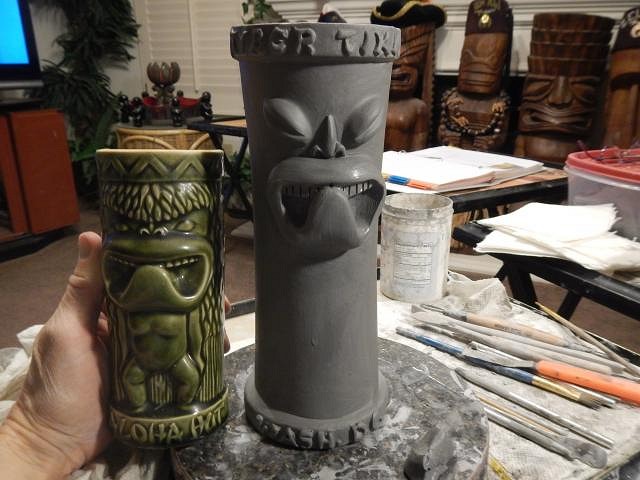
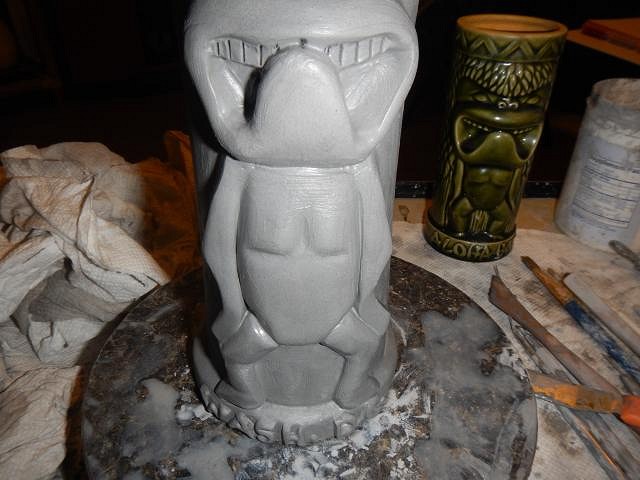
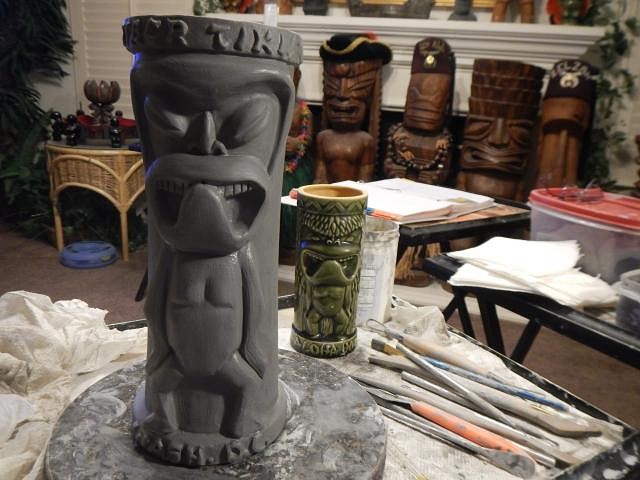
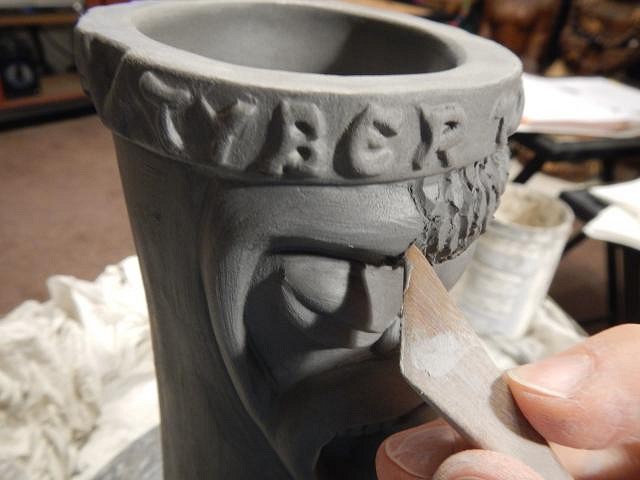
The bride will be all white and the groom will be black except for the face. I haven't been told the flower color yet. On the bottom I will leave an unglazed area where a felt pen can be used to write the actual wedding date which hasn't been set yet. =============================== The next project is for Tyber Tiki. He has been searching for the vintage mug for a long time and decided to have me make one customized for him. I'm so happy that I sculpted and molded three styles of fogcutter mugs. I used to have to add clay to cover a Tiki Bob so I could us it as a base. Now I just get to work. I started with the lettering which is super hard. I did my best to match the style of the original mug. This says Tyber Tiki. Then onto the top of the mug decoration. He requested that the eyes be changed to coffee bean eyes. That's a style I like too. Then I began to build the mouth. I forgot to take a photograph but the next one shows the addition along with the nose I added. The mug sat overnight in a plastic bag to let this clay firm up for carving. Now it's ready to carve. First I did the lips. Next the teeth. I added the body and here's how the front of the mug looked so far. Now after it sat overnight I began to carve the leaves aka hair. On the backside I was back to working on those difficult letters. I added the name of the bar. Then I continued on with the background carving. Finished and I await the opinion of Tyber Tiki. Did I fulfil his wish or is it a bust?
Close up of the face I lived with for so many days! Fingers crossed, Wendy |
|
TT

Tyber Tiki
Posted
posted
on
Wed, Sep 16, 2015 3:50 PM
Wendy, it looks great!!! I am thrilled with how it's turned out so far. Love the lettering, the placement of the names, and the detailed face. Just awesome! BTW - I am currently in Ljubliana, Slovenia....yes it's a mouthful to say, but a beautiful country just south of Austria. When I am not in work related conferences, I've been sightseeing. This is Lake Bled, picture taken from a tower window of the Castle Bled, of a church, on an small island, in the middle of this glacier-created lake. Pretty incredible place, but I feel a million miles from tiki, so viewing your thread warms the heart.
[ Edited by: Tyber Tiki 2015-09-16 16:07 ] |
|
D
danlovestikis
Posted
posted
on
Thu, Sep 17, 2015 3:05 PM
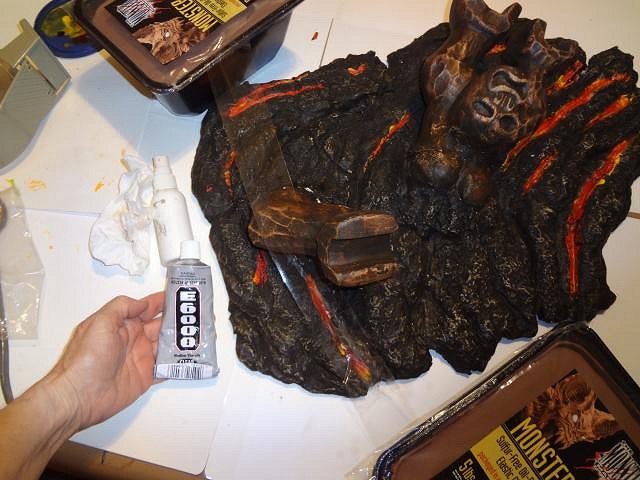
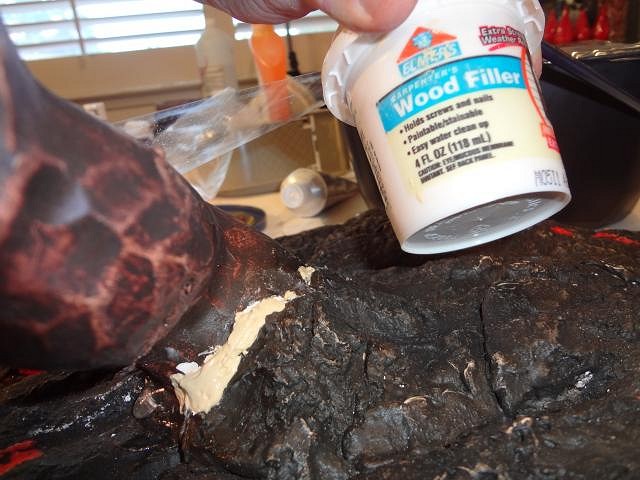
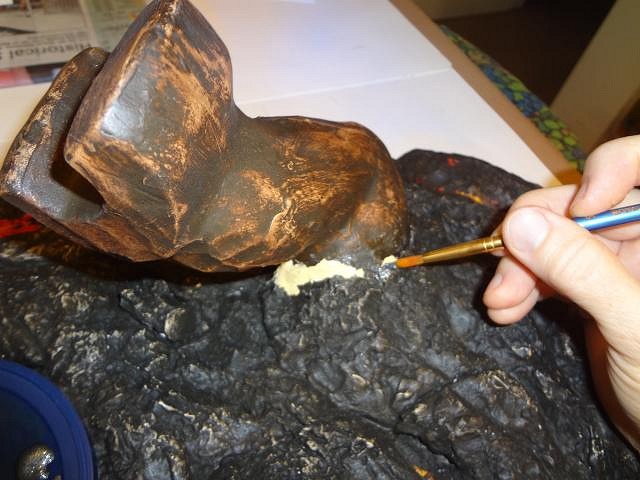
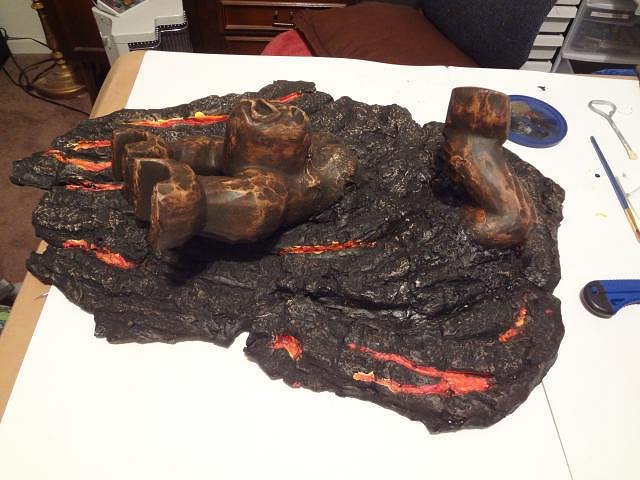
Tyber Tiki the furthest my work sent me for a conference was Las Vegas. You are a lucky man! I'm happy that your mug design meets your expectations. One step down more to go. ============================ Yesterday Honu Tiki aka Vance brought over this huge lava art piece by Gecko. Unfortunately the box crushed in the mail and broke off the back leg. kingstiedye and Gecko referred him to the tiki hospital...my home. This is how it all started for me. I repaired tikis for Dan. First I used this ceramic glue to attach the leg. I used tape and weights to hold it in place. We had a nice visit for a while as it set. If you keep your fingers wet with water you can remove any that squishes out without it sticking to your fingers. After a while I filled all the areas that had chunks missing. I used Elmer's wood filler. This is wonderful for ceramics. The next day I mixed black, grey and brown into a matching color and covered over the patch. When the paint was dry I sprayed it with a ceramic matte fix to protect the paint. All done and ready to go home. This is a terrific piece of art and I'm so happy to have restored it. Wendy [ Edited by: danlovestikis 2015-09-17 15:13 ] |
|
H
hang10tiki
Posted
posted
on
Thu, Sep 17, 2015 7:38 PM
Great new mugs |
|
D
danlovestikis
Posted
posted
on
Fri, Sep 18, 2015 5:08 AM
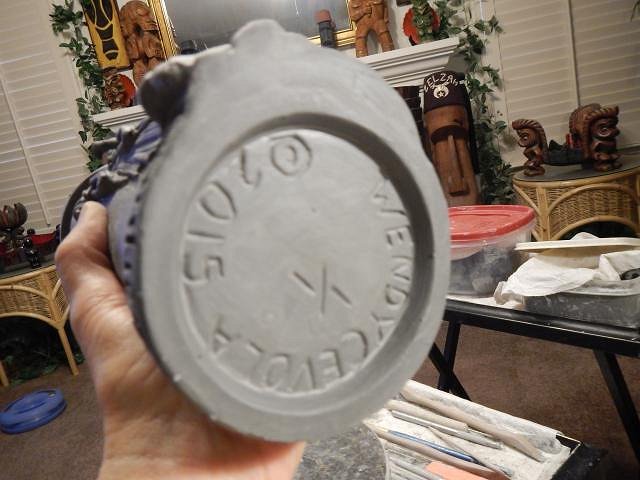
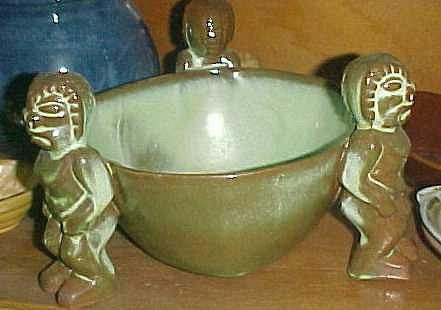
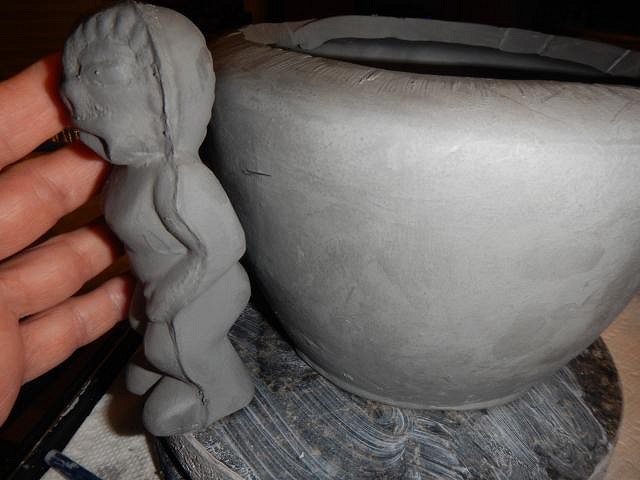
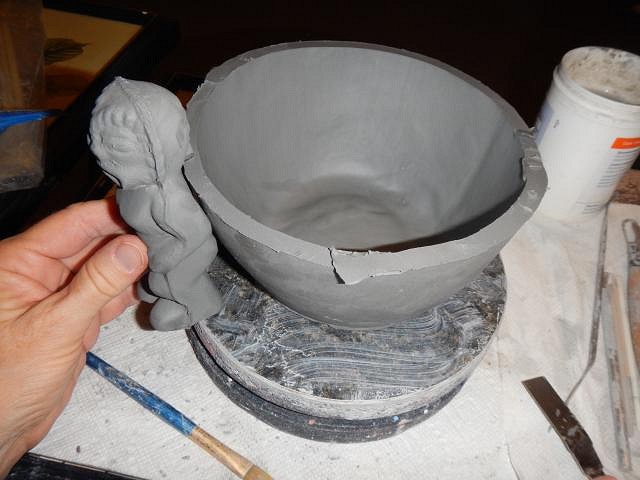
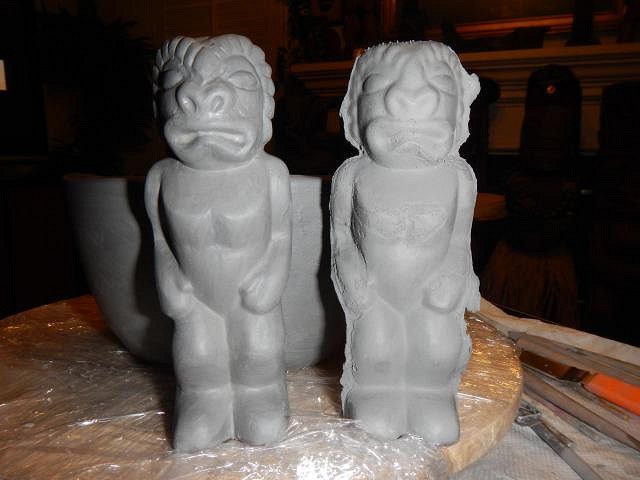
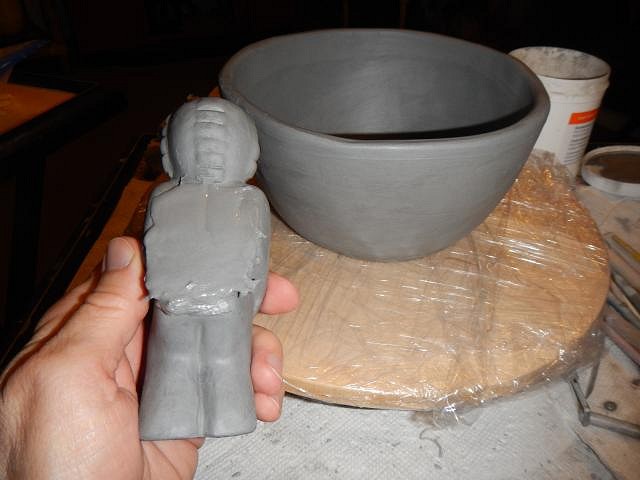
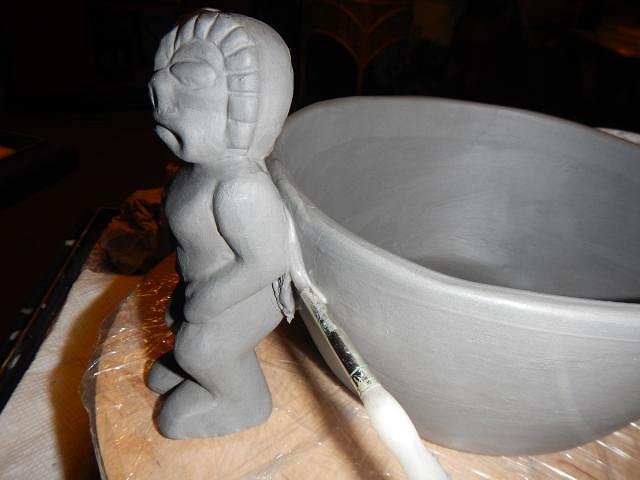
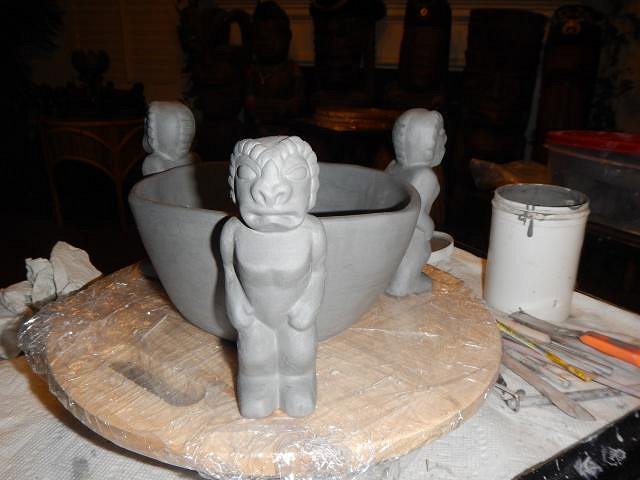
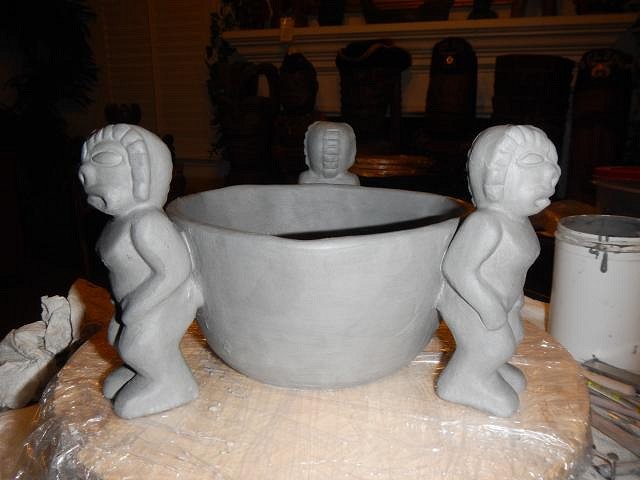
hang10tiki always a pleasure to see you here. ==================================== Wish List #6 update. Rich Teski and James Molter Jr. both of facebook ordered Frankoma bowls. The story of how I got this little tiki from Joniece Frank (named for her father John) is on page one of this thread. It is a special tiki she designed. It was the only tiki to survive the horrific fire at the factory. This is one of her rare tiki bowls. All of the Frankoma glazes are now lost. The bowls I'll be making will have some beautiful glazes. I cast all the little tikis and bowls that I would need for this project and then I set to work. I used the tiki to mark where I should cut the bowl. Here the top is removed. I flipped the bowl and cleaned the bottom. I also carved my name and copy write. Flipping it back over you can see where the mold line runs up the side. I add clay to the inside of the bowl until it is smooth. Here is an example of a cleaned up little tiki next to one just our of the mold. I clean the entire tiki and deepen lines. Now I add sticky clay to the back of the tiki so I can glue it to the bowl. I use a stiff wet brush to remove the excess clay that squished out. Three tikis on each bowl. Different view. The bowl had crimping so I did that too. Three bowls for Rich and two bowls for James. Two back up bowls in case any of these fail and the tikis fall off when fired. Lots of Wishes filled this time. Wendy |
|
D
danlovestikis
Posted
posted
on
Sat, Sep 19, 2015 9:24 AM
Thank you for the visits to see how Wish List #6 is coming along. I am having so much fun making all of your wishes come true. I don't share the work ahead of posting. These are my SUPRISE pages. At the same time these are the pages that must be judged as to whether or not I did it right. Don't worry I can take criticism or suggestions. Remember your wish must come true. So here's the next mug. The last TC swap I participated in was the Enchanted Tiki Hut swap. I made a mug for swapping and another one for Dan. After the swap I had 3 requests for Dan's mug. So Mahalo Tiki, Dale (Tiki Tonie's husband) and Lloyd AlohaHaHa here are your mugs. I used the photo from Disneyland and started adding clay to one of my fogcutter mugs. Actually I did each step 3 times for 3 mugs. I smoothed the tiki base into shape. After doing all three they sat in plastic bags overnight to firm up. The next day I carved the faces and the long "mouth" that makes them a slit drum. Then for each I carved these rings. Three ready to go to sleep for the night. The third day I did all the carving for the designs around the mugs. I clean them up with a wet brush. All done and ready to dry over the next few weeks. Backside. When really thick areas of clay are added they will split off of the mug base if not dried very slowly. I keep them in plastic and then during the day I remove it and let them dry for an hour and then back into the plastic. This occurs for most of my pieces even the bowl need to dry slowly so the little tiki won't pop off. I do this for weeks and eventually they are dry. =============================== I'm having fun. I hope you all are having a great weekend. Cheers, Wendy |
|
B
bkrownd
Posted
posted
on
Sat, Sep 19, 2015 9:52 AM
LOL - Reuleaux triangle goes tiki |
|
D
danlovestikis
Posted
posted
on
Sun, Sep 20, 2015 8:12 AM
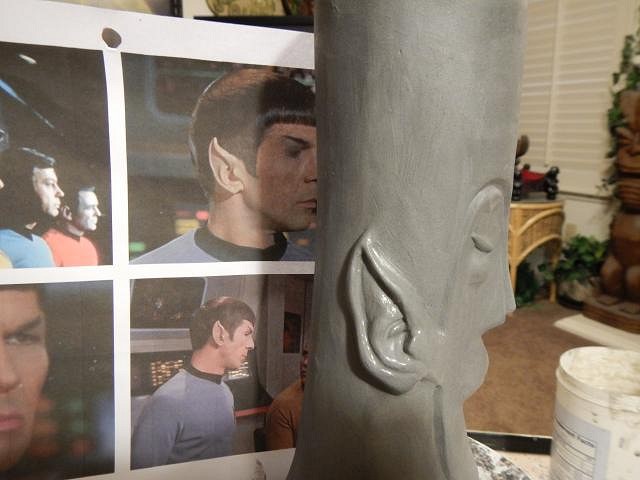
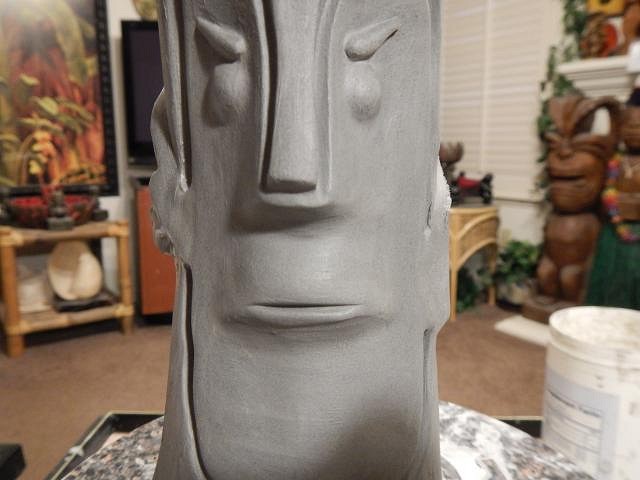
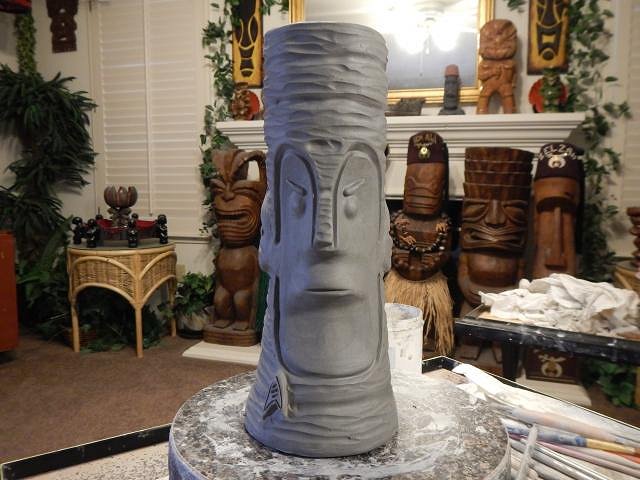
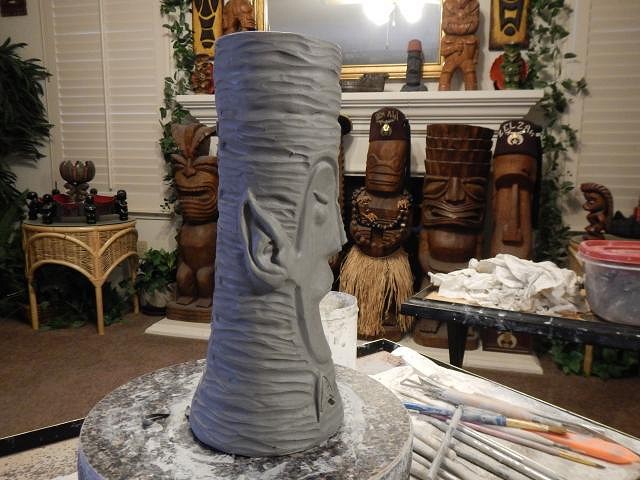
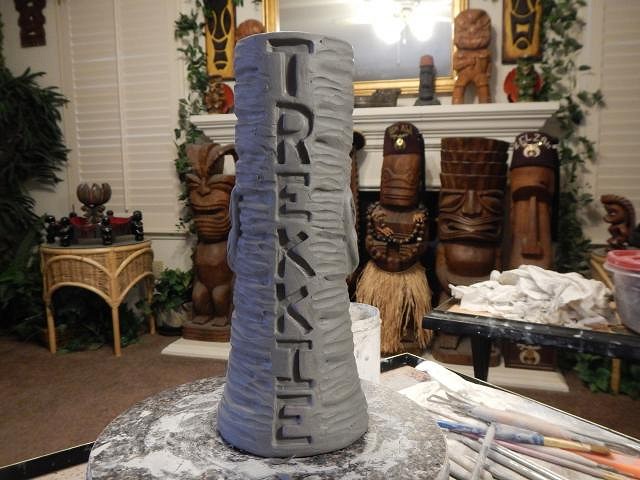
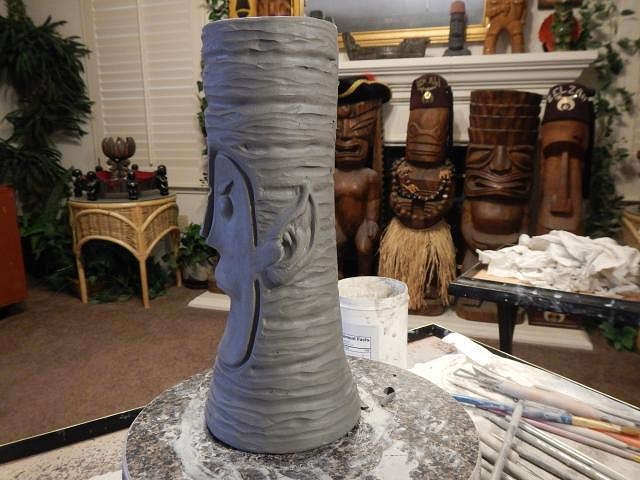
bkrownd that's a very fancy name for that shape. Thank you for the information. ====================== Wish List #6 progress report. Comicbookhero asked if I could make a Spock Bob. Here's what I did. Of course I had to start with the ears. I used these photos and copied them and the straight up eyebrows. Different pictures had them looking different so this is a blend of photos. Next the unfeeling mouth. I found his badge on a Spock costume for Halloween. I did the Tiki Bob Texture from the oldest style Tiki Bob's. As requested. All done. Comicbookhero does this fulfill your wish? Cheers, Wendy |
|
H
hang10tiki
Posted
posted
on
Sun, Sep 20, 2015 11:47 AM
Wow It's great that more tiki people wanted the I love using the Wendy area as a great background for drink photos
|
|
I
IDoVoodoo
Posted
posted
on
Mon, Sep 21, 2015 1:52 AM
I love your work! I need to get drawing! |
|
C

Comicbookhero
Posted
posted
on
Mon, Sep 21, 2015 9:56 AM
That is the coolest mug I have ever seen! You "fulfilled my wish" and then some. I love it! |
|
H
hang10tiki
Posted
posted
on
Mon, Sep 21, 2015 10:36 AM
You two are so busy ya made me feel lazy So I finally got around to restaining two of my dudes :)
|
|
D
danlovestikis
Posted
posted
on
Mon, Sep 21, 2015 2:22 PM
hang10tiki thank you and thank you. We were just talking about how fun it would be to visit you in December. I love to go to Ethyl M's when all the little lights are shining on the cactus plants. We also need to see the Golden Tiki. Did I get the name right? I LOVE it when you use my tikis as a backdrop! IDoVoodoo I am nearly ready to start on your cannibal bowl. Are you going to sketch for that project or am I to go by your word instructions? Comicbookhero not only your wish but your design. I really enjoy lending my hands to make a wish come true. It is now hanging out on the drying table. This takes a week or two. hang10tiki preserving all that hard work is great but doing so really makes them look good too. How hot was it outside when you were working? ======================= Before I started the Wish List #6 I made another HUGE Maori lamp ceramic. If anyone is interested let me know. This is a one of a kind design, hand carved and the 4th from the mold. $350 with the buyer doing the electrical and shade. Buy it now and you can choose the color or colors for it. Here are the step by steps. DAn's nightmare is that I'll want him to life the HUGE Maori mold. Poor Dan. The next day the molds are opened. The Ren Clark head is what I changed into the devil head that Freddie snagged. Once in the house I clean it up and add clay pieces to the sides and then I carve them. New style eyes. More work done. I even carve the top where it might end up covered by the shade. The front is finished. I even changed the shape of the war club. Here it is without the flash. Now I'll carve all the rest of the body. Finished. I like photos without the flash to show that the carving is deep.
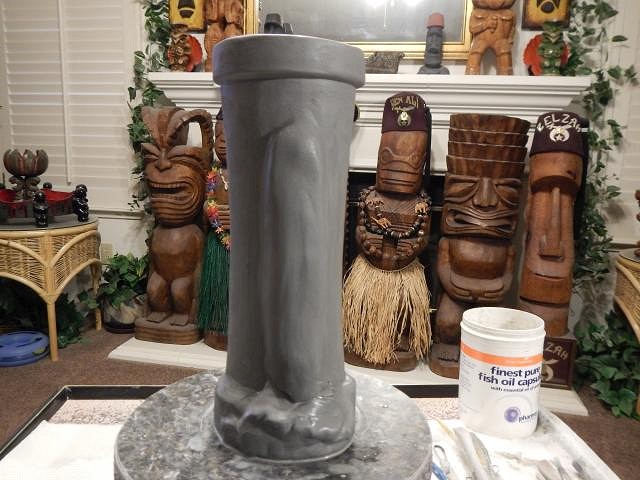
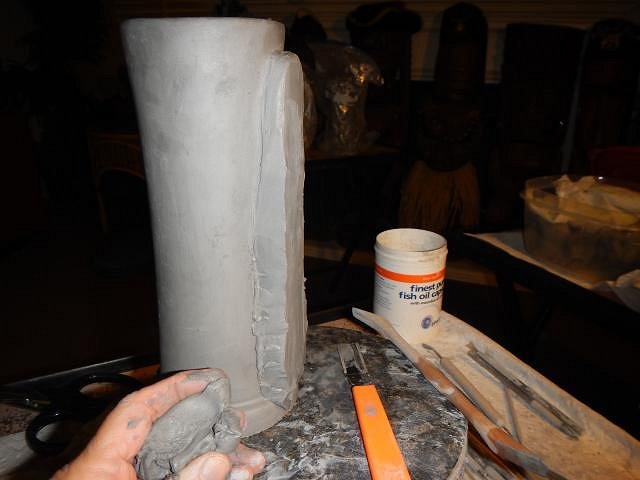
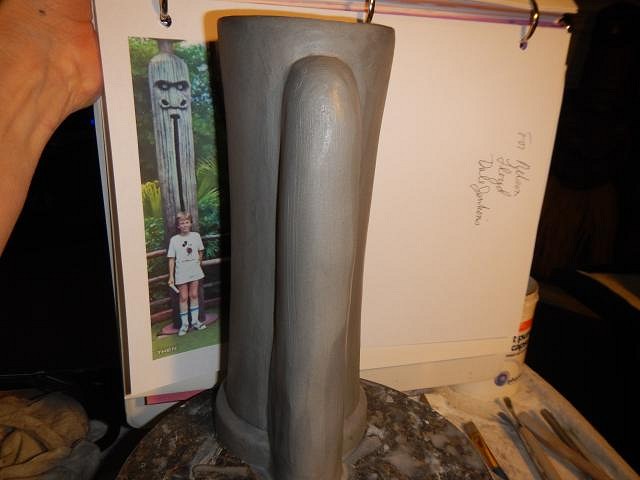
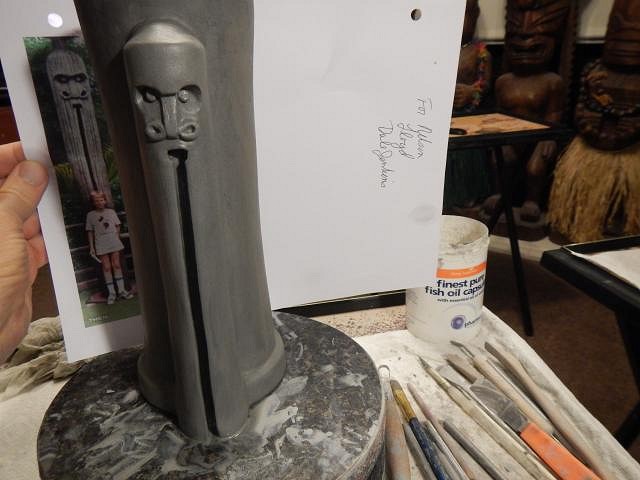
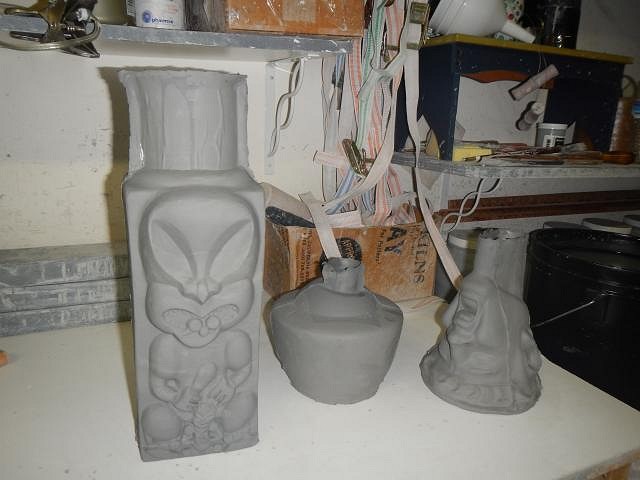
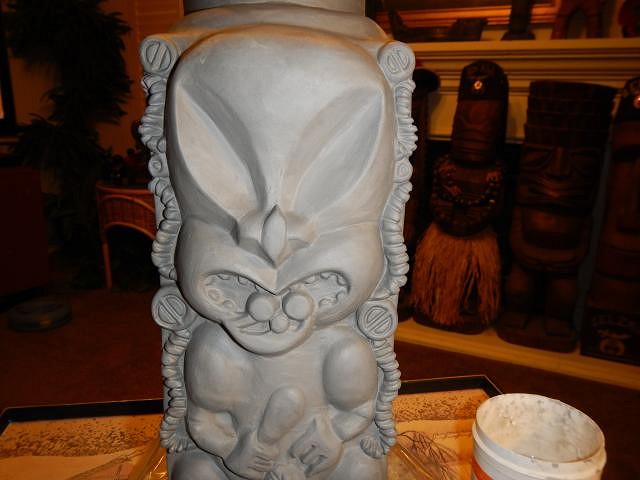
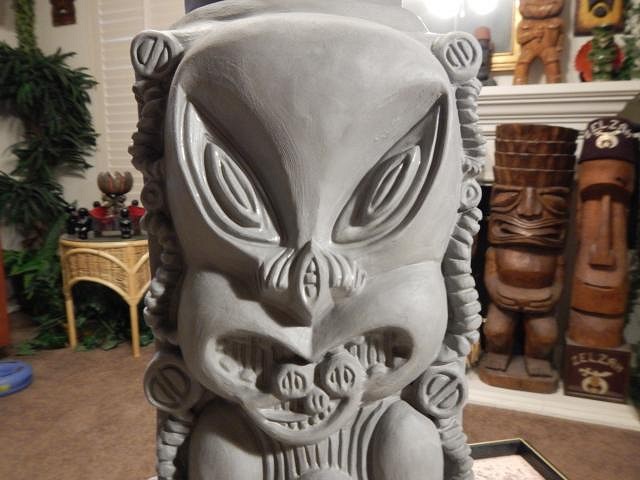
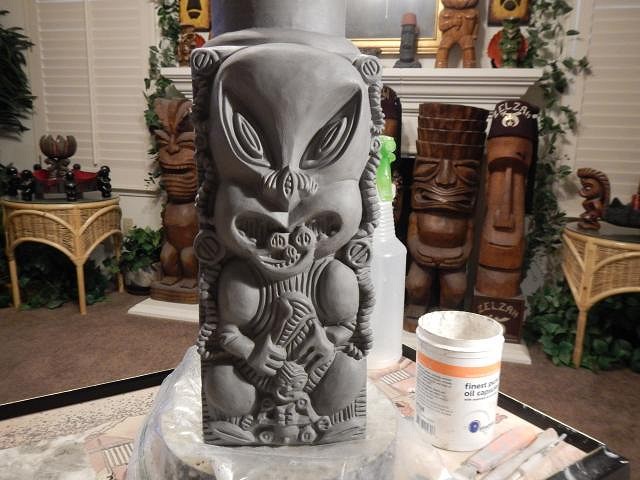
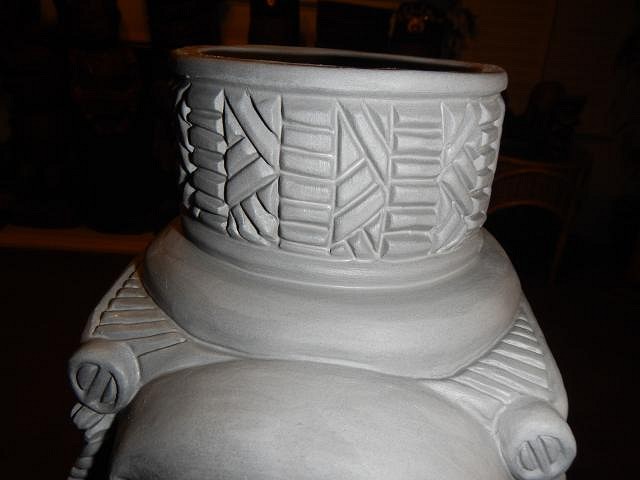
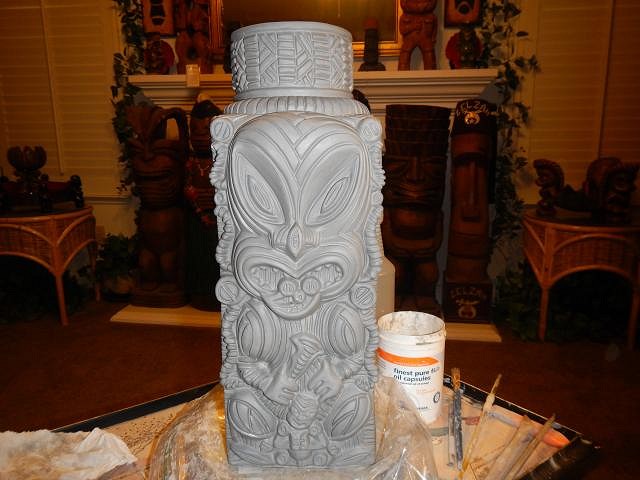
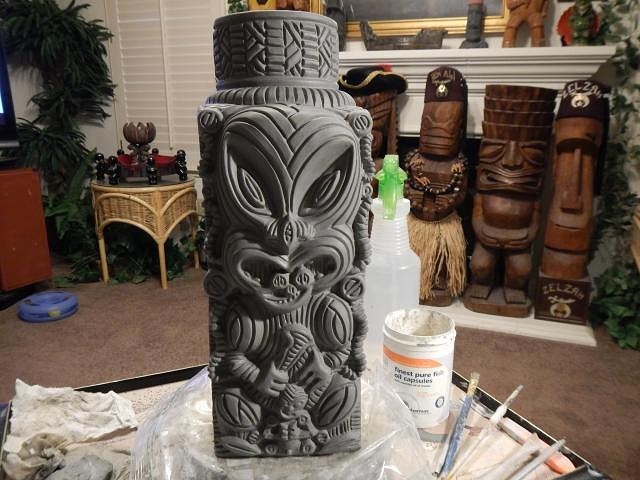
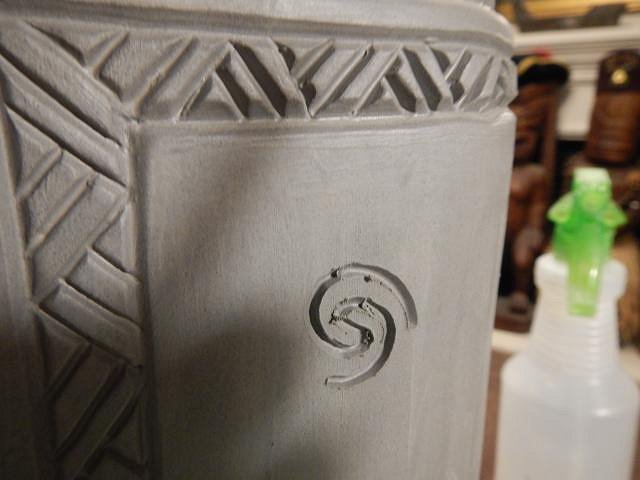
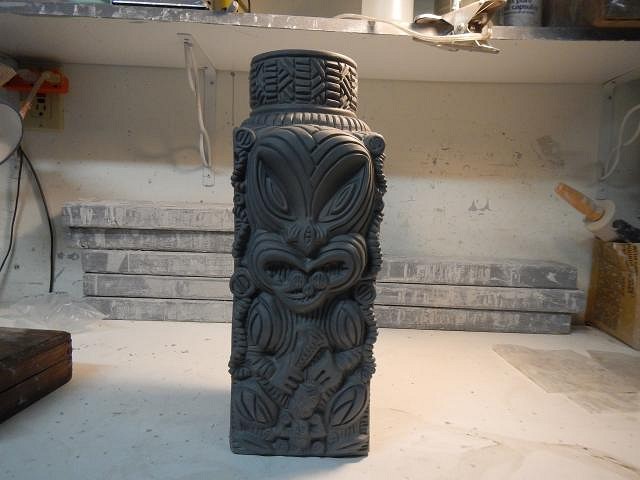
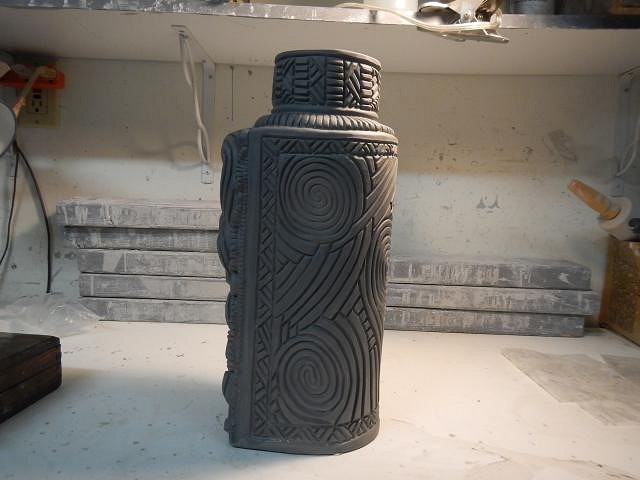
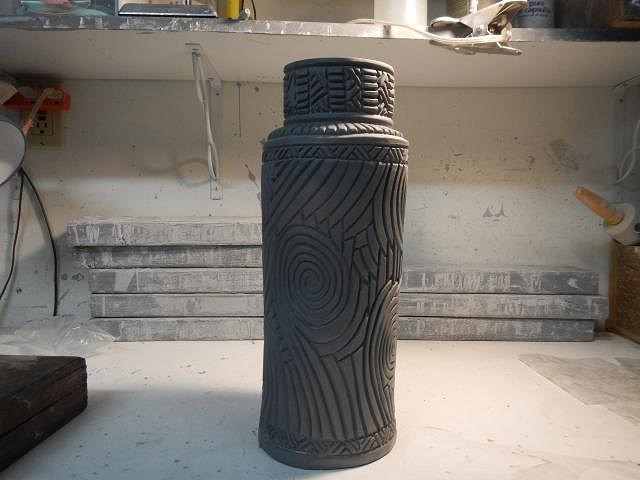
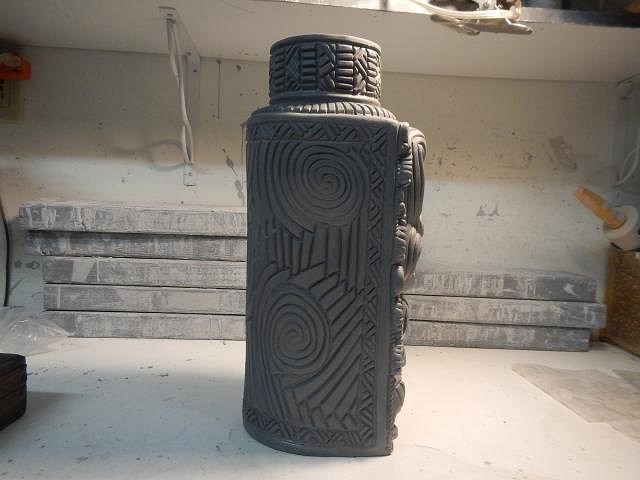
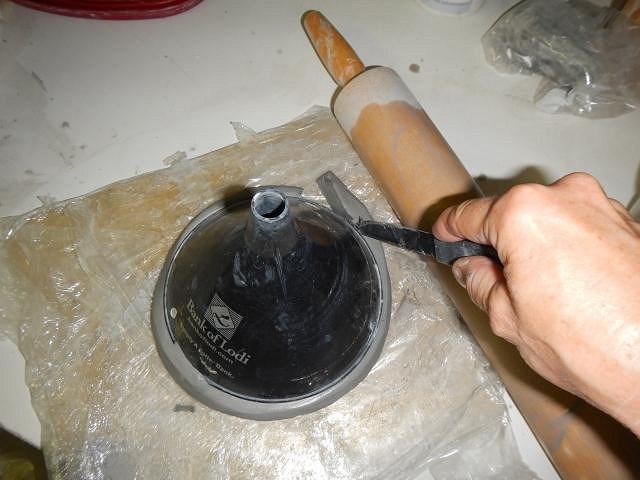
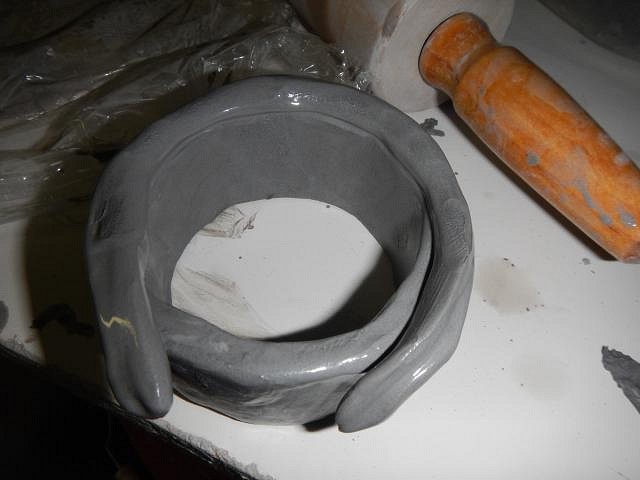
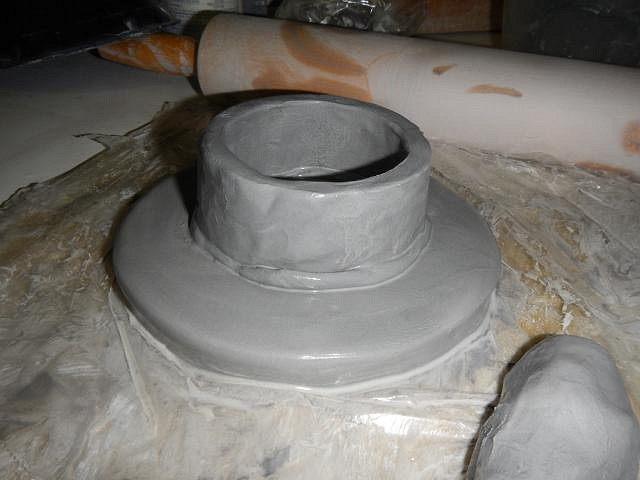
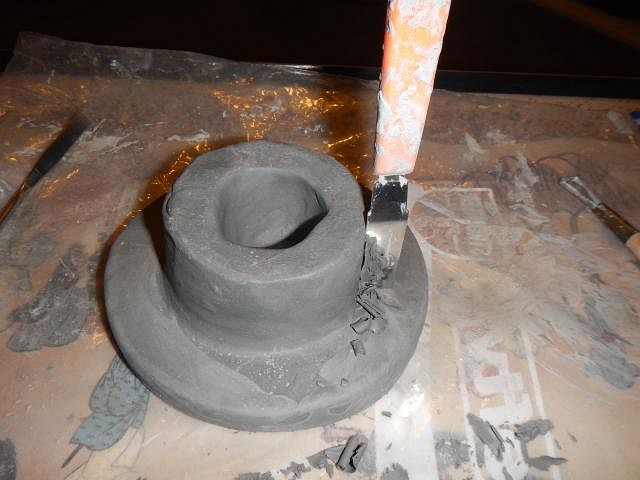
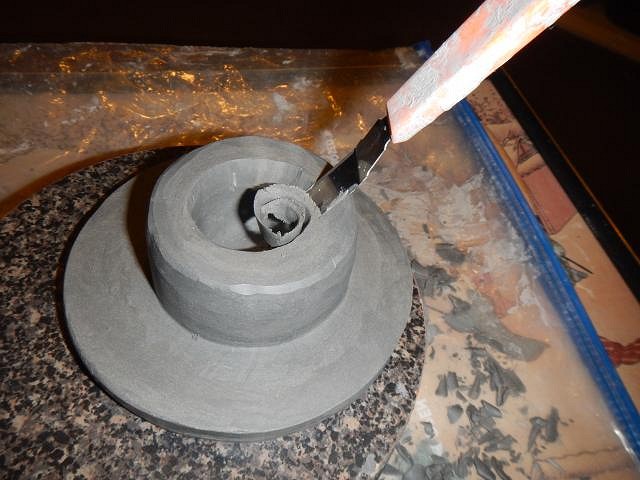
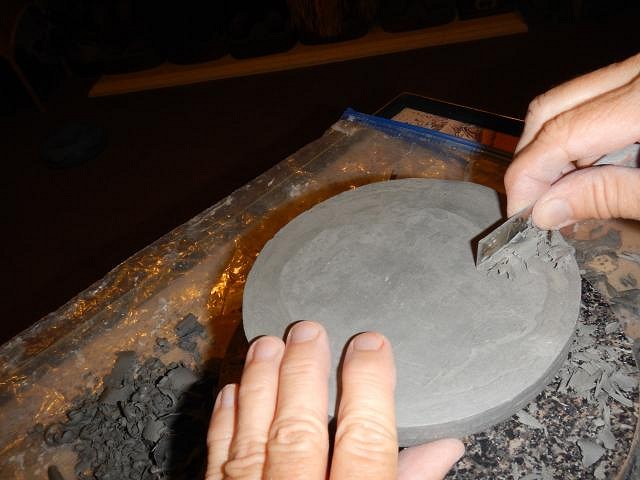
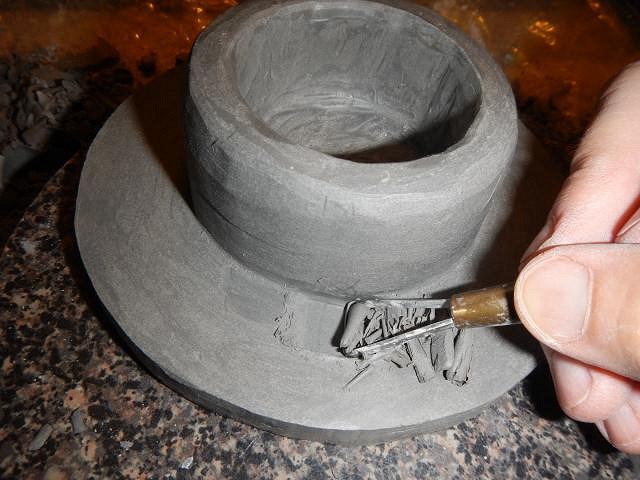
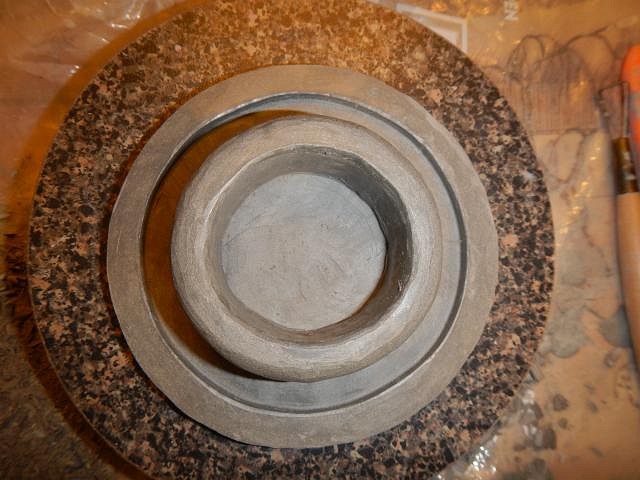
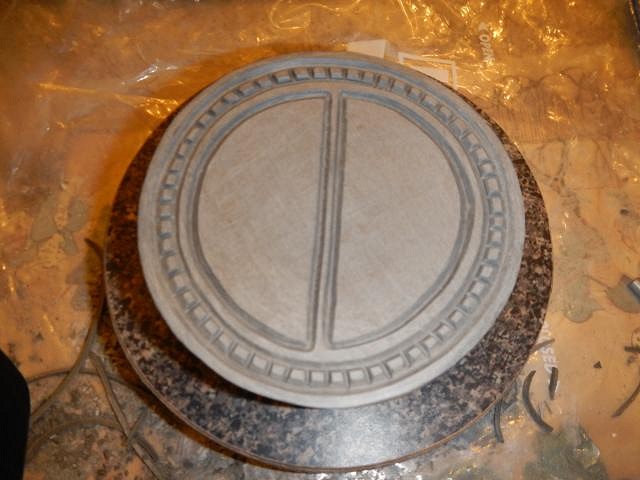
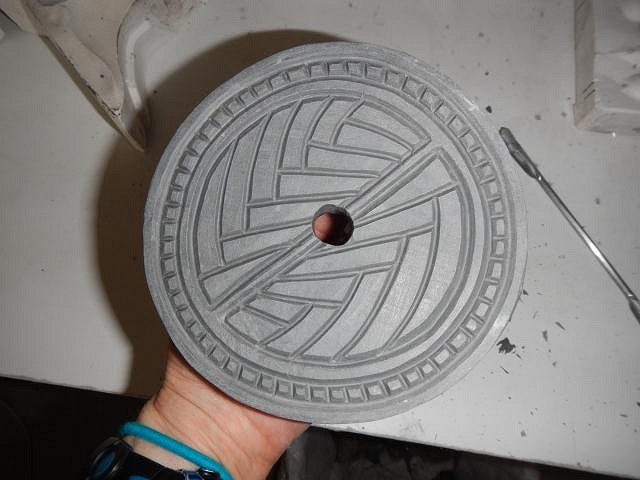
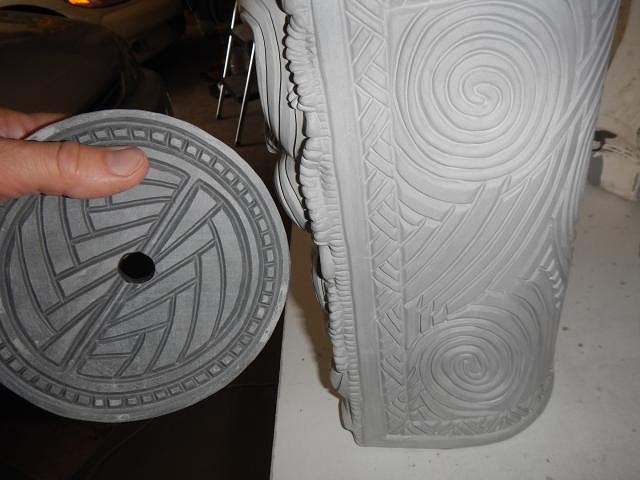
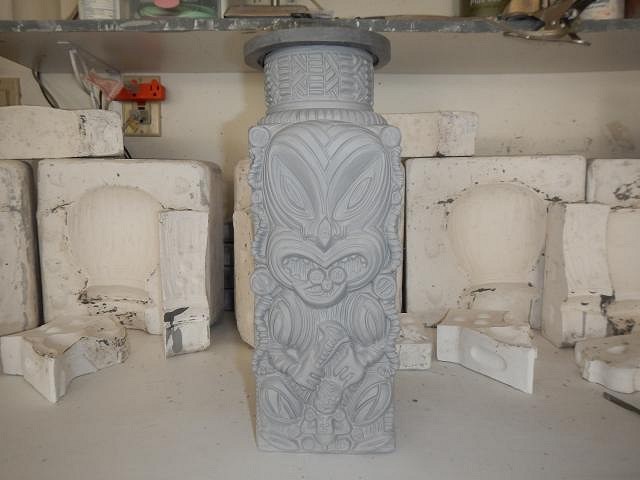
I build my lids from scratch. That way they always fit tightly. I choose something that is the right size to use like a cookie cutter. This time it was a funnel. I get some strips of clay and fuse them together. I press them into place. I let them sit in a plastic bag until firm. Then I use tools to scrape them flat. I keep removing clay to make them fit. I keep scraping and scraping. At the end I carve a trough so that the lid sits over the edge of the top. I started to carve the lid. I added the hole for the lamp fixture. I matched the carving on the lid to the carving on the body. In place. Now it will dry. Thank you Tyber Tiki for asking me to make the first one. I enjoy doing these so much. Cheers, Wendy |


Pages: 1 2 3 4 5 6 7 8 9 10 11 12 13 14 15 16 17 18 19 20 21 22 23 24 25 26 27 28 29 30 31 32 33 34 35 36 37 38 39 40 41 42 43 44 45 46 47 48 49 50 51 52 53 54 55 56 57 58 59 60 61 62 63 64 65 66 67 68 69 70 71 72 73 74 75 76 77 78 79 80 81 82 83 84 85 86 87 88 89 90 91 92 93 94 95 96 97 98 99 100 101 102 103 104 105 106 107 108 109 110 111 112 113 114 115 116 117 118 119 120 121 122 123 124 125 126 127 128 129 130 131 132 133 134 135 136 137 138 139 140 141 142 143 144 145 146 147 148 149 150 151 152 153 154 155 156 157 158 159 160 161 162 163 164 165 166 167 168 169 170 171 172 173 174 175 176 177 178 179 180 181 182 183 184 185 186 187 188 189 190 191 192 193 194 195 196 197 198 199 200 201 202 203 204 205 206 207 208 209 210 211 212 213 214 215 216 217 218 219 220 221 222 223 224 225 226 10816 replies