Pages: 1 2 3 4 5 6 7 8 9 10 11 12 13 14 15 16 17 18 19 20 21 22 23 24 25 26 27 28 29 30 31 32 33 34 35 36 37 38 39 40 41 42 43 44 45 46 47 48 49 50 51 52 53 54 55 56 57 58 59 60 61 62 63 64 65 66 67 68 69 70 71 72 73 74 75 76 77 78 79 80 81 82 83 84 85 86 87 88 89 90 91 92 93 94 95 96 97 98 99 100 101 102 103 104 105 106 107 108 109 110 111 112 113 114 115 116 117 118 119 120 121 122 123 124 125 126 127 128 129 130 131 132 133 134 135 136 137 138 139 140 141 142 143 144 145 146 147 148 149 150 151 152 153 154 155 156 157 158 159 160 161 162 163 164 165 166 167 168 169 170 171 172 173 174 175 176 177 178 179 180 181 182 183 184 185 186 187 188 189 190 191 192 193 194 195 196 197 198 199 200 201 202 203 204 205 206 207 208 209 210 211 212 213 214 215 216 217 218 219 220 221 222 223 224 225 226 10,816 replies
|
D

danlovestikis
Posted
posted
on
Fri, May 27, 2016 5:19 PM
bobtiki thank you. I started ceramics in 2010 in August. I guess I didn't work hard enough to make it to 100 pages a year. I'll have to try harder. Thank you for reading my pages. I hope there are many times that you laugh. I've gotten many good friends from these pages you can join the crowd. hang10tiki I wonder how many of these pages are yours! Thank you for helping me keep it fun. Danno That's so good to hear. I hope that we all have fun here. I sure do. ================================== Dinner's ready, I'll be back later after my champagne! Cheers, Wendy |
|
B

bobtiki
Posted
posted
on
Fri, May 27, 2016 8:34 PM
Thank you! I certainly have laughed a lot so far. It's a real page-turner! I'm making notes and picking up little tips and tricks as I go.
Well deserved! |
|
D
danlovestikis
Posted
posted
on
Fri, May 27, 2016 8:36 PM
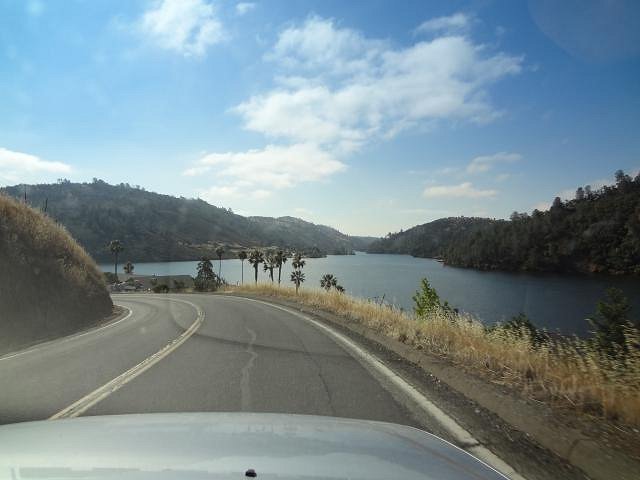
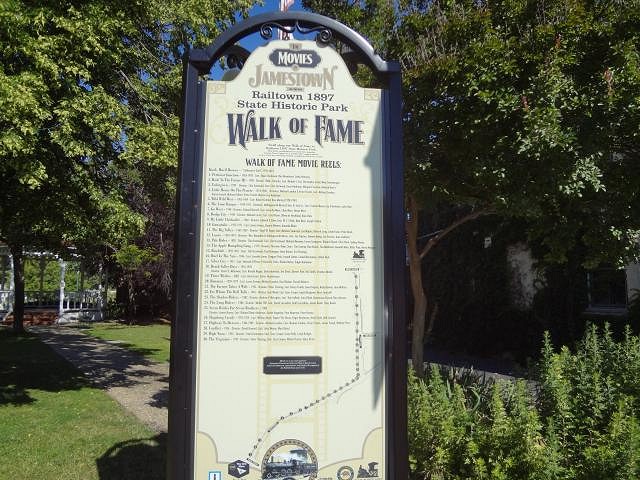
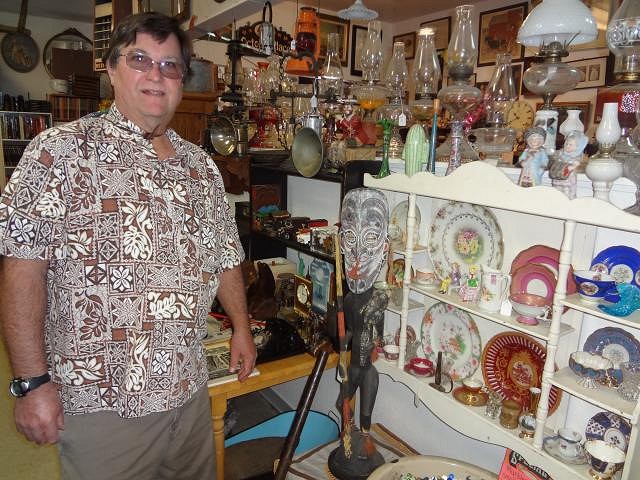
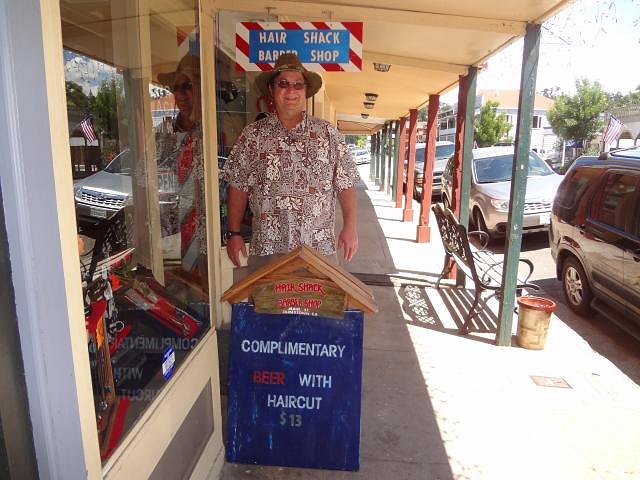
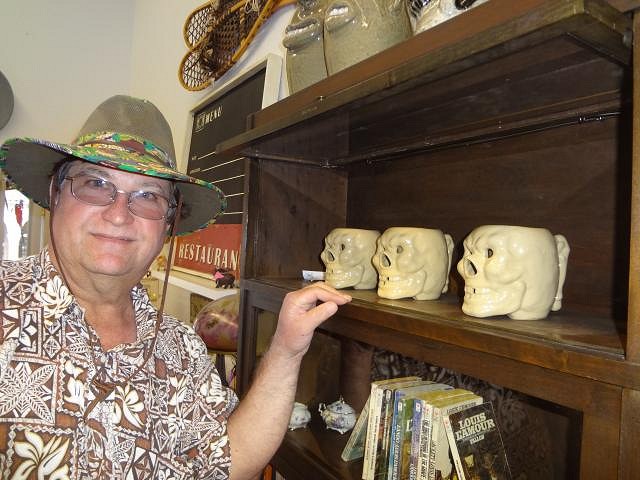
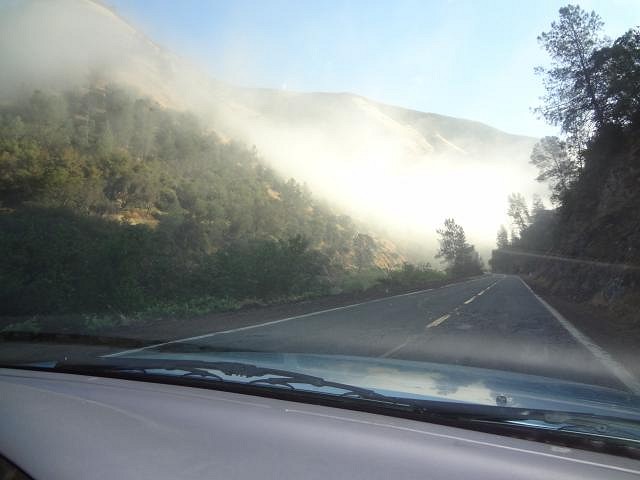
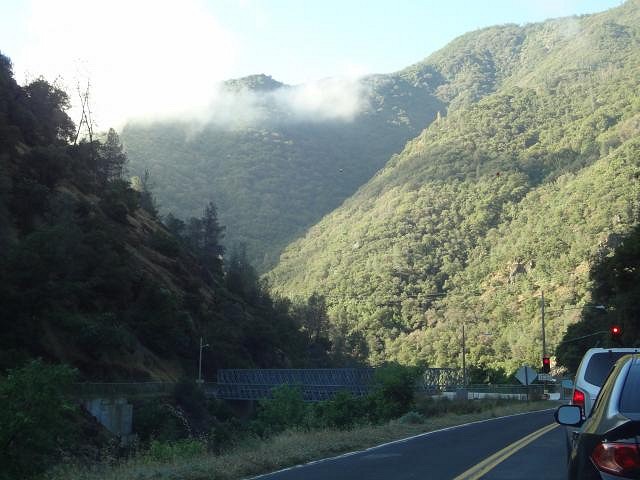
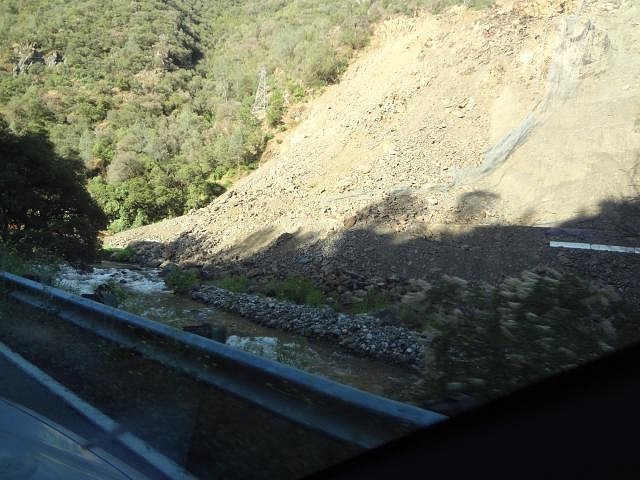
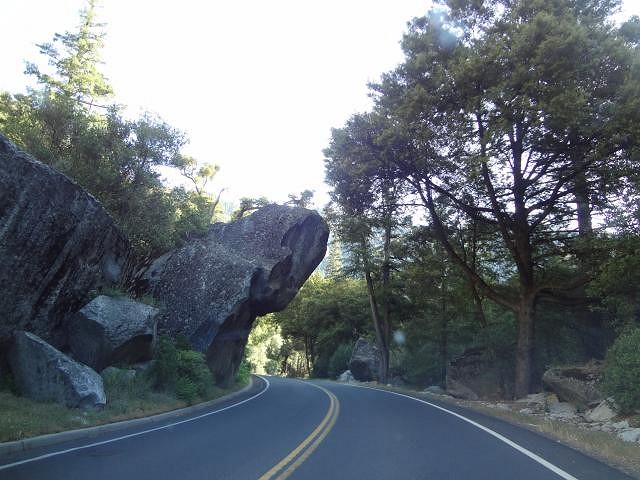
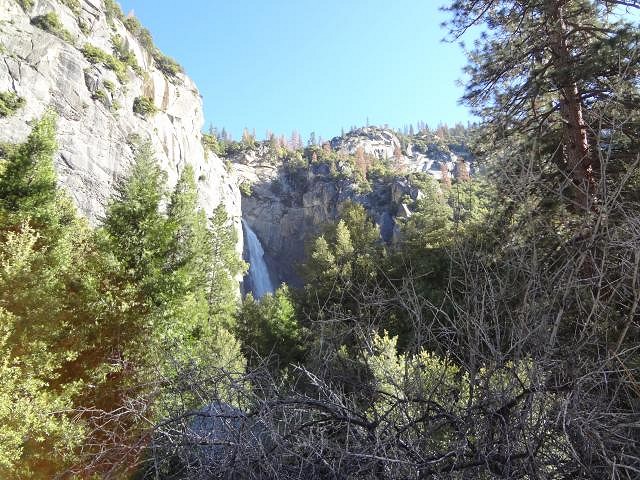
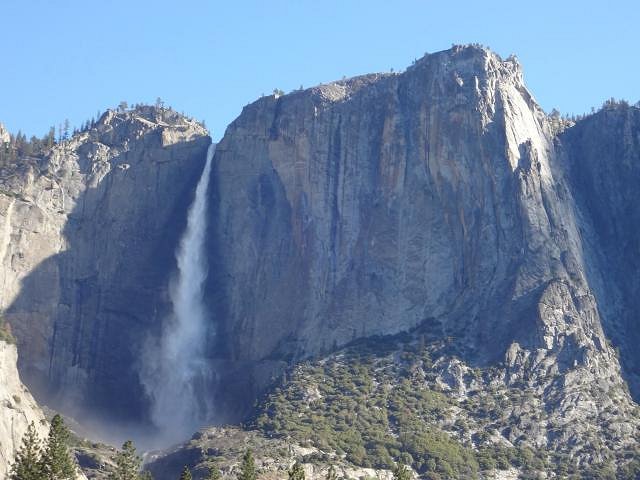
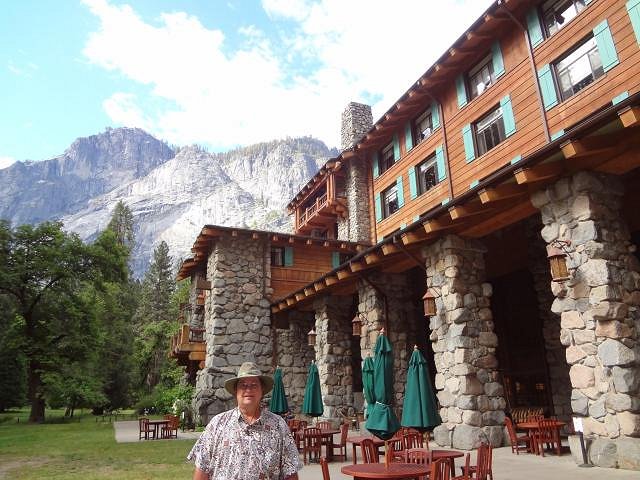
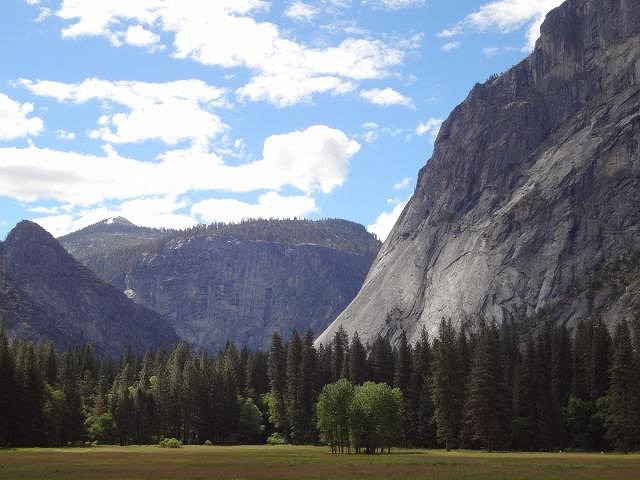
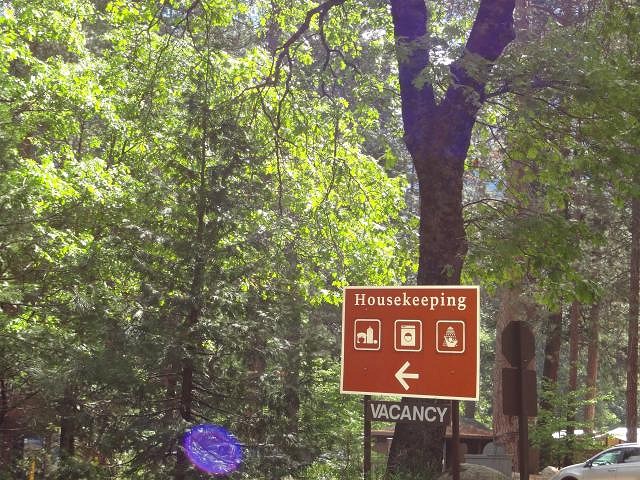
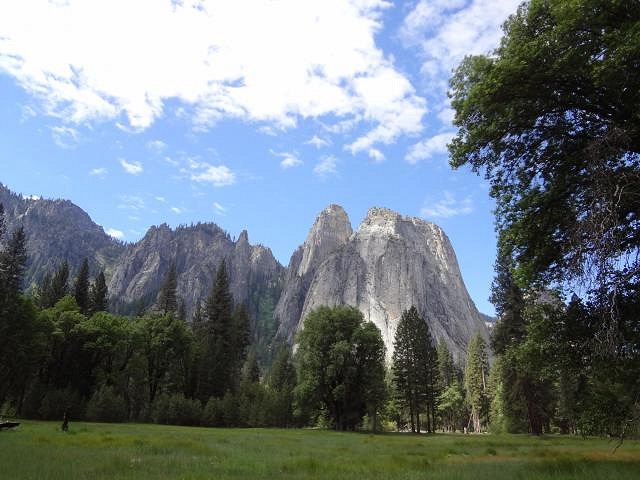
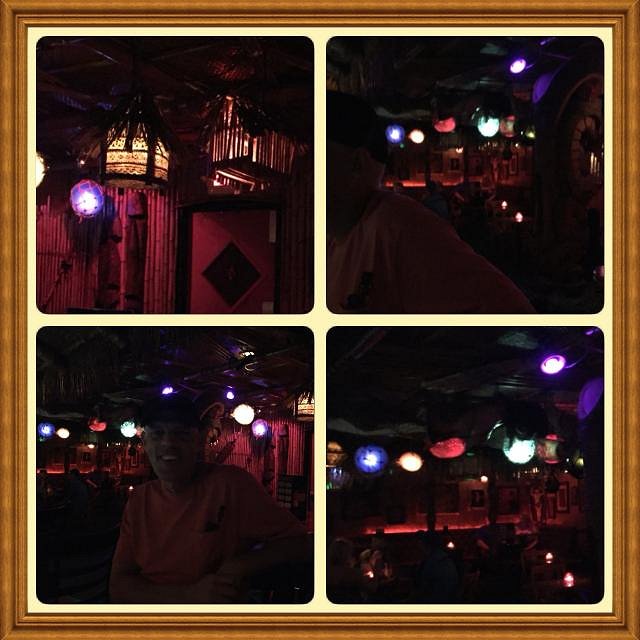
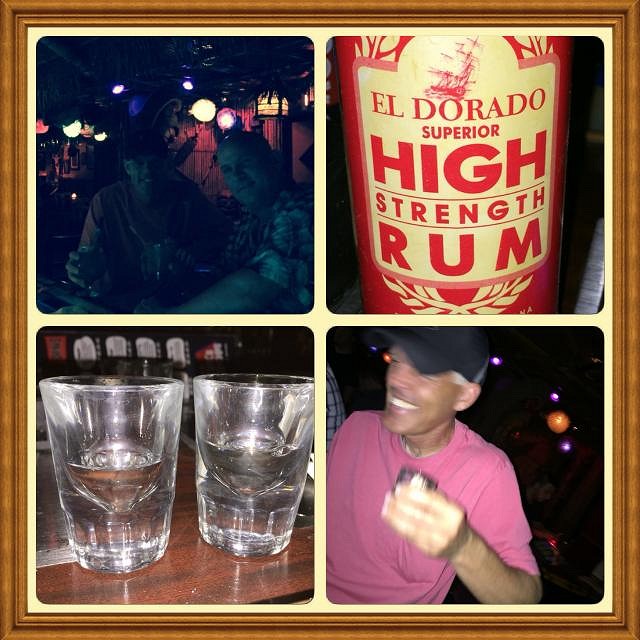
Dan and I are celebrating our 38th wedding anniversary today. My gift was a trip to the gold country and Yosemite. When you head to the gold country you see how much of California is still empty. We drove past reservoir's and saw where people who work in a huge prison live. Yep they are in a gated community. Then we reached Jamestown. First antique store had this treasure for us. It's a PNG hunter with a spear and a dead alligator or crocodile over his shoulder. A wonderful find. I wanted a photo of this fun sign. We had lunch and then went on to Sonora. Dan passed on the Trader Vic's skulls since he had a couple but they were fun to find. Now to Yosemite National Park. To beat traffic we drove into the park very early. We still ended up sitting at a detour for 10 minutes. We were sent across a temporary bridge. Then we saw the huge landslide covering the road we had been on. I remembered hearing about this on the news. Wow! I think Yosemite should have been named Yostone for all the giant rocks that were everywhere. Once we were into the park we came across beautiful waterfalls every other mile.
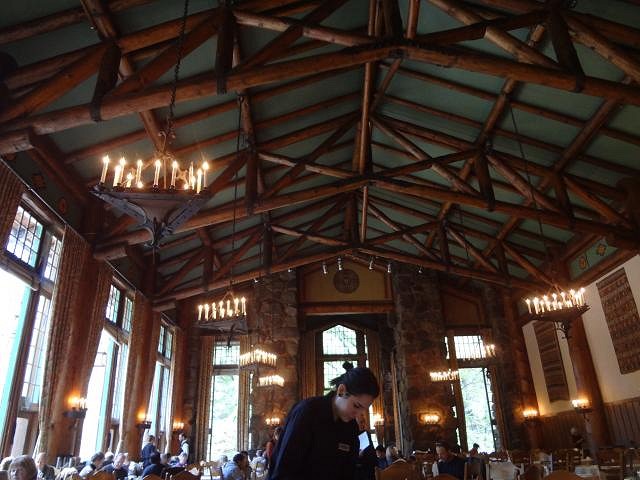
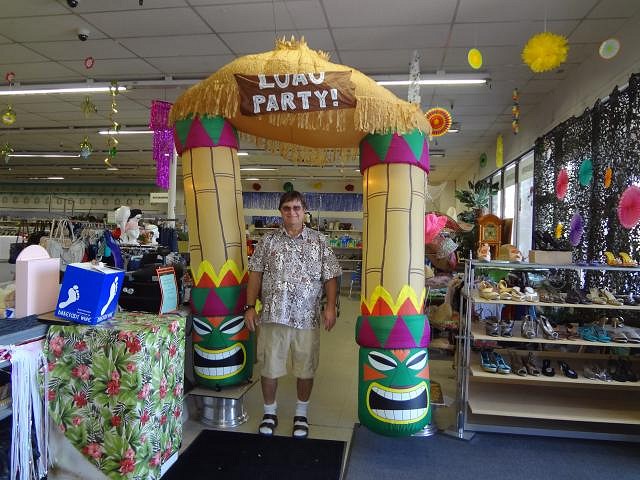
We went to the Ahwahnee Hotel now named the Majestic for a breakfast buffet. We just wanted to sit in this room for an hour. This was a relaxing stop after a long drive. We walked around out back. We drove on every road that we could find. Interesting? Then it was time to head home. Which is only 3.5 hours away. I can't believe we have never been here before. One last look back at the Yosemite Valley. You can see one of the waterfalls at the very top. On the way home we stopped at a thrift store in Oakdale. We were greeted with this funky tiki arch. A fun end to our anniversary adventure. |
|
H

Heath
Posted
posted
on
Fri, May 27, 2016 8:57 PM
Congratulations! |
|
L

lunavideogames
Posted
posted
on
Sat, May 28, 2016 11:31 AM
Congrats on your anniversary! Looks like a fun trip! |
|
H

hang10tiki
Posted
posted
on
Sat, May 28, 2016 3:14 PM
Great anniversary fun |
|
B
bobtiki
Posted
posted
on
Sat, May 28, 2016 4:17 PM
Thanks looks like a ton of fun. Happy anniversary to you both! |
|
D
danlovestikis
Posted
posted
on
Sat, May 28, 2016 7:33 PM
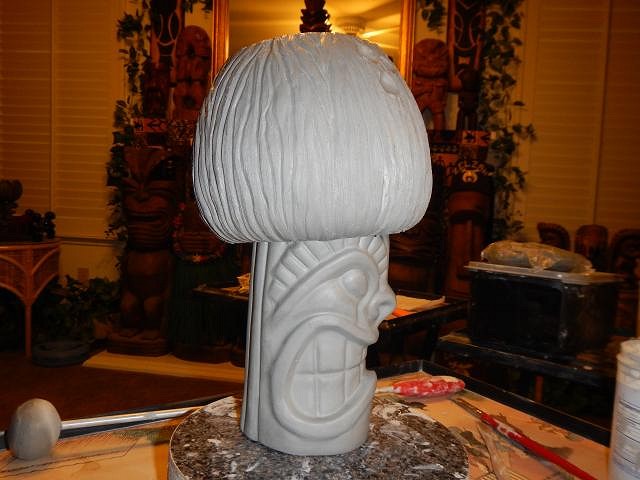
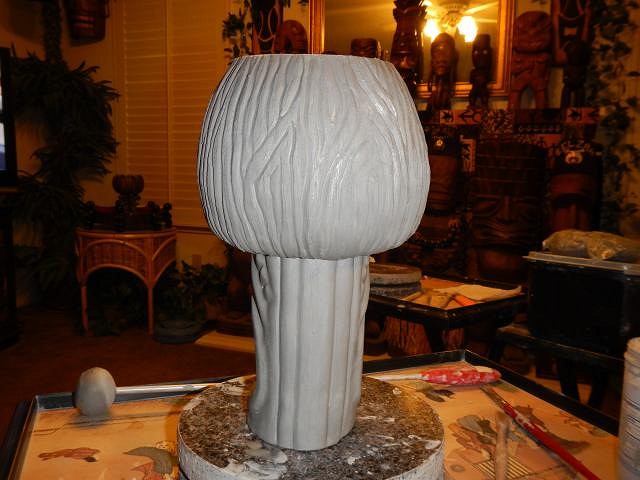
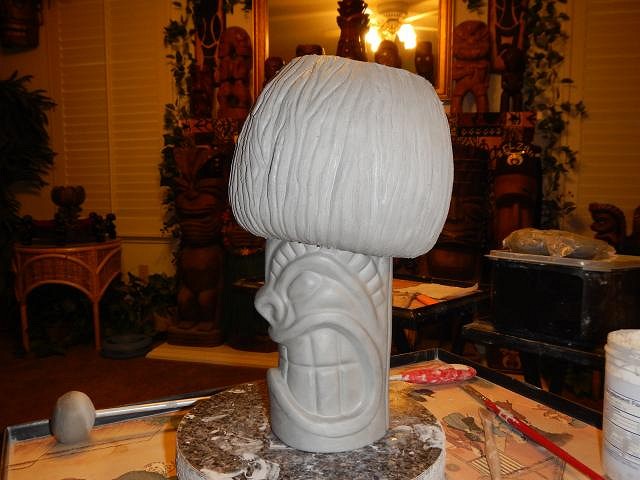
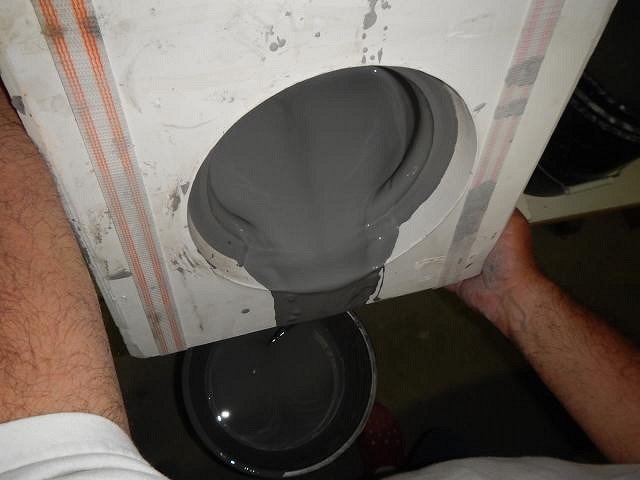
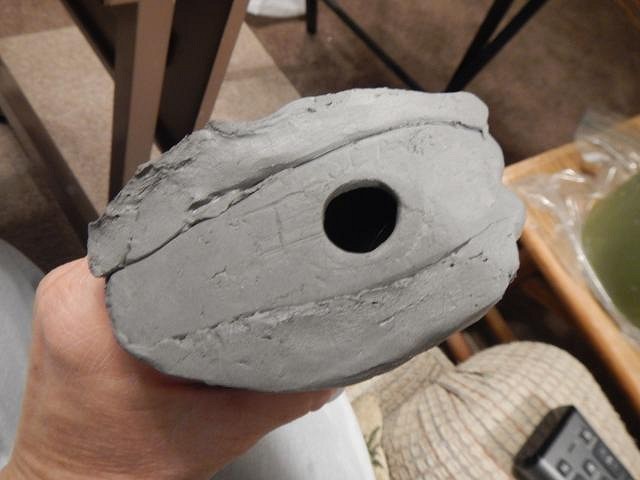
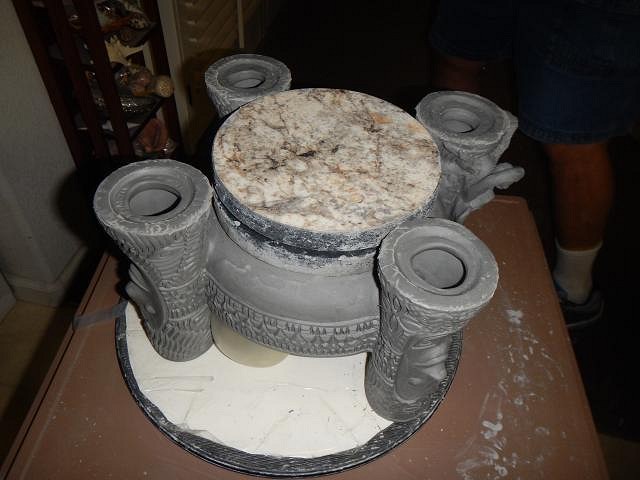
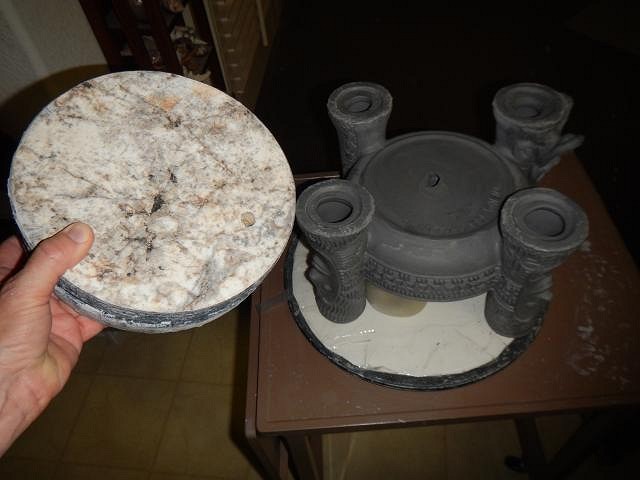
bobtiki we posted 2 mins. apart! Thank you all for the congrats. We do feel very lucky to have this long successful marriage. The experts say we'll live longer because of it. ========================= I've been making so many things that it was already time to go back to Alpha Fired Arts for more slip. I also ordered glaze for the pineapple. Dan and I went to a Chili festival near our home. I like to go for walks and its fun to have something to look at. I got a free oil funnel. Of course I'll use it with clay. ======================= Play time is over and now it's back to work. With the nose healed it was time to assemble the Frankoma coconut goblet. Then I stuck it on the head which had a hole in it to prevent air from being trapped. All done and ready to slowly dry.
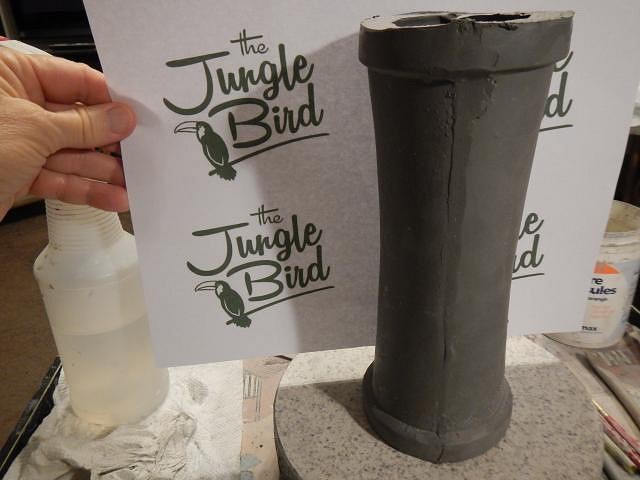
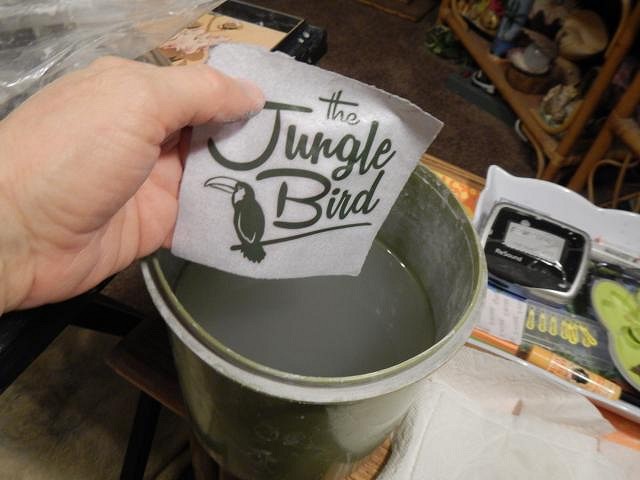
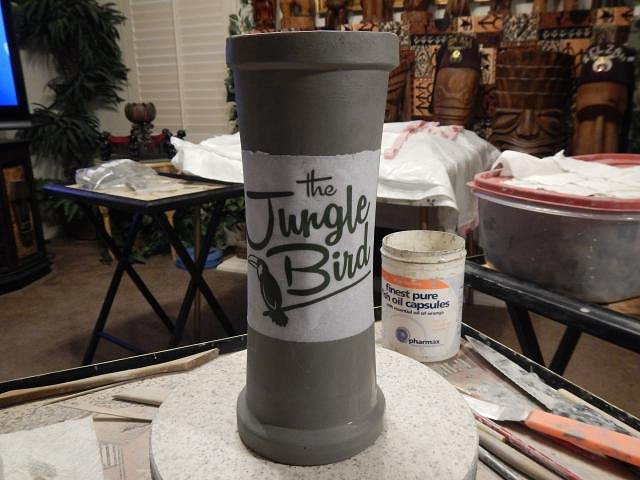
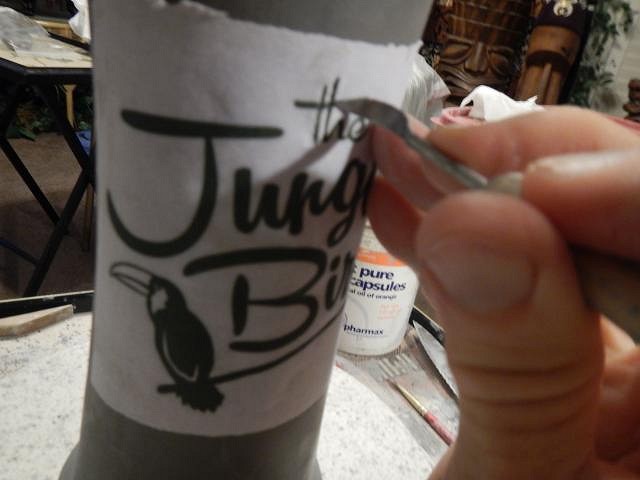
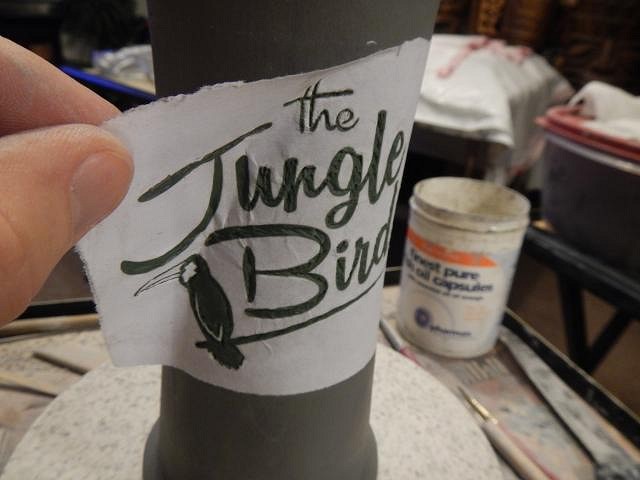
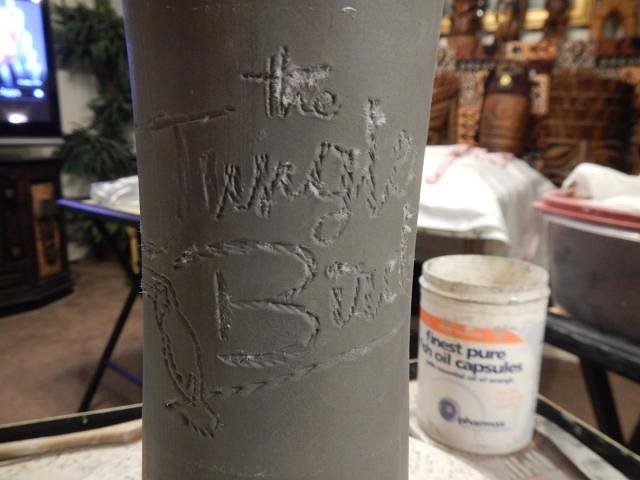
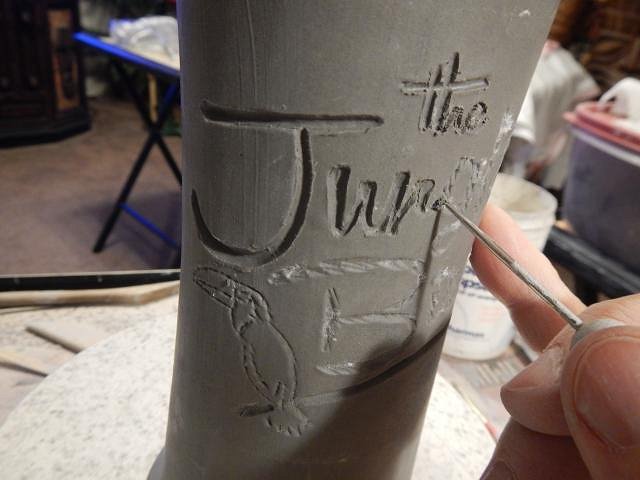
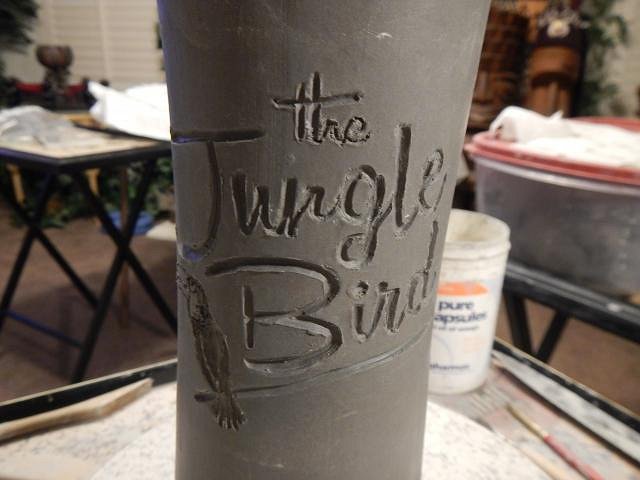
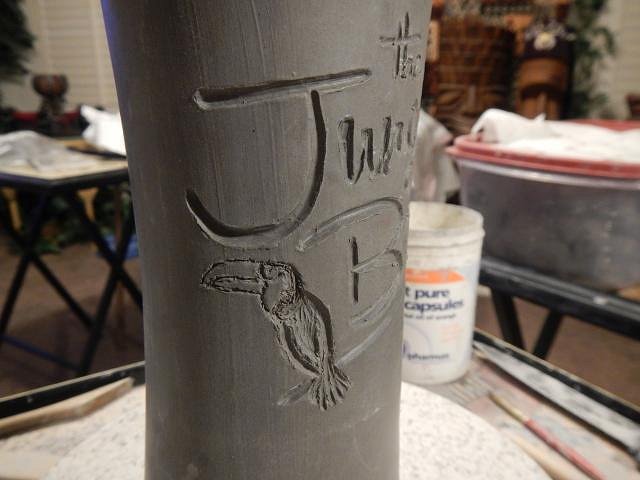
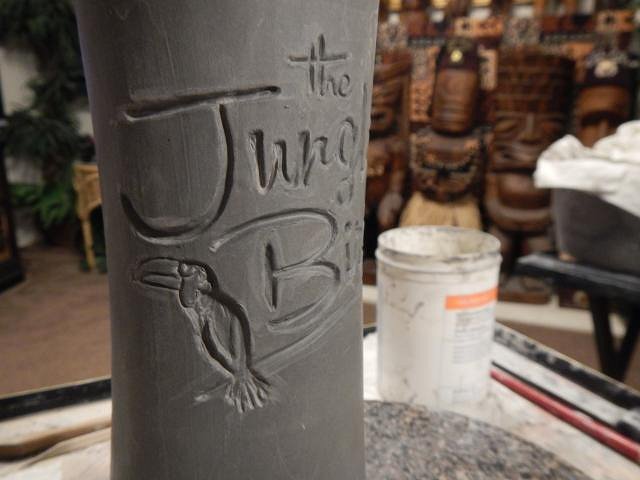
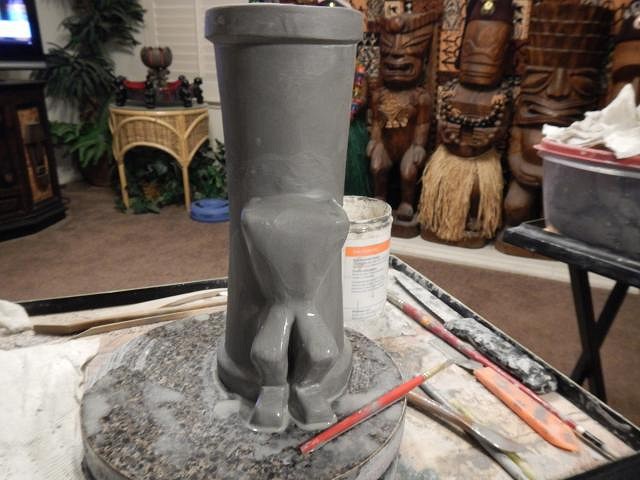
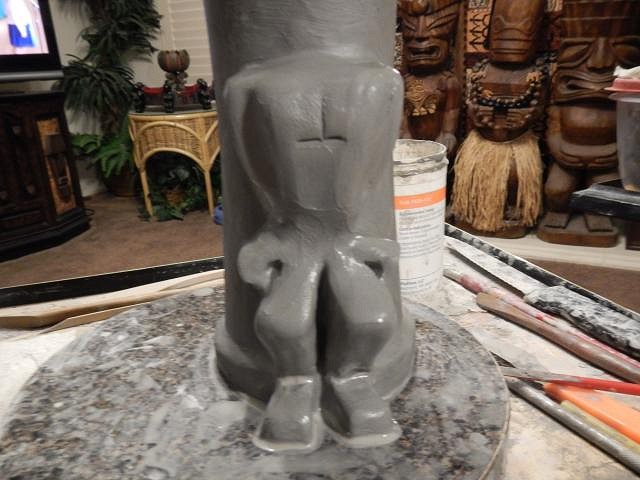
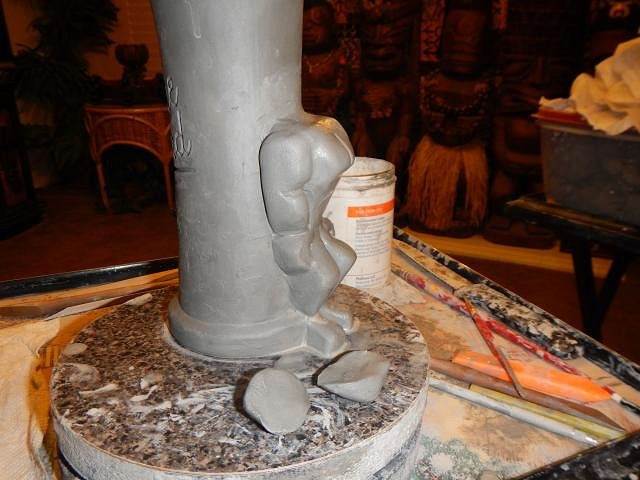
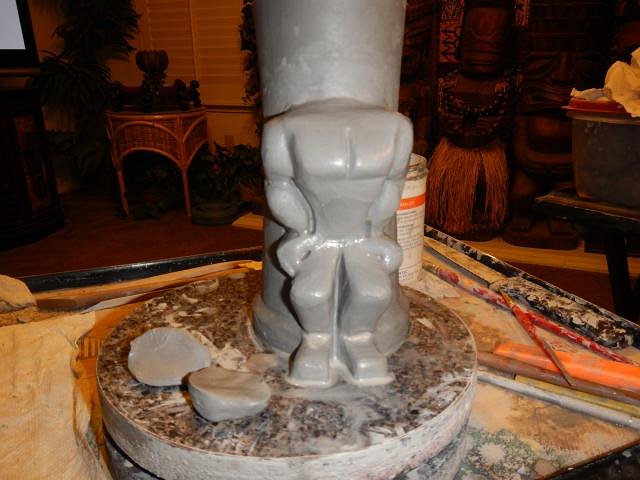
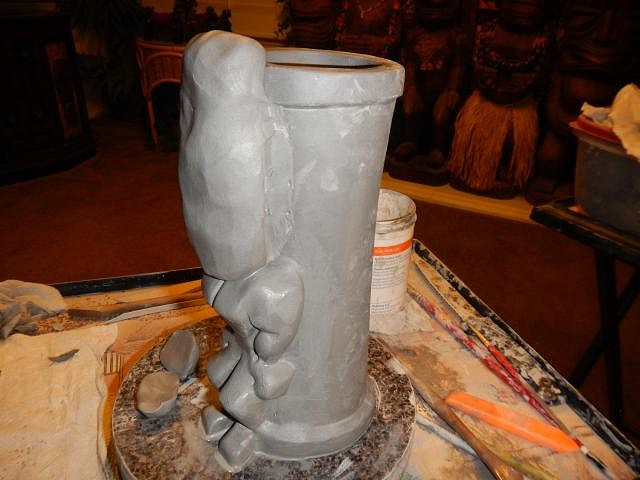
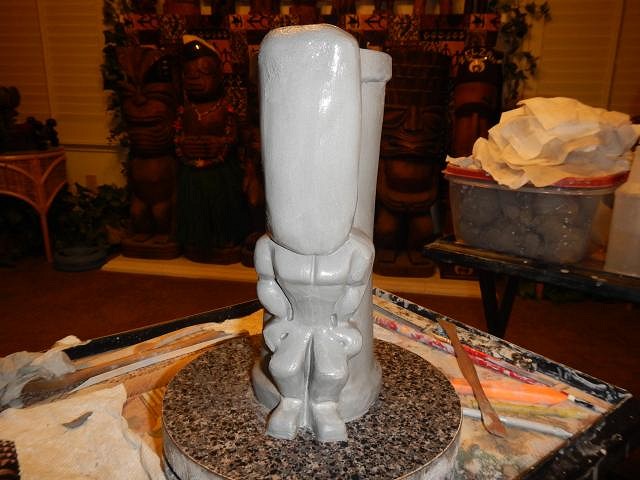
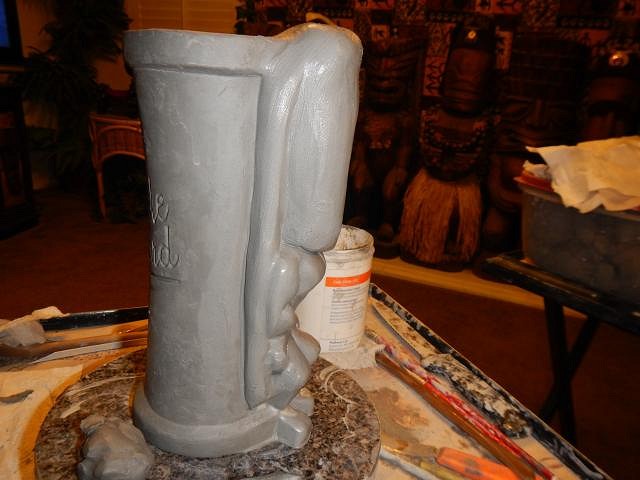
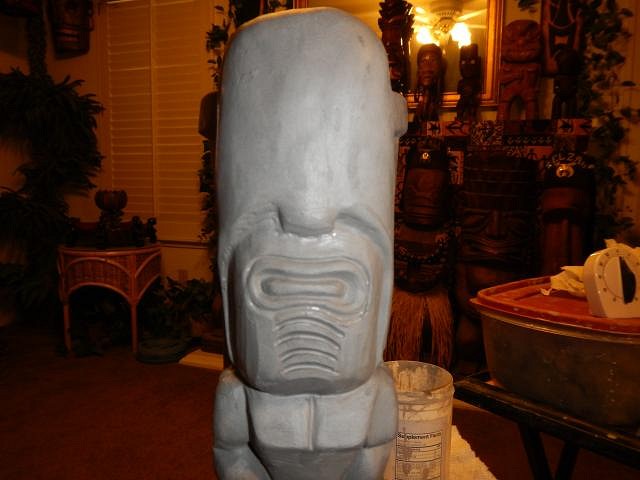
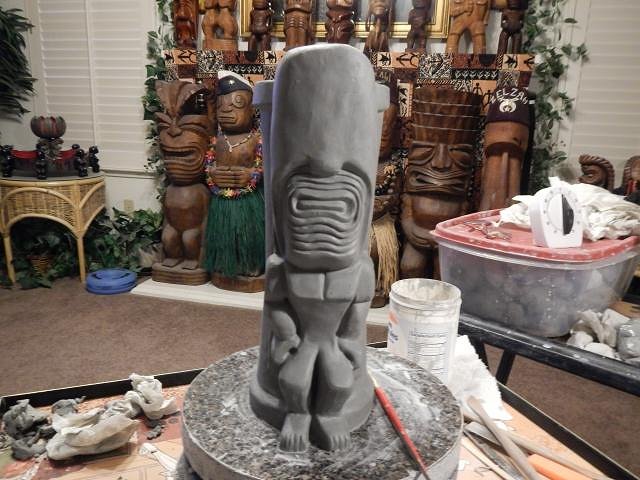
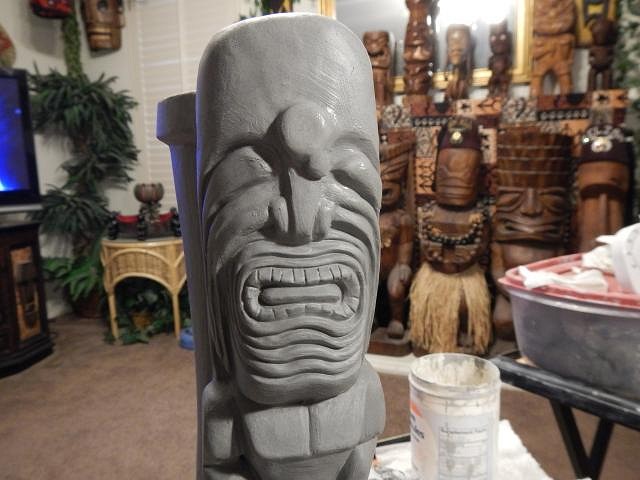
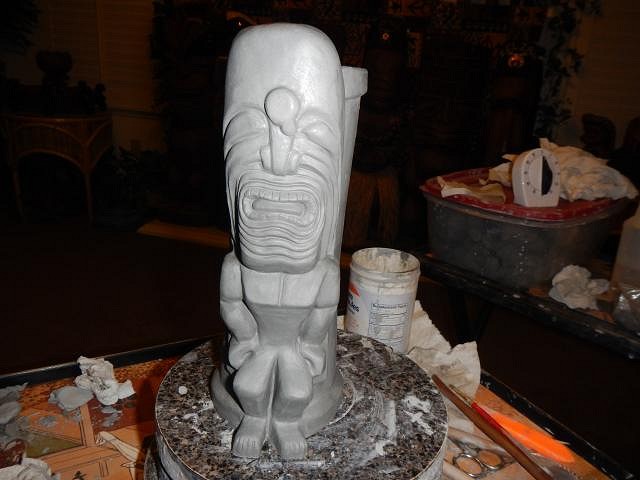
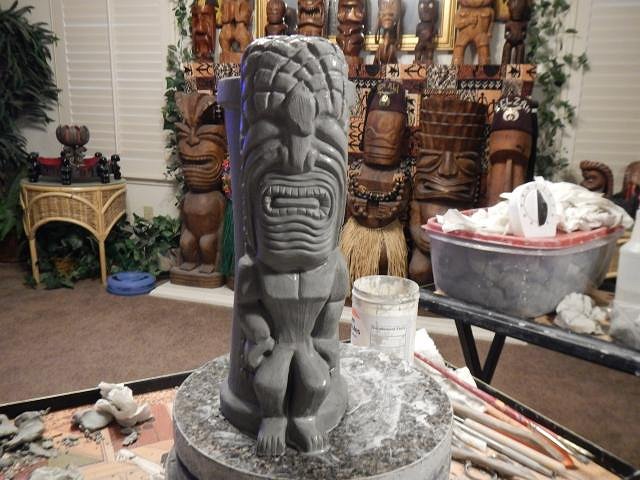
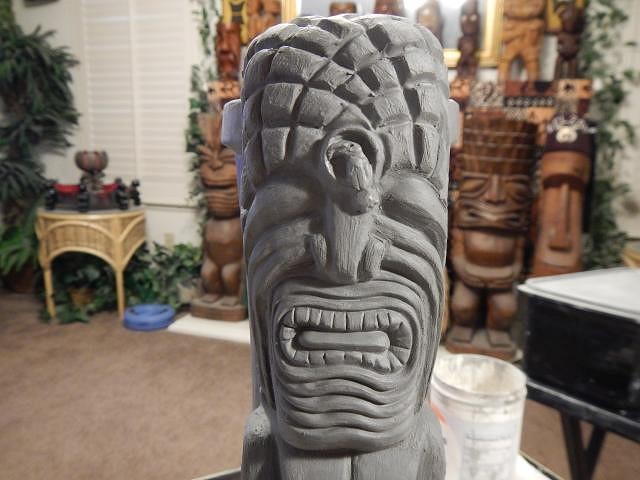
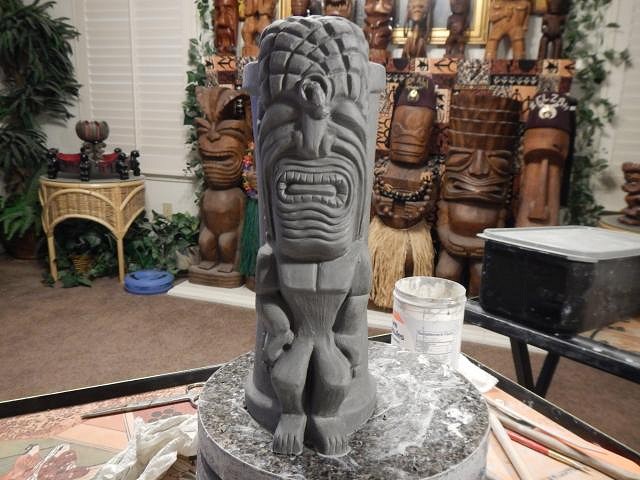
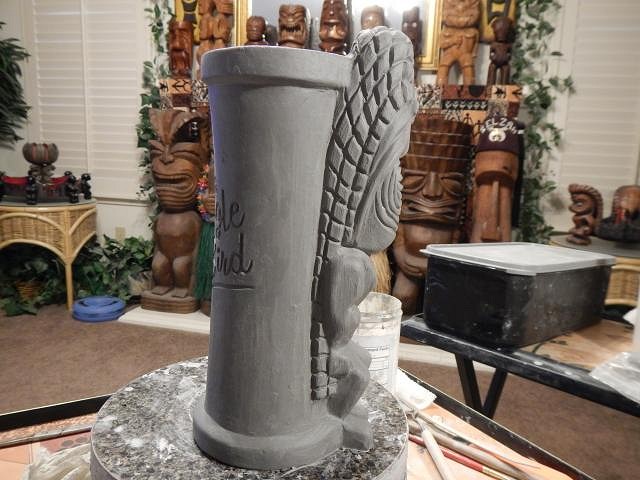
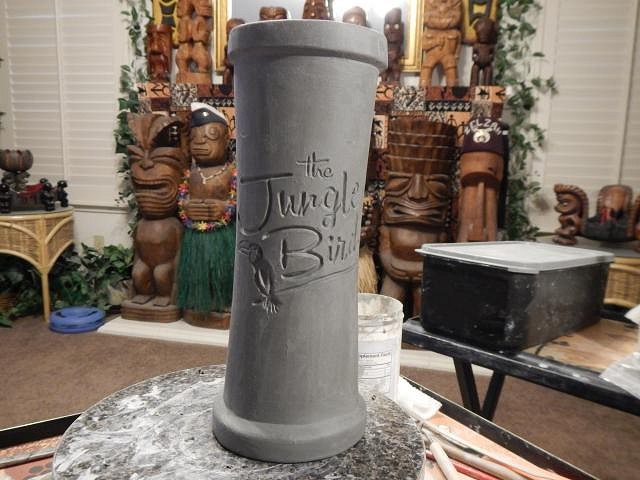
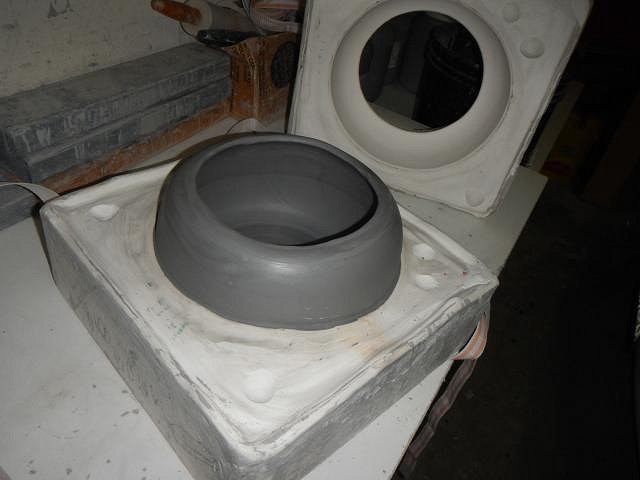
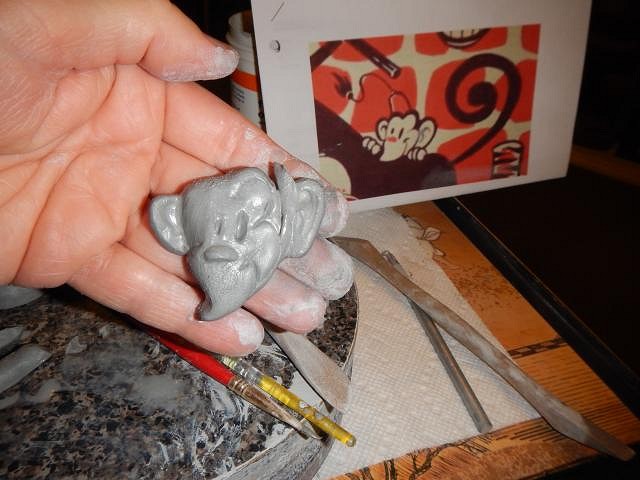
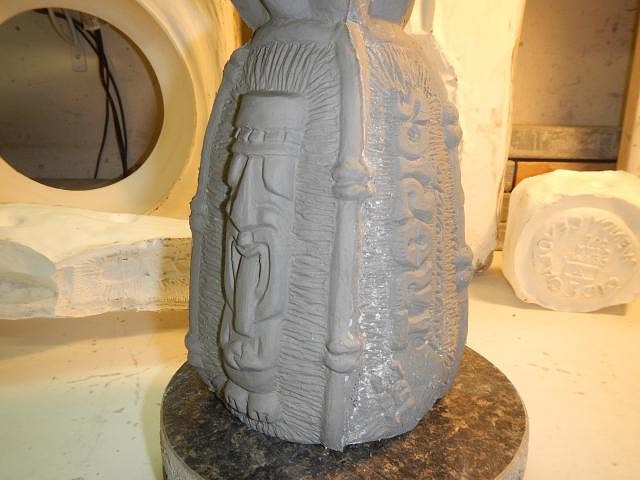
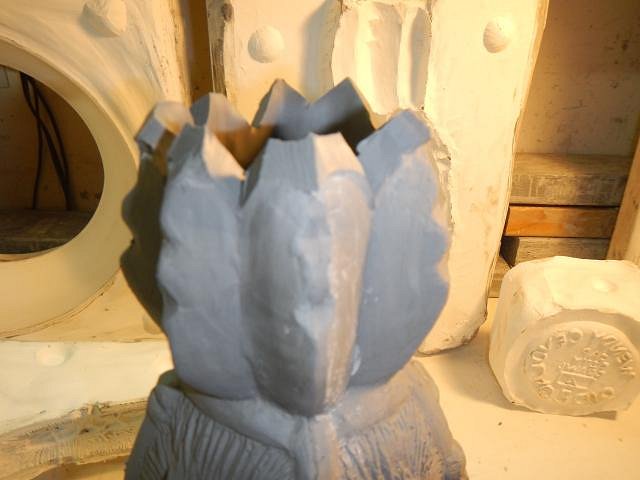
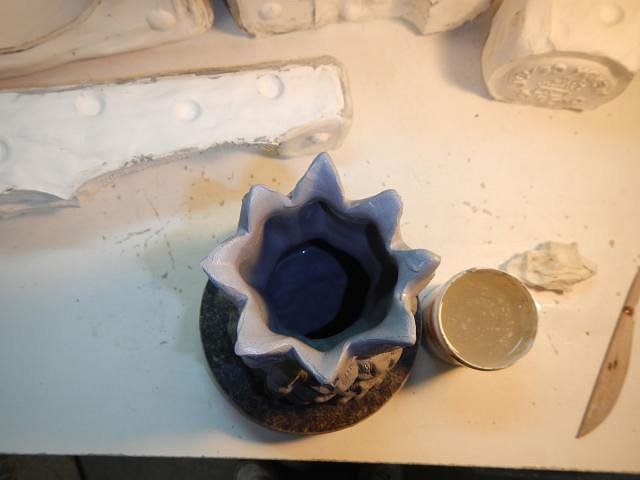
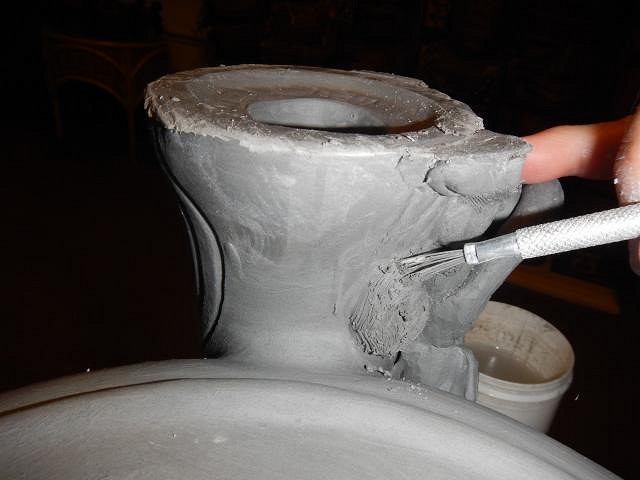
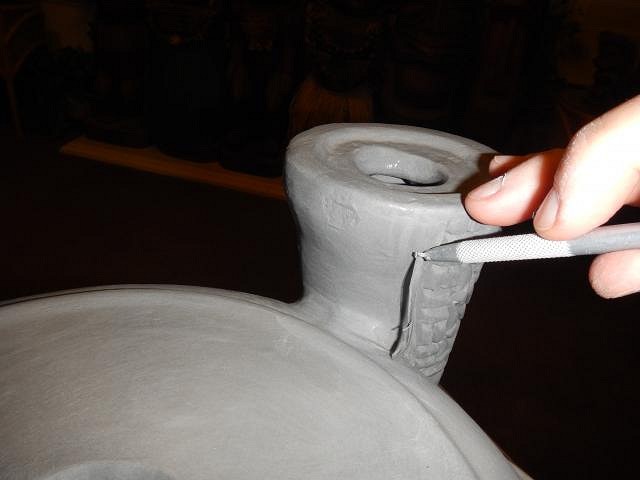
======================== We are soooooooooo lucky. There is a tiki bar/restaurant being built in Sacramento. One of the owners Buddy wished for a special mug to drink from at the opening. I couldn't say no and jumped it ahead with two other wishes I have in the works. I'm sneaking them in with the crawl mugs. Here's Buddy's mug which is based on the signature tiki of the bar which will be called The Jungle Bird. I can share the logo but not a photo of the tiki which I used to make the mug. I printed the logo in the right size and then cut it out and dipped it into water. I stuck it on the mug. I used a tool to press into the clay. When I finished I peeled it off. This is what it looked like. Then I used a stick with an end that I sanded straight across. I stopped here and I'll fine tune it when the clay is drier. Next I worked on the bird. Done for now. Now I show the step by steps as I built the body.
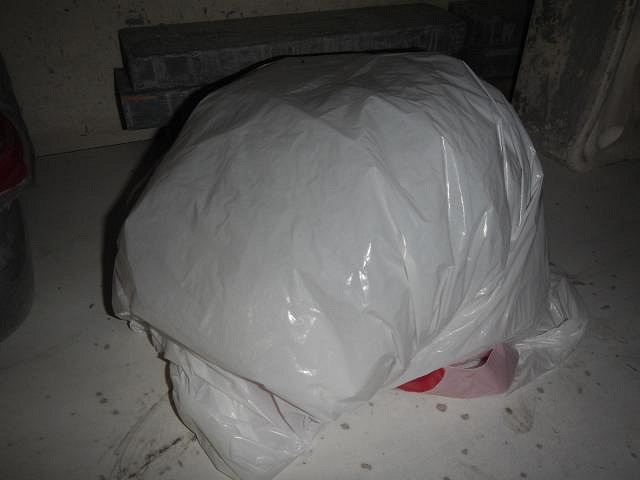
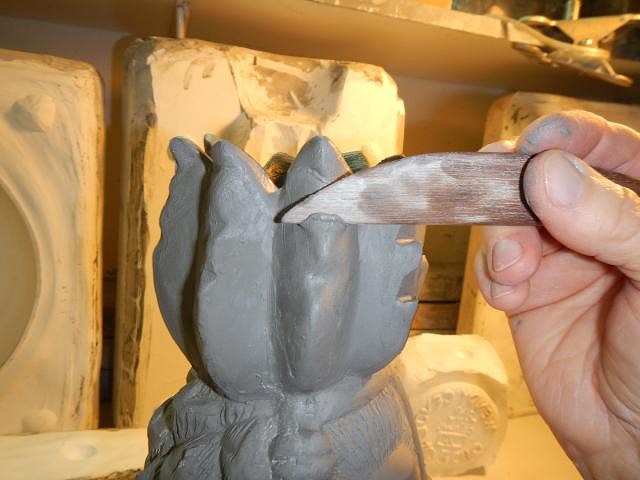
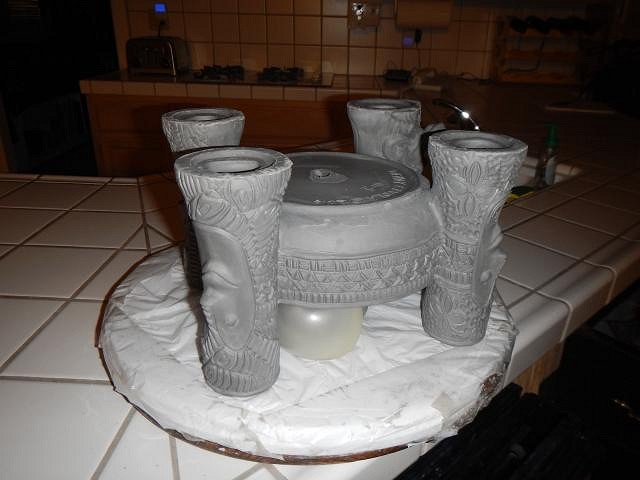
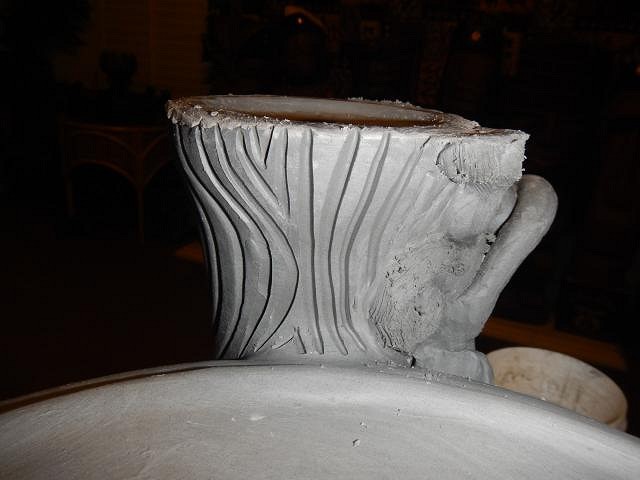
Now that the body is build I need to cover it with a loose plastic bag to let the clay firm up so that I can carve in the detail. A day later I can now do all the rest of the carving.
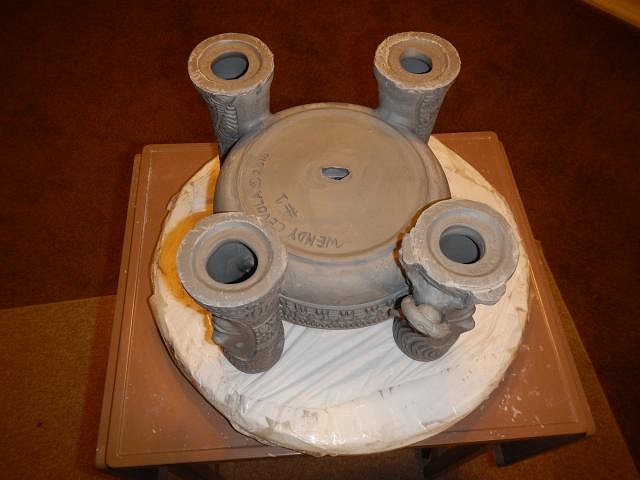
All done and posing. This will be fun to glaze.
It will take a couple of weeks for it to slowly dry. I put it into a loose plastic bag then I take it out for a couple of hours and then back in again. If I didn't dry it this slowly it will crack. Cheers, Wendy |
|
V

VampiressRN
Posted
posted
on
Sat, May 28, 2016 10:21 PM
Happy Anniversary and congratulations on 500 pages. |
|
D
danlovestikis
Posted
posted
on
Sun, May 29, 2016 7:07 AM
VampiressRN thank you. ================================= |
|
T

TikiAno
Posted
posted
on
Sun, May 29, 2016 1:14 PM
Wow wow wow. Congratulations on continued page-posting, Wendy & Dan fandom, and keeping all of us interested for 500 pages (and going). Of course, Jon is responsible for at least half of these pages, but still, pretty impressive. :wink: (just kidding). Blown away by the Jungle Bird mug. Not only is a groovy name for a bar, the mug is spectacular. Look forward to seeing it progress. And a TC congratulations on your anniversary! Looks like you both had a great adventure and I look to you guys as inspiration- even if my wife doesn't make me tiki mugs... ha! |
|
D
danlovestikis
Posted
posted
on
Sun, May 29, 2016 2:57 PM
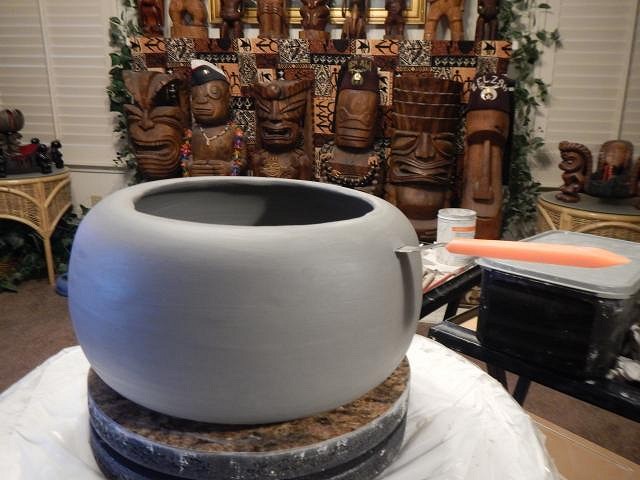
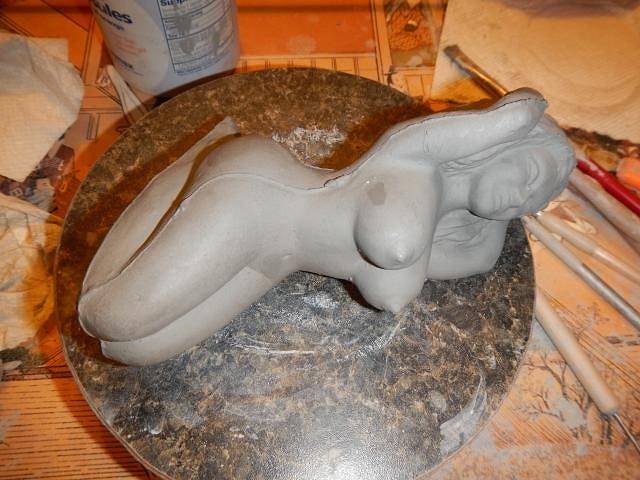
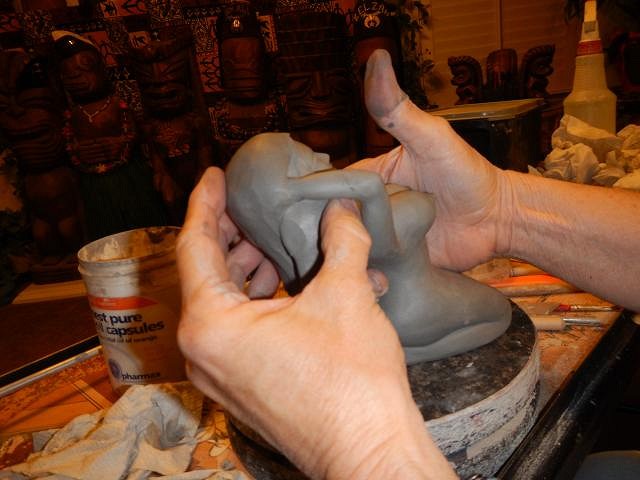
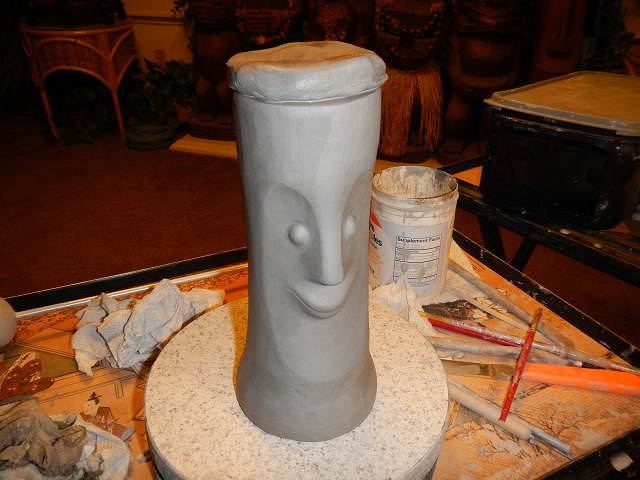
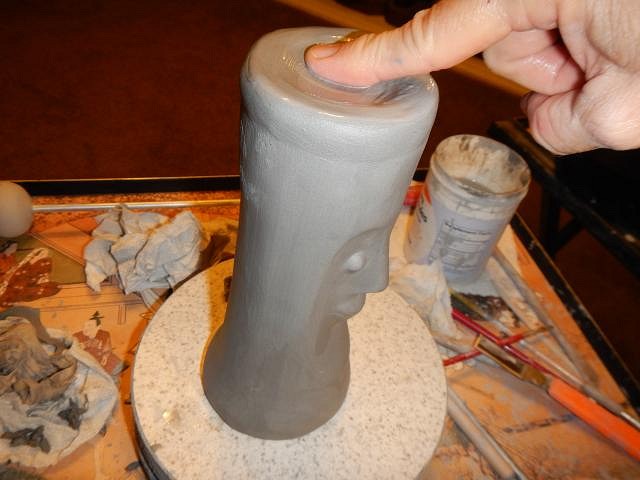
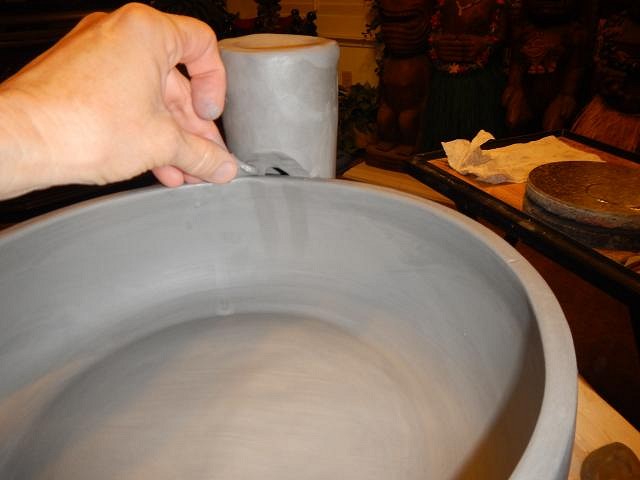
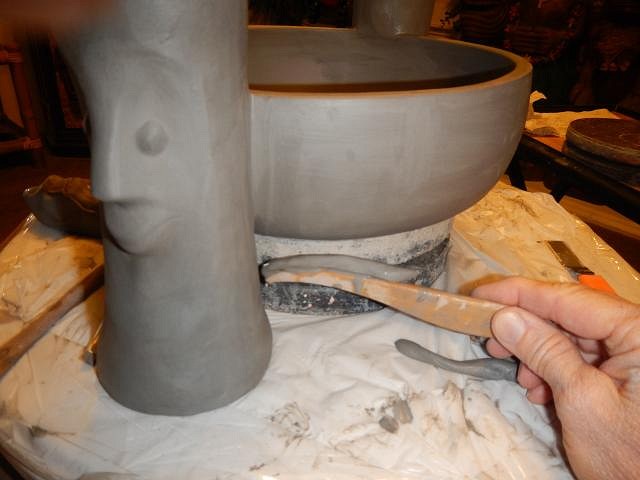
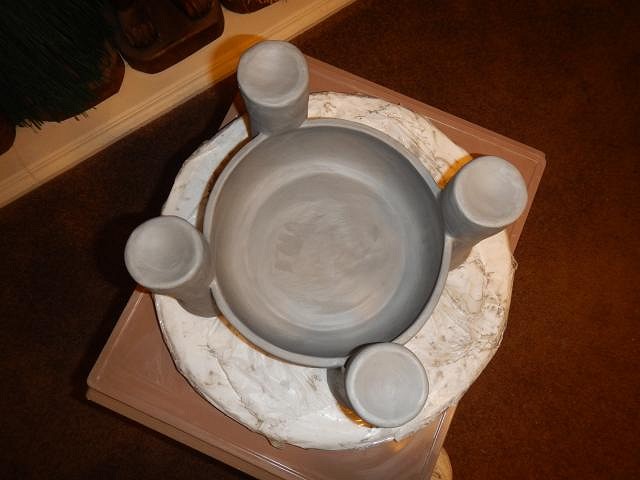
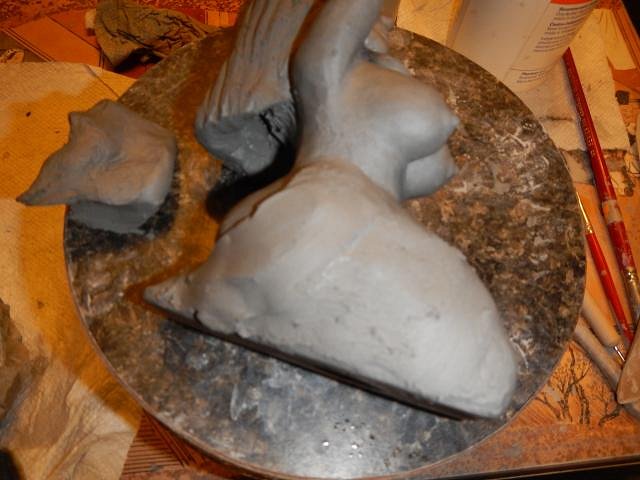
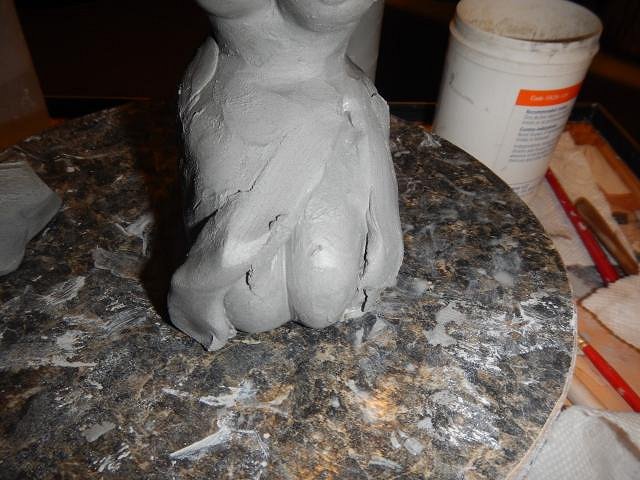
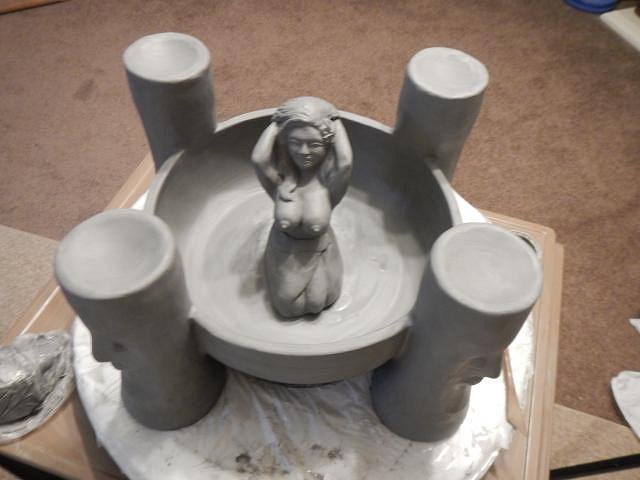
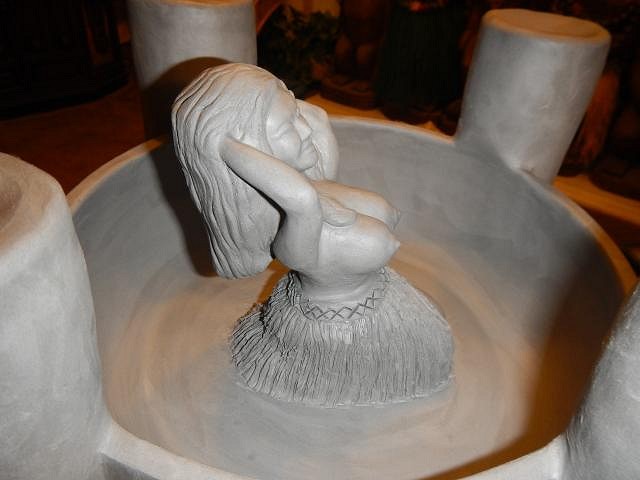
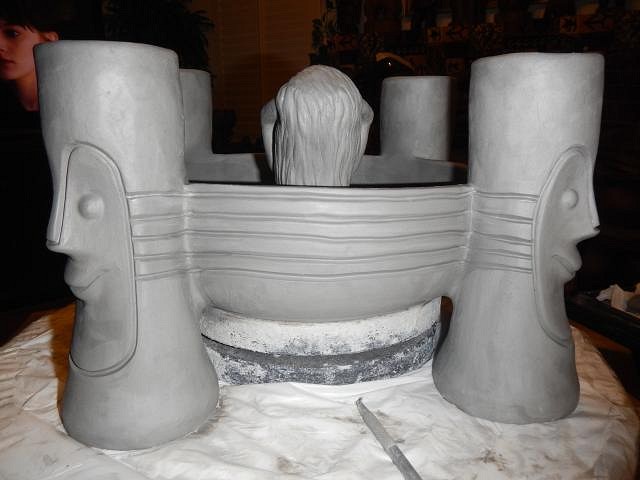
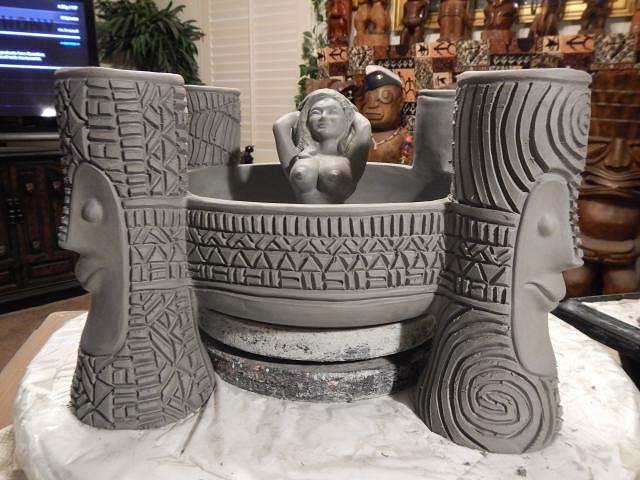
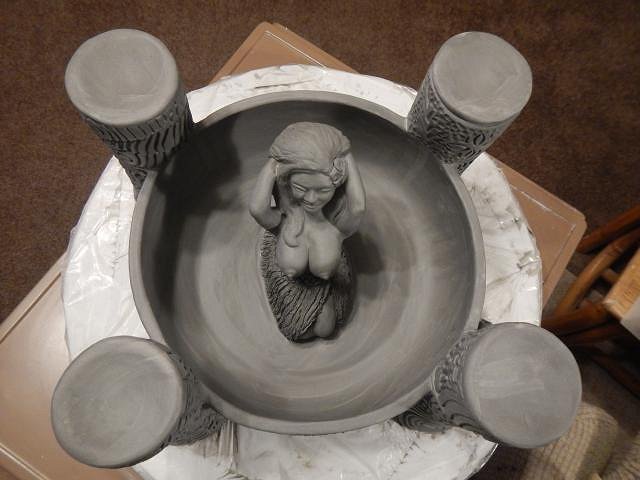
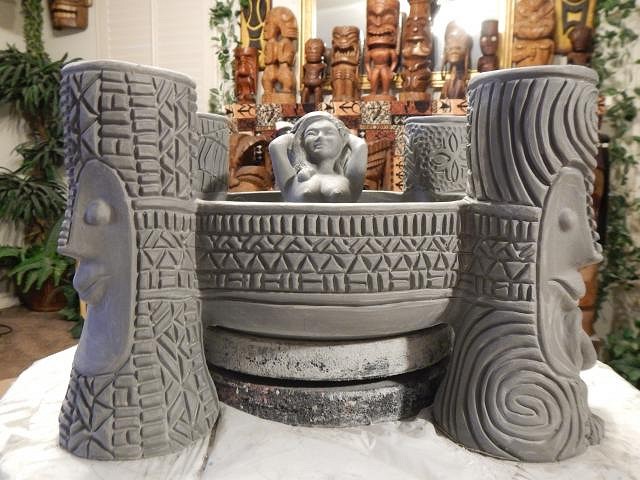
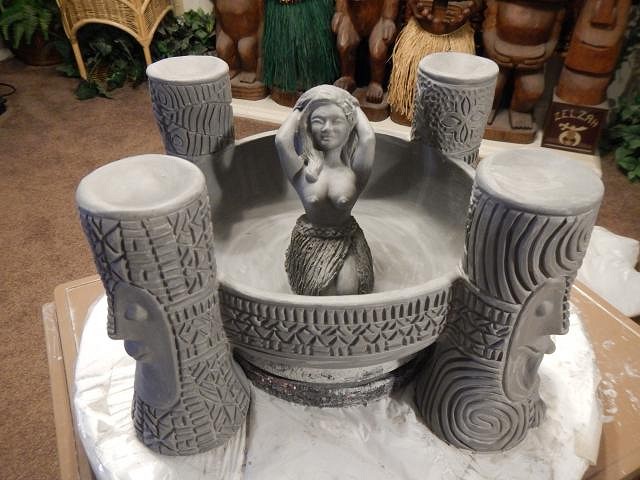
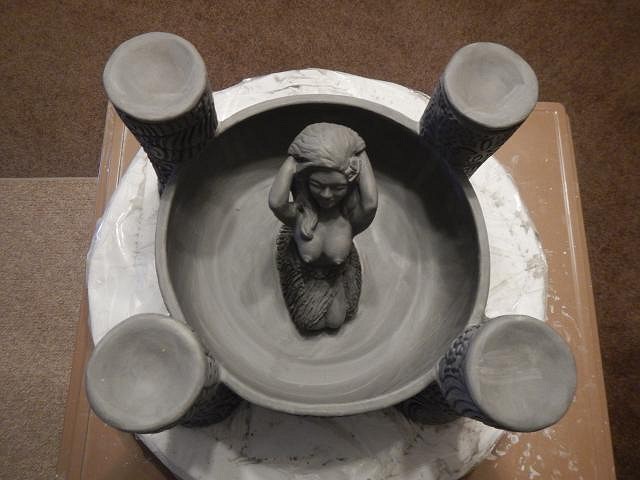
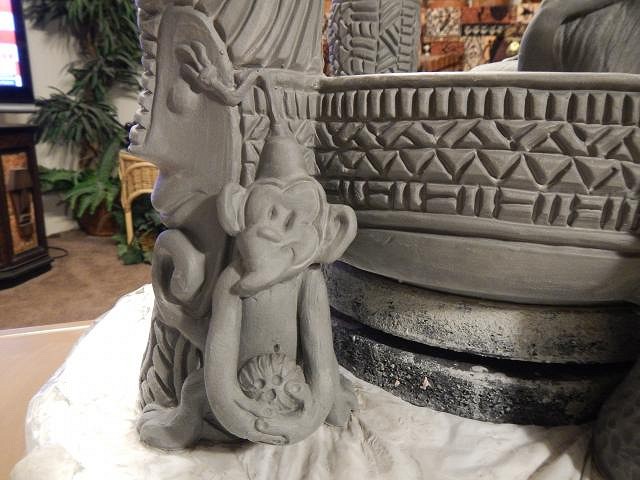
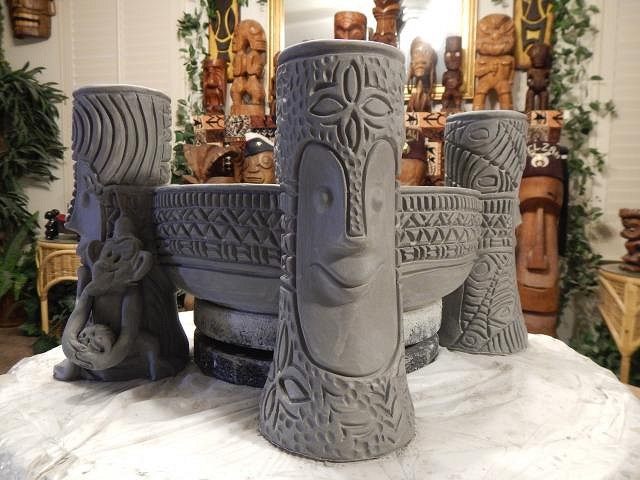
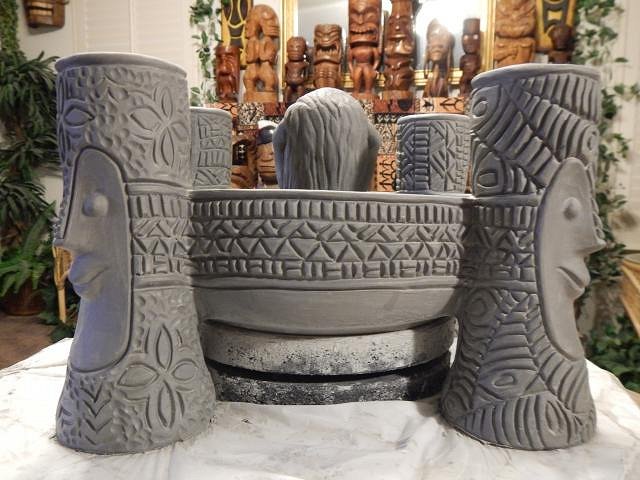
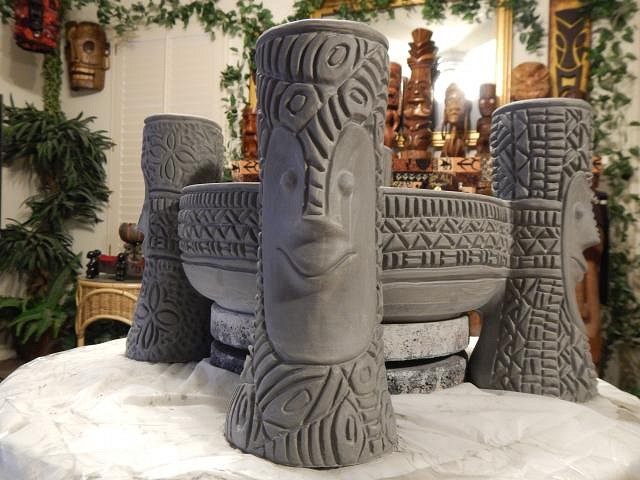
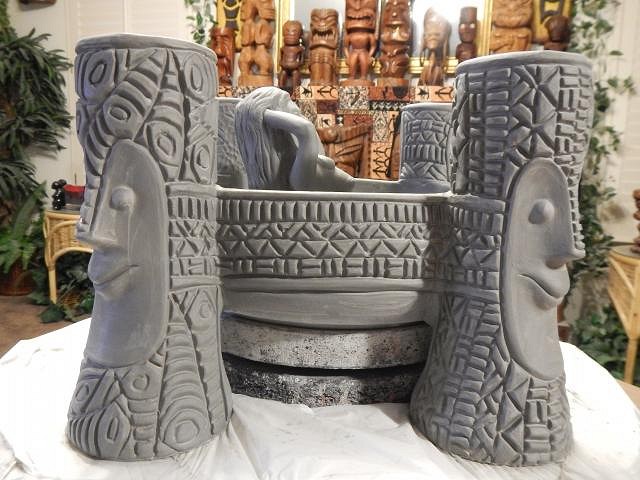
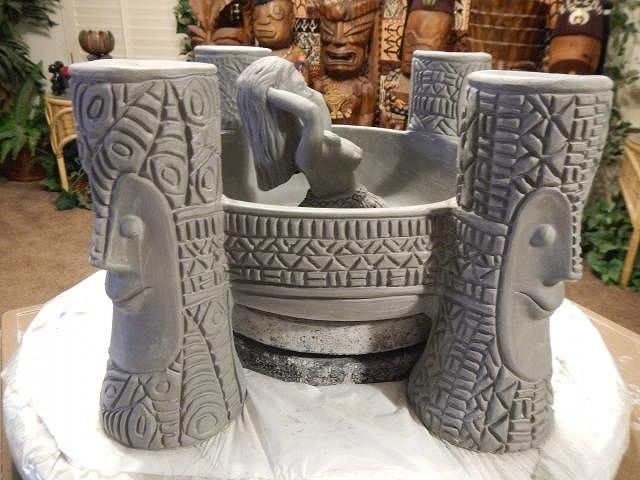
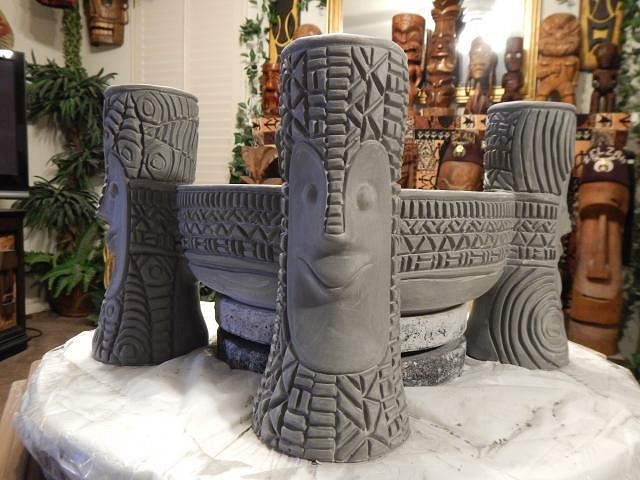
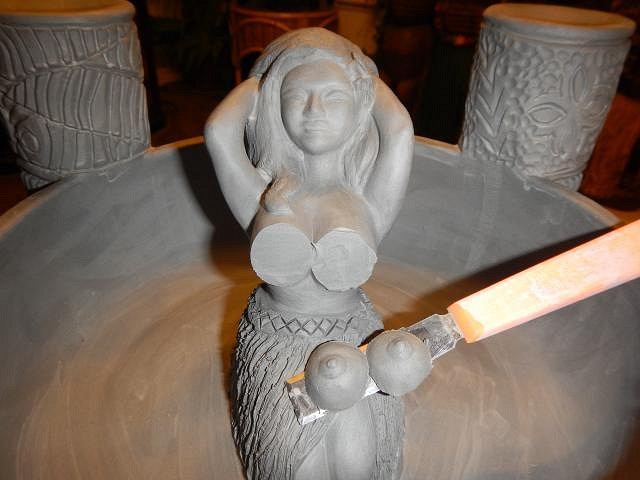
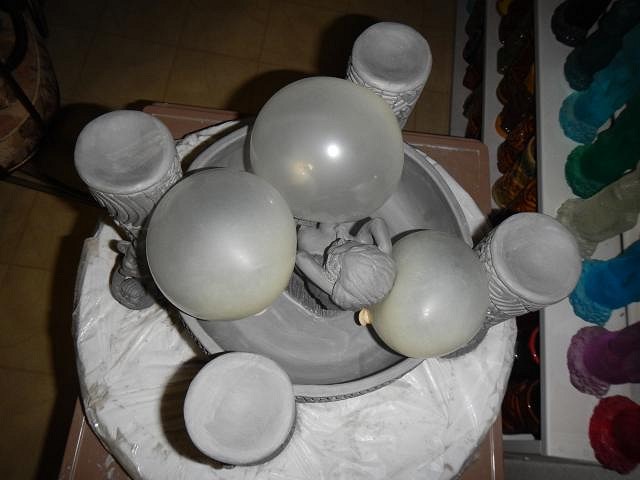
TikiAno nope she doesn't make tiki mugs but she made one adorable Tiki Ari. How about an updated photo. ================================= While the mold for the Sacramento Crawl mug was drying I had time to work on some other projects. Owen Wright on facebook has wished for a huge bowl. Four full size Tiki Bobs with indentations on the heads so rum flames can be lit. A topless hula girl with a grass skirt in the center of the bowl. A small monkey kind of hidden and wearing a blue fez. Well this sounds fun so it was time to start. Oh, I forgot to mention that each Tiki Bob and the bowl were to be super carved! It was time to pour a big bowl. This mold dried way faster than the crawl mug mold. Then the Tiki Bob's were poured along with one hula girl. The pieces are adding up! I took the bowl out of the mold by having Dan tip the mold while I held this board in place. I got it in place and then cleaned off the mold lines. Then I wrapped up the Tiki Bob's the girl and then the bowl so that they would firm up overnight. I use a label scrapper to cut the clay. This is a great tool. It came off in one piece. I always save this clay to use in many ways. Now I have the hula girl ready to work on. First I use some of that saved clay to build more hair.
Each Tiki Bob needed a cap on the top. It was easy to press down against the air pressure. When I had it where I wanted I then cut a hole in the bottom to relieve the pressure. This also prevents it from blowing up in the kiln. It only works to go so far before the clay needs to rest overnight. Me too! Cheers, Wendy |
|
H
hang10tiki
Posted
posted
on
Sun, May 29, 2016 7:50 PM
Jungle bird mug looks incredible, :) |
|
D
danlovestikis
Posted
posted
on
Mon, May 30, 2016 12:48 PM
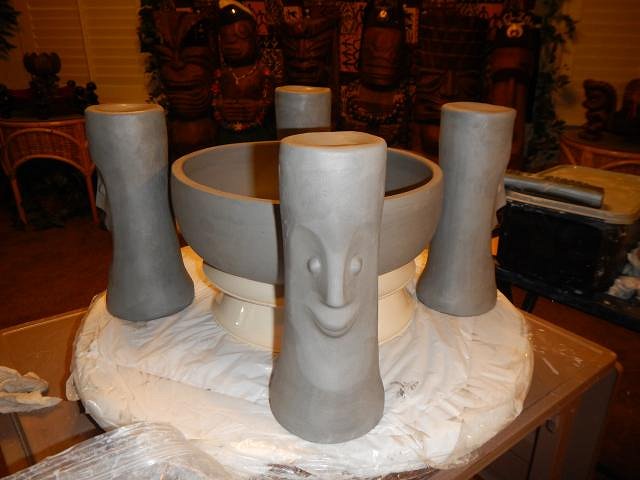
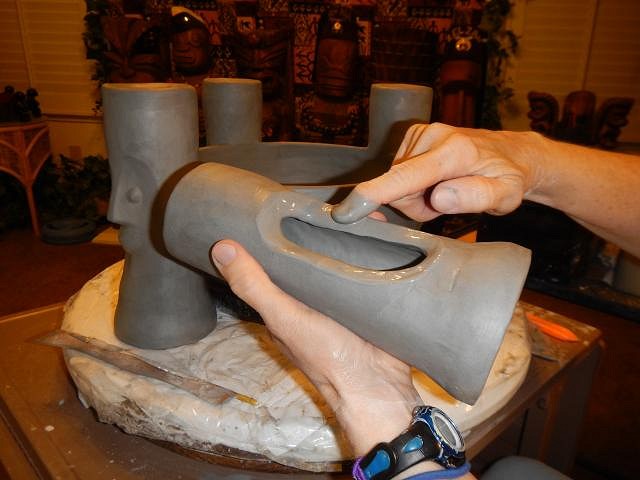
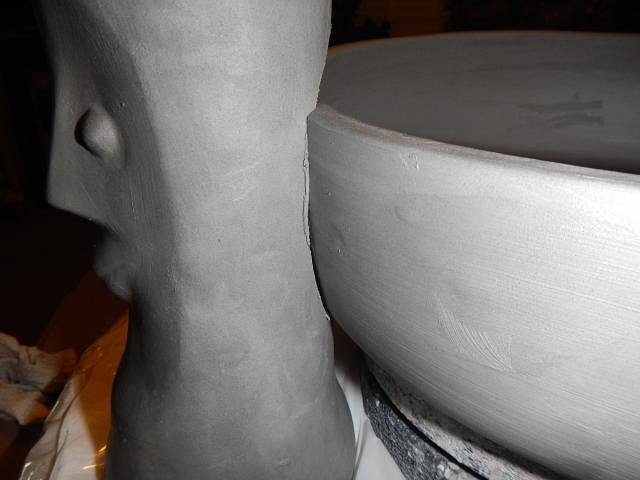
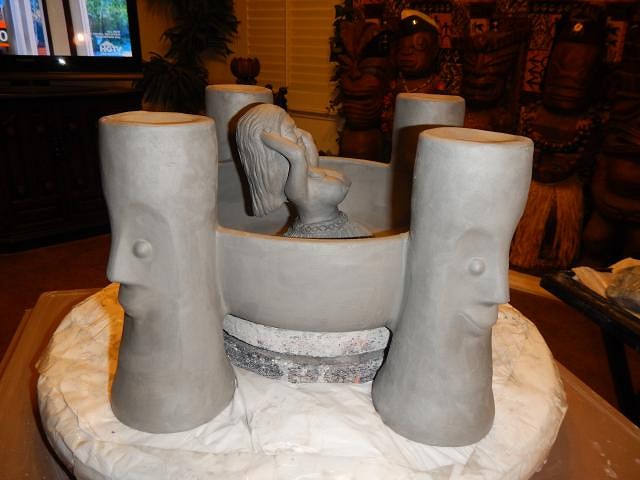
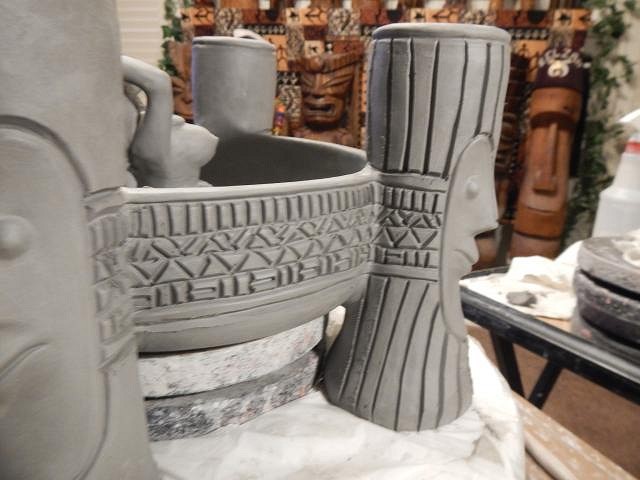
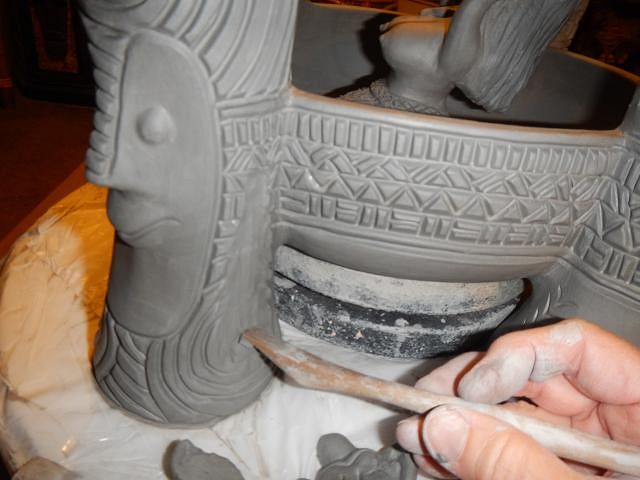
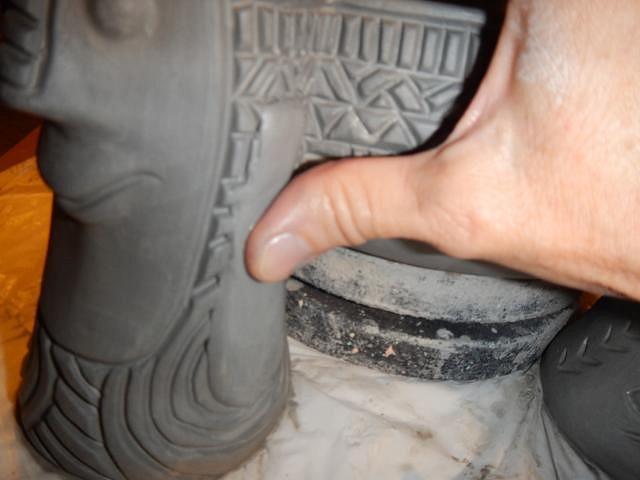
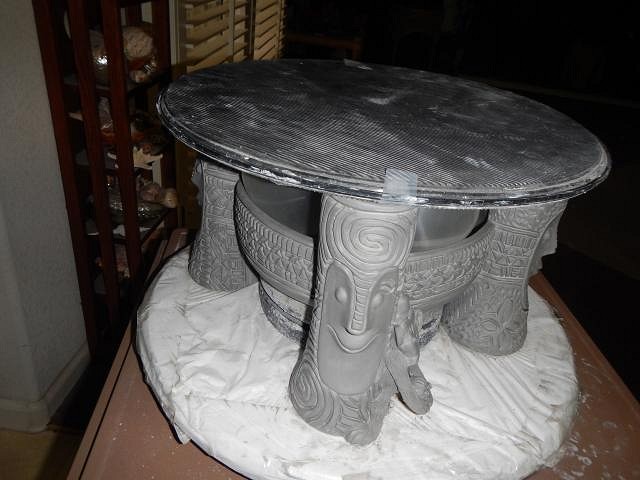
hang10tiki thank you and here are the next steps for Owen's HUGE bowl. ============================== The HUGE bowl for Owen Wright is being built step by step. I had a lot of re-starts trying to get a support under the bowl that was the right height but also allowed for the base of the tiki to fit underneath. All those photos I'll skip. Here's what makes sense. I have four full size Tiki Bob's to attach. I start by cutting away clay so I can fit it to the bowl. When I think I have it right I add sticky clay and slip to the attachment edge. A good fit. Now I go all the way around the tiki with more clay to make a firmer attachment. Here I'm also filling in where I cut the opening too high. There isn't room for my fingers when I got to the edge at the bottom. So I dipped a clay snake into a jar of slip and then I lay it on top of a tool. I moved it behind the tiki and then lifted up to press it into clay. I slipped the tool back out. Next I took a wet paper towel and fed it behind the tiki. Then taking the two ends I was able to lift and move it back and forth to smooth the clay and to make the I did these steps until all four tikis were firmly in place.
Now the bowl is wrapped in plastic until the new clay firms up and is the same as the rest of the bowl. Cheers, Wendy |
|
H
hang10tiki
Posted
posted
on
Mon, May 30, 2016 7:03 PM
Awesome |
|
P

Philot
Posted
posted
on
Tue, May 31, 2016 8:36 AM
Good googly moogly! |
|
D
danlovestikis
Posted
posted
on
Tue, May 31, 2016 1:53 PM
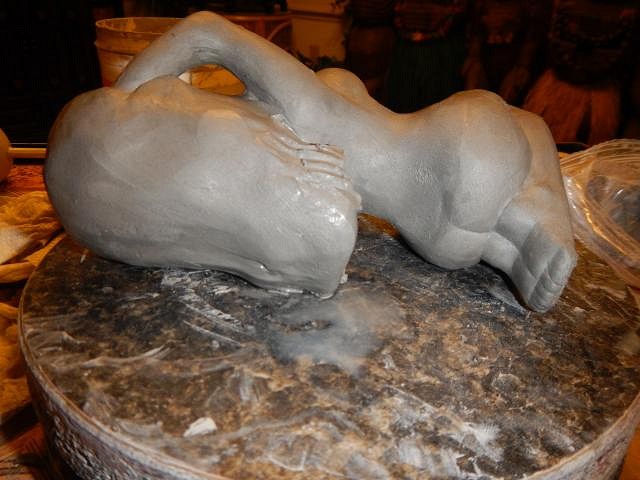
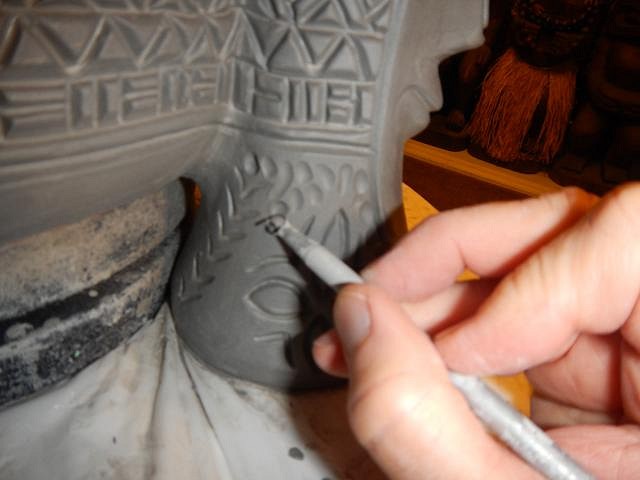
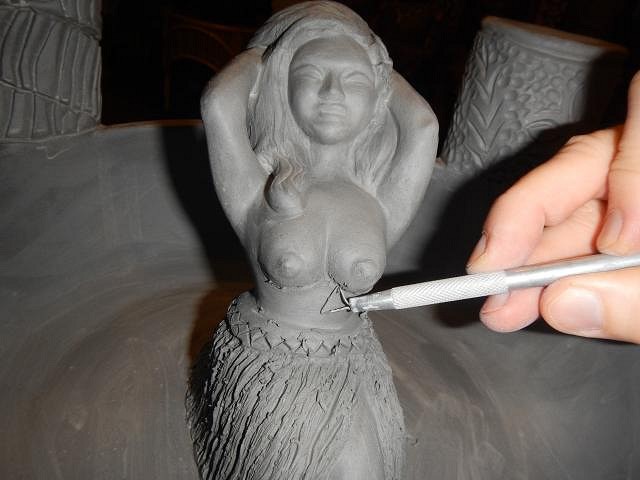
hang10tiki I think those were Dan's words too. It is HUGE! Philot I will have to ask Owen to share photos when it's all lit up. ============================ More steps on Owne Wrights HUGE Tiki Bob bowl. He wanted the hula girl to be wearing a grass skirt. I have to fill in the all the indentations of the legs etc. to prevent air pockets that will cause it to explode in the kiln. I decided to let the skirt part to make her sexier. I added a belt. To let air escape she has a hole on the bottom. Once in the bowl there must be an opening in the bowl. I did smooth out all these joints. I I cut out a piece and when she we put into the bowl the two holes were matched up....I hope. Now in place more clay is added to seal her to the bowl. Trying to sculpt the girls skirt between these soft Bob's wasn't easy. I got it done and now she'll rest overnight before I begin more detail work.
Cheers, Wendy |
|
M

MadDogMike
Posted
posted
on
Tue, May 31, 2016 2:48 PM
Very cool Wendy, looks beautiful! |
|
H
hang10tiki
Posted
posted
on
Tue, May 31, 2016 6:57 PM
Yep |
|
T
TikiAno
Posted
posted
on
Tue, May 31, 2016 8:42 PM
Holy moly, that looks Bobilicious! Can't wait to see THIS bowl progress- and how you will glaze it. Okay, though I think you've seen this one on FB, Wendy, when my wife went away on a work trip, Tiki Ari and I decided to have a few beverages. As they say, "when the wife's away..."
(did I post this one to your thread before? I don't think so). By the way, Ari became very attached to the Beanie Baby monkey you sent him and wouldn't let go of it after a car ride. I tried to take a photo of him with it but he kept turning around saying "Monkey mine" and running away. Greedy kid. Jeez. I'll have to tempt him with rum, that normally works.... thanks again! :) |
|
H
hang10tiki
Posted
posted
on
Wed, Jun 1, 2016 6:26 AM
Ano- that's funny |
|
D

Danno
Posted
posted
on
Wed, Jun 1, 2016 9:22 AM
The Tiki Bob Bowl looks fantastic! Wow! Love it! |
|
D
danlovestikis
Posted
posted
on
Wed, Jun 1, 2016 8:55 PM
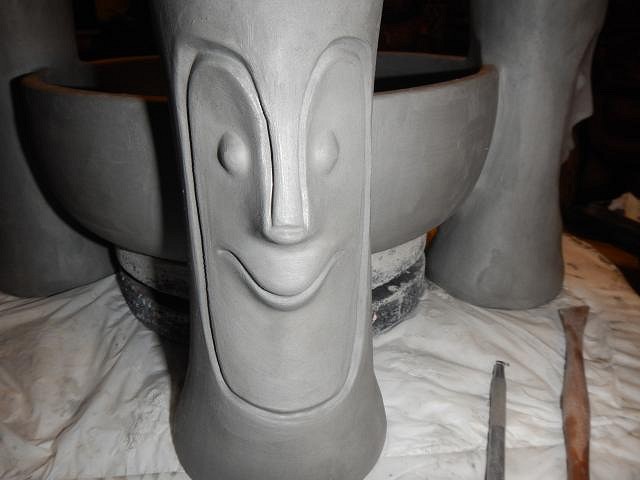
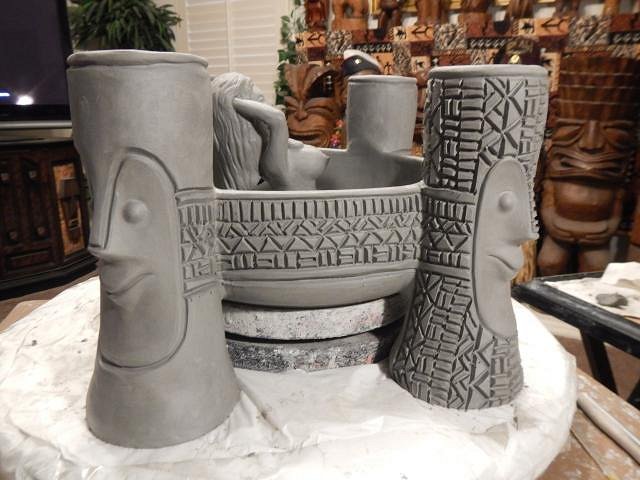
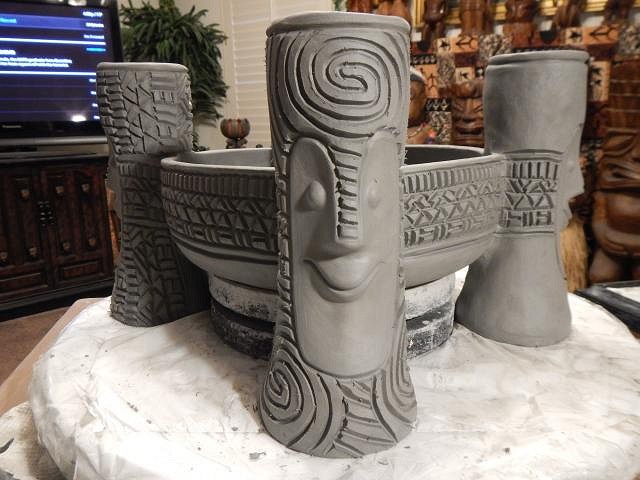
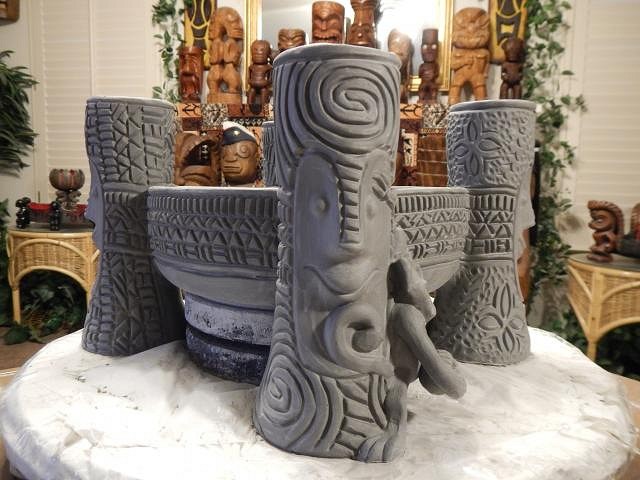
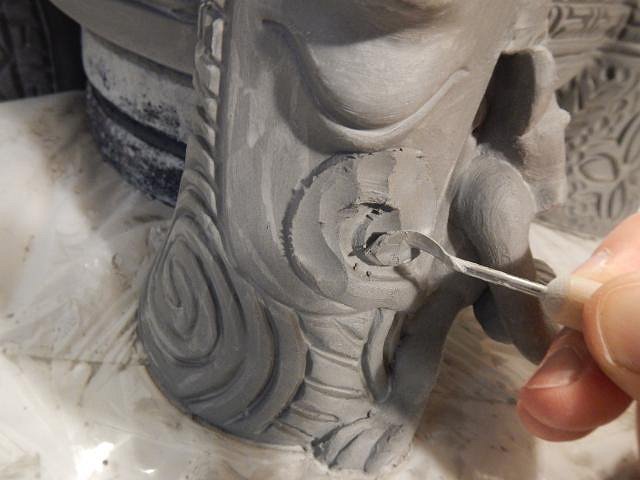
MadDogMike thank you. Now it's my turn to have kiln problems. I'm going to take it apart and take it to a repair shop to see if replacing the relay switches will fix it. Such a bummer since I'm in the middle of my huge project. hang10tiki I would like to resemble that remark! TikiAno I missed this photo of Tiki Ari. Now that I have over 1000 friends I miss way too many posts. What a funny dad and adorable boy. Danno I should make more huge bowls. I love reading the comments. ============================ More steps on Owen Wright's HUGE Tiki Bob Hula Girl Monkey bowl. When I am going to super carve a Bob I start by carving an outline around the face. To tie the Bob's to the bowl I did a strip of carving all the way around that was the same. Once that was done I started on each individual Tiki Bob doing a different style. Here I'm starting and here he is finished. Then another style and another. Three done and one to go. NO I did not do all of this carving in a day, nor in two days, nor in three days... I decided to work on the monkey as shown in the photo. I added one ear and went to work on the second. Once I decided where the monkey would hide out I smoothed out the carving. I added some clay to back up the monkey. Now it was time to let the monkey firm up while I carved the fourth Tiki Bob. This is a good place to stop for tonight. Cheers, Wendy |
|
H
hang10tiki
Posted
posted
on
Wed, Jun 1, 2016 9:22 PM
Love how the "super carve" makes em pop |
|
T
TikiAno
Posted
posted
on
Wed, Jun 1, 2016 9:58 PM
Wowwwwwwwww. |
|
D
danlovestikis
Posted
posted
on
Thu, Jun 2, 2016 9:09 AM
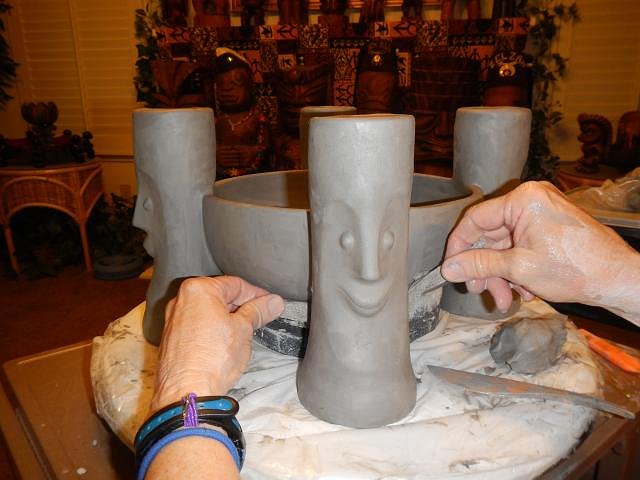
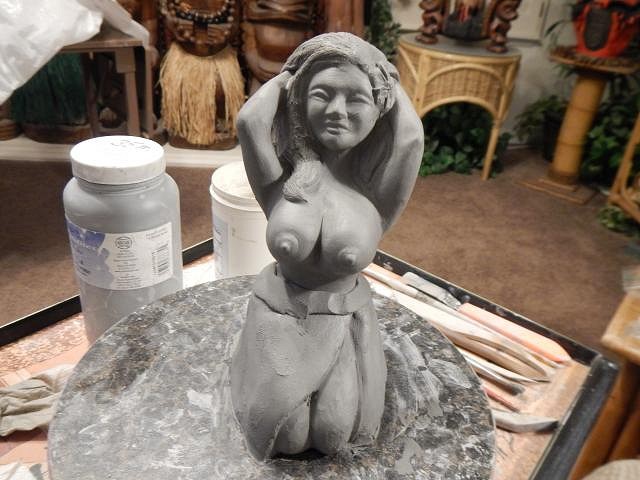
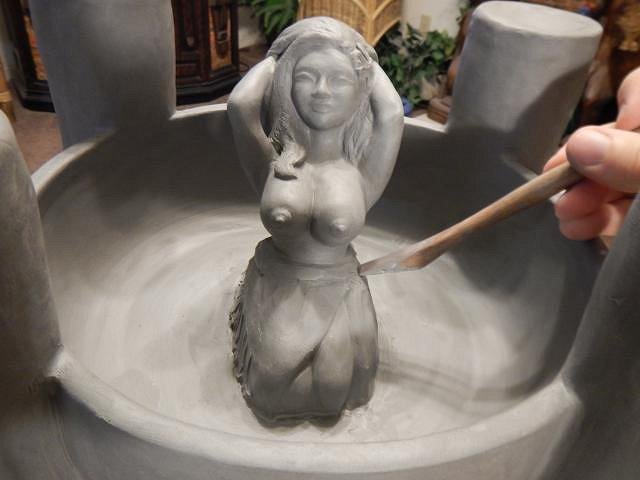
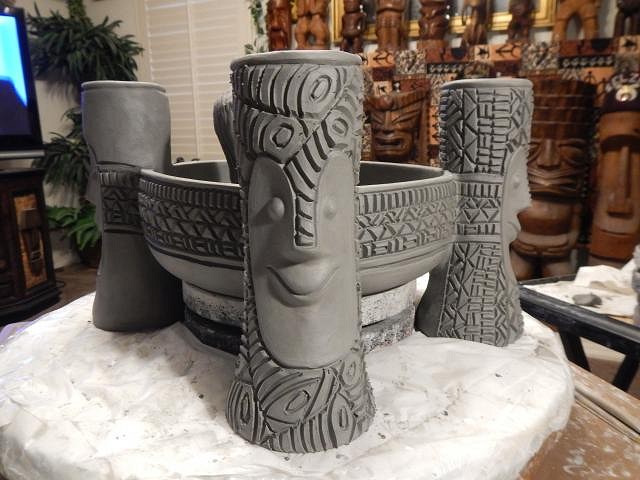
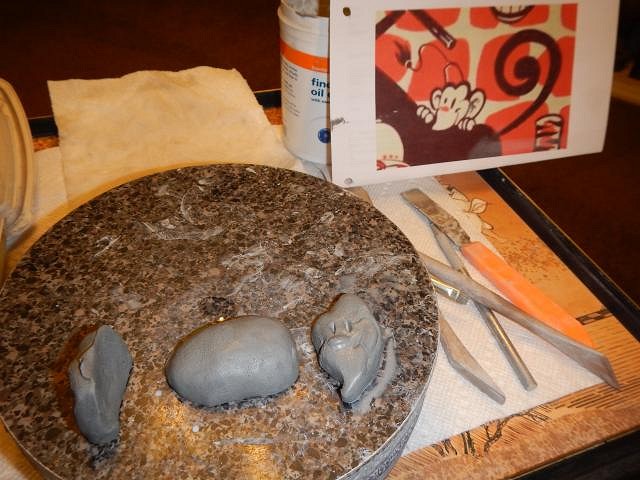
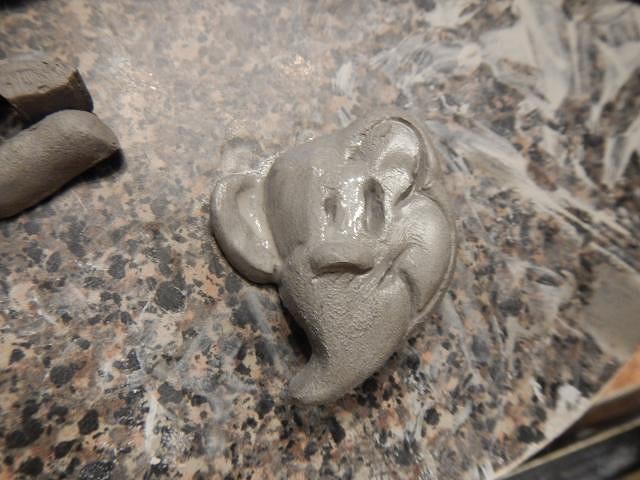
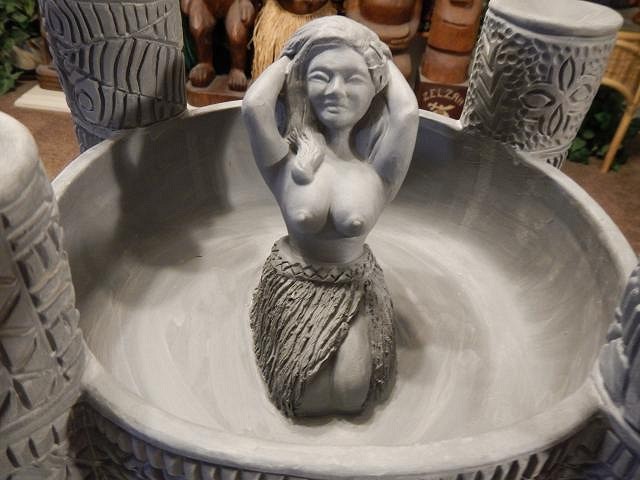
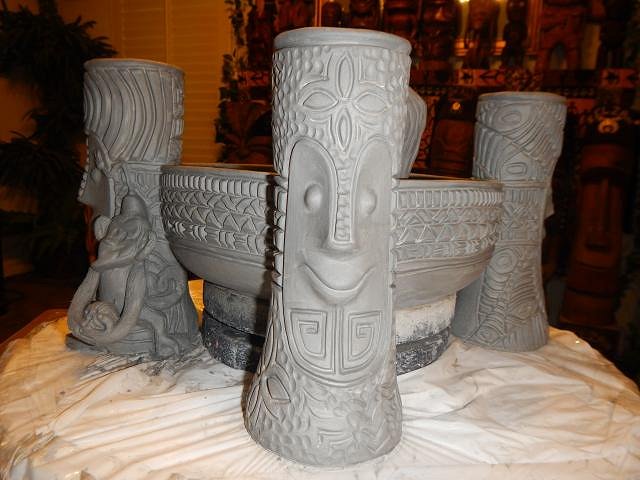
hang10tiki and it's fun to carve a bowl so large. TikiAno I like that. The bowl may be finished as far as sculpting. See below. =================== Owen decided that he wanted the hula girl to have a breast reduction surgery. Good thing I worked in a hospital and have the skills! I reshaped them and then the next day I fine tuned them with a slight undercut. So here are the photos for Owen to compare them to the original size.
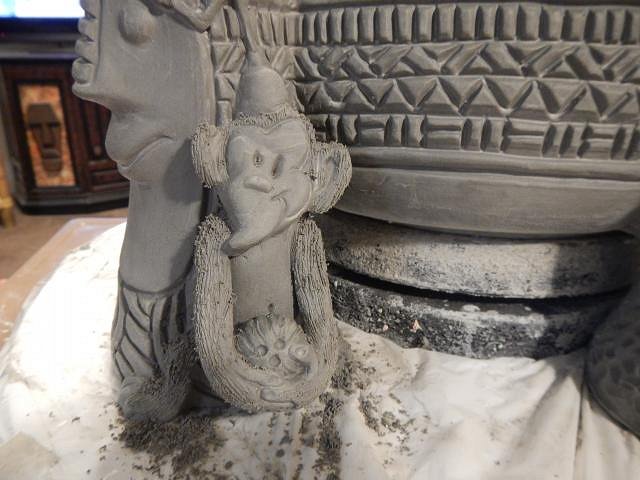
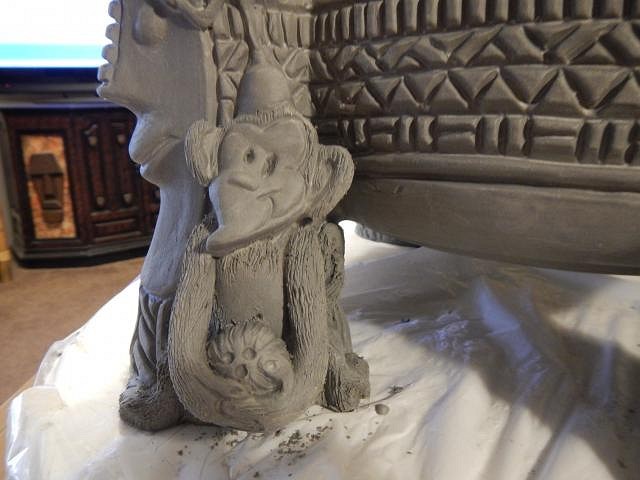
Now it was time to finish off the hidden monkey. He left the body up to me. I already had a tail and a tassel on the face of the Tiki Bob so I made his arms hold a coconut. I hope he likes it this way. In this photo you can also see the last Tiki Bob that I supercarved with tapa designs and a peanut surface.
Fingers crossed that the sculpt is done. I'm waiting to hear back. Cheers, Wendy |
|
H
hang10tiki
Posted
posted
on
Thu, Jun 2, 2016 2:23 PM
|
|
H
hang10tiki
Posted
posted
on
Thu, Jun 2, 2016 2:24 PM
The bowl came out great Wendy!!!!!!!!!!! I mean Dr. Wendy |
|
D
danlovestikis
Posted
posted
on
Thu, Jun 2, 2016 8:32 PM
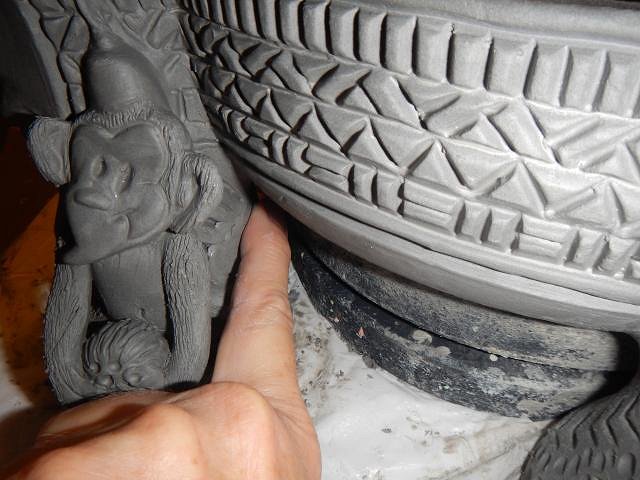
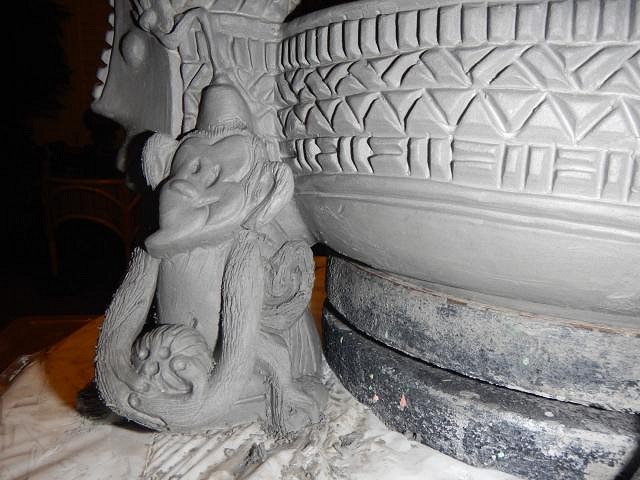
hang10tiki he requested a few tweaks. See below!!! ======================== After posting photos on the page before this one, of Owen's huge bowl, he has a few requested changes. I had matched the picture of the monkey but he wanted the tail to now go on the opposite side. I removed the tail from Tiki Bob's face. I repaired Bob's face and then added hair to the monkey. I filled in some of the carved areas so I could build a new tail. The last request was for a tattoo on this Tiki Bob's chin. Fingers crossed that the bowl is now done. |
|
D
danlovestikis
Posted
posted
on
Fri, Jun 3, 2016 8:42 AM
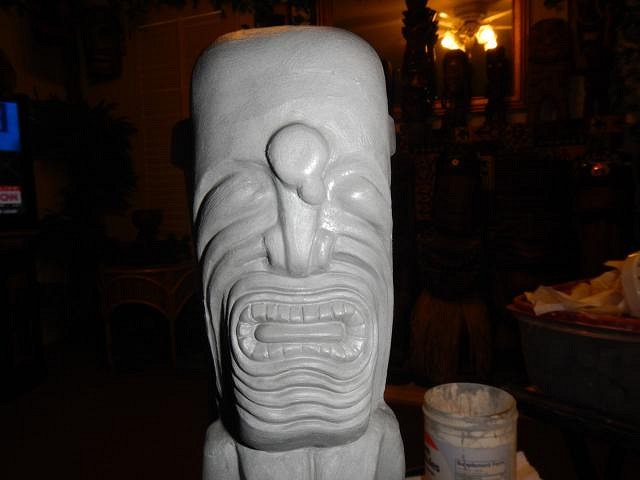
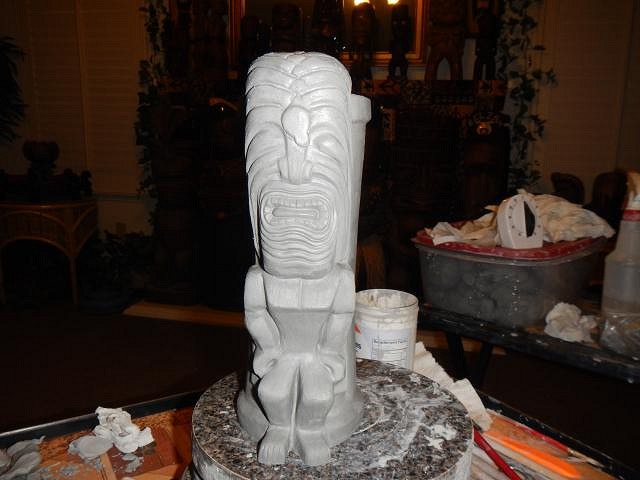
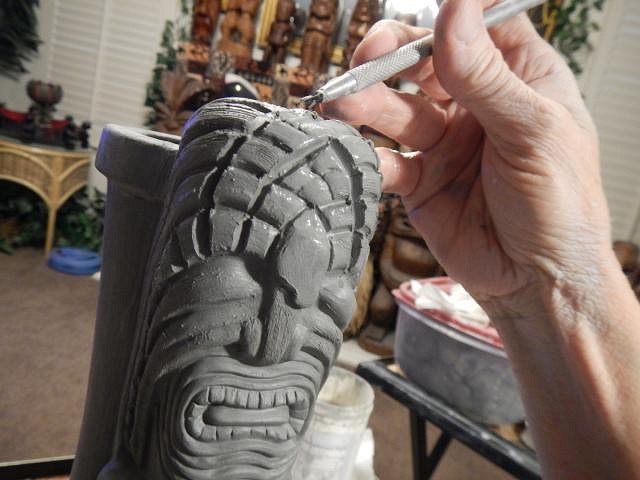
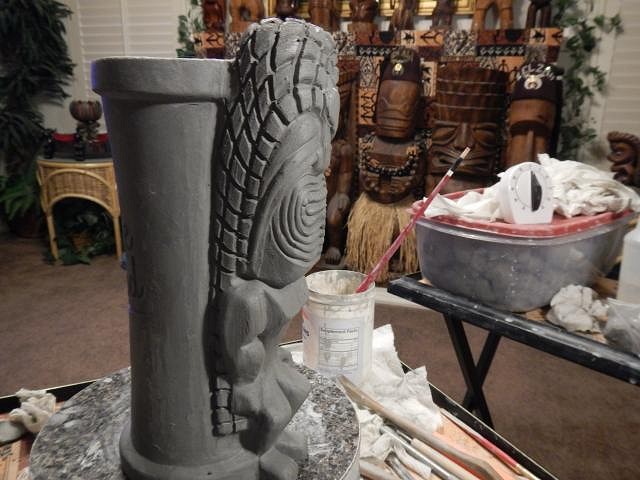
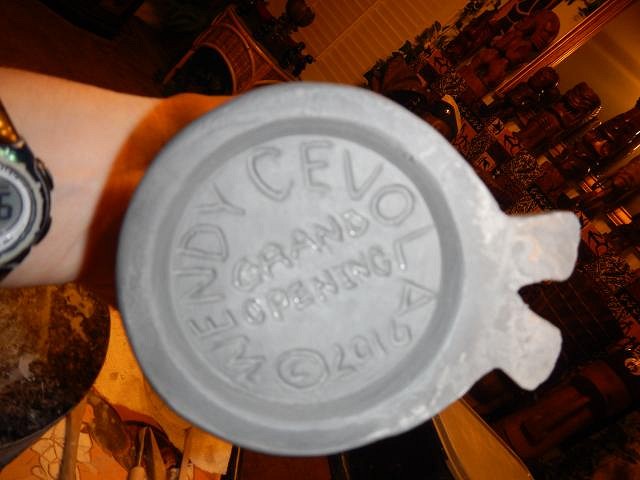
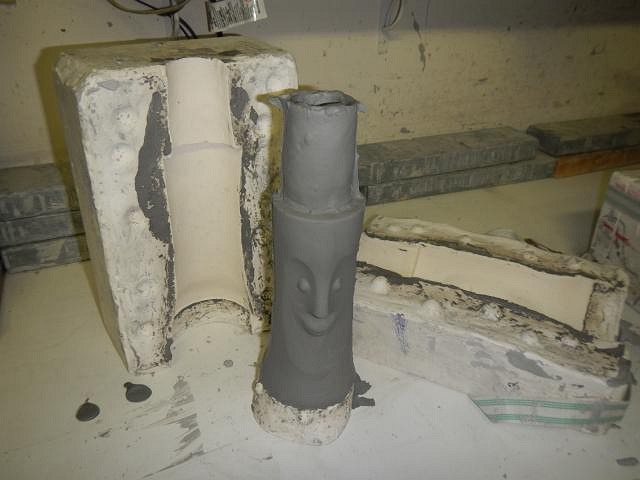
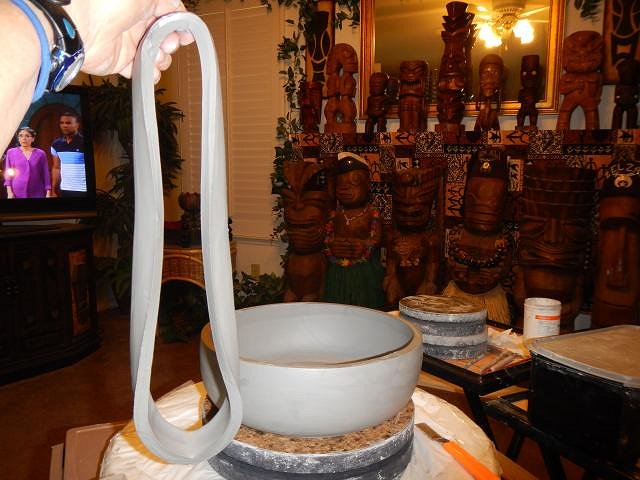
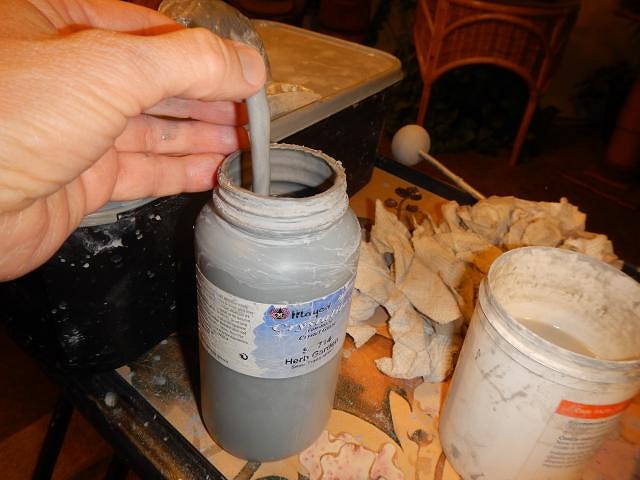
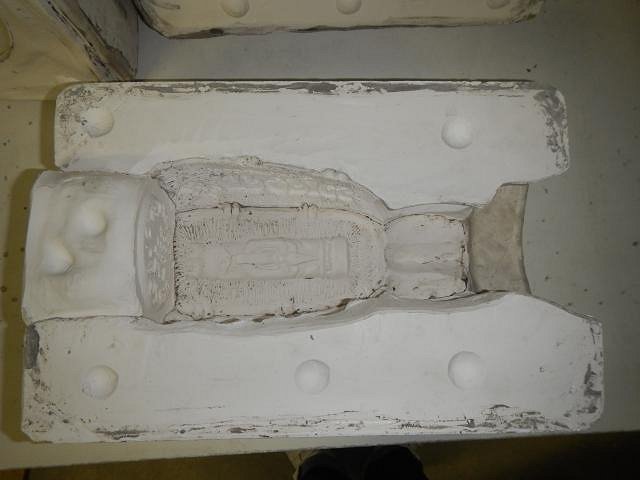
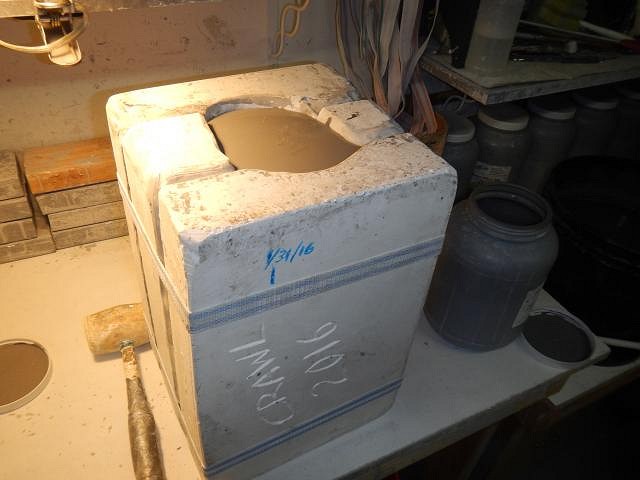
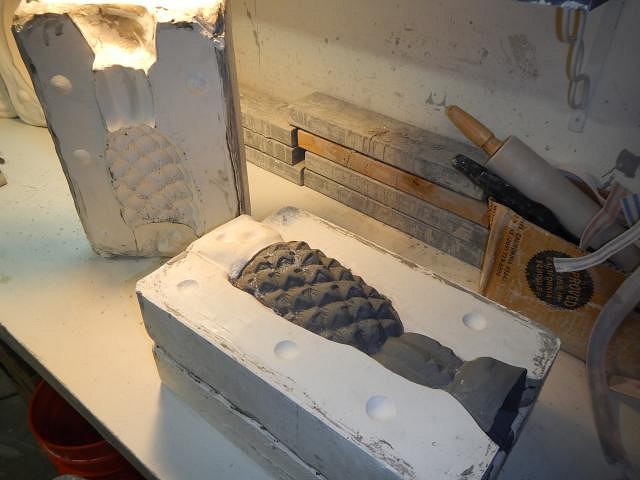
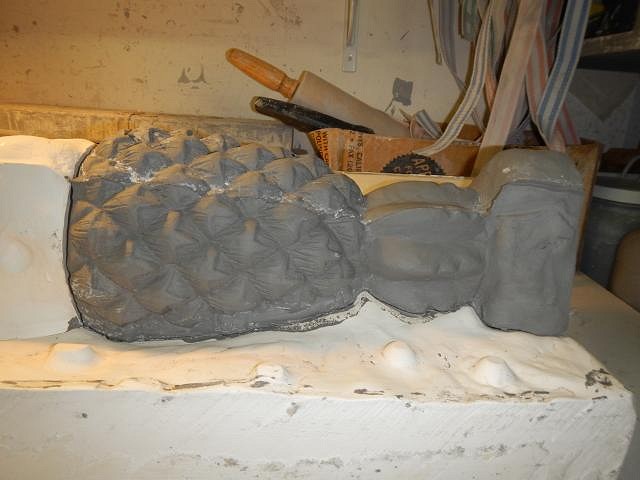
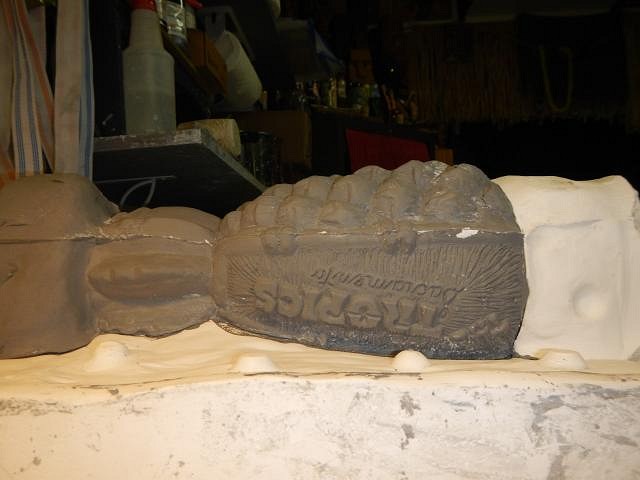
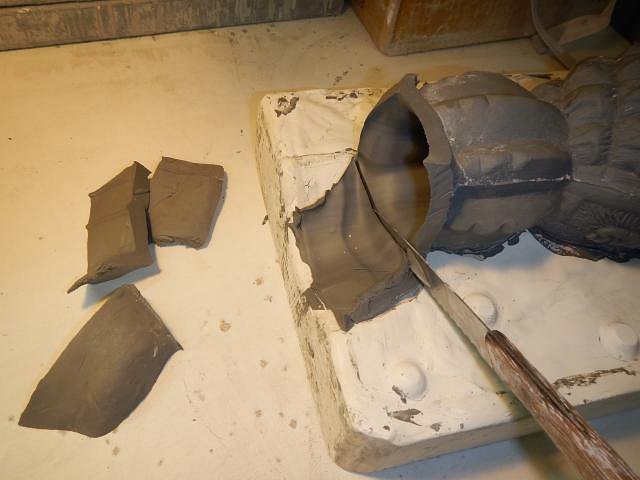
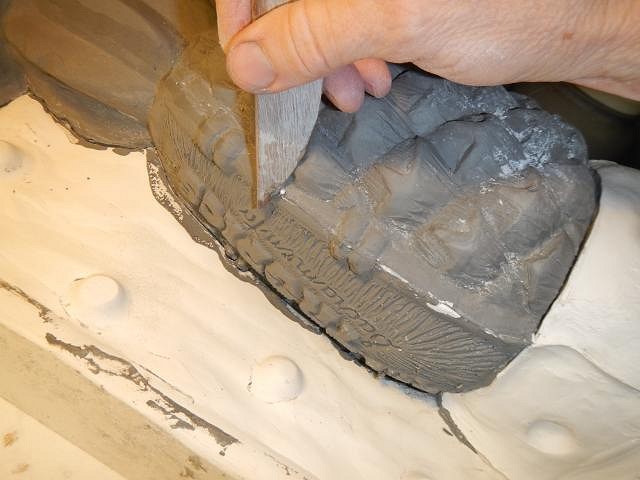
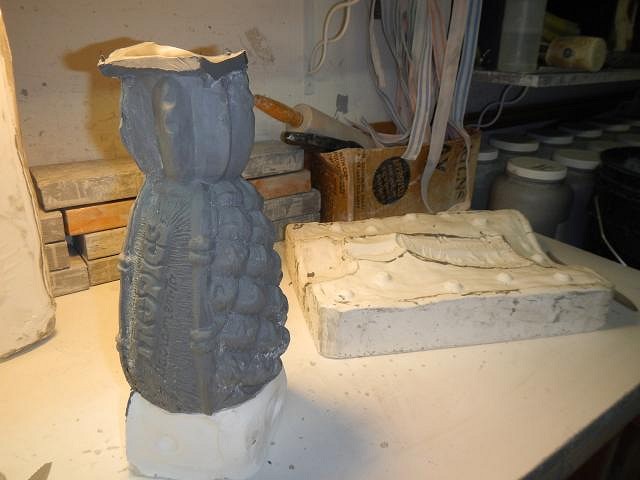
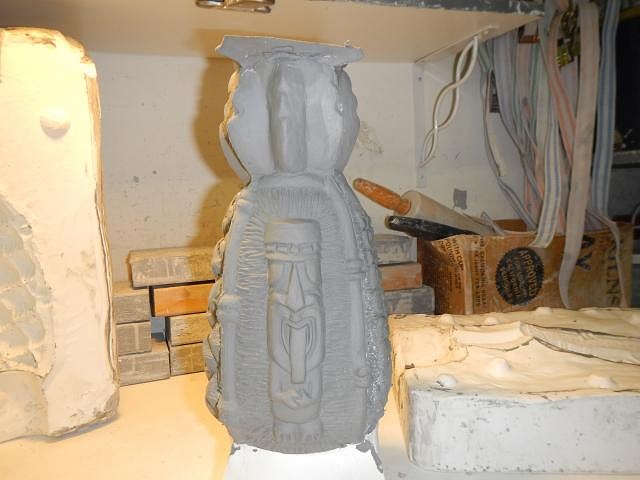
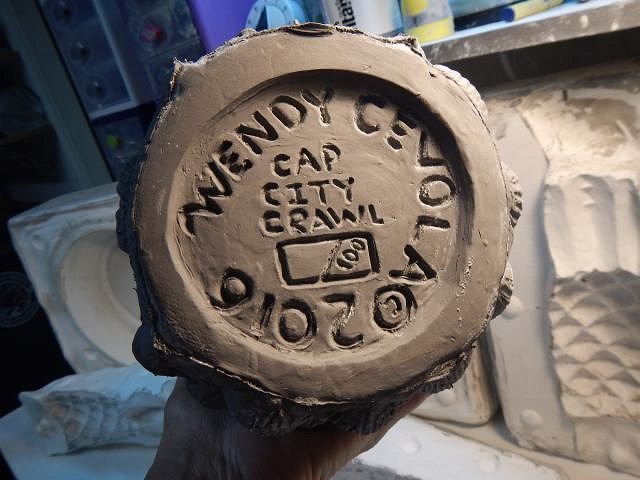
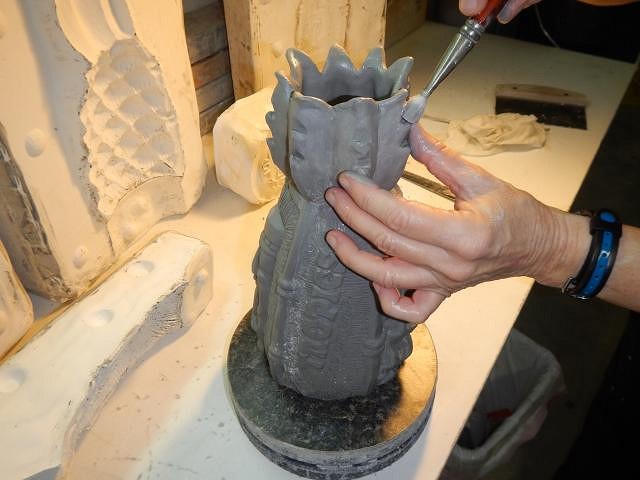
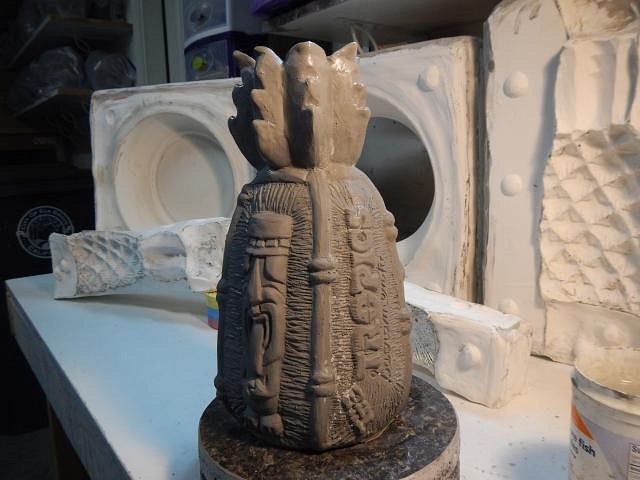
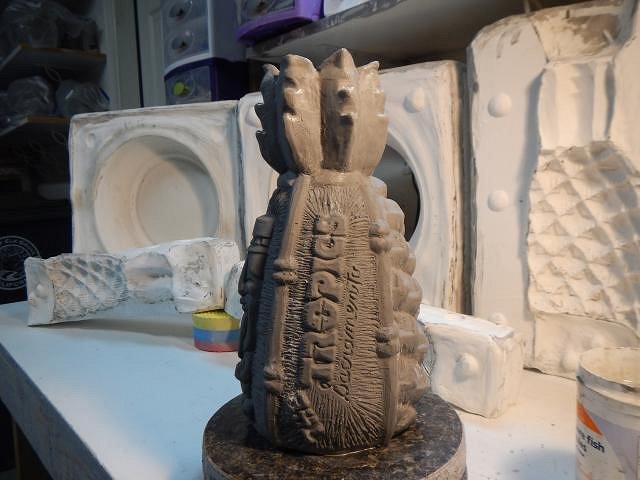
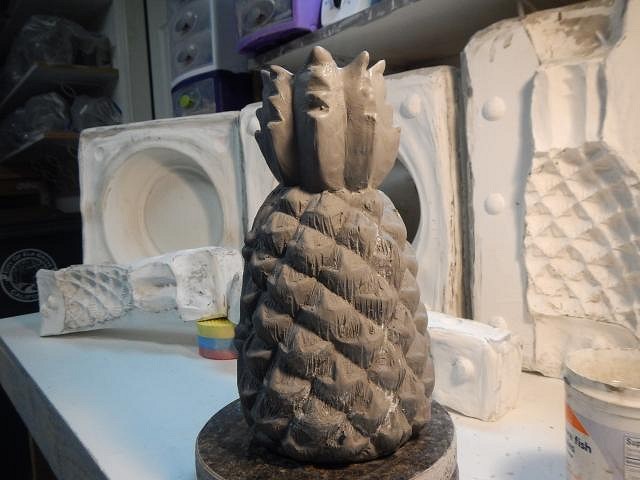
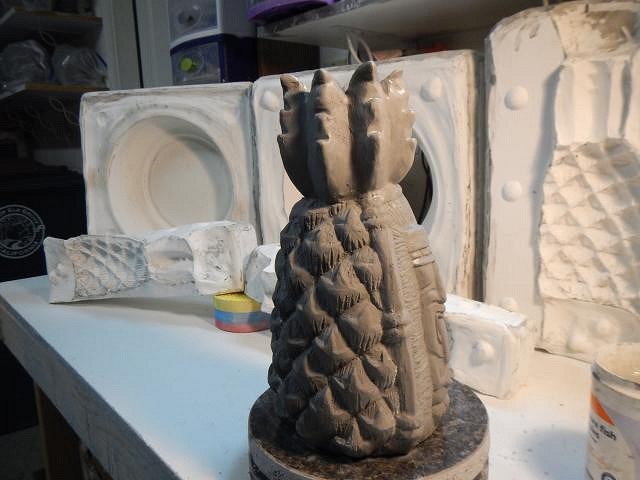
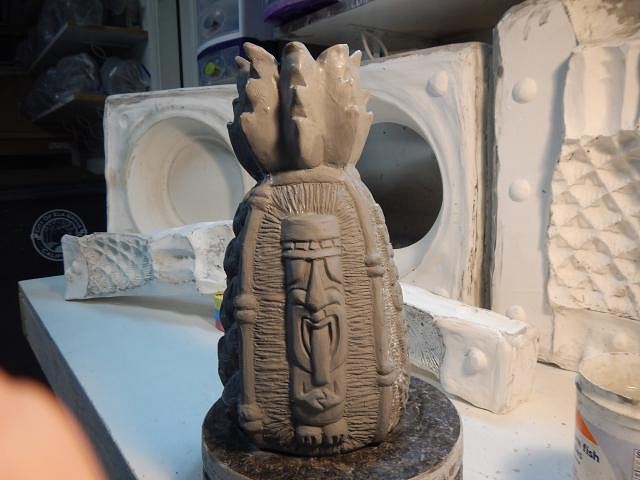
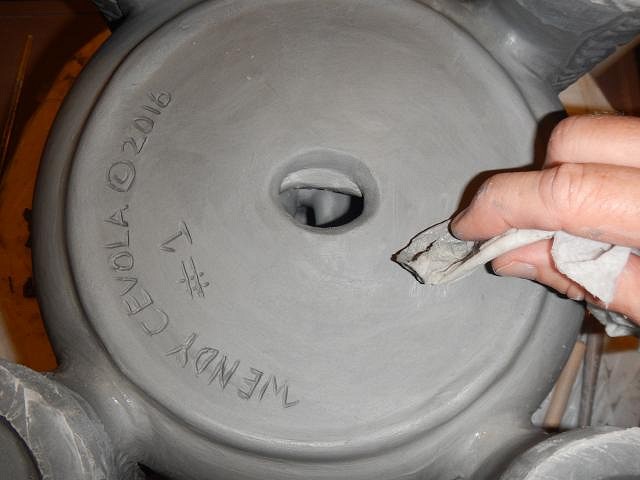
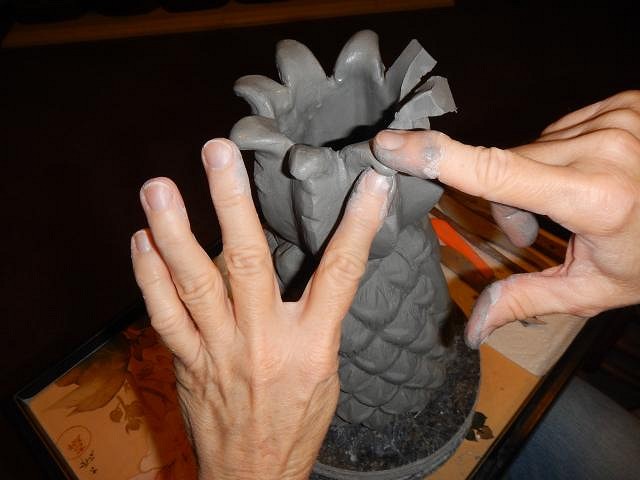
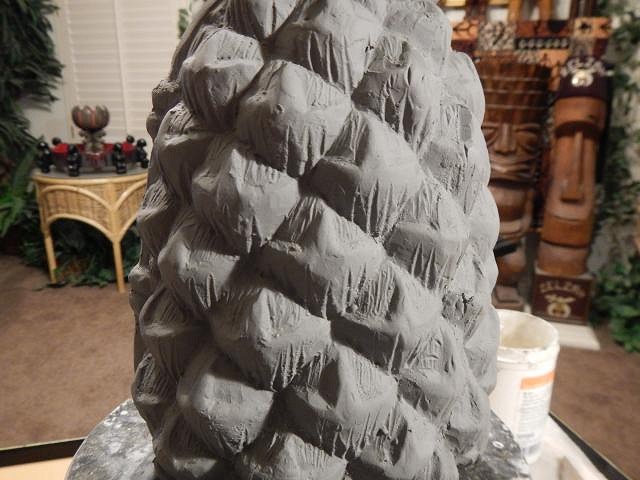
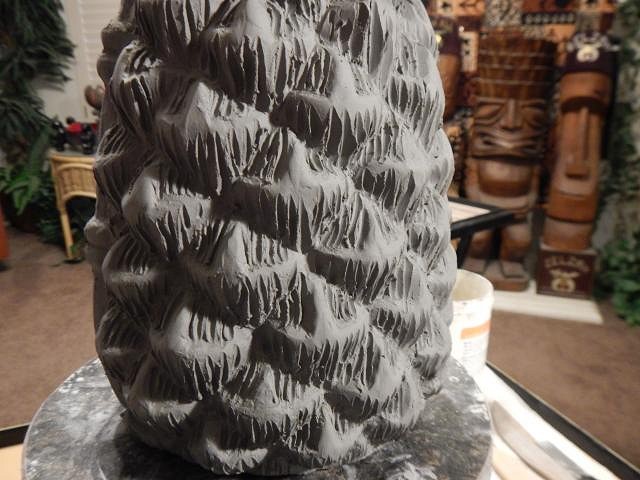
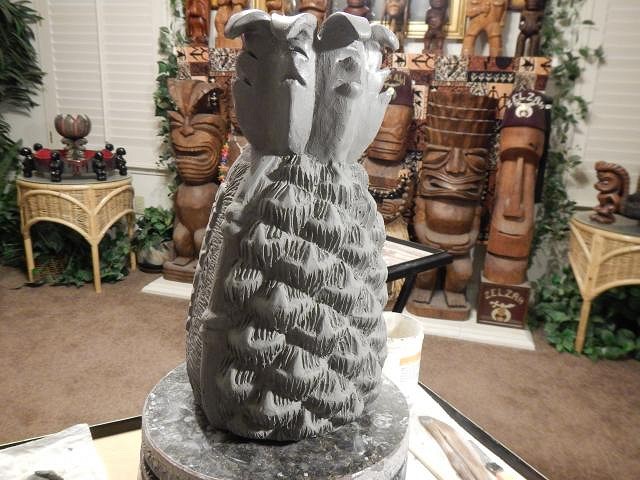
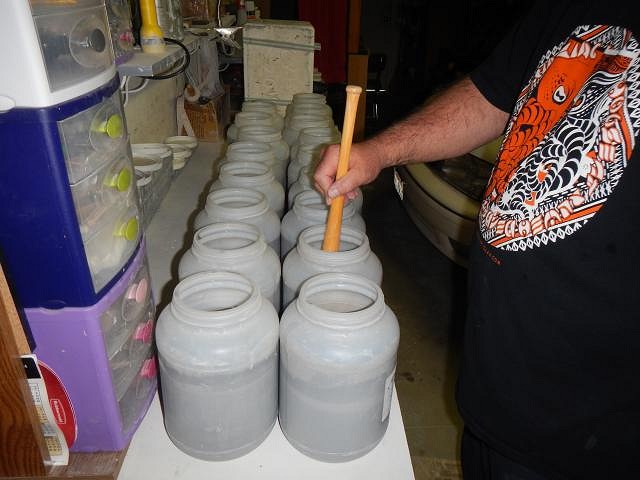
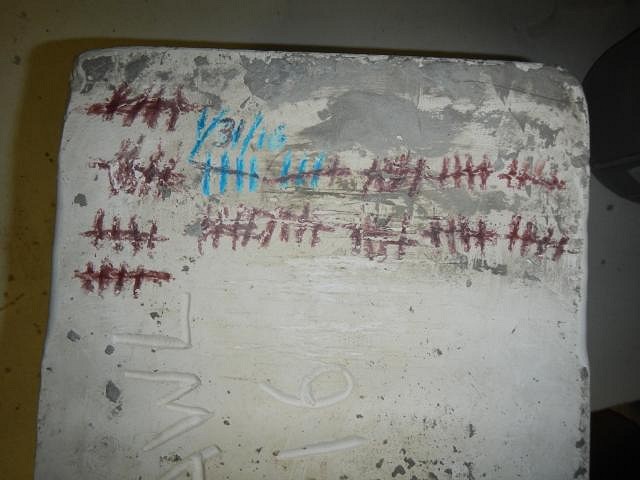
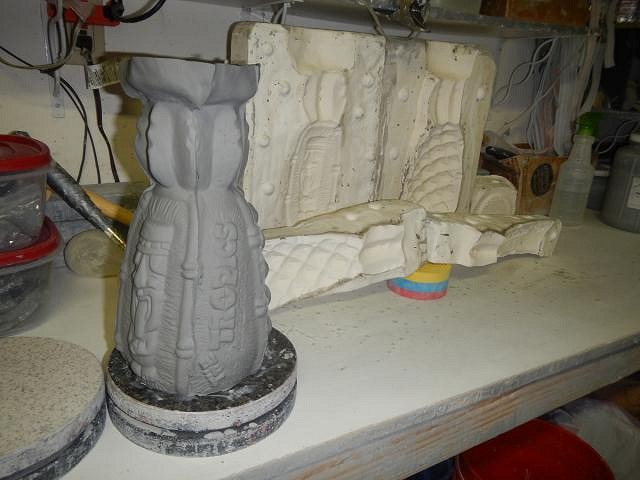
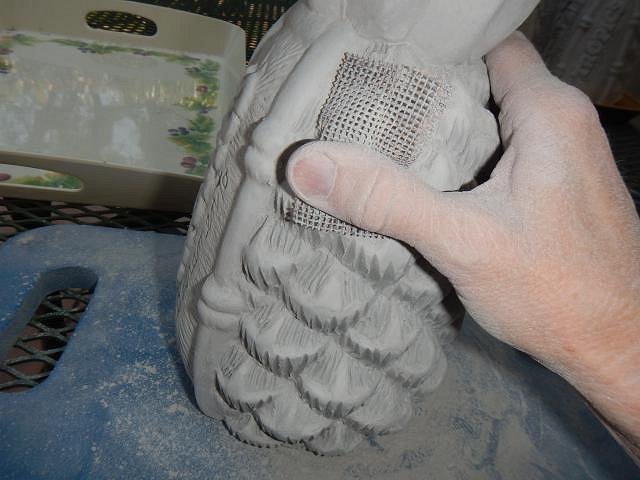
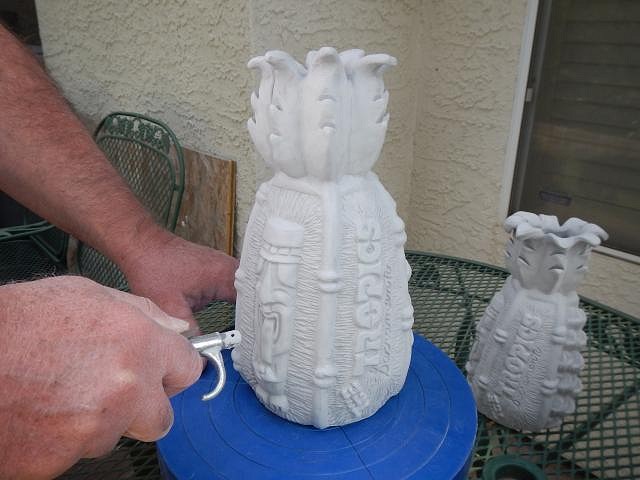
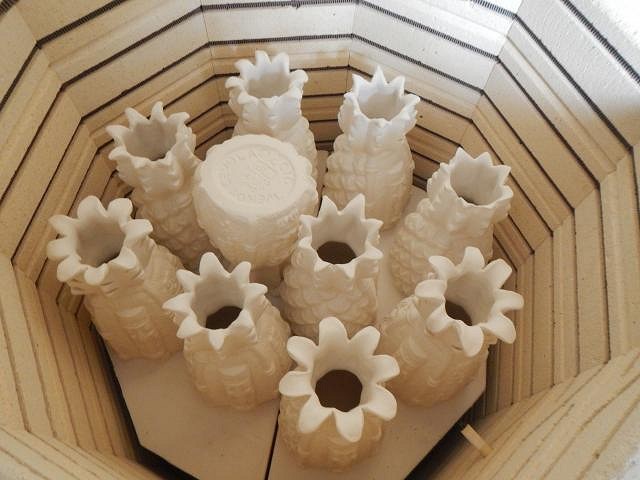
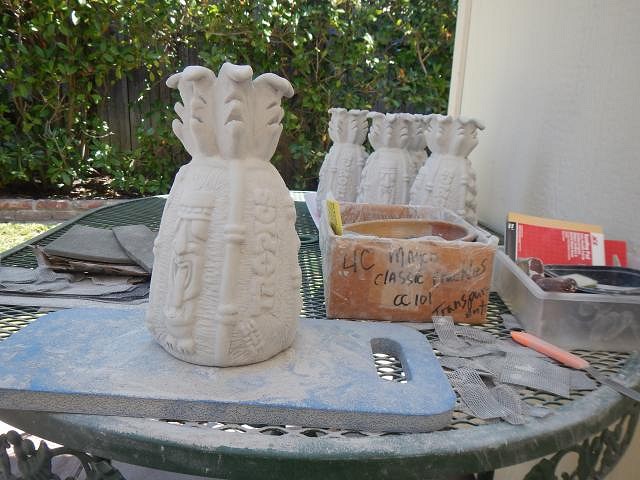
SACRAMENTO CRAWL MUG THE VERY FIREST ONE OUT OF THE MOLD. First let me say that what I show here as my "cleaning method" will change. The TOP will change. So I will be using the first mugs for my glaze tests and then the run of mugs for the crawl will all have the new top and the extra pineapple skin carving. Future photos will explain what I have written today. I put the mold together. Five pieces. We only made ONE mold so it will take 70 days to pour the 70 mugs I want to get done this summer. I will use the mold 100 times before I break it into pieces. We filled up the mold to the top. Another reason I make thick mold is that we don't have to baby sit the mold. Once it is poured it can sit until it is time to pour it out. Note how I use a crayon to mark 1 on the side of the mold. I keep track of how many times the mold has been used. Hit 100 and it will be broken. As the water is removed from the slip by the mold it lowers the top level. If my mold wasn't didn't have a couple of inches before it gets to the mug I would have to return to keep "topping" it off. My little hula girl molds have to be topped off every 10 minutes for one hour to get a good cast. At the end of 2 hours we poured out the rest of the slip. I now have a hollow mug. The mold is left upside down over night and then the next morning I can open it. I quickly learned that this mold should be opened upright not lying on its side like these photos. It was too much weight to lift it out this way. The mold came apart easily and I didn't find any undercuts. One of my best molds to date. I then trimmed the top. I did a rough clean up of the mold lines. I checked this side and then the other side. Looking successful so far. Still checking. The bottom came out well also. Now it was time to work on the top. Remember it will be different in the end. Top view of the mug. I can see that a regular straw will not work. It will fall in and disappear. I am doing a stylized top to my pineapple. This is not the final version. Did I say that before??? I sand with a wet brush of different sizes. Number One is done and this will eventually become one of the glaze test batch.
One more thing I will do to this mug is to hand carve more detail into the pineapple skin of every mug.
|
|
H
hang10tiki
Posted
posted
on
Fri, Jun 3, 2016 2:11 PM
Nice |
|
T
TikiAno
Posted
posted
on
Fri, Jun 3, 2016 9:24 PM
Likey likey. Tiki Ari will like this mug. He loves pineapples (calling for it by yelling "apple!"). Well, apples are "apples," as are pineapples, not to mention cucumbers. What can I say? He's not the sharpest kid. At least he likes apples. How many glaze tests are you going to do for the Crawl mug? Love watching the magic happen. Like Jon, now I'm hungry. For some apple. |
|
D
danlovestikis
Posted
posted
on
Sat, Jun 4, 2016 1:51 PM
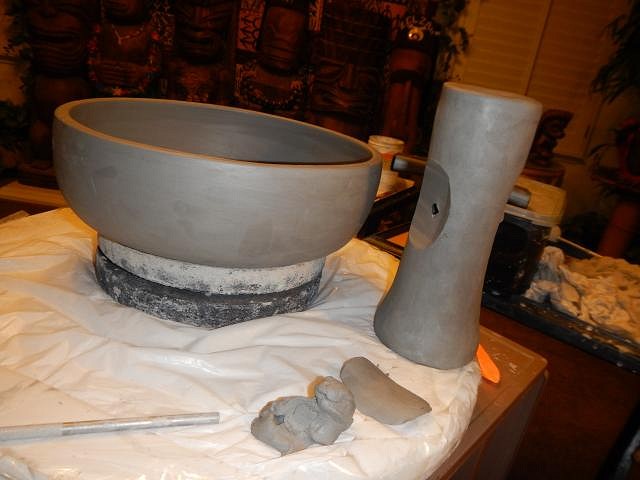
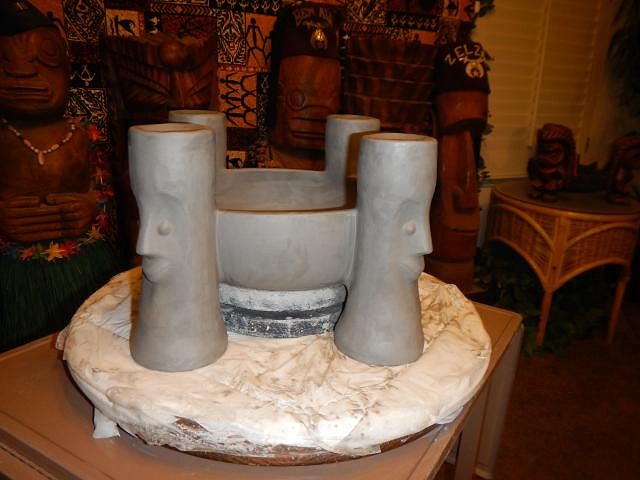
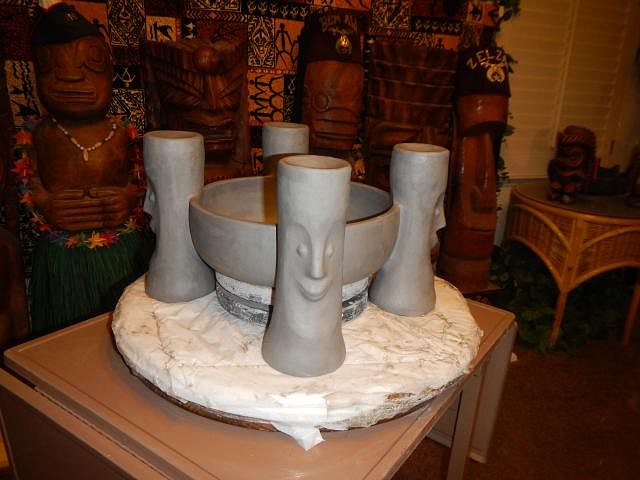
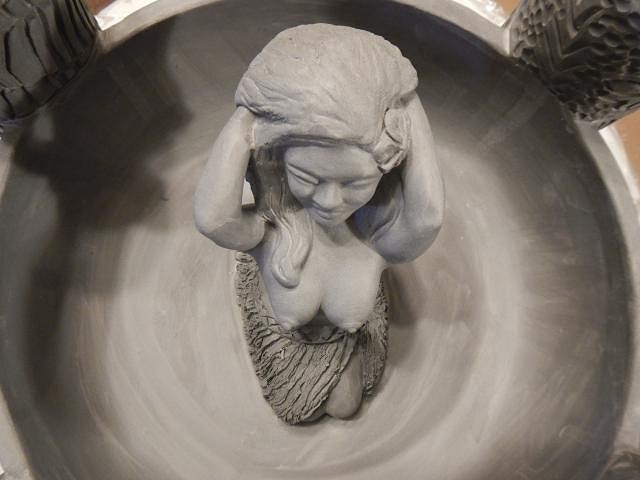
hang10tiki pineapple is a wonderful fruit. I'm glad you like the texture. I end up re-carving it on every mug so that it's even better. TikiAno he is so sweet. ========================== Well you all may have thought I had finished the HUGE bowl for Owen Wright but it wasn't done. Here are the last steps. I wasn't sure how firm the bottom of the bowl was as of today. So I made some balloon supports so that the weight of the hula girl wouldn't pull on the bottom when turned upside down. I put another disc on top of the bowl. I held it in place while Dan lifted all the weight. Together we flipped the bowl over. I easily removed the support. Now I could tell that the bottom was firm and that the balloons weren't really needed. Didn't hurt either. Now it's time to clean up the bottom of the bowl and the bottoms of the mugs. I carved the opening that goes up into the hula girl to prevent trapped gas. Next I started on the backs of each mug. I added texture to the monkey's tail. Then I continued the carving from the front to the back. It's a really weird angle to carve from but it still works. One by one I did all four. Now the bowl is done being sculpted and can dry. Here's a photo without the support under the bowl. The monkey is happy to be furry and out of the bag. Cheers, Wendy |
|
H
hang10tiki
Posted
posted
on
Sat, Jun 4, 2016 6:57 PM
:) |
|
D
danlovestikis
Posted
posted
on
Sun, Jun 5, 2016 1:34 PM
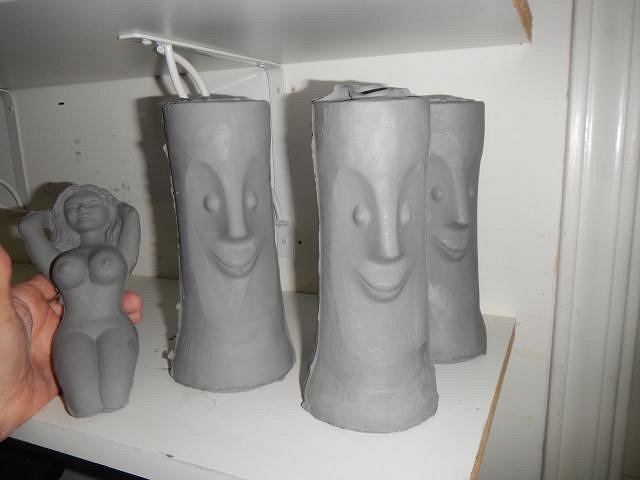
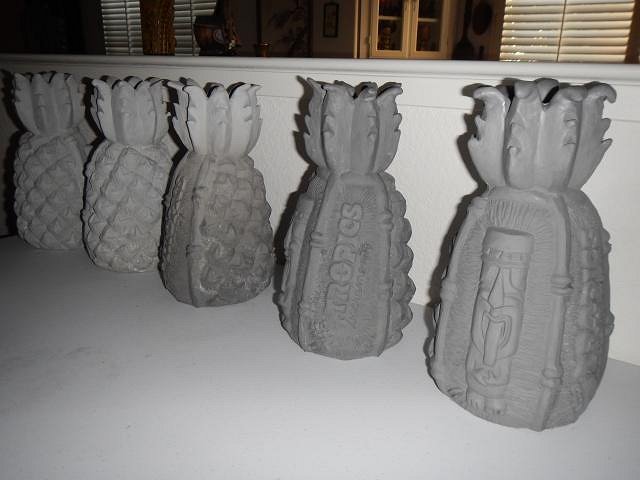
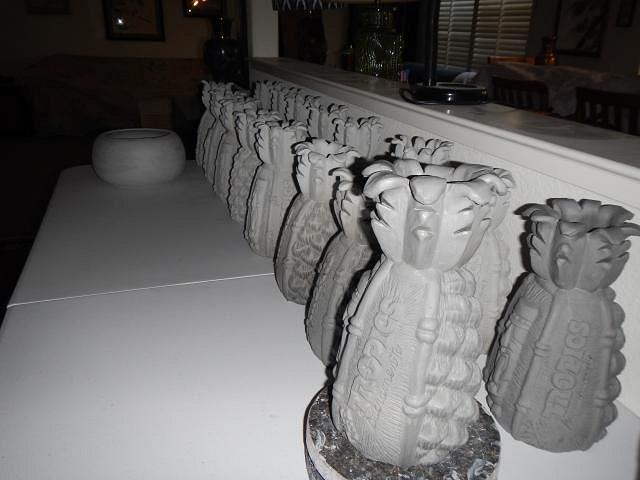
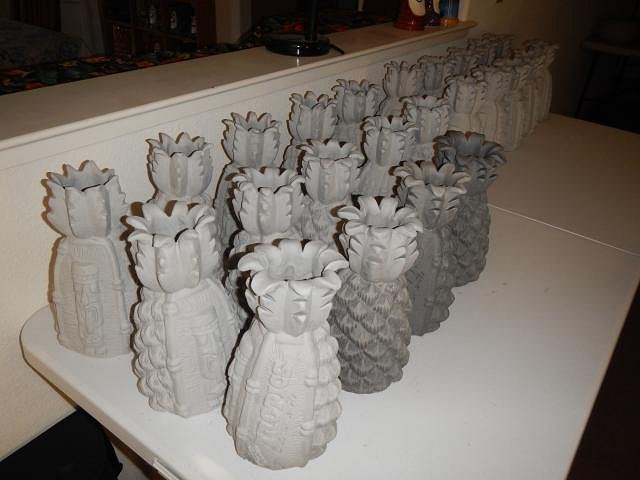
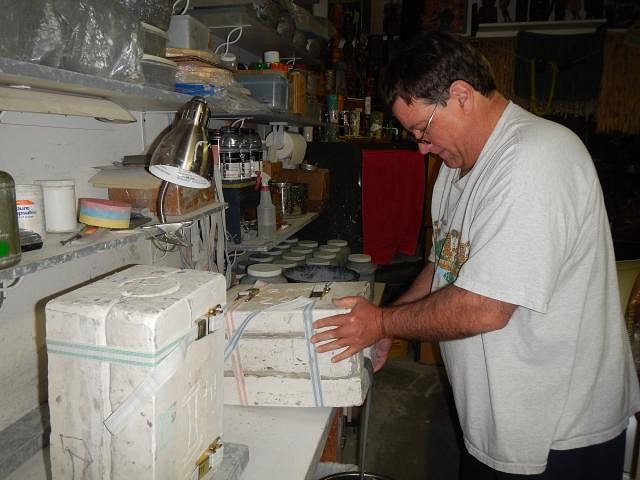
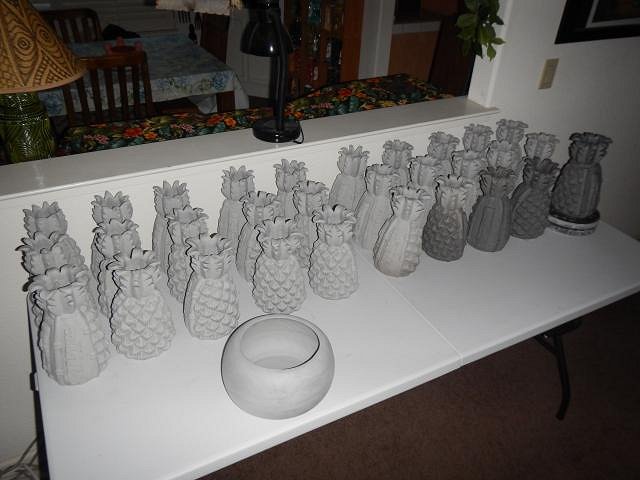
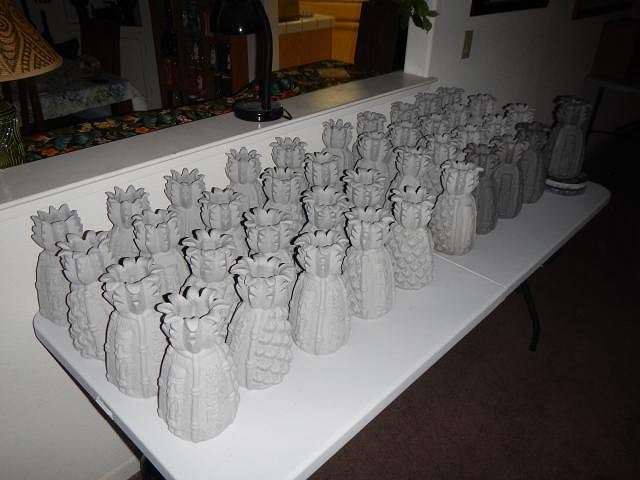
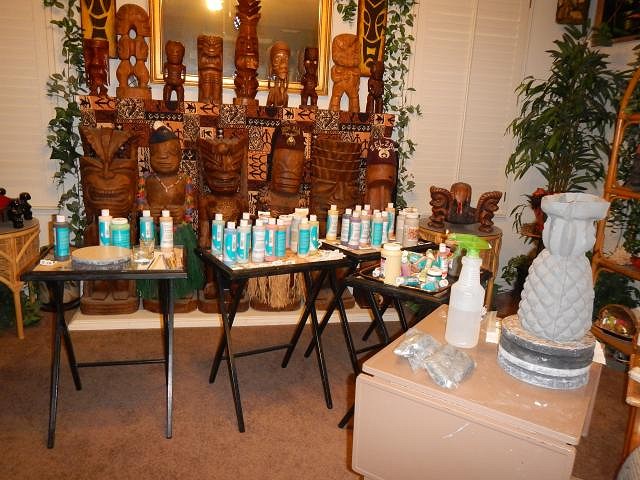
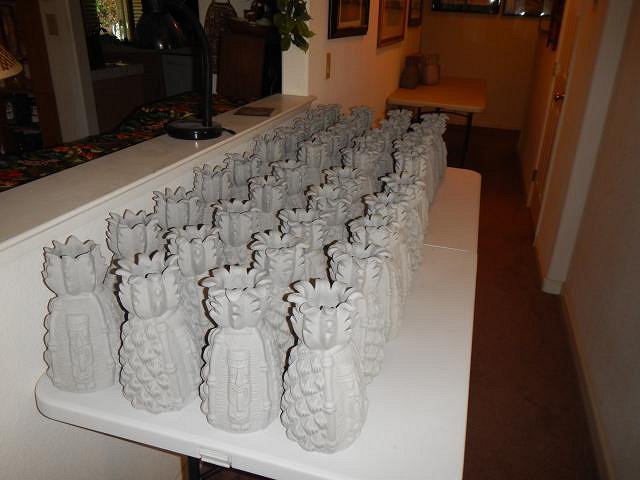
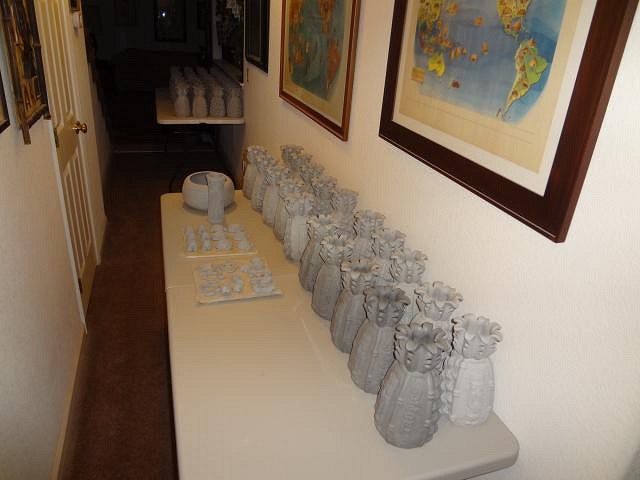
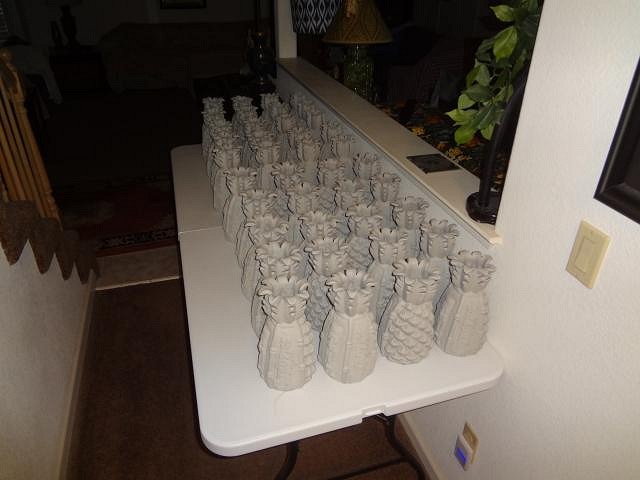
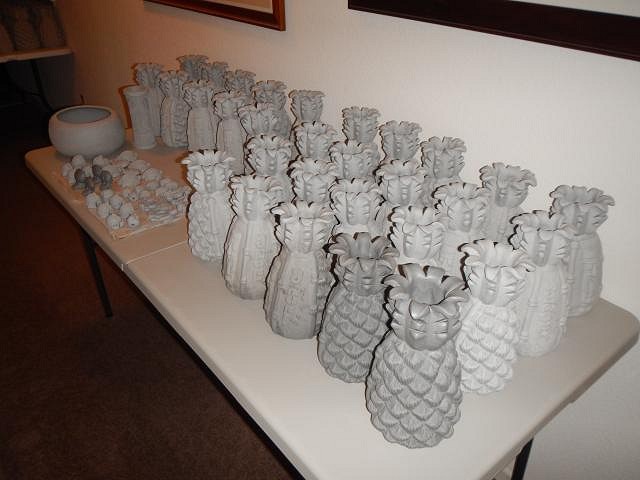
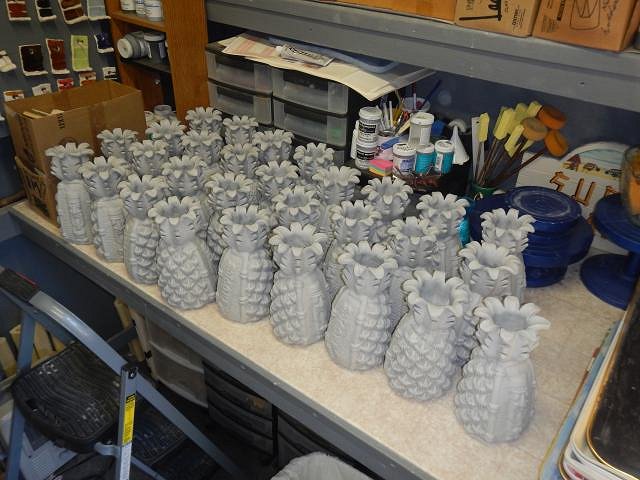
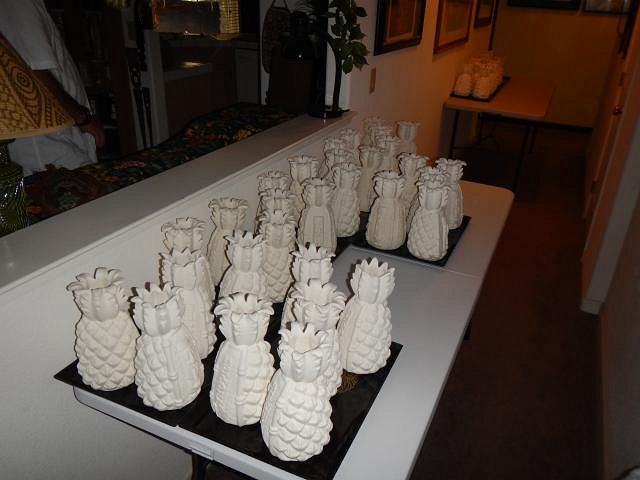
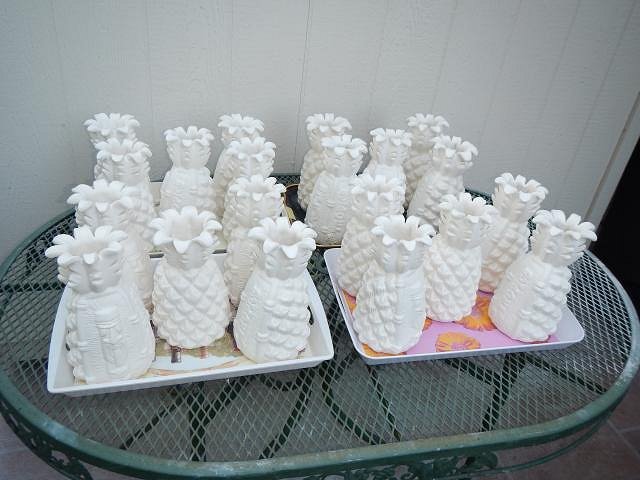
hang10tiki thank you for the smiling face. ========================================= SACRAMENTO CRAWL MUG 2016. It took three months to cast 70 mugs. We had a trip during this time that halted production. It is a real commitment to make a run of mugs. I set up a table in the hallway for the crawl mugs. The dining room table was covered with the Wish List #6 pieces in progress. I finally decided to build leaves and to wilt them on the top of each mug. Out of the mold the detail wasn't as much as I wanted so I hand carved the detail into each section on the back. It now looks like I wanted. I will just have to sculpt better in the future. I always put Dan to work. He's my heavy lifter and this mold is around 35 pounds when filled. One by one they start to add up. These mugs are so huge and I cast them to be thick that we keep running out of slip. When we bring it home I add water and we mix it up. They make it thick where we buy it so in a way it's a bargain. It is fun to watch them add up. Sometimes we have company and I get to show off our work. Every day we pour a mug. The next day we open the mold and I take it inside to fine tune all the parts. The mold dries from 6 am until 3 PM and then we pour the next mug. The table is slowly filling up. Ten days later I have 40 mugs on the table and we went shopping to buy another table for the next 30. Back to the store for more slip and then we mixed it up with water again. Every day I finish off a mug and then get back to the Wish List #6. In the background you can see the second table is beginning to fill up with mugs. Now I've done 20 more and placed them on the second table. 10 days later you can see how well the mugs on table one have dried. I have marked the mold with #70 the last mug I will pour now. Here it is out of the mold. No catastrophes so far. This photo shows that I have 70 total mugs drying. From the other end of the hallway you can see both tables are loaded. This was a huge project and there's so much more to do. Good thing I started on January 1st 2016! Cheers, Wendy |
|
L
lunavideogames
Posted
posted
on
Sun, Jun 5, 2016 4:16 PM
Wow Wendy what a huge task. You sure are a trooper! The pineapples look great. It will be a fun crawl to get such a cool mug. |
|
H
hang10tiki
Posted
posted
on
Mon, Jun 6, 2016 7:48 AM
Dannnng |
|
C

cy
Posted
posted
on
Mon, Jun 6, 2016 2:22 PM
The monkey bowl is fantasy Wendy!! |
|
D
danlovestikis
Posted
posted
on
Mon, Jun 6, 2016 8:53 PM
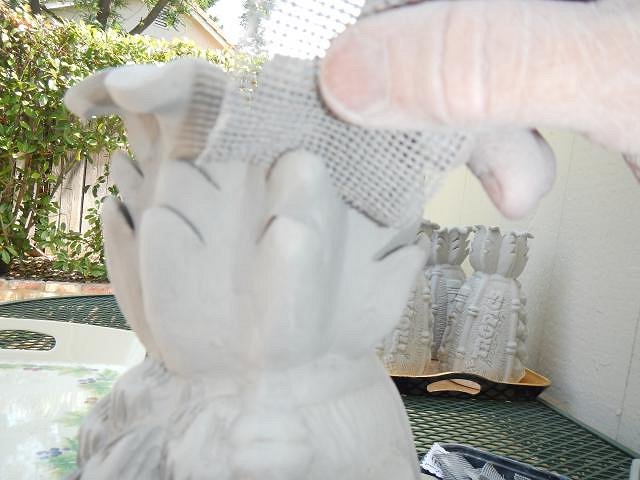
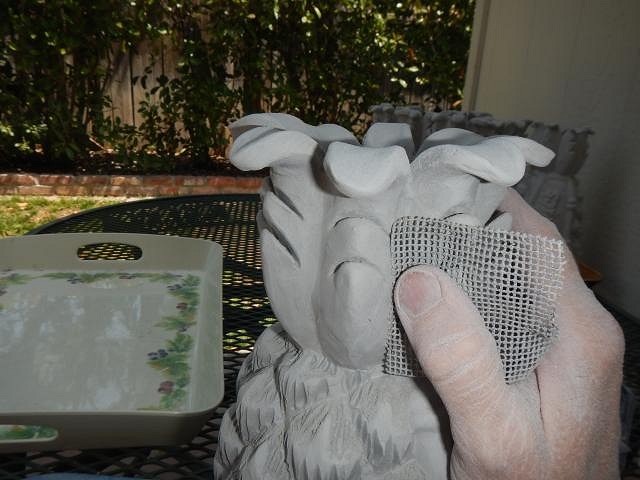
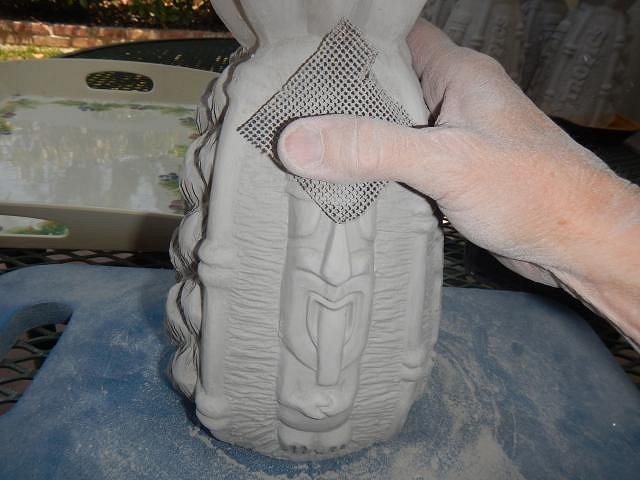
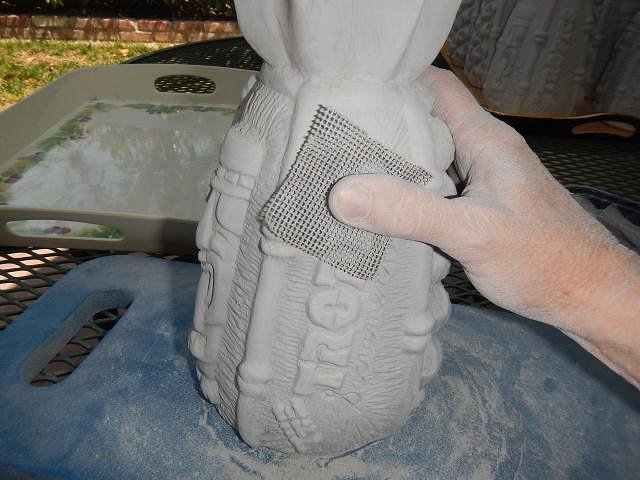
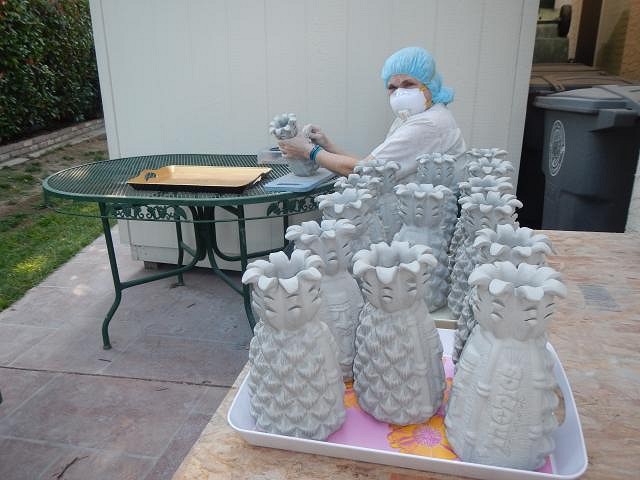
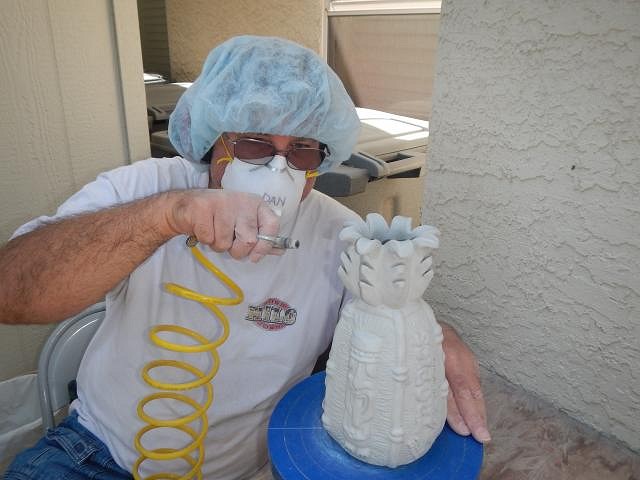
lunavideogames it is really a huge task but I started Jan. 1st. The year I made the first crawl mug I started in August. I am still shocked that I got them made by October. hang10tiki your comment just made the mug better. cy this was a fun bowl to make. Now it's in and out of a plastic bag all day long. Slowly drying. I sure like your new guitar design. ============================ Sacramento Crawl mug. The next step is to sand and to fine tune 70 huge mugs. It's time to wear a face mask for hours. Over the years I've learned a few things. One the clay dust will just fall right off of a big plastic bag so I wear one over my lap. Two I use a knee pad or other soft surface to protect the mug when I sand. Three I stick a piece of tape between my eyebrows so that I don't frown and end up with deep lines. You all know by now to WEAR A FACE MASK to prevent dying. When I designed this mug I knew it would be a bear to sand and to glaze but I did it anyway. It is always good to have a sanding plan and to stick with it on every mug. That will prevent you from missing a part. So my first area to sand was between each leaf on the top. Next I sanded all of the bent over leaves, top bottom and edges. I couldn't take a photo to show it but I used fingers from both hands to hold each end of the mesh and then I pulled it back and forth like a saw. I did this with the mesh pulled forward and then with it pressed backwards. 16 of these to sand on every mug. Then I sanded both sides of each leaf base. Now going around the tiki I sanded the bamboo, the tiki, the bamboo, the name, the bamboo. Next I did the bottom. 1 bottom x's 70 bottom's equals 70. The last step was to sand the pineapple made of 44 squares times 70 equals 3,080 squares. The grand total is 6,860 parts to sand to fine tune 70 mugs. Do I look hot and tired? I will be sharing my work days ahead. This wasn't a fast task. Time to rest, cheers, Wendy |
|
H
hang10tiki
Posted
posted
on
Mon, Jun 6, 2016 9:16 PM
This has to be my new favorite Wendy quote: WEAR A FACE MASK to prevent dying. That's a ton of work.... |
|
D
danlovestikis
Posted
posted
on
Tue, Jun 7, 2016 8:41 PM
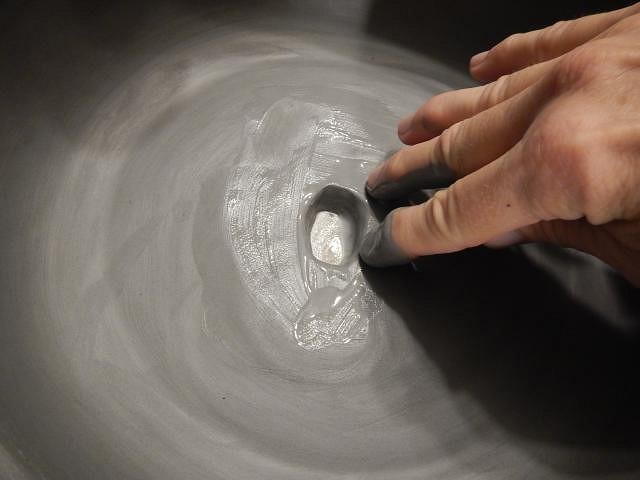
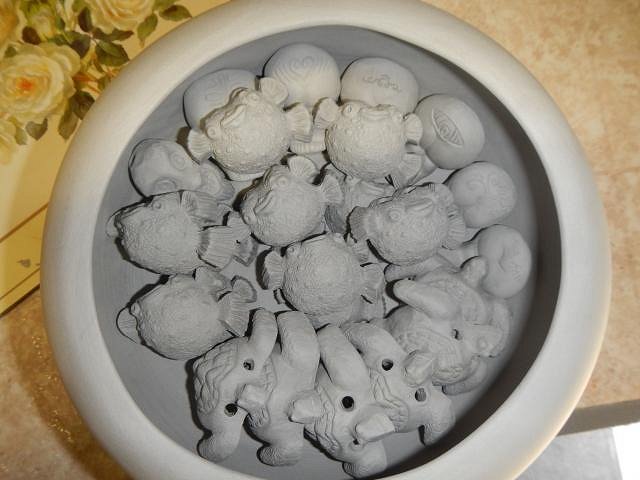
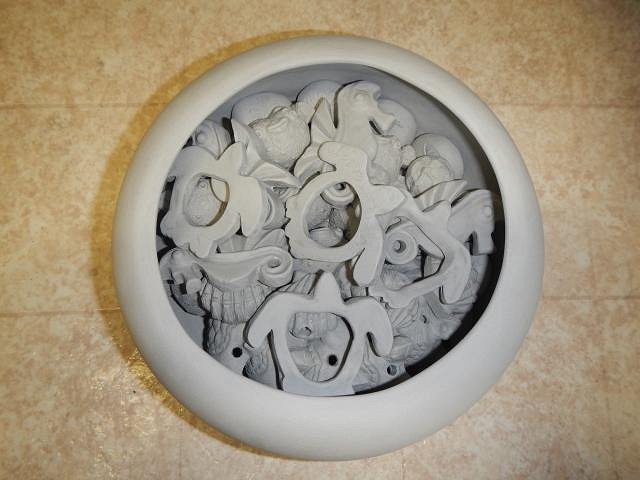
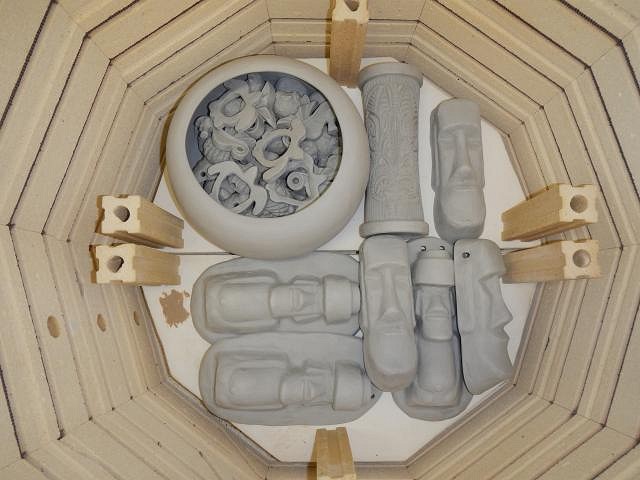
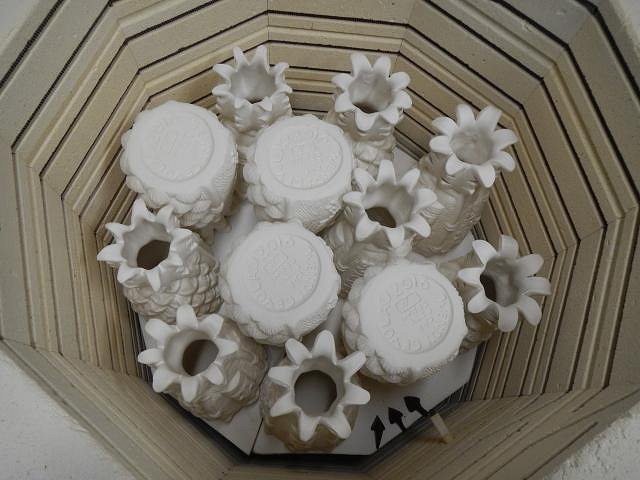
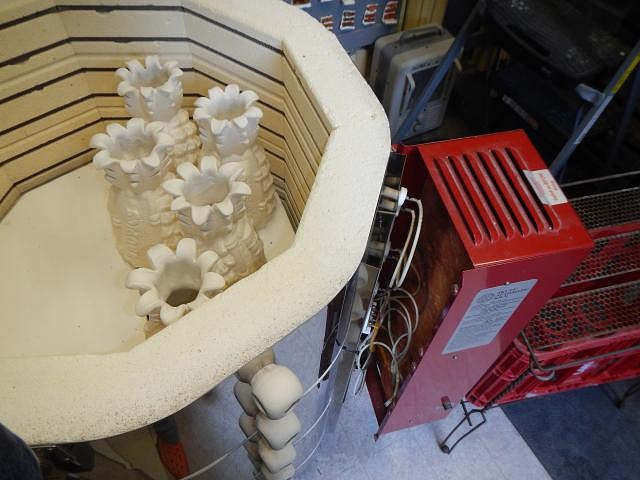
hang10tiki it's really fun to have someone not only read my words but to dub them a favorite. Thank you so much. ============================= While working on the Sacramento Crawl mug I also cast a few other things. They dried first and now it was time to sand them. Necklaces, the Swap mug and a huge bowl. I carved my name on the bottom of the bowl while sanding. My sanding supplies are a soft support for the item, mesh sandpaper and clay tools for carving. Now it the time to fine tune before firing. When I finished Dan got out the air compressor to blow off the dust. I was looking forward to loading all of the necklaces into the big bowl. When you bisque fire everything is able to touch each other. So I kept stacking in the necklaces in layers until they were all in the bowl. Now I filled the bottom shelf of the kiln with the bowl, the swap mug and some Moai that I'd made. This is the first load of crawl mugs to sand. I took them outside and you saw how many places I had to sand to finish each one. Dan again blew off the dust. He had to get behind the lower leaves and at the same time not hit the bent leaves. He did an excellent job and into the kiln they went to be fired. I fire with a preheat only if I am uncertain that they are completely dry. If there is any moisture they will crack. Cheers, Wendy |
|
H
hang10tiki
Posted
posted
on
Wed, Jun 8, 2016 12:42 AM
Busy busy Well well well
|
|
H
hang10tiki
Posted
posted
on
Wed, Jun 8, 2016 7:53 PM
|
|
D
danlovestikis
Posted
posted
on
Wed, Jun 8, 2016 8:17 PM
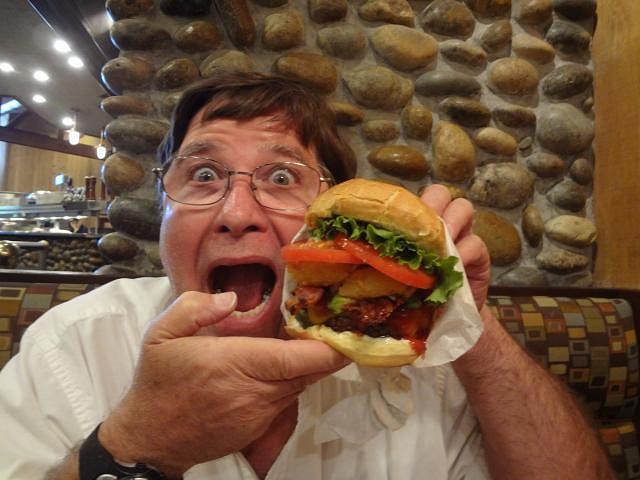
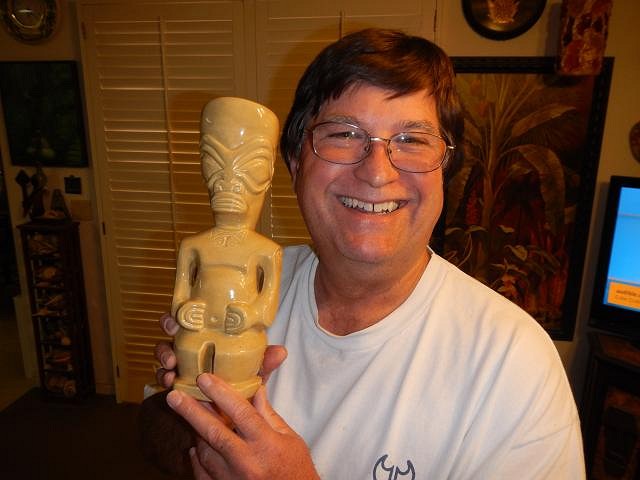
hang10tiki thank you so much for including us in Tiki Hula's visit to Las Vegas. You showed him a great time. The photos are fun. I hope he got loose from the Frankie's tiki without harm. ============================ I've been working hard today so I'm just going to post some catch up photos. Justin posted this photo on fb of one of my hot tub hula girls. They sure get around! We did a lot of backyard pruning and clean up and I thought that the flower made this a photo time. I took Dan out for a burger. This one was called a Widow Maker. I had a salad. Dan earned a tiki. I got this one from Dylan in Australia. We were in a thrift store when I saw this mask. I think it is African in origin but it will fit in well with tikis. That's it tonight I need to crash. Cheers, Wendy |
|
H
hang10tiki
Posted
posted
on
Wed, Jun 8, 2016 10:41 PM
Yep This is awesome
So is this
Round 2
Good times... |
|
D
danlovestikis
Posted
posted
on
Fri, Jun 10, 2016 9:21 PM
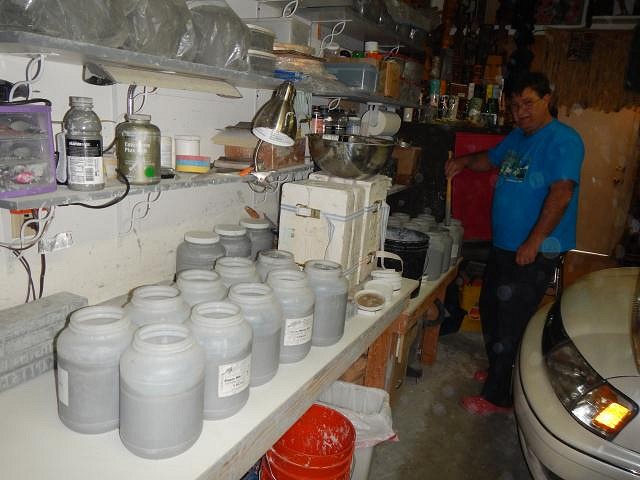
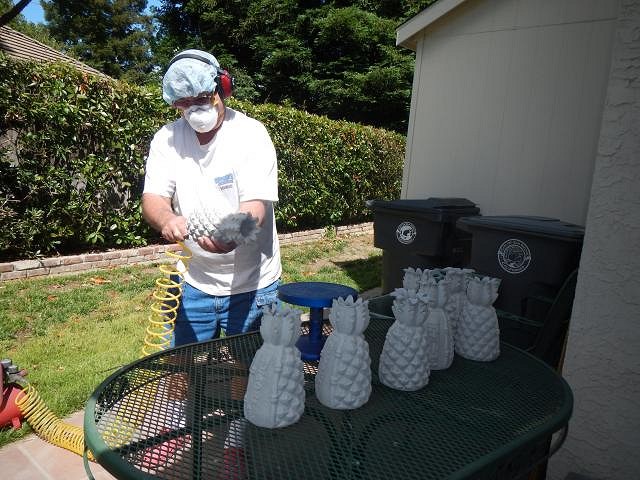
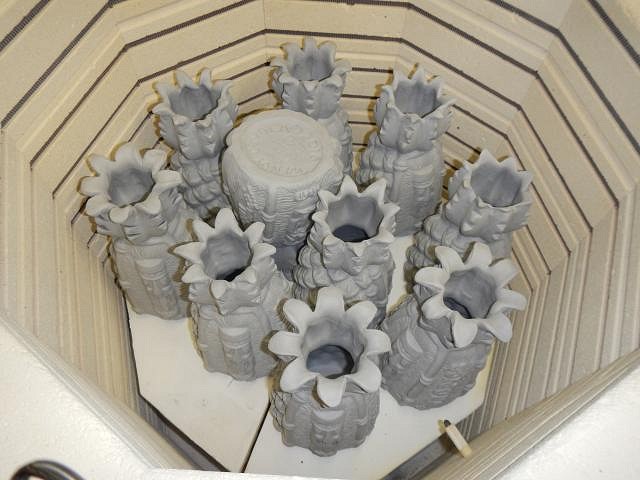
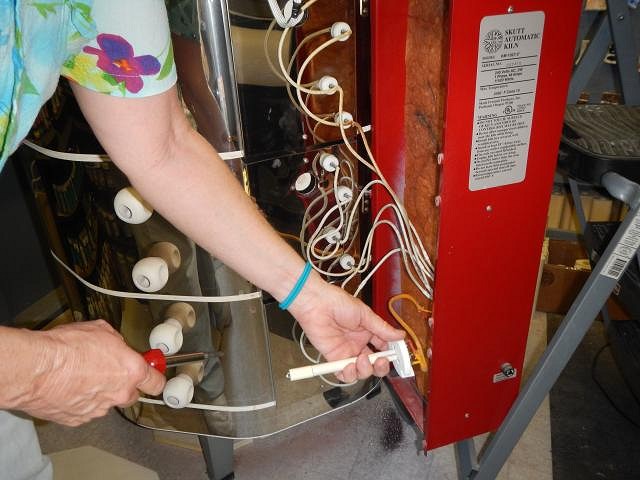
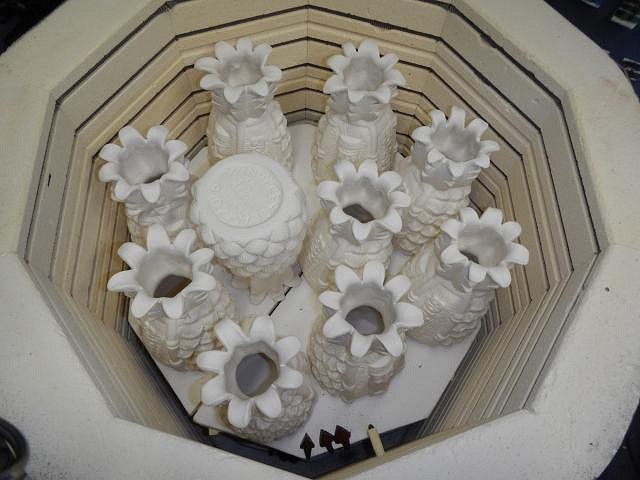
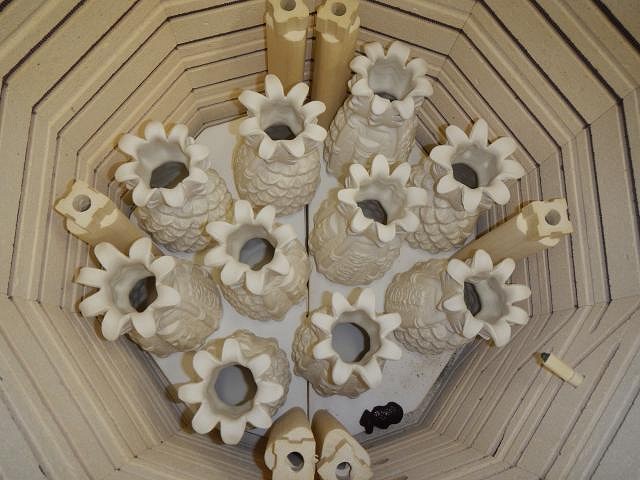
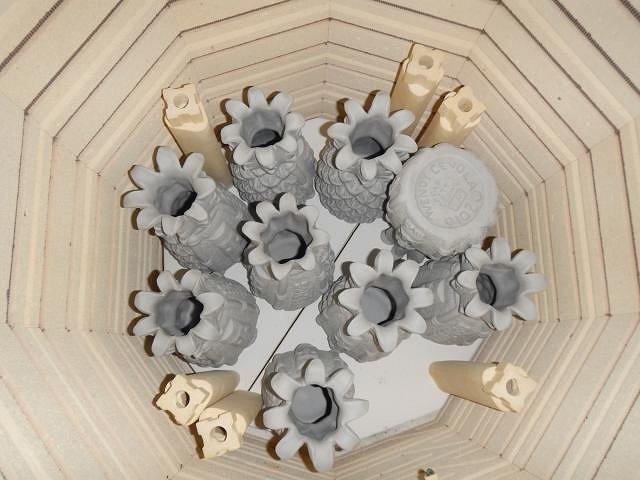
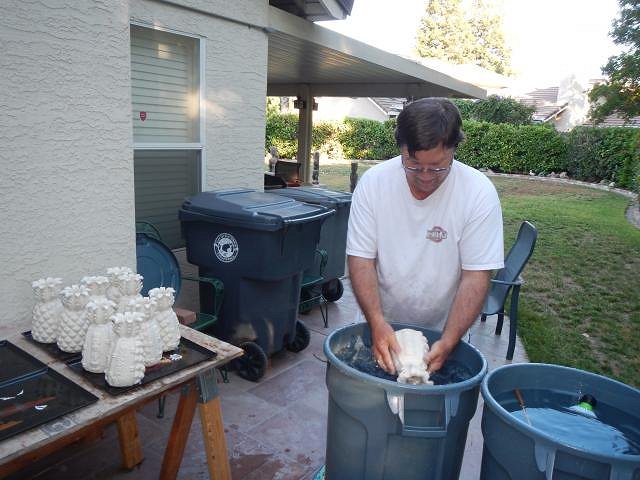
Man oh man you two know how to party! I'm jealous but at the same time I'm loving watching you guys have so much fun. I just wish we were there. ================================ Sacramento Crawl mug progress report. Here are a few of the photos that cover one whole month of work. I would get carpel tunnel if I posted all of them. It was time to open the kiln with the first Sacramento Crawl mugs. Did they make it or did they crack? They were all fine. I unloaded all the misc. things and they were fine too. Every necklace and mug had to be scrubbed. I was able to get him to blow a bubble just for you! Once in the house these were put on the dining room table and covered with plastic until it is time to glaze them. The next load is brought out to be sanded. It's time to kiln wash some of my shelves. This material comes as powder that you mix in water. It is poison and a mask must be worn. Also so not get it on your skin. Death from kiln wash comes much faster than with clay dust. Once it is made into a paste you brush it on in one direction and once it is dry then the other and then back again. Let it dry before using the self in your kiln. Sanding and Dusting. There's a lot of repetition when making a run of mugs. I had problems with the kiln turning off because it wasn't heating fast enough. So I replaced the thermal couple. I put it back together and started another load. It turned off once and I restarted it and it finished. Another load sanded and dusted. Fired but the cones all melted. Not good. There is still a problem. Dan said a good mug should be able to be held with one hand. I showed him it was easy even if they do weight 3.5 pounds empty! I had to take the whole control box in to have the 3 replays replaced. I hope I remember where all these wires go and that it works. I turned in the box at Alpha and got it back a few hours later. A miracle. Once they are washed they go back into the house and are stored on the tables in the hallway. Yes the kiln is fixed! Another batch waiting to be washed. The last 10 to fire are waiting for Owen's HUGE bowl to dry. It will go on the top shelf of this load. I scrub each one with a brush and Dan rinses them in the second can. The rinse water should stay clear. 60 of the 70 are now bisque fired. 10 to go. Not a single one cracked in the kiln. It's a great day for pineapples! |
|
H
hang10tiki
Posted
posted
on
Sat, Jun 11, 2016 5:49 AM
Come on
:) |
|
D
danlovestikis
Posted
posted
on
Sun, Jun 12, 2016 7:52 AM
hang10tiki you caught us. We should have waited until they matured and were colored. The hurricane sure did knock them over. ======================== We are taking a break and going for a walk. Back later. Wendy |


Pages: 1 2 3 4 5 6 7 8 9 10 11 12 13 14 15 16 17 18 19 20 21 22 23 24 25 26 27 28 29 30 31 32 33 34 35 36 37 38 39 40 41 42 43 44 45 46 47 48 49 50 51 52 53 54 55 56 57 58 59 60 61 62 63 64 65 66 67 68 69 70 71 72 73 74 75 76 77 78 79 80 81 82 83 84 85 86 87 88 89 90 91 92 93 94 95 96 97 98 99 100 101 102 103 104 105 106 107 108 109 110 111 112 113 114 115 116 117 118 119 120 121 122 123 124 125 126 127 128 129 130 131 132 133 134 135 136 137 138 139 140 141 142 143 144 145 146 147 148 149 150 151 152 153 154 155 156 157 158 159 160 161 162 163 164 165 166 167 168 169 170 171 172 173 174 175 176 177 178 179 180 181 182 183 184 185 186 187 188 189 190 191 192 193 194 195 196 197 198 199 200 201 202 203 204 205 206 207 208 209 210 211 212 213 214 215 216 217 218 219 220 221 222 223 224 225 226 10816 replies