Pages: 1 2 3 4 5 6 7 8 9 10 11 12 13 14 15 16 17 18 19 20 21 22 23 24 25 26 27 28 29 30 31 32 33 34 35 36 37 38 39 40 41 42 43 44 45 46 47 48 49 50 51 52 53 54 55 56 57 58 59 60 61 62 63 64 65 66 67 68 69 70 71 72 73 74 75 76 77 78 79 80 81 82 83 84 85 86 87 88 89 90 91 92 93 94 95 96 97 98 99 100 101 102 103 104 105 106 107 108 109 110 111 112 113 114 115 116 117 118 119 120 121 122 123 124 125 126 127 128 129 130 131 132 133 134 135 136 137 138 139 140 141 142 143 144 145 146 147 148 149 150 151 152 153 154 155 156 157 158 159 160 161 162 163 164 165 166 167 168 169 170 171 172 173 174 175 176 177 178 179 180 181 182 183 184 185 186 187 188 189 190 191 192 193 194 195 196 197 198 199 200 201 202 203 204 205 206 207 208 209 210 211 212 213 214 215 216 217 218 219 220 221 222 223 224 225 226 10,816 replies
|
H

hang10tiki
Posted
posted
on
Tue, Apr 9, 2019 9:31 PM
Wow Cheers |
|
C

CyroTiki
Posted
posted
on
Wed, Apr 10, 2019 12:25 PM
Wow, such a cool mug! I love the stippling texture on it and the tray on top is going to be great for garnishes and effects! :D |
|
D

danlovestikis
Posted
posted
on
Wed, Apr 10, 2019 7:29 PM
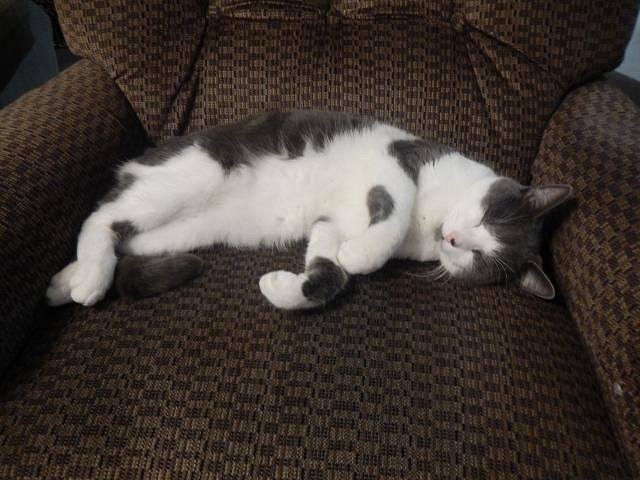
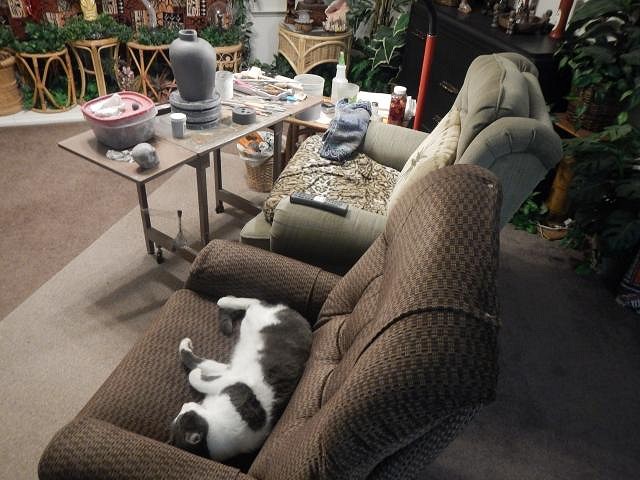
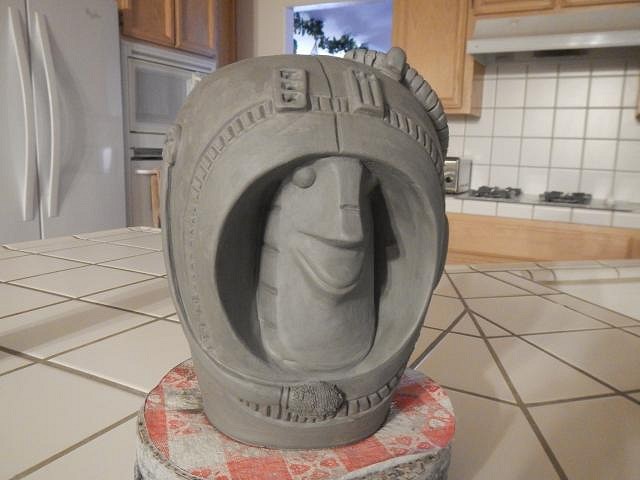
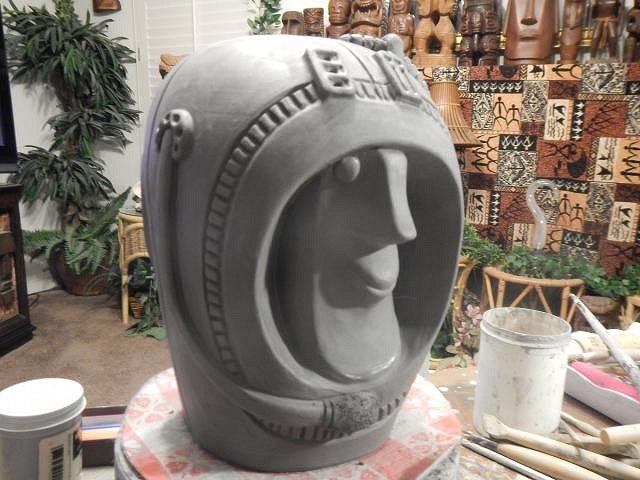
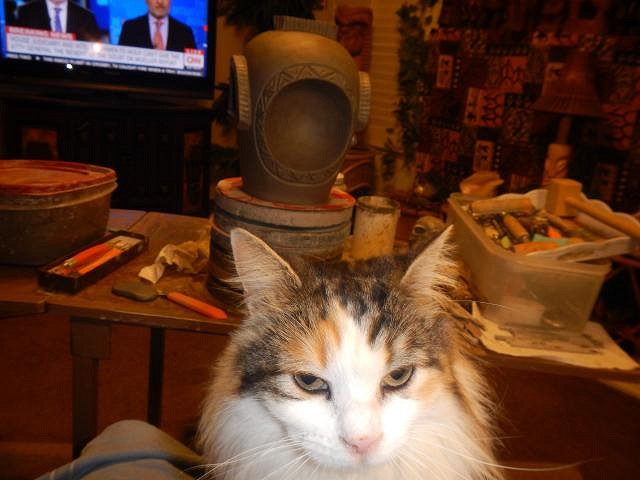
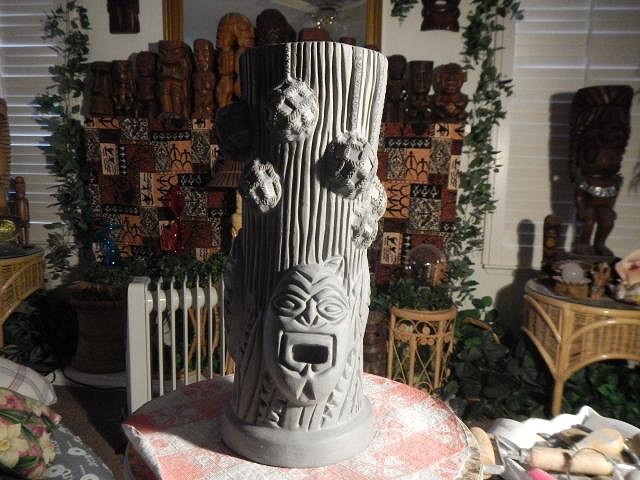
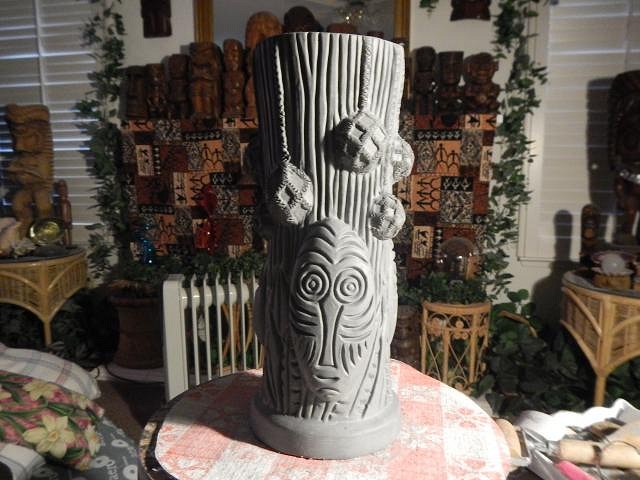
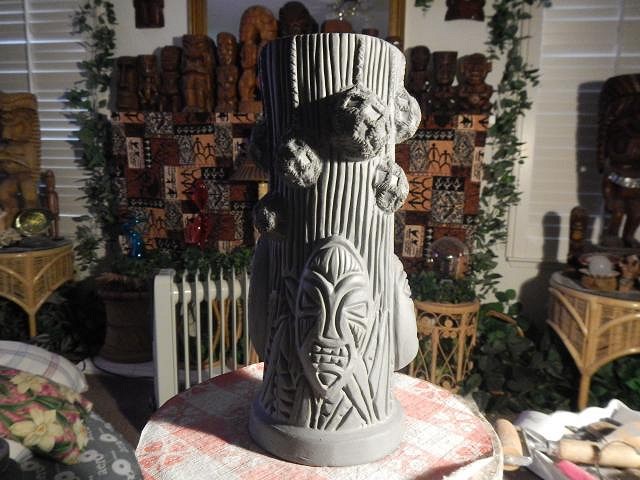
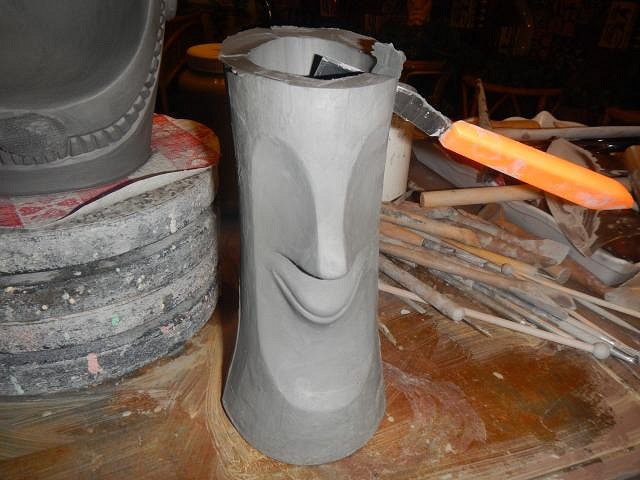
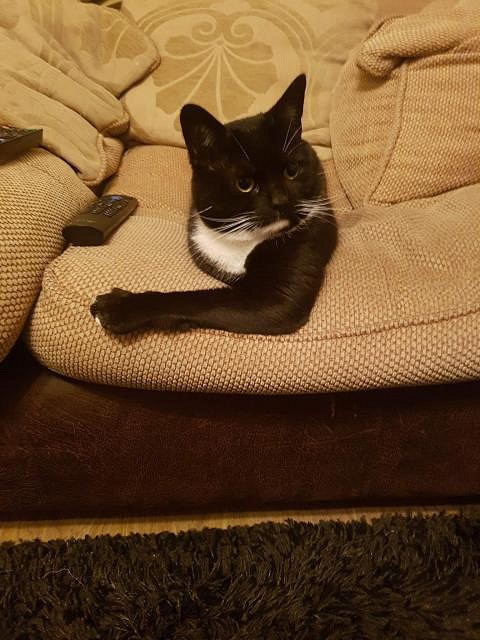
hang10tiki ah thank you tiki brother. CyroTiki thank you. I was just admiring your sunken pirate ship. That's really fun. =================================== Wish List #8 Phase Four continues with some twists. I will eventually show the helmets as they were in the past with skulls but first I'll show some other designs. Once I have these fired and glazed then I will go down the list of wishers and let them decide it there is one they want. Next up I made a Spaceman Tiki Bob helmet. This is our neighbors cat Scottie. He comes over each morning to hang out while I work. On this morning he feel asleep. I had fun playing with Tiki Bob and making his helmet.
It always looks as if I make something in one day. That is rarely the case. This one took three days. Cheers, Wendy |
|
D
danlovestikis
Posted
posted
on
Fri, Apr 12, 2019 6:42 AM
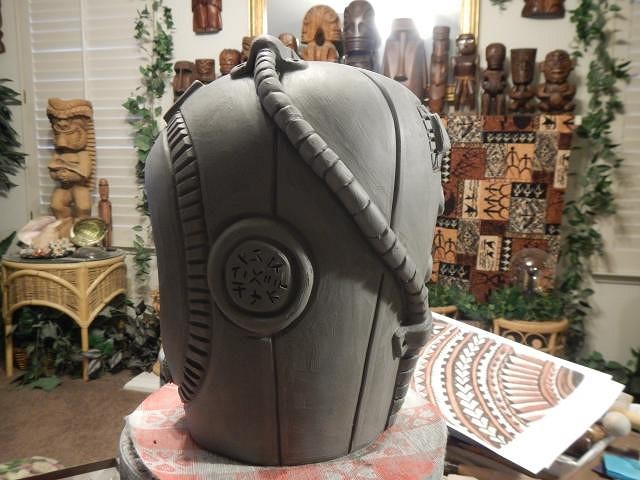
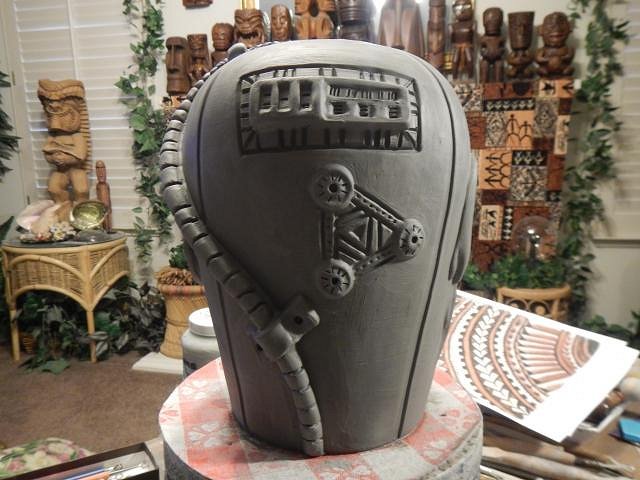
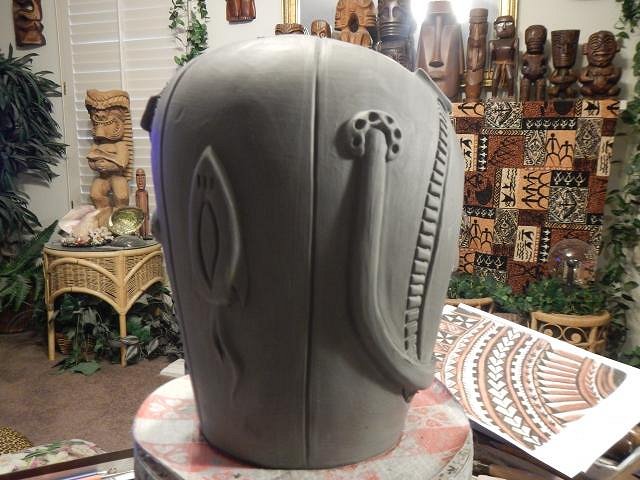
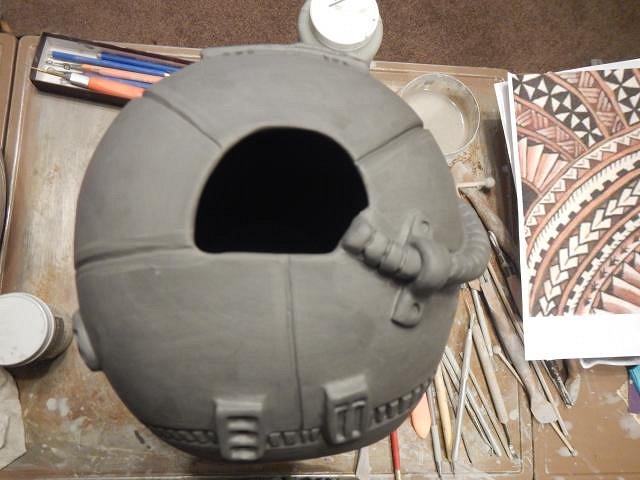
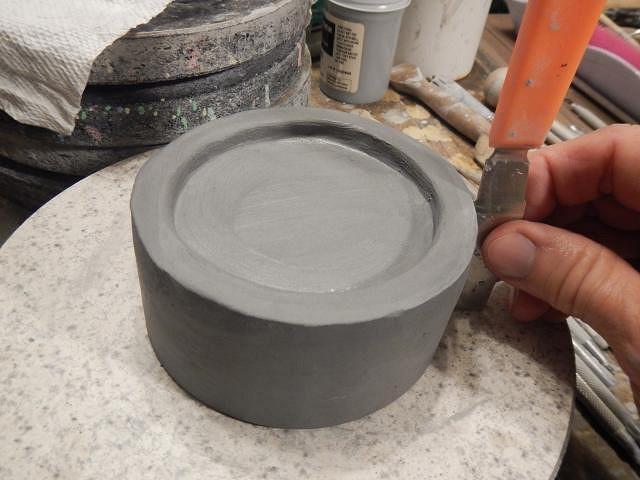
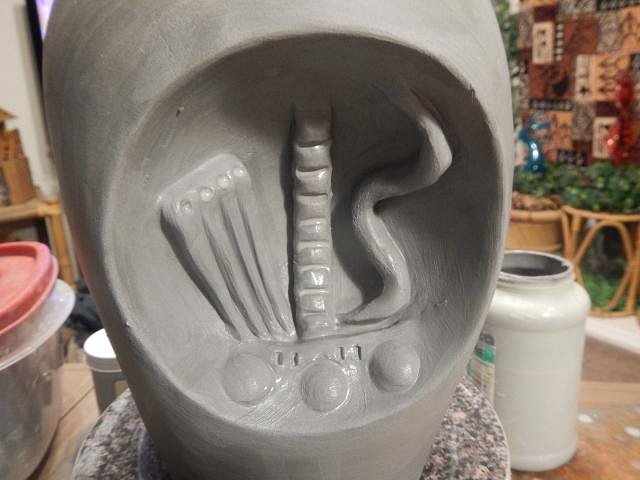
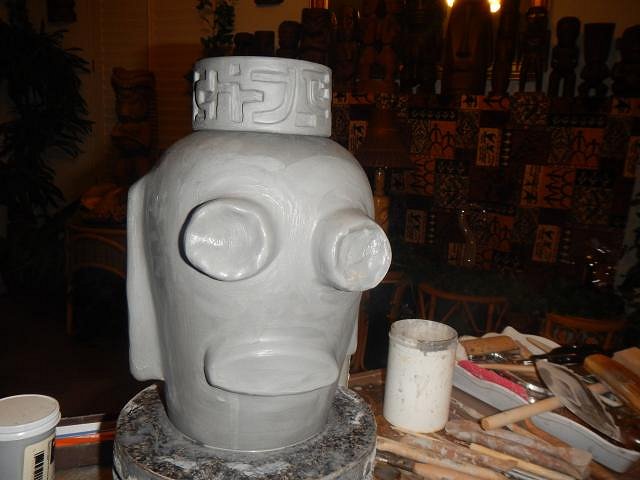
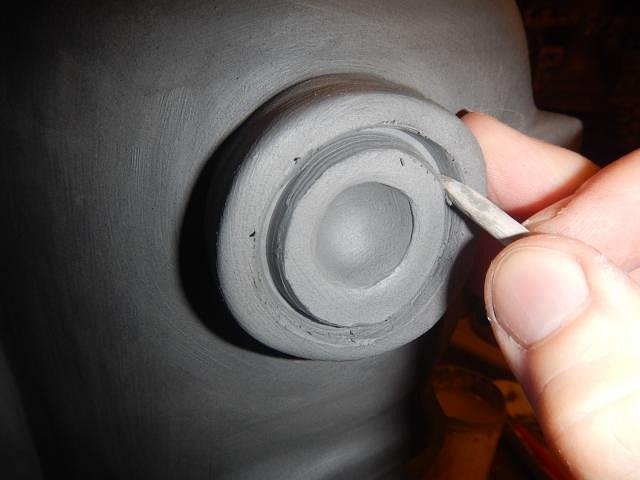
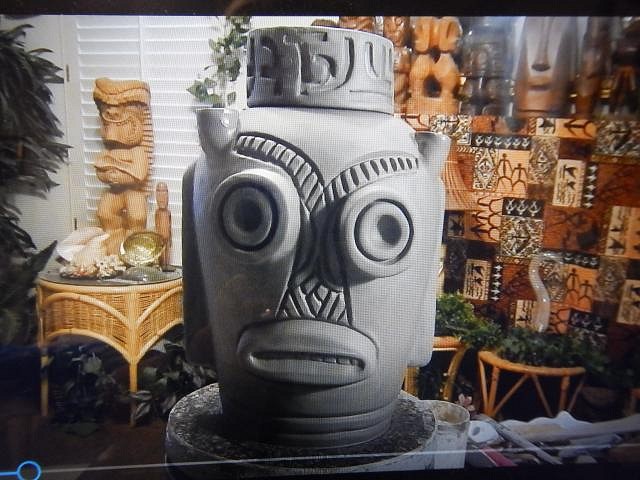
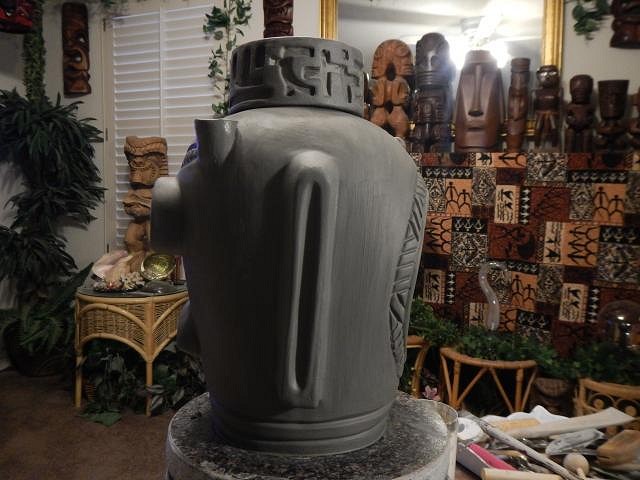
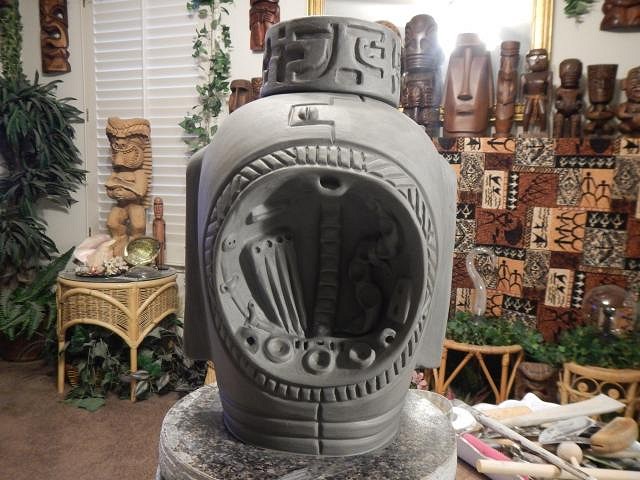
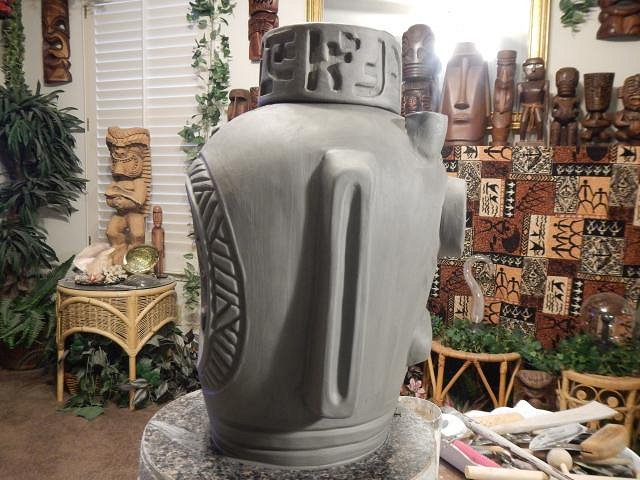
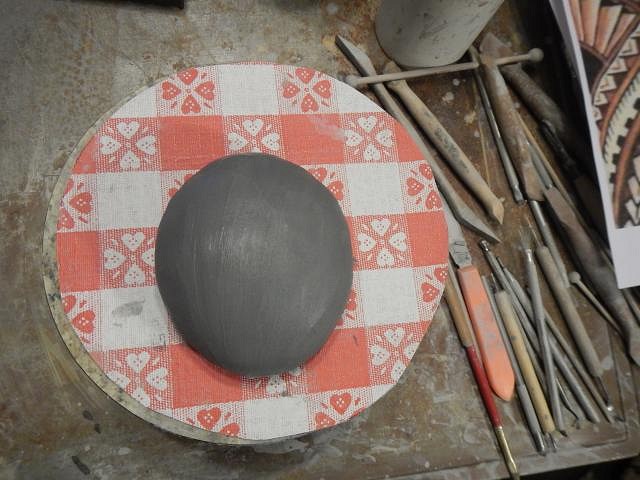
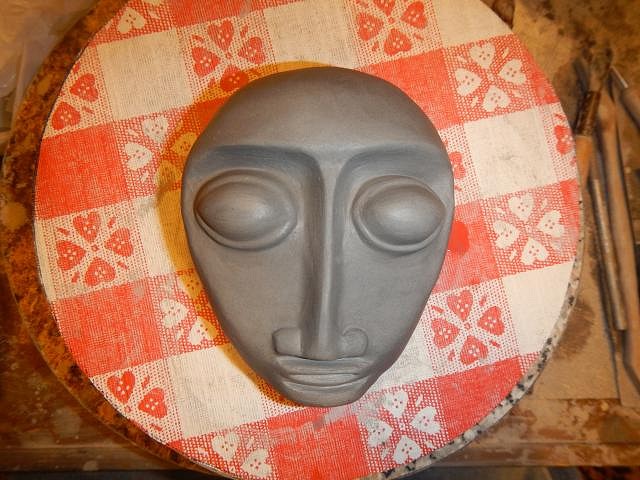
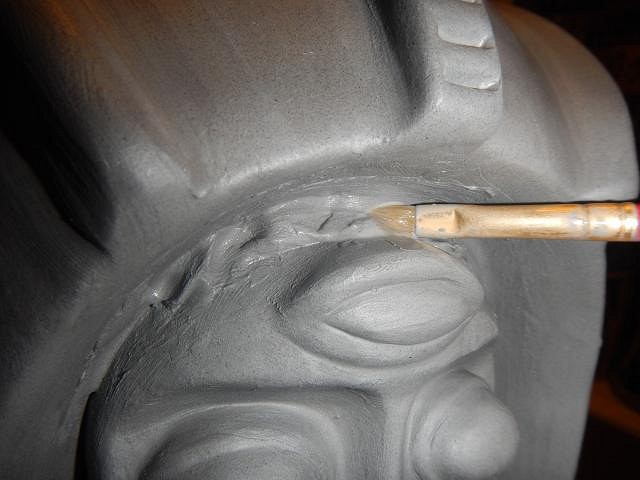
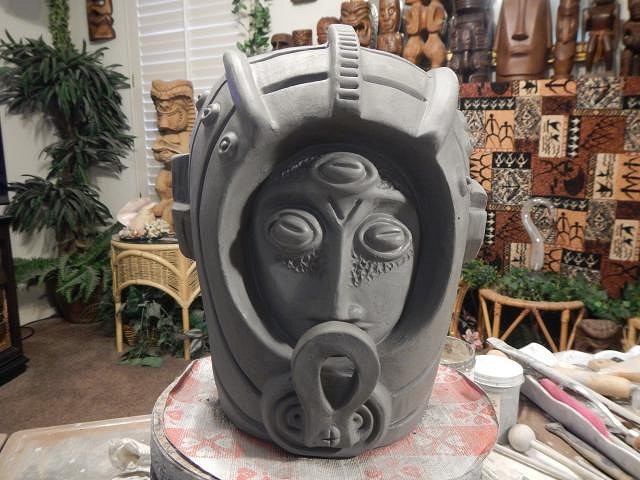
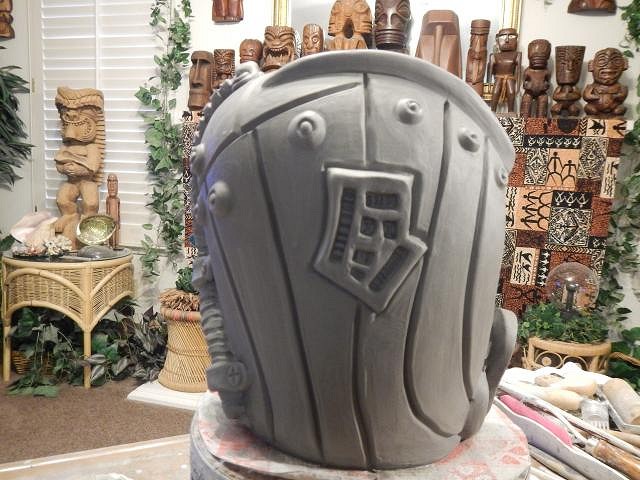
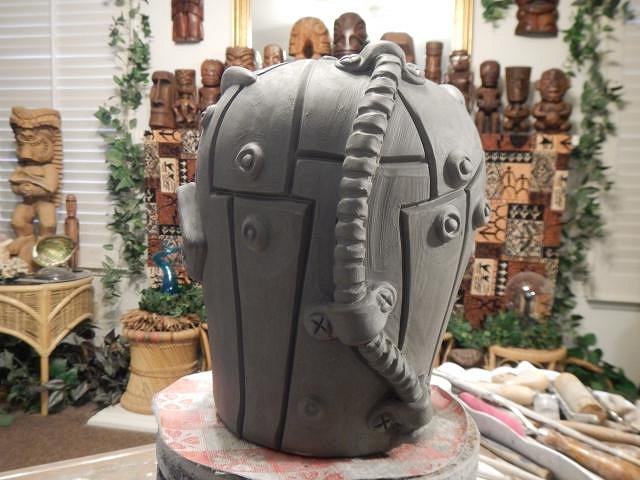
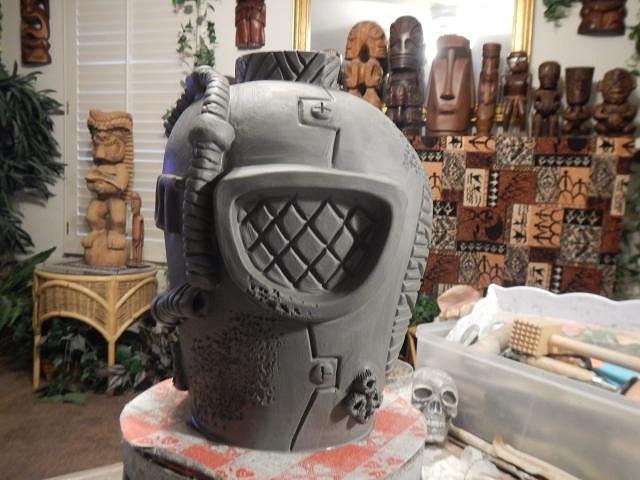
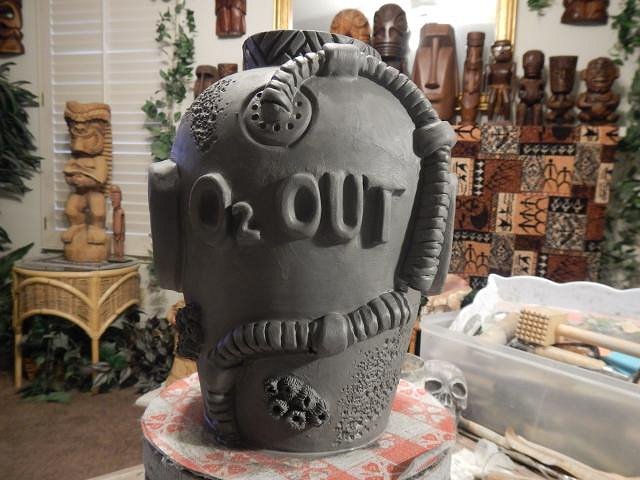
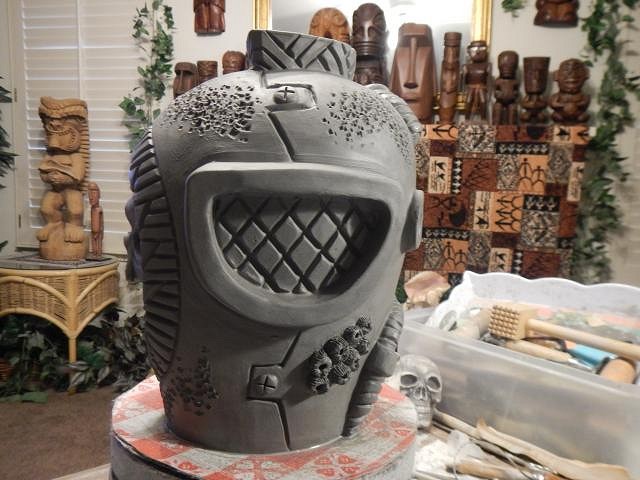
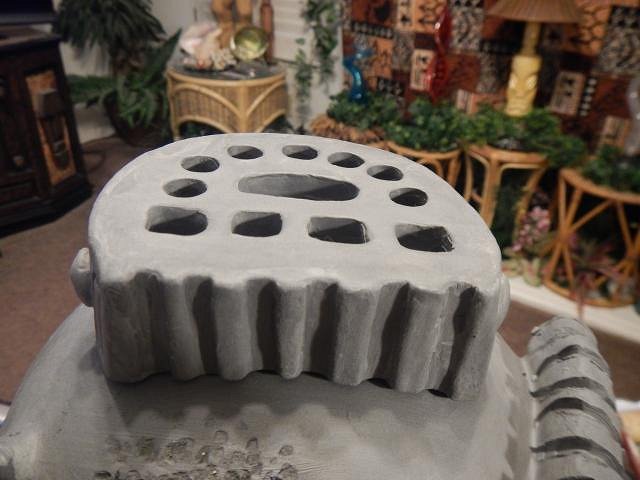
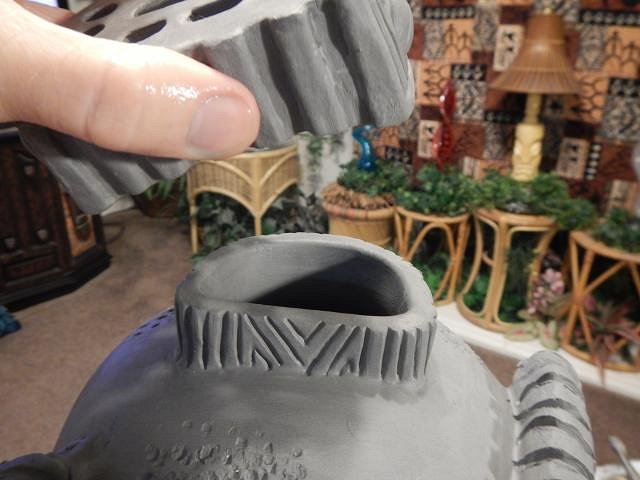
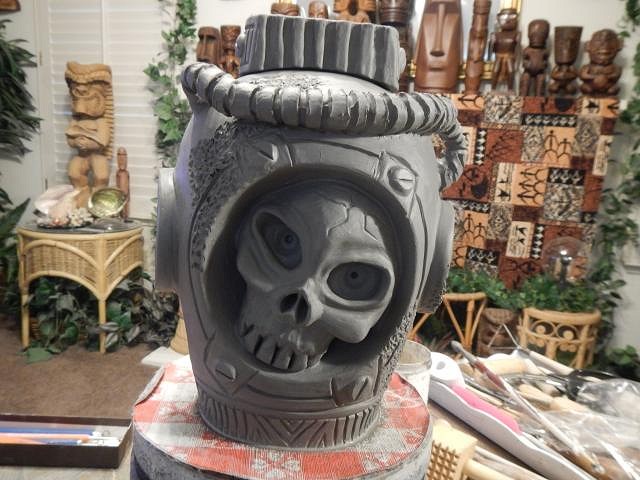
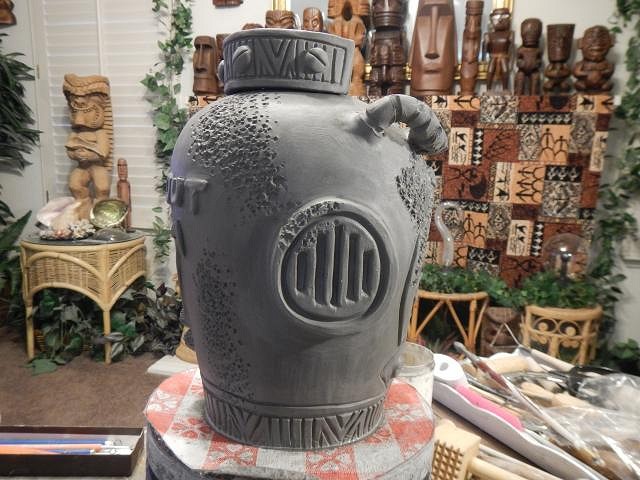
Wish List #8 Phase Four the Helmet Series. Ok, I love Robot toys though I've never owned one. I looked at my helmet cast and said, have some fun do a Robot. Here's what I came up with. To start with I formed a lid. I used a label scraper to make sure the sides were straight up and down. I carved out the inside too and made sure it fit. Then I used alien designs to decorate the lid and then I added straw holes. In the back I started adding instrument panels and eventually there will be jewels and wires that add to the look. Next I began to build the face. I use little wooden sticks that I've shaped with a knife and sandpaper. Meet the Polynesian Robot. His antenna will have a jewel on top of each one. Side. There are even loops for adding the wire. Other side. It's fun to see what I can do with the helmet. The last thing will be fill wishes with the Diver's Helmets with a skull. But first I'll so a ……… Cheers, Wendy |
|
H
hang10tiki
Posted
posted
on
Fri, Apr 12, 2019 11:06 AM
Love the Bob |
|
D
danlovestikis
Posted
posted
on
Sat, Apr 13, 2019 7:24 AM
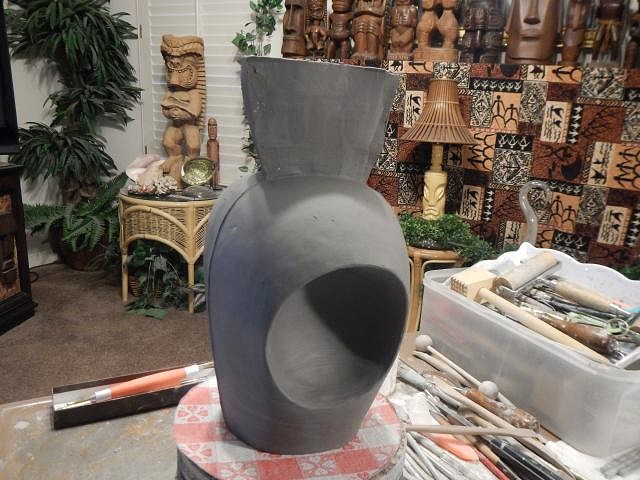
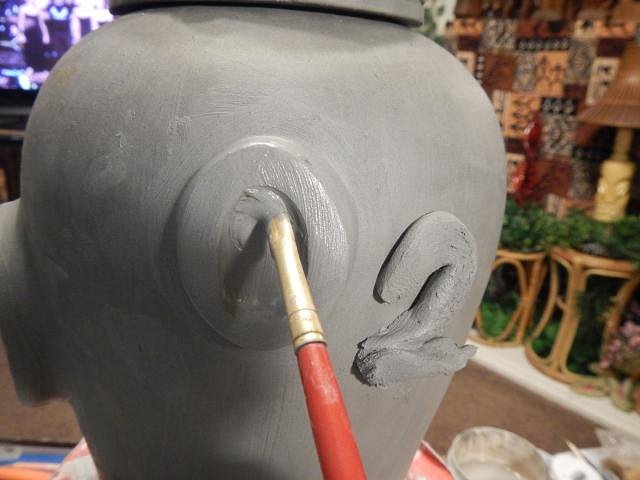
hang10tiki thank you for the visit and enthusiasm over my art! ==================================== Wish List #8 Phase Four continues with another helmet this one holding an Alien from the planet Gidzork. I start off with a cast of the helmet and a lump of clay for the Alien head. Our neighbors cat Scrabble comes most every day to watch me work and to eat her treats. The secret lives of cats! I form the head and then let it firm up for a couple of days. Then I carve out the back and clean it up. Then I store it in plastic until the time is right for adding it to the helmet. Dan told me to add a third eye. I did that and then I added the head to the helmet and sealed it with sticky clay.
This has been fun but now is the time to just make some Diver's helmets with the skulls inside. Every so often I just have to have some play days and now it's back to the real world of wishes. Cheers, Wendy |
|
S

Sandbartender
Posted
posted
on
Sat, Apr 13, 2019 7:27 AM
Holy moleys! Wendy, you outdo yourself on a daily basis! These helmets are all amazing! |
|
H
hang10tiki
Posted
posted
on
Sat, Apr 13, 2019 6:42 PM
Wow Strong work |
|
D
danlovestikis
Posted
posted
on
Sun, Apr 14, 2019 9:01 AM
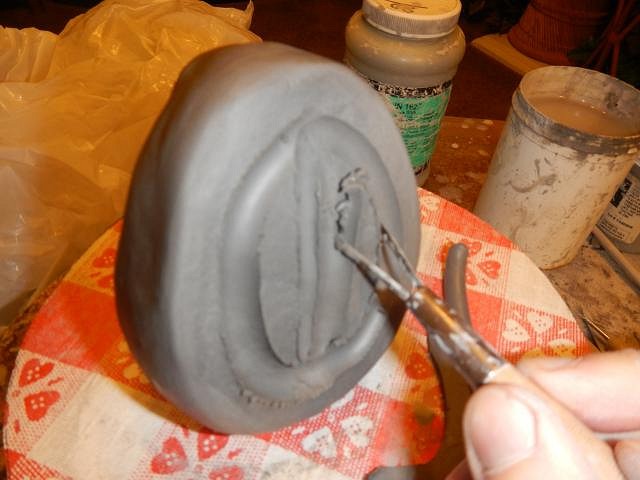
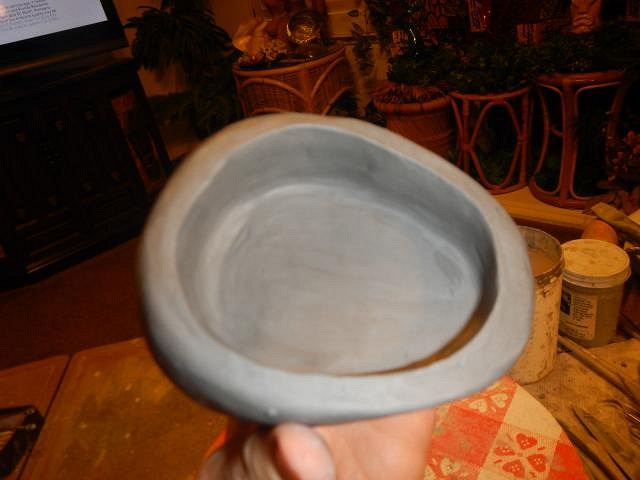
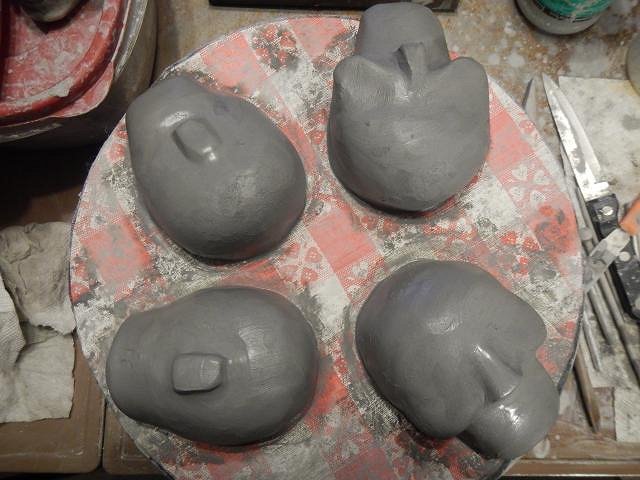
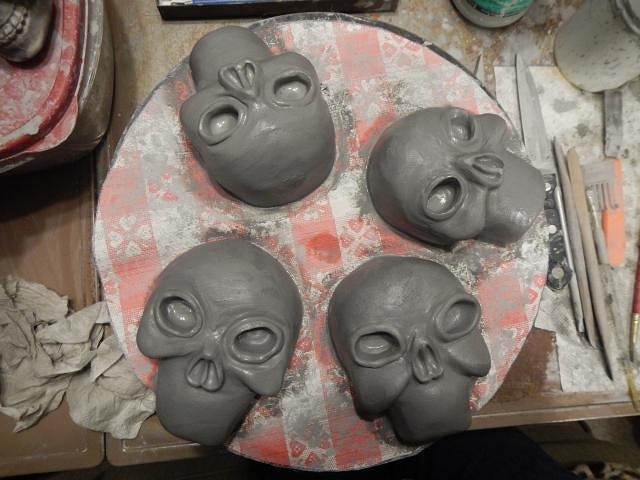
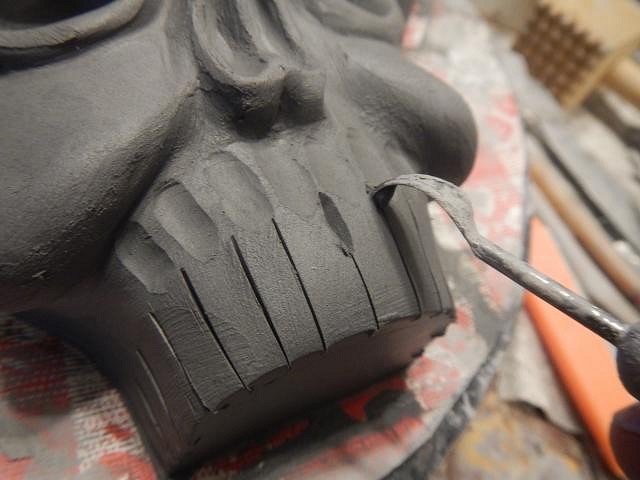
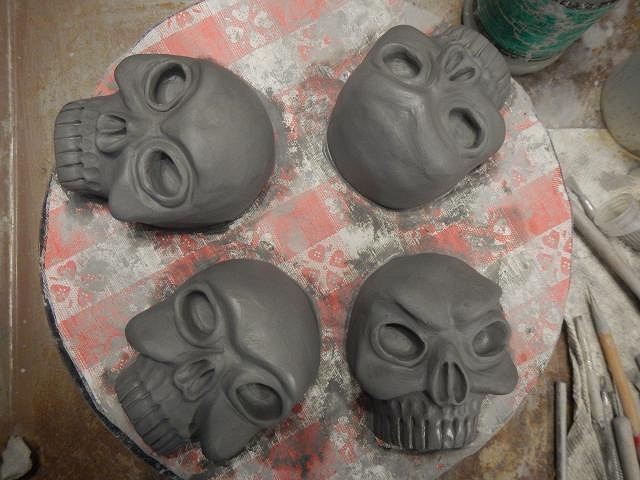
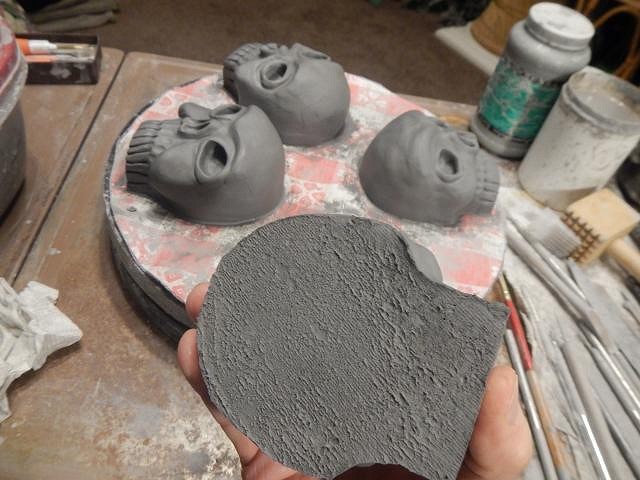
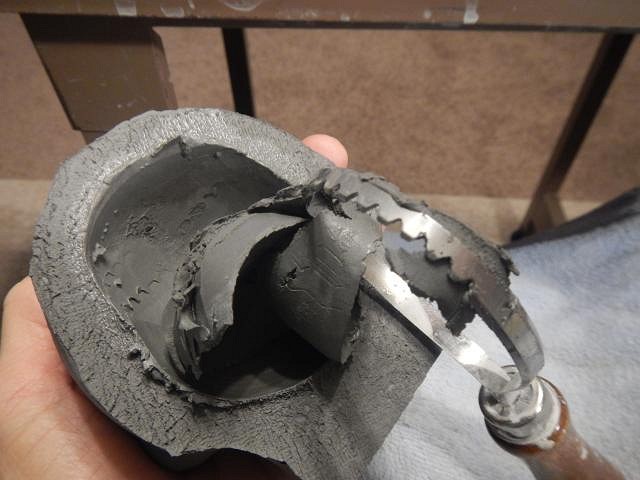
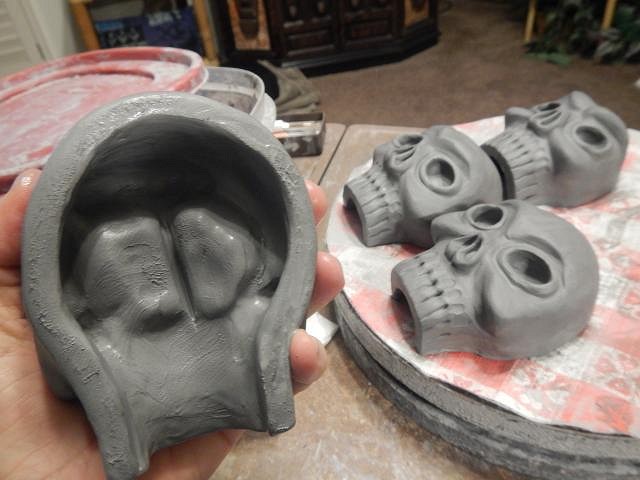
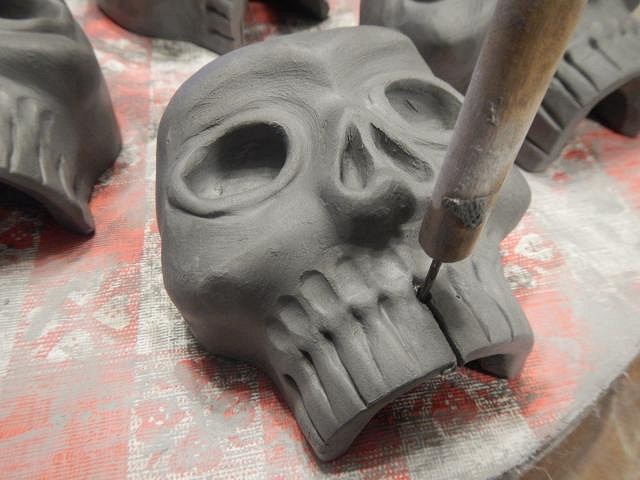
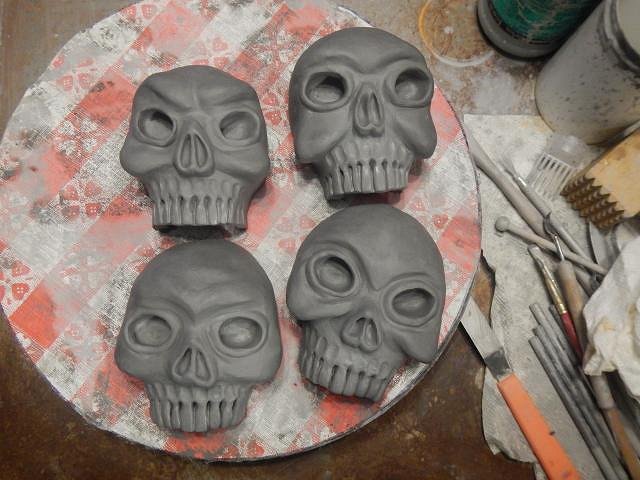
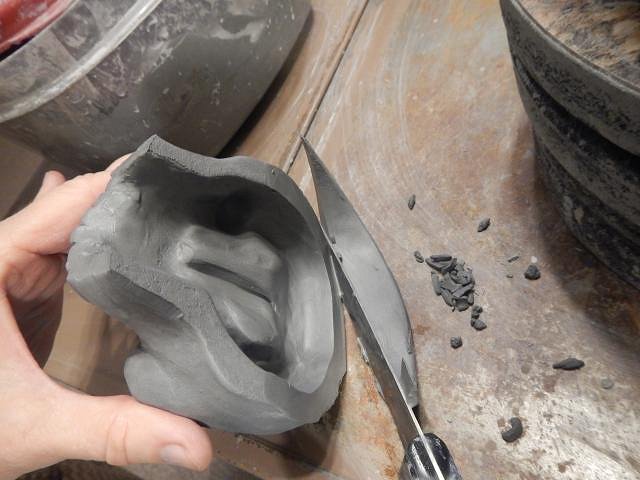
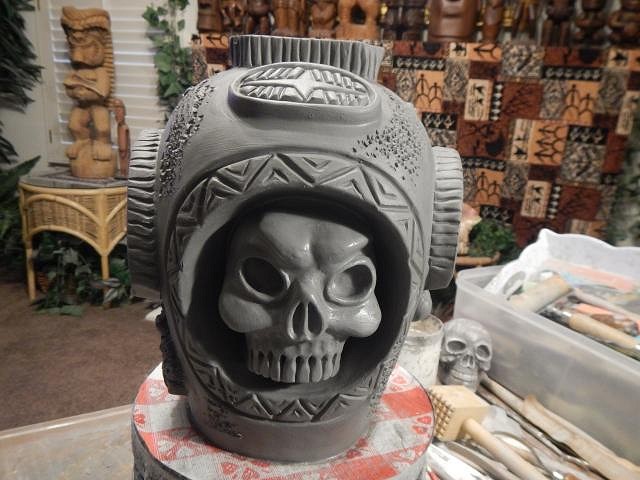
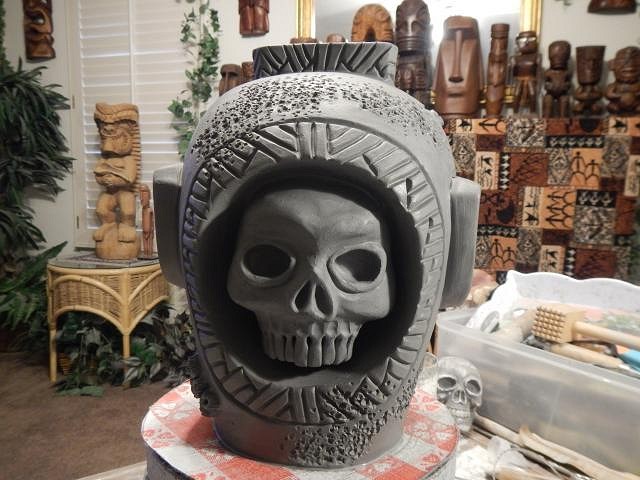
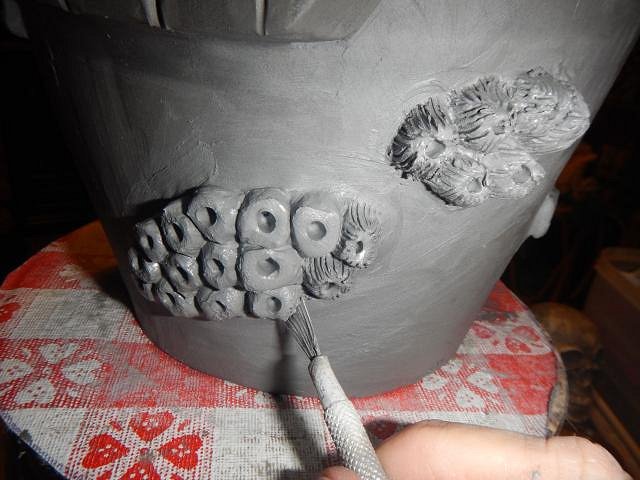
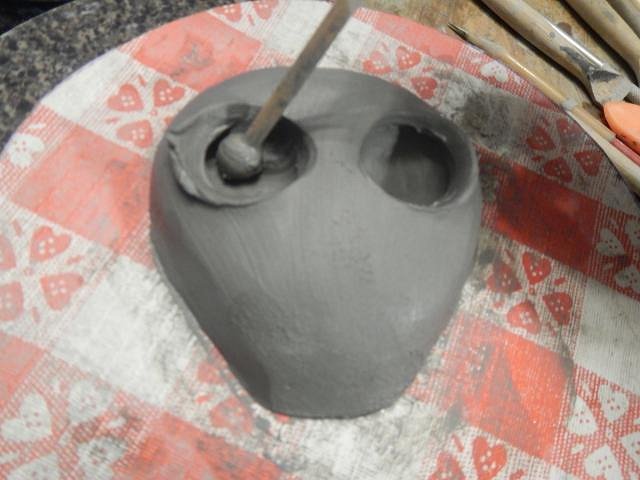
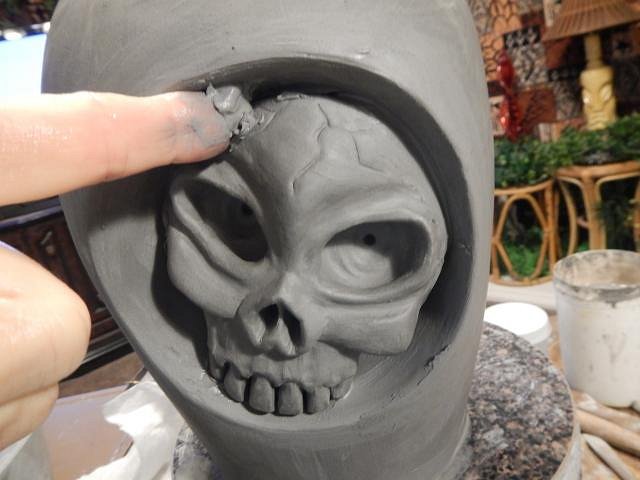
Sandbartender thank you. It takes three days to make a helmet. I'm just good at how I post so that it doesn't get too boring. I'm really happy with the response. Thank you. hang10tiki a bar with aliens from all planets would rival a tiki bar but for all of us the tiki bar is the ultimate place to go. It's all such fun. =========================================== Next up for Wish List #8 Phase Four are the next run of Diver's Helmets with skulls inside. These are called O2 out. Since I hand build them each will be different in some way. They are a completely different shape from those of the past. I've made five. I will share the first one I made last. Today I'll start with showing the production of four skulls. This process takes a lot of days. First I make solid mounds of clay and I let it sit for a couple of days until it's a bit firm. Then I start to add more clay to form the face. I figure out where to put the nose and then I build the cheekbones, then the nose and then the eyes. If the clay is firm enough I work on carving the teeth. Now I leave the clay uncovered for two days. Now the clay is firm enough to peal off the plastic cover and I can hold it without squashing the face. I start to carve out the backside. I was carful not to carve off the backs of the eye sockets. Next I go to work on the teeth again. This time the carving goes all the way through. Done for now. Once they are inside the helmet I fine tune the teeth again. Slowly I remove clay from the backs of the skulls until they will fit into the helmet. It's fun to build skulls. I really should just make a mold and then alter each one. It would go much faster. Have a wonderful weekend, Wendy |
|
H
hang10tiki
Posted
posted
on
Sun, Apr 14, 2019 9:14 PM
Skulls :tiki: |
|
C
CyroTiki
Posted
posted
on
Mon, Apr 15, 2019 6:48 AM
Always impressed! Space Bob is so cool Wendy! How large is he going to be? Do you plan on making any more of him? :D |
|
L

littlegiles
Posted
posted
on
Mon, Apr 15, 2019 8:11 AM
Skulls make me such a happy boy. HAHA I love the expressions on their faces....Mr Skull in the upper left looks quite put out at the whole situation. You might want to keep an eye on him. |
|
D
danlovestikis
Posted
posted
on
Mon, Apr 15, 2019 9:32 AM
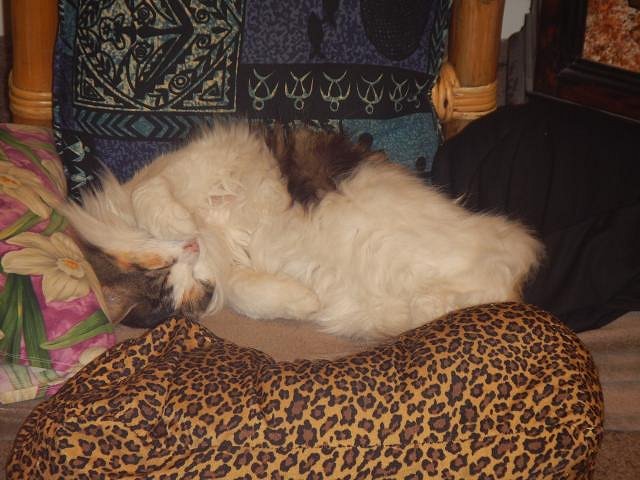
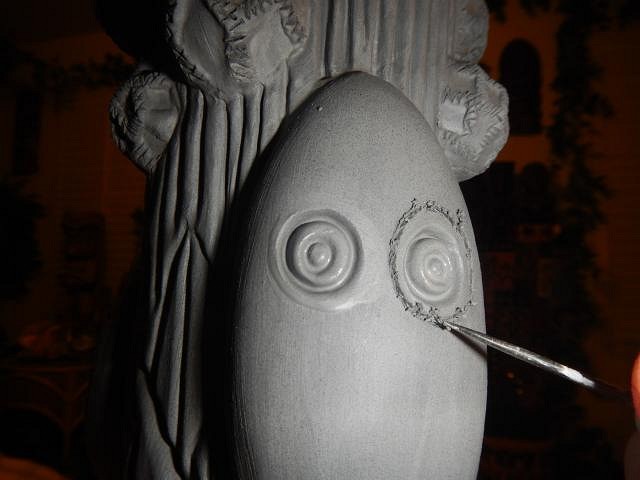
hang10tiki Skulls one a day for five days... CyroTiki I am working hard on Wish List #8. At this point I have no idea when I will get it finished. Once I do I will open Wish List #9 and take orders. If someone requests a Astronaut Tiki Bob I would make another or if no one takes this one then it's theirs. Glazing will make a huge difference on how all of these will look. These are huge. I should measure them once they are dry and fired to give everyone an idea. littlegiles and I am happy when people post messages for me to answer. Here comes five days of skulls. ====================================== Wish List #8 Phase Four: The Days of the Skulls begins... This is Skull number Five. I glaze these how ever I choose and then those on the list for one look them over to see if they still want one. My neighbors cat wants all the attention. I keep putting her on the floor and she just jumps back into my lap.
After a while she gives up and takes a nap. These helmets are currently drying in and out of plastic bags.
One shown and four to go. Thank you always for the visit, Wendy |
|
D
danlovestikis
Posted
posted
on
Tue, Apr 16, 2019 6:43 AM
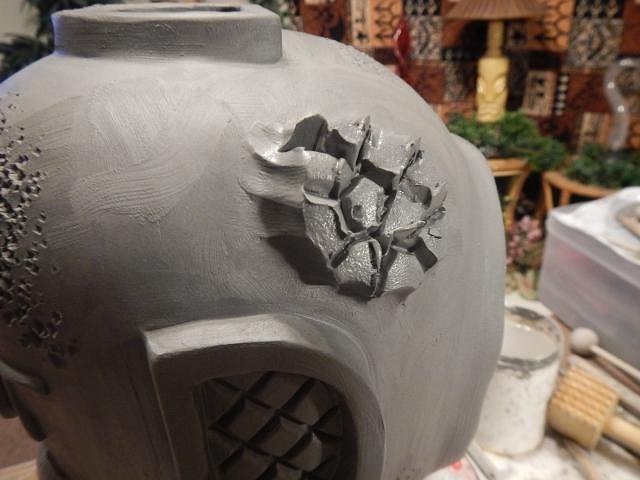
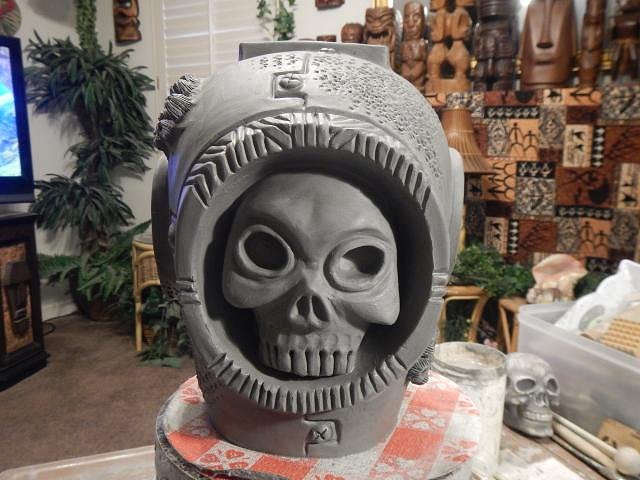
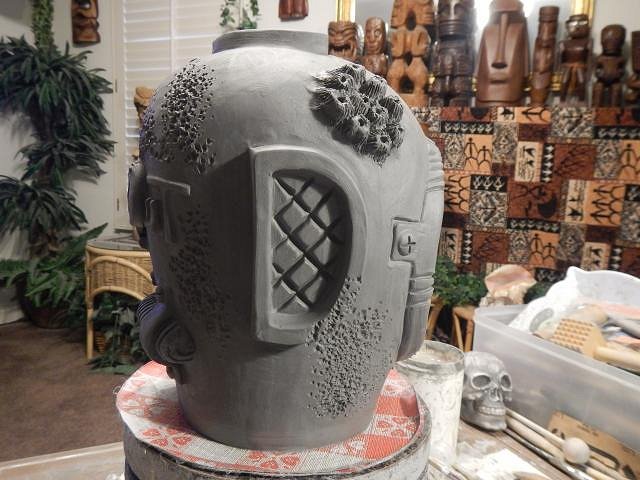
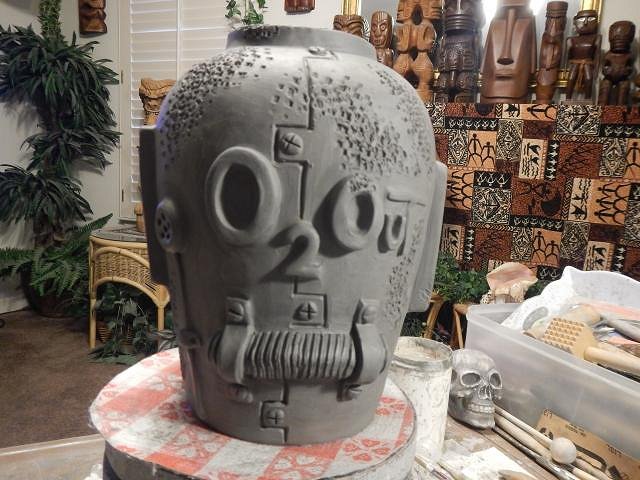
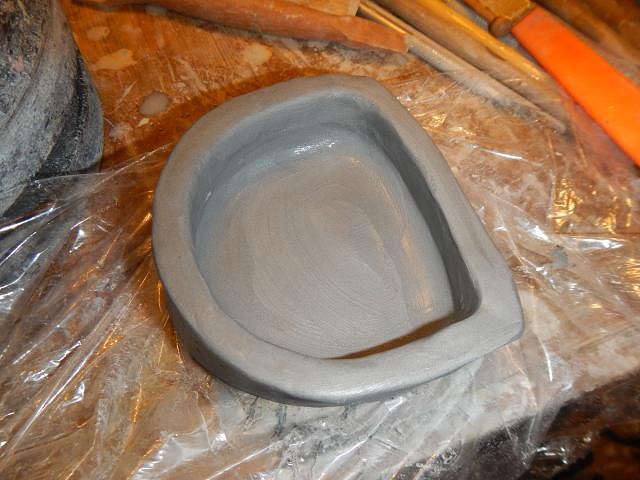
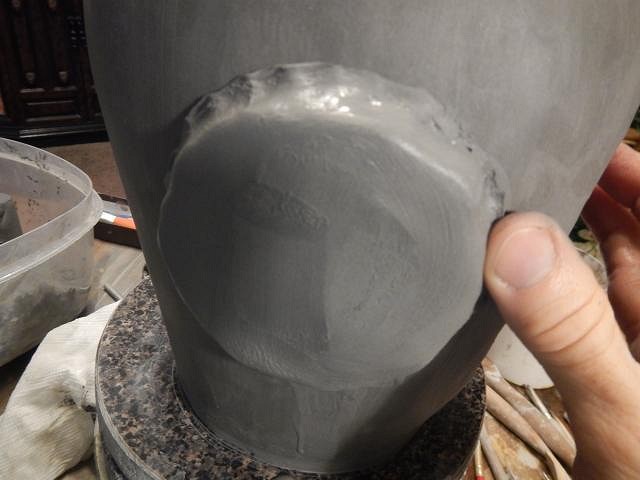
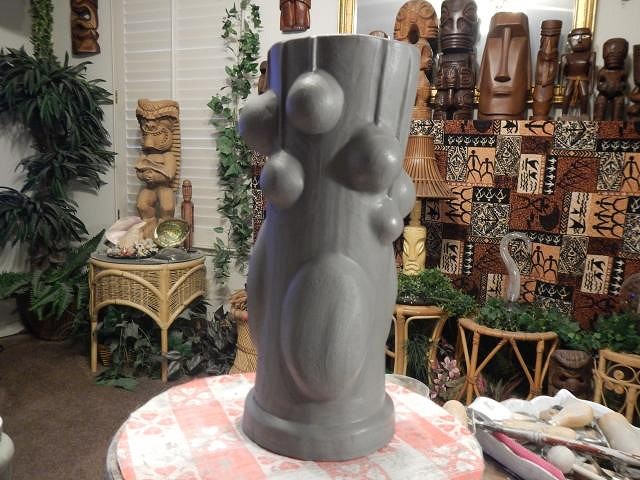
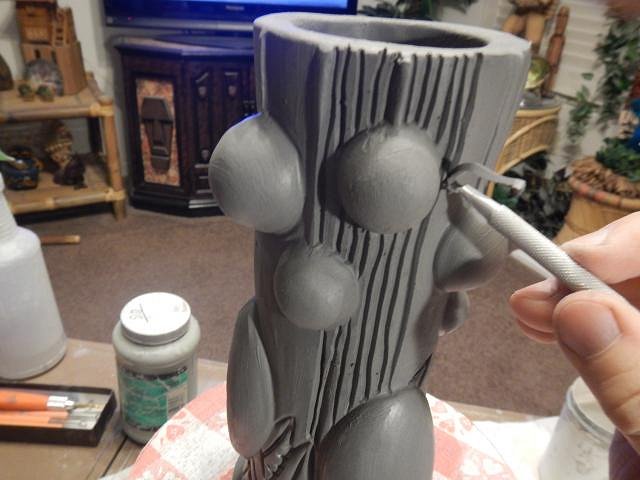
Wish List #8 Phase Four continues. At this point I've cut off the top. Made the side windows and cleaned off all the mold lines. Next I glued on a slab of clay and then I cut out the letters. I then spent a long time cleaning them up.
If you look closely you will see the little fur ball is on my lap. Good thing she weighs about 1 1/2 pounds. Tiniest cat ever. All done and ready for inspection.
The air hose broke open, horrors!
Two posted three to go. Wendy |
|
D
danlovestikis
Posted
posted
on
Wed, Apr 17, 2019 7:24 AM
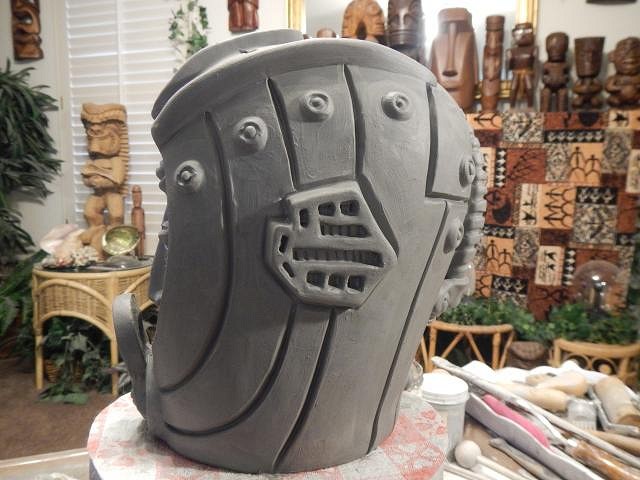
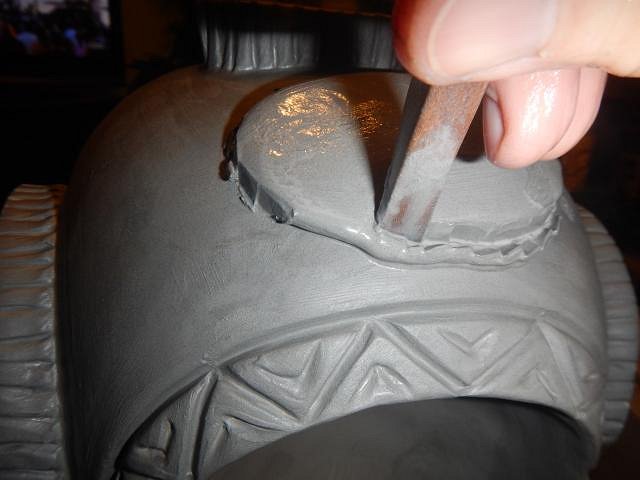
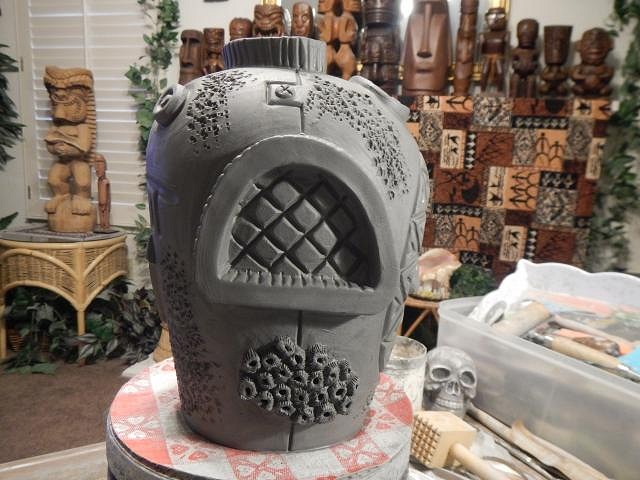
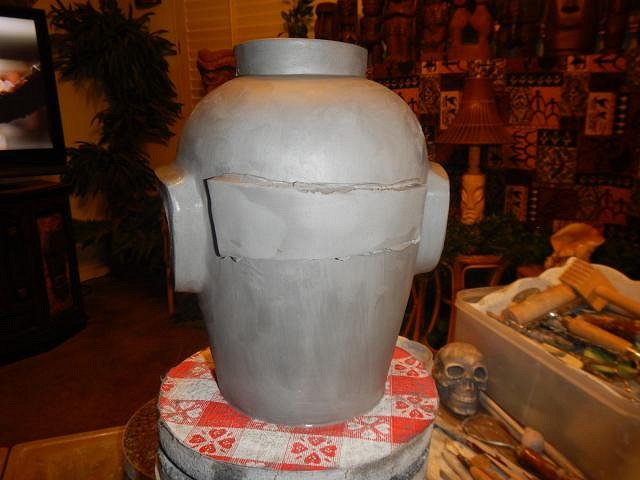
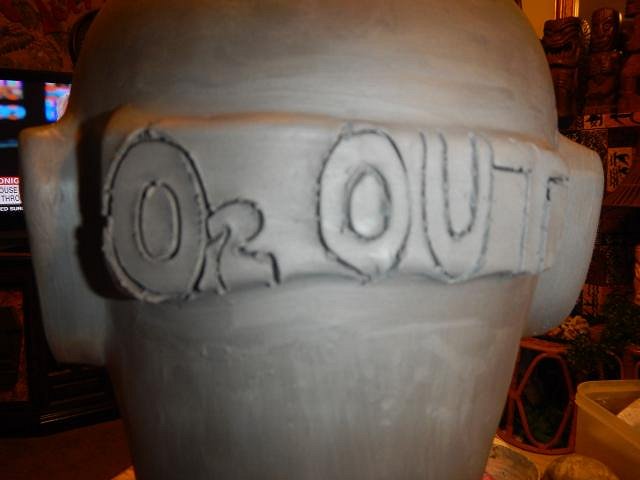
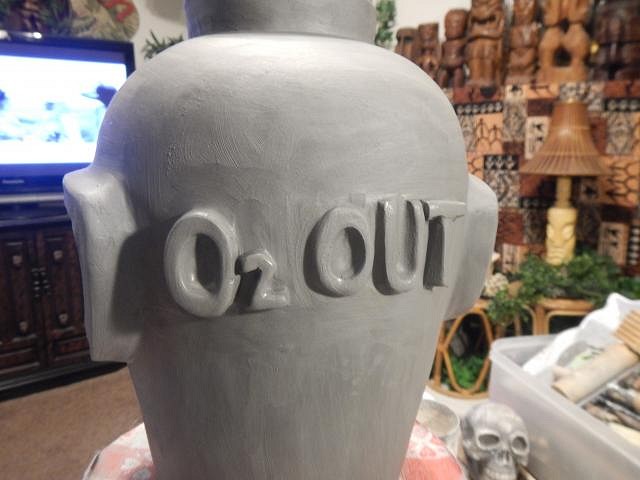
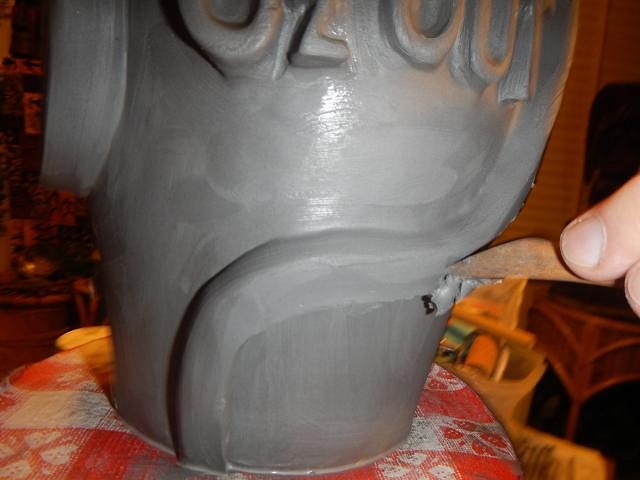
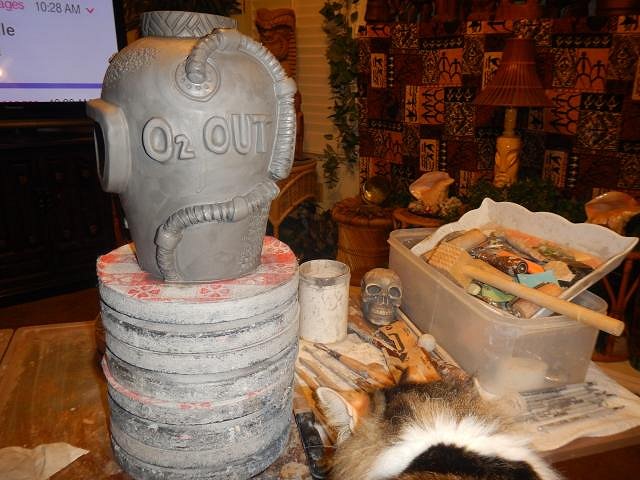
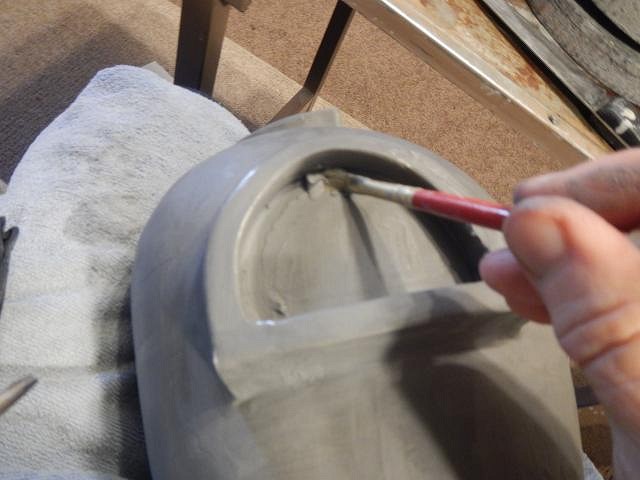
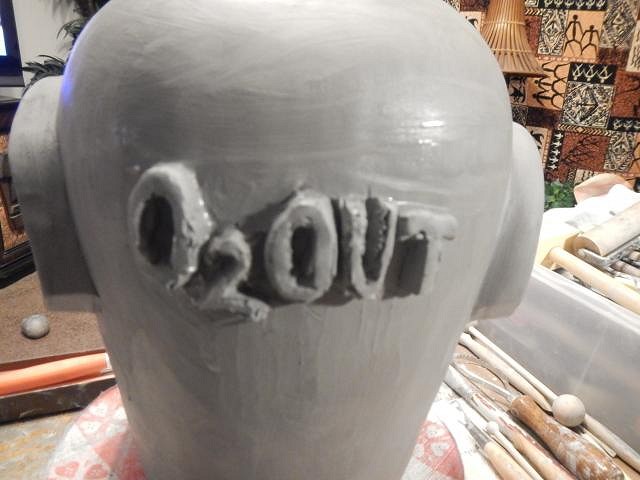
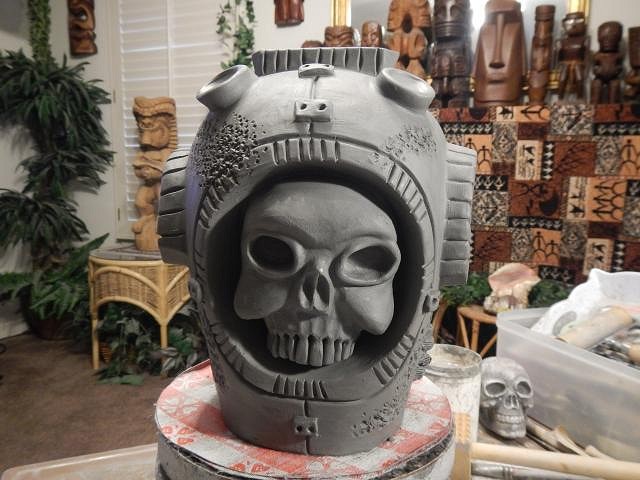
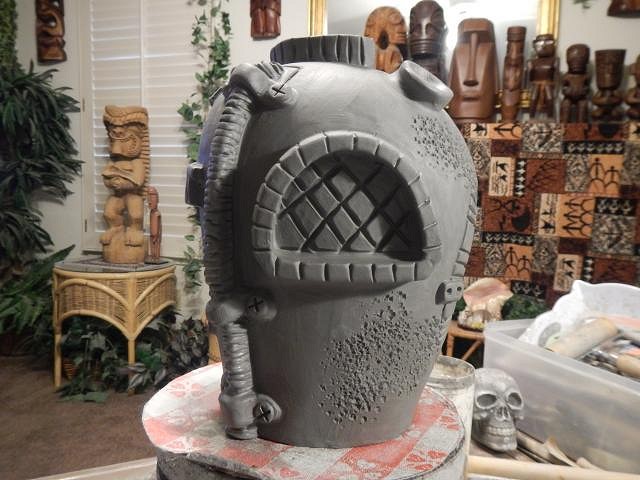
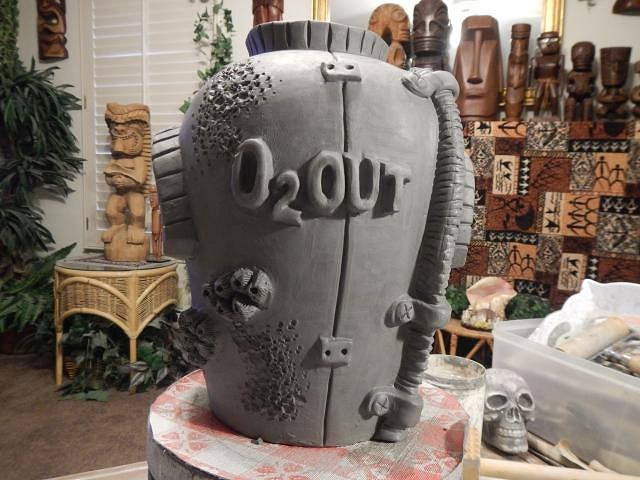
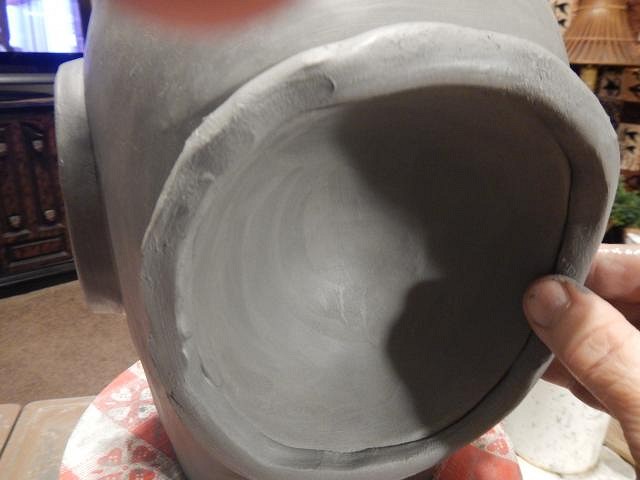
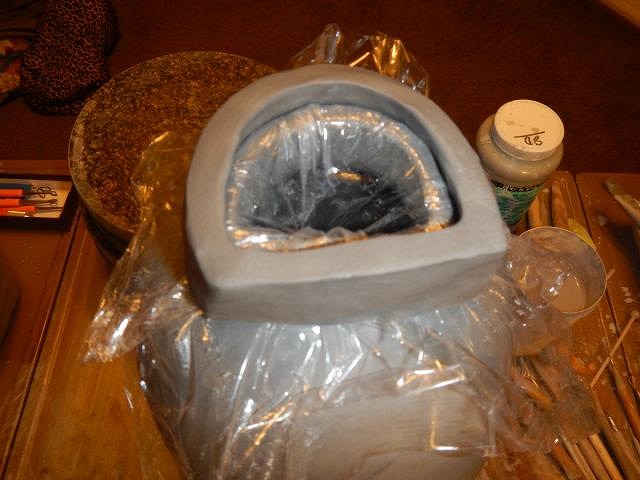
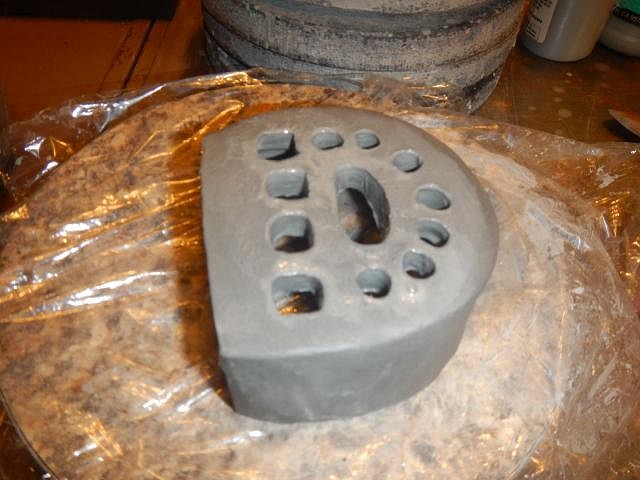
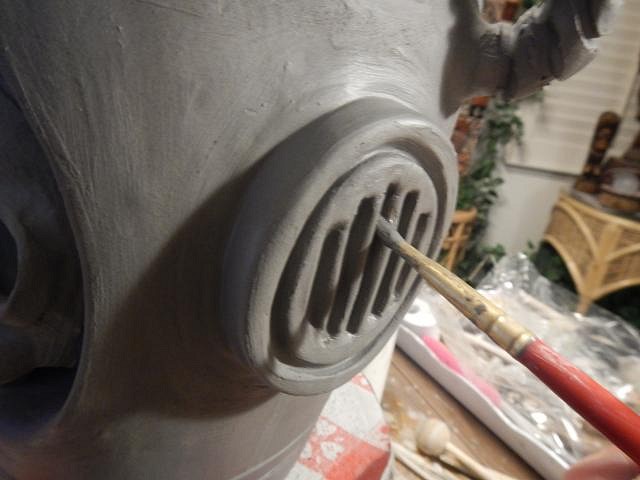
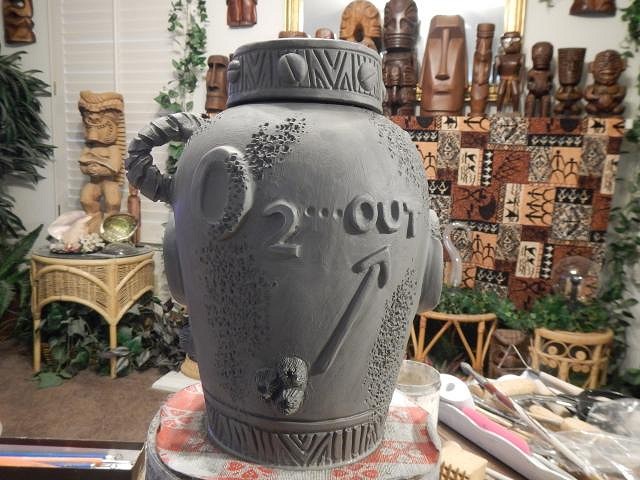
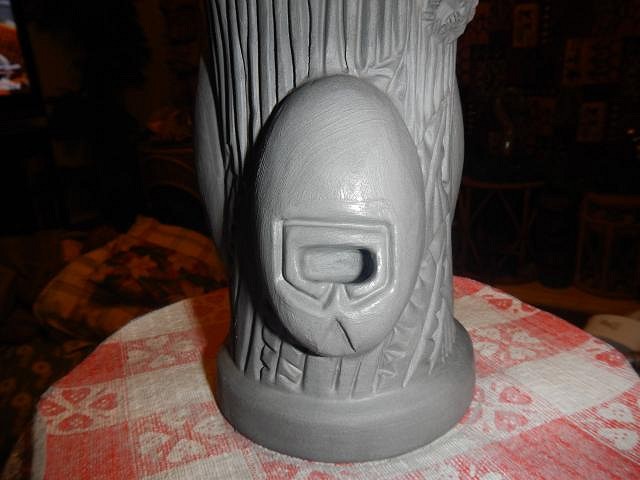
Wish List #8 Phase Four continues the countdown of Diver's Helmets with skulls. This is number three. I always start with a blank helmet and then I go to work. I cut a window box and I stick it on with sticky clay. That's clay mixed with slip and the clay is what I have cut off the tops of mugs. Then very carefully to not trap any air I move the clay to seal it to the helmet. I do this inside the box and outside of the box. I then glue on a slab of clay and outline the O2 Out with a spike. I remove the excess clay and smooth it with wet brush and tools. The barnacles have found a place to grow. All done and ready for inspection.
My goal is to have each one be different in some way. Wendy |
|
L
littlegiles
Posted
posted
on
Wed, Apr 17, 2019 8:28 AM
Great as always. Love the busted air hose on the second one. Poor guys suffer so much for our enjoyment. :) |
|
H
hang10tiki
Posted
posted
on
Wed, Apr 17, 2019 4:41 PM
These kick sum serious butt |
|
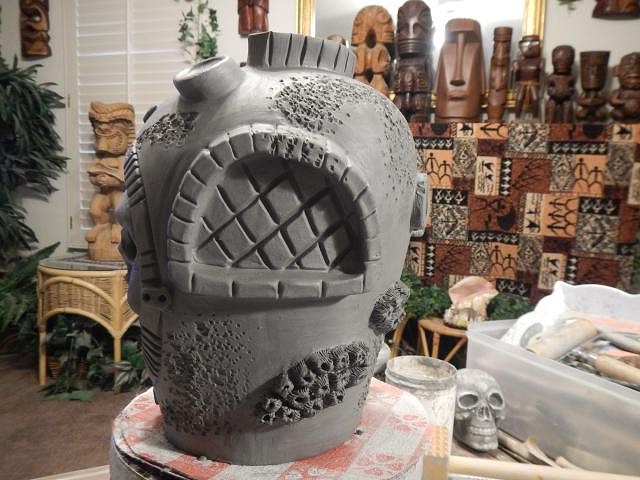
D
danlovestikis
Posted
posted
on
Thu, Apr 18, 2019 8:04 AM
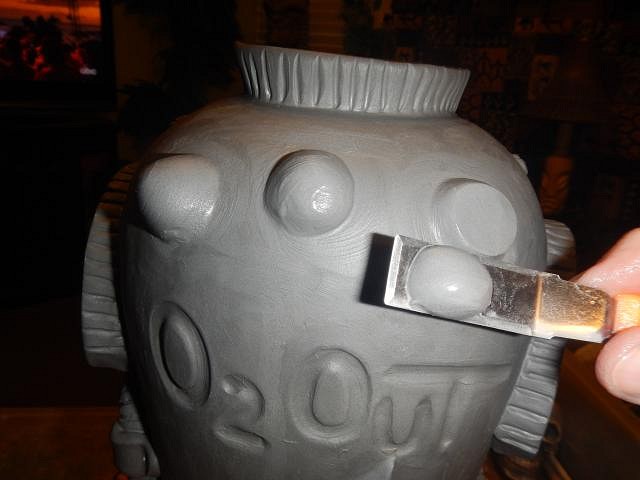
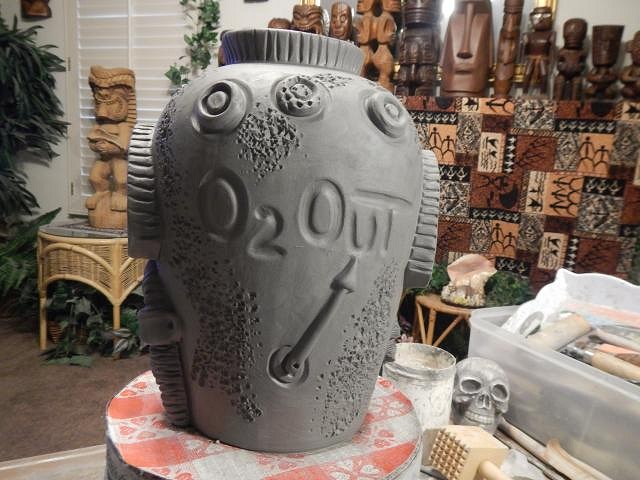
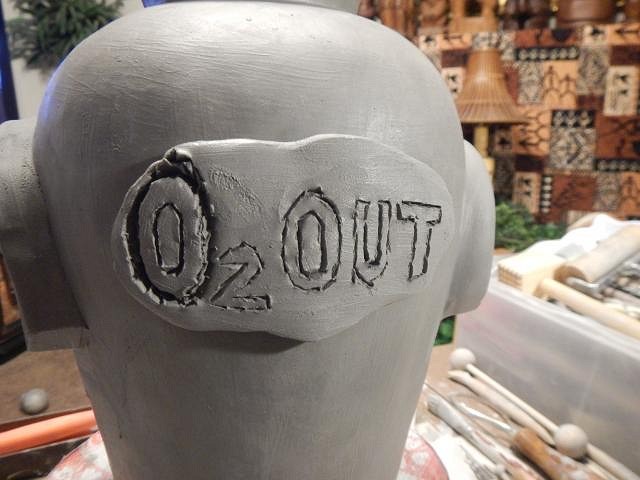
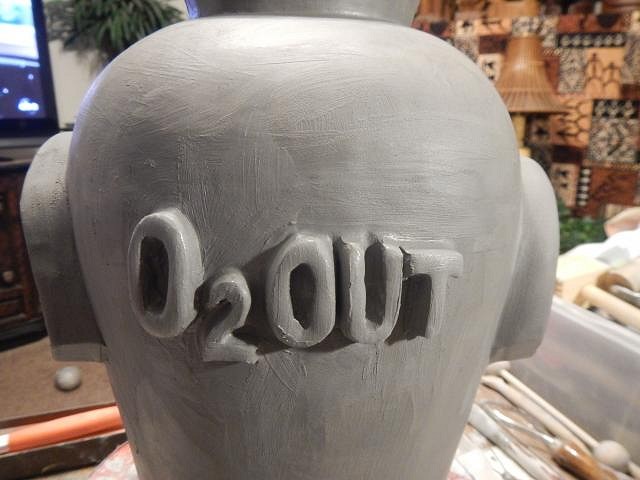
littlegiles this poor diver had an accident the rest just forgot to watch their gauges. Thank you. hang10tiki ha you must have read my post on Art Swap! Thank you too. ==================================== Wish List #8 Phase Four and this Diver's skull is number two. For each one I cut off the top. I use this clay to make the windows on the sides of the helmet. I formed each letter and number by hand. This took a very long time. By number three I changed my technique. Making the barnacles starts with a slab that I cut into individuals. I use a wire brush on the sides. Only on this one did I build up the edge around the opening. All done and ready for inspection.
I had already done a Robot when this worked out to look like one too.
Clay is so much fun. I wish everyone had clay days, Wendy |
|
F

foamy
Posted
posted
on
Thu, Apr 18, 2019 9:41 AM
Wow! Just wow! |
|
D
danlovestikis
Posted
posted
on
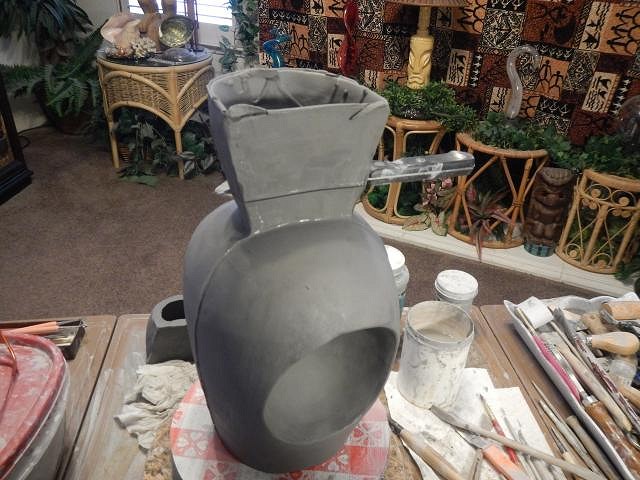
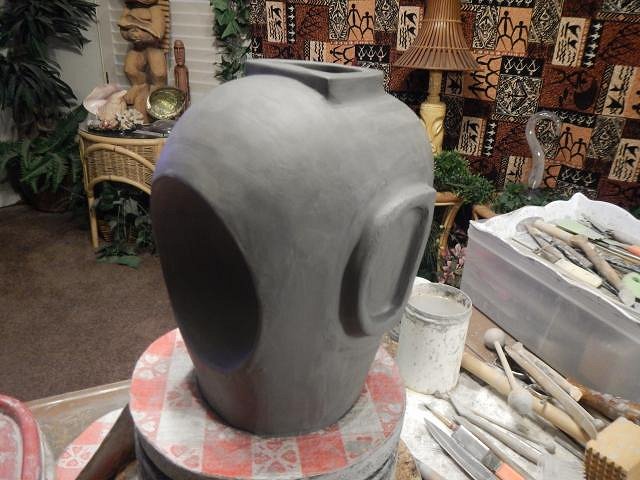
Fri, Apr 19, 2019 8:53 AM
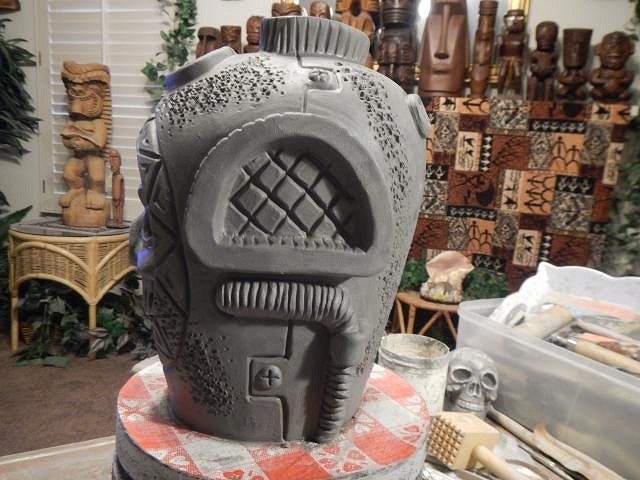
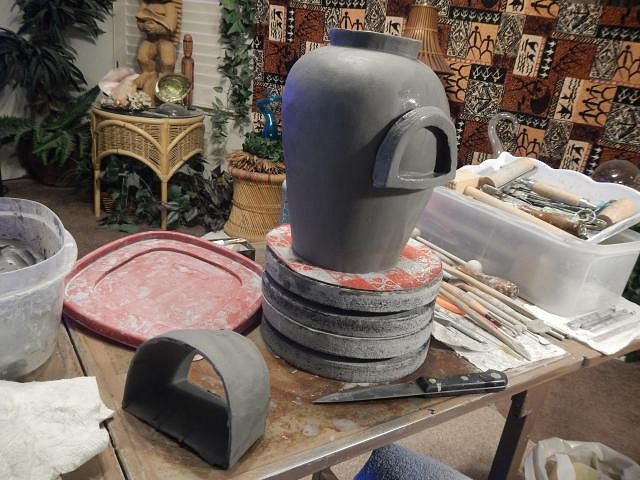
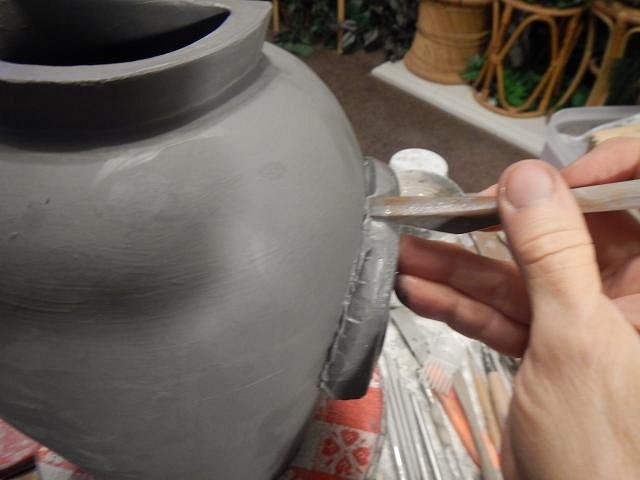
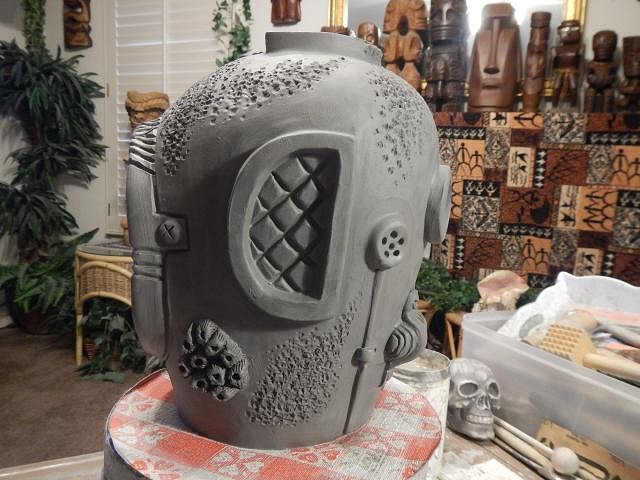
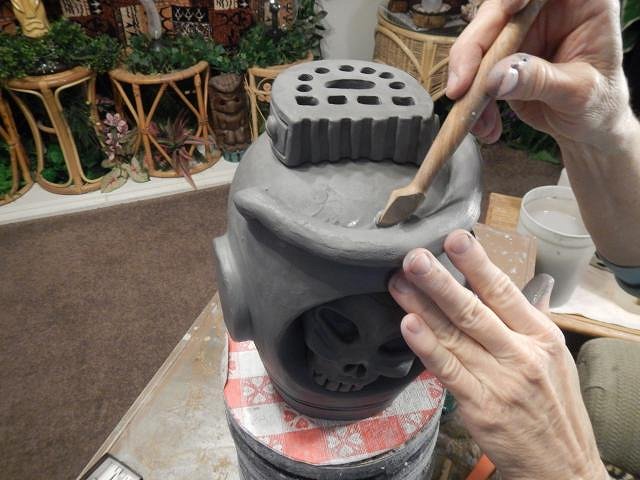
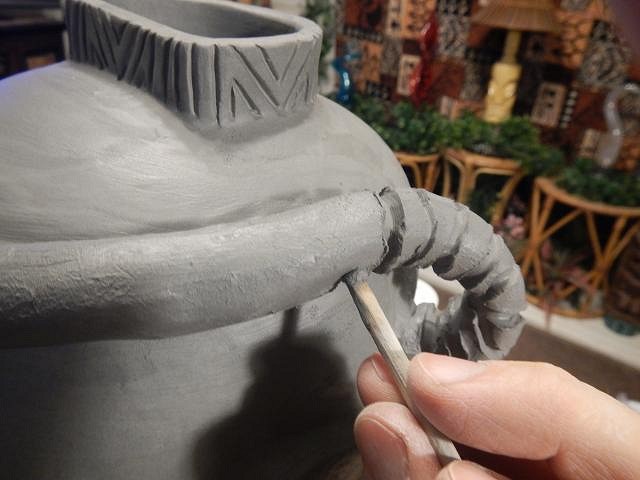
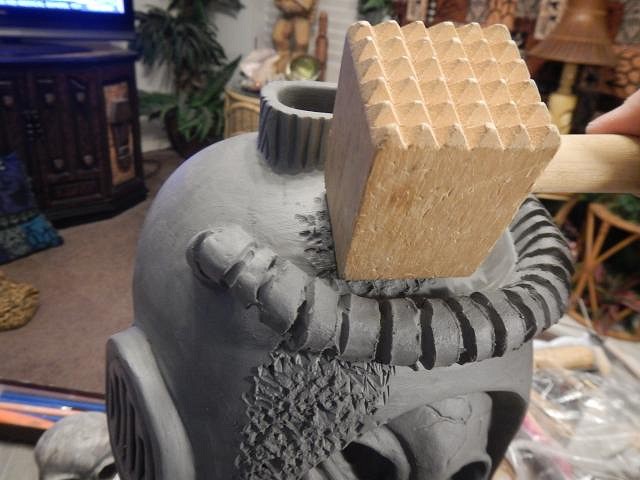
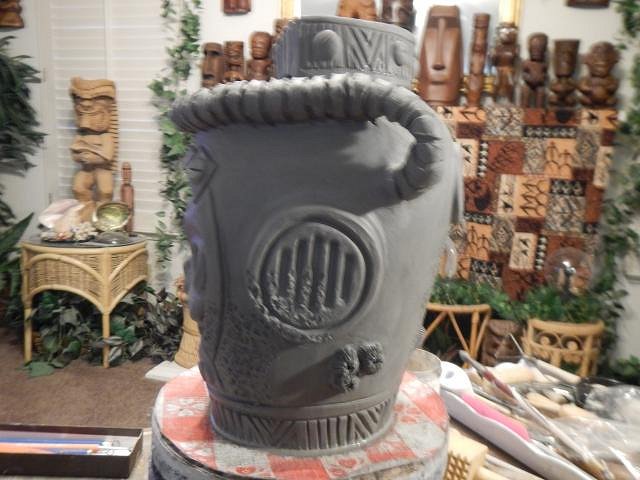
foamy, thank you. It's so fun to log and find a comment that makes my day. =============================== Wish List #8 Phase Four the Last and Number one Diver's Helmet. I put these up as a countdown to number one because this one is more elaborate and expensive. All the other helmets are $275 but this one is $300 because of the lid. I still have to dry and glaze all of these so the finished art is a ways off. I have to go down the list of those who signed up for one but that will be done once they are finished. Here's Number One. These take three days or more to sculpt the additions. To make a lid that fits I cut off the top and then I cut off the piece furthest from the top of the helmet. To prevent sticking I put down plastic wrap. Once it fit I added a top. Then I carved the straw holes and designs when it was firm. Just in case it shrunk more than the helmet I didn't leave it on during the drying process. If it gets tight I will sand it to fit. I made a ball of clay and then began to form the skull. A week later it was firm enough to carve out the back and then to glue it into place. I made a ball of clay and pressed it flat onto the helmet. I used sticky clay to glue it. Days later I was able to carve the clay. I hand built each letter and number as you saw later on I used the slab technique which sped this up. I made a snake of clay and attached it to the helmet. Next I made the ribs and then I used a mallet for aging the metal. The lid with the straw holes is now dry enough to take it on and off without the plastic. In case no one wants the lid I carved the opening so it looks good without it. The sculpting is all done and ready for inspection.
I didn't make enough to cover the orders so I will be making more of these when I move on to Phase Five. They are fun to make because I do not have a plan when I start. Cheers, Wendy |
|
L
littlegiles
Posted
posted
on
Fri, Apr 19, 2019 9:14 AM
Another great one! I got very excited when you said you rolled a snake of clay....my brain immediately thought about a Moray Eel living in the helmet with the skull. HAHA But my imagination got the best of me and what you created was beautiful. I like it when your art takes me on a journey. |
|
H
hang10tiki
Posted
posted
on
Fri, Apr 19, 2019 10:37 PM
These make me want to go diving Cheers |
|
D
danlovestikis
Posted
posted
on
Sat, Apr 20, 2019 8:40 PM
littlegiles that would be a good one. I have a wish for one with an octopus tentacle but I've not gotten there yet. Thank you. hang10tiki I think this holds a half gallon. I need to figure that out soon. More a drink with friends helmet. ================================= May your Easter Day be a celebration of life. Cheers, Wendy
|
|
H

Hamo
Posted
posted
on
Sun, Apr 21, 2019 11:02 PM
Happy Easter, Wendy and Dan! |
|
D
danlovestikis
Posted
posted
on
Mon, Apr 22, 2019 8:14 AM
Thank you Hamo. Here's one that hang10tiki shared this morning. I might as well have them all lined up together.
|
|
D
danlovestikis
Posted
posted
on
Wed, Apr 24, 2019 9:33 AM
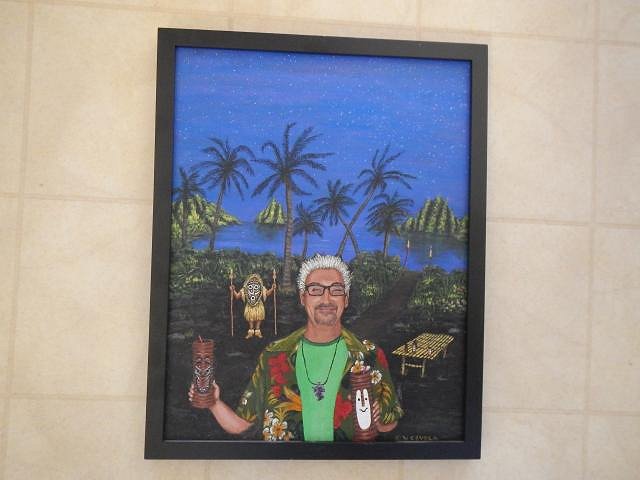
As Dan downsizes and the home changes we have learned to let go. So I decided to send my painting of little lost tiki aka Ken Ruzic to his studio work area. When I did the painting in April 2011 his hair was darker. I have updated his hair color and shipped this to him.
He has hung it next to a portrait of himself done by Big Toe. Wendy |
|
C

cy
Posted
posted
on
Wed, Apr 24, 2019 3:06 PM
Some incredible work going on here Wendy, the portrait of Ken looks great also! |
|
H
hang10tiki
Posted
posted
on
Wed, Apr 24, 2019 9:25 PM
Looks just like him |
|
H
hang10tiki
Posted
posted
on
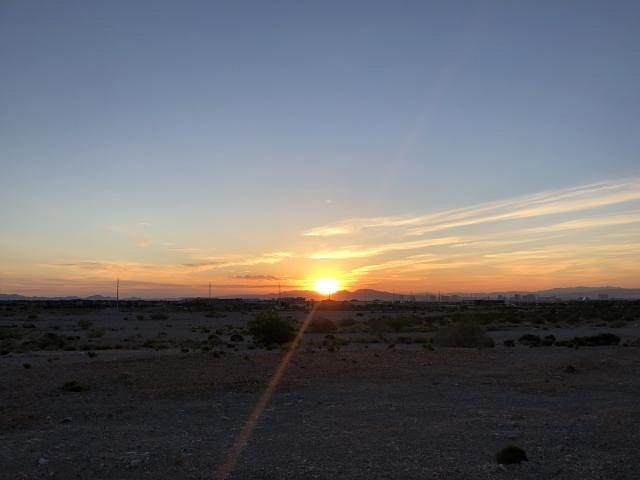
Fri, Apr 26, 2019 9:11 AM
Great view on our early walk today
|
|
D
danlovestikis
Posted
posted
on
Sat, Apr 27, 2019 9:57 AM
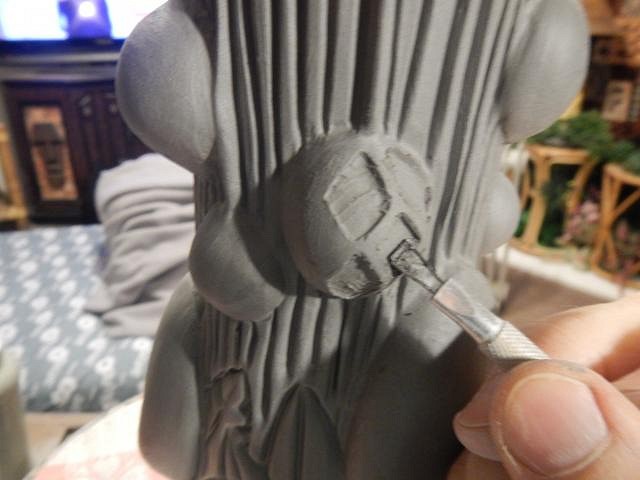
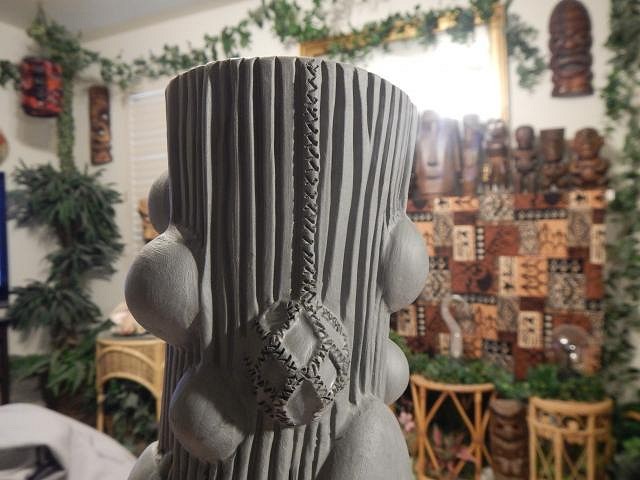
hang10tiki what a great view. Las Vegas is really in the middle of a desert. ============================== Wish List #8 Phase Four. This mug has become the wish of Joseph Desmond. I hand built it so it's one of a kind. I took a blank fogcutter mug and began to add clay and then days later to carve the clay.
I think of this mug as a tiki bar wall mug. You sit and look around the room and this is what you see.
Cheers, Wendy |
|
S
Sandbartender
Posted
posted
on
Sat, Apr 27, 2019 11:32 AM
Holy moly! I'm running out of ways to say how amazing your work is. This tiki-bar-wall mug has got to be one of my favorites you've done so far- Just incredible. I love every single detail. |
|
H
Hamo
Posted
posted
on
Sat, Apr 27, 2019 10:24 PM
This one's pretty neat. You just keep coming up with original ideas. |
|
L
littlegiles
Posted
posted
on
Mon, Apr 29, 2019 6:34 AM
Really liking those float lights on that mug! Great work as always Wendy. |
|
H
hang10tiki
Posted
posted
on
Mon, Apr 29, 2019 11:18 AM
Dang |
|
D
danlovestikis
Posted
posted
on
Mon, Apr 29, 2019 8:39 PM
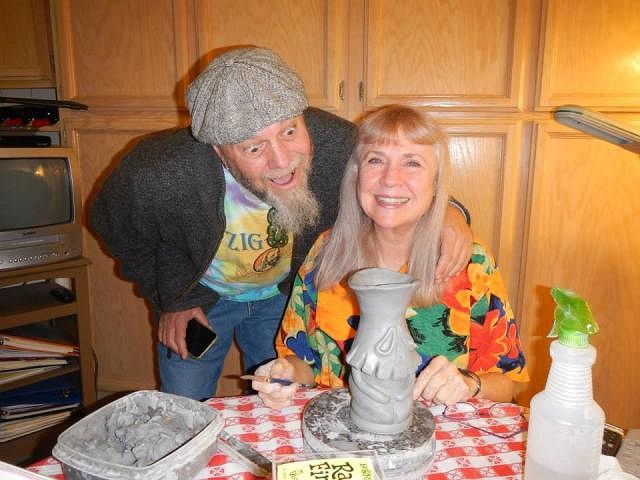
Sandbartender I just told hang10tiki that tiki bars are all the rage! I love your carving you just put on the carving thread. Thank you for your words and any others you come up with (=; Hamo it's going to be hard to do new ideas with so many of us trying. No matter what it's just fun to play with clay. littlegiles I love float lights. I just wish I could make them glow. hang10tiki thank you for your message and for the photo I am posting tonight. ========================== I have some catch up and re-show photos for tonight. Bullet came to watch me sculpt his wish a few years ago. I love a good photo. A newspaper took this photo. Our jungle room has changed but it's still thriving. hang10tiki took this photo when Dan took me out for my birthday a few years ago. I live for hugs. I got this one from Sven Kirsten at Tiki Oasis. I'm going to really miss not being there this year. Dan has a place to rest as I shop for glaze. I have no jewelry, shoes, dresses, perfume etc. but I have hundreds of bottles of glaze. Gregory picked up his 2018 crawl mug. We had a nice visit with him and his wife. Dan will always do as I ask. "Honey can you smile for me?" This has been fun for me, I hope you all liked my catch up photos. Wendy [ Edited by: danlovestikis 2019-04-29 20:49 ] |
|
L
littlegiles
Posted
posted
on
Tue, Apr 30, 2019 4:52 AM
glowing float lights on a mug....sounds like a job for MDM! Glow paint? Hmmmmmm. Love the old pics. |
|
H
hang10tiki
Posted
posted
on
Tue, Apr 30, 2019 1:31 PM
Good catch up pics |
|
D
danlovestikis
Posted
posted
on
Fri, May 3, 2019 9:48 AM
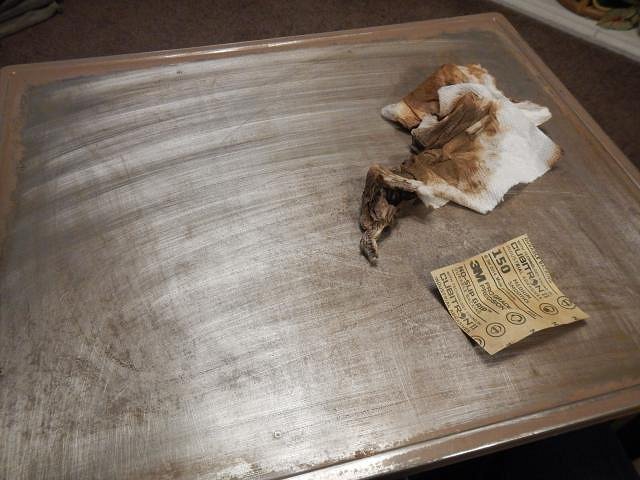
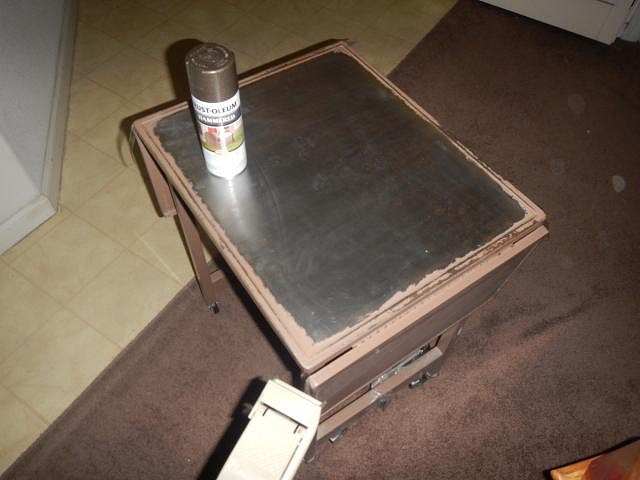
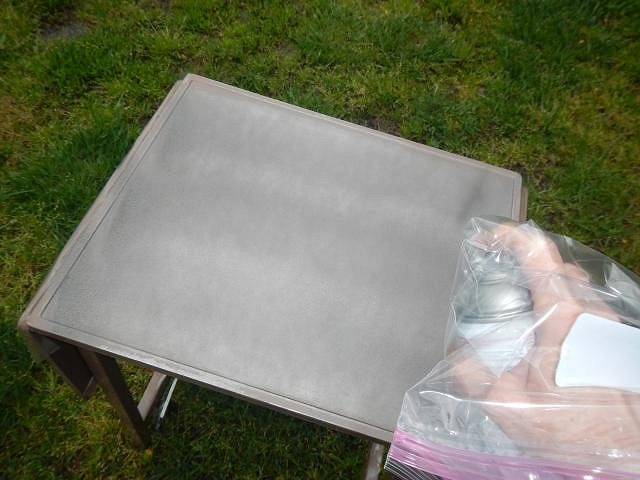
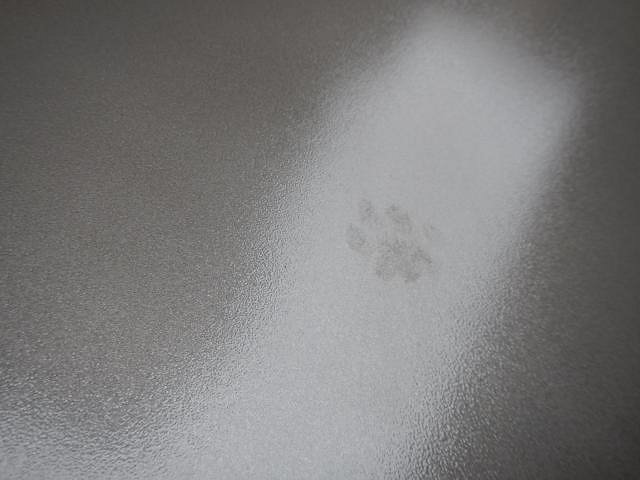
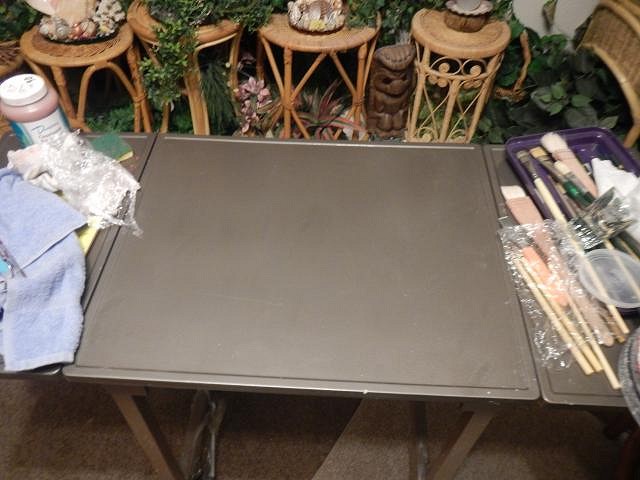
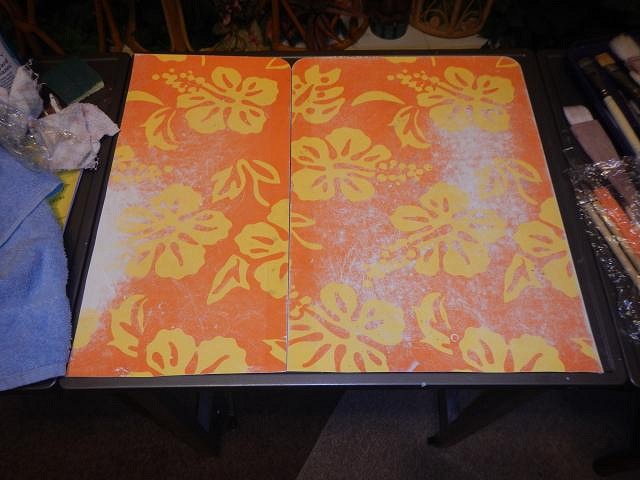
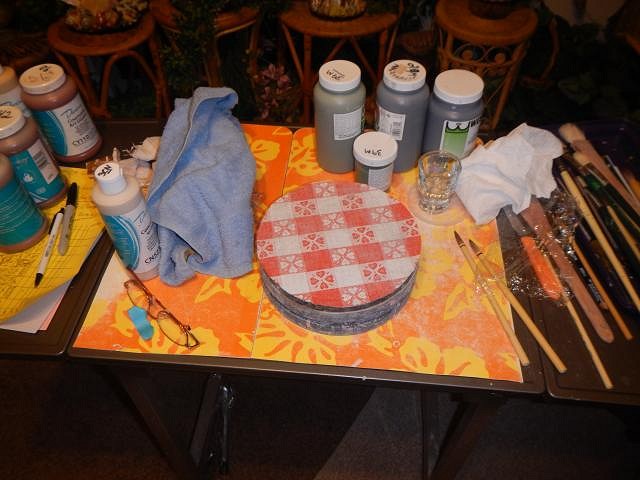
littlegiles If I had a small kiln this could be done. The glowing glazes require a lower firing temperature. Not worth it for one mug. hang10tiki glad you liked them. ================================================== The time had come to fix my rusting work table. It was so bad that I kept getting rust on my clay and hands. I spent a day repeatedly sanding are wiping the rust off the table. When I finished we went to Home Depo and bought the spray paint. The work went like this...I sprayed a layer and left the table in the sun to dry. Each time I returned I found one paw print in the paint. How does a cat jump on a table but only leave one print? It's magic. After all the paw prints were covered by multiple layers of spray paint the table was left in the garage until the paint smell was gone. This time I decided to protect the to with a couple of old placemats. I cut them to fit and then taped them together. Now I'm back to work. I never did figure out which visiting cat, there are three, and how each time it was only one paw print! Wendy |
|
H
hang10tiki
Posted
posted
on
Sat, May 4, 2019 12:22 PM
The elusive one legged cat |
|
D
danlovestikis
Posted
posted
on
Sat, May 4, 2019 7:36 PM
Thank you hang10tiki for getting a photo of the cat that left a food print on my table top!!! Wendy
|
|
H
hang10tiki
Posted
posted
on
Sat, May 4, 2019 8:05 PM
:) |
|
T

TheBigT
Posted
posted
on
Sun, May 5, 2019 5:55 AM
That's one healthy looking jungle room, Wendy! I'm amazed that you get that kind of growth indoors!! :lol: :lol: |
|
D
danlovestikis
Posted
posted
on
Sun, May 5, 2019 7:17 PM
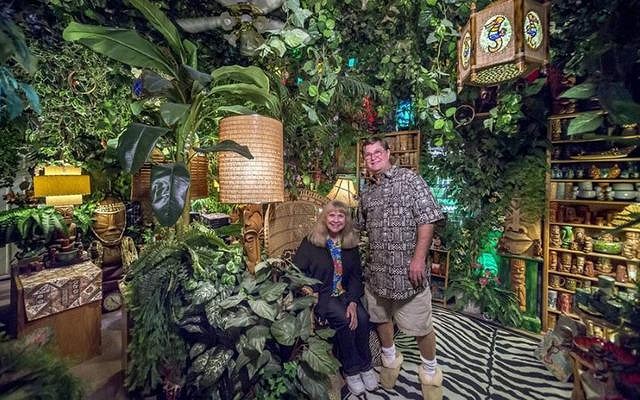
hang10tiki (=: TheBigT thank you, we never have to water these plants so it's an easy care room. ================================== I am so sad. The enamel paint I've used for years is no longer manufactured. However I do have a good sized stockpile. I have also begun to buy pinstriping paint which is also really good. Here's a vintage mug I fixed up for Dan. He bought the second one without all of the cold paint. I figured out what I needed and went to work. All done and displayed on his shelf. It's fun to post so I will keep doing this as long as Tiki Central keeps on going. Cheers, Wendy |
|
D
danlovestikis
Posted
posted
on
Sun, May 5, 2019 7:44 PM
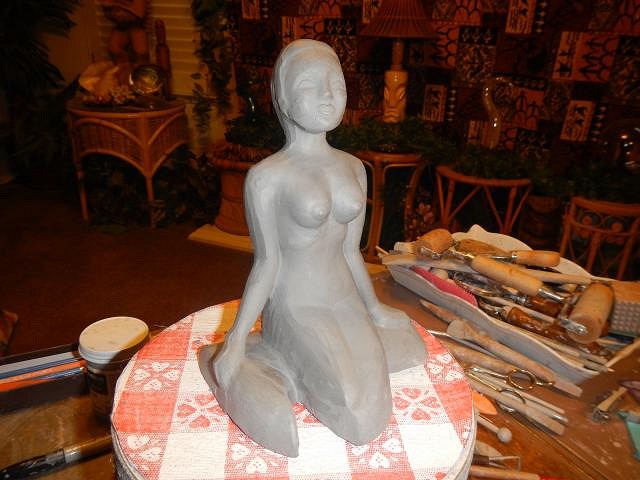
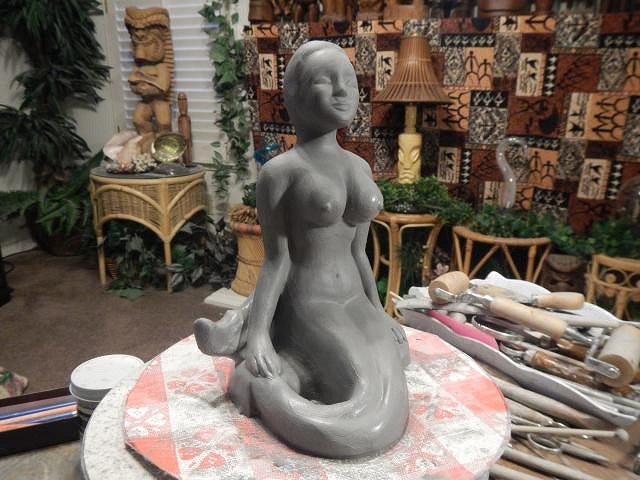
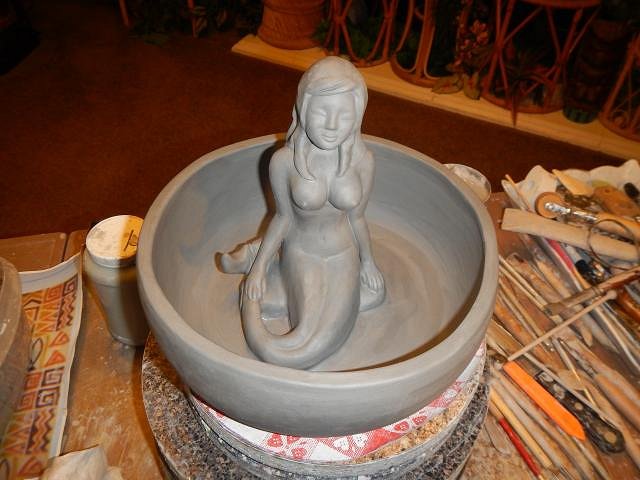
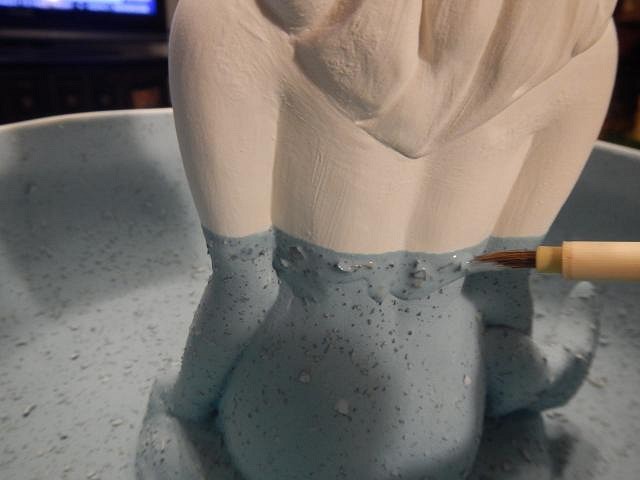
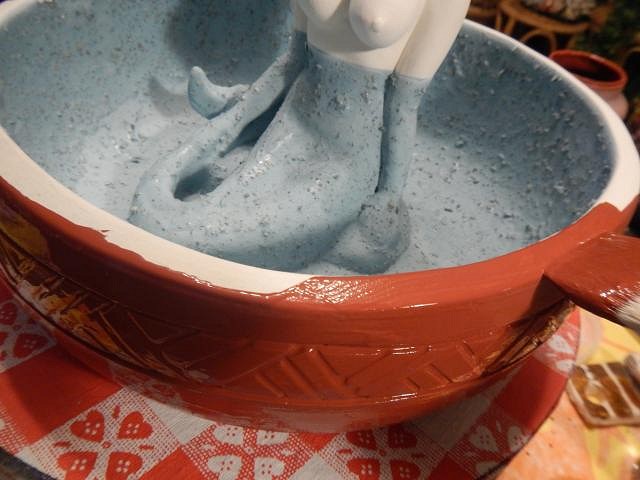
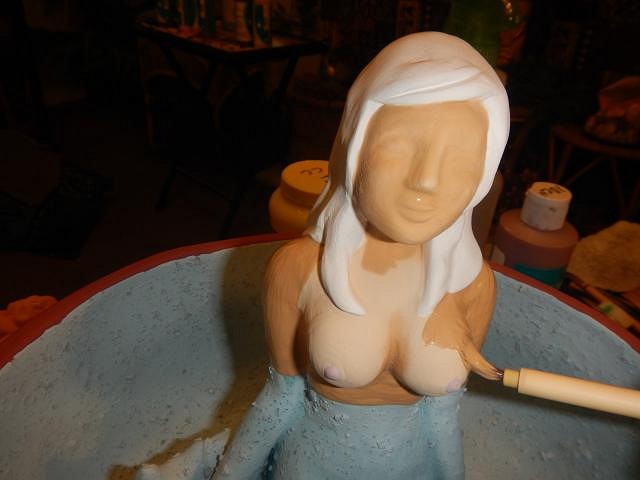
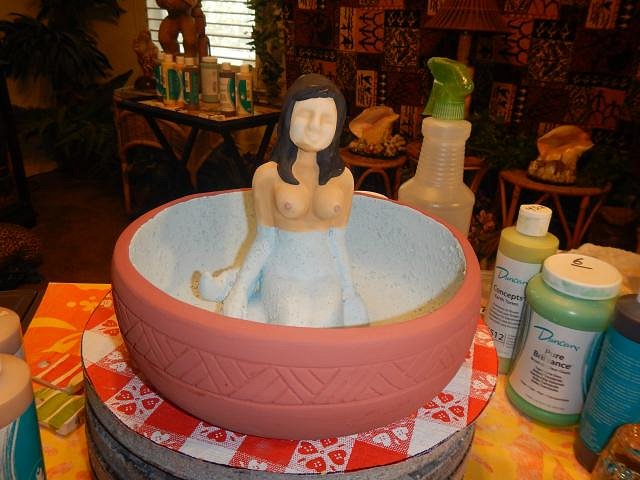
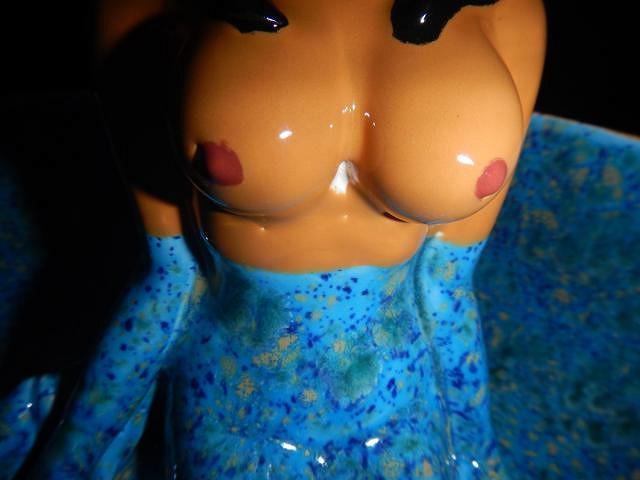
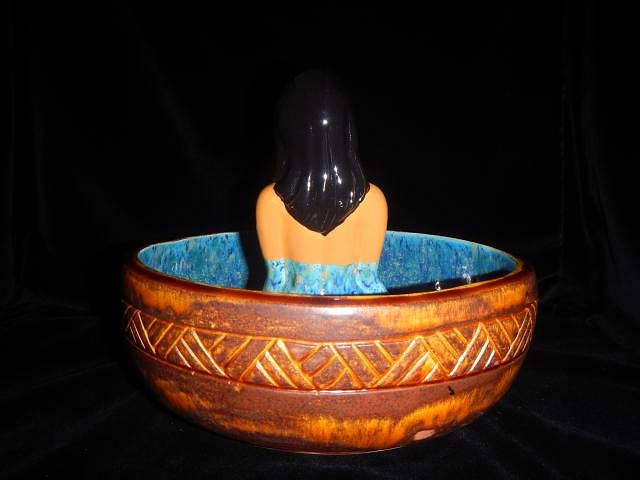
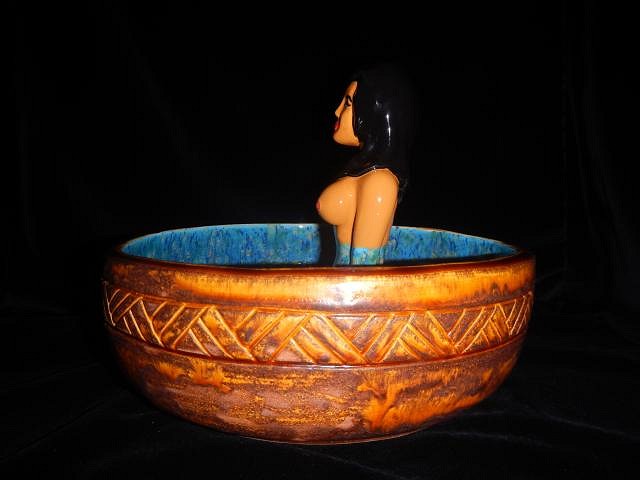
I'm going to place a bowl in the Tonga Hut show along with so many artists that you know. GROG, MadDogMike and Eric October so far. I am entering a mermaid bowl for the show. I cast one and then I added all the missing parts. I want it to sell so I enhanced her bosom. I cleaned up a good sized bowl to hold her and Then I attached her in the center. More soon, Wendy |
|
H
hang10tiki
Posted
posted
on
Mon, May 6, 2019 7:55 AM
Nice fix on the mug Mermaid bowl, nice |
|
T
TheBigT
Posted
posted
on
Mon, May 6, 2019 11:42 AM
The mug touch up is really impressive! Nice job. Do you mask those areas you are painting, or all free hand? |
|
D
danlovestikis
Posted
posted
on
Mon, May 6, 2019 8:06 PM
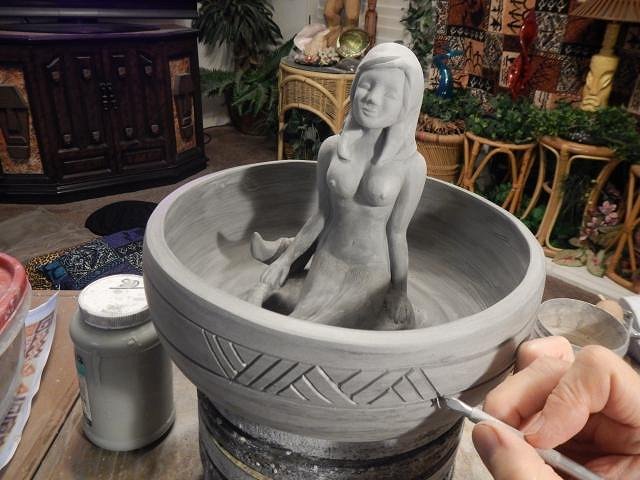
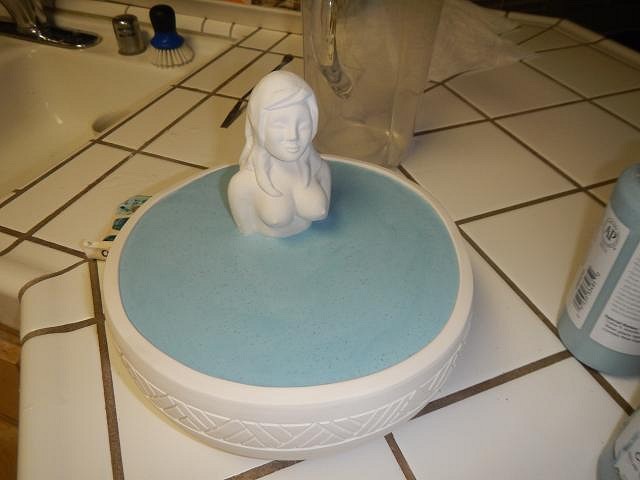
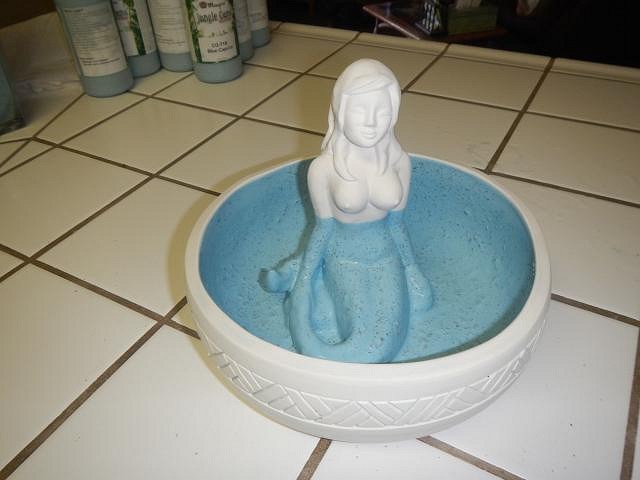
hang10tiki and BigT thank you for your messages. They are much appreciated. Here is the rest of the Mermaid bowl story. Tomorrow I'll not post. Dan is having an ultrasound procedure to break up a kidney stone. Once the bowl had been drying for a week I decided to carve around the bowl. Weeks later the bowl was dry, sanded and bisque fired. Now it was time to glaze it. I emptied all these half filled jars of glaze to fill the bowl. After 30 seconds I poured it out and then cleaned off where the glaze was in an undesired area. I later touched up around the girl and the upper rim of the bowl because the crystals had moved down earlier. I wanted it uniform. Once the blue glaze was dry I began to glaze the bowl and then the girl. She was done with 3 layers of a Duncan CN glaze. The last was her hair. I go very slowly so that I don't drip this black glaze on her body. I actually meant to do the hair first which is safer but I forgot. Once the bowl and mermaid were 100% dry it was added to a load and fired. This is one reason I'm not making these any longer. There is always a glaze skip someplace no matter how hard I try and these bowls take up too much space in the kiln. So I scrubbed this area and glazed it again and she fired again. After her second firing I picked up the bowl using the mermaid as a handle. Woops! She came loose. Oh well Nothing was broken I just needed to glue her in place with glaze and to fire her again. The glaze will melt and all will be good. Once she was pressed into place I cleaned up the excess glaze. She went back into the kiln with the next load. When she came out of the third firing all was well. I could also pick her up using the mermaid as a handle. The connection was strong. All the glaze skips were gone and now all I needed to do was to use enamel to paint on her face. 24 hours after painting her face she was baked in the home oven to "set" the enamel.
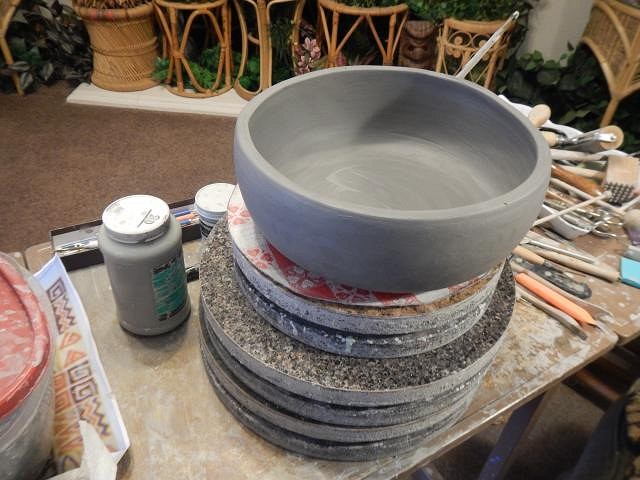
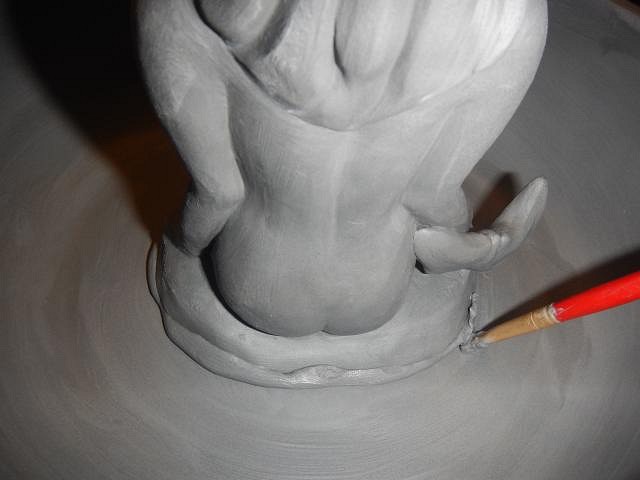
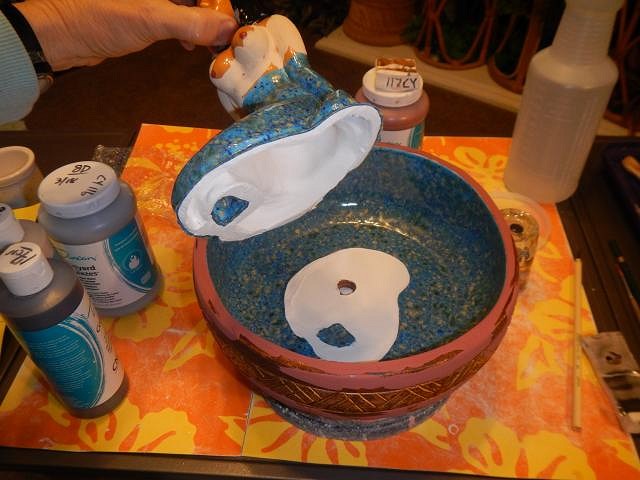
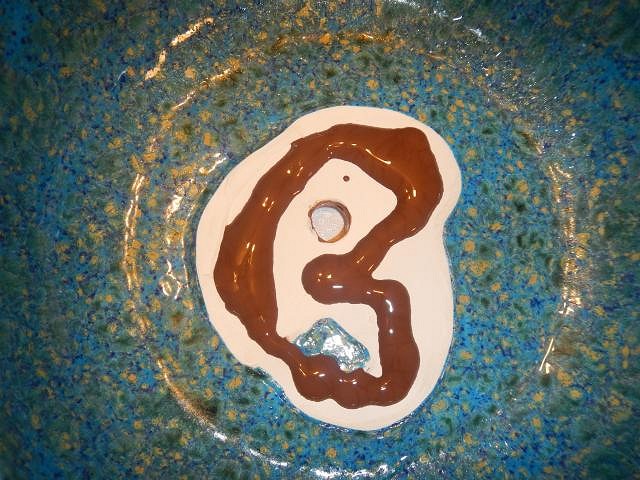
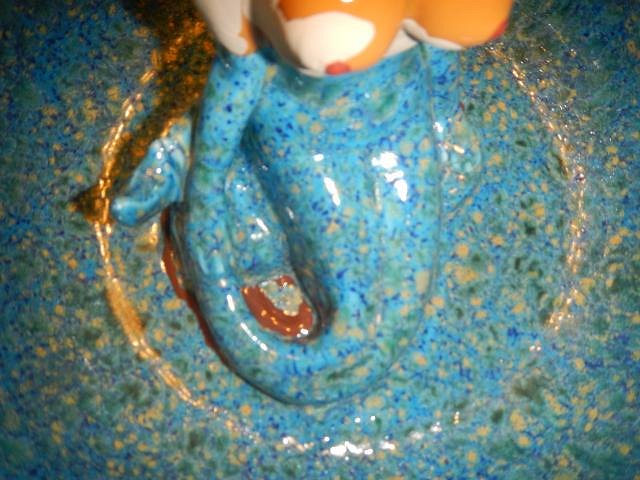
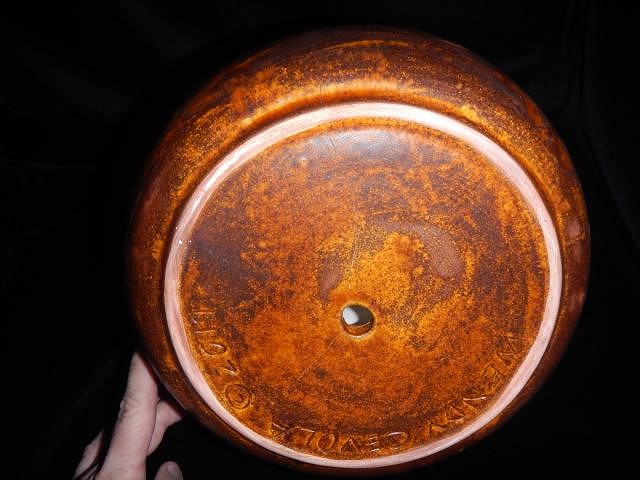
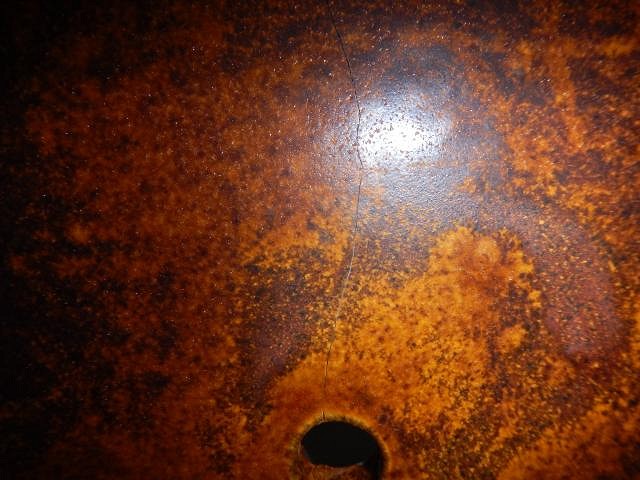
When taking photos I like to also take a photo of the bottom. This is when I saw a very long crack. Once I saw it I then could feel it. The bowl is a total loss. It could be that I trapped air when I pressed the mermaid into place with the brown glaze. That would make it crack. Or there was some other stress. I do not know if it cracked after the 2nd or 3rd firing. After the first I glazed the bottom and would have seen it then. It's a mystery. It's been years since I had something crack so I'm fine, only a little bit sad. This is what I am putting in the Bowlarama show. Good thing it doesn't have to be for sale. Cheers, Wendy PS wish Dan luck that his kidney stone cracks up tomorrow |
|
H
Hamo
Posted
posted
on
Mon, May 6, 2019 8:37 PM
A CRACK AFTER ALL THAT HARD WORK!? NOOOOOO! Good luck, Dan! Hope everything goes smoothly and he gets ice cream afterward. |


Pages: 1 2 3 4 5 6 7 8 9 10 11 12 13 14 15 16 17 18 19 20 21 22 23 24 25 26 27 28 29 30 31 32 33 34 35 36 37 38 39 40 41 42 43 44 45 46 47 48 49 50 51 52 53 54 55 56 57 58 59 60 61 62 63 64 65 66 67 68 69 70 71 72 73 74 75 76 77 78 79 80 81 82 83 84 85 86 87 88 89 90 91 92 93 94 95 96 97 98 99 100 101 102 103 104 105 106 107 108 109 110 111 112 113 114 115 116 117 118 119 120 121 122 123 124 125 126 127 128 129 130 131 132 133 134 135 136 137 138 139 140 141 142 143 144 145 146 147 148 149 150 151 152 153 154 155 156 157 158 159 160 161 162 163 164 165 166 167 168 169 170 171 172 173 174 175 176 177 178 179 180 181 182 183 184 185 186 187 188 189 190 191 192 193 194 195 196 197 198 199 200 201 202 203 204 205 206 207 208 209 210 211 212 213 214 215 216 217 218 219 220 221 222 223 224 225 226 10816 replies