Tiki Central / Other Crafts
News and Troubles of Jürka's Tiki Factory
|
J

Jürka
Posted
posted
on
Wed, Aug 15, 2012 2:49 PM
As I mentioned in hello-topic ( http://www.tikicentral.com/viewtopic.php?topic=6&forum=1&start=3465&3468 ), I started to make my own Tiki who is portraying first man on this egg called world – Kumuhonua. So... I carved my wooden guy and started make a mold for slip casting... I made my first (and worst so far) mold of constructional plaster. So my first question? Should I throw away idea of not using some special ceramic plaster which is around 5 times more expensive than constructional one? Is 20 euros for 25 kg bag normal price for it (for example in your countries)? Is formsil and plastificator really important for slip-casting clay? It is again pretty expensive fun to buy them and some local internet shop said that it's "recommended"... What kind of glazes you use or I should use? Is there some better and more trustworthy manufacturer for them? Botz? Some glazes does not need firing before glazing... Are them equal to ones which need firing before glaze? |
|
P

pjc5150
Posted
posted
on
Thu, Aug 16, 2012 4:03 PM
this question would probably get a lot more response in the "creating tiki" section... this is where the carving guys hang out...I've seen some ceramic posts over there in the "creating" forum though... |
|
M

McTiki
Posted
posted
on
Thu, Aug 16, 2012 4:41 PM
Well done Jeff! That was graceful! Jurka! Welcome to Tiki Central! Mahalo! McTiki |
|
J
Jürka
Posted
posted
on
Thu, Aug 16, 2012 5:37 PM
Yeap, I already voted it for moderators to throw it into "other crafts" section... So I hope it will happen... But meanwhile I think I'll post some pictures here for illustration of my holy way... Hello and thanks, McTiki! |
|
J
Jürka
Posted
posted
on
Thu, Aug 16, 2012 6:27 PM
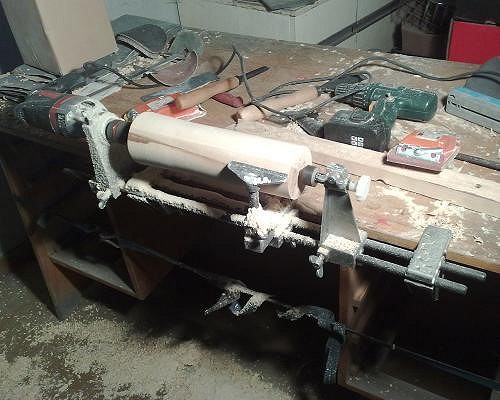
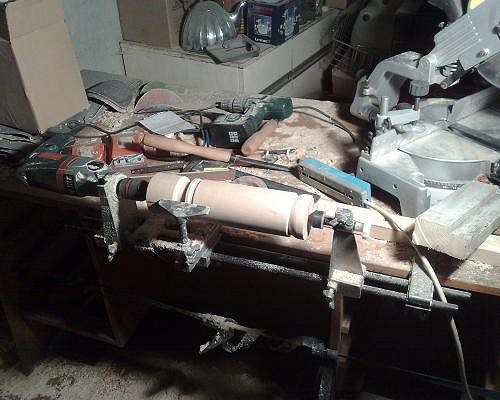
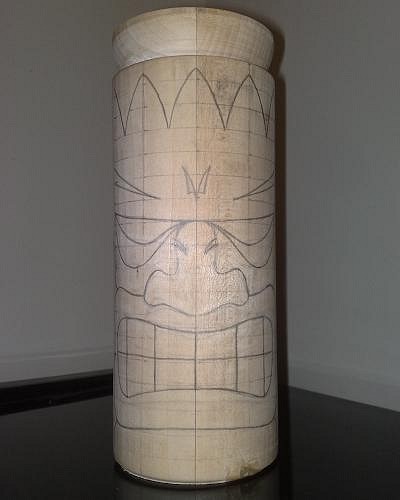
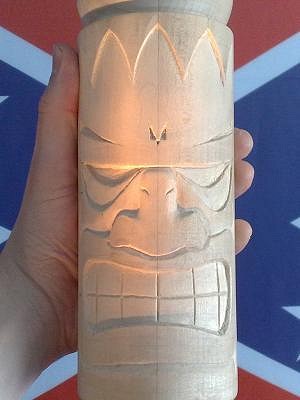
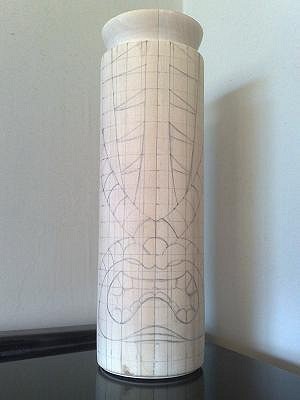
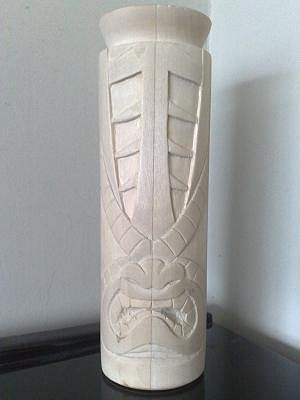
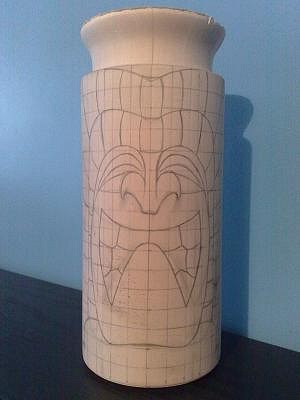
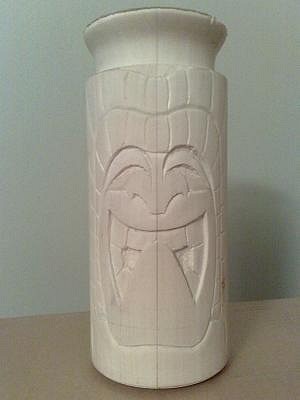
Now here is illustration... At first I took just some piece of Picea-wood to see how is it feel to have a lathe and chisel in my hand... Then I glued together four pieces of good wood (I think it's Alnus) for real thing... ...and shaped it round... ...and thought very carefully what kind of curves it needs to have in future... So now I had that only job in this road where I feel at least a little bit confidence... Drawing part... After chisel and sandpaper... Before befouling my Tiki I wanted to try with that old piece of wood how is plaster (constructional one) acting with wood... Well... Almost... Plaster is too weak... but at least it doesn't hurt wooden object... So I was brave enough to try it with my Kumuhonua... That plaster dries too fast, I had to throw away first half of the moldbox... and mix the new one... and faster... We are talking about seconds! Next day I poured the second half... and hoped it will be okay... ...but it wasn't. Now I'm stuck. I guess I have to search my trousers to find my wallet and get a real ceramic plaster... |
|
P
pjc5150
Posted
posted
on
Thu, Aug 16, 2012 7:46 PM
definitely wasn't trying to chase anyone off there...just trying to be helpful... cool stuff though man...a lot involved with that mug stuff for sure... |
|
T

tikiskip
Posted
posted
on
Fri, Aug 17, 2012 4:31 AM
Did you soap your tiki before you put plaster on? [ Edited by: tikiskip 2012-08-17 04:41 ] |
|
J
Jürka
Posted
posted
on
Fri, Aug 17, 2012 5:21 AM
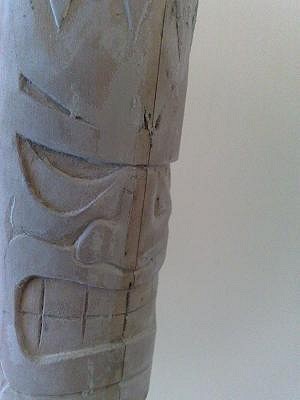
Yeap, thanks, pjc5150! Yes, tikiskip, I soaped it well and with extra caution... I've watched little bit of those videos from Youtube, but haven't find any answers for myself. This forum has been much more detailed place for learning with all common mistakes and useful tips... My Tiki has pretty sharp edges and that's what makes a problem when I'm trying to get it out from plastermold. I must remove it from right direction, otherwise it will break those edges. I believe that the right ceramic plaster would not break so easily and won't petrify so fast and that would be solution I hope, but I have no experiences at all with it and before buying it I'd like to find out differences between those two plasters to make sure if it's the answer for my problems... |
|
A

AlohaStation
Posted
posted
on
Fri, Aug 17, 2012 7:36 AM
Try using a 3-piece or 4-piece mold. You are right the sharp edges are difficult. By reducing the surface area the mold has to form, may help. Good luck. |
|
O

OnlyATikiLad
Posted
posted
on
Fri, Aug 17, 2012 9:51 AM
"befouling" Excellent, love it. |
|
C

cy
Posted
posted
on
Fri, Aug 17, 2012 12:06 PM
"Petrify" is also cool. |
|
J
Jürka
Posted
posted
on
Fri, Aug 17, 2012 2:15 PM
3-piece mold may be pretty good idea, but it means that one of the most important places must be cleaned after slip casting... I would not like to have connection on the front part... I guess I'll try to find some ceramic plaster at Monday and hope it will work better... and use a lot of soap... But meanwhile... Today I glued together next four pieces of wood and try to start carving Lono for the next mug after if it happens to happen that one day Kumuhonua comes alive... |
|
J
Jürka
Posted
posted
on
Wed, Aug 22, 2012 3:42 PM
Still no plaster for Kumuhonua, searching for it... as much as I have had time... But meanwhile I started with Lono... Glued pieces of wood, made it round and made a drawing (which came out perfect, hope to not ruin it with chisel)... and now I'm waiting for right feeling before I touch it with anything sharp... I'll add pictures later... after carving or sometime... And li'l bit for entertainment... I made a picture using Microsoft Paint... for Facebook's timeline heading... Heh-heh... [ Edited by: Jürka 2012-08-22 15:46 ] |
|
J
Jürka
Posted
posted
on
Thu, Aug 23, 2012 6:39 AM
Now I talked with a guy who knows those things and he said that ceramic plaster is almost the same as usual constructional plaster... and all the ceramics here use usual one because it's so much cheaper... He also suggest to use vinegar in plaster to avoid drying too fast... 1,25 kg plaster powder for 1 l water... Well... What else... I'll keep trying... And I guess I'll try three-piece mold this time like AlohaStation recommended... |
|
D

danlovestikis
Posted
posted
on
Thu, Aug 23, 2012 10:37 AM
Hi Jerka, I have been making molds now for a couple of years. We started with the cheap plaster and found that it didn't hold up. After a few casts the edges started to crumble. We only buy first grade mold plaster now and even still after 30 casts parts start to break off. You can glue them back in place with wood glue. The most important lesson to follow is that once you make a mold it is not truly done until it has completely dried out. That takes around 2 weeks in the sun. If the mold feels cool or cold it is not yet dry. We always wait this long before we make the first cast. Good luck, Wendy-danlovestikis |
|
J
Jürka
Posted
posted
on
Thu, Aug 23, 2012 3:41 PM
Thank you very much for your wise response... The man told me that one day is not enough, two days would be more likely... but two weeks?? Well, that's what I should try... What about opening the mold? When is the right time to take my Tiki out of it and put the mold back to dry? Lono carving is getting finished soon... It wants some touch of slice and sandpaper... and I have to figure out how sculpted I want it... It's pretty tight face, so I guess I won't try to make it too deep... |
|
D
danlovestikis
Posted
posted
on
Thu, Aug 23, 2012 3:48 PM
We take the original out of the mold as soon as we finish all the pieces. Then we strap it back toether to dry. I've been told that will help prevent leaks in the future. Wendy |
|
J
Jürka
Posted
posted
on
Thu, Aug 23, 2012 4:28 PM
It would be the next day? After the process, when the mold is going hot, is over? ...or even before that? |
|
D
danlovestikis
Posted
posted
on
Sat, Aug 25, 2012 5:39 PM
We make the mold, when it is hot we take it apart and take out the sculpture. Then we put it back together and put it in the sun to dry. You said your plaster is setting up too fast. That means you are not using enough water. I figure out the size using a 3 cup measuring cup. I put the water in a deep container. Then while mixing it with an electric mixer I add the plaster a big scoop at a time. When I see tiny bubbles I stop and dip my hand into the plaster. It is sticks to my fingers like butter milk I'm done. It is is not I add more plaster and mix. Once it is like butter milk then it is ready to pour. It takes around 20 minutes before it becomes hot. I have lots of "how to make molds" on my section here on other crafts. Good Luck, Wendy |
|
J
Jürka
Posted
posted
on
Sun, Aug 26, 2012 2:27 AM
Yeap, that's a place I learned before any action... And yeap, I did put too less water... way too less... Now I do it as the guy told me (1,25 kg powder to 1 l water) which is really-really liquid (but seems right)... I didn't saw those bubbles before, now I did... Well, we'll see... Thank you for tips, I need them! |
|
J
Jürka
Posted
posted
on
Wed, Sep 5, 2012 2:14 PM
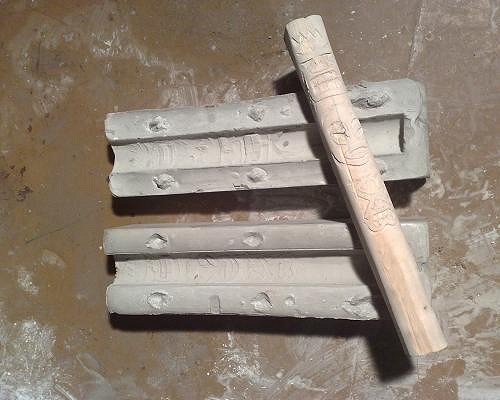
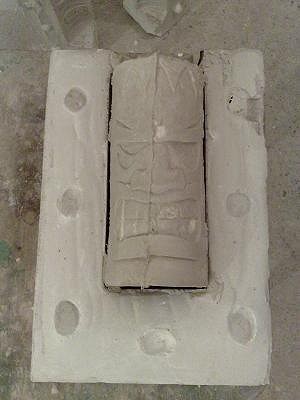
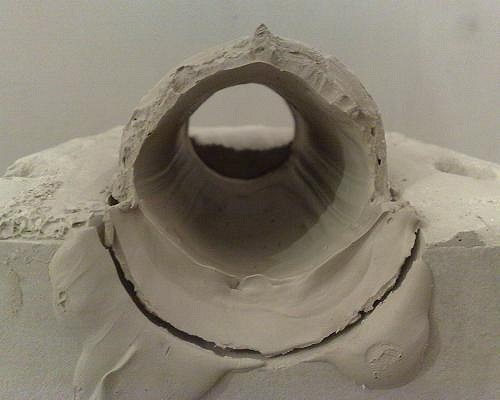
My news and troubles continues... I made a new mold for Kumuhonua... This time I used much more water for plaster powder and tried three-piece version... I tried to open it next day, but it was too soft, I would have brake it... So today, after one week, I did it... Result is much better than previously, but still not too good... I think that this time I try to fix this same mold, glue some pieces back which were stuck to wooden guy, and fill some few bubble-holes... The worst thing is that the upper part is one that I have to build up from front-side... In future I think I'll make that cone for slipping lot longer... that it would stay together... But meanwhile... I started my Lono... from zero again... Made a drawing which came out exactly as I wanted it... (Classic Lono!) And carving came out as well... Maybe I brush it up more a little bit, but mostly it's done... Two places happened where I had to use glue+sawdust coctail on its lips, those darker spots there, but otherwise I'm happy with it... I guess I have to work more with the place behind teeth... Holy work will continue... The mold is drying... Maybe I should tie it together, now it's just placed together... Lono is waiting its time... I hope it will come someday... After the mold is stronger I have to build it up... and next thing is to start learning about clay and stuff... I hope this mold works... or I must make a third one... before forth... to be more competent with fifth... |
|
M

MadDogMike
Posted
posted
on
Wed, Sep 5, 2012 3:45 PM
Jürka, if you want to do a couple hundred mugs then you want your mold to be as perfect as possible. 30 minutes cleaning each one times 200 castings is a buttload of time. But if you are only doing 10 or 20 mugs it's not such a big deal. You don't have to fill in the little bubble holes, just cut the bubble off each casting. The more molds you make the better each one will get (in theory at least, my molds don't seem to be getting any better :D ) You seem pretty comfortable working with a wood master but there are easier and more forgiving things to work with like clay or wax. Of course you could burn and brush your wood master to get a really cool texture in your mold and on your mug. |
|
J
Jürka
Posted
posted
on
Thu, Sep 6, 2012 3:18 PM
Well, I don't think I ever do couple hundreds of them but I still want it to be as perfect as possible... Ofcourse this is just what I want and not what it is... I hope it's good enough to make first mugs and if it works I'm pretty sure I'll do new mold and hopefully better one. That's why I think I'll try to fix this same mold to be as good as I can make it... that I would not have to do too much fixing work for each clay-guy... At first I did think about making the master from clay, but... it's much cheaper with wood (I don't have any tools for clay), I think it's much easier for me to do it from wood (I have time to work with it, I don't have to know any other rules or techniques than "result is only that matters")... and most of all I like wooden version because it's the traditional way. Really tikis are carved from wood and mugs are portraying wooden tikis... So I want my mug to be like wooden tiki... I have my own geeks in these things... But I've thought that maybe the wooden guy is the reason why it doesn't like to get out of its plaster-bed (I soaped it well, can't blame me on that), maybe it would be easier with claymen... but... still, I'm gonna be stuck with wood-tikis... |
|
D
danlovestikis
Posted
posted
on
Thu, Sep 6, 2012 6:03 PM
I'm really enjoying reading your posts on this thread. Good job. Wendy |
|
J
Jürka
Posted
posted
on
Fri, Sep 7, 2012 5:12 AM
Thanks, Wendy! |
|
J
Jürka
Posted
posted
on
Fri, Sep 21, 2012 3:15 PM
Today I went to see that Kumuhonua's mold... Haven't seen such a hard mold before, so next days I should try to build it up and fix... But very soon I have to go to work for half a year or so... so I think I won't start with clay-stuff before I come back at spring. What I do is maybe... if I have time and mood enough... maybe I will carve Ku in next week or so... Today I already started with it... It's glued together and shaped round... |
|
B

BeezleBug
Posted
posted
on
Fri, Sep 21, 2012 8:18 PM
You can still use an imperfect mold - it just requires a little extra clean-up on the cast slip. Nothing that a little sandpaper or simple clay tools can't fix (I use cheap steel dental tools made in India). I also have tons of mold-making pics on my thread: http://www.tikicentral.com/viewtopic.php?topic=30009&forum=18&176 |
|
J
Jürka
Posted
posted
on
Sat, Sep 22, 2012 4:36 AM
Yeap, but only thing I'm worried at moment is that upper part... I want entry to my mug to be unbent and same fatness... Slip casting clay must run down equally of every side to have perfect ring... Maybe it's not so big problem at all as in theory it seems to be... Must try first... |
|
M
MadDogMike
Posted
posted
on
Sat, Sep 22, 2012 12:28 PM
Estland as in Estonia? Some people like to measure plaster out to exact quantities by weight or volume but you can you a "mounding method" if you want it close but not so exact. Start with your desired volume of water in a container and start sprinkling the plaster over the surface with a spoon. The plaster with absorb water then sink to the bottom. Keep sprinkling the plaster on the water until it has all soaked up and is starting to mound above the waterline. Let it soak (slake) about 5 minutes then stir thoroughly. |
|
J
Jürka
Posted
posted
on
Sun, Sep 23, 2012 12:21 PM
Yes, politics and scientists call it Estonia... and doctors and businessmen and taxidrivers and schoolteachers and all the others... but it doesn't change the fact that Estland is Estland... I'm doing it in measuring way... 1,25 kg of powder to 1 l of water... and seems right... but next time I must tape corners that it would not flow out from the crate. I'm afraid 5 min to let it soak... it will get hard in that time... All the moves I do, must be the fastest moves of my life... otherwise it gets stoned too early... I guess I have to find out my Polynesian folder and put some nice southern seas music on... to make a right mood that I'd be able to pick up pen and ruler and start drawing mr Ku... |
|
J
Jürka
Posted
posted
on
Mon, Oct 8, 2012 4:47 PM
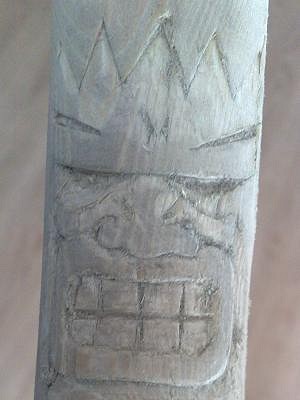
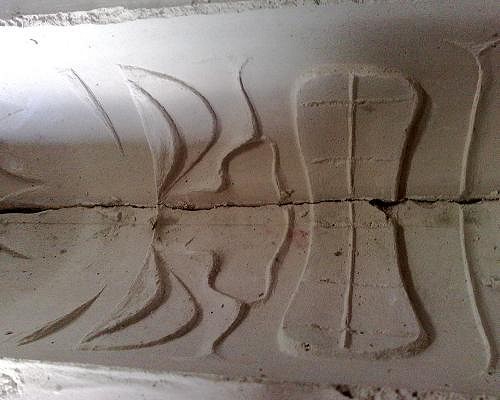
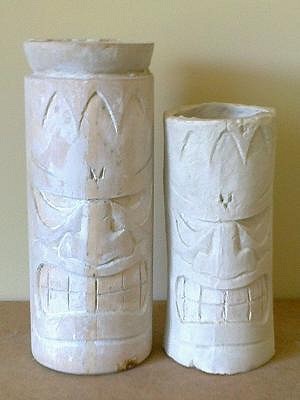
Ahoy! Then I started to mix the clay with water... I didn't waste my money for plastificator nor formsil... I don't know how much they could have change things... Anyway... It was said that for 10 kg of powder must put 4 l of water... I thought that maybe 1 kg would be enough for my mold... So... 400 mg of water... Mmjah... Nope! No way... Must add water... and more... and more... and more... I put at least 1 additional litre of water in the bucket... before it started to change little bit like if you add some more water then it's getting possible to pour it... So I added some more water till it looked okay... I have no idea where those 10 kg and 4 l numbers has come from... At last I got more than two times of cubage of clay then I thought I needed... I wanted 1 litre, got almost 2,5 litre... I poured the clay in the mold and shaked it like hulagirls do it with their asses... It was a real long shaky song... So I waited half hour, meanwhile I had to pour some more clay in it, because the level kept lowering in the mold... Now I was pretty happy that i had so much clay ready to pour... Oki, half hour was over, so I turned it around and tried to slip it out... I thought that it's all stuck and plans to stay there forever and I patted on the upside bottom... Well, really it wasn't necessary... Result of my work was catastrophic... This "mug" does not have destiny to carry some rum-coctail in it... ever... I also noticed some bubblehole's in the walls... and the wooden bottom came off and fell also out... and... you know... like them catastrophs are... everything is f*cked up in the end... That's my fallen out wooden bottom on the edge... Times went by and I found out that wooden piece is really bad idea to have it inside... I had never seen wood in liquid condition before but now I did... It shrinked and... Picture says it... But... Really... I didn't want to depress you by showing unlucky tiki-mug attempts... That was not my plan... So I try to finish this post with more positive way... I glued, shaped and drew Ku... Look, he's smiling to you here! And then I carved him... I guess that before starting any mold of him I want to cut him little bit more... and sandpaper and stuff... But he is almost ready I think... And here's my Kumuhonua who is come out from mold... He is really badass guy! Reminds me Rambo... or that striped guy from "Commando" movie... Anyway... You meet him, don't you mess with him... So... Now... I guess I may try some more unlucky attempts in these two weeks... for just to learn what kind of problems is in that clay-business and stuff... but more serious mugging will continue in spring... There must come a day when those guys will hold coctails in them... Must come! |
|
J
Jürka
Posted
posted
on
Tue, Oct 9, 2012 2:12 PM
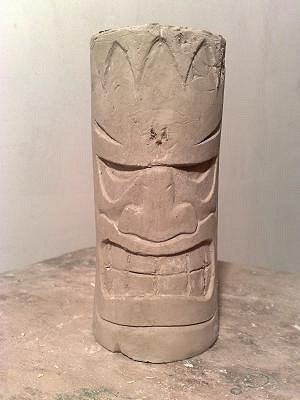
Ahoy! Next time I must take a long stick and stir it inside to lose bubbles from edges... There are some in my prototype... And here it is... The first Kumuhonua... with bullethole in the back and no bottom... I cleaned those three vertical lines from top to bottom... Worked little bit with teeth and few places, but didn't give too much attention to refinement, because I have to make a new mold anyway... I like the result... The looks is exactly as I have wanted it... and now I have much more faith that the coctail-loving Kumuhonua will come alive one day! |
|
D
danlovestikis
Posted
posted
on
Tue, Oct 9, 2012 4:14 PM
You've done very well. It's not easy. I'm lucky to have Dan help me with each step. I'm looking forward to when you start to glaze. Duncan IN glazes show detail really well but they also show up every defect even it it is a pin hole. Good Luck, Wendy |
|
J
Jürka
Posted
posted
on
Tue, Oct 9, 2012 4:45 PM
Well, yeah, glazing is in far-away-future... But I've already looked little bit of those glazes... I guess I should look at glazes which are available in my country... and also it is important how many colors of it are available... because I want to use same kind of glazes for all my tikis... or at least those five which is my first mission (Kanaloa and Kane doesn't even know yet that I'm gonna make them)... So... I need brown, red, grey, green, blue and something purple-like... and they all must be in appropriate tone... Plus they must be suitable for tableware... So... I have looked these here... http://www.botz-glasuren.de/steinzeug-glasuren-farben/?L=1 I'm not sure how good they are showing details on surface, but if they don't hide everything, then it's ok for me... I'm not really too interested of making effect that lines are like drawn on by pencil... [ Edited by: Jürka 2012-10-09 16:46 ] |
|
J
Jürka
Posted
posted
on
Sun, May 26, 2013 1:10 PM
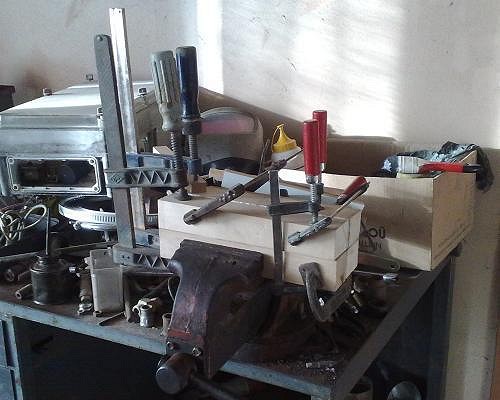
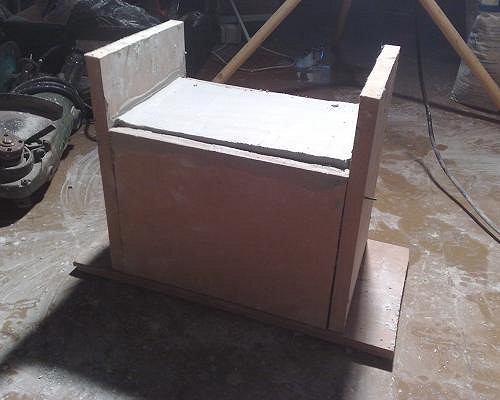
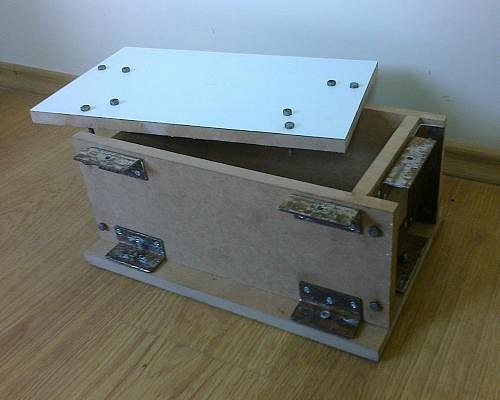
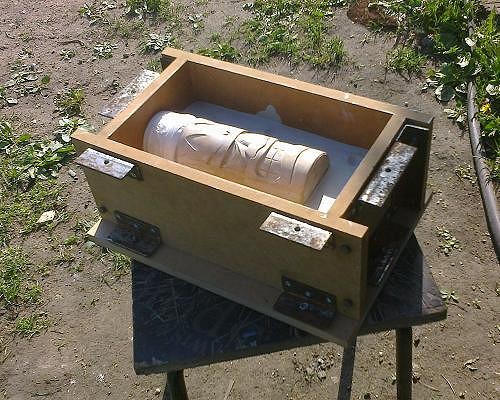
Ahoy again! I arrived around month ago and my holy tiki mission is proceeding... Today the box for mold got finished... Not the sh*tty one as the previous ones, but the pretty good one... I forgot to make a picture, but maybe next time... This box is not for one-time-use now... Appropriate size for all my tiki-zoo... So... here it goes again... Not too fast, but... we'll see... |
|
J
Jürka
Posted
posted
on
Thu, May 30, 2013 2:05 AM
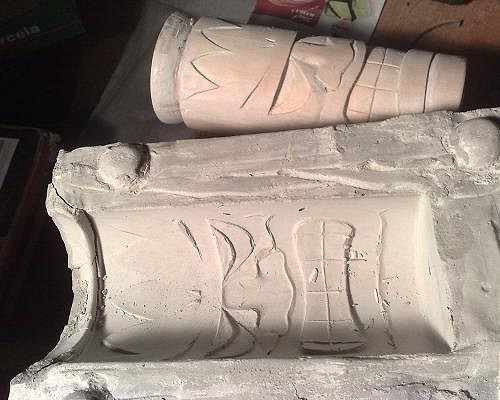
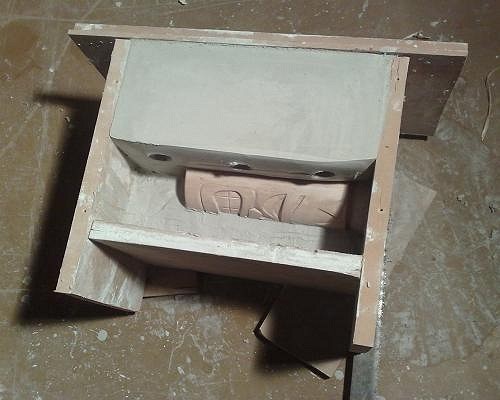
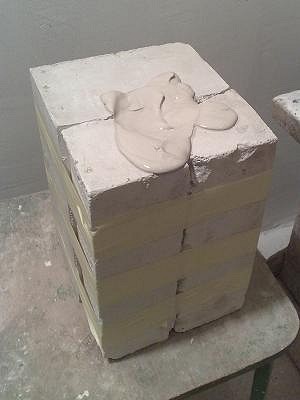
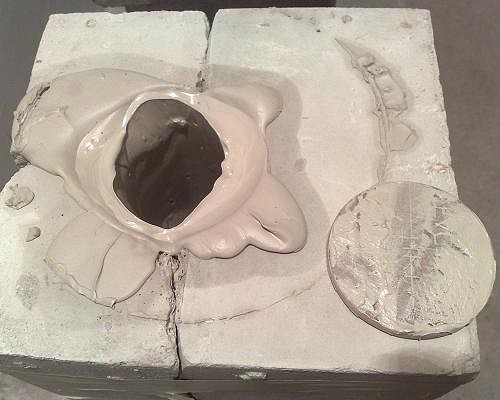
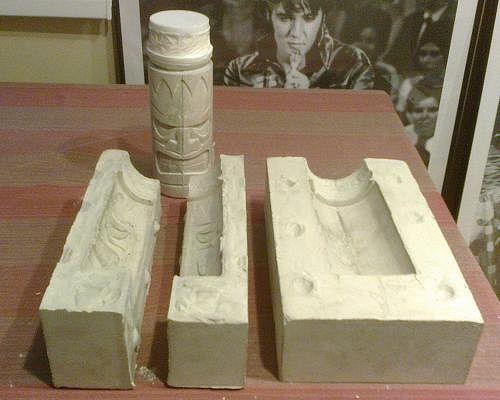
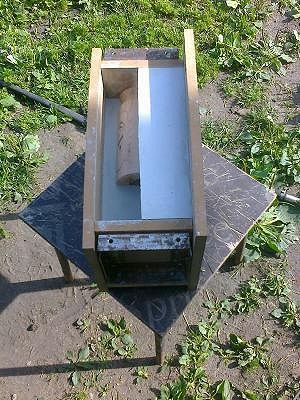
The new mold is in progress now... Here is some pictures: Here can be seen how much the clay-guy (from last fall) has shrunk due to loss of aqueous humor... Clay-guy has not been fired. Here is my new box... It is totally detachable and universal (fits for all my tikis by size; also possible to reduce the length if necessary). And here is the new mold poured... In other words: "Vampire-Tiki lying in his coffin (don't pay attention to killer-rays of the sun)." |
|
M
MadDogMike
Posted
posted
on
Fri, May 31, 2013 8:56 PM
Jurka is back! Best wishes on your new attempt to bring Tiki to Estonia :) |
|
D
danlovestikis
Posted
posted
on
Fri, May 31, 2013 9:54 PM
I just re-read all three pages. You are a funny guy. Best wishes for success. Remember that you can let some slip firm up and use it like clay. You could make a bottom as long as the cast hasn't started to dry out. You just make a circle of clay on top of plastic wrap so it doesn't stick to the table. They put some wet slip on top of it as glue. Then stick your bottomless tiki on the circle of clay and smooth the outside. On the inside run a paint brush or a sponge on a long stick around to smooth it out. You can do anything with the clay before it dries, even add horns. Have fun and keep up the good work, Wendy |
|
J
Jürka
Posted
posted
on
Wed, Jun 5, 2013 7:31 AM
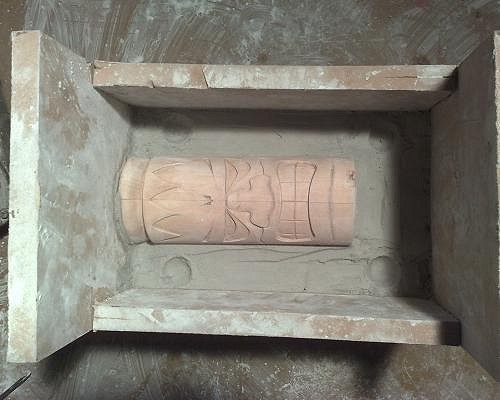
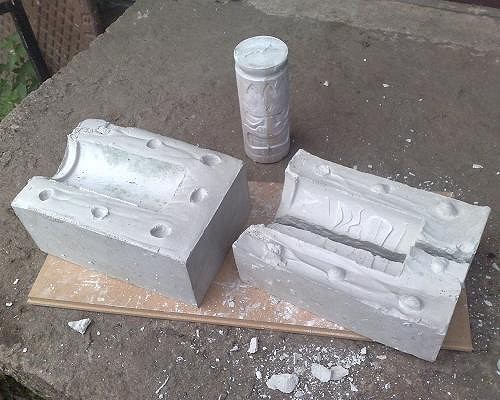
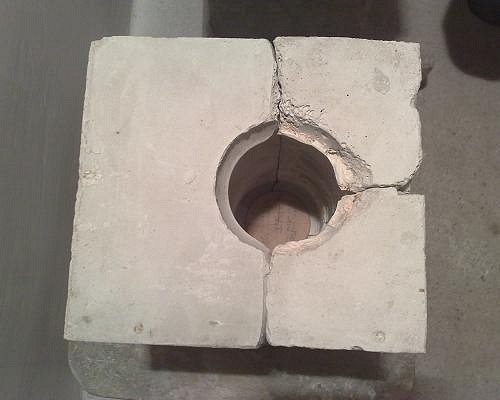
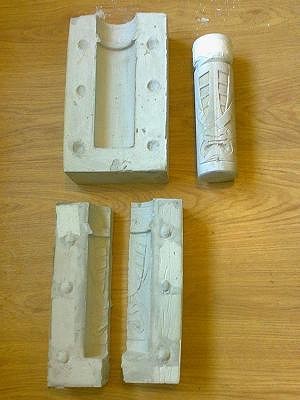
Thank you for your feedback and support! I've poured also other parts of mold few days ago and now it dries... I made it three-piece mold again and as you can see from previous pictures I attached a cylinder to Tiki's head so that the Tiki itself would stay more inside part of the mold and would not break so easily when I'm gonna try to open it. Hope it works. After 1,5 weeks I try to open it. So far I'm gonna have some rock 'n' roll trip... |
|
J
Jürka
Posted
posted
on
Mon, Jun 17, 2013 4:47 AM
The mold is opened now. I was positively surprised that the mold got opened pretty easily. I had also put some tapes between the sides so it was like isolation between them. Result is pretty good. There's not much airholes, because I used very waterish plaster. The only problem is that the wooden boy took the water from plaster to inside of him and started to grow and it gave a pressure to plaster, so now the plaster has some cracks, but it is not a real problem I guess. I just hope the mold itself doesn't broke in two... Some very few little details were cut off (got stuck to wooden boy), but I glued them back, I hope it will stay there, if it doesn't, also not too big problem. Now the mold is drying... and I'm afraid it will do it pretty long time. Can't wait to start with clay again. This time there's a lot more hope to get my first mug finished! I ordered and received my first Hawaiian shirt for case when I have to celebrate my first mug... so... you can see I really have a hope!
[ Edited by: Jürka 2013-06-17 04:53 ] |
|
M
MadDogMike
Posted
posted
on
Mon, Jun 17, 2013 1:06 PM
Looks like a sevicable mold to me! It doesn't need to be perfect, you will always need to get rid of seam lines and correct little problems anyway. But the better a mold is, the less time you will have to spend cleaning it up. Congrats on your first Hawaiian shirt :D those are probably hard to find where you are. Best wishes to your continued success! |
|
J
Jürka
Posted
posted
on
Mon, Jun 17, 2013 2:39 PM
Exactly my thoughts... Yeap! |
|
D
danlovestikis
Posted
posted
on
Mon, Jun 17, 2013 9:38 PM
Please post a photo of you wearing the shirt and holding a mug. (: Wendy |
|
J
Jürka
Posted
posted
on
Tue, Jun 18, 2013 3:10 AM
Wait! Wait-wait-wait! Must complete the mug at first! It's just a illusion yet and it's hard to catch it on the photo as long as it doesn't exist... But that one day... I sure will! |
|
D
danlovestikis
Posted
posted
on
Tue, Jun 18, 2013 1:43 PM
I'll remember your promise! Wendy |
|
J
Jürka
Posted
posted
on
Tue, Jun 18, 2013 3:13 PM
:D |
|
J
Jürka
Posted
posted
on
Thu, Jun 20, 2013 1:45 PM
Today I was thinking that time wasting is not the smartest idea and started to make a mold for Lono also... So, the bottom part is poured today. Should have done it days ago... |
|
J
Jürka
Posted
posted
on
Fri, Jun 28, 2013 11:15 AM
Updating My Tiki Factory News... Lono got his mold. It's ready, opened and drying... Some very little pieces broke off, I glued them back, I guess it's totally ok mold to use... There may be very little pieces of glue around glued parts, I hope it will not be a problem (the same as it was with filler that the clay stuck on it)... Then... Kanaloa is starting to become alive... I glued together woods whitch I'm gonna shape round and so on... Back in beginning! Also, if the length of wood is enough, maybe I also try to make little skull-shaped shot-mug... Simple, but nice one... And... Now the next guy, Ku, gets his last part of mold tomorrow... So far it looks like this... And... also... today I made a pretty big outgoings and ordered Botz glazes for Kumuhonua, Lono and Ku... Four different 800 ml glazes... costs something over 90 euros... Getting tough... :D It takes somewhile till it arrives from Germany, meanwhile I should make first portion of clay-guys and make the first firing... The problem is that slip-casting method... I mix my clay with water, I pour it in, I slip it out... and all that comes out, I can't use it any more, because then I don't know the exact relation, how much water, how much powder... I guess the thickness of the mug's edge depends on it... And the question is following: Is the shrinking size of clay-guy depending on how much water it has inside while pouring? |