Tiki Central / Other Crafts
Tiki Ano Mugsville: "I made it out of clay."
Pages: 1 2 3 4 5 6 7 8 337 replies
|
T

TikiAno
Posted
posted
on
Thu, Feb 27, 2014 11:08 PM
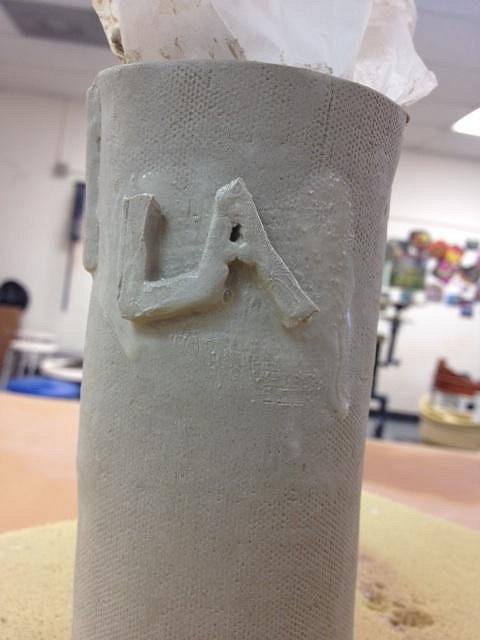
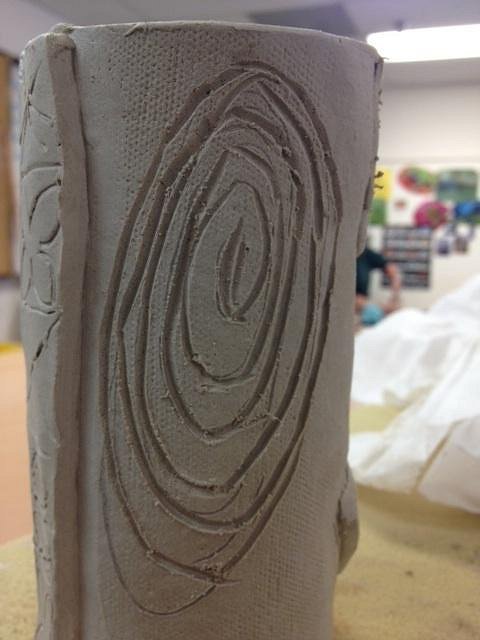
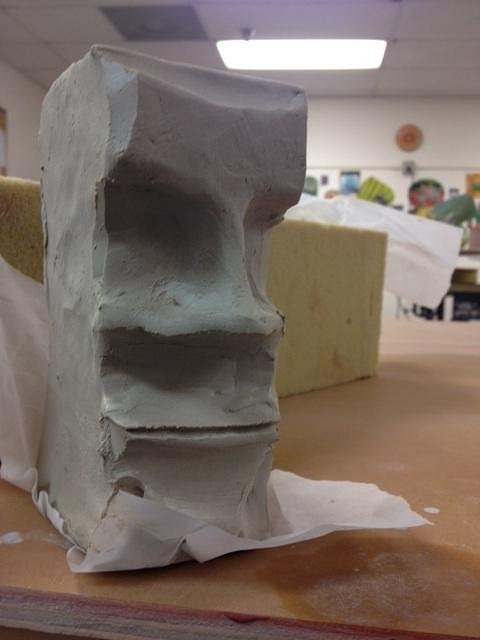
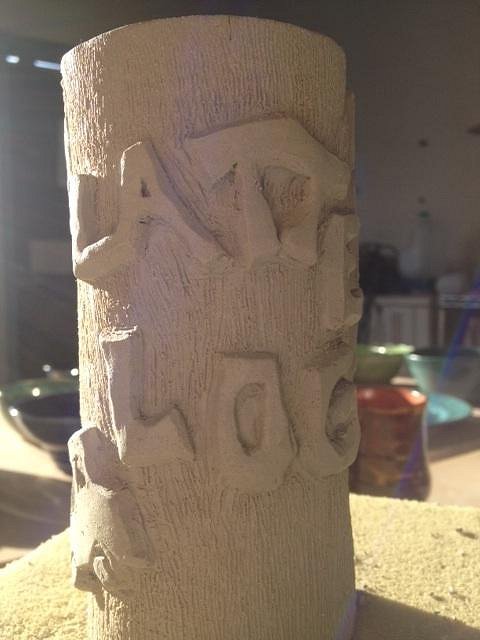
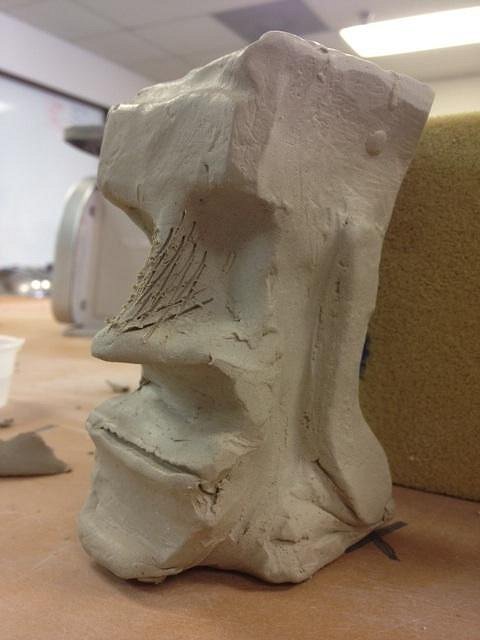
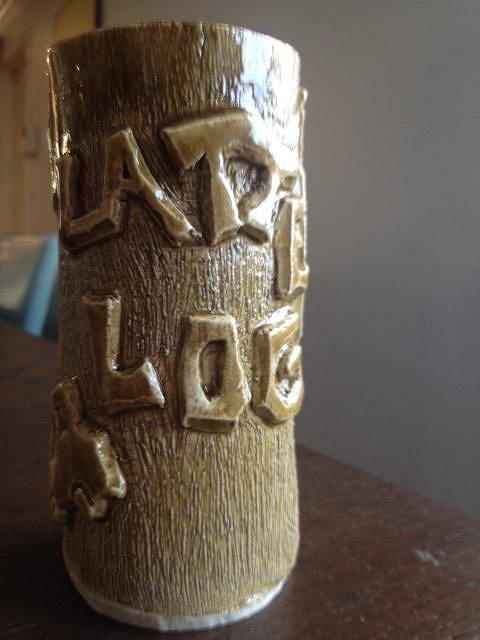
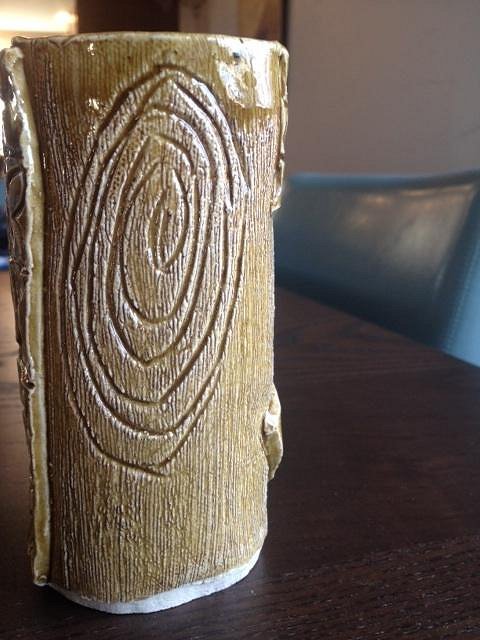
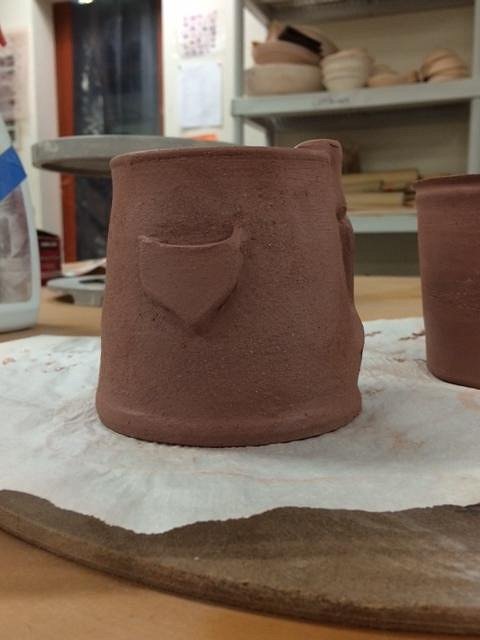
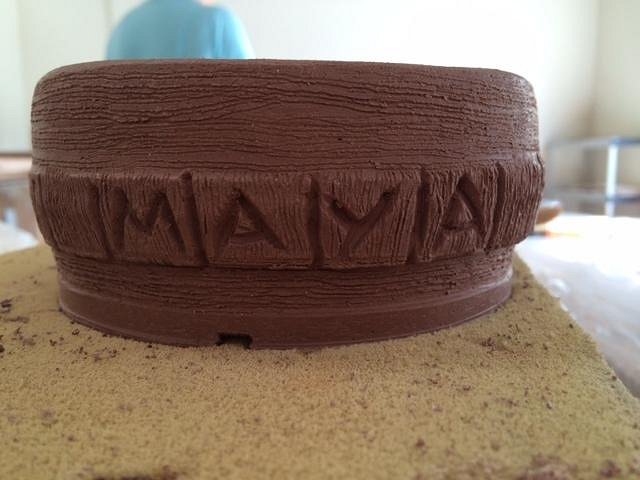
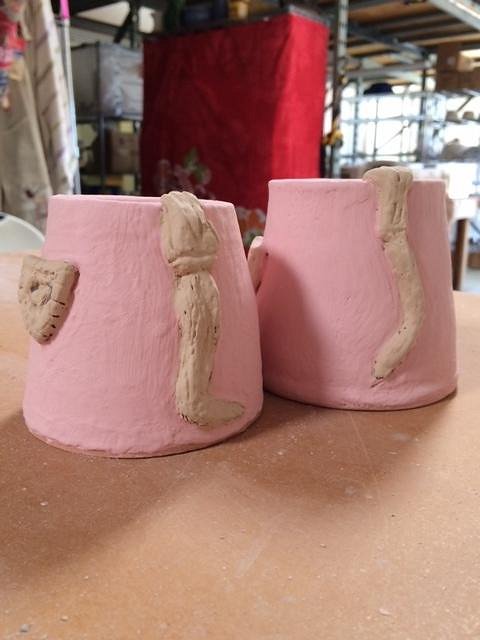
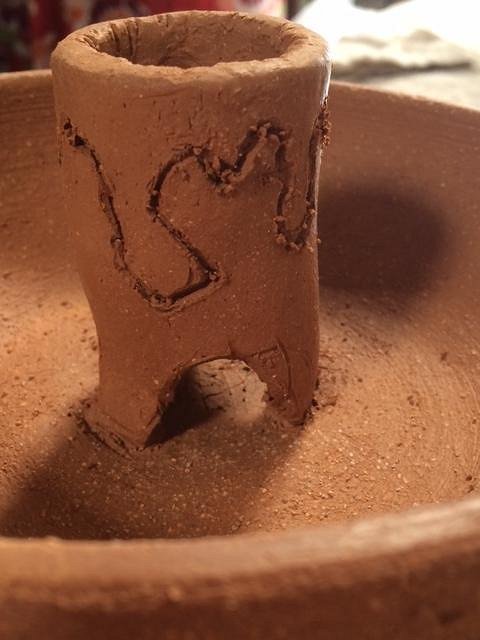
Started working on another handbuilt mug for the "Latte Lug" challenge winner. I had made a slab w/ a slab roller and gotten the form to firm up a bit. I free hand drew then cut out letters out of a thrown slab. Attaching letters one at a time.... until more were scored and slipped onto the mug: I then drew in and carved a big knot in the side: then added a little tapa strip: All of these pieces need to firm up some more, then I will trim more, as well as add wood grain texture to the rest of the mug. I also continued working on another Moai mug. I saw MadDog Mike cut away a block of clay from his last Art Swap piece, and really wanted to try the process. I cut a chunk of clay out of a bag, removed clay in wet chunks. Wasn't working so well, so I let it firm up a little bit, then attacked it more today. It's the first time I've worked a piece of clay like a wood carver, so it's definitely a learning process- not quite as "Moai" as I had hoped. Once it's trimmed up I'll cut it in half to remove the interior, then re-attach it. So far:
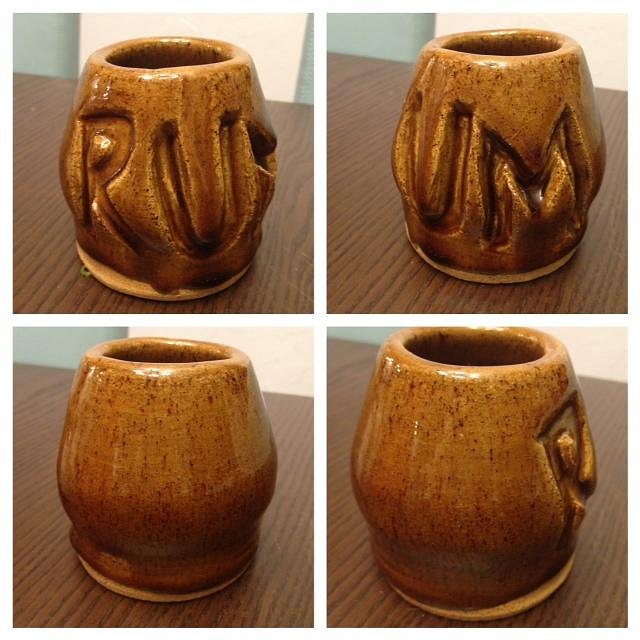
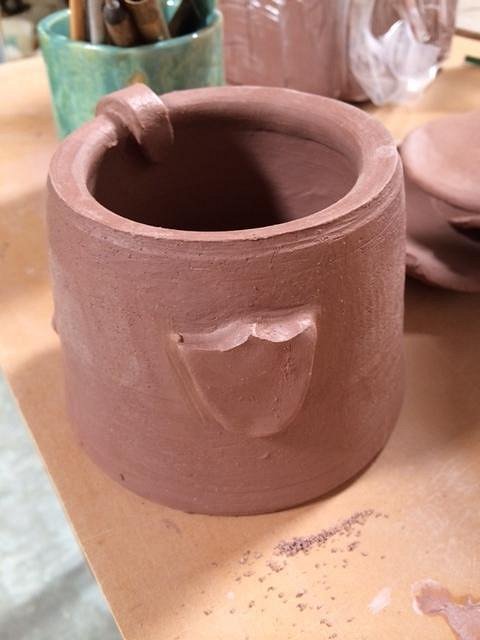
I also got a thrown vessel (that was carved) back after glaze firing. The "Rum" letters are carved very deep into the cup (thick walls), which made the glaze really pop. It's pretty small, and an almost-coconut shape.
Thanks for lookin'. [ Edited by: TikiAno 2014-02-27 23:09 ] |
|
H

hang10tiki
Posted
posted
on
Fri, Feb 28, 2014 7:46 AM
Very cool |
|
T
TikiAno
Posted
posted
on
Fri, Mar 7, 2014 6:41 PM
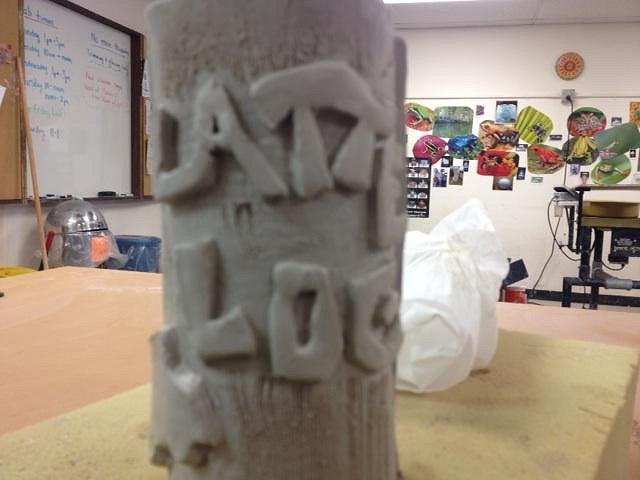
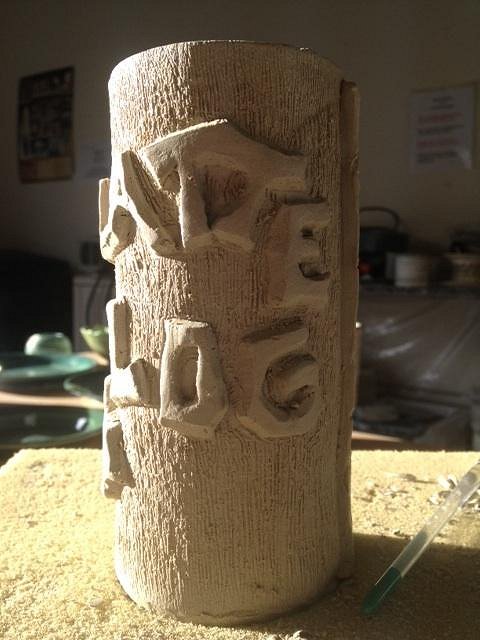
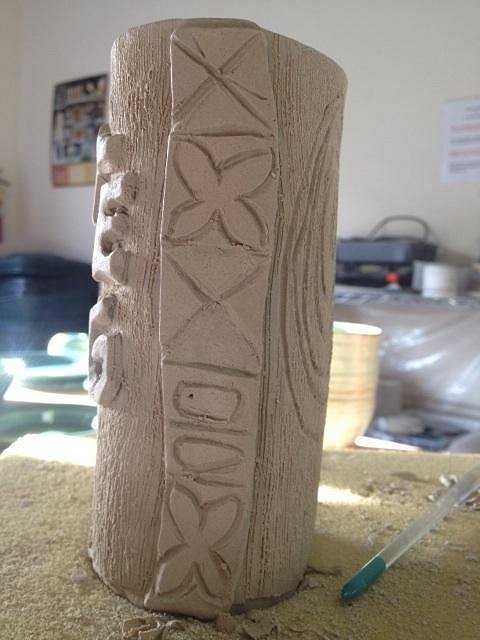
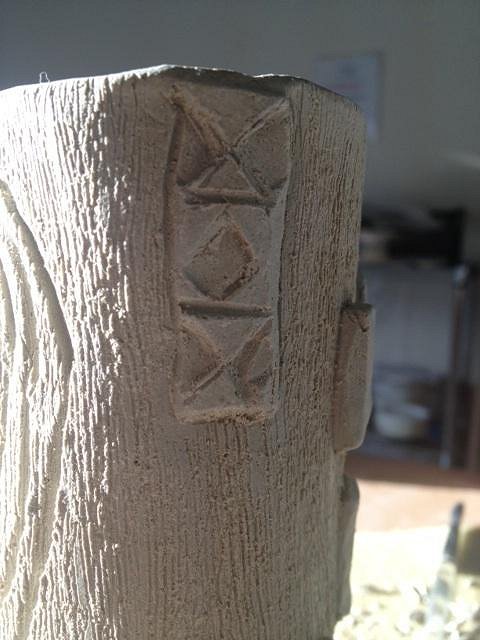
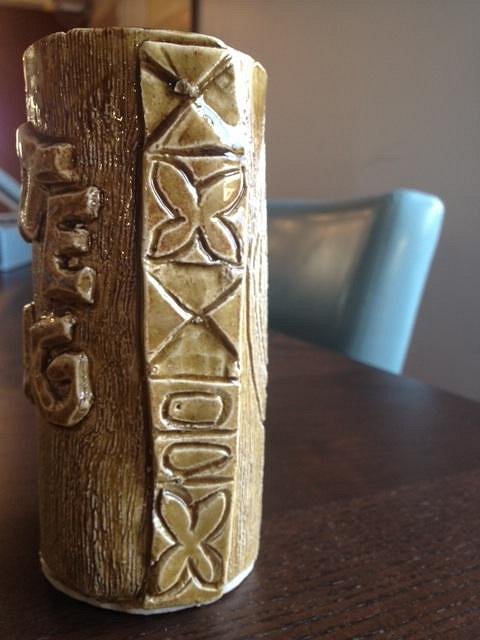
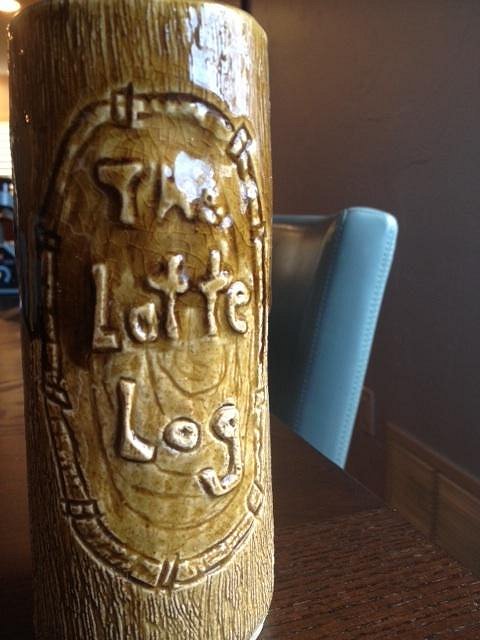
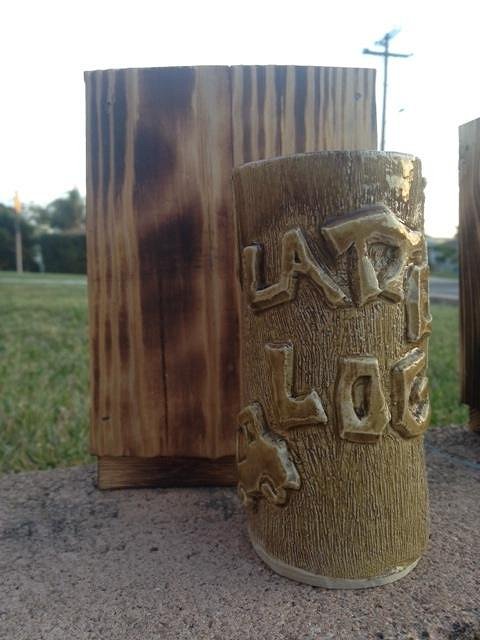
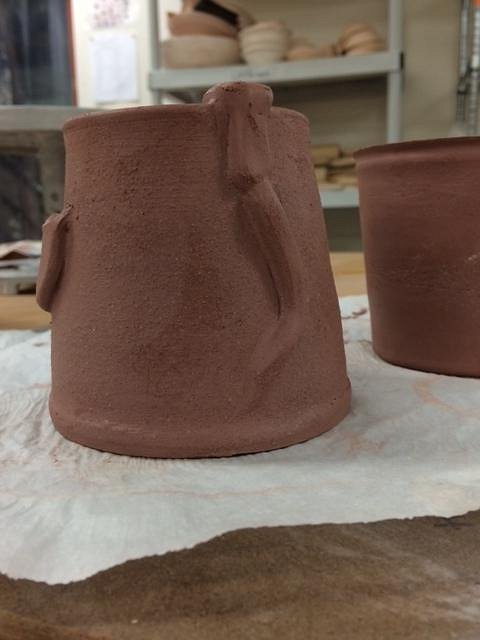
Further work on the second Latte Log mug... it had dried a bit, so was able to add wood grain texture, as well as make some cleaner cuts/ trims on the clay. The letters were fixed up:
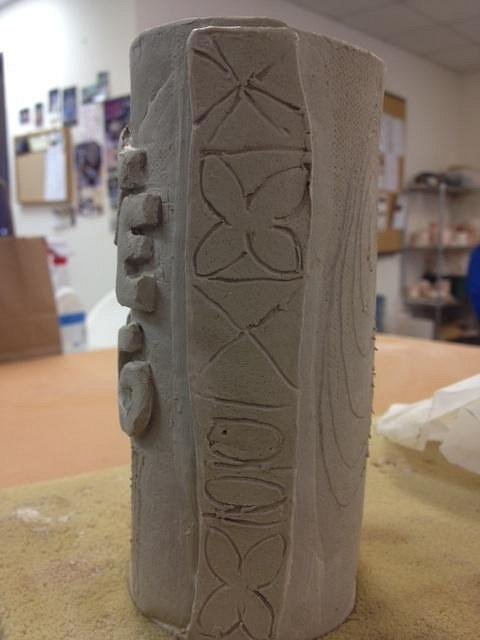
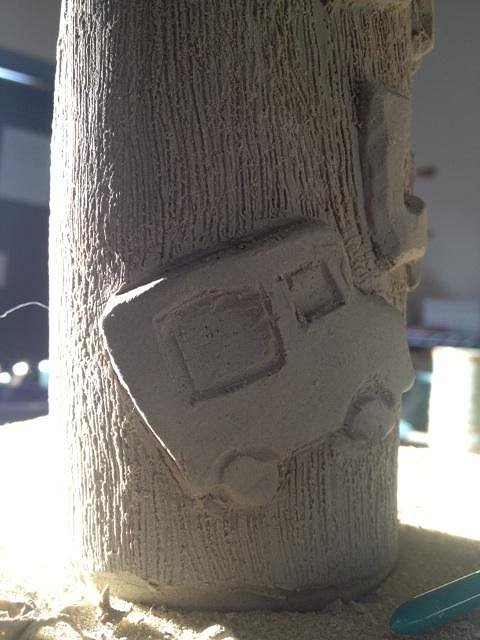
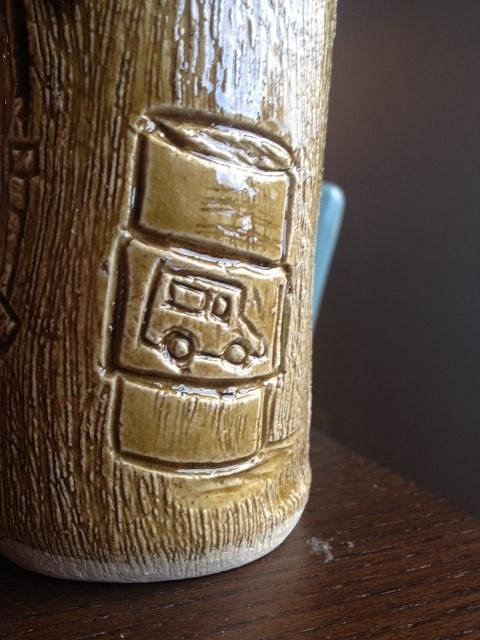
Details on the Coffee Truck: and tapa trimmed and cut in deeper...
Hopefully can bisque fire both of these next week.... Thanks for lookin'. |
|
D

danlovestikis
Posted
posted
on
Fri, Mar 7, 2014 10:06 PM
This is such a fun thread to read and observe. That's a lucky winner. Wendy |
|
T
TikiAno
Posted
posted
on
Wed, Mar 12, 2014 1:27 PM
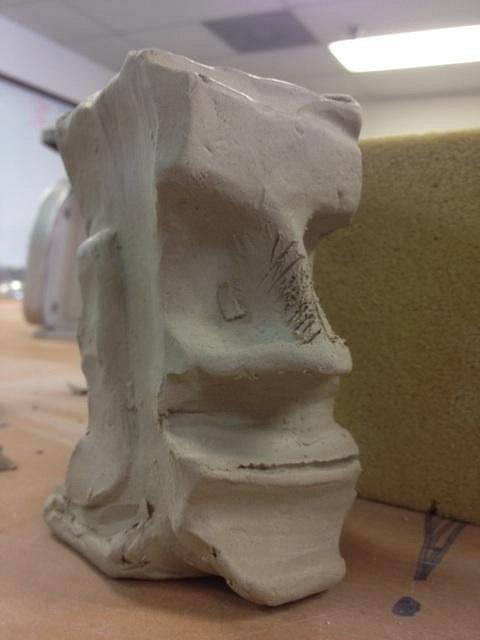
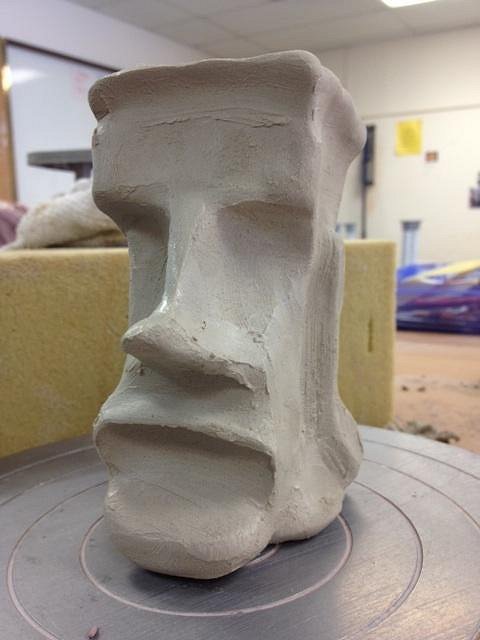
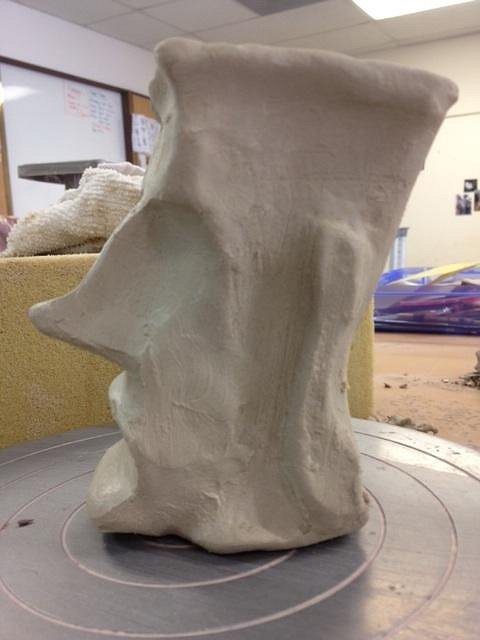
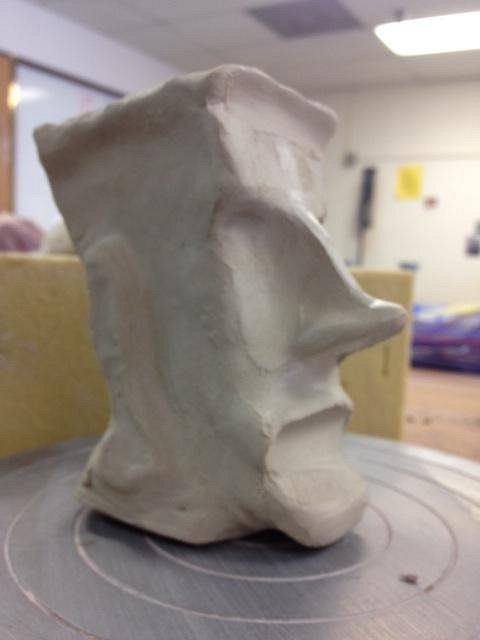
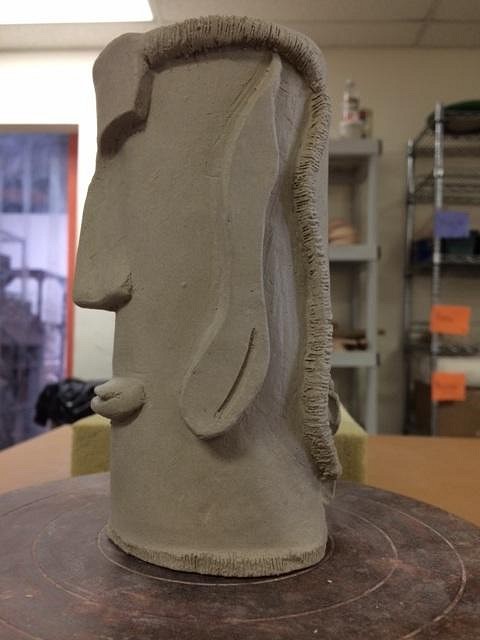
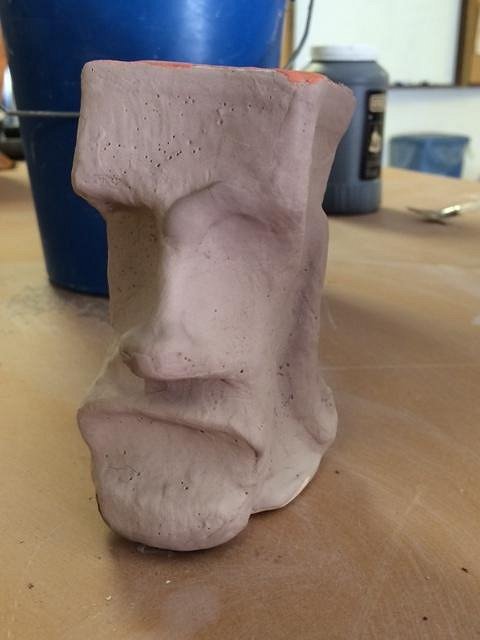
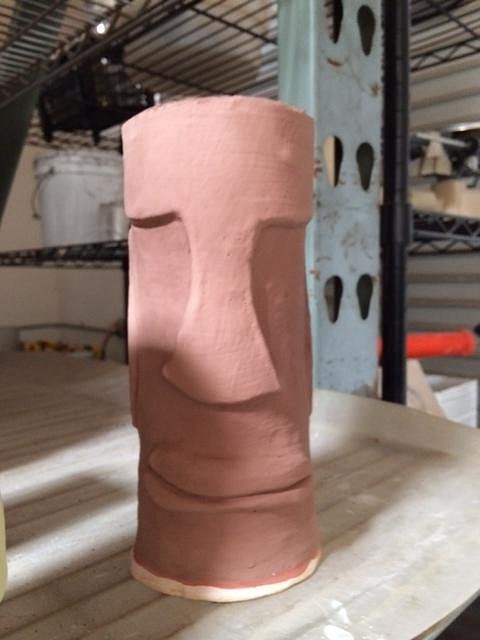
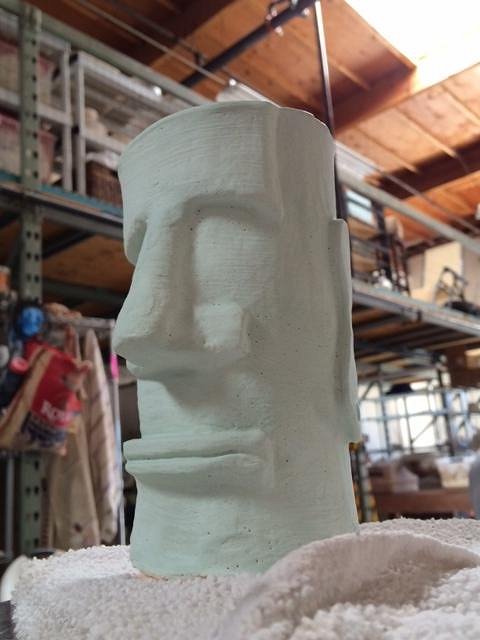
Thanks Wendy! A little more progress on a new Moai mug. Instead of starting w/ a circular form, I went a la the Mad Dog Mike (and other potters') method of subtractive work from a chunk of clay. I had trimmed a bit away, but wasn't quite happy w/ its current look:
Not Moai-y enough, so I added clay to improve the features. The top will have a rim/ brim. While I had no intention of it looking like Bamboo Ben's mug from Tiki Farm, it's somewhat similar- maybe it's just its chin. More work will certainly differentiate it. So far:
It will dry out a bit more, then will carve out its ears and more. Next up will be cutting the solid mass in half and hollowing it out, then reattaching it. Still waiting for the two "Latte Log" Tiki Mugs to be bisque fired- hopefully this week. Here they are, waiting...
Thanks for lookin'. |
|
H
hang10tiki
Posted
posted
on
Wed, Mar 12, 2014 4:33 PM
Like the new one |
|
B

Bowana
Posted
posted
on
Wed, Mar 12, 2014 4:52 PM
Hand building from wet clay is always a challenge. The waiting around for it to get to just the right firmness for shaping and carving can kill a guy (or gal)! Bowie |
|
T
TikiAno
Posted
posted
on
Thu, Mar 13, 2014 1:15 PM
Thanks, guys! Dave, I agree- this clay was almost there- but needs a bit more time. Wendy, I've learned from you- looking at the photos showed me some adjustments I need to make! Good advice. Next up is to chop it in half and start digging out the guts. |
|
D
danlovestikis
Posted
posted
on
Thu, Mar 13, 2014 1:18 PM
I just took a break from the clay and decided to check up on you. It was fun to find a message. |
|
LLT

little lost tiki
Posted
posted
on
Thu, Mar 13, 2014 9:57 PM
Looking Good,Ano! |
|
T
TikiAno
Posted
posted
on
Wed, Mar 19, 2014 5:35 PM
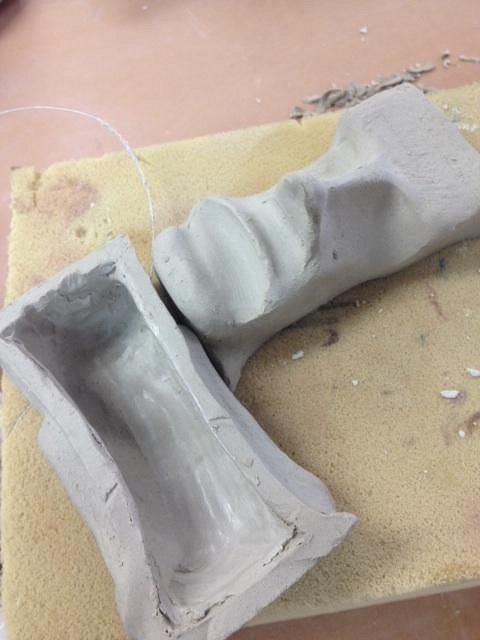
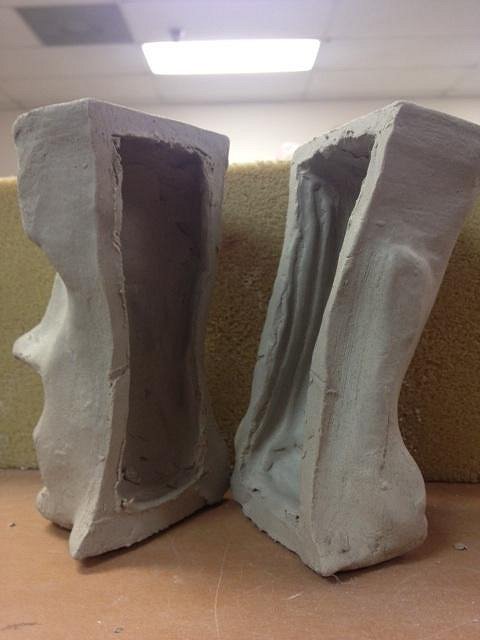
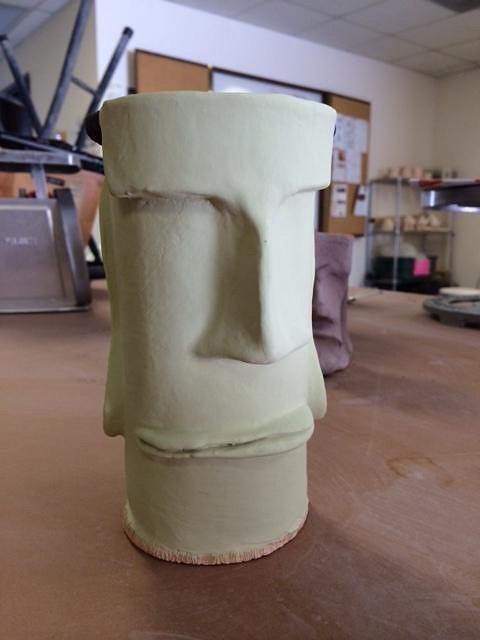
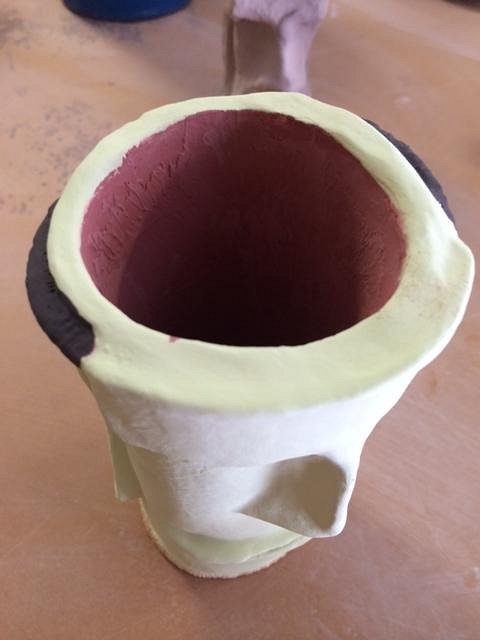
Thanks! Been away from the studio for a bit, so got back today and started digging away... but first I had to slice the Moai in half...
Then I dug out the guts, until both halves were empty. I think that's what the inside of MY head looks like...
Then I scored and slipped the two halves back together. I didn't trim the top to ensure that it fit together well....
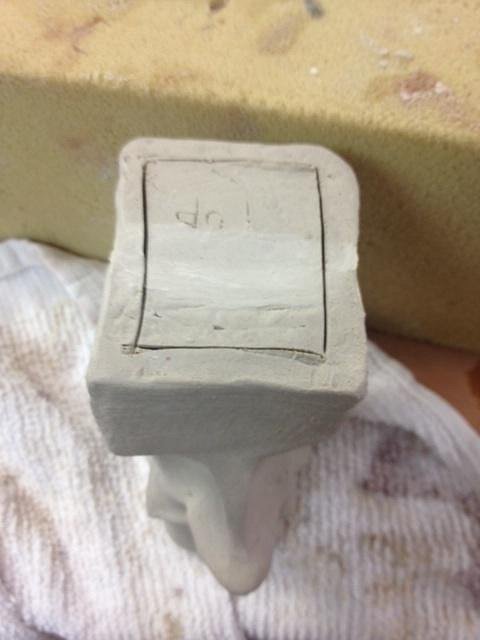
After it set for a little bit, I took a tool and trimmed off the top of the mug.
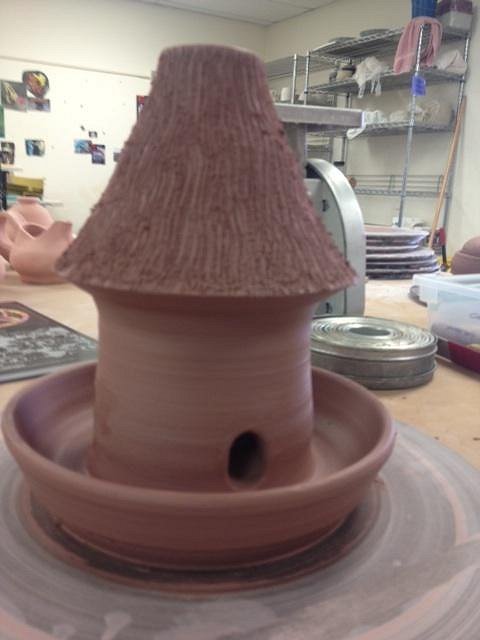
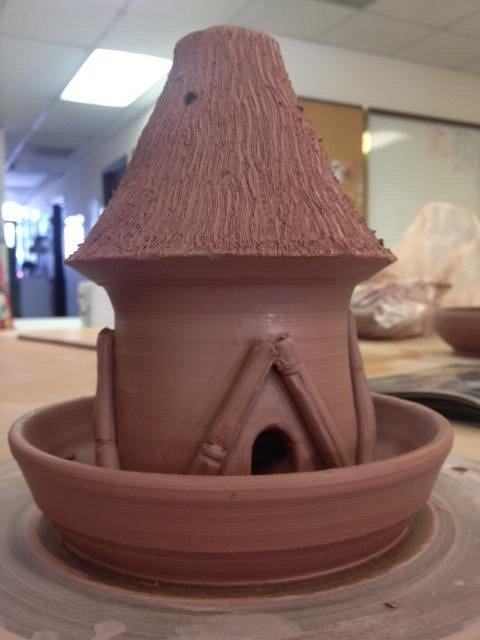
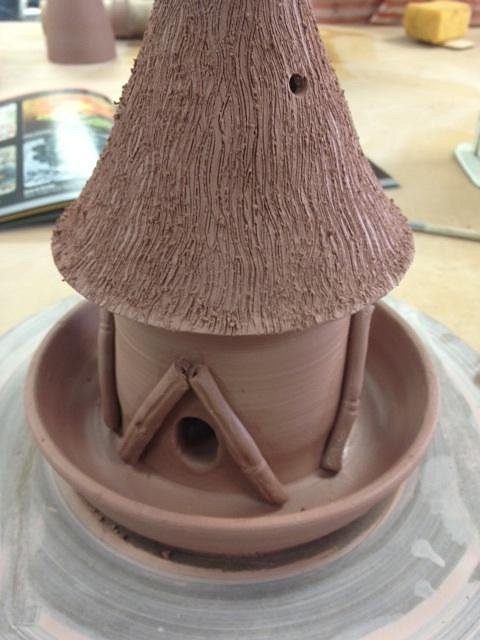
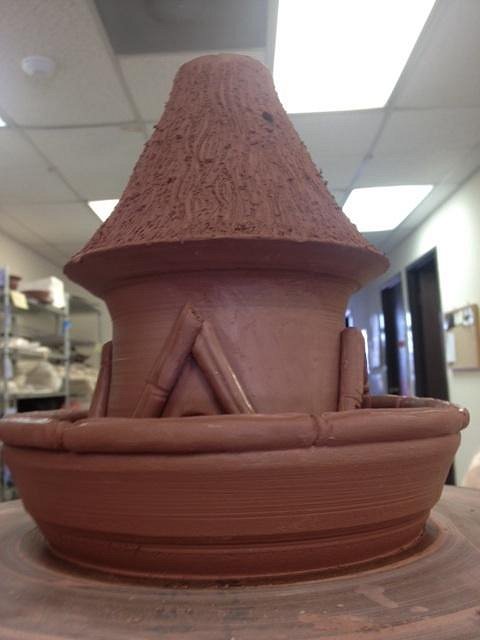
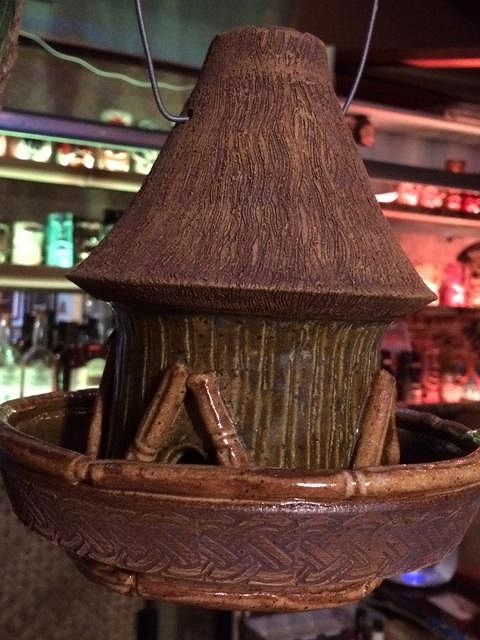
Next up I wrapped it up in plastic to set up for a bit. I won't touch this until some time next week. I work at a communal clay studio in San Diego, alongside some very talented potters- not all are into tiki- though the owner of the studio likes working in all styles. Though not a TC member (yet), I wanted to introduce you to L.E. Tiki (her name is Elly)- I'm not sure if there's another LE Tiki on TC- if so, she (and I) apologize. She threw a bird feeder as one piece of clay on the wheel, then started tinkering with it. I'm pretty interested in buying this piece from her, but thought everyone here might want to check it out- or order one for yourself. First she textured the palapa with a rake tool: Then added some holes for the bird seed to pour out. She then added some bamboo framing around each "doorway"
L.E. Tiki is really into details- the bamboo ends are hollowed out and look very realistic. Higher angle view:
She then added a (very) long bamboo border along the rim of the lower bowl/ seed holder.
I'll try to post some more photos of her work as her Tiki Bird Feeder progresses, and will pass along any comments/ questions/ requests to her as well! Thanks for lookin'. |
|
H
hang10tiki
Posted
posted
on
Wed, Mar 19, 2014 5:54 PM
Moai looks great Jon |
|
T
TikiAno
Posted
posted
on
Wed, Mar 26, 2014 6:33 PM
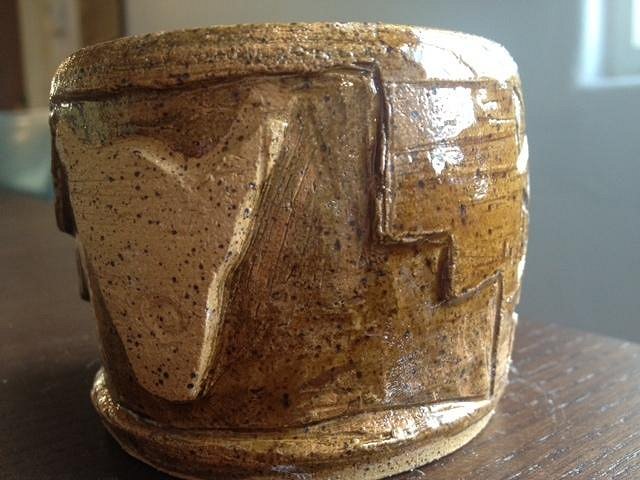
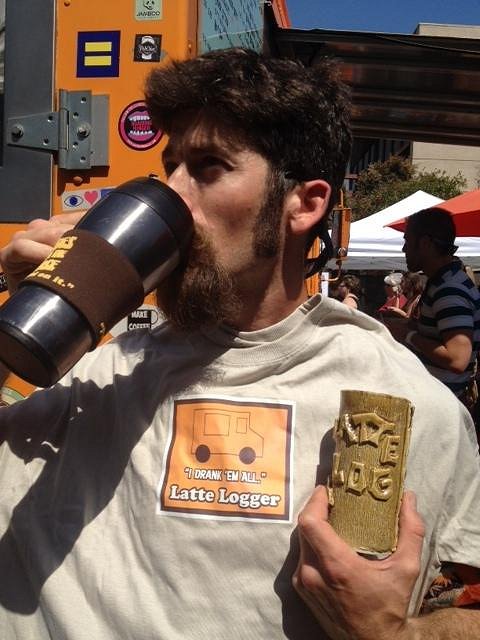
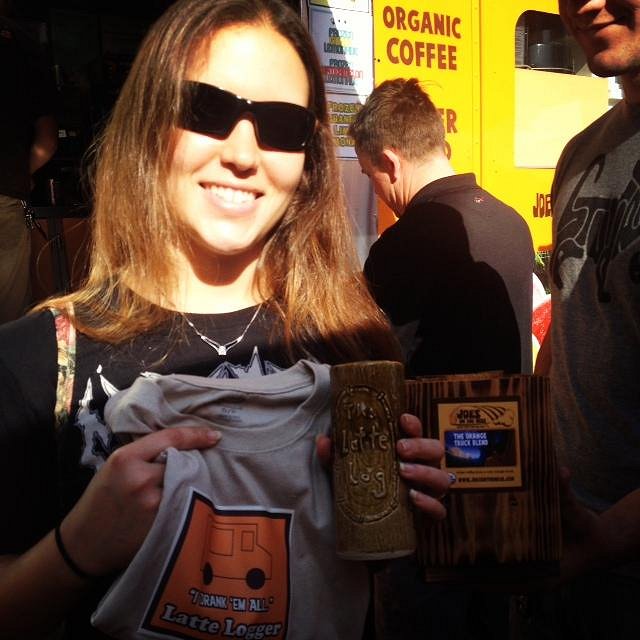
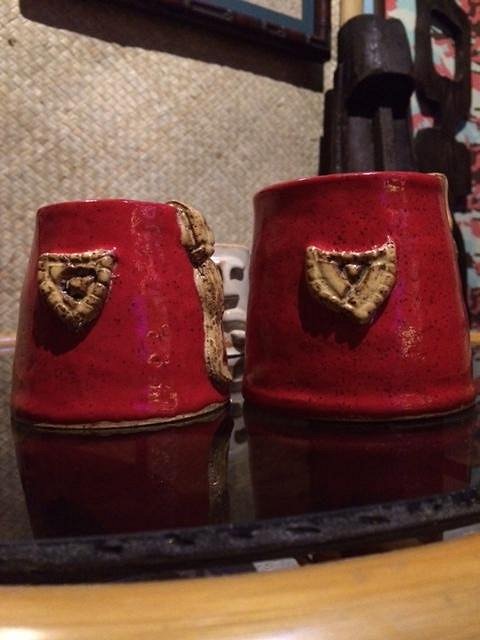
The Latte Log mugs made it out of the kiln.They'll be given away this weekend to two customers who were the first to complete a challenge in drinking 41 coffee drinks off our Coffee Truck menu. Inspired by the Grog Log at the Tonga Hut, they had a year to finish the task. These customers rushed through it to make it to the end first (in four months)- the first place finisher had 9 drinks in one weekend- plus a few more shots of espresso after the completion. In any case, stoked to give these away to folks this weekend. Enough story, here's what they look like: (I made two):
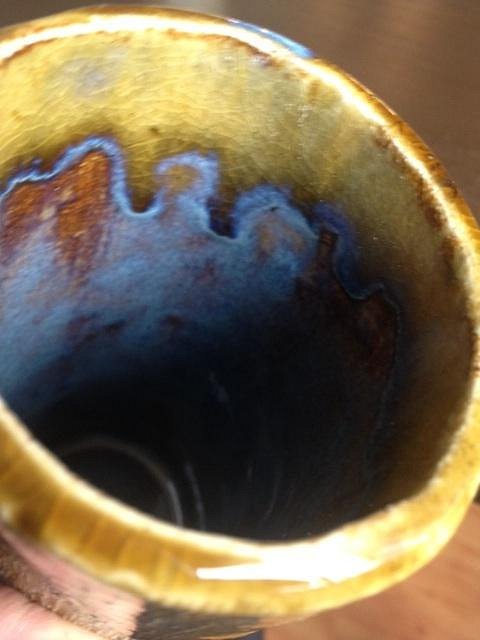
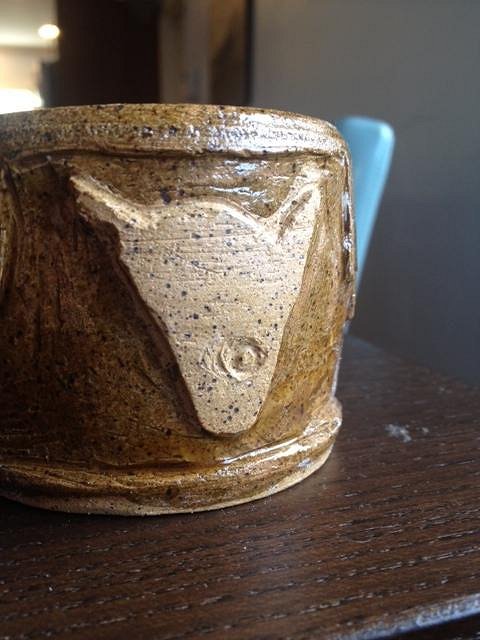
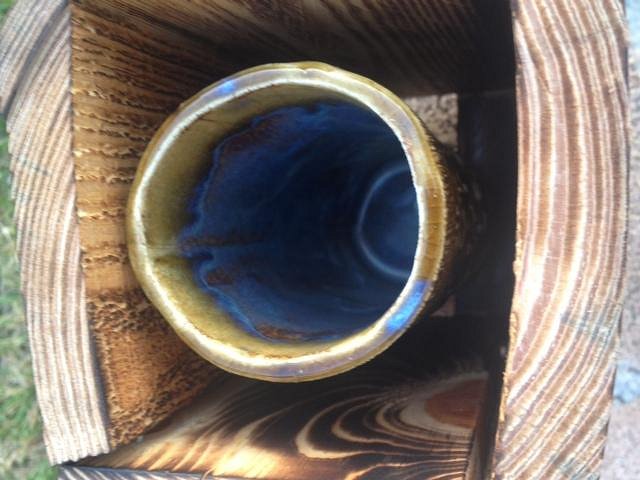
Knotty: The Coffee Truck on the mug: Interior:
Mug 2: a bit taller, w/ different design.
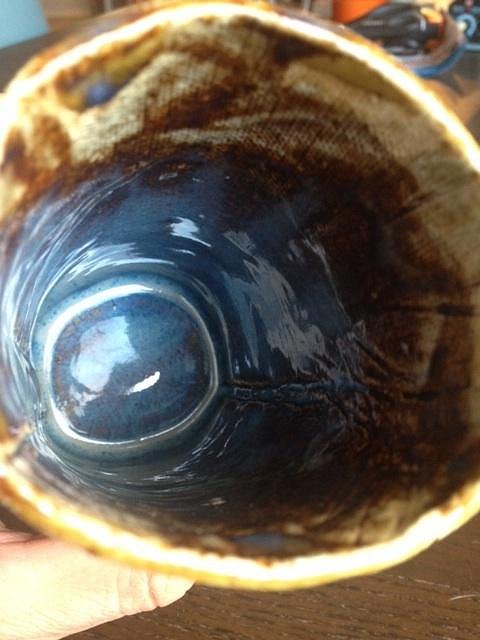
I double dipped the mug into the glaze, thinking I would get some kind of "coffee spilling" look. It came out interesting, though not perfect. The glaze gets very glossy when thicker, wasn't expecting such a different look to it. Sides:
Interior:
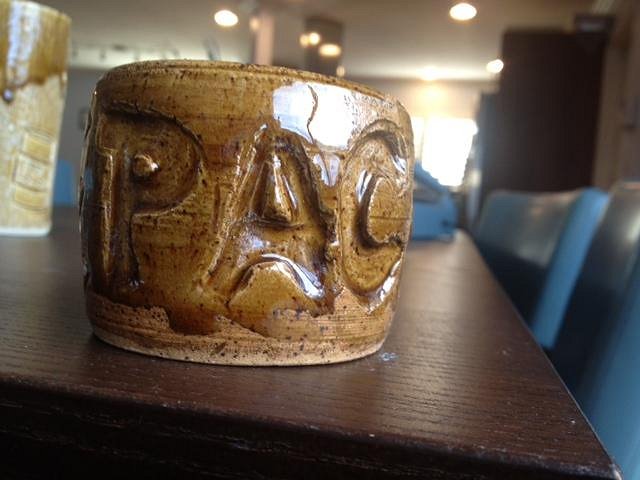
The mini-Paco Coconut came out of the kiln as well. This was a hand thrown piece w/ the silhouette of my wife's 14 year chihuahua. He's missing part of one of his ears due to a scrap w/ our other dog over an empty jar of peanut butter. I took the blame, but it really wasn't my fault. It's almost too small to drink out of, so it'll be Paco's honorary mug at the home bar.
It spells out "Paco"... Interior has same glaze as exterior on top of white porcelain slip. Cool effect: A little further progress on the Moai Dug-out mug. Cut harder edges and added more details:
Thanks for lookin'. [ Edited by: TikiAno 2014-03-26 18:37 ] |
|
D
danlovestikis
Posted
posted
on
Thu, Mar 27, 2014 12:45 AM
Wow there was a lot to catch up on. You and MadDogMike have the cut it in half and hollow it out technique down. I've not tried that yet. The Moai looks really good. The coffee mugs came out great. I hope you post those who earn one on here. It's sweet that you dog has a tribute mug. I really enjoy watching your projects, Wendy |
|
T
TikiAno
Posted
posted
on
Thu, Mar 27, 2014 4:45 PM
Thanks, Wendy! Hoping the customers enjoy the mugs- they worked hard for them. :) I dug out another mug cut in half yesterday- learning as I go. I'm sure Mike has advice for me (should have asked him first)! The new one is a "Quad Bob" mug- w/ a Tiki Bob on each side. I'm going to work on a few hand-built Bobs next. Thanks for the support. Reading your thread keeps me excited on moving forward w/ designs. Hope to see you at an event soon. |
|
H
hang10tiki
Posted
posted
on
Sat, Mar 29, 2014 8:31 PM
Cheers to u n paco Looks good That thick glaZe does look like coffee Kool Jon |
|
T
TikiAno
Posted
posted
on
Sun, Mar 30, 2014 2:25 PM
The Latte Loggers picked up their mugs this weekend. Originally the (one) winner was going to receive a mug AND a track jacket, but with the tie I made t-shirts for each- as well as a small wooden box to store the mugs. I cut down some pieces of pallet wood, burned them and shot them together. Pretty simple but did the trick. Here are a few pics of the mugs, boxes, and the winners (since Wendy requested these pics). :)
Top view, interior of Mug 1/2:
Todd, one of the winners- who has been a collector of tiki mugs in the past. He said this mug has rekindled his interest....
Jessica, who would have come in first place, though Todd snaked her at the last second by drinking 8 (or 9?) coffee drinks in one weekend:
Thanks for lookin'. |
|
D
danlovestikis
Posted
posted
on
Sun, Mar 30, 2014 4:24 PM
Those are fun photos. I loved seeing who got the mugs. You are very nice to do all that work for your customers. Wendy |
|
T
TikiAno
Posted
posted
on
Fri, May 16, 2014 9:36 AM
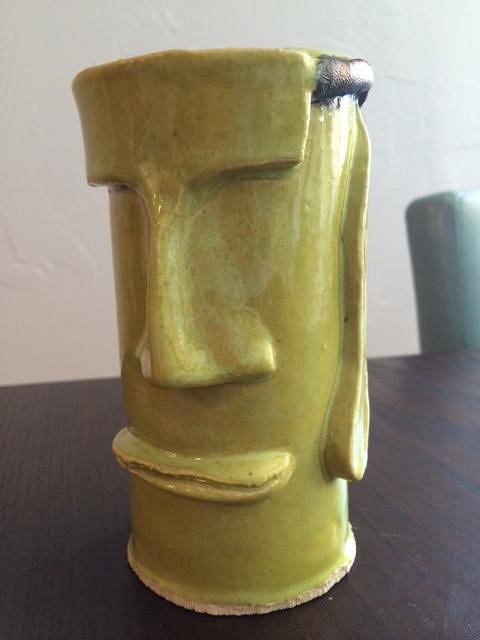
It's been a while since I've posted (here), but working on a few different pieces- the first is for this year's Art Swap. The theme is "Space Tiki," so my first (of possibly two) pieces is called "Some People Call Me a Space Moai." I built the cylinder out of a slab, then went to town on it. I gave the Moai pointy alien ears, then tucked two antennae around the back of its head. I'm torn (right now) between a green alien glaze, or possibly something metallic. Hmmmm.....
I had started working on another cylinder (for the above Moai mug), but it dried out too much to add any pieces to it. Instead, I started shaving pieces off and carving away.
It was slightly too dry, so accidentally popped a few holes in it. Another potter showed me how to make paper clay (using the shavings from the form, water, and toilet paper). I used it to patch the holes, hopefully it will survive the bisque fire (next week). Speaking of which, I posted up some photos of the tiki bird feeder from L.E. Tiki a while ago, I bought that piece from her- she's not on TC yet, but wanted to show it here. She made a few more and will be selling them locally- or can ship if you might be interested. Each one is hand thrown, decorated, and glazed differently. I can put you in touch with her if you might want one for your home or yard (I posted a few more pics in the Marketplace).
|
|
D
danlovestikis
Posted
posted
on
Fri, May 16, 2014 4:48 PM
Carving is as much fun as sculpting. Good job. Wendy |
|
T
TikiAno
Posted
posted
on
Sat, May 17, 2014 5:06 PM
Thanks, Wendy! It's been fun getting back to the studio so hope to get started on a few new pieces! |
|
T
TikiAno
Posted
posted
on
Wed, May 21, 2014 7:49 AM
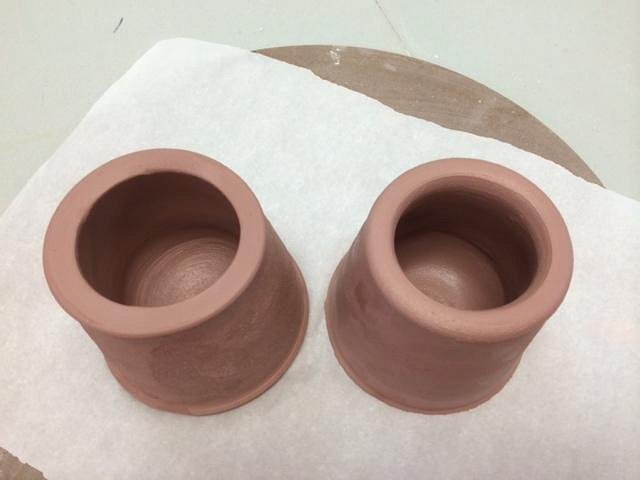
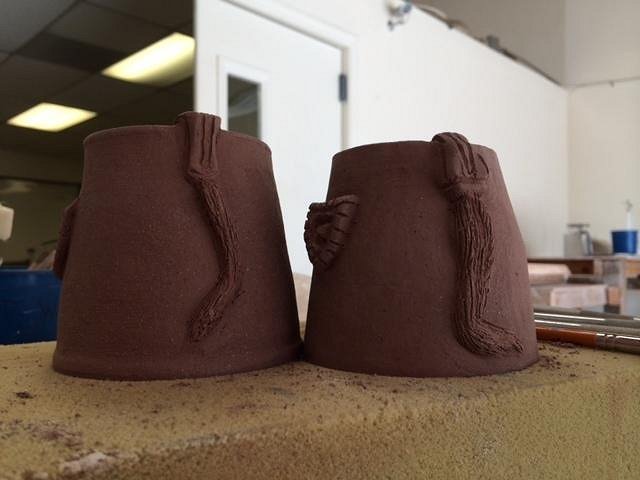
Wanted some more practice on the wheel, and was inspired by another potter in the clay studio who had thrown a bottom part of a pitcher that looked like a fez. I thought I'd try this out. First I threw two small shapes (w/ speckled buff clay- it will have some "dots" that will appear under the red glaze when it's done):
I then let these dry for a few days, then came back, trimmed a foot ring, and added an emblem and a tassel.
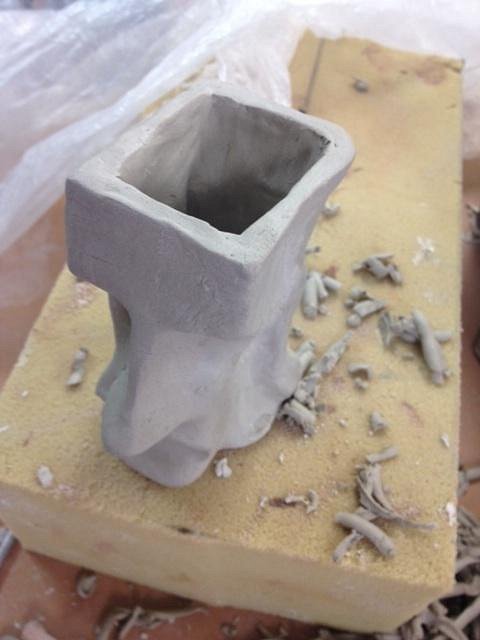
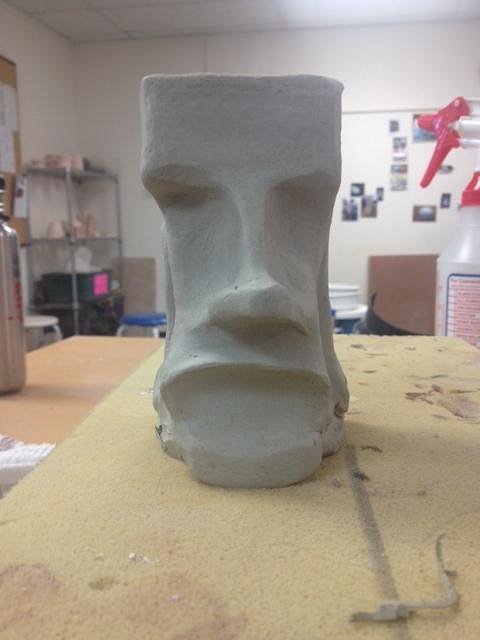
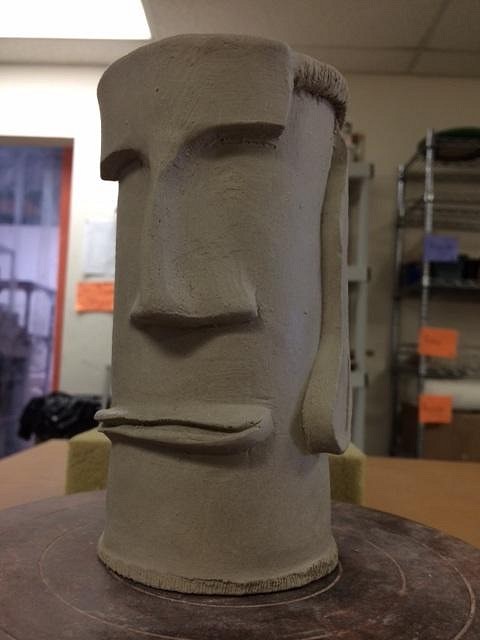
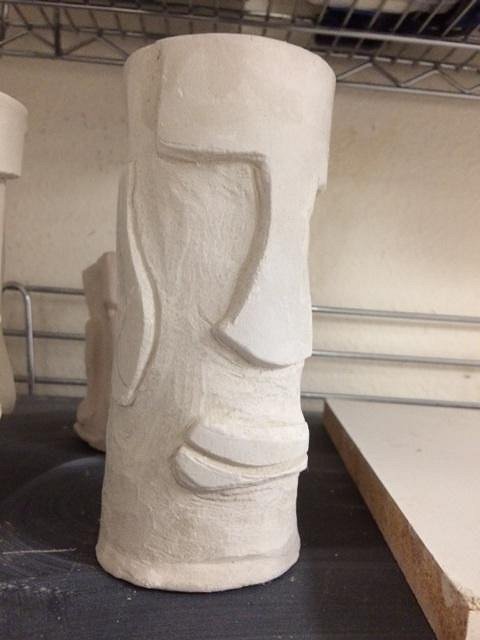
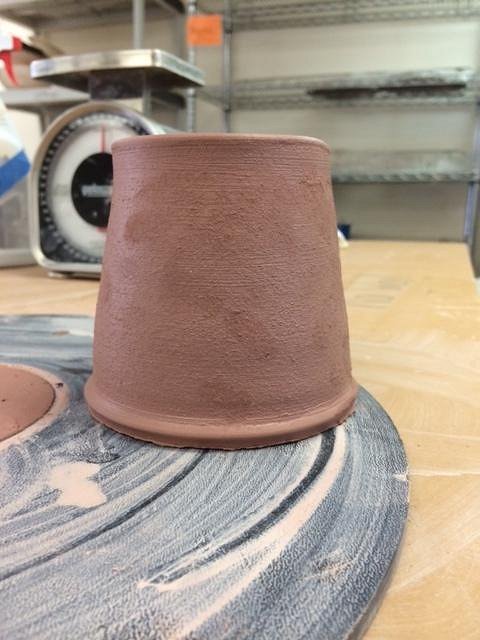
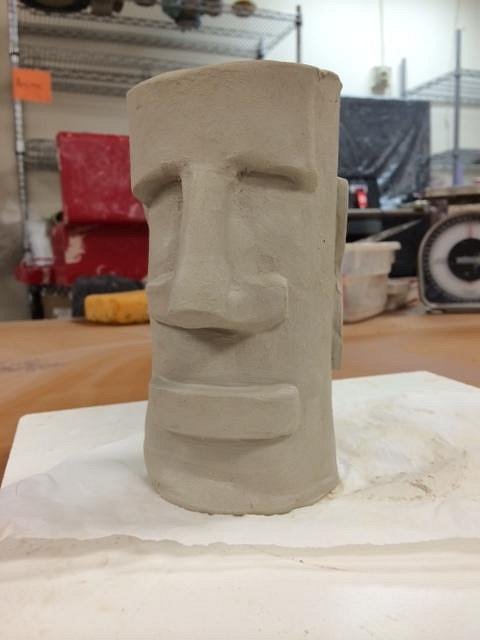
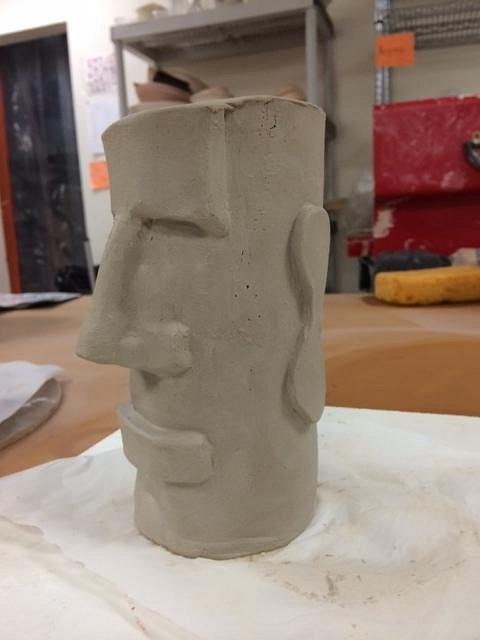
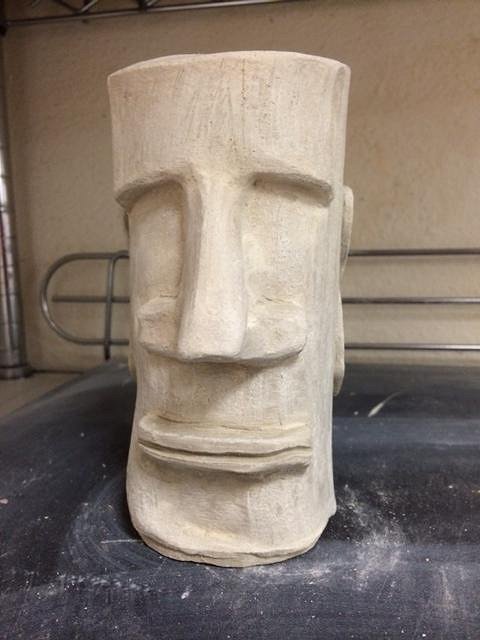
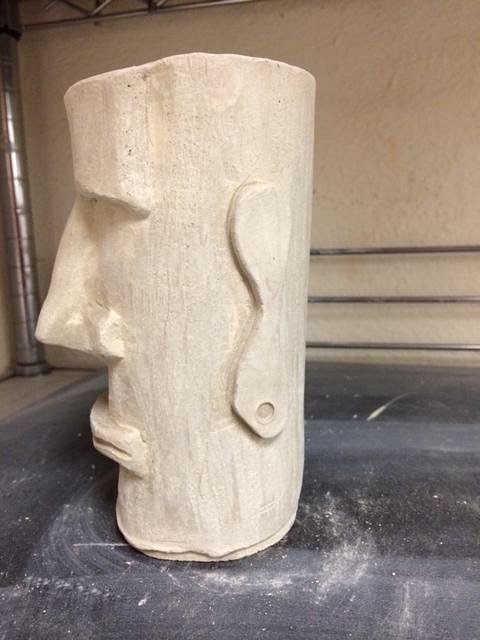
Now it's drying a bit more, then will carve & more detail to the added pieces. Also got working on another handbuilt Moai mug. There's lots more to add (and trim), but here is the form so far. I'm working with different noses and seeing which one is my favorite to work with (some traditional, some not so much).
Thanks for lookin'. Feedback, as always, is welcomed. |
|
D
danlovestikis
Posted
posted
on
Wed, May 21, 2014 7:54 AM
Looking good. Dry those wheel mugs slowly since they are thick. I've had too many crack. In and out of a plastic bag with the bottom open helps. Wendy |
|
T
TikiAno
Posted
posted
on
Wed, May 21, 2014 10:09 AM
Thanks, Wendy. Yes, the fez mugs are pretty thick- due to my (lack of) throwing skills. Taking the time to dry them out nice and sloooowwwwwwwww. In no hurry, if they come out looking nice they'll be a surprise for a local brewery owner and friend. |
|
H
hang10tiki
Posted
posted
on
Wed, May 21, 2014 6:02 PM
Cool bruddah |
|
T
TikiAno
Posted
posted
on
Tue, May 27, 2014 7:28 PM
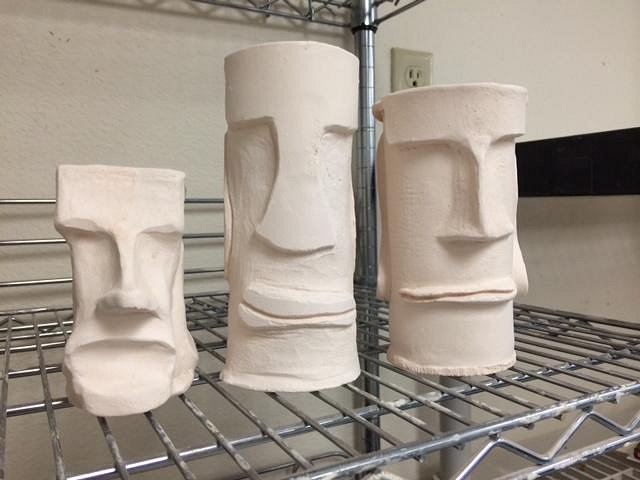
These guys have all been bisque fired and are waiting to be glazed. The Space Art Swap piece is all the way on the right in both pics:
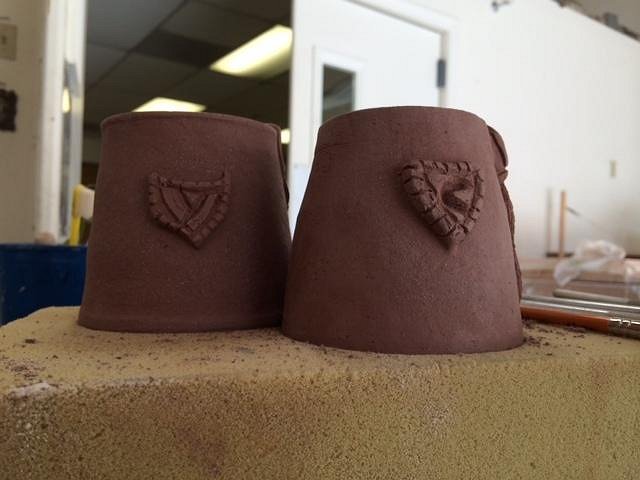
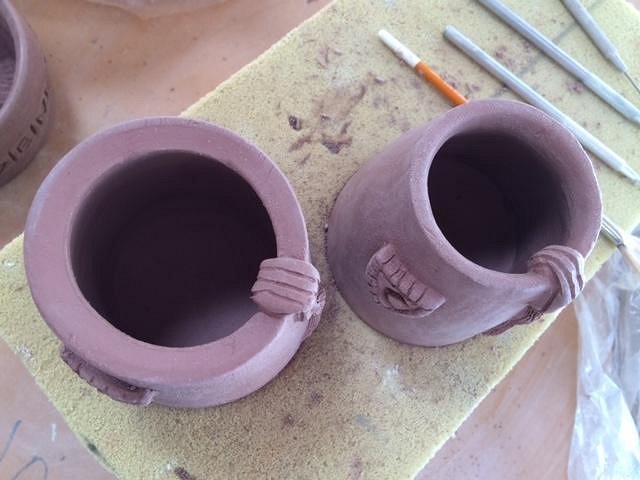
The two fezzes are drying out, so I carved into them a bit more. These will go to two different people, their initials are carved into the emblem on the fronts. I ended up trimming one down (threw them a little thick) and kept the other heavy. Tassels:
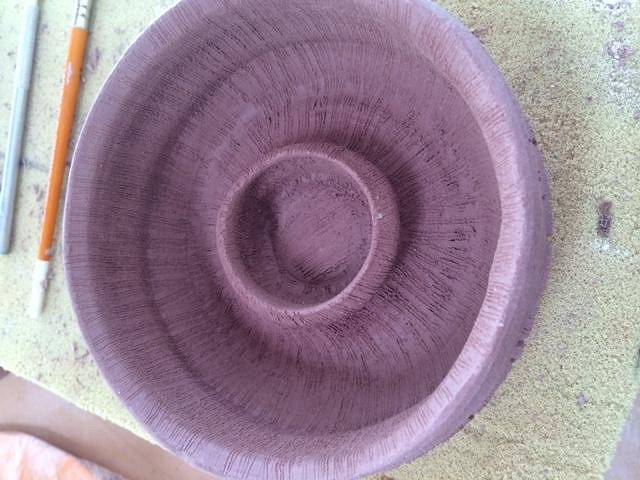
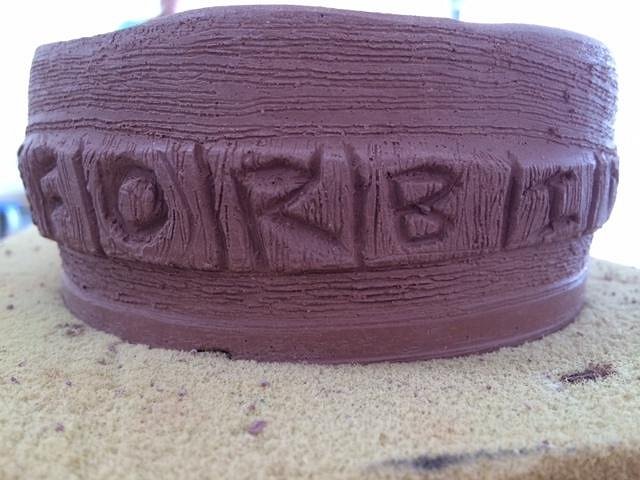
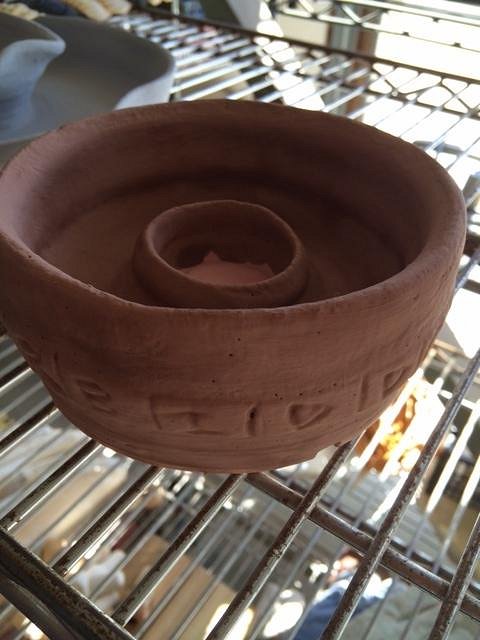
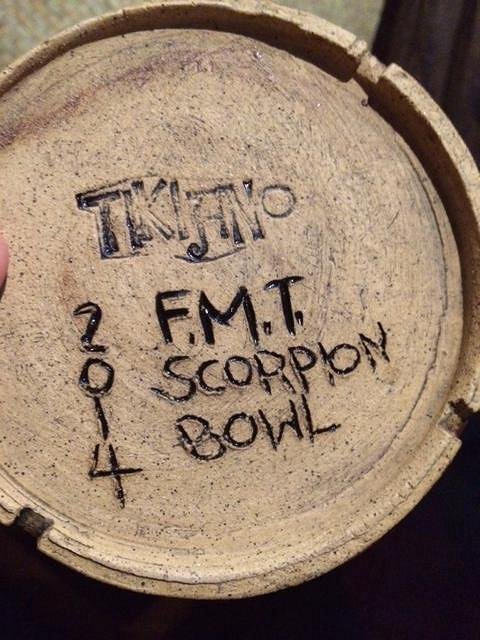
I threw a scorpionesque bowl for my home bar ("The Forbidden Maya Tai"). I tried to pull up a small bowl in the center to light on fire. It was my first attempt, so not the best, but I added texture all over the piece and look forward to seeing it done. The name of the bar is spelled out around the circumference. (Not sure why the color is so different in each pic, but the clay is speckled buff, a brown clay that will show dots when its fired). Top view:
Thanks for lookin'. |
|
H
hang10tiki
Posted
posted
on
Tue, May 27, 2014 9:29 PM
Lookin good bruddah |
|
T
TikiAno
Posted
posted
on
Thu, May 29, 2014 10:53 AM
Thanks Jon! |
|
BT

Badd Tiki
Posted
posted
on
Thu, May 29, 2014 3:38 PM
Cool Stuff. You could also make a fez mug and use the tassle for a handle :wink: |
|
T
TikiAno
Posted
posted
on
Fri, May 30, 2014 7:21 AM
Badd, Goodd thinking.... :) Testing a few glazes for this one, and curious how the speckled buff will look under the red glaze..... |
|
T
TikiAno
Posted
posted
on
Sun, Jun 1, 2014 6:57 PM
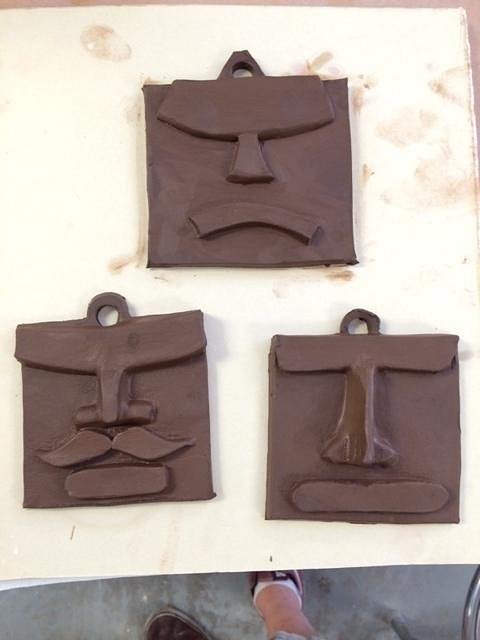
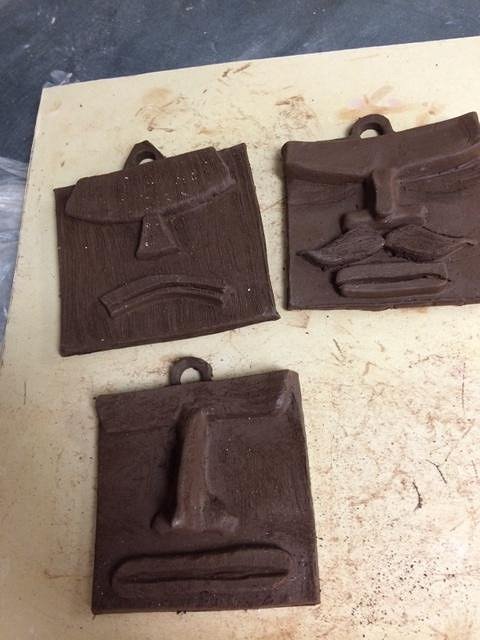
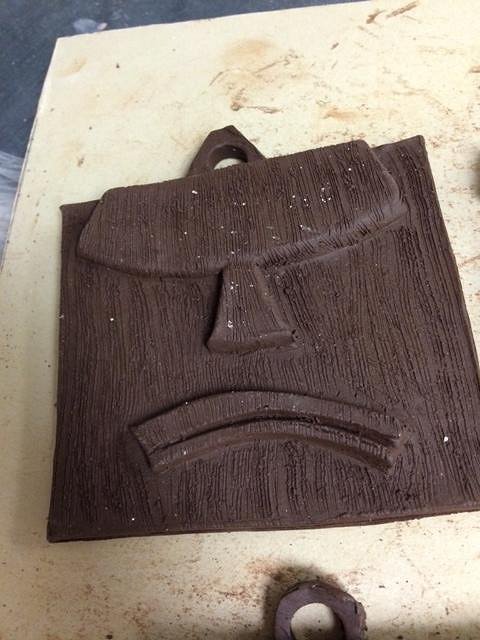
A few new hanging tiles. These are all hand built out of a black clay. Will let them firm up for a few days, then carve more into them. While now a chocolate-y brown, the clay body turns coal black when it's high/ glaze fired. Each is approximately 4" wide.
Glazed a few mugs, including:
|
|
T
TikiAno
Posted
posted
on
Tue, Jun 3, 2014 5:50 PM
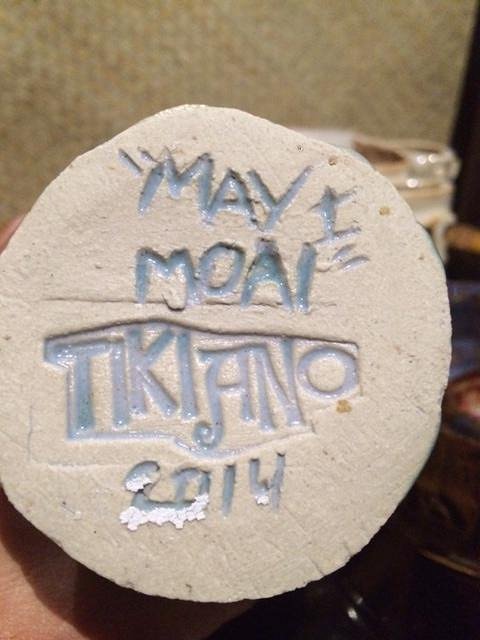
Finished carving on this guy, he's waiting to get bisque fired. Named the "May I Moai?" (since it was made in May), hand built
Also went back and added details and texture to the three black clay hanging tiles:
Thanks for lookin'! |
|
T
TikiAno
Posted
posted
on
Sat, Jun 7, 2014 11:48 AM
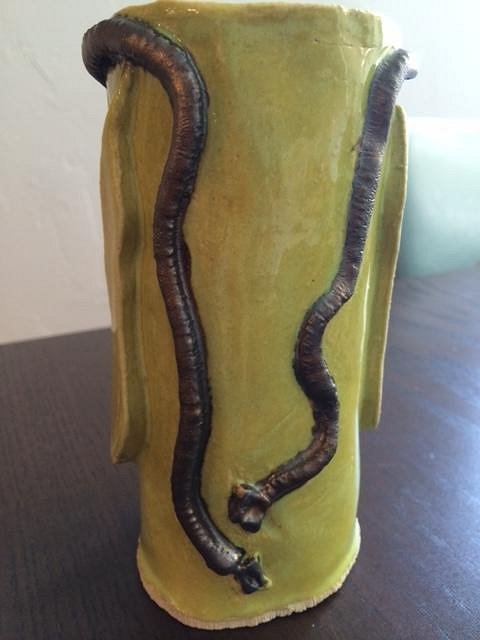
Out of the kiln. First up, the Space Tiki Art Swap Mug, named "Some People Call Me a Space Moai..." (Note: Green color a bit more vibrant in person, bad camera phone quality)....
Next, the Flat-Nosed Moai (name TBD). Photos do not show the true color- I blended two glazes (Blue Rutile under Albany Slip Brown) which came out as a washed brown glaze with blue highlights. A bit more "brown" in person- and while the photos show a lot of texture, it's a high gloss, "flat" object.
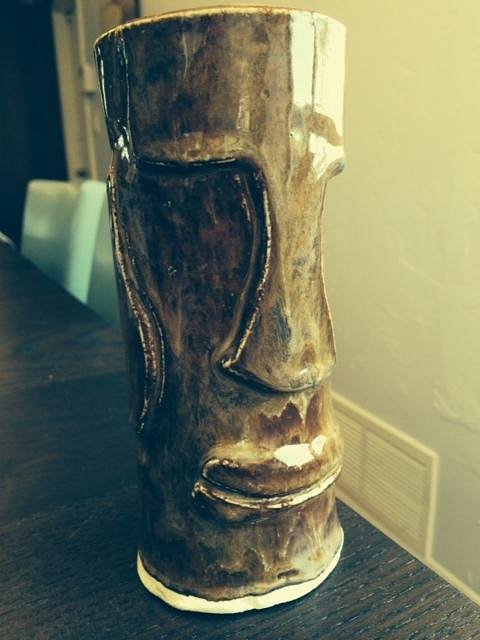
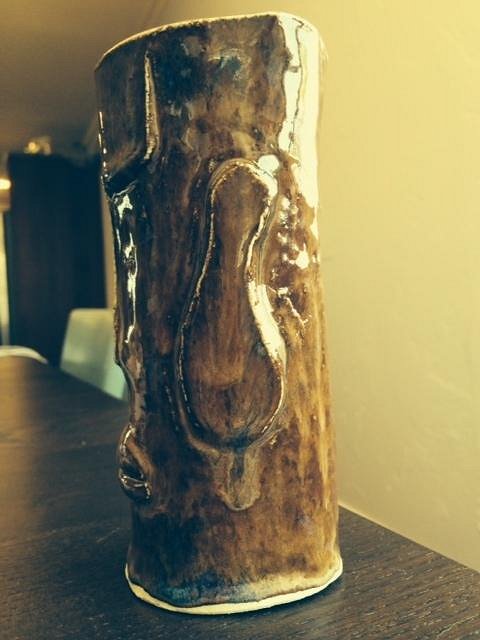
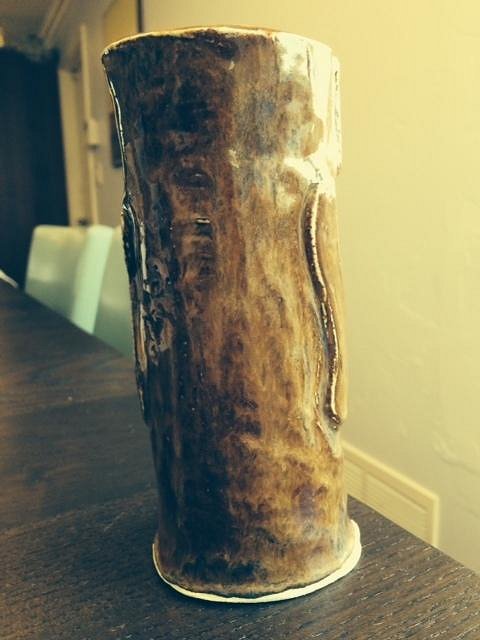
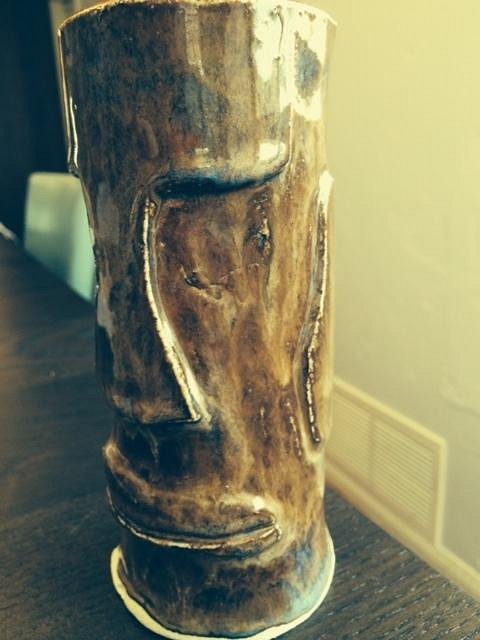
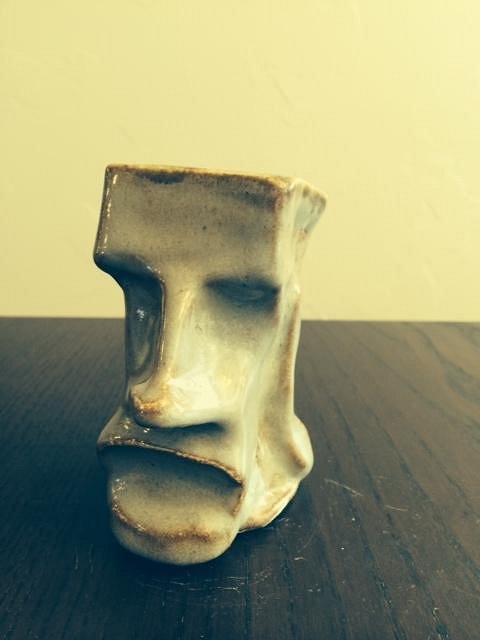
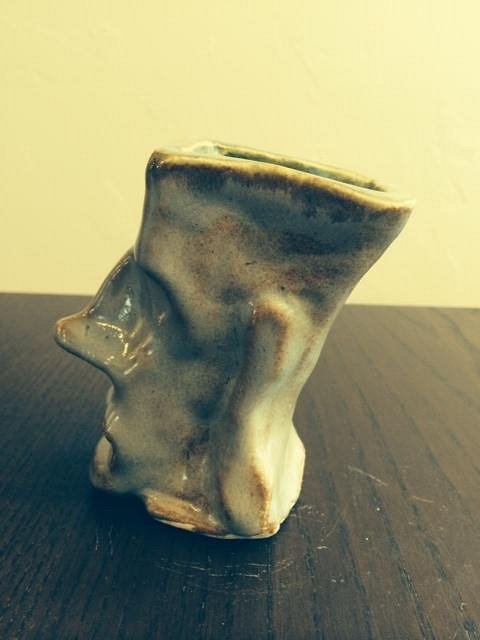
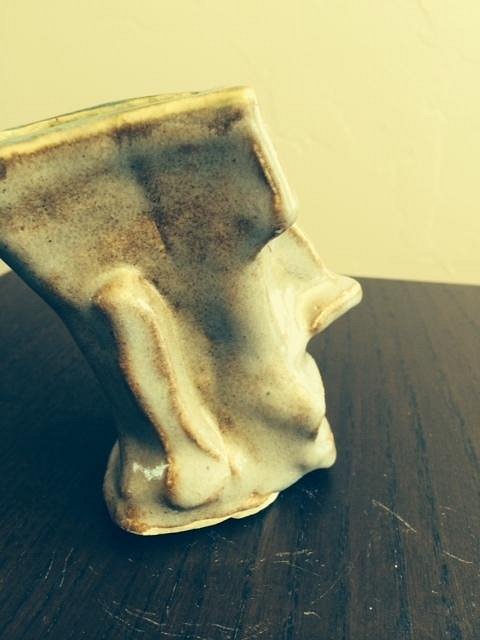
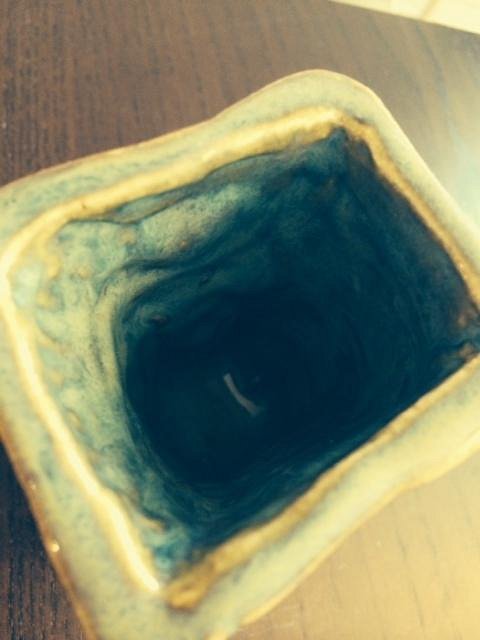
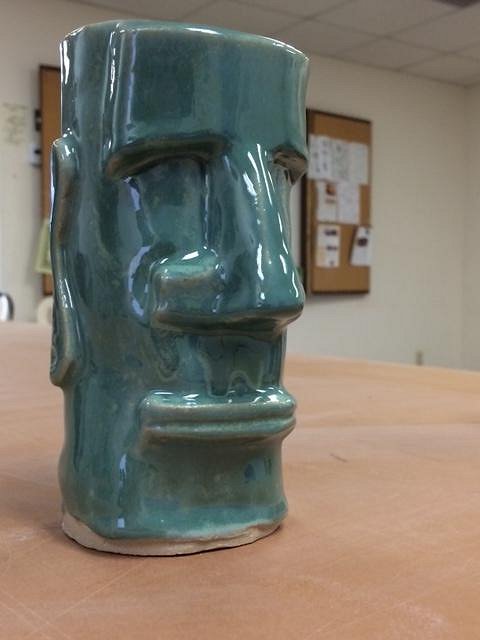
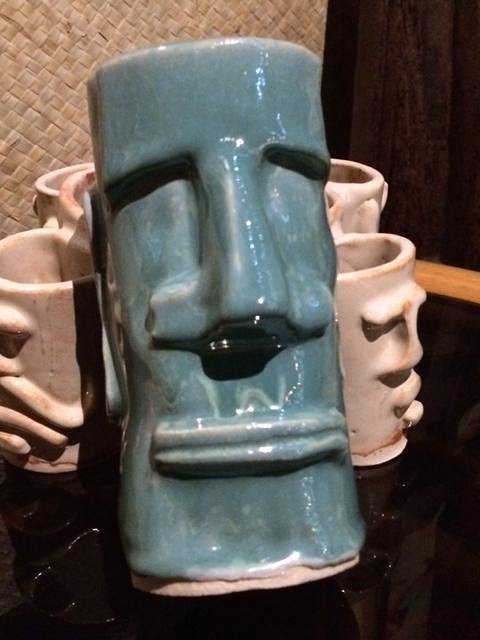
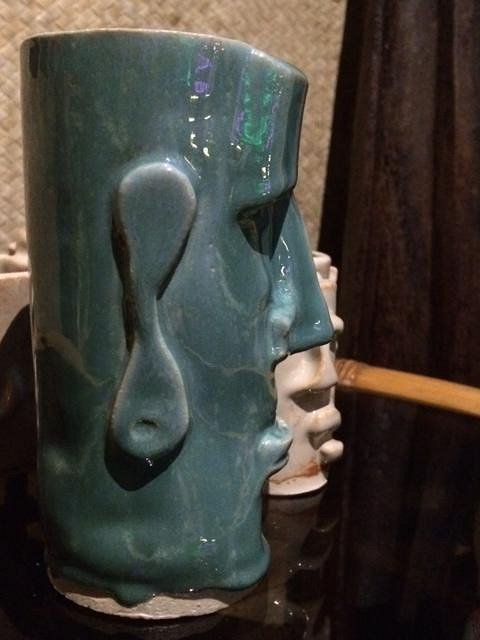
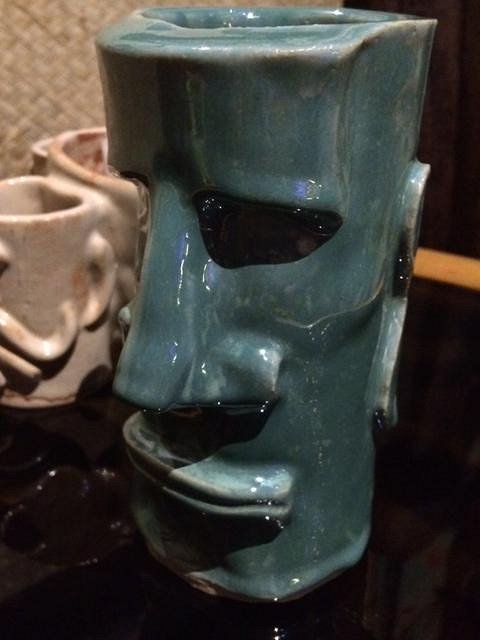
Also out is the Subtractive Mini-Moai, carved out of a solid piece of clay and then hollowed out and reassembled. Around 4.5" tall. Smokey Shino exterior glaze, Textured Turquoise glazed interior.
Thanks for lookin'. |
|
H
hang10tiki
Posted
posted
on
Sat, Jun 7, 2014 12:35 PM
Wow |
|
T
TikiAno
Posted
posted
on
Sun, Jun 15, 2014 6:09 PM
Got to glazing a few new pieces, including... Two Fez Mugs- these are thrown on a wheel and custom designed as surprise gifts:
The "May I Moai?" will turn out as a light "Robin's Egg" blue:
The "Forbidden Maya Tai" Scorpion Bowl. Three different colors, including an untested glaze combo:
Now time to wait for them to get fired.... |
|
M

MadDogMike
Posted
posted
on
Sun, Jun 15, 2014 7:17 PM
Nice Dave! Goin' balls to the walls with the untested glaze combo!!! |
|
T
TikiAno
Posted
posted
on
Sun, Jun 15, 2014 7:56 PM
Thanks, Mike. I admit I tend to use my pieces as test tiles- especially since I don't have my own kiln... :) |
|
T
TikiAno
Posted
posted
on
Wed, Jun 18, 2014 10:36 PM
A few pieces out of the kiln, including: Fez 1 & 2/ 2:
The "May I Moai?" a handbuilt piece, 1/1: From the Studio... to the home bar:
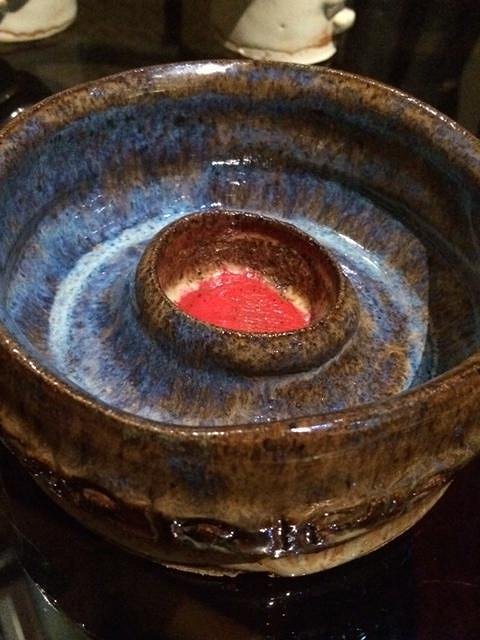
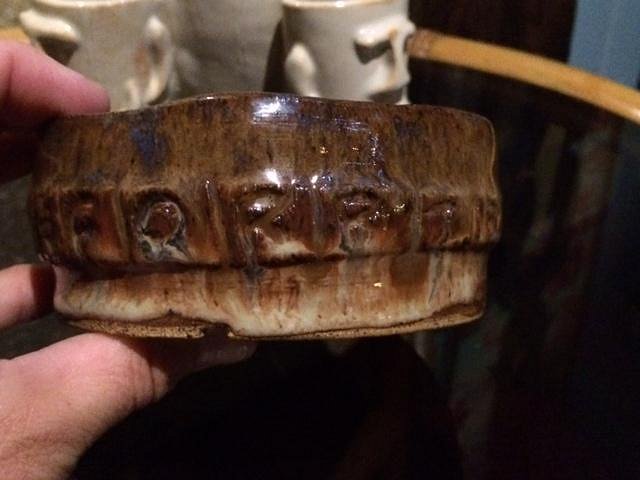
The "Forbidden Maya Tai" Scorpion Bowl. Glazes turned out great, but the lettering is hidden unless you really look. Learned my lesson, should have put wax resist over the initial letter glazing...
Thanks for lookin'. |
|
H
hang10tiki
Posted
posted
on
Sun, Jun 22, 2014 11:41 AM
Me like |
|
D
danlovestikis
Posted
posted
on
Sun, Jun 22, 2014 12:31 PM
Good job. I really enjoy watching your work. Wendy |
|
T
TikiAno
Posted
posted
on
Sun, Jun 22, 2014 10:05 PM
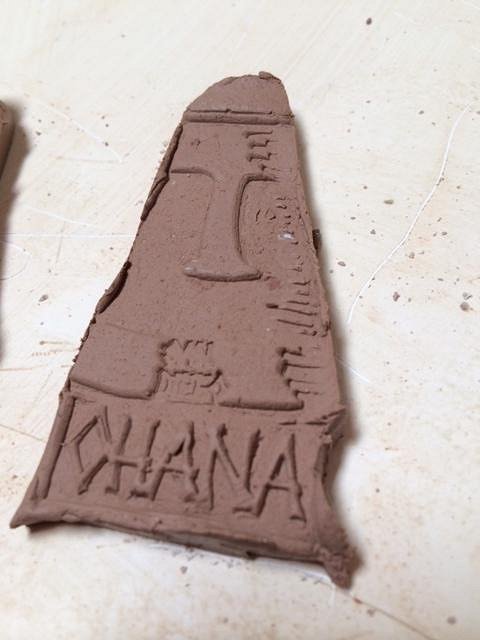
Jon, ha. Now I'm thirsty too- Wendy, thanks for checking in! A certain Tiki Tavarua made a request for another pendant for use during Tiki Oasis (or maybe we came up with the idea at the same time at the Bali Hai- there were some Zombies involved), but it seemed like a good idea. The original "SD Ohana" stamp, made of bisqued clay, cracked due to my lack of attention to detail, so I went with a (hopefully) longer lasting production solution (a rubber stamp). I drew out a design, scanned it, then added some text and sent it out to be made into a stamp. It looks like this:
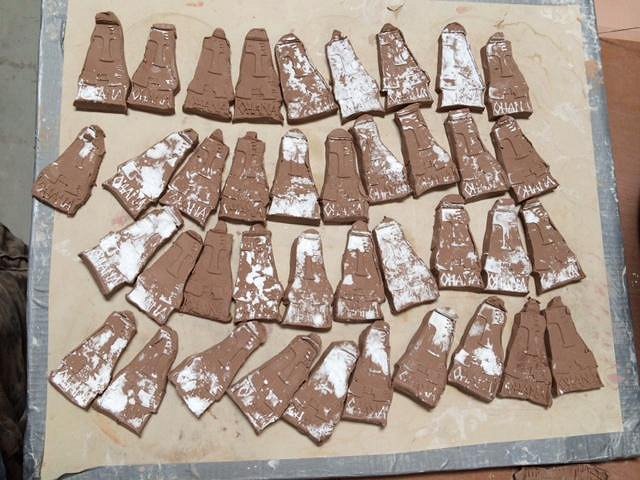
Then I stamped out a few more, using corn starch so the clay wouldn't stick to the stamp too much..... (that's the white stuff). These are just under 3" tall, and pretty thin. Each one is trimmed a big different to make each one completely unique. I left a bit of room above the moai's head to figure out the best way to attach it to a cord....
Muchos mahalos for the visit! |
|
D
danlovestikis
Posted
posted
on
Tue, Jun 24, 2014 5:56 PM
Now I am so hungry for tiki sugar cookies. Yummm. Wendy |
|
T
TikiAno
Posted
posted
on
Sun, Jun 29, 2014 5:53 AM
Wendy, ha ha ha! I thought the same thing, actually. That IS what they looked like, though I prefer my cookies without corn starch. :) |
|
T
TikiAno
Posted
posted
on
Wed, Jul 9, 2014 9:56 PM
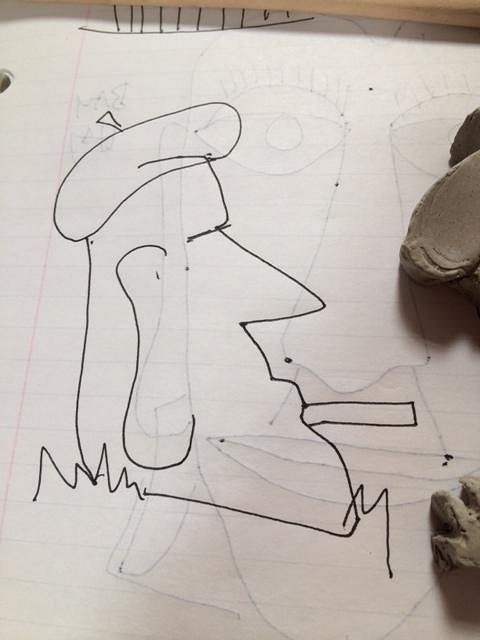
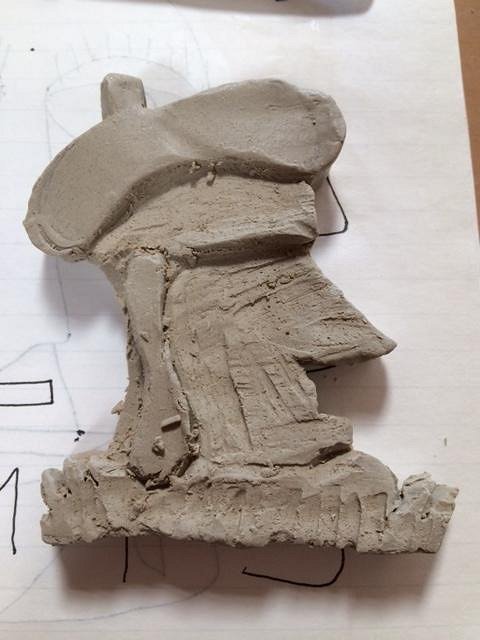
Wasn't too happy with the first round of new SD Ohana pendants, so broke them apart and recycled the clay. Started working on a new pendant for Tiki Oasis- Beat themed. I drew this quite a while ago, even before I saw John Mulder's amazing mug for Oasis.
I threw a mini slab, and did a rough sculpt. The cigarette didn't make the cut- so to speak.
The texture on the bottom will be grass- or possibly a black turtleneck?
Tiles came out of the kiln. These are all made out of Black Clay body (actually, it's Laguna B-3 Brown, which high fires to a charcoal black), which leads to black highlights.
Close-Ups:
Muchos mahalos for the visit! |
|
H
hang10tiki
Posted
posted
on
Sat, Jul 12, 2014 6:54 PM
Sweet stuff bruddah |
|
T
TikiAno
Posted
posted
on
Mon, Jul 21, 2014 8:55 PM
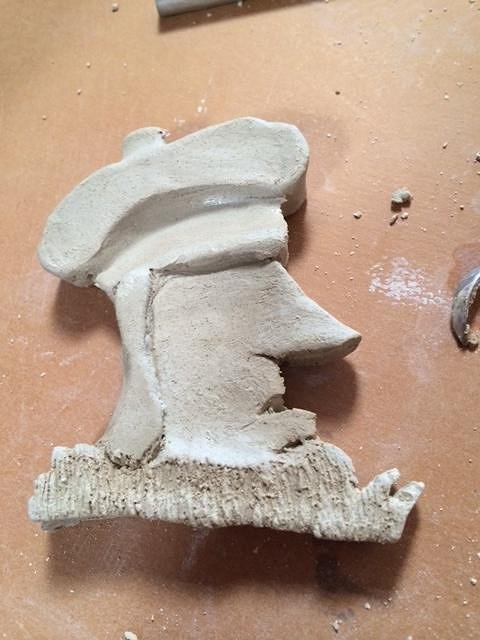
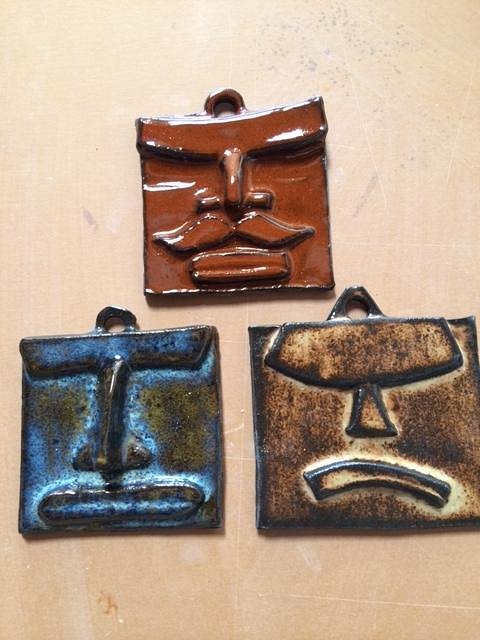
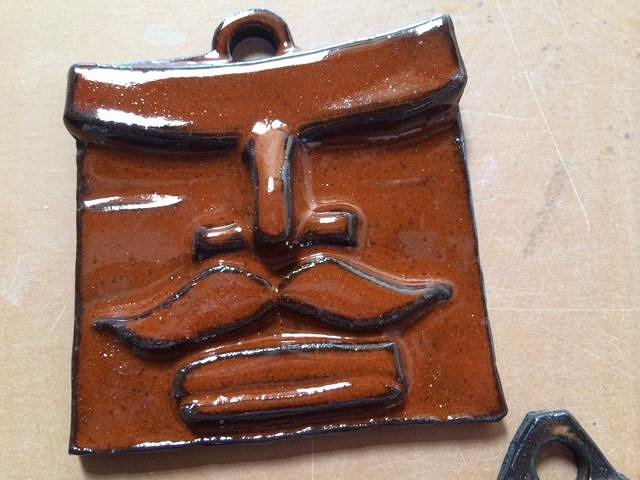
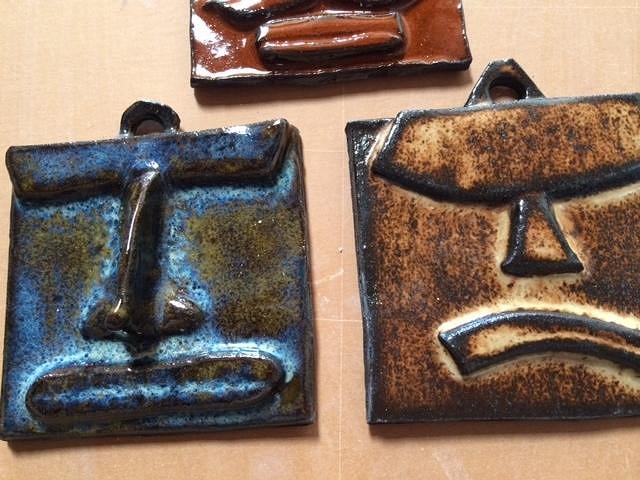
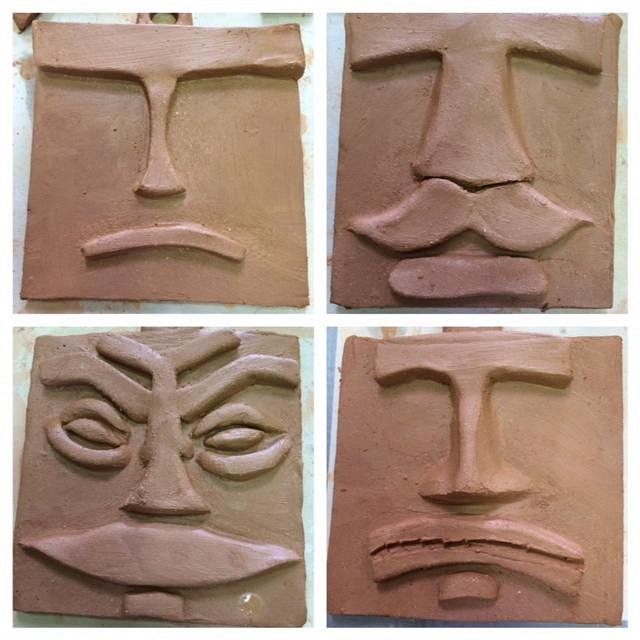
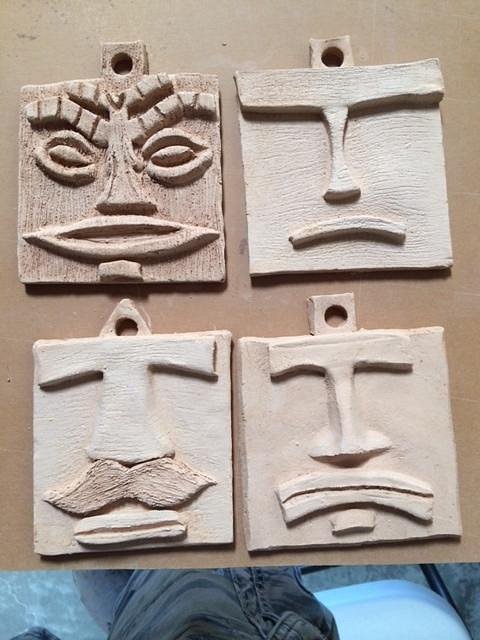
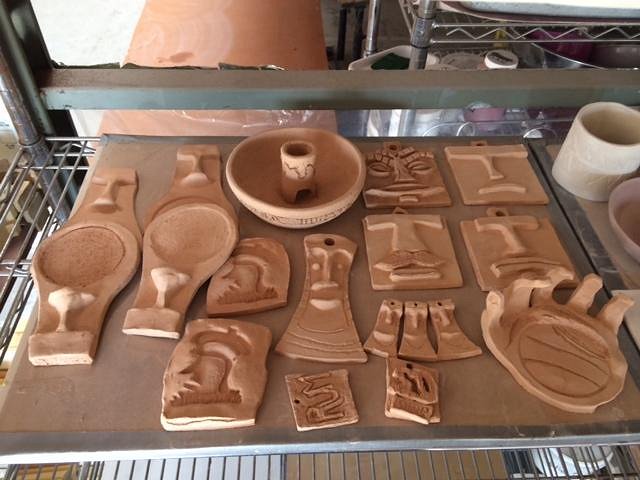
Been working on a number of tiles and assorted clay projects. Figure I'd just post 'em all at once. Started with four small (4" square) tiki tiles. First I threw a slab, then added pieces and carved away. Then I let them dry a few days, added texture and some more carving. Now they're dry enough to bisque fire them:
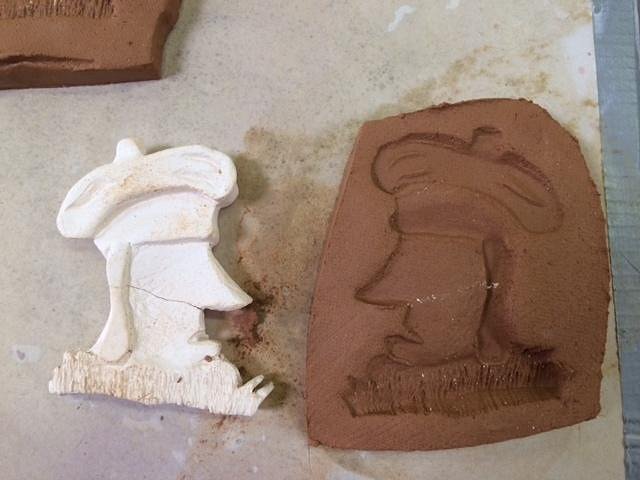
I bisqure fired the Beat Moai pendant for Tiki Oasis, then used it as a press stamp to make a negative. While doing this I snapped the original (I trimmed out the back to thin it out, which made it a bit fragile, especially before glaze firing it), but made a few negative pieces (which I will use to create new pendants that will hopefully be ready in time for T.O.). Here's what it looks like:
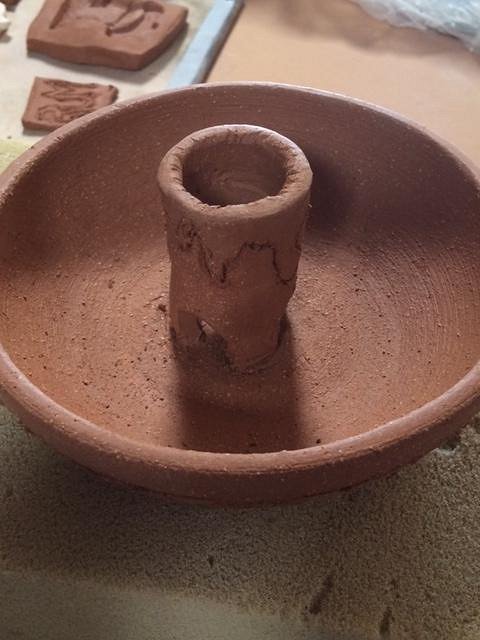
The Volcano Scorpion Bowl: I threw this on the wheel a week or so ago. It was a new clay body for me to work with, with a lot of sand in it, so wasn't too fun to throw. You can see the sand/ texture on the clay, and it will be visible when it gets fired. I let it dry/ set-up, then built a small cylinder by hand for the center of the bowl. There's a small platform inside of it to hold a flaming sugar cube, then I trimmed the base so it would be "open." I thought it would look cool to see your drink floating under the flaming center. I can't remember seeing that before in a scorpion bowl design- has anyone else? I carved some tapa around the sides- and added the name of the home bar: "The Forbidden Maya Tai."
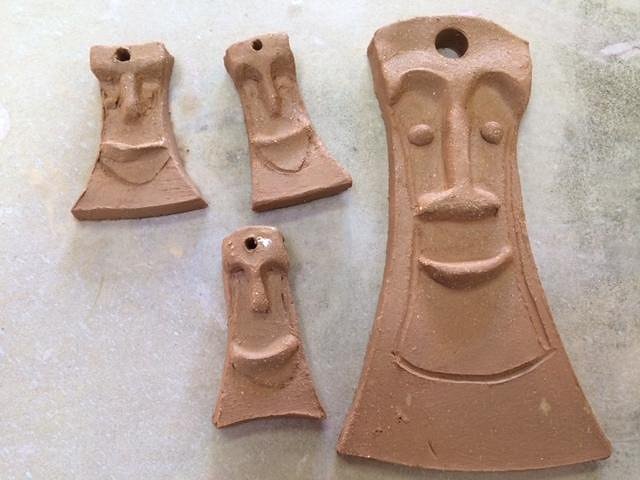
I started working on some Tiki Bobs (my first time with this subject). First I made a larger hanging wall tile:
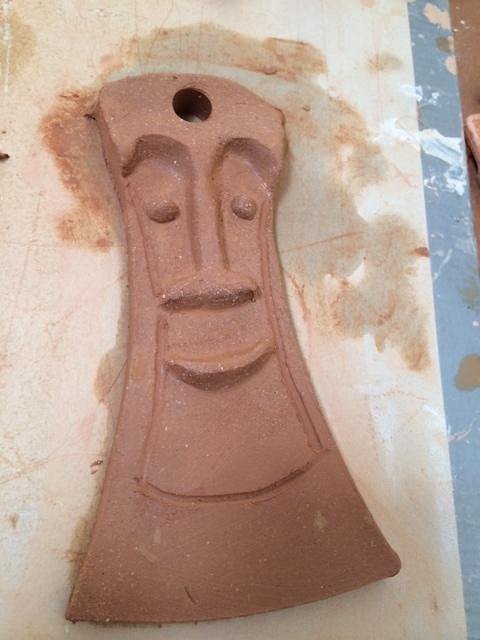
Then made some smaller Tiki Bobs as pendants- here's the whole family:
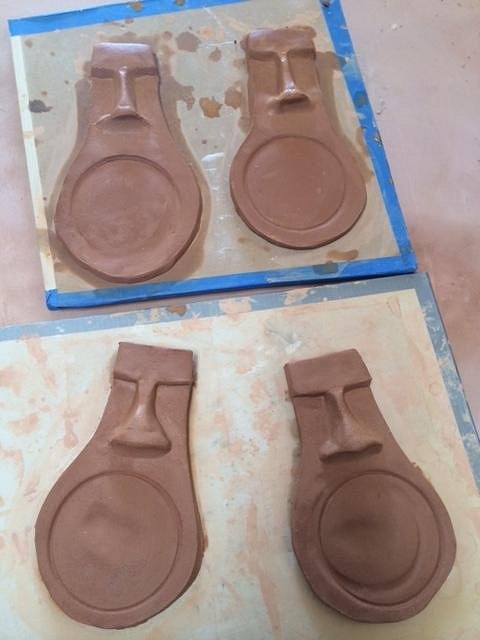
Jon/ Hang 10, you inspired me, so here are a few new coasters... Some of these may or may not be for you... (these will be trimmed a bit after they dry for a few days to "clean up" the areas for the mugs/ glasses.
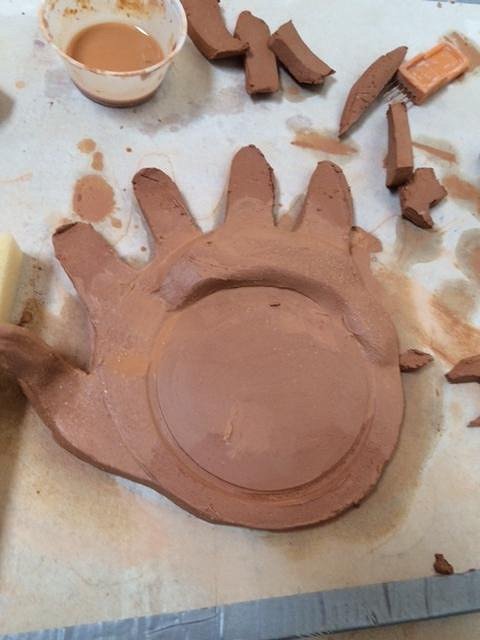
And here's my attempt at making a "handy" coaster- Jon, let me know your thoughts... this was interesting to build since wet clay has to be supported as it dries so it doesn't crack. Each piece is built up and will hopefully survive and dry slow enough to be safely fired. Unfortunately, this clay body dries a little faster than I'd like, so we'll see what happens. Jon sent me a photo of a design that he saw- mine is quite a bit different. First I started to build up a base with fingers coming out of a palm...
Then added bent fingers (separate pieces of clay), which are bent forward to look like they're clenching- ideally, around a mai tai glass. This will have to dry slowly and set up before I can touch it and trim/ carve it more.
Muchos mahaolos for the visit! [ Edited by: TikiAno 2014-07-21 20:58 ] |
|
H
hang10tiki
Posted
posted
on
Mon, Jul 28, 2014 11:48 PM
Wow Jon |
|
T
TikiAno
Posted
posted
on
Wed, Jul 30, 2014 7:30 PM
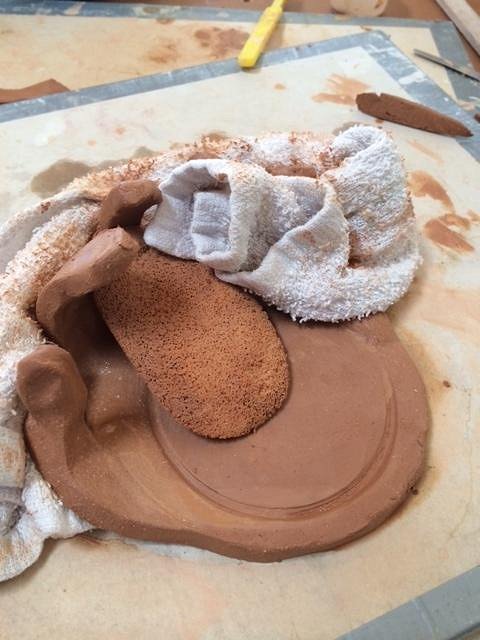
Jon, thanks. The hand coaster is waiting to get bisque fired, along with a whole lotta other pieces. It's times like this when I realize I need my own kiln...
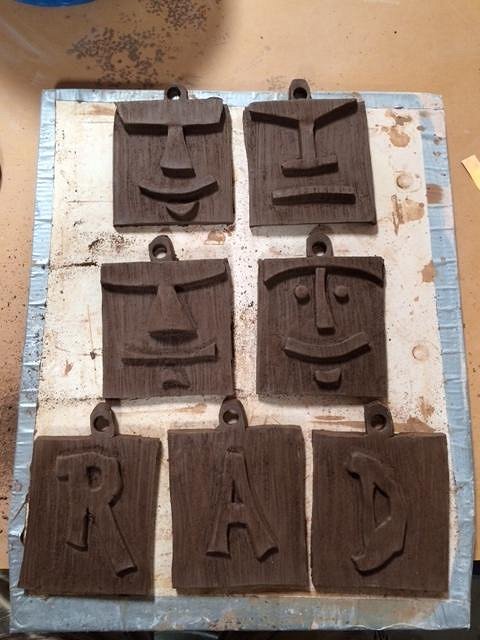
Started working on a gift for a friend- his son is six months old, and his folks are fans of the tiki tiles I've been making. I offered to make a hanging set of tiles, with his son's initials (which just so happen to to "RAD"). I made some child-friendly looking tiki tiles using that black clay. These will be hung in a line on a piece of bamboo or a dowel- the faces in between the letters. (The "Jorge" Hello Tiki mug I made a while back was for RAD's dad). Each tile is ~ 4" square.
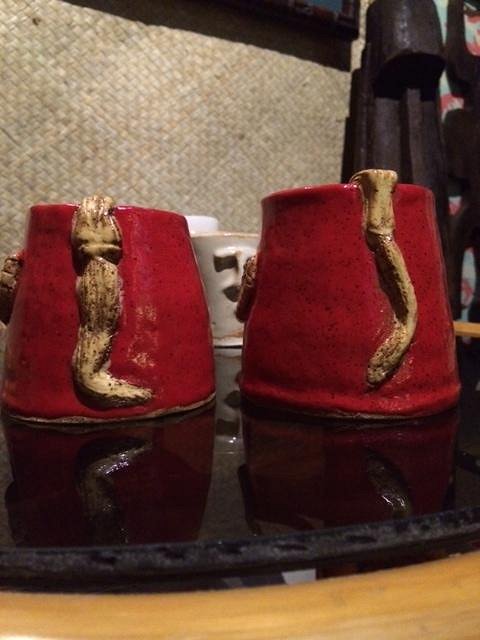
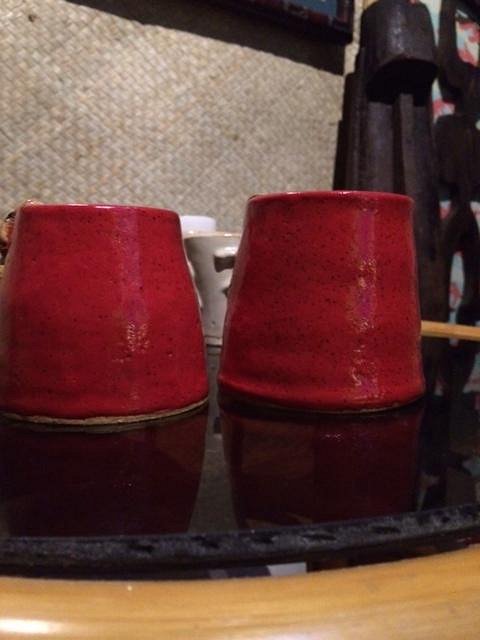
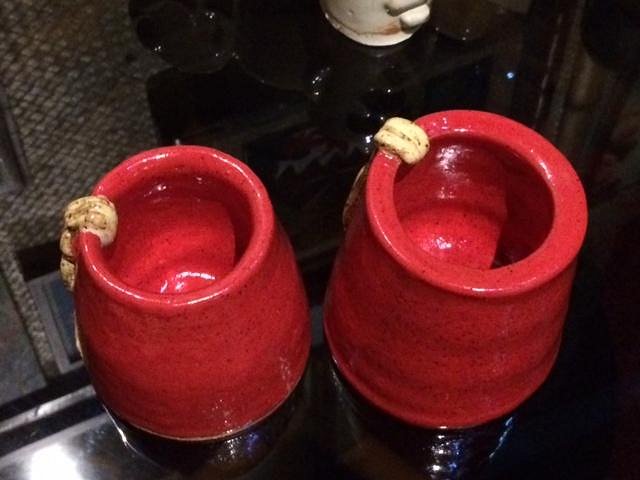
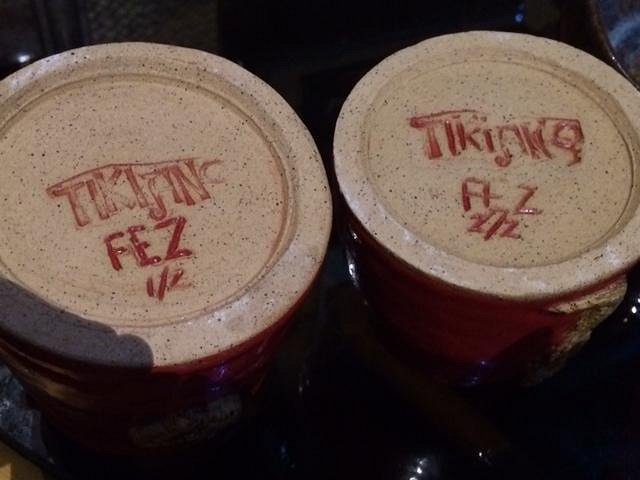
The next two pieces I threw on a potters' wheel then added details. The first is a larger version of the Fez Mug:
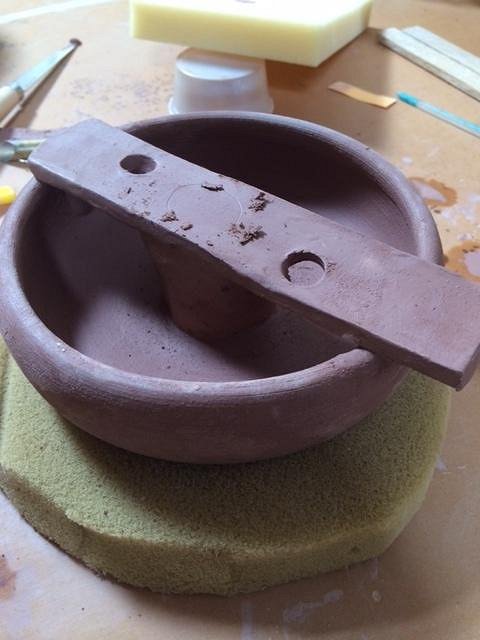
The second is a scorpion bowl as a surprise gift for some friends- this bowl will be delivered along with the early fez mug. First I threw the bowl and let it set up for a few days, then made a diving board to go across the top of the bowl, including a base to help hold up the board. I cut straw holes at opposing angles on the board.
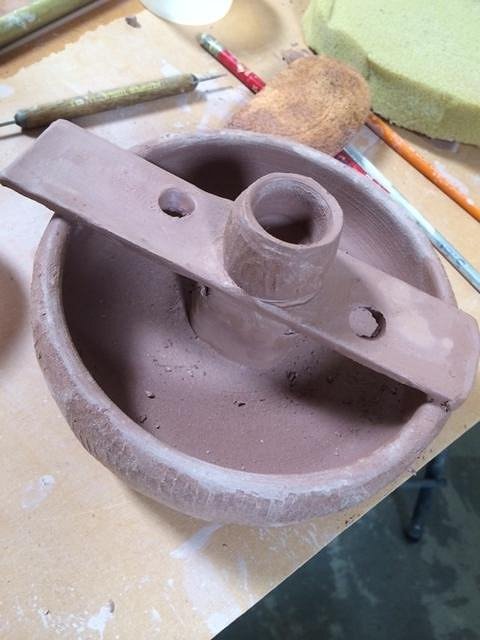
I supported the edges of the diving board with bits of clay, then planed down a tiny fire bowl I threw on the wheel. I hadn't thrown something that small as of yet. I shaved it down with a rasp, which left it looking like a little coconut. I shaved down the sides of the bowl to match.
Muchos mahalos for the visit..... |