Tiki Central / Other Crafts
Tiki Ano Mugsville: "I made it out of clay."
Pages: 1 2 3 4 5 6 7 8 337 replies
|
T

TikiAno
Posted
posted
on
Wed, Mar 13, 2013 10:19 AM
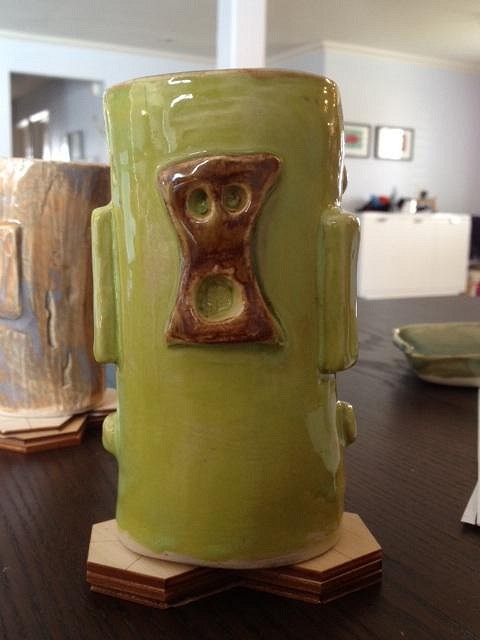
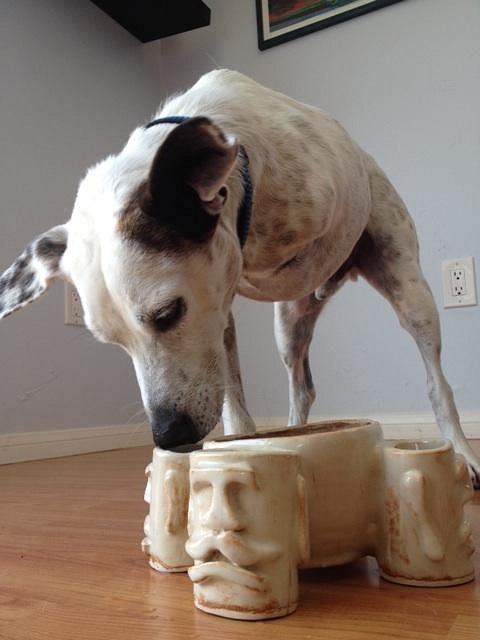
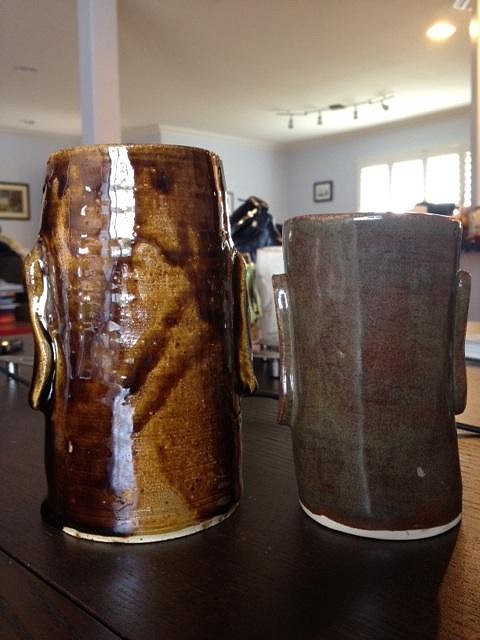
Canvas, thanks! It's true, the Reverend believes in "everything in moderation. Including moderation." This goes double for rum- or so he tells me. A few new original sculpts bisque fired: "W-eyed Open" and "Skully McSkullster." W-eyed has some serious wood graining and a broad nose. Skully sports a few "mod" skulls (sans crossbones) and traditional clasped hands. Trying new glaze combos on these.
Would love any feedback, as always. |
|
T
TikiAno
Posted
posted
on
Thu, Mar 14, 2013 5:16 PM
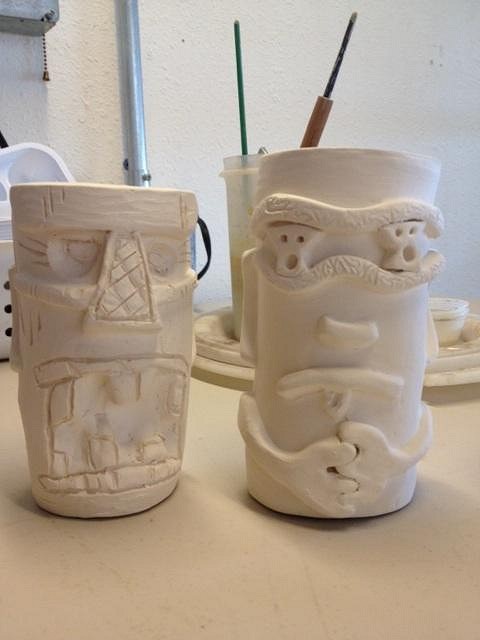
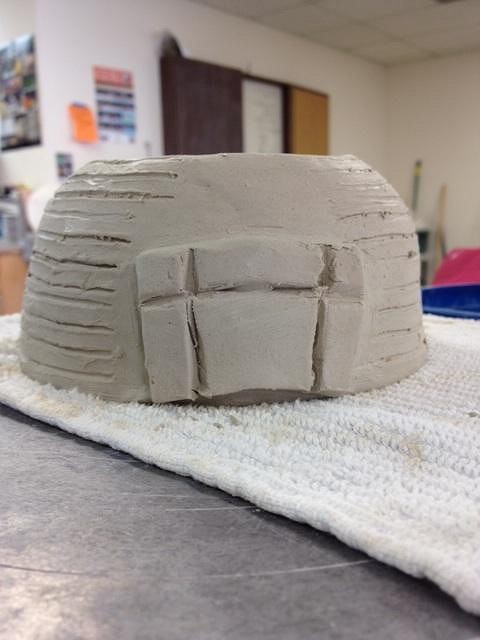
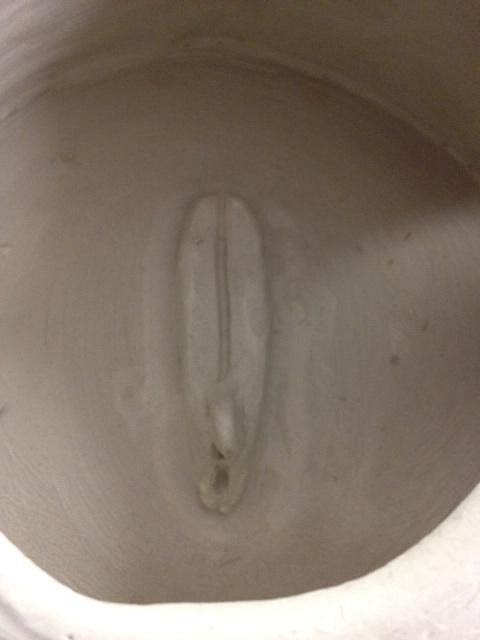
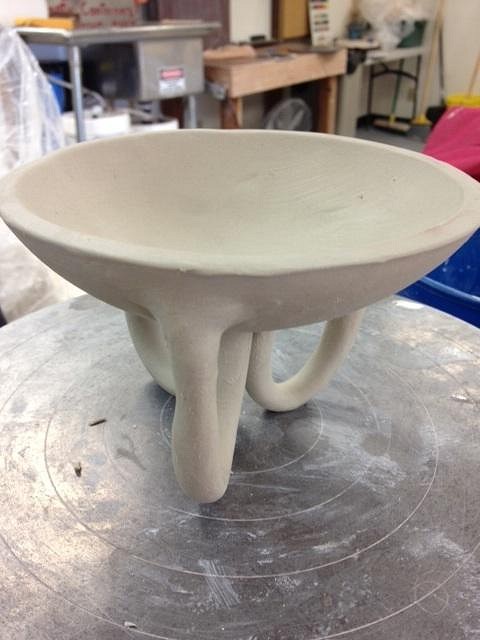
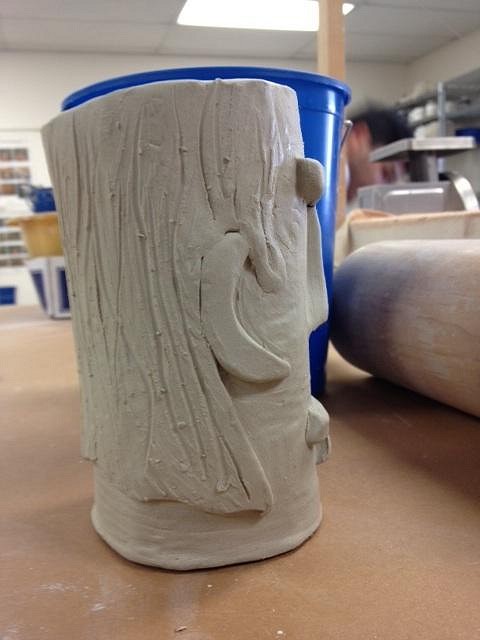
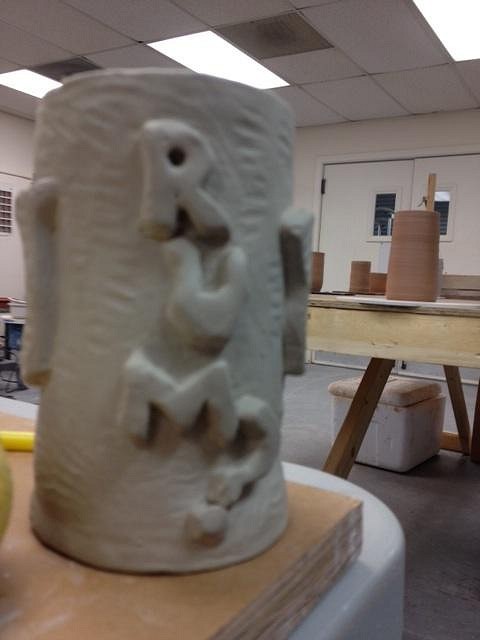
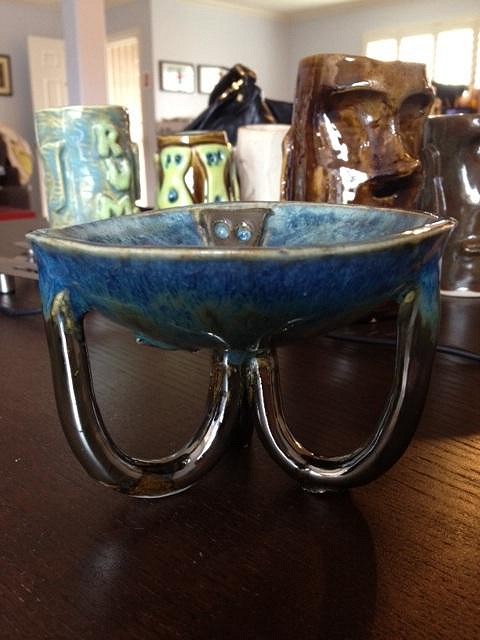
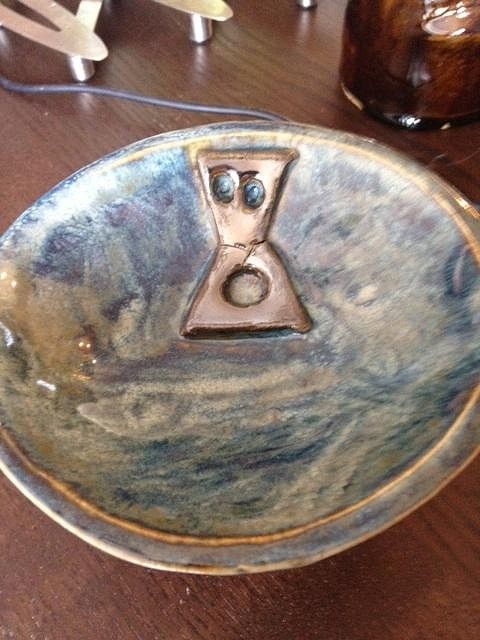
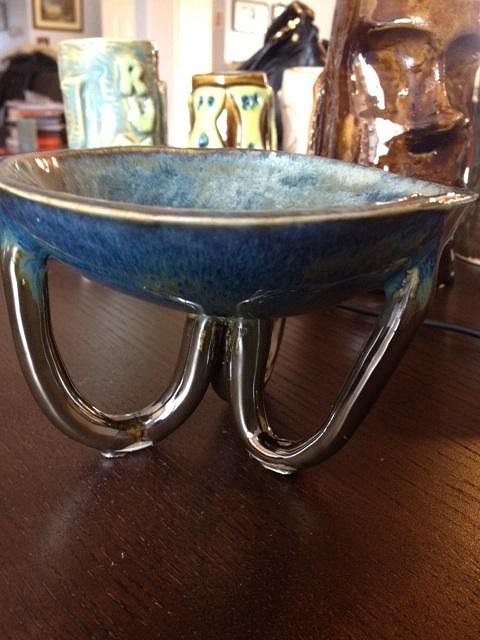
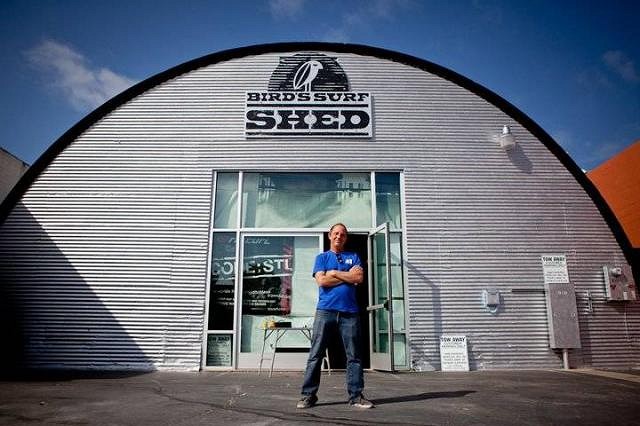
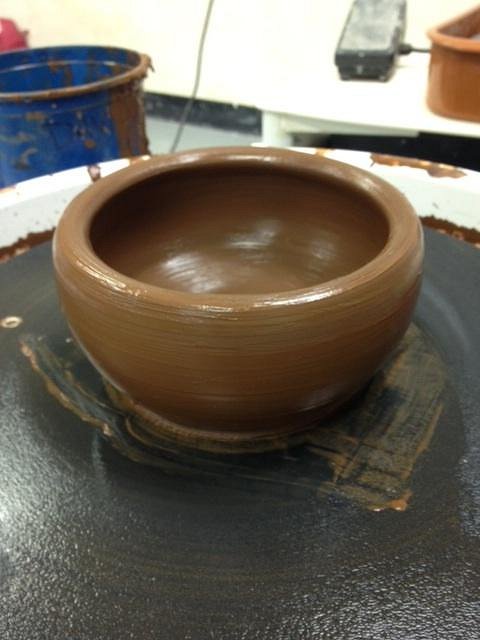
Some more carving today. I've been secretly working on a gift project for a surf shop owner here in SD- his shop is housed in big ol' quonset hut (if you're in SD you may know what I'm talking about. If not, I'll eventually post pics for comparison- but I don't want the owner to know this will be coming to him). Instead of a mug I'm working on an (inverted) bowl. As of now I've etched the aluminum "lines" in the walls after building the shape, added doors, and put a longboard down inside. I have another piece of clay that I plan to carve out their logo onto- I will try to summon up Wendy's carving skills. I know, it's not quite "Tiki," per se, but it's for someone that embodies the spirit of Aloha for everyone in the surf community around here. There will be more detail carved in as it dries some more. Some rough pics: Keeping with the spirit of bowls, I started working on another 3-legged bowl a while back. I tried forming some mid-century modern wire legs out of clay, but the thin gauge was not quite strong enough. I beefed them up and attached them to the bottom of a bowl. It looks kind of like a flying saucer, so I threw mid-century out the window and put a mod-skull (sans crossbones, of course) on the interior.
All these bowls just reinforces how badly I wanted to go to Grog's Bowl-a-rama show at the Tonga Hut. Working on the weekend doesn't help, was sorry I missed it. Look forward to any feedback, as always. Update: plan on making some molds, including Reverend Rum, in the next few weeks... |
|
T
TikiAno
Posted
posted
on
Thu, Mar 28, 2013 3:53 PM
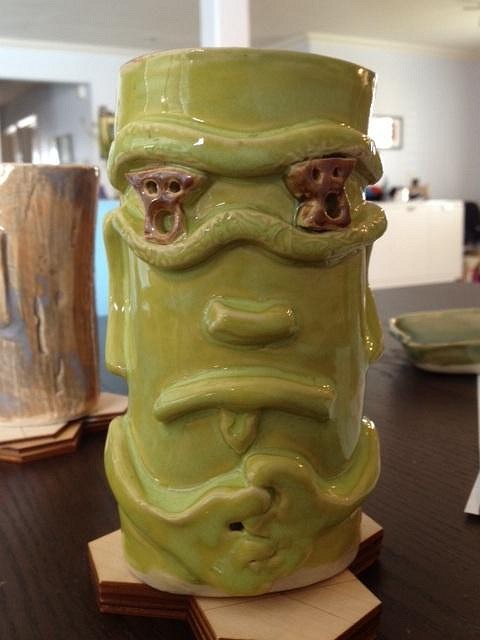
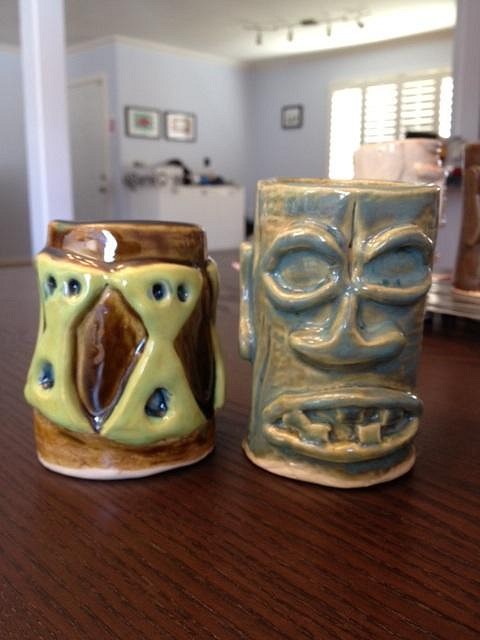
It's been a while, but Skully McSkullster & W-eyed Open are all done. Skully is a lime green (w/ a bit of texture underneath)with earth brown skull eyes. W-eyed Open is a ruddy earth brown. Fun to make these pieces, planning on trying to make molds in the next couple weeks. Any requests for specific ones to cast?
Skully is a pretty bright, chartreuse-like green- don't think the photo does the color justice. |
|
H

hang10tiki
Posted
posted
on
Thu, Mar 28, 2013 9:37 PM
U have been busy Jon |
|
D

danlovestikis
Posted
posted
on
Fri, Mar 29, 2013 10:16 AM
It's fun that you have a definite style that is easy to recognize. Love the top hat and glasses. I am really looking forward to the bowl. That is a daring design. Wendy |
|
T
TikiAno
Posted
posted
on
Mon, Apr 1, 2013 4:17 PM
Jon, thanks a lot. Wendy, thanks- I think the style is lack of carving skills. :) No, I do enjoy building on top of forms, so that has become part of my style. So glad that you like it. A few of the pieces are very thick-walled because of this (due to using a thick die in the extruder). I assume that when I make a mold I can control the wall's thickness of the pour by the amount of casting slip used. Work's been a bit crazy, distracting me a bit from the clay studio.... |
|
M

MadDogMike
Posted
posted
on
Mon, Apr 1, 2013 6:32 PM
Doesn't it suck when work interferes with your life! :lol: Yes, you will be able to control the thickness of slipcasts items. Love that brown glaze David, are you mixing your own glazes? |
|
T
TikiAno
Posted
posted
on
Tue, Apr 2, 2013 3:05 PM
Mike, thanks. I'm not mixing my own glazes from scratch, just mixing existing glazes. which has worked out pretty well. Which brown glaze did you like? (The brown skull on Skully is a Turkish Amber, the the one w/ Orange is a combo of Mayco Orange with Turkish Amber. I've found that Amaco's Toasted Sage, kind of boring by itself, combines really well with bright colors and creates new textures. Similarly, I've had great success with using Amaco's Textured Turquoise (an absurdly high gloss, intense glaze) on top of other "mellower" glazes (it was one of the three glazes I used for that water effect in the Sinking Moai Art Swap piece. [ Edited by: TikiAno 2013-04-02 15:08 ] |
|
T
TikiAno
Posted
posted
on
Sat, Apr 13, 2013 2:55 PM
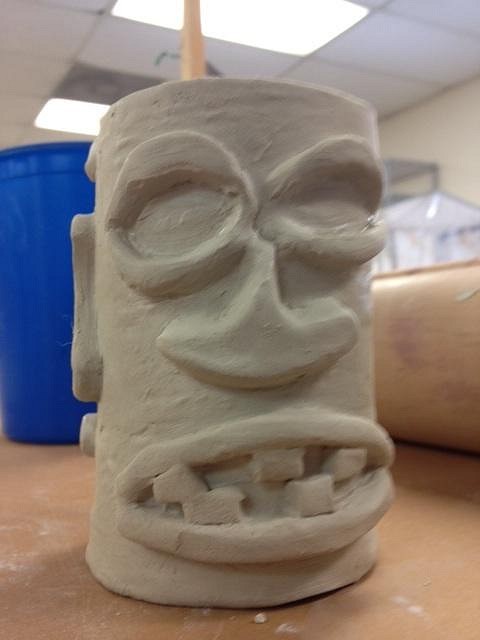
Spent a little time in the studio this week hammering out some more pieces. Here are a few "in-progress" shots: The first is The Skipper, which is made to pay homage to SD surfing legend Skip Frye. The Skipper has long hair, shaggy brow, and will be aged/ textured as he dries. I know, not very traditional, but I tried to include some more traditional tiki elements.
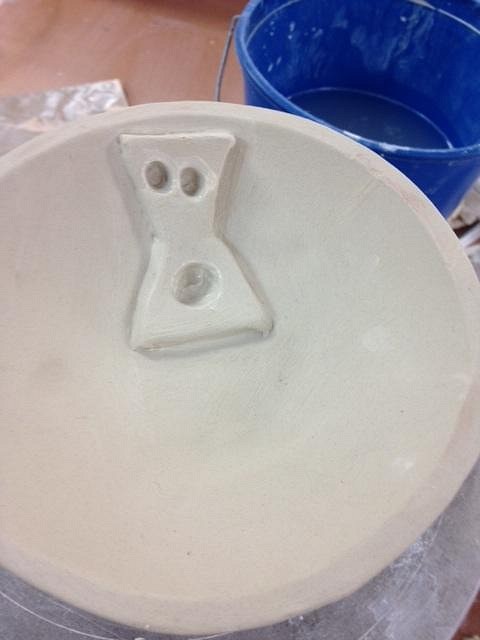
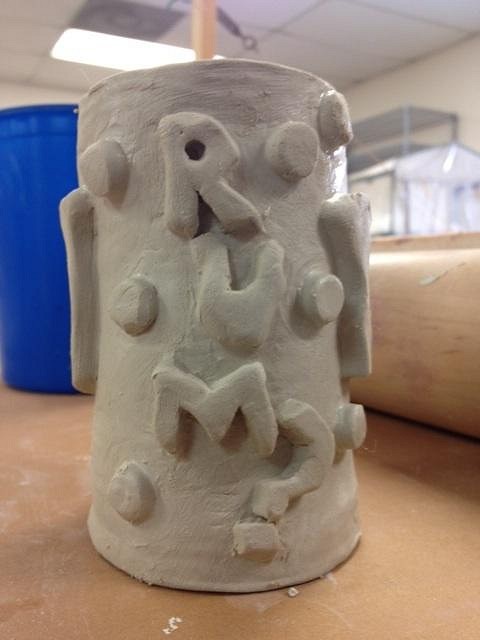
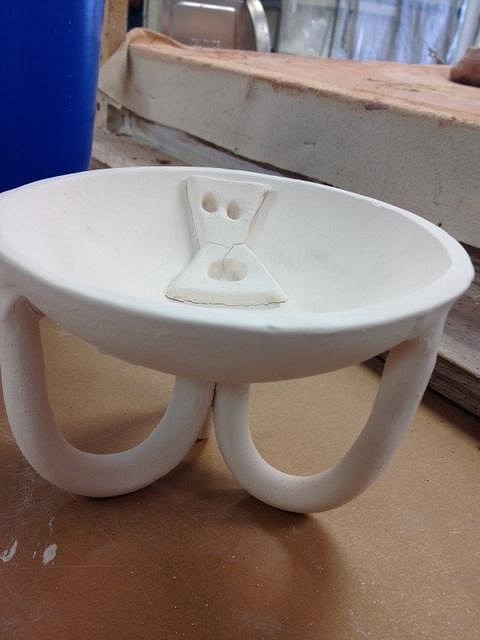
The Tangaroan Long Distance Rummer is up next. While not 100% traditional, I used Tangaroan elements (less lines, I know, and more teeth) for the face. More details will be carved in as he dries. The "Rum?" on the back will have more texture, and the circles added will be cut out into different shapes. This one is definitely a work in progress. The hairpin legged bowl has been bisque fired, and now I have to figure out how to glaze it. While the chubby legs are no longer mid century modern looking, a silver look might be in order. The little cracks in the skull should be covered up when glazing- it's my first crack in a bisqued piece, which was bound to happen one of these days. :) Any thoughts are appreciated. While my wife isn't as attached to the ever growing world of tiki at home, Dreyfus is coming along & exploring his options: Feedback, as always, is appreciated. Thanks! |
|
T
TikiAno
Posted
posted
on
Wed, Apr 17, 2013 9:31 AM
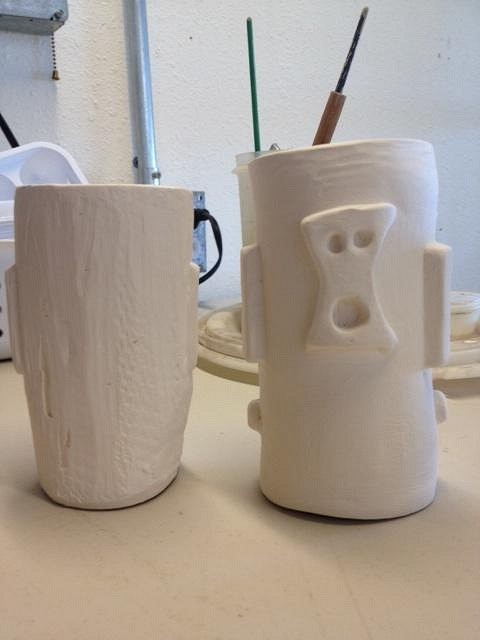
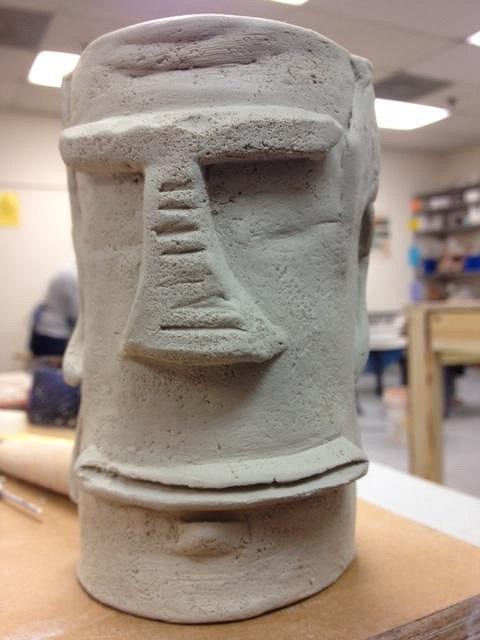
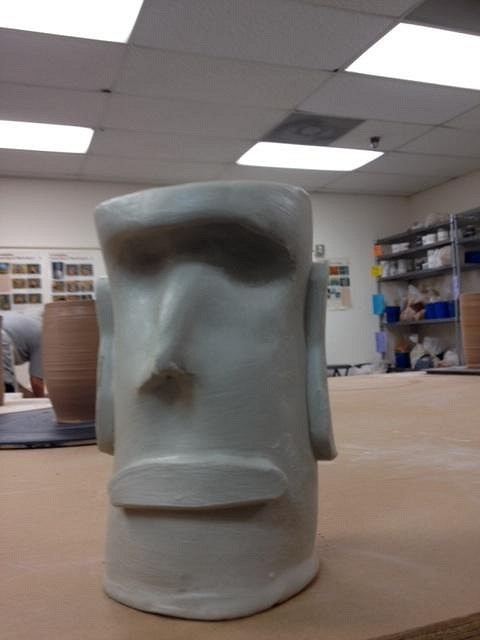
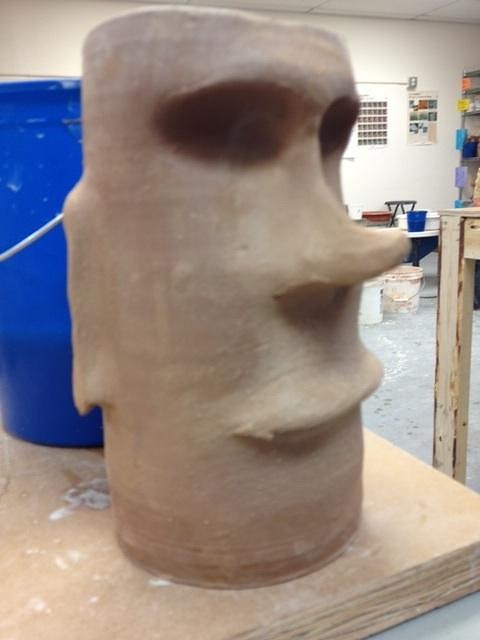
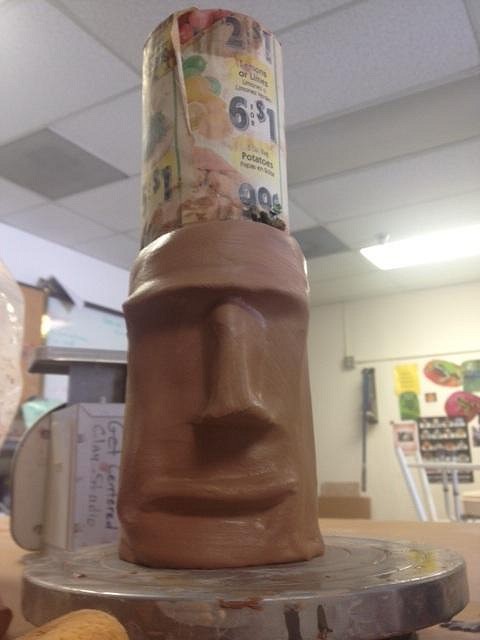
Did a little "editing" on the Skipper and the TLDR. Skip got a new mouth, light stone texturing, and some new carved lines. Started working in a different way on a new Moai mug. I started pushing from the interior, forming the brow and the beginnings of a nose (it will be built out more after it dries a bit). Always excited to learn new ways to work- Also working on a larger version of this same piece (in the same way) on a pretty big cylinder that the owner of the clay studio I work threw on the wheel (it's the brown clay form on the bat on the table in the last photo). I admit I'm more of a hand builder, so excited to where this piece will be going (right now, I admit, it's not too hotsy totsy). :) |
|
D
danlovestikis
Posted
posted
on
Thu, Apr 18, 2013 8:54 AM
When I see your work I smile. It's such fun to see you continue to come up with new ideas. Push outs, terrific. I have covered some cracks with paperclay or with Magic Mend. I let them dry, sanded and glazed over them and fired. Sometimes it works. Once I kept filling the crack with underglaze until the crack didn't show. I overfilled it. Then sanded. Then I put clear glaze on top and fired. It still showed a bit but it was stable. Good luck and keep up the great work, Wendy |
|
H
hang10tiki
Posted
posted
on
Thu, Apr 18, 2013 9:03 AM
Man U r busy |
|
T
TikiAno
Posted
posted
on
Fri, Apr 19, 2013 11:46 PM
Wendy, thanks for the continued support, makes me smile to read what you write. It's the first time I've had a crack in a bisque fired piece. It's pretty small, I think it will be hidden by glaze, if not, it might look kind of cool (and perhaps intentional???) :wink: The push-out was an experiment, I was gifted that thrown cylinder, and it was a whole lot wetter (less dry?) than the slabs I'm usually working with, so it was fun to mess with the clay. I'm trying to convince a super talented young guy at the studio to learn about tiki. At first he was completely confused by my stuff, now he's asking questions about it. Heh heh heh. Jon, thanks! By the time Oasis rolls around I'll have a pile of mugs and I'll walk around like Santa w/ mugs for all of my (TC) friends! |
|
T
TikiAno
Posted
posted
on
Mon, Apr 22, 2013 5:28 PM
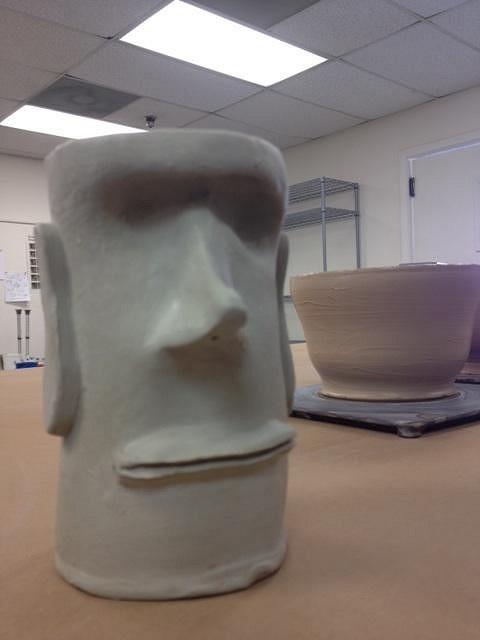
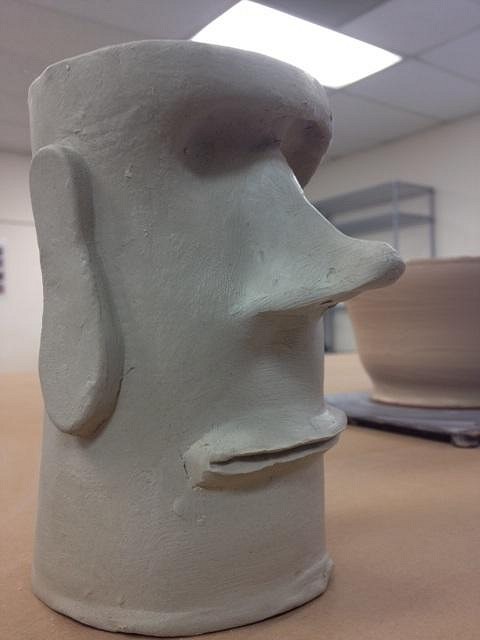
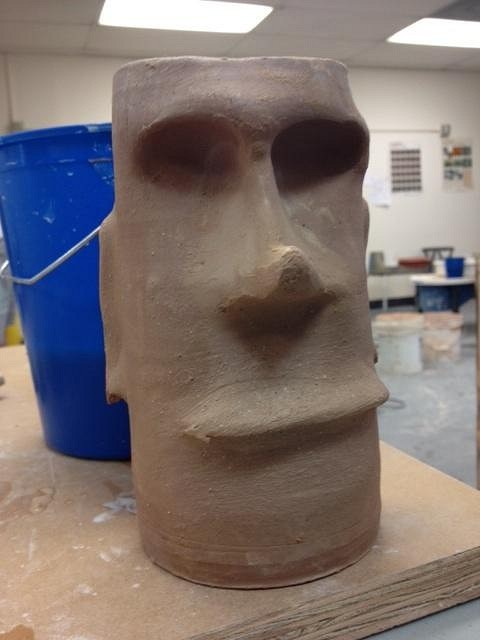
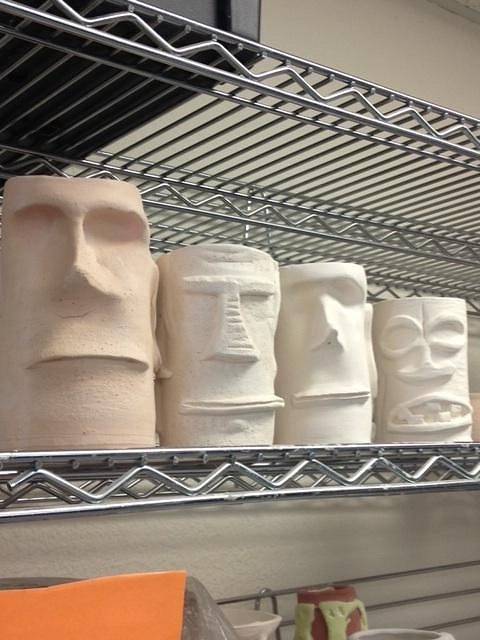
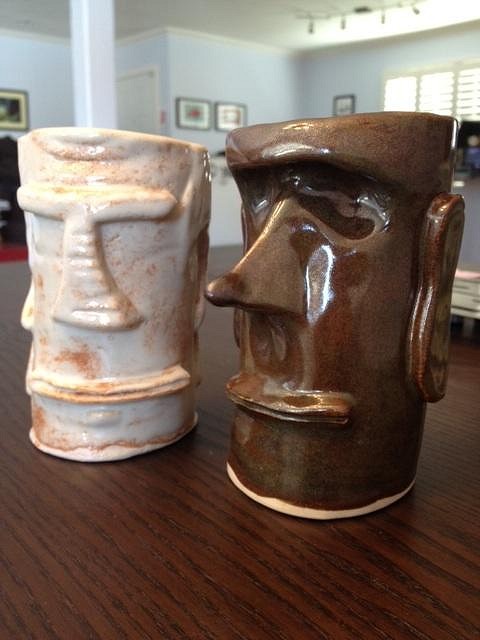
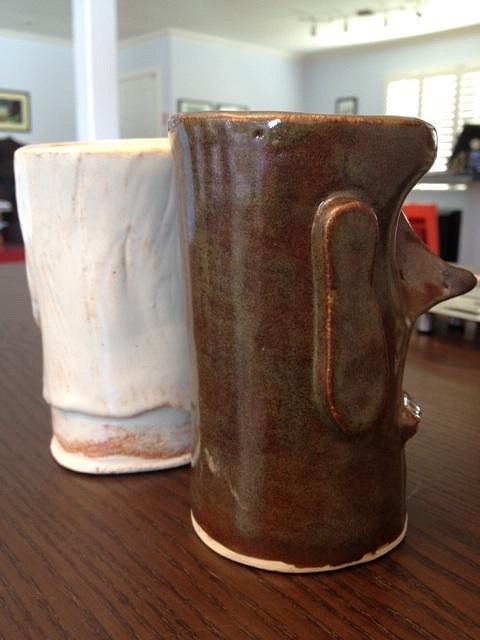
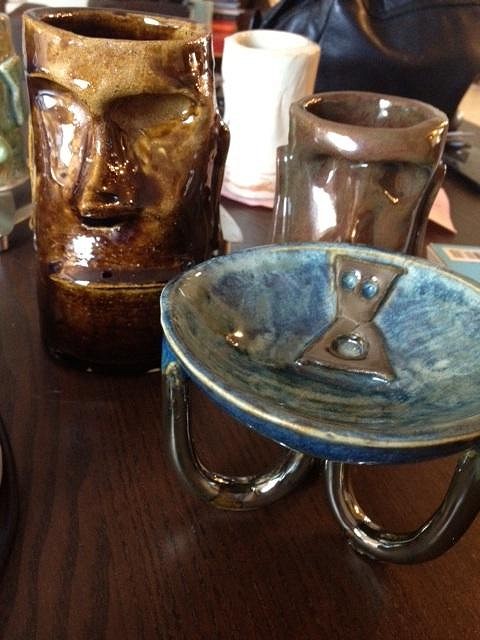
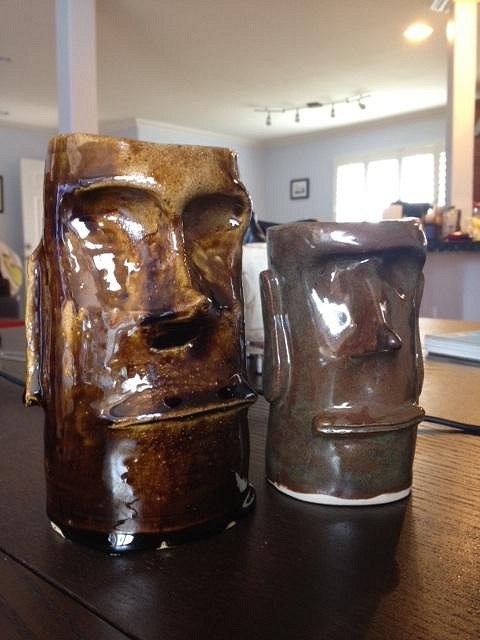
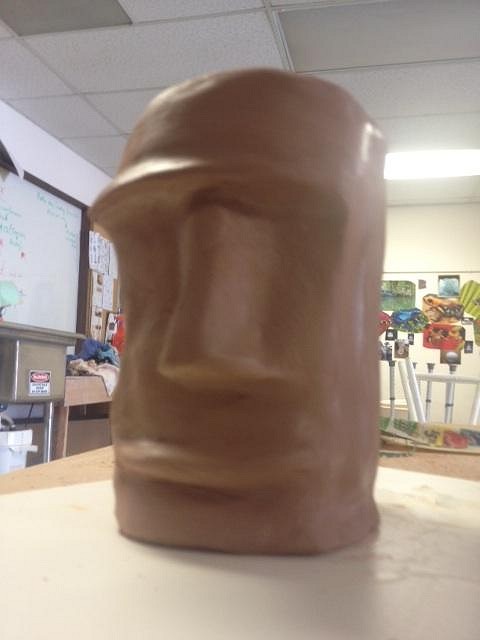
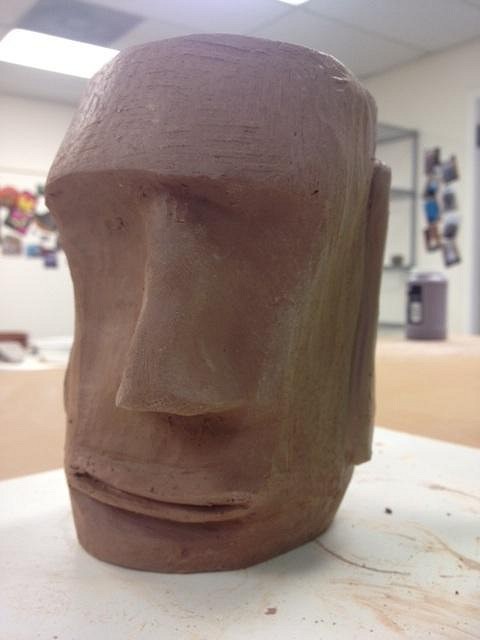
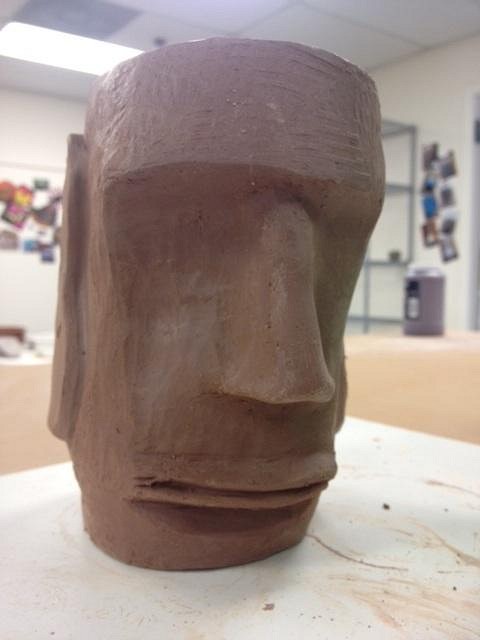
Mo Moai progress. While these two pieces look similar, the reddish clay one is actually around 10" high, quite a bit taller. I worked on the smaller one first, building a traditional Moai sniffer, as well as carving out his mouth (though admittedly it is kind of Simpsons-esque. The new additions are drying us, hopefully can fire this soon. The red Moai (which should fire white, w/ a bit of speckling from grog (no, not you, Grog) took a bit longer, Instead of attaching slab rolled forms for the ears and mouth, I added small pieces of clay (a la Wendy) and built out each form. His mouth definitely has the look/feel of a traditional Moai- but will need to be trimmed up a bit more.
Now I just need to get some time to glaze these guys: Thanks for the support, look forward to any/all feedback. |
|
L

LoriLovesTiki
Posted
posted
on
Mon, Apr 22, 2013 7:28 PM
I'm liking your work, especially this Moai. I think he's going to be fantanstic! Keep having fun. |
|
T
TikiAno
Posted
posted
on
Wed, Apr 24, 2013 8:40 PM
Thanks, Lori! |
|
D
danlovestikis
Posted
posted
on
Wed, Apr 24, 2013 9:45 PM
You Moai is really tiki but I have to ask has he been lying? Wendy [ Edited by: danlovestikis 2013-04-24 21:46 ] |
|
T
TikiAno
Posted
posted
on
Thu, Apr 25, 2013 9:56 PM
Wendy, ha ha ha! I'd like to say it's the angle of the photo that makes him look Pinocchio-ish. Maybe? :wink: |
|
T
TikiAno
Posted
posted
on
Thu, Apr 25, 2013 9:57 PM
[ Edited by: TikiAno 2013-04-30 22:03 ] |
|
T
TikiAno
Posted
posted
on
Thu, Apr 25, 2013 9:57 PM
Wendy, ha ha ha! I'd like to say it's the angle of the photo that makes him look Pinocchio-ish. Maybe? :wink: |
|
D
danlovestikis
Posted
posted
on
Fri, Apr 26, 2013 8:42 AM
OH NO you have caught the GROG virus. I hope I haven't caught it too. Wendy |
|
T
TikiAno
Posted
posted
on
Tue, Apr 30, 2013 10:03 PM
Uh oh. I just noticed this. This is the first time it's happened. Maybe I need to go see a doctor.... :( |
|
D
danlovestikis
Posted
posted
on
Wed, May 1, 2013 6:02 AM
That's a big enough group of fired tikis that you will learn what marathon glazing is like. It is so worth it when the kiln opens and all the colors show. Making sure the piece is slightly damp before glazing helps make it stick. Also dust free. I'm looking forward to seeing the end result. Good job, Wendy |
|
T
TikiAno
Posted
posted
on
Thu, May 2, 2013 5:55 PM
Thanks, Wendy! Yes, I always sponge them down to get any dust off. I used to love glazing, though today (for some reason) I only got through two pieces in a couple of hours (multiple colors, multiple coats, wiping off layers, etc). Still have a few to finish up, hopefully next week. Things would be easier w/ a kiln at home and glazing at night. Thanks for all the support! |
|
L
LoriLovesTiki
Posted
posted
on
Mon, May 6, 2013 6:14 PM
Can't wait to see your pieces glazed. I still haven't glazed my last one. Slacker! |
|
T
TikiAno
Posted
posted
on
Tue, May 7, 2013 1:53 PM
Lori, I think it will take a while to see mine glazed. The kiln at the studio where I work has been reserved out for weeks! Thankfully, it gives me more time to glaze these things. I started working on a (non-tiki) piece inspired by one I saw in Palm Springs a few weeks ago, kind of a mid-century stoneware (small) sculpture. As I worked on it, I realized I should probably stick with what I know- and love: Tiki. Ha! That being said, you should start glazing yours! :wink: |
|
T
TikiAno
Posted
posted
on
Fri, May 17, 2013 9:03 AM
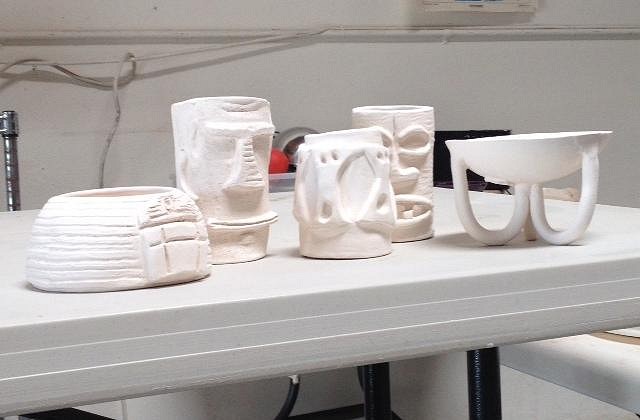
All of my greenware pieces have now been bisque fired, now looking at rows of pieces to glaze (and figure out how to glaze). The tall Moai got a little crack when fired but will fix him up with glaze. He's a pretty big guy. Beyond the heads I have another shelf before with the Surf Shed Bowl, the Hair Pin Leg Bowl, and this large semi-abstract piece I'm working on. Yowzers. Hopefully can glaze next week. Sorry haven't posted much, work has gotten in the way a bit. Hope everyone at Caliente has a great time- stay cool out there! Any feedback, as always, is appreciated!
|
|
D
danlovestikis
Posted
posted
on
Sat, May 18, 2013 10:57 AM
You are going to have enough tiki ware of your own for a party. I'm looking forward to your glazing of each one. Enjoy, Wendy |
|
T
TikiAno
Posted
posted
on
Thu, May 23, 2013 4:36 PM
Wendy, ha! Well, there are some good ones and some not so good ones. Sometimes they look better in my head than they do in reality. I keep trying to get to glazing that pile of mugs, work keeps getting in the way. Hoping to glaze them all early next week to show the final versions.... |
|
D
danlovestikis
Posted
posted
on
Wed, May 29, 2013 9:07 AM
I just read on my thread that you have glazed your mugs. I'm excited to see the color you choose. Wendy |
|
T
TikiAno
Posted
posted
on
Wed, May 29, 2013 12:27 PM
Wendy, Thanks- I went all out, including some untested glaze combinations- including using Amaco Palladium, which I'm very excited about- I'm hoping the palladium-heavy piece gets loaded in the "right" place in the kiln- I've been told that it needs to be on the center shelf for the best "metallic" look. Hopefully all of the pieces will make it into a firing this week (or early next week)? It's times like this when having one's own kiln would be a LOT better. :) |
|
M

mp
Posted
posted
on
Wed, May 29, 2013 6:15 PM
Looking Good!
Cant wait to see these glazed! |
|
T
TikiAno
Posted
posted
on
Thu, May 30, 2013 10:31 AM
Thanks, mp! I admit, I'm curious how a few of the new glaze combos turned out.... |
|
T
TikiAno
Posted
posted
on
Mon, Jun 3, 2013 4:05 PM
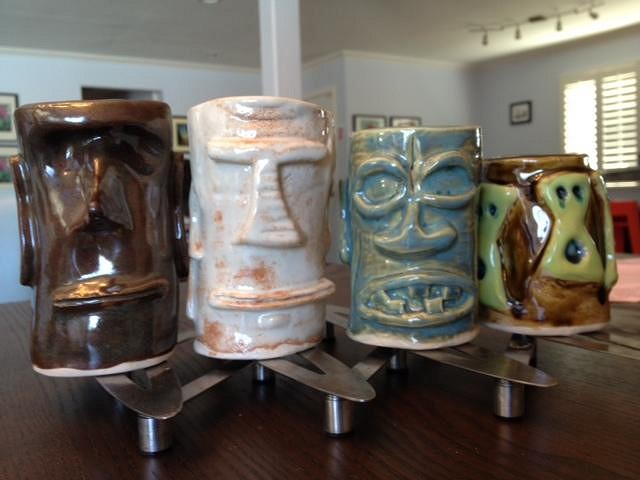
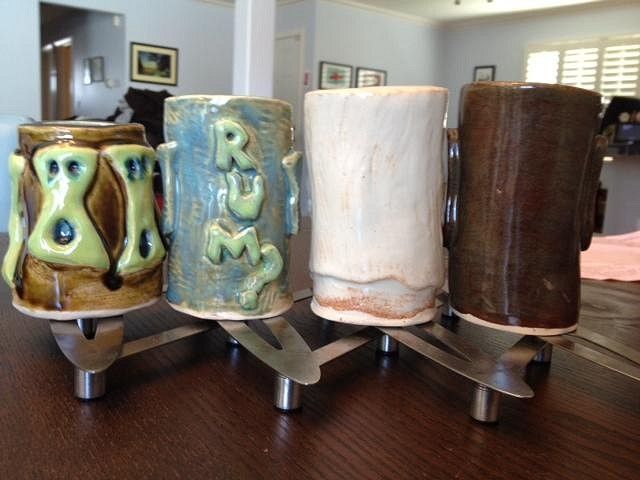
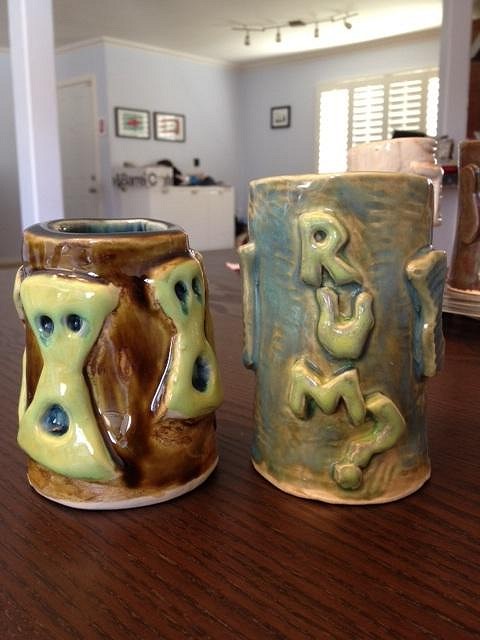
A few pieces came out of the kiln & more went in today. Here are the first four pieces. Group shots: Close-ups ("The Skipper" & "The Lying Moai")- big thanks to Wendy for noting the extra-lengthy nose- :) ): Close-ups ("Skullbound" & "The Tangaroan Long Distance Rummer"): Would love any feedback, as always- hope to post photos of the new bowls (and bigger Moai) tomorrow. |
|
L
LoriLovesTiki
Posted
posted
on
Tue, Jun 4, 2013 11:20 AM
I really like the blue glaze on the RUM? mug! |
|
D
danlovestikis
Posted
posted
on
Tue, Jun 4, 2013 7:45 PM
It sure is fun to watch you work and glaze. The Lying Moai, love that. You did well with your lime green. I've used it once and it all popped off. I hope you do the bowl soon. Keep experimenting so I don't have too. Good job, Wendy |
|
T
TikiAno
Posted
posted
on
Tue, Jun 4, 2013 8:27 PM
Lori, thanks a lot! A few more came out of the kiln today. First, a group shot:
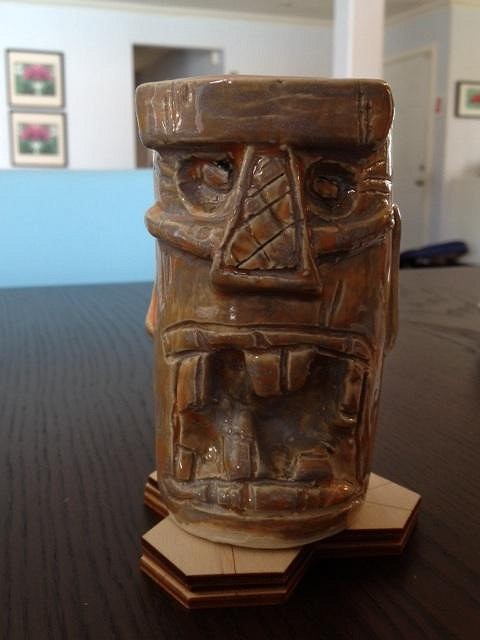
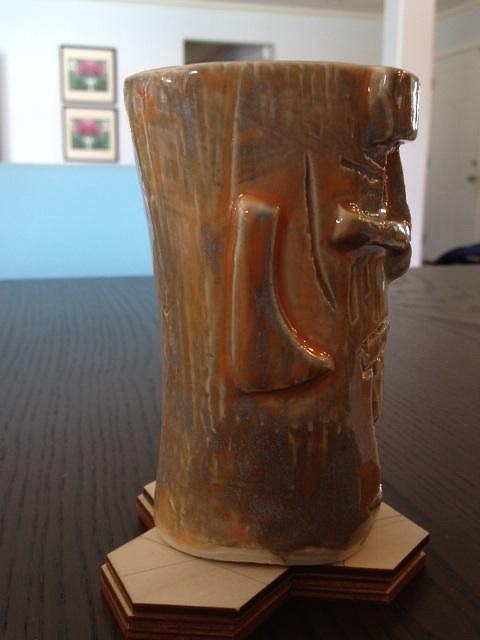
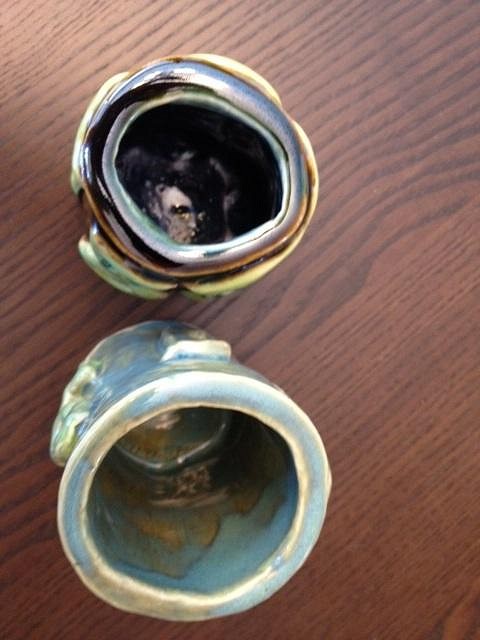
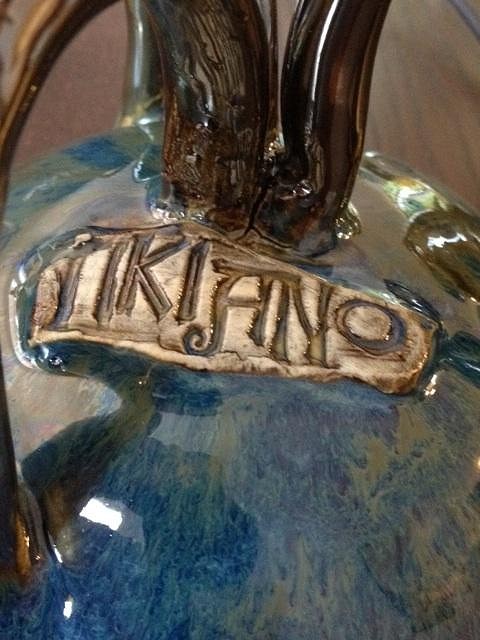
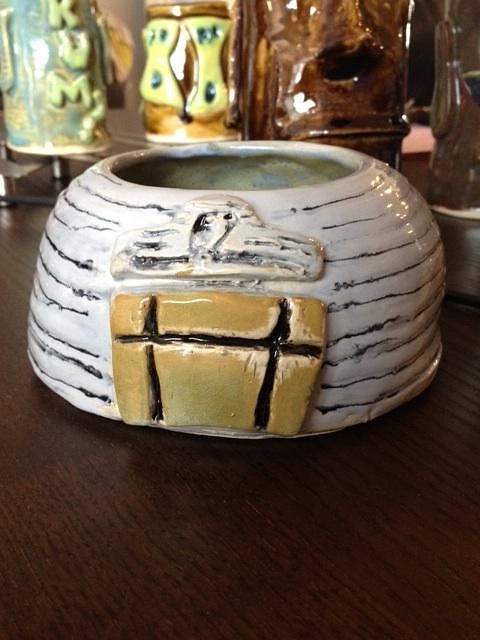
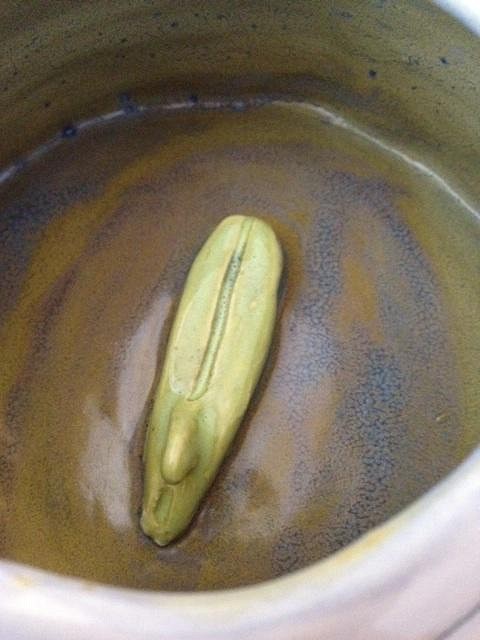
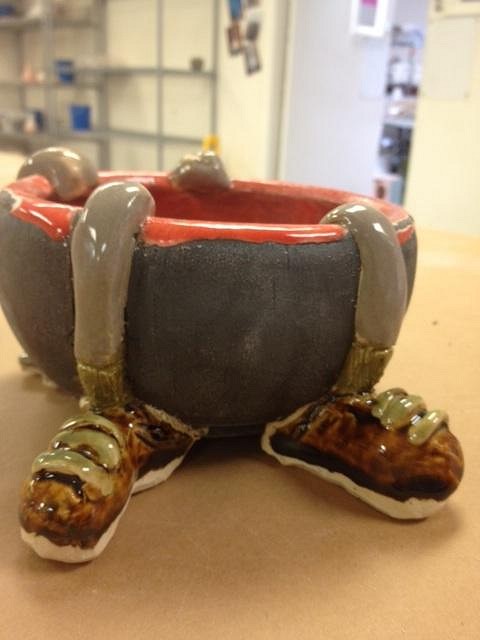
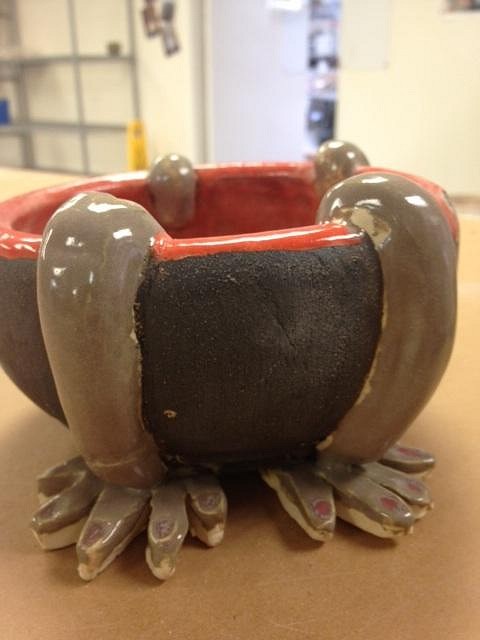
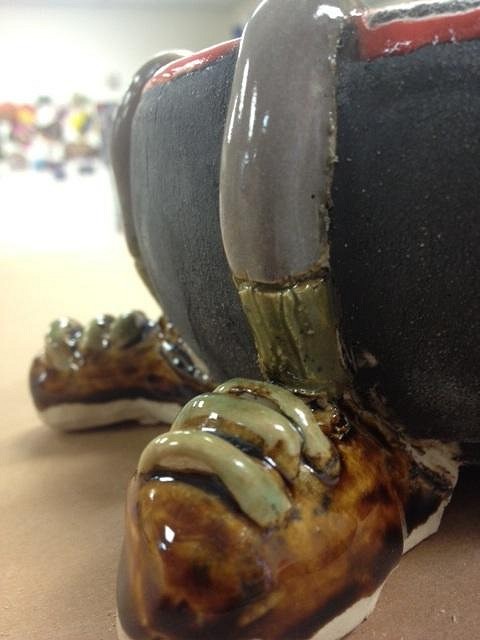
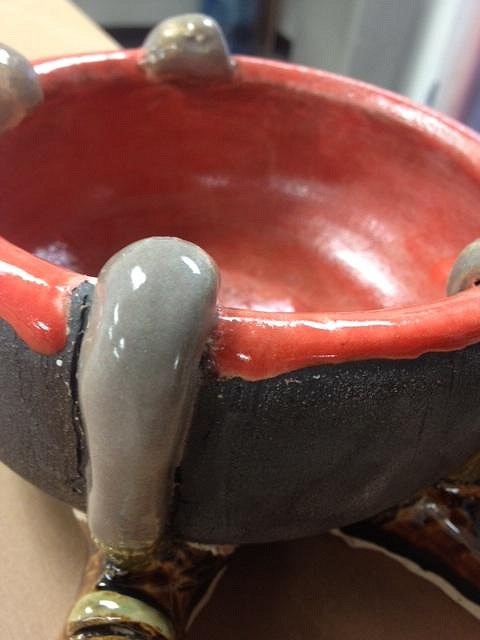
Here's the taller Moai, compared next to yesterday's. A bit taller, w/ a different glaze. Front view: Back view: He fell into the glaze bucket (Turkish Amber), & stayed in the bath a bit too long- thus the heavy (and somewhat uneven coating) Here's one view of the Palladium-glazed Wire Pin Skully Bowl. I'm pretty stoked w/ how the palladium glaze turned out (shiny silver metallic glaze), even after I glazed it on a bit thick and had to pay penance by cleaning the kiln wash off the shelf- not fun, but necessary. I look forward to using this glaze both by itself and in combination w/ other glazes- there are some great combos for glaze geeks (like myself). Inner view- though in person the blue is a bit richer looking: Another angle. Bottom view, w/ the "Tiki Ano" stamp: Here's the first view of the Bird's Surf Shed Bowl. And the interior, with a surfboard inside: If you've never visited the Shed, it's a great San Diego surf shop, filled with hundreds (if not more) surfboards, housed in an old Quonset Hut (not too far from Tiki Oasis). More info at: Thanks for looking! [ Edited by: TikiAno 2013-06-04 20:35 ] |
|
D
danlovestikis
Posted
posted
on
Wed, Jun 5, 2013 6:29 PM
I like that blue glaze. The photo with so many showing at once is really fun to see. I hope you are keeping good track of your experiments and glazes used. What's next? Wendy |
|
T
TikiAno
Posted
posted
on
Thu, Jun 6, 2013 1:30 PM
Thanks for all the support! Wendy, apparently I missed a comment you made earlier- the lime green is Mayco Green Opal. We received a number of sample bottles in the studio, let me see if there are still a few left (I might be the only one using it). :) The blue glaze (on the bowl piece?) is Amaco Indigo Float on top of Palladium. The blue on the Rum? mug is Textured Turquoise (Amaco) on top of Amaco Toasted Sage. I've been messing w/ lots of (untested) glaze combinations- I really need to do a huge round of test tiles. Unfortunately, even tried and true glaze combinations sometimes come out different- especially in the Surf Shed bowl, which was supposed to have a blue-green interior, though it turned pretty green and murky. I just posted this in the Art Swap thread, but started working on a new bowl piece. Haven't thrown anything in a bit, but decided to have a go at it again: Oh, and next will be one (or two) Art Swap pieces, as well as a larger bowl that I threw that I'm thinking of making into an oversized scorpion bowl (a larger version of the bowl that's pictured above, w/ the same clay body). And then.... making a mold or two! [ Edited by: TikiAno 2013-06-06 14:02 ] [ Edited by: TikiAno 2013-06-06 14:02 ] |
|
T
TikiAno
Posted
posted
on
Thu, Jun 20, 2013 11:07 AM
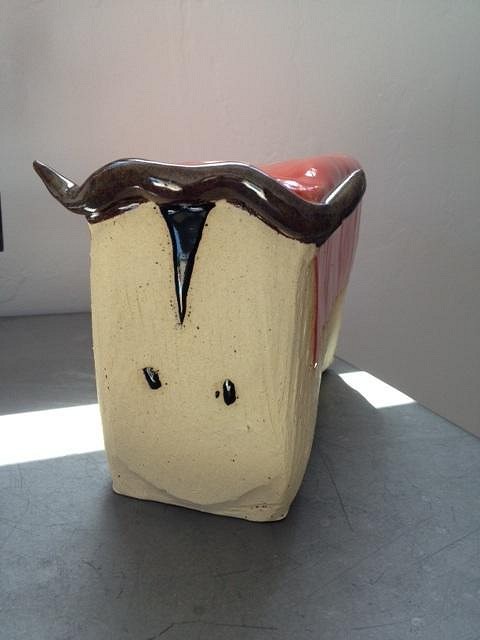
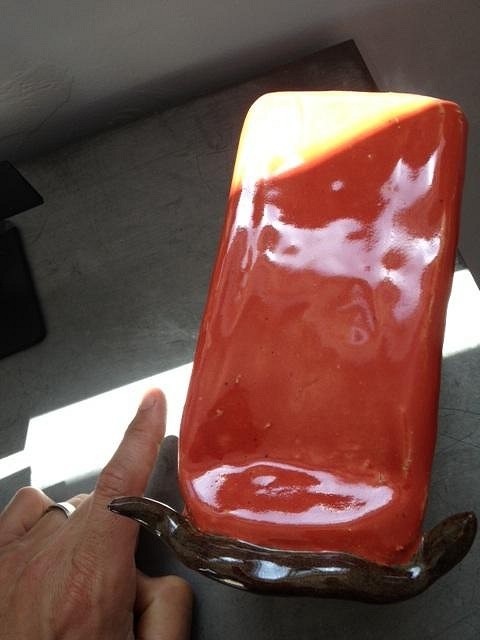
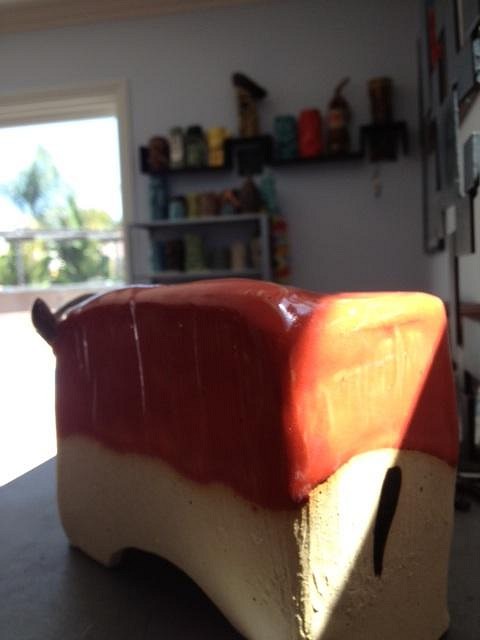
Along with the mugs, I was working on a ceramic piece inspired by a small sculpture I found in Palm Springs when I went out there for a wedding (unfortunately not for Caliente). While not tiki per se, it has elements that will be used in some future tiki-themed stuff. It's kind of a midcentury stoneware water buffalo. Tried to keep it w/simple lines. I like the unglazed + glazed combo, this style will be used in the Cannibal Art Swap bowl I'm working on, too (photos on that thread). |
|
T
TikiAno
Posted
posted
on
Mon, Jun 24, 2013 3:40 PM
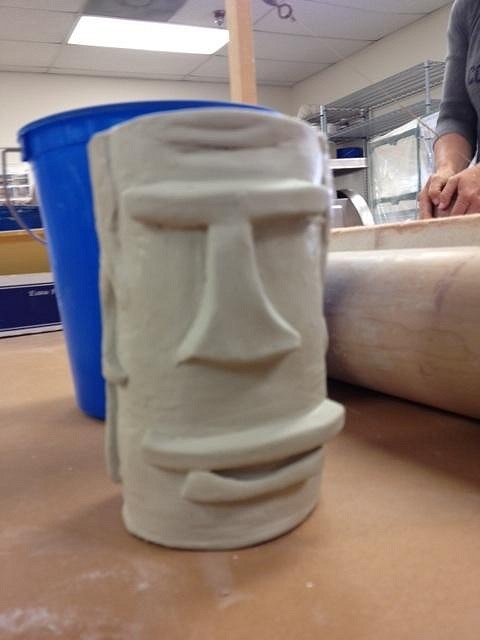
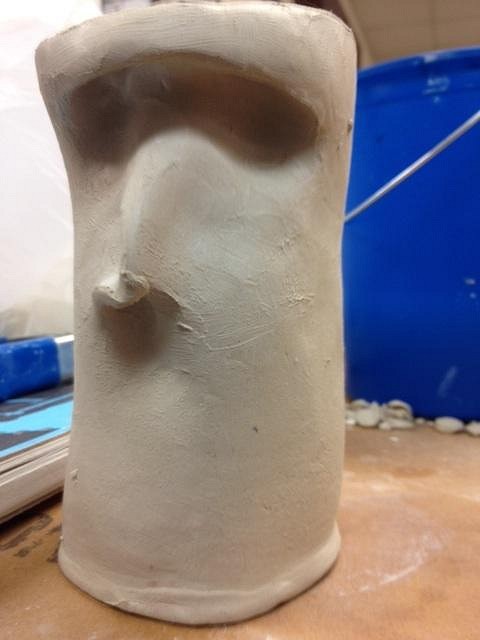
New Moai started, Method 2.0. I've been having fun throwing but realized it would be near impossible to start the next Moai with a thin cylinder- I needed a little more "meat" to work with. I'm building it via addition (of clay). I started w/ a pieve of wide PVC wrapped in newspaper, rolled a slab around it, then added more clay to build out his brow and features. AFter a bit of work it looked like: |
|
L

lunavideogames
Posted
posted
on
Mon, Jun 24, 2013 3:49 PM
I like that bowl with the silver legs. Very cool! Must have found some good glaze for that one. |
|
V

VanTiki
Posted
posted
on
Mon, Jun 24, 2013 5:04 PM
My hand-built mug method of choice! I do this for any cylinder larger than 4" in diameter. For anything less, I can usually get away with just rolling the clay without a support form. Loving your mugs! Henrik "VanTiki" |
|
H
hang10tiki
Posted
posted
on
Mon, Jun 24, 2013 8:48 PM
Lookin good Jon |
|
T
TikiAno
Posted
posted
on
Wed, Jun 26, 2013 9:33 AM
luna, thanks- the silver glaze worked out. Not food safe, so unfortunately not for any mugs. Henrik, thanks so much! I like this method as well- though I keep trying different ones! (why???) Jon, thanks! |
|
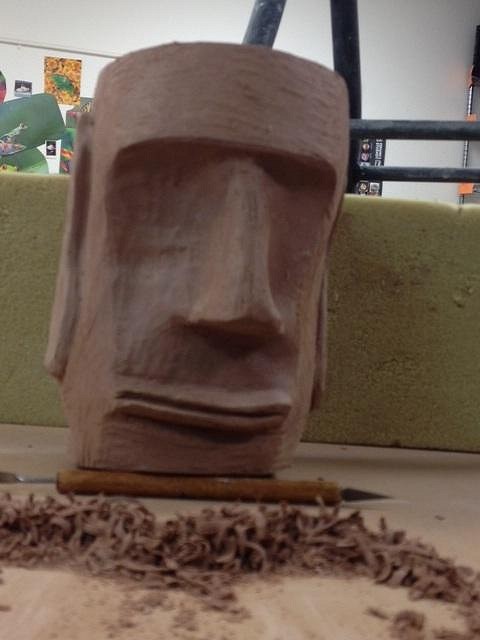
T
TikiAno
Posted
posted
on
Mon, Jul 22, 2013 7:32 PM
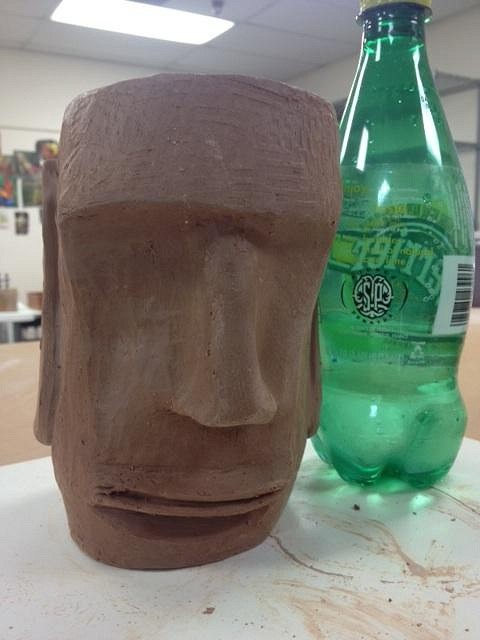
More progress on a Moai getting carved up today- I'll call him (for now) "Off-Kilter Moai." Shaved off a good amount of clay/ weight, evening up and balancing out his facial features and thinning out the mug (in all the right places). He's leaning a bit to the left (his left, that is)- not unlike a dog who's giving you that "what are you talking about?" look- a little angle to the nod. He's a bit larger than some of the last Moai work I've done- the last photo gives a bottle for height comparison: He has a bit of stone-texturing going on, look forward to glazing this guy. I also finished up the latest Art Swap Anthropologist Soup Bowl (Cannibal themed for the Swap)- there's lots of photos on that thread- here are a few details from the final piece (sorry for the re-post of some of these): |
|
T
TikiAno
Posted
posted
on
Mon, Jul 29, 2013 3:19 PM
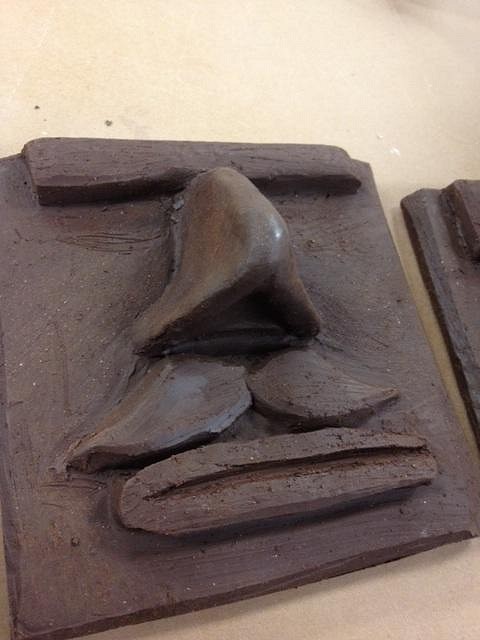
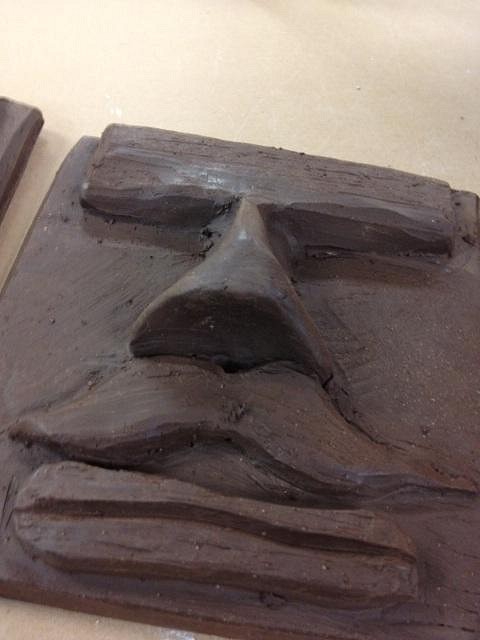
Decided to work on a few new 'Stachetiki tiles, this time w/ that black clay. Made two slightly different from one another. They're trimmed up and will hopefully get bisque fired later this week. I know, mustaches may not be the most traditional design feature, my apologies.... Thinking about glazing the entire facade except for the mustache, which would leave it a flat black color... though not sure yet.
Also trimmed more of the leaning Moai. His face is slightly scrunched up, and leaning not unlike a dog who's trying to understand what you're saying (w/ its head cocked to one side). I get this look a lot from both of my dogs. |
|
G

GROG
Posted
posted
on
Mon, Jul 29, 2013 4:55 PM
If he's still wet enough, bump his bottom down (GENTLY!!) on the table on the side that's too high up, so that it flattens that side more so that he's more straight up. And when he dries, you can sand some off the bottom to make him stand straighter. Or you can always add some clay to the low side. |