Tiki Central / Tiki Carving
neo - gope
Pages: 1 5 replies
|
M

ManoKoa
Posted
posted
on
Fri, Dec 2, 2016 5:31 PM
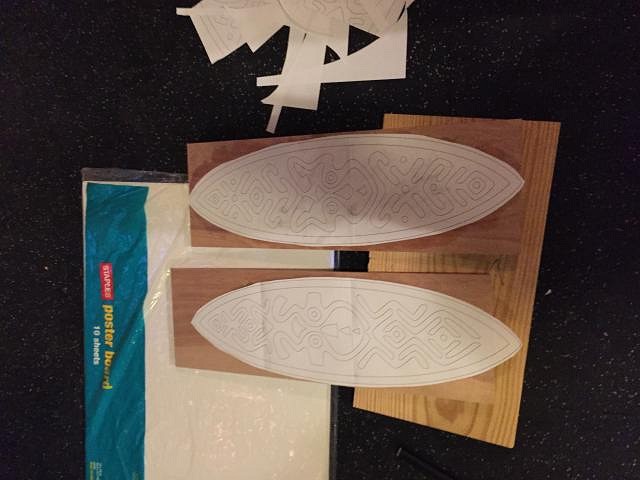
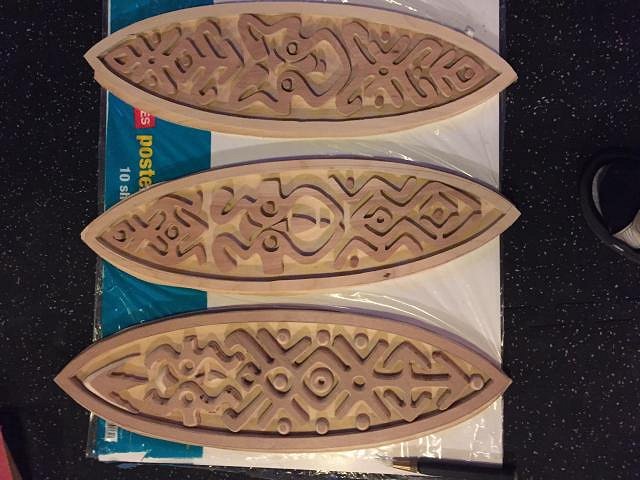
Aloha ka'kou! Hi everyone - It has been a long time since creating anything and even longer since posting on this site. I've got a lot of ideas about projects in my head. Not all are tiki related. From those that are, some have made it to paper, and even fewer into production. My latest project is a few versions of the PNG gope board. I'm trying to pay some respects to the design but less towards reproducing the "artifact" quality with inspiration coming from Pacific spirits through visions and dreams. Sorry for the picture quality. The pieces are 8"x24" and made from plywood using scrollsaw. I tried different techniques with the color as I wanted experiment with varying degrees of wood grain display. They are not quite finished yet but almost there. Please share your thoughts. I would love to see if these ideas are accepted in the tiki community because there are a lot more where these came from. MAhalo!
|
|
H

hang10tiki
Posted
posted
on
Fri, Dec 2, 2016 5:45 PM
Very kool |
|
H

hiltiki
Posted
posted
on
Sat, Dec 3, 2016 9:24 AM
Can you show some step by step pictures of your techniques. Nice pieces by the way. |
|
M
ManoKoa
Posted
posted
on
Sat, Dec 3, 2016 4:18 PM
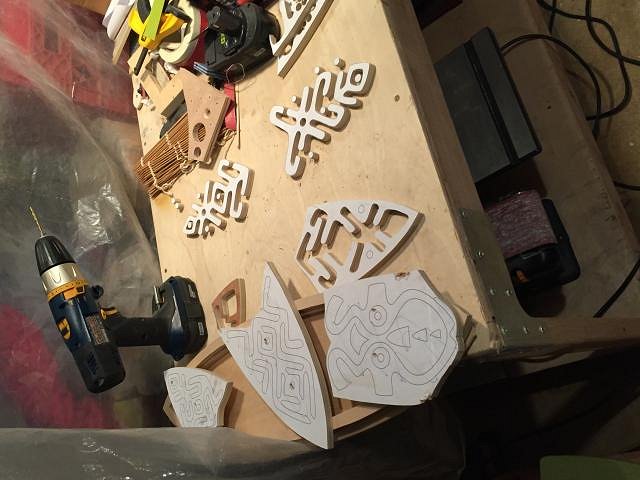
Here is what pics I have and a timeline. After many pages of drawings in the sketchbook, I settle on a design I am happy with, then I scan it into the pc and use Adobe illustrator to trace, make a vector file, then print it out. Since the idea was to make it 8"x24", I had 3 pages I spliced. Then I stuck the printout to the 1/2" plywood board using rubber cement. I used a bandsaw to cut the outside, jigsaw to cut out the inside, then scrollsaw to cut out the actual design pieces. I used another layer of 1/4" plywood as the background which I cut slightly larger than the board outline that the pieces and outline will be mounted to. Then you see it almost finished in my 1st post, I used 4 layers of black stain on the black parts. The red is a stain/sealer combo which I'm not happy with. For the next one I'll do, I'll look for a red stain and after I'm happy with the color, then use a gloss sealer. What's next I'll use a layer of gloss on everything except the white then attach all the pieces to the background then attach mounting hardware. For any further details or questions, please ask. I'm happy to share anything except the actual design and vector files. I encourage the creation of which to be made highly personal.
Be excellent to everyone . . . Mano |
|
C

cy
Posted
posted
on
Sat, Dec 3, 2016 7:13 PM
Very cool ManoKoa! |
|
M

MadDogMike
Posted
posted
on
Sat, Dec 3, 2016 9:17 PM
Very nice, welcome back to TC - hope to see more. |

Pages: 1 5 replies