Tiki Central / Home Tiki Bars
Lagoon of Mystery
Pages: 1 2 3 4 5 6 242 replies
|
PP

Prikli Pear
Posted
posted
on
Mon, Nov 4, 2019 9:17 AM
Skip, I looked at those images, and read your thread with the book recommendation. I suppose I was imprecise with my wording. What I meant was that I could find no reference how the jade tiles were tied and knotted to hide said knots from view. I hadn't see those Japanese lashing techniques, though, so thanks for that ('tis a problem searching on Google when one doesn't know the proper terminology! :wink: ). Square lashing's what I've been trying to suss out to hide the wire ties. The diagrams will come in handy. |
|
T

tikiskip
Posted
posted
on
Mon, Nov 4, 2019 1:25 PM
Looks like you kinda did in a way that looks like the way they did it. All looks great. |
|
BS

BIG SMOOTH
Posted
posted
on
Tue, Nov 5, 2019 3:36 AM
Wow those jade tiles look absolutely fantastic! Wonder if I can find Any here in the U.K?! They would look amazing hung up in my bar window! Tho I don’t fancy paying the postage! Thanks for the step by step on hanging them. This will really help people out! |
|
T
tikiskip
Posted
posted
on
Tue, Nov 5, 2019 7:08 AM
"Wonder if I can find Any here in the U.K?" Since you see these jade tiles in Asian restaurants and other Asian type buildings a good place to start looking for these jade tiles would be in your local China Towns, every place has em. We go to China Town when we travel as they are awesome, we never feel welcome so be ready for that, and for the most part they will say they don't understand English if you ask for something but you may see them in a store. If nothing else you can see how they were used in buildings long ago and heck China towns are cool even if 75% of the people you see don't want you there. My brother in law who lived in New York would not go to the China town there I think he thought it not safe, we did leave when we saw a dozen police cars role in around dusk. |
|
J

jimsflies
Posted
posted
on
Tue, Nov 5, 2019 6:27 PM
I've never seen the yellow tiles. I like those a lot. [ Edited by: jimsflies 2019-11-05 18:28 ] |
|
H

Hamo
Posted
posted
on
Tue, Nov 5, 2019 7:43 PM
Cheeky Tiki has some: https://cheekytiki.com/?s=jade&post_type=product |
|
H

HopeChest
Posted
posted
on
Wed, Nov 6, 2019 9:21 AM
The only place I've seen them was in pics of an old Trader Vic's, never in person. They must be rare as hen's teeth. |
|
T
tikiskip
Posted
posted
on
Wed, Nov 6, 2019 12:10 PM
Those were from the kahiki as shown in the warehouse. Don't know who wound up with those it was all sold in a huge lot and then some was split from said lot after that. |
|
BS
BIG SMOOTH
Posted
posted
on
Wed, Nov 6, 2019 5:37 PM
Skip, Hamo thanks for the info guys. |
|
W

wentiki
Posted
posted
on
Sun, Nov 10, 2019 4:26 PM
I have yellow, brown, and green ones from the Kahiki but it was probably only a part of the lot. |
|
T
tikiskip
Posted
posted
on
Mon, Nov 11, 2019 12:23 PM
Ha! Got a good idea where that came from. Never saw the brown ones before, there were none in any of the sales. |
|
PP
Prikli Pear
Posted
posted
on
Sun, Mar 15, 2020 8:11 PM
I've been futzing around with the lighting in the Lagoon of Mystery since day one, practically, but by late last fall it was time to bite the bullet and abandon my ad hoc setups and get everything hardwired in. Inside the house, next to the doors outside, was a bank of four switches, one of which we could not figure out what it controlled. I climbed into the attic, found its wire, and followed it all the way back to the secondary fuse box in The Wife's studio, where it simply ended. At some point it had controlled something, but the previous owners simply cut it and let it dangle, unconnected to any circuit. This suited my purposes just fine. I installed a new breaker and now had a dedicated switch for the majority of the lighting in the Lagoon.
Of course, that meant I had to actually wire everything. October in Texas is supposed to be cool, but working in the attic was brutally hot. For each light in the bar below, I had to install a junction box and wire in a pigtail connection. With frequent breaks, this took several days.
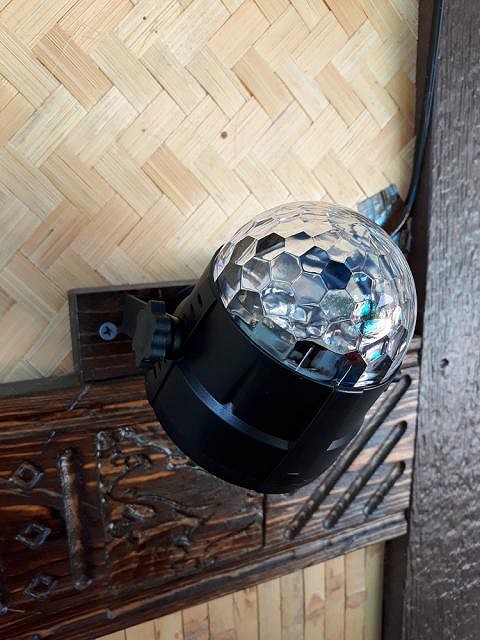
The LED wave projectors were simple plug-in models, so I cut off the plug and spliced the cord to a longer wire to get the necessary length for each unit. I used multiple layers of heat-shrink insulation sleeves. I'd never worked with this stuff before, but it didn't take long to get the hang of it. Now, the whole cord was protected from the elements.
At this point, I ran into the biggest drawback to my piecemeal build-along approach. I'd bought three LED projectors two years back, when I was first getting started and only had a 20' section of the Lagoon built out. I needed six more to finish, but that model had been discontinued and replaced by an "improved" version. The new version was problematic for me for many reasons, but the biggest was that they were now DC, and used an AC adapter that I couldn't hardwire. This led to my ordering from Amazon, Ebay and AliExpress a number of different LED projector models to test out their suitability. I'd thought I'd found a perfect solution from China, with a model almost identical to my existing one that only projected blue light. Since I'm simulating waves/ripples on the ceiling, this would be perfect. Alas, their "blue" turned out to actually be purple. I finally found the dome models, below, which projected a light color and wave pattern close enough to my existing projectors to work. But guess what? These have been replaced by an "improved" model as well that is unsuitable for my needs. This means if any go out, I've got to start the whole process over again to find a replacement. Sheesh.
To mount the projectors, I cut some scrap boards into 4" lengths, stained them dark and drilled a hole in the center for a screw, which I secured with epoxy.
I then mounted the base to the wall with screws, and used washers and a nut to fasten the projectors in place via the mounting brackets they came with. The power cord was subsequently hidden beneath a half-round piece of bamboo trim. The classics never go out of style!
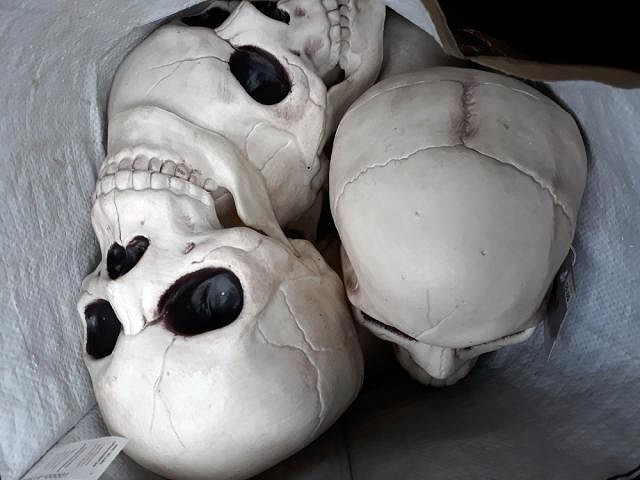
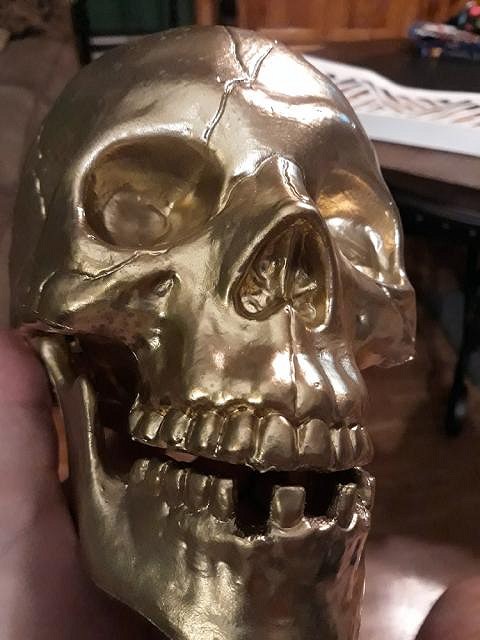
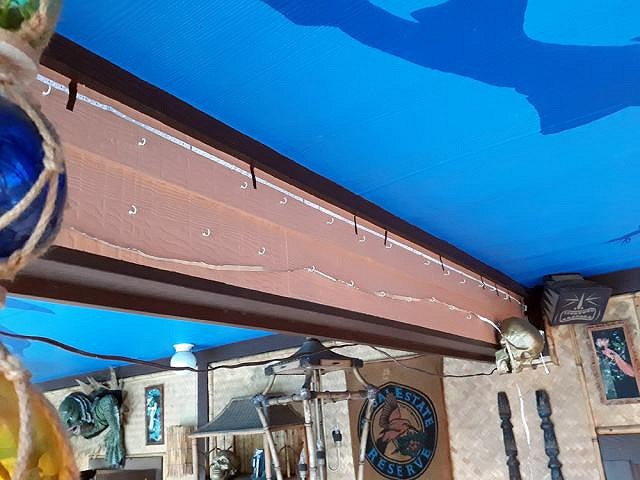
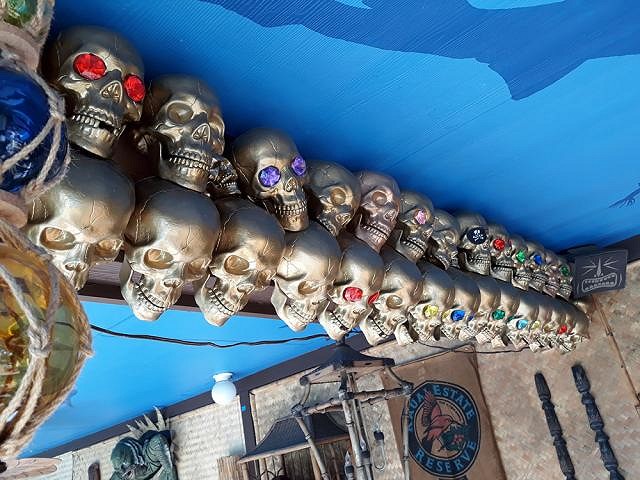
My lighting ambitions weren't limited to the projectors, though. The first tiki bar I ever visited was Pilikia in Dallas. It was mediocre at best, and there's a reason it is now gone. But they had some decent decor, and one thing that impressed me was the wall of golden skulls they had. I thought that was cool. So I decided to make my own version to cover a beam that interrupted the ceiling. For two consecutive Halloweens I raided the clearance bins, buying up a certain type of plastic skull from area stores.
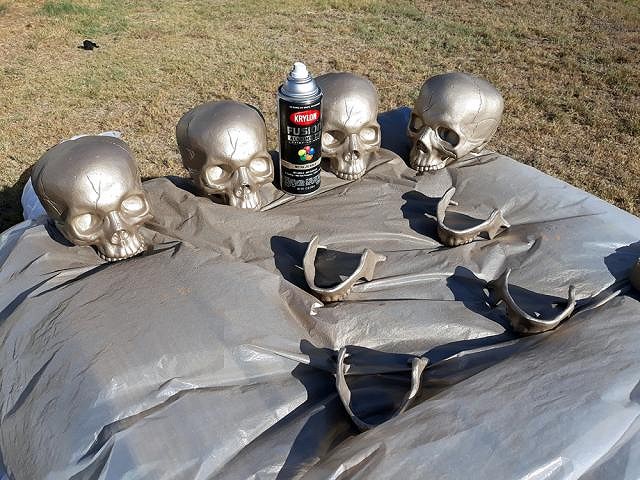
I amassed something like 35 before I was done. Then I spray painted them all gold. I actually used two different shades of gold, one of which was somewhat brassier, for variety. Since the skulls would be outdoors, painting them also had the added bonus of protecting the plastic from UV damage.
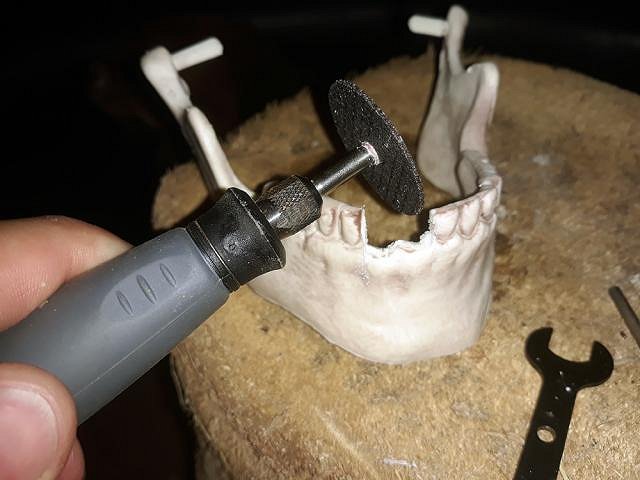
They skulls had detachable jaws. I used my Dremel to cut away random teeth, adding additional variety to them.
Smile!
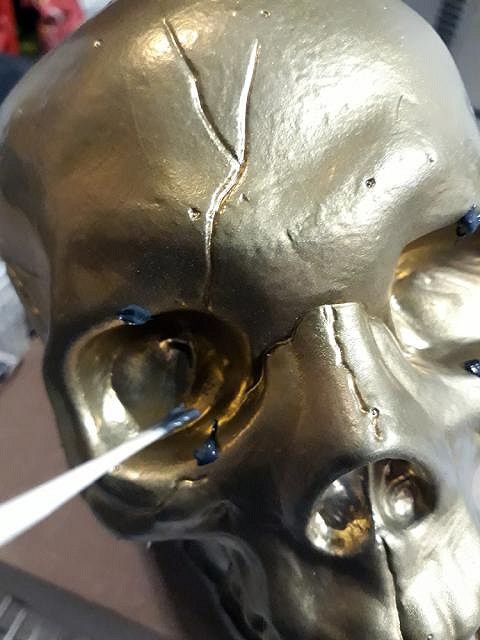
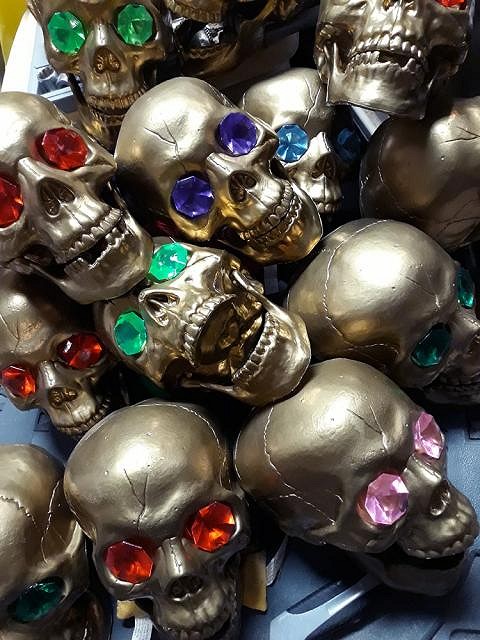
Gold skulls were cool and all, but I wanted a little extra. I applied some epoxy to the eye sockets.
Then I inserted plastic gemstones for eyes. There's a bit of Goonies here I suppose, but the real influence is that 1977 Disney movie The Rescuers. Remember the big ruby the little girl was forced to retrieve from that skull in the cave? I guess it made an impression on younger me. Anyway, I think the end result looks pretty cool.
I drilled holes in the backs of the skulls, then epoxied eye rings in place. There were a lot of them to do.
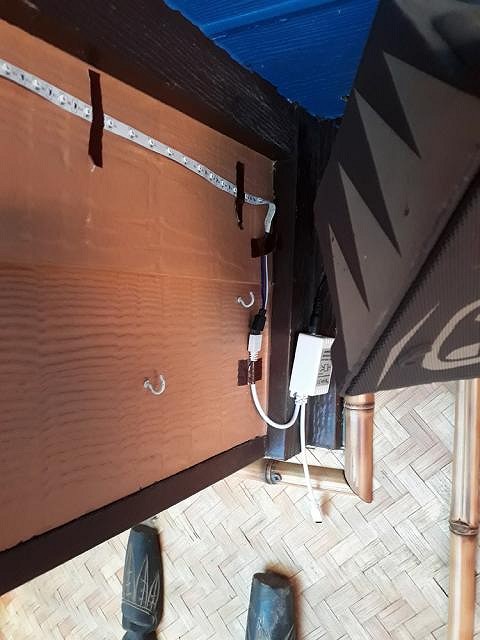
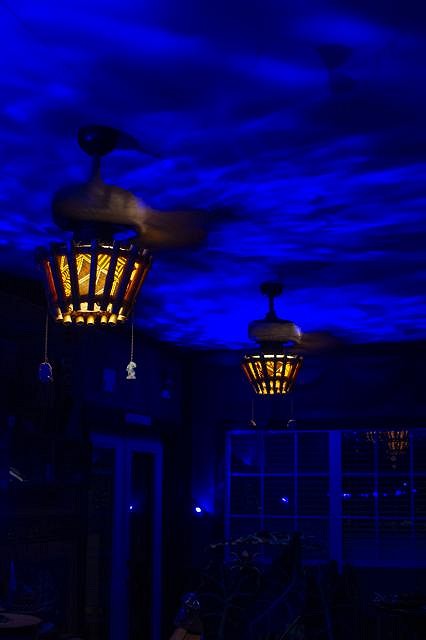
Next, I wired the LED strip lights into the main lighting circuit in the attic. The LED strip light was actually had an AC to DC converter plug that gave me trouble with the projectors, so I couldn't actually hard wire it. Since this was right up against the ceiling, I was able to install a wall socket in the attic and the plug was long enough to reach. Inelegant, but it worked.
The LED tape light had "adhesive backing" that was so weak I ended up using pieces of brown duct tape to hold it in place. The LED strip was long enough to stretch the length of the bean all the way across and back again. I installed two rows of cup hooks from which to hang the skulls.
Then I hung the skulls in place. There were a few gaps, so I took a few miniature skulls I had, painted them gold as well, and stuck them in the gaps. What I'd really like to do is get some fake monkey skulls, paint gold, and set them in the gaps. Alas, monkey skulls aren't that popular outside of VanTiki mugs, so I'm going to have to pass on that idea until more affordable options come my way.
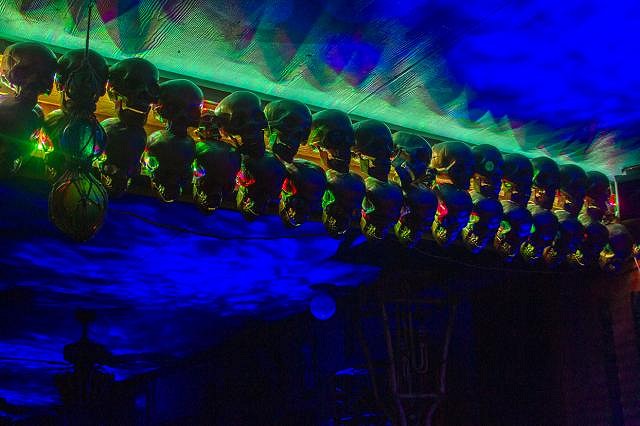
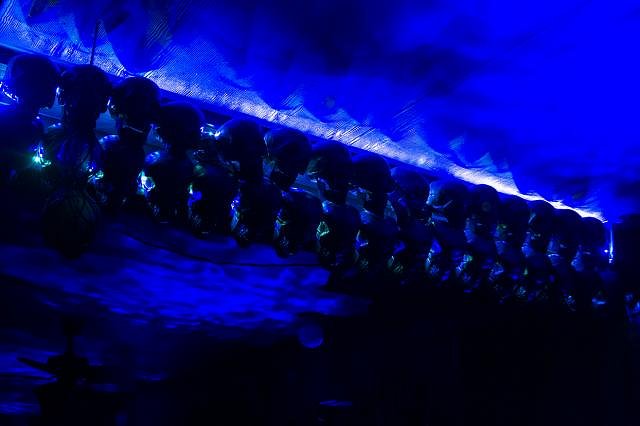
And here is what the skulls look like with the color changing LEDs backlighting them at night.
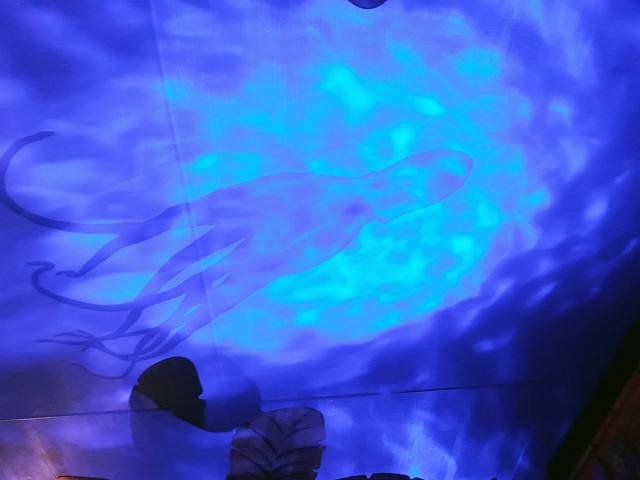
Here is the effect the LED projectors have on the ceiling. Try to imagine this ripple pattern in continuous motion.
And the ripple projectors juxtaposed with my pans and tapa light covers.
Thanks for checking out my work! A more exhaustive writeup may be found on my blog for those interested in such things. |
|
M

MadDogMike
Posted
posted
on
Mon, Mar 16, 2020 1:15 PM
Very cool Jayme! I have one of the dome LED projectors in orange/red to project on my big rootball Tiki. I like the monkey skull idea, this would be fun to do with monkey skulls |
|
PP
Prikli Pear
Posted
posted
on
Mon, Mar 16, 2020 8:21 PM
Oooh, great idea, Mike! Can we expect to see something of that nature emerge from your magical kiln in the near future? |
|
PP
Prikli Pear
Posted
posted
on
Tue, Mar 24, 2020 5:51 PM
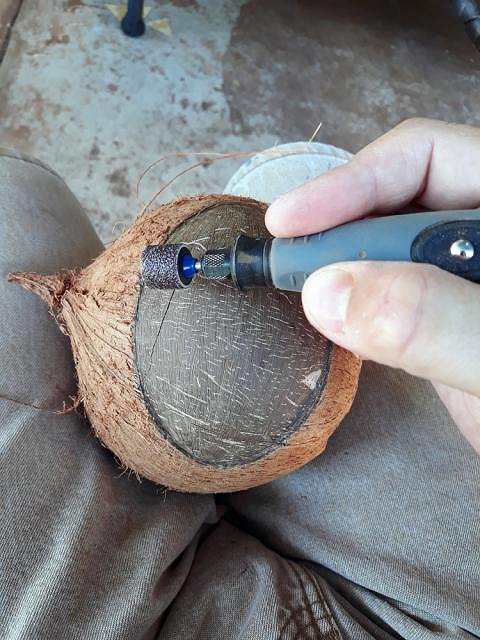
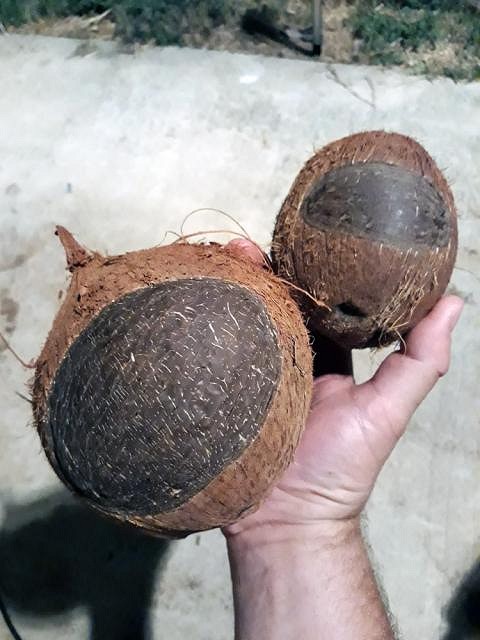
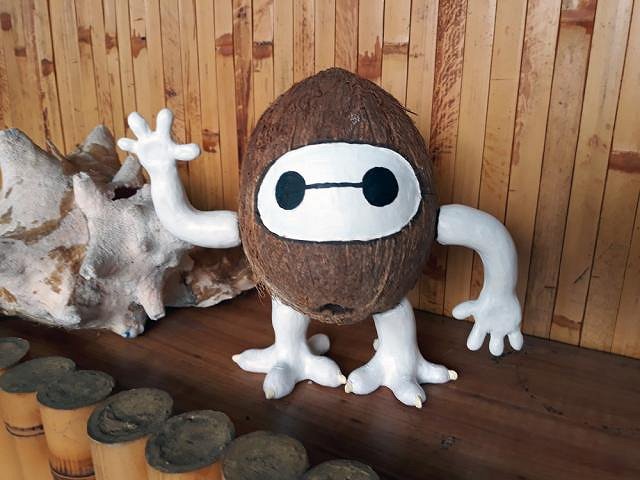
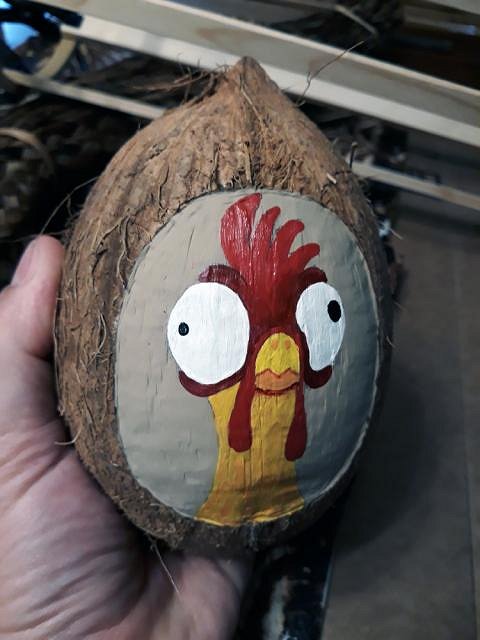
I'm making new decor for the Lagoon of Mystery. I, like many here, got a kick out of the Disney animated film Moana, and loved the Kakamora, described by Maui as "murderous little pirates." Surprisingly, the Disney money machine never got around to making actual coconut-sized versions we tiki folk could buy. Tiki Rob makes some amazing Kakamora mugs, but sadly those were out of my price range. So I decided to get some actual coconuts and make my own. Not knowing how didn't stop me--I'd figure it out as I went along. Step 1: Get some coconuts. Step 2: Use Dremel cutting bit to carve away the rough husk in the face area. Step 3: Use Dremel sanding attachment to smooth the face area. This could be accomplished using carving knives, chisels and sandpaper, but since I had the Dremel, why work harder than necessary?
Did you know coconuts come in different shapes and sizes? I hadn't paid that any attention prior to this project. The shape and size of the coconut influences the Kakamora face design, don'tcha know.
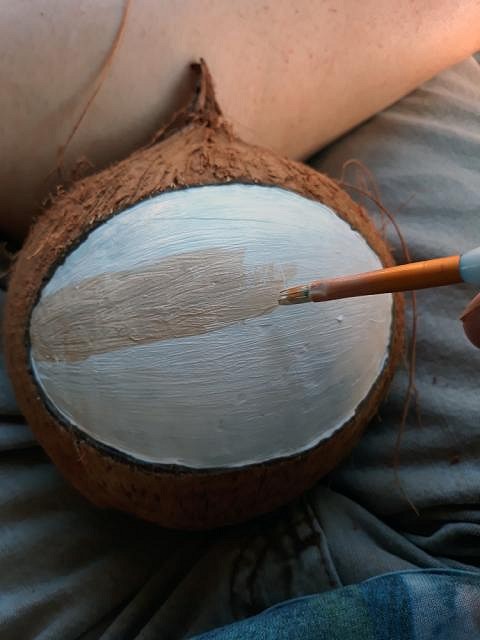
I put down a base coat of white, then a topcoat of tan to match the look from the movie. I used acrylic paint because 1) acrylic's cheap and 2) being water-based, it's easy to clean up after.
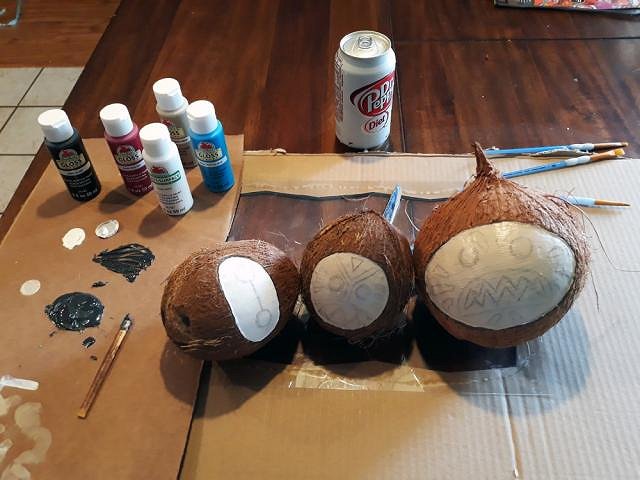
Once the paint dried, I sketched in faces. Then I painted. In the movie, the Kakamoras all had red war paint, but I wanted to put my own spin on it, so I thought I'd do each one in a different color. To further distinguish mine, I'd match their limbs with that war paint color (in the movie, all the Kakamoras have magenta arms and legs).
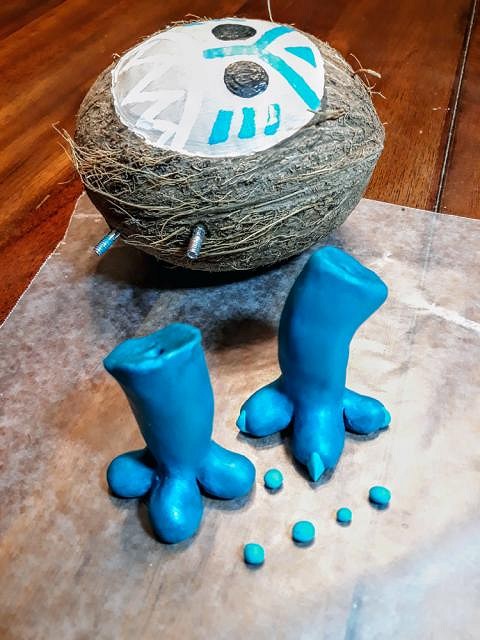
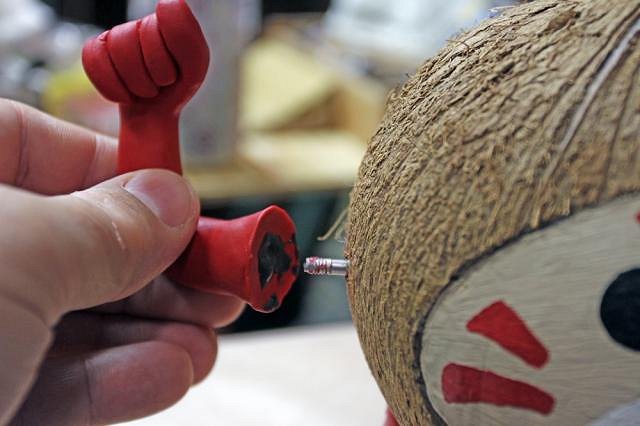
Ah, such grand plans are easier said than done. I had no idea how to make the limbs. I finally settled on using Sculpey polymer clay. I've never messed with clay or sculpting. I had no idea what I was doing. I cursed a lot. I started out with Sculpey III, which turned out to be too soft and mushy for my liking. Eventually, I switched to Sculpey Premo, which I liked a lot better. The feet of my Kakamoras went through something of an evolution to give the assembly more stability. They don't look much like those from the film. So be it. After more trial and error, I figured out the best way to attach the limbs to the coconut was to screw hanger bolts into the coconut where said limbs would go, press the still-soft limbs into place to the bolt would leave a socket, then bake the Sculpey limbs. The Sculpey III limbs I made always overcooked and came out singed. The Premo limbs came out perfect. I also mixed small amounts of the colored Premo I had with some Sculpey III white to get lighter shades of clay for the toenails on the feet. I think that worked out nicely.
Once the limbs came out of the oven and had cooled, I mixed up some fast-setting epoxy and applied a liberal amount into the socket with a shard of bamboo I keep handy for such things.
Then I pressed the limb into place over the hanger bolt, holding steady until the epoxy hardened (six minutes in this case).
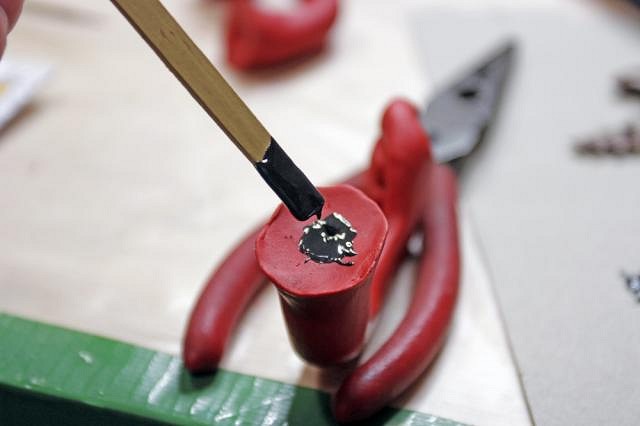
I also used bits of leftover Sculpey to make weapons. This spear point is epoxied to a bamboo skewer.
The serrated "shark tooth" look of the blades was achieved by shaping the main blade out of brown clay, then pinching a rope of white onto the perimeter. I used an Xacto knife to slice triangular wedges away, leaving the serrated edge.
Baymax was my proof-of-concept. My kids requested him because they love Big Hero 6 and liked his Kakamora cameo in Moana. I agreed because I figured he'd be easier than the others, and I was right. Even so, I made many mistakes with him. This is one of those projects where experience really is the best teacher. His limbs were all Sculpey III, and came out looking like overcooked marshmallows, so I had to paint them. I got better, honest.
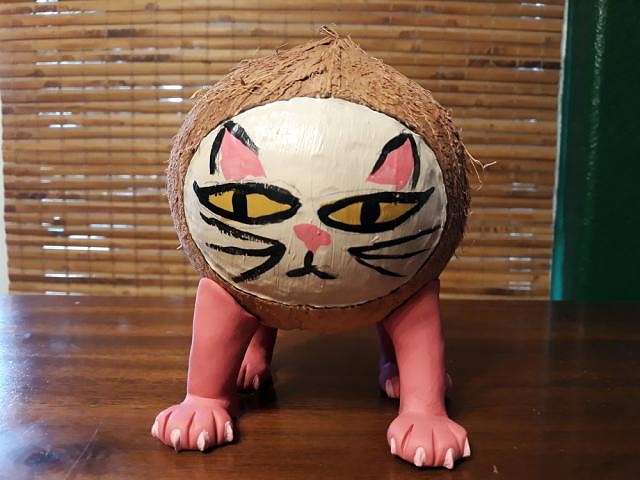
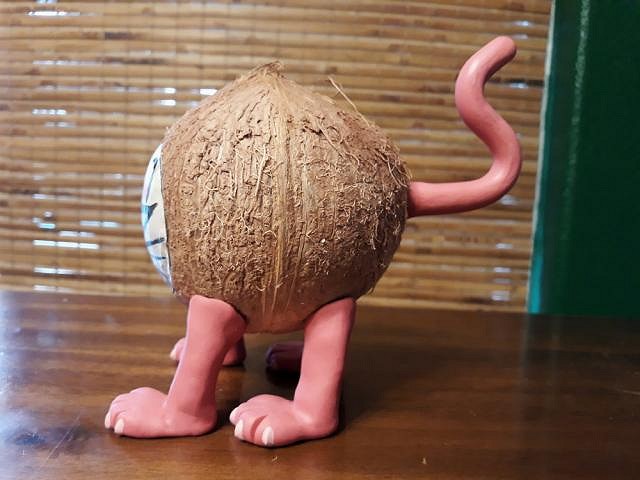
Also, I gave each of my family a blank coconut they could personalize. The Wife painted a pink cat face on hers. So I just went with it. I don't know if this counts as a Kakamora anymore.
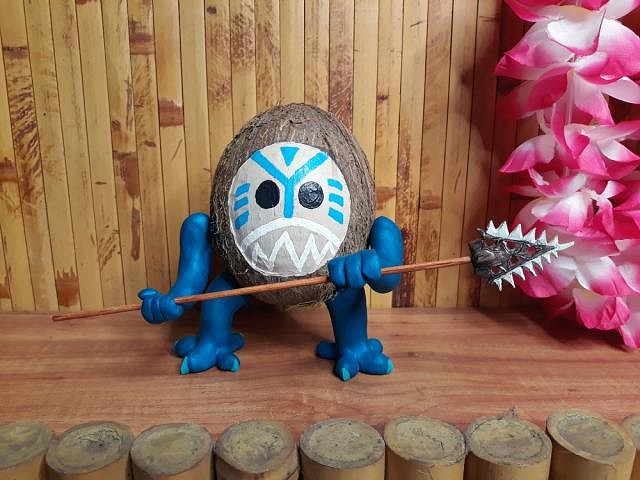
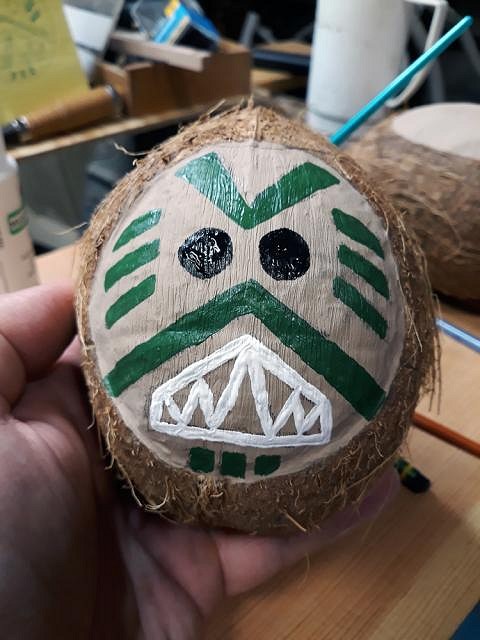
Other than those family ones, I started a couple more that still need limbs. There's a green one that's fairly traditional in design:
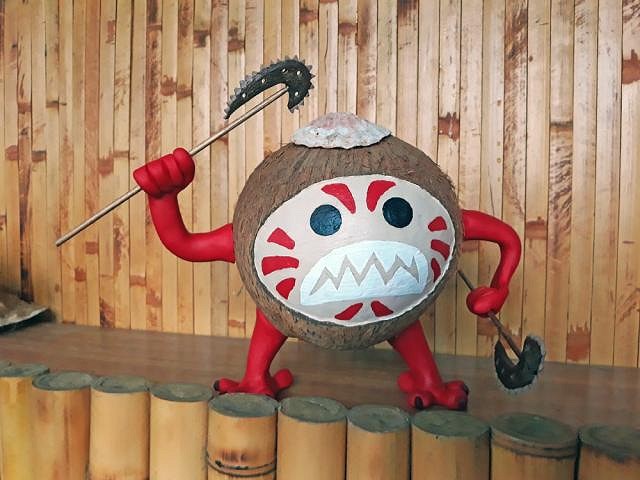
Then this. It's still Moana, right? Are self-referential mashups allowed?
As always, a more detailed step-by-step build-along may be found on my blog for those who are interested. |
|
M

MauiRose
Posted
posted
on
Wed, Mar 25, 2020 12:55 AM
Wow! Your creativity is blowing me away. Thanks for sharing all the photos. |
|
M

MaukaHale
Posted
posted
on
Wed, Mar 25, 2020 8:25 AM
I love people that want something and they just make it. |
|
PP
Prikli Pear
Posted
posted
on
Wed, Mar 25, 2020 12:08 PM
Well, you know what they say: Mother is the necessity of invention... no, that's not it, FRUGALITY! FRUGALITY IS THE MOTHER OF NECESSITY! :lol: |
|
PP
Prikli Pear
Posted
posted
on
Wed, Mar 25, 2020 12:18 PM
That's the hallmark of the tiki revival, isn't it? After 30-something years of being out of fashion, one couldn't just ring up Sea & Jungle or browse the Orchids of Hawaii website to deck out your home paradise. I mean, sure, Oceanic Arts is still kicking, but they're not exactly leaning into cyber Mondays, right? For the most part, we've had to scavenge and improvise. Unless you live in California or Florida, finding old tiki mugs or masks at the local Goodwill is a rare thing, indeed. You make it, or do without. There's a crazy amount of talent represented here on Tiki Central, most of whom happily share their knowledge. I'm just happy to give back what little I have to contribute. |
|
M
MaukaHale
Posted
posted
on
Wed, Mar 25, 2020 7:30 PM
I live in Colorado, I feel your pain. |
|
PP
Prikli Pear
Posted
posted
on
Wed, Mar 25, 2020 9:39 PM
Oof. Possibly more a tiki wasteland than Texas. Apart from the Outrigger/Trader Vic's in Denver, was there any other classic tiki in Colorado? Although on the upside, I doubt your liquor laws were as messed up as ours. :) |
|
L

LoriLovesTiki
Posted
posted
on
Thu, Mar 26, 2020 6:17 AM
Can I get some votes for NJ? Pretty sparse out these parts. Even NY kinda sucks, for a big city. |
|
PP
Prikli Pear
Posted
posted
on
Thu, Mar 26, 2020 9:09 AM
I think we can agree that the wasteland extends far, far beyond what any of us are comfortable with! |
|
M
MadDogMike
Posted
posted
on
Thu, Mar 26, 2020 9:27 AM
Love the Kakamoras :D And I'm a sucker for HeiHei. Isn't Sculpty fun stuff to play with? We'll see if I make the 3 monkey skulls, no many projects and so little time :( I'd rather do the 4 monkeys (4th one "Have no fun" with hands over crotch :lol: ) but that would require full body skeletons instead of just skulls. Sounds like a lot of work |
|
PP
Prikli Pear
Posted
posted
on
Wed, Apr 6, 2022 8:06 AM
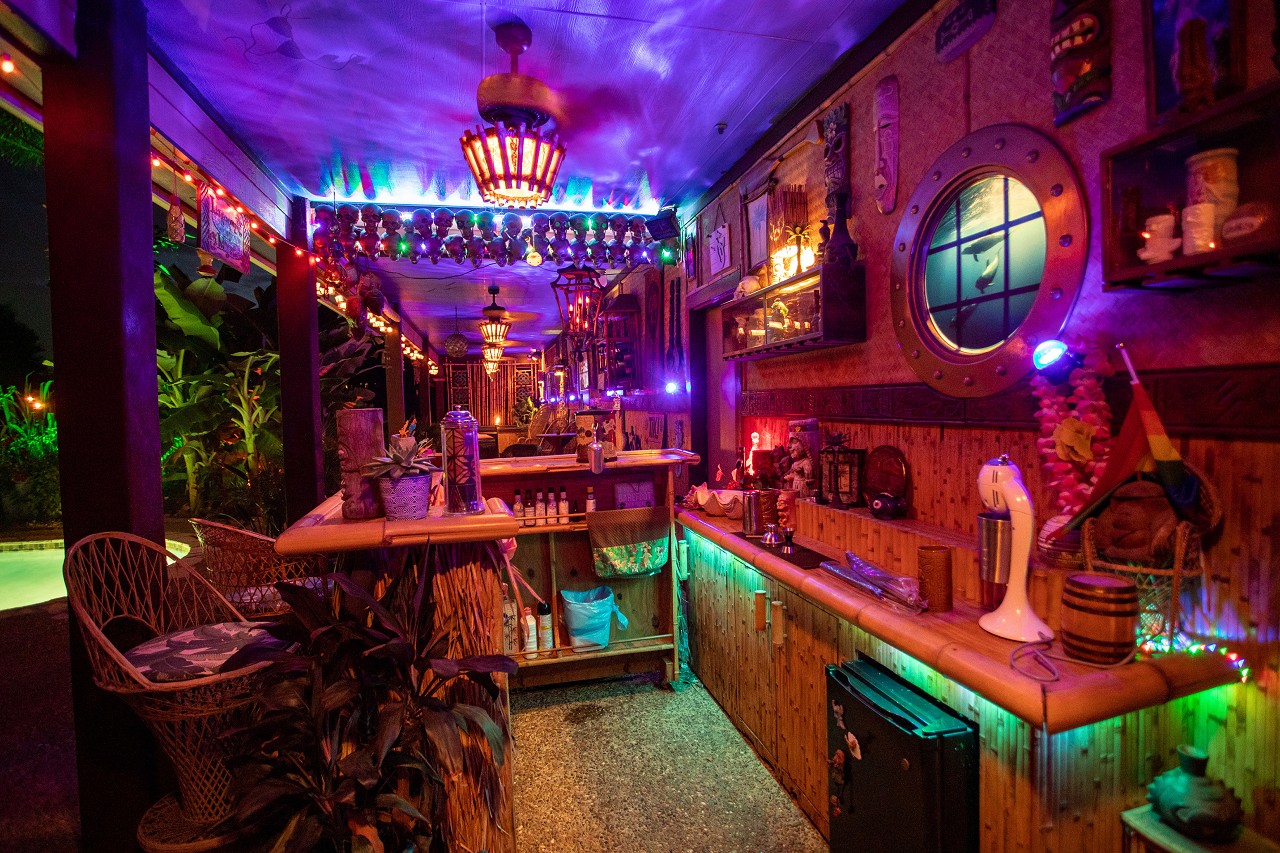
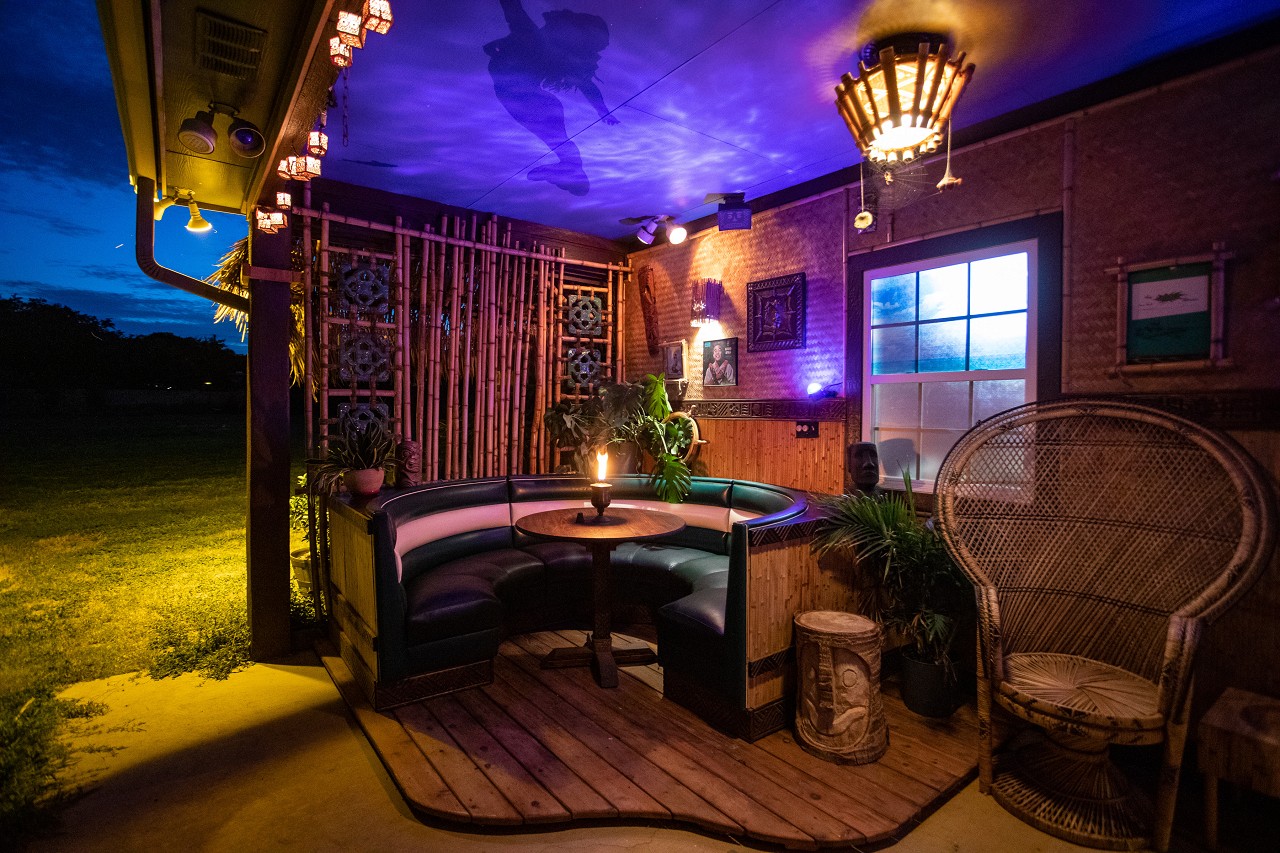
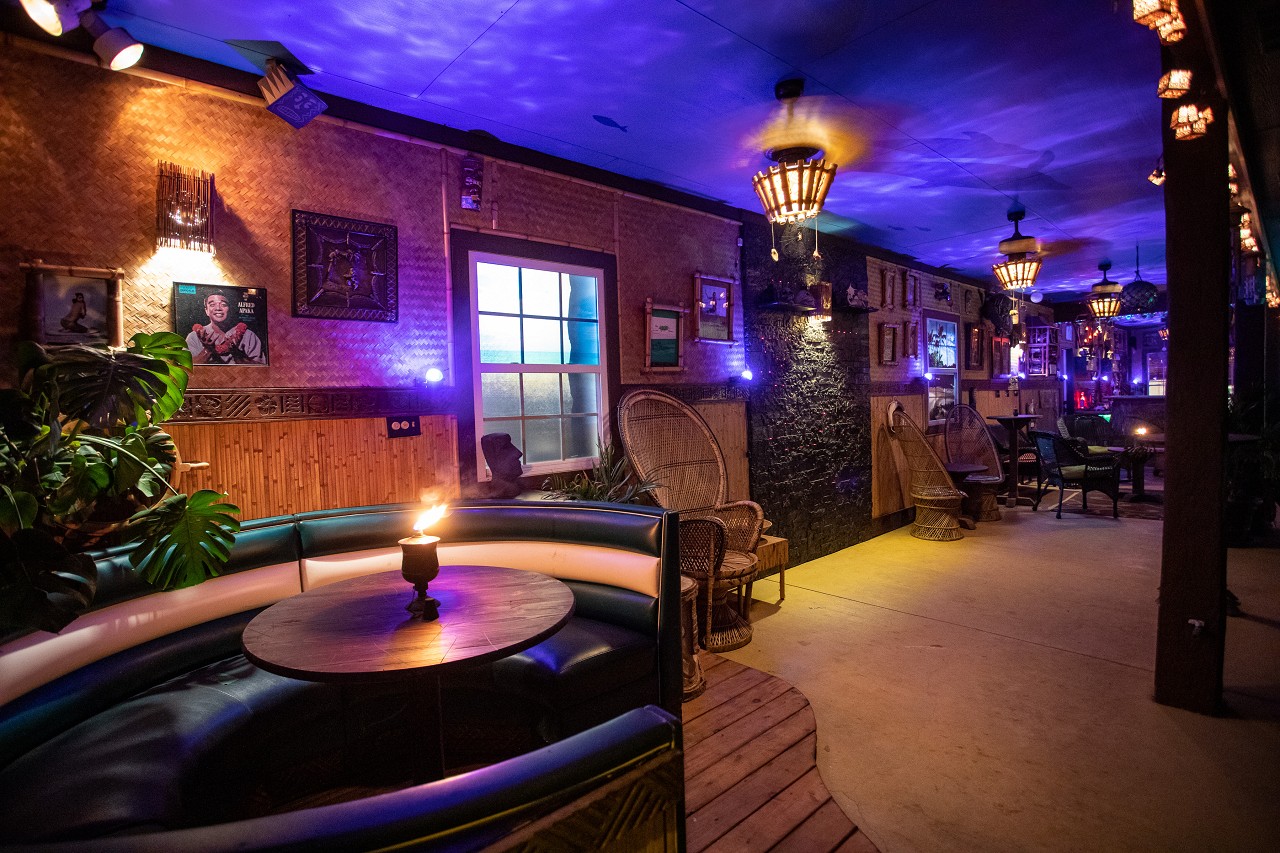
Yay! Tiki Central's back up and I'm back in! Here are some scenes of the Lagoon of Mystery. I've done some additional work on it whilst TC was on hiatus.
|
|
M
MadDogMike
Posted
posted
on
Wed, Apr 6, 2022 8:16 AM
Looks awesome!!! |
|
SF

Slacks Ferret
Posted
posted
on
Wed, Apr 6, 2022 9:05 AM
So nice! Mahalos a plenty for posting these pix! |
|
G

gooneybird
Posted
posted
on
Wed, Apr 6, 2022 3:31 PM
I love the booth (and the platform under it), but that last pic with the plants is amazing. |
|
PP
Prikli Pear
Posted
posted
on
Thu, Apr 7, 2022 8:02 AM
Thanks Mike! I suspect you've already seen some of these over on FB. Much appreciated, Slacks! Gooneybird, thank you for the kind words! Those plants (well, some of them, at least) are the reason we got into tiki in the first place. When we moved in, the pool already had several mature palm trees surrounding it. I added the bananas. That combination prompted The Wife to suggest we needed a tiki bar. It was a deep and twisty rabbit hole from there, but tropical landscaping has always been a big factor in the overall ambience of our space. Adding hardy and deciduous hibiscus brought a lot of tropical flair. Passion flowers are a perennial exotic. Root beer plants nicely filled in the space behind the waterfall. Loquats bring a faux-tropical evergreen into the mix. It's been a lot of fun--in recent years I've even added sugar cane to the mix! |
|
PP
Prikli Pear
Posted
posted
on
Thu, Apr 7, 2022 8:32 AM
Whilst Tiki Central was away, I was invited to be a guest on a couple of podcasts and hold forth on all manner of tiki-related subjects. A few months back David Phantomatic visited the Lagoon to record this episode of Marooned: A Texas Tiki Podcast Then last summer, Eric Kozlik invited me to be a guest on Modern Bar Cart. Both times out I said some things that made me sound like a dolt and a few things that made me sound like an insightful sage, but most of it falls somewhere in the middle. Enjoy, or not, as you choose. [ Edited by Prikli Pear on 2022-04-07 11:09:32 ] |
|
BS

bamboo stu
Posted
posted
on
Wed, Apr 20, 2022 7:01 AM
Fantastic work on this bar. I can only imagine the great parties you must have there. How do you keep all the decor safe and clean in the weather? Even in California weather my last outdoor bar took a beating, and the dust and spider webs were a constant battle. |
|
PP
Prikli Pear
Posted
posted
on
Wed, Apr 20, 2022 12:08 PM
Clean? Ha ha ha! It's pretty filthy at the moment--oak tree pollination season means everything is coated with a fine layer of yellow dust. Old dry banana leaves are accumulating under the chairs. This weekend, or maybe the next, we'll do a full clean out. That means sweeping, maybe even hosing down the floor. The tables will be scrubbed and wiped down. I do the vinyl of the booth with UV protectant and a mold cleaner to get those little black spots that've appeared over the winter months. The deck needs a coat of sealant, so that's on the agenda as well. Everything's mostly protected from direct exposure to the elements under the patio roof. Reflected UV is an issue, but not as bad as direct UV. Humidity's often high, but my stuff never actually gets wet, so the various sealants/topcoats on the rattan, wood trim, etc. are up to the task. The biggest thing is that when I started my outside build, I focused on using materials that would be more durable, such as woven bamboo panels instead of lauhala matting, paint instead of tapa, etc. All the displayed art are prints that can easily be replaced once they inevitably fade. The valuable art we have goes inside, where it's protected. A major contributor to the outside aesthetic is the tropical landscaping we've done. The palm trees are there year round, obviously, but the bananas, hardy hibiscus, sugar cane and passion flowers are all waking up from their winter slumber. This time next month the place is going to look lush. I'm a firm believer in letting the available space dictate the build, so if you're outdoors, then leverage that to the hilt. But back to your original question, once we complete the initial deep clean, regular use throughout the summer and fall keeps it in pretty good shape. Before parties we'll wipe down the tables with furniture polish and The Wife may walk through with a leaf blower, but overall maintenance is minimal. It's winter and spring that dump the most crap in there. |
|
S

SouthSeasKat
Posted
posted
on
Wed, Apr 20, 2022 11:57 PM
You've been such a help with and an influence on The Makuhari Club, because I've been following you through various means (not just TC) for years now, and your philosophy of "let the space dictate the build" and "do what you can, when you can, with what you can" has been much more... shall we say... approachable than some of the other Tiki space projects. You see some people going all in immediately and pulling a residential Bamboo Ben and you can just be like... "yeaaaaaah, don't have that space, that money, that time, or that permission." The results are amazing, but they can be demotivating if you aren't in the same place (physically, financially, mentally). |
|
PP
Prikli Pear
Posted
posted
on
Thu, Apr 21, 2022 7:53 AM
Ha ha! Yeah, I'd love to wave a magic credit card and have a fully built tiki space appear instantaneously! There's absolutely nothing wrong with that, and the bonus is that you get to enjoy it to the fullest, immediately! BUT--and this is something I wasn't expecting--my perspective has changed as I've done my build-outs. The Lagoon isn't finished--no home tiki bar ever is--but I've started working on an interior space as well. And I'm doing things differently, both inside and out, than I may have done five years ago. I've learned more about what works for me and what doesn't, but maybe more importantly my tastes have changed. Not radically, but there's been a distinct evolution. Visitors won't notice anything of the sort, but I can see it. That's interesting and surprising. It keeps things fresh and exciting, so that's a big plus for the take-it-slowly approach. |
|
L

littlegiles
Posted
posted
on
Sun, May 1, 2022 5:03 AM
Great to see your build back on here and can't wait to see more. I follow and watch the YouTube vids and have really enjoyed them. Keep up the great work! |
|
M
MaukaHale
Posted
posted
on
Fri, May 6, 2022 9:33 PM
I like what you have done. You have excellent skills for creating an escape environment! |
|
K

Kilaueakyd
Posted
posted
on
Thu, Aug 11, 2022 12:04 PM
in reply to MadDogMike
Slacks Ferret this is kinda my style. Love the way it blends outside. The walls are great. |
|
CC

Captain Cook
Posted
posted
on
Tue, Aug 16, 2022 9:24 PM
in reply to Prikli Pear
I appreciate this advice! Currently planning a tiki space in LA and been watching some of your videos. I think you did a great job with the Tapa lamp and I want to make something similar so thank you! Also your non-alcoholic cocktail videos are appreciated as it makes sense that people who don't drink still deserve the level of immersion that craft drinks presents. |
|
PP
Prikli Pear
Posted
posted
on
Wed, Aug 17, 2022 7:14 AM
Thanks for the kind words, Captain Cook! I confess I've grown lax in my detailed build-along posts as the YouTube thing is more time consuming than I expected, but it's fun in its own way. Also, if I'm going to make all of these mistakes, somebody ought to benefit from them! |
|
CC
Captain Cook
Posted
posted
on
Thu, Aug 18, 2022 12:24 PM
in reply to Prikli Pear
You're welcome, and certainly! It definitely seems like there's a lot of behind the scenes work in capturing your process on camera, even with your laid-back personality it's still time consuming! For that reason I feel lucky when creators like you share your process, as making the pieces themselves is already enough work. That being said, it's cool that your channel gives another voice on Youtube that is different from Spike's Cocktail Hour, his stuff is awesome too. Keep up the awesome sharing, and don't feel bad for taking needed breaks! |
|
PP
Prikli Pear
Posted
posted
on
Thu, Jan 5, 2023 9:09 AM
First time attempting to post images via phone. Let's see how this works... Yikes! Way too big. Okay, Noted for the future. Quick edits on the desktop and here we are with something more reasonable. Although I'm still doing stuff with the Lagoon, The Wife and I made the decision during pandemic (well, she made the decision and I wisely declined to argue) to convert the loft area in our home--which was previously used as a media room--into an indoor tiki space. Although Central Texas winters are relatively mild, December through February is not generally a pleasant time to hang out in the Lagoon and weatherizing it with portable heaters, etc., would be more trouble (and expense) that I really wanted to invest. So an indoor tiki annex it was. I've been collecting materials and prepping for the past couple of years, but over the Christmas break I took the big step of mounting lauhala matting to the walls (well, one wall thus far, but you get the idea.
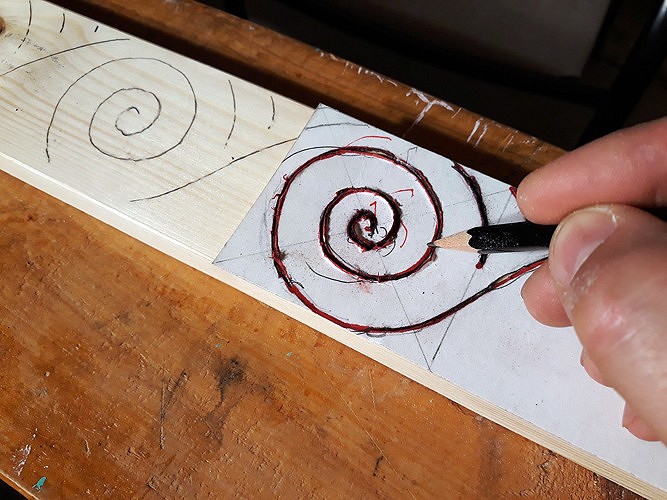
Folks who complain about the irregularity of lauhala aren't lying. I got this roll of matting more than a year ago and every dimension is "-ish." Nothing is square. Nothing is straight. It's very different to work with than the bamboo weave panels I'd used outdoors. Nothing quite looks like lauhala tho. Or bac bac. And I'm not using bac bac (yet). To cover the irregular seams I am power carving trim pieces. I did triangular patterns for the baseboards of the Lagoon and also this room, so am pretty sick of doing triangle patterns. Instead, I've opted for tiki spiral patterns. I've always loved this aesthetic but have avoided doing them because there's plenty of room for error as you can't cheat with a straight edge. I tried practicing some years back and the results were disappointing. This time I was determined to make it work, so I took a piece of cardstock, drew a freehand spiral pattern until I approximated what I wanted, then used a chip carving knife to slice holes through the pattern so I could use it as a stencil. I run a pencil through it and the marks on the wood give me a reference guide. It's not a rigid stencil so there's variation to the guide lines, but the important thing is the reference so my spirals aren't lopsided or bunched up. The proportions are consistent, and that's what matters to me.
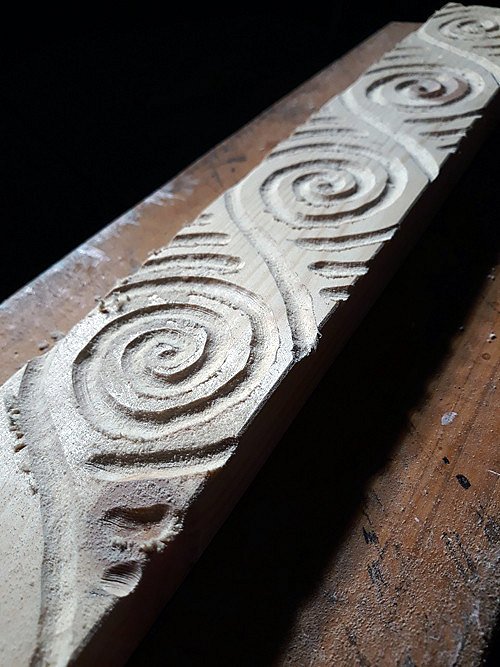
These are narrower pieces of wood I'm using for the trim, 1"x3"x8', so instead of the routers I've used for the baseboards I'm using my Dremel with a sphere burr from Kutzall to make the carvings. So far, so good. I've timed myself and learned that it takes roughly four minutes for me to power carve one full spiral. There are 27 of these per 8' board. You do the math. I am not fast. I am using the cheapest pine boards I can find. Knots are fine. Blemishes are okay. They just have to be straight--no hockey sticks. Finding those is more challenging than one might think.
Next, I will be applying the torch and wire brush, so stay tuned! [ Edited by Prikli Pear on 2023-01-05 09:33:20 ] |
|
T
tikiskip
Posted
posted
on
Tue, Jan 10, 2023 3:30 AM
I thought that was a plaster cast when I saw that carving first, then thought hey you could make that trim with a plaster cast. Your YouTube vids are great! Have always wanted to do a few. YouTube would be about the only way to show how I tie fish floats, or in person. The New Tiki Mag and more wanted me to do a piece in the mag on how to tie floats but only make it one page! Thank the guy who ran that Mag into the ground for that not coming out. I think he did Route 66 mag as well, that went out too, I see a theme here. Too bad. |
|
PP
Prikli Pear
Posted
posted
on
Tue, Jan 10, 2023 6:43 AM
Thanks, Skip! Now that you mention it, that light pine does look like it came out of a plaster cast. I know what you mean about Tiki Mag & More. I subscribed right as he turned into a ghost. Kinda annoying for someone just getting into tiki and looking to learn about the community. On one hand, I'm somewhat sympathetic as I've been involved in various ongoing publications/projects and know first hand how easy it is to get overwhelmed and disconnected, especially if depression is involved. On the other, if that's going on the proper course of action is to be open and upfront as opposed to denying there's anything wrong and making a whole bunch of publication promises you know there's no possibility of making. If I recall correctly, as late as 2020 he was posting that the new issue was ready to go to the printer and subscribers would see it within a couple of months. Obviously, that never happened. When the pandemic hit, everyone else learned to make sourdough and I learned how to post to YouTube. Not sure which is the more useful skill, but a friend had been urging me to start a tiki bar build podcast and I thought the visual aspect of YouTube would suit that topic much better. And I think it has. The downside is that it's time consuming and I've neglected my build-along blog posts during that time, which are useful references in their own right. Usually by the time I remember I need stills, the project's finished and screen captures look crappy. |
|
PP
Prikli Pear
Posted
posted
on
Tue, Jan 10, 2023 1:57 PM
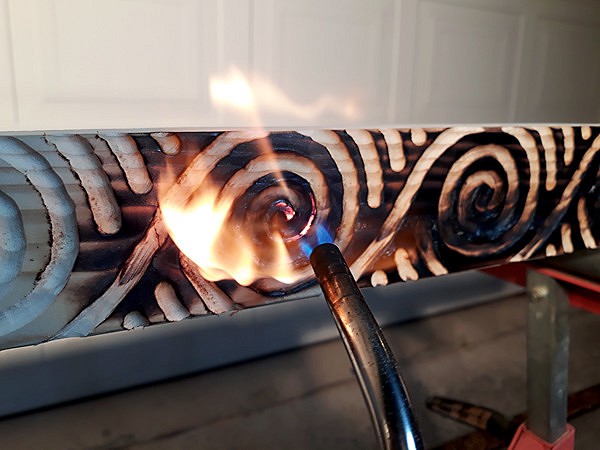
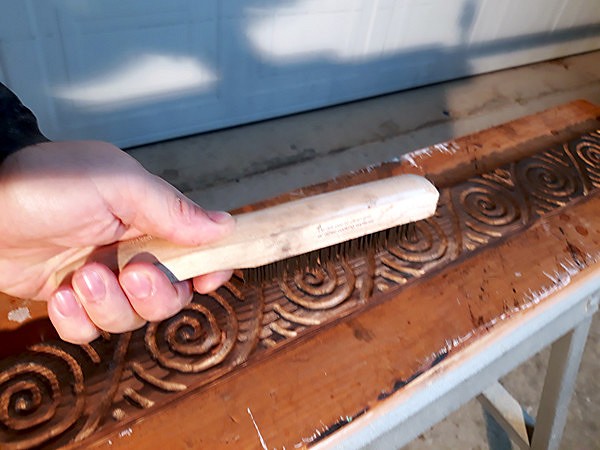
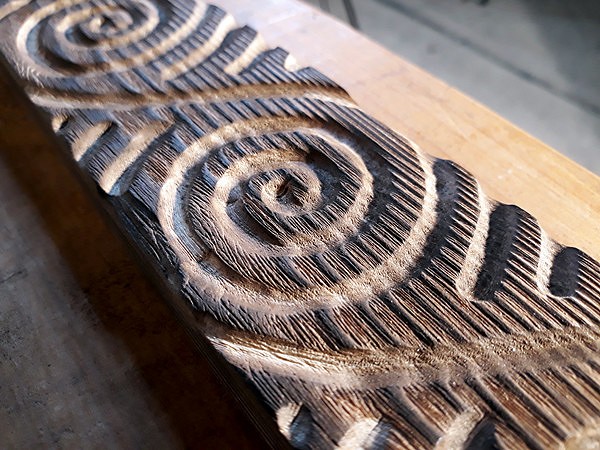
My work on the spiral trim continues to plod along. I know much of this has been posted elsewhere, but I wanted to recap the technique for any newcomers hoping to start on their own home tiki bar. Once I had all of the spirals routed out (or Dremeled out in this case) it was time to apply the flame treatment. I use a hand-held Berzomatic propane/butane torch. Nothing fancy, although I recommend those with built-in igniters. I set the flame on what might be considered medium-low and wave it back and forth over the wood until the top layer is evenly charred and the carved out sections are toasted enough to see browning in the wood. I also toast the sides of the boards, although this isn't strictly necessary.
This is how the trim pieces look when I'm finished torching them. I don't use a terribly light touch, but I don't turn it all into charcoal, either.
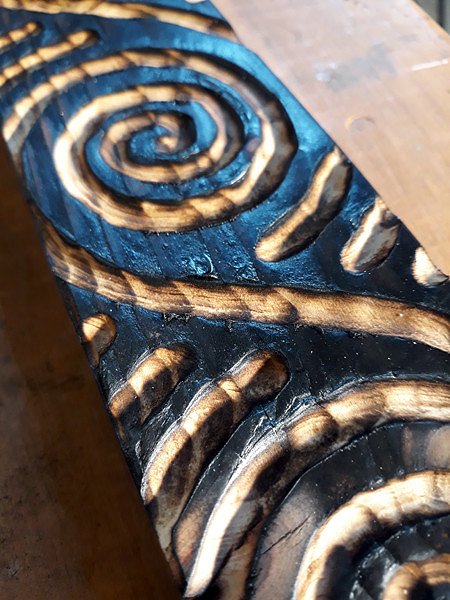
Some folks like it all blackened, others less so. And advantage of burning is that any fuzz, splintering or minor blemishes simply go away when kissed by fire. In the Japanese technique of shou sugi ban, a coat of preserving oil (tung, linseed, etc.) is applied at this stage. The combination of carbonized wood and oil makes the wood water resistant and resistant to insects, rot and decay. It's gained popularity in the U.S. in the past couple of decades for the aesthetic look it gives the wood. It's not specifically tiki, but it's not not tiki either. Just a data point if you want to look further into it.
Once all the torching is finished, it's time to hit the wood with a good wire brush scrubbing. Some have asked if using a power tool for this would work better. I've found brush attachments for something like a Dremel aren't durable enough to last for more than a few square inches of brushing, whereas heavier brushes--be they wire or nylon--used with a power drill are far too aggressive and strip away all the detail. But your mileage may vary.
The idea of the wire brush scrubbing is to remove the carbonized wood to leave dramatic texture behind, which simulates the long-term aging of wood. I've seen this referred to as "raising the grain" here on TC, but that shouldn't be confused with the woodworking term raising the grain, which involves wetting a piece of wood during the sanding process. Because of the unique growth properties of softwood trees, softwood (such as pine, cedar, cypress) work much better for this technique than hardwoods (ie oak, poplar, maple). I'm using the cheapest pine I can get here. Western red cedar works well and is weather resistant for outdoor spaces, but is unfortunately around triple the cost of an equivalent board of pine. So there's that.
|
|
O

Otterdog
Posted
posted
on
Mon, Jan 23, 2023 10:06 AM
Your tiki bar is freaking fantastic! I LOVE it. Really impressed with how much you made from where you started! It inspires me! |
|
PP
Prikli Pear
Posted
posted
on
Wed, Jan 25, 2023 12:49 PM
Thanks for the kind words, Otterdog! I knew nothing when I started, and I know a little bit more than nothing now. One thing I've learned is that incremental progress is progress nonetheless--it may feel painfully slow but adds up more quickly than you'd think! |
|
M
MadDogMike
Posted
posted
on
Wed, Jan 25, 2023 5:47 PM
Great trim Prikli Pear! |
|
T

TIKIGIKI
Posted
posted
on
Wed, Jan 25, 2023 8:19 PM
I do wish I had such a huge space for my own effort. Great atmosphere. |