Tiki Central / Home Tiki Bars
Lagoon of Mystery
Pages: 1 2 3 4 5 6 242 replies
|
T

tikiskip
Posted
posted
on
Tue, Jul 18, 2017 10:31 AM
Yeah the ones that are about $25.00 bucks have a 6-10W led light. So look for more wattage. |
|
MAM

mike and marie
Posted
posted
on
Tue, Jul 18, 2017 6:20 PM
We have something similar to this for a water ripple effect on our underwater ceiling: LED is nice, it burns cool, last long, and best of all it made such a difference. You really feel like you're underwater! |
|
PP

Prikli Pear
Posted
posted
on
Tue, Jul 18, 2017 8:04 PM
That's cool. Looks like the one I have is the lowest power available--essentially a night light. I suppose I'll just have to try different types until I find one that works for my particular needs. Thanks for the links! |
|
H

hiltiki
Posted
posted
on
Wed, Jul 19, 2017 10:19 AM
Love that name, and looking forward to more progression pictures, and great job. |
|
T

tikitube
Posted
posted
on
Tue, Aug 8, 2017 12:21 PM
LOVE the ceiling!! I had seen your pix before that, but this totally encompasses the theme of your build name. And I'm a sucker for themes. Keep up the great work, and stay cool! |
|
L

LoriLovesTiki
Posted
posted
on
Sun, Aug 13, 2017 6:17 PM
Hi Prikli Pear! LOVE LOVE LOVE everything! I just went through your entire thread and am quite impressed! Everything looks great so far. I think Skip's light suggestion is fab. That would completely kick it up a notch. Can't wait for more progress pics come fall! |
|
PP
Prikli Pear
Posted
posted
on
Mon, Aug 14, 2017 7:01 AM
Thanks for the continued kind words, folks! That kind of egoboo never gets old. :D Just a quick update on the lighting situation--I ordered one of the lamp/projectors Skip suggested and the answer is YES! It is indeed bright enough to overcome the ambient light in the bar. In fact, it comes with a fade knob on the back, so you can turn the intensity up or down depending on need. It seems to work best in the Lagoon at about half power. Even better, the unit has an aluminum (not plastic) housing that is easily disassembled. The power cord is a simple two-prong thing, so the wire can easily be switched out. Once I put the wooden cladding on the vertical columns (probably a December project, but that may change) I intend to mount a projector on each one and run the wire up behind the cladding into the ceiling, where I'll tie them all together to one switch. Each projector's only 9 watts max, so that makes it easy. Now, I need to get about five more... So, in case there was any doubt, TikiSkip's da man, especially when it comes to tiki lighting! Edut: Okay, my faulty memory's at work again. The projector Skip suggested is still on order. The one I tested successfully is the one linked by Mike & Marie. That one's not so much as a caustic water ripple pattern as a light-reflecting-off-water pattern. The effect is similar, but distinct. Regardless, either approach will work for my needs. I may even alternate projectors to mix things up. Fun! [ Edited by: Prikli Pear 2017-08-14 07:05 ] |
|
T
tikitube
Posted
posted
on
Mon, Aug 28, 2017 8:18 PM
Hey, was just thinking about you...hope you are weathering the storm okay down there in TX. |
|
PP
Prikli Pear
Posted
posted
on
Tue, Aug 29, 2017 9:25 AM
We've been very fortunate here. We received at least 15" of rain Saturday-Sunday, but it was evenly spread out. It was mid-afternoon Saturday before we even began to see any runoff. The ground was so dry it soaked it up. The ditches and drainages started to fill after that, and we were worried how that would turn out. The heavy runoff subsided by mid-Sunday, so no flooded garage this time around. The wind was pretty rough, but I don't believe it ever got as high as forecast. We had 30 mph pretty steadily through Saturday night, but I'd say it only reached the predicted 40-plus during occasional gusts. A neighbor's cedar elm lost some big limbs. There were downed oak branches all around. Smaller trees, like crape myrtles and mountain laurels, were flattened here and there. Our big gate to the back yard essentially ripped off its hinges, and I had to cobble together a fix yesterday. But there's no doubt that we were extremely lucky. Along the Colorado River (not the Grand Canyon one) there's major evacuations. My hometown of Columbus is almost completely evacuated. A flood of this magnitude hasn't hit since at least the 1920s, before the flood control dams in the Hill Country above Austin were constructed. And Houston is completely underwater. The amount of rain dumped on that area this week is simply incomprehensible. It's insane. |
|
PP
Prikli Pear
Posted
posted
on
Tue, Sep 5, 2017 2:27 PM
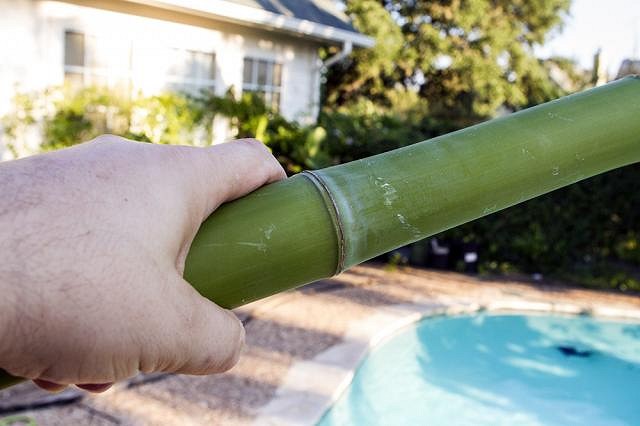
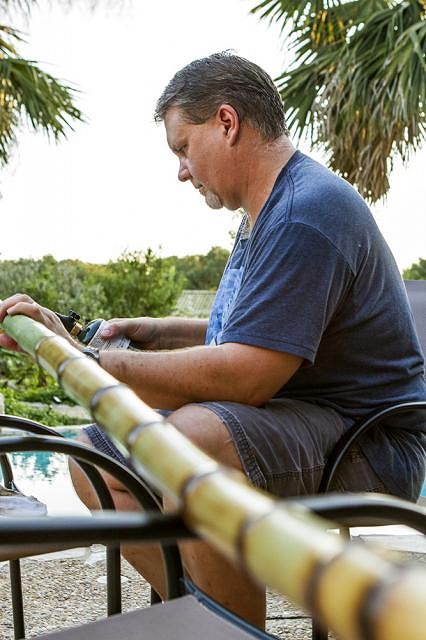
I've posted quite a few of these build-alongs thus far, but have not yet spoken about bamboo in any great length. In light of that, you may consider this something of an interlude. I don't actually build anything here, but I do show some of the prep work that goes into preparing bamboo for use in tik bar construction. Bamboo Ben, TikiSkip and others are far more experienced than I, so if you need advice, go to them. This is just a process I've developed via trial-and-error for my limited needs. There are two things about torching bamboo that I did not expect. First, the green culms, when toasted, smell wonderful. Dried ones smell charred and nasty, but semi-fresh, green bamboo emits this savory odor that reminds me of hot dogs and spring baseball. How's that for weirdly specific imagery? Secondly, I find torching bamboo oddly relaxing. I can sort of zone out and let inertial take over, shutting down my higher brain functions. It's almost like meditation, I suppose. I wouldn't have expected that, but there it is.
Most of the bamboo I have access to is, I think, the Golden Bamboo variety. Which is a runner and invasive, but it's contained by geography to a tight thicket. The largest culms I've found are just over 2" wide, which is good for my use--no big timbers here. I'll let them dry a little for a few weeks before applying flame. If I'm busy, it takes longer to get to them. Either way, they're usually still some kind of green. Torching fully dried bamboo that's turned a pale yellow is a pain.
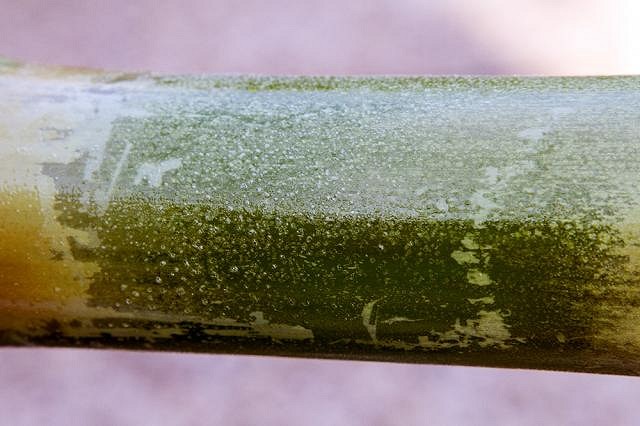
When you apply flame to fresh(ish) bamboo, the natural resins boil up to the surface. You can see that here, in the white droplets. Rub this down with a rag to spread the resin evenly over the bamboo surface to get a polished, shiny appearance that has some degree of weather resistance. It'll wear off with exposure to the elements, but it's a good, natural protectant.
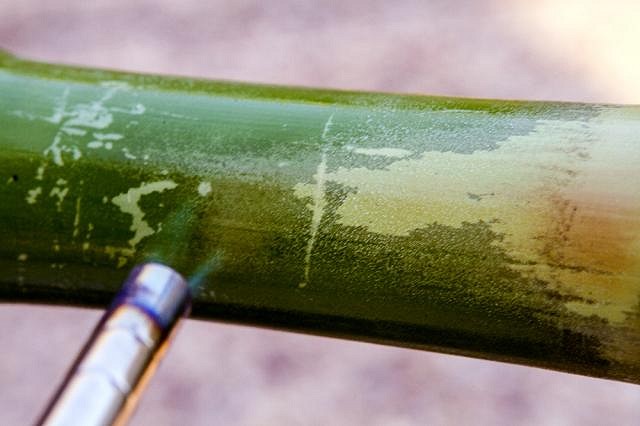
Torching green bamboo is almost fool-proof. The color change is dramatic and striking. As the resin boils up, the bamboo will go from bright green to drab olive. When the final heat change happens, it goes from olive to tan instantly. What's more, it changes is abrupt sections. It's crazy--it looks almost pixellated, like an obscure Atari game from the early 80s. It's impossible not to notice.
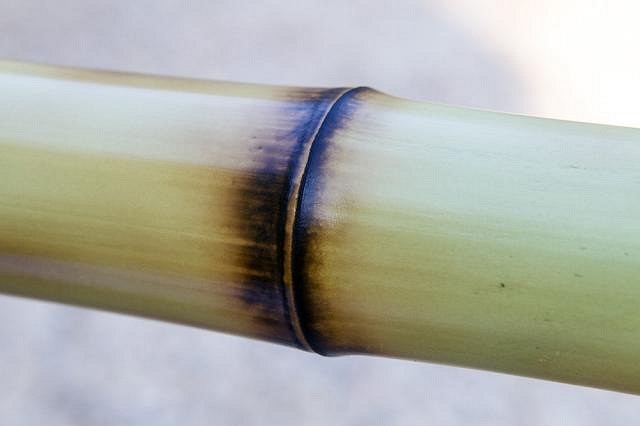
Once all of the culm has changed color, I'll go back over the nodes to apply a bit more flame. That results in deeper contrast. When torching bamboo, I use just a simple butane torch from the hardware store. Nothing fancy. I do a segment at a time, rotating the culm as I brush the flame back and forth with deliberate strokes. Note that the nodes are solid and the internal segments are air-tight, so if you're torching smaller bamboo pieces, the water in the wood will steam, build up pressure and burst the culm. This is startling if you don't expect it. I either knock the nodes out with a long piece of rebar for the larger culms, or use a tiny drill bit to punch a hole near the nodes. Either way, a hot air/steam mix may blow out, so watch that you don't accidentally burn yourself.
Once heated, the bamboo hardens and loses any flex it once had, so if you plan to bend it into shapes for lamps, furniture or other creative uses, best be sure to bend it into that position before applying flame. Personally, I need straight pieces now for wall trim, etc., so I'm torching them as-is.
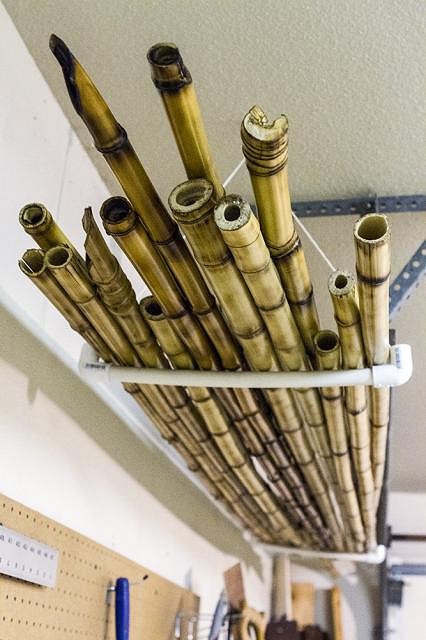
Of course, 8' bamboo poles take up a lot of room and can get in the way. Even after torching, they need to dry out and lose that extra water. I solved my storage problem with a few pieces of PVC pipe I hung from the garage roof. I've got a dehumidifier I run if the weather gets too wet and the garage too damp. Most of the time, however, the climate in there's pretty favorable for the bamboo. Up out of the way, it sits there minding its own business until I need it. And I've needed quite a bit lately. For anyone who's interested in such things, I've a longer writeup on my blog. |
|
M

mikehooker
Posted
posted
on
Wed, Sep 6, 2017 12:33 PM
Great post. Looking forward to seeing more progress shots. |
|
T
tikitube
Posted
posted
on
Wed, Sep 6, 2017 7:33 PM
Great insights, thanks again for sharing! |
|
PP
Prikli Pear
Posted
posted
on
Mon, Sep 11, 2017 11:40 AM
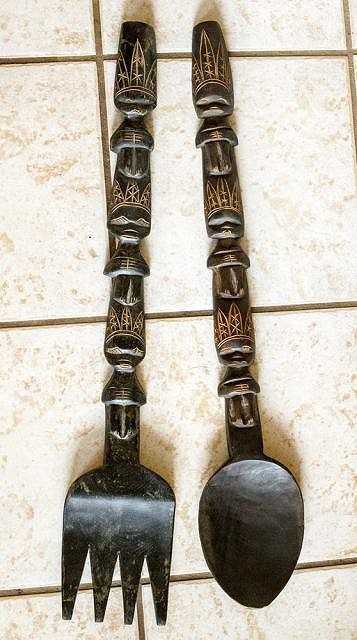
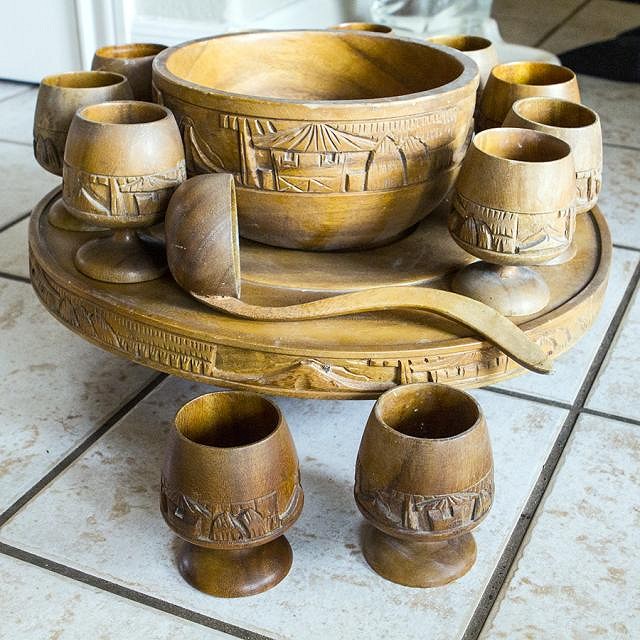
So, there was an estate sale this weekend that featured tiki. That doesn't happen in Texas very often. I went Saturday. Unfortunately, the sale started Friday, so the really cool stuff was already gone. Even so, I came away with some nice additions for the Lagoon. This is my first-ever second-hand tiki haul that consisted of more than a single mug or the like.
I'm particularly pleased with the punch set. It's all dusty and dirty, but beyond one cup with a crack starting in the rim, looks to be in great shape. Once I get them cleaned up and properly oiled, they'll be gorgeous. Here's a cobbled-together panorama of the tiki hideaway this stuff came from, the Huna Lounge:
I've got a more extensive writeup on my blog for anyone interested. |
|
T
tikitube
Posted
posted
on
Tue, Sep 12, 2017 7:49 AM
Awesome score!! :) |
|
PP
Prikli Pear
Posted
posted
on
Mon, Oct 2, 2017 6:46 PM
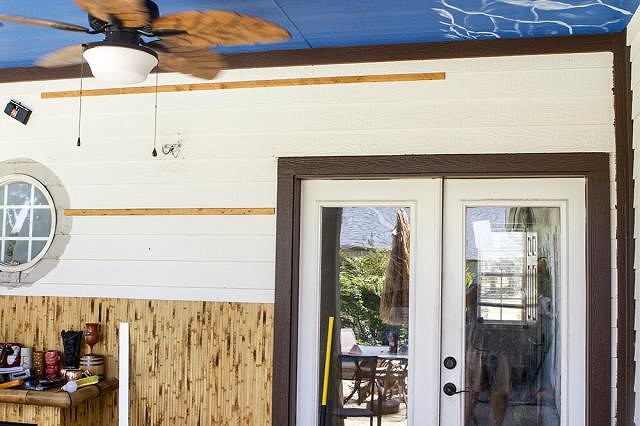
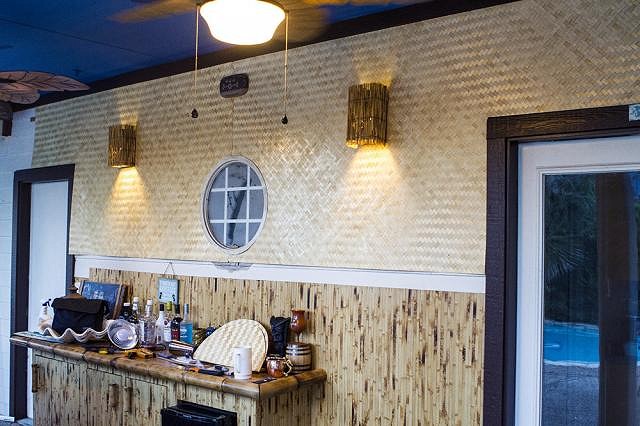
Back to work on the Lagoon of Mystery, it was time to tackle the white(ish) walls. The first step being the removal of the porthole frame. We thought it cool when we first moved in, but with the upgrades it started looking downright shabby. A crowbar made short work of it.
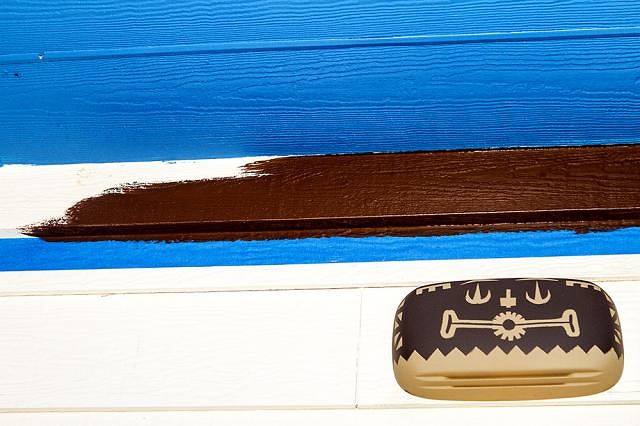
The siding and edging are fiber cement, tough to drill or nail, but durable and fairly weatherproof. I matched up some Olympic outdoor paint to a piece of my routered molding (the color selection was "Chocolate Truffle" or something like that) and, after masking everything down with painter's tape, the edge pieces became brown. This is everything that won't be covered by bamboo or other new wall coverings.
I was surprise how much of an immediate difference it made. Because the siding isn't easy to drill or nail into, and isn't flat, I trimmed some more furring strips to sit in the wedge of the siding overlap so I could staple the woven bamboo panel to it.
Following suggestions offered here, I went with the bamboo panel because it seemed like it would be more durable in my bar's outdoor conditions than lauhala matting or bac bac, etc. It gets bonus points for being cut very easily with tin snips. I took measurements, cut to spec, and mounted it to the wall fairly painlessly. At some point I'll go back over the staples with tan paint to hide them more than they are now.
Makes a big difference, no? I need about four more panels to finish the length of the covered patio. Not sure when the extra cash will be on hand, though.
For trim, I went with the obligatory split bamboo. I started out using the machete/wedge method, but my bamboo was narrow enough in diameter that I learned I could get straighter cuts using my band saw. So I did. I drilled a pilot hole through the trim piece and into the backing fiber cement siding, then used a larger drill bit to make a countersink hole. Here's where I ran into trouble--some of the bamboo I had on hand was young, and therefore thin. It split all to hell whenever I tried to do the countersink hole, so I had to start over on a number of pieces. Fortunately, I had some more mature, thicker culms available. I've not yet made up my mind about how I will cover up those screws. Wrapping with twine doesn't strike me as terribly easy at this point, but I'll think of something.
As always, I've got more pictures (and more words) in my blog entry. Thanks for looking! |
|
PP
Prikli Pear
Posted
posted
on
Thu, Oct 5, 2017 8:11 AM
So, how many people have abruptly pulled over for a cut piece of palm log spotted on the side of the road?
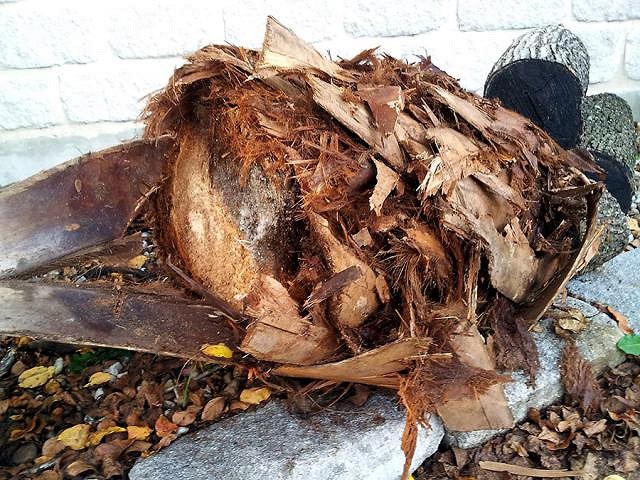
The actual wood is a little more than two feet long and 18" across. The remains of the sabal palm's top was right next to it, and it appears they'd cut up the trunk with a chainsaw and hauled off the rest (the tree'd been laying there beside the road for more than a week). I also spotted some cut logs from the lower portion of the trunk, but they were stacked against the house at the end of the driveway. I didn't feel I could venture onto the property to claim those. Unfortunately, the place is a rental house and the tenants didn't know what the owner had planned for the palm. I gave them a note with my contact info to pass along, but don't have my hopes up. I've never carved palm, but find it intriguing. I've been reading the carving threads to get some idea of how to proceed. I plan to seal the ends this evening and let it dry over the winter and maybe cut into it this spring. |
|
T
tikitube
Posted
posted
on
Thu, Oct 5, 2017 11:23 PM
Hey those bamboo panels look great, and probably easier to work with than unruly, out of square lauhala or bac-bac. Im in the same boat as you with one wall covered in fiber cement. I'm covering it with cabinets, for the most part. It's great stuff and nearly impenetrable once it's up, but it's a bitch to cut and drive nails and screws into it. Can't wait to see what you do with that chunk of palm tree. :) [ Edited by: tikitube 2017-10-05 23:24 ] |
|
PP
Prikli Pear
Posted
posted
on
Tue, Oct 10, 2017 7:58 AM
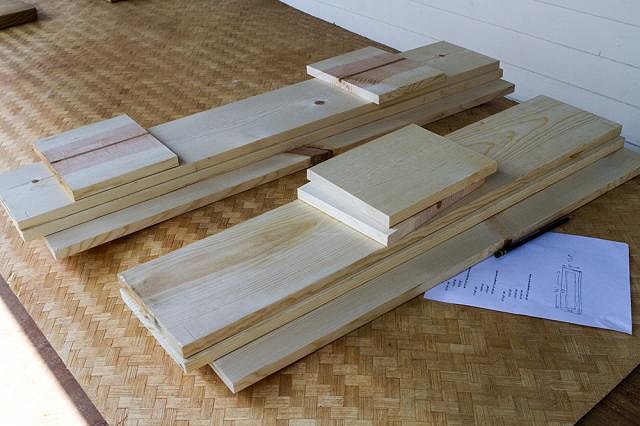
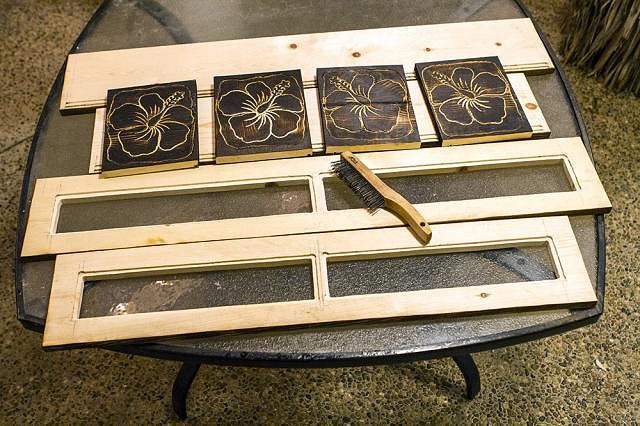
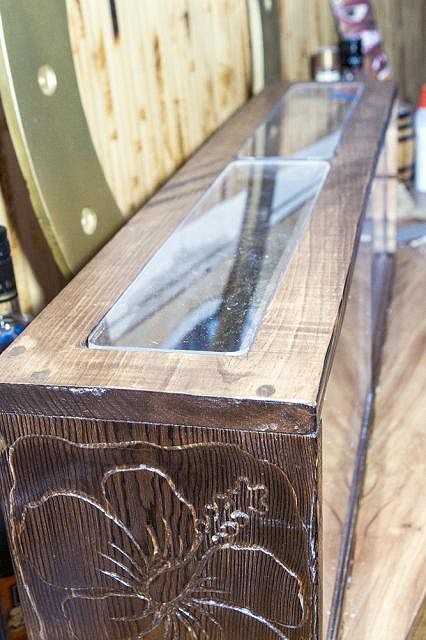
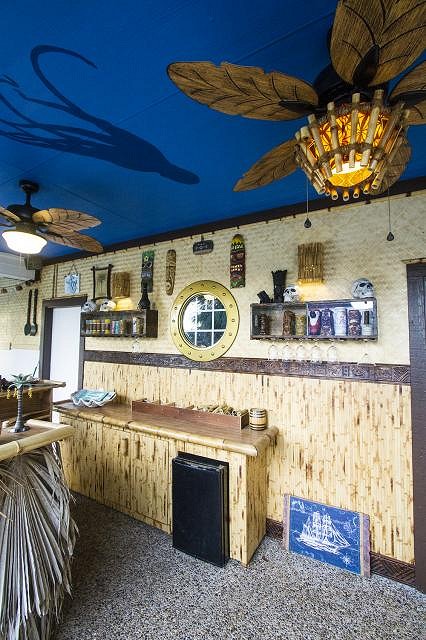
Thanks, Tikitube. I've burned through several jigsaw blades trying to cut that fibercement for a different project. That stuff's unforgiving, but super-durable. This summer I came to the realization that I did not have adequate drinkware storage for tiki mugs or stemware in my bar area. Being open air, anything on the bar tended to get dusty very quickly. So I decided on constructing two display cabinets on either side of the center porthole, beneath the sconce lights. After sketching out a rough design, I got the lumber and made the cuts. Each cabinet would be 10" tall, 8" deep. Because of differences in available space, one would be 36" long and the other 42".
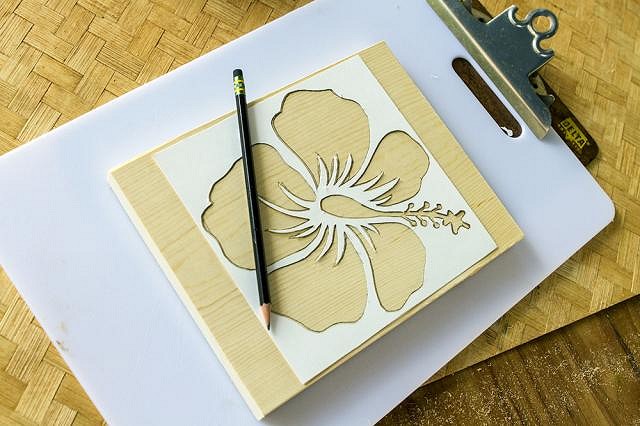
This being a tiki bar, a plain side panel on the cabinets wouldn't do. I decided I would go with a hibiscus flower on the ends, that being the classic tropical blossom representative of Hawaii, Polynesia and the Caribbean as well. I looked at a bunch of designs online and cherry-picked elements I liked, tweaking them to get an image that satisfied me. I printed it out and transferred it to a piece of poster board, which I cut out with an X-acto knife to make a template pattern.
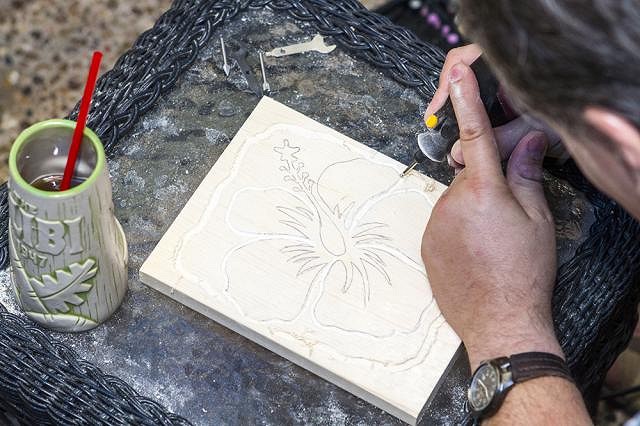
Once the pattern was marked down, I attacked it with a Dremel to carve out the outlines and fine, inner details. I used my trim router to carve out the remaining wood. The first one took me almost an entire evening to do, learning as I was. The next evening I knocked two of them out in the same amount of time. I tried to keep the design simple, but I learned that simple to the eye and simple to the router are two very, very different things.
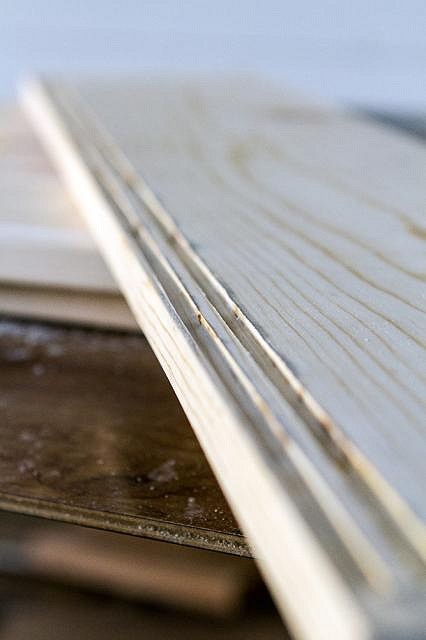
Once I finished all the end pieces, it was time to get serious about the cabinet doors. Early on, because these were to be display cases, I decided to have sliding doors. I've seen such before, but it's amazing just how little information was available on the DIY sites that populate the interwebz. The cabinets would have two plexiglass doors that slide in parallel. The most solid sheet of plexiglass readily available measured .22" in thickness, so I went with a quarter-inch router bit, set at 1/8" depth for the bottom and sides of the cabinets, and a quarter inch deep for the top. It was very stressful making sure the routered grooves aligned. I was using a guide, but that's never 100 percent guaranteed to work right.
To make everything work, I needed the two plexiglass doors to slide in parallel. Which meant I had to router two grooves that ran in parallel, very, very close to one another. This was very stress-inducing. Even with a guide, the routher bit would catch on the wood occasionally and jerk, potentially ruining everything. I kept a very tight grip and worked it slowly. The finished tandem slots weren't perfect, but they were close enough.
I used a jigsaw and router to cut skylights into the cabinet tops. I took my butane torch and scorched the hibiscus carvings and the front edge of the boards. Once everything was suitably carbonized, I took a wire brush and scrubbed off the char and soot, leaving an interestingly textured surface evocative of the old Witco designs. The next step was to glue (Titebond II) all the pieces together. For each joint I drilled a pilot hole and sank in a wood screw to hold it together. Once the glue set, the cabinets would be pretty darn solid. Then I stained everything with my go-to Minwax "Special Walnut" stain. When that was dry, I put on a coat of water-based spar urethane, because that's what I had on hand. I will go back over it in the future with oil-based spar urethane, because that has an amber tone to it whereas the water-based is clear. Used oil-based on my routered baseboards and want my woodwork to match. Fortunately, you can topcoat water-based spar with oil-based, but not vice-versa.
|
|
H
hiltiki
Posted
posted
on
Tue, Oct 10, 2017 8:06 AM
Nice work, this is going to look great, keep us posted. |
|
PP
Prikli Pear
Posted
posted
on
Tue, Oct 10, 2017 8:15 AM
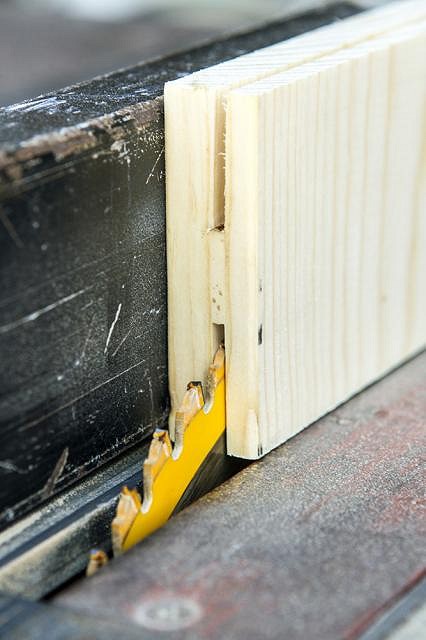
Not all of our drinkware consists of tiki mugs. In fact, because of the close proximity to the pool, our go-to barware consists of acrylic poco grande glasses (think half-size hurricane glasses). Actual glass is a no-go in the bar area. The poco grande stemware needs a place to hang out as well. After some thought, I realized the entire bottom of my cabinets was going unused. I took the remaining wood left over from the cabinets themselves and cut a bunch (I forget how many) 3"x8" rectangles. Then I ran those pieces through the table saw, like this:
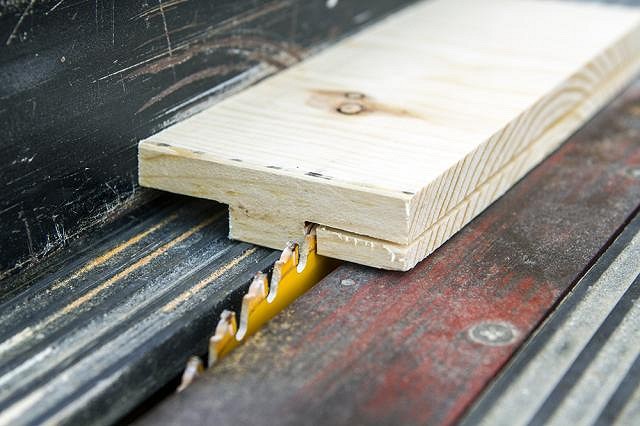
After running them through on each side, I flipped them down and ran them through again, like this. See where I'm going yet?
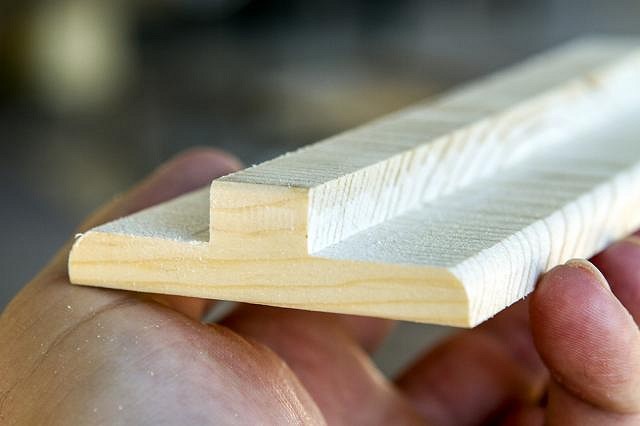
Once all the pieces were cut into a T, I put a rounded trim router bit into my full-sized router. Normally, one would use a router table for this, but since I haven't built a router table yet, I winged it, laying the router on its side, locking the power button in the "on" position, and running the pieces across it by hand to get a nice beveled edge. Yes, mistakes were made, but I'm not going to talk about those. Suffice to say that it was a good thing I had extras. I also hand-sanded the rough spots, of which there were quite a few.
After that came a lot of boring stuff. Staining and applying spar urethane. Then drilling pilot holes and countersink holes. Beading glue along the bottom of the T and screwing them into position. Puttying over the screw heads, sanding, staining and applying more spar urethane. It was neither quick nor fun, but at least it's starting to look like something.
|
|
PP
Prikli Pear
Posted
posted
on
Tue, Oct 10, 2017 8:24 AM
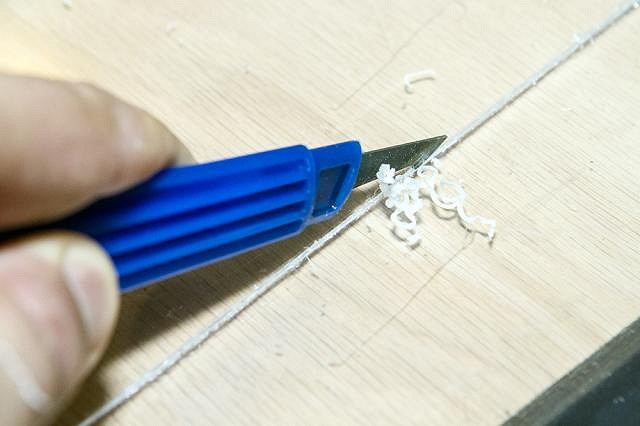
At this point I entered uncharted territory. I've never worked with plexiglass before. I was nervous and cautious--not least because the sheet of plexiglass I'd gotten for this cost more than all the other materials combined. I carefully measured the cut, then double- and triple-checked it. I clamped down a steel yard stick as a guide, then ran the plexiglass cutting tool along the intended cut.
Plexiglass is weird in that it's very strong--much stronger than glass--but also very soft. The cutter was similar to an X-acto knife, except it has a barb to dig into the plexiglass. To make a cut, I drew it across many, many times. With each pass it bit a little deeper, gouging up coiled shavings.
Once I'd cut about halfway through, I simply snapped the piece off. I was surprised at how clean the breaks were. I had a couple of small pieces turn out a little jagged, but that was a result of my getting impatient and trying to break the piece off before I'd cut a deep enough groove first.
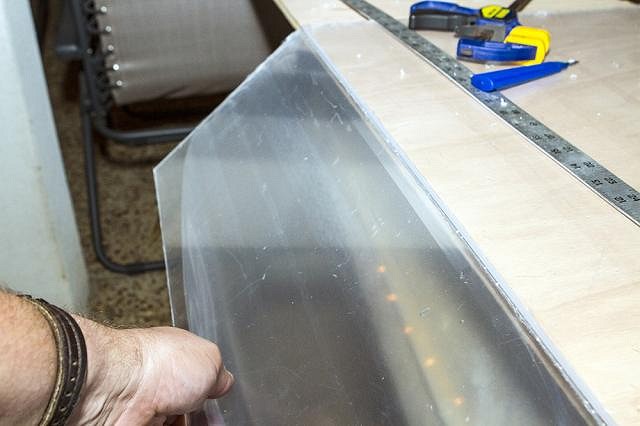
Since the display cabinets are to be mounted beneath the sconce lights, I wanted to utilize that available light source. I used a jig saw and router to cut skylight windows in the tops of both cabinets. Then I cut plexiglass windows to fill those holes. Now, when the lights are on, they illuminate the contents of the cabinets from above, and the light spills out the front. I've seen a lot of people add LED light strips to their shelves to illuminate their tiki mugs. This saves me a little of that trouble.
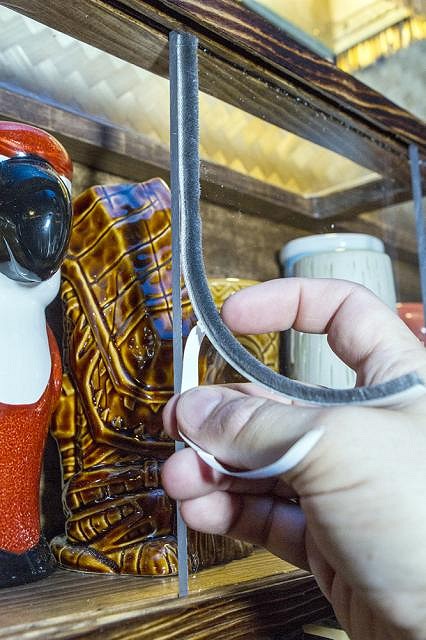
Once cut to size, I inserted the sliding plexiglass doors. The top grooves are deeper than the bottom, so that I can push the plexiglass all the way up into the top groove and have enough clearance to slip the bottom into the lower groove. But having those nice clear doors does me no good if the interior fills up with mud daubers, spiders and the like, so I had to seal that gap between the doors somehow. The solution? Self-adhesive pile weatherstripping. I cut to size and placed one strip on each section of door, facing toward the opposite door. It's not an airtight seal, but it should keep most dust and critters out.
|
|
PP
Prikli Pear
Posted
posted
on
Tue, Oct 10, 2017 10:59 AM
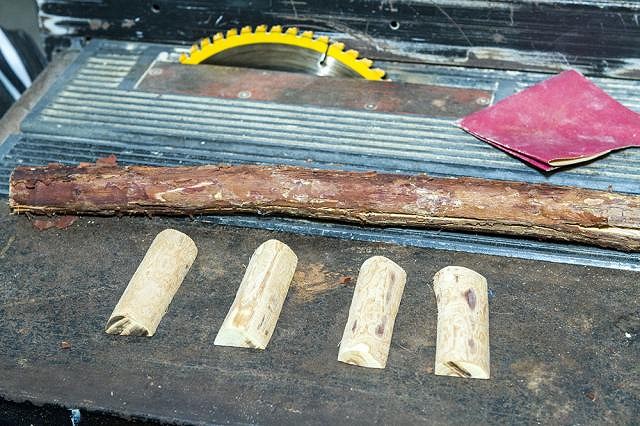
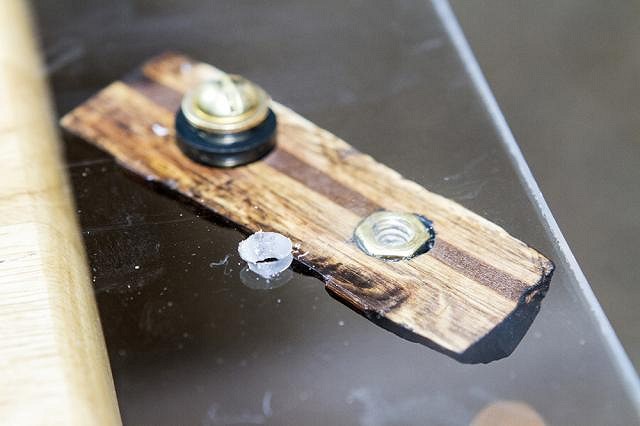
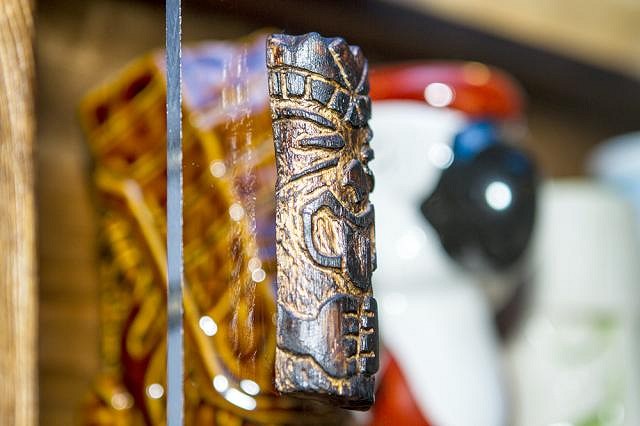
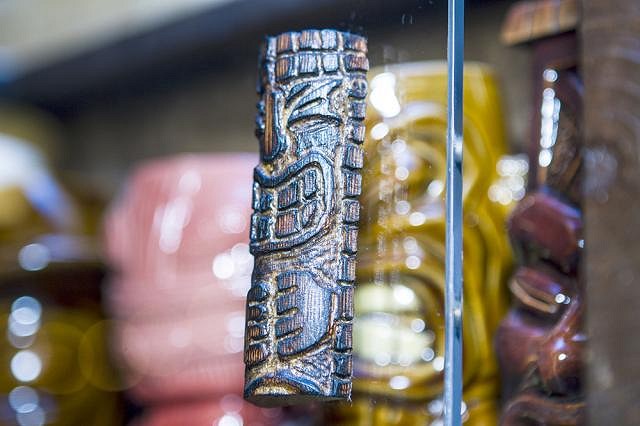
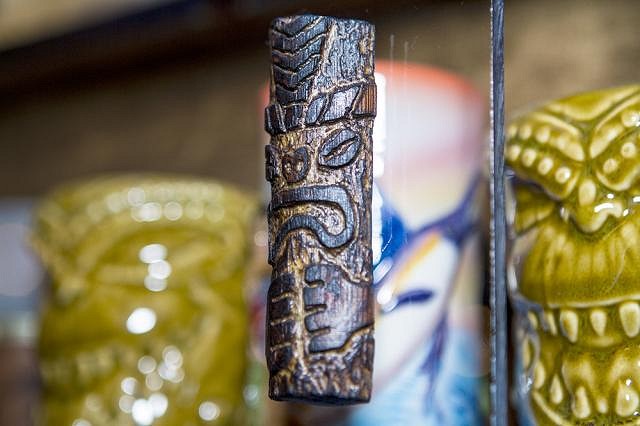
I had one remaining challenge. Those plexiglass doors slid open and shut just fine, especially once I sprayed the grooves with furniture wax. But fingerprints showed up readily. Fingerprints are ugly. I didn't want to have to spend all my time cleaning the doors, so I needed handles. I looked at building supply and home furnishing stores for something appropriate, but nothing seemed right. Then I thought to myself, "Why not make your own?" And that's what I did. I had a pine branch in the garage I'd picked up during one of my son's campouts last fall. I had a vague notion I'd carve something into it at the time, but I had no idea what. I cut two 3.5" sections from it, then split those lengthwise into halves. Then I ran then over my power sander to strip away the bark. Looking back, I should've sanded more to strip away all of the cambium as well, but live and learn.
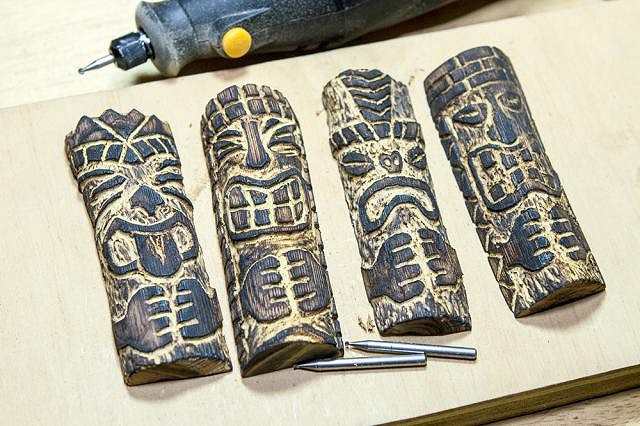
I took a pencil and sketched tiki faces on them. They're mostly inspired by Hawaiian tikis, but I mixed and matched different design elements and added some interpretations of my own. Alas, I don't seem to have taken any photos of the pencil sketches. They didn't last long once I attacked with the Dremel. This is where I found that the cambium fuzzed up and made a brittle, splintery mess. It was really hard to see what I was doing with that going on. Fortunately, all of that cleaned up nicely once I scorched them. Then, of course, came the obligatory "Special Walnut" stain and spar urethane coating.
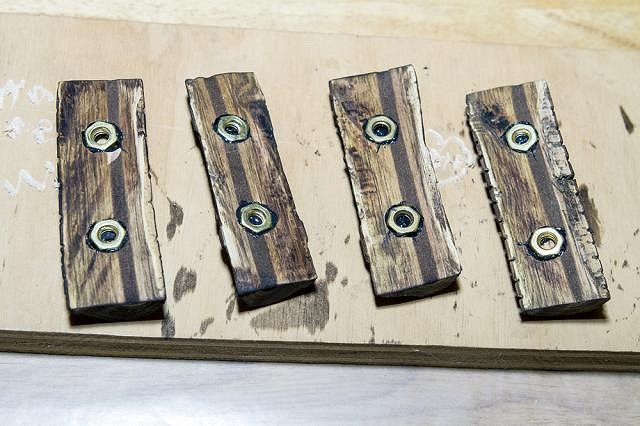
I wanted them attached to the plexiglass doors as a floating mount, so that meant more drilling. I cut out two holes in each tiki handle deep and wide enough for a brass nut, then set them in place with a dab of JB Weld epoxy. On a couple of these the epoxy oozed into the center, and I had to Dremel it out once it dried so the screw would fit properly.
I drilled through the plexiglass with a bit large enough to accommodate the screw. Drilling plexiglass was challenging, because although it's soft, it'll melt if you drill too fast from friction. That doesn't sound terrible, but it slows the drilling and gums up the bit. So I had to drill through it like I was Goldilocks--not to fast, not too slow, not too hard, not too soft. Once I got the first hole through, I attached the handle using a rubber washer and brass washer on either side of the plexiglass. I recentered to make sure the original dot was still valid (it wasn't always) then drilled the second screw hole.
And here they are, in position and operational:
And the two display cabinets, under normal lighting conditions (tiki mugs sold separately).
That's all for this episode of the Lagoon of Mystery build-along. A more extensive writeup, with more extensive photos, may be found on my blog. As always, thanks for the encouragement and inspiration! |
|
T
tikitube
Posted
posted
on
Thu, Oct 12, 2017 9:22 AM
Damn, you've been busy!! Everything is looking stellar, really superb. And your carving skills are enviable. I still haven't had a chance to even play with that little trim router yet, but now I'm feeling inspired again. Keep up the good work! Jeff |
|
PP
Prikli Pear
Posted
posted
on
Thu, Oct 12, 2017 11:41 AM
Practice on some scrap wood, Jeff. It's surprisingly easy, but there's a learning curve. Particularly in compensating for the torque, which always seems to want to pull you in the wrong direction. And it seems to me that the ideal bit depth is invariably a little shallower than you'd think by eyeballing it. |
|
L
LoriLovesTiki
Posted
posted
on
Fri, Oct 13, 2017 5:24 PM
Looks fantastic! Love it!!! |
|
PP
Prikli Pear
Posted
posted
on
Tue, Oct 24, 2017 2:32 PM
One area the Lagoon of Mystery is sadly lacking is appropriate tiki lighting. The two new ceiling fans were very tiki-friendly, but unfortunately their lamps were not.
Because the glass light cover has a weird slide-and twist attachment process, straight-out replacing it was problematic. So I decided I'd read everything Tiki Skip has ever posted on lamp-making and try to make a light cover that wasn't terribly embarrassing. I used two crochet hoops, one 12" diameter and one 8" diameter, and glued their concentric loops together. I cut a bunch of scorched bamboo into 10" lengths, then drilled holes in either side of the bamboo along with a hole in the hoop. Then I used craft wire to tie them together. I probably went overboard on the wire.
Once all the bamboo was tied on, it looked like an open basket.
I wrapped 5/8" Manila rope around the hoops. In retrospect, using 1/4" rope would've been better, but I could not find any at the time. I glued it using Goop, which is weather resistant and flexible, pinning in place with a tack until set.
At this point, I made my biggest screw-up. Not thinking, I tied the Manila rope in a cros-cross patter over the wire on the bamboo. This looked quite impressive, but was exceedingly bulky. When I tried to fit it on the fan, it wouldn't work. Not even close. So I had to untie all of that rope. Lesson learned. Instead, I got some cheap jute twine, which isn't as durable or pretty, but was small and manageable. Tying the bamboo with it worked well. It was much lighter than the Manila rope and not in a good way. I fixed this by reaching into Skip's bag of tricks and applying a coat of amber shellac. Voila! Now the jute and Manila match!
For the shade, I wanted a tapa pattern but didn't want to ruin any authentic tapa cloth. I ordered some cotton-print fabric online in a primarily orange-and-white pattern. I applied a coat of amber shellac which gave it the appearance of aged patina and helped even the colors out. This also made the fabric stiff and easier to work with for my purposes. My initial cut measurements were way off (big surprise) so I ended up slicing the shade into three sections and attaching them individually. I replaced the stock bulbs in the lamp with amber "Edison" style LEDs, and the setup puts out a nice, warm, golden glow.
I screwed in four eye loops on the top and used more of the wire to secure the cover in place. Although the cover is solid and not about to fall, it isn't stable. It shifts out of position when either of the chains are pulled. I'll eventually figure out something else that works better. I made a ton of mistakes on this one, so hopefully I learned enough so that the next one goes much more quickly. There's additional commentary and photos on my blog. |
|
D

danlovestikis
Posted
posted
on
Fri, Oct 27, 2017 10:16 AM
I clicked on to see your latest post and got hooked because of all the great ideas. So I HAD to go back to page one and to look at each page again. This is the second time you have caught me. I love the shadows on the ceiling of the shark, turtle etc. How you jazzed up the fan was wonderful. Just so many great ideas. Wendy |
|
PP
Prikli Pear
Posted
posted
on
Fri, Oct 27, 2017 2:08 PM
That means a lot, coming from the "Queen of Creativity" Wendy! I wish I could take full credit, but I'm finding the space itself is influencing its direction and look as much, if not moreso, than I. There've been multiple times when I started out with one idea, but nope, the space resisted me until I came around to its point of view. If it weren't completely and totally inanimate, I might be in trouble! |
|
D
danlovestikis
Posted
posted
on
Sat, Oct 28, 2017 7:52 AM
We understand. We have collected so many tiki items that we can't do all the fun creative walls because they would just get covered up with more tiki things. I love see the matted walls and creative nooks and crannies. All I can say to you is Good Job in making a great space. Wendy |
|
M
mikehooker
Posted
posted
on
Sat, Oct 28, 2017 11:16 AM
I appreciate your persistence. The light cover is a great touch. |
|
PP
Prikli Pear
Posted
posted
on
Mon, Oct 30, 2017 10:41 AM
Sometimes it seems like persistence is all I've got. I suspect I could do some real damage with about $10,000 and a couple months off from work to devote to my tiki space, but as neither of those seem terribly likely, I'll have to content myself with chipping away around the edges. That is, if the Astros don't kill me with their extra-inning madness first! |
|
T
tikiskip
Posted
posted
on
Mon, Oct 30, 2017 1:31 PM
"I fixed this by reaching into Skip's bag of tricks and applying a coat of amber shellac." Looks good. Burn, Elmer's glue, Shellac. |
|
PP
Prikli Pear
Posted
posted
on
Mon, Nov 20, 2017 11:07 AM
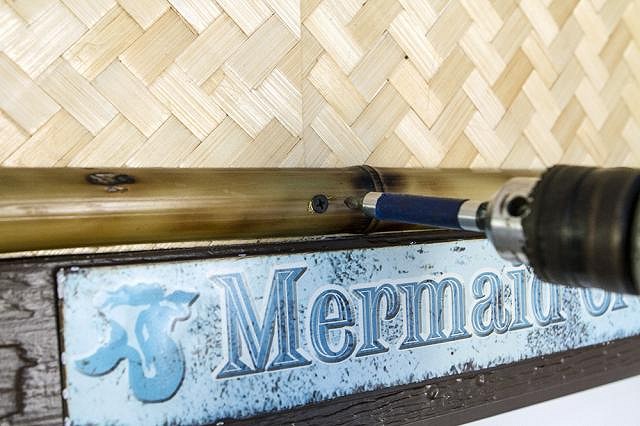
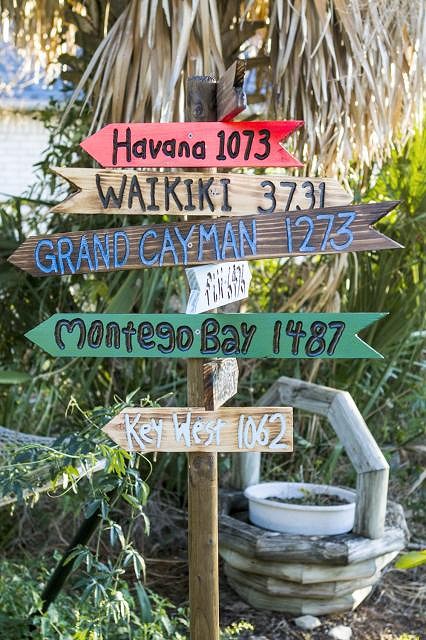
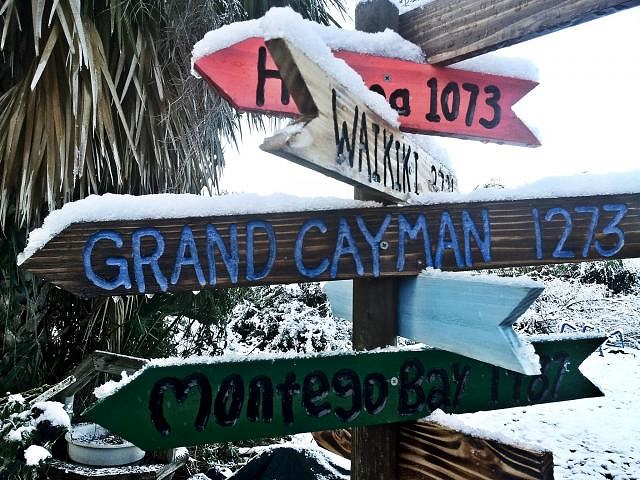
When I started this whole tiki bar thing, I knew early on that I wanted one of those sign posts that listed a bunch of exotic destinations. Cliched? Sure. Cheesy? Maybe. But I finished it up this weekend and it makes me happier than really warranted.
Details and more photos may be found in my blog entry. |
|
PP
Prikli Pear
Posted
posted
on
Tue, Nov 21, 2017 7:50 AM
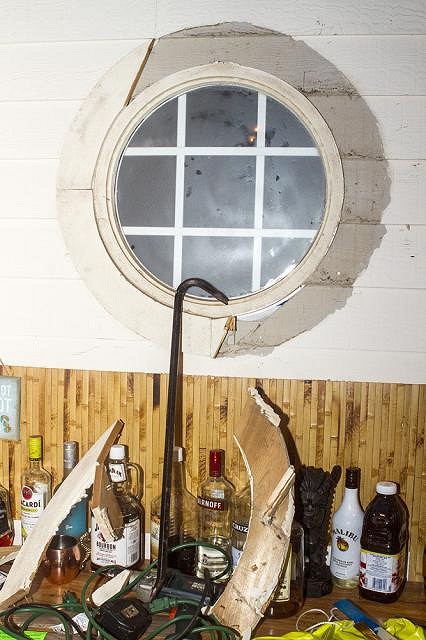
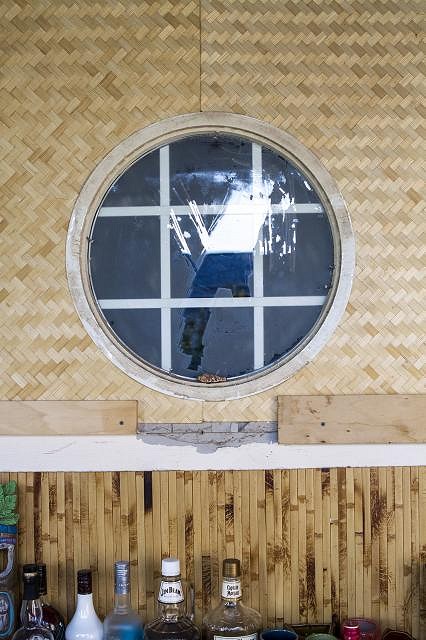
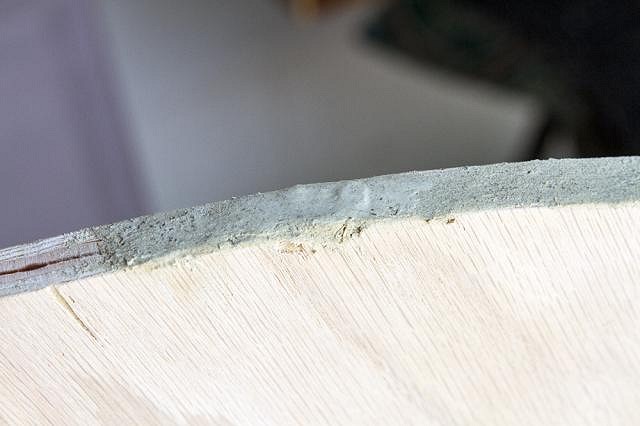
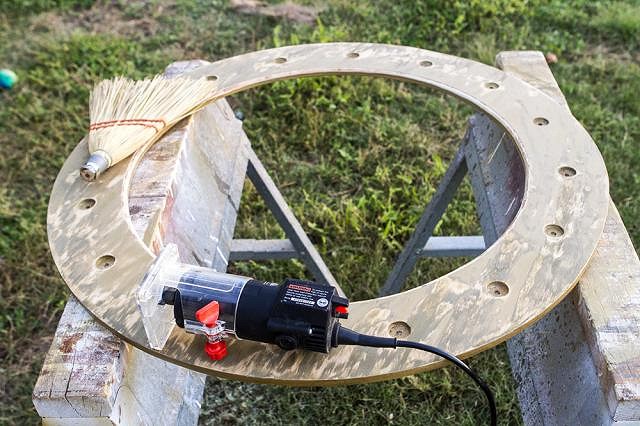
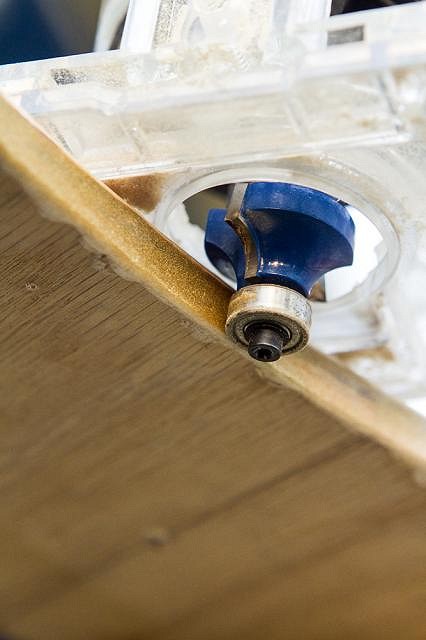
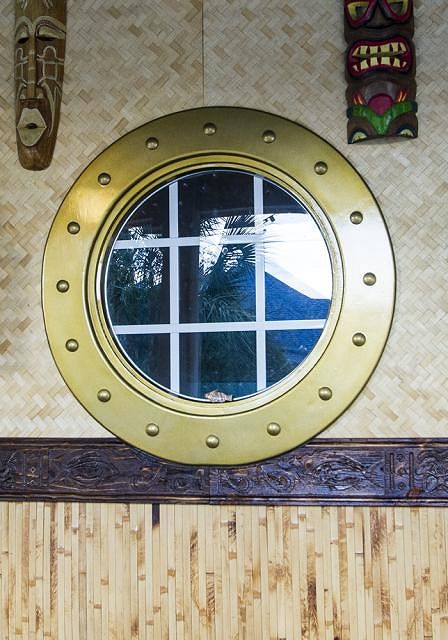
Time to bite the bullet. I've been avoiding that damn porthole window for the better part of a year because I knew it'd be a PITA to deal with. We thought the round window cool when we first moved in, but as I upgraded the patio, it looked shabbier and shabbier. Ideally, we'd have replaced it with an actual, for-real salvaged ship's porthole, but 1) the window's 31" across, which is HUGE for a porthole, 2) the few that exist are crazy expensive and 3) it'd be too heavy for the wall (at least for my comfort). So that left making one. Which I didn't want to do, because "cheap plywood painted in a half-assed attempt to look like metal" was the absolute last thing I wanted in my tiki bar.
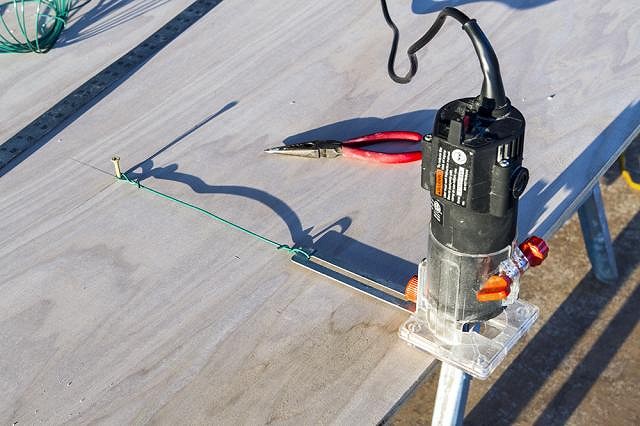
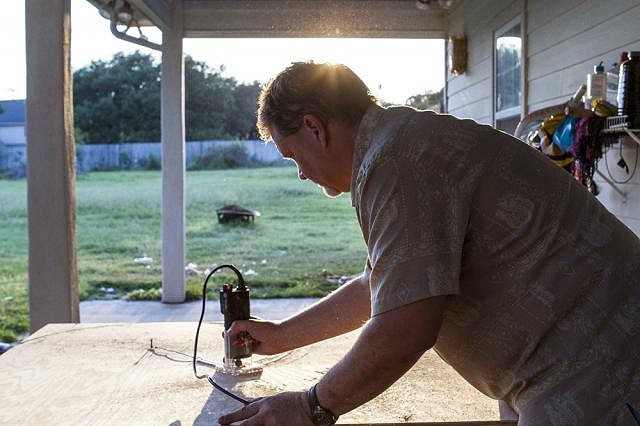
I got a nice piece of 4'x4' oak plywood. That was my first mistake. I thought the hardness of the oak would be preferable to pine or spruce, but I hadn't counted on the aggressive grain of the oak. Some routers come with a circle-cutting attachment, but these are only good for small circles of less than 12" diameter. As you can see, I came up with a highly technical substitute.
The Wife is an excellent photographer. She can even make it look like I know what I'm doing. All that's missing is a Wile E. Coyote "Genius At Work" sign.
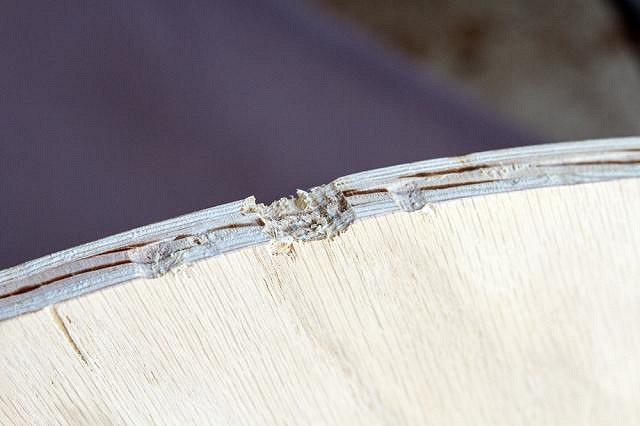
Another consequence of the hard oak--the router bit snagged and jumped repeatedly despite my best efforts, gouging sections of the wood. I have a hard time believing this would've happened with softwood.
I repaired the marred surfaces with basic wood putty. Had I been smart, I'd have coated the entire surface with the stuff. I'm not smart. As it was, the repaired sections sanded down nice and smooth, one of the few elements of this particular project that went as planned.
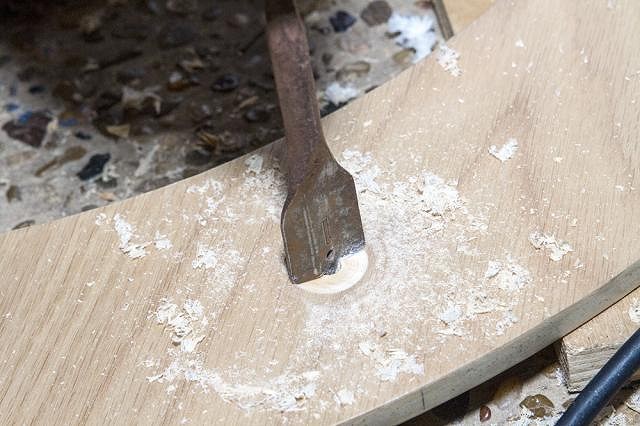
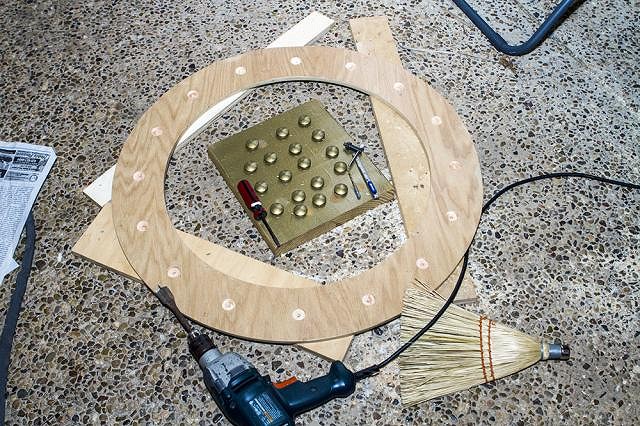
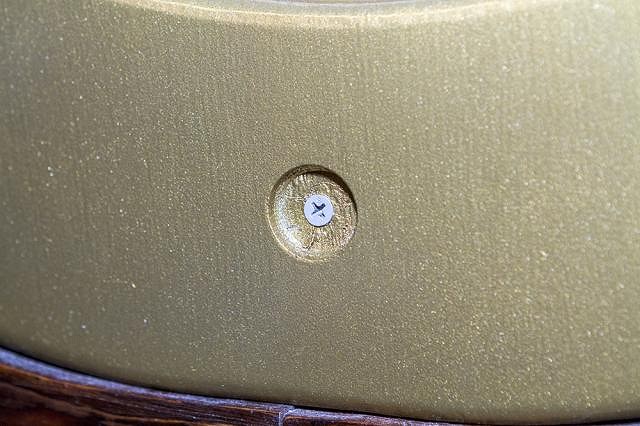
What's a porthole without rivets? A big wooden donut is what. To fake the rivets, I picked up several packets of 1" wooden mushroom buttons from Lowes. Then I marked the cardinal points on the wooden donut and drilled 1" holes in the center. Then I drilled four more holes at the quarter points. I'd hoped to stop there, but eight "rivets" looked sparse. I doubled it up, and finished with 16 rivet holes. That looked a lot better.
Then I started applying sanding sealer. I hadn't worked with sanding sealer for more than a decade, but I remembered it building up more quickly than this stuff did. The mushroom buttons smoothed out nicely, and I was able to paint them metallic brass early on. They looked good. The big wooden donut? Not so much. Apply sealer, sand, repeat. Over and over I did this, for several weeks. Some parts of the wooden donut got glossy smooth, which is what I wanted. Others, the grain stayed stubbornly visible. This became my personal Sysiphean stone. Ugh.
|
|
PP
Prikli Pear
Posted
posted
on
Tue, Nov 21, 2017 8:16 AM
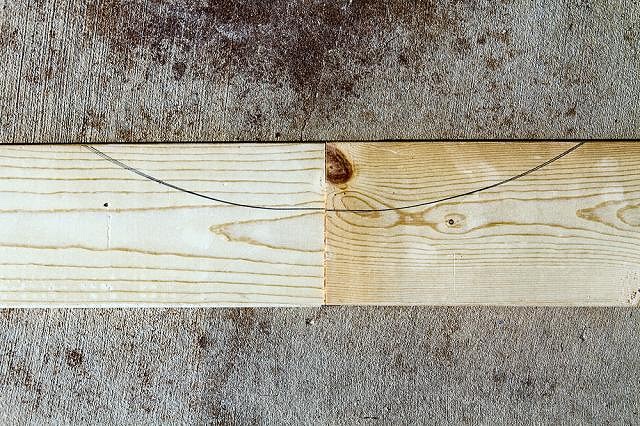
With all that applying sealer and sanding, I had lots of downtime waiting for the coats to dry. So I started working on the center trim pieces, that separate the bamboo tambour wainscotting on the lower portion of the wall from the bamboo weave panels on the top portion. I pressed my complaining kids into service to hold the 1"x6" ponderosa pine boards in place as I centered the big wooden donut and marked the cuts I needed to make so everything would fit together.
Hey! Would you look at that! They match up nicely!
And I cut the crescent shape without any big screwups! Actually, a short time after this, I did screw up with the router and ruin these nice end cuts. Fortunately, I had enough excess board length that I was able to lop off the ruined section and re-cut the crescent. I took no photos of that incompetence.
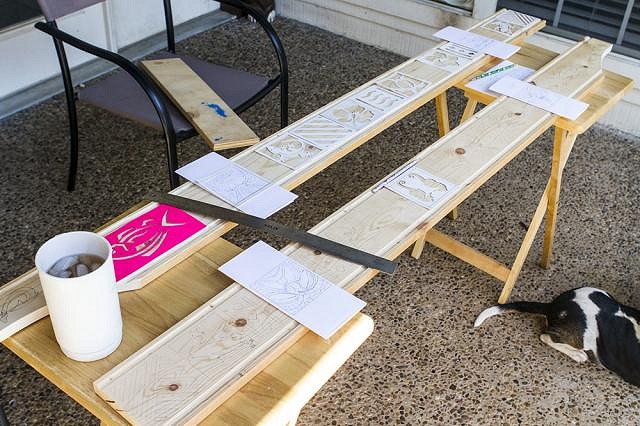
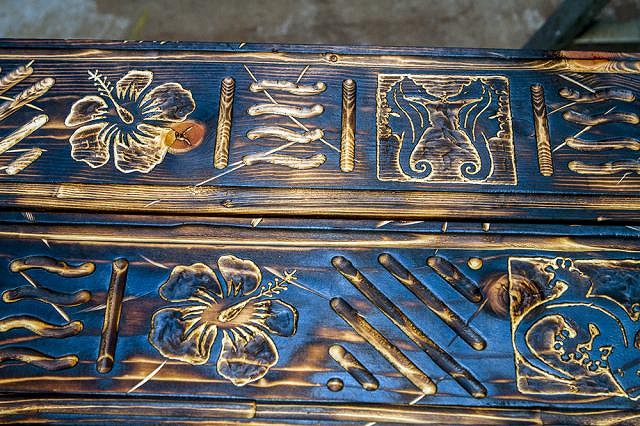
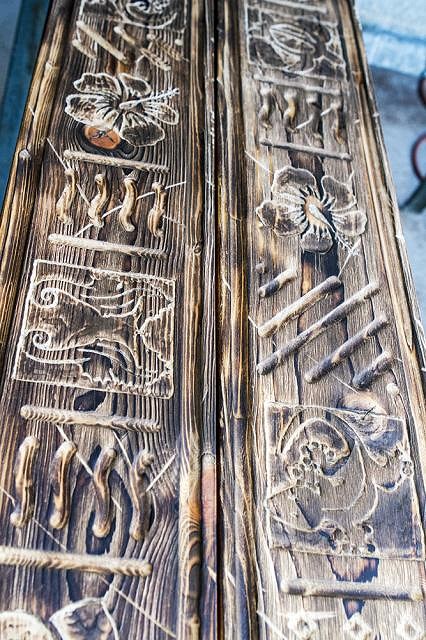
Now, the fun begins. For my floor trim, I routered out simple, alternating triangle patterns. Nothing terribly complicated, and they turned out well. For the middle trim, though, because they'd be much more visible, I got the notion that I needed to mix things up with different designs. What can I say? I have more enthusiasm than sense. I worked up a variety of interchangeable designs and cut them out in cardstock stencils so I could reuse them. Then I spaced them out on the wood and traced the patterns. If you're thinking this was an insane amount of work, you'd be right.
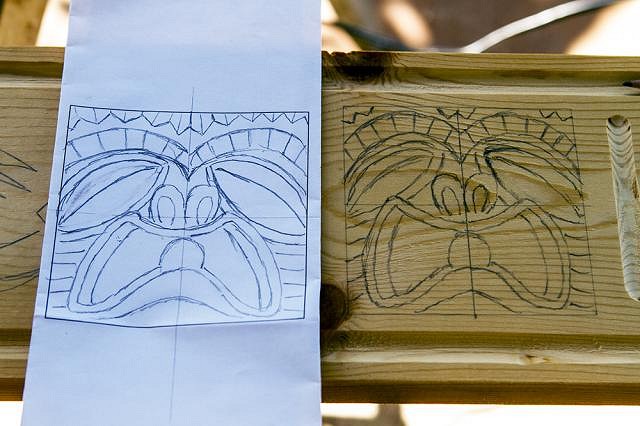
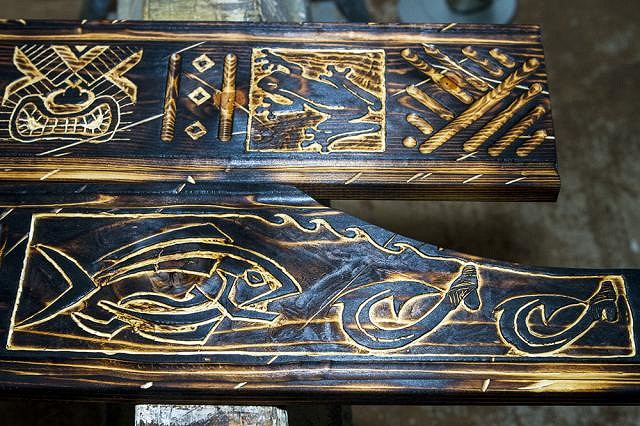
But even that wasn't enough for me--I got the notion that I needed tiki faces in the trim as well. So I sketched out some on paper. These were too detailed to craft a stencil for (red flag right there, which I ignored) so I used my original drawing as a guide and added the pattern to the wood freehand.
This was too darn detailed for even a small trim router, so I had to break out the Dremel. That takes a lot longer, not even counting the time wasted changing out the different bits. I made plenty of screwups, but in the end I got the hang of it. Sort of.
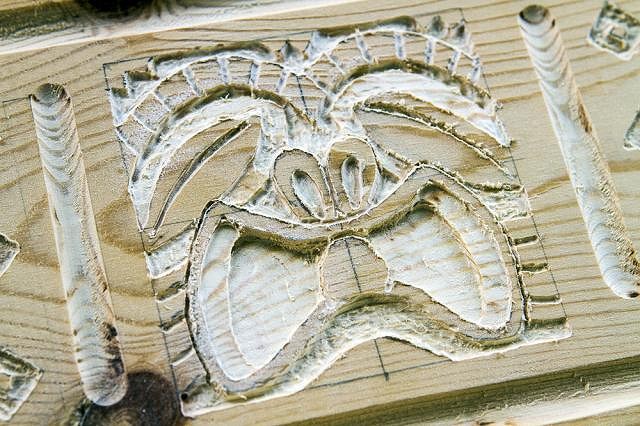
Once I got all the ornamentation carved out, I hit the trim pieces with an angle grinder to nick and scuff them up to create the impression of wear and tear. Then I applied the butane torch to scorch it up.
More scorched trim.
Then I followed up with an aggressive application of the wire brush to remove the carbonized soot and leave the raised grain texture. Anyone else notice a pervasive burnt marshmallow odor when doing this? I'm assuming the sugars in the wood caramelize under the flame. It's a curious side effect. Once the wire brush was finished, I hit the trim with Minwax Special Walnut stain and several coats of spar urethane. Those steps were boring and no different from the way I'd done things earlier, so I didn't bother with photos.
|
|
PP
Prikli Pear
Posted
posted
on
Tue, Nov 21, 2017 8:57 AM
I eventually reached a point where I thought the big wooden donut had been sanded and sealed to the point where it was ready for painting. I thought wrong. Big sections of wood grain still showed through. What's worse, even without the wood grain, it looked like a piece of plywood painted to look like metal. To say I was not happy was an understatement. This was exactly what I'd feared would happen. So I started sanding. Sanding off the paint, the sanding sealer, the wood grain. I started with a power sander, and when that started damaging the wood, I hit the big, ugly wooden donut with elbow grease.
None of that addressed the squared, plywood look of the donut, tho. It was The Wife who suggested I bevel the edges to remove those sharp angles. Well, okay then. This was something I could do, and I even had the proper router bits for the job.
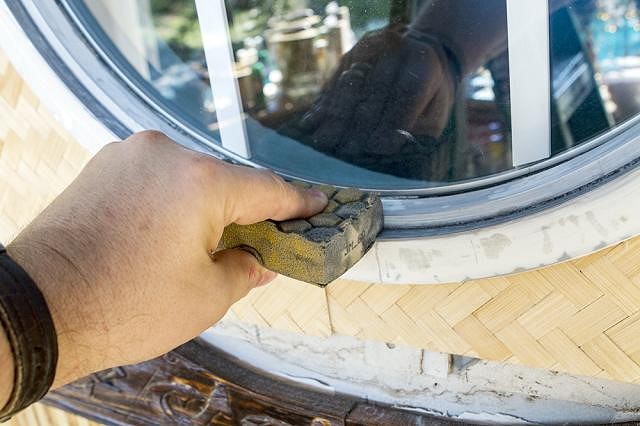
The metal window frame was also giving me problems at this time. The metal had been coated with this textured paint/resin compound that did a great job of collecting dust, and an even better job of not being removed. I couldn't just paint it metallic brass, because that'd look like I was just trying to cover the crap up in a half-assed manner. I used paint scrapers. I used utility knives. I used razor blades. Nothing really worked effectively. The curved surface of this frame and intersecting angles made it a challenge. Finally, a wet sanding sponge turned out to be the most effective tool. After a few hours, I finally had smooth metal.
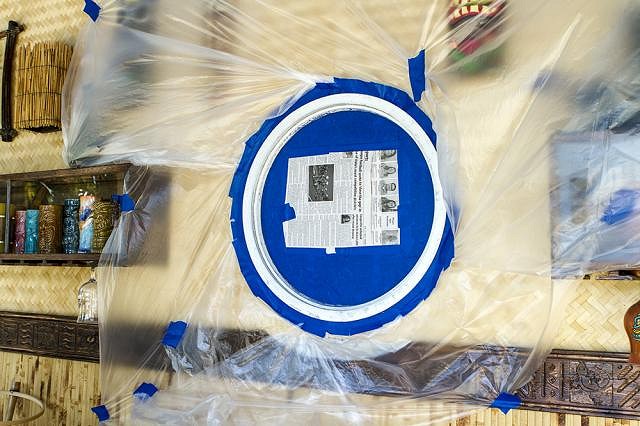
I used painter's tape and newspaper to mask off the glass, and taped plastic sheeting everywhere else to catch overspray. About this time a cold front decided to blow through. Temperatures didn't drop much, but it got crazy windy. The plastic sheeting ripped away from the wall several times before I got it secure. I knew it wouldn't last the night, so I was determined to paint the metal that evening. I ended up watching the palm trees around our pool. Whenever they stopped whipping around, I knew there was a lull in the wind that would give me 10-15 seconds of spray time. So that's how I did it, grabbing those windows of opportunity every 5-10 minutes.
To cut a really, really, really long story short, I spent about two weeks reworking the big, ugly wooden donut. Instead of sanding sealer, this time I went with water-based spar urethane. It didn't build up as quickly as oil-based urethane, but 1) it dried more quickly and 2) was more paint-friendly. It built up better than the sanding sealer, so yay. So, when it came time to paint, I was understandably nervous. The good news: No wood grain was showing! The bad news: Brush strokes in the urethane were showing! Well, crap. Sometimes you just have to admit defeat and move on. The brush strokes weren't really visible from more than a few feet away, so most wouldn't ever notice (although I certainly do). The holes cut for the rivets worked perfectly for counter-sunk screws to attach it to the wall. I just held the porthole in place, drilled the pilot hole into the backing fiber cement siding, then drilled in the screw. Unfortunately, the paint and urethane had built up in the rivet holes, so that the wooden mushroom buttons wouldn't fit. I had to re-drill those. Then I tapped the rivets into place using a wooden mallet and a piece of belt leather covering the painted rivet, so as to not mar the metallic finish.
Here's a shot to compare with the starting image two posts up. The bevel and the fake rivets make a huge difference on the final aesthetic.
And here it is in the larger context. With the center trim and everything else in place. Hard to believe I've been working on this so long. Progress has been incremental, but keep at it long enough and it adds up.
As always, I have more images and step-by-step details on my blog. |
|
C

Cap'n_Crafty_McGrim_II
Posted
posted
on
Sun, Nov 26, 2017 1:47 PM
I like coming over here and just looking, I always walk away with new ideas and inspiration. |
|
PP
Prikli Pear
Posted
posted
on
Mon, Nov 27, 2017 10:28 AM
Why, thank you, Cap'n! I could say much the same about your build. I'm going to have to tackle our old deck pretty soon and am keeping an eye on your progress. :wink: |
|
T
tikitube
Posted
posted
on
Fri, Dec 1, 2017 3:51 PM
Wow, Prikli, that porthole looks stellar! And I love how your trim is turning out. Keep posting, my friend. I'm living vicariously through your work until I find time to do more of my own! |
|
PP
Prikli Pear
Posted
posted
on
Sun, Dec 3, 2017 8:28 PM
Much appreciated, Tikitube! I'm at a point now where there's not going to be much new work worth posting for a while. I made another shade for the second ceiling fan light, and am working on a new trim piece for the next section. Nothing terribly ground breaking or different from what I've previously posted. Adding bamboo trim to the walls, touching up the ceiling paint, etc. Working at the margins, so to speak. I've got some interesting plans queued up, but probably won't have the cash to move forward until the spring (and my office remodel is only half-finished as well, and needs attention). Can you say "Spread too thin?" I can. But I'm happy the bar is in a place where it finally looks like a tiki bar, and our guests can see what my vision is for the rest of the covered patio. :) |
|
H

hang10tiki
Posted
posted
on
Mon, Dec 4, 2017 9:16 PM
That came out great |
|
PP
Prikli Pear
Posted
posted
on
Fri, Dec 8, 2017 8:46 AM
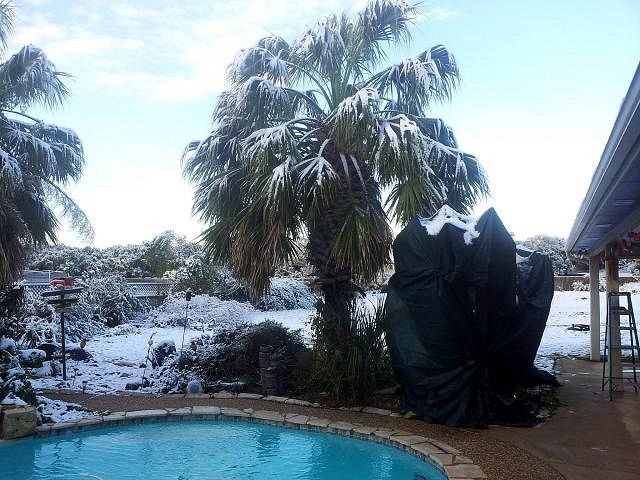
Thanks, Hang10tiki! In other news, we had an incredibly rare snowfall last nigh. To put it in perspective, this is the biggest snow event I've experienced since 1973 or so. It's the first time my eldest has ever seen snow actually falling, and she's 19. Freezing precipitation around here, when it comes, usually takes the form of sleet or freezing rain. We get ice storms every few years. Snow is limited to a few stray flakes, and never sticks.
I did get the bananas, plumeria and bird of paradise covered, so yay! |
|
M

MaukaHale
Posted
posted
on
Sat, Dec 9, 2017 6:36 AM
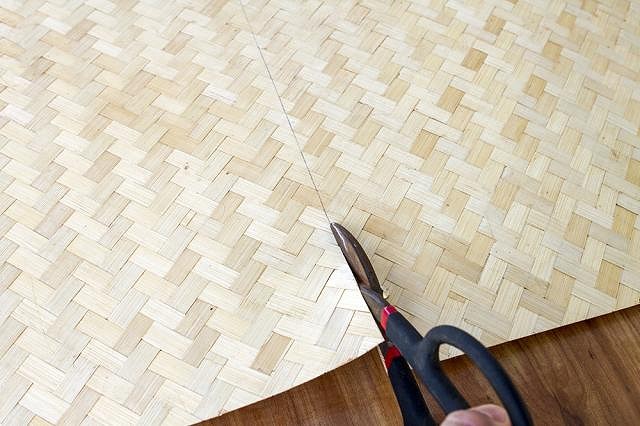
Your thread is whats so unique about Tiki Central's' "Home Tiki Bar" section. Everyone gets to benefit watching the process you go through to create what you like. FYI, you can also cut the bamboo board with a heavy pair of scissors. Looking forward to see what you make next. |
|
D
danlovestikis
Posted
posted
on
Mon, Dec 25, 2017 9:50 AM
Of course I started on the last page but ended up looking at every page. Fun ideas and done so well. This upcoming summer you'll be ready for a party or your own tiki crawl. Wendy |
|
PP
Prikli Pear
Posted
posted
on
Sat, Dec 30, 2017 8:24 PM
Thanks for the kind words, MaukaHale! I learned so much my reading everyone else's bar-build threads that I thought it only fitting to share my trial-and-error flailings as well. If someone can take inspiration from what I cobble together--of better yet, avoid some of my missteps--then I'll be happy. Always a pleasure to have you comment on my thread, Wendy! If it's any consolation, more than once I've checked in on your thread and found myself going down the rabbit hole of previous postings--but this thread is only up to 7 pages, whereas YOURS is at 595! :o A brief, tangential update for Christmas. The Wife's favorite movie is "Joe vs. the Volcano," so after reading Absolute60's Hula Lamp thread earlier this year, I knew I would have to make one for her. Here's the result:
Rather than cannibalize an existing lamp, I made the base out of scrap oak from my porthole project (the oak worked a lot better as a lamp base than as a porhole) and a lamp kit from Lowe's. I had an interesting length of bamboo that would work as the vertical body of the lamp. That was all pretty straightforward. I routered out a cavity for a music box movement that plays "Lovely Hula Hands."
The shade was a royal pain. I reworked the artwork for the shade, originally done by a poster going by the handle of Jintosh on the RPF boards. Then the shade I ordered from Zazzle turned out to be the uno type, rather than the harp-and-filial type fitting that my lamp kit was designed for. Very disappointed by Zazzle's lack of responsiveness on this, and lack of clarity on the lamp shade page. Nevertheless, I managed to cobble together an adapter, then added manila rope trim to the top and raffia skirting to the bottom.
More photos (and detail) than you could possibly want may be found on my blog writeup. |
|
PP
Prikli Pear
Posted
posted
on
Sun, Dec 31, 2017 6:18 PM
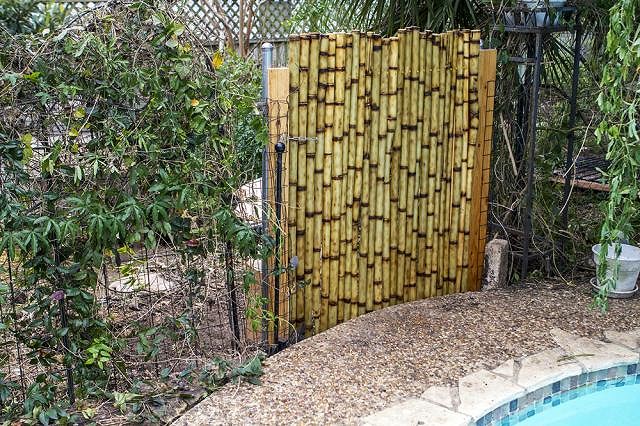
One project forced upon me recently was building a new gate for our dog kennel. The original fencing and gate were put up hastily 3 years ago and never meant to be permanent. Recently, one of our beagles has become a Houdini (Houndini?) of sorts and escapes over the gate. So I built a 5' bamboo gate to confound his efforts and blend with out future plans for the area on the other side of the pool. I harvested, cut and torched all the bamboo by hand, because rolls of 6' bamboo fencing runs $90 and it's not like I'm made of money. The frame was built using a hinge/frame kit from Lowes and scrap 2x4s I had in the garage, coated with weather sealant.
Because of the urgency of the build, the bamboo didn't dry as long as it normally should have, so I expect shrinkage and cracking. To aid its longevity, I filled the cavities along the top and bottom with "Good Stuff" foam. Once it finished expanding (it expands a LOT) and cured, I trimmed it back and capped the ends with outdoor wood putty. Once that cured, and I sanded it down, I finished sealing the ends with a coat of spar urethane. At least now the bamboo won't pool water and rot from the inside out.
And this is the gate in place. Post holes, steel posts and concrete not photographed, but I assure you it was a pain, as was ripping out the decorative rusting steel garden arbor the previous owners had placed there. Yuck. The gate's currently secured with a simple chain and hook, but that'll be upgraded as I install the permanent bamboo fencing at some point--hopefully this spring?
Alas, my efforts haven't been completely successful. Houndini has escaped twice, but those have been traced back to my failing to secure the fence to gate posts properly, rather than any fault with the gate itself. Time will tell. |
|
PP
Prikli Pear
Posted
posted
on
Sun, Dec 31, 2017 7:50 PM
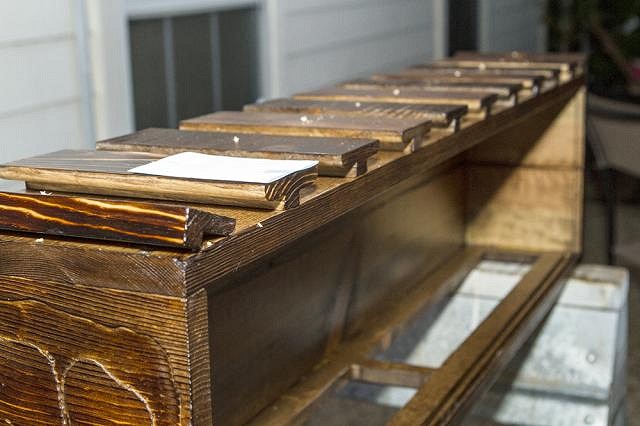
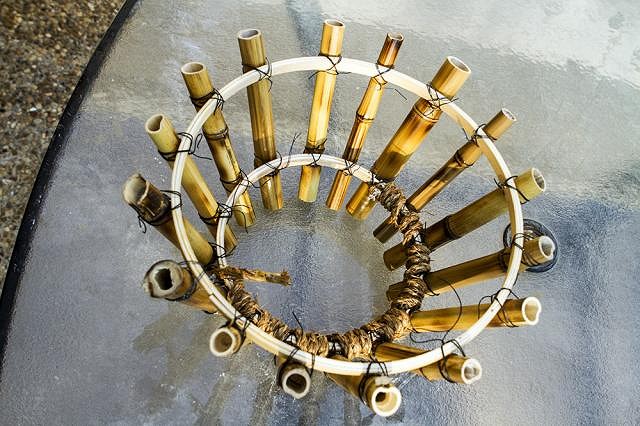
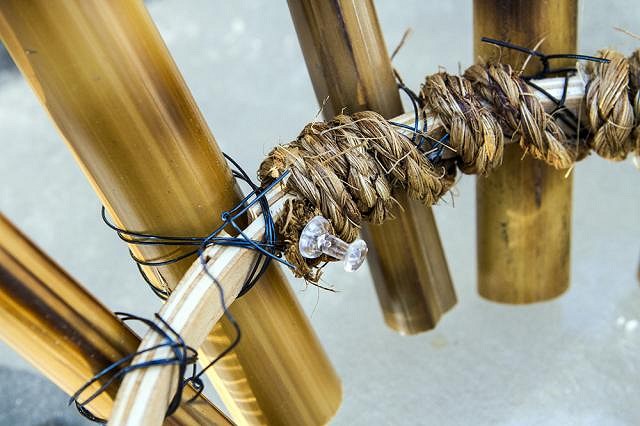
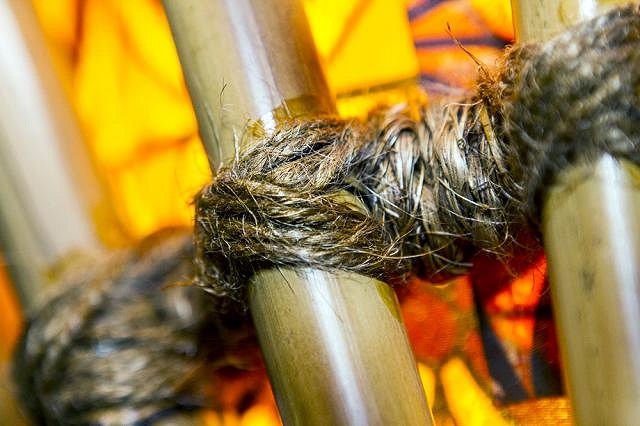
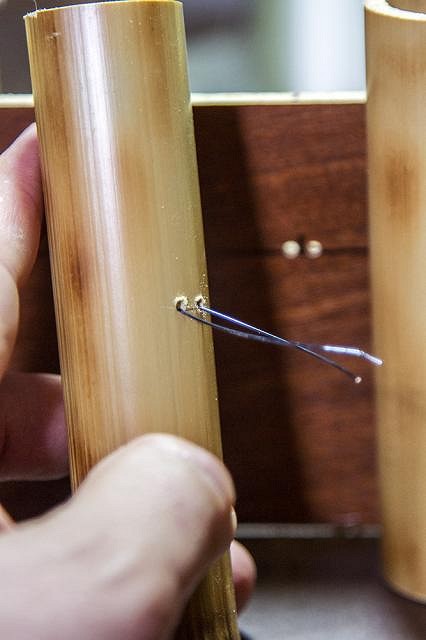
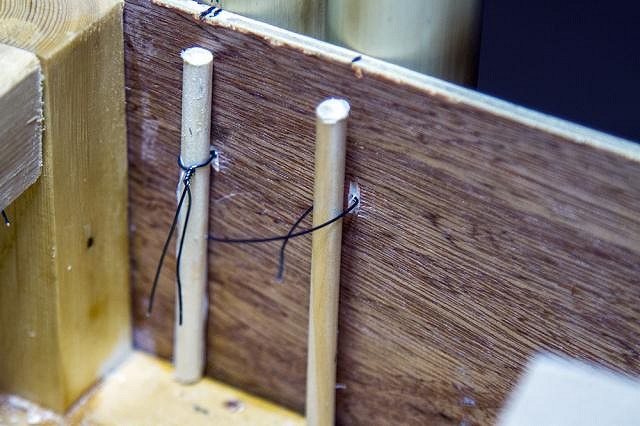
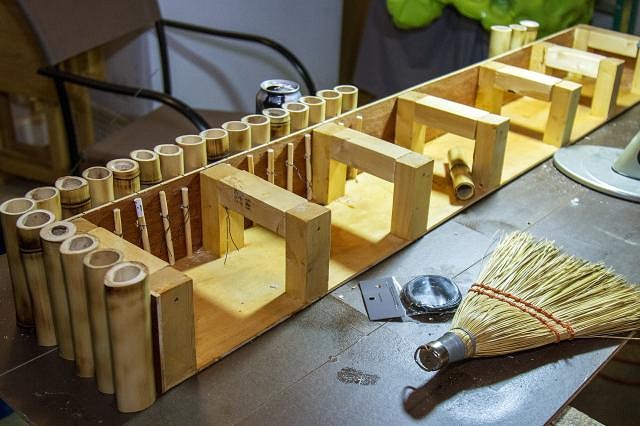
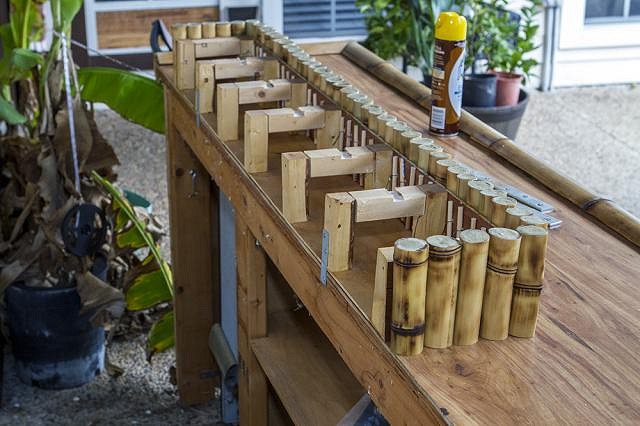
Next up is a project I began back in the spring--a rum shelf for the back bar. I built the frame from scrap wood handy, but I wanted it clad with bamboo segments. That meant harvesting, burning, cutting and drying all the bamboo. That proved somewhat time-consuming. But, with the holiday break upon me, I had time to finish the project. I marked a reference line on the shelf frame, and a matching line on the bamboo segments. I drilled holes in the bamboo and matching holes in the plywood of the frame. I threaded 22 gauge jewelry wire through the holes in the bamboo, which involved a bit of trial-and-error before I got the knack of it.
I then threaded the wires through the corresponding holes in the plywood frame. Simply tying them didn't give enough stability, so I cut a wooden dowel to length and inserted this before tying. This made the tie much tighter (although 22 gauge wire was still too thin to tie very tight lest it snap.
If you're thinking this looks like too much work, you'd be correct. Once I got all the bamboo tied on, I ran a bead of Titebond II glue where the bamboo met the wood, just of a little added stability. It won't take any kind of stress, but stabilized the whole setup a bit. For the open ends of the bamboo segments, I repeated the process I used on the bamboo gate above--fill the cavities with Good Stuff foam, trim the excess and fill with wood putty, finishing up with a spar urethane seal.
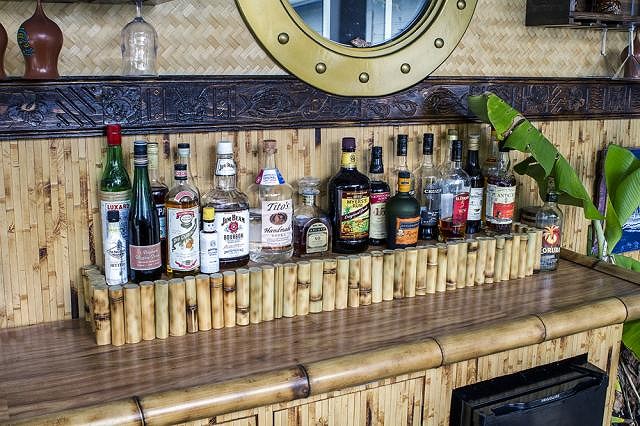
I attached the shelf to the back bar using a couple of galvanized mending plates. Simple and effective. See those routered grooves in the cross-supports? My initial intent was to run LED lighting through there, so as to illuminate the bottles from below, through a translucent plexiglass shelf, not entirely dissimilar to what ProgrockTV has done with his home bar. Alas, the appropriate plexiglass is not cheap and not lying around my garage in sufficient scrap quantities to make this happen at the moment. Rather than wait until I had sufficient surplus funds, I cut out a piece of the same laminate flooring I've used for the bar top to serve as the shelf. It actually looks pretty good, blending in with the existing bar for now.
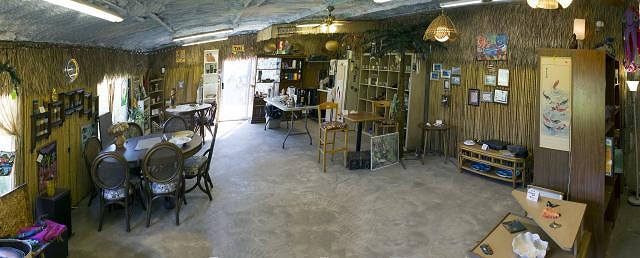
Once everything was back in place, I gave it a test drive, so to speak, with a variety of liquors and liqueurs handy. I think it turned out pretty well. Now, all that remains to do is install the sink and faucet (and plumbing, duh) and the back bar will be completed. I look back at the first page of this thread and amazed at how far I've come in less than a year. Crazy!
As always, I have a more detailed writeup posted on my blog for those who just can't get enough build-along! |
|
L
LoriLovesTiki
Posted
posted
on
Sun, Jan 7, 2018 12:21 PM
Looking good! I love the details for your projects. They will be helpful for those trying something similar. |