Tiki Central / Home Tiki Bars
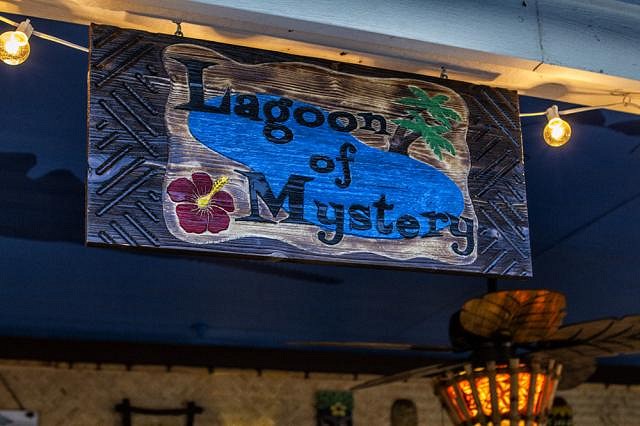
Lagoon of Mystery
Pages: 1 2 3 4 5 6 242 replies
|
PP

Prikli Pear
Posted
posted
on
Thu, Jan 18, 2018 8:11 AM
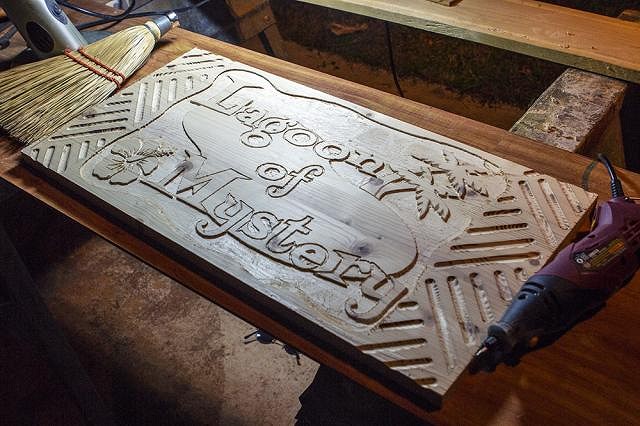
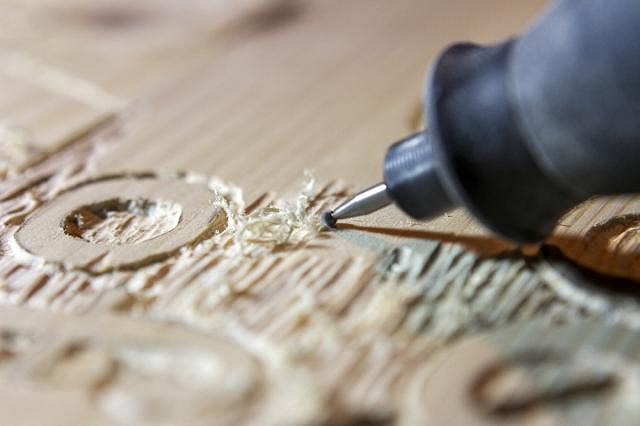
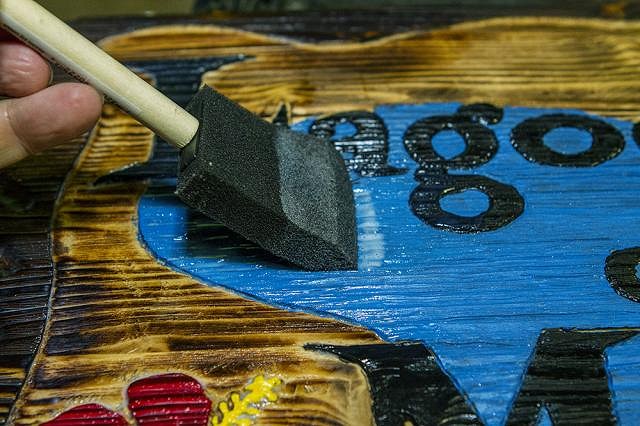
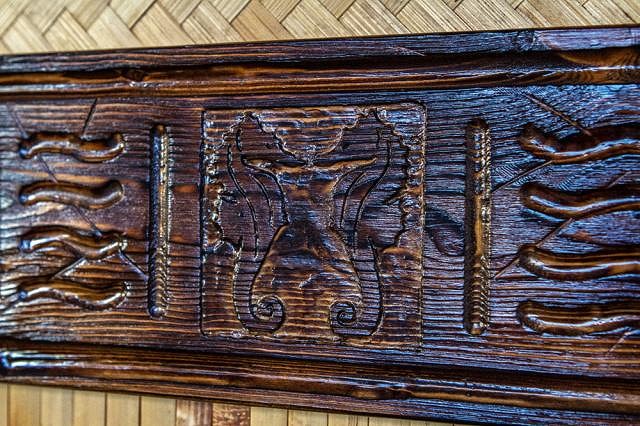
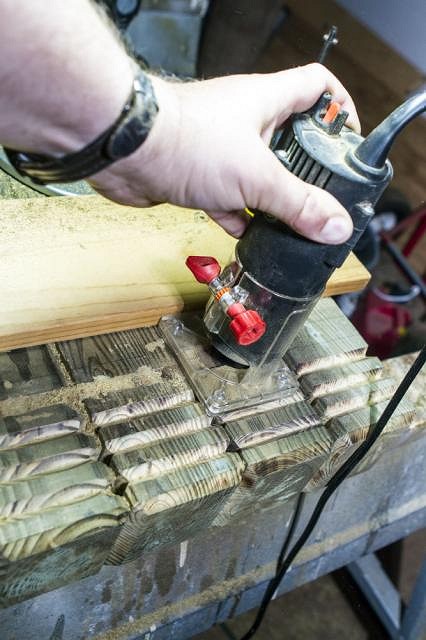
For some unfathomable reason, this year winter in Texas has decided to act like winter in other parts of the world and actually be cold. We've had snow. Twice. Sleet. Freezing rain. For comparison, last winter we had a total of 390 chill hours (ie, the total number of hours spent below 45F, a number closely watched by fruit tree growers). This winter we topped 500 hours before the end of December. So that's driven me indoors, where I started work on a sign for the Lagoon, among other things. After noodling around on the computer and coming up with an acceptable graphic design, I printed it out on paper, the transferred that design onto a board using my good old Xacto knife and a pencil. Once that was done, I used my trim router to carve out the big area and my Dremel to get the details. I always include too much detail work. I'm dumb that way. I have to confess that this would've been a perfect job to use the nice, German wood-carving set my brother gifted me with a decade ago, but last summer I boxed them up and put them away because of a different project, and have since been unable to find them. Like I said, I'm dumb that way.
So instead of using nice German wood carving chisels, I was left to cut in the texture of the water with the Dremel. Time consuming? Oh, yes.
After that, I torched the sign to get that textured Witco look. This is always fun, and makes pretty pictures. I then scrubbed it down with a wire brush to remove all the carbonized (ie burnt) wood. Guess what? That removed most of the texture to the water I'd spent all that time adding. sigh
Next up, a coat of Minwax Special Walnut for the "framing" section. I thought I could get away with just the Special Walnut, but I ended up adding a topcoat of Dark Walnut just because it looks so much nicer, and give so much more visual depth. Once that dried, I attacked the rest of the sign with paint. For the most part, I used what I already had on hand--the blue with the glitter in it that I used on the ceiling, the green and black for my directional sign. I ended up spending $4 for some cheap, exterior acrylic in yellow and red for the hibiscus, because I had no yellow or red. When am I going to learn with this hibiscus design? Apparently never. Super-detailed and a huge time sink, but I continue adding it to every wood carving project I come up with.
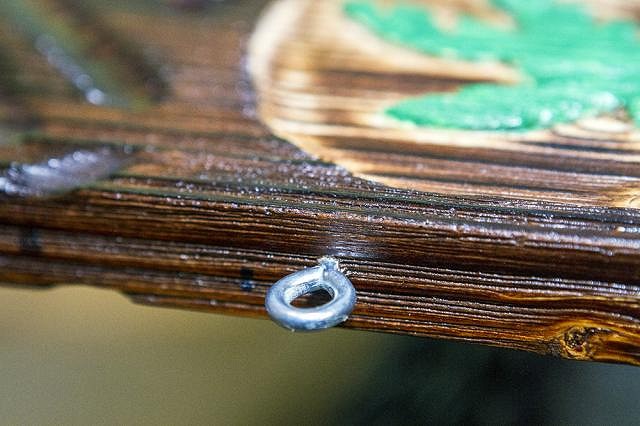
I drilled pilot holes 4.5" from either end of the sign then added eyehooks. This is how the sign will be hung (duh). I did the same for matching companion hooks in the ceiling beam, which kinda goes without saying, but I say it anyway because, as The Wife says, I'm anal like that.
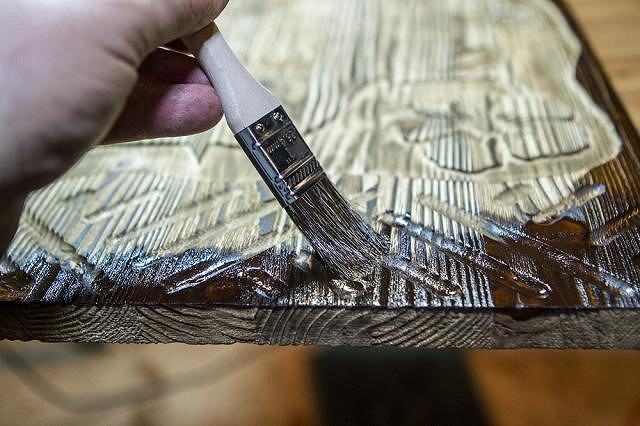
As if this update wasn't exciting enough, this is the application of water-based spar urethane! I know I've deprived you of witnessing this joy on previous updates, but no more! A couple of technical points: I have both water- and oil-based spar urethane on hand, but went with the water type because it dries clear and I didn't want the paint colors muddled. The oil type dries with a kind of sepia tone to it, which looks great on natural-looking stained wood, but I didn't trust it with the colored paint. Also, urethanes are notorious for capturing bubbles when applied, and then drying that way, marring the finish. I have to confess I've not seen water-bases spar urethane do that. I goes on easy, and any bubbles vanish before it dries. Very forgiving.
And here is the finished sign, in situ. I'm happy with it, although looking back, there are all manner of things I'd have done differently. Also, it's double-sided, so it's visible from either direction. Double the workload, double the fun, right?
As always, there are more photos and detailed step-by-step descriptions on my blog for those who are gluttons for punishment. [ Edited by: Prikli Pear 2018-01-25 13:04 ] |
|
M

mikehooker
Posted
posted
on
Thu, Jan 18, 2018 1:15 PM
Truly appreciate the attention to detail you put into all your projects and the effort you put into each post. |
|
H

Hami-The-Tiki-Torch
Posted
posted
on
Fri, Jan 19, 2018 8:52 AM
Great stuff! Love all the pics. Enjoyed your appearance on Marooned! Super informative. Keep on keepin' on! https://itunes.apple.com/us/podcast/marooned-a-texas-tiki-podcast/id1257608123 |
|
PP
Prikli Pear
Posted
posted
on
Fri, Jan 19, 2018 12:33 PM
Appreciate the compliments, Mike! I've always figured that if I'm going to do it, might as well do it-- well, not "right" exactly, but maybe less half-assed than normal! Hami, appreciate your listening in! I was a whole lot of fun, and David and Jennifer made fantastic guests. For anyone else interested, David Phantomatic dropped by the Lagoon of Mystery last week during a much-welcome break in the cold weather we've been having this winter to record an episode of Marooned: A Texas Tiki Podcast. Looking back, I'm kicking myself for drawing a blank when trying to remember Mr. Pupu Pants and Hula Sue's South Seas Hideaway, where I got the idea to use glitter crystals in my ceiling paint for a shimmering effect. Also, the actress from It's a Mad Mad Mad Mad World is Barrie Chase, who I could not remember for the life of me at the time. Break out the Barbancourt 5-Star! Port Au Princes all around! :drink:
David and Jennifer saying "Man, what is taking him so long with those drinks?"
|
|
H

Hakalugi
Posted
posted
on
Fri, Jan 19, 2018 2:21 PM
Nice job on the bamboo work! If you have some extra bamboo you could add two more pieces to the gate like below. If you had wider pieces to add, that would be even better.
|
|
PP
Prikli Pear
Posted
posted
on
Sat, Jan 20, 2018 8:07 PM
Honestly, that had not occurred to me, Hakalugi. A split clum would go nicely over those screws. Thanks for the suggestion! |
|
PP
Prikli Pear
Posted
posted
on
Thu, Jan 25, 2018 1:14 PM
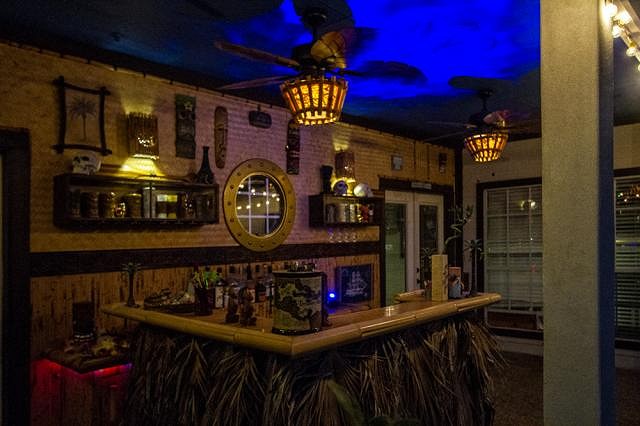
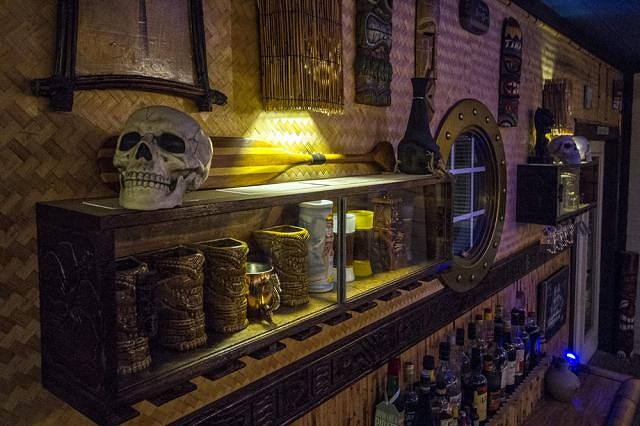
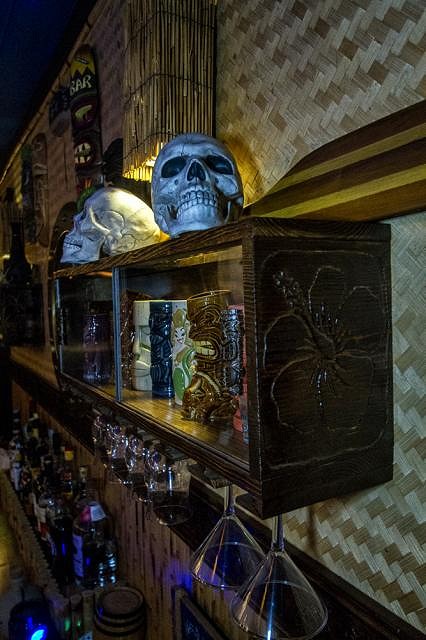
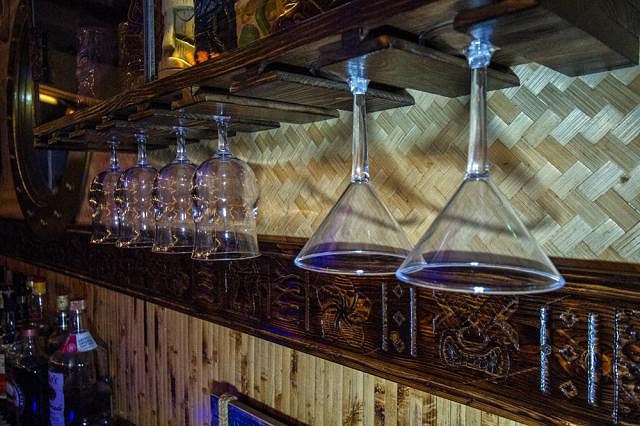
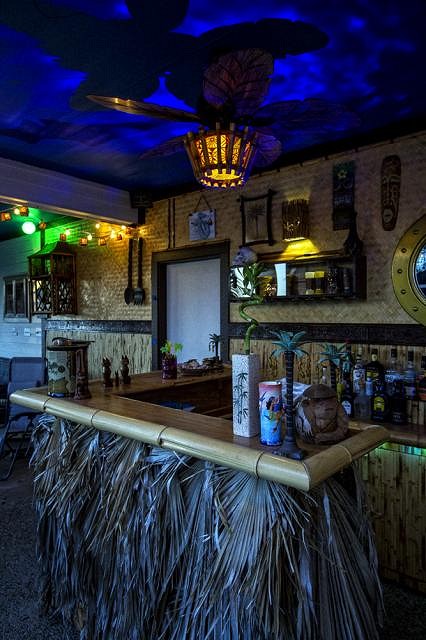
I have realized that despite an over-abundance of build-along photos on this thread, I have not shared any "glamour shots" of the Lagoon of Mystery as it looks in operation. Here is my effort to correct that. The build is far from finished, and I've yet to figure out what I'm going to do with those white doors, but this should give a good indication of the vibe I've got going.
I think the ceiling is the most striking feature of the whole bar. The sea life silhouettes (which are more visible in person than in photos) coupled with the LED ripple projector does an impressive job of selling the illusion of being under water. The glitter crystals I added to the blue paint also lends a subtle shimmering effect that contributes. I'm ready for the weather to warm up so I can finish all the silhouette details.
[ Edited by: Prikli Pear 2018-01-25 13:26 ] [ Edited by: Prikli Pear 2018-01-25 13:27 ] |
|
H

hiltiki
Posted
posted
on
Fri, Jan 26, 2018 10:58 AM
Looks great already, best of luck with the rest. |
|
D

danlovestikis
Posted
posted
on
Sat, Jan 27, 2018 2:07 PM
I haven't cruised TC for awhile so it was really fun to find your thread and to see your projects in the backyard. You have some creative ideas. I'm going to have to remember to come back and to check up on you. Wendy |
|
PP
Prikli Pear
Posted
posted
on
Sat, Jan 27, 2018 6:12 PM
Much appreciated, Hiltiki! It still seems like soooooo much is left to do, but I look at where I started from and, to quote Keanu Reeves, "Whoa!" You're so sweet, Wendy. You make Tiki Central worth visiting for your positive outlook alone! Just between you and me, you're probably visiting this thread the right amount. My updates are coming in fits and starts now because 1) winter 2) lack of free cash and 3) necessary but unglamourous work. At the moment I'm currently repairing the wooden deck adjacent the pool. It was make of red cedar, which is naturally decay resistant--if it's taken care of. Unfortunately, the previous owners never did any preventive maintenance and there's a lot of rot in addition to UV damage. Pulling up the planks, cutting away the rot, sanding them smooth and weatherproofing is pretty tedious. It's something that needs to be done, but isn't going to change the look of the place by much, if any. Not everything can be eye candy. :) |
|
D
danlovestikis
Posted
posted
on
Sat, Jan 27, 2018 7:44 PM
I totally understand. I hate dusting our plantation blinds and that only took us a couple of days. But yours is all about safety first. I hope it all works out. My pointer is screws are so much better than nails. I had a mother who would build rooms on homes. Wendy PS you are super nice |
|
PP
Prikli Pear
Posted
posted
on
Sat, Jan 27, 2018 8:20 PM
I agree completely on nails-vs-screws. My son cut his foot open this past summer on a nail that'd worked its way up out of the wood. That was part of the impetus for this. That, and the fact some of the boards are completely rotted through at the far end. And there are random screws here and there from when the planks started to come loose, except the nails are still in place and the rusting screws are impossible to see until I've already split the plank apart with a crowbar trying to get it up. It's an unfun mess. Near as I can tell, the previous owners laid the cedar boards down and never did anything else to preserve or maintain them. The top sides have serious UV damage (the natural version of the Witco look) whereas the undersides have fungus eating away at 'em. I'm cutting away far more bad wood than I'd hoped to. Next weekend I'll have to make a run to the lumber yard to buy planks to fill in the gaps. Oh, and they built the deck out of 2"x6" red cedar boards, rather than 1"x6" decking planks. Which is all well and good, except for the fact that it's going to cost more $$ to replace. On the bright side, once I'm finished with this, we'll be ready to start some killer landscaping. Variegated ginger, hardy hibiscus, dwarf palmettos, some more banana plants... this place is going to look crazy tropical. |
|
D
danlovestikis
Posted
posted
on
Sun, Jan 28, 2018 4:05 PM
I don't know about Texas but banana plants die in the winters here and have to be cut down each winter. Such a huge mess as they get bigger. We had planted 16 of them in our backyard when we told that every month we needed to put a pill in the water at the base of every leaf to kill off the mosquito larva that will grow there. We have West Nile Virus in our town carried by mosquitoes, no Zika yet but we took this advise to heart and took out the banana trees. Never fails that there's something that can go wrong. Best wishes for your project, Wendy |
|
PP
Prikli Pear
Posted
posted
on
Sun, Jan 28, 2018 8:32 PM
I'm straddling boundary of Zone 8b and 9a. Some bananas are more cold-tolerant than others. With the aid of frost blankets and some Christmas lights they survived 16F a few weeks ago. Unfortunately, the same can't be said of a bunch of fruit that had set back in September. They started turning black, so that was that. The plant survived, but I cut it down since bananas only fruit once. Bananas haven't been an issue as far as mosquitoes go--that's a whole other story. They were really bad around here until I chopped out all the Lady Banks roses and Carolina jasmine that were giving them shelter. I've also got some Bird of Paradise and plumeria in the ground that've survived winter thus far. I just have to make sure to pay attention to the weather forecast. Next year will be more of a challenge once they're bigger, but so far, so good. :) |
|
C

Cap'n_Crafty_McGrim_II
Posted
posted
on
Thu, Feb 1, 2018 12:30 PM
I didnt know bananas only fruit once. |
|
PP
Prikli Pear
Posted
posted
on
Thu, Feb 1, 2018 6:57 PM
Yes, they only fruit once. But the parent plant suckers pups, and these will fruit in turn. Under the right conditions, you can get a grove of banana plants after starting with just one. |
|
C
Cap'n_Crafty_McGrim_II
Posted
posted
on
Fri, Feb 2, 2018 1:24 PM
Nice! I have to try that! |
|
PP
Prikli Pear
Posted
posted
on
Fri, Feb 2, 2018 6:31 PM
Bananas like three things: Lots of sunshine, water and fertilizer (composted manure is great, and better for them than chemical alternatives). Give them that and you'll have more plants than you know what to do with. Basjoo is a super-cold-hardy Japanese cultivar that has inedible fruit but is used for its fiber. If you're not worried about fruit, it's a great low-care choice. And there are super-dwarf varieties that can be grown in pots for the space/climate impaired. The edible types generally take a year of uninterrupted growth before they fruit (that is, if they freeze to the ground, the clock resets) and another 4-5 months or so after that for the fruit to mature and ripen. Going Bananas has a great variety of banana cultivars and descriptions. Their plants are grown from tissue culture, which ensures they're true to type and disease free. I've bought from them in the past and have been impressed with the quality of the plants I've received in the mail. [ Edited by: Prikli Pear 2018-02-02 18:31 ] |
|
R

rgordo1147
Posted
posted
on
Sun, Feb 11, 2018 5:13 PM
Spent some quality time with your thread and what you’ve accomplished so far is really impressive. I’ve been debating whether to break out my trim router and Dremmel to try my hand at carving - you’ve given me the inspiration to do it! |
|
PP
Prikli Pear
Posted
posted
on
Sun, Feb 11, 2018 9:07 PM
That's the spirit, rgordo! Look, I'd never done any detail work with a router until those first triangle base boards upstream. All I'd ever done was 1/2 inch deep dado cuts. When you lock down a straight edge to act as a rip fence, those are super easy. Decorative router work? Not nearly so cut and dried. There's a steep learning curve, but the good thing is that all you need is maybe 10 minutes practice on scrap wood, then you've got it. Dremel's a little different, but the good thing there is that the scale is so much smaller that screw-ups are easier to cover up. :wink: The best advice I can give is to plan it out. Cut out templates in card stock if you're going with a repeating pattern, and trace that onto the wood to guide you. And don't get too complicated to start out. Stay simple, and increase the amount of detail when you feel ready for it. [ Edited by: Prikli Pear 2018-02-11 21:08 ] |
|
PP
Prikli Pear
Posted
posted
on
Fri, Feb 16, 2018 7:54 AM
Elsewhere on Tiki Central I posted about making jackfruit-infused rum. Why jackfruit? Because it's an unusual, distinctive tropical flavor that's not really available outside of Juicy Fruit gum, and I have access to the stuff. I tried the jackfruit rum in a daiquiri. It was very flavorful but also way too sweet--that jackfruit brought a lot of fruit sugars along with it. Clearly, I needed to craft a signature cocktail for the Lagoon of Mystery around it.
I ended up with two cocktails. The first is super-fruity that I'll get around to sharing in the future. The second, the Jaguarundi, is an offshoot I'm sharing now. It evolved from an experiment with agricole that didn't work, but showed promise. I also found that using coconut milk had a positive effect on the drink's flavor, texture and mouthfeel. I don't like coconut normally. The texture of shredded coconut makes me gag. The flavor's normally too sweet and cloying. But an encounter with fresh coconut water during a trip to Jamaica some years ago showed me that all coconut is not created equal. I'm more open now to incorporating coconut into cocktails, although I still don't really like Coco Lopez, Coco Real and the like.
Jaguarundi Combine all ingredients in a shaker tin with crushed ice and shake until frost forms on outside of tin. Gated pour into poco grande glass or tiki mug (I normally use a tiki mug, but went with the poco grande this time to show off the drink better) and add crushed ice to fill (I use the ice from the mixing tin). Garnish with a pineapple frond and candied ginger on a cocktail pick. A sprig of mint is okay too, if you're so inclined. I searched the interwebz and didn't really come up with any recipes that are similar, even allowing for the rarity of jackfruit rum. Probably the biggest influences here are Brazilian batidas and the 3 Dots and a Dash, but it doesn't really taste like either of those. I'm by no means a polished mixologist, but I have to say I'm surprisingly pleased with my first real cocktail recipes. :) |
|
PP
Prikli Pear
Posted
posted
on
Sun, Feb 18, 2018 7:56 PM
As promised, my other jackfruit-infused rum cocktail, the Coatimundi:
Coatimundi 1 oz. Jackfruit-infused rum Combine all ingredients in a shaker tin with crushed ice and shake until frost forms on outside of tin. Gated pour into poco grande glass or tiki mug (I normally use a tiki mug, but went with the poco grande this time to show off the drink better) and add crushed ice to fill (I use the ice from the mixing tin). Garnish with a cinnamon stick along with a kumquat wrapped in a loop of lime peel on a cocktail pick. [ Edited by: Prikli Pear 2018-02-18 19:57 ] [ Edited by: Prikli Pear 2018-02-18 20:50 ] |
|
PP
Prikli Pear
Posted
posted
on
Wed, Apr 4, 2018 8:33 PM
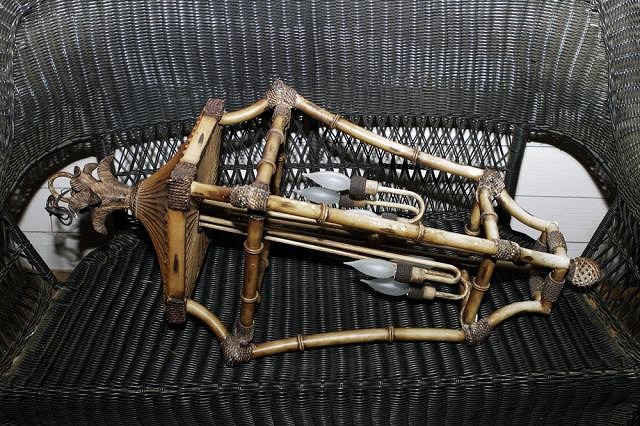
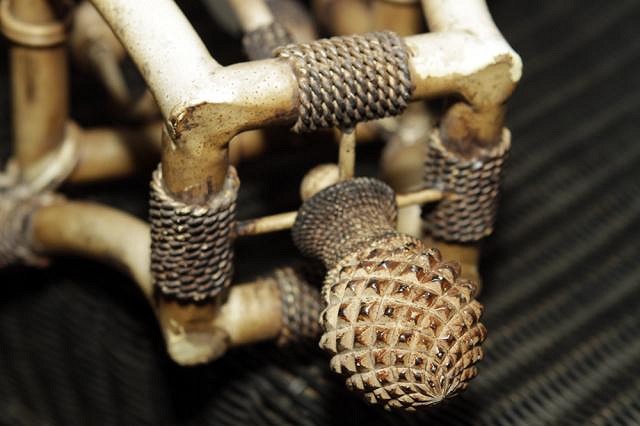
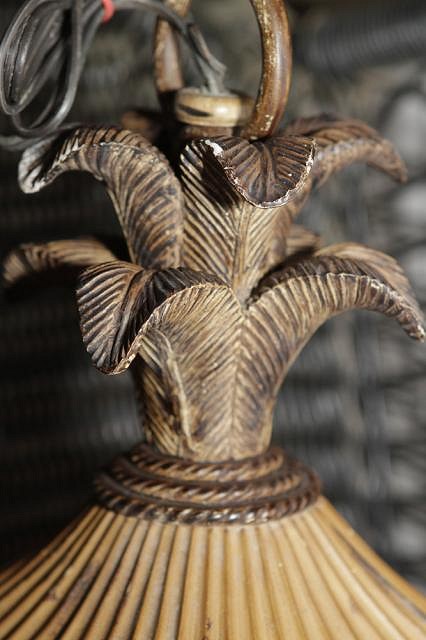
Lucked into this hanging lamp find on CL. Was listed as "bamboo lamp" but turns out it's made of steel or brass or similar metal. This sucker's heavy! Big, too--39" top to bottom. And check out the detail. Once I get some flicker bulbs in it, it will be stunning. Now I just have to figure out where it goes.
|
|
L

littlegiles
Posted
posted
on
Fri, Apr 6, 2018 8:57 AM
Great score on that lamp! Placing it somewhere may be a challenge. |
|
T

tikitube
Posted
posted
on
Fri, Apr 6, 2018 9:55 AM
That lamp looks amazing... great details! I just picked up some flicker LED bulbs on Amazon for cheap, and they work well but are best if you see the light they cast and not the bulbs themselves. Glad to see you're still moving forward. My lanai has mostly been on hold due to weather and the fact that I have other home projects (like the kitchen) that are a bit higher priority. You're keeping me inspired, though. Thanks, Jeff |
|
PP
Prikli Pear
Posted
posted
on
Thu, Apr 26, 2018 1:49 PM
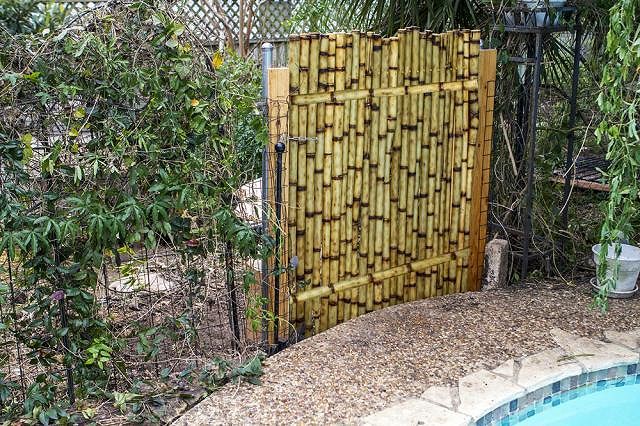
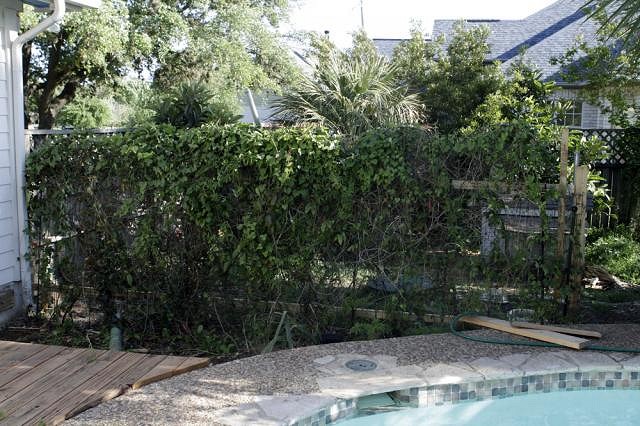
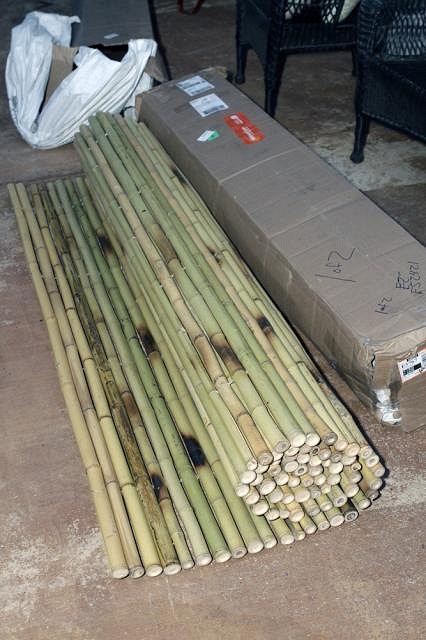
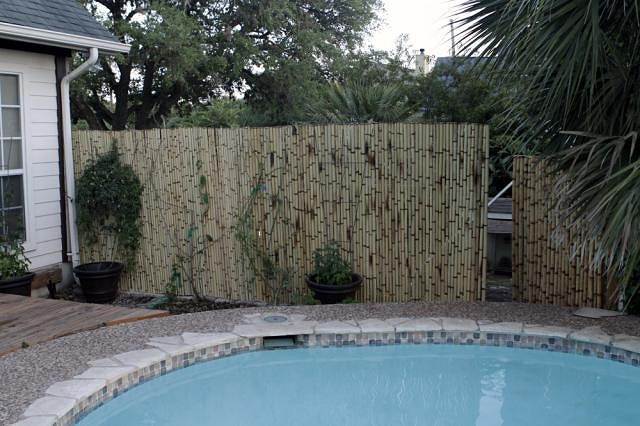
I haven't posted any updates in a while, but that's not because I haven't been busy--my project have just been long, drawn-out affairs that don't lend themselves to good photos. Except the dog kennel fence adjacent to the pool. It was essentially a chain of trellises wired together, reinforced by wire fencing and overgrown with flowering vines. Except it was never terribly stable and the weedy vines outgrew the flowering ones. When I replaced the gate with a home build bamboo one, I knew the fence had to follow.
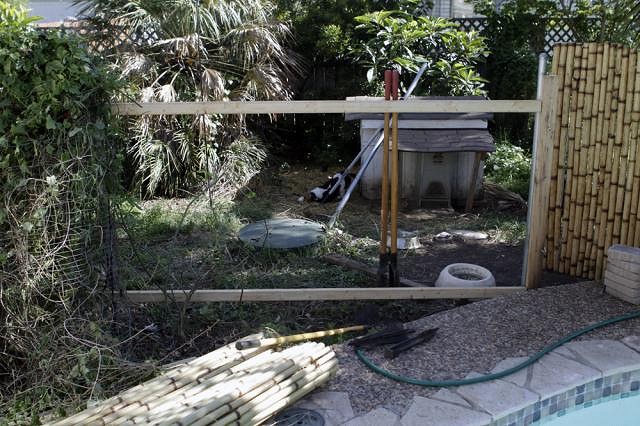
Harvesting and torching all the bamboo for the gate convinced me to buy commercial bamboo fencing for the fence itself. So I ordered two 8' lengths of 6' high fence. That's taller than I wanted, but 4' was too short and I didn't want to waste time trimming to size. I did go through and torch the nodes so that it would better match the gate.
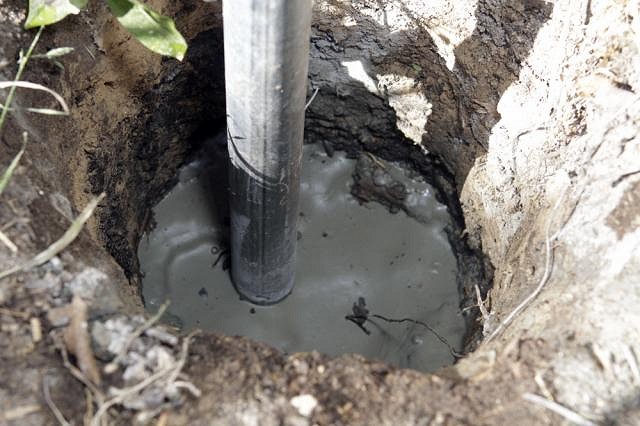
I used a post hole digger to dig a 2' deep hole and set a steel post. I used fast-setting concrete mix, as the clay soil does not for a stable fence make (learned that from experience). I used a carpenter's level to make sure the post was square.
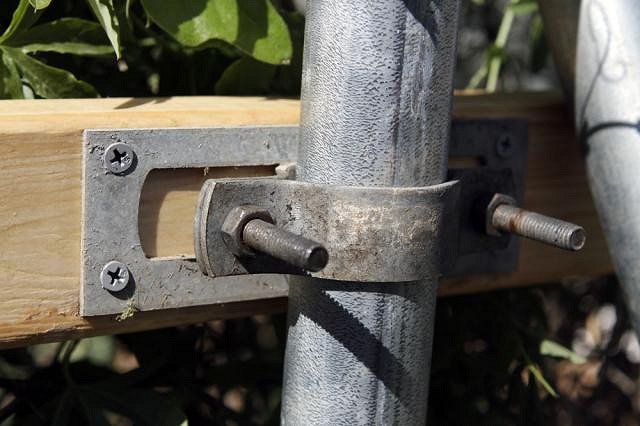
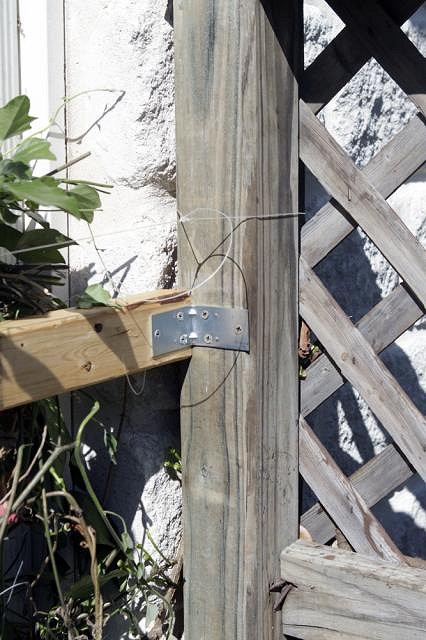
I then anchored 2"x3" crossbeams to the post...
...and secured them to the square post of the privacy fence using brackets and wood screws. The other end of that plastic line is tied to the gate post to ensure the fence is straight, and not weaving drunkenly when finished.
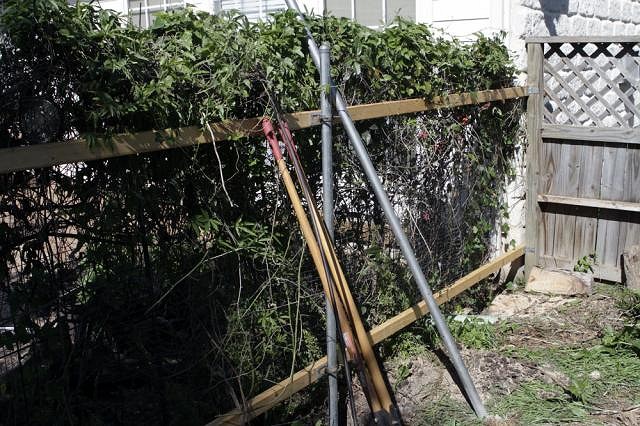
The finished frame, from the dogs' side. Note that none of the existing makeshift fence (or vines) have been removed yet).
Here, the first stages of removing the existing fence and overgrowth has begun. This was much more difficult and tedious than anticipated. I'd wired everything together to keep the dogs in, and the vines had grown in and out and around the wire, tying everything in knots. What a mess.
I laid down a line of pavers to elevate the bottom of the fence from the dirt/mud to stave off rot a little. The pavers also discourage the dogs from digging out, at least a little.
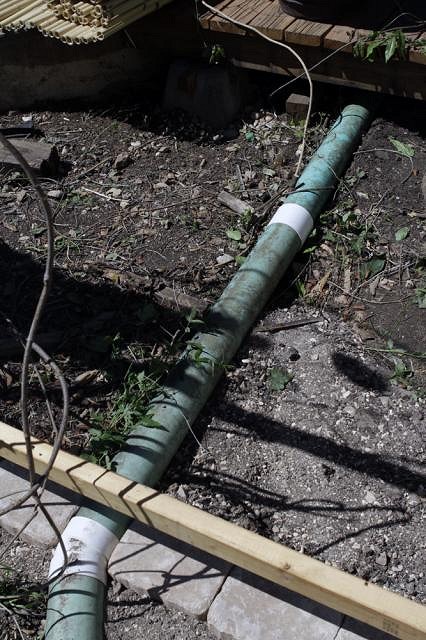
The rain drain from the patio ran under the deck. Because of future plans, I needed to relocate the 22-degree elbow beyond the new fence, otherwise things would be needlessly complicated. Turns out a 4" PVC drainpipe does not measure the same as a 4" PVC water pipe. I made several trips in search of the proper size coupling before I figured out the problem. Eventually I got the drain relocated.
Finally, the fence went up. I used deck screws to attach the bamboo, one every 5-6 culms. I've yet to waterproof the tops with wood putty and spar urethane, but that's coming in the next week or so. I tied the surviving, non-weedy, vines to the fence and am expecting new growth any minute now. The new fence has been in place a week now and no escapes have been made, so I'm cautiously optimistic I can mark this as a success.
As always, a more detailed writeup may be found on my blog. |
|
T
tikitube
Posted
posted
on
Fri, Apr 27, 2018 9:52 AM
Looks great, and that's an excellent idea for that bamboo fencing! I'm envious that you can use a post hole digger...here we start hitting rocks about an inch below the surface, so our tools of trade are a mattock, pick axe, and rock bar. |
|
PP
Prikli Pear
Posted
posted
on
Fri, Apr 27, 2018 12:04 PM
Pure chance on that aspect! We're at the start of the Texas Hill Country, where most of the soil is 4"-6" deep, with limestone underneath. Our lot spans one rare deposit of black Anhalt clay, which I have reason to suspect extends up to 5' deep in places. I've looked over the USGS map of our property, and our rectangular property is literally straddling a narrow triangle of deeper soil with neighbors on all sides sitting atop rock. Now, that clay can do some ugly things to foundations if left to its own devices, but it's allowed me to plant quite a few fruit trees around our yard that otherwise wouldn't have been viable. :) |
|
PP
Prikli Pear
Posted
posted
on
Mon, May 14, 2018 1:25 PM
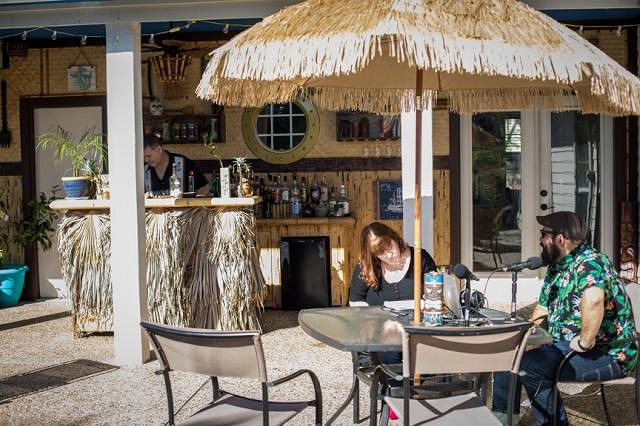
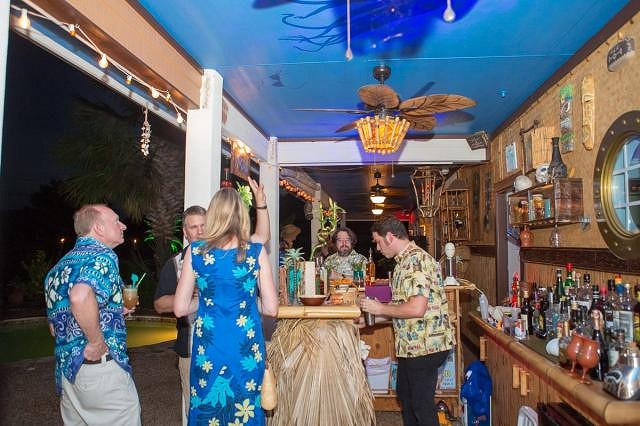
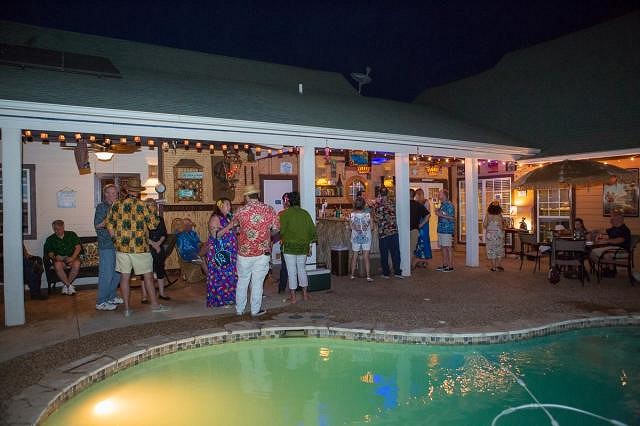
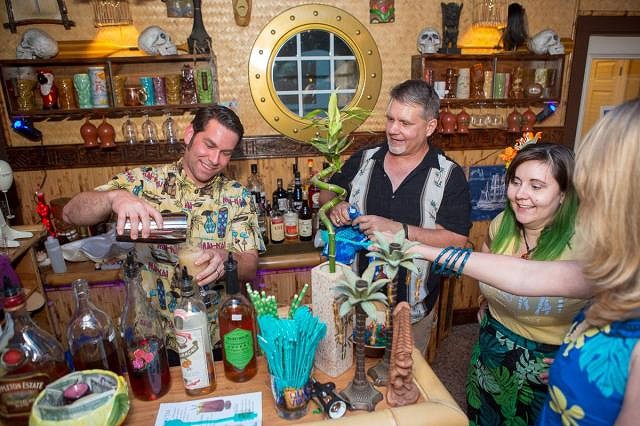
Been super-busy working on the Lagoon lately. I have a couple of build-alongs coming, but they have lots of photos and writing, really involved, so it'll be a bit before I share those. Instead, I have some photos from our inaugural tiki party, "Luau at the Lagoon," held this past Saturday. Mike Hooker and The Quiet Village--Austin's forthcoming tiki bar (once the lease negotiations are settled) handled everything behind the bar. We were expecting about 15 people to show up, maybe 20. Ultimately, more than 30 turned out and everyone brought gifts--seems like we finished the night with more rum than we started! The Boozy Doodler brought this fantastic shrunken head sculpture for the bar!
More things went wrong in the run-up to the party than I can count, and I was pretty much a basket case by the time guests started arriving. But everything eventually worked itself out as the evening progressed, and from my perspective it was a great introduction of my little tiki lounge to the greater community of Texas Tikiphiles.
|
|
L
littlegiles
Posted
posted
on
Tue, May 15, 2018 6:23 AM
Excellent and looks like everyone had a great time! I have learned to not get so stressed before parties because 99.9% of people won't even notice what got me so worked up in the first place. Everybody just wants to have a good time and looks like you have a great group of friends. Nobody fall into the pool? :) Love the shrunken head and can't wait to see the projects when you get the time. |
|
BB

Bam Bam
Posted
posted
on
Tue, May 15, 2018 8:54 AM
Looks like a fantastic time! |
|
J

jimsflies
Posted
posted
on
Wed, May 16, 2018 5:51 PM
Bar looks great! And party looks like fun too. |
|
PP
Prikli Pear
Posted
posted
on
Thu, May 17, 2018 12:12 PM
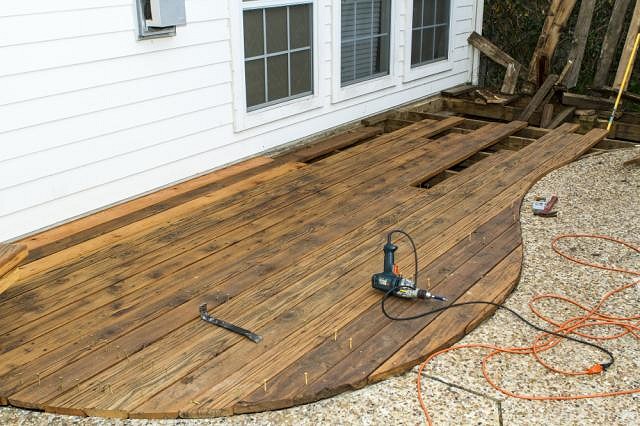
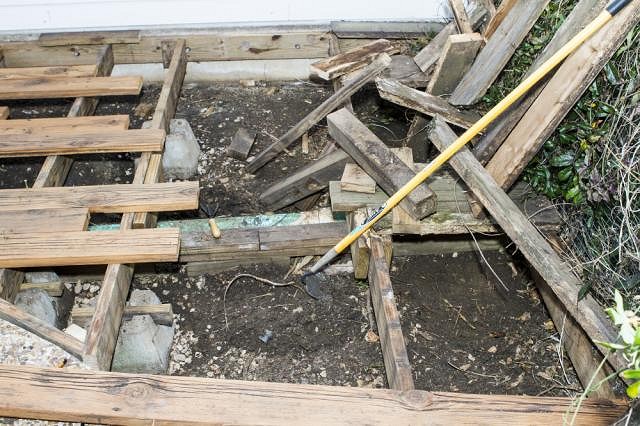
Our house has a deck that extended all the way to the fence I rebuilt with bamboo (see link above). The deck was of western red cedar, which is naturally decay-resistant and should last indefinitely if taken care of. Previous owners did not take care of. The deck had turned a dull gray, had water and UV damage and was occasionally splintery. Problematically, some of the nails were working themselves loose, to the extent my son cut his foot badly on one last fall. Clearly, something had to be done, so in January I began taking the deck apart to get an idea of what it would take to repair it to a usable state. A great number of the planks turned out to be rotten. Mold and fungus had turned sections brittle and spongy. Some sections literally crumbled as I pulled them up--it's a small miracle that the entire deck hadn't collapsed. So, this is what I did: I took each and every plank, determined what wood was salvageable and used a circle saw to cut off the rotten stuff. Then I took a belt sander and sanded down the UV-damaged wood, and sanded away any surface mold and fungus. Then I saturated the "clean" wood with Mold Armor. Once it dried, I applied several coats of Flood UV weathersealant.
Here's where I pause to offer this public service announcement. If you ever have to sand wood that has mold or fungal issues, wear a breathing mask. Seriously. When I started this, I took one small section of wood to use as a test to see if any of it could be salvaged. I was outdoors in a well-ventilated area. The wood was in generally good condition, with just a little bit of mold. No problem, I thought. This'll take five minutes, I'll be fine. Wrong. I was ill for several days after, terrible congestion, watering eyes, headaches... it was pretty unpleasant. Lesson learned. I did not sand anything else without a mask on--safety glasses, either. I went through half a dozen masks. Look at the one below--see how brown that mask is? That's all the crap that didn't go down into my lungs.
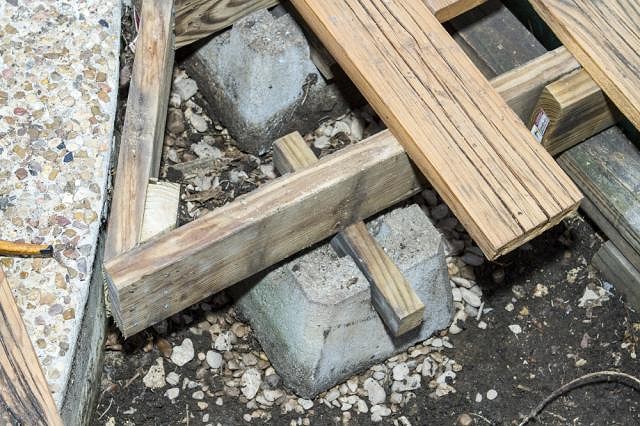
The more I pulled up, the grimmer it became. At some point, the previous owner effected some "repairs." Super-half-assed repairs. From what I can surmise, the concrete footers had subsided, resulting in a sagging deck. Rather than re-set them, the guy tossed them aside and piled up landscape timbers, 2x4s and 4x4 posts to support the deck. Honestly, it was a mess.
I had earlier decided the rebuilt deck would not extend all the way to the fence, and that was a fortuitous decision, because not nearly enough good wood remained to extend that far. In fact, I had to buy several new planks to even fill in the shortened deck. After ripping out all the cross-beams and ill-advised wood pile-ups supporting the deck, I leveled the ground then built up a layer of rocks/gravel as a foundation for those previously-discarded concrete footers. When I finished, I had a pretty solid deck frame in place.
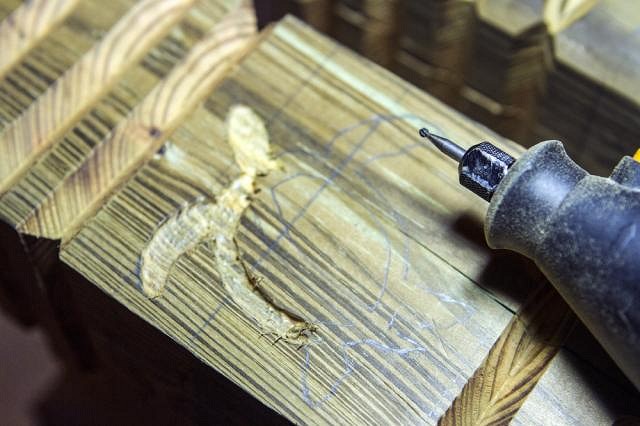
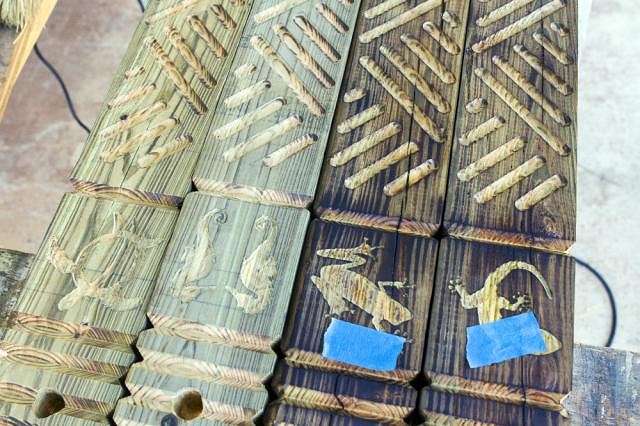
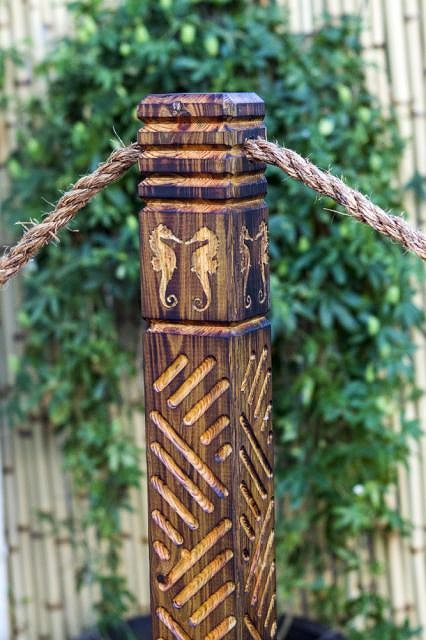
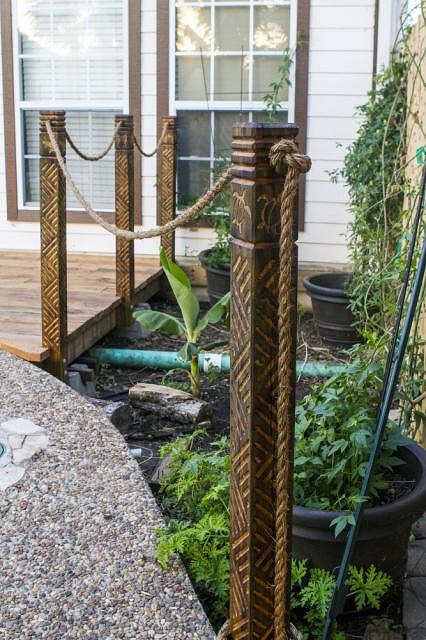
Now, for the railing. Initially I was just going to use some landscape timbers with rope wrapped around them, but insanity prevailed. Router work's fun, right? How about lots and lots of router work that'll take up a month of work when I'd originally planned for just a couple of days? Aces! I took two 8' long 4x4 posts (pressure treated) and cut them in half to make 4' railing posts.
And don't forget detailed figures of sea turtles, geckos, sea horses and frogs that are small and detailed so they need to be carved out with a Dremel. That really makes the project go more quickly!
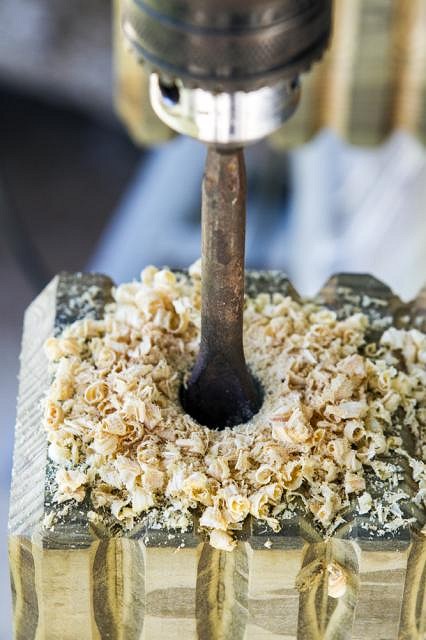
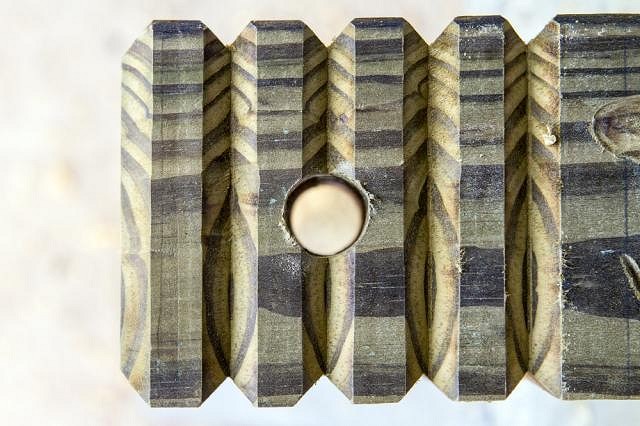
Note that when you plan to drill a 3/4" hole through each post for a rope, it's generally advisable to do so before routering out decorative V-grooves. That saves unnecessary complication. Ask me how I know.
Potential disaster did not manifest. Thank goodness. Note with all the drilling and routing, I work my breather mask. They don't use arsenic in pressure-treated lumber any more, but regular sawdust is bad enough to breathe in. After my experience with the mold dust, I wasn't taking chances.
Pressure-treated wood is a funky greenish color, so I lightly scorched the posts with my little torch (not enough to really carbonize anything) to increase contrast a little and enhance the grain. Then I applied a coat of Flood UV (natural wood tint). This wasn't so much for protection (although there is that) but to help the posts blend more with the deck. They definitely looked better once I finished staining.
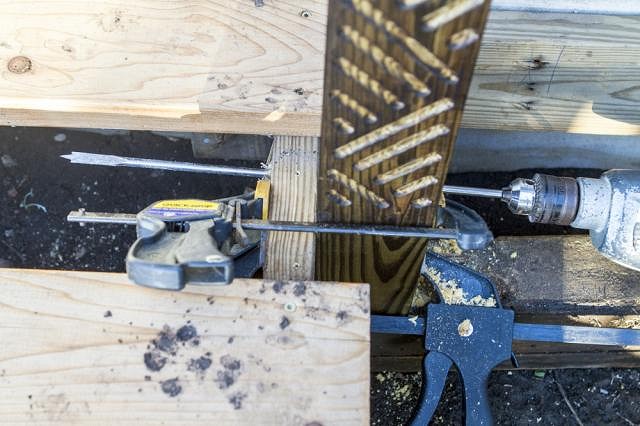
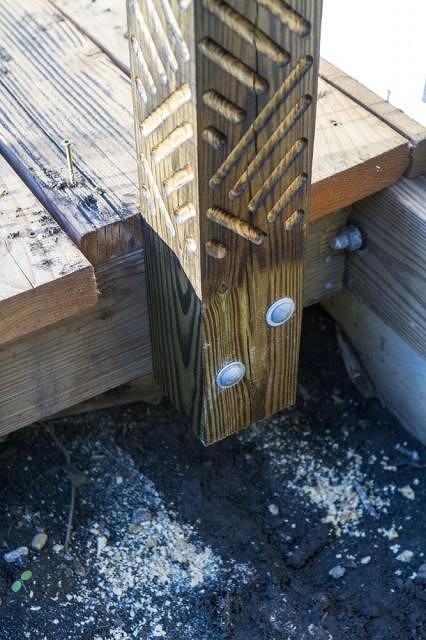
I positioned the posts, using a carpenter's level to ensure they were straight. I held them in place with clamps while I drilled through the posts and deck support beam. Two holes per post.
I used 6" carriage bolts, with washers and nuts (Tighten! Tighten! Tighten!) to secure the posts to the deck. I used a jig saw to trim the deck planks to fit around the posts.
Then I ran 3/4" Manila rope through the posts. Note that 3/4" Manila rope is significantly cheaper than 1" Manila rope, and looks just as good.
Honestly, I was surprise at how closely the final product matched the vision I had when I started.
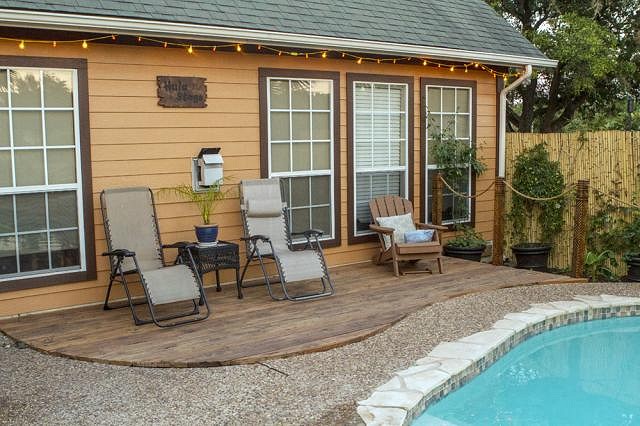
There was just one remaining problem: White walls! The dull white/graying paint looked awful, so first I repainted the trim around the windows with Olympic One (Fudge Truffle) and the wall itself with the same type of paint (Doeskin or somesuch). I also took a piece of scrap wood and routered out that "Hula Stage" sign, because says tiki more, "Wooden deck" or "Hula stage"? Presentation is everything, amirite?
We're landscaping that area between the deck and bamboo fence. Right now there's a small banana, several citronella plants and some pots with passion flowers in them occupying the space, with landscape fabric and mulch down. I have plans to add more hardy tropicals and tiki decor, but that's a longer-term project. I'm just jazzed that was once pretty much an eyesore and foot hazard has now become an aesthetic plus for the Lagoon of Mystery. As always, there are more photos and descriptions (plus a short video) at my blog for those who can't get enough of my blather. ~Jayme Lagoon of Mystery [ Edited by: Prikli Pear 2018-05-17 12:13 ] |
|
T
tikitube
Posted
posted
on
Thu, May 17, 2018 12:46 PM
Fantastic, as always! The router work on those posts really makes them pop. So with the Manila rope, does that need to be treated in any way, or is it naturally weather and uv resistent? I've never worked with it, but you're giving me some ideas! |
|
PP
Prikli Pear
Posted
posted
on
Thu, May 17, 2018 12:59 PM
The Manila rope supposedly does not retain water as do other natural rope options, so is more durable and resistant to rot. I intend to give it a coat of a UV blocker but have not gotten around to it--I just got the posts in and painting done the night before the party, so I was running right up against my deadline. I will say that the Manila rope is coarser and has a darker, richer color than other natural fiber ropes, so aesthetically it does lend itself to tiki better than sisal or jute. ~Jayme Lagoon of Mystery [ Edited by: Prikli Pear 2018-05-17 13:00 ] |
|
T
tikitube
Posted
posted
on
Thu, May 17, 2018 1:27 PM
Good to know. I was picturing dipping it into a bucket of triple thick poly or something. :wink: |
|
L
littlegiles
Posted
posted
on
Fri, May 18, 2018 6:05 AM
Great job on that facelift. Isn't it amazing what a coat of paint can do and those posts turned out terrific. |
|
PP
Prikli Pear
Posted
posted
on
Fri, May 18, 2018 8:19 AM
I know, right? The Wife and I were sitting out there and I was lamenting how ugly that dull wall was (it didn't look bad until I fixed up the other stuff, then looked terrible) and how lauhala, bamboo, etc. would just get eaten alive by the direct summer sun out of the west. She said "Why don't you just paint it until we figure out a permanent solution?" Sometimes it's best not to over-think a problem. I over-think all the time. :) |
|
PP
Prikli Pear
Posted
posted
on
Wed, May 30, 2018 9:36 PM
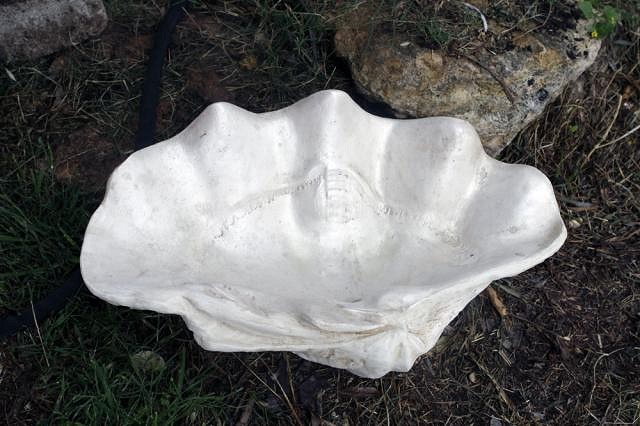
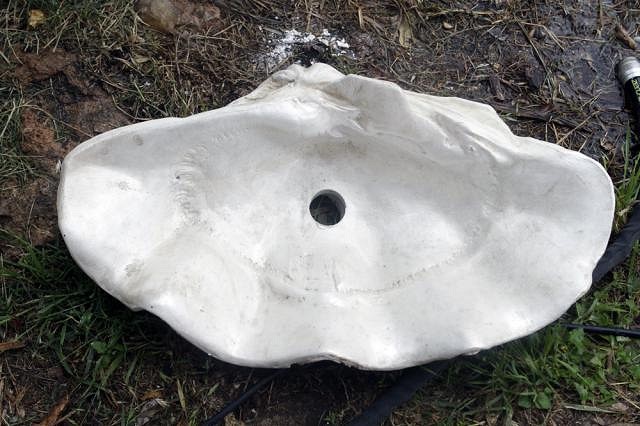
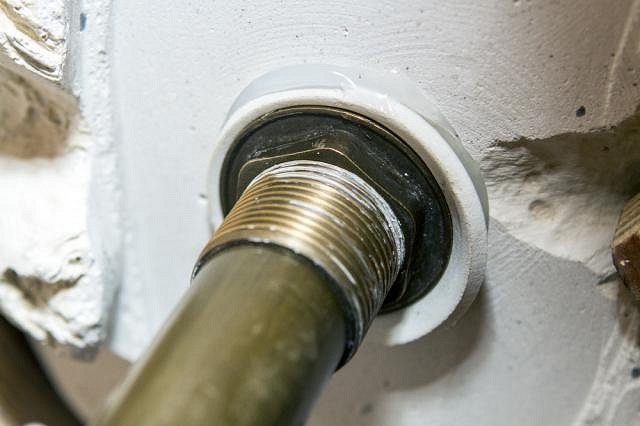
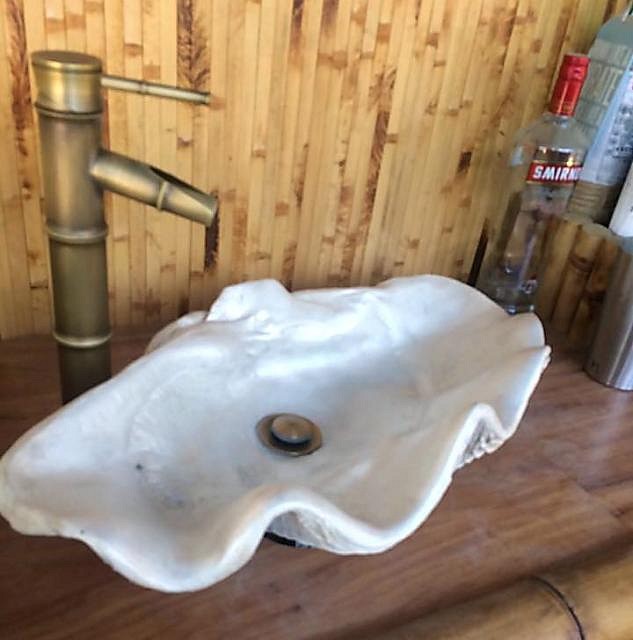
It was time to install a sink in the Lagoon of Mystery to make it a wet bar. But it had to be tiki, and to me that meant a shell sink. Unfortunately, actual giant clam shells have been banned from import to the U.S. since the 1980s because of over-fishing. Those already in the U.S. can cost thousands. There are decorator sinks in the shape of clam shells, but these are more abstract and the fake marble looks like something out of a 1990s restaurant bathroom. They're expensive as well. So I looked around for fake shells. I found some that looked good, but they were mostly plaster that wouldn't hold up to water. Resin types looked great and were more durable, but always seemed to be out of stock or out of production. Eventually, I settled on a concrete shell purchased online on Amazon for about $50. I bought it last year, expecting to get the sink installed right away. Instead, it sat gathering dust. Now, these same shells are available via Home Depot.
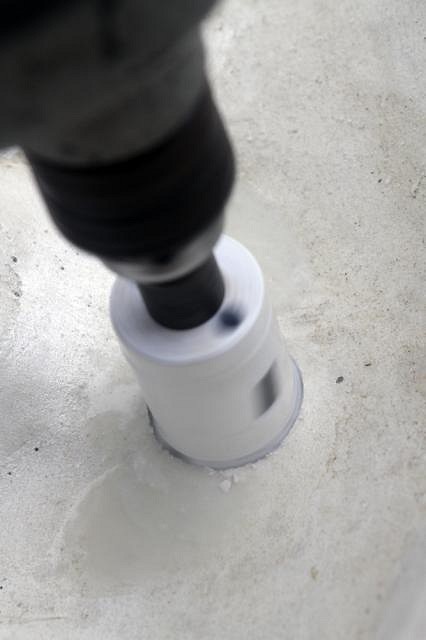
Cutting through concrete isn't the easiest thing to do. I bought a 1.5" holesaw for the job, and drilled and drilled and drilled. The addition of water kept the dust and friction heat down.
I managed to drill the drain hole without destroying the shell, a minor miracle.
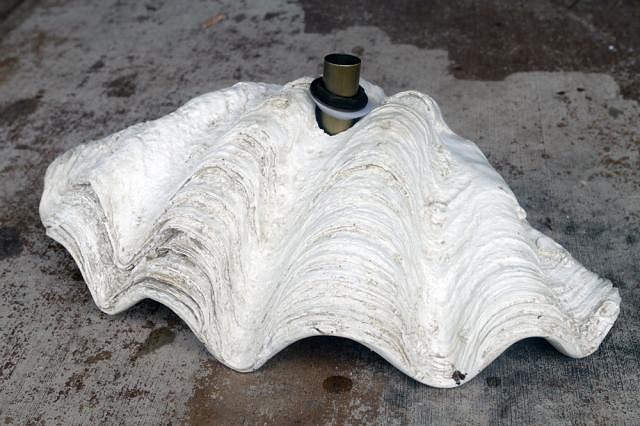
But I hadn't taken into account the contour of the underside of the shell. The brass drain insert would not fit securely.
That meant I had to grind it flat. I bought a concrete grinding wheel for the task. After my experience with the moldy sawdust from the deck rebuild, I made sure to wear a dust mask and safety goggles. Silicosis is no laughing matter, and grinding away that much concrete made for a lot of dust.
After a good bit of grinding, I got the drain insert fitting more or less flush on the bottom side.
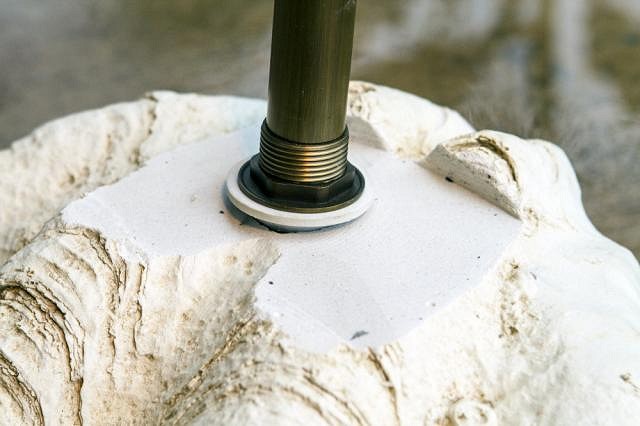
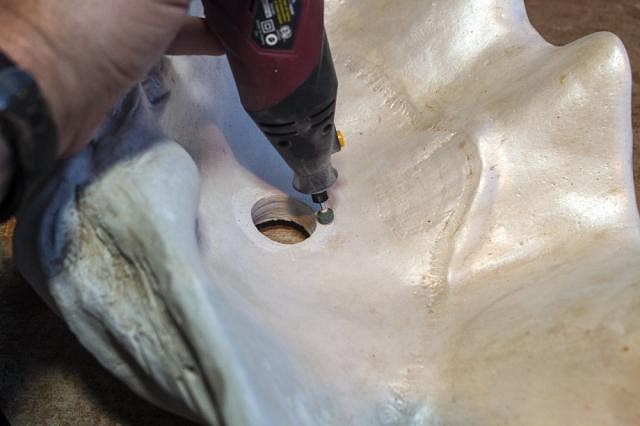
The basin was a different story. It looked smooth enough, but the gradual undulations of the shell held the drain up too far, allowing water to pool under it. I used a Dremel and various grinding bits to carve out a recess for the drain insert to sit.
|
|
PP
Prikli Pear
Posted
posted
on
Wed, May 30, 2018 10:22 PM
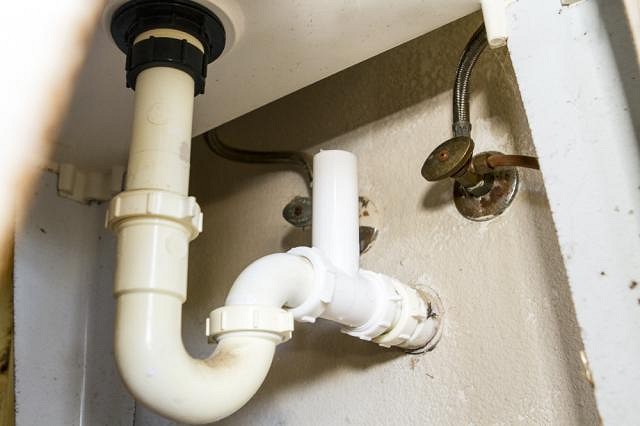
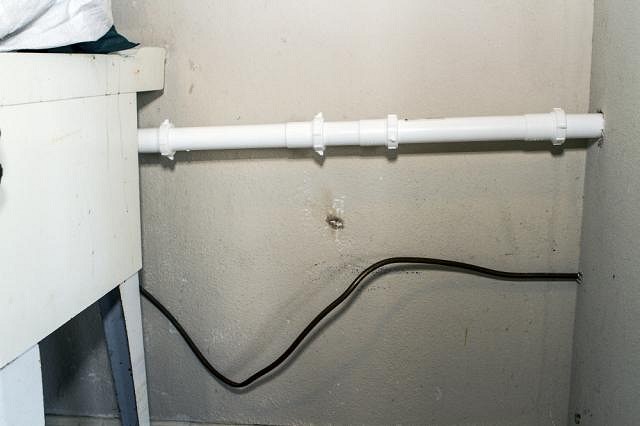
The previous owners of our house had done two things in the garage that made the sink a straightforward addition. First, they'd installed a work sink in the garage on the opposite side of the patio wall. Secondly, they'd had a refrigerator in there with a copper ice maker line that tied into the sink's cold water valve. I drilled through the fibercement siding and ran the copper tubing through.
I added a pressure coupling to connect the back bar faucet's water line.
As a teenager, I worked summers installing underground sprinkler systems. I grew to appreciate pipe join compound's ability to seal threaded joints and prevent leaks. I used a good amount on this project.
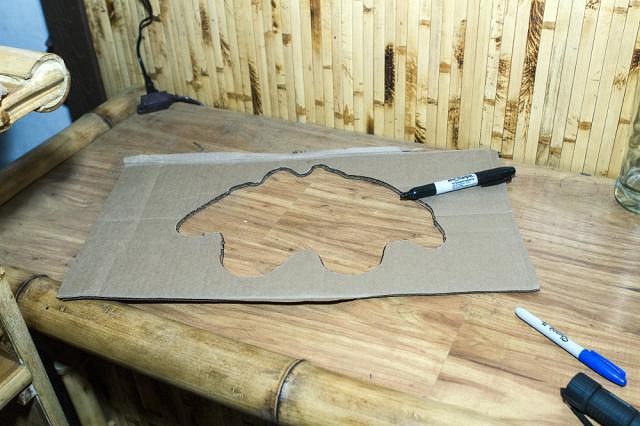
I cut out a contour template of the underside of the shell using scrap cardboard. This was imperfect at best, but I couldn't figure out a better way to do this. I laid the template on the bar top, making sure to allow for the shell overhand, then used a Sharpie to trace the pattern onto the bar top.
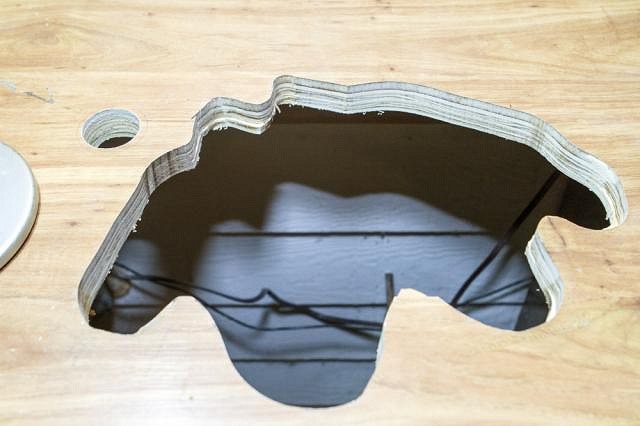
I used a drill to make pilot holes, then a jig saw to cut out the pattern. The jig saw was imprecise, in part because I'd forgotten how damn thick I'd made the bar top. I also drilled out a hole for the faucet as well.
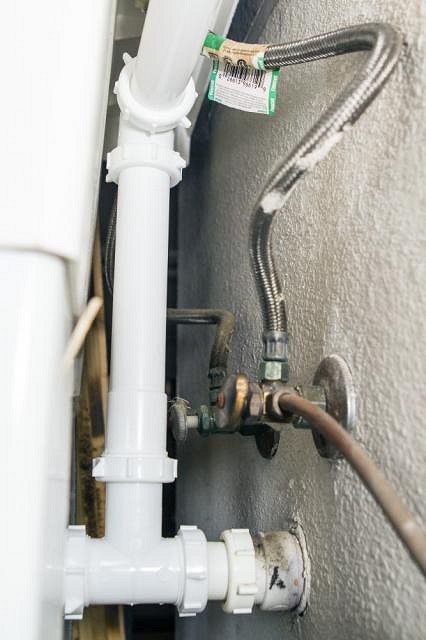
I spliced in a T joint into the garage sink's drain. Again, this made things much simpler than having to run a whole new drain line.
For some reason, all the plumbing pipes, etc. at Lowe's and Home Depot were a very thin, specialized PVC, as opposed to standard PVC. I'm not sure what was up with that, but the two didn't seem compatible. Which was frustrating, because I needed to run about 4 feet of drain line from the shell sink to the garage drain line. One piece of standard PVC could be cut to the perfect length. As it was, they only sold 12" extension pieces. I had to buy four and cut to fit, which was more costly and looks completely crappy. It gets the job done, but man, it's just ugly as sin.
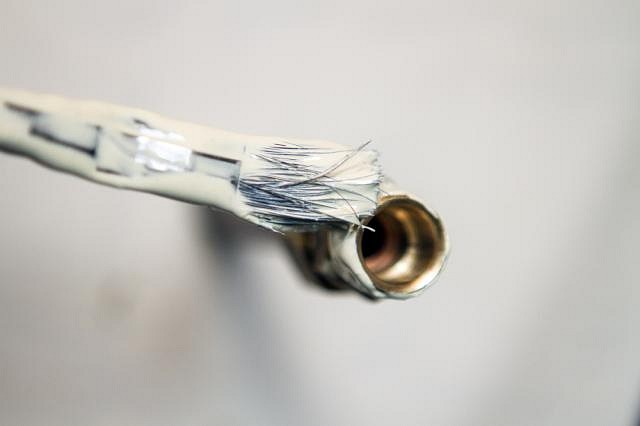
This is how everything ties in together behind the sink--the drain line and the copper ice maker line repurposeed to supply water to the back bar.
When I connected the cold water to the faucet, water flowed perfectly. Unfortunately, because of the faucet design, water also spewed out the hot water inlet. I'd decided to not connect the hot water for a number of reasons, but now I had to cap the hot water inlet to stop that backflow leak. I used a brass coupling, brass cap and significant amounts of pipe join compound. Leak stopped.
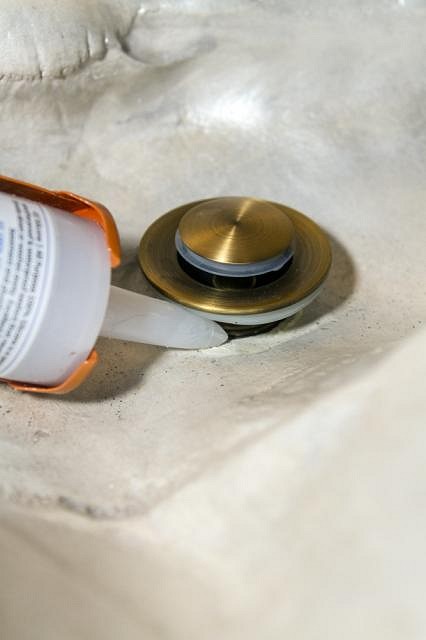
Even with my grinding work, I couldn't get a flush seal with the drain insert. Water leaked through. So I resorted to silicone sealant. I pumped enough in to completely fill the drain cavity. I tightened the drain insert into place, then smoothed flush all the silicone extruded to make a watertight seal.
The underside of the drain. I didn't bother smoothing down the silicone on this side. Once it cured, I had no more problems with leaks of any sort.
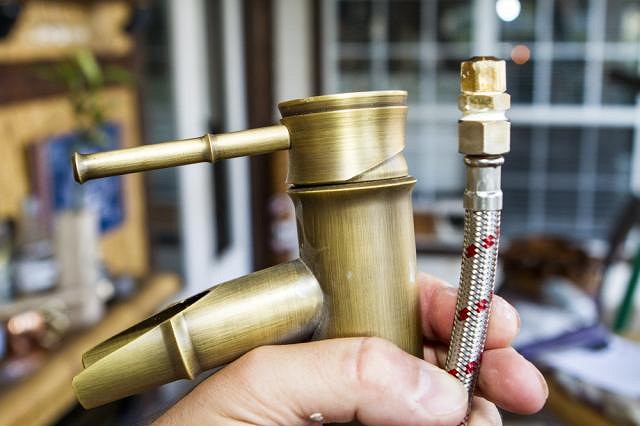
The operational sink. The faucet is an antique brass finish, styled to look like bamboo. I found it online, and it fits the aesthetic nicely. Having enjoyed a working wet bar for several weeks now, I really have to recommend it if you can swing it for your personal home bar. The convenience of simply being able to rinse out glasses and barware on the spot is very nice. Sure, the kitchen isn't that far away, but on the whole, it's surprising how much I like not having to run to the kitchen for such mundane tasks. Heck, I rinse out jiggers not because I need to, but because I can!
As always, there are more images and more detailed writeup available on my blog for those of you who are gluttons for punishment. |
|
BB
Bam Bam
Posted
posted
on
Thu, May 31, 2018 6:40 AM
Oh that is just the coolest, and the fact that it's custom built makes it even better. |
|
T
tikitube
Posted
posted
on
Thu, May 31, 2018 10:27 AM
Looks great, and very professional as always, Jayme! Shame that the PVC was weird and you had to piece it together like that. But that shell is amazing as a sink! Not to rain on your parade, but keep a close eye on that faucet. We installed one just like it a few years ago, and it developed an internal leak after only three months that was not repairable. The company that made it was based in China, with no support, and the seller was no longer valid on eBay when I discovered the leak. :( Hopefully yours will not give you any trouble, but I figured I'd mention it just in case, since it's the exact same design. I love the look of it. Jeff |
|
PP
Prikli Pear
Posted
posted
on
Thu, May 31, 2018 10:46 AM
Does not surprise me, Jeff. This one was from China as well, a no-name seller. The price was cheap enough to be worth the risk. Not so cheap as to make them disposable, but hey, it's not like there's a huge selection of bamboo-style faucets out there. :) |
|
PP
Prikli Pear
Posted
posted
on
Thu, May 31, 2018 10:49 AM
Thanks for the kind words, Bam Bam. To be honest, I'd like to take off-the-shelf simplicity over custom-built specialness on occasion, but the universe does not seem to share those sentiments. Watch Walmart start carrying a line of custom-styled shell sinks next month! :lol: |
|
T
tikitube
Posted
posted
on
Thu, May 31, 2018 11:36 AM
Yep, I caught it soon enough that it didn't cause too much damage. Figured I'd give you a heads up. Water damage sucks! |
|
PP
Prikli Pear
Posted
posted
on
Thu, May 31, 2018 11:50 AM
I have the advantage of being outdoors. The floor is concrete, the bar wood is weather-treated and the backing wall is exterior fiber cement planking. A leak would be annoying, but fortunately it would not likely be anything more than that. I'll keep an eye on it, though--being somewhat exposed to the elements could cause it to deteriorate more quickly. If so, I'll know better for round two. |
|
PP
Prikli Pear
Posted
posted
on
Mon, Jun 25, 2018 11:26 AM
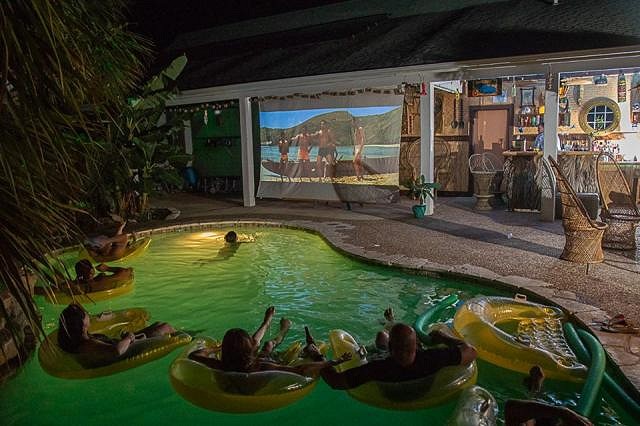
We had one of our Dive-In movies over the weekend. We showed Elvis' Blue Hawaii with the Blue Hawaii as the featured cocktail. A fun time was had by all. Highly recommended.
Also, the previous week, our friend Taylor came over to do an underwater mermaid photo shoot with The Wife. I took this image of them toward the end of the session:
They also did some shots out of the water. I think this one turned out quite nice.
|
|
L
littlegiles
Posted
posted
on
Tue, Jun 26, 2018 7:34 AM
Great! Love the Dive-In movie and the pics. |