Tiki Central / Home Tiki Bars
Mariner Mike's Below Decks [Completed!]
Pages: 1 41 replies
|
MM

Mariner Mike
Posted
posted
on
Thu, Aug 23, 2018 9:35 AM
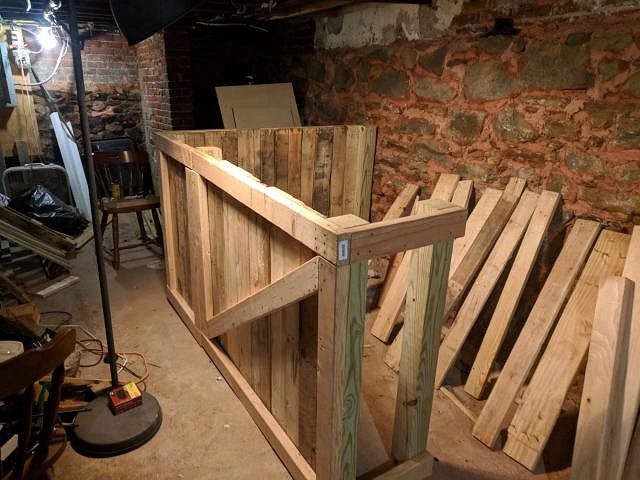
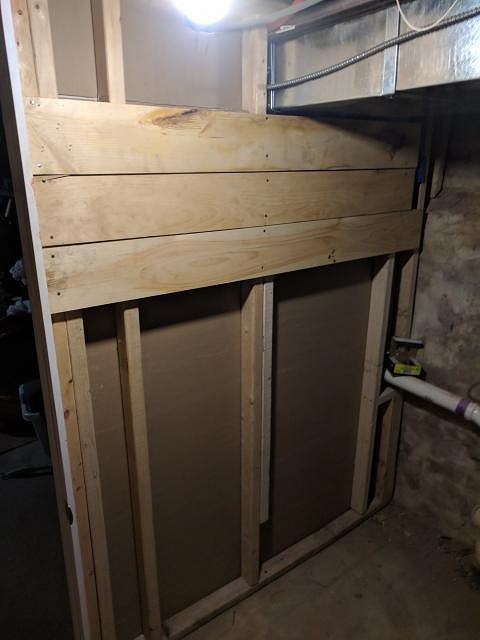
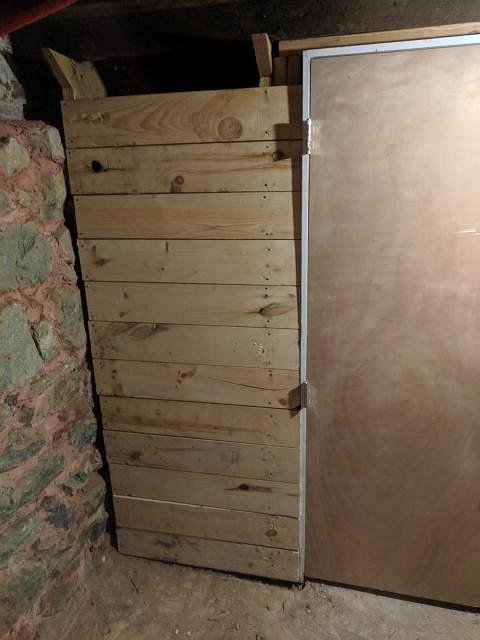
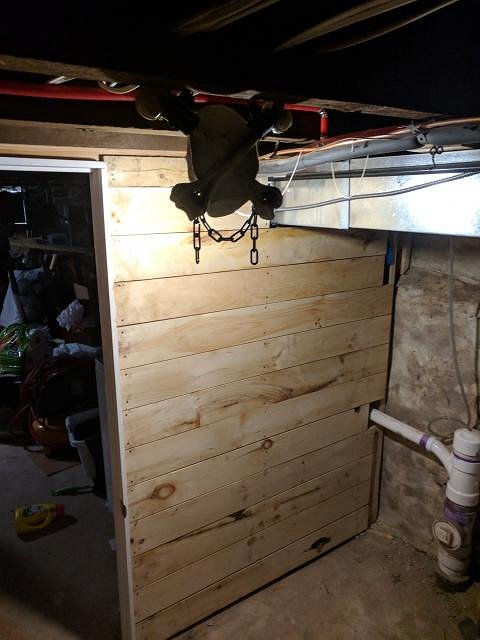
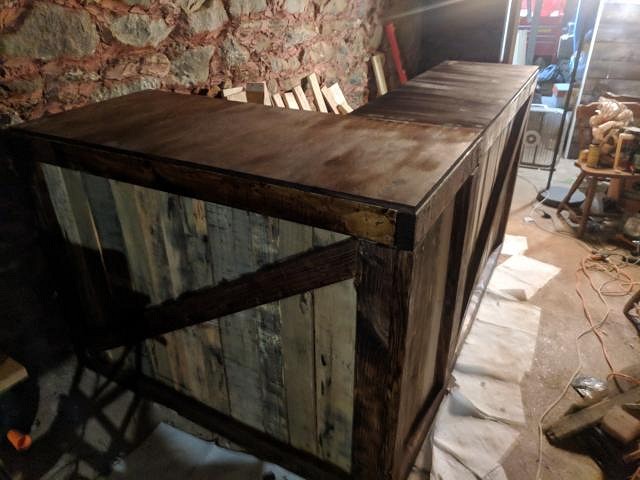
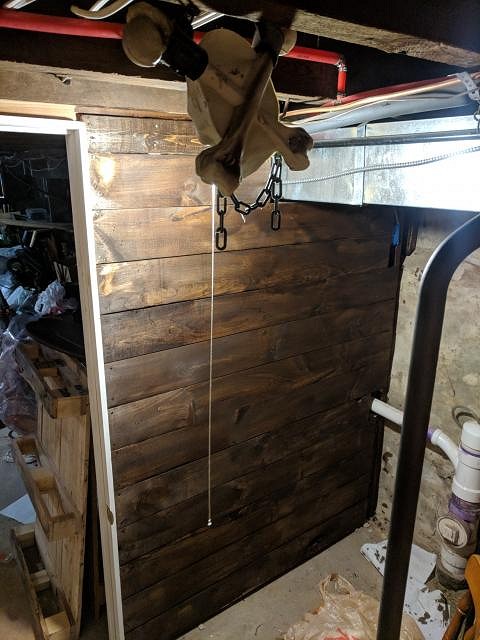
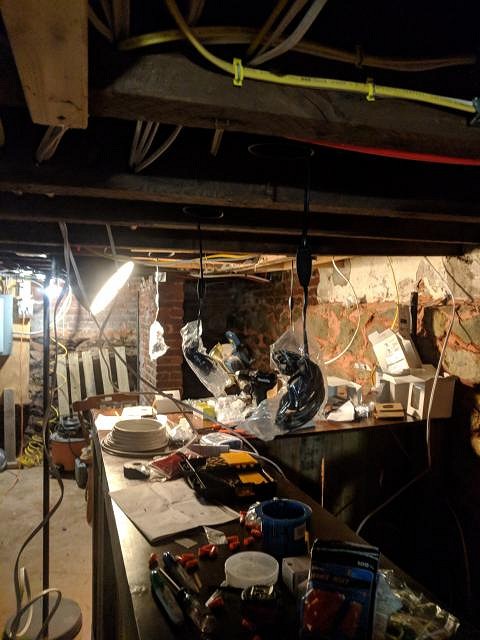
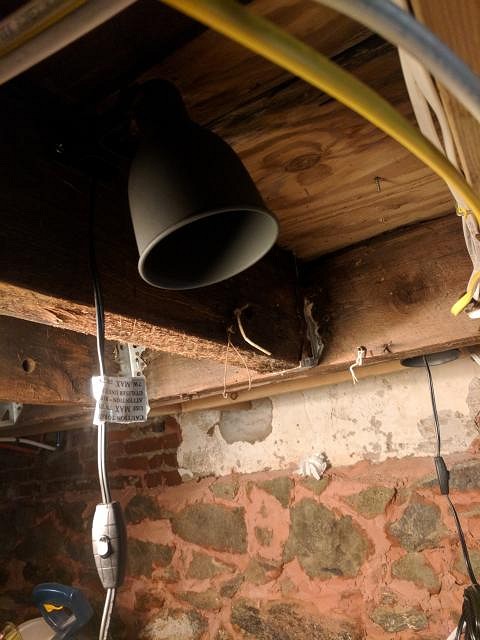
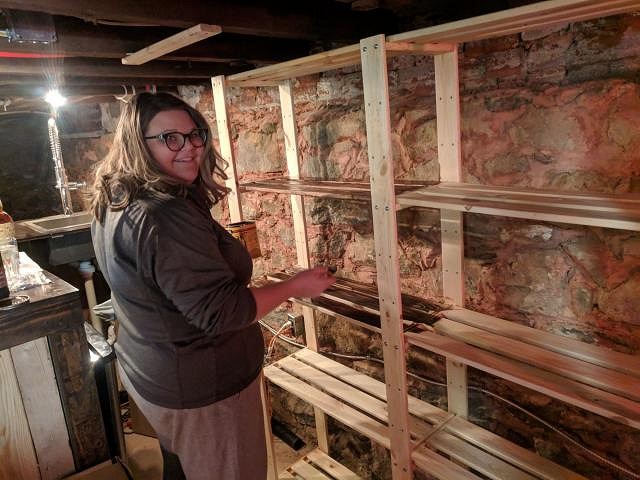
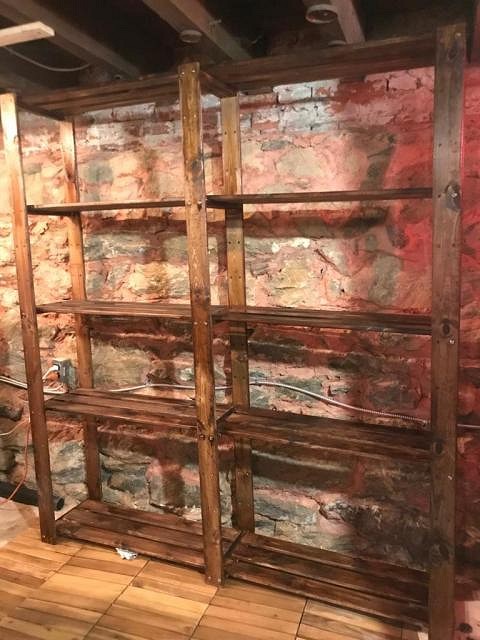
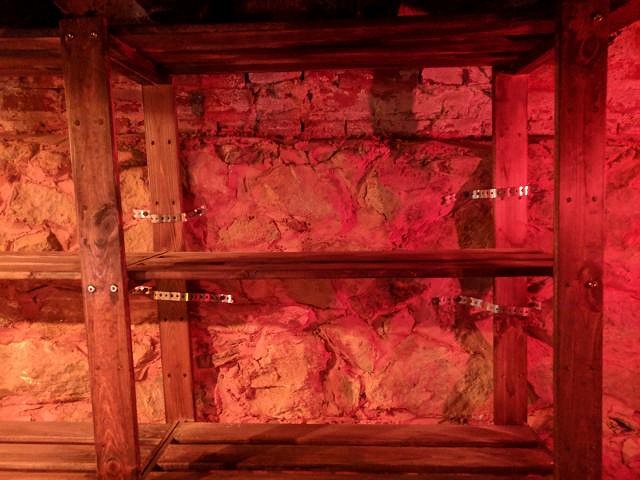
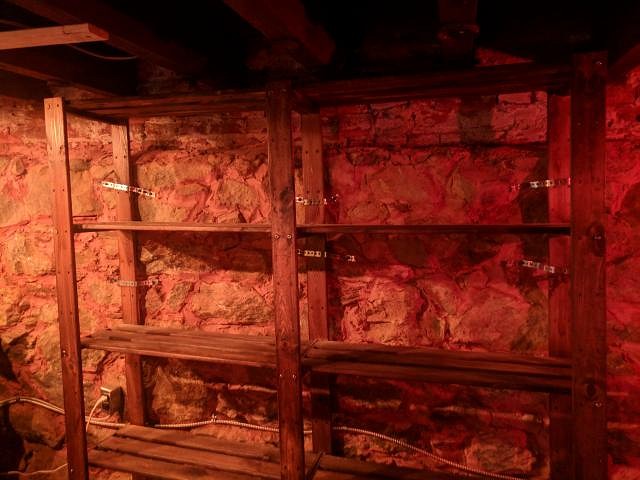
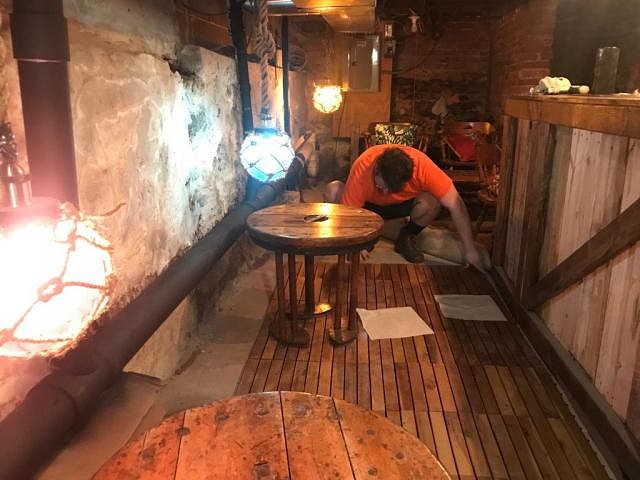
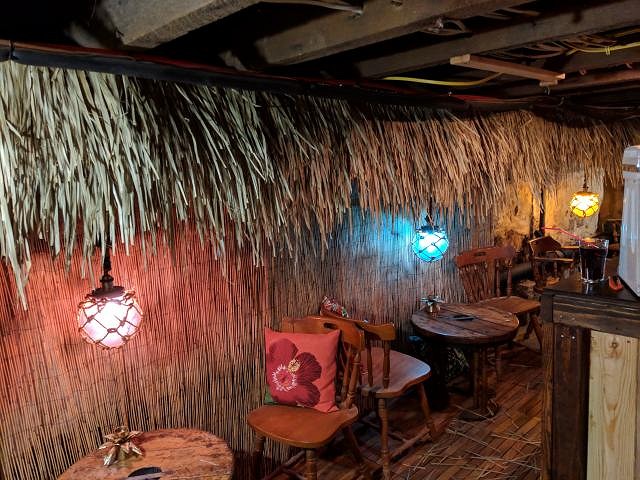
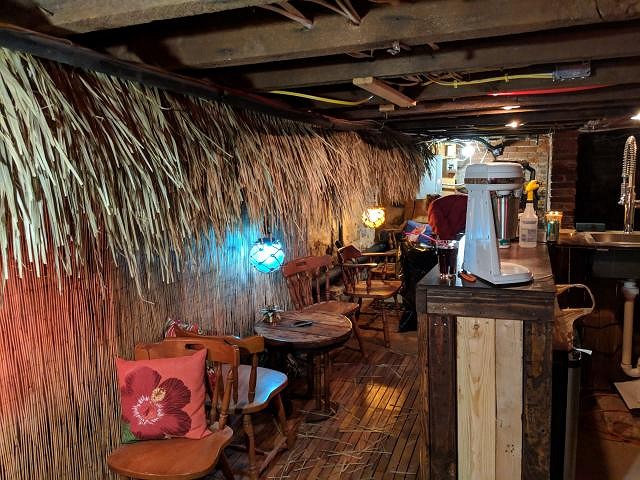
Aloha and Ahoy from Philadelphia, Tiki Ohana! A few years ago I was exploring the burgeoning cocktail movement, on the path of speakeasies and gin. The summer was just beginning and my thoughts began to drift to rum. I'd been unfamiliar with the spirit beyond the white stuff and the spiced one featuring a sea monster, but I had heard the term Tiki Drinks at some point, and I soon found myself with a copy of Beachbum Berry Remixed. One book led to more, a handful of bottles multiplied into a collection. And thus, the siren song pulled me off of that path, through the jungle and to the quiet village of Tiki that hid within. At the time my dad had a house at the Jersey Shore in which the previous owners had so thoughtfully included a wet bar. There the original Mariner Mike's was born (the name was a creation of a friend and regular). Sadly, all thing must eventually come to an end, the house had to be sold, and Mariner Mike was left without an island to call his own. Like all good pirates after a second act setback, Mariner Mike was down but not out. I had recently bought a house in Philadelphia, and, though I was still largely in the process of getting settled, a plan began to emerge to build a new bar in the basement, which for some reason has a back room. The existing space has exposed beams and a low ceiling, which inspired the name Below Decks. Those combined with the stone walls led me to the concept of this being a wrecked ship used as a smuggler's hideaway. It's not as though I can just pop over to OA from the east coast, so I have to make do with a lot of diy touches. The Before Pictures: As you can see, the space was pretty rough and I had a bunch of junk stored back there. First step was pulling all that out. Then I discovered that the wall needed some repointing. To go with the Nautical / Tiki Aesthetic we used a terra cotta dye. Next step was to start construction on the bar itself. To achieve the smuggler effect I wanted to build a bar that looked like shipping crates. I used 4x4s as posts, 2x4s for framing, and pallet wood for the slats on the crate. I also used some of the pallet wood to panel the bare walls in the front. The bar top is a very heavy plywood used for making cutting dies at my day job. The next step was staining and sealing the bar top. And now we've reached the "in progress" part of the story. Right now we're in the middle of running electric so I can replace the exposed bulb fixtures with something more suitable to the mood. Either side of the door I'm putting jelly jar sconces I'm going to paint for port/starboard. Above the bar I've put in some spotlight style fixtures so I could direct the light down and not have anything hanging in the way of interacting with people. I got some pendant globe lights I'm going to paint and tie up to look like floats, they're going to go under the ductwork. These are all going to be controlled by antique style (but UL certified) push button switches by the door, and dimmers behind the bar. Once the electric is done I'll be moving on to plumbing (adding a sink to the bar), moving in furniture from the former bar, and decorating, which I'm looking forward to most of all. The big shelf from the old bar is going to go behind the bar-ish, tables/chairs are going to go under the ductwork or in the rear, reed fencing is going to go over the plumbing, and I'm going to hang thatch over the duct. Thats all for now but I'll be sure to post updates as it moves towards operation [ Edited by: Mariner Mike 2019-01-02 10:48 ] |
|
H

Hakalugi
Posted
posted
on
Thu, Aug 23, 2018 5:30 PM
Great first post! This looks like it's going to be amazing. It already looks good! |
|
BB

Bam Bam
Posted
posted
on
Thu, Aug 23, 2018 5:36 PM
You are right, talk about a rough starting point! The terracotta is a nice touch. Love the in-progress thus far, can't wait to see how this turns out with all those floats I'm sure you're planning to hang back up in there. |
|
L

littlegiles
Posted
posted
on
Fri, Aug 24, 2018 10:32 AM
NICE! Really loving the look of this. Taking a dark cave and turning it into a nautical space is genius. |
|
C

coldwarspacemonkey
Posted
posted
on
Fri, Aug 24, 2018 11:11 AM
Awesome start! This is gonna be good. |
|
PP

Prikli Pear
Posted
posted
on
Fri, Aug 24, 2018 2:24 PM
Well done thus far! It looks like you've got a great space and the perfect concept to maximize the effect. Can't wait to see further progress! |
|
MM
Mariner Mike
Posted
posted
on
Sat, Aug 25, 2018 3:25 AM
Thanks for the positive vibes everyone! More wiring is on the agenda today. |
|
MM
Mariner Mike
Posted
posted
on
Wed, Sep 12, 2018 7:58 AM
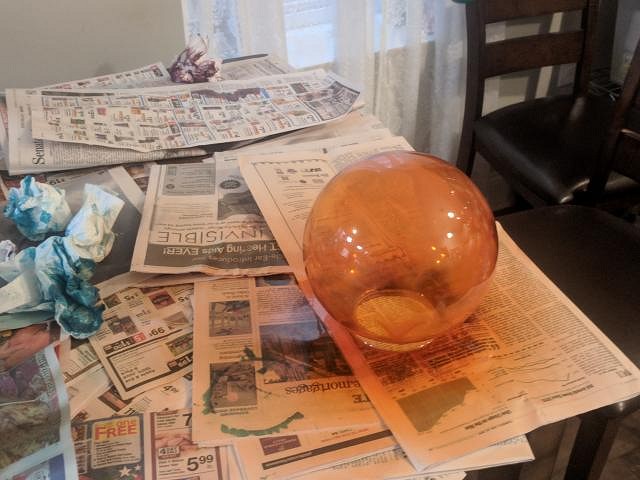
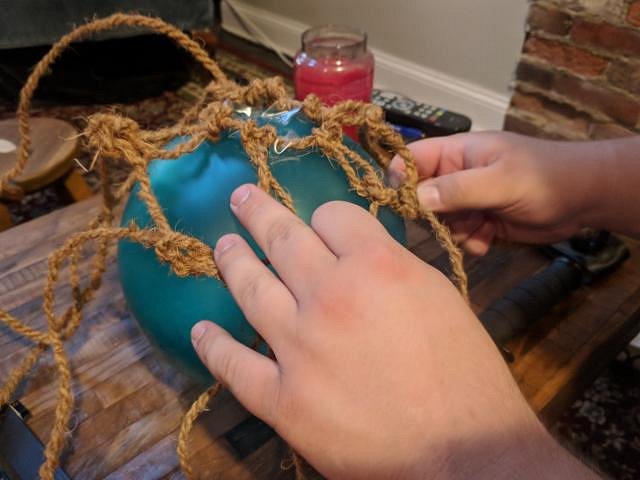
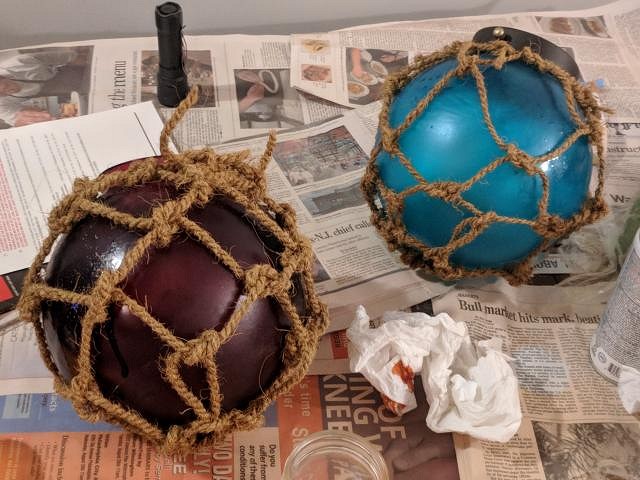
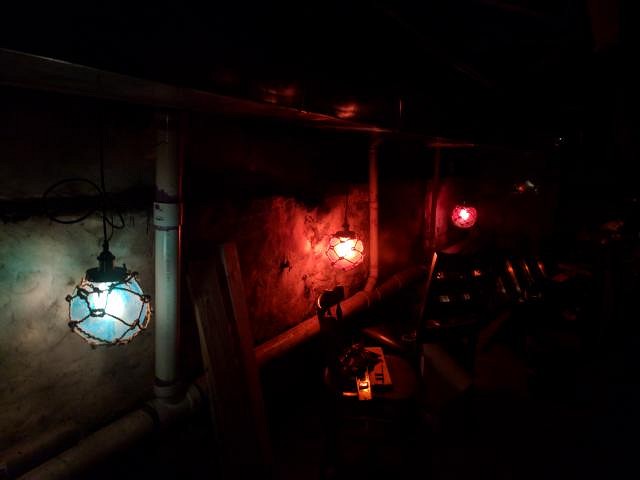
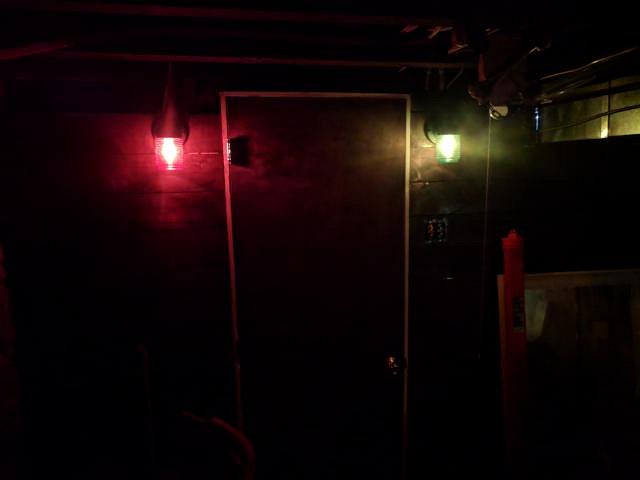
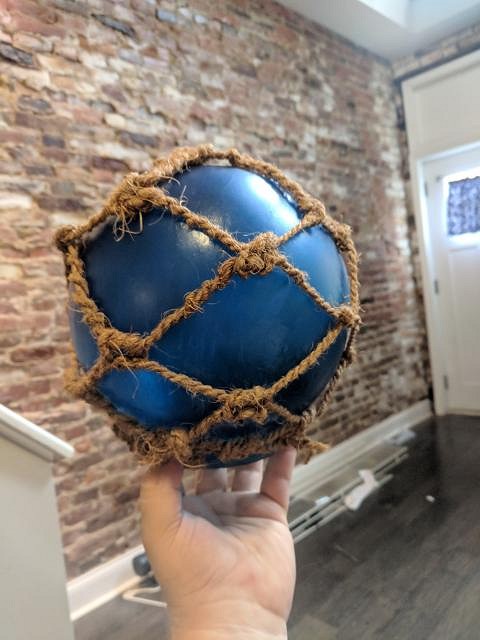
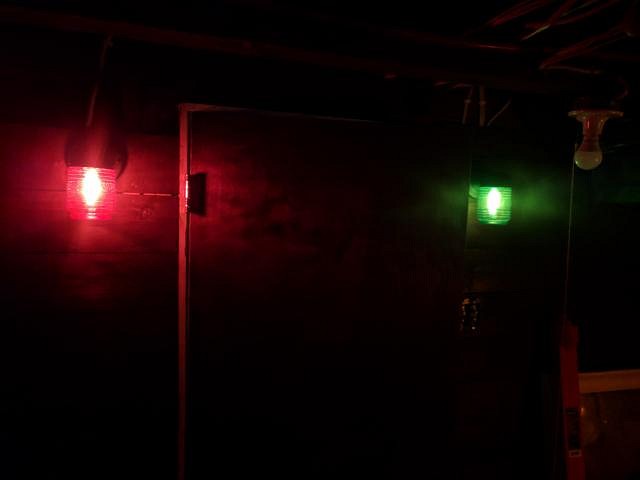
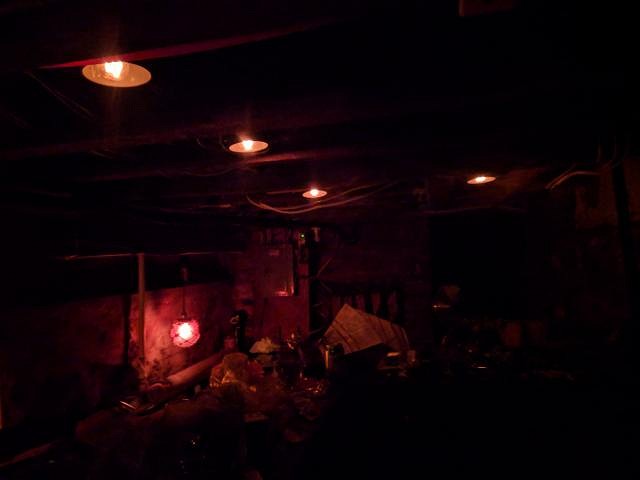
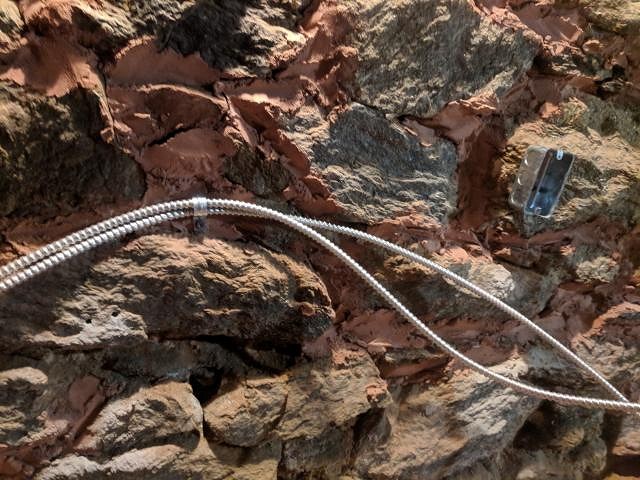
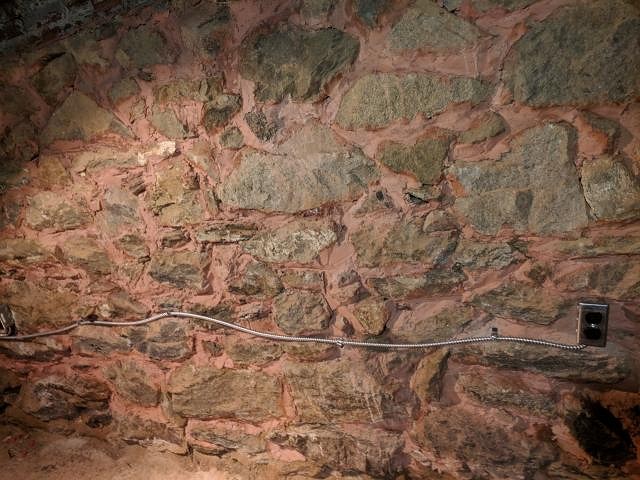
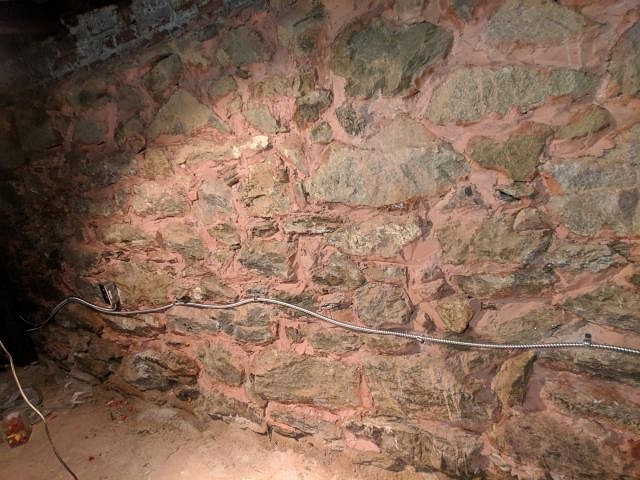
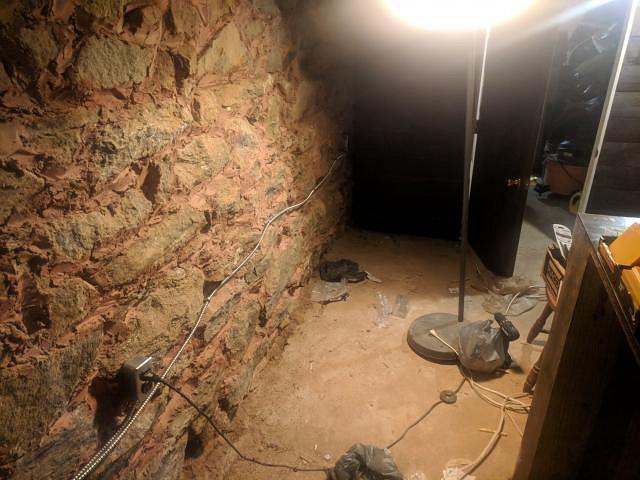
The lighting is finally done! After three weeks of steady progress wiring light fixtures, I finally connected up the dimmer switches and after that was all done I donned my headlight, shut off the breaker, and wired the whole thing to the existing light circuit. When I flipped the breaker back on I was greeted with a blinding dose of... darkness. Praying I hadn't made some horrible mistake I re-opened the breaker and checked the connection I had just made... where it turned out that one of the wires hadn't actually stayed in the nut. A quick re-tightening and voilà! It's alive! Both circuits working. Thunder crashed in the distance. (Actually. A crazy storm blew in out of nowhere. If you were watching Thursday Night Football it delayed the Eagles a half hour. Obviously I had no idea it was coming or else I wouldn't have had my hands in the wiring) Meanwhile, in the past, I had started work on painting my light fixtures. Red and green for the port/starboard; blue, purple, and orange for the floats, with a frosted glass coat on top. I learned the hard lesson of patience over the course of them, by the last one I actually managed to mostly avoid it pooling up and dripping, just in time for me to be done. Ain't that just the way. Honestly though even the rough ones have sort of a jetsam feel to them so I'm not too bothered. I then set to the work of tying up the replica floats. I found some great coconut fiber rope at the blue big box hardware store which really captured the look I was going for. Minor hand cramps aside, it was actually pretty fun to do. I got to put to great effect the first knot I learned back in scouts, and it reminded me of watching my dad string fishing poles. It gave me this great feeling of being a 19th/early 20th century fisherman, without all the backbreaking labor and potential scurvy. Very much the idealized fantasy version, in keeping with the tiki spirit. Can you tell that the blue one was my first attempt at both painting and knotting? I hauled them all down to the new space and gave them a test. The blue and green weren't coming across as well as I would have liked, so I added a couple more coats to the green and I broke out a deeper blue paint, which gave me the opportunity to re-knot that one. I also tried some different temperature bulbs in the floats, which made a big difference in the blue and orange, but I might switch the purple back. Ah the weird ways light sources and paints can interact. I'm still trying to figure out what exactly to do with bulbs for the overhead lights. I didn't realize that they were a weird in-between base size (E17). I tried using a plug adapter to E26 and a small-ish Edison bulb but the filament sticks out a bit too far because of the adapter and so it doesn't quite work. Next steps are wiring up outlets for an under-sink pump (looking for recommendations on those as well if anyone has any experience), the bar appliances (you know, blender, mixer, ice crusher), as well as whatever else needs plugged in. Then it's plumbing, and, finally, decorating. Talk about seeming so tantalizingly close yet far. Cheers everyone! |
|
PP
Prikli Pear
Posted
posted
on
Thu, Sep 13, 2018 8:42 AM
Looking good, Mike! I've had good experience with Christmas Lights Etc. They've got a wide assortment of LED bulbs in a range of base sizes and color temperatures. That E17 base is essentially a C9 bulb size. I also just came across Christmas Light Source which is an option as well. I know there's a general dislike of LEDs on here because of the cool light temperature from some bulbs, but I've found the newer amber and other colors available work really well in a tiki setting. The trick is shopping around, because prices can vary wildly. With the lack of heat and low power consumption, I'm a convert. |
|
P

Piddersthecat
Posted
posted
on
Thu, Sep 13, 2018 8:58 AM
I love, love, love that space. The rock wall...well rocks! I think what you've been doing so far looks great. Can't wait to see the rest! |
|
R

rumackay
Posted
posted
on
Thu, Sep 13, 2018 5:11 PM
What a great space! This has got "awesome" written all over it. Looking forward to watching it evolve |
|
BB
Bam Bam
Posted
posted
on
Thu, Sep 13, 2018 8:19 PM
Awesome, more progress pics! That space lends itself so well to low, colored lighting. Great job on the float lamps! |
|
T

TabooDan
Posted
posted
on
Sat, Sep 15, 2018 10:02 PM
Yeh I agree with everyone, this is a great start to a cool space. It's got a lot of features already to help you build off. Looking forward to more of this build. Mahalo TabbDan |
|
L
littlegiles
Posted
posted
on
Tue, Sep 18, 2018 6:03 AM
Thanks for the update and great job on those lights! Looking forward to more. |
|
E

EnchantedTikiGoth
Posted
posted
on
Tue, Sep 18, 2018 7:49 AM
Wow! That's an amazing space with huge potential! I look forward to seeing how it comes together! |
|
H

hiltiki
Posted
posted
on
Tue, Sep 18, 2018 8:21 AM
Great job on the light floats, looking forward to more pictures. |
|
MM
Mariner Mike
Posted
posted
on
Fri, Oct 12, 2018 10:48 AM
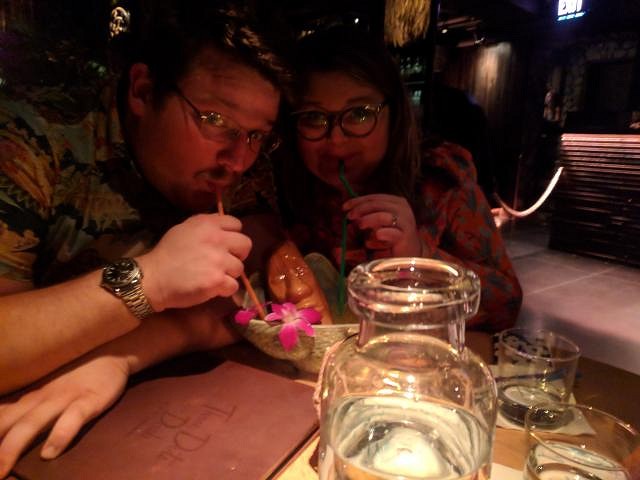
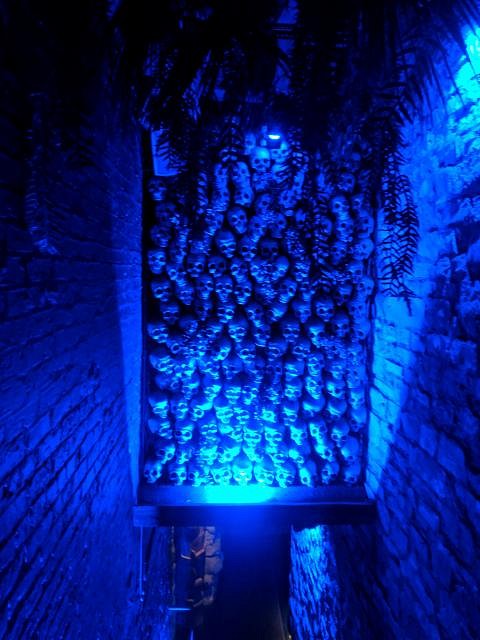
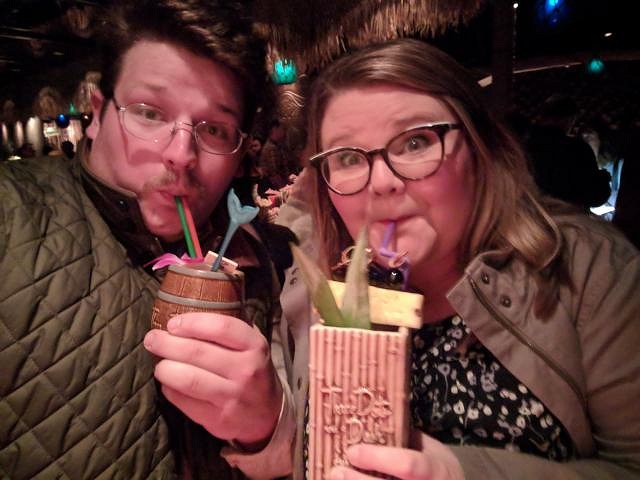
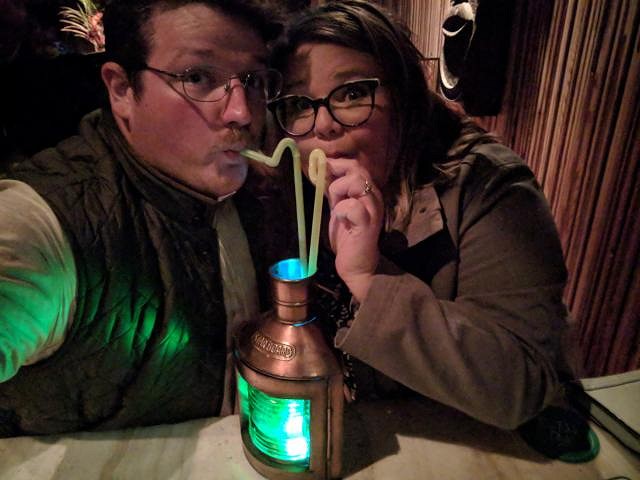
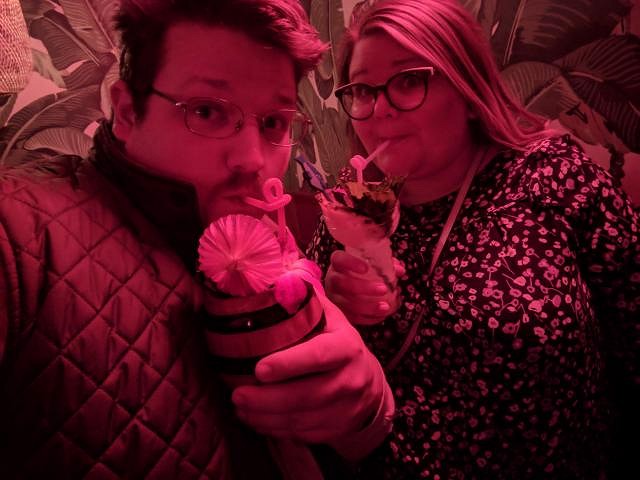
Ahoy! On to the plumbing next, then furniture and the promised land of decorating! To make up for the light amount of photos this update, I'll end on a few shots of Luau Laura and I visiting Three Dots and Lost Lake on our trip to Chicago a couple weeks ago. Cheers! |
|
PP
Prikli Pear
Posted
posted
on
Mon, Oct 15, 2018 7:36 AM
Great to see the wiring went through without (much of) a hitch! Electrical work always gets me jittery, since it's not my forte. We had an electrician come in to connect the mini split AC for The Wife's photo studio. I'd done all the other wiring for it (converted garage). The electrician came down from the attic space and asked me who did all the wiring. "Here we go," I thought. "He's going to ream me for all sorts of mistakes." Instead, he told me it was a very good job and he doesn't normally see them that thorough. What a relief! That conduit does look pretty cool on the rock wall (which, in and of itself, is fantastic). Do you have any plans to give the conduit a patina of age? Rust it up with strategically applied paint? Regardless, I'm eager to see the next phase of your build. |
|
MM
Mariner Mike
Posted
posted
on
Tue, Oct 16, 2018 5:46 AM
Thanks! Yeah, I went in to the wiring very confident, but I did develop some jitters over time. Everything about the logic of the wiring made sense to me, and I had checked all of it against the black and decker home wiring book (heartily recommended, it showed me exactly what I needed to do). I got started and quickly realized that there was a lot I didn't know, mostly about size and type boxes, wire clamps and wire nuts. I had triple checked what I needed as far as the wire itself, the right gauge for the amperage, making sure I hooked the right wires for the fixtures etc, but in retrospect I underestimated how potentially complicated the actual assembly could be. There was definitely a point in the middle where I was worried I'd really messed something up, and to make sure I went back and double checked my work, most especially the grounding. I hadn't had any thoughts of aging the conduit! It's a good idea. I think I'll hold off for now though. In the dimmer lighting and with the rest of the furniture put in I'm hoping it won't stand out too much, but if it does I'll definitely remember the suggestion. Maybe even just some very thinned down reddish brown paint to darken it up. |
|
T

tikiskip
Posted
posted
on
Tue, Oct 16, 2018 6:15 AM
One way to do that is to build a "knee wall" this is a wall that bumps out about four inches the width of a 4x4 and about 4 feet tall then put all that electric behind the Knee wall. Then you have a four or even six inch wide cap that goes on top of the Knee wall that serves as a nice small ledge or shelf for drinks or even your mug collection to sit on. Just another way to do it. Good luck on your build. Here is a Knee wall on the outside of our house we put in. (¯
|
|
T
tikiskip
Posted
posted
on
Tue, Oct 16, 2018 11:59 AM
"According to NEC Article 330.30, MC cable must be supported and secured at intervals of 6 feet or less (unless routed through a framing member) and cables containing four or fewer conductors sized no larger than 10 AWG must be secured within 12 inches of every termination." Looks like you are good on that one. "Where not subject to physical abuse, Type MC Cables are permitted to be installed as service, feeder, and branch circuit cables for lighting, power, control, and signaling circuits." Who knows what they call "not subject to physical abuse" but this is the one I was thinking about. https://www.ecmag.com/section/systems/review-metal-clad-cable-requirements |
|
MM
Mariner Mike
Posted
posted
on
Tue, Oct 16, 2018 1:09 PM
Thanks for the research Tikiskip. I tried to follow code best I could but I'm not an expert by any means. There are a handful of outlets in my house wired with exposed metal clad cable due to exposed brick walls, and the inspector didn't have any issue with them. Of course, there may well be a reason I'm not aware of why one might work and another not, and I'd defer to those who know more than I on that. |
|
T
tikiskip
Posted
posted
on
Wed, Oct 17, 2018 2:51 AM
Glad it was not a problem. I'm sure they will not ok it when we go to sell. "I'm not aware of why one might work and another not," One other thing that can happen is they ring the copper wire when they strip off the coating and that breaks lose after time. Turn off the circuit before you look at it. I used to be an electrician of sorts at OSU. |
|
MM
Mariner Mike
Posted
posted
on
Wed, Oct 17, 2018 8:08 AM
When I bought the house apparently both the city inspector and the inspector I hired somehow missed the fact that the contractor renovating the house had stuck heavy gauge wires where the meter was supposed to be and covered it with cardboard (outdoors) so as to avoid the power bill. Power company was very confused when I called up to switch the account to my name. They had to send a guy out to fix it. Downside is I have a power bill but much, much better that than the god only knows what sorts of safety issues could have arisen. Other side of the fence I've had inspectors in at my workplace (not in the construction or contracting field but for spaces we were having work done on) take tape measures to measure the distance between a toilet and the TP roll for ADA and and halt construction for months based on fire code questions that turned out to be ok. That's their job and inconvenience is preferable to injury. But it all goes to show there are definitely all sorts out there conducting inspections. |
|
M

MrBaliHai
Posted
posted
on
Wed, Oct 17, 2018 2:32 PM
I can't tell you how many times I've fallen off the commode at work while reaching for the toilet paper. Of course it usually happened after I'd been drinking heavily in the Yellow Liver Room (former conference room converted to a bar), but it's a still a very serious issue. |
|
S

Sandbartender
Posted
posted
on
Wed, Oct 17, 2018 2:37 PM
Wow! I can't imagine the hell that would break loose once rain or animals got to the mains. The bar is looking fantastic so far. I love the rock wall. It's a really great look. |
|
T
tikiskip
Posted
posted
on
Wed, Oct 17, 2018 3:33 PM
Here is a light that may work for down and even up lighting. You could have blue light going up and yellow lights going down your wall, Moody. [ Edited by: tikiskip 2018-10-25 07:43 ] |
|
T
tikiskip
Posted
posted
on
Thu, Oct 18, 2018 5:38 AM
That is a bit too much though I admit. You could have blue light going up and yellow lights going down your wall, Moody. [ Edited by: tikiskip 2018-10-25 07:42 ] |
|
MM
Mariner Mike
Posted
posted
on
Wed, Jan 2, 2019 10:45 AM
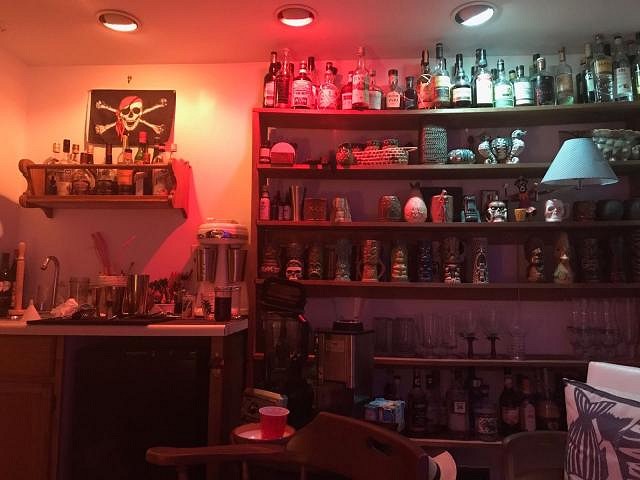
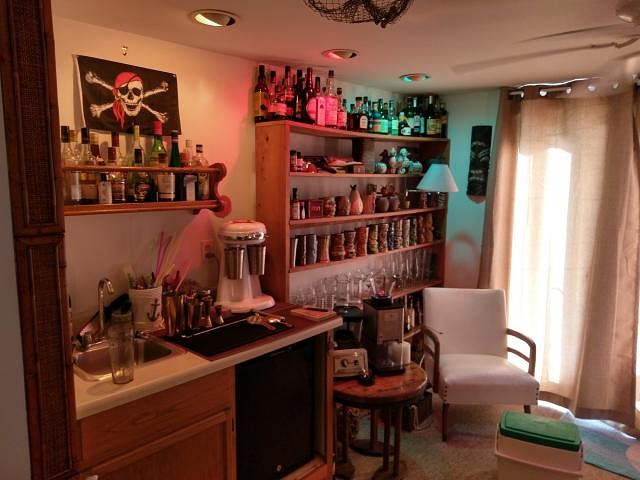
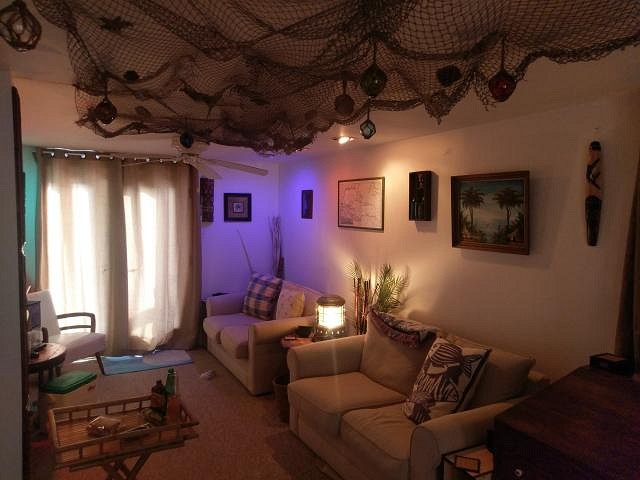
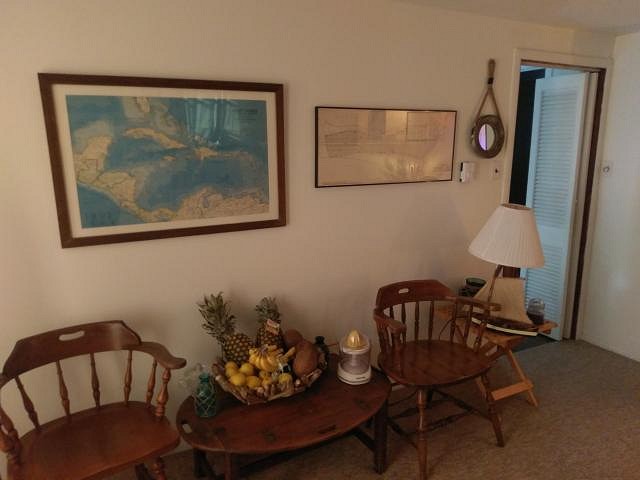
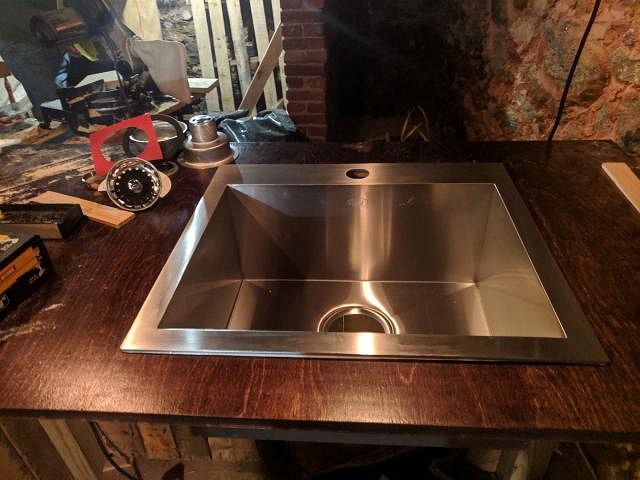
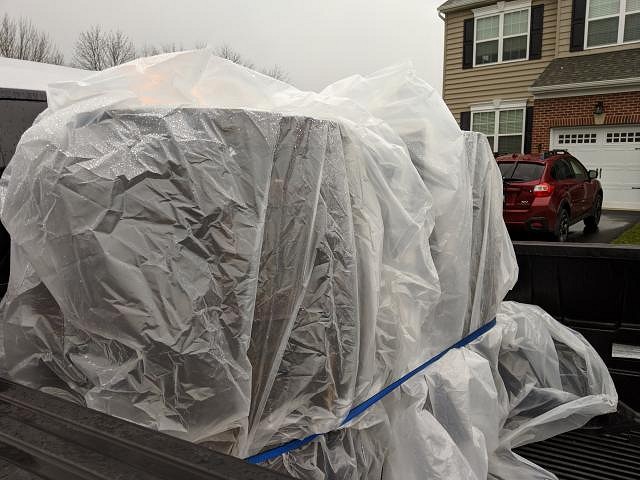
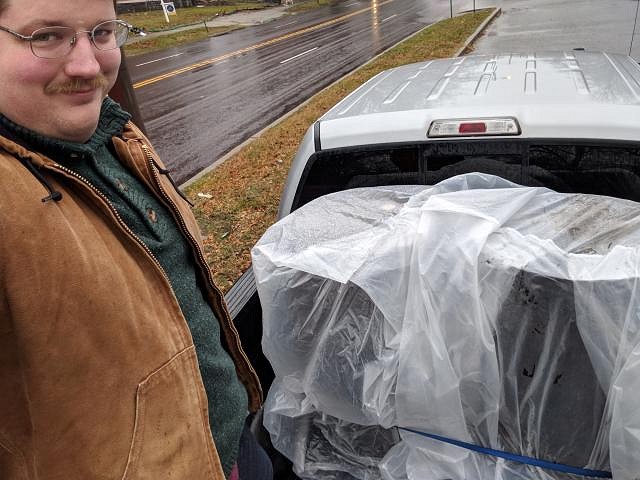
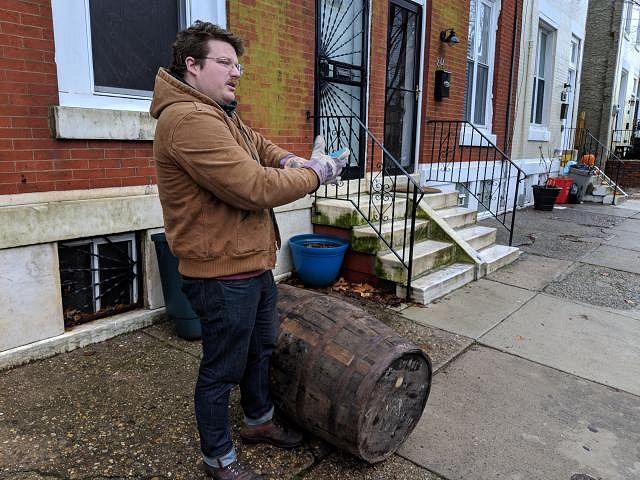
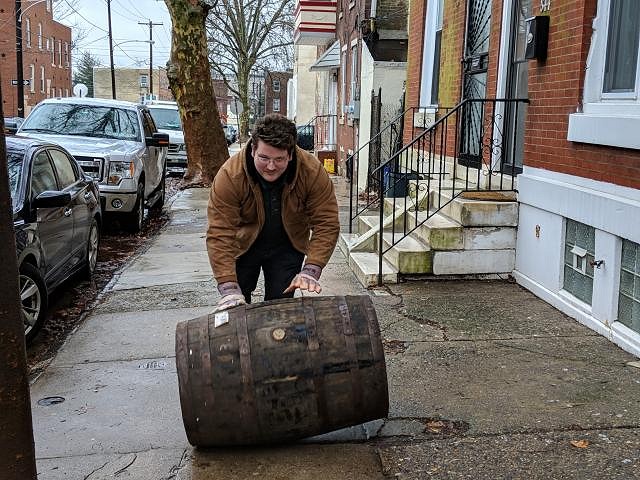
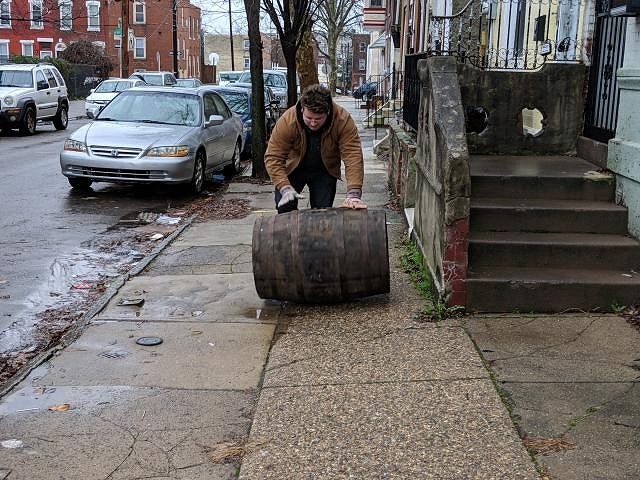
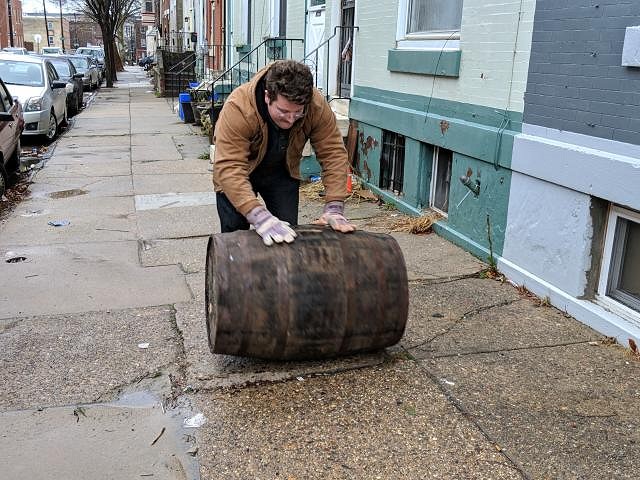
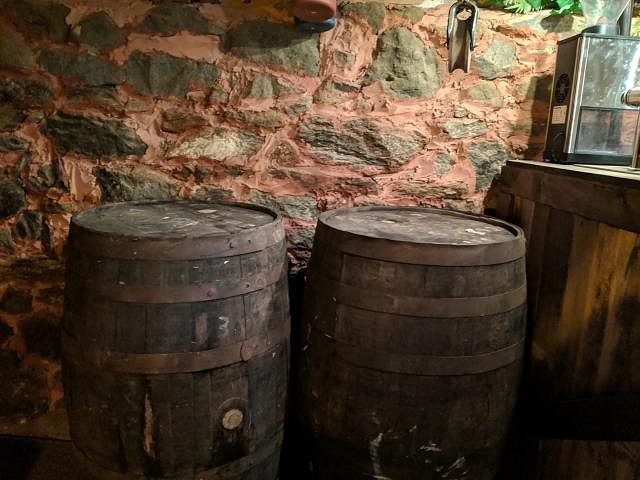
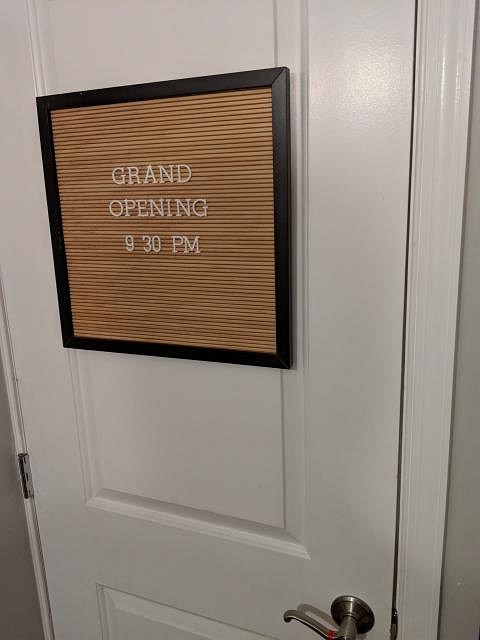
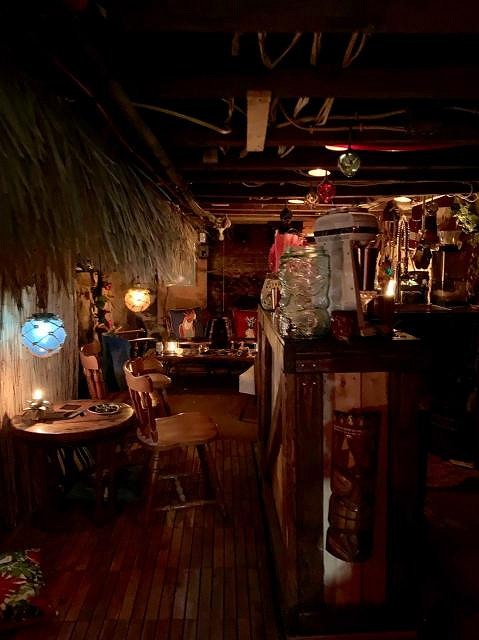
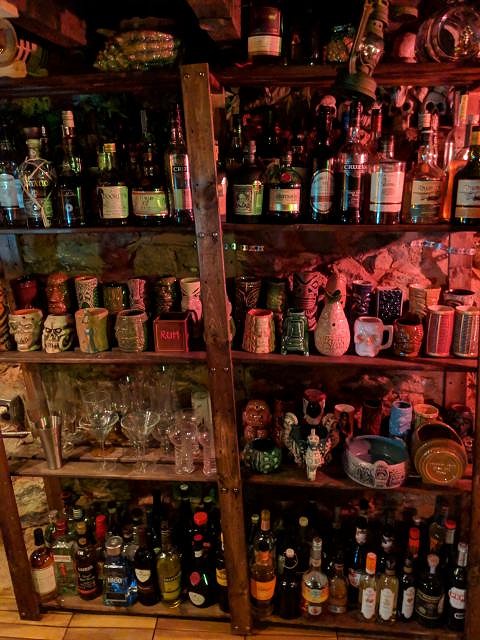
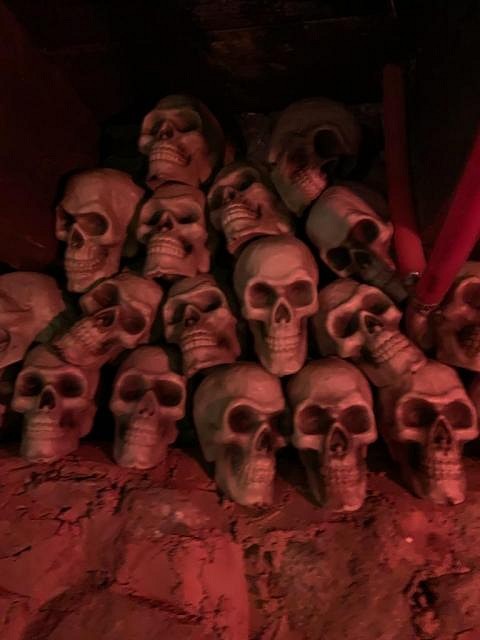
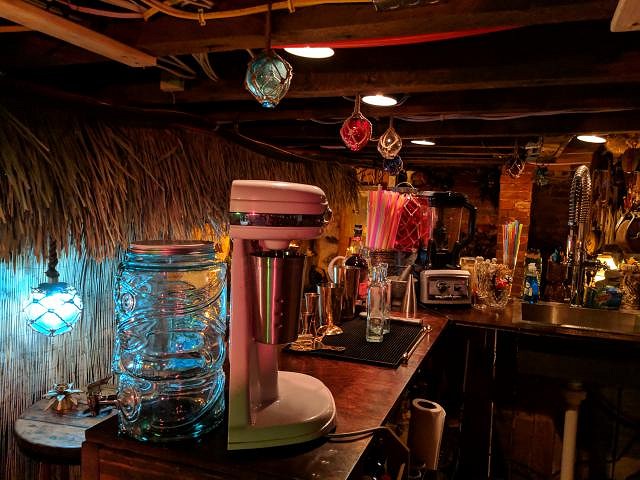
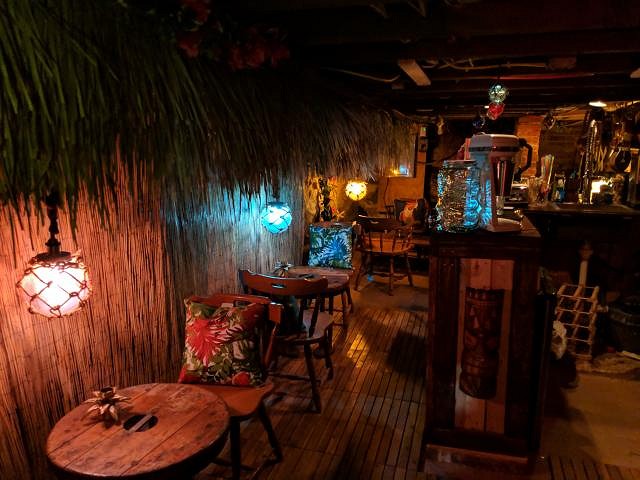
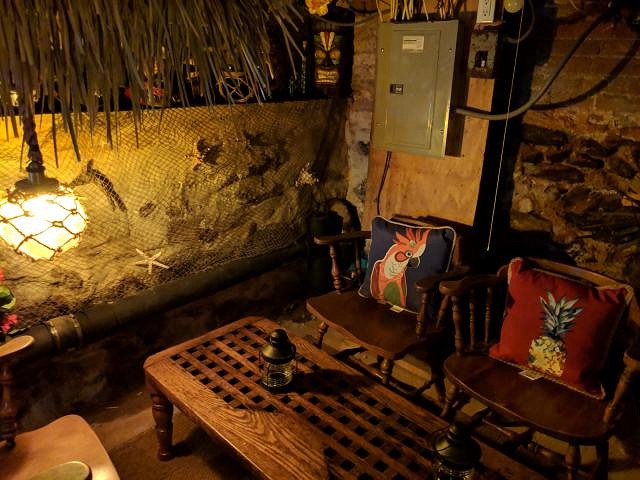
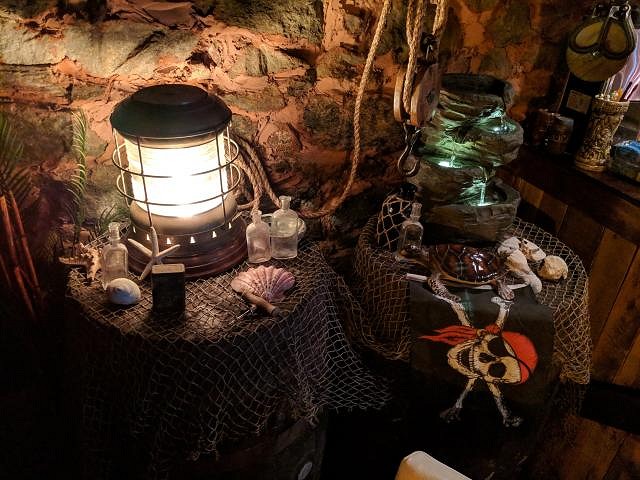
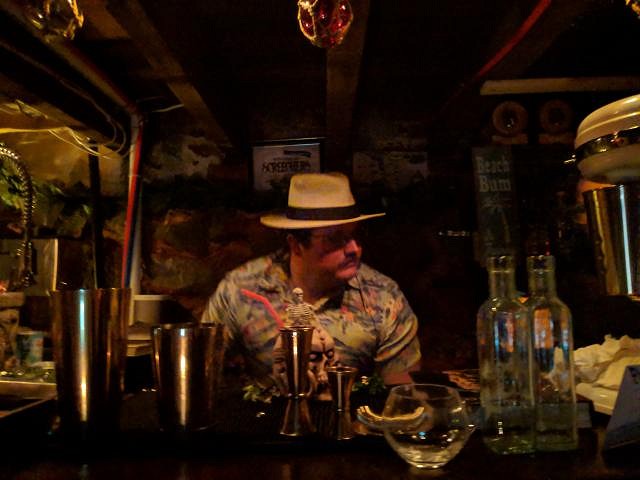
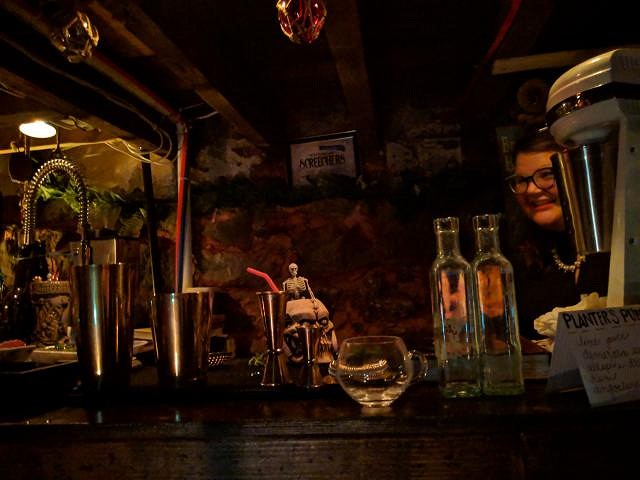
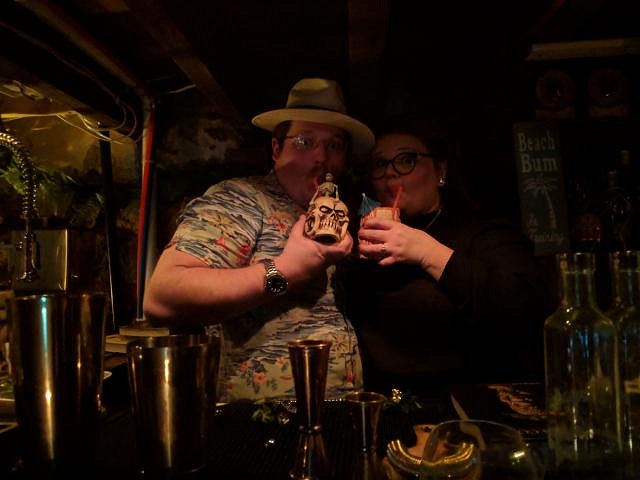
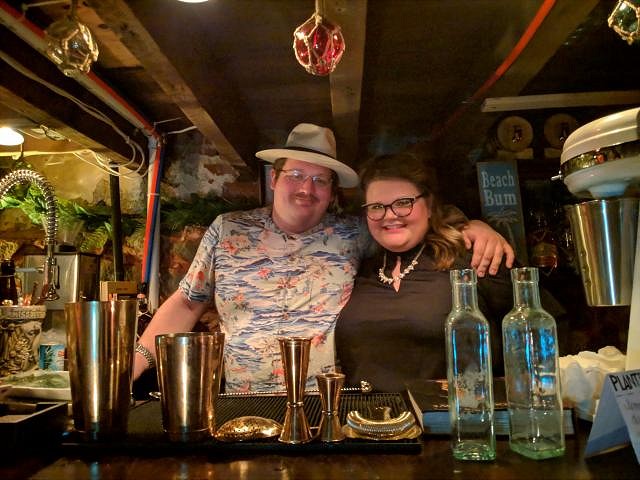
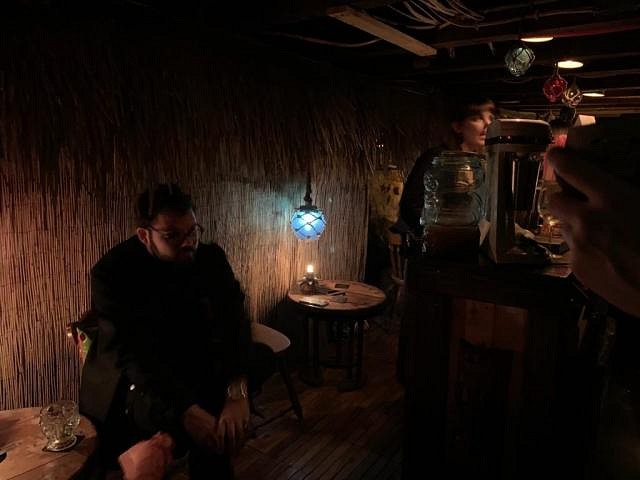
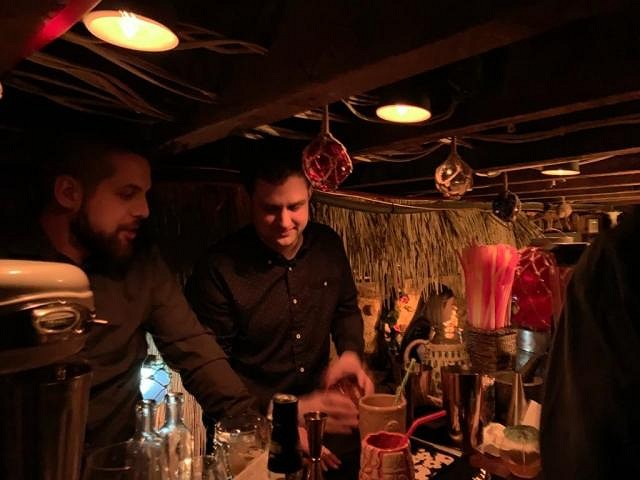
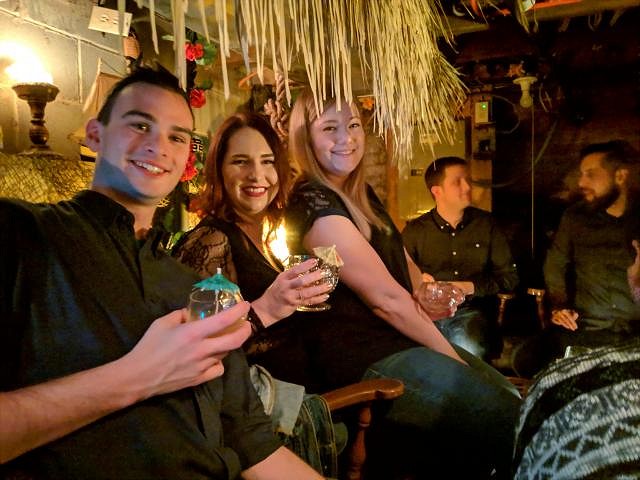
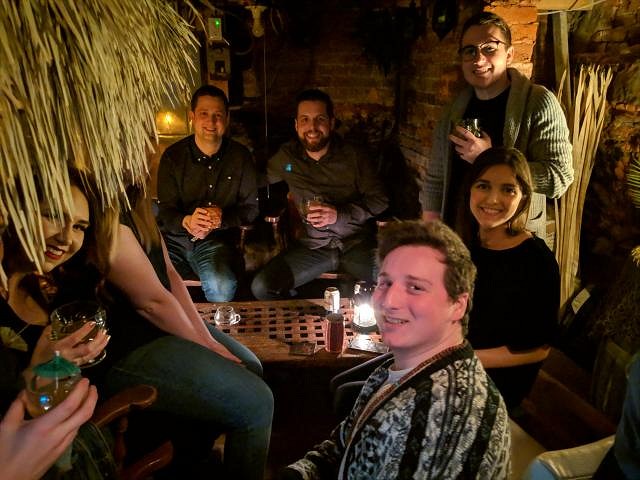
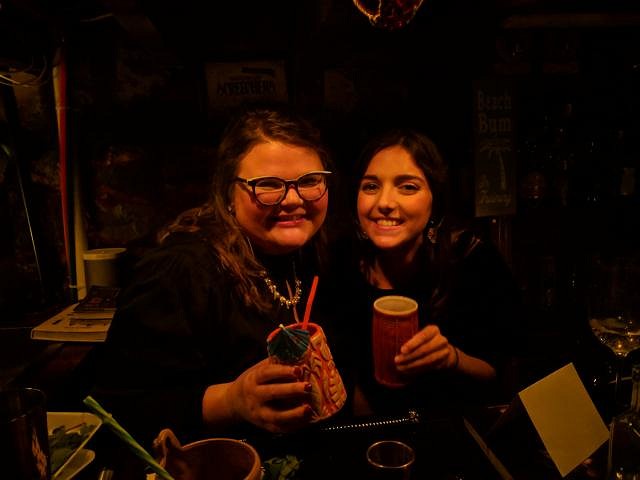
Aloha and Ahoy! I know I've left you guys hanging for some time, but Mariner Mike's Below Decks finally opened this New Year's Eve! Completion and party pictures at the end of the post! But first, the last of the story: I found a great sink from the orange big box store online, square and nice and deep so I can get those big mugs in there. The plumbing was actually surprisingly easy once we got everything we needed. Turns out Pex bite fittings really are that simple. Once the plumbing was done, there was the much hated job of cleaning up all the dust and construction leftovers strewn about. Started out with a broom and a shopvac, quickly learned just how fine construction dust can be. a quick trip to the hardware store for a new HEPA filter for the shopvac and a mask for me and We were finally able to get that finished. Unfortunately the big shelf from the old place wouldn't fit in the new, so we replaced it with one from Ikea, which we then stained to match We found some fantastic wood tile "flooring" to give the effect of being on a ship, and got a couple of natural looking woven brown rugs for the back This left one major piece left: barrels. I've wanted to put barrels in the bar going all the way back to the old place, and the nautical / shipping crate style I was going for really felt like I could swing it. I did some research and found out that there is a barrel warehouse not too far outside the city, and quite convenient to my day job: Northeast Barrel Company. If any of you guys happen to be near here and are looking for barrels, I heartily recommend giving these guys a shout, they really hooked me up, and I always love a chance to support a local business. That being said, my day felt like a story completely out of time long past. After making an appointment to come in, my brother and I pull up in my dad's pickup truck (because there's no way I could fit barrels in my Focus RS). There's no clear front entrance, but we can clearly see barrels through the window, and the smell of dried spirits and wood is heavy on the air. We climb up to their outdoor loading dock. We know we're in the right place. It's an old brick building that was clearly built there to be serviced by the old Reading Railroad line (now a commuter line) that goes past. A guy is unloading a tractor trailer at the outdoor loading dock, so we call up, "Hey, we're here to see about some barrels." Unfortunately it was raining that day. But we did come prepared. We brought pallet bags, which are large enough to be slid over the barrels, to keep the rain out, and we cinched up a strap to keep them from sliding around. That last major thing in place we were finally able to unpack all the old stuff and start laying out the new. We had long been shooting for New Year's Eve as our goal, and we hit it. We already had our friends coming over for a New Years party, and they were already buzzing about whether it would be open or not, so to set the stage we set out a sign. And with that, we kicked off the second phase of the New Year's Party. I had batched Planters Punch and the Yuletidal Wave from the back of the Smugglers Cove book, and they both went over really well. Everyone loved the new place. I got more than a couple "you outdid yourselves". Two of my friends who live out in SF told me that they were instantly put in mind of Smuggler's Cove, which I took as high praise. And even better than complements, everyone had a great time. It proved that the layout and flow of the room works even when there's more people than I had in mind, which was a great thing to find out. It was a great night. Here's some party pics to show off the bar in use:
|
|
C

Commodore
Posted
posted
on
Wed, Jan 2, 2019 10:54 AM
Well done! That has to be an overwhelmingly satisfying feeling - getting the bar open! The place looks great - I love the coffee table with the use of a teak boat grate - can tell that the room has a great feel! |
|
S
Sandbartender
Posted
posted
on
Wed, Jan 2, 2019 11:14 AM
Congratulations on the big opening, everything looks FANTASTIC! From the happy looks on everyone's faces I'd say you definitely stuck the landing. |
|
MM
Mariner Mike
Posted
posted
on
Wed, Jan 2, 2019 11:15 AM
Thanks! That piece, along with the hatch cover tables and the white leather chair I completely lucked into. They were all left behind by the previous owners in the shore house I had originally set up the bar in! They helped me discover the tone I wanted to go for. |
|
C

Cutcarefullyplayloud
Posted
posted
on
Wed, Jan 2, 2019 12:12 PM
My god man, that is wonderful! It's a good thing I wasn't one of those friends of yours, i would've just set up and never left. Many kudos. |
|
W

W8N2Surf
Posted
posted
on
Wed, Jan 2, 2019 1:19 PM
Completed! What a great milestone to reach, congratulations. The finished look is great, and you will never regret going through the extra work to make a working wet bar. If you can sneak an ice machine under the counter, do it! Love the barrel story and even more so the rolling barrel pictures! Great job all the way around. I hope you post future party pics and changes. |
|
PP
Prikli Pear
Posted
posted
on
Wed, Jan 2, 2019 8:56 PM
Congratulations Mike! I have to agree with your friends--you really outdid yourself. The Below Decks is what I consider to be the Platonic Ideal of a dark, mysterious home tiki bar. You'll certainly add to it as the years progress, but it is fantastic as-is. Someday, if the mood takes you, you might consider rubbing down those old rum barrels with boiled linseed oil. While they're protected inside, that wood's been subjected to a lot over the decades. Best to shore it up as much as possible to preserve it for years to come. :) |
|
JB

Joshua Bell
Posted
posted
on
Wed, Jan 2, 2019 10:22 PM
Looks wonderful. Excellent way to adapt the space and make it work so well. |
|
MM
Mariner Mike
Posted
posted
on
Thu, Jan 3, 2019 7:35 AM
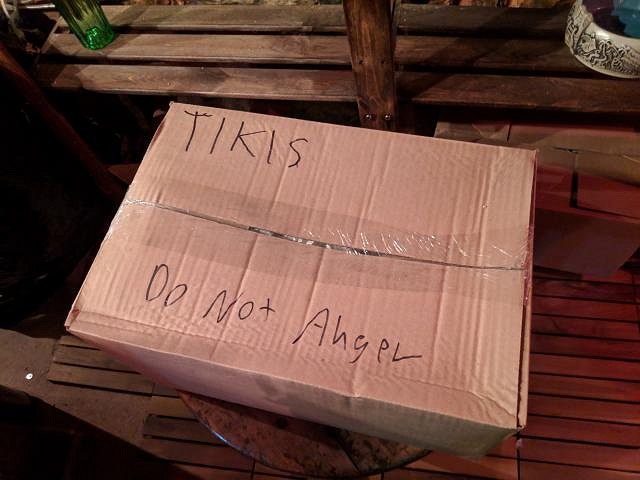
Thank you all so much! I think I'm blushing (if that's not last night's Mai Tai still talking). If you’ll pardon the excess, I’d like to give a little speech. From the balcony: And I’d like to take a little nap! Being thankful I can finally use the bar while still being excited for down the road additions pretty much sums up how I feel about it right now. I love the part of the hobby that is thrift store beachcombing and keeping a level eye out, and still having a horizon out there, but knowing that I can use it now and not having it sit there unfinished is such a great feeling. Does anyone else anthropomorphize their tikis in their head? The whole time I was working on the space I was envisioning Toy Story style scenes of the mugs and masks and skulls sneaking out from their boxes to see the progress on their new home. From the first time I had the idea in my head of putting the bar down there I had a really specific vision of bridging nautical, pirate, and tiki proper in a dark space. The nautical came from childhood summers spent fishing on boats, hanging out around all kinds of marinas from the Yucatan to St Johns NL, and getting into trouble in little inflatables and Boston Whalers on the Barnegat Bay (including one time I had to row a mile and then walk through quicksand, but that’s another story). The pirate definitely came from youthful adventure books, movies, and cartoons. Muppet Treasure Island in particular was an obvious influence, so was the Pirates of the Caribbean ride (well what I remember of it from when I was in the third grade and last at Disney World), and Donkey Kong Country 2, weirdly enough. Tiki was partly Disney again, the Polynesian Hotel still sticks in my memory from that third grade trip, and the song from the enchanted Tiki Room can be recalled at a moment’s notice. That’s a lot of childhood there, and one could easily come to the conclusion that this is just a way to add drinking to childhood fantasy, like making Butterbeer for Harry Potter fans. And I’m sure there’s a bit of that. But I think there’s something else there too, a sort of retreat into an ideal of a less cynical time where there are still islands to explore and mysteries within reach. All of that to say, I’m thankful to have found this particular escape from reality, and to have such a warm welcome from a great community. I’ve really felt like I’ve put my heart and soul into this, and I’ve had such great help from family and friends along the way, not to mention my right hand lady Luau Laura and her continued support throughout and hands on work during the decorating phase. It’s been extremely rewarding to get such a fantastic response both from friends visiting in person and all of you here in the Tiki Ohana. [ Edited by: Mariner Mike 2019-01-03 16:36 ] |
|
T
TabooDan
Posted
posted
on
Fri, Jan 4, 2019 9:22 PM
Aloha Mariner Mike! Happy New Year! Glad you've shared and added your space here. |
|
D

Donovan
Posted
posted
on
Sat, Jan 5, 2019 5:56 AM
Great job!! Nothing not to love about what you've done. You've captured the "feel" and that's what it's all about. Proud to see another committed keeper of the flame realize his dream. |
|
H
hiltiki
Posted
posted
on
Sat, Jan 5, 2019 8:59 AM
Great job, looks wonderful. |
|
R
rumackay
Posted
posted
on
Sun, Jan 6, 2019 7:19 PM
FAN-BLOODY-TASTIC!! What a great space you've created. I hope you have many more awesome shindigs in there. Thanks for sharing |
|
M

Melintur
Posted
posted
on
Sat, Feb 2, 2019 7:40 AM
I adore the scale, texture, and general aesthetic! Your rock walls are such a great backdrop to the overall setting. LOVE IT |


Pages: 1 41 replies