Pages: 1 2 3 4 5 6 275 replies
|
PP

Prikli Pear
Posted
posted
on
Thu, Aug 1, 2019 1:41 PM
Zounds! That looks equal parts amazing and ambitious. You guys are setting a crazy high standard for the rest of us to live up to! A question, if I may--why walnut for the trim? It's a beautiful wood, but after looking at various options I ultimately went with pine, torched, stained and sealed for all of my routed/carved trim thus far. It just seems easier to work with and is far cheaper than hardwoods (which makes the inevitable screw-up slightly less painful to bear). I'm probably going to have to go with western red cedar for my next bar project, tho. |
|
J

jimsflies
Posted
posted
on
Fri, Aug 2, 2019 7:33 AM
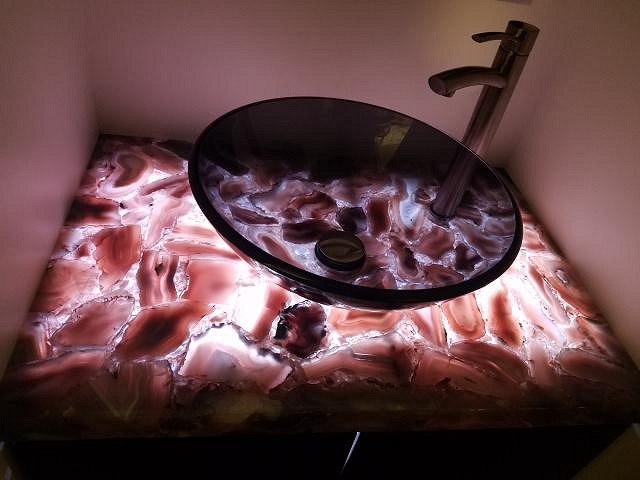
What is the size of the onyx background? I might have just the thing for you. I have these RGB LED panels that would work awesome if the size it right! I bought several for a kitchen island project and then the gemstone countertop was received broken and ended up having to change plans. The photo here shows a bathroom countertop I managed to salvage out of the broken pieces and have it back-lit. I have one panel that is 1x2 and 3 that are 2x2. They need a power supply and a RGB controller (both of which are readily available and inexpensive).
|
|
C

Commodore
Posted
posted
on
Fri, Aug 2, 2019 7:36 AM
Thanks Prikli! The hardwoods do look great but they are costly - on the front end of this build I became friends with a guy who owns a reclaimed wood company... that set the bar as I was able to get my hands on an ample amount of African mahogany and oak - super fortuitous for the build and of which most of the structure is made - especially the back bar, bar top (coming), and outside carvings. When I did the main beams I wasn't sure what would bend well. Oak was too heavy, the lighter woods would bend but not hold shape with any strength. the walnut seemed to not just bend well, but be strong in its new shape and... so it kind of became the go to. and it looks great I bought one large board and then table cut it into the strips that you see I'm using now. I'm careful as I have to keep any mishaps with the router - I'm not torching them, but I stain the grooves before varnish. That bottom board did almost break - yikes! - you can see one of the pictures it has one lone clamp on it - that's holding the beginnings of a crack that is being glued back together. Also - I do have some red cedar in the main support beams - its super light and looks great. but its sandwiched between walnut and some other stuff. Mahalo and appreciate the support - I think I'm seeing daylight at the end of this now! |
|
C
Commodore
Posted
posted
on
Fri, Aug 2, 2019 7:43 AM
Thanks Jim! I'll take a measurement and get back to you. I'm thinking around 15"x40" but I'll double check |
|
C
Commodore
Posted
posted
on
Fri, Aug 2, 2019 12:34 PM
Jim, the part to be lit is 14.5" x 41.5" - so likely those dimensions won't work... a 1x1 and a 1x2 might be doable, but 2x2's would be too big. Thanks for bringing that forward though - much appreciated! |
|
W

W8N2Surf
Posted
posted
on
Sun, Aug 4, 2019 5:51 AM
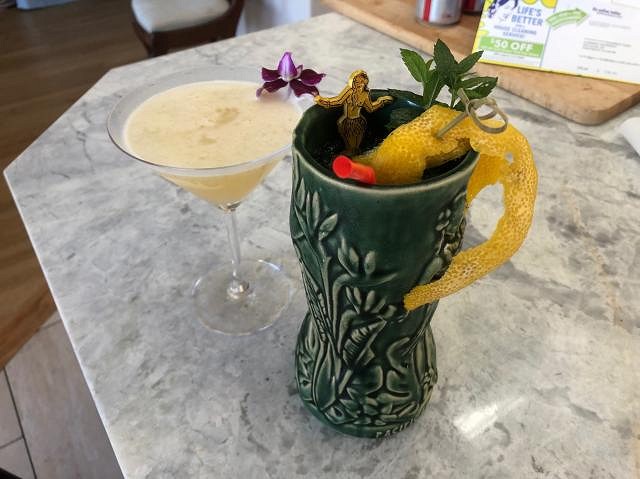
Oasis is upon us. Here's how we decided to build the bar - it keeps with the theme of bent wood and brings to mind stringers from a vintage surf board.
The pictures make clear the work and time involved in this. Cheers Commodore, keep it coming!
|
|
BB

Banana Bill
Posted
posted
on
Sun, Aug 4, 2019 9:24 AM
Love that bar top idea! Where did you get the wood? |
|
C
Commodore
Posted
posted
on
Sun, Aug 4, 2019 3:51 PM
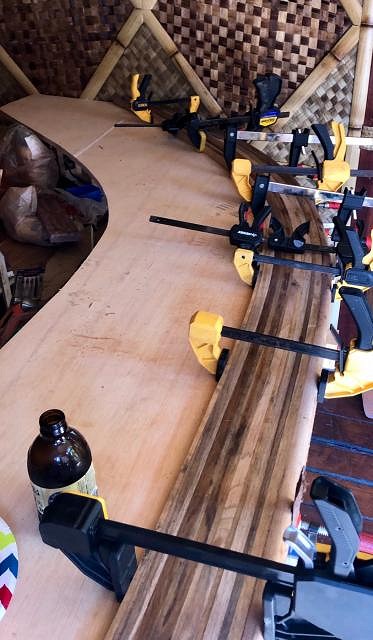
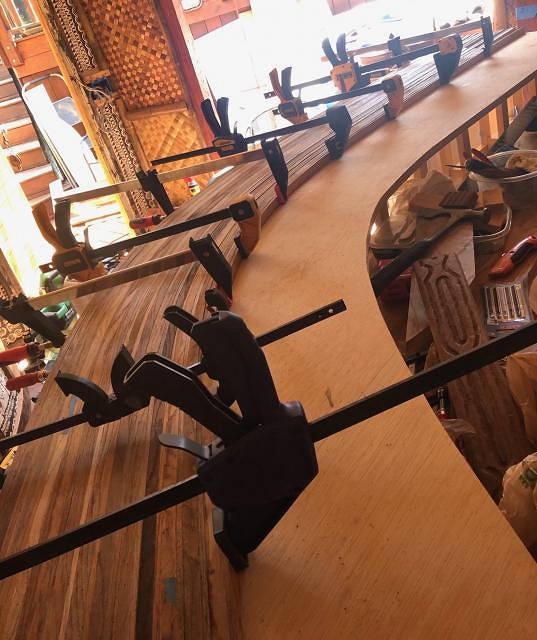
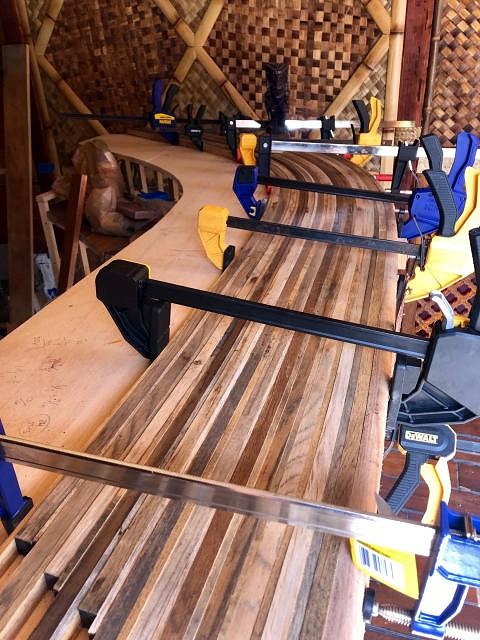
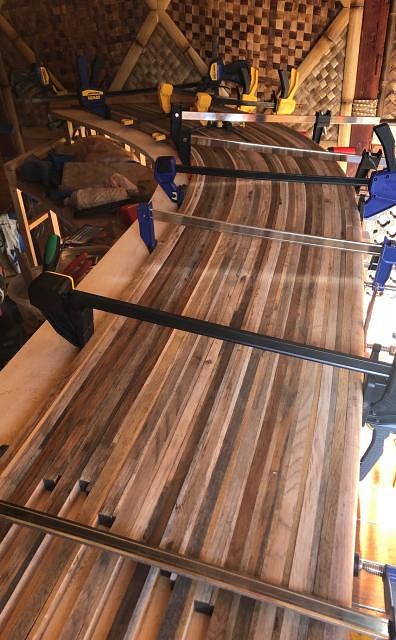
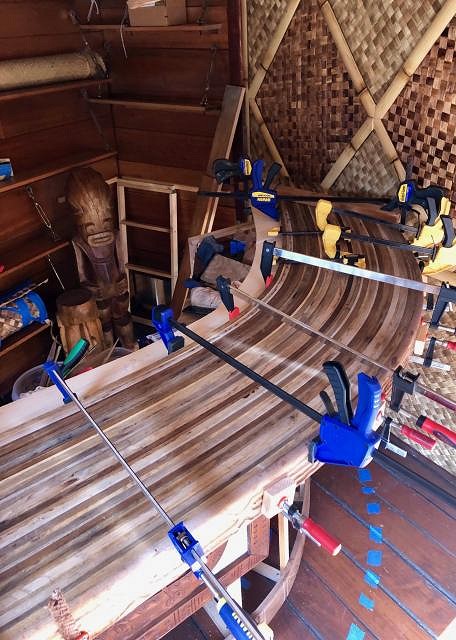
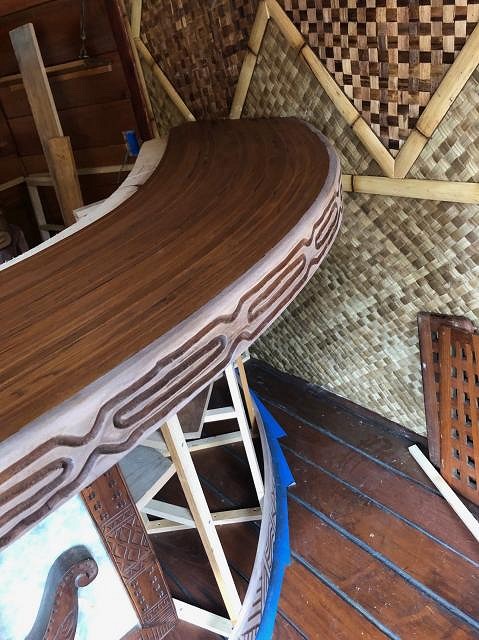
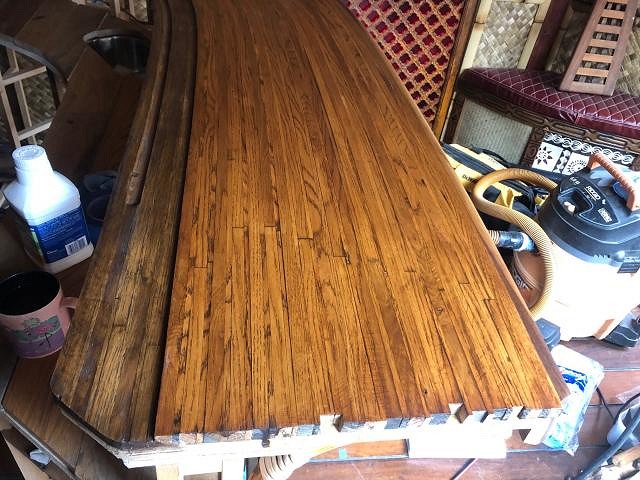
Thanks Bill! The bar top is all oak strips. I was able to get my hands on a bunch of reclaimed tongue & grooved oak boards... I was just going to do a straight oak board top - but my brothers threw the challenge down to do something more interesting... so I table sawed them all into 5/8" and 1/4" strips... I steamed them and then bent them in place at about 4" worth at a time as you can see from the pics. They look like different colors but thats because some of the boards will really dirty - they will sand out all to the same color. lots and lots and lots of saw dust - but it looks sweet - anyone want to buy some slightly used clamps? Mahalo! [ Edited by: Commodore 2019-08-04 15:59 ] |
|
W
W8N2Surf
Posted
posted
on
Fri, Aug 30, 2019 11:21 AM
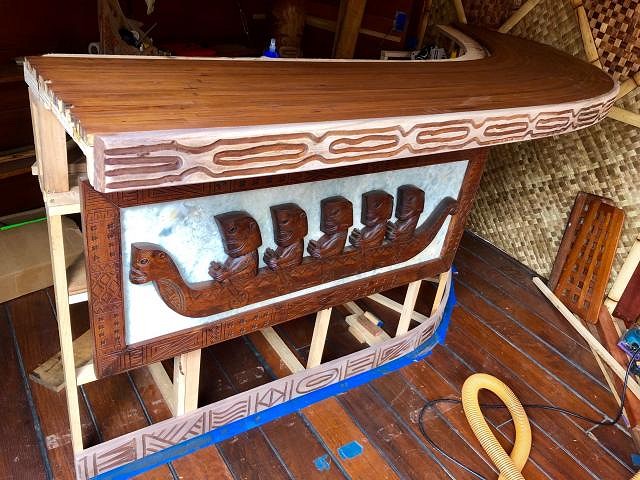
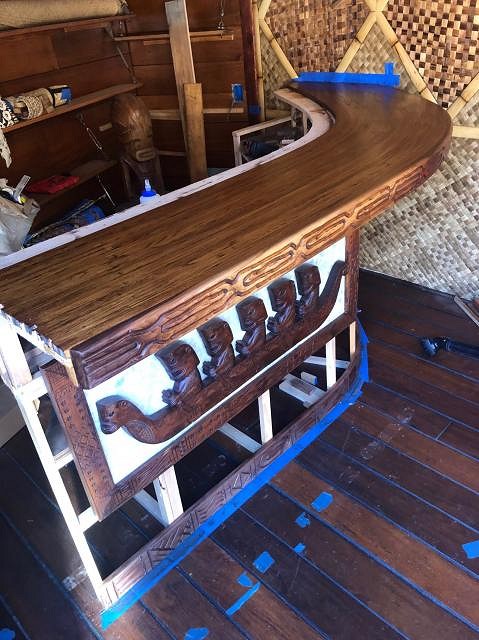
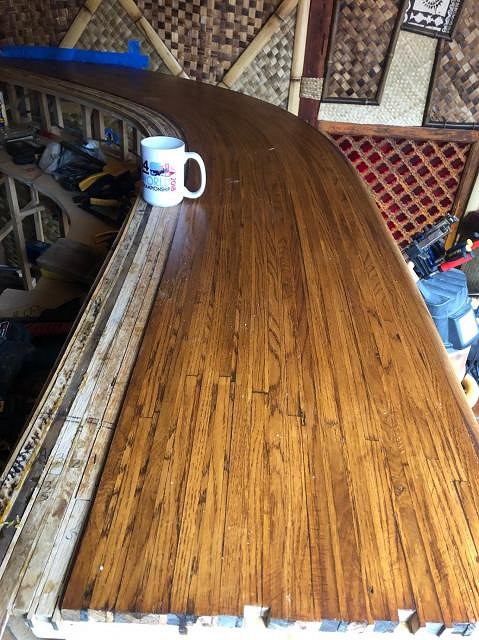
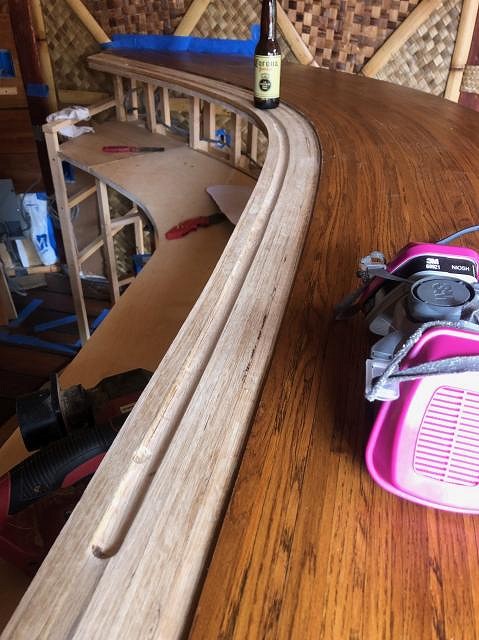
Here's how the bartop came out. Next area of focus is the spill rail in the back. |
|
S

Sandbartender
Posted
posted
on
Fri, Aug 30, 2019 11:51 AM
Woah, that bar top is gorgeous!!! |
|
C
Commodore
Posted
posted
on
Fri, Aug 30, 2019 2:35 PM
Thanks Bartender... it looks great live as well. As of today we are officially one year in (to my 2 month project)... but the good news is that we are now in the home stretch with an established Opening Date on the calendar. More photos to come and the last set of them filled with smiles and beverages. Mahalo! |
|
BS

bamboo stu
Posted
posted
on
Sat, Aug 31, 2019 3:51 PM
Gorgeous bar top. As a recovering cabinetmaker, I understand how much work went into that. |
|
M

MaukaHale
Posted
posted
on
Sun, Sep 1, 2019 2:56 PM
The bar top is superb! |
|
W
W8N2Surf
Posted
posted
on
Thu, Sep 19, 2019 6:55 AM
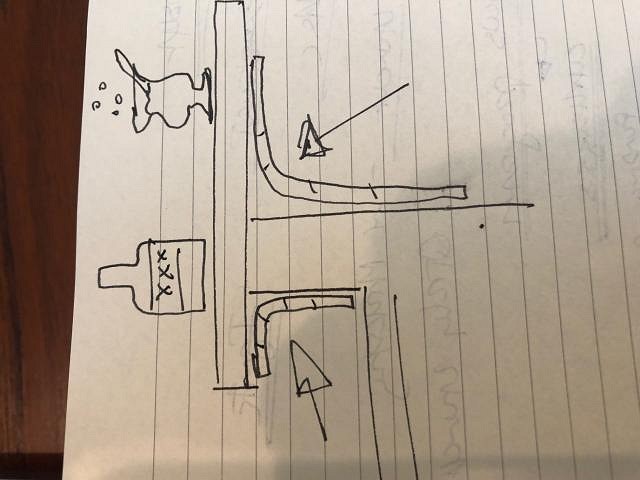
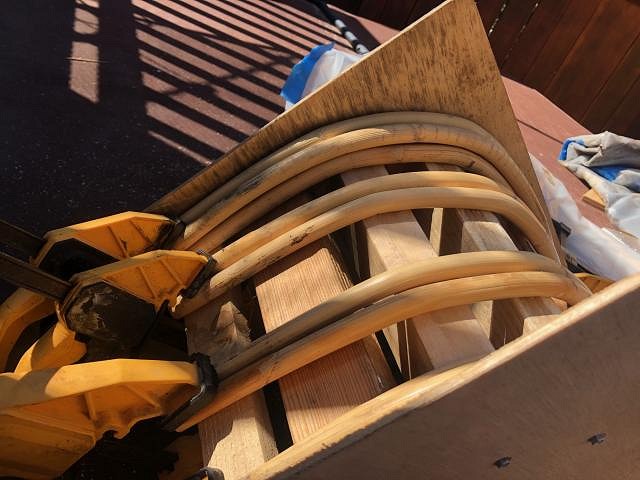
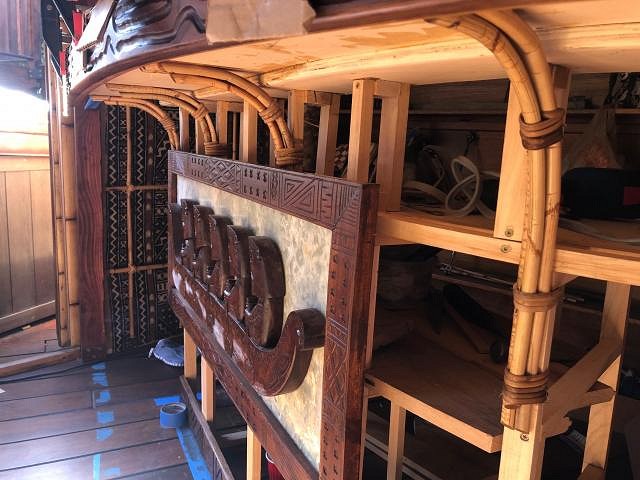
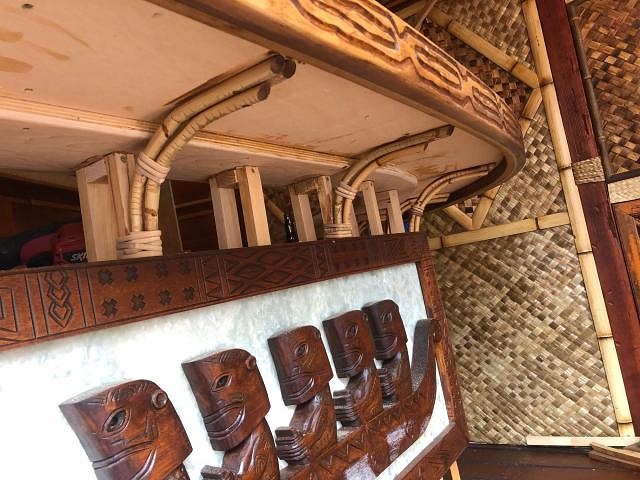
Good morning Ohana. It's the middle of September already, and we are still targeting opening night a month from now. Commodore is busy! Here's how he envisioned adding some support to the bar structure itself.
Using his steam bending techniques, he's bent the rattan to order.
And here it is installed! Nice touch.
|
|
C
Commodore
Posted
posted
on
Thu, Sep 19, 2019 9:08 AM
Thanks for the update W8N2SRF! I originally tried some bent wood supports, but they kept breaking on such a tight curves - so I moved to rattan and was super impressed with how much support the rattan actually provides. Its a heavy bar top that over hangs quite a bit. These supports really push up hard on the bar and there's enough of them that make it really solid. Its starting to get finished! |
|
W
W8N2Surf
Posted
posted
on
Thu, Sep 19, 2019 10:05 AM
Another picture of the bar supports installed
The second part of finishing the bar is doing a spill rail in back. Here are some pics of that.
|
|
W
W8N2Surf
Posted
posted
on
Thu, Sep 19, 2019 10:07 AM
And on that, Okole Maluna!
|
|
S
Sandbartender
Posted
posted
on
Thu, Sep 19, 2019 10:08 AM
Super impressive, as always. What an amazing build! |
|
W
W8N2Surf
Posted
posted
on
Sun, Sep 29, 2019 5:29 PM
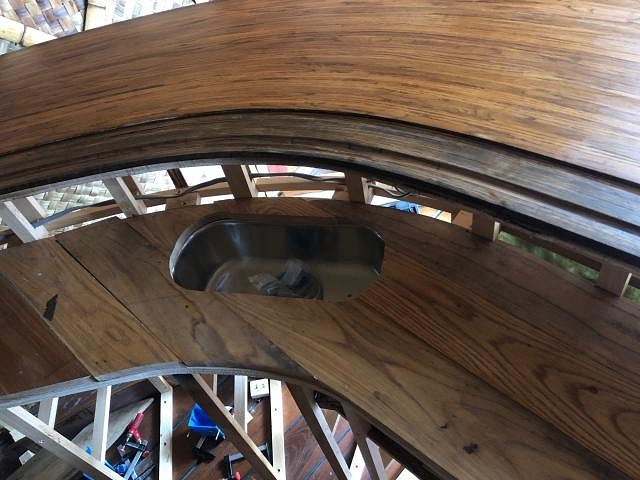
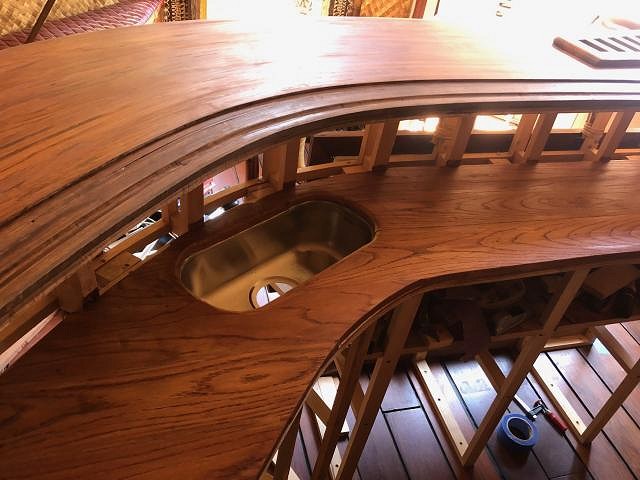
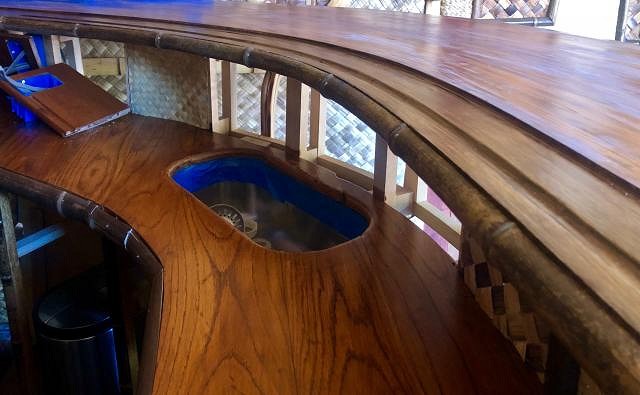
Progress Continues as we shoot for a grand opening in the near future. Here's a few shots of the underbar, prepping for the sink.
Next, we needed to provide a swing gate on the bar for getting in and out. Here it is!
Great job Commodore with that inset flush hinge keeping the gate flush with the bar!
More soon!
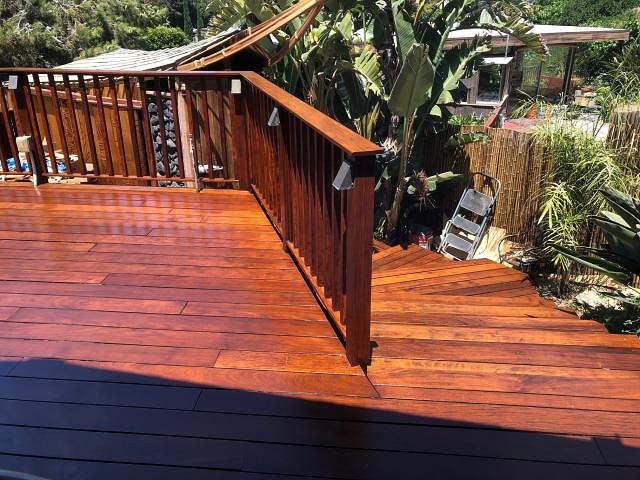
And just a quick shot of the refinished deck, with the stairs leading down to the Loma Kai in the background
|
|
J
jimsflies
Posted
posted
on
Sun, Sep 29, 2019 5:49 PM
Looks awesome. Someone has some carpentry skills for sure. Those skills are too good for tiki. :) Are you going to have running water in the bar? |
|
S
Sandbartender
Posted
posted
on
Sun, Sep 29, 2019 7:25 PM
I am in love with the swing gate! So awesome how it looks like a cargo hold hatch cover. The newly refinished deck is super schmexy as well. Sadly, we're battening down the hatches here as fall suddenly has us in it's cold and damp grips. Luckily, my bar is inside and below grade, so the drinks can keep flowing until... well hopefully until we pull up staked and move to Belize. LOL |
|
BS

BIG SMOOTH
Posted
posted
on
Mon, Sep 30, 2019 12:14 AM
Love that wood! Absolutely beautiful work! Love following your build. |
|
C
Commodore
Posted
posted
on
Mon, Sep 30, 2019 7:42 PM
Yes on the running water - putting in an ice-maker and we'll have cold water running (with ability to hook up hot - but no plans)... Thanks on the skills comment - its been fun - too good for tiki?? you haven't seen all the mistakes! (err... happy accidents). :wink: |
|
C
Commodore
Posted
posted
on
Mon, Sep 30, 2019 7:44 PM
Sorry to hear you have shut down the bar Sandbartender!... the swing gate is cool - and its a removable floor grate for an old boat - I got two of them from a Yacht Surplus store... took me awhile to figure how to use them... you'll like what I did with the other one as well. Getting closer... super appreciate all the encouragement! Mahalo! -Commodore |
|
W
W8N2Surf
Posted
posted
on
Mon, Oct 7, 2019 12:20 PM
A little project update for you. You saw the "swing" gate above for bar entry. Here, we use the same nautical grate for a shelf next to the bench seat mid-bar. The pulley raise/lower line is great. It's nice to be able to raise the hatch when the bar needs some standing space, or the Hula dancers need a tad bit more room to move. Great idea Commodore!
As always, Commodore ends the weekend with a justly deserved reward!
|
|
T

Tikifrog
Posted
posted
on
Thu, Oct 10, 2019 6:14 PM
Amazing work as always. And the drinks look good too! |
|
W
W8N2Surf
Posted
posted
on
Mon, Oct 28, 2019 7:13 AM
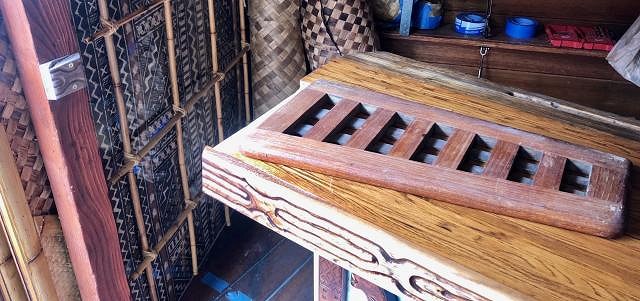
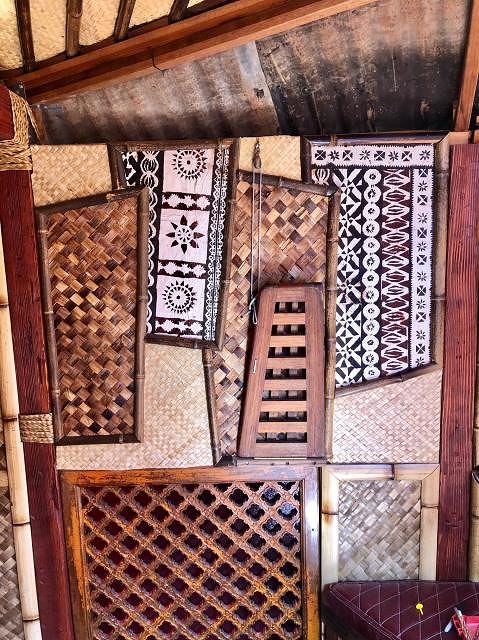
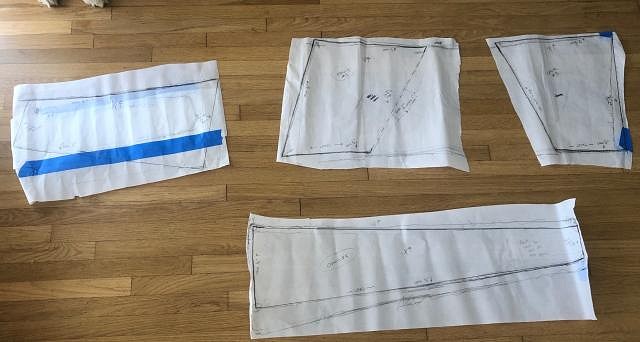
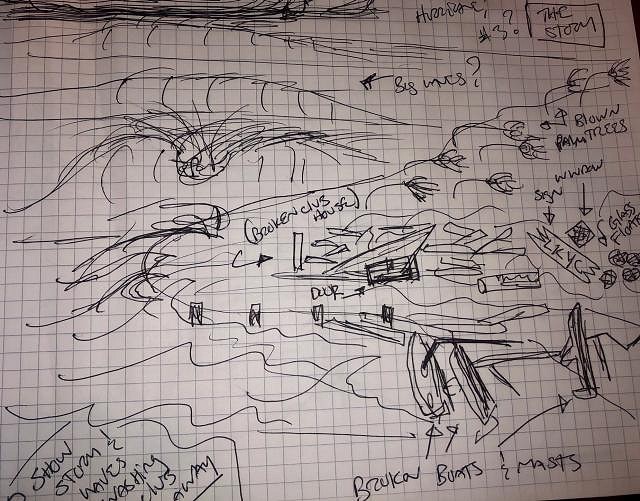
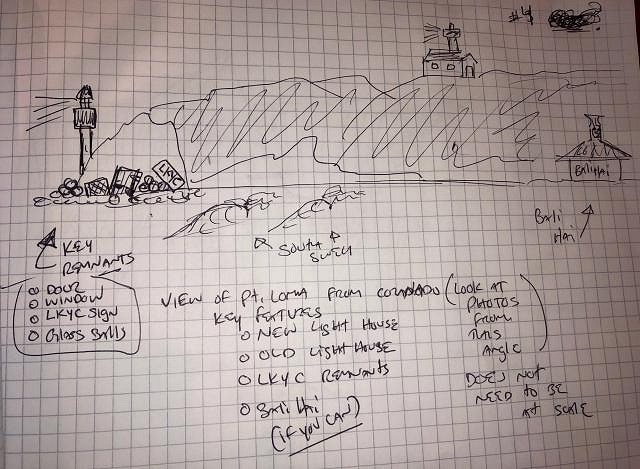
So the Loma Kai has a story, which you can read on the first page of this thread. Inside the Loma Kai, there are two exposed spaces between the top of the interior wall and the roof where the matting/bamboo start. Commodore has the idea to "fill" that space with hand-carved panels depicting the story of the Loma Kai. He's measured the shape of each of those panels, and come up with 4 templates. The assignment: Each of the 4 brothers must design and then hand carve a panel showing a particular part of the LKS&G's story. Great idea, and great way to let the immediate family be part of the build. Here's the templates:
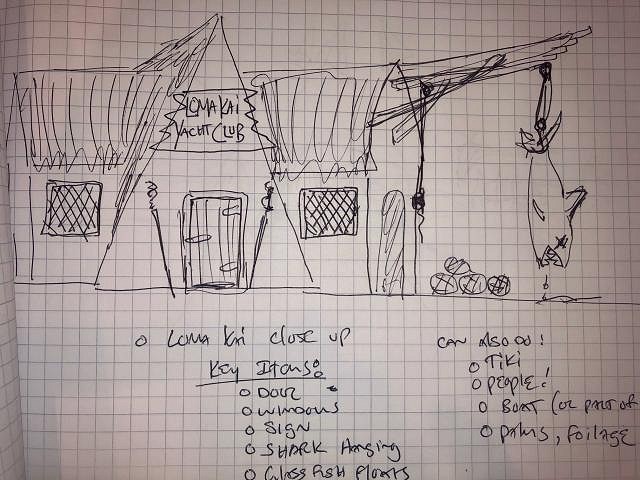
The first panel would show a close up of the LK in it's hey day. Here's Commodore's suggested vision in his own drawings, which will be open to interpretation by the carver. That one is going to Paul.
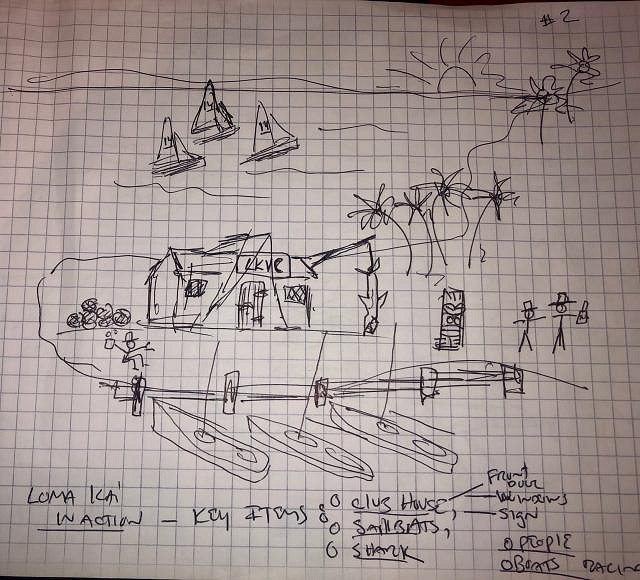
Next is the LK in action. That one is going to me.
Next is the LK being destroyed by the great storm, going to Robert.
Or maybe something like this: Last would be the flotsam of the LK washing up on the shores of Sunset Cliffs, going to Mike.
So, each of us will need to secure the wood, build a panel, then draw out and carve the corresponding theme. The panels will the be mounted to the interior of the LK. This project will take us a bit, but updates soon. |
|
M

mikehooker
Posted
posted
on
Mon, Oct 28, 2019 8:12 AM
Wow that's such a cool idea and one hell of an undertaking. Hope you all have the skills to pull it off! Good luck and can't wait to see the finished panels. |
|
C
Commodore
Posted
posted
on
Tue, Oct 29, 2019 7:18 AM
Thanks Mike... and apologize for my chicken scratch drawings above! :wink: My brothers wanted to have a hand in the build and all live remote so this seemed like a good idea. It'll be 4 panels- they are odd shapes but all about 12-14 sq inches. I can frame out with bamboo and space between with some tapa or matting so it flows. We'll see how it turns out - and I don't need these to finish the bar -so we'll see when they arrive. I think it will work! These guys are all fairly competitive so I'll keep my fingers crossed they turn out. Getting there... Mahalo! |
|
M
MaukaHale
Posted
posted
on
Tue, Oct 29, 2019 2:56 PM
The craftsmanship in your bar is unbelievable! |
|
BS
BIG SMOOTH
Posted
posted
on
Tue, Oct 29, 2019 6:31 PM
What an amazing idea to bring your family in to your already amazing build! Such a cool idea and something the will bring fond memories every time you’re in the bar. Good work. |
|
C
Commodore
Posted
posted
on
Tue, Nov 26, 2019 4:32 PM
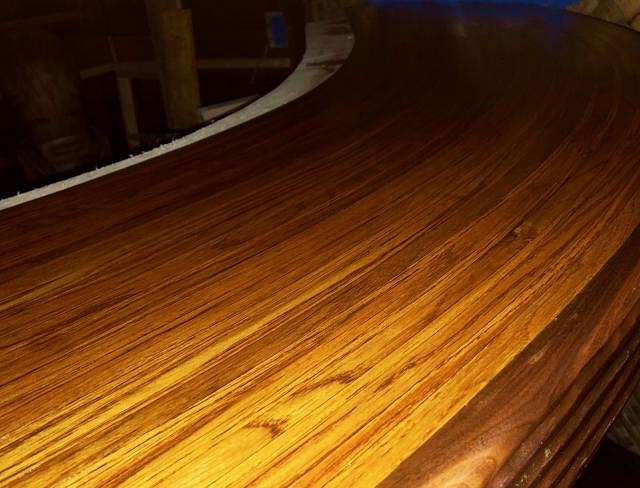
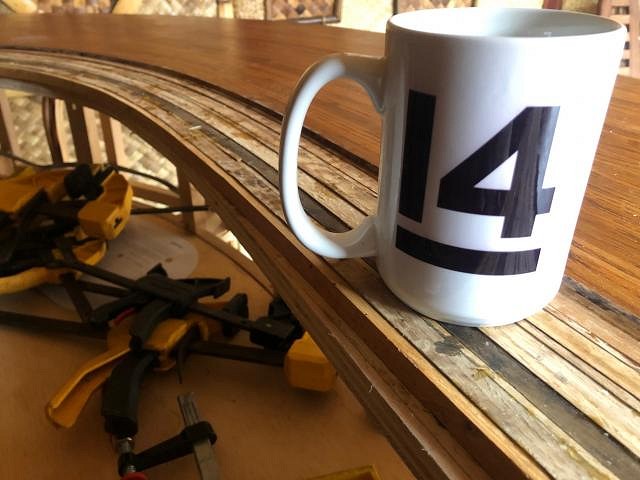
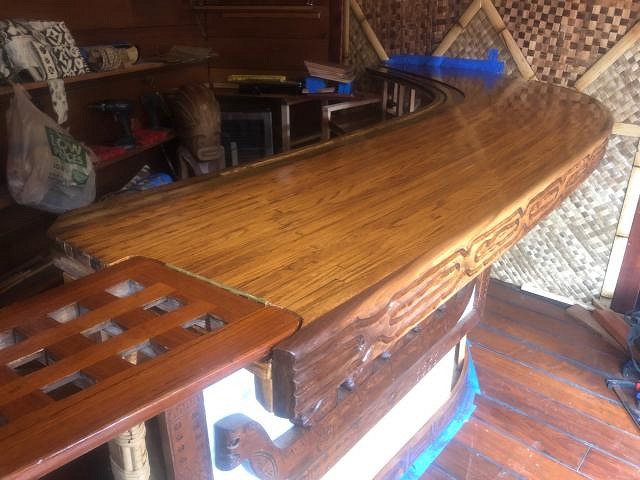
Ok... TikiCentral Ohana - its been a month and we owe you an update! My bro W8N2SRF has been super busy and I need some distractions so let me try posting some photos. Here is one last detailed shot of the bar top. Lots of work so showing it again... its over 40 individual oak strips steamed, bent, & glued into place. Really turned out nice and it has 11 coats of varnish on it. Why 11 you ask? Because I screwed up coats 9 & 10! :wink:
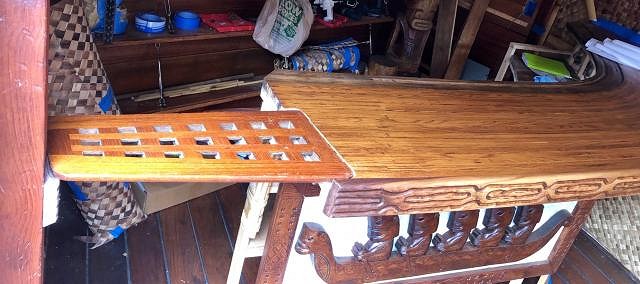
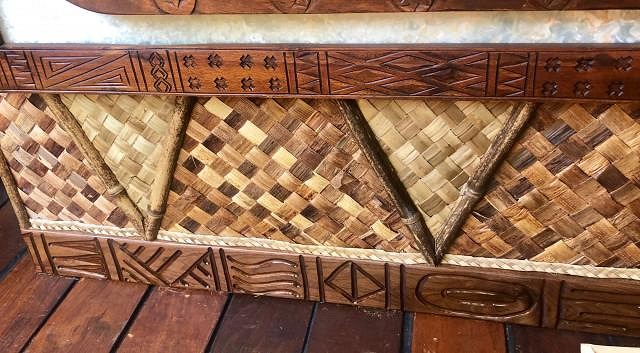
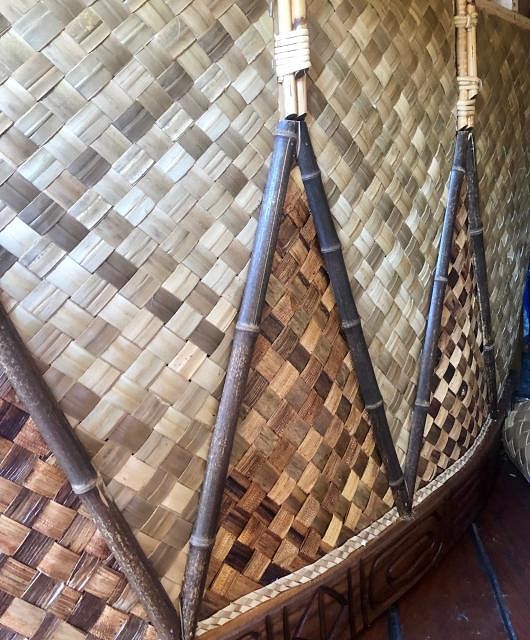
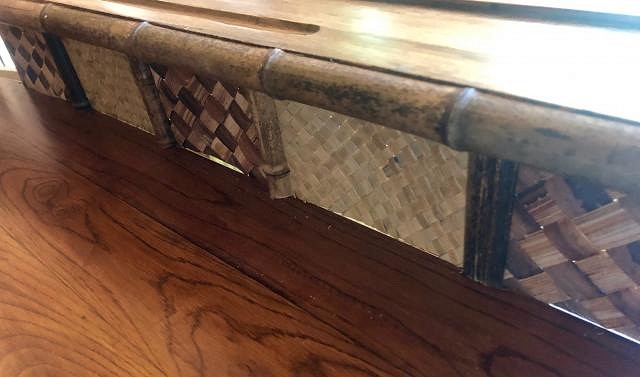
ok... now lets get to the bar front... Here's a few shots and this- really looks great and the different matting turned out well together.
and with the bamboo trim in place
Love how it came together with the bar floor trim, bamboo and the rattan bar top supports. Stoked on how this came together.
Enjoy and wishing you all a Happy Thanksgiving - we'll keep the posts coming! Mahalo! -Commodore |
|
C
Commodore
Posted
posted
on
Thu, Dec 12, 2019 8:46 PM
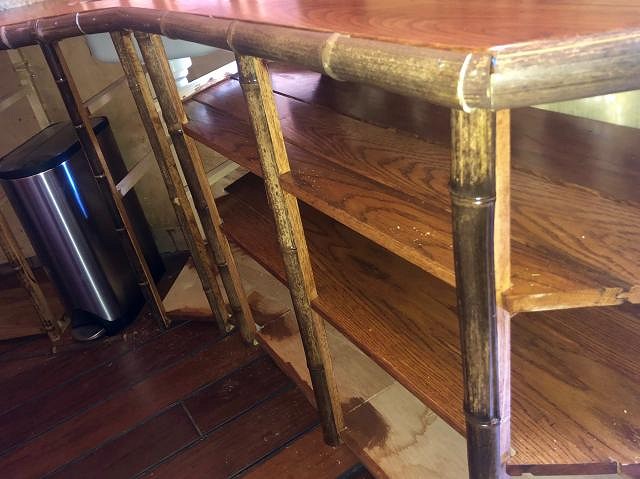
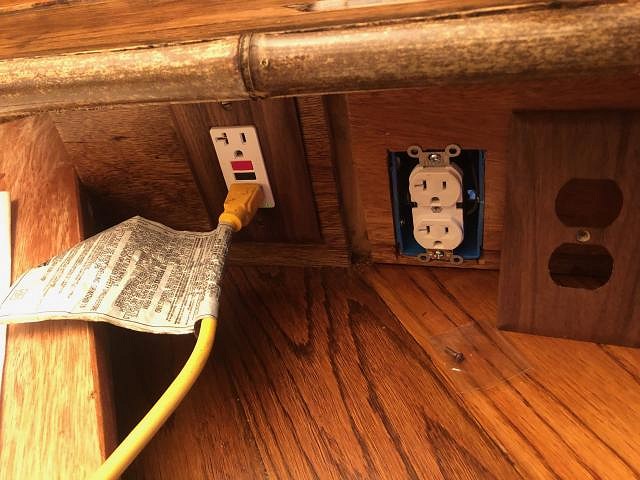
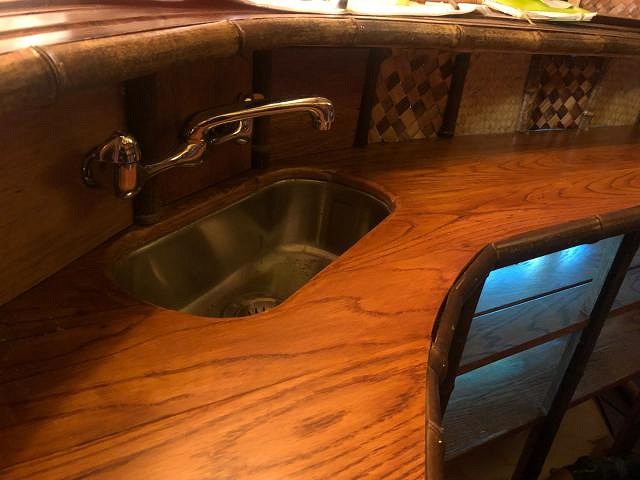
Hey all you tiki peeps... thought I'd share some other shots of how the backbar came together... dropped the sink in, & flat oak work top. Also bent a piece of bamboo to trim out the back of the top bar - that worked out well and looks good. trimmed out the back sections with different matting, wood, & more bamboo trim dropped in oak shelving below (still using reclaimed oak I was able to pick up... but running out - bottom shelf is plywood), trimmed the outside with more bamboo fitted in some electrical for blenders, etc... fitted faucet in... was a really tight area - was tougher than it looked - but got in there solid and... now here is the backbar complete... pleased with how it all came together... man - getting thirsty! |
|
C
Commodore
Posted
posted
on
Sun, Dec 22, 2019 9:05 PM
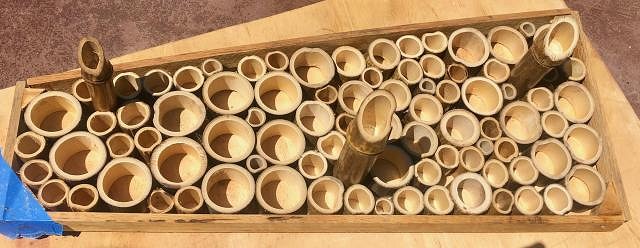
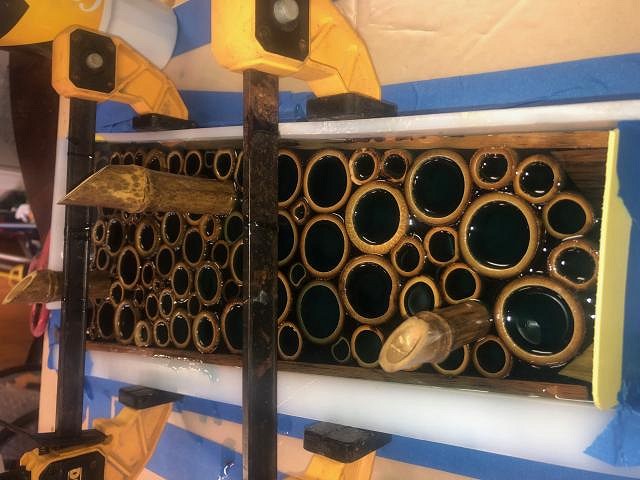
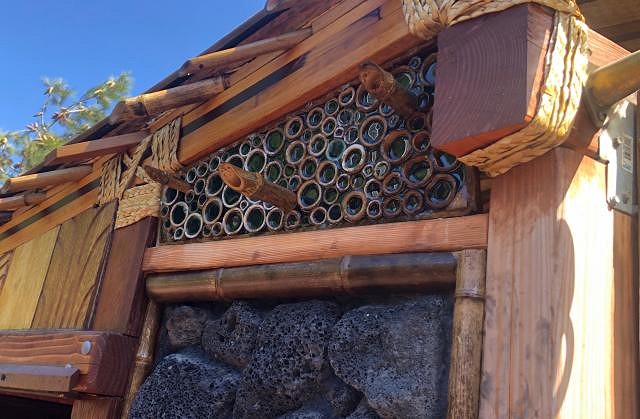
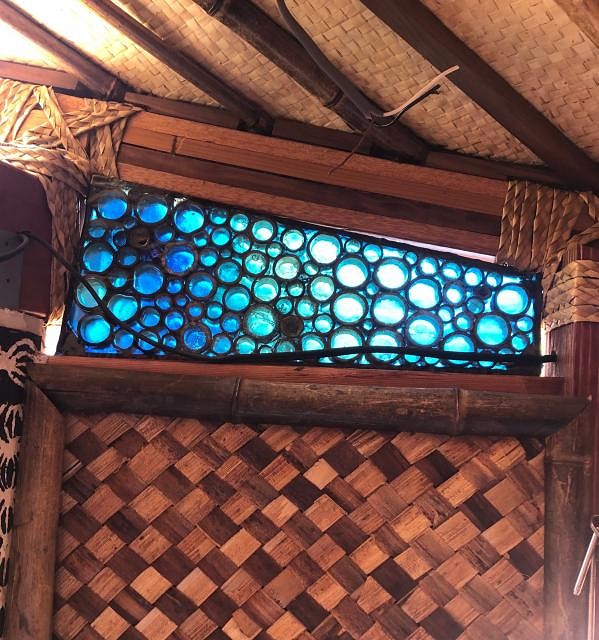
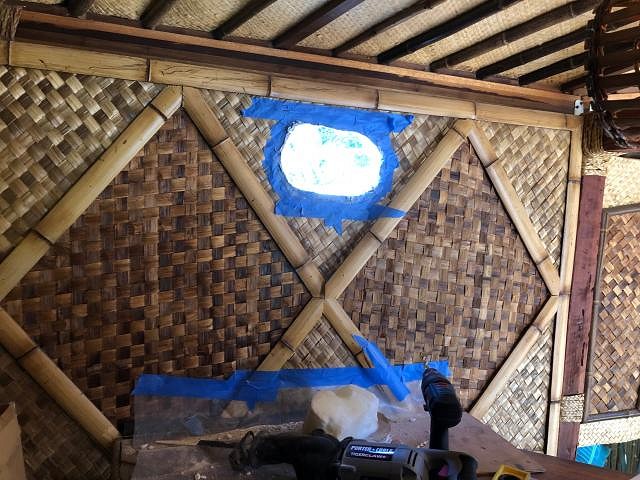
Ok Holiday Tiki peeps! Here's a little project - because of the upslope of the roof - have some odd shaped areas to fill... here is what we did for one section - a bamboo section window filled with blue/green two part epoxy. it turned out ok - my first time using this stuff and it can be tricky... the 3 long bamboo sections are actually to hang towels on for the hot tub err... grotto... which is just outside. I'm stoked... Its all coming together! lots of chop sawed bamboo... cut slowly for best results! setting the epoxy its not perfect, but what in tiki is? view from the outside quick fit view from the inside - it works! Happy Holidays everyone! Hope you have wonderful quality time with your family and friends... and if nice rum fueled beverages help bring that together, then even better! Mahalo! -Commodore |
|
H

hang10tiki
Posted
posted
on
Mon, Dec 23, 2019 9:27 PM
Wow |
|
C
Commodore
Posted
posted
on
Sun, Dec 29, 2019 7:16 PM
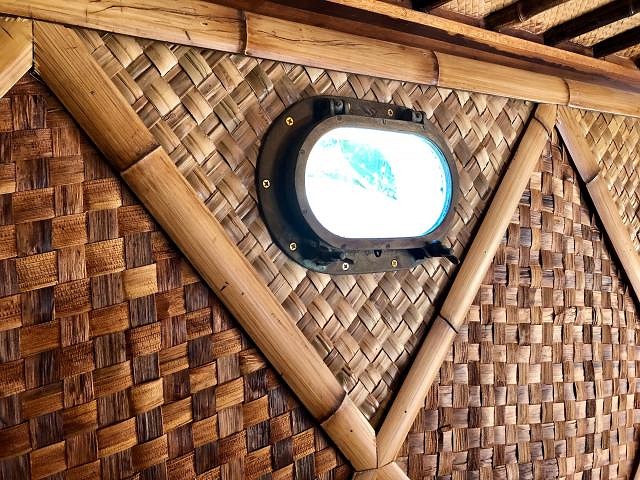
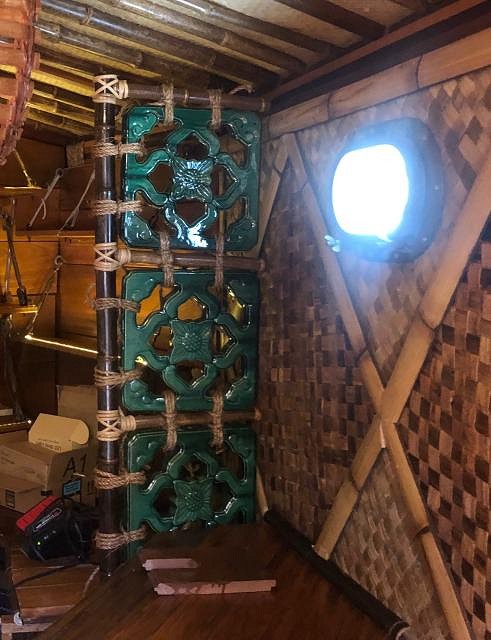
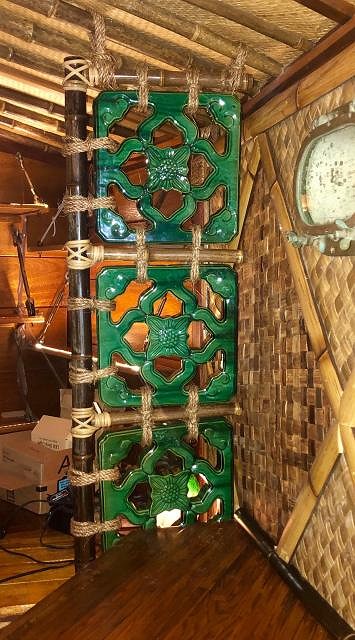
Truly hope everyone had a wonderful Christmas and Holidays and wish you all a prosperous and tropical New Year! Here's a couple updates on some quick projects... First I put in a porthole - nothing like taking a sawzall to put a hole in the side of the tiki bar you just built... ughhhh... was clean from the inside - a bit messy on the outside, but no one will see that side of it!
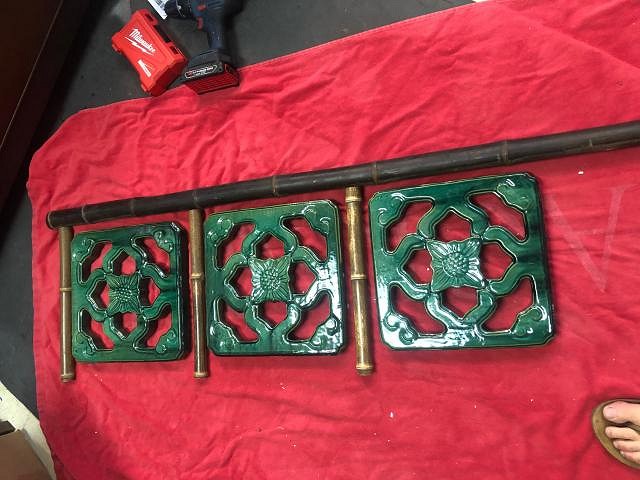
its a used brass porthole that I picked up - pretty cool and great aging on it - plan is to put some blue film on the glass so its not such bright light in the daytime Next project was to create a screen of sorts with these cool jade tiles... they block the view a bit to part of the back bar that will have stuff no one wants to see - mixers, ice crusher, etc... here's the build:
in place... and complete! I dig it - and I hope you do as well! |
|
C

coldwarspacemonkey
Posted
posted
on
Mon, Dec 30, 2019 3:53 AM
Completely diggin' it! Beautiful work throughout, and it keeps getting better! |
|
S
Sandbartender
Posted
posted
on
Thu, Jan 9, 2020 9:38 AM
That bamboo resin window came out amazing! Loving the tile screen as well. |
|
T
Tikifrog
Posted
posted
on
Fri, Jan 10, 2020 8:05 AM
Awesome as usual! I love the color of the bamboo /epoxy screen. |
|
W

Wayfarer
Posted
posted
on
Fri, Jan 17, 2020 4:44 AM
Beautiful glass work! |
|
SF

Slacks Ferret
Posted
posted
on
Sat, Jan 18, 2020 2:58 PM
These are great touches! Looks really nice. |
|
W
W8N2Surf
Posted
posted
on
Wed, Feb 19, 2020 7:48 PM
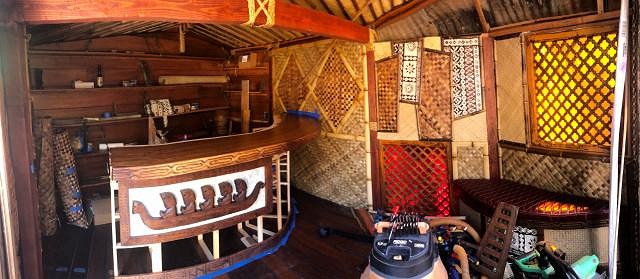
Just a small update, quick shot of the overall room, looking into the space
|
|
M

Mele_Ipo
Posted
posted
on
Wed, Feb 19, 2020 8:51 PM
Aloha Commodore! Outstanding work! I really dig the epoxy window panes and the green tiles. Everything is coming together beautifully. |
|
M

MauiRose
Posted
posted
on
Thu, Feb 20, 2020 10:52 AM
So loving this! Such an inspiration. |
|
E

eroc
Posted
posted
on
Thu, Feb 20, 2020 1:14 PM
Amazing work! Puts all my right angles to shame..... When do we get to see a video walkthrough? :wink: |
|
C

CyroTiki
Posted
posted
on
Fri, Feb 21, 2020 6:48 AM
I just discovered your build yesterday and spent most of the afternoon drooling over it! :o This is hands down one of the best home builds I've seen. Keep up the great work and inspiring the rest of us to up our game! Cheers! :drink: |
|
W
W8N2Surf
Posted
posted
on
Tue, Feb 25, 2020 12:42 PM
Commodore has actually made great progress, more updates coming soon. All your comments keep him going. Cheers Ohana! |
|
C
Commodore
Posted
posted
on
Sat, Feb 29, 2020 7:33 AM
Aloha TC People! Thank you all for the kind words on the build - its been fun and its been great to share with you all - we'll get some more pics up for sure - and Eroc I'll make it a goal to get a vid done at some point. good call -Commodore |