Tiki Central / Home Tiki Bars
The Spooky Pineapple Tiki Lounge & Arcade
Pages: 1 37 replies
|
S

SassyPonyPants
Posted
posted
on
Fri, Apr 19, 2019 8:12 AM
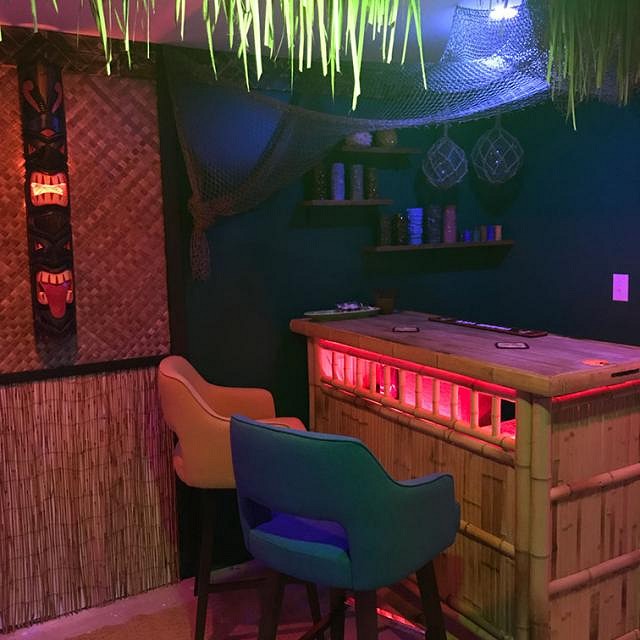
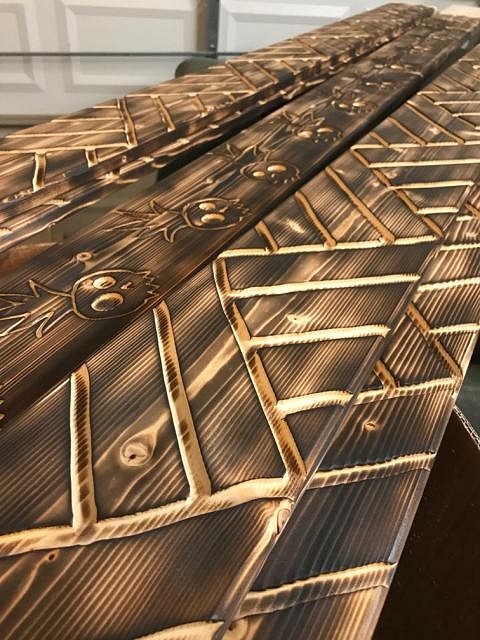
I am sooooo excited to finally share this! I wanted a tiki bar/lounge, my husband wanted an arcade. So 4 months ago we "broke ground" on our unfinished basement. He did the framing and most of the drywall, we both almost had mental breakdowns, but it's finally coming together. It is a work in progress, but we've come a long way in such a short time. We need to tackle the flooring next because concrete is cold! So, I've lurked here for a while and got some great ideas! Having visited Frankie's in Vegas and Three Dots in Chicago recently, I was ridiculously inspired to get this going. I also, with the magic of auction site bidfta.com, accumulated $3000 worth of furniture and materials for about $350 – including a bamboo tiki bar, amazing bar stools, thatch, rugs, and more. Current state: The lounge prior to adding futon and wallpaper and adjusting the mood lighting: Wallpaper I bought on auction for $1/roll. (Sells on Amazon for $48/roll!) Here is the trim that I cut and burned. My first time using a router and a torch! 10/10 would do again. So much fun. We currently just have a VPcab in the arcade, but there's more to come. It's a virtual pinball / arcade cabinet loaded with a bunch of games – super fun! |
|
T

Thortiki
Posted
posted
on
Sat, Apr 20, 2019 2:55 AM
COOL! (-: |
|
H

hang10tiki
Posted
posted
on
Sat, Apr 20, 2019 7:51 PM
Lookin good Have fun and cheers |
|
L

littlegiles
Posted
posted
on
Mon, Apr 22, 2019 6:13 AM
Looks like a great place to hang out. Really loving those bar stools! |
|
S
SassyPonyPants
Posted
posted
on
Thu, Apr 25, 2019 6:06 AM
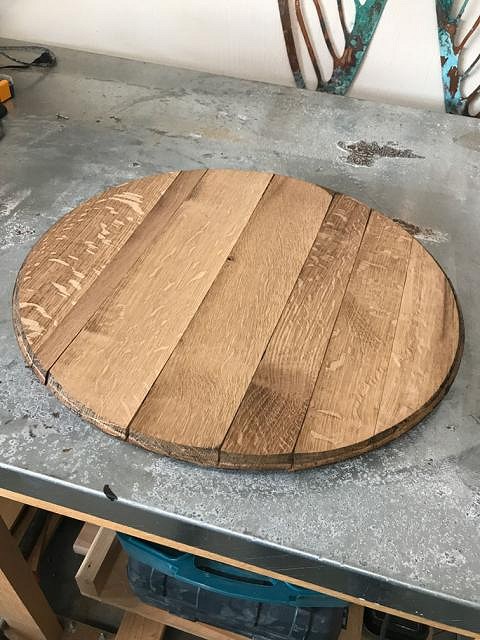
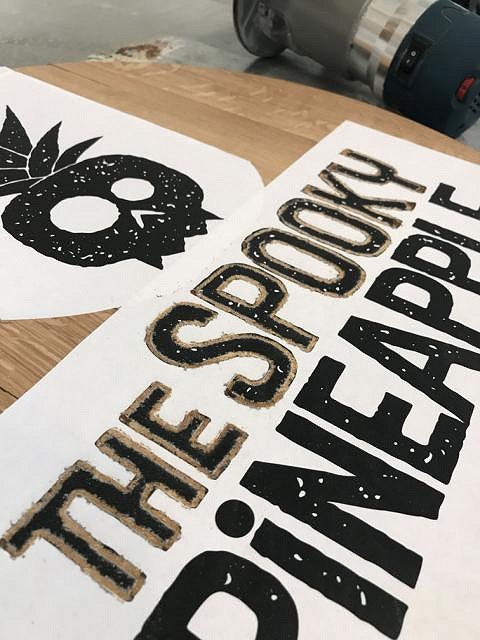
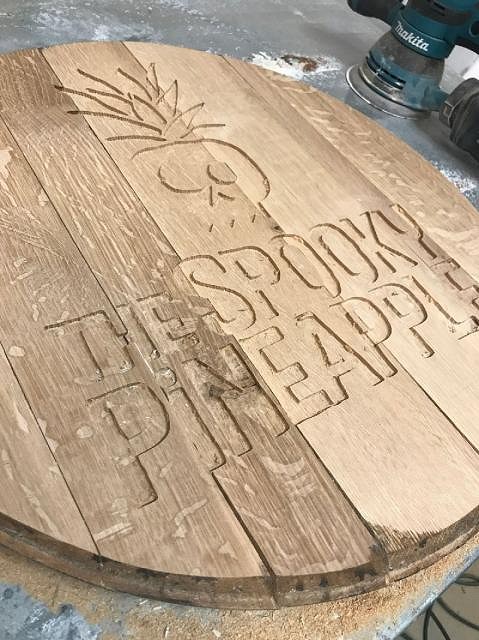
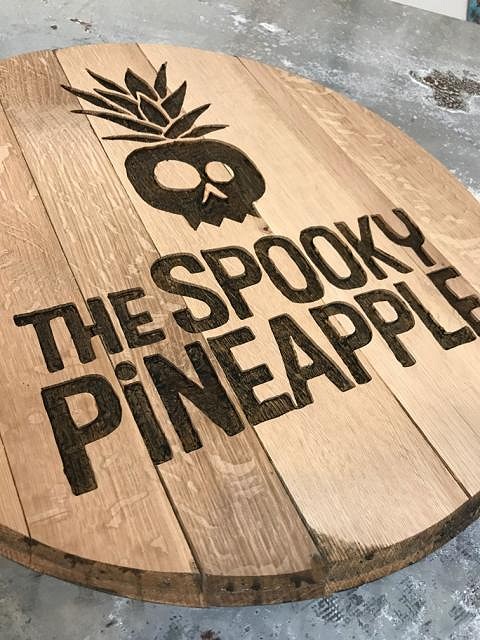
We have a sign! Being located in Kentucky, I felt it was appropriate to use an oak bourbon barrel head. I had a friend pick one up for me in Lexington, and it's authentic! Not sure which distillery it originated from though, as it came pre-planed.
Adhered pattern with some spray adhesive. Outlined with a 3/32" bit... Then went up to a 3/16" I believe to cut out the solid areas. Broke that bit (whoops) then finished with the next smallest bit. Filled in with some ebony stain, then polyurethane on the whole thing. Ta-dah! |
|
L
littlegiles
Posted
posted
on
Thu, Apr 25, 2019 6:23 AM
Nice work on the sign. So now you need to make a signature mug to match your sign. :) You can share that in the next update. No pressure |
|
N''

nui 'umi 'umi
Posted
posted
on
Thu, Apr 25, 2019 11:20 PM
dat sign is awesome. [ Edited by: nui 'umi 'umi 2019-04-25 23:22 ] |
|
S
SassyPonyPants
Posted
posted
on
Fri, Apr 26, 2019 7:02 PM
Ay carumba! Once I'm to a point where everything finally feels "together"... that may happen. Hahaha. |
|
S
SassyPonyPants
Posted
posted
on
Fri, Jul 12, 2019 10:23 AM
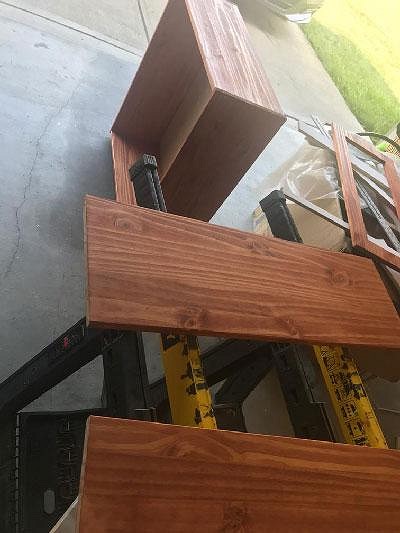
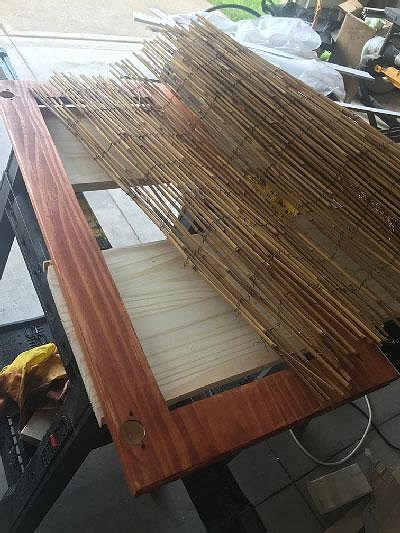
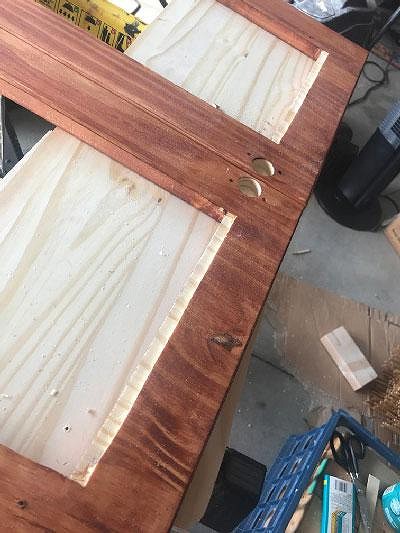
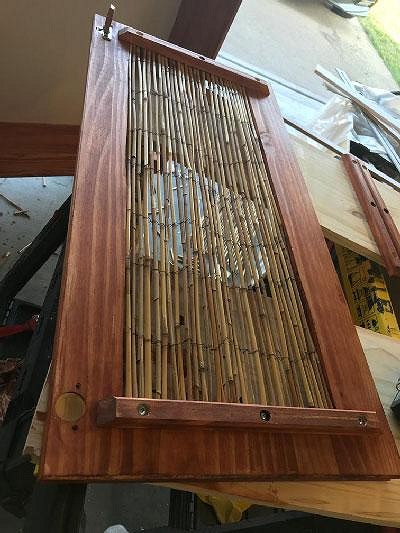
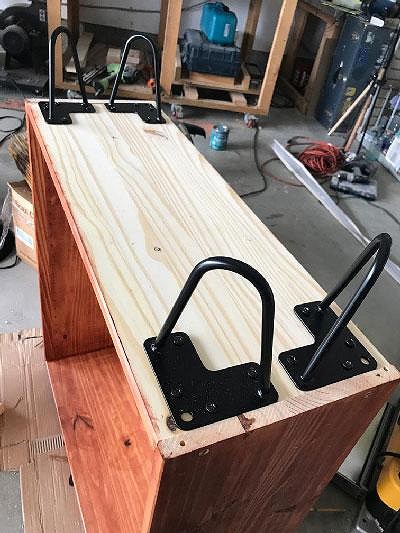
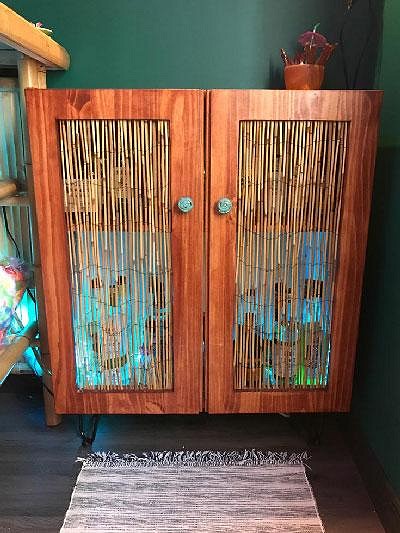
I've just added a liquor cabinet to the Spooky Pineapple! It's an IKEA hack I did using a $70 IVAR cabinet. I found this tutorial and ran with it.
|
|
C

Cutcarefullyplayloud
Posted
posted
on
Fri, Jul 12, 2019 10:45 AM
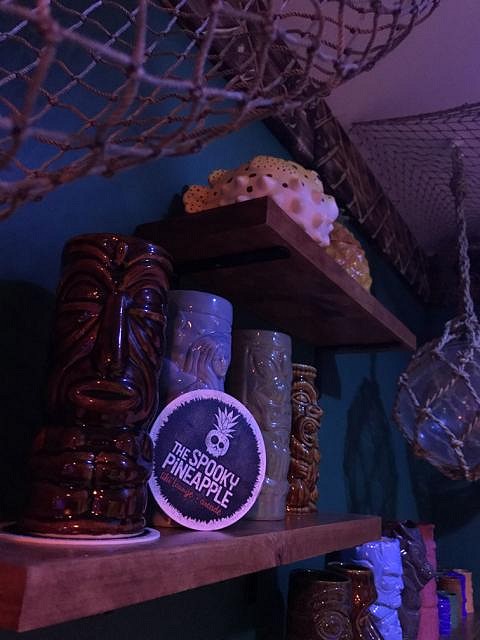
Looking great so far! I have one of those mugs facing the camera in the coaster photo that I found at Goodwill recently. On the back it's printed with a fraternity luau name and date, which makes me dislike it a bit, but it's a great mug and fits a mai tai perfectly. |
|
P

Philot
Posted
posted
on
Fri, Jul 12, 2019 11:00 AM
Wow that's coming together nicely. Nice job on the sign. And I like what you're doing with the lighting, especially the bar and liquor cabinet. The VPC cabinet is a new one to me, though I've been aware of various arcade emulators for a long time. I checked their site but didn't see much specific information. Is that just a specialized arcade emulator or does it have additional stuff to emulate pinball machine hardware? Like tilt/shake sensors, knocker solenoids, or fancy surround sound to simulate the sound of the balls rolling around? Now I wish I had a basement. [ Edited by: Philot 2019-07-12 11:03 ] |
|
S
SassyPonyPants
Posted
posted
on
Fri, Jul 12, 2019 1:07 PM
Thanks for the compliments! I'm thoroughly enjoying the process, as I enjoy arts & crafts and this is essentially my biggest arts & crafts project ever.
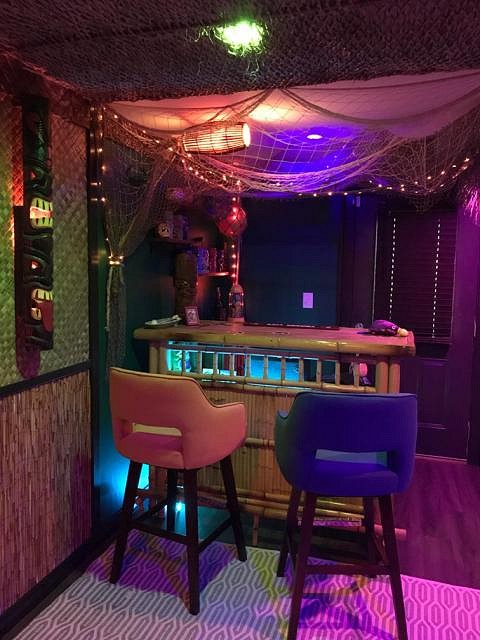
My husband understands all of this way better than I do, but I'll attempt to explain, haha. So the full size VPCab that looks like a pinball machine I believe has sensors and reacts to nudges. The games contain all the sounds, and they install decent speakers, so your realistic sounds are dependent on those things. Like anything, the realism is also dependent on the programming and design. There are sims that have the perspective figured out – it's kind of crazy and I don't know how they do it, but it really makes the monitor look like a three dimensional playfield. We purchased the Vertigo and it came preloaded with hundreds of arcade games and VP games. You can't physically nudge this thing, you use secondary flipper buttons to nudge. My husband is in IT so of course he immediately started tinkering the day we got the thing. He removed unwanted games and installed a bunch of open source pinball games (some much more realistic than others.) We got all the upgrades on ours which includes a subwoofer, and it sounds amazing. Overall, a solid purchase and everyone enjoys playing it. But with all the tinkering hubs did, my opinion might be a little skewed because I've never played it un-tweaked! |
|
S
SassyPonyPants
Posted
posted
on
Sat, Jul 27, 2019 4:52 PM
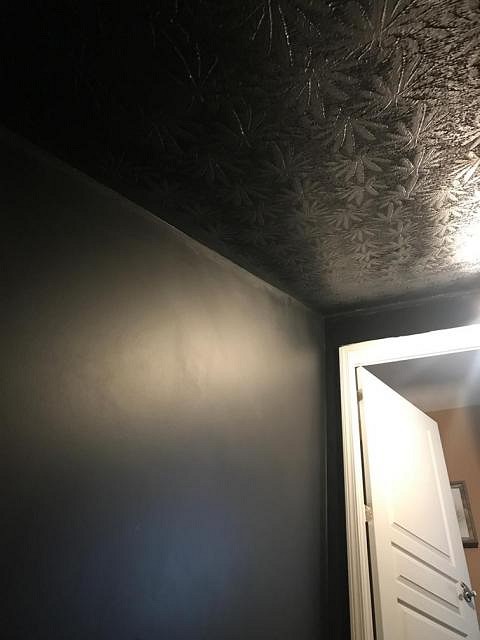
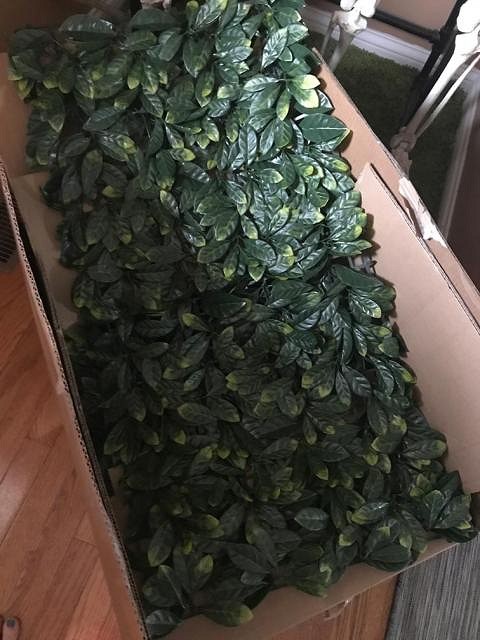
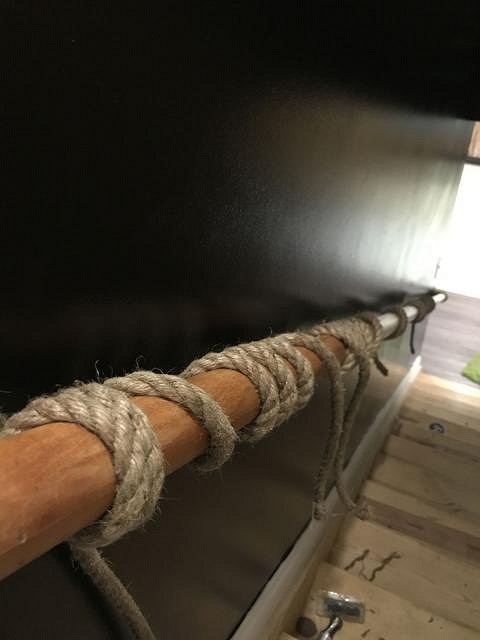
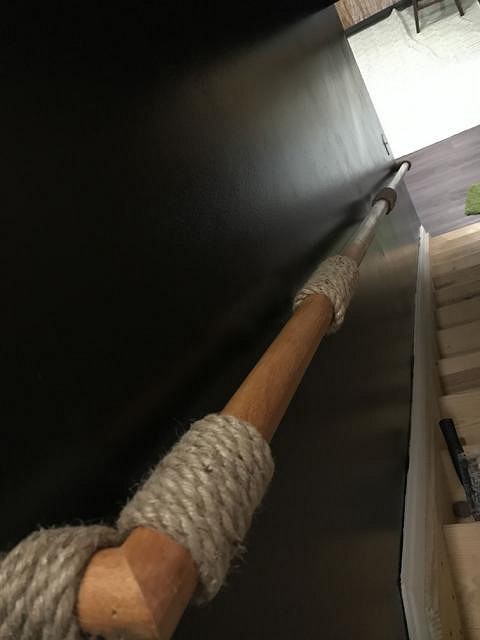
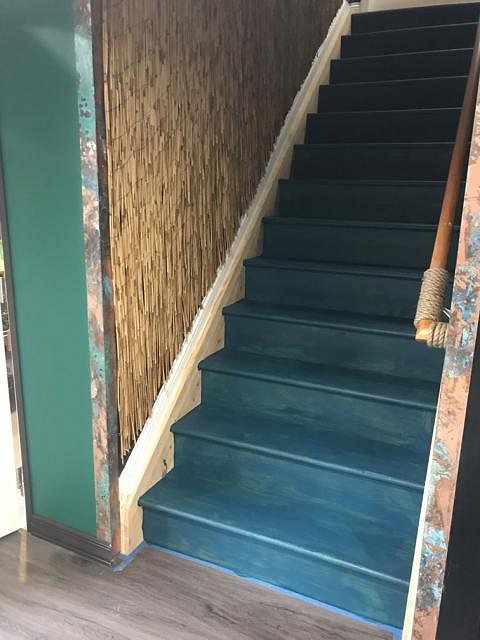
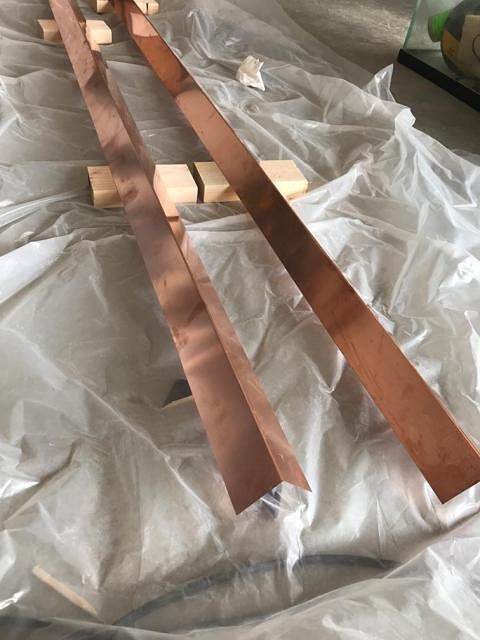
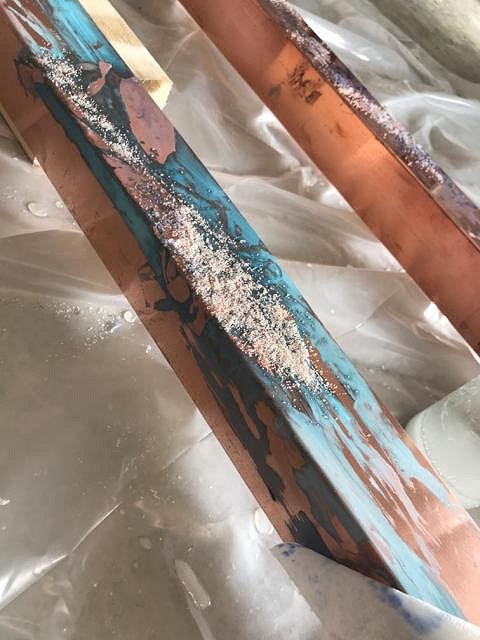
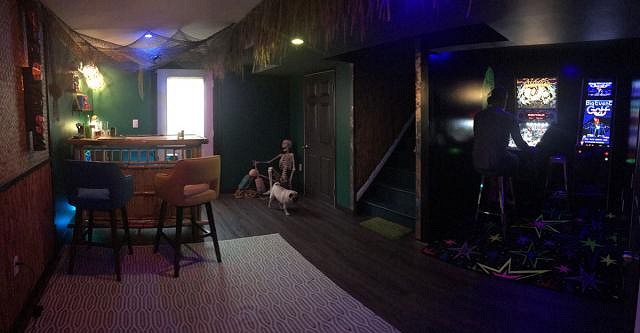
I've been working on the stairwell lately. Not done yet, but so close! WALLS! I had tons of leftover black paint from the arcade and slathered the stairwell with that. CEILING! Bought these 20"x20" privet leaf panels on Amazon. Put the privet panels on the ceiling. They link together and are light so they just took a few staples. I also added reed fencing to the wall. RAILING! Got a 50' roll of 1/2" jute rope from Hobby Lobby for about $10 with coupon. Wrapped that around the railing in segments. For the ends, I just glopped some clear adhesive and wrapped them with fine twine. Let them dry, then used some tiny nails to attach the ends to the underside of the railing. STAIRS! Found a color at Home Depot named "Ocean Abyss" which was totally appropriate because that's the exact color I was going for. Oh, and those corners at the bottom of the stairs are copper... I am fortunate enough to have access to a metal shop, so I gave them the measurements and they cut up some copper angle for me. I then oxidized it using ammonia and sea salt, then sprayed with clear coat. We also got a HUGE addition to the arcade... a Metallica pinball machine. Obviously not a tiki theme, but was the best choice for our investment. Hubs and I are really happy with how we gave the arcade a designated area that sort of feels separate from the tiki area. [ Edited by: SassyPonyPants 2019-07-27 16:53 ] |
|
S
SassyPonyPants
Posted
posted
on
Sat, Jul 27, 2019 4:58 PM
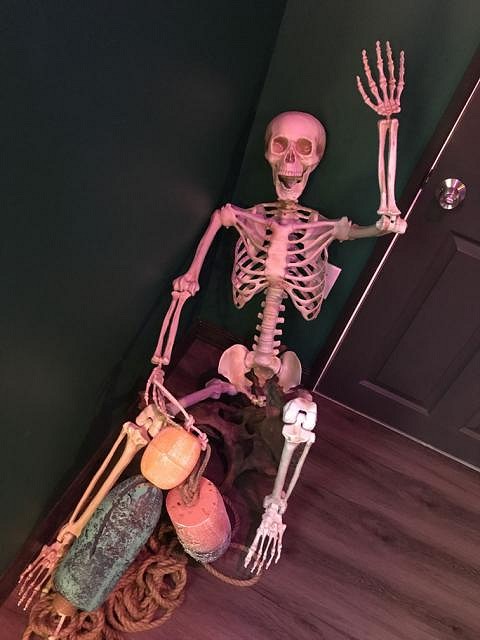
P.S. Mr. Bones says hi. |
|
C

Commodore
Posted
posted
on
Sat, Jul 27, 2019 7:47 PM
Looks great and really coming together well! |
|
S

Sandbartender
Posted
posted
on
Sun, Jul 28, 2019 7:00 AM
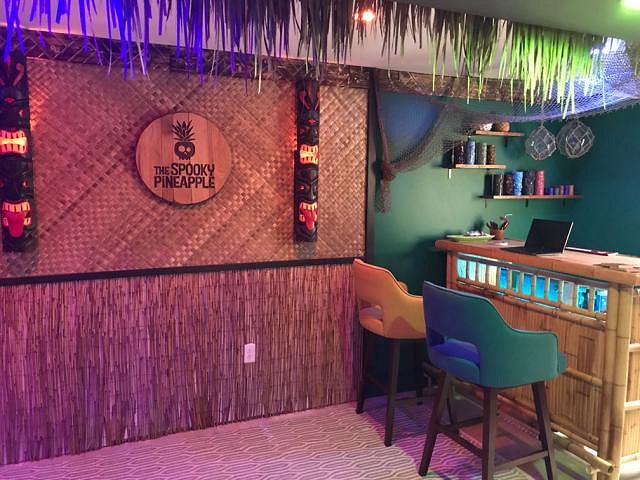
I LOVE your logo graphic. The skull pineapple is super cute. Great color on the stairs. I may use that for my ceiling (which is currently white). |
|
H

hiltiki
Posted
posted
on
Sun, Jul 28, 2019 8:29 AM
Nicely done, keep up the great work. |
|
S
SassyPonyPants
Posted
posted
on
Sat, Feb 1, 2020 10:53 AM
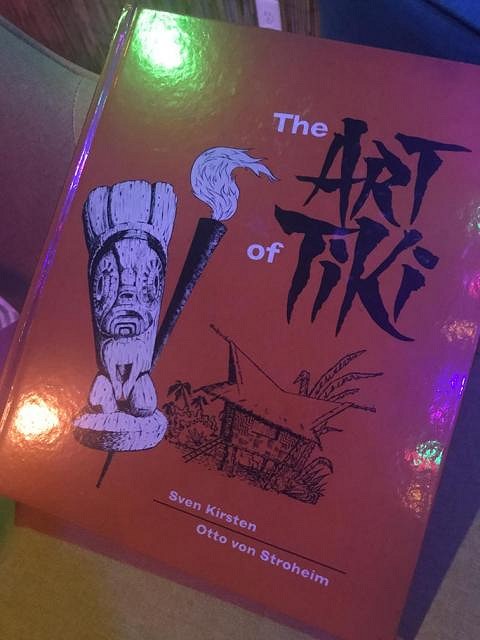
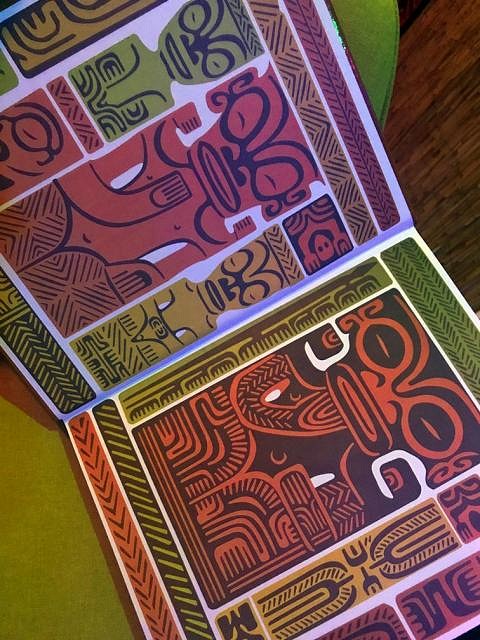
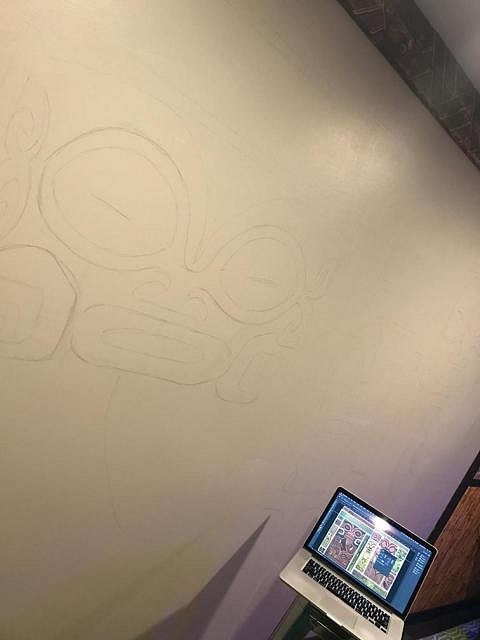
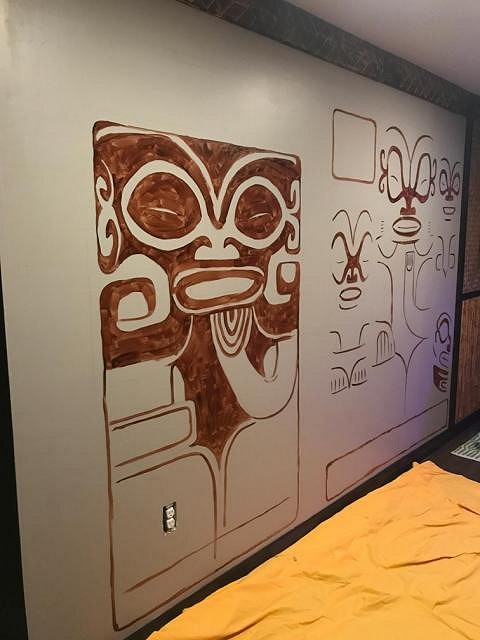
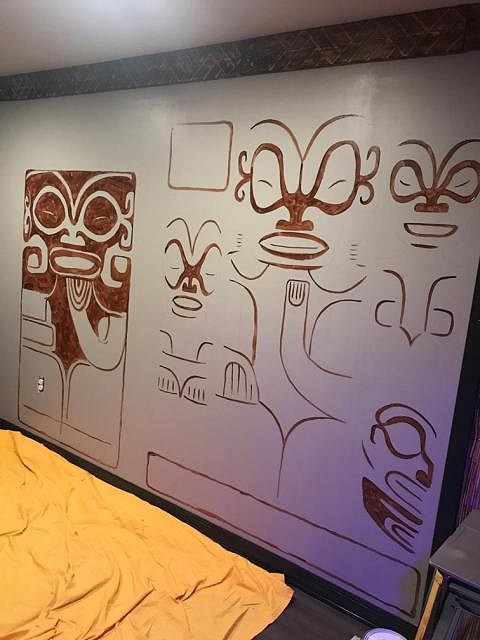
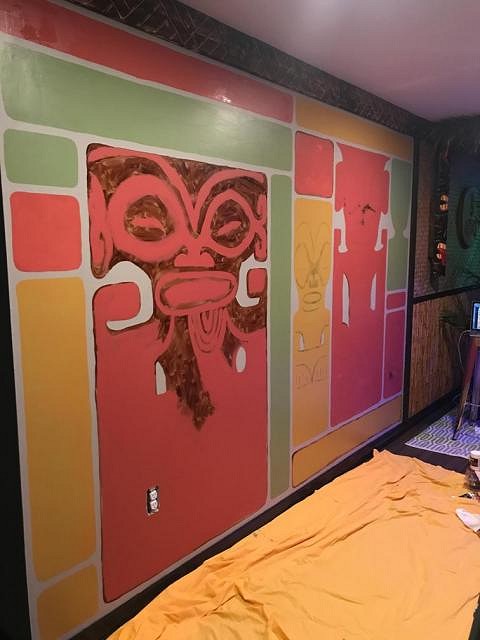
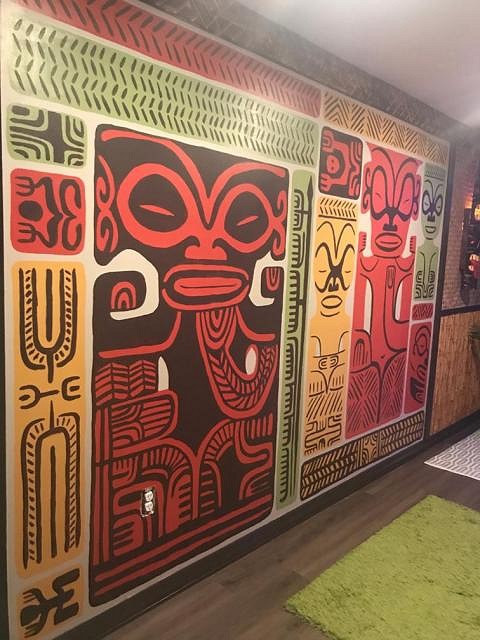
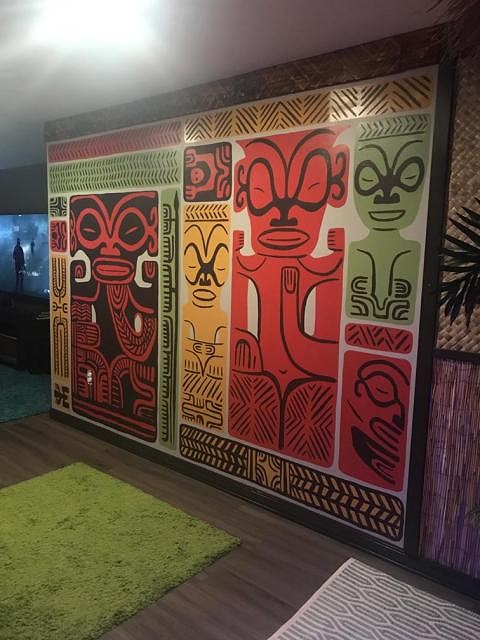
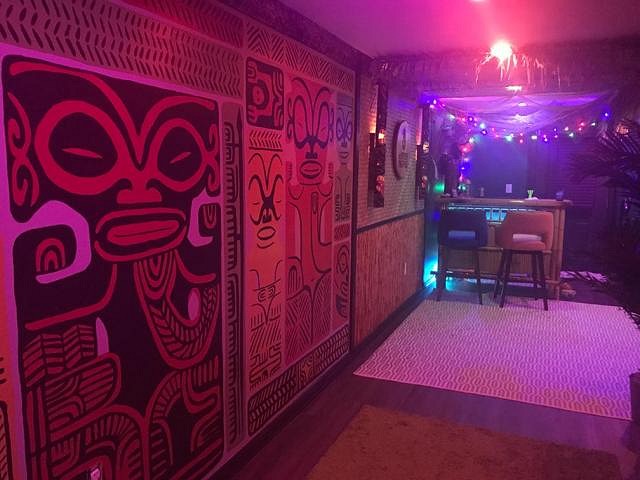
I've successfully filled the last blank wall! I’ve stewed over this dang wall for months. I knew it needed a mural of some kind, looking at tiki-esque fabric patterns and geometric designs but couldn't settle on anything. Then for Christmas I received The Art of Tiki! I opened it up, was hit with this great design right inside the cover, and immediately stated “that’s going on the wall! So a few weeks later, it began! I took a photo of the art, and rearranged the elements a bit in Photoshop to best accommodate the dimensions of my wall. “Plan A” was to use our projector and simply trace the image, but space and basement arrangement didn’t allow the projector to sit far back enough to project a 10′ wide image onto the wall. So “Plan B”… measure everything out and draw freehand. This meant less accurate replication, but the design is pretty forgiving so things didn’t need to be exact. Measuring and sketching Laying down key dark areas (I was thanking myself later for this.) First coat of color… I used highly unscientific blends of various interior wall paint and acrylics. Second coat of color. Notice those key dark areas showing through the lighter colors. Makes the next step so much easier… Two evenings later, all the detail is complete! |
|
M

MadDogMike
Posted
posted
on
Sat, Feb 1, 2020 12:53 PM
Very cool! |
|
C
Commodore
Posted
posted
on
Sat, Feb 1, 2020 7:50 PM
I absolutely love this! Big wall and great use of it. Super cool and well done, looks awesome. dig it! -Commodore |
|
SF

Slacks Ferret
Posted
posted
on
Sun, Feb 2, 2020 7:29 AM
That mural wall looks great...without checking in my book, it looks like Muhlenkott's design. I love the idea of a basement arcade nearby...if I only had the room. |
|
S
SassyPonyPants
Posted
posted
on
Sun, Feb 2, 2020 2:25 PM
The original plan was arcade cabinets. Then my husband became infatuated with pinball... those machines are MUCH bigger. Now we have two pinball machines and one virtual pin / arcade cab. I wish we had a little more room, but we are pretty proud of how well we utilized the space in our awkwardly shaped basement. We even had to move our furnace and water heater — It helps that our neighbor is a great HVAC tech. |
|
K

kala60
Posted
posted
on
Sun, Feb 2, 2020 3:59 PM
OMG. That wall is an inspiration for me. Awesome Build. Kala60 |
|
H

Hamo
Posted
posted
on
Sun, Feb 2, 2020 4:58 PM
Magnificent. That's some of my favorite art from the book, too, but I would never have thought to make it a mural. |
|
N''
nui 'umi 'umi
Posted
posted
on
Sun, Feb 2, 2020 7:21 PM
Hey Sassy, that’s pretty darn awesome! |
|
H

Hearn
Posted
posted
on
Mon, Feb 3, 2020 6:57 AM
Sweet Mural |
|
G

Ghostsoldier
Posted
posted
on
Mon, Feb 3, 2020 8:43 AM
Beautiful work! :) |
|
W

W8N2Surf
Posted
posted
on
Mon, Feb 3, 2020 12:20 PM
Good stuff on this one! Really love the paint work, came out great, cheers on that! |
|
BB

Bam Bam
Posted
posted
on
Sat, Feb 8, 2020 10:23 AM
Wowowow! That is fantastic! |
|
M

Mele_Ipo
Posted
posted
on
Sat, Feb 8, 2020 5:57 PM
Hey Sassy! Everything is looking great. Beautiful work. :tiki: :drink: |
|
E

eroc
Posted
posted
on
Thu, Feb 20, 2020 1:54 PM
Love it! Those cabinet see-through doors are awesome! Might see one or two in my bar in the near future......lol! As far as the pinball machines, put whatever you want in your tiki bar... I have dragons in mine. Personal flair, rather than strict adherence to code, makes visiting tiki bars a unique experience, every time. ducks from flying rum bottles |
|
S
SassyPonyPants
Posted
posted
on
Mon, Mar 9, 2020 10:20 AM
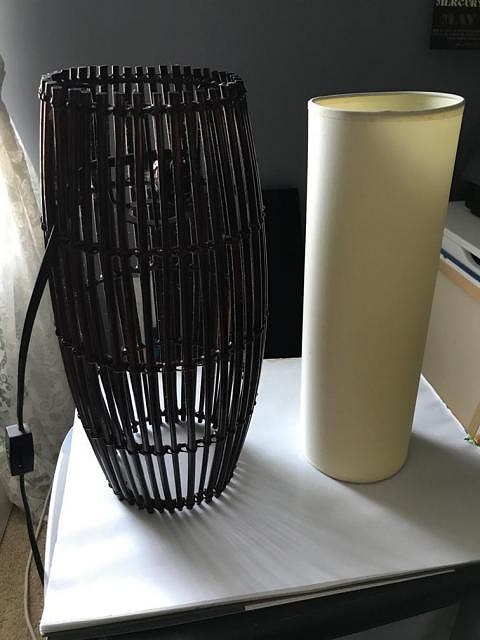
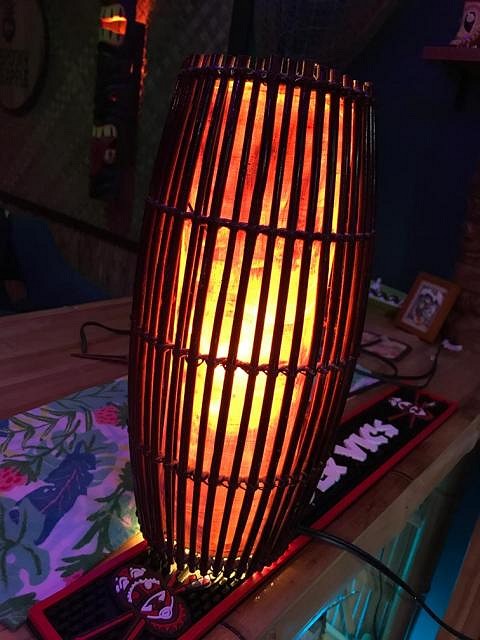
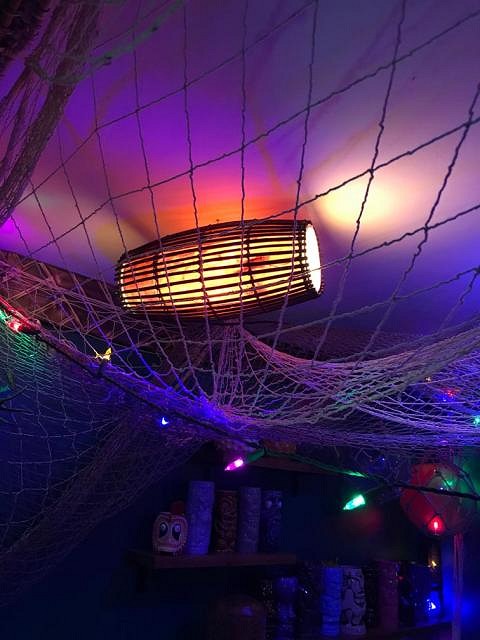
My aunt handed this great lamp down to me. I was very pleased, as it looks like one of those fish traps which I've been wanting!
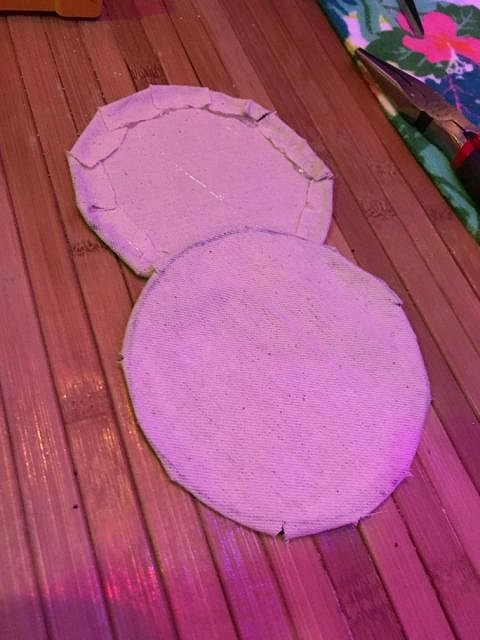
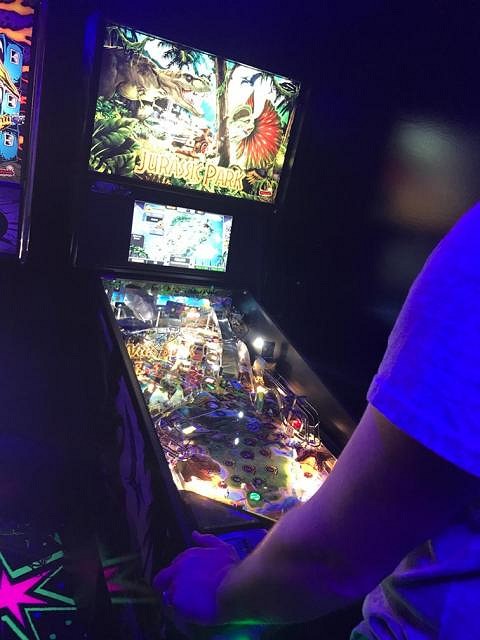
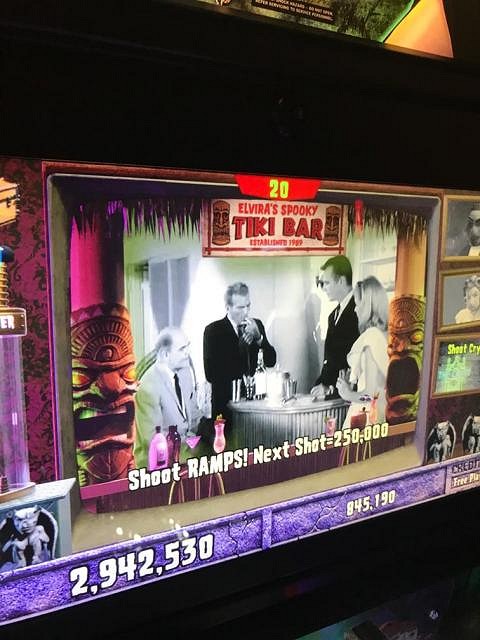
I removed the shade and painted it with a couple coats of tan-color acrylic. It looked like an even coat of paint until lit from behind. I was very pleased with the uneven, rustic look. I cut out the lamp components and replaced them with the cord fixture already integrated in my setup, then hung it on a hook. Over the weekend, my husband and I attended an arcade and pinball expo. We traded our Stranger Things pinball for Jurassic Park. (He realized he had made the wrong choice.) ... However, while at the expo we also grew quite fond of the new Elvira pinball machine. We activated a mode on it called "Elvira's Spooky Tiki Bar" which has created a whole new problem. I was floored!!! Was this machine telling us that it belongs in the Spooky Pineapple? Maybe some day... |
|
E
eroc
Posted
posted
on
Mon, Mar 9, 2020 10:28 AM
I have almost the same lamp, except mine is outdoors. Fun fact about horizontal lamps sitting outdoors.... Carolina Wrens think they make great nesting places! I was looking into some way to cover mine as well, lol! |
|
PP

Prikli Pear
Posted
posted
on
Tue, Mar 24, 2020 5:56 PM
Eroc, we had similar problems with barn swallows at the Lagoon, until I discovered those plastic owls work wonders. We put them out for a few weeks in the spring, when young birds in love are looking to build nests, then put them away for the rest of the year. :) |
|
PP
Prikli Pear
Posted
posted
on
Tue, Mar 24, 2020 6:11 PM
SassyPonyPants, that mural is spectacular! That's one element that seems to be missing from the great home bars and next-generation commercial bars that the old, vintage places had. The time and effort that goes into a great mural is sadly under-appreciated. Well done! Also, your Spooky Pineapple logo is aces! |
|
S
SassyPonyPants
Posted
posted
on
Thu, Mar 26, 2020 1:29 PM
Thank you and thank you! It's crazy to think that just a year ago we were having mental breakdowns dealing with drywall. We've come a long way! Now people ask "is your basement done?" and I always have to reply with "a tiki bar is never done." I love that someone can walk in and think it looks finished. But it's not. And it will be different (and even better) the next time they visit! |
|
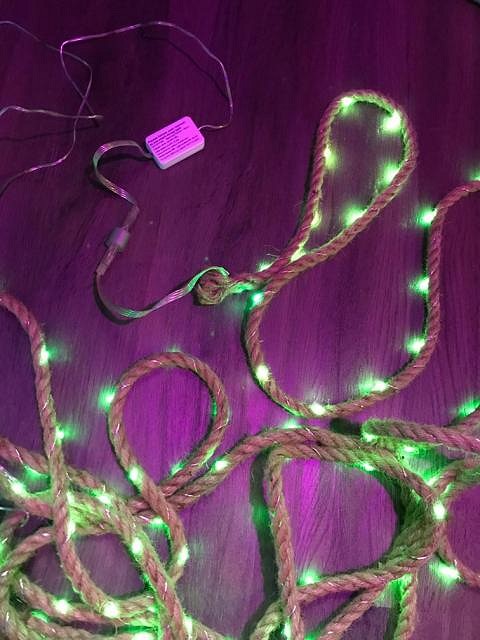
S
SassyPonyPants
Posted
posted
on
Thu, Mar 26, 2020 2:55 PM
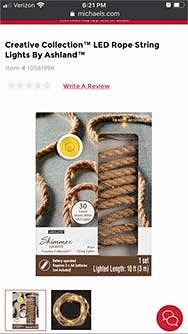
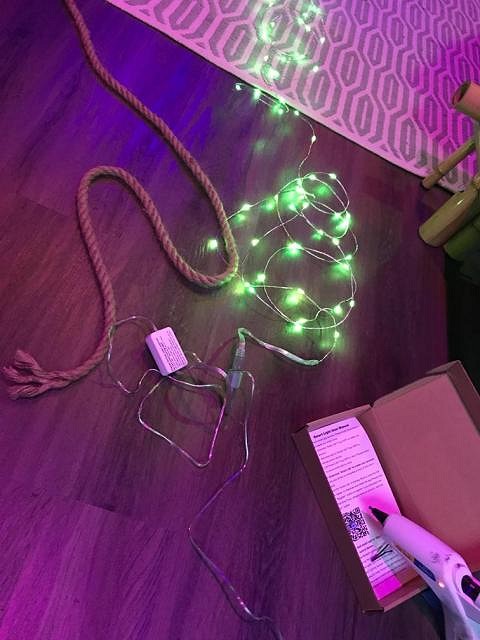
I saw these great string lights at Michaels but they were battery powered... I hate dealing with batteries! So I decided to make my own. I had plenty of 3/4" rope leftover, so I just needed lights. But I had a laundry list of requirements...
Wouldn't you know it, there were a whopping TWO products on Amazon that met my requirements. This one looked best. So I got my glue gun out and started wrapping! Ta-dah! I love the way these turned out. And I don't know if this is a defect or it's because of how the bulbs are at different angles, but in person some of them look orangey, some look yellowish, and some look greenish. It's actually a super cool effect. |


Pages: 1 37 replies