Tiki Central / Other Crafts
Trader Sam's Enchanted Tiki Bar In-A-Box
|
D

danlovestikis
Posted
posted
on
Fri, Feb 28, 2020 8:56 AM
Just what MadDogMIke said on the last page!!! I'm a lady so I can't repeat it. Wonderful, Wendy |
|
T

TheLuckyParrot
Posted
posted
on
Fri, Feb 28, 2020 1:11 PM
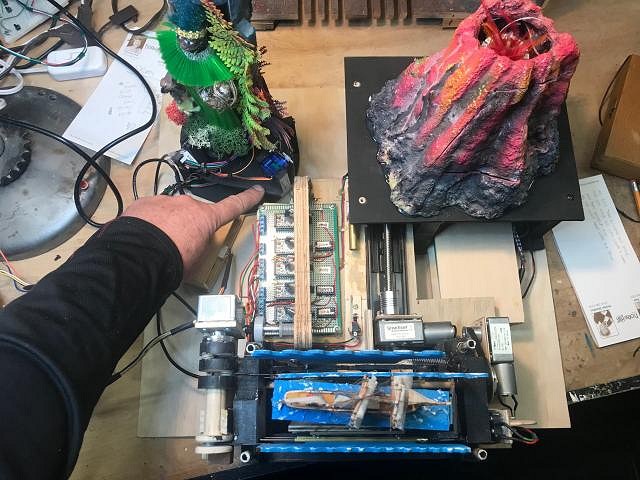
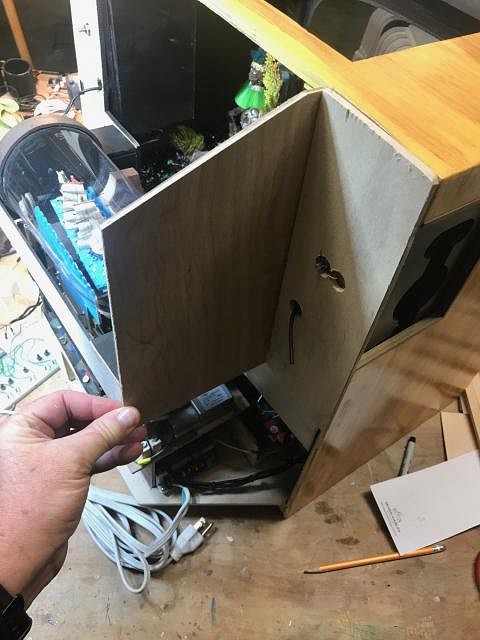
STAGE ASSEMBLY, PART 2 Aha! I knew I could get this figured out. Below is a photo taken from above that shows all three features positioned on the base platform that slides into the TV cabinet. The Trader Same feature is already screwed down and the other two are not. My finger is pointing to the one remaining spot that is a problem. I need another 1/4" of clearance in order for the Sam/Moai platform to rotate. I already know how I am going to solve that so this weekend it should rectified. And I hope to have the upper deck to the stage fabricated, positioned and tested/validated, too.
In order to make this fit, I had to cut back and rebuild some of the support platform beneath the volcano. I also had to create a lifting platform for the shipwreck. That lifting platform serves multiple purposes. First and foremost it raises up the entire shipwreck presentation at the back of the stage so that the viewing angle is ideal. Second, it allowed me to make some necessary clearance for overall fit. And third, it gives me some much needed pathways for electrical cabling for all the electronics and controls. I also had to do some trimming of the Sam Feature. In hindsight I would have made the top platform of the Sam feature a perfect circle and without the bump out for the tilting motor. But it is what it is and it works great so we go with it. You cannot see it clearly here, but I am also creating the promised cover boxes for the circuit boards and tightening up the cabling. I will be creating and then decorating the upper stage and taking photos of that while, in parallel, I will be doing a lot of electronics work below deck. I need to tie the three features together, and I need to start working on a master orchestration control system, and I need to add some fun stuff to the upper deck, and then I need to get going on lighting and audio. I will try not to bother you all too much with the electrical and computer stuff so that you can spend more time enjoying the Tiki aspects. But I will reveal enough of the tech in case somebody trips over this project and has the missing expertise. For example, if there is anybody out there who knows has to play on demand 720p video to a 7" screen PLEASE LET ME KNOW! Expect a string of photo updates until I have the ability to demo all three existing feature sub-systems inside the TV cabinet, sans audio/lighting. It will be cool if I get that far in the next week. TLP P.S. - thanks for the kudos and comments. Feedback of all kinds is much appreciated, as are questions. I will try to answer any/all Q's. The whole reason I came here with this project is because other sites promised the much better engagement with my fellow Tikiphiles. That is turning out to be true! |
|
T

tikiskip
Posted
posted
on
Sat, Feb 29, 2020 7:30 AM
"Feedback of all kinds is much appreciated, as are questions." First this is so cool, wish I understood how to put all those relays and switches together to make things like this. So I always wanted to make a shooting gallery with the ducks that go by and you shoot them over type of thing. The slow moving motors are the ones that are harder to find. Also my wife bought a whole corner of a room once just for one item and in that lot was an old TV much like yours but we left it there, wish we had taken it now. Can't wait to see the end. |
|
T
TheLuckyParrot
Posted
posted
on
Sat, Feb 29, 2020 5:13 PM
Sure I can help! It depends on the size of your shooting gallery project. If you are going full-sized, I would start with the motors out of garage door openers. If you are going smaller, these are what I use: High Torque Turbo Geared Motor DC 12V Motor Both can be purchased at different speeds, based on your requirement. And both are high torque, which is what you need to drive weighty mechanics. I also know how to create an electronic score-keeping system. And I know how to start/stop 12V and 120V motors using electronic controls. (By the way, never pass up a $5 vintage console TV!!!!! We turn them into sexy dry bars and people fight to buy them from us, up to $500. We have done 4.) |
|
T
TheLuckyParrot
Posted
posted
on
Sun, Mar 1, 2020 10:16 PM
STAGE ASSEMBLY, PART 3 As promised, that last little bit of origami was a success and the three features are fitted and secured to the base. What follows are two photos of my rough - and I emphasize ROUGH! - first fitting of the top stage. This photo is from above. Note that all the electronics are disappearing. That's the point. And this photo is head on, so that you see what I have been talking about, having two levels: one on top for the main decor and set decorating...and one below for all the electronics and mechanical services. This top stage needs to be completed, and then the surfaces finished so that they make a little more sense for set decorating. I also need to take care not to lock myself out of future maintenance access. And then I need to do some trimming and fitting to ensure that it all fits into the TV cabinet again. After that I can return to below stage and tie up all the electrical. |
|
T
tikiskip
Posted
posted
on
Mon, Mar 2, 2020 6:41 AM
Thanks for the info, it would be a small project with a small motor. "By the way, never pass up a...…………." Well that is how I was for many years, we even get tons of free stuff, great stuff. That and I have so many unfinished projects. Looking good by the way. |
|
UT

uncle trav
Posted
posted
on
Sat, Mar 7, 2020 4:50 AM
Great thread!!! Refreshing to have something totally different to delve into. I’m learning new things from your posts and that’s always a plus. Thanks! |
|
T
TheLuckyParrot
Posted
posted
on
Sun, Mar 8, 2020 8:42 PM
STAGE ASSEMBLY, PART 4 Progress made this weekend! The dry fit is complete for the front portions of the stage. The full assembly fits easily into the cabinet and I have added a front skirt to the top stage which will provide a little more coverage to prevent viewing of the underneath stage mechanical magic. I too the following photo and video before I painted the skirt, just so that it was more visible for the purposes of documentation (this post). At this point I am tightening down the assembly onto the lower stage and making sure everything is reliably secure and permanent. Good thing, too. I am constantly having to make corrective tweaks that make things run even more smoothly. And the more smooth things run now, the less likely will be future mechanical failures. The next step is to construct the backstage, which is mostly two triangular towers that go on each back corner. The rear right corner tower (as seen from the front) will include a boatload of electronic connections that will serve the purpose of maintenance and re-programming without having to take the final system apart. First a couple of photos:
And then a video review: https://www.youtube.com/watch?v=9simXwwHxLA&feature=youtu.be |
|
D
danlovestikis
Posted
posted
on
Mon, Mar 9, 2020 9:14 AM
I really enjoy your videos. This is a wonderful project. Wendy |
|
T
TheLuckyParrot
Posted
posted
on
Mon, Mar 9, 2020 8:16 PM
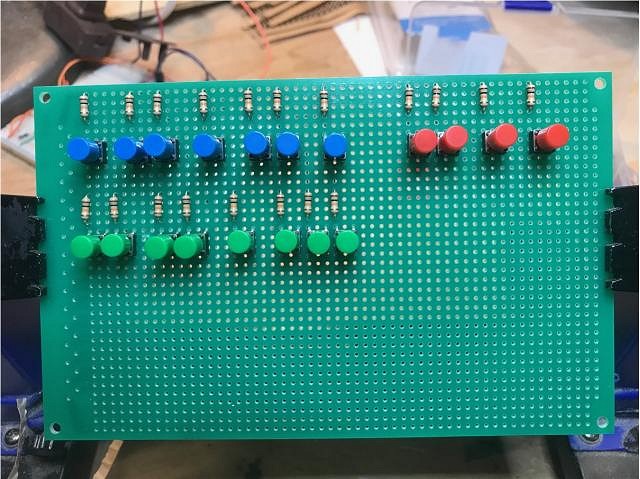
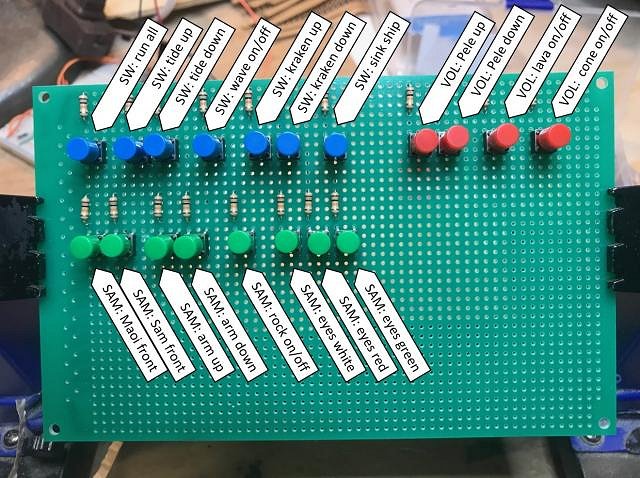
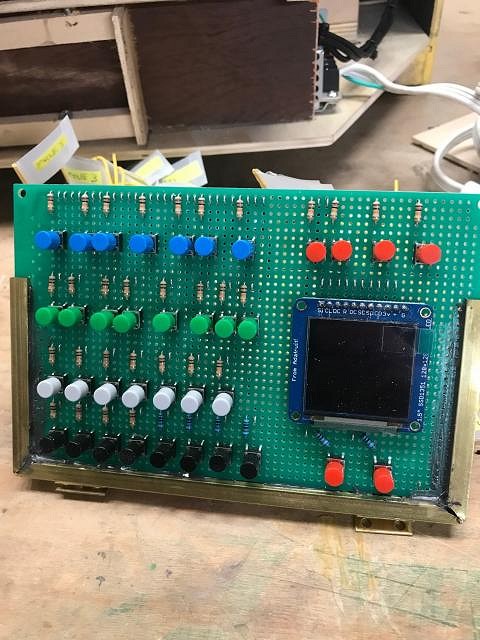
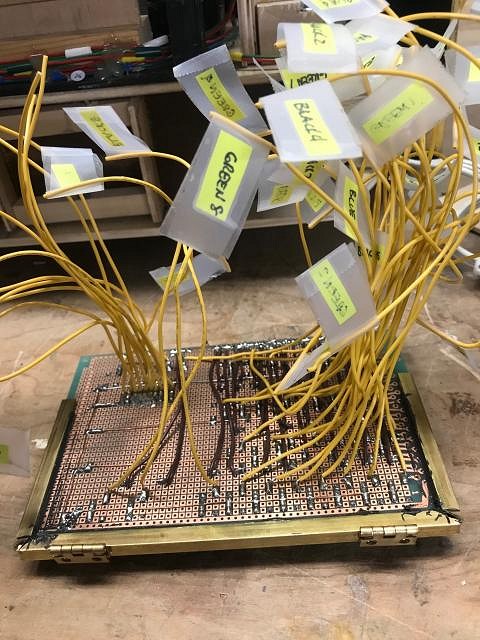
STAGE ASSEMBLY, PART 5 Let's partake in a slight digression, shall we? While the work goes on in the arts and crafts department for this project, the magic itself comes from all the electro-mechanical stuff that will be hidden from the world. This is no different from the ETB experience itself. Only if you are sitting at the bar, and only if you are paying close attention, will you catch one of the skippers reach under the bar counter to push a button and launch one of the entertainment events associated with one of their signature cocktails. And is you REALLY want to understand the level of fun the skippers have with this secrecy of all this, try to chat one of them up about the 2 bar stools that drop! We are not going to be like that here. I am sharing with you everything, soup to nuts. You have seen much of the electronics already done but here is one item that is being developed in parallel with the work I am doing on the main stage. A couple of challenges I wish to conquer are: [list=A] [] the ability to test the system without taking it back apart, AND [] the ability to alter the programming within the system without taking it back apart. [list] Below are three photos of a test panel I am putting together which will solve my desire to test things. This first photo is the front of the panel so far. It is all going on what is called a "proto board" (for those not into home electronic projects). Yes, "proto" is short for "prototyping" but since this is a one-off and I won't be mass producing this project, ALL of my work on this project is using proto boards. For one off work, these are perfectly acceptable. There will be more buttons for testing lighting and audio and wifi, but this is a start: To give you an idea as to what the buttons will be used for, I added the labels to the photo, below: The holder tool used for soldering allows the board to be rotated, and here is a photo of the backside so that you can see the first soldering work: This will be enclosed in a box I will build from scratch that will have its own power supply, and will connect to a port I will create on the back of the completed TV. The connection cable will be extra long so that I can plug my testing control panel into wall power, connect to the test port in back, and then place myself in the front and push the various buttons to confirm that everything is working inside. And I will be able to test things independently without having to run through an entire performance. |
|
H

Hamo
Posted
posted
on
Tue, Mar 10, 2020 10:33 PM
Thanks for sharing your videos. I've just finished watching them, and it's some great documentation of your hard work! |
|
T
TheLuckyParrot
Posted
posted
on
Tue, Mar 10, 2020 11:12 PM
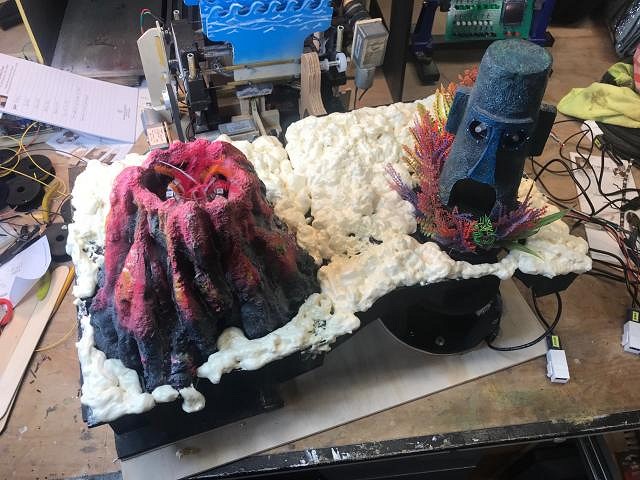
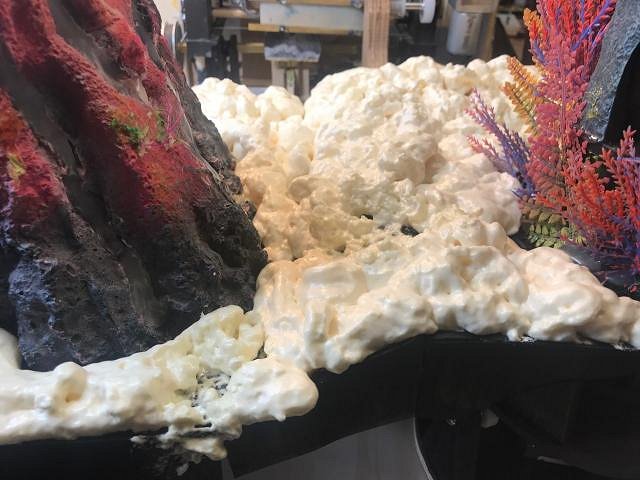
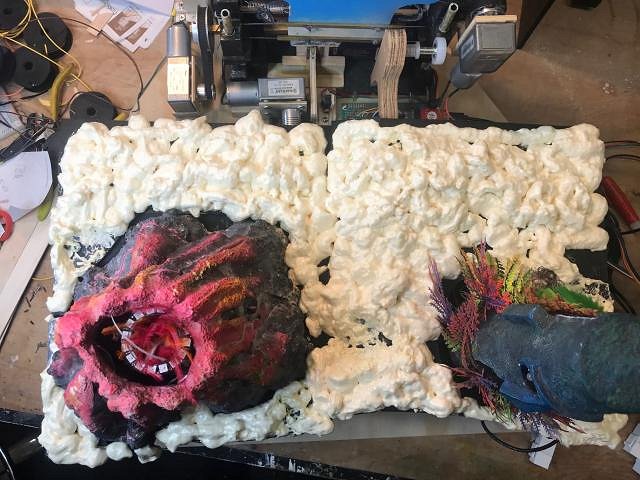
STAGE ASSEMBLY, PART 5 I'm working in parallel right now, taking advantage of the time it take things to set or dry and moving the electronics along on the side. My last post I showed some of the ongoing electronics work. Here is set decorating (finally!). I took the stage decks and painted them just to make sure that I was sealing up the wood for long-term care. Of course I used flat black, in case I fail to cover absolutely every tiny speck of stage area. Then, on top of that now-painted surface, I applied that expanding foam in a can that is used for home insulation. Gotta be careful, because the stuff can really grow and get out of hand! This creates a "lava field" surface that I can paint, carve and install hidden lighting or attach flora. This is a full set view: Here are two close-ups:
And this is an overhead view: One thing that is apparent to the keen eye from these views, which will NOT be visible from the viewer perspective in the end system, is that I worked pretty hard to keep the foam from expanding from one section of the stage to another and prevent future maintenance access. If you look carefully you can see seams, which I later trimmed and enlarged. But from the front...NO SEAMS! It all still comes back apart. Coming up: I have a video that I am trying to upload off of my phone so that I can show painting progress of that foam. It's just the first of several coats but it shows how quickly this stuff morphs from Home Depot mode to "Oh wow! I can see where he is going!" mode. With luck, I will get that link posted here fast. |
|
H

hang10tiki
Posted
posted
on
Wed, Mar 11, 2020 8:39 AM
Great execution Bruddah Cheers |
|
W

W8N2Surf
Posted
posted
on
Wed, Mar 11, 2020 8:51 AM
Fantastic fantastic work here. Covet your electronics know how, great great job with this. |
|
T
TheLuckyParrot
Posted
posted
on
Wed, Mar 11, 2020 1:45 PM
Thanks, man....or...the "completed masterpiece" will remain available for select viewing by honored guests. Drinks are on the house!! |
|
T
TheLuckyParrot
Posted
posted
on
Wed, Mar 11, 2020 2:13 PM
Thank you. And stick around! This is my NEW (and far more effective!) way of documenting and sharing my hobby. I have many completed projects, projects to complete, and concepts I will get to in due time. There are some electronics skills way beyond my level, but there are some projects that require electro-mechanical stuff that I can happily translate and explain. Some of those explanations just might make them accessible to anyone. But also, I am always happy to collaborate, time permitting. Ultimately, I would like to end up with projects that I showcase here with photos, commentary and videos, but are also documented on github. And anybody could take the information and create their own outcome. Maybe not a fully integrated thing as I am doing here, but at least some of the sub-sets. You buy the parts, you download any software and follow instructions on how to install it. You hook everything together, and you then put it to work in some creation of your own making. For (but one) example, I have an idea for a new version of a home Tiki bar shelf lighting and audio system (multiple examples of which are already on FB and here at Tiki Central) whereby anyone could buy the correct parts online, put their own audio on a micro-SD card, plug it all in and throw the switch and watch it go. It's do-able. I just have to get to it. But here is where you will find it eventually.
|
|
T
TheLuckyParrot
Posted
posted
on
Wed, Mar 11, 2020 2:18 PM
STAGE ASSEMBLY, PART 6 I promised you all a video, and a video I am delivering. The foam is dry and hard, and here I am applying the first coat of paint. Watch how fast it stops looking like hardware store stuff once the paint hits it! Remember, ultimately I am going for the stage floor to look like a lava field that is being taken over by the jungle, with a volcano and Moai rising out of it. (The back and side walls will be decorated to invoke the spirit of the walls of ETB.) |
|
T
TheLuckyParrot
Posted
posted
on
Thu, Mar 12, 2020 7:48 AM
STAGE ASSEMBLY, PART 7 Ok, another video as I color coat the stage deck to create the "lava field" effect. The first coat, opalescent dark gray, is very apparent now that it is dry. This second coat is another shade of dark gray but is a plain and solid color. It also is applied randomly so as to protect the undercoat even as we break up that undercoat with a random overcoat. Overall, we will get some depth and a "minerals embedded in the lava flow" effect. |
|
T
TheLuckyParrot
Posted
posted
on
Fri, Mar 13, 2020 8:31 AM
STAGE ASSEMBLY, PART 8 A third video of the painting up of the spray expanding insulation foam. This coat is nothing but glitter flake paint, which will give us another layer of that opalescence but with large flakes and even more dramatic appearance of minerals...AND...hopefully give us a special effect once it gets hit with black light, which will be useful for a night time effect. [ Edited by: TheLuckyParrot 2020-03-13 08:32 ] |
|
T
TheLuckyParrot
Posted
posted
on
Sat, Mar 14, 2020 12:19 AM
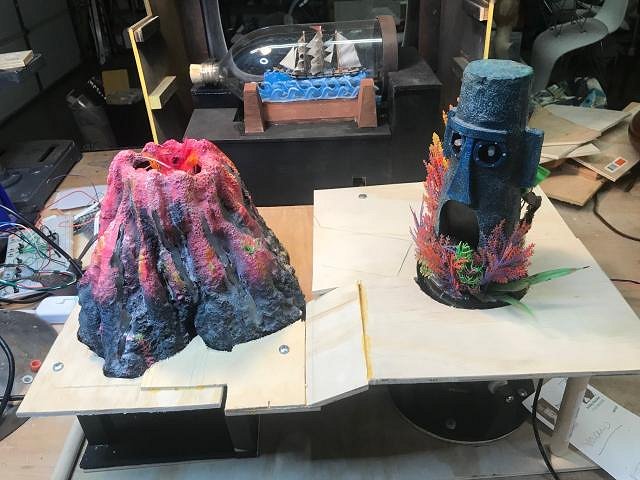
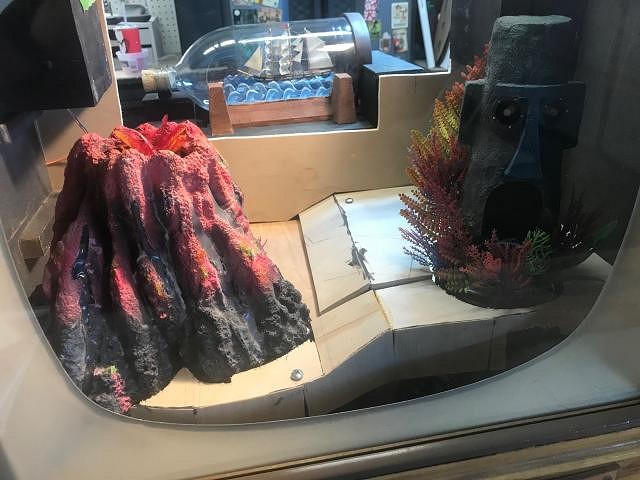
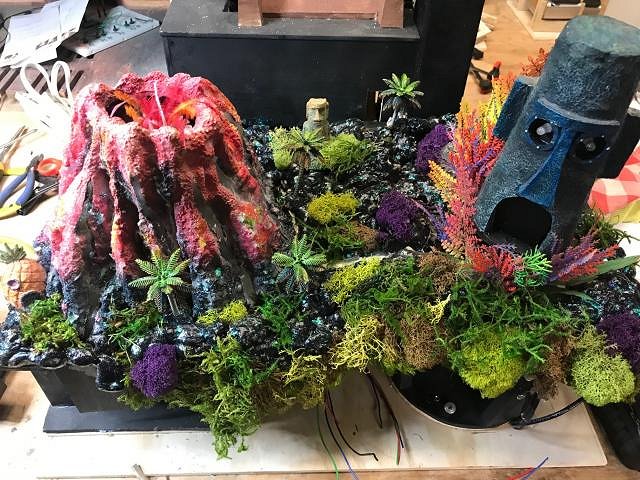
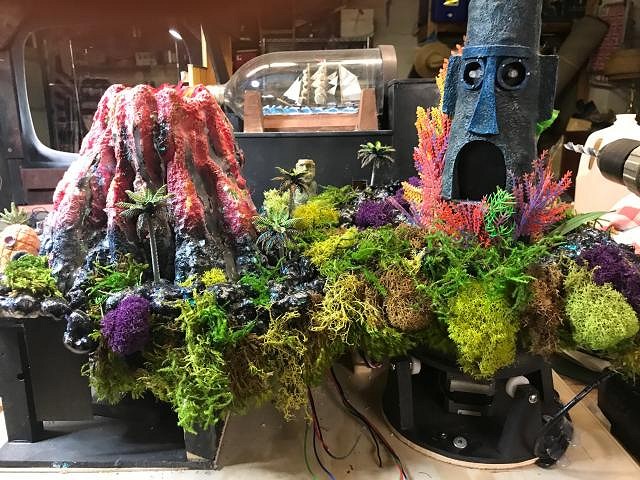
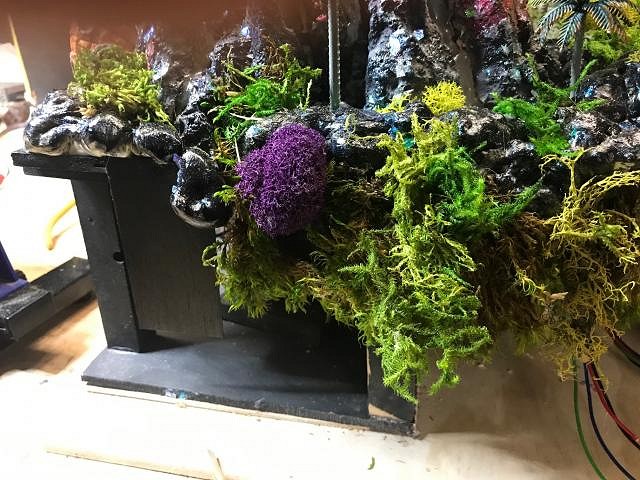
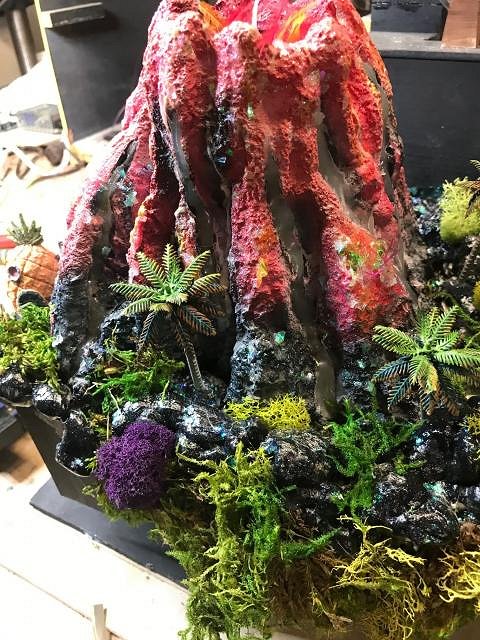
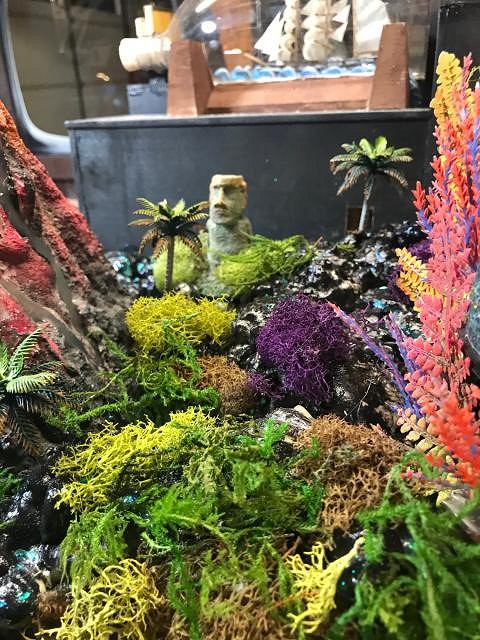
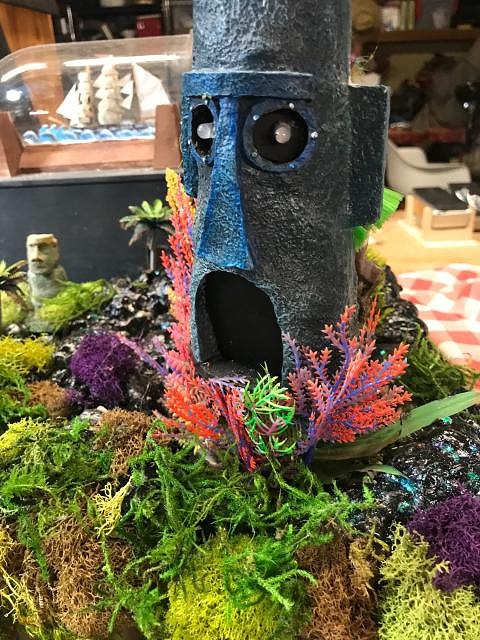
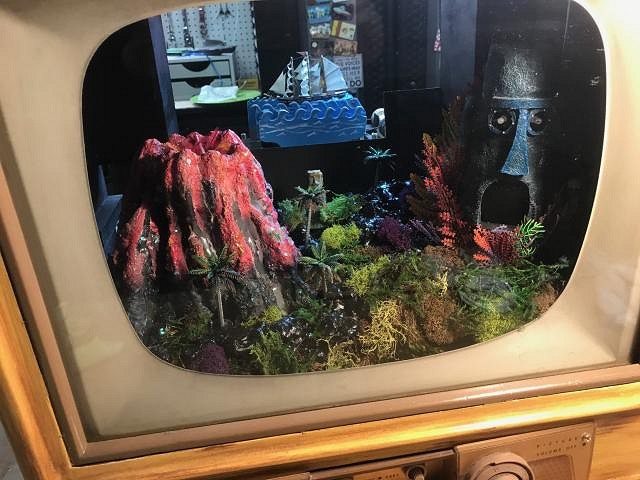
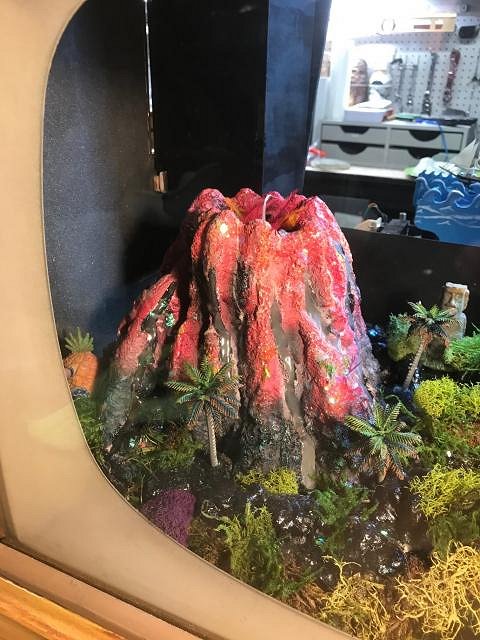
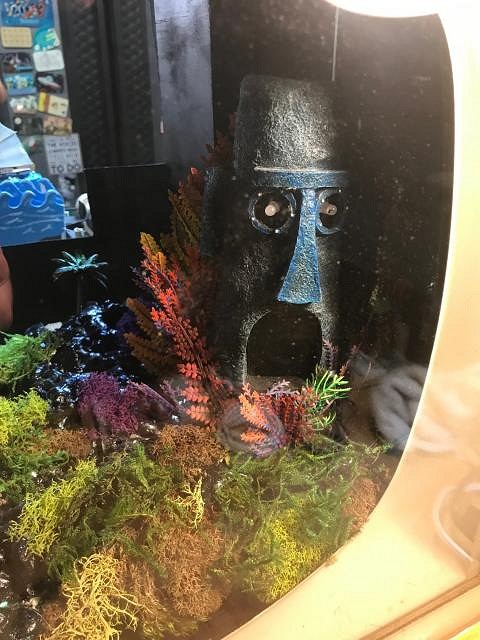
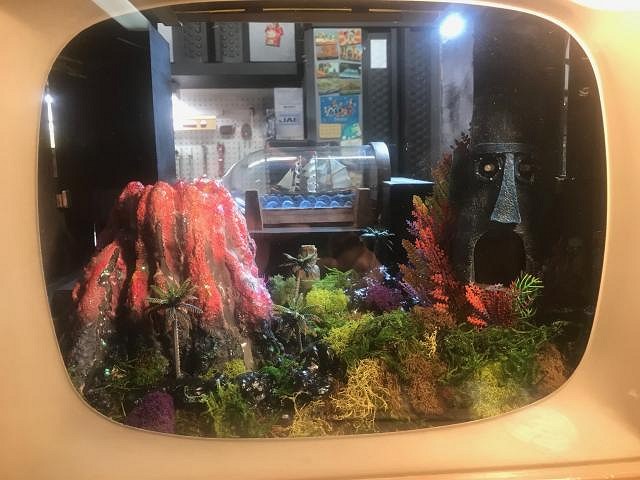
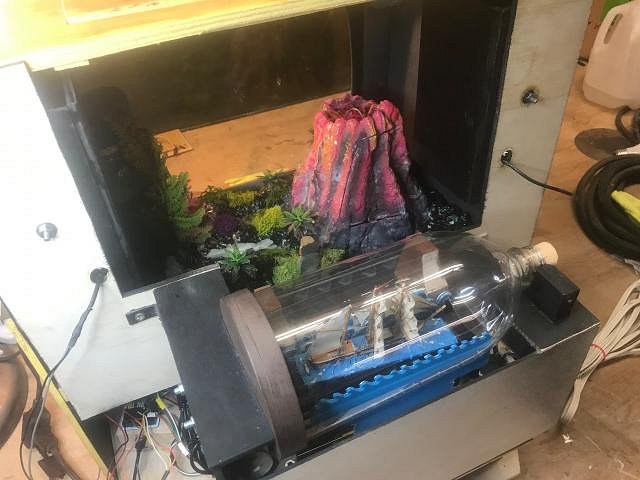
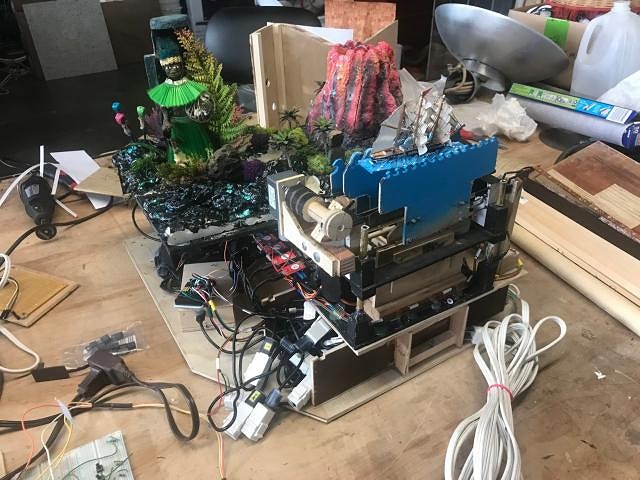
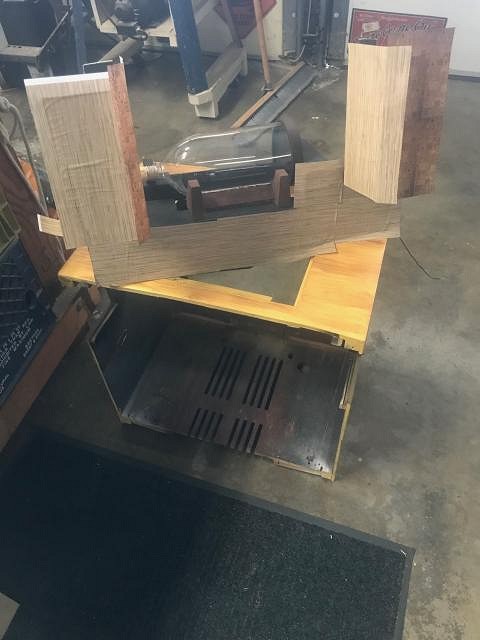
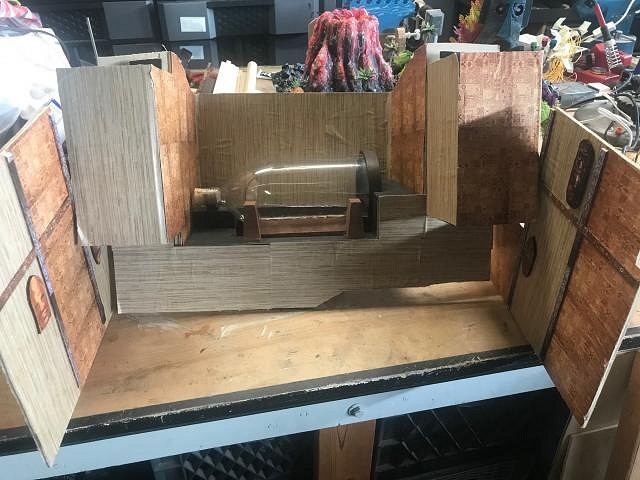
STAGE ASSEMBLY, PART 9 Alrighty, then...the paint finished, I added the deco. Lots of hobby store moss, a couple of hidden light features (neopixel strips for those with some knowledge and curiosity), gotta have palm trees, of course, way in the back a tiny Easter Island homage, and tucked far off into the corner for some extremely dedicated person to possibly pick out...Spongebob's pineapple house. This is the overall decor. From back here you can't see much of the paint and opalescence detail but it's there: This is the head-on view, as will commonly be seen by the viewer. The wires that you see hanging out from under the stage deck are the wires for the added light feature. I'll be explaining this later. And, by the way, the enclosure for the ship-in-a-bottle at the rear is still not secured to the assembly. That's why it looks a little cock-eyed: I have the moss hanging down in the front to help obscure any ability to peek under the stage from the front and see the mechanics and electronics. Volcano and palm trees. And down there in the far left corner of the volcano.... Easter Island for the keen-eyed: And now, after all this time, it really should be apparent that we will be able to hide Trader Sam successfully among everything else going on. You only know how to identify that Sam is back there because you can go back in time in this project thread and spoil the surprise: |
|
UT
uncle trav
Posted
posted
on
Sat, Mar 14, 2020 6:14 AM
Right on!! You nailed the mini landscape perfectly. Adding tiny features for people to pick out is the hallmark of a classic and well executed diorama in my book. |
|
T
TheLuckyParrot
Posted
posted
on
Sat, Mar 14, 2020 11:11 PM
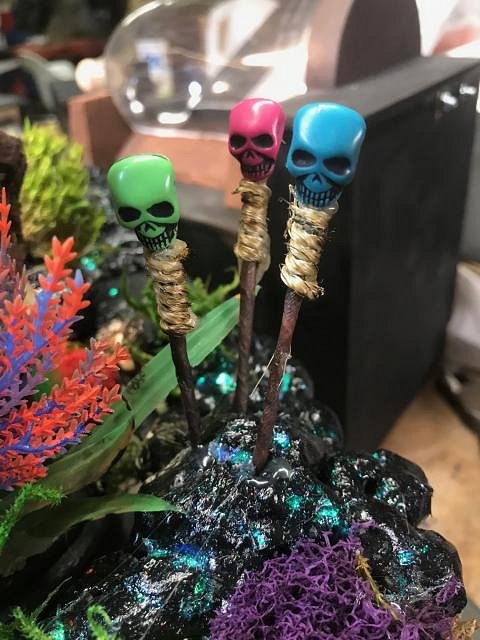
STAGE ASSEMBLY, PART 10 More decor, and the next major fit test. (There is A LOT of electronics work going on behind these photos. I am holding off on that so as to not scare people away...) So what we got here are some cocktail picks, some floral tape, some twine, some hot melt glue and a little flame to roast things up: Looking good in the neighborhood! A look to the left... A look to the right... Next, we have the full platform constructed so far bolted together for the first time. This includes the shipwreck cover in the back, the speakers, and the back wall: And here we have a couple of looks "back stage":
|
|
D
danlovestikis
Posted
posted
on
Sun, Mar 15, 2020 9:16 AM
My husband built dioramas within his tiki collection. They were smaller but looked a lot like your project. However nothing moved or lit up. Your project is one for the history of tiki books. This is so well done. I know all of us can hardly wait for when it is in action. |
|
T
TheLuckyParrot
Posted
posted
on
Sun, Mar 15, 2020 10:58 PM
Thanks, Wendy! I hope that the final system meets expectations!! |
|
T
TheLuckyParrot
Posted
posted
on
Sun, Mar 15, 2020 11:33 PM
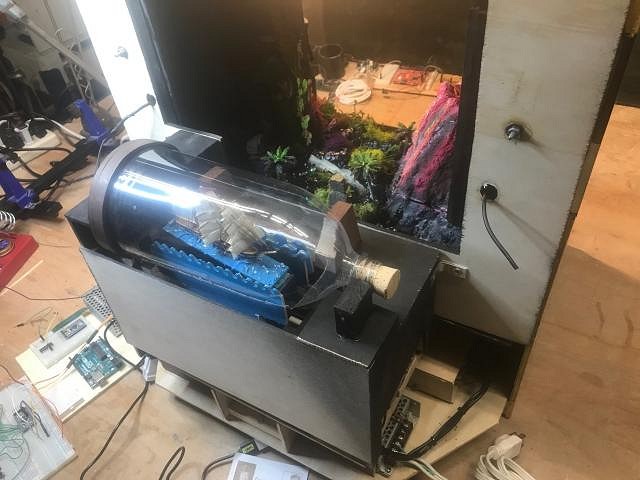
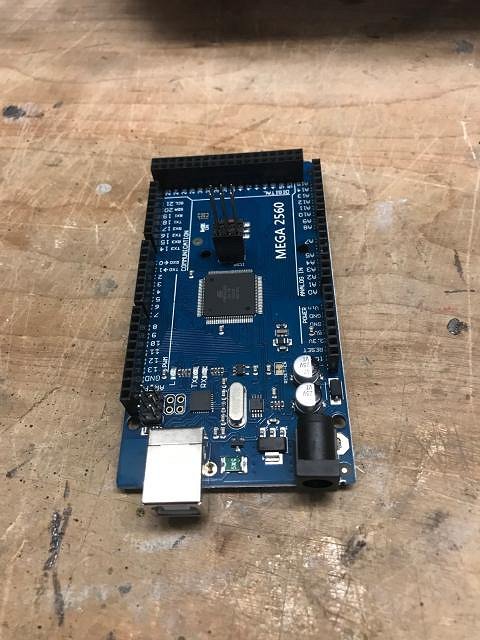
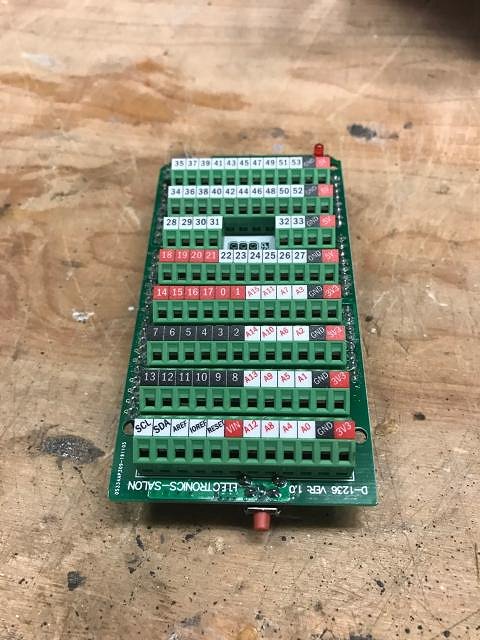
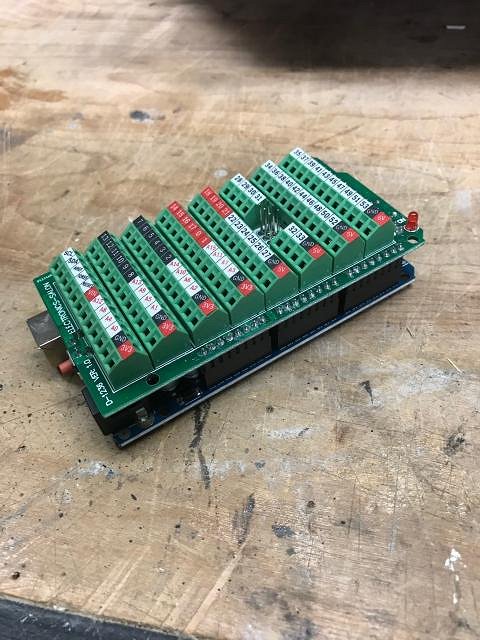
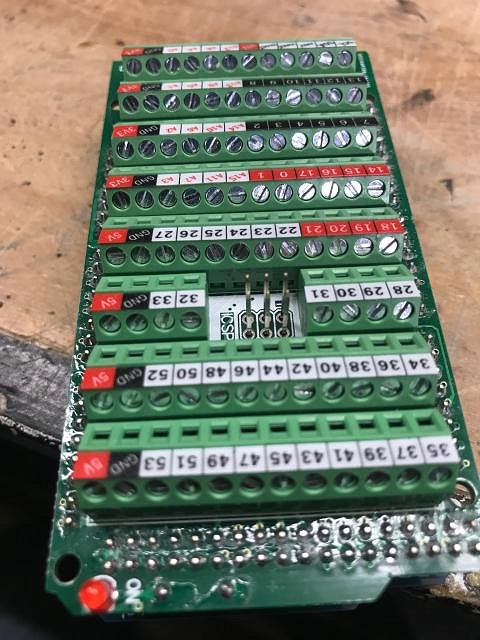
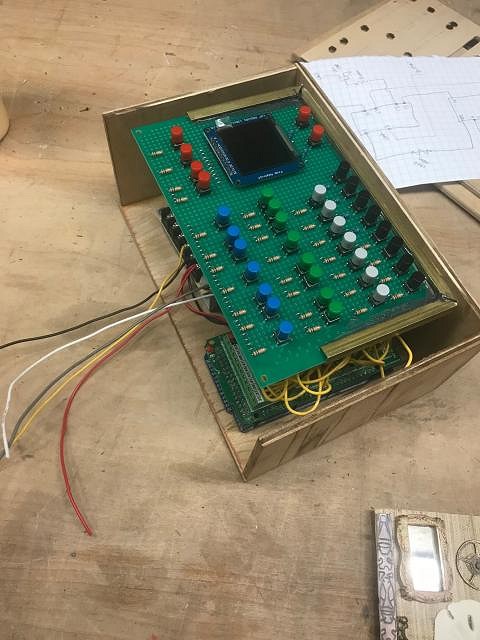
STAGE ASSEMBLY, PART 11 It was not real noticeable in the photos I posted in the previous update, but this most recent dry fit test did not go so well. I am off by about a full inch. If I attempt to force the fit back into alignment the cover bottle and box for the shipwreck feature gets compressed and the shipwreck parts that need to move all start rubbing together. That's bad. Can't have that. I ended up pulling the system back out of the TV cabinet and taking off the back panel and speakers. I am going to have to cut and re-fit that back panel so that I have a different geometry between the speakers and the shipwreck feature. It should be easy, just tedious. So while that is going on let's divert and show some pics about all that electronics work I keep hinting at. You saw an earlier photo of the test panel in progress. Here is that panel with all of the buttons soldered in. It's important to have the panel ready soon so that I can do testing of the internal electro-mechanics once I assemble things for what I would hop to be the final time. Notice that it ALSO includes a small video screen. This will help simplify the method for providing feedback to the person pushing test buttons: The back side of this panel looks like a mess now. But don't panic. I will admit that in hind-sight it would have been smarter to design a true printed circuit board for this, pay the $30 to order it online and have it shipped to the house, and waited the 2 weeks for the turnaround. But what the heck, it's been raining and the garage time was pretty peaceful: This is the micontroller device that I will be using to drive the test panel. It's an Arduino Mega 2560 R3. It's really useful because of all the Input/Output (I/O) ports that can be connected to. I need those for all the buttons and and the video screen.: The problem with these things is that the I/O port connections are built for prototype experiments. There are other makers of this same devise that come in different forms that allow for soldering but they can be costly, require more work, and take time to ship. The Arduino Mega that I have was purchased locally at the sweet price of only $9. So how do I solve that problem of connecting all those wires to all those ports, with reliable connections that are easy to use? With this sweet device: What is very sweet is that I already owned one! The thing is simply pushed into the Arduino Mega. Zero soldering. And then here is a close-up, where you can see that the wires can be connected by inserting into connection points that can then be secured by tightening down a screw. Oh happy days! So now you have a sneak peek at the test control box. And you have an update on the dry fitting. Those two things are being worked on in parallel. In fact, I am also starting to work on audio, which I will revel in an update post soon. And I have ordered the last of the lighting material so I can start on that next week. And I am taking the first steps to finish the ETB diorama by creating the walls upon which will be all sorts of oddities - all in miniature! |
|
T
TheLuckyParrot
Posted
posted
on
Tue, Mar 17, 2020 9:57 PM
STAGE ASSEMBLY, PART 11 You know how they say "a picture is worth a thousand words"? Yeah, well, this ain't one of those: Meanwhile, over at another part of the garage I am starting to construct the back enclosure to the cabinetry. This will also provide support and protection for more of the electronics packaging. I am taking photos of each step for the historical purpose of documenting the assembly. |
|
D
danlovestikis
Posted
posted
on
Wed, Mar 18, 2020 7:50 AM
I am sure that many of us have looked at Trader Sam's display and thought, "hey that's fun" and then gone on our way. But now with each of your posts we can look at it and think this is a modern day pyramid. So much thought and effort. You are a master builder. I for one hope that when this is finished that you will be on to another fun project that we can all watch and enjoy. Wendy |
|
H

hiltiki
Posted
posted
on
Wed, Mar 18, 2020 8:45 AM
Amazing work. |
|
T
TheLuckyParrot
Posted
posted
on
Wed, Mar 18, 2020 10:54 AM
Thanks, Wendy! That's funny about the "modern day pyramid". Trust me, I am not burying any treasure deep inside and creating booby traps to foil project robbers. With the covid-19 "work from home" edict in place with my company and with our customers, I am guessing that I am about a month away from completion now on this project. I absolutely DO have a list of follow-on projects that I aim to work on and share here. The very next one actually depends on this Trader Sam's Enchanted Tiki Bar In-A-Box. This project will need remote control so that I can fire off actions from behind my bar just like they do in the real establishment. I am choosing WiFi to do this since it will help me be very discreet (again, just like the real establishment). I don't know how to do WiFi even as I type this, so it will be learn-on-the-job. But once I have that figured out, I can then take that knowledge and ENTIRELY RE-DO an existing project that is sitting on my workbench right now, covered so that it doesn't gather any more dust than necessary. That next one is at least as fun as this one, and if I do it right I will have documented the path for readers to duplicate the result for their own home entertainment. Beyond that, oh yeah, I have a list that just keeps growing! But then, retirement is just around the corner so I will certainly have the time and energy...
|
|
T
TheLuckyParrot
Posted
posted
on
Wed, Mar 18, 2020 10:55 AM
Thank you. I do appreciate the feedback. And if you have any questions, suggestions or other observations do not be shy!
|
|
T
TheLuckyParrot
Posted
posted
on
Fri, Mar 20, 2020 10:19 AM
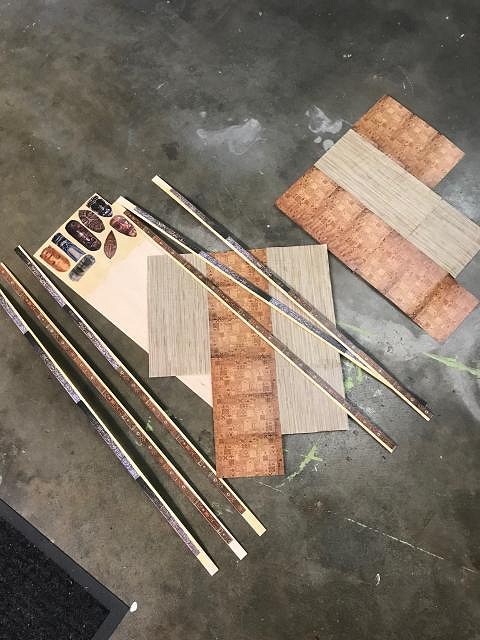
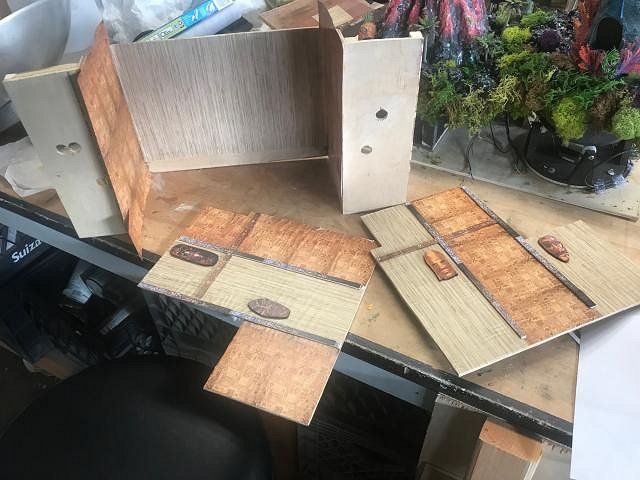
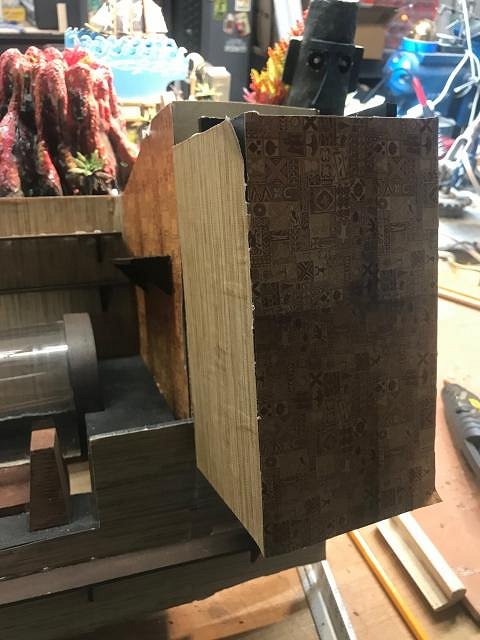
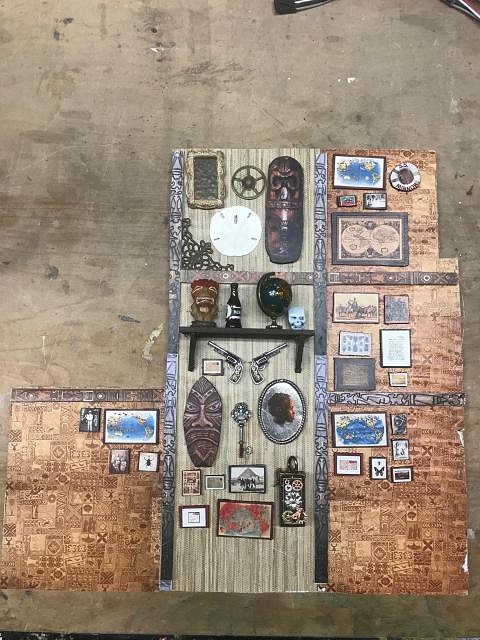
STAGE ASSEMBLY, PART 12 Good news! The dry fit has been finalized. Everything packaged up great and is fitting perfectly within the cabinet. There is one final proof of that, however, and that is when it goes back together for the final time. It better fit back together just as clean or imma gonna be mad at myself. That means that I get to take it all apart one last time. The stage is back out from the cabinet where I can gain access to the electronics, where I can add the final components and clean up the last portions, tie everything down and do one last full systems check before final assembly. My guess is that final assembly will occur in April. That will be cool. So, yeah, here is me making what appears to be "un-progress", going backwards and having the stage platform all by it's lonesome on the work bench: On the electronics side, apart from the cleanup and testing of which I spoke earlier, I have to construct the light gantry that will fit up above and install all the lighting, tie the lighting to new micro-controllers, and program those up. I have done those things and the planned effects on other projects, so there is no mystery there. It's more tedium than adventure. I just have to execute. Being on weekend home shit-in mode will help me focus on that execution. The adventurous side, though, will be the WiFi. Other than a Wifi router still in the box that I will dedicate to my Tiki bar projects, I don't even own the project electronics to do this much less experiment, learn and master the technology. That's now just around the corner and I am kind of geeking out with anticipation. I also have to build out all the audio capabilities. The plan is to construct and install the audio system and have it fully tested and proven, even though I won't have all the audio tracks for a while. But working on audio in this order means that I need to approach the challenge in a way that allows me to add the tracks easily after things are assembled. That is a huge long-term benefit anyway. And, finally, I have to figure out what I want to do with the access panel at the top of the cabinet. What purpose will that serve? What do I put in there? How am I going to connect it? Right now I am thinking only of a master on/off power switch and the right/left audio volume controls. And maybe a small LED panel which displays status or error messages. And now back to fabrication. I am currently making progress on dressing the stage. The first part was building the panels for the 3 sides of the stage, and then dressing them with wallpaper and trim. Simple photos of patterns and materials printed out on a color printed and glued to the wood panels is doing the trick. Don't fret if the individual panel pieces don't make much sense: Also we don't need to worry too much about the bubbling of the paper as it was glued to the wood panels. My guess is all that will disappear in the end. And to give you an idea as to where I am going with this, here are those panels trimmed and laid out on the workbench in their approximate positions: What I have to do next is cover all that wallpaper with all the ETB-style tchotchke and more trim, and even shelves to hold tchotchke. I already possess A LOT. It should make for a fun day or two. Only later will I know if I have enough. If I don't, I can only hope that I can fabricate the difference or hope even harder that there are online delivery services that answer my call for more miniature items. With luck, my next post should impress! |
|
BB

Bam Bam
Posted
posted
on
Fri, Mar 20, 2020 10:51 AM
It's certainly coming together now - that backdrop reminds me of the maquettes I built in college for Theater Set Design! |
|
T
TheLuckyParrot
Posted
posted
on
Fri, Mar 20, 2020 11:37 AM
That's EXACTLY what I am going for! Create a maquette that surrounds the diorama where the electro-mechanical 'performers' are positioned. Except that because my project is miniature, my maquette is not temporary, or an example. It's actually THE permanent set. Thanks for the feedback!
|
|
D
danlovestikis
Posted
posted
on
Fri, Mar 20, 2020 1:28 PM
Dose it's operation take much electricity? I wouldn't want you to blow a fuse when it all comes together. Wendy |
|
T
TheLuckyParrot
Posted
posted
on
Fri, Mar 20, 2020 2:05 PM
Actually, not at all. I single 110v electrical cord is far more than needed. All the electronics run on 3.3v, 5v or 12v. That's battery power! The trick is to keep the grand total contained so that I do not try and do too many things at the same time, and all those "same time" things add up to consuming too many AMPS. And even then, it's not the worry about the amount of AMPS coming out of the wall and blowing a fuse. It's more about consuming too much amperage for the power supply that I am installing inside the system. That power supply is what draws power from the wall outlet. For that we are fine. The power supply only draws 1 AMP, so that's only 1/15th of what is coming out of the wall. But there is a maximum amount of power it can DELIVER to everything. The power supply that I am using can deliver up to 6 AMPS. But the tiny little electronics pieces use so little power that they are measured in "milliamps", or 1,000th of an amp. I am trying to target between 500 milliamps up to 1 full AMP for any single function, and only 1 function will be allowed to run at a time. Thus, worse case I an using only 1/6 of what the power supply can do. And we already know that I am using only 1/15th of what comes out of the wall. There is another factor, WATTS, that I need to take into consideration, too. WATTS are what you commonly know as heat from electricity. I don't want anything getting too hot, either. But, again as with the other calculations, I am waaaay within all safety factors even in worse-case scenarios. If electricity and electronics are not your thing, the whole point of my next project will be to do all that work on behalf of everyone, provide a list of parts that can be purchased independent of me, download some software that I will write (which will be free), and then follow some instructions on how to create your own audio tracks and make your own content and have some fun. You know, since I am locked indoors, I should upload some sample videos of what is coming next as a preview to what I keep hinting at... And, as always, thanks for the feedback!
|
|
T
TheLuckyParrot
Posted
posted
on
Fri, Mar 20, 2020 3:48 PM
ENCHANTING TIKI BIRDS PROJECT - PREVIEW! Weeks from now, when I have completed this Trader-Sam's-in-a-Box and put it to bed, I will be getting back to an earlier incomplete project of audio animatronic Tiki birds. It's by no means a new concept. There are literally dozens of example videos on YouTube showcasing finished projects and those exploit all levels of technology. The vast majority of them, though, emphasize the Enchanted Tiki Room performances from the Disney parks. Here is one example.....And here is another one. There are many other videos of custom hacks and autopsies of this particular toy. This search will reveal many.....My own hack example is here. That example actually is complete to the protoboard level. However, it is hardwired and requires far too much product and too many steps. The wiring itself is 1/2" thick. Totally unworkable. So I am going to revamp and simplify the entire thing, and will document here on Tiki Central as I go. And, most importantly, it will be wireless! I'll be using what I learn from the current project to make that wireless happen. My goal will be to enable anybody to build their own performers, and have heir own performances using whatever content they choose to acquire, in their own home Tiki bars. After that I will do some other projects that I have queued up, but then I will get back to the Enchanting Tiki Birds project and give it a major upgrade, allowing for the use of more than just this one particular toy as the performer. Disney fans will take that and create singing flowers and totems and drummers, etc. I get that. But that will by no means be the limit!
|
|
D
danlovestikis
Posted
posted
on
Fri, Mar 20, 2020 7:37 PM
I really enjoyed reading your detailed amp information. Do you have a gage to measure amps? I've never had to do that for any reason. Your two parrots talking was such fun to watch. I love your current project but since I have always loved birds in art I'm looking forward to this next project just as much. Wendy |
|
T
TheLuckyParrot
Posted
posted
on
Sun, Mar 22, 2020 12:37 AM
Thanks, again, Wendy. Devices to measure amps are easy to come by. Many common multimeters have that option. A multimeter is a hand held tool that is most commonly used to measure volts. Actually, they are most commonly found on car dashboards. They are the meter that tells you how well your alternator is working. I don't actually use one, though. My multimeter does not have that option. But the formula for figuring out amps is pretty simple. |
|
T
TheLuckyParrot
Posted
posted
on
Sun, Mar 22, 2020 12:55 AM
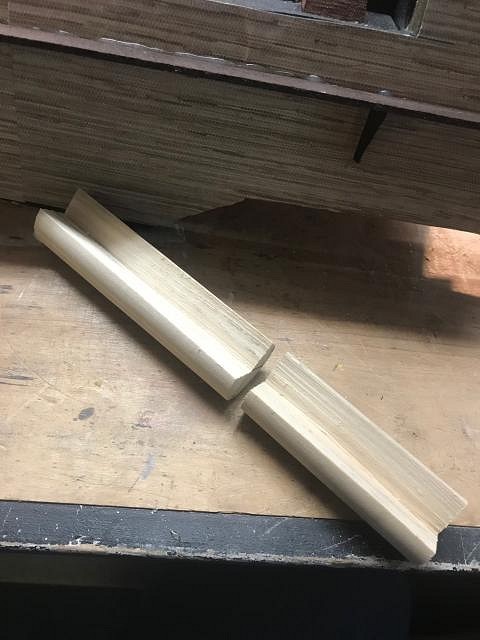
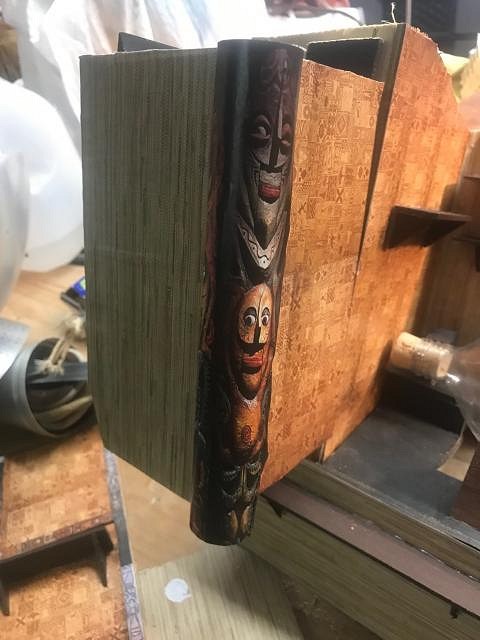
STAGE ASSEMBLY, PART 13 Let's have some fun, shall we? What you are looking at here is the nearest corner from the audience's POV of one of the speaker boxes. This is covered with "wallpaper" and would be to the rear of the TV cabinet, above the stage, on either side of the ship in a bottle. I don't care about the parts of the paper that are not adhering well. You will see why. The speaker box is about 7 1/2" tall. I cut a 1" dowel to a 7 1/2" length, then cut it into two lengths at some random point. This way it will fit into my band saw. Using the band saw, I cut a notch lengthwise in each that creates a 90 degree void. I hot melt glue the dowel pieces to the corner of the speaker box. This is why I didn't care about any loose "wallpaper". For the record, I also tapped in some small screws at the back of each dowel section because, well, in my history I have learned that at some point you can always count on hot melt glue to fail. Snag some images from The Enchanted Tiki Room, put them onto my computer and bolt them together, send the result to Staples to be printed out in color (just like my wallpaper and some other features to be seen in this project), cut them out and glue them to the dowels, and lookee what I now got! |
|
D
danlovestikis
Posted
posted
on
Sun, Mar 22, 2020 7:58 AM
Your amp math chart takes me back to my physic and math classes. It even looks like the Pythagorean Theorem. Making those tiki poles using photos is ingenious. I have a friend Chippy who has made an enchanted tiki room at his house. I'm going to direct him to your thread. He NEEDS to see this method. It's a wow for sure. Wendy |
|
T
TheLuckyParrot
Posted
posted
on
Sun, Mar 22, 2020 9:27 PM
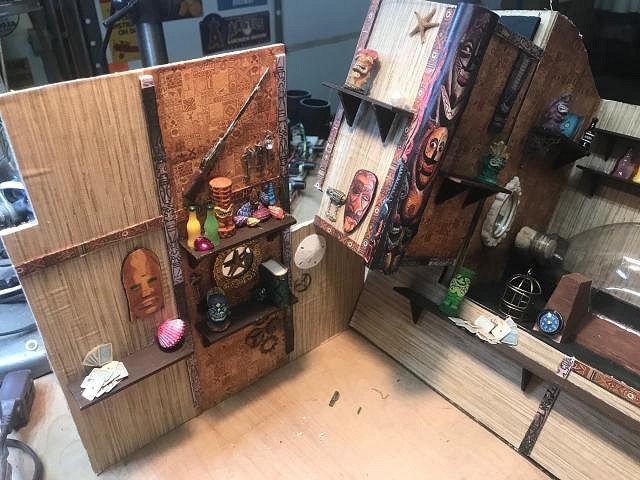
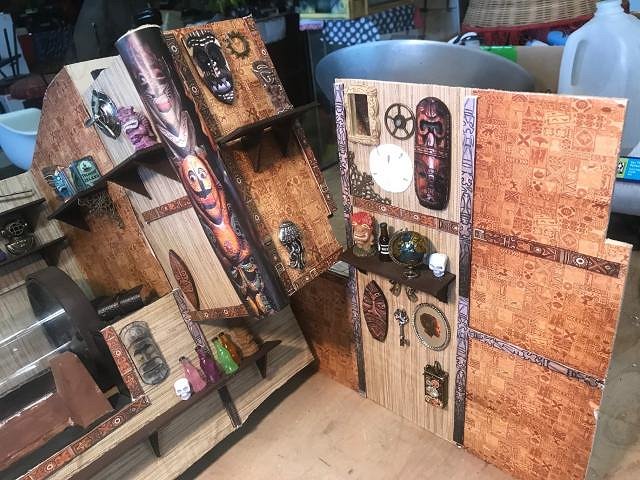
STAGE ASSEMBLY, PART 14 I have a long way to go, but I have to wait for more "stuff" to arrive. Being house bound is going to take a toll on set decorating progress. But I have enough of a start to show off. Here are (in order) the left side, the right side, and the rear of the stage outside of the cabinet and leaning up in their relative positions, and with all the decor attached that i have in my possession. In my opinion, this is about 50% of my desired goal. I did some view tests and found that the foreground features are large enough that there are major portions of the walls that are obscured from view and I don't need to cover them. But what does show, and those shelves, clearly need a lot more decor to unify things. My hope is that when anyone looks closely inside, independent of the animatronic showcase, they have a feast of entertainment for their eyes. And all of it should invoke memories of their experience in the Enchanted Tiki Bar. I want this baby to live up to the reputation I am going to claim for it, and for years to come. |
|
D
danlovestikis
Posted
posted
on
Mon, Mar 23, 2020 10:11 AM
OH OH OH OH This is so cool. It is a feast for the eyes. A project all coming together is wonderful medicine. I hope you get everything you need. Keep on washing those hands and don't touch your face. We don't want a bigger slow down. Dang you are so good at this. Wendy |
|
H
Hamo
Posted
posted
on
Mon, Mar 23, 2020 4:01 PM
This gets better and better, and I'm looking forward to your next project, too. |
|
T
TheLuckyParrot
Posted
posted
on
Mon, Mar 23, 2020 10:23 PM
Thank you, kind Hamo. |
|
T
TheLuckyParrot
Posted
posted
on
Mon, Mar 23, 2020 10:51 PM
STAGE ASSEMBLY, PART 15 Good progress for a Monday! Let's start by showing my target level for wall decor within the cabinet. Here is the left-hand wall panel of the stage from yesterday, which I estimated to be only 50% complete: And here is the right-hand panel which I completed today: So here I sit hunting for more photos with which to work. I have a lot more surface to cover. The unfortunate news is that I have been following my orders for miniature decor for the shelves, and the covid-19 impact is slowing all that down. Right now my last shipment will not arrive until mid-May. And I cannot pack this up and bolt it closed until I have those in place. This means that although I was hoping to finish in April, that ain't going to happen. With the challenges we are all facing at the moment, I am not going to complain about it. It can take until May of next year if that is what it takes to keep even one person healthy. It doesn't mean I am stopped, of course. There is still quite a load of electronics work to get done. That testing controller box I have started, the one with that mind-numbing mess of wires and soldering? I started the wood case for that today, mounted the controller and the power supply within, and attached the button panel which is now wired into the controller. This is kind of scary, because I am not doing system testing step-by-step as I go. I won't know if it works until it all comes together. But I make small progress on this as I fast approach the electronics for light and audio. That's one of my schematics for audio that you can catch a glimpse of in the upper right corner: [ Edited by: TheLuckyParrot 2020-03-24 08:26 ] |
|
D
danlovestikis
Posted
posted
on
Tue, Mar 24, 2020 7:52 AM
Those tiny pictures on the wall are so cool. I sent you a personal message. Wendy |
|
T
TheLuckyParrot
Posted
posted
on
Wed, Mar 25, 2020 2:37 PM
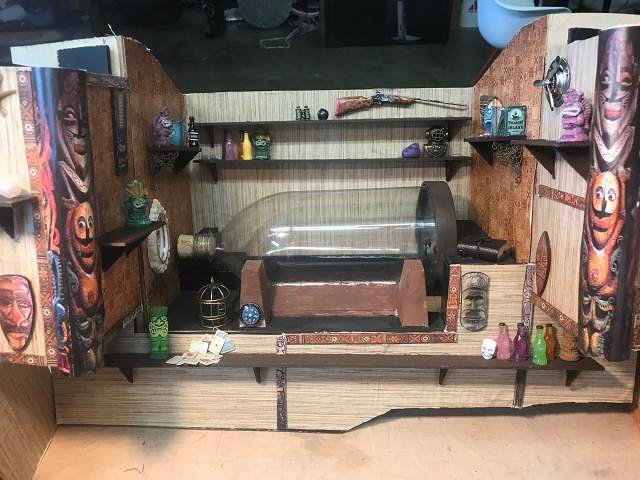
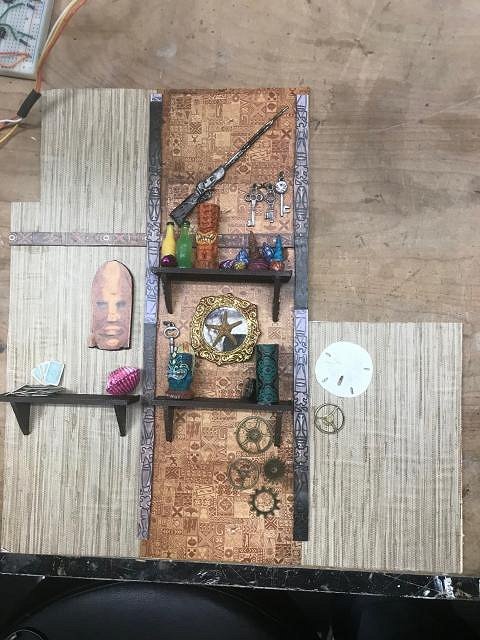
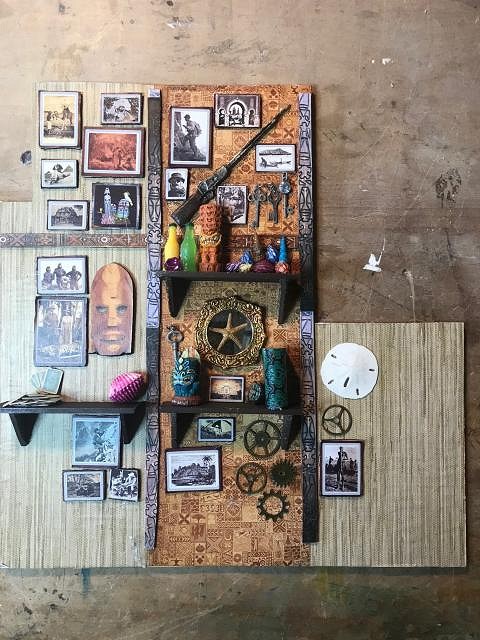
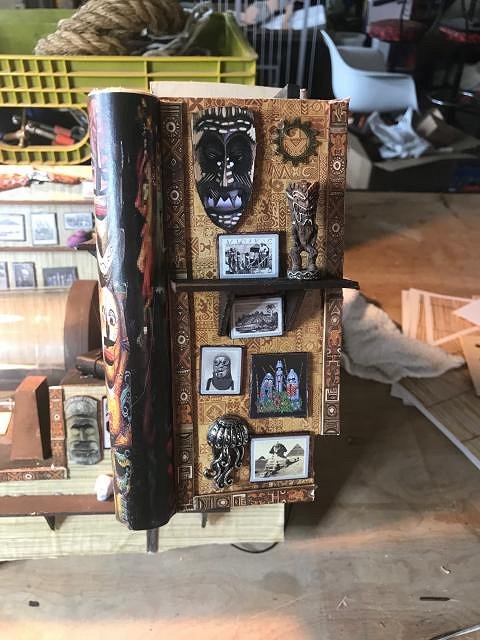
STAGE ASSEMBLY, PART 16 I have finished decorating the walls. (Well, except for one last surprise that is due in the mail tomorrow!) The shelves all need lots of decor but that is what I have to wait on . All back ordered. So although I am done with these for now and can move on to lighting and misc. electronics, I cannot install this into the cabinet for probably 2 months. But here you go, finished wall decor! (P.S. - Somebody might want to inspect these closely for certain artwork!!) This is the left-side wall panel of the stage. Again, it does not need 100% coverage because of the volcano obscuring so much of the viewing angle: This is front-facing surface of the right-hand speaker box: This is the front-facing surface of the left-hand speaker box. And, yes, that IS a white pearl!!: This is the left side wall of the rear stage area that surrounds the ship in a bottle. The front half of this is the back of the speaker box: This is the right side wall of the rear stage area that surrounds the ship in a bottle. The front half of this is the back of the speaker box: And, finally this is the very back wall of the rear stage area. Dead center, top shelf, is the BLACK pearl. So all I am missing is Orange Bird (working on it!). Close inspection to detail will reveal that many of the pictures back there are of sea monsters swallowing up ships at sea. Not an accident. Not by a long shot! Also, I have officially christened the doomed vessel. "The Intrepid": You might also notice that some pictures are duplicates. Not an issue for me. Truly, most of this work will never be seen again due to intense viewing angles through the front of the TV cabinet. But just in case, I put it all up. Now, on to some electrical work.... |
|
T

TikiDaye
Posted
posted
on
Wed, Mar 25, 2020 5:33 PM
Oh my... this piece is amazing! I watched your YouTube videos, as well. Great work! |


