Tiki Central / Home Tiki Bars
The Zombie Hideaway
|
M

Murph
Posted
posted
on
Tue, Jun 16, 2009 10:24 PM
Your room is going to be awesome. |
|
W

Wayfarer
Posted
posted
on
Thu, Jun 18, 2009 8:15 AM
The cross bamboo came out good. I've been drawing some concept art for a tiki lounge I'll never build that has a lot of crossed bamboo like that and seeing it actually done is pretty neat. Didn't have a cool Trader Vic panel in the center though, (my little lounge idea is across between tiki & WWII south pacific pilot's lounge.) over all I think it's coming together nicely. |
|
T

TabooDan
Posted
posted
on
Thu, Jun 18, 2009 2:43 PM
Thanks alot Slacks and Murph!! Hey Wayfarer, Thank you! Your Lounge sounds like it will be cool too! The Pacific theater of WWII and Tiki go hand in hand and when done correctly can look awesome! Alot of the stuff I try to collect has a bit of military flavor if I can get it. Lot's of other people are interested in this field as well so there are usually slim pickings. Did you see the great job Mr.Pupu Pants is doing over here?: That place will be awesome when it's all done!! |
|
SF

Swamp Fire
Posted
posted
on
Fri, Jun 19, 2009 7:18 PM
How did I miss this! Wow Dan, looking awesome. I love all the detail you're adding. I dream of having a place like this. Look forward to see it done. |
|
N

nicholauslee
Posted
posted
on
Fri, Jun 19, 2009 10:19 PM
MAN! this looks absolutely amazing! Not to just reflect the rest of the sentiment, but I can't wait to see it once it's done! |
|
W
Wayfarer
Posted
posted
on
Mon, Jun 22, 2009 5:15 AM
I just saw the airliner section, so many nice tiki lounges going up here. |
|
RH

Robb Hamel
Posted
posted
on
Mon, Jun 22, 2009 5:39 AM
Really fine work. I'm impressed with that beautiful ceiling, it looks at least perfect. |
|
MR

Matt Reese
Posted
posted
on
Thu, Jul 2, 2009 8:51 PM
Looking fantastic. Can't wait to see more progress pics. The attention to detail is so cool. |
|
TM

Tipsy McStagger
Posted
posted
on
Mon, Aug 3, 2009 8:52 PM
...lookin good!!! |
|
SF

Slacks Ferret
Posted
posted
on
Fri, Sep 18, 2009 6:45 AM
Looks great! Any updates? |
|
MPP

Mr. Pupu Pants
Posted
posted
on
Wed, Oct 21, 2009 6:23 PM
Hi Dan, can't wait to see how it looks now. Have you had a chance to make more progress on your room? |
|
D

Dustycajun
Posted
posted
on
Wed, Oct 21, 2009 7:33 PM
Mr. Pupu Pants, Here, here! Let's see some more progress from Taboo Dan. Speaking of seeing more, are you ready to start posting on your Hula Sue's South Seas Hideaway thread again? I hope so. DC |
|
BTS

BIG tiki scott
Posted
posted
on
Thu, Oct 22, 2009 5:50 AM
taboo! your place is lookin sweet!!! luvin the trader vics wall peice installed !! that shld look sweet w the lights!!! cheerz! |
|
T
TabooDan
Posted
posted
on
Tue, Nov 10, 2009 4:08 PM
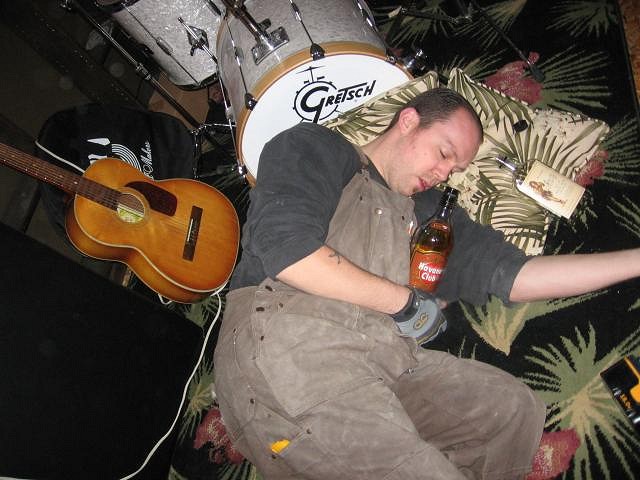
Aloha guys and gals!! Thanks for the kind words all and the interest!! It does give us who are working on these projects alot of motivation when other people keep checking up on you and are waiting for updates. I promise more to come very soon!! That being said, I did start to work on another ceiling light for the Zombie Hideaway but a little Sailor and a Cuban paid me a visit and I wasn't able to get too much done!! Check out the picture:
Thanks and Mahalo!! |
|
SF
Slacks Ferret
Posted
posted
on
Sun, Dec 27, 2009 7:40 PM
Looking good! Keep posting yr progress! |
|
M

Mongoloid
Posted
posted
on
Mon, Dec 28, 2009 2:17 PM
Great thread i just discovered and got to see so much progress from beginning to end. The fireplace was such a great transformation. I can just imagine on a cold Canadian Winter day, closing the blinds cranking up the heat and exotica, pouring a mai tai and escaping. Thats what a tiki bar is all about! |
|
T
TabooDan
Posted
posted
on
Mon, Dec 28, 2009 9:34 PM
Hey Guys, thanks for checking out the thread and for looking for updates. You're interest is lighting a bit of a fire under me to get some updates on here! I really gotta do it and I will be posting some updates soon. |
|
T
TabooDan
Posted
posted
on
Thu, Dec 31, 2009 8:27 PM
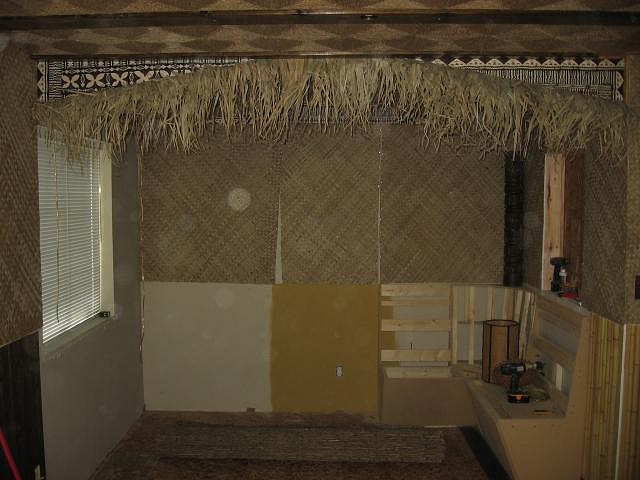
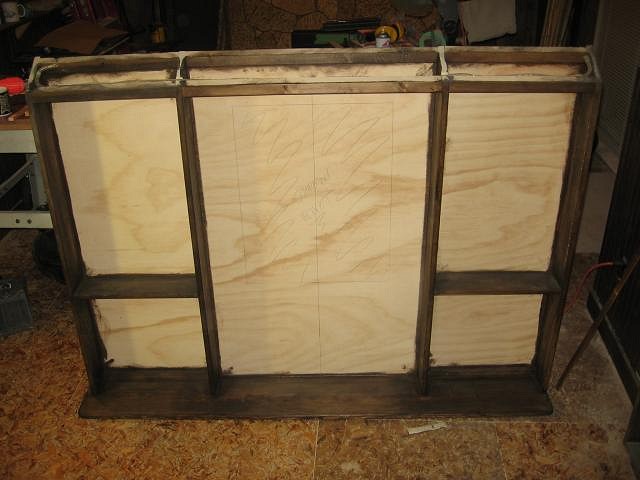
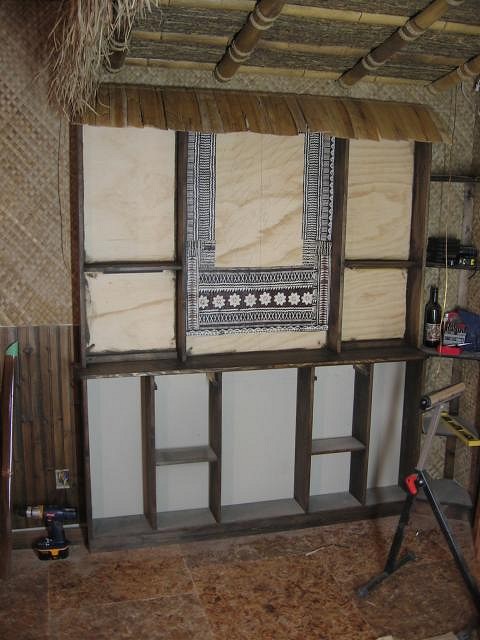
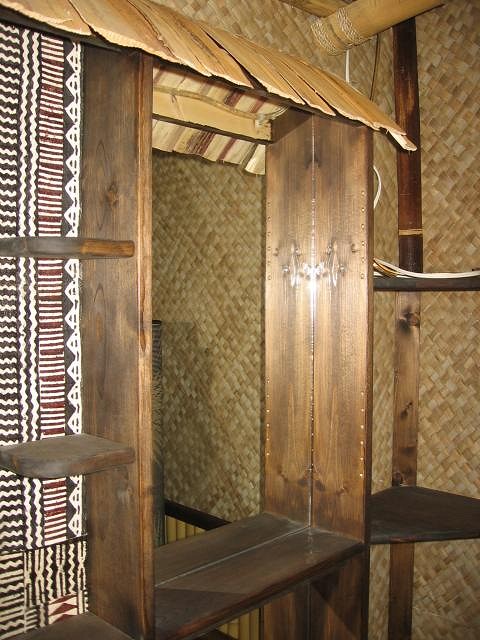
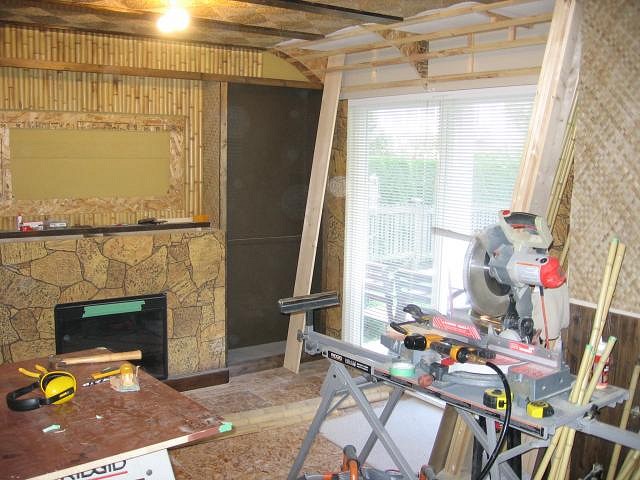
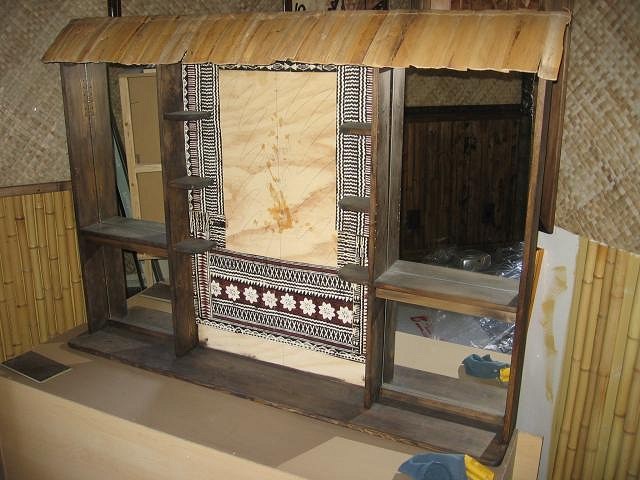
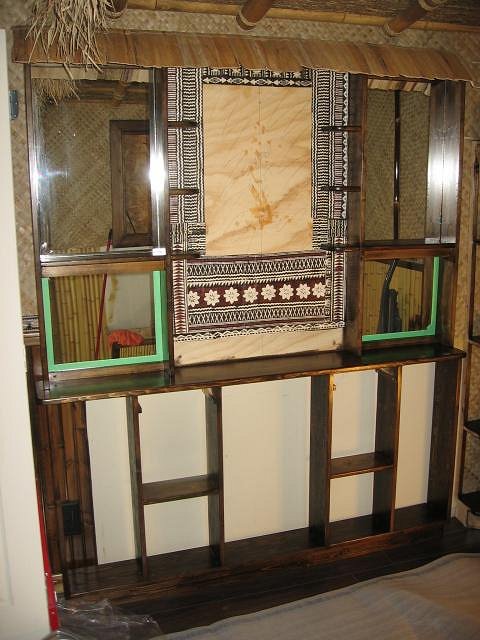
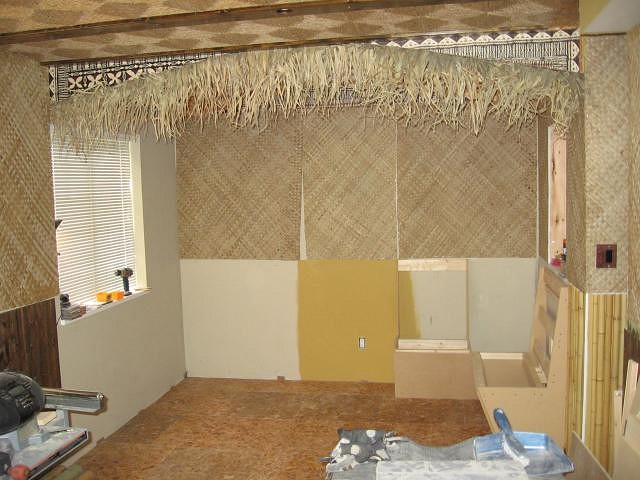
Okay, finally a little update. I have been so busy with alot of other things that over 7 months has passed with little work done on the room. I really gotta pull the finger out and do it but just so much of.....life just keeps popping up! Here is where I left yah with the end of the room, the Hut area, where I am building a wall cabinet to hide the window and go behind the bar:
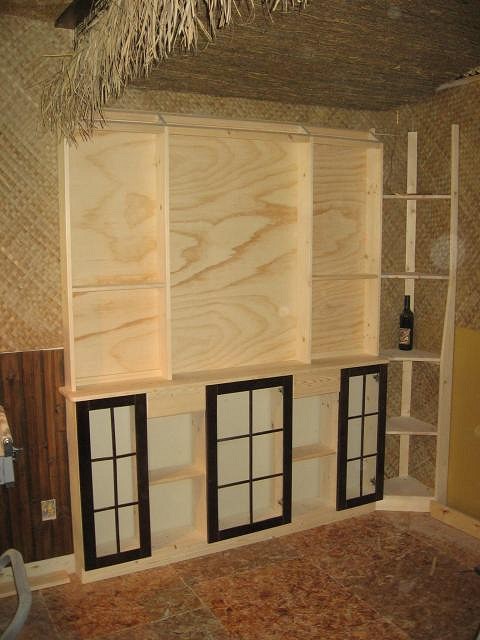
This is after the cabinet was built and ready for the stain:
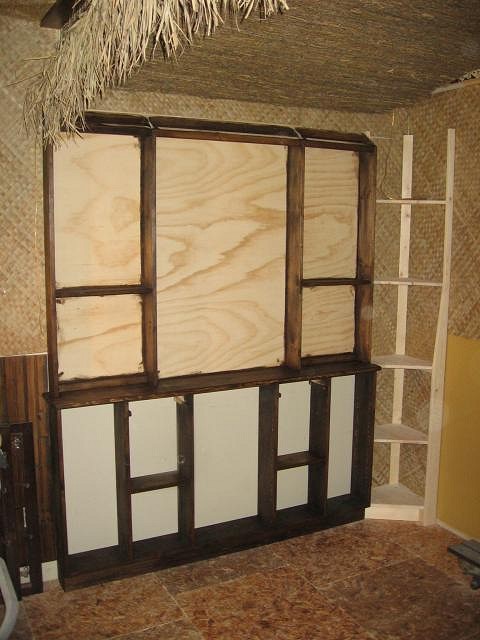
The corner shelf on the right I was not happy with so I cut the top down to be the same height as the top shelf of the wall unit. You'll see this in later photos. I figured it would be a good unit for bowls and some odd shaped stuff. Here it is again stained up:
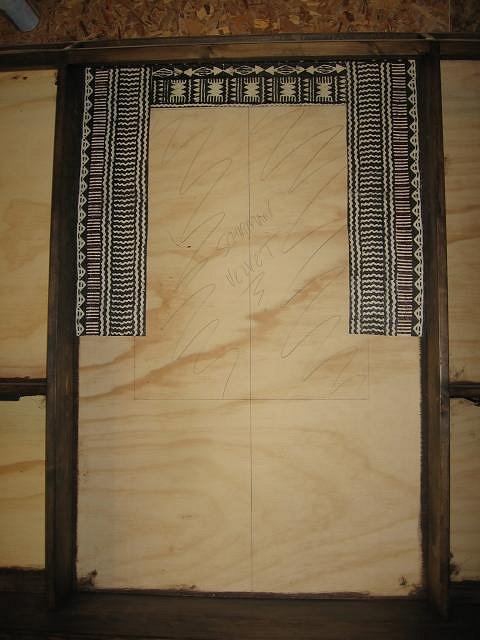
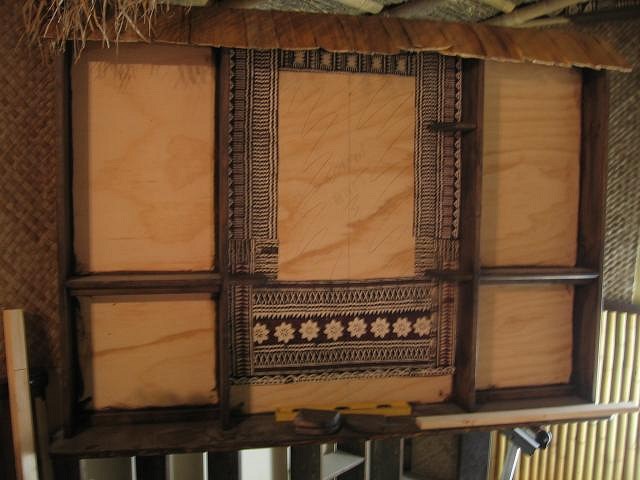
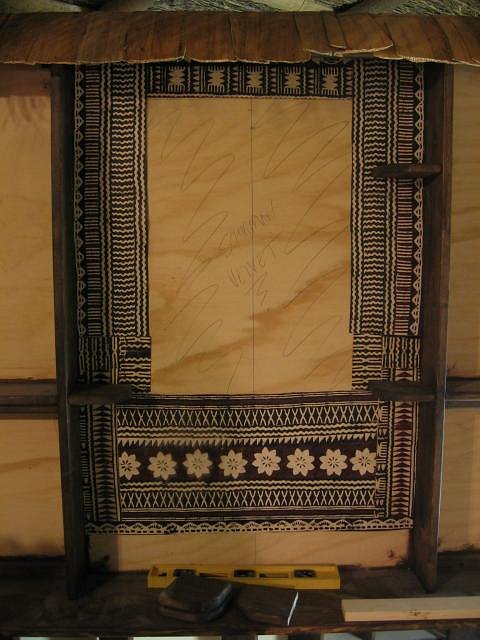
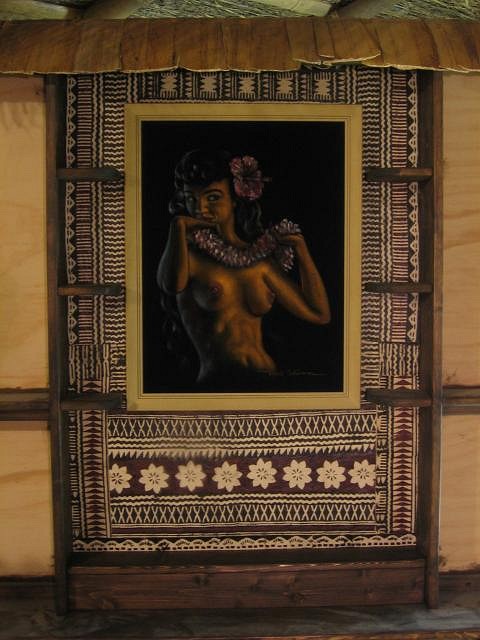
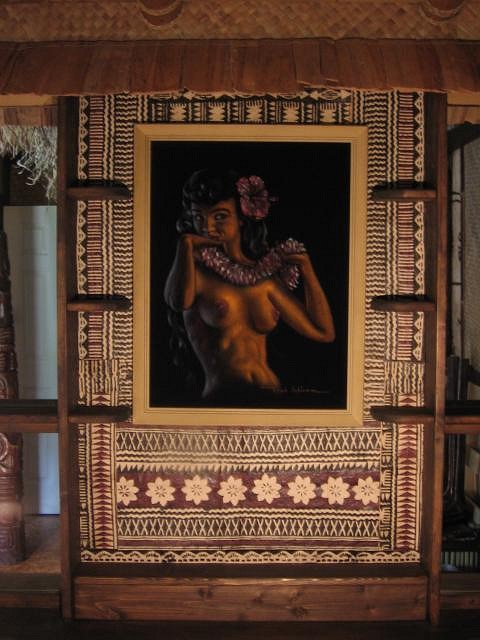
The goal of this little unit was to hide all the light from the window and add some character and display space to the area behind where the bar will be. I also specifically kept my design in mind to showpiece a rare Frank Schirman Velvet that I have along with a few of his Black Coral pieces. I want to have the velvet painting in the center of the cabinet with small, half-round shelves either side of it. Only a few, not too crowd the main piece. As a backing for the velvet, I am using real Tapa Cloth from Fiji. This is the top half of the unit removed from the bottom to make it easier to work on:
Next is some of the Tapa Cloth being added:
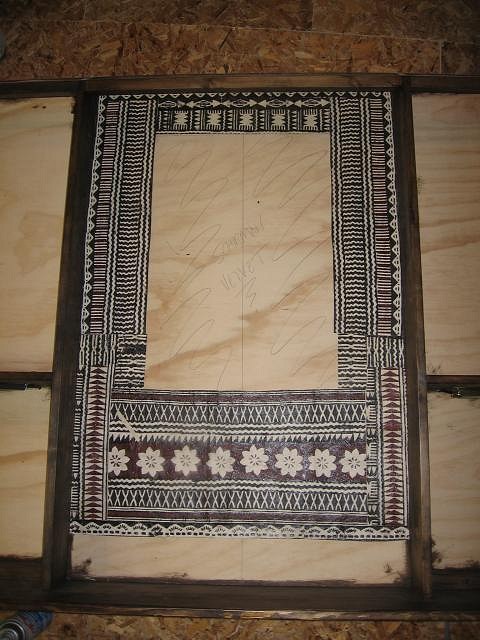
I couldn't find my big piece of this style so I will be cutting up some of the pieces I have and making a pattern around the space that I want. The center does not have to have any Tapa as the velvet will be covering this blank space. Yes, it would have been better to use a bigger piece but I couldn't find the piece I had in time. This way did give it kind of a cool pattern and made it a bit more decorative though. Here is the center section finished up:
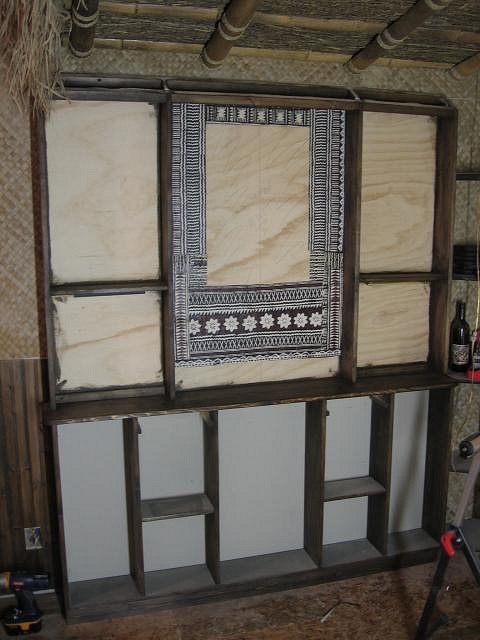
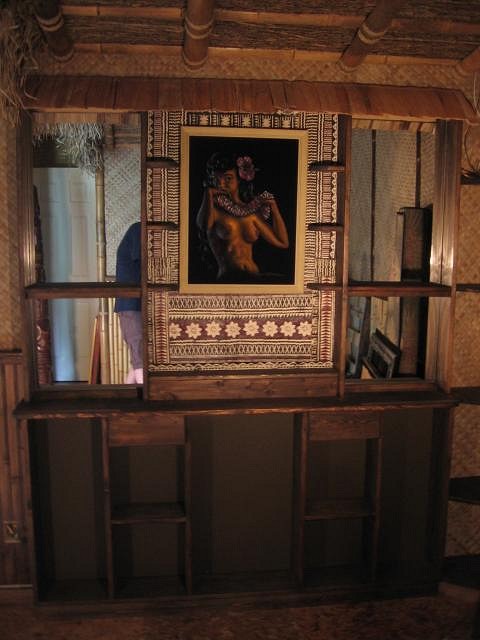
Here's the whole cabinet again:
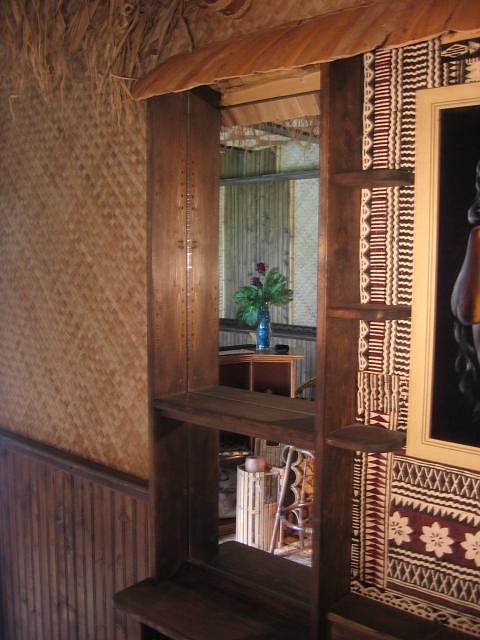
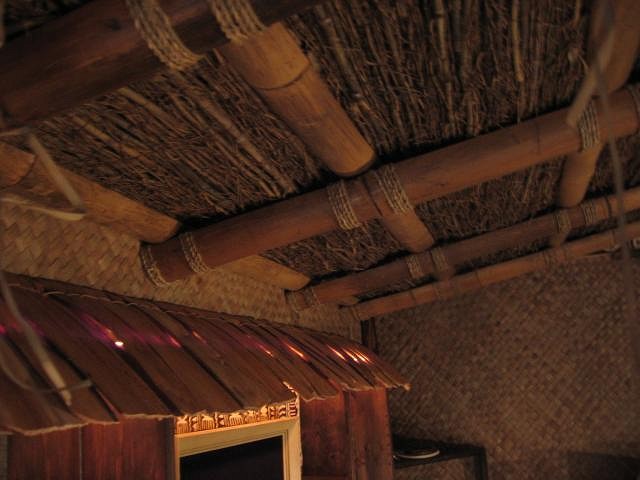
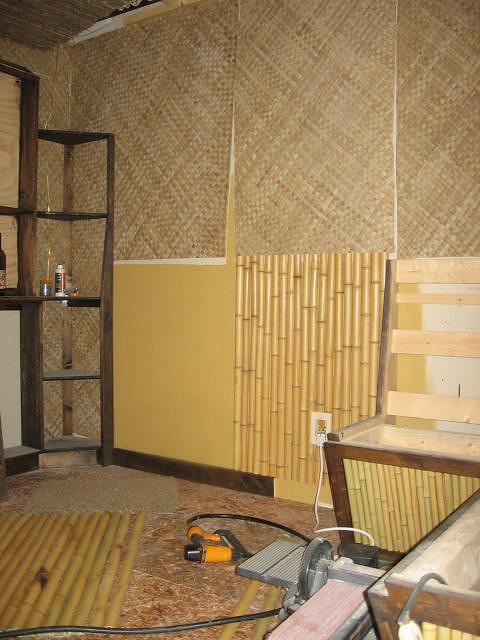
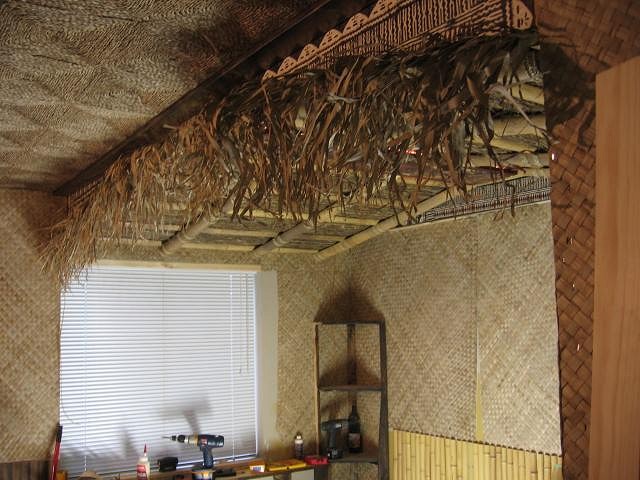
To add another texture and material to the room, I decided to go with a dried banana leaf to use for the roof. I had also not seen these used to commonly so thought it would be different. It adds another color and another example of all the different types of materials you would have found in some of the old Polynesian Restaurants. This was imported right from Bali. The banana leaf is folded over a piece of split bamboo and then the next piece is added then laid on top folded over and continued down the section. They are then tied to the bamboo. They came in pieces about 14" by about 30" wide and are perfect for roofs or ceilings! Here's the cabinet with the banana leaf roof on:
In this shot, I have not yet cut the leaf to the exact length of hang over yet so it may seem to hang over too much at the top. You can also just make out some of the strips of rope lighting that will be going in under some of the shelves and under the banana leaf. Also, the corner shelf has been cut down away from the ceiling. That's it for tonight. More to come!! |
|
UT

uncle trav
Posted
posted
on
Fri, Jan 1, 2010 5:01 AM
Fantastic job Dan. Love the way you have mixed all of the materials and textures into your decor. Great job as always and can't wait to see more. They all blend together very well. How did you attach the tapa to the back bar? |
|
MPP
Mr. Pupu Pants
Posted
posted
on
Fri, Jan 1, 2010 1:50 PM
Happy New Year Dan :) |
|
T
TabooDan
Posted
posted
on
Mon, Jan 4, 2010 7:47 PM
Hey Trav, Happy New Year to yah!! I attached the Tapa Cloth by using spray adhesive. I didn't really want to wreck the Tapa but knew I would have to glue it so it stayed where I wanted it to. DO NOT USE a cheap spray glue (like Elmer's brand or a no-name craft glue)!! You may save $6-9 at the time but you will regret it in the long run!! Make sure it is a good one like the 3m brand (Avail. at Home Depot) or what I used was a proper upholstery adhesive. Sure, some of the adhesive did come through some of the thinner areas of the Tapa but once the glue dried there was no issue's whatsoever. Aloha Mr. Pupu Pants! Happy New Year to you as well!! |
|
T
TabooDan
Posted
posted
on
Mon, Jan 4, 2010 9:10 PM
Here's just a couple more shots of the center area of the behind the bar cabinet. This (unclear!) one is of some of the small semi-round shelves that are going to go on the Tapa either side of the velvet painting:
Here's a shot a little closer:
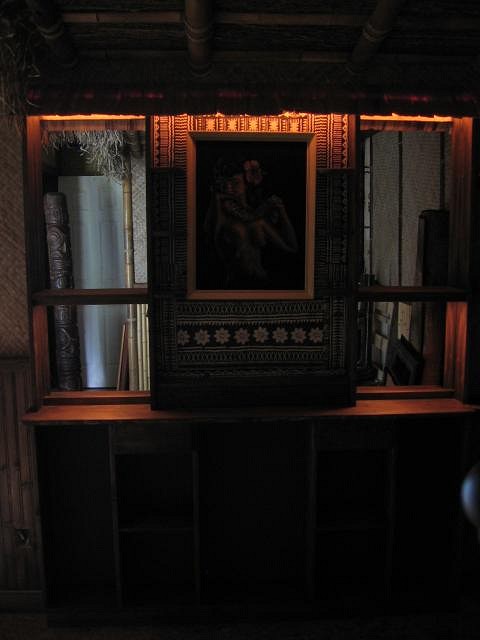
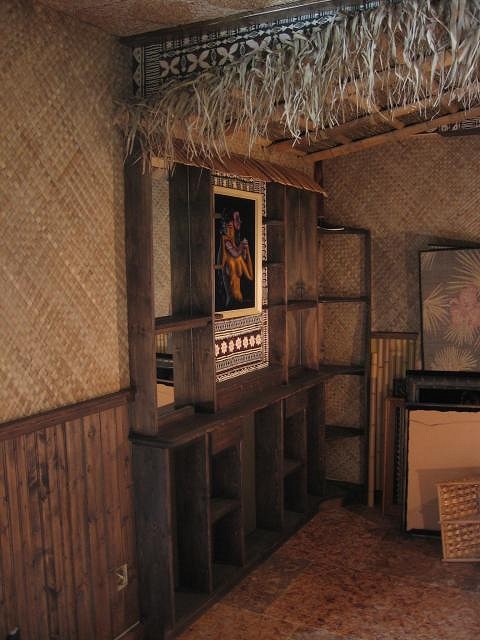
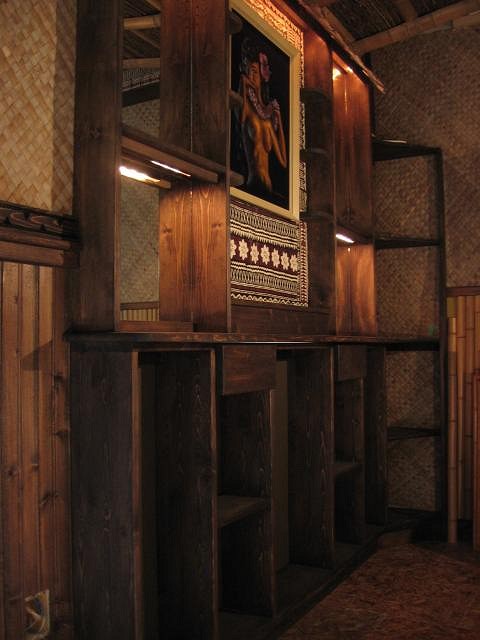
And this shot is of the cabinet with the six half-round shelves installed and the Schirman velvet in place:
You can also note the dark wood box under the velvet. This just gives a bit of a 'step' to have some bottles or display pieces at different heights. More to come with some of the other backing done and some accent lighting done. [ Edited by: TabooDan 2010-01-05 17:06 ] |
|
IK

Iokona Ki'i
Posted
posted
on
Tue, Jan 5, 2010 1:23 AM
Coming along very nicely! |
|
T
TabooDan
Posted
posted
on
Tue, Jan 5, 2010 7:26 PM
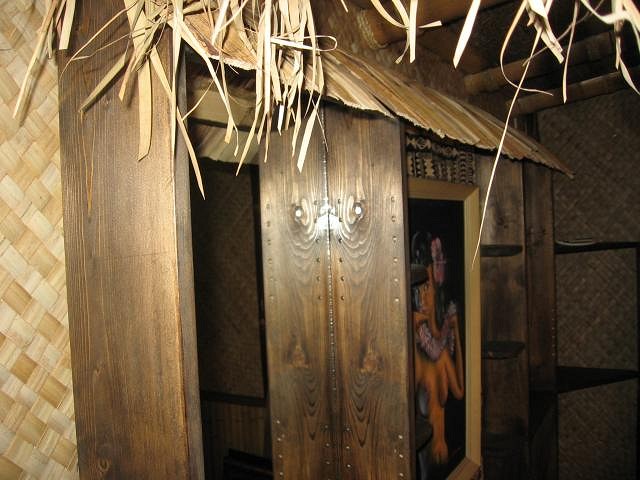
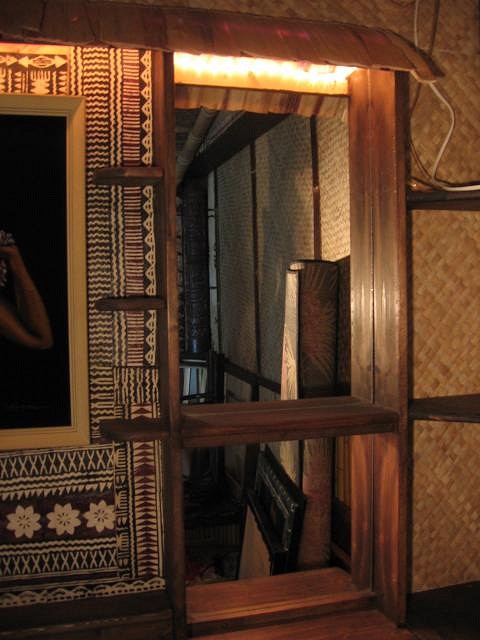
Next is a shot of the wall unit's center velvet area again where you can see mirror that I had cut and installed as a backing on either side:
Mirrors make absolutely great backings for bars. Even in Tiki Bars!! It adds alot of depth and really makes the space look larger. It also displays your collectibles very well and also helps bounce around light. I think it adds that little bit extra. You can see in the photos how the mirror makes this wall unit look deeper than it actually is. The top section of this unit is only 5.5" deep.
Here's an overall shot again:
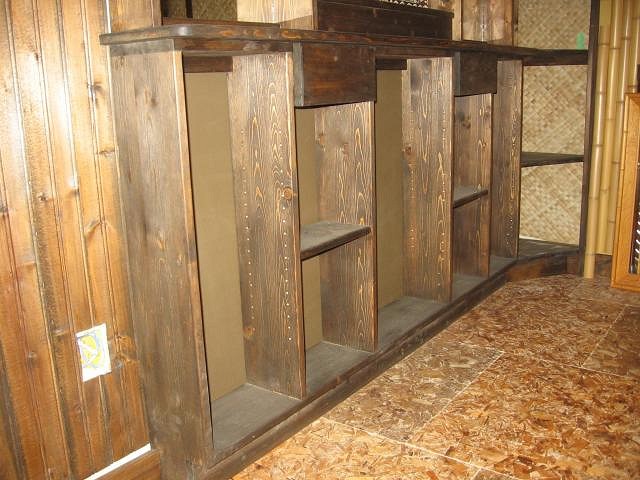
These shots shows the lower cabinet pretty well. The left, center, and right sections have glass doors going on them and will have glass shelves. The two other sections with the drawers will be open and have one fixed wood shelf. Should be able to fit tall bottles in these two areas.
A closer shot of the upper right side:
I wasn't going to point it out yet, but here's a mistake I made which I did not realize until after the cabinet was built and the mirrored backing was cut and installed. Left side:
You can see the holes I drilled in the sides which will have pegs for glass shelving to go in at a later date with the mirrors behind them. Here's the cabinet with the rope light on:
Crappy daylight reflecting in the mirror but you get the idea here. I wanted to have accent light only but just enough to see the velvet and what may go on some of the shelves. Here's where you can see the mistake again :(:
The glow from the rope light just illuminates that whole unfinished area and is way to visible in the reflection of the mirror. That will be taken care of. Here's another angle:
And with the rope light visible:
I also replaced the pieces of wood that cover the rope light on the left and right sides. That way, when you are sitting down and looking at the cabinet, you don't see any rope light at all and get just the glow. This last photo is a shot of the top of the cabinet with the banana leaf covered roof looking towards the back wall. You can see the rope light through the leaf which adds kind of a cool effect when it is real dark in the room.
That's it for now. Thanks for looking! |
|
BTS
BIG tiki scott
Posted
posted
on
Tue, Jan 5, 2010 7:44 PM
TABOODAN!!! the zombie hideaway is lookin REALY SWEEEEET!!! thats gonna be one sweet room when ur dun !! hats off!! cheerz!! |
|
T
TabooDan
Posted
posted
on
Wed, Jan 27, 2010 6:56 PM
Okay, Nothing too huge here, just a quick lamp I kind of put together. Here is a shot of this side of the room with the fireplace:
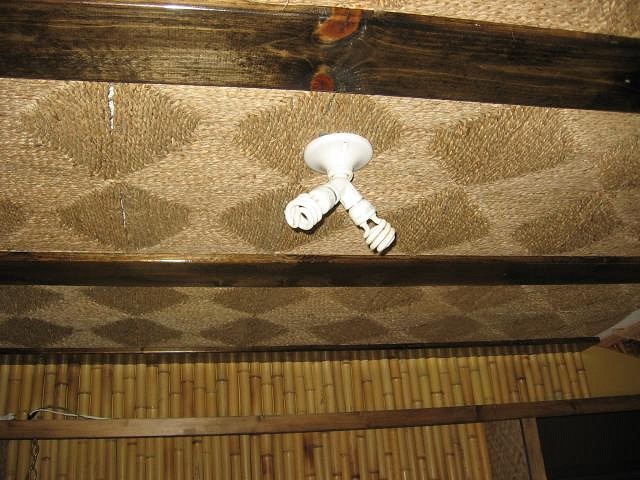
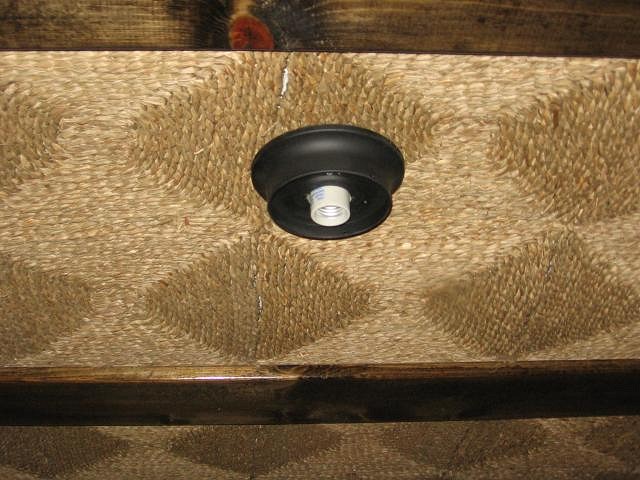
Looking straight up at the ceiling once I added the matting and removed the old fixture:
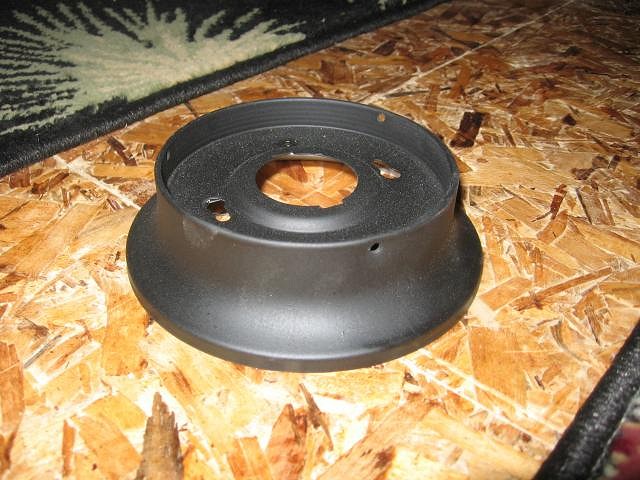
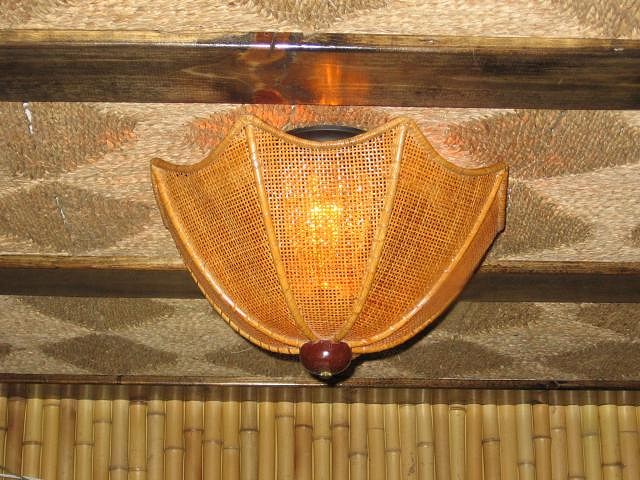
Because I was adding sea grass matting to the ceiling, I added a extension ring to the box so it would securely and safely hang a light fixture flush underneath the matting. Note In some of these pictures, and others, you can see the white ceiling in behind. Well, once I get said and done, you will not see any of the white come through. If I was to do it over, I would have painted the ceiling like I do with the walls behind the bamboo so that that it hid the ceiling better. Sometimes you just dont want to do these things but wish you did later! When I started off in the room, it just had a standard socket in the ceiling. When I was working I added this double bulb fixture just for a little extra light:
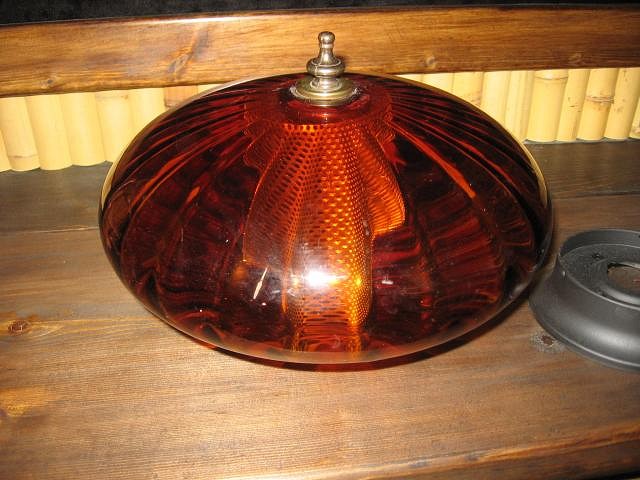
This is a shot once the ceiling was finished with the wood beams. I had this cool old Amber glass shade that I thought would give a great glow in the Lounge. Here it is:
It's got that neat metal piece in the center with all the holes drilled in to it which gives a cool lighting effect and helps cut down on the bulb glare. I soon realized that a few other people out there must be having the same problem because the ones I saw on Ebay were being bid on and they were selling from $14-19 each (in US funds plus shipping of course!). I think that's a bit much for one of these guys!! After several calls and a few visits to some electrical suppliers, I found one and ended up paying only $6 for it which was right in my budget!! They only had white ones so I painted it black. Pretty plain but here it is:
Once installed on the ceiling:
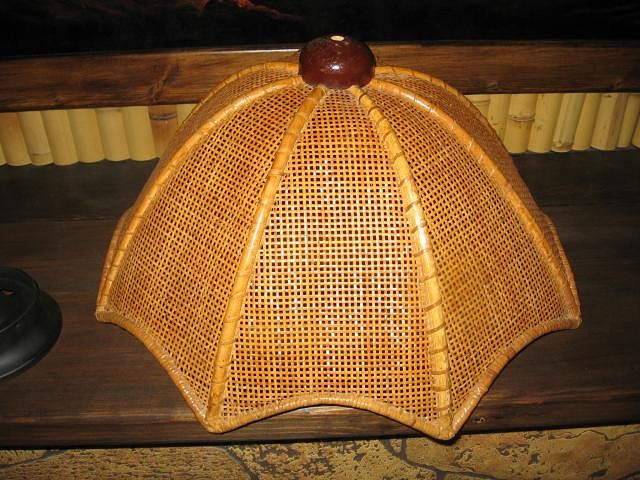
I had an old rattan drop pendant shade that I had purchased quite a few years ago wanting to use it in my lounge. I figured if I flipped it over and put this over top of the amber glass that it would look pretty cool. Like you would see on a semi-flushmount sort of fixture. Here's the old shade:
I figured out the drop I would need between the glass and the shade and made the appropriate threaded rod size. A coupling, rod, nuts and a light bulb and that was about it. Here's the glass mounted without the rattan shade:
And here it is with the rattan shade:
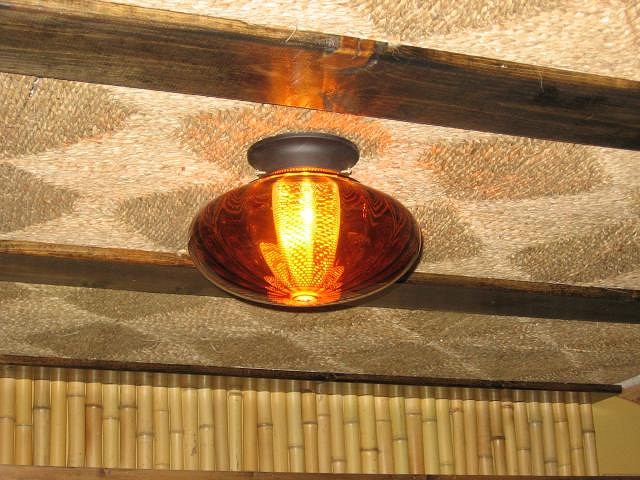
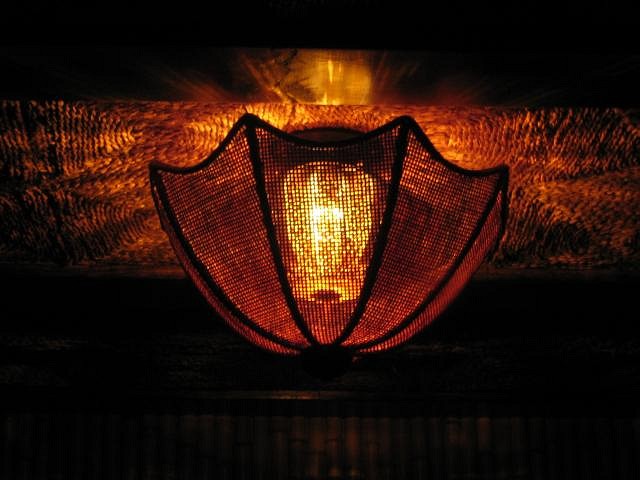
It came together pretty good as the shade hides most of the glass and you don't really see the color until it's on. Here it is with the rest of the lights out and no flash:
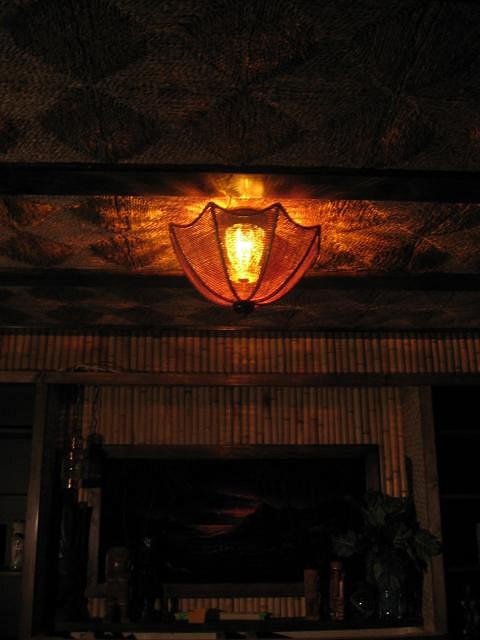
You can see some of the effect of the shade and the metal where you see the straight lines of light. This continues all around the lamp and goes all over the ceiling. Hard to see in photos but it looks really cool. One last shot with a few things on the mantel that were temporarily put out as they were being packed away. Can't decorate the Lounge just yet! Still lot's of work to do!!
Mahalo, TabooDan |
|
K

Kon-Hemsby
Posted
posted
on
Thu, Jan 28, 2010 12:57 AM
Great lighting. Looks really impressive when turned on. |
|
GK

Grand Kahu
Posted
posted
on
Wed, Mar 3, 2010 10:45 PM
I'm curious - where did you find the banana leaf material for the ceiling? Thanks, |
|
F

Formikahini
Posted
posted
on
Thu, Mar 4, 2010 10:22 AM
That's my flooring - from World Market! Comes essentially a dollar a square foot. (Putting it on a ceiling and staring at it after a few Jet Pilots just might cause me to think I was, well, a few Jet Pilots too many!) |
|
T
TabooDan
Posted
posted
on
Fri, Mar 5, 2010 6:42 PM
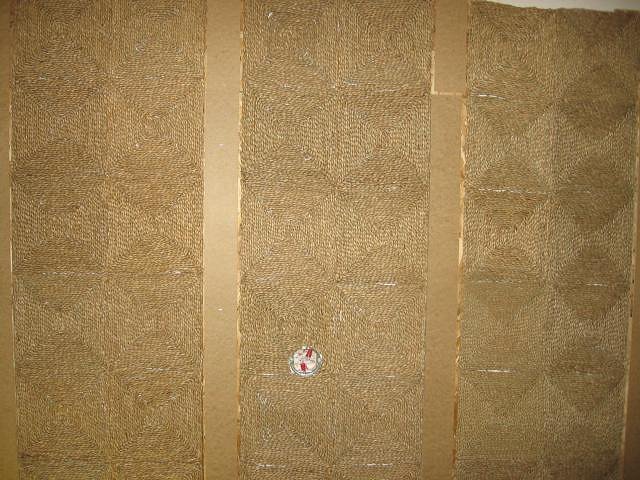
It sure is cool to have a Tiki Bar page on here now! Thanks for all the work getting these threads organized! I'm sure it is a chore!!! Hey Kon-Hemsby, thanks alot for the words! Grand Kahu, I got the Seagrass Matting from our supplier here in BC, Canada. This stuff comes as a direct Import from China although I don't know exactly which Province. You should be able to find some at possibly some of your Oriental Supply stores or Rattan or Wicker suppliers or repair places. I am not sure of your area. Let me know if you need any other help. Hey Formikahini, I got the idea of using the Seagrass on the ceiling from a few old vintage postcards that I had of some old Tiki restaurants. I thought it came out pretty good. Later, TabooDan |
|
MPP
Mr. Pupu Pants
Posted
posted
on
Fri, Mar 5, 2010 8:06 PM
So classy looking Dan. Can't wait to see more updates. |
|
LS

Lake Surfer
Posted
posted
on
Fri, Mar 5, 2010 10:32 PM
Looking great Dan! |
|
P

pablus
Posted
posted
on
Sat, Mar 6, 2010 1:16 AM
Bosso room. But you know that. Mahalo for the how-to all the way through. |
|
TJ

tyger jymmy
Posted
posted
on
Sat, Mar 6, 2010 7:29 AM
Very kool im doing the same thing Light that is . great info and love your progress on your room . |
|
T

TorchGuy
Posted
posted
on
Tue, Mar 9, 2010 2:52 AM
Hey, TabooDan... You're in BC? If you want any more nifty light fittings or globes similar to that amber one, or need to pick up some cheap building materials, tell me. I'm down in Seattle, and we've got a salvage store here that gets all kinds of funky junk. I volunteer there, and I've seen similar amber shades. Yours went to one of those swag chain pendant fixtures from the 70s with the gaudy cast brass fitter. I'm sure I could help you dig up some electrical bits for pennies on the dollar, and building materials are dirt cheap there, too. Seattle has four salvage stores, but only one is inexpensive and has a lot of funky 60s and 70s stuff as opposed to "antique" things. Your place is looking great, you really are getting the moody feel already! [ Edited by: TorchGuy 2010-03-09 02:54 ] |
|
MPP
Mr. Pupu Pants
Posted
posted
on
Tue, Mar 9, 2010 5:00 PM
Hi Torchguy, which salvage stores are you talking about? Is one of them Earth Wise? Great place to find all kinds of cool old buulding materials and fixtures. |
|
TT

Tucker's Tikis
Posted
posted
on
Tue, Mar 9, 2010 10:31 PM
WOW MAN! I tip my hat to your artistic craftsmanship. I appreciate your fine attention to detail, truly amazing work. I can't wait to see the rest of your finishing touches. |
|
T
TorchGuy
Posted
posted
on
Tue, Mar 9, 2010 10:47 PM
Earthwise is indeed a great place with great stuff and nice people. But the ReStore in Ballard is my go-to spot for inexpensive stuff, and more oddball stuff. |
|
T
TabooDan
Posted
posted
on
Wed, Mar 17, 2010 4:53 PM
Thanks for the kind words everybody and for making me feel like somebody other than myself actually wants to see some of this stuff!! Thanks Lake Surfer! You'll see some of your work in here soon!! Not soon enough as I am so busy doing other things right now but am wanting to get this all done in the next month or so. Hey TorchGuy, thanks for the info. If I get down your way with some time, maybe I'll drop you a line and you can tell me some good places to check out. I hopefully will be coming down that way soon but plans change up here like the weather! Updates will be coming soon!! |
|
T
TabooDan
Posted
posted
on
Mon, Jun 21, 2010 6:26 PM
I can't believe how long it has been since my last post on the Zombie Hideaway!! The last time I posted we didn't even have a Home Tiki Bar page here on TC yet! What a great idea that was!! I have been looking at so many different spaces, it really drives and inspires me to get mine done! Although time just doesn't help at all! Well, we've been going through alot out here but I really gotta post some pic's so hopefully you don't mind me adding some updates! I've done a few things but it is still not 100% yet. I'm getting close and I seem to be going by the saying "It's not the arrival but the journey" (whatever the hell that means!) :wink: Okay, so when I last left this thread, I was working on the custom cabinet for behind the bar. This is how we left off:
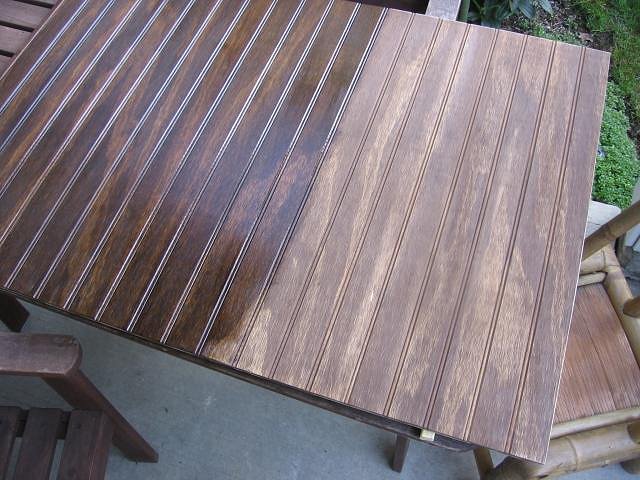
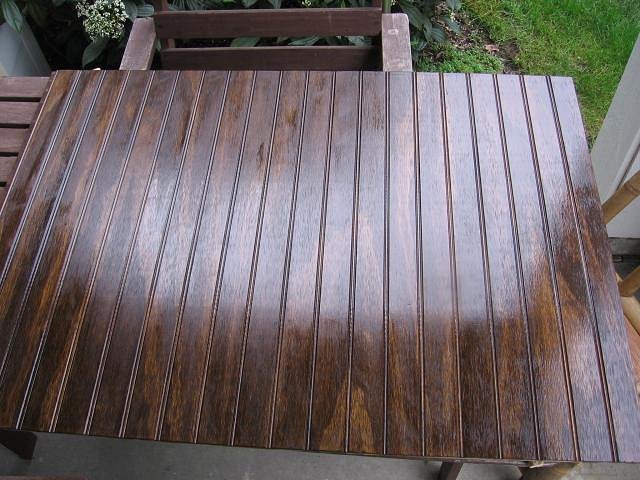
I had finished building it but I had yet to varnish it and fix the mistakes with the lighting. The goal was to be able to sit down across from this unit and not see the lighting or a reflection of it. Now for the varnishing. What a pain in the ass!! I have done so much woodworking in the Zombie Hideaway that I have ton's to do! Next time I gotta use more bamboo!! At least I will get the look I wanted but it is a hell of a lot of work. It sure pays off though once you varnish! The wood grains just pop and it's so much better to take care off. I went with a Semi-gloss poly-urethane which is pretty much what I use all the time for woodworking. I will use Gloss for Bar Tops just to give it that extra shine but on shelving, trim and other pieces, I will use semi. I use Min-wax brand which I have had no problems with at all and like the finish I can get. Two coats of varnish with sanding between and three coats on shelves or horizontal surfaces. What a job but you really have to do it right if you want it to last and look good! The cabinet was built in two pieces so I could move it if I had to and just so it wasn't too big. Here is the top half about to be varnished:
And the bottom half:
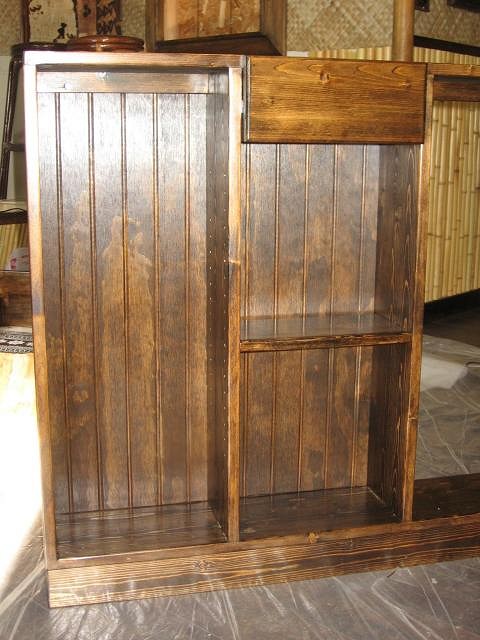
You can also see the painted dark brown back panel in this shot. It doesn't look too bad but I decided to remove the backing as I just didn't really like the color contrast between the stained wood and paint. Here is the cabinet once it was varnished and without the lower back panel:
I decided to go with a tongue and groove back panel to kind of tie in with the wall and just to give it more of a classy look. I really didn't need to do too much because once the shelf is full of stuff you won't really see the backing. I just wanted it to look good and not regret leaving it. Here's the panel once cut to fit and stained:
This shot shows just why I love varnished wood:
Left side varnished and right side just stain. Not only does the wood get a rich darker color, the grain pops and it really looks nice. Here's the completed piece:
And installed on the left side:
Here it is with the panel installed and the drawers in:
Because this unit is not too deep at all, the drawers are more of a look I wanted as opposed to something that's going to get alot of use. I did however still wanted them to look good. They will be perfect for matchbooks, stir stix and napkins I think. Here's a look inside after varnish:
I did a small sliding drawer on top to reveal the bottom of the drawer. More of just an accent thing I like to do but it add's a little character and works pretty good. Here it is against the wall and with the lights on:
More to come!! [ Edited by: TabooDan 2010-06-21 18:28 ] |
|
A

ashman_atl
Posted
posted
on
Tue, Jun 22, 2010 9:09 AM
Looking good! |
|
K

KAHAKA
Posted
posted
on
Tue, Jun 22, 2010 9:57 AM
Wow, that looks sharp... kinda gives it that nautical feel to it. That room is lookin' really nice. Great work! |
|
M

MondoMcGonzo
Posted
posted
on
Tue, Jun 22, 2010 12:28 PM
Great Scott! You could charge admission to get in it's looking so good. |
|
T
TabooDan
Posted
posted
on
Tue, Jun 22, 2010 8:04 PM
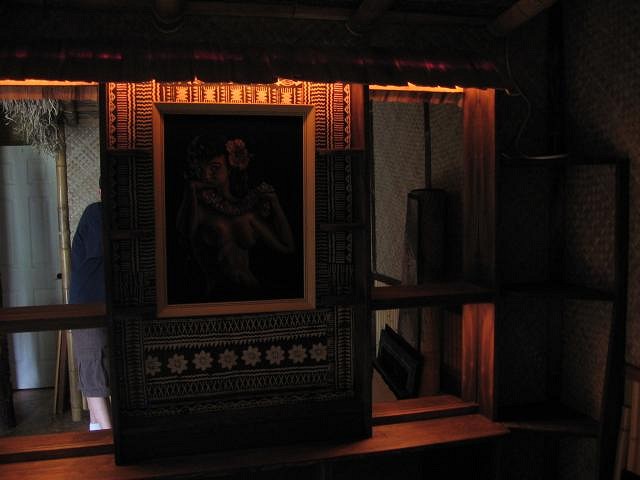
Thanks everybody!! Charge admission.....sounds like a good idea! More than happy to show it off for a small fee or donation!! :wink: I forgot to post one shot with the Schirman velvet back up and the wood step shelf below the velvet installed:
Without flash:
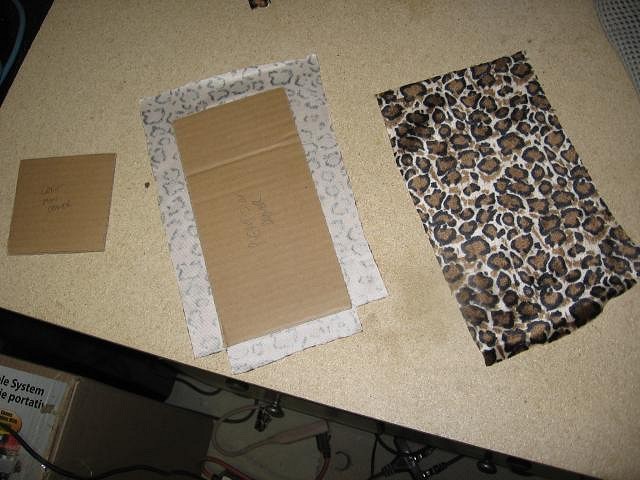
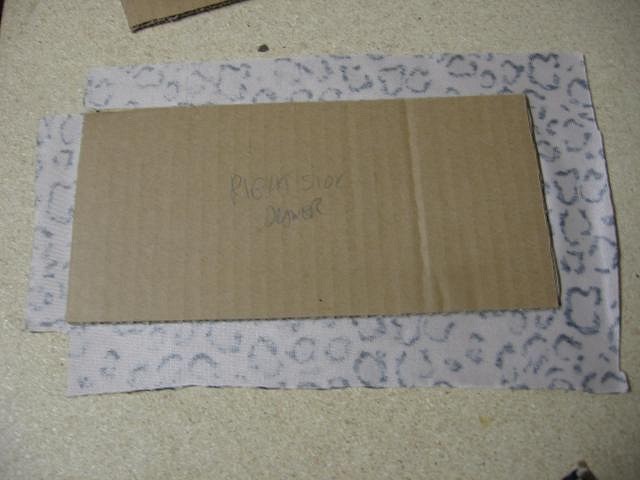
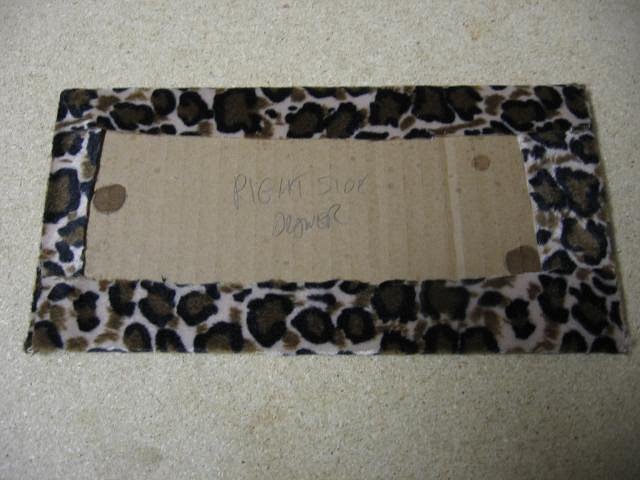
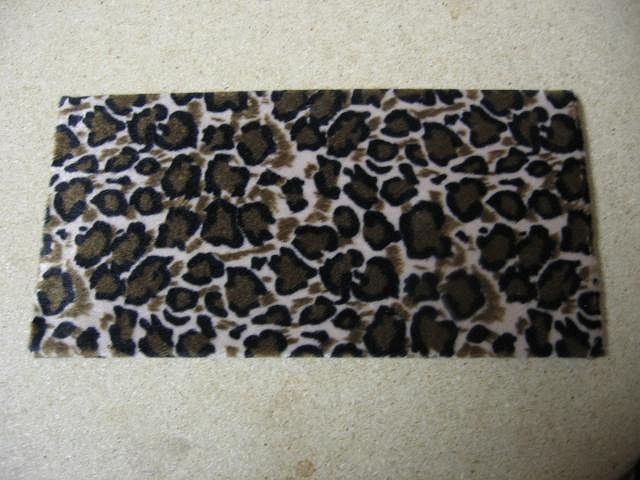
Going back to the drawers for a minute, here are a few pictures of the finishing I did on the inside. I wanted to give the inside a quick lining on the bottom of the drawer so decided to add a little fabric. This can be done very quickly and is a great little finishing tip. You could always just stain or paint the inside but I wanted it to be soft on the inside. First, I cut some cardboard (three pieces) as a base that would be wrapped in the material and then put in the drawer for the bottom. Cardboard works just fine as it's easy to cut, rigid enough to hold things, and still soft enough once wrapped.
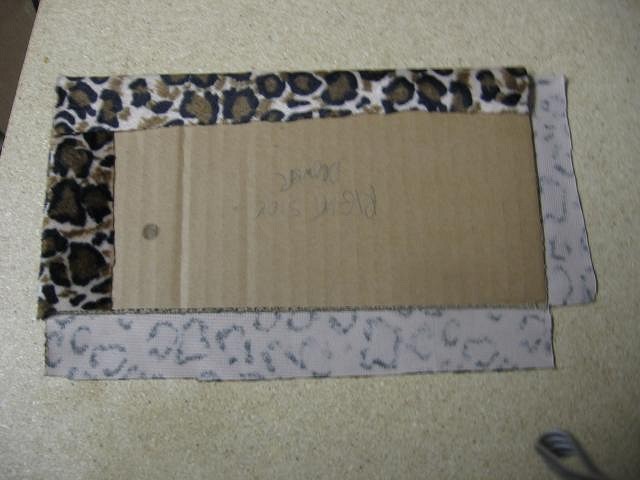
I then sprayed the cardboard with upholstery glue and placed it onto the pre-cut fabric. I cut sections of fabric from the corners like in the photos and began to fold each side over like this:
It doesn't matter about your cuts or your glue or tape on the back because it will all be covered up. If you try this, don't cut the fabric too close to the corners of the cardboard as you don't want any of the cardboard to stick out. Once all corners and edges folded over you can put glue on the fabric or even tape works just fine. You won't see any of it and the pressure and glue will keep it all together nicely. Here it is folded over and glued:
Finished:
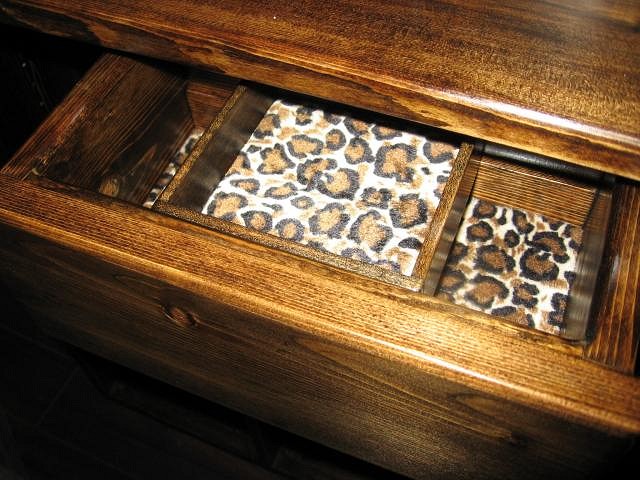
Here's a shot of the drawer with the slider installed with it's new liner:
Didn't come out too bad for about 15 minutes work. Later, TabooDan |
|
T
TabooDan
Posted
posted
on
Wed, Jun 23, 2010 5:39 PM
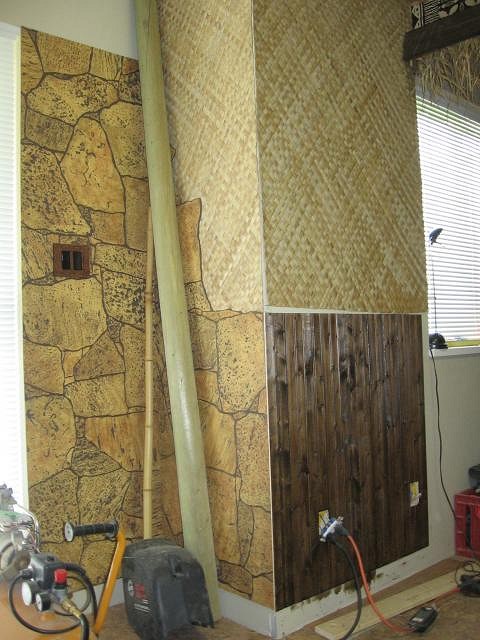
Okay, here's a flash back of that wall again:
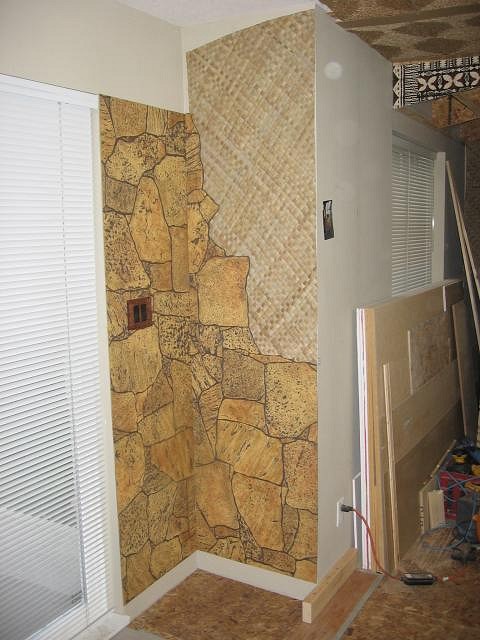
This is the West wall with the patio door. The window off to the right is the one covered up by the wall cabinet (previous post). After adding the Matting and T&G on the wall:
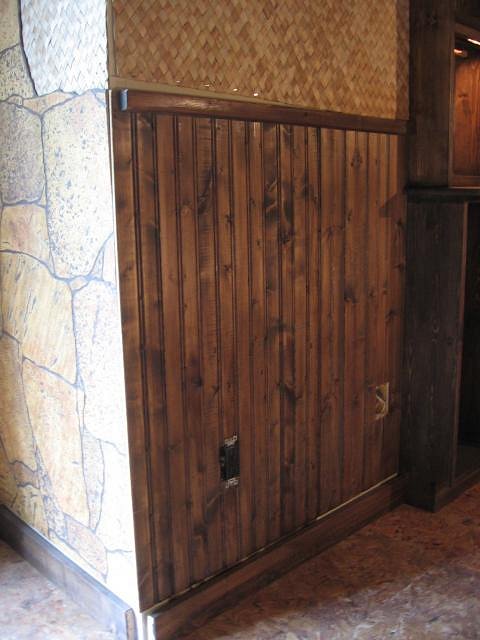
Note the green wood pole in the picture above? It is a pressure treated fir fence post. More to come on that! Here's the wall with a wood strip mounted at the top of the T&G:
I am doing one strip mounted on the wall like above with another 'top' added it to this piece and then a carved molding above that. This will match the other side of the room and kind of bulk it up a bit.
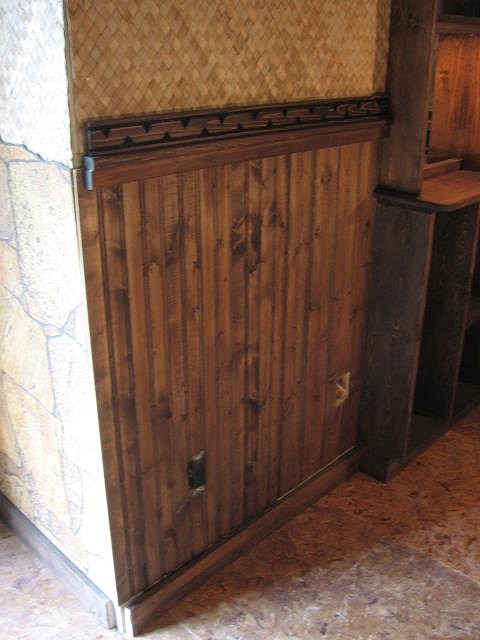
On the T&G on the walls, I wanted a custom carved molding to go around. This carving will also be added on the other T&G wall as well. Eventually, I would like to have carved moldings above all the bamboo work but for now just on the T&G sections. I like the different look. I may give the carvings a try myself one day but for now I just don't have the time. I got Reido to carve these moldings and he did an awesome job!! Here it is with the molding:
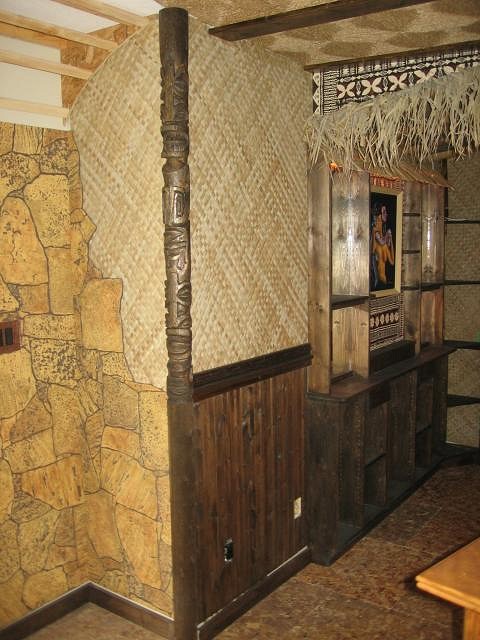
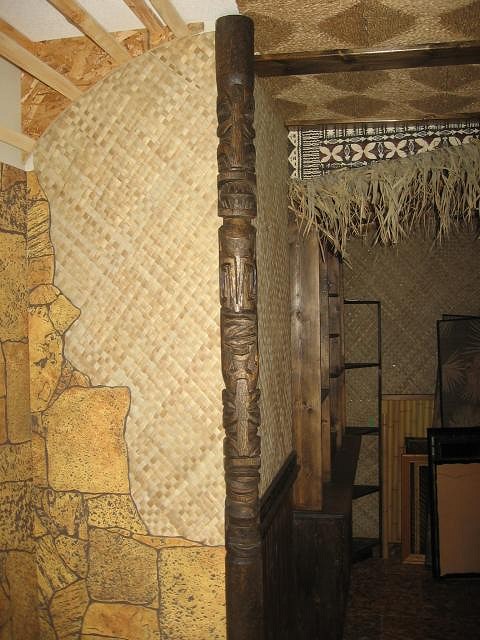
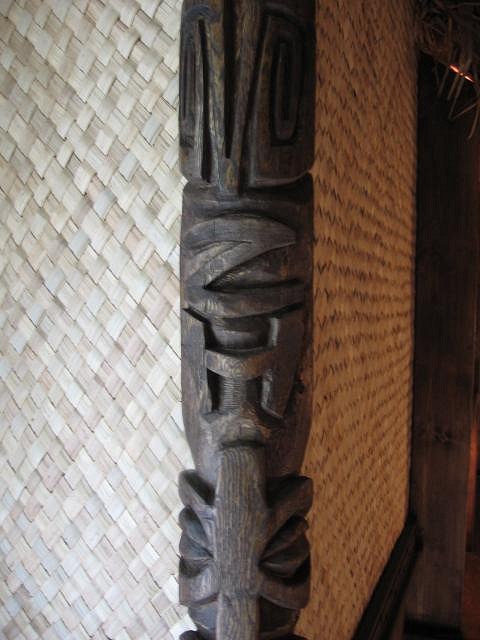
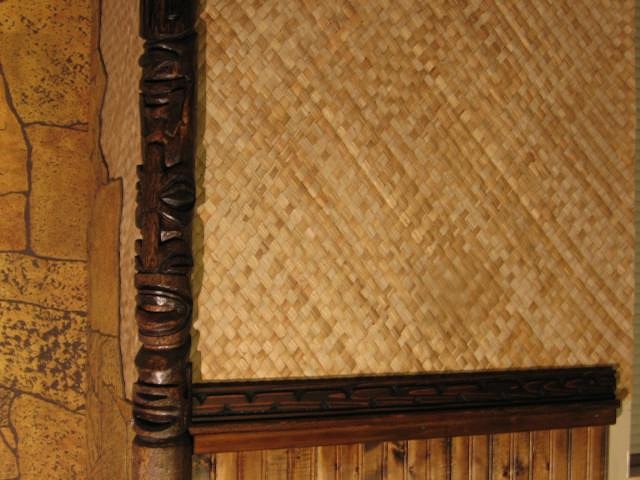
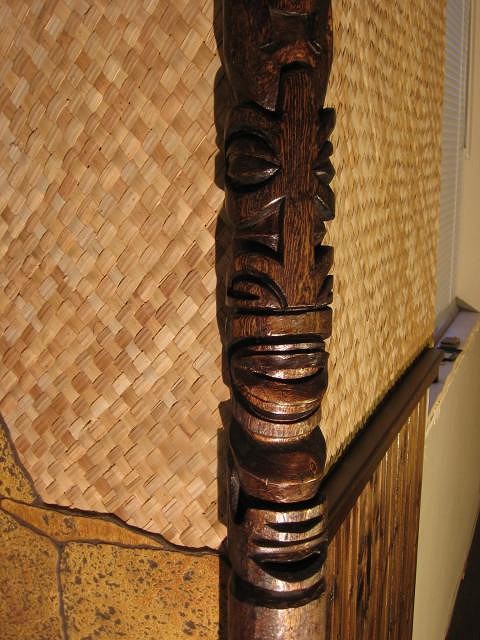
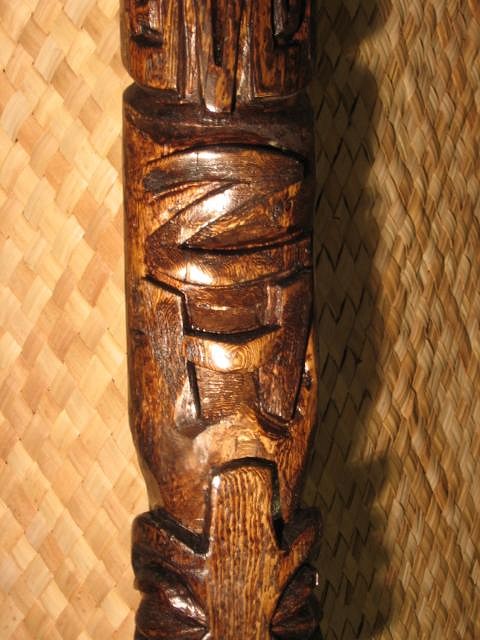
On the corner of this wall, between the rock and T&G, I wanted a custom carving. Remember that Green pole from a couple of photos ago??? Well, here it is now:
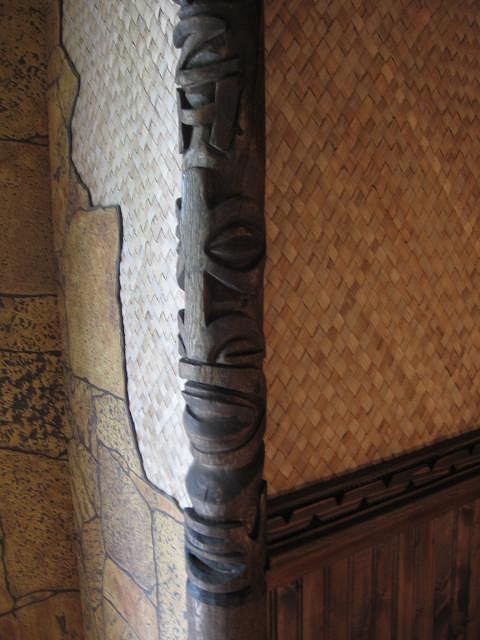
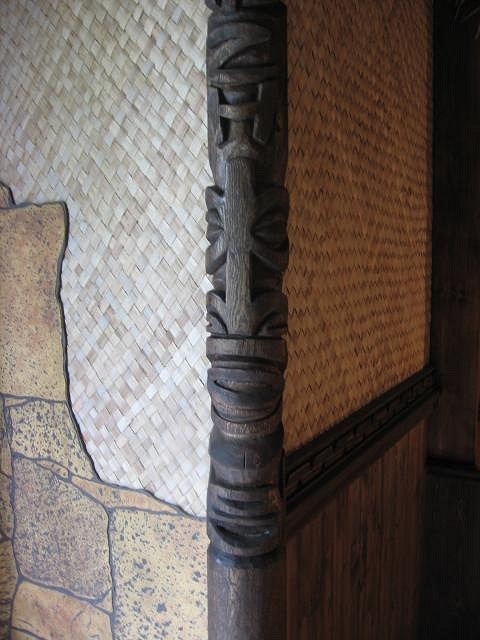
Now all you carvers out there will understand this but first up, you don't really want to carve Fir! Secondly, you sure as hell don't carve anything that's been pressure treated!!! I knew it shouldn't be done but it was the perfect size that I wanted to use and really, besides spending a hell of alot of time carving down a square cedar post, I figured if anybody could do it Reido could! Plus I already cut a v-notch out of the back of this baby to mount it to the wall nice and tight. Here's a closer look. This is the lower half with the first Tiki:
Here's the upper half of the Tiki Pole with the other Tiki:
In the next picture, which shows the middle area between the two Tikis, you can see "Z H" carved vertically which of course stands for "Zombie Hideaway"!!!
I gave Reido an idea of what I wanted in terms of style of carving and I told him I wanted the initials in the carving and this is what he came up with. He did an awesome job and it really added that personal touch specifcally for the Zombie Hideaway!! Still gotta mount this bad boy and get it all varnished up. Mahalo, TabooDan |
|
T
TabooDan
Posted
posted
on
Thu, Jun 24, 2010 5:00 PM
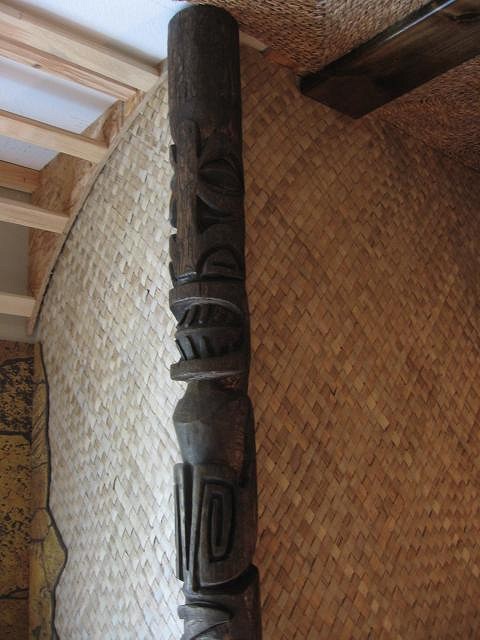
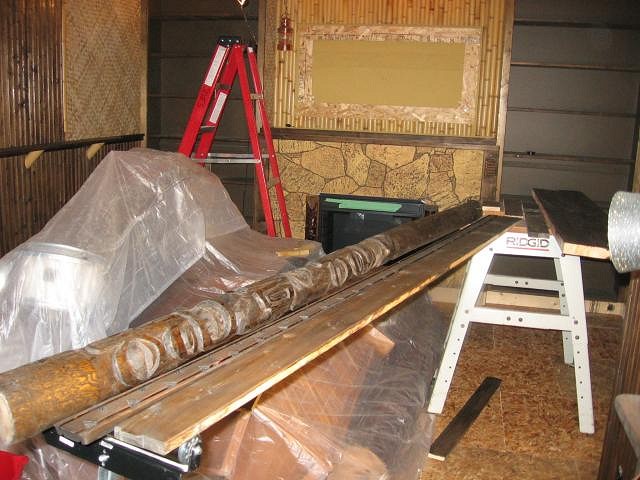
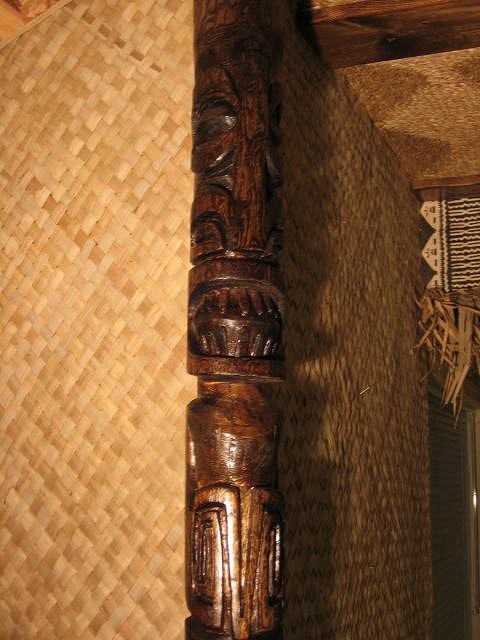
Here's more varnishing getting done on the Tiki Pole and some baseboard moldings:
The Tiki Pole completed:
The very top 4" or so of the Pole I plan on doing a wrap of some thick old rope. I'll also be wrapping from the floor of the Tiki Pole just to where the top of the rock panel and wood molding meet. I thought this would look cool and kind of give it that sort of Tonga Room look.
Semi-gloss finish with three coats and sanding between the first two. I thought it would be a little rougher because of the wood but it came out really nice and smooth. The details and grain are really nice in person. I need a better camera! Close up of "Z H":
And the upper half of the Pole:
That's it for now! |
|
A
ashman_atl
Posted
posted
on
Thu, Jun 24, 2010 5:35 PM
TD- |
|
T
TabooDan
Posted
posted
on
Sat, Jun 26, 2010 10:59 PM
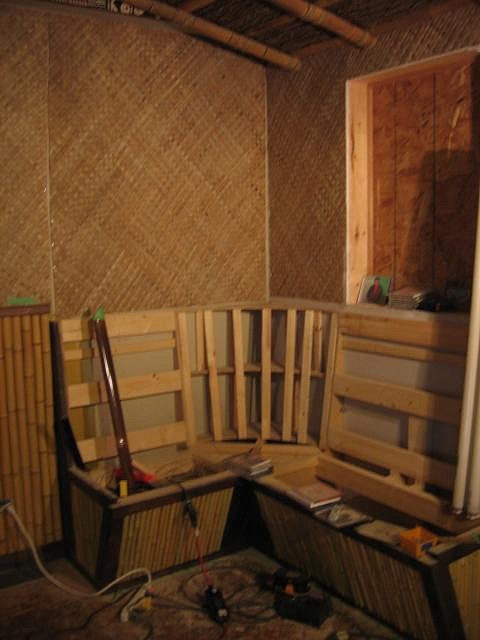
Hey Ashman, thanks for the kind words! It sure helps keeping me going!! Just so I can continue showing the room in a way you can see the progression, here's a few shots of the rest of the side of the room where the bench is going opposite the wall cabinet. This is an earlier photo of that side of the room:
As I completed the building and woodworking on the bench, I pre-painted the walls so they are ready for the bamboo as well. Here's the bench pre-bamboo:
As I worked on finishing up the bamboo on the bench, I continued the bamboo along the side of the wall, between the wall cabinet and the bench. Here's the bench completed with bamboo and starting on the walls:
At the same time, I was dry fitting my wood trim that will run along the top of the bench and tie into the corner where the Tiki Pole will rest. Here's one showing the bamboo going up:
The wall between the two now covered in bamboo:
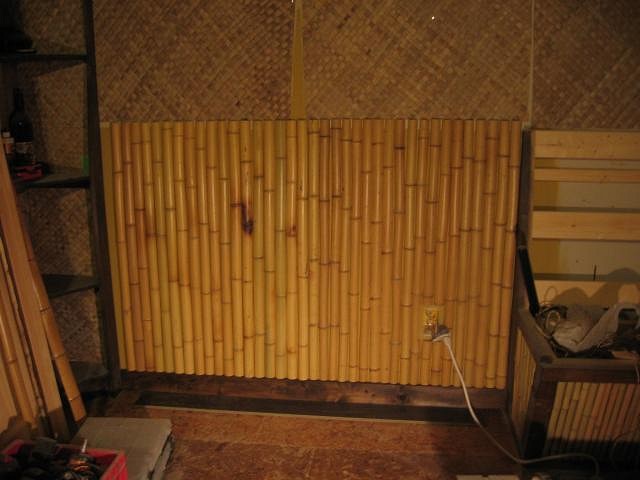
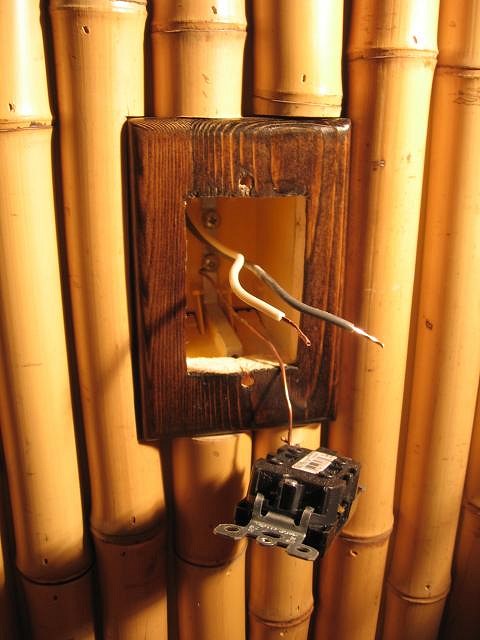
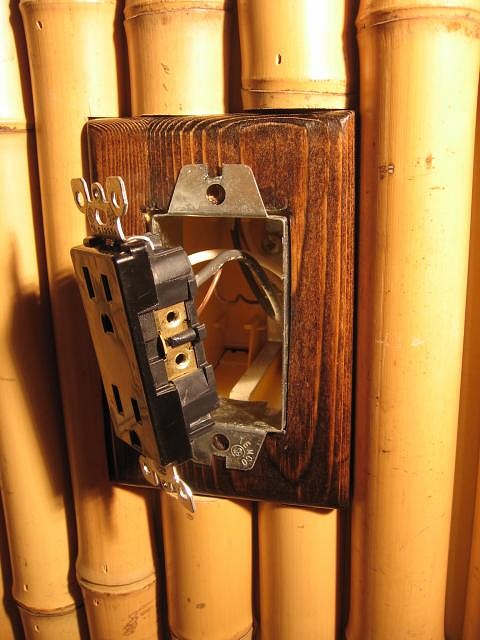
You can see a receptacle on the right side. When I mounted the bamboo to the wall, I cut out bamboo straight around the outlet by about 3/4". I didn't want the outlet to be a recessed but rather flush with the bamboo. The bamboo is pretty much uneven and sticks out about 1/2" to about 3/4" from the wall. I also didn't want to have to cut the bamboo at different lengths or notch too much of it out. To make the outlet even with the bamboo and easy to deal with, I basically cut a piece of wood about 3/4" bigger than an electrical box. I then cut a hole out that matched the size of the inside of standard outlet box. It didn't have to be a perfect cut because a cover plate goes over the cutout area anyway. I made sure I had the right size cut out by using an extension device which is what you would use if you were extending your boxes to install ceramic tile. This is also good to use as it extends the box past the wood so we don't have to worry about any electrical or fire hazards.
Here it is with the metal extension in place:
All I gotta do is mount it and put on a cover plate and it's all done. Once that's done I will mount some wood trim and dark bamboo on the wall to cover the seams in the matting and accents. Two shots of the wall again:
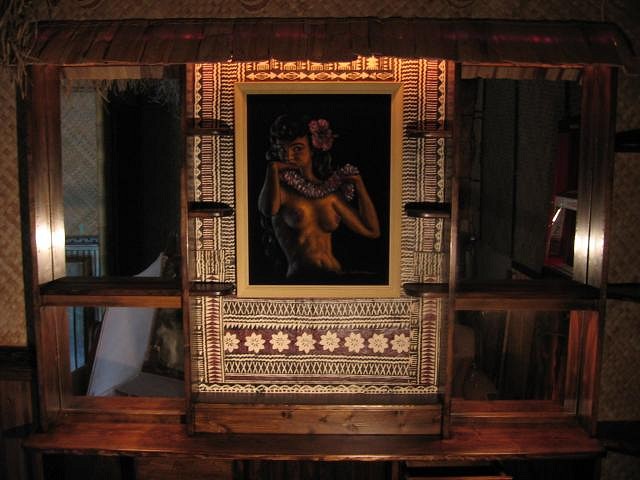
This is the corner over the bench that will be home to a cool Tiki Pole I got from Leroy at Oceanic Arts a few years ago. I'll have Tapa Cloth behind the Pole with bamboo trim. Also in the above shot, you can see the hole in the wall on the right. I'll make a frame for this and have a feature velvet painting in the wall that will have lighting as well. I'm hoping to make this corner look a little like a Trader Vic meets the Waldorf Hotel with the recessed velvet and all!! Hopefully I can do both these great places a little justice! TabooDan [ Edited by: TabooDan 2010-06-26 23:03 ] |