Tiki Central / Home Tiki Bars
The Zombie Hideaway
|
T

TabooDan
Posted
posted
on
Sat, Dec 6, 2008 12:28 AM
May I take a moment of your time and introduce to you, The Zombie Hideaway
|
|
H

Hakalugi
Posted
posted
on
Sat, Dec 6, 2008 12:42 AM
It looks good so far but don't be a tease! Show us what you got. |
|
T

twitch
Posted
posted
on
Sat, Dec 6, 2008 6:19 AM
I'm already flippin' out! |
|
BK

Big Kahuna
Posted
posted
on
Sat, Dec 6, 2008 7:57 AM
That's it!?!? Come on! Let's see more!!!!! |
|
SF

Slacks Ferret
Posted
posted
on
Sat, Dec 6, 2008 4:44 PM
Yeah! Show us more! |
|
PLT

Pepe le Tiki
Posted
posted
on
Sun, Dec 7, 2008 6:38 PM
I've had the privilege of seeing the Zombie Hideaway in it's early stages. Hang on to your jaws. |
|
S

sasquatch
Posted
posted
on
Mon, Dec 8, 2008 1:33 AM
... I wanna see more! [ Edited by: sasquatch 2008-12-08 01:33 ] |
|
S

Sneakytiki
Posted
posted
on
Mon, Dec 8, 2008 3:02 AM
Tiki and Tapa, bamboo and lahala, looks good so far! |
|
T
TabooDan
Posted
posted
on
Wed, Dec 10, 2008 7:12 AM
Aloha all! Thanks for the interest!! I will be posting more pictures, from the beginning soon! Mahalo, TabooDan |
|
T
TabooDan
Posted
posted
on
Sun, Jan 4, 2009 3:58 PM
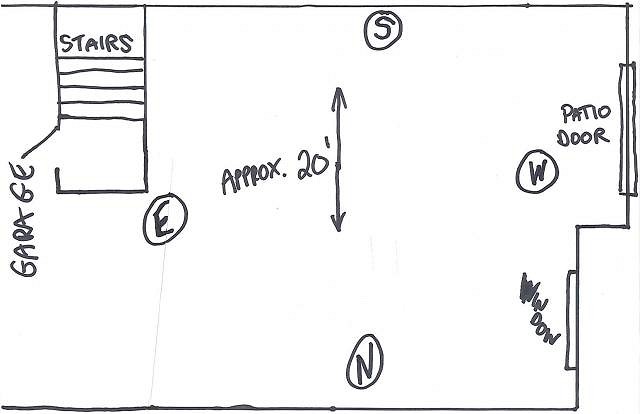
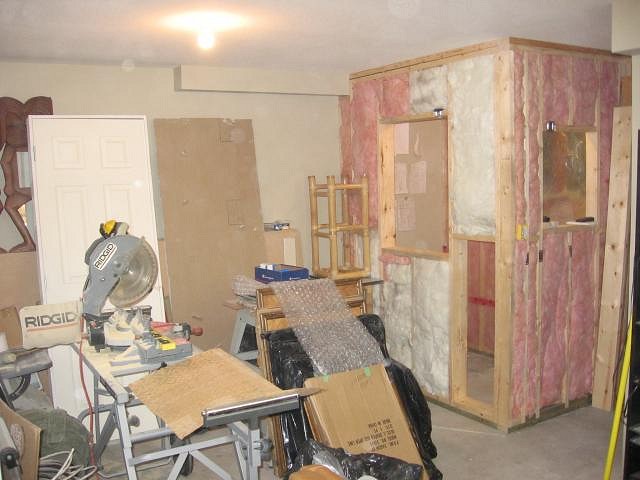
I guess to tell and show the story of the Zombie Hideaway, I should start from the beginning. A few TCer's got tired of me talking about it and wanted to check it out. At first, I wasn't sure about posting pictures of construction and doing a thread. I decided to open a thread here because I always like looking at other people's work and see how they progress and thought I should do the same and show how and what I'm doing. Maybe someone might get inspired by what I'm doing and decide to create their own place to escape. We bought our place two years ago now and for the past year I have been slowly working on finishing the bottom back half of our place. The two car garage was open to the rest of our ground floor. The perimeter walls were up and that was it. There was about 250 Sq.Ft. or so of unfinished just open space leading with a patio door to the back yard. I was deciding on whether to put a shop in or a Tiki Lounge (or both) and decided to go with the Lounge. Doing both rooms would cut the space up pretty good and I would run into trouble with fire codes and the like. I have space I can work in so a Tiki Lounge was now the plan! Here is a quick drawing of the space before I did any work:
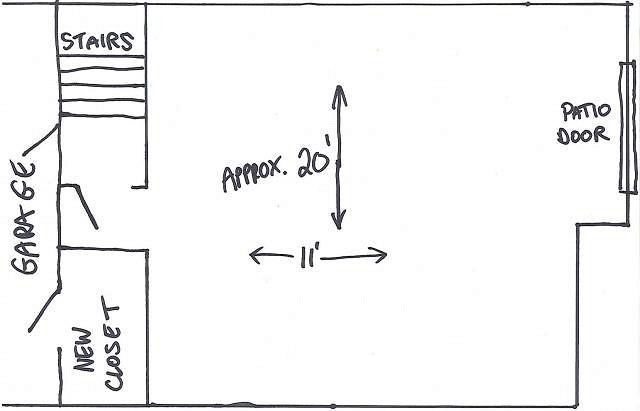
We live in a townhouse so we have our two car garage(side x side)at the front. You would come down the stairs and open the door to the garage to access this whole area. When we were first looking at the house, we saw this as good potential for us as we could plan out what we wanted to do. The person we bought from worked on old cars so he actually had three cars in the garage with a back work shop area(where the patio doors are). Here is a quick drawing of what the plan was and what we ended up doing:
You can see here now that I built a wall between the new space and the garage. To access the new space(the Lounge), I cut a hole in the wall to install a new doorway. This will be the entrance to the Lounge. I built a closet on this wall as well. It is a good size and does take a little bit of space away from the Lounge but, believe me, we do need the storage space. With the building of the wall, I planned out how I wanted it to look when it was done. I wanted a little tribute to the Tahitian Lounge at the Waldorf Hotel so I kept in mind while framing that I would like to have two recessed spaces in the wall. Couple of velvets maybe?? [ Edited by: TabooDan 2009-01-22 21:15 ] |
|
T
TabooDan
Posted
posted
on
Sun, Jan 4, 2009 4:42 PM
I wanted this room to be as close as I could make it to an authentic Tiki Bar. Or at least one you might see in the 1950's or 1960's. That's it. No crazy colors, bright lites, painted walls or other items that you would not have found in the most classic of Tiki Bars. Truly an authentic Tiki Lounge where you're transported back to a time where nothing else mattered except the company you shared and the drink in front of you! I am hoping I can achieve this. The name, Zombie Hideaway, came to me in a song. I couldn't at first decide on a name and it took about 8-9 months of thinking about one. I wanted it to be different but yet still have that sound of something you would find back in the day. There were a few vintage Zombie named places so when I figured this one out, that was it! Quick story. One of my all time favorite bands is "The Amazing Crowns" which were a great group back in the late 90's that came out of Providence, Rhode Island. Heavy Rockabiily music that moves the soul!! I am sure some of you have heard of them. Anyways, the guitarist and drummer were in another band called the "Speed Devils"(another awesome band!!). On their self titled CD (If you like the Amazing Crowns or say Reverend Horton Heat, check this CD out! You won't be disappointed!), "Speed Devils", there is a song called "Zombie Rock". I was working in the Lounge and was singing along when the lines, That's the story so far. I will get some photos posted in the next post of the beginning of my build. TabooDan [ Edited by: TabooDan 2009-01-22 21:18 ] |
|
T
TabooDan
Posted
posted
on
Thu, Jan 22, 2009 8:41 PM
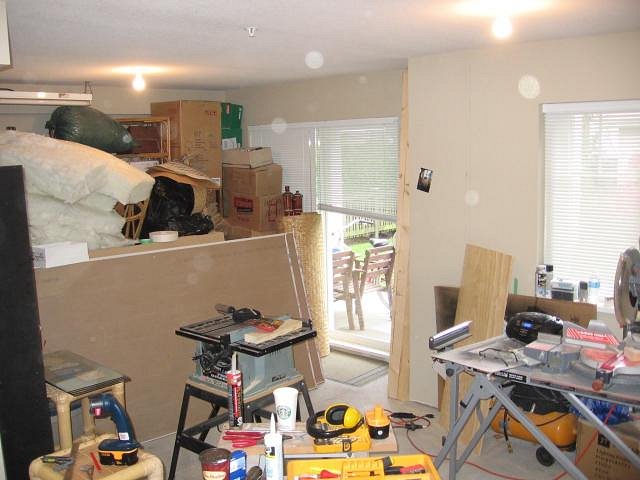
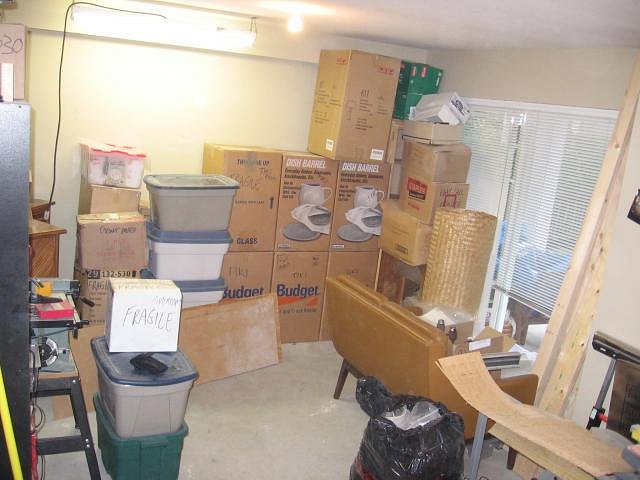
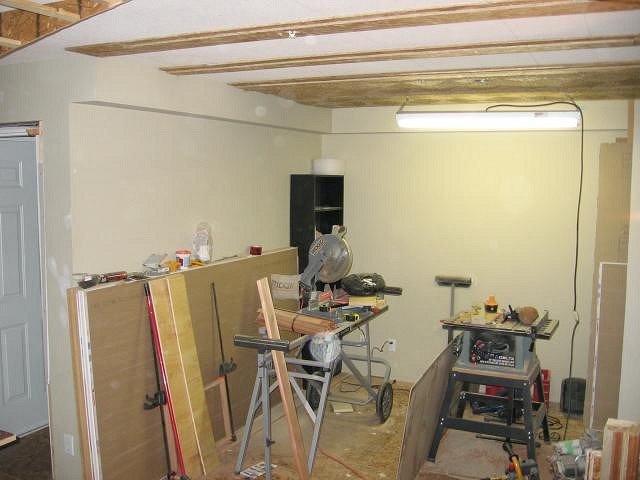
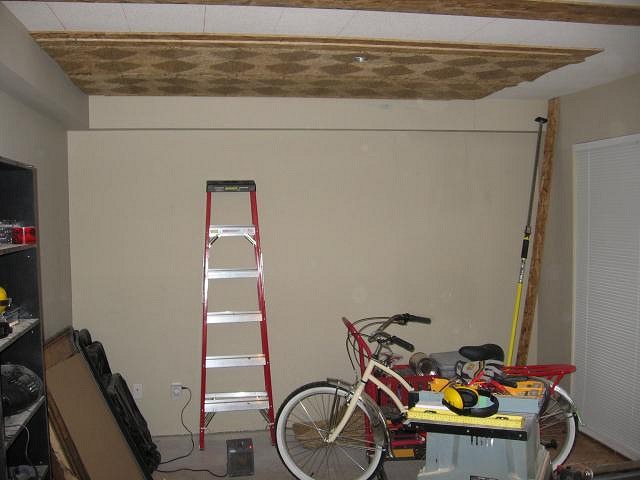
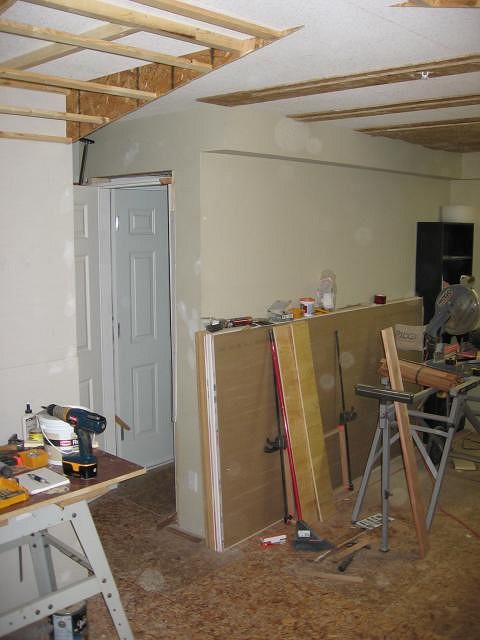
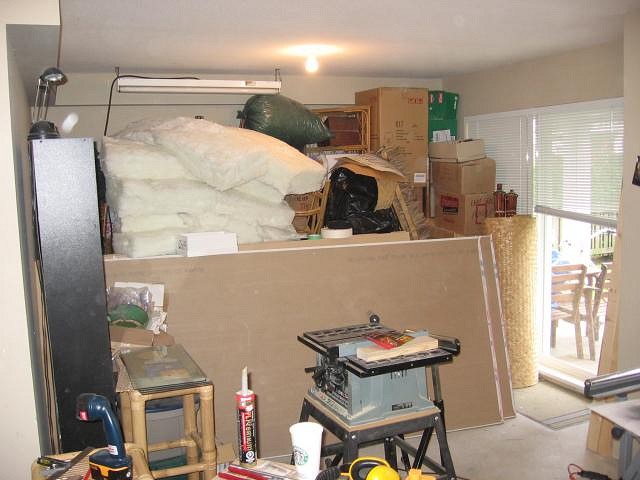
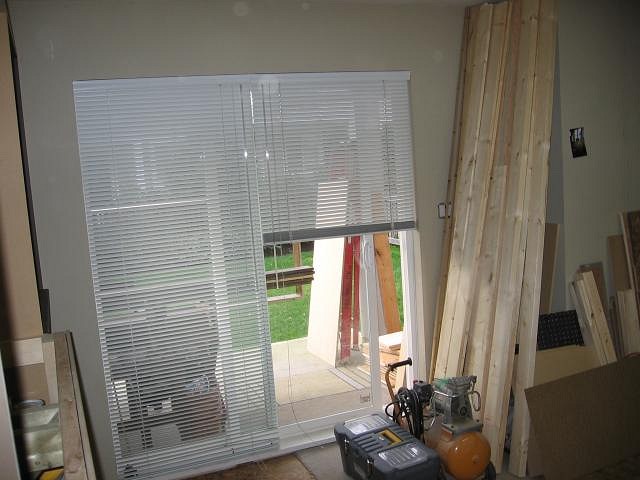
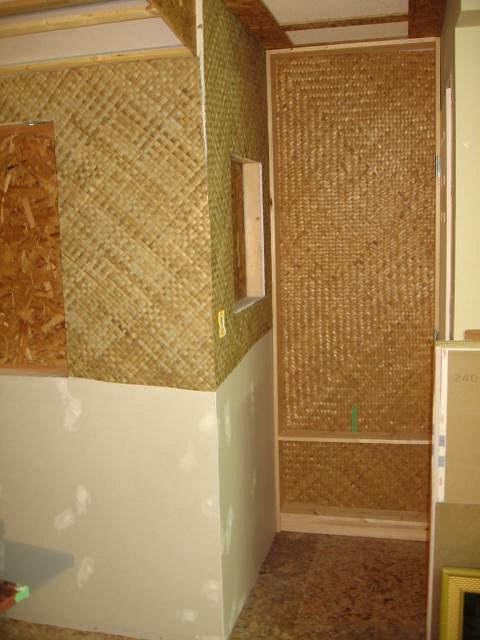
Okay, finally got some more time to get some pictures on here. This is what I was starting with:
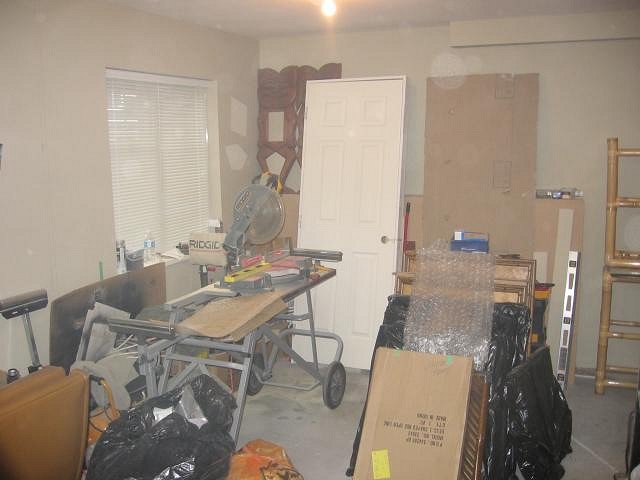
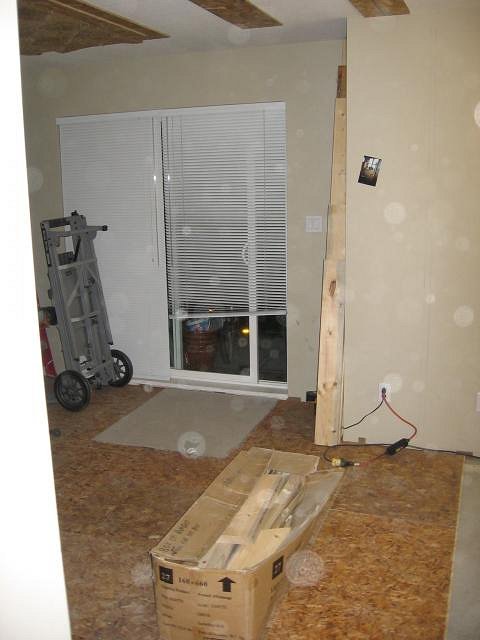
A space filled with all the crap!! Everything was in the space so first I gotta get it out of there! This is a picture of the South wall. Picture of the West wall which has the patio door and window:
Always a bit tricky and not alot of fun to have no room for your materials and tools and still have to work and build in the space!! The photos/room look pretty tight but it's because I can't photo the whole room because as I am taking these I am leaning on and stepping all over all this stuff!! Some of the crap gone now. Looking South/West again:
Looking at North/West Wall:
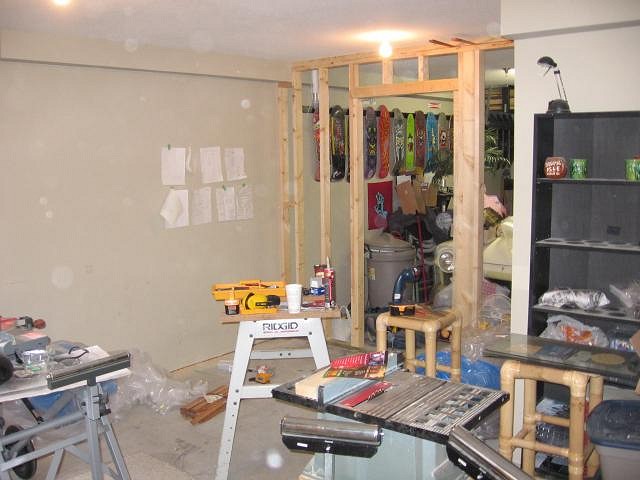
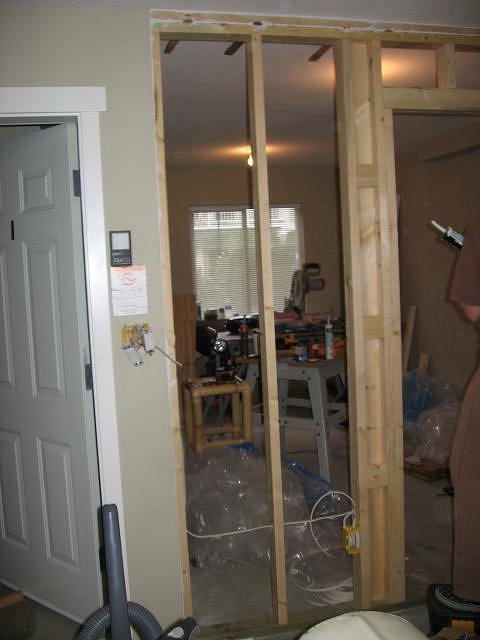
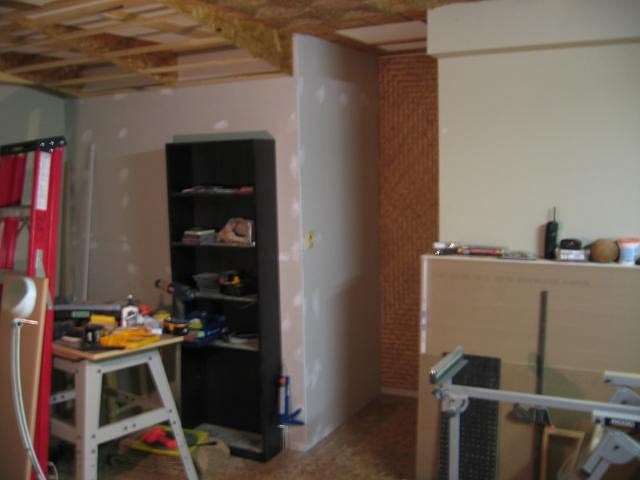
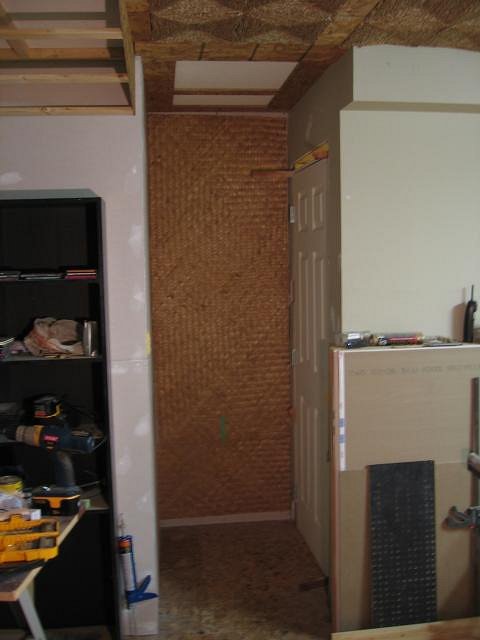
Looking North/East to the new garage side wall. The opening is for the new closet door on the garage side:
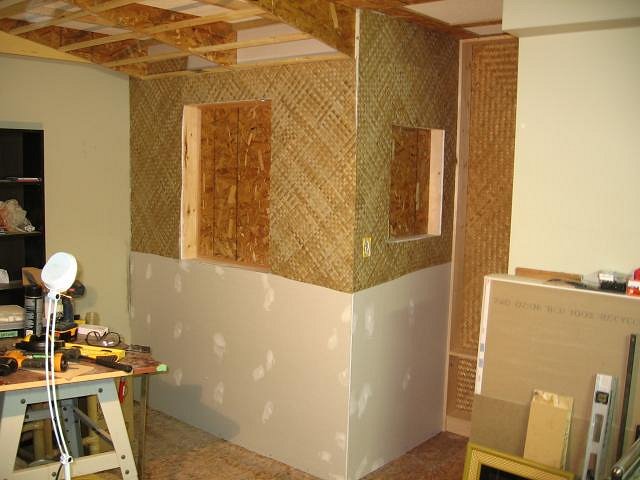
This is the framing stage where I will build two recesses into the new wall so I can recess some velvet paintings into it. My little tribute to the Waldorf Hotel!! You can even make out the stuffed garage and our hidden car! Looking from the garage into the new room:
Next is the new completed Lounge side (North/East) of the closet wall. This wall is 2x6 so I can have a deeper recess in the wall. I wanted to give it some depth by the time it is all finished. Ran new wiring so each recess will have it's own light source and installed switched outlets to turn on the plugs. On the right, opposite the small recess, is where the new entrance way into the Lounge will be:
On the ceiling, the plan was to have two styles. I wanted an A-frame style on the Lounge side of the room which would have the Bar, Table, Bench, etc. Basically on the North side of the room which also has the recessed velvets. The larger side of the room, with the patio door, I wanted to do something similar to what I saw at Trader Vic's in the Captain's Room in Bellevue. Well actually, I had the idea for a while of incorporating square matting and dark wood beams but hadn't made up my mind of the materials and the design. Here is a picture I took at Trader Vic's:
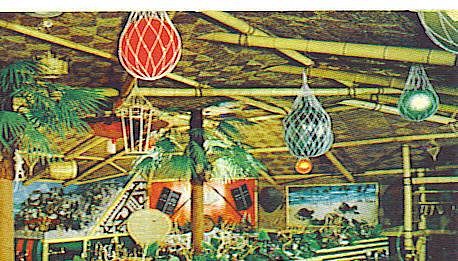
I liked this look but wanted less wood involved in breaking up the larger matting I wanted. I decided to run the wood the width of the room and have the matting between the wood. Basically, 5.50" of dark stained wood, about 24" of matting, 5.50" Wood, etc. This will then run the whole room until it meets with the A-Frame end. I also like the way this type of grass matting looked on the ceiling as I had seen at other older Restaurants and also the Mauna Loa Lounge that was once located
I started by adding strips of particle board to the ceiling where I wanted the dark wood to go and the matting to be fastened to. I wanted the dark wood to be lower than the matting and to hide the edges of the matting so another strip of particle board was added to give it the thickness:
The matting comes in pieces of about 12'x10' which can make it hard to deal with. At first I was just going to staple it all up to the ceiling and then put the dark wood where I wanted over top.
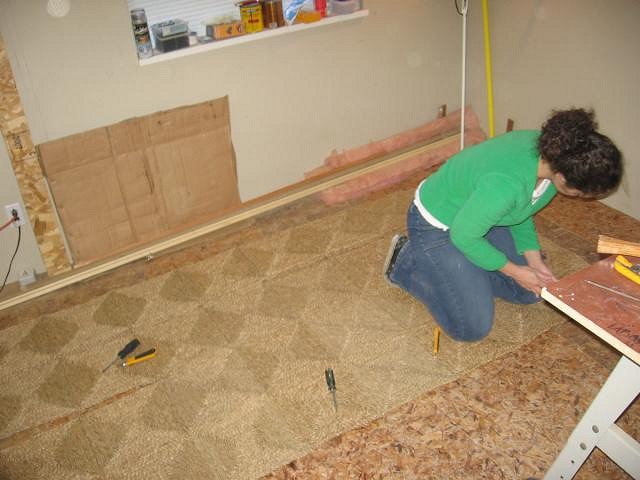
This is my bashful fiance who helped me separate the matting and tie it all back together which was quite the process:
You can also see the new floor we did which was done at the same time. Because this room will be right on the concrete floor, I wanted to have a half decent sub floor. I choose the Durolock tile panels which are basically particle board with a plastic cube pattern on the bottom of it. You can see in the next photo (on the right) the last particle strip on the ceiling. This is where the A-Frame ceiling will start. Also, on the left is the space on the ceiling I have left above the patio door for another grand scheme and tribute to the Waldorf:
Well, that's it for now. |
|
LS

Lake Surfer
Posted
posted
on
Thu, Jan 22, 2009 11:03 PM
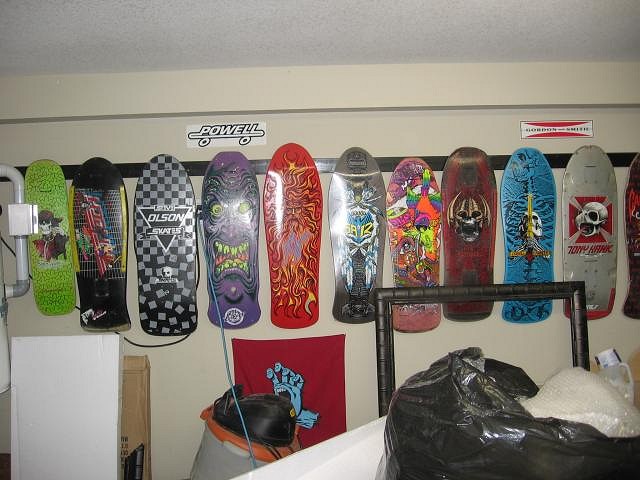
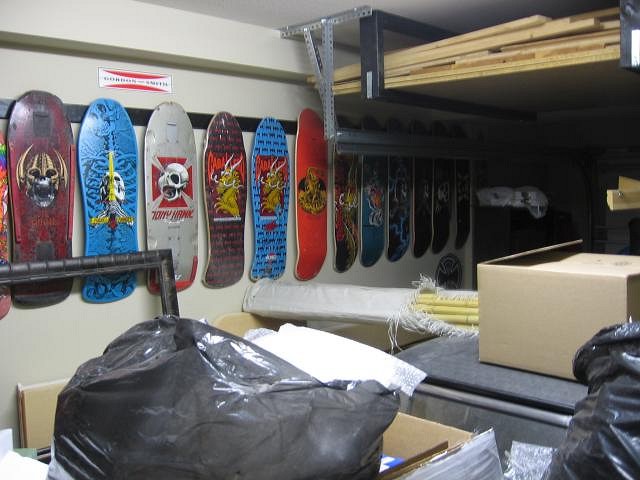
Wow... looking good! Shaping up to be a nice room! How about a picture of that great collection of boards! :) I see a McGill, a Rodriguez, a Hawk, a Welinder, a Harris Mountie freestyle (!) What else is back there?! |
|
MPP

Mr. Pupu Pants
Posted
posted
on
Fri, Jan 23, 2009 1:05 AM
Hi Dan, where did you find the nice matting you're using for the ceiling? |
|
T
TabooDan
Posted
posted
on
Fri, Jan 23, 2009 5:52 AM
Hey Lake Surfer, Thanks! I am at work now but since you asked, I will throw a picture on here for yah! Good eye on the boards!! Hey Pupu, I got the Matting from our supplier here in Vancouver called Coolite Bamboo Products. They are on the web at http://www.coolitebamboo.com. Mahalo, TabooDan [ Edited by: TabooDan 2009-01-30 18:06 ] |
|
T
TabooDan
Posted
posted
on
Fri, Jan 23, 2009 4:39 PM
Hey Lake Surfer, Since you asked here are two shots of the boards in the garage. Kind of bad photos but I didn't really have too much space to work with!!
I still have a few more around and then I have the early 60's and 70's boards which are just packed away. Hopefully one day I can get all the boards displayed nice. They are great pieces of art and they got a good history!! Sorry to all who aren't really interested in these but if someone asks to see my deck, I mean...decks, I show it!! TabooDan |
|
T
TabooDan
Posted
posted
on
Fri, Jan 23, 2009 5:18 PM
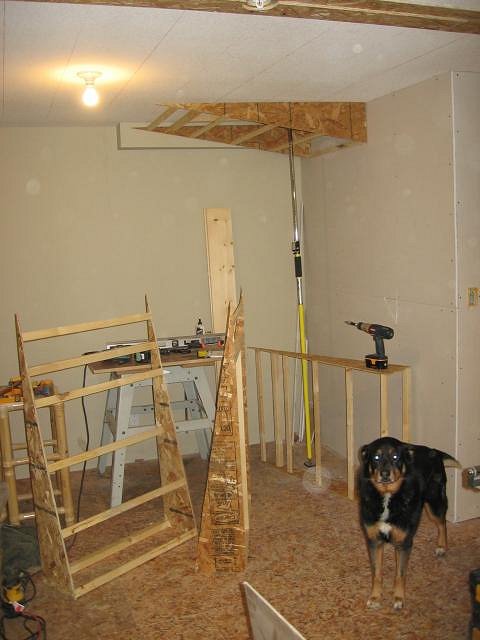
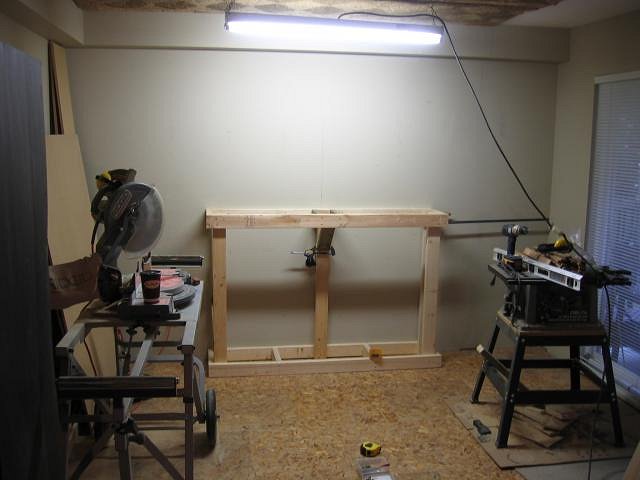
Here is the North side of the room where the A-Frame style roof will go and the Bar, etc. The drywall has been put up on the new wall and one of the roof frames has gone up:
There will be four of these going up as it is easier for me to deal with and install them. I also wanted to keep the center of the roof strong and not have to worry about too many supports. Although, as I progressed, I ended up adding quite a bit more support to them just to make sure they stayed strong. Here is my boy, Bones, coming down to check things out:
Here is a shot of all four roof sections up:
You can get a much better view in this shot of where the doorway to the room is. You can just make out the door on the right which opens into the room. As I look at these shots, it looks kind of small. It is a little bigger then it seems here in person. This area, under the roof, measures about 9.6' wide and just over 6' deep. I will make it all fit!! This is more of a straight on shot of this side of the room:
Because this is the ground floor, some might say basement, I did want to watch my height. The ceiling was bang on 8' tall which is standard. But that was also before I put my underlay down and also my strips of wood on the ceiling for attaching and adding the matting. Also, my design with the roof only brings it down low along the outside of the area of the room where no one will be walking or standing anyway. I think it will actually make it quite cozy. Once the finished roof is up, it will be covered in material and then big 4" bamboo will run along it. More to come!! Mahalo, TabooDan [ Edited by: TabooDan 2009-01-30 18:09 ] |
|
S

shampoovta
Posted
posted
on
Fri, Jan 23, 2009 7:51 PM
I spy with my little eye some bad as vintage skate boards. It's like a trip back in time to Dave's Cave skate shop 1984 here in Ventura Ca. :) Those Were The Days! http://www.youtube.com/watch?v=X5pkkAhETYg |
|
LS
Lake Surfer
Posted
posted
on
Fri, Jan 23, 2009 11:29 PM
Yessssireee... nice collection of decks there. Not one, but three vintage Cabs. Jason Jessee Sungod model (looks mint). The Roskopp. (I'm currently skating a re-issue of this model) An Olson Skull Skates. A Saiz. And your dog's name is "Bones." I take it you were a fan of Powell Peralta? They had a musuem at the 2005 ASR... http://powell-peralta.com/history/museum/ A few of your decks in there. Thanks for the pics... and the progress on the room looks great! Good luck! |
|
T
TabooDan
Posted
posted
on
Sat, Jan 24, 2009 12:17 PM
Hey Shampoovta, You are right.....THOSE WERE THE DAYS!!!! Lake Surfer, Yeh, I guess it shows I liked Powell Peralta!! I started sk8ing in 86' when a bunch of you Southern Boys (Hawk, Hosoi, Caballero, Mountain, etc. ) came up to Vancouver and did demo's at the Expo 86 on a huge 12' Vert Ramp!! Anyways, I guess this isn't really a skateboard Forum!! And who cares about old skaters anyway!! |
|
T
TabooDan
Posted
posted
on
Sun, Jan 25, 2009 1:15 PM
Here's another shot of the dropped roof area:
You can just see a ceiling box in the center which will be hidden by the roof. I replaced the light and put in a receptacle there. Then I ran a power bar from there to the back left of the room. This is where the fake beam runs along the back wall. I will have a little access panel there to get to the power and will be able to plug different lights in from this spot. This way, when I turn on the main light switch for the room, the power bar turns all the lamps on. Of course, these lamps will all be low wattage! Just will hide alot of plugs and wires. Here's a pic from under the dropped roof looking to the rest of the room and the doorway:
It sure sucks having the supplies and storage in the room you're working! Our garage is so full, we can't move stuff out of where I am working. The next pic is looking towards the patio door:
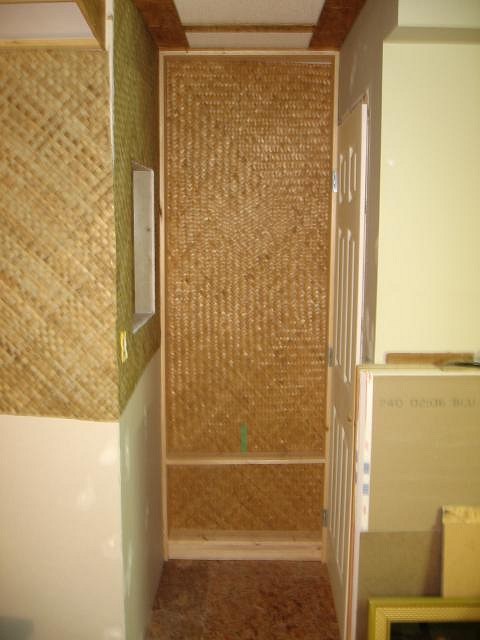
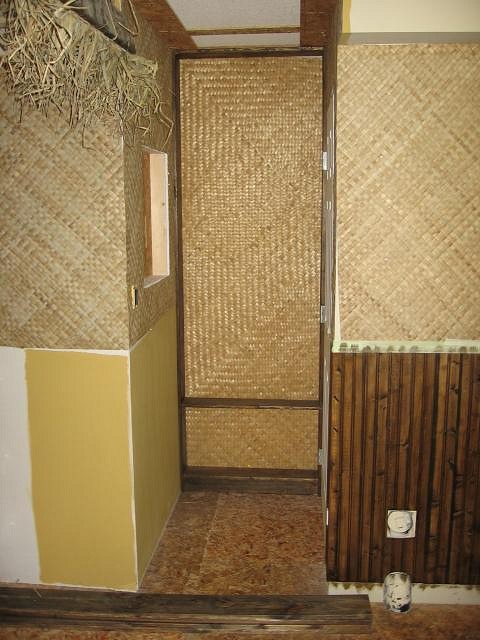
Have only done two sections of the 2' wide woven matting on the ceiling at this point. Now here is a view of the woven matting all installed on the ceiling:
It sure was a pain in the ass installing it!! Me lady and I sure had a few "Healthy" discussions while installing this!! I didn't know she knew some of the words that came out of her!! The next one (a little blurry) is of the door way again:
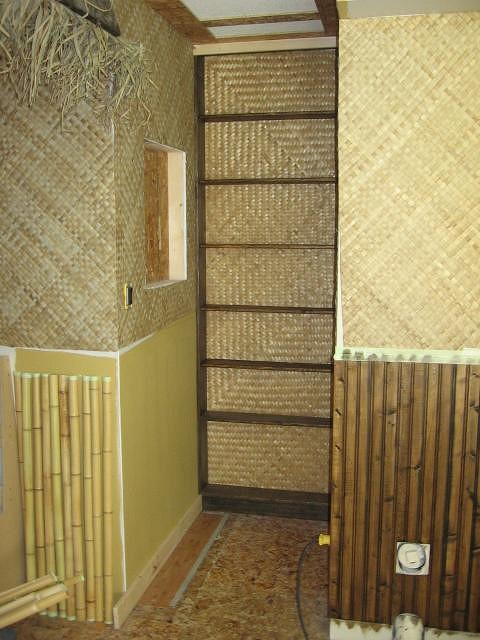
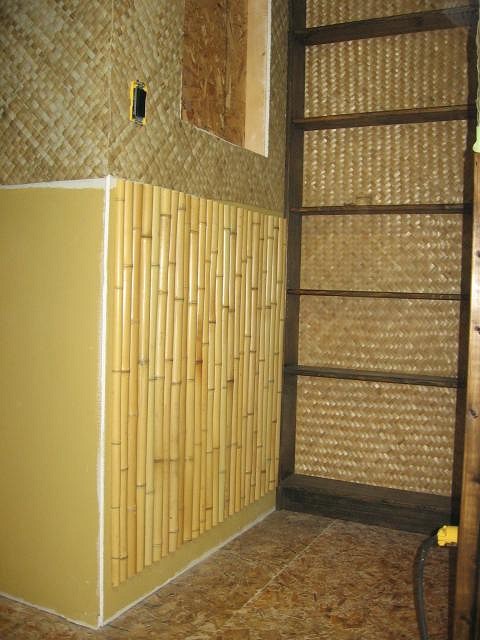
I have now added the heavy matting that will go behind an open wall shelf display. This type of heavy matting will only go behind this display as I wanted it a bit different then the rest of the room. I want to have as many different examples of natural materials and items that I could squeeze in. It will kind of keep it a little different from other places out there as well. The rest of the walls will have the more traditional Lauhala Matting which I got direct from Bali. Another angle, straight on:
This shelf unit will have about 6 or 7 adjustable shelves. This will be kind of a dead space that will behind the door. Because of the doorway, it is quite tight so I want to use all the room I have. That's why I am also doing a recess in the wall on the left, direct from when you come into the room. This open shelf unit will hold the Black Lava of the collection. After my last lounge, I said I wouldn't do a open Black Lava display again as I wanted to keep them behind glass because of dust. The design of this room just keeps things pretty specific and I do like the openness of the room and allow people to pick up and touch the collection. That's it for now. Keep checking back!! |
|
BK
Big Kahuna
Posted
posted
on
Sun, Jan 25, 2009 2:31 PM
Nice! Starting to look like a real tiki lounge. Keep us updated. |
|
T
TabooDan
Posted
posted
on
Tue, Jan 27, 2009 9:09 PM
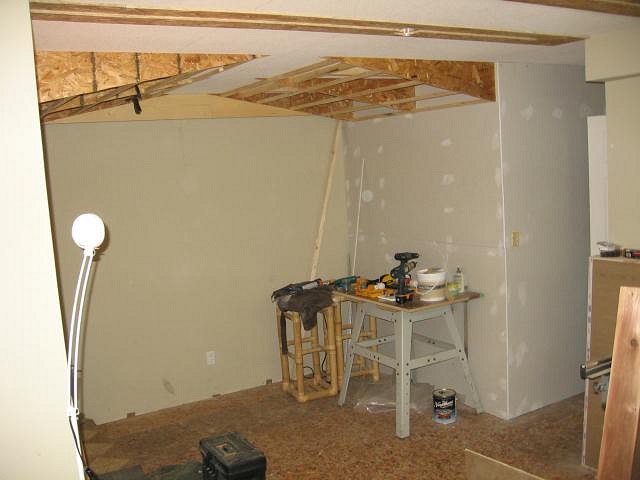
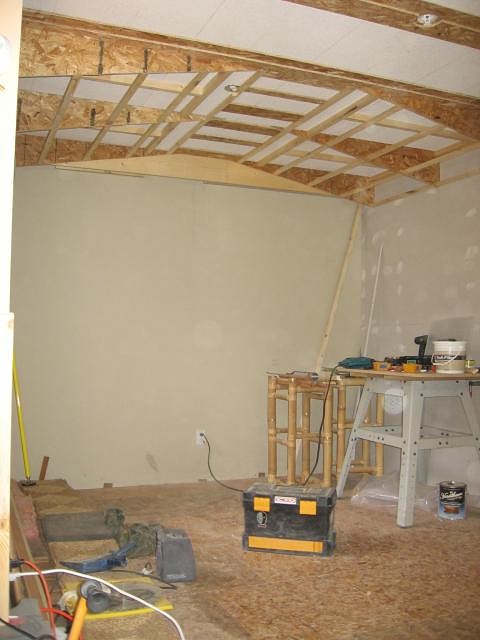
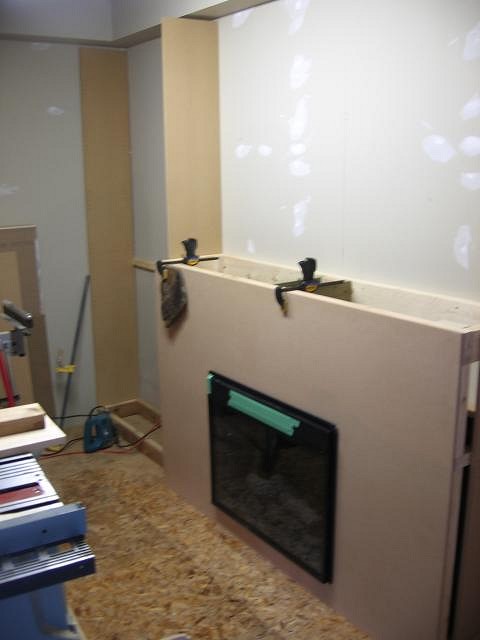
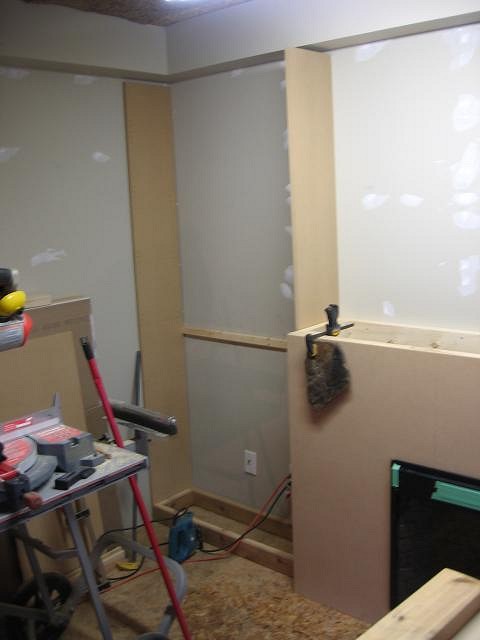
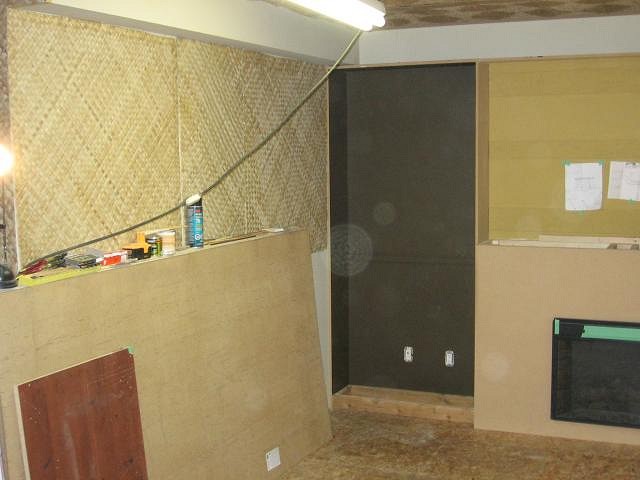
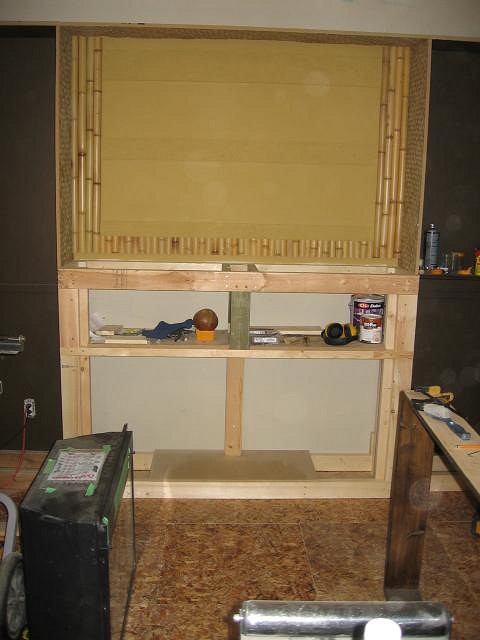
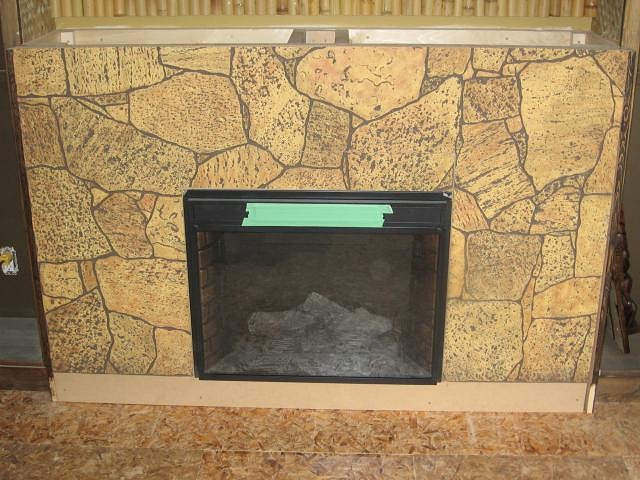
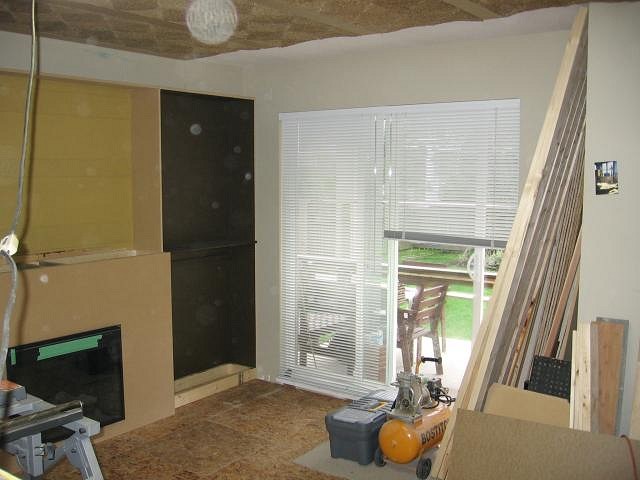
Okay, so here is the South Wall that is going to house the Fireplace and wall to wall shelving:
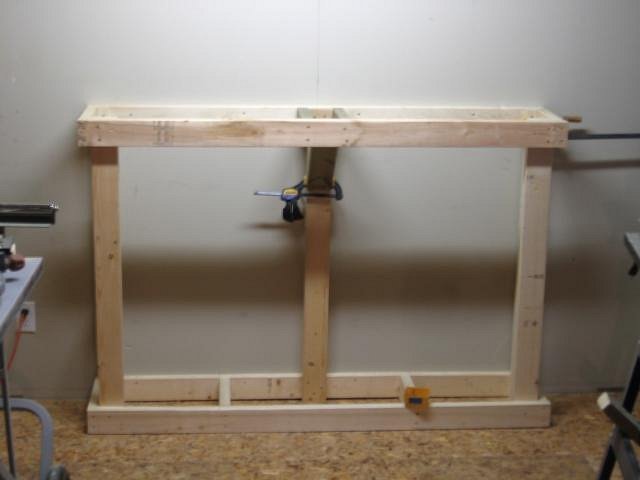
This was before the clean out and what I had to deal with first! Our basement, when we bought the place, only had the perimeter walls finished. They didn't run any 240 Volt wire down here like the rest of the house for our baseboard heaters. So basically, there is no heat! Great for the summer but damn cold in the winter months!! Having a portable heater in here is just not going to cut it and ruin the look of the room so a fireplace it was!! Beginning the frame for the center fireplace:
The fireplace is going to be a pretty big center piece for the whole room so it had to be good. A little bit closer:
I used 2x4 and, just after this photo, 2x2 construction to do the framing and supports. I was going to have the top mantle bar height so I wanted the whole thing to be real strong. I'm using 1/2 MDF for the surface of the fireplace which is plenty strong. For the mantle, I will be having 1.50" thick piece of wood. I was also looking at real rock to go on the front which would also mean it would have to be strong to hold the weight. I started hunting for that rock you see on alot of building exteriors that you were built in the 1950-1970's. I think it's called Mountain Gold or Mountain Harvest or something like that. I thought it would be cool to incorporate this rock as a material that again would have been used back in the day. Once I had the frame done, I cut the MDF to fit the front:
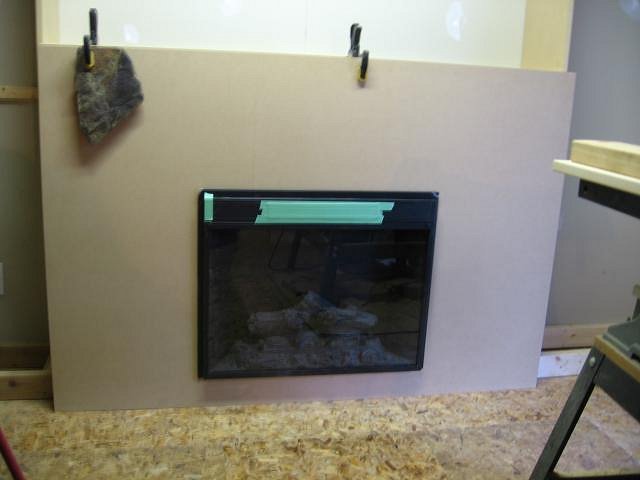
This is a shot of the front where I have cut the hole in the MDf to insert the fireplace. It is just resting there right now as I play with the rock (you can see a piece held with clamp). The gables of the shelving unit are MDF and all the shelves are pine which will be stained. I used MDF for the sides as it will not really be seen as I will be covering them up and painting them. They are also cheaper and very strong. I would have had to buy 4 pieces of Pine at a cost of about $50 and would have had to sand one side so it was decent. Instead I bought 1 sheet of 5/8 MDf which cost me $20. I have aligned and drilled holes into both sides of the units so the pegs for the shelves will fit right in and will be easy to adjust. Angled shot of fireplace and shelves:
The Shelves are about 11.25" deep right now and will be 12" deep when I add the wood face frame. I wanted the fireplace to have a bigger impact on the room so I bought it in a couple more inches than the shelves. I will post some more pictures later tommorrow. |
|
TM

Tipsy McStagger
Posted
posted
on
Wed, Jan 28, 2009 7:20 AM
..i'm sad.... you should have used one of those 6ft kahiki fireplace replicas from daddy kats in dayton, ohio.... |
|
RR

Rob Roy
Posted
posted
on
Wed, Jan 28, 2009 10:07 AM
Dave's Cave was much more crowded than his garage. |
|
T
TabooDan
Posted
posted
on
Wed, Jan 28, 2009 4:04 PM
Hey Tipsy, yeh....I saw those. They're pretty cool! This one won't be as cool but I am building it from scratch so it's all my work and I get it to fit perfect for me. TabooDan |
|
SK

Sofa King
Posted
posted
on
Wed, Jan 28, 2009 4:49 PM
Great job. The hideaway is looking good. Your progress is very motivational to us who plan on building our own tiki space in the future. Besides your craftsmanship I admire your collection of decks. You may be interested in a book called "Disposable: a history of skateboarding art" if you are into boards from the era of your collection. Also, it appears by the way you constructed your A-frame ceiling you may have built a skateboard ramp or two? :) Keep up the good work and please keep posting your progress. SF |
|
T
TabooDan
Posted
posted
on
Wed, Jan 28, 2009 7:10 PM
Here's a shot of the shelf unit and a bit of the fireplace:
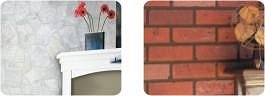
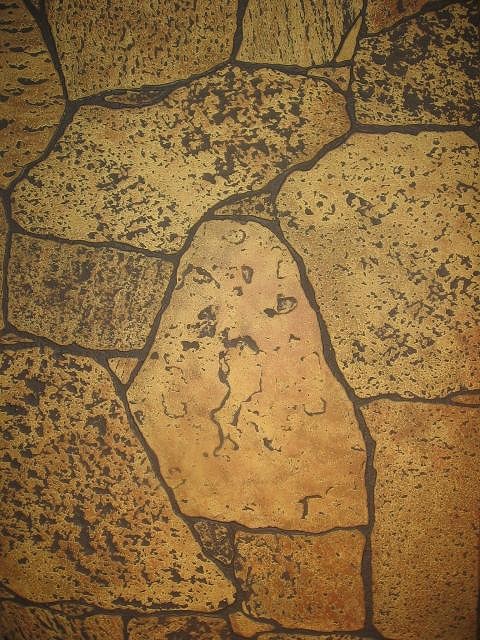
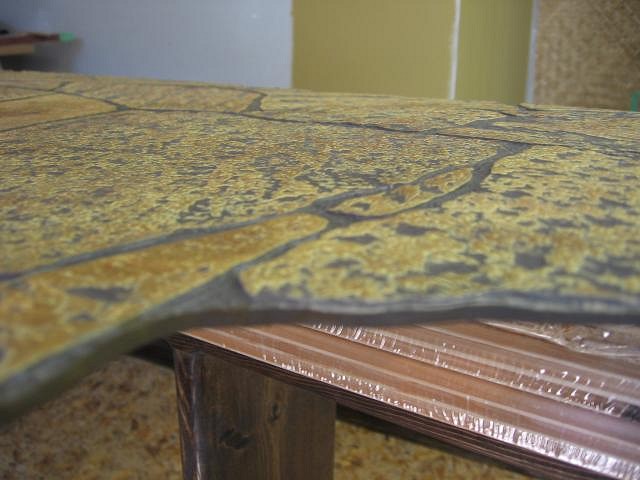
After finding some of the real rock (one piece attached in above photo) at a stone/building supply shop, I decided not to go through with it. It want really the cost but more of all the work. It isn't alot but just enough where I started to think twice about it. I was just going to PL Premium all the stones on and then grout around them. That way I wouldn't have to use a mortar to get them mounted to the face. I figured I would do it anyway but then I started to wonder if it really was the look I wanted. I remembered seeing some stone designed paneling stuck to part of a wall at a local building supply shop. I went in to see if they had any of it available and they said they hadn't sold it in years. Something that isn't quickly available made it more interesting to me as it made it more original. And being that it was old and not too common was cool. I was trying to do the fireplace different and original but still have an authentic look. I knew I had to track some down. None of the usual places carried it. The more specialized places for paneling and plywood's could get some sort of what I had seen but lacked that "look" I wanted. I was starting to have alot of trouble finding any. I was recommended by one of my suppliers to check out a place that they order from. They do not deal with the public but was told to see this guy and he will let you know if they can get it. This is a picture of the rock that I could find in white. Kind of hard to see but the one on the left:
You probably all know the brick one on the right and probably have seen this white one as well. I called this new supplier and asked if they had any of the dark colored paneling that looked like stone. He said they had white and beige. Crap, I thought, as those were the colors everyone else had. He pulled out the old samples for me and showed me the one he was talking about which I thought was pretty damn cool and old looking. PERFECT!! I got them to put two sheets (4x8) on hold for me as I still couldn't deal with them. Even though I had a business, they still would only go through the suppliers they dealt with and who have accounts with them. Photo's coming........ |
|
RH

Robb Hamel
Posted
posted
on
Thu, Jan 29, 2009 6:06 AM
Looks like it's humming along. Can't wait to see it take shape - it's looking beautious so far. |
|
T
TabooDan
Posted
posted
on
Thu, Jan 29, 2009 9:57 PM
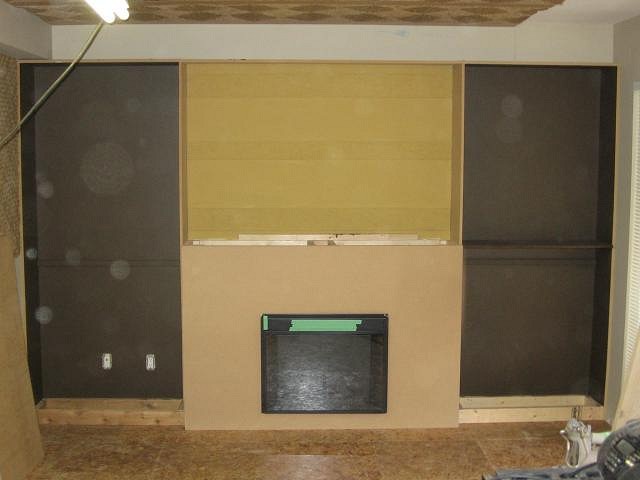
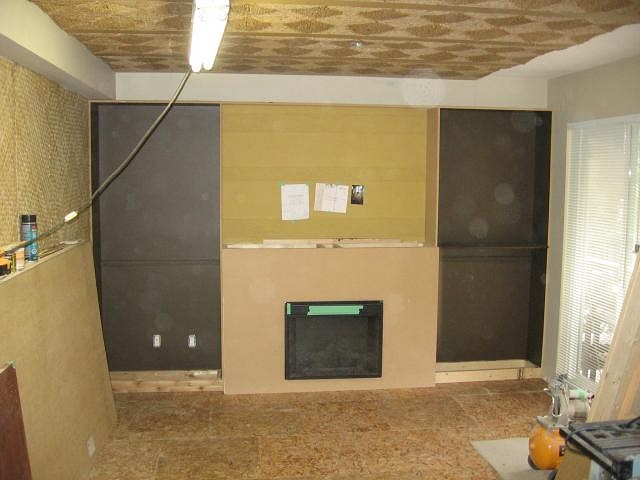
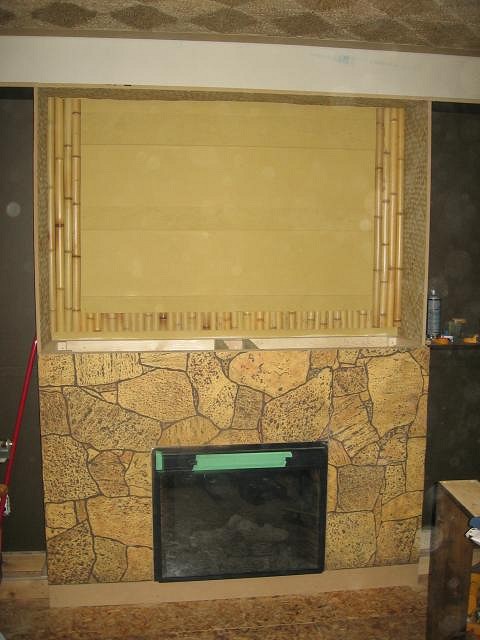
Thanks Robb for checking it out!! I didn't realize my last post I rambled all about the hunt for the paneling and then didn't even show it!! Sorry about that! I will have one for yah at the end of this post. Here is a picture of the two shelf unit's and the fireplace frame done and painted up:
You can see on the top left a drop down in the ceiling. This runs above the shelves and fireplace as well, along the whole back wall. The top of my cabinet mounts to the bottom of it and sticks past it about 5" or so. Makes for a little shelf right now but one day I was thinking about doing thatch all along there on an angle so it's like a roof. That I am putting on the back burner for now as I gotta make up my mind. The center is painted dark yellow (I will call it that!) as a back drop for the bamboo. I can't have any colors coming through from the wall as this is one of the focal points of the room and will be right at eye level. The back wall of the cabinets is a color I had mixed to match the dark stain on the wood I am using. All the shelves will be pine wood and stained dark so wanted it to kind of blend in. At first I was going to put matting on the back but I kind of wanted the mugs, which is mainly what the shelves are for, to have a different background. I may use matting, mirrors, or tongue and groove wood panels. At the same time, I am doing the matting on the walls:
This next shot shows the patio door again in relation to the fireplace and shelves:
See all the Tiki Orb's flying around the room?? The ghostly glass float? All the trapped souls from all the relics. Another reason it's called the Zombie Hideaway!! In this shot you can see the matting added on the outside of the shelf walls:
This was glued with a GOOD spray adhesive (By 3M) and also stapled along the edges and some of the center. Trick to stapling in the center (where it might not get covered) is to pull back a top strip of the matting, staple through the bottom cross piece and then pull back the top surface which will then cover the staple. Sounds easy but it took me a little bit to think about it. Works good and you don't see the staple at all. In the above photo, you can also make out all the hand drilled holes in the inside of the shelf walls. This is where the pegs go for the adjustable shelving. Quite the process to do all these but there is a trick. Next photo shows the start of the bamboo:
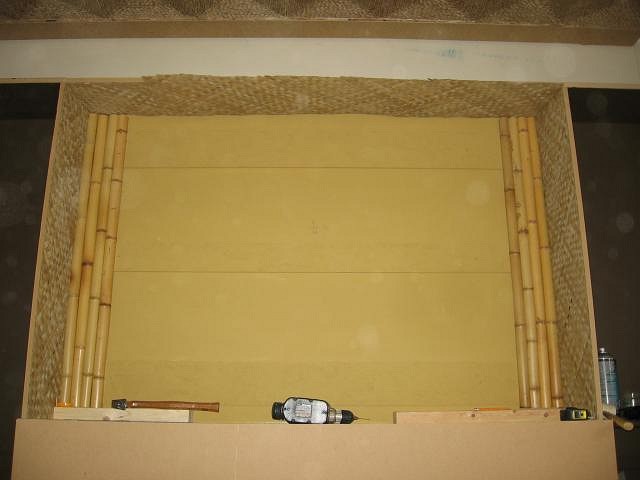
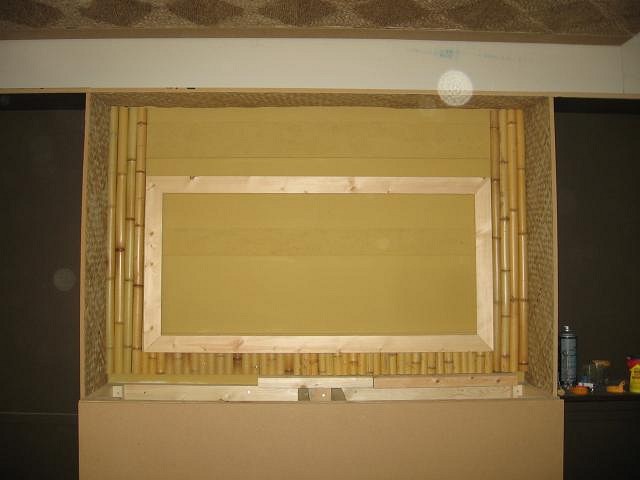
Center section above fireplace:
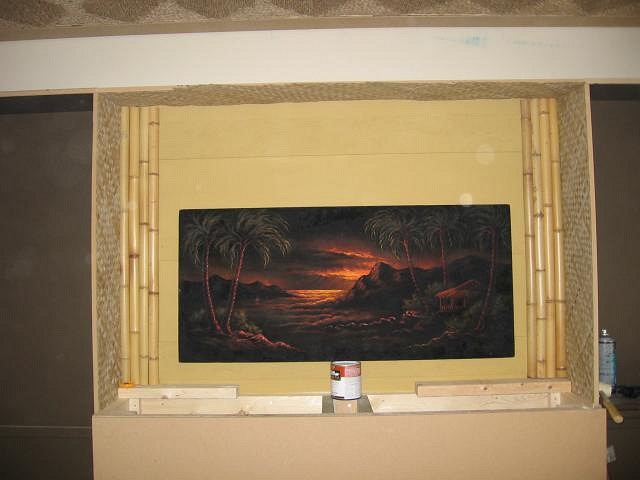
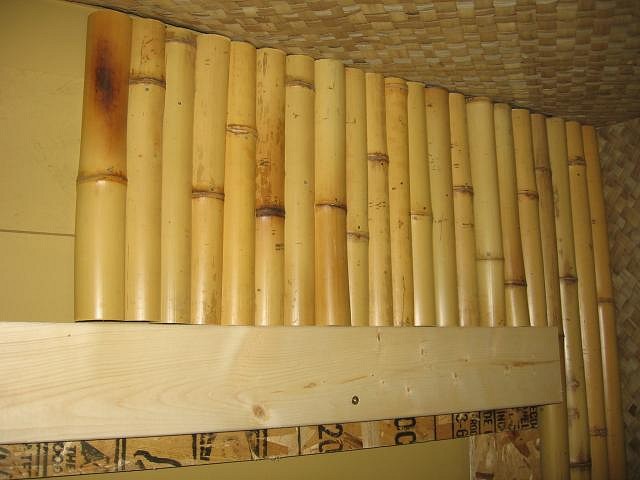
This section is going to have a custom frame for a large vintage velvet painting I have. I want this area completely surrounded by bamboo. I started at each end and then worked my way to the center. I added particle board strips to the back wall where my bamboo will be nailed before I painted. A shot of the velvet painting being held up just trying to figure on the placement and what I have to do for a frame and where I need bamboo:
This next picture shows the area without the front panel and fireplace and also the bottom strip of bamboo finished:
Quite a few cuts for all that bamboo!! The mantel will just slide right underneath the bamboo when it is ready to go. This one is of the unfinished frame:
Made of pine and will be stained dark like all the woodwork. I use Minwax stain that is available pretty much anywhere. I have found this product to be very good to deal with and consistent. Oh, and finally, a shot of the cool rock paneling I found:
I'll post some pictures soon of this when it is mounted on the fireplace. Mahalo, TabooDan |
|
Z

Zeta
Posted
posted
on
Thu, Jan 29, 2009 10:35 PM
ARR!!! Looking good! You inspired me today. I also love those classic skateboards! The name of your bar is perfect too. |
|
SF
Slacks Ferret
Posted
posted
on
Fri, Jan 30, 2009 8:35 AM
It's looking great in there. I quite like the black velvet painting too. Was it a thrift store find, commissioned, or created by yourself? Thanks for the progress pics. |
|
T
TabooDan
Posted
posted
on
Fri, Jan 30, 2009 4:51 PM
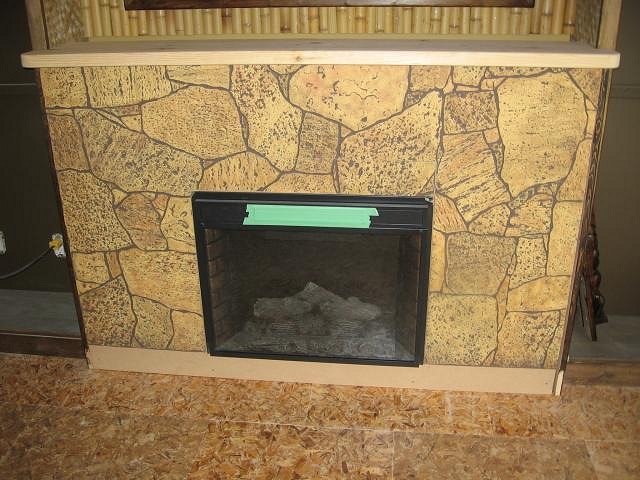
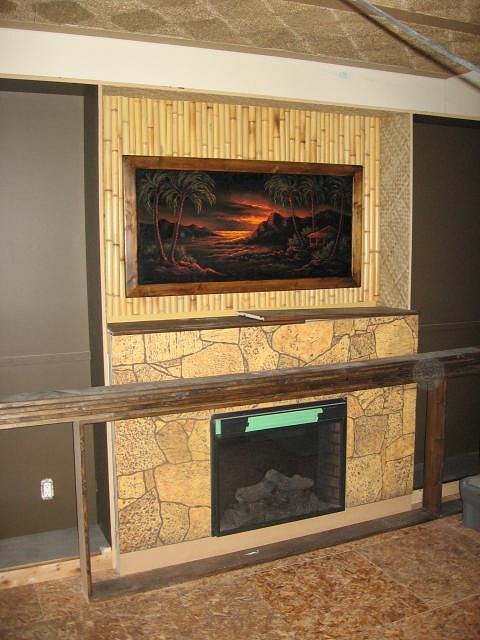
Hey Zeta, thanks!! Slacks, the velvet is a vintage one I picked up last year. Picture's don't do that one justice! The colors are so vivid. Most of the image is dark but then you have this bright orange/red color and it really pops out from the picture. Here's a picture of the fireplace with the stone panel cut and mounted:
Not too bad. What yah think? Kind of that old rumpus room sort of look but yet, when the woodworking is done, I am hoping it will look pretty classy!! In the next picture, you can see the face frame being lined up and measured to the front of the shelves and top:
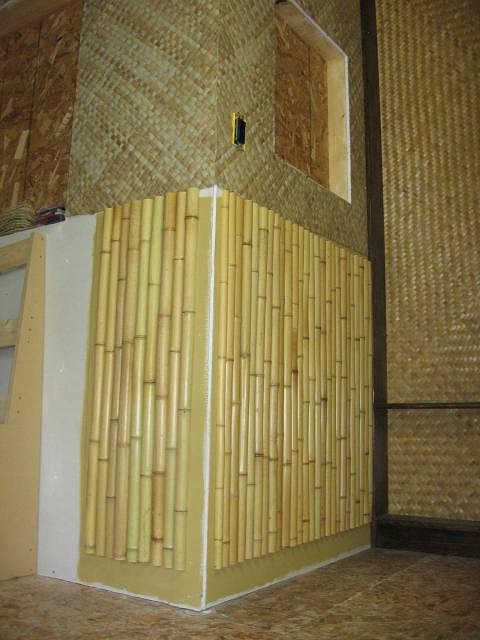
This face frame measures about 2.25" wide and is big enough to hide the rope lite that will go on the inside of the frame to lite up the shelves. Now adding the bamboo that will go all around the frame:
A little bit closer:
I always try to have my nails, or whatever I am using to attach the bamboo, in different spots. If you do them in a straight line, your eye can sometimes catch that line and then notice the nails. Mix it up a bit. Here is a close up of the bamboo finished and the frame in place:
Maybe I should forget the velvet and put in a Flat Screen TV! Not likely!!!!! The next shot sort of shows how the mantel will go:
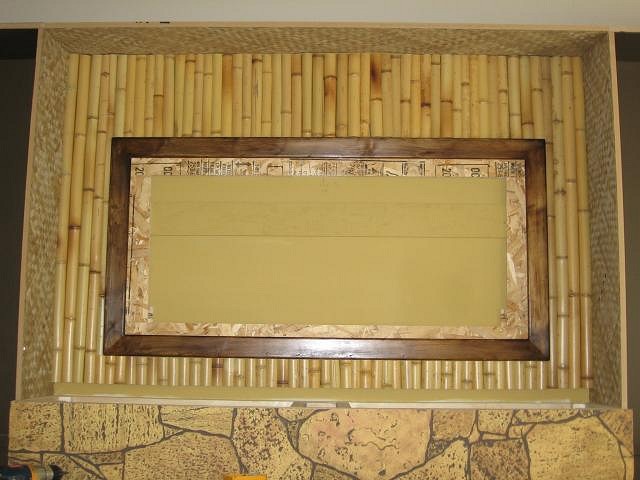
Still have a ways to go as I didn't decide on the moldings around the fireplace and around the outside yet. I do know I will have carvings of some sort around it. Either on the outside edges or right by the fireplace. Now here is a shot of the frame with the velvet, bamboo work done, and the face frame around the shelves installed and stained:
Bit of a bright picture but you can kind of see how all the colors are starting to go together now. Still have the mantel to finish and all the woodworking. That's it for now!! [ Edited by: TabooDan 2009-02-06 17:20 ] |
|
BK
Big Kahuna
Posted
posted
on
Fri, Jan 30, 2009 6:38 PM
WOW! |
|
MPP
Mr. Pupu Pants
Posted
posted
on
Fri, Jan 30, 2009 6:58 PM
That is beeeeeeeauuuuuutiful! |
|
P

Pyro
Posted
posted
on
Fri, Jan 30, 2009 8:11 PM
Wow, its really coming along. I love the mantle, it looks great. |
|
H

harro
Posted
posted
on
Sat, Jan 31, 2009 4:48 AM
love watching the progress on this project - great inspiration. |
|
S
sasquatch
Posted
posted
on
Sat, Jan 31, 2009 5:53 AM
... noice |
|
T
TabooDan
Posted
posted
on
Mon, Feb 2, 2009 5:59 PM
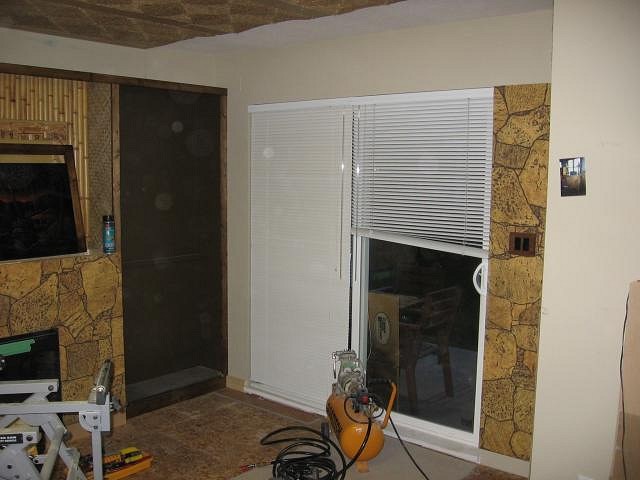
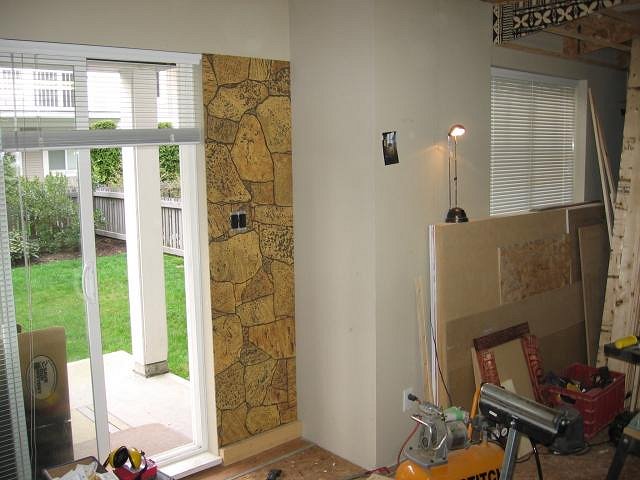
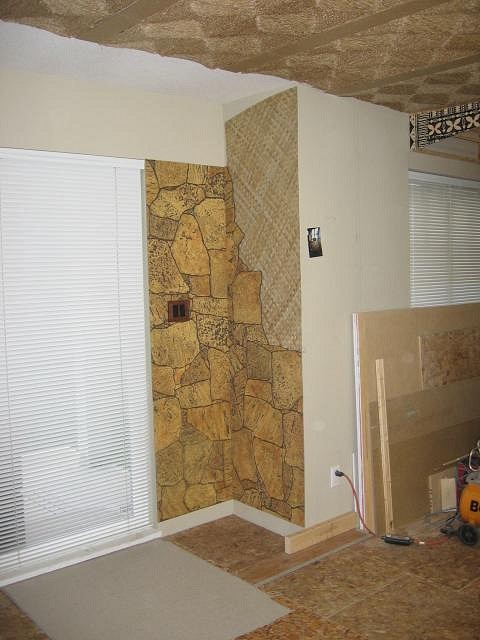
Thanks all!! Glad a few of you like it!! Since I was quite happy with the look of the rock panels, I wanted to use some more of it else where. I decided that I would like to put it either side of the patio door:
The plan for this area is to have sort of an 'outside' look. I wanted the rock either side of the doorway. Above this, where the ceiling is not finished, I am having another tribute to the Waldorf Hotel's Tahitian Room. The plan is to have rock either side of the doorway with large piece's of bamboo as molding around it. Then, have a curved ceiling which is actually painted with sort of a dusk idea in mind with lights. This will then meet up with a large piece of bamboo that will run the whole length of this area. This large piece of bamboo will meet up with the already matted ceiling. That way, when you are sitting under the thatch hut or the rest of the room, you can look over at the rock wall and then up at the twilight sky. Well, that's the plan anyway.
The curved ceiling will basically go from the top of the patio door up to the edge of the matting. Here's the right side with the rock:
Here it is with right and left:
Here is a closer shot of the right side:
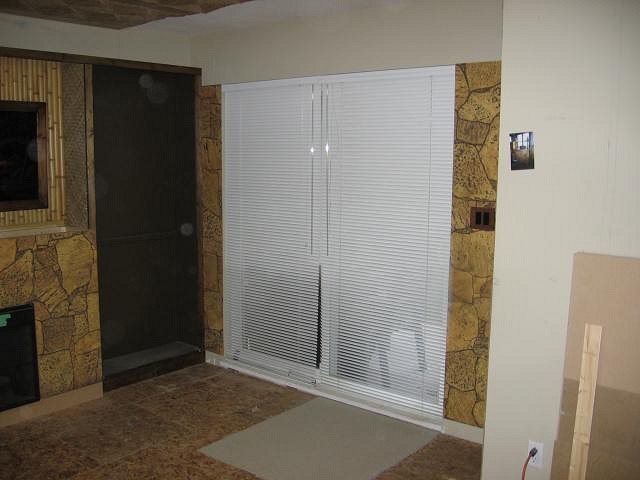
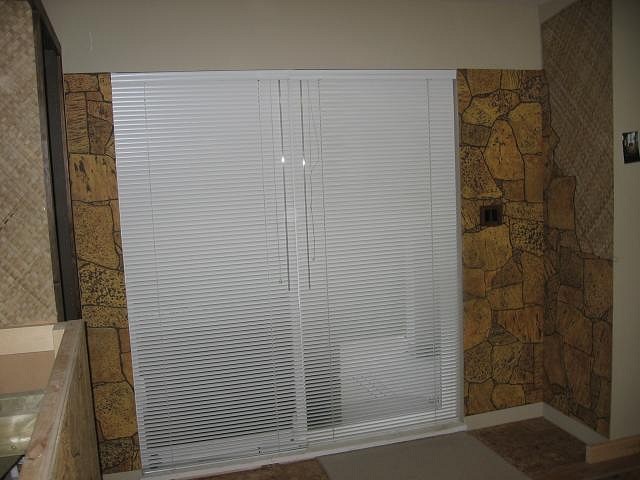
In this shot you can see the corner section. I wanted to do something a little more decorative and a bit more unique here so I decided on cutting the rock panel along the rock edges. That way, this will give it a bit more of a jagged, actual rock look. Here's a close up of the cutting of the panel and the edge:
After I cut it, I sanded the edge to smooth it out and also round the edge a little and then painted it the matching brown as the grout color. It came out pretty good and I got the look I wanted. Here it is on the wall and with matting behind it:
You can see the rock cut ends at a height on the wall. I will be doing a tongue and groove board that will tie in at this height and then run along that painted wall (where the drywall is). I am also having a custom Tiki Pole carved and mounted here, right on the edge, which will tie it all together and finish the corner nicely. Here's a shot of both sides:
Mahalo, TabooDan |
|
T
TabooDan
Posted
posted
on
Fri, Feb 6, 2009 7:03 PM
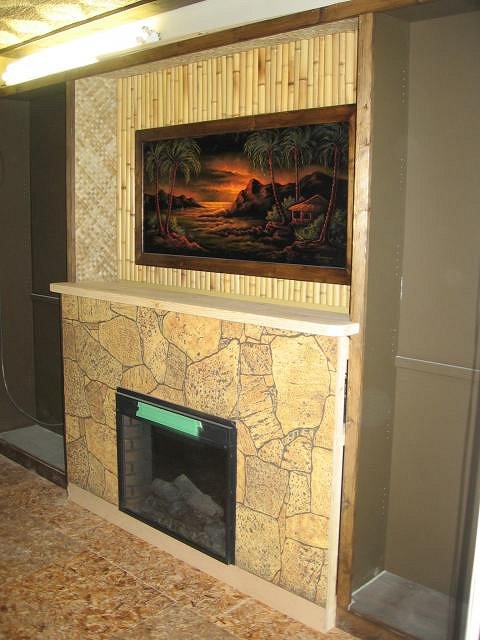
Here's another shot of the fireplace:
In this next one, you can see how the velvet colors really glow when there is just little amount of light on it:
This shot is a little closer to the level of light that will be in this area. I am having a small amount of light above the painting and also a nautical lamp or two around it but that will be about it. After the wall either side of the patio door got it's rock paneling, I focused on the East side of the room which is left to the fireplace. Early shot of the matting just going up:
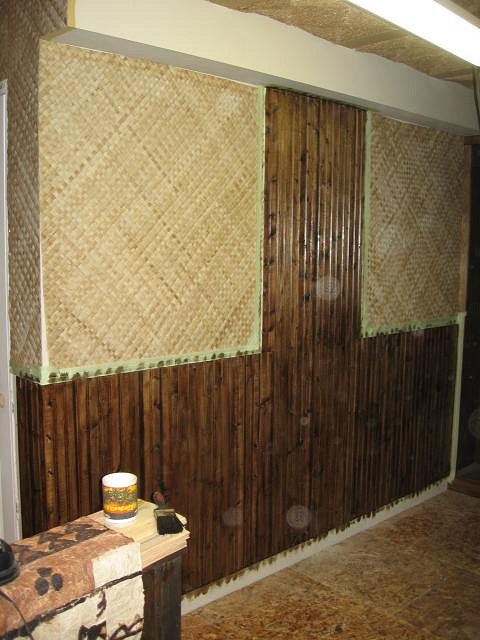
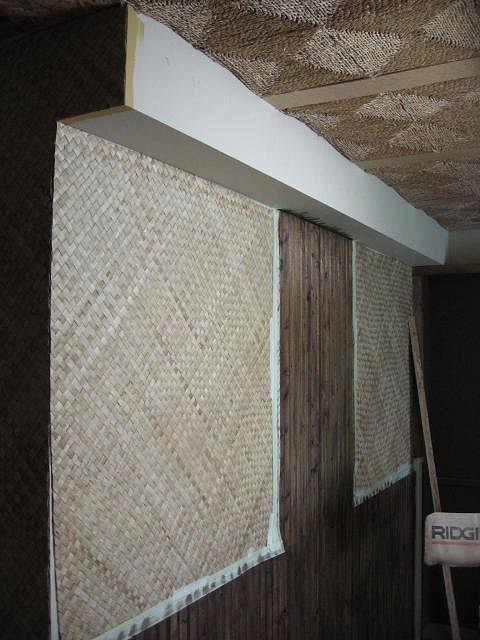
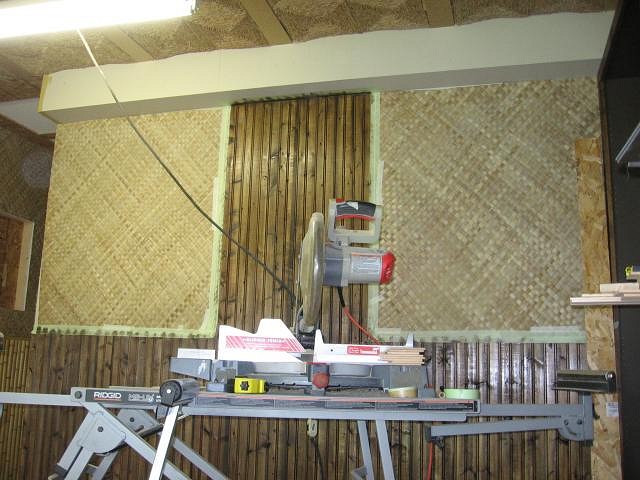
After adding the matting to the top half of the walls, I considered the rest of the room. I felt like I wanted to change it up a bit. The rest of the room will have matting on the top half and bamboo on the bottom with a dark wood section between. I was considering bamboo under the matting here but wanted to give this side of the room a little more of a nautical feel and also a look that you might see in an older room or restaurant. Also, I was having bamboo on the lower half of the other walls so I wanted to change this wall up a bit. At about this time, there were quite a few of posts of pictures of the Mai Kai in Florida here on TC. I looked at my own pictures of the Mai Kai and saw lots of woodwork in a few of the rooms. Beams, moldings and paneling was used quite a bit. Here is this great shot of the Mai Kai from a 1975 calender I have:
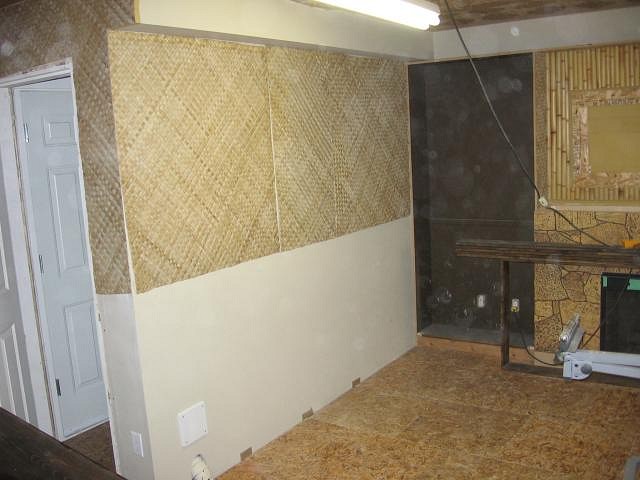
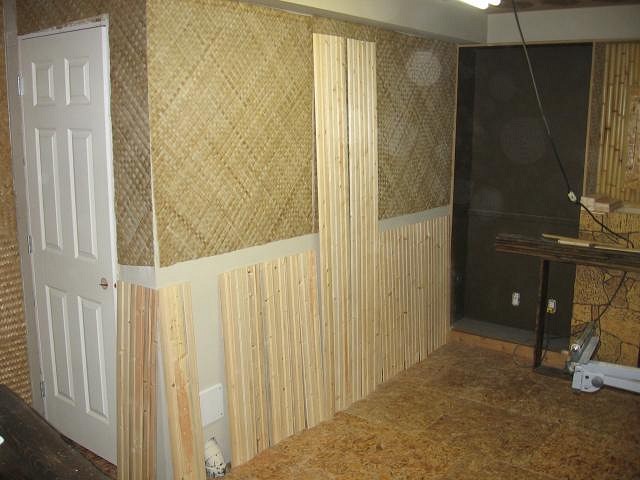
I love this shot as it really could be any nautical themed restaurant in the world. But it wasn't. It was the Mai Kai! After considering it a bit more, I now planned on having Tongue and Groove Pine Wood panels as opposed to bamboo on this section of the room. You can see some paneling behind the above pictured statue on the wall. I was thinking just the lower half was going to be T&G (tongue and groove) pine stained dark. Matting added on the wall and around the doorway:
Here's a shot of the whole section:
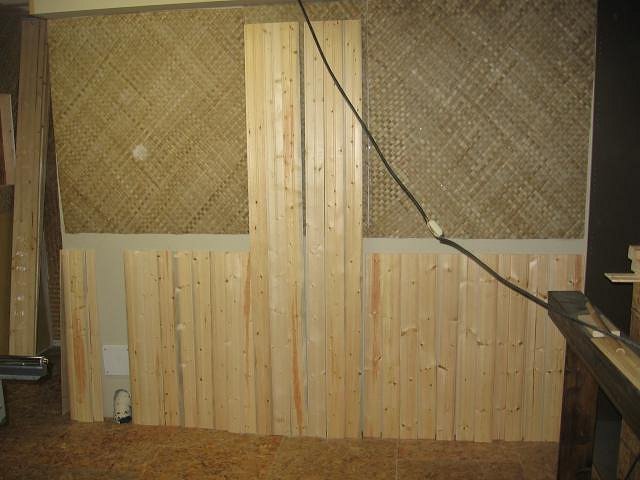
Bamboo was going to go between the matting joints to hide the seams. After lining a few pieces of T&G on the lower section of the wall, I decided to change it up again and actually break up the matting a bit. In the center section, I would pull off the matting and have the T&G go right up to the top. Like this:
Here is a shot straight on:
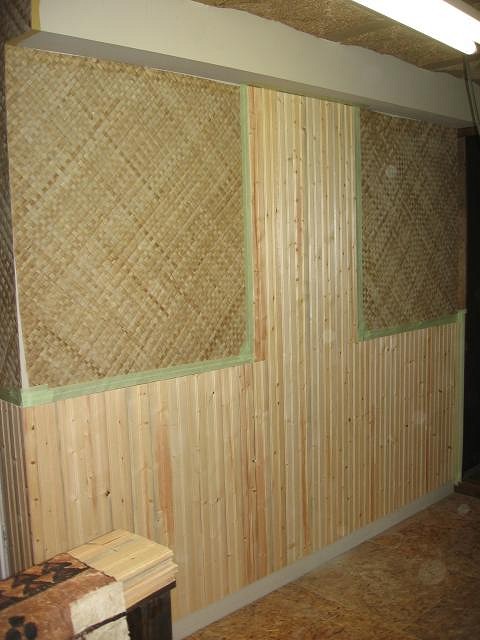
You can still see the matting behind the pine right now. After looking at it and thinking for a while I decided it would be best to have the pine come right up. It should look pretty good right up to the top and break up the matting nicely. Here it is with the T&G mounted to the wall:
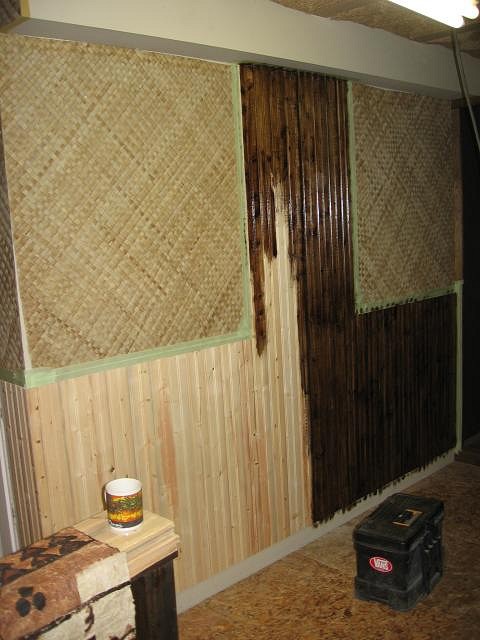
I used a little PL700 (adhesive for paneling) to give it a bit of stick and then finishing gun. Worked perfect. After masking of some of the matting, I began staining:
Here it is freshly stained:
Crappy color in this picture but it does show the top valance that I had to figure out:
Here is a shot straight on after the stain dried a bit:
No varnish on any of the wood yet. All woodwork will get about three coats on it which will give it a nice finish, seal it all up and make it all a little more durable. More to come!! |
|
T

TikiPhil
Posted
posted
on
Sat, Feb 7, 2009 8:59 AM
Looks awesome. Thanks for all the pics. One idea is you could put plywood or 1x12 boards on that soffit above the T&G to give the look of a big heavy beam. |
|
T
TabooDan
Posted
posted
on
Mon, Feb 9, 2009 6:43 PM
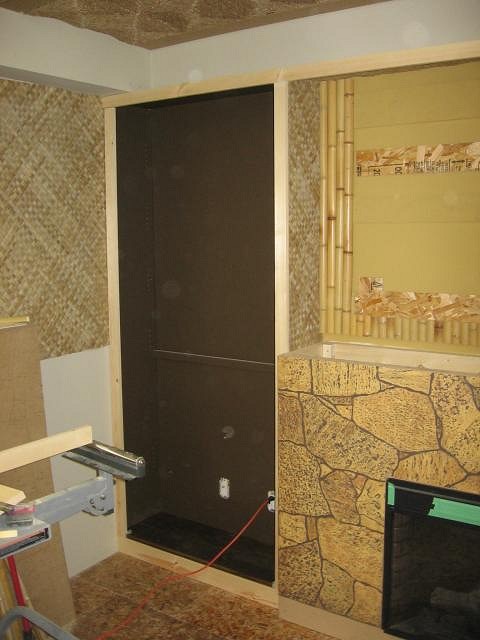
Hey TikiPhil, Thanks for the comments!! I still gotta decide on what will happen here. Okay, when I last left the North side of the room, where the bar and table area are going to be, it looked like this:
The drop downs had just been added and the drywall not yet completed. This is looking North/East towards the entrance, which is just on the right:
I still have the drywall cavities to cut out and also the center supports for the ceiling where the two drop downs will meet. This next shot is of the same area once I cut the two holes in the drywall and began to mount the matting:
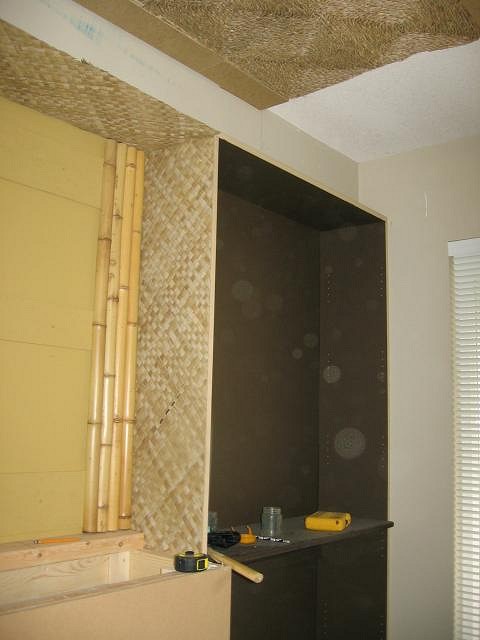
The two holes are big enough to display a few pieces that I have and will be adding later. Because the door area is a bit tight and the door opens into the room, I decided the facing wall when you come in would be great for a small wall display. I can't really do anything else here because of the door. At the same time, I am building a shallow wall shelf unit that will go behind the door. It is only 3.50" deep but again, because of the door, it will give me something to display some items on and a use for the otherwise dead space. I have a lot more items in my collection to display as opposed to wall pieces so I could always hang stuff but I do need the display space. Here is a view of that area, behind the door:
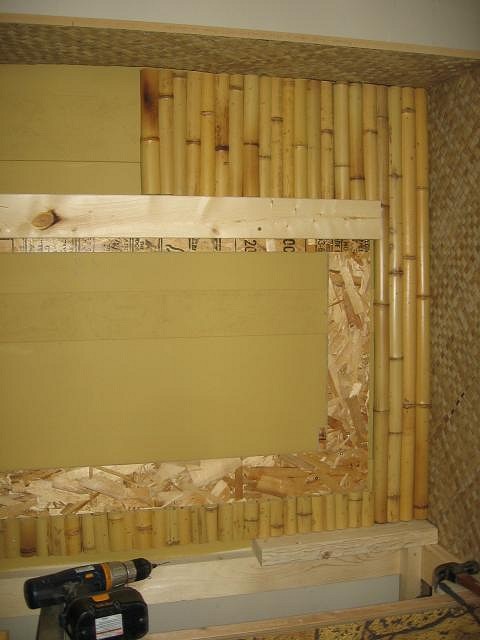
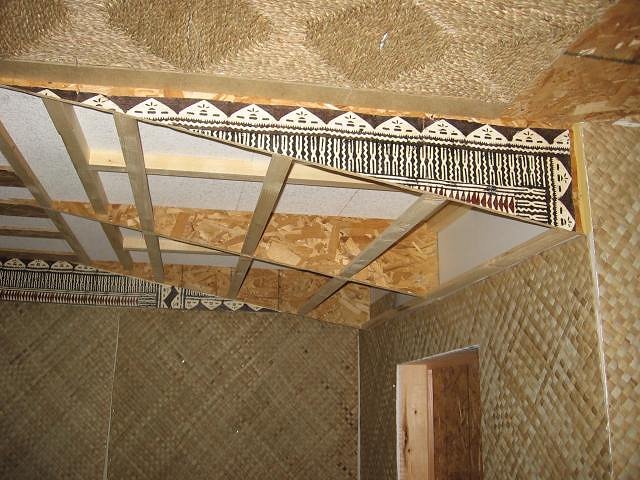
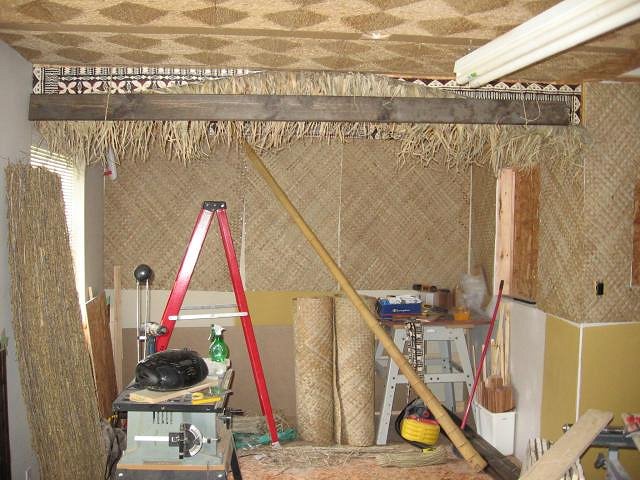
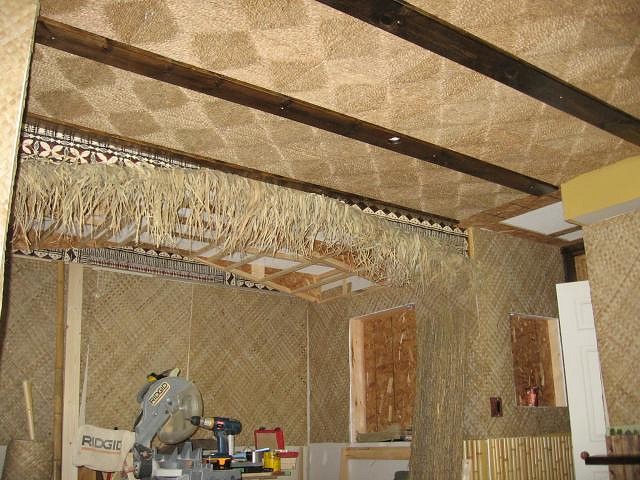
You can see the door just on the right. This wall unit is being built with all my black lava pieces in mind. This will be their new home. I used a different, thicker matting here to break it up a bit and use another type of material. Once I finished the matting on the walls, I cut some original Tapa Cloth from Fiji, and mounted it on the ends of the roof structure and along the back beam I built:
I was at first considering making my own stamps for the tapa cloth or just painting a design but in trying to keep up to what I think they would have done back in the day, I think the builders would have just mounted the real stuff! In this next one you can see all the pieces:
You can see the center supports along the ceiling between the two roofs. This will allow me to mount the thatching and all the other good stuff on the roof. A different angle showing the window wall:
The plan here is to have a thatch that will hang down and come out from the bottom of the roof giving the "Hut" look. The underside will be covered up with a different material, not thatch, all together. Then, I will have large bamboo poles running on an angle out from the walls on either side of the room running under the roof. These poles will meet in the center either with a center pole or piece of wood. More to come!! [ Edited by: TabooDan 2009-02-09 18:51 ] |
|
S
sasquatch
Posted
posted
on
Mon, Feb 9, 2009 7:28 PM
... this going to look amazing. Thanks for the updates. |
|
T

tikifreak1
Posted
posted
on
Tue, Feb 10, 2009 4:44 AM
Can't wait to see what it looks like when it's finished!! Looks great so far. |
|
T
TabooDan
Posted
posted
on
Tue, Feb 10, 2009 5:09 PM
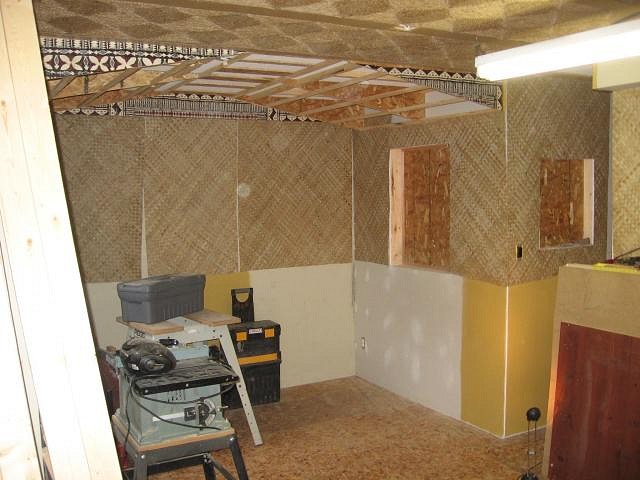
Here is a shot of the beginning of the small shelf unit that will be behind the door:
I am making it out of pine and it has holes drilled in each side so I can adjust the shelves or add more as I need to. For now, there will be no lighting directly on the unit. Just a glow from above, on the ceiling, and light coming from the recess in the wall. In this shot, I have stained the unit and have painted the wall it's base coat to go behind the bamboo:
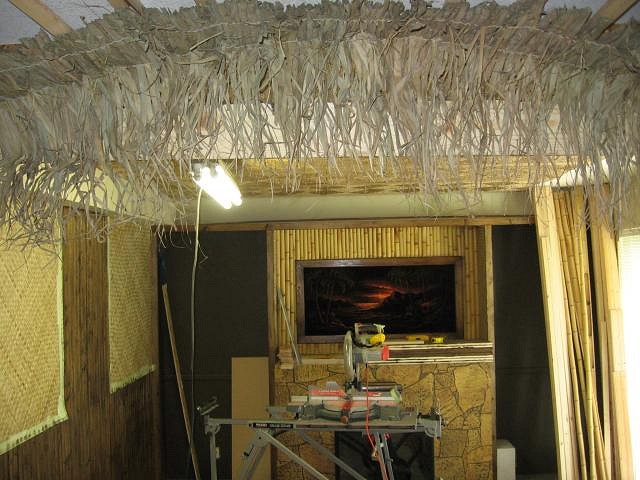
I have also added the sea grass on the edge of the roof. As of right now, I have only added a strip of the sea grass right on the edge. It only goes back about 12" or so. I will be doing layers on the roof to make sure it is done to where I like it. Walls painted up, threw some shelves on and just cutting and sizing the bamboo:
Here's one wall with the bamboo on:
The bottom will have a 3.50" dark wood baseboard. Pretty much around the whole room and it will all tie together through the custom furniture or whatever woodworking I do. Next shot with both walls:
Each side of the doorway will have 4" bamboo either side. Here is a shot of this side of the room with the edge of sea grass up:
I kind of like this shot as you can now see the shape of the roof much better. Here is a shot from under the roof looking out to the rest of The Zombie Hideaway:
Not the best of photos but you can kind of get the idea of the two sections of roofing. Mahalo, TabooDan |
|
M

MadDogMike
Posted
posted
on
Tue, Feb 10, 2009 11:15 PM
Great thread, great room, fantastic workmanship! They caught the skateboard decks in the background but what about the old car - looks like an old Volvo? |
|
T
TabooDan
Posted
posted
on
Wed, Feb 11, 2009 5:22 PM
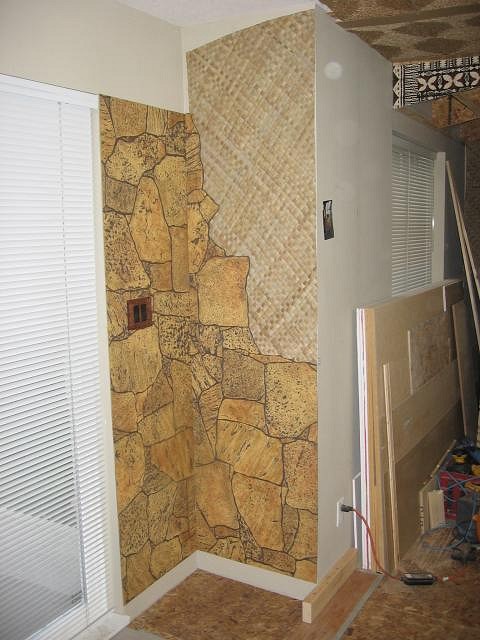
Hey MadDogMike! Good eye but it sure ain't no Volvo!! Here is an early shot of the West wall where the window is:
And another one of this wall specifically:
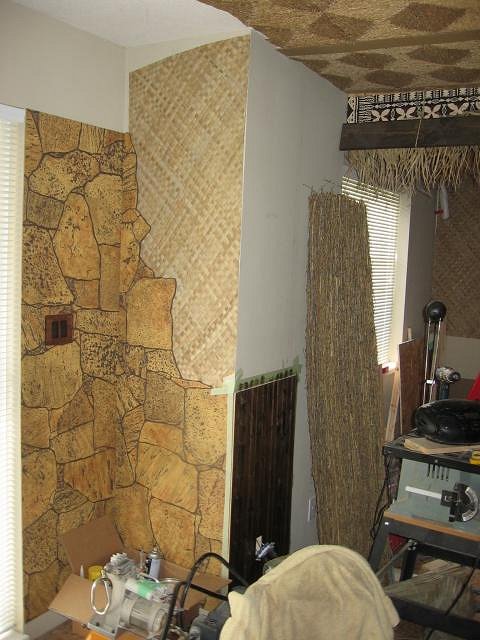
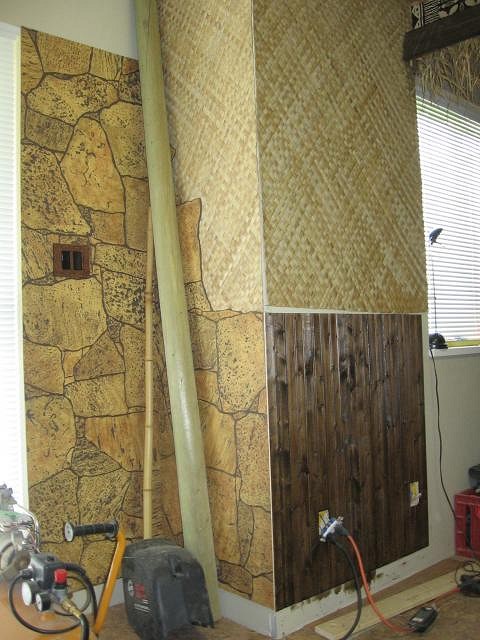
The goal here is to have a large wall cabinet cover the area of the window and go into the corner. This will be behind the bar. Basically, there will be no window anymore. From the edge of the window to the corner is about six feet. Because the build (lots of reasons!) is taking so long, I will be putting off building my own bar right now and using an old vintage rattan bar that I have. I would like to build my own one day but for now, so I can get the room done, I will use the bar I have. It will still work and the shape of it actually works pretty good here. I only want the patio door as the natural lite coming in as it's not too easy to get rid of or hide!! I will work around it and make it look good in the grand scheme of things! The window, however, is open game and has gotta go!! Gotta be dark in here!! I'll talk about the patio door later. Once I added the stone wall and matting:
As I did the T&G on the other side of the room, to the left of the fireplace, I decided I would add a small amount on this wall as well. Basically, from the corner edge to where the bar would go. Here is some of the T&G up:
You can also see I replaced the white electrical and threw on a Crazy Al Tiki wall plate. Great detail and awesome designs on his electrical covers!! I recommend you going over to his site and checking them out if you haven't! In this next shot, you can see the added matting on the wall above the new T&G:
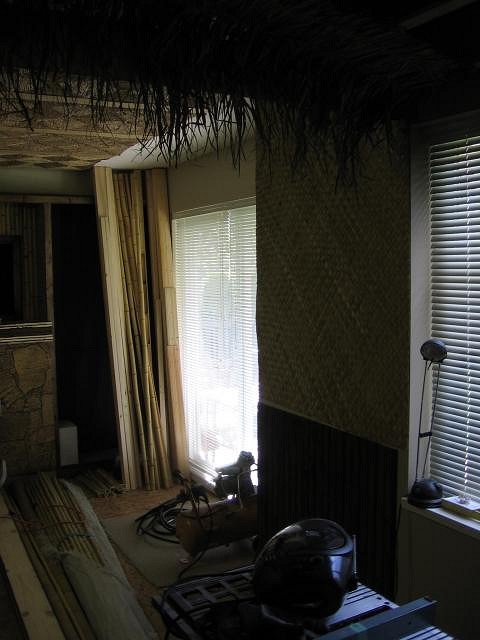
I extended the T&G almost to the windows edge. At first I was going to build the bar but after deciding not to for now, I added extra T&G on the wall which will run right to the wall cabinet behind the bar. Here's a dark shot looking back at the rest of the room from under the hut:
Supplies and tools! Supplies and tools!! TabooDan |
|
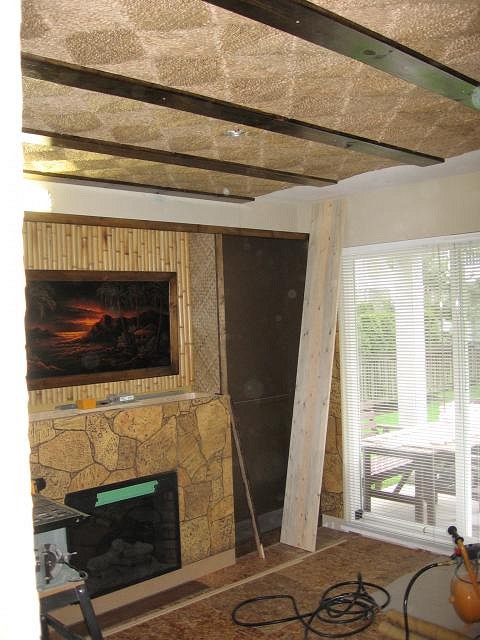
T
TabooDan
Posted
posted
on
Thu, Feb 12, 2009 4:27 PM
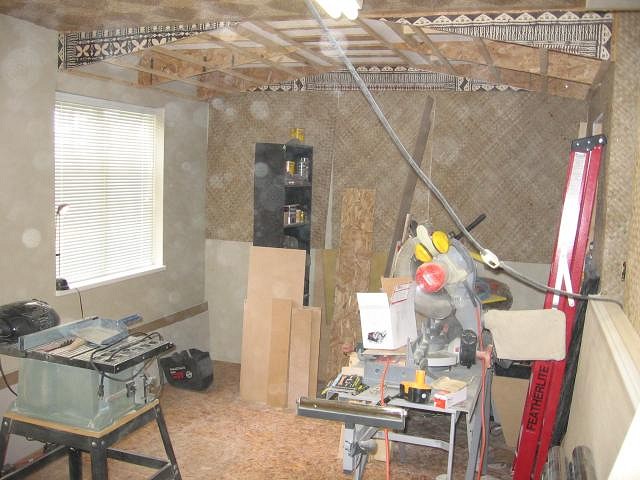
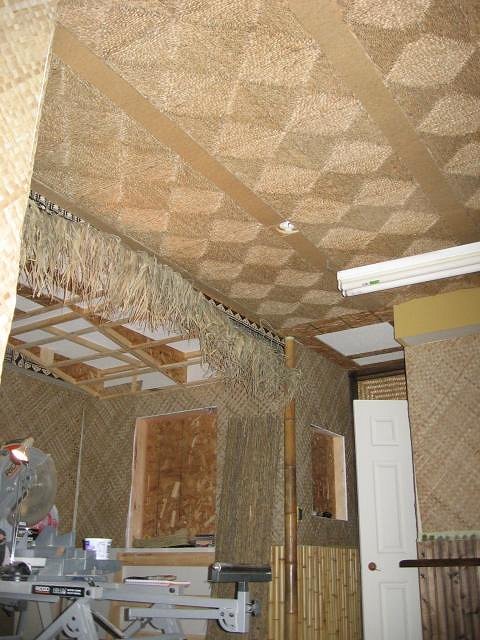
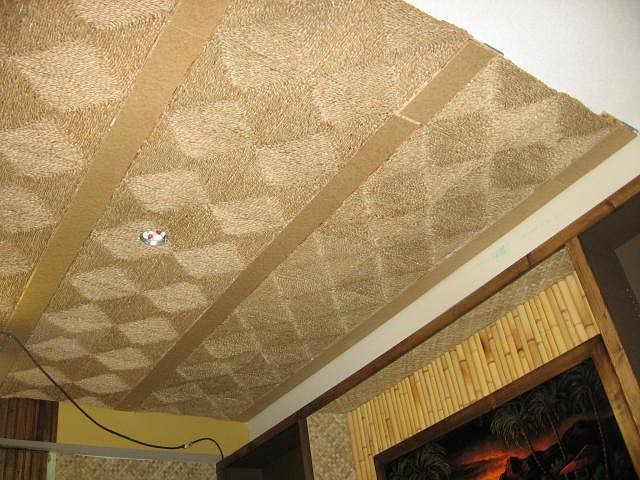
About the same time I did the staining of the T&G for the walls, I got the wood beams for the ceiling cut up, routed, stained and varnished. Here is the ceiling looking towards the hut and door area:
I also added strips of hardboard on top of the chip board as I found I needed that extra thickness for the pine to go on and actually rest over and cover up the edges of the matting. Here's another shot:
Here is the same area once I added the wood:
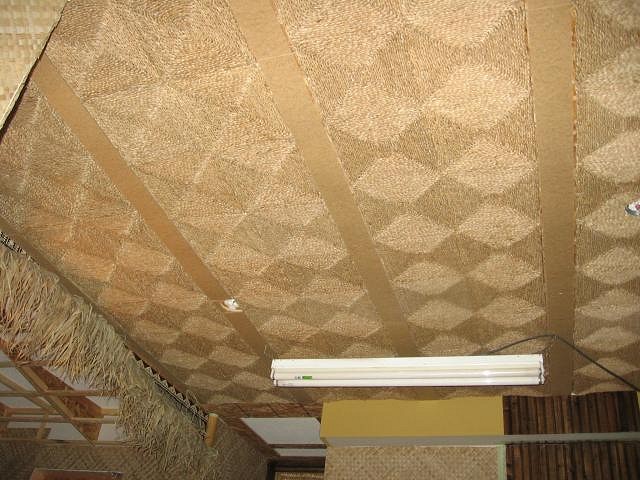
The spacing actually worked out perfect for the matting and with the 1x6 between them. Only the one right next to the hut roof is narrower but you don't even notice. The second beam in also has a fire sprinkler drilled out of it. I'll add just a touch of dark paint on the bottom of that to blend it in just a little. The dark wood came out nice right up against the Tapa cloth and the sea grass roof as well. The next one is of the ceiling with the fireplace on the right:
Here is this area again but looking from the left, back at the room:
Still have a few touch ups on the beams to do but nothing much. For right now, this will be about it for this ceiling. I will probably be adding cross pieces and bamboo eventually but for the meantime this will be about it. Mahalo, TabooDan |