|
T

tikisobayli
Posted
posted
on
Wed, Mar 1, 2006 6:57 AM
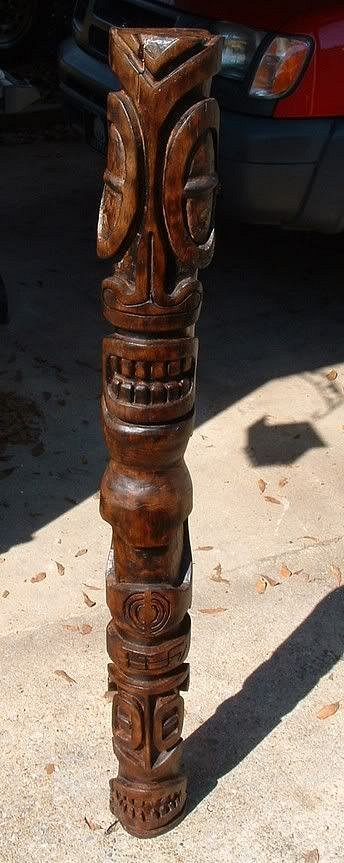
Well, here goes nothing! Here are a few pictures of my Marquesan style tiki. As you can see, it is still in progress but I thought that it might help to see it as it progresses. I know that many of the work-in-progress posts have helped alot. Plan drawing: Initial Layout: Rough Out: (as it stands this morning) As you can see, the log is a little wonky at the top but I think that it enhances the upper eyes which I have to say is my favorite aspect of the Marquesan style. Anyway, I will continue to chip away at it over the next few days. Hopefully this weekend I can start to apply a finish to it. Speaking of finish, I have started thinking about how to go about it to give it that more authentic look, so any advice you might pass along would be great. [ Edited by: tikisobayli 2006-06-17 19:07 ] [ Edited by: tikisobayli 2009-12-09 07:26 ] |
|
H

HelloTiki
Posted
posted
on
Wed, Mar 1, 2006 7:38 AM
That's a very handsome fellow. Evil spirits won't mess with your house! |
|
J

JohnnyP
Posted
posted
on
Wed, Mar 1, 2006 1:40 PM
For a first carving that is a very nice job. |
|
B

Benzart
Posted
posted
on
Wed, Mar 1, 2006 4:36 PM
Wonky Logs make great tikis. Looks like he is gonna be killer. Excellent first tiki. |
|
P

PockyTiki
Posted
posted
on
Wed, Mar 1, 2006 4:48 PM
man, now i wish I could carve...geez. Very nice job. Your obviously a talented craftsman. |
|
T
tikisobayli
Posted
posted
on
Thu, Mar 2, 2006 6:34 AM
Thanks for the encouragement everyone. Ben, it means alot to hear your kind words coming from the master. I think rule number one for wanna-be carvers is just to get out there and start hacking away. I mean with just about every stroke, you learn more and more how to use the tools. I spent most of yesterday working on it and made quite a bit of progress. I will post some larger pictures hopefully later this afternoon. It looks like this weekend I will be able to start putting on the final finish. Now to start searching through Creating to find some hints. I thought that BK had a good thread about applying finishes. I'll have to find that one. Again, thanks for the encouragement! |
|
P

pdrake
Posted
posted
on
Thu, Mar 2, 2006 8:40 AM
very nice. what kind of wood is that? |
|
BK

Basement Kahuna
Posted
posted
on
Thu, Mar 2, 2006 9:05 AM
Nice Tiki, and for a first that's incredible. I'll PM you with some of my humble techniques on finish for what it's worth! |
|
T
tikisobayli
Posted
posted
on
Thu, Mar 2, 2006 10:11 AM
Thanks BK for the help...I think that I speak for everyone on here that you and Benzart are a great help and resource. As far as the wood, I believe its poplar. When Katrina can through our way it knocked down a bunch of trees in our backyard. So, the first thing that popped into my mind was "Hey! Tiki Wood!!". So I cut the longest straightest portions. I have a few more but only about 2.5'-3' tall. This one measures in at just about 4.75'. |
|
T

tikigap
Posted
posted
on
Thu, Mar 2, 2006 11:19 AM
Hey BK - I'd like to see your notes on finishing too! Can you post them or PM me with that? Thanks in advance! |
|
G

GMAN
Posted
posted
on
Thu, Mar 2, 2006 11:24 AM
I agree. Very nice stuff. Don't rush it though, wait until it is really done before you start applying finish. After you think you are done carving/sanding, set it aside for a day or two and then see if you still think you are finished. Good luck, and please post pics of it when you are done. |
|
P

Polynesiac
Posted
posted
on
Thu, Mar 2, 2006 12:59 PM
Awsome way to make the best out of a very bad situation, bro. REcycle all the wood you can find and let the tikis loose amazing first carving - most first timers (like I did) start with just a tiki head, but you dove right in and did a full body. That ain't no easy task when you're still learning how to use the tools too! Thanks for sharing and keep the tikis coming! |
|
H

Howland
Posted
posted
on
Thu, Mar 2, 2006 7:18 PM
I like that---nice job! His 'wonkiness' evokes motion-makes him look almost alive. Post more pics (BIGGER ones). |
|
H

hewey
Posted
posted
on
Fri, Mar 3, 2006 4:17 AM
Cool, The wonky look gives him an individual look |
|
T
tikisobayli
Posted
posted
on
Sat, Mar 4, 2006 3:13 AM
Thanks everyone for the continuing encouragement. I do have to agree with Surf and Turf, my fiance said the same thing. She's the real artist of the family, but when you see him in person, the upper half takes on movement. Well, here is the guy just after his final sanding and he's just about ready to take his stain bath. I did just a bit more work on the interior line on the nose after this picture was taken to clean it up a bit. Front View: Side View: Today he will begin to take on some color...I'll keep you updated. [ Edited by: tikisobayli 2006-03-04 03:17 ] |
|
T
tikisobayli
Posted
posted
on
Sun, Mar 5, 2006 11:02 AM
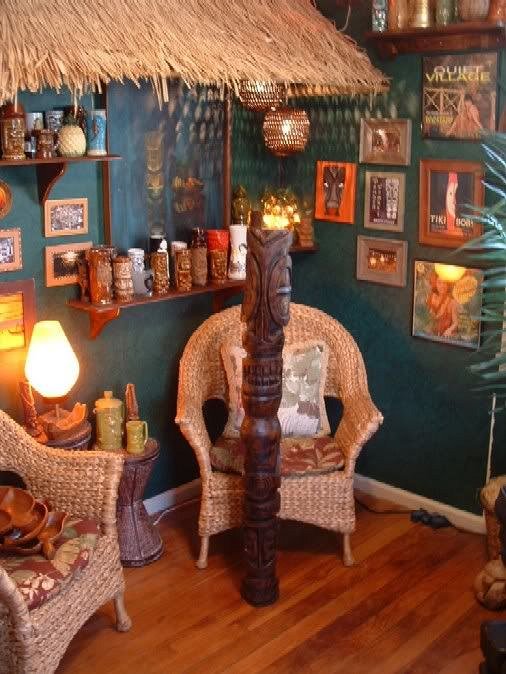
Here are some pics of the Marquesan Tiki done and in his rightful place. Outside just after final finish layer: I was a bit worried while the stain was drying as it had a mush redder color then I wanted. But, after drying, the color calmed down and is pretty close to what I was going for: And finally, here he is in his new home, The Wiki Wiki Room: All in all, he turned out really good for my first attempt. I'm very happy with the results and he really makes a difference in the Wiki Wiki Room. So, I have started working out the next tiki. I will post some of it once I get started. It is going to be a bit more whimsical but not cartoony! Again, thanks to everyone for the help! I hoep that one day I will be able to return the favor. |
|
H
HelloTiki
Posted
posted
on
Sun, Mar 5, 2006 11:42 AM
He looks great. He needs a name. (marq?). |
|
P
PockyTiki
Posted
posted
on
Sun, Mar 5, 2006 12:07 PM
that's really sweet. I'd deffinately buy one of those guys from ya. |
|
T

Tikiwahine
Posted
posted
on
Sun, Mar 5, 2006 12:18 PM
Great tiki! Great room! You have many talents. |
|
H

hmc
Posted
posted
on
Sun, Mar 5, 2006 2:39 PM
Looks great, fantastic stain on it. Funny how it looks even better in it's rightful place! |
|
BK
Basement Kahuna
Posted
posted
on
Sun, Mar 5, 2006 4:33 PM
Nice job, man. |
|
J
JohnnyP
Posted
posted
on
Sun, Mar 5, 2006 5:48 PM
Nice job, he'll be happy in that wonderful room. Can't wait to see what you come up with next. |
|
G
GMAN
Posted
posted
on
Sun, Mar 5, 2006 6:00 PM
Very nice Marq. Nice clean job. He looks wonderful in your tiki room. Be careful, carving is addictive and you may need to expand your tiki space if you continue - or you could make pendants. -Gman |
|
T
tikisobayli
Posted
posted
on
Tue, Mar 7, 2006 7:17 AM
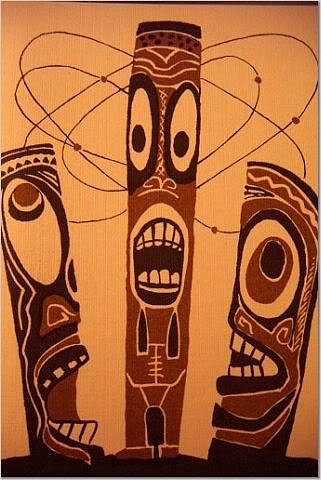
Thanks for the words of encouragement. We had a few people over on Sunday and the ones that knew what I was up to were interested in seeing what I came up with. They were all amazed at what someone can do with a bit of time and some desire. Anyway, as for the name I named it Nuku Hiva after one of the islands in the Marquesas. So one to the next one. My next project is concerned with one of my favorite images that has popped up on Tiki Central. Some of you might remember the perfect image blending atomic and tiki themes that Virani posted awhile ago in the Tiki Finds thread. For those of you that do not, here is a copy of the image:
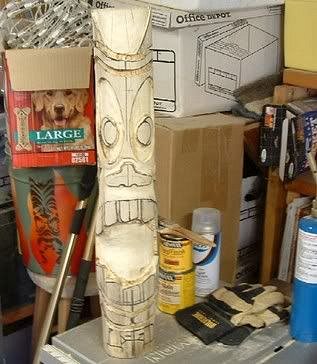
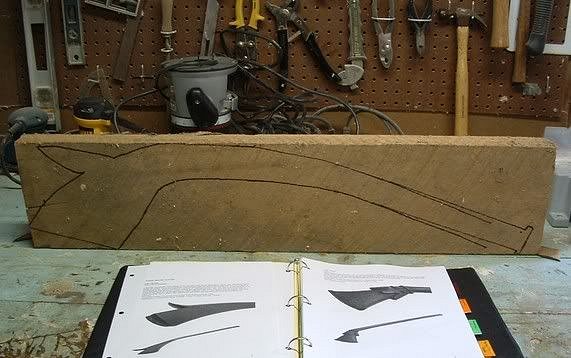
I have always loved this image. So for the next project, I am going to pay "tribute" to the image and attempt to create a grouping of three tikis that give off a similar spirit that is found in the original image. Here is the first picture of the layout and rough mouth cutout:
This one is just under 3' and again is poplar. This time I started with the rough mouth cutout and established a center line off of it so the rest of the guy will be centered on the mouth. Here is a picture of the initial body rough out cuts:
I do not have a side view picture yet, but this one to is a bit wonky. So, with this one I used that to my advantage. If looking at the tiki in profile, you see that starting from about 6" up from the bottom, the log begins to curve back. This really makes a difference and really helps with portraying the movement in the original image. |
|
M

McTiki
Posted
posted
on
Tue, Mar 7, 2006 9:07 AM
Sweetness! I have to do one of these. Nice work! |
|
H
hewey
Posted
posted
on
Tue, Mar 7, 2006 6:41 PM
Cool Marquesan. This style of tiki is really growing on me. Carvings like yours only helps :) |
|
H
Howland
Posted
posted
on
Thu, Mar 9, 2006 6:48 PM
TS--are you 'wonky-tonkin' again? That's gonna look real cool when your done, I'm thinkin'. Can't wait to see the trio together. SnT |
|
P

pappythesailor
Posted
posted
on
Thu, Mar 9, 2006 7:38 PM
Really nice start. I can't wait to see more. |
|
T
tikisobayli
Posted
posted
on
Fri, Mar 10, 2006 5:52 AM
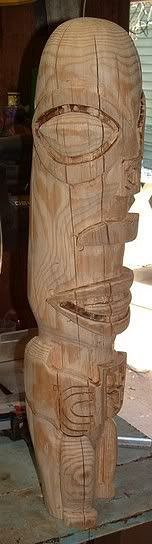
Thanks to the folks that are keeping an eye on my progress. SnT, You'll have to ask our dog Pizmo about the cookies, but I think she might let you have one if you really want one. Also, I agree about the grouping of three. So many of the tikis I have seen carved here and in other places are singular in nature. I think the three together will add something to them as they get ready for that great atomic power! Here are some update pictures of the first of my Atomic Tikis. The initial rough out cuts are just about finished. I still have some shaping to finish around the head dress and mouth, but hoepfully I can get that knocked off today. Here is a front view: Side View: In the profile view, you can really get a sense of the curve in the log. I think it works out very well with the Atomic tiki and really helps in replicating the image. It adds a real sense of "playfulness" and motion to him. As an aside, while working on these guys, I have been thinking about the differences between modern carvers/tikis and traditional carvers/tikis. Beside the obvious differences (e.g. tools and temporal difference), it has dawned on me that traditional carvers were more focused on the image and the spirit of the tiki while modern carvers pay attention to the same thing. Modern carvers challenge, in a sense, is to impart a sense of personality to the tiki. Just a thought, I'm sure that many carvers on here have similar odd thoughts while working. |
|
B
Benzart
Posted
posted
on
Fri, Mar 10, 2006 6:13 AM
I can see already, Obayli, that this guy is going to be Another Excellent carving, Especially for your Second tiki?? |
|
T
tikigap
Posted
posted
on
Fri, Mar 10, 2006 6:38 AM
Boy I'll say! Great Job! The color is very rich! |
|
MD

Mr. Dale
Posted
posted
on
Fri, Mar 10, 2006 4:19 PM
These are awesome.....Willy wonkinees or not......Great tikis for your first....hell they'd be great tikis for your fourth or fifth. |
|
T
tikisobayli
Posted
posted
on
Fri, Mar 10, 2006 5:43 PM
I spent a little time today working on the new guy, but not much came of it. I went to our university library most of the afternoon spending time reading and photocopying. It truly is amazing the depth of Oceanic Art. My question to everyone, any suggestions as to completing the hand/leg/feet section at the lower portion of the tiki? Should it remain rather simple or have more detail. My thinking is that since these guys are going to be more kitschy then traditional, maybe more on the simple side. Any thoughts? |
|
J
JohnnyP
Posted
posted
on
Fri, Mar 10, 2006 5:53 PM
For just getting started you are doing some really great work. |
|
T
tikisobayli
Posted
posted
on
Sat, Mar 11, 2006 8:42 PM
Here are some new pictures of the first atomic guy. These pictures are from tonight, just after the first sanding. I still have to sanding with 100 and 220 grit before any type of finish is applied. Front View: Side View: Back: Kind of a Canted Angle: |
|
H

harro
Posted
posted
on
Sun, Mar 12, 2006 4:35 AM
i can't suggest any areas for improvement - it's looking great so far - can't wait to see the final product (and his 2 mates!). |
|
L

Loki
Posted
posted
on
Sun, Mar 12, 2006 5:15 AM
Wow, really great first tikis. Puts mine to shame. Keep up the great work. Just keep making wood chips and using lots of tools to learn what each one does. Another carver is born. Whooowooo! |
|
V

virani
Posted
posted
on
Sun, Mar 12, 2006 11:07 AM
Hey, that's great. I'm glad that my post made you want to carve those tikis... By the way, don't know if you remember, but they were first real tiki poles, before being the design for the atomic office, as seen on this record cover, and were famous in papeete :
|
|
C

congatiki
Posted
posted
on
Sun, Mar 12, 2006 3:55 PM
Well he sure looks happy....I like him...any plans for the finish...ya gonna splash a little |
|
T
tikisobayli
Posted
posted
on
Sun, Mar 12, 2006 7:07 PM
Varani- Thanks for the album cover! I knew that there was another image that went along with it, but just could not remember what it was. I will say this, they are certainly colorful, but I like them a lot. I worked on putting a finish on the latest tiki today: Overall the finish is OK. I tried to go a little lighter on this one. When you see it, some of the features kind of get lost. So, after seeing the album cover, I'm thinking that I will add some muted colors over the stain to highlight some of the features. While the stain was drying and so forth, I started on another project: I have had these large piece of oak for a while now and never knew what to do with them. The came out of a old cotton warehouse and were originally floorboards. They are just under 2 inches thick. Great pieces of wood and I think they my turn into some weaponry for the Wiki Wiki Room. Very excited about working on this for sure. |
|
J
JohnnyP
Posted
posted
on
Mon, Mar 13, 2006 9:25 AM
The finish came out really nice, better than that on the album cover. That is a nice chunk of oak. Keep us posted. |
|
B
Benzart
Posted
posted
on
Mon, Mar 13, 2006 9:42 AM
You have REALLY Out done yourself wth your Awesome first tikis. They came out VERY Nicely. Looks like you are going down the same path with this club.. Keep it UP. Great... |
|
T
tikisobayli
Posted
posted
on
Tue, Mar 14, 2006 9:09 AM
Thanks JP and Ben for the continued support. I'm continuing with the Sali club. After cutting out the basic shape with the band saw, I realized the club was to thick. So, as I don't own a planer, I used a router to thin out portions in the handle and blade. Once thinned, chisels and a sander were used to round the lower potion of the handle. I have never worked with oak before and assumed that it would be very tough to carve. But, the oak is really nice to work with and I think in the end is going to have a great finish. So, here are a couple progress shots:
[ Edited by: tikisobayli 2006-03-14 09:14 ] |
|
T
tikisobayli
Posted
posted
on
Sat, Apr 8, 2006 1:02 PM
So, here are a few updates on my projects. My first war club is just about finished. The last coat of stain is drying as I type. Here are a couple pictures of the progress: One side with initial check carving on the upper handle Final Sanding and 1st part of finish applied: Overall the club turned out pretty good and was for sure a great learning experience. I still need to apply the shell inlay that I have cut for the upper handle. I will be finishing that task this afternoon. I have some good ideas of where to improve on the next one. I wish that I could have afforded Coon Tiki to see the weapon master firsthand. Next, is a second Marquesas inspired guy. Over our spring break I was at my parents house up in the N. Georgia mountains. So I went on a search for new wood and found plenty. I brought back about 6 white pine logs ranging from 2.5' to over 6' in height. Plus, I cut a bunch of very large white oak sections that are still at their house drying. Anyway, here is the first of the tikis to be made out of pine material. Very first rough out cuts or "Torpedo Tiki" Here is the guy as he stands today: I will have some time over the next few days to finish this guy up. I have read on here about how nice pine is to carve. I do enjoy the easy of it and it really does cut like butter. However, it appears that it will take more sanding in the end and it does not hold the best detail when compared to the other wood that I have used. So, when this guy is finished I think that he is going to have to find a new home. We are moving to the Atlanta area during the end of May and we want to move as little as possible. |
|
T
tikisobayli
Posted
posted
on
Tue, Apr 11, 2006 4:57 PM
Here are some new pictures of things being worked on right now. With the spring weather here in the south taking hold, plenty of time for projects. Anyway, here we go. Here is the finished sali, except for the shell inlay which I am still working on. The picture does not really portray the color of the finished product. The flash made the club have a much redder hue then it really does.
My second Marquesan inspired just got its final sanding. Here are a couple shots of this guy:
Tomorrow I will start with the stain and we will see how it turns out. |
|
T
tikisobayli
Posted
posted
on
Mon, May 1, 2006 11:38 AM
Here is the latest project. Layout and roughout cuts are complete:
The lower face is cut out, just don't have a picture of it. This one is going pretty fast and should be onto the sanding tomorrow. |
|
BPB

Bay Park Buzzy
Posted
posted
on
Mon, May 1, 2006 1:33 PM
Cool picture of Norm. Is it autographed? |
|
J
JohnnyP
Posted
posted
on
Tue, May 2, 2006 12:22 PM
I missed the sali finished you posted a few weeks ago. Nice. How did the marq turn out after stain? JP |