Tiki Central / Other Crafts
Tropical Patio Rebuild May 2013 Done!
|
BPB

Bay Park Buzzy
Posted
posted
on
Tue, Jun 20, 2006 4:18 PM
A fellow member of the Tiki Central family hired me to fix up a lounging area that was constructed a few years ago. The project would entail making a deck and re-fashioning an originally thrown together thatch style roof. I had no idea what the area or existing structure looked like. I had measurements of how far apart four 4x4s were and sent back a plan drawing in advance to iron out the details and make sure that what I envisioned was correct. We tweaked it slightly and I was able to come up with a complete set of materials that would be on site and painted prior to my arrival.
[ Edited by: Bay Park Buzzy 2013-05-03 00:48 ] |
|
H

hiltiki
Posted
posted
on
Tue, Jun 20, 2006 6:03 PM
Oh my Buzzy, you never seize to amaze me...It looks great, nice job. Can't wait to see the finished project. :) |
|
H

hewey
Posted
posted
on
Tue, Jun 20, 2006 8:55 PM
Looks pretty good for a days work man! Nice |
|
M

McTiki
Posted
posted
on
Wed, Jun 21, 2006 11:08 AM
Buzz, Are you cloned? First you are carving up all kinds of logs, now this? Wow! |
|
BB

Bamboo Boyd
Posted
posted
on
Thu, Jun 22, 2006 5:02 PM
Lookin' Good Buzzy! Love the bamboo fence and railing. Great Job! |
|
BPB
Bay Park Buzzy
Posted
posted
on
Fri, Jun 23, 2006 4:44 PM
Bamboo Boyd: It's the highest honor, in my opinion, to be recognized for this effort by someone with "Bamboo" in front of his name. |
|
H
hiltiki
Posted
posted
on
Fri, Jun 23, 2006 5:13 PM
Not that I am an expert at this kind of stuff or anything, frankly ask me anything about the latest fashion trends and I am there....but, I think the new 3 pieces would look ravishing in this structure. ( I am like a scud missile following Buzzy's develpments)...:) :) :) :) :) |
|
B

Benzart
Posted
posted
on
Sun, Jun 25, 2006 6:24 AM
Buzzy, you just DOn't Ever stop do you! Excellent stuff here too. |
|
BPB
Bay Park Buzzy
Posted
posted
on
Thu, Jul 6, 2006 11:39 AM
Dear boss, |
|
BPB
Bay Park Buzzy
Posted
posted
on
Thu, Jul 6, 2006 6:01 PM
Dear Boss: If you want a grass ceiling instead: 4 foot by 4 foot sections available(you would need four for the ceiling-exactly like the ones you have now-but flat and brand new)
[ Edited by: Bay Park Buzzy 2006-07-09 19:56 ] [ Edited by: Bay Park Buzzy 2006-07-11 23:17 ] |
|
BPB
Bay Park Buzzy
Posted
posted
on
Tue, Jul 11, 2006 8:16 PM
Material plans and costs: |
|
TD

Tiki Duddy
Posted
posted
on
Tue, Jul 11, 2006 9:01 PM
hey that is looking real good. i especially like the bamboo railing. hope it turns out just the way you want it to. good luck on the roof. |
|
BPB
Bay Park Buzzy
Posted
posted
on
Wed, Jul 19, 2006 1:25 AM
Dear boss, Interior ceiling idea: As always, let me know... |
|
BPB
Bay Park Buzzy
Posted
posted
on
Fri, Jul 28, 2006 4:05 PM
Dear Boss:
[ Edited by: Bay Park Buzzy 2006-08-01 17:46 ] |
|
BPB
Bay Park Buzzy
Posted
posted
on
Tue, Aug 1, 2006 6:19 PM
I hoped to finish the second half of the project in a single day. The heat last week made me have to reschedule. On Sunday, I was able to get it done... Dear Boss: Thank you so much for trusting me with this project. I'm glad you like it, and hope it will only get better with time. Enjoy your new patio, |
|
H
hewey
Posted
posted
on
Tue, Aug 1, 2006 8:06 PM
That looks great man - kool project! Did you go with the corrugated iron/steel roof? If so, how did you attach the matting underneath. I am gonna have to remember this for when I get my own place - I want one! |
|
BPB
Bay Park Buzzy
Posted
posted
on
Thu, Aug 3, 2006 1:00 AM
Hewey:
[ Edited by: Bay Park Buzzy 2006-08-03 01:46 ] |
|
H
hiltiki
Posted
posted
on
Mon, Aug 7, 2006 9:17 AM
Buzzy regarding the black bamboo panel, is it real black bamboo and if not how do they weather being out all year round, do you have any idea. I was thinking of buying some? :) |
|
BPB
Bay Park Buzzy
Posted
posted
on
Tue, Aug 8, 2006 1:55 PM
Hiltiki: I went down and visited some pals at the wholesale bamboo yard today and asked them several questions on your behalf. Here is what I remember: |
|
H
hiltiki
Posted
posted
on
Tue, Aug 15, 2006 6:34 PM
Thanks for the info Buzzy, it really helps. |
|
H'T

Hau 'oli Tiki
Posted
posted
on
Tue, Feb 6, 2007 8:10 AM
I had to bump this thread cuz Buzzy's awesome project, complete with his drawings, has solved my problem!! |
|
Z

Zaya
Posted
posted
on
Tue, Feb 6, 2007 3:19 PM
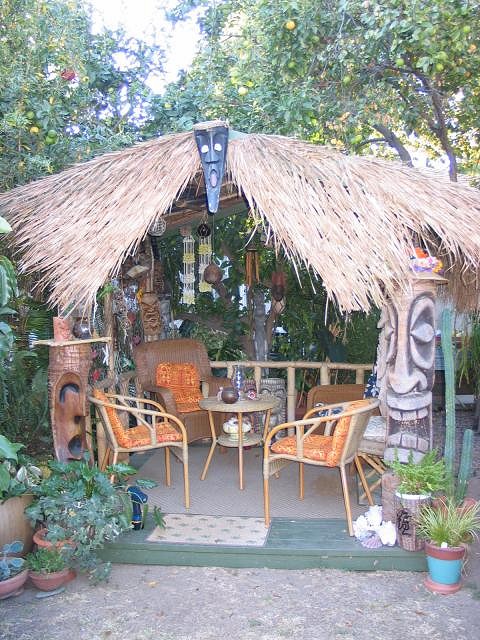
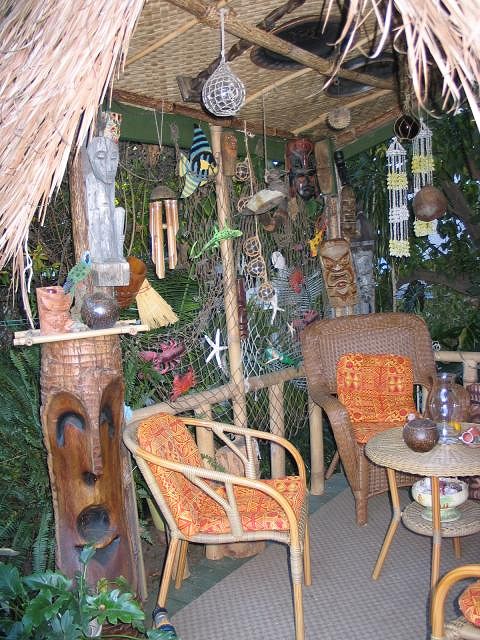
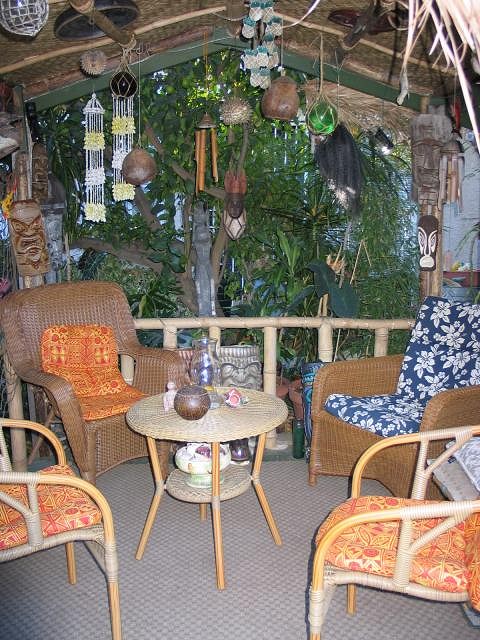
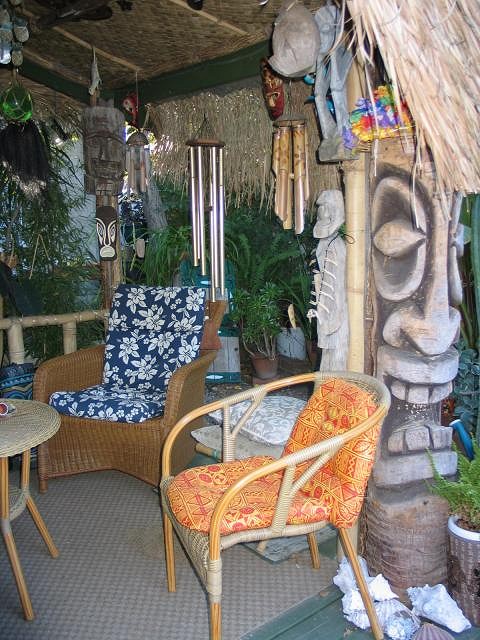
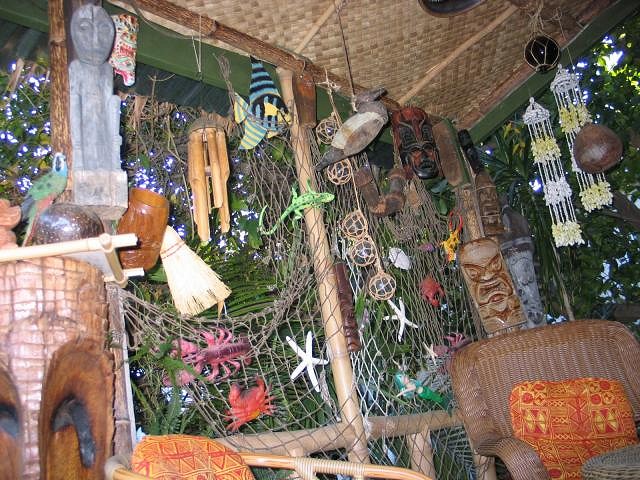
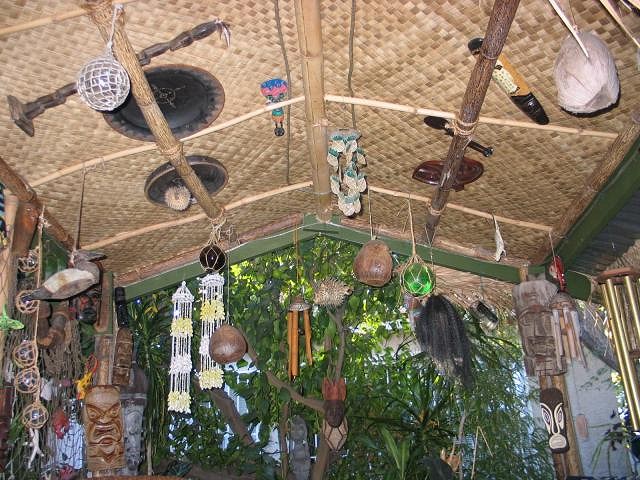
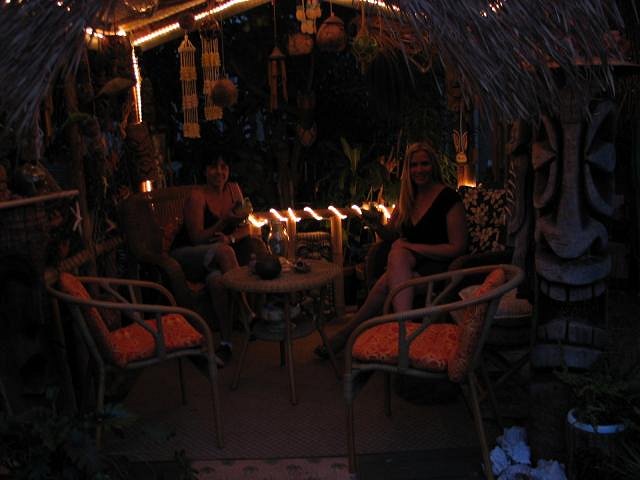
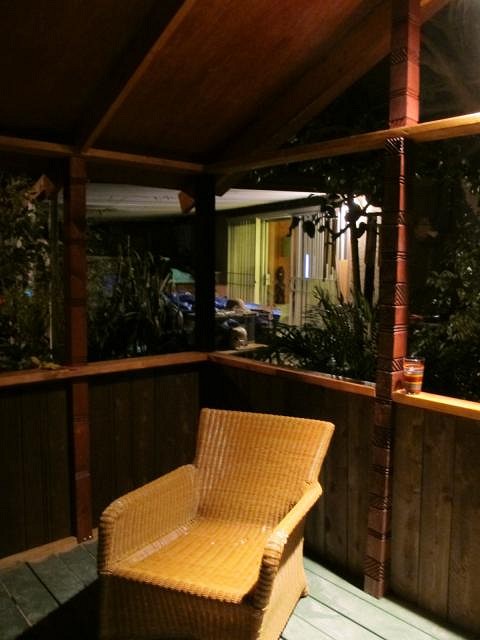
Hau 'oli Tiki, yes, Buzzy is very creative and an excellent teacher. He can make the most complicated things seem very simple so anyone can do it. I wanted to show you pictures of how the Tropical Patio turned out in the end. These were taken the last time we were up at Hiltiki's house. I think they'll get you excited about the outcome of your own patio!
Here's one of Hiltiki and I enjoying the embiance of this wonderful place at night! Enjoy!! I'm looking forward to seeing how yours turns out. Definitely post some pictures! Good luck! [ Edited by: Zaya 2007-02-06 16:08 ] |
|
M
McTiki
Posted
posted
on
Tue, Feb 6, 2007 3:52 PM
Someone is having fun :) Very cozy retreat indeed. Mahalo McTiki |
|
H
hewey
Posted
posted
on
Tue, Feb 6, 2007 5:38 PM
yeh, very nice hut and thanks to Buzzy for the sketches :) |
|
H
hiltiki
Posted
posted
on
Tue, Feb 6, 2007 7:07 PM
My tiki hut is real sturdy and extreme weather happy.Buzzzzzzzzzzzzzzy rocks! |
|
B

Babalu
Posted
posted
on
Tue, Feb 6, 2007 8:36 PM
Hey Buz, Extra cool! Real nice work. This stuff is fun stuff to play with huh. I really like that black bamboo too...if I could have only found 4" diameter. Is the carving one of yours? Babalu |
|
BPB
Bay Park Buzzy
Posted
posted
on
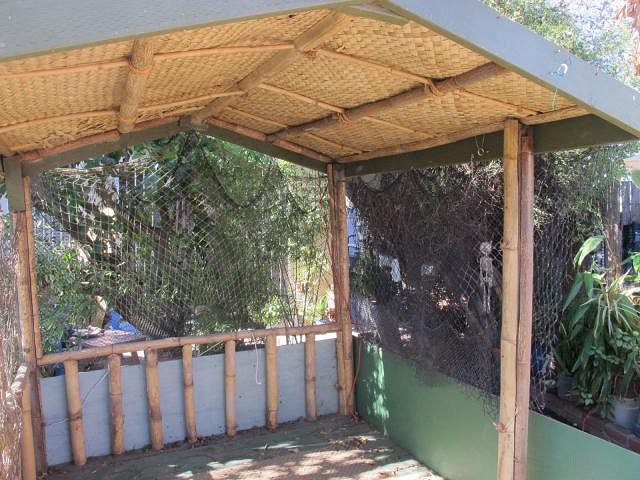
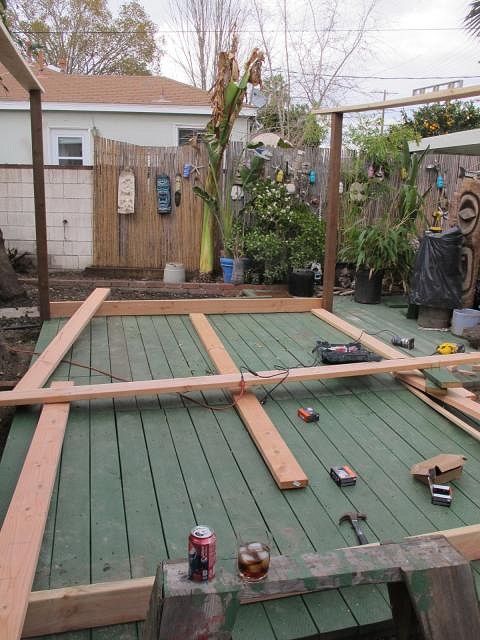
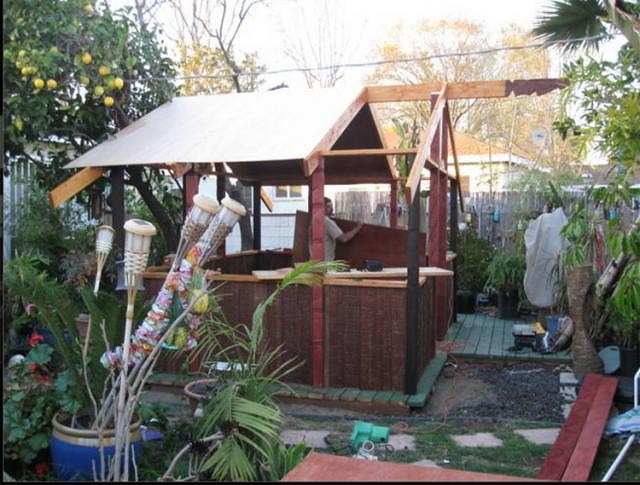
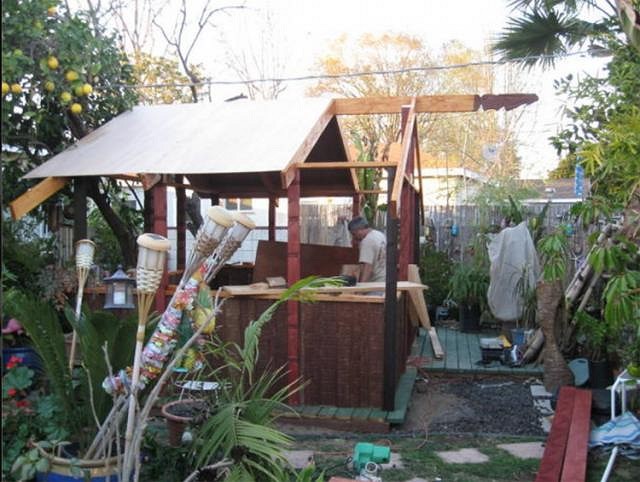
Thu, Jan 24, 2013 11:36 AM
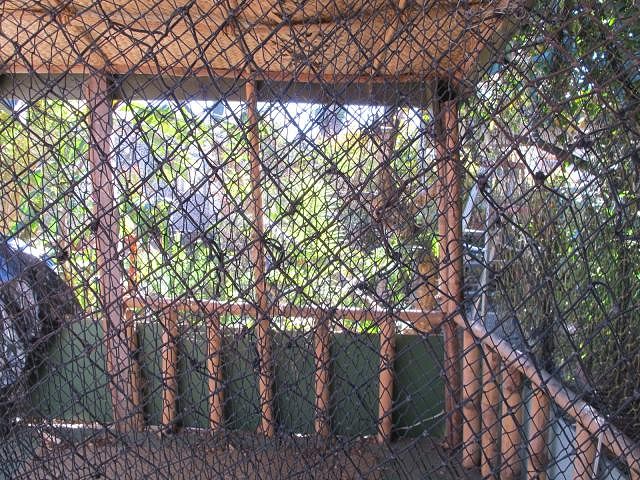
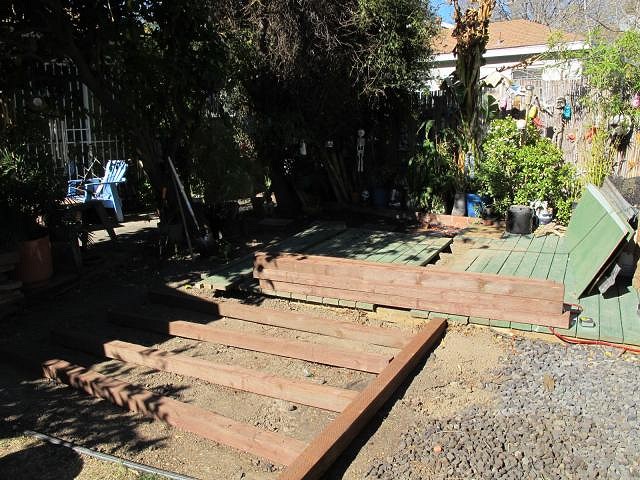
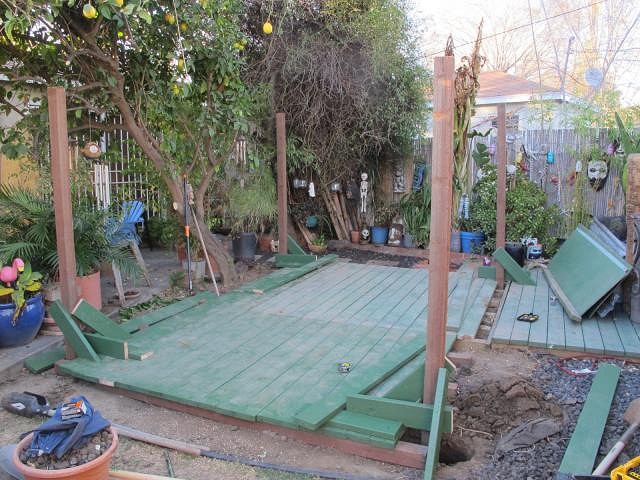
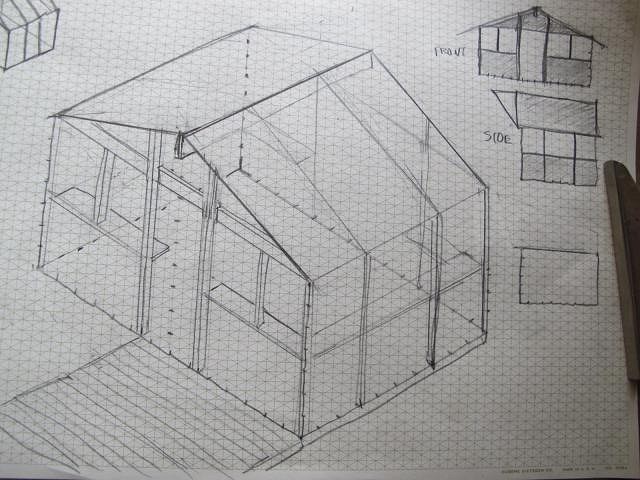
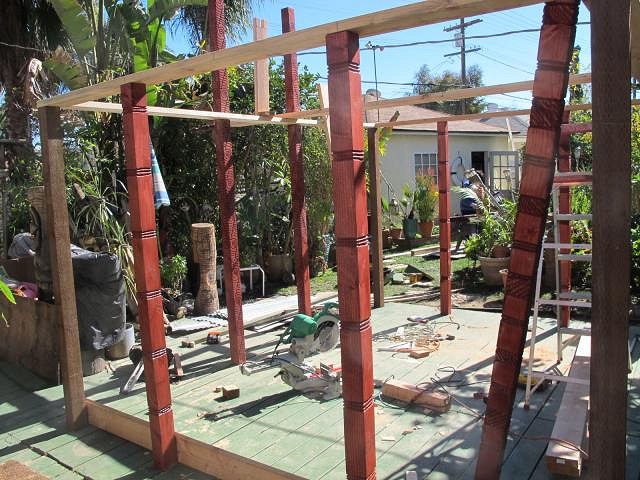
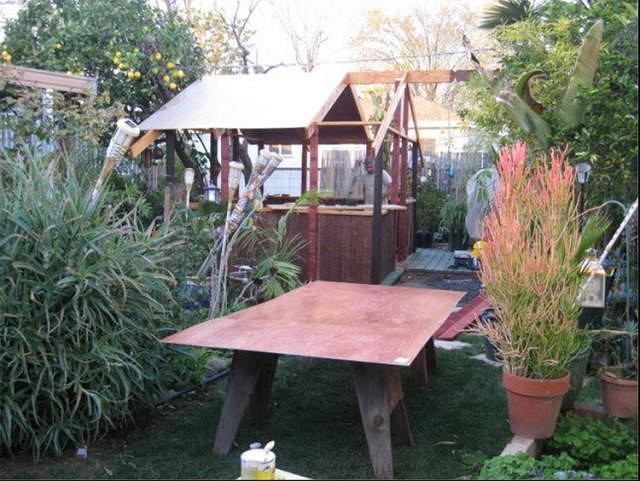
Time to rebuild the rebuild I did a few years ago... One last look before it goes bye bye: All gone! Construction time! First day's action. New floor down, poles set, and waiting for a roof: Rough sketch of where it's going:
Roof and fun stuff next! |
|
D

danlovestikis
Posted
posted
on
Thu, Jan 24, 2013 12:26 PM
Can't wait for the next |
|
HT

Hale Tiki
Posted
posted
on
Thu, Jan 24, 2013 1:48 PM
Good luck, Buzzy! |
|
L

LoriLovesTiki
Posted
posted
on
Thu, Jan 24, 2013 6:18 PM
A new build! Oh goodie!!! Can't wait to see the progress. Keep the pictures coming. :) |
|
M

MadDogMike
Posted
posted
on
Fri, Jan 25, 2013 11:45 AM
Look at that BuzzMan go!!! |
|
BPB
Bay Park Buzzy
Posted
posted
on
Tue, Feb 12, 2013 9:44 PM
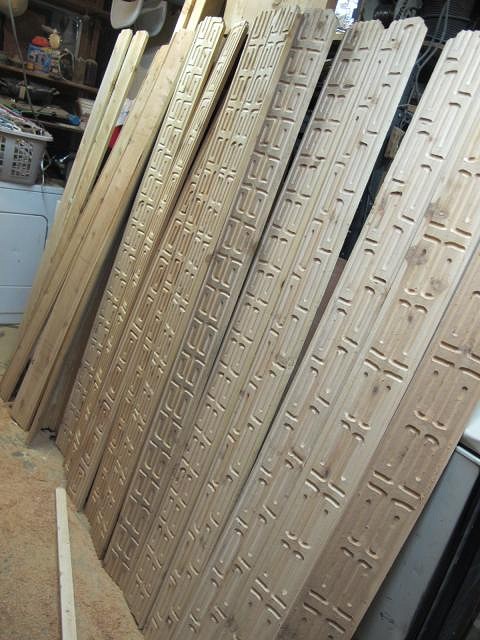
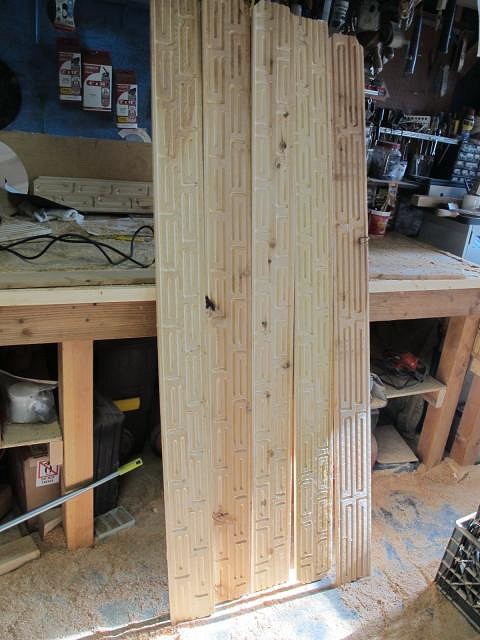
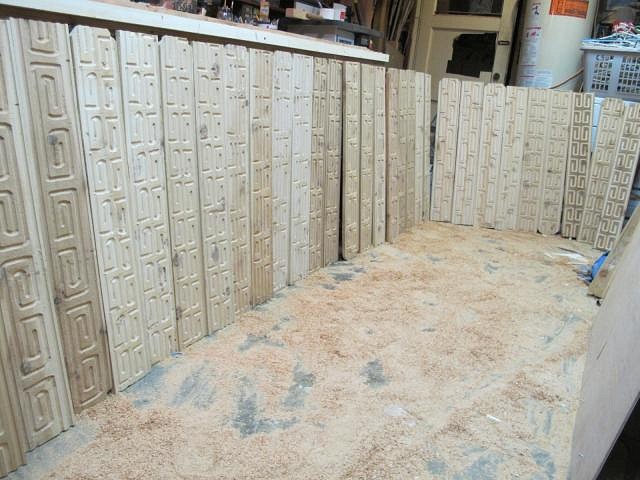
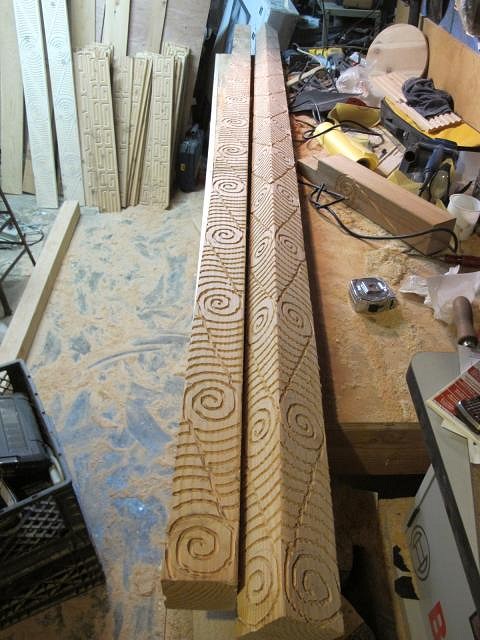
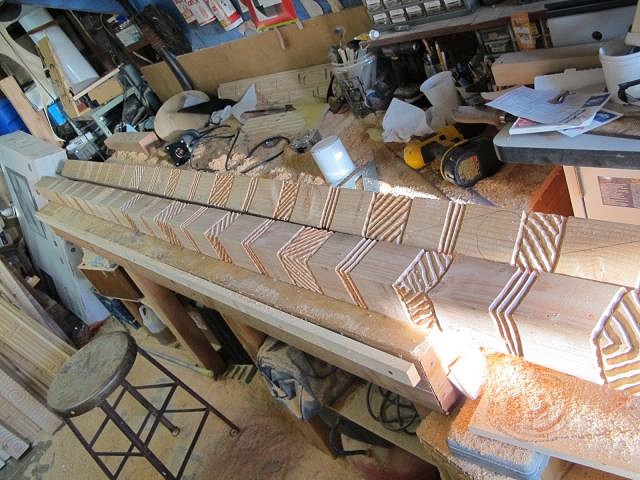
Top of the page, so here is where we are kind of going with this: Before I started the actual build, I did a little decorative work on the lumber stock. 22 six foot fence planks, 10 or different Marq inspired patterns
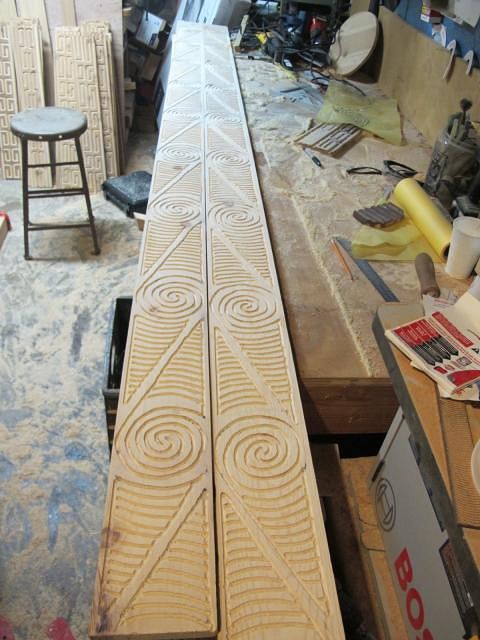
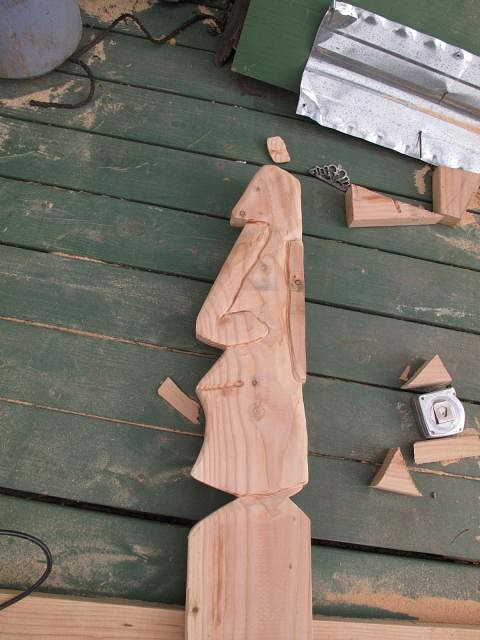
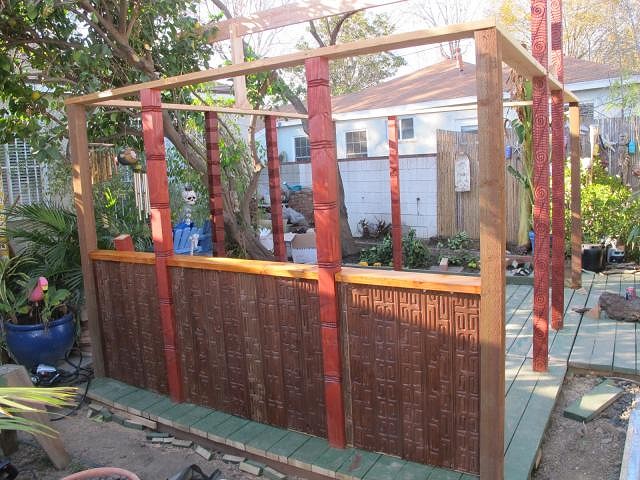
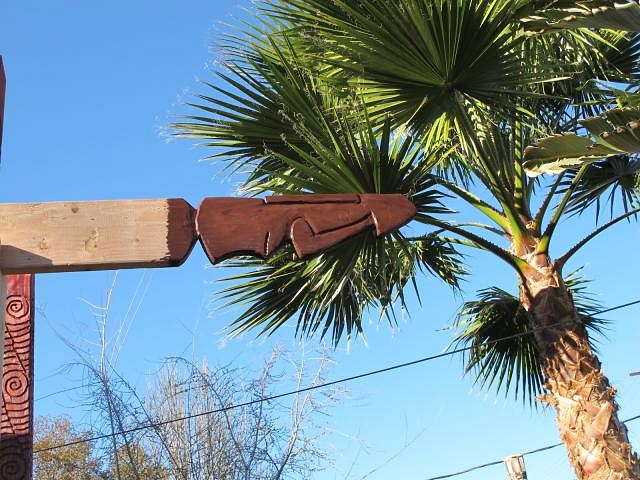
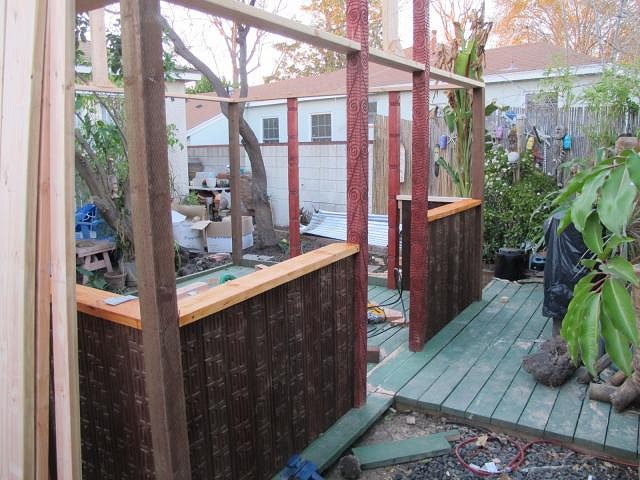
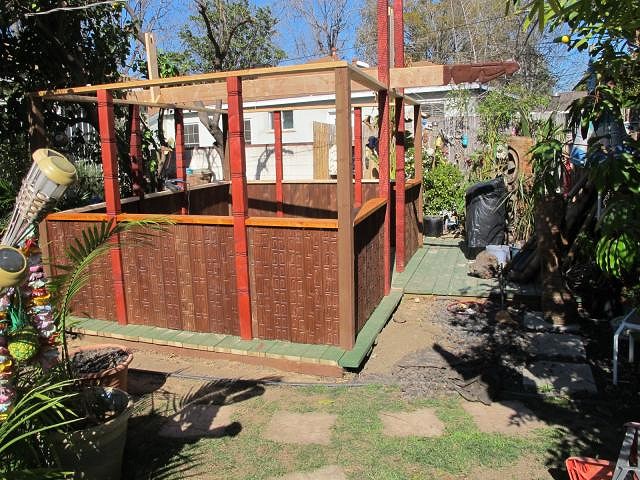
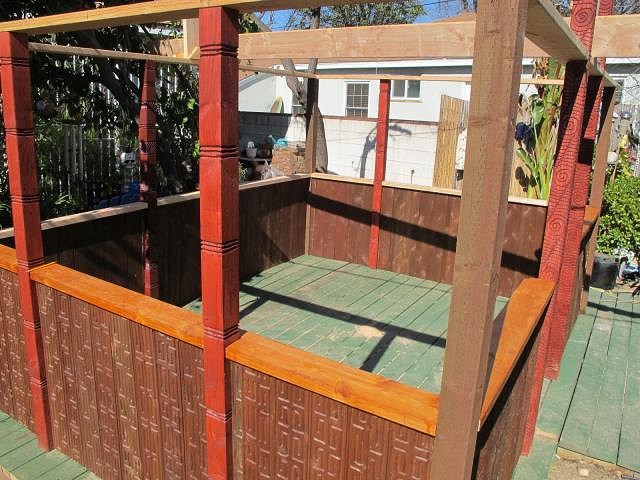
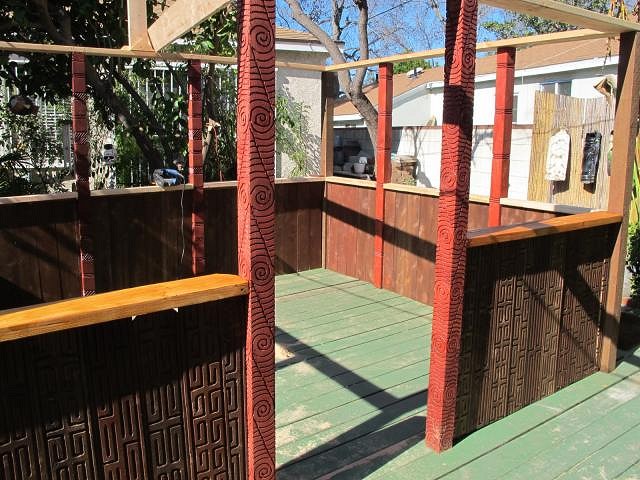
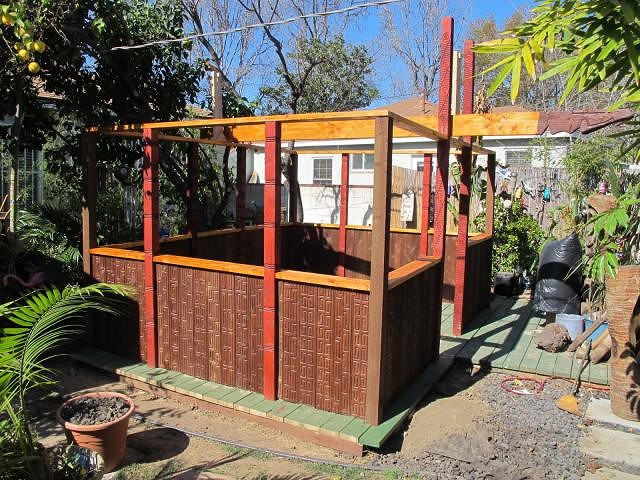
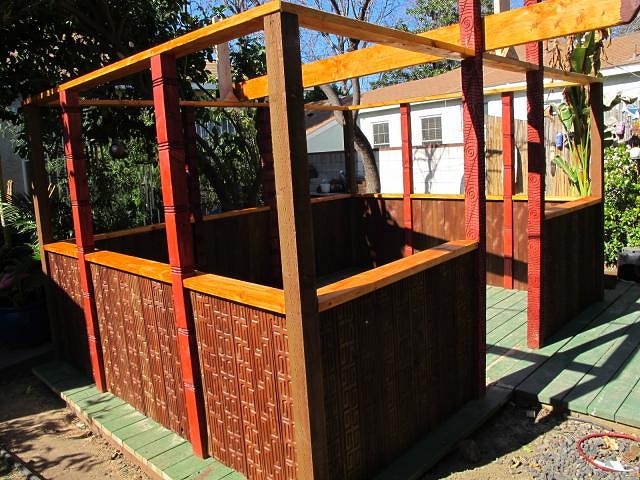
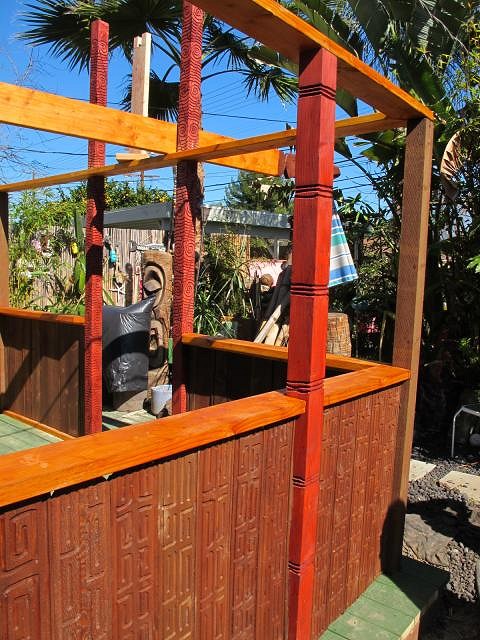
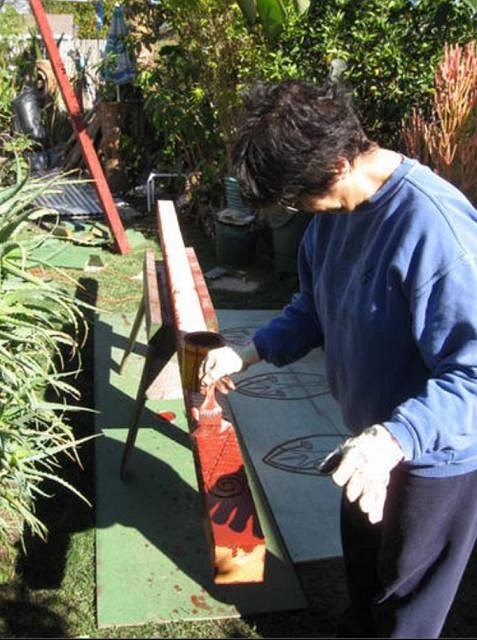
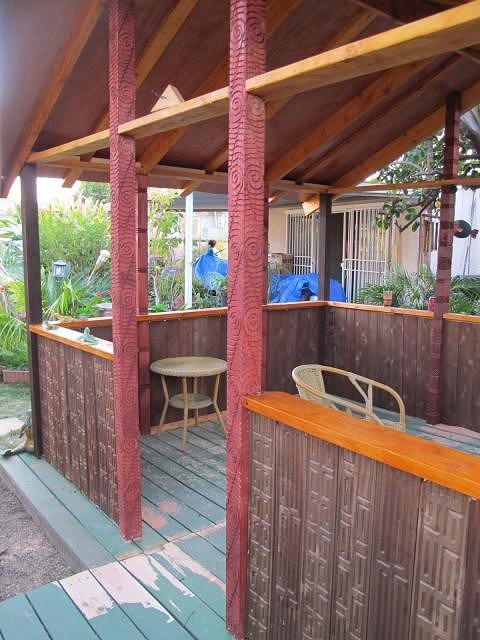
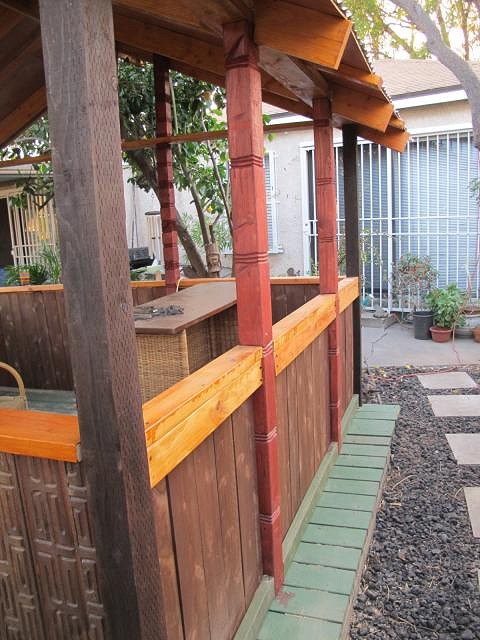
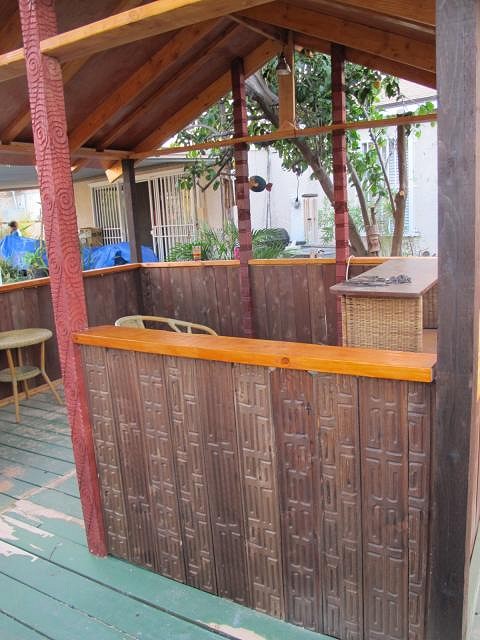
Chopped in half make all i need for exterior lower sections on the two visible walls Next were the front eaves done in Maori swirls Then two maori 10' entry way poles Two 10' back wall poles Now on to the actual build, phase two, the lower half... Poured myself a wild Cherry Pepsi in a glass and got to work. I put the floor boards around the cemented beams back on and started laying wood I carved a Moai profile on the ridge beam I decorated a few more 4 x 4's with some simple designs and started placing those. You can just barely see Hiltiki in the background staining the poles I just decorated. It was stain and install... Fun part started here: Putting the lower walls and window sills up Moai head stained: Creeping around the front with the patterned boards and table bar window sills Some more staining help and I finished the last two lower walls Nice, pretty box
Little more color, and the lower part is done!
Couple weeks, and it's roof time... |
|
D
danlovestikis
Posted
posted
on
Tue, Feb 12, 2013 10:15 PM
Wow, all that detail is over the top wonderful. You are the man Buzzy. MadDogMike stayed in the Buzzy Bedroom this past week. |
|
HT
Hale Tiki
Posted
posted
on
Wed, Feb 13, 2013 3:13 AM
Looking good Buzzy! EDIT: Actually, I like it so much that it's given me pause, to reconsidering staining my shelving... [ Edited by: Hale Tiki 2013-02-13 03:21 ] |
|
P

poptiki
Posted
posted
on
Wed, Feb 13, 2013 3:24 AM
M [ Edited by poptiki on 2022-10-12 03:04:37 ] |
|
M
MadDogMike
Posted
posted
on
Wed, Feb 13, 2013 6:05 AM
How come I never heard of isometric graph paper before? I gotta get with the program and get me some of that! |
|
T

TikiAno
Posted
posted
on
Wed, Feb 13, 2013 8:01 PM
Buzzy, looks awesome! If you want to head up the hill to Clairemont, I may need to transform an area in the yard. :wink: Look forward to seeing more. [ Edited by: TikiAno 2013-02-13 20:02 ] |
|
L
LoriLovesTiki
Posted
posted
on
Thu, Feb 14, 2013 7:48 AM
I am loving the carved panels for the lower walls, fantastic idea and I'm really digging the different stain colors. Looking great! |
|
C

Canvas
Posted
posted
on
Thu, Feb 14, 2013 4:20 PM
This is awesome. |
|
H

hang10tiki
Posted
posted
on
Fri, Feb 15, 2013 5:54 PM
Buzz room rockin Jon |
|
BPB
Bay Park Buzzy
Posted
posted
on
Mon, Feb 25, 2013 11:22 AM
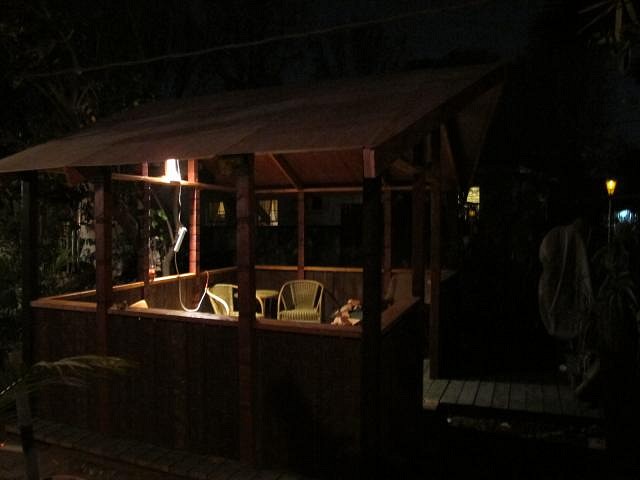
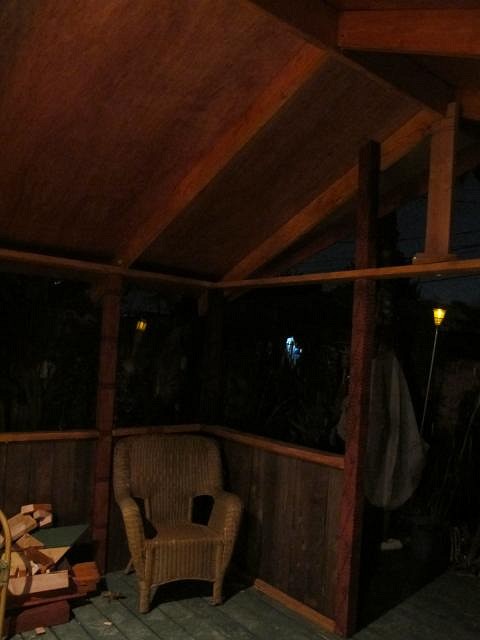
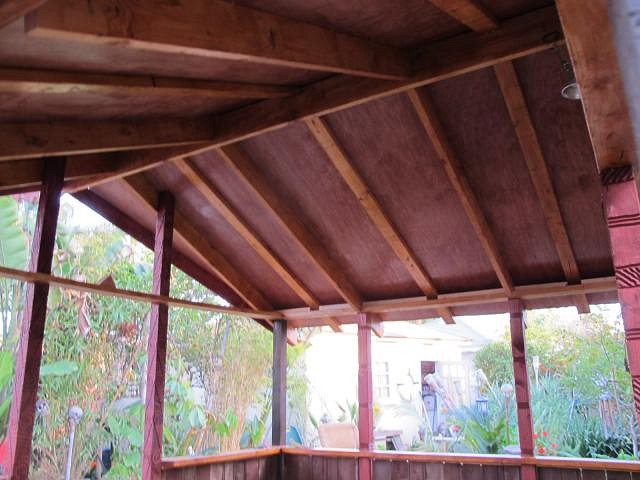
I ran out of daylight before I could get the tin roof up, but the roof supports, ceiling, and everything else is finished. I don't know how it actually looks, because it was too dark to see it.
Looking towards the front door Here's where I pulled in a chair and enjoyed a Cherry Pepsi after a long day of work
I didn't build a tiki hut, I CARVED it!
Thanks Poptiki. My philosophy: If I can't have one, at least I can have the fun of building one!
I wanted something quite different than the tried and true method of burning the shit out of all the wood. I'm pretty happy with it. And to think this decorative fence plank stuff all started just because I had to cover a gate...
I love isometric paper! saves the hassle of using the Tsquare and triangles for the rough sketches. I liked the way my gate looked with the opposing colors, so I ran with that for the whole build so far. Wide pallet...Hilda's pretty much let me do whatever I wanted for this, so thta's been real cool. So far, she seems pretty happy with it.
That'd be nice to work close to home. Let me know when you're ready...
Thanks Lori! I actually can't wait until I see it myself!
Hope you like the rest of it as well.
A few more people like you and TikiAno want one of these, and I just might have to make prefab hut kits... Multi Colored Tiki Huts for ALL! More soon! |
|
H
hiltiki
Posted
posted
on
Thu, Feb 28, 2013 8:30 AM
Here are some progress pictures taken in the daylight, as Buzzy is working non stop.
He made me work like a slave in the freezing weather.
Loved every minute of it. |
|
W

WestADad
Posted
posted
on
Thu, Feb 28, 2013 9:23 AM
WoW! This is a great project! Thanks Hilda and Buzzy for the pictures! Have some of that Lemon Hart out there for me Hilda. Chris |
|
T
TikiAno
Posted
posted
on
Thu, Feb 28, 2013 3:42 PM
Buzzy, I plan on re-working an existing location in the yard- been trying to figure out how to attach an A-frame roof to an existing structure (w/ only two posts). I dig the molding, may want some to go around existing 4x4 posts... look forward to meeting one of these days soon. |
|
WC

Will carve
Posted
posted
on
Fri, Mar 1, 2013 3:49 AM
It took Buzzys thread to get a picture |
|
H
hiltiki
Posted
posted
on
Fri, Mar 1, 2013 7:23 AM
Will that is the worst picture, hahaha. I could only find a few in my tiki hut. Here is one from last year. |
|
BPB
Bay Park Buzzy
Posted
posted
on
Mon, Mar 4, 2013 11:55 PM
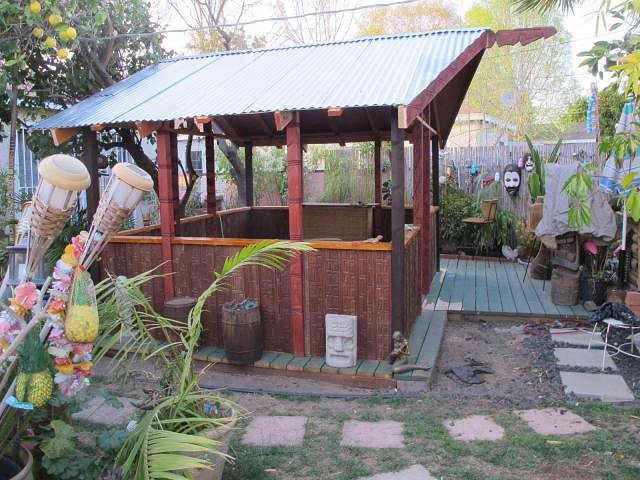
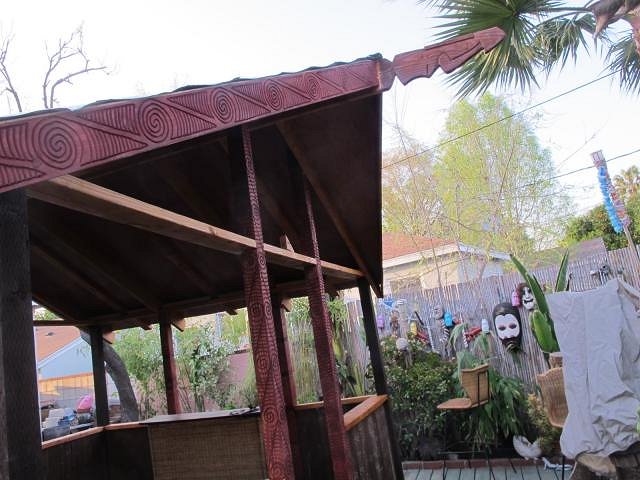
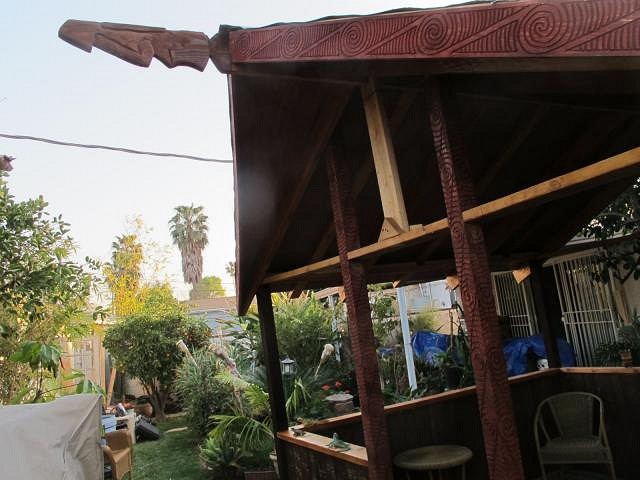
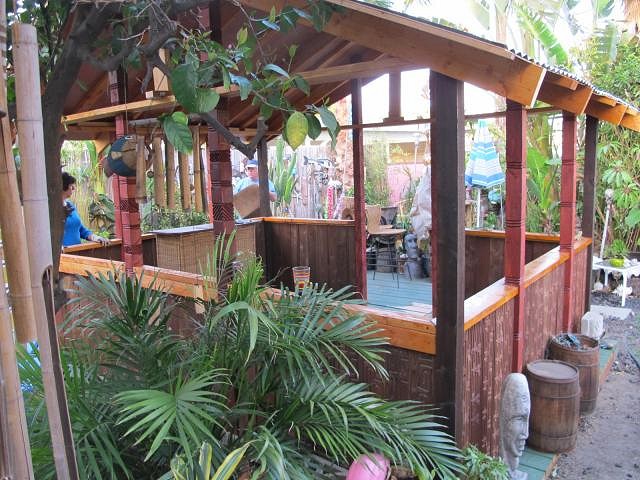
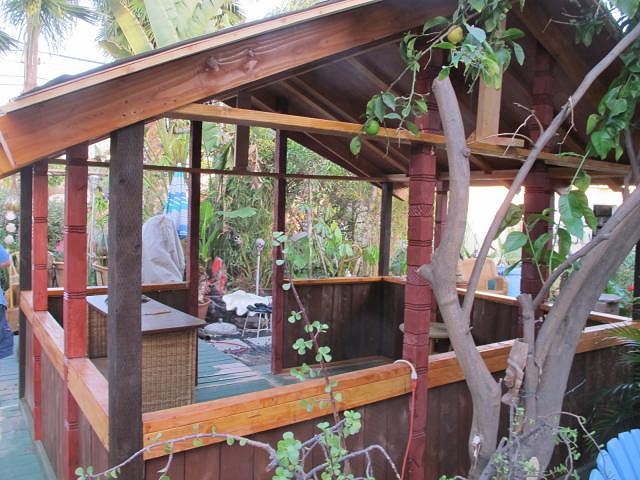
Rain's on the way later this week, so I had to get the tin roofing up before the interior ceiling wood got wet. Here's a side view after I got all the metal roofing up Front side with the Maori swirl patterns: Other side: Back side: I had to hack a bunch of lower brances off that lemon tree to work, but it will fill back in soon and hopefully you can grab a fresh one off the tree while tending bar A few detail shots:
And the ceiling: Next time, some decor, some lights, and a few more little wood details I'll get to the replies from last page tomorrow. I just wanted to post these before I pass out... |
|
ATP

Atomic Tiki Punk
Posted
posted
on
Tue, Mar 5, 2013 2:55 AM
Looking Good Buzzy! |