Tiki Central / Tiki Carving
Kumihimo Tutorial 1.0 (The First One)
Pages: 1 2 replies
|
SU

Sebastian Urresti
Posted
posted
on
Sun, Dec 21, 2008 3:45 PM
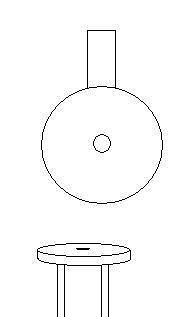
Hello All! Here is what I promise, the first Kumihimo tutorial (To be honest with you, this is the least that I can do for our Tiki Central Iwi). I want to say that this tradition is very rich and the only thing that I want to do is to share the little I know about with you. First we need the stool that is called Maru Dai. Here is a drawing of what can be simply constructed, the first is not mine but Stephen Myhre´s design and can be placed with a C-clamp to any table, the other is an adaptation that I made from the original that has four legs and a base, this one has only two attached to a rectangular base long enough to be also attached to a table with a C-clamp. (I´ll send a photo soon). The circle can be 4" wide and 1" for the middle hole, that small Maru-Dai will be useful to make 4, 6 and some of the simpler 8 strand braids.
Once that we have the Maru Dai we need the Tama, or bobbins were the thread is placed. If you don´t have this you can put the strand around a piece of hard cardboard with an extra-weight attached to it and cut it with the outer shape of the Tama, that is with a waist. The important thing is that the four, six, eight, etc. pieces have the SAME weight. Once you have all the pieces you need to find a counter-weight that is equivalent to the 45% of the total weight. More weight = a loose braid, less weight = a tight braid. The counter-weight can be made with fish weights.
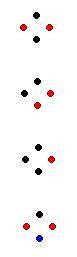
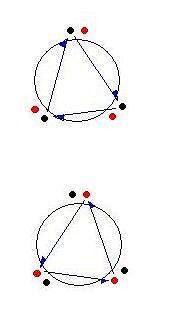
Red is step 1. North dot will be right hand, South dot will be left hand.
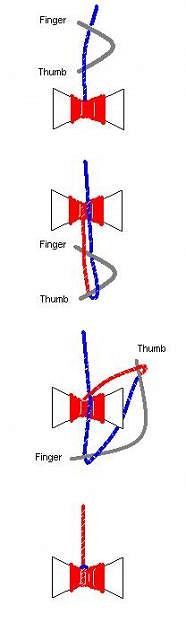
The first is a vertical pattern. The second is a spiral. The third will make a spot that goes in a spiral too. The fourth is a three color spot with two vertical lines. Here´s the way that a fiber is attached to the bobbin. I hope that you all understand the process. Once that all the fibers are tied to the counter-weight ( or hold them with your teeth as I do ) follow the instructions:
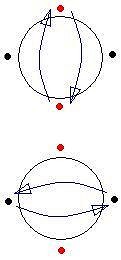
I hope that you understand the process, is not hard to do and once you´ve learned it is easy. Here is another braid for you. That is the start of more complex braids.
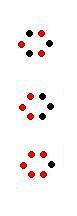
Step 1: North black dot will be Right hand, South-East black dot will be Left hand then both hands will move together. Here are some classical color arrangements.
IMPORTANT NOTE: And last but not least: MOVE YOUR BODY WITH EACH MOVE. Go along with each movement, that will help you to get with the rhythm of braiding. SEND SOOME PHOTOS OF YOUR BRAIDS! Hughs, |
|
G

Grapa-RuHa
Posted
posted
on
Mon, Dec 22, 2008 2:58 AM
Thank you Sebastian, |
|
S

surfintiki
Posted
posted
on
Mon, Dec 22, 2008 9:39 AM
Wow! Thats intense! Thanks for spending the time on this for us. But I am thinking I need to come stay at your house and you can show me in person!!! Ha! :o |
Pages: 1 2 replies