TS

Tom Slick
Tiki Socialite
The Beaches of South Bay, SoCal
Joined: Aug 26, 2005
Posts: 1093
|
TS
Hello all,
I will tell the details of my situation, and get down into the fixing of the pump in the section below that, for some who may just want the fix idea, vs. the story! :lol:
I ran into a problem with my ETR Anniversary Fountain shutting off by itself without any sound.(the fountain has a "clapper" type device to shut it off)
The sound feature was not the problem, it was a short somewhere within the pump. I knew trying to get a replacement would have been a headache thru Disney, that I just tolerated it, and disconnected the pump completely. That way I could at least use the LED lighting as a mood piece. Anyhow, I had a strong suspicion it was a pump leak, because when I diconnected it, and gave it a little shake to clear out excess water from the pump, ALOT more water came out than should have. It even started to trickle out in a tinted pinkish-red color(RUST!). So I set the pump away, and a couple months went by. I recently took the pump down, and it was completely red on the inside plastic case. So I decided I might as well tear it apart and see if I can get it to work again. Also, the pump blade would not turn, due the the internal rust.
Here is what I did to solve the problem, with pictures just in case others may need this help.
What you'll need for tools:
- Dremmel/rotary type tool w/ cutting disk.
- jewelers screwdriver set, or the small screwdrivers used for tightening eyeglasses/sunglasses.
- WD40 or other similar lubricant.
- Silicon Gel(make sure it is waterproof and mold/mildew proof)
- A small vice/clamp
6.(1) piece of 800 grit wet dry sandpaper* (optional)
- needle nosed pliers* (optional)
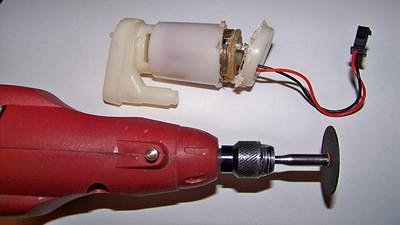
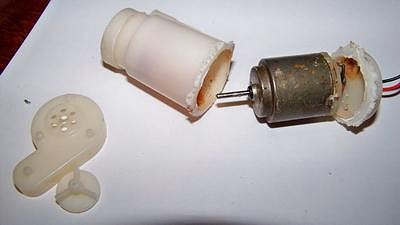
First of all, look where the red and black wire go into the top glued plastic cover. There is a seam where it was fitted and glued on. This is where I seperated the top from the body of the plastic pump protector using the dremmel tool with cutting disk. Just cut along the seam carefully, and not too deep, just enough to clear the plastic. Also I should tell you to use
mid-lower/to middle RPM setting. I would not recommend using high RPM setting, to help avoid cutting through the metal pump motor casing.
After careful cutting, you should end up with something like this:
Now the bottom protection cover for the finned pump blade on my pump was not glued on, so it with little effort, it popped off. (If your bottom is glued on and will not wiggle off, you may want to abort fixing the pump, or at your own discretion and risk, either use a jewelers screwdriver(thicker flathead)or carefully dremmel it off.)
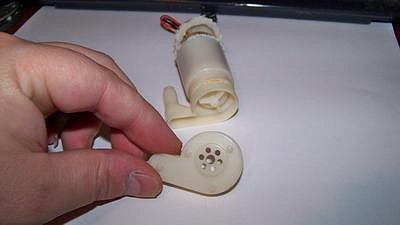
Now you should be able to see the finned pump blade inside the protective pump body. Use a med/large flathead jewelers screwdriver and wedge it underneath the plastic pump blade, carefully applying pressure in order to "pop" off the finned blade. I used the area where the water is returned upwards as a leverage to get underneath the blade.
Once you removed the pump blade(propeller), you should have a layout simliar to this below:
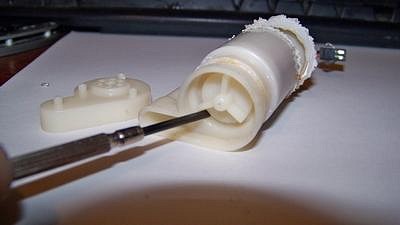
Now with little force, push upward on the metal pin that held the pump blade.
The motor unit should pop out like this:
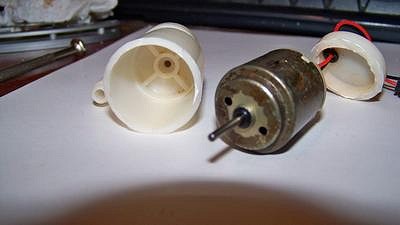
You can see below, that my pump had issues!

Becareful here, as there is a tiny rubber o-ring either on the metal shaft, or located inside the bottom pump housing.

Once the o-ring is secured, use a medium(or whatever will fit) jewelers flathead screwdriver and pry the two metal clips upwards, that hold the plastic wire casing to the top of the motor.
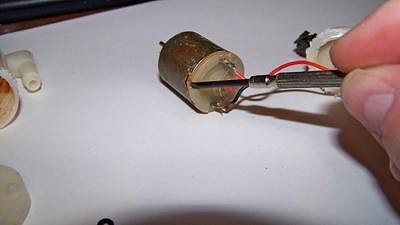
Now gently pry the plastic wire housing off of the metal motor housing.
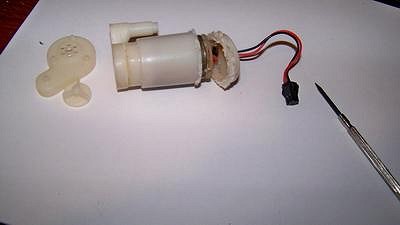
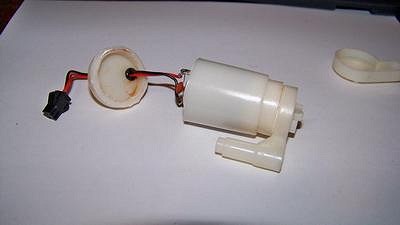
You should end up with this below:

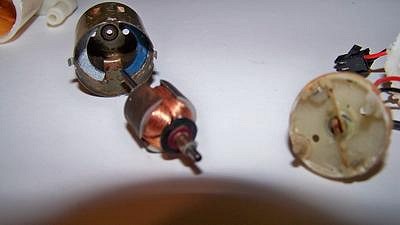
Now you can pull out the center with your fingers, or pliers if needbe.
It should slide out like this:
Now to the cleaning.
As much rust should be removed as possible. I first used the bigger flathead screwdriver to scrape the internal surfaces, freeing as much as rust as possible, including the 2 magnets attached inside the metal casing.(they were secured tightly in the casing, so I did not attempt to remove the magnets. I scraped all around them the best I could. (here is where you could use the *optional 800 grit sandpaper(small 2x2 inch piece) and use a pen/pencil to control the sanding inside the motor housing.)Once the internal seems cleaner, apply the same techniques to the outside metal casing. Blow it out, and wipe the best you can with a paper towel.
Now onto cleaning inside the plastic pump case. I used hot water, an old toothbrush to clean the reddish, rust-stained platic.
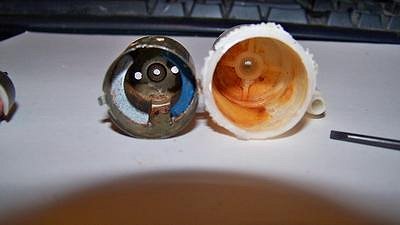
I then sprayed WD-40 lubricant/rust inhibitor inside the METAL casing, and wiped it out with a paper towel. I also used WD-40 on the motor insert, and wiped it down well, removing as much rust as possible.
Now that the pieces are cleaned, you can add a little grease to the ends and re-assemble the motor.(I didn't bother with grease at this point on my own motor, just because i can pop off the motor lid another time to lubricate it).
VERY IMPORTANT
When adding the plastic wire casing (motor top), make sure that the two tiny metal clips go around the metal pin, embracing it, surrounding it, etc, etc...
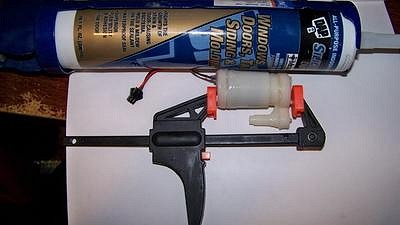
After your motor is reassembled, and you have the metal motor back in the plastic casing you are ready for siliconing it. Use the clamp to hold the top onto the rest of the pump casing. I applied the silicon generously with my finger, making sure all seams were filled in. I would suggest to make sure the silicon you use is waterproof, and it might help if it says mold/mildew proof
If you have any excess silicon away from the seam, you can remove it. Allow the cut top cure for at least 12 hours before re-applying the pump base cover with silicon along the seam. This will help to ensure a better pump action. Also apply silicon to the area where the wires enter the housing. Doing all of this should ensure a watertight pump, and much better, than the original.
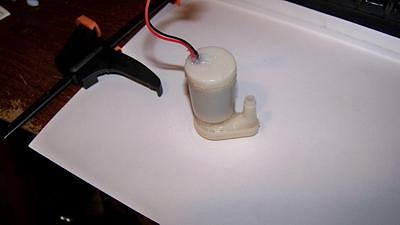
Well thats it. I hope your fountain work like new, and if you did everything right, it should be waterproofed to the extreme! Enjoy!
|
JT

Joined: Jan 04, 2003
Posts: 3772
|
JT
The pumps I work with should always be stored in water. Don't know if this applies to the ETR fountain pump or not but it might.
Just gotta say, Thanks for the in-depth time consuming post Tom Slick. Nice of you.
|