Tiki Central / Other Crafts / MadDog Mike's Platterful of Pupule - Pupu Pufferfish
Post #673587 by MadDogMike on Sun, Apr 7, 2013 8:50 AM
|
M

MadDogMike
Posted
posted
on
Sun, Apr 7, 2013 8:50 AM
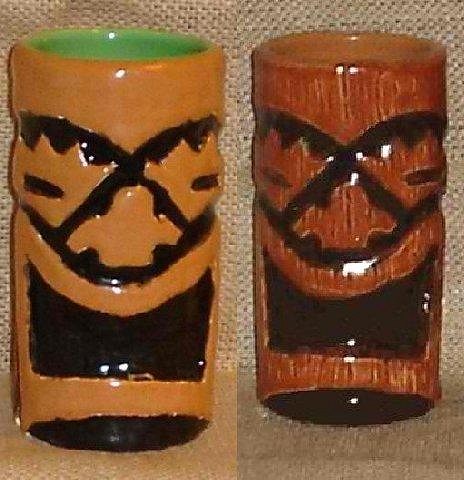
Cy, Jon & Dale – Thank you :) As far as the firings, I’ll see if I can’t explain that without getting too technical and boring. Different types of glazes have different characteristics, pros and cons. Regular glazes go on with 2 or 3 coats, when they fire they come out shiny and glossy. They range from transparent to opaque. Transparent glazes pool in the recessed areas so they are darker there and “break” or get thinner and lighter over higher spots. They automatically give shadows and highlights, color variations. The more opaque glazes are solid colors with little variation, they cover up texture and detail. Here’s a good example (my first ceramic project) of the difference between opaque glaze on the left and transparent glazes on the right. The transparent glaze accents the wood grain texture while the opaque completely covers it. Regular glazes also “move” or spread a little when they are fired and bleed into each other. I don’t like the available black transparent glazes and the opaque would cover the hair detail so I needed to use black underglaze for the hair. Underglazes come out of the kiln with dull colors and a matte finish, you need to put a coat of clear over them to make them shiny and make the colors vivid. But they don’t “move” and can be used to paint tiny details. The mugs get fired once without any glaze to harden the ceramic. I brushed a semi-transparent on the face, the black underglaze on the hair, and did the accents (hair ties, beads, etc) with underglaze so the colors won’t spread. Then I fired them a second time. Next, I’ll brush glossy clear glaze over the underglaze and fire them a third time. As long as there are no glaze skips or pinholes they will be done. Except the one on the right with the shell disk nose ornament. I will brush mother-of-pearl luster on the shell and fire it one more time at a lower temp (about 1000F instead of 1800F) to give the shell an iridescent look. |