Tiki Central / Other Crafts / News and Troubles of Jürka's Tiki Factory
Post #686550 by Jürka on Fri, Jul 19, 2013 5:35 PM
|
J

Jürka
Posted
posted
on
Fri, Jul 19, 2013 5:35 PM
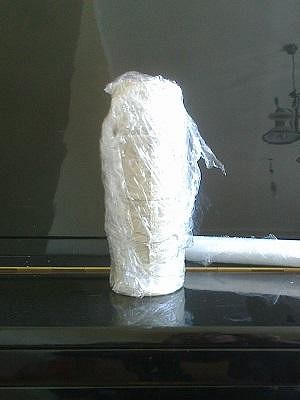
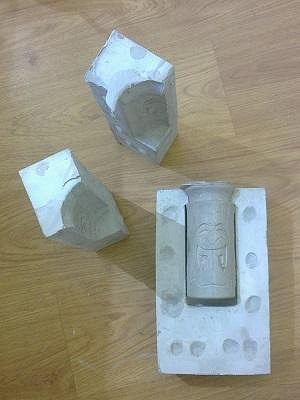
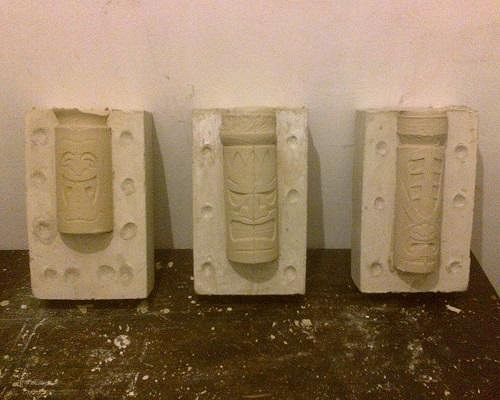
For me it would be okay if the glaze would cover small details. The main thing is that it must look natural. So... Today I discovered new way of fixing/cleaning them... I wait till they are dry and then I'll use scalpel and carve it as wood. Result is natural. Also the same thing I will do with that bottom. I'll wait till it's dry, then I'll take dividers and make a round and with scalpel I will scrape it out. And now some pictures... Here is a tip when you have to take the tiki out and you don't have time to clean it or anything... Put some plastic over it and you can go for rock and roll for few days, come back and it's still fresh... No sh*t, Sherlock... :D But yeah, I discovered that the dry one is just as good to fix than fresh... Here's the example how much it dries and shrinks in one night. Here they are... Coming three together... So... 1) Slip in. 2) Wait 30 min. 3) Slip out. 4) Wait around 2 hours. 5) Open front sides and let them dry as they are in picture... but better to take them out as soon as possible, because other side doesn't shrink as fast as front side and it will bend. I don't know yet if it bends back later when the back side will dry too after it's out. A-a-a-and here's carved Kanaloa and shot-skull and drawn Kane.
No! I'm not having good time, I'm f*cking pissed off every time I find out something is wrong again and again and again and things doesn't go as they should... but... must walk that road, cause holy mission doesn't finish itself. I will do it as long as it gets ready for rum and juice and umbrella. Amen! |