Welcome to the Tiki Central 2.0 Beta. Read the announcement
Tiki Central logo
Celebrating classic and modern Polynesian Pop

Tiki Central / Other Crafts

Tikitronic Mug # 3 : Luaahi

Pages: 1 30 replies

T
Tikitronic posted on 06/01/2007

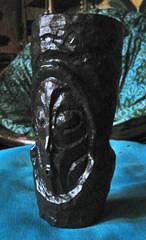
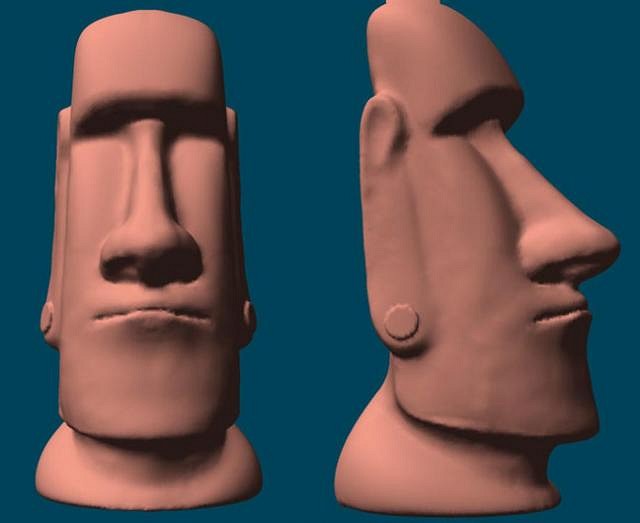
I have an experiment to share (trying out a new medium).

So - it was late January I needed to design a mug for this year's Tiki-Kon.
Seeing as
a) I was somewhat dissatisfied with my results from my first mug attempt (sculpting in mold-able resin - 2005):

and
b) was even more dissatisfied with my second attempt (carving a mug out of hard foam 2006):

and
c) I've been wanting to start learning 3d modeling for some time now, I decided to get on it and see if I could use the mug as a 3d starter project, and hopefully learn enough to sculpt this years mug. Which - in retrospect - was pushing my luck with regards to time-line.

But anyhoo - I won't show my first attempt.
My second attempt (late march) at least bore a resemblance to the design I had in my head.
But was still pretty rough, more cartoony than I wanted, and was abandoned at this point:

At that point, I stopped, took a deep breath, re-watched some tutorials, and started over.
The result* was this guy, who I'm calling Luaahi:

  • with some assistance on getting the lettering on there properly - thank you Gideon!

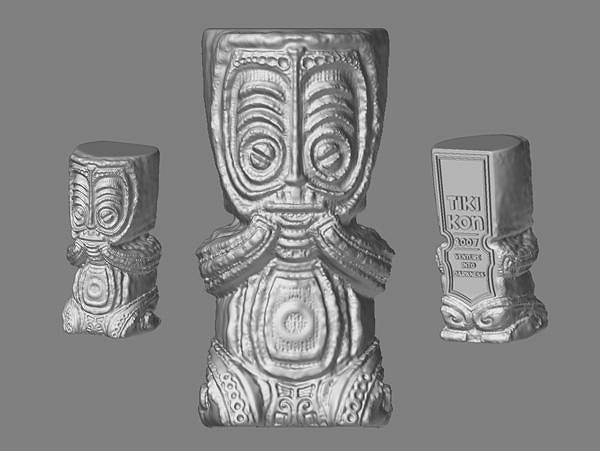
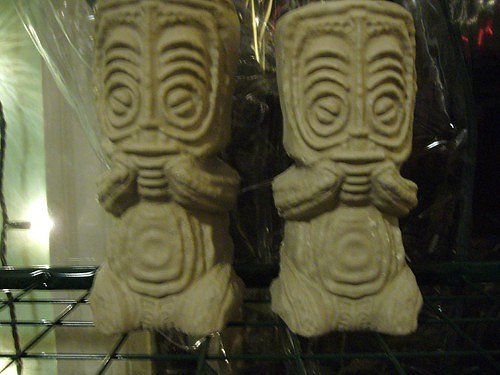
The other organizers were satisfied with the design (and in fairness - probably a bit impatient to get the thing out of my head and into production:) - so I sent the file for digital output, and 2 weeks later received this in the mail:

**
** photograph courtesy of Tikimama

I have to say - its a little surreal to sculpt something on a computer, and then being able to hold it in your hands.
Next step - Melintur is working on the mold making process, and then we start experimenting with glazes.

I'd love to hear thoughts/advice on the medium/constructive criticism on the design/etc.
Has anyone else out there tried designing a mug (or any other tiki stuff) this way?

BB
Bora Boris posted on 06/01/2007

Luaahi is very cool!

Nicely done.

LEDT
La Esquina Del Tiki! posted on 06/01/2007

Very cool Tikitronic. What software did you use? I use Pro/E at work but I'm almost positive I wouldn't be able to design something like your mug with it.

Chris

[ Edited by: La Esquina Del Tiki! 2007-06-01 14:06 ]

H
hewey posted on 06/01/2007

I like the design, and the whole computer design process is really different and interesting too. Im not big on the white, but with a nice glaze seeping into the design I think it will look really cool. Nice :D

M
Monkeyman posted on 06/01/2007

You never disappoint with your artwork TikiTronic

You are one of the real hidden heavyweights here.

thanks for explaining the evolution to us and I really like that most recent design (but I also own the other two)

LLT
little lost tiki posted on 06/01/2007

Tikitronic!
Great mugs! All three of 'em look great!

T
tikitammy posted on 06/01/2007

Very impressive! I also would be interested in the software name. It's so cool to know that things like this are possible today.

Congratulations!

M Image Missing: https://tikicentral.com/resize.php/uploads/4/65d772902dd2c.jpg?sharp=10&fit=crop&w=96&h=96&s=7c5d6454e34ef480c93f8a3f84d1b032
Melintur posted on 06/01/2007

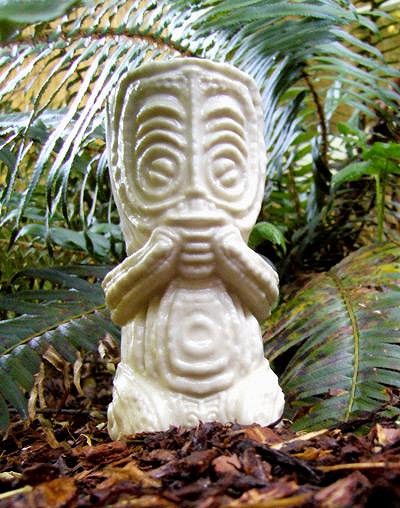
We are planning to experiment with glaze techniques with some slip-molds of the 2005 mug.

We have cone 6 glazes of one white and two different browns for under/overglazes. We as well have a few colors for detail glazing work.

I hope to go into the lab soon for experimentation. I spoke with some local ceramicists who pointed me for the best glazes for layering/mixing and instructions that is is "much better to experiment and follow your own findings" than follow any other parameters, I do so like the fail/success/screw around model.

Oh, and the White of the master sculpt above is immaterial - We haven't set yet on a glaze color, but we are headed toward a traditional brown with (hopefully) some accents.

S Image Missing: https://www.gravatar.com/avatar/e396d337f36ced2e2f376da861d38996?d=blank&s=192&fit=fill
Sneakytiki posted on 06/01/2007

Very cool! Echoes of Bumatay. Body texture is scary, kinda slug/slimy looking! Brilliant!


To drown sorrow, where should one jump first and best? "Certainly not water. Water rusts you." -Frank Sinatra

[ Edited by: Sneakytiki 2007-06-01 12:41 ]

P Image Missing: https://www.gravatar.com/avatar/b3036b2b294796410b37f812c49c8487?d=blank&s=192&fit=fill
pdrake posted on 06/01/2007

looks like zbrush.

A Image Missing: https://tikicentral.com/resize.php/uploads/181/62364f9451cde.jpg?sharp=10&fit=crop&w=96&h=96&s=42a50dcaa8465d919fafb30d96599031
atomictonytiki posted on 06/01/2007

I wondered how long it would be before we saw the first computer created mug, was the final piece printed out in one of those 3D printers?

T Image Missing: https://www.gravatar.com/avatar/cb732f34095f89ddbae6f64ba91d13ba?d=blank&s=192&fit=fill
TravelingJones posted on 06/02/2007

Techno-I.T.iki?
Veeery interesting, hhhmmm... Cool Concept!

Flip-flOp-fLipPp...

T
Tikitronic posted on 06/02/2007

Thanks everyone!

To follow up - yes, the mug was sculpted in zBrush (which ironically took me rather longer than sculpting the clay mug - ha) - and then sent to a 3d print house.

And while its true that the mug wont be glazed white for production - I'm kind of tempted to produce some with a gloss white finish, and setting up a Futuristic Tiki/Korova Milk Bar in our new basement:)

M Image Missing: https://tikicentral.com/resize.php/uploads/4/65d772902dd2c.jpg?sharp=10&fit=crop&w=96&h=96&s=7c5d6454e34ef480c93f8a3f84d1b032
Melintur posted on 06/06/2007

We hope to get the result of the glaze tests back from our ceramicist today. I'm very excited.

M Image Missing: https://tikicentral.com/resize.php/uploads/4/65d772902dd2c.jpg?sharp=10&fit=crop&w=96&h=96&s=7c5d6454e34ef480c93f8a3f84d1b032
Melintur posted on 07/12/2007

Here's what happens to the sculpt after I get it.

I make a negative mold of the sculpt with which to make multiple sculpt copies. These Will be used to make plaster slip molds. The plaster slip molds will go to our ceramicist for mug creation.

Here's the first batch of pictures:

After creating a mold box ยพ" larger than the sculpt (in each direction) out of art board and hot glue. I'll pour each half of the mold separately. To masque out 3-d areas for where I don't want the polyurethane to go, I use modeling clay:
Image Missing: https://tikicentral.com/proxy-image.php?user_id=4&url=http%3A%2F%2Fwww.sylvanfells.net%2Fimg%2Fmug_process%2Fplacing_clay.jpg&w=1280&h=1280&fit=max&sharp=5&s=a52829b4453339fb2d0060e5a0b78d00

To help keep the two halves of the mold together, I make impressions for use as a key to align. Here you can see a closeup of one in the clay masque.
Image Missing: https://tikicentral.com/proxy-image.php?user_id=4&url=http%3A%2F%2Fwww.sylvanfells.net%2Fimg%2Fmug_process%2Fkey_closeup.jpg&w=1280&h=1280&fit=max&sharp=5&s=6280f0f18b8d357d82347032146ef1e2

So, how to find out how much of the casting material you'll need? I use rice to approximate the volume.
Image Missing: https://tikicentral.com/proxy-image.php?user_id=4&url=http%3A%2F%2Fwww.sylvanfells.net%2Fimg%2Fmug_process%2Ffilling_rice.jpg&w=1280&h=1280&fit=max&sharp=5&s=7beed40e98182cf2b8d2751e451587e4

Now it's full.
Image Missing: https://tikicentral.com/proxy-image.php?user_id=4&url=http%3A%2F%2Fwww.sylvanfells.net%2Fimg%2Fmug_process%2Frice_full.jpg&w=1280&h=1280&fit=max&sharp=5&s=bffd976a3e14bc799dff8ca4b62310f0

And now it's measured.
Image Missing: https://tikicentral.com/proxy-image.php?user_id=4&url=http%3A%2F%2Fwww.sylvanfells.net%2Fimg%2Fmug_process%2Fremoving_rice.jpg&w=1280&h=1280&fit=max&sharp=5&s=542b8b43472a8d7aa0f5b543bd50392e

After the rice is removed the whole thing gets sprayed with Tap Plastics Mold Release.

The Materials: Polyurethane Casting Resin system from Tap Plastics.
Image Missing: https://tikicentral.com/proxy-image.php?user_id=4&url=http%3A%2F%2Fwww.sylvanfells.net%2Fimg%2Fmug_process%2Fmaterials.jpg&w=1280&h=1280&fit=max&sharp=5&s=0e1af2de18b45c87b47d49e63b1b1930

I mix half the measure of each of the 2-part polyurethane and mix like 'taint no mixing been done.
Image Missing: https://tikicentral.com/proxy-image.php?user_id=4&url=http%3A%2F%2Fwww.sylvanfells.net%2Fimg%2Fmug_process%2Fpouring_clear.jpg&w=1280&h=1280&fit=max&sharp=5&s=bd35f4223f02251541bace2a4cf1adda

The trick is to scrape the sides and the bottom of the container with something square. I use chopsticks. Next, I pour evenly and slowly into a corner of the box. I let the material slowly seep around and up the sculpt. As it's pouring I notice how like a chocolate bar it looks. Here see it filling in the keys - caramel spilling into chocolate caverns surrounded by creamy white nougat:
Image Missing: https://tikicentral.com/proxy-image.php?user_id=4&url=http%3A%2F%2Fwww.sylvanfells.net%2Fimg%2Fmug_process%2Fcaramel_oozing.jpg&w=1280&h=1280&fit=max&sharp=5&s=ed4c5c8eeffa9df2f7390063242e6489

Delicious caramel will be the last breath of this tiki mug!
Image Missing: https://tikicentral.com/proxy-image.php?user_id=4&url=http%3A%2F%2Fwww.sylvanfells.net%2Fimg%2Fmug_process%2Fcaramel_filling.jpg&w=1280&h=1280&fit=max&sharp=5&s=20937e36409434e669d60312a0f3a919

Almost there:
Image Missing: https://tikicentral.com/proxy-image.php?user_id=4&url=http%3A%2F%2Fwww.sylvanfells.net%2Fimg%2Fmug_process%2Falmost_there.jpg&w=1280&h=1280&fit=max&sharp=5&s=d3a68df181fd68097b6726bada6fb77e

The complete pour.
Image Missing: https://tikicentral.com/proxy-image.php?user_id=4&url=http%3A%2F%2Fwww.sylvanfells.net%2Fimg%2Fmug_process%2Ffull_pour.jpg&w=1280&h=1280&fit=max&sharp=5&s=7c6b73384e855d207d2d14a97755198e

Once a day has passed, it is safe to attempt the other half. It takes a couple more than a few days to fully cure. I take off the bottom of the mold and flip 'er over. All that clay we put in has to come out.
Image Missing: https://tikicentral.com/proxy-image.php?user_id=4&url=http%3A%2F%2Fwww.sylvanfells.net%2Fimg%2Fmug_process%2Fback_clay_gone.jpg&w=1280&h=1280&fit=max&sharp=5&s=61a3082e0110a81768db930da375a7a7

The same process is repeated (It usually happens that the rest of the containers are the perfect amount of material) on the back. Mold release, mix half of each, pouring into the corner:
Image Missing: https://tikicentral.com/proxy-image.php?user_id=4&url=http%3A%2F%2Fwww.sylvanfells.net%2Fimg%2Fmug_process%2Fbeginning_filling_Back.jpg&w=1280&h=1280&fit=max&sharp=5&s=82bef6c871ec39343ee0b6382a0f4f82

Slowly to the top it pours.
Image Missing: https://tikicentral.com/proxy-image.php?user_id=4&url=http%3A%2F%2Fwww.sylvanfells.net%2Fimg%2Fmug_process%2Fback_filling.jpg&w=1280&h=1280&fit=max&sharp=5&s=0d62e61c76ed493cf7e833cb25e7a50d

This is the End product. 2 Halves which allows us to make copies of the scupt to use and not have to suffer a meltdown if it becomes damaged. We can just make another. And another. And another.

Next update coming when I get the pics prepared!

Image Missing: https://tikicentral.com/proxy-image.php?user_id=4&url=http%3A%2F%2Fwww.sylvanfells.net%2Fimg%2Fmug_process%2Fend_block.jpg&w=1280&h=1280&fit=max&sharp=5&s=64a7618ce94db977c3aa82103df8f494

B Image Missing: https://tikicentral.com/resize.php/uploads/6025/623a0776a4498.png?sharp=10&fit=crop&w=96&h=96&s=f774c32f91f65b9b582c69dceada04d2
Babalu posted on 07/12/2007

TT - Very nice design there! Very interesting process too!

How many plaster molds are you planning to make on this mug? What kind of qtys are you planning to run on this design?

I am only able to pull about one casting per day from the molds I have, for a few mugs that I am doing now....I find that after I pull a casting, I have to put the plaster molds in the range of a house fan (while I'm at my other job during the day) to let them dry out a little before I can pour the next one, usually, that evening...doing one a day is a slow process. It would be nice to have multiple plaster molds...Another interesting thing...I had just figured that the original sculpt that I had made out of oil clay would be ruined in the plaster mold making process, and surprisingly, they came out fine; so I could feasibly do another plaster mold from them if I choose....can't say for certain that that would always be the case, but hey?

M Image Missing: https://tikicentral.com/resize.php/uploads/4/65d772902dd2c.jpg?sharp=10&fit=crop&w=96&h=96&s=7c5d6454e34ef480c93f8a3f84d1b032
Melintur posted on 07/12/2007

We usually do 4 plaster molds for a run of 100, 25 per plaster. I know our ceramicist gets up to about 5 before she puts the plaster in a 200 degree oven to remove the moisture.

B Image Missing: https://tikicentral.com/resize.php/uploads/6025/623a0776a4498.png?sharp=10&fit=crop&w=96&h=96&s=f774c32f91f65b9b582c69dceada04d2
Babalu posted on 07/12/2007

Thanks for coming back Melintur....This is all very interesting to me. I've heard that you can get up to 200 castings, or so, from a plaster mold before you start to loose definition. Does that sound about right to you? I'll have to try and heat my plaster molds to 200 degrees and see how long that takes them to dry them out. I guess it's just been fun just to have a clay studio up and running for a bit. Thanks for taking the time to post these progress pictures...It's also great fun to learn new stuff as well.

F Image Missing: https://www.gravatar.com/avatar/ac295b288270f01382d924b26c1ea82c?d=blank&s=192&fit=fill
FreddieBallsomic posted on 07/12/2007

Great step by step... Pretty damn interesting... Thanx for all the pix. ~fB

M Image Missing: https://tikicentral.com/resize.php/uploads/4/65d772902dd2c.jpg?sharp=10&fit=crop&w=96&h=96&s=7c5d6454e34ef480c93f8a3f84d1b032
Melintur posted on 07/13/2007

It's the first time I did that part by myself. I'm getting the help of Rum Demon Studios for the next bit, which we'll hope to have done by next Tuesday. Tonight and Tomorrow I pour some positives that we'll use. I will keep up the snaps as we go along for fun (there's no profit save the joy of tiki!)

K Image Missing: https://www.gravatar.com/avatar/9162ee98aff6768c57e0ea30338c822f?d=blank&s=192&fit=fill
kingstiedye posted on 07/14/2007

this year's mug looks great! i'm looking forward to scoring one of them. however, i don't understand your dissappointment with last years mug. i dig the png style and think it turned out great.

K Image Missing: https://www.gravatar.com/avatar/9162ee98aff6768c57e0ea30338c822f?d=blank&s=192&fit=fill
kingstiedye posted on 07/14/2007

p.s. say hi to mark (dr. tongue) for me. i hope married life is treating him well.

[ Edited by: kingstiedye 2007-07-13 18:29 ]

M Image Missing: https://tikicentral.com/resize.php/uploads/4/65d772902dd2c.jpg?sharp=10&fit=crop&w=96&h=96&s=7c5d6454e34ef480c93f8a3f84d1b032
Melintur posted on 07/16/2007

Bad news: our main run will be late due to scheduling difficulties.

Good news: We're doing a limited run with the help of Rum Demon. Expect more pictures and process, until they finally come out of the Kiln.

M Image Missing: https://tikicentral.com/resize.php/uploads/4/65d772902dd2c.jpg?sharp=10&fit=crop&w=96&h=96&s=7c5d6454e34ef480c93f8a3f84d1b032
Melintur posted on 07/19/2007

Image Missing: https://tikicentral.com/proxy-image.php?user_id=4&url=http%3A%2F%2Ffarm2.static.flickr.com%2F1293%2F847876446_166e04d51b.jpg&w=1280&h=1280&fit=max&sharp=5&s=6c73ed66b36f25c0ffe3ef0fd1fc9f9c

Plaster molds, drying in my oven at 170 for about 10 hours. Overnight should do it, but I chose to let it go a little longer.

Last night I pulled some APs from the molds. Pics soon, Things are going very well (save for the time window!). At least no set-backs so far!

Wee!

M Image Missing: https://tikicentral.com/resize.php/uploads/4/65d772902dd2c.jpg?sharp=10&fit=crop&w=96&h=96&s=7c5d6454e34ef480c93f8a3f84d1b032
Melintur posted on 07/20/2007

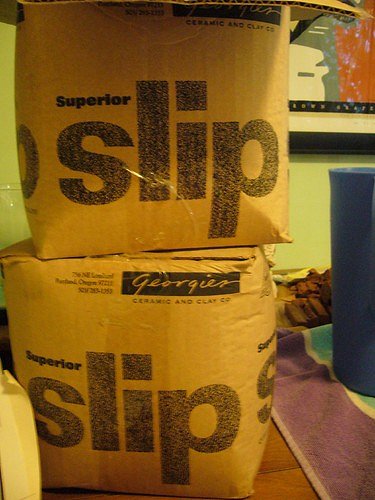
Hey folks! No time today for much text, so here are more photos of the slip casting process:

Image Missing: https://tikicentral.com/proxy-image.php?user_id=4&url=http%3A%2F%2Ffarm2.static.flickr.com%2F1423%2F859608554_9781628709.jpg&w=1280&h=1280&fit=max&sharp=5&s=b5755f8747c1e8fb1cd13b3dbf9c9981
Georgie's Slip, ready to become Tiki mugs

Image Missing: https://tikicentral.com/proxy-image.php?user_id=4&url=http%3A%2F%2Ffarm2.static.flickr.com%2F1230%2F858747613_9dd1c77f2e.jpg&w=1280&h=1280&fit=max&sharp=5&s=4114e4b84bb0c3104fd9467ade9abd13
Pouring the slip into the bucket

Image Missing: https://tikicentral.com/proxy-image.php?user_id=4&url=http%3A%2F%2Ffarm2.static.flickr.com%2F1322%2F859607938_217aaaca4d.jpg&w=1280&h=1280&fit=max&sharp=5&s=96616ce1096106f2d656839561676322
The interior of the plaster mold

Image Missing: https://tikicentral.com/proxy-image.php?user_id=4&url=http%3A%2F%2Ffarm2.static.flickr.com%2F1185%2F858747031_b6eb04493a.jpg&w=1280&h=1280&fit=max&sharp=5&s=89a282ec6a194e1728476d64a89e4fa8
Moving slip from bucket to pitcher for pouring

Image Missing: https://tikicentral.com/proxy-image.php?user_id=4&url=http%3A%2F%2Ffarm2.static.flickr.com%2F1052%2F858746835_35088f850b.jpg&w=1280&h=1280&fit=max&sharp=5&s=5aa77035ccbbacfead2ab92012dc05c8
Pouring slip

Image Missing: https://tikicentral.com/proxy-image.php?user_id=4&url=http%3A%2F%2Ffarm2.static.flickr.com%2F1262%2F858746623_34d088286b.jpg&w=1280&h=1280&fit=max&sharp=5&s=0c9ab27ab9a61524d13c261e532d731c
Slow going pour

Image Missing: https://tikicentral.com/proxy-image.php?user_id=4&url=http%3A%2F%2Ffarm2.static.flickr.com%2F1073%2F860050934_a8d54955d2.jpg&w=1280&h=1280&fit=max&sharp=5&s=5d3bcc72abefafb4d2f4a7c7b52c3a35
Drying slip

Image Missing: https://tikicentral.com/proxy-image.php?user_id=4&url=http%3A%2F%2Ffarm2.static.flickr.com%2F1322%2F860051106_52b5ee52a5.jpg&w=1280&h=1280&fit=max&sharp=5&s=c5f96d0fbf269f2488a4a3f2e54eea53
Starting to pour out the non-dried slip

Image Missing: https://tikicentral.com/proxy-image.php?user_id=4&url=http%3A%2F%2Ffarm2.static.flickr.com%2F1162%2F859190153_1620ed0af8.jpg&w=1280&h=1280&fit=max&sharp=5&s=1525b99f940ee2baabc2e9d96ff62a28
Slip dripping upside down

Image Missing: https://tikicentral.com/proxy-image.php?user_id=4&url=http%3A%2F%2Ffarm2.static.flickr.com%2F1165%2F859604902_008aa04205.jpg&w=1280&h=1280&fit=max&sharp=5&s=603eefa4f4d12bf0cff0a77c5cfc0ed6
Right side up, sprue has been scored to aid in drying

Image Missing: https://tikicentral.com/proxy-image.php?user_id=4&url=http%3A%2F%2Ffarm2.static.flickr.com%2F1368%2F858746453_3b477040cb.jpg&w=1280&h=1280&fit=max&sharp=5&s=79bbb993dce13faca62a21c07ba57d85
Starting to pull of top after slip drying process

Image Missing: https://tikicentral.com/proxy-image.php?user_id=4&url=http%3A%2F%2Ffarm2.static.flickr.com%2F1012%2F858746263_5a8c1c245f.jpg&w=1280&h=1280&fit=max&sharp=5&s=13bbf4f8d0aa4634b96519b3609fb419
Top is off!

Image Missing: https://tikicentral.com/proxy-image.php?user_id=4&url=http%3A%2F%2Ffarm2.static.flickr.com%2F1145%2F858746057_f33903326e.jpg&w=1280&h=1280&fit=max&sharp=5&s=aa96c8a1354f02e1bb5afdc794534811
Drying after top removed

Image Missing: https://tikicentral.com/proxy-image.php?user_id=4&url=http%3A%2F%2Ffarm2.static.flickr.com%2F1169%2F859606602_0f66bc5e1d.jpg&w=1280&h=1280&fit=max&sharp=5&s=da93af225651085d9296f52ce781991c
Removing from mold the wrong way (turn mold upside down and have gravity help you)

Image Missing: https://tikicentral.com/proxy-image.php?user_id=4&url=http%3A%2F%2Ffarm2.static.flickr.com%2F1364%2F858745661_3644c21b00.jpg&w=1280&h=1280&fit=max&sharp=5&s=22823b48e6c424324e1e8edf4332cbe6
Out of the mold

Image Missing: https://tikicentral.com/proxy-image.php?user_id=4&url=http%3A%2F%2Ffarm2.static.flickr.com%2F1171%2F859606240_bcd7119641.jpg&w=1280&h=1280&fit=max&sharp=5&s=c836996f2b201af21e3d5d50a8599aec
Melintur cleaning

Image Missing: https://tikicentral.com/proxy-image.php?user_id=4&url=http%3A%2F%2Ffarm2.static.flickr.com%2F1430%2F859605816_407afa074f.jpg&w=1280&h=1280&fit=max&sharp=5&s=d75ee73e079c245db134cfb056106ffd
Tikimama cleaning

Image Missing: https://tikicentral.com/proxy-image.php?user_id=4&url=http%3A%2F%2Ffarm2.static.flickr.com%2F1191%2F858744929_888efa33ce.jpg&w=1280&h=1280&fit=max&sharp=5&s=e829f860e9875897fd854b34bf7be0c8
More Tikimama cleaning

Image Missing: https://tikicentral.com/proxy-image.php?user_id=4&url=http%3A%2F%2Ffarm2.static.flickr.com%2F1394%2F859606008_1a5510351c.jpg&w=1280&h=1280&fit=max&sharp=5&s=71f0f209dd1dd8cededee6b1fc990128
Hello, gorgeous!

Image Missing: https://tikicentral.com/proxy-image.php?user_id=4&url=http%3A%2F%2Ffarm2.static.flickr.com%2F1145%2F859540688_455bc90c40.jpg&w=1280&h=1280&fit=max&sharp=5&s=2c5d09a2b02a393066f539055a1c2df5
Drying on the rack

Image Missing: https://tikicentral.com/proxy-image.php?user_id=4&url=http%3A%2F%2Ffarm2.static.flickr.com%2F1349%2F858744741_2369938a21.jpg&w=1280&h=1280&fit=max&sharp=5&s=478e163c66470499e454949ba6d87f64
Drying on the rack 2

See you in the funny papers!

MN Image Missing: https://www.gravatar.com/avatar/1f023fbc44947a4ec741232915258f20?d=blank&s=192&fit=fill
Mr. NoNaMe posted on 07/20/2007

TikiMama is actually doing the work correctly as far as I can tell. :drink:

T Image Missing: https://www.gravatar.com/avatar/adf1d0038d8908f51b8744a9670323d2?d=blank&s=192&fit=fill
TikiMama posted on 07/20/2007

That's a Von Tiki (which, btw, I always call a Baron Von Tiki, which I think has a much grander feel) in my cocktail glass in case you want to play along at home. I try and incorporate drinking into all my hobbies if possible.

BB
Bora Boris posted on 07/20/2007

I love that mug. I know it's early but I think it's a strong contender for Mug of the Year!

B Image Missing: https://www.gravatar.com/avatar/d9efe571a3d4fdd3f9fd82b78a99fab9?d=blank&s=192&fit=fill
Billbot posted on 07/21/2007

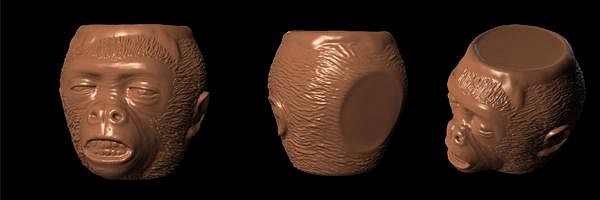
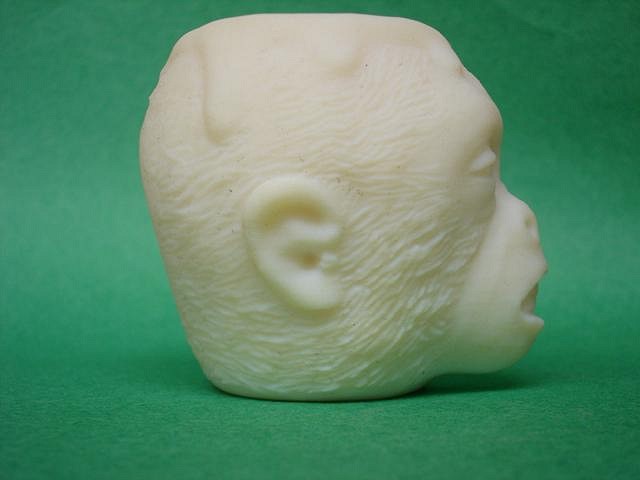
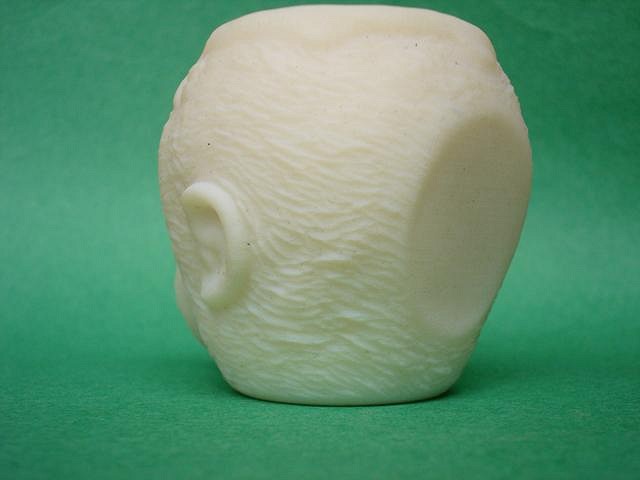
Greetings.

I'm jazzed to see the digital to mug process. Looks great!

I've got a similar project going.
Image Missing: https://tikicentral.com/resize.php/uploads/5213/46a18890.jpg?w=1280&h=1280&fit=max&sharp=5&s=fdbe588a15d1c2e916e8c68ce8a16634
I've a little more to do, but basically it's done. It's for the drink, "Monkey Brains", and it would have the recipe on the back. It would be like a large shot glass.

I want to print it out soon, and maybe try to make it into a mug.

However, I'd love some feedback: What do you think? Is it something that I could sell?

Thanks!

B Image Missing: https://www.gravatar.com/avatar/d9efe571a3d4fdd3f9fd82b78a99fab9?d=blank&s=192&fit=fill
Billbot posted on 08/29/2007

I finally got my model printed out. I had it printed smaller than I originally planned. It's about 2 1/2 inches tall. I was impresses with the level of detail. I think I'm going to try to cast this one, just as an experiment and see how it turns out.

Image Missing: https://tikicentral.com/resize.php/uploads/5213/46d4fca0.jpg?w=1280&h=1280&fit=max&sharp=5&s=bb149a8aed19763ebe0730f454f4a38d
Image Missing: https://tikicentral.com/resize.php/uploads/5213/46d4fc94.jpg?w=1280&h=1280&fit=max&sharp=5&s=119efd00f2c19bcb8380d2e47c5ca4e2
Image Missing: https://tikicentral.com/resize.php/uploads/5213/46d4fc88.jpg?w=1280&h=1280&fit=max&sharp=5&s=30f4ac9956c6f3fff75401008d15237f
Image Missing: https://tikicentral.com/resize.php/uploads/5213/46d4fcad.jpg?w=1280&h=1280&fit=max&sharp=5&s=b7533a18a4da53f629ebe349a95d1d20
Image Missing: https://tikicentral.com/resize.php/uploads/5213/46d4fcb8.jpg?w=1280&h=1280&fit=max&sharp=5&s=c49db36fef585049ad993c074ca71057

B Image Missing: https://www.gravatar.com/avatar/6619863b667ab66b429a39569f4eb8b1?d=blank&s=192&fit=fill
Bowana posted on 09/22/2007

This is a great thread. So! I am not the only one on TC who has designed a Tiki using a 3D program.

I made this guy a few years back using FreeForm:

Image Missing: https://tikicentral.com/resize.php/uploads/5974/46f49cda.jpg?w=1280&h=1280&fit=max&sharp=5&s=1db54103ec1b732f2e5188cb1bc67163

I'm doing stuff on ZBrush now, but no Tikis yet.

Looking forward to seeing the glazed mugs, Tikitronic.

...and Billbot, your monkey head is pretty cool.


Image Missing: https://tikicentral.com/resize.php/uploads/5974/45aaeca6.jpg?w=1280&h=1280&fit=max&sharp=5&s=7f90ac2a31fe618a5d65093ed197a555
The Artist Formally Known As Tikidav

[ Edited by: Bowana 2007-09-21 21:48 ]

Pages: 1 30 replies