Tiki Central / Tiki Carving
Skully's #4- Resin Casting
Pages: 1 35 replies
|
CS

Capt'n Skully
Posted
posted
on
Tue, Oct 3, 2006 4:00 PM
Ahoy All! I've been jealous cause everyone's been carving away and doing such tremendous work!! I finally get to share something again.. Here's my 2nd named Koochie-Ku. Finally carved up & ready for stain! The original sketch: Koochie-Ku: [ Edited by: Capt'n Skully 2006-10-07 05:57 ] [ Edited by: Capt'n Skully 2006-12-26 13:54 ] |
|
TG

Tiki G.
Posted
posted
on
Tue, Oct 3, 2006 4:14 PM
Sweet! I like it. Good job. |
|
J

JohnnyP
Posted
posted
on
Tue, Oct 3, 2006 4:15 PM
Nice and clean cut. The final piece looks better than the sketch with the added features. |
|
K

kirby
Posted
posted
on
Tue, Oct 3, 2006 4:19 PM
I love it ..great work dude... |
|
TSW

The Sperm Whale
Posted
posted
on
Tue, Oct 3, 2006 4:24 PM
Freaking unbelivable!!! Great Work and thanx for posting!!! |
|
SD

Savage Daddy
Posted
posted
on
Tue, Oct 3, 2006 4:39 PM
Nice Work. Verrrry Nice! |
|
M

McTiki
Posted
posted
on
Tue, Oct 3, 2006 4:49 PM
I'm jealous as hell brah. Thats a nice smooth carving there. I love the design. Well done sir. Mahaloz McTiki [ Edited by: McTiki 2006-10-03 16:54 ] |
|
P

Paipo
Posted
posted
on
Tue, Oct 3, 2006 4:51 PM
Beautiful...highly stylised but distinctively Marquesan, and super crisp carving. You've got some pretty polished skills there. Could we see some in-between shots if you have them? edit: I found some of your old posts...you had this guy on the back-burner for a year? All your old pics are dead in those other threads - maybe you could update this thread with your Tiki #1 and the progress pics from #2 - your process using the 3D mapping sounded really interesting! [ Edited by: Paipo 2006-10-03 17:06 ] |
|
CS
Capt'n Skully
Posted
posted
on
Tue, Oct 3, 2006 8:13 PM
Thanks for the comments! YES... I'm ashamed that I haven't worked on him for a year.. Here are some progress shots- Initial Rough-out on palm log with 3D "line test": Quicky 3D shading: Carving Begins: Carving Session at Benzarts!: The Master Benzart helps me with the belly button: Further Progress: And then this was my first carving... He's called Big-Scary..
|
|
I

IsleConch
Posted
posted
on
Tue, Oct 3, 2006 8:28 PM
You're a natural....judgin' from the 1st one. but then again, you're learnin' with benZ...the master !! |
|
P

Polynesiac
Posted
posted
on
Tue, Oct 3, 2006 10:14 PM
Great number 2! I love the roundness of it, looks like it would fit in nicely in a disneyesque setting. |
|
G

GROG
Posted
posted
on
Tue, Oct 3, 2006 11:03 PM
Quality over quantity. Great job, Cap'n. GROG |
|
P
Paipo
Posted
posted
on
Wed, Oct 4, 2006 12:49 AM
Thanks for reposting the old pics, these are superb tikis. The 3D mapping and shading is insane! |
|
H

haikai
Posted
posted
on
Wed, Oct 4, 2006 3:48 AM
Very beautiful work, Capt'n Skully! There have the right and clean cuts on your Tikis. Especially I like the massive eyes of your first Tiki. Beautiful, beautiful ..... |
|
H

hewey
Posted
posted
on
Wed, Oct 4, 2006 4:23 AM
Awesome work Capn! :) Such nice clean lines man! |
|
A

AlohaStation
Posted
posted
on
Wed, Oct 4, 2006 6:15 AM
I was wondering what happened to you. I remember you were part of the South Florida ohana and then disappeared. I love you carvings. Crisp, clean cuts with alot of detail. You put alot of effort into your designs and it shows in the final pieces. Keep em coming. |
|
CS
Capt'n Skully
Posted
posted
on
Thu, Oct 5, 2006 6:44 AM
Thanks again all! What is it about these tikis and their pleas for detail? Koochie-Ku won't let me touch him with stain until he gets more tattoos! So I added a tat to his arms and on the sides of his mouth.. And he still wants MORE! |
|
M
McTiki
Posted
posted
on
Thu, Oct 5, 2006 6:49 AM
Capt. Listen to the Tiki. I started a 2 1/2 ft Lono (my first) he's talkin already. Actually, he has a foul mouth right now. He's going to take a while. Take your time. Koochie looks awesome. Keep moving. Take pics, post em up. Mahalo McTiki [ Edited by: McTiki 2006-10-05 06:50 ] |
|
CS
Capt'n Skully
Posted
posted
on
Sat, Oct 7, 2006 5:56 AM
Here's a small, 3 inch tall Moai I carved in a rock I found.. I think it's sandstone?
|
|
T

TikiLandy
Posted
posted
on
Sat, Oct 7, 2006 2:16 PM
WOW they are superb !! |
|
T

Tamapoutini
Posted
posted
on
Sat, Oct 7, 2006 2:33 PM
Beautiful work Capt'n! Your eye for form/shape is amazing & you get those 'junction' points so crisp, ka pai. Love the stone Moai, looks very much like the native lava/tuff from E.Island. Can I ask how you went about carving him, tools/processes? (maybe you could explain on the new stone-carving thread..?) Great stuff! Tama |
|
M
McTiki
Posted
posted
on
Sat, Oct 7, 2006 2:42 PM
Awesome C&S ! Run out of wood? lol Mahalo McTiki |
|
CS
Capt'n Skully
Posted
posted
on
Mon, Oct 9, 2006 6:56 AM
Thanks! Tama: The stone screamed Moai so I picked it up and in my pocket it went.. I just drew lines with pencil then went to shaping- profile first. I used an old set of small files that are now mostly worn out and ruined! Wrong tools, but enough to get the job done on this soft stone. Maybe I should post this info in the stone thread so others don't make the same mistake with their tools... McTiki: I have 1 large palm log left that I brought from Florida then I'm out.. Need a new source since there aren't any hurricanes here in Ohio! Thanks for your comments.. |
|
B

Benzart
Posted
posted
on
Mon, Oct 9, 2006 7:02 AM
Sweet Moai Skully, I'm Impressed, and with worn out files!!Most Excellent. |
|
P
Paipo
Posted
posted
on
Mon, Oct 9, 2006 2:42 PM
He's a little beauty - it does look like a softer version of the stuff I'm using which is basically a sandstone. Get yourself a few diamond tools as Tama suggested and you'll be set for plenty more of these. |
|
B
Benzart
Posted
posted
on
Fri, Oct 20, 2006 7:00 AM
Also, I forgot to say what beauties you have here on the first page. Your First tiki looks as good as my 100th, you Better stick with this and Don't take so much time Off! |
|
M

MachTiki
Posted
posted
on
Fri, Oct 20, 2006 12:40 PM
Outstanding! Very clean lines. |
|
B
Benzart
Posted
posted
on
Fri, Oct 20, 2006 7:19 PM
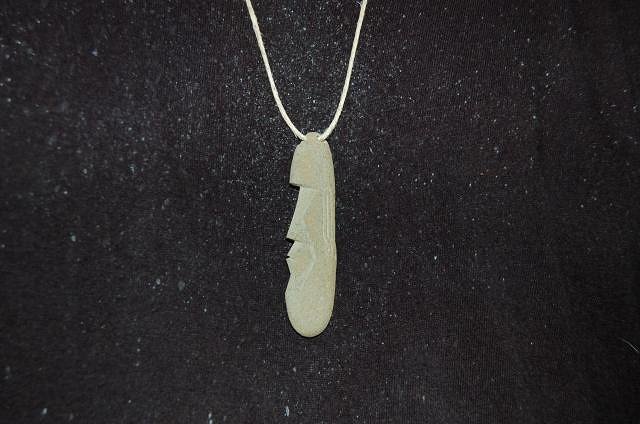
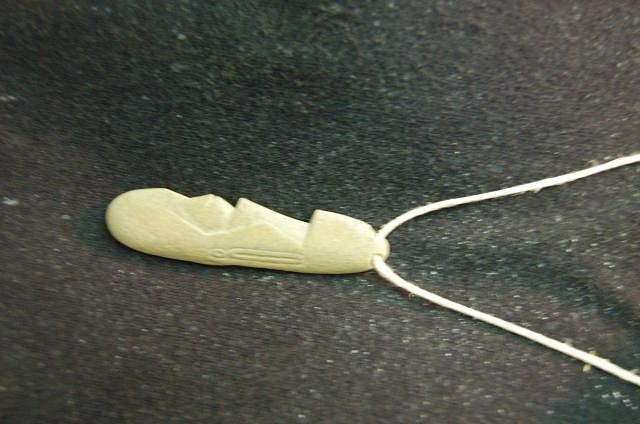
Cap't Skully, I got this mailman standing in my garage, not saying a word as I was working on the green Lono. Finally I stopped and he said he had to deliver this mail and was afraid to interrupt me doing such intricate work. I wondered what I was getting sent to me now and as I opened it up, in Amazement I saw this beautiful Stone moai with a note to do with it what I wished. So I got my Big hammer(where is GMAN with his PIGSTISK when you need him. Anyway I got my big hammer and made Little moai out of your big moai! At the last minute, I couldn't bear it and turned the big hammer away to fall helplessly on the garage floor. Instead I drilled a hole in his head for a string so I could wear him around my neck
[ Edited by: Benzart 2006-11-12 15:31 ] |
|
CS
Capt'n Skully
Posted
posted
on
Sat, Oct 21, 2006 6:42 AM
Just a little token to say thanks for all your help- He's lookin' good as a pendant! :) That's a nice mailman you have not to startle you while working. That or he thinks you're completely nuts and not to be messed with while holding sharp objects- lest HE be the next carved! |
|
B

Bowana
Posted
posted
on
Sat, Nov 11, 2006 9:32 PM
Hey Skully, I really like your work. Nice clean lines and shapes. Can I ask how long it takes you to carve a piece like Kootchie-Ku for example? I've been spending 30-40 hours on a carving. Of course carving Tikis is fun, but I'd like to be able to get them done quicker. Sometimes they get made up as I go. Probably why it takes so long. Also, what 3-D program did you use to do your line layouts? They look really good. Thanks, and keep up the awesome work! |
|
CS
Capt'n Skully
Posted
posted
on
Tue, Dec 26, 2006 1:53 PM
Sorry for the delay in answering Tikidav- I missed your post: Koochie-Ku probably took about 10-12 hours in pre-planning (sketching and 3D) and maybe around 40 hours to carve- broken up into 30min to 3 hr sessions at a time.. I really don't like sanding, so I've left him pretty rough. Staining/varnishing lasts about 2 weeks with drying time between coats. I use Cinema 4D, but any basic 3D program could do this- it's just a cylinder shape with a Photoshopped image mapped around it to get an idea of the final look.. One day I may actually model a tiki in 3D. Ok- So here is the latest project.. Learning how to cast in resin. I decided to make a FOM pendant to learn the casting process.. The brown one is the original (made with plasticine/Sculptey), and the off-white one is the resin casted piece.. Anyone who's done any casting can probably see all the mistakes I made on this first one! There's about 5 things I will do better next time.
|
|
B
Bowana
Posted
posted
on
Tue, Dec 26, 2006 9:01 PM
No worries, Skully! Thanks for the reply. I'm glad to find out that I'm not the only one who spends 40+ hours on a carving. It shows in your work though. How else could your carvings get to such a high level without putting in a lot of time! I'm doing some computer work using Z-Brush. Nothing worth posting at this point though. Your silicone mold looks great, only you could have boxed it up a bit smaller and saved yourself a few bucks. Silicone=$$$$$! What are the 5 things you said you would do better? |
|
CS
Capt'n Skully
Posted
posted
on
Wed, Dec 27, 2006 9:30 AM
It goes back to the old saying- Haste makes waste.. I should have spent more time on the Original and thought it through a bit more. Guess excitement to do it got the best of me (once again!). I'd like a cleaner, better master, but something tells me I'd never be completely happy with it anyways. Since this is a one-sided mold, I should have made the master thicker than necessary- that way I could control the copy's thickness with the resin pouring. The pendant isn't as thick/deep as I wanted.. I need a scale for mixing the silicone.. I had to go with a strict measurement provided by the manufacturer or risk an improper ratio. I also didn't want to risk not having mixed enough- should do a displacement test for correct amount. Same with the resin- I made over twice the amount I needed. Overall I lucked out for my first time- no issues with air bubbles in the mold or the resin copy.. But the design is pretty basic with no undercuts. |
|
HB

hala bullhiki
Posted
posted
on
Wed, Dec 27, 2006 9:35 AM
alright, thats awsome! |
|
B
Benzart
Posted
posted
on
Wed, Dec 27, 2006 10:57 AM
Skully, Your resin Moai is great. If there are issues, they are picky-picky ones, overall you did a great job, better than almost everyone for the first cast. I Knew you could Do It! |
|
B
Bowana
Posted
posted
on
Wed, Dec 27, 2006 11:53 AM
It's a great Moai, Skully! Take the best resin casting you've got, sand it as smooth as you like, patch any flaws with epoxy putty, put some more meat on the back and remold it. I do it all the time with my stuff.
Yes, for sure get a scale. In my experience with mixing silicone, if you are a little bit off it's not going to matter. A little too much catalyst means it will set a little quicker, a little less, a little slower. Just make sure you're not TOO far off or else bad things will happen (sets before you're done pouring, or never sets at all). I use a triple beam balance.
If you find that you didn't mix enough silicone, you can mix more and pour it right on top. It's best if this is done while the previous batch is still goopey. After more experience with it, you will be able to eyeball about how much silicone it takes to fill any size mold, and how much resin it takes to fill a mold. I like to have extra molds on hand so in case I've got too much resin, rather than throw it away, I'll just fill up those molds as well with what's left. You can also fill a mold with more than one resin batch if you did not mix enough. (Not as desireable as getting it on the first shot, but it still works!) I hope this is helpfull to you, Cap'n! |


Pages: 1 35 replies