Tiki Central / Other Crafts
Backyard Pond Progress Pix - Update
Pages: 1 37 replies
|
P

pariartspaul
Posted
posted
on
Fri, May 18, 2007 7:54 AM
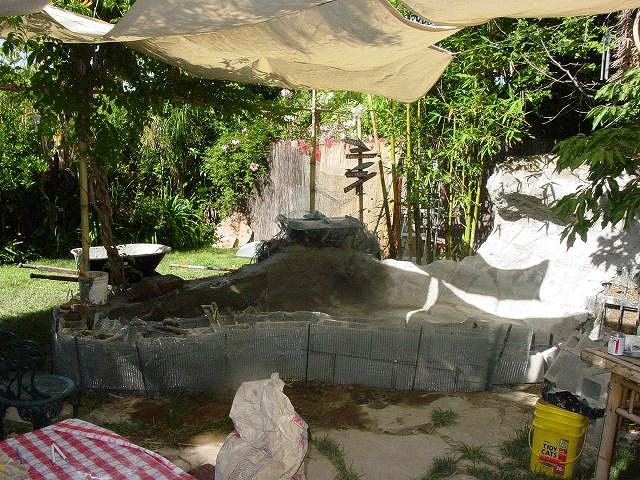
Okay I'm FINALLY getting some work done to my backyard pond! A few years ago I posted something here about building my 'dream pond'. Well I started it a year and a half ago and it's been just a muddy hole sitting there. Richard says he'll kill me if I don't have it done for 4th of July.... so... LOOK! Paul [ Edited by: pariartspaul 2007-05-18 08:02 ] [ Edited by: pariartspaul 2007-05-18 08:04 ] [ Edited by: pariartspaul 2007-06-13 08:56 ] |
|
H

Howland
Posted
posted
on
Fri, May 18, 2007 8:47 AM
Holy Cow! This is gonna be awesome! I have year old mud hole/future pond in my backyard too that is screaming for attention. I've been toying with the idea of doing a crete pond like yours instead of a liner pond. Looks like alot of work and $$$! Feel free to post many, many progress shots. I'd love to see how this all comes together. |
|
T

tikiwinebear
Posted
posted
on
Fri, May 18, 2007 8:50 AM
Yeehaw! Looking good, Paul!! Love to see these "in process" shots. July 4th, huh? :D Good Luck... will be watching for the next progress report.
|
|
T

tikiskip
Posted
posted
on
Fri, May 18, 2007 8:57 AM
The wall pockets for plants is a good idea. |
|
P
pariartspaul
Posted
posted
on
Fri, May 18, 2007 9:47 AM
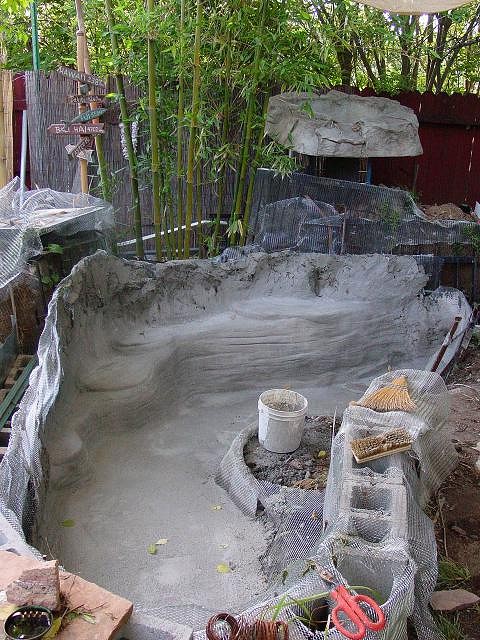
Hey tikiskip... no fish! It will be chlorinated like pool water. And surf-n-turf, yes a lot of work, but not too expensive considering. Most of the metal is junk I found over time, along with some purchased rebar. The base of the big waterfall is actually... ready for this... an old shopping cart I found on the street! Solid steel! Ha! The most expensive thing so far was the actual concrete. $375 delivered from Home Depot. I had 35 80lb bags of regualar concrete and 35 bags of 60lb mortar mix. I'll be out of concrete later today already so I'll have to get another load of it. I'm using the concrete for all the poured sections and then the mortar mix for the sculpted sections. I'm adding lime to the mortar mix. It makes it stick better and thickens it up kind of like clay. The sculpting is the fun part. It's kind of like frosting a cake! Then I bought some concrete blocks... I still need a few more. And miscellaneous pvc plumbing parts. I have the main drain/inlet to the pump all in, but I still have to do the return line and the waterfall lines. I will have valves to all the returns so I can control the waterfall volumes, or turn them off completely and just have the return into the pool itself if I want. Oh, the pump, filter and basket were pricey. I think I spend about $300 or so on all that, but I bought them last year so the expenses have been spread out. |
|
CS

Capt'n Skully
Posted
posted
on
Fri, May 18, 2007 10:30 AM
That's going to be nice! Excellent job so far.. |
|
N

nicolemdalton
Posted
posted
on
Fri, May 18, 2007 11:32 AM
Wow! What a great idea, I've heard of the lined ones but never acutally seen anyone try to make a cement pond. That'd be great if you could get some bubble jets in there somewhere, like a natural, bubbling pond. But it seems awesome without it. I look forward to seeing your progress! |
|
M

McTiki
Posted
posted
on
Fri, May 18, 2007 2:13 PM
Sweeeet. Fond memories of the mud hole. lol. It took me 12 months to manifest the serious pond off of our bar's deck as well. We can't sit in ours though. The fish would be pissed! The waterfall is soothing though. Very nice! Envious of the size Mahalo McTiki |
|
P
pariartspaul
Posted
posted
on
Sat, May 19, 2007 8:19 AM
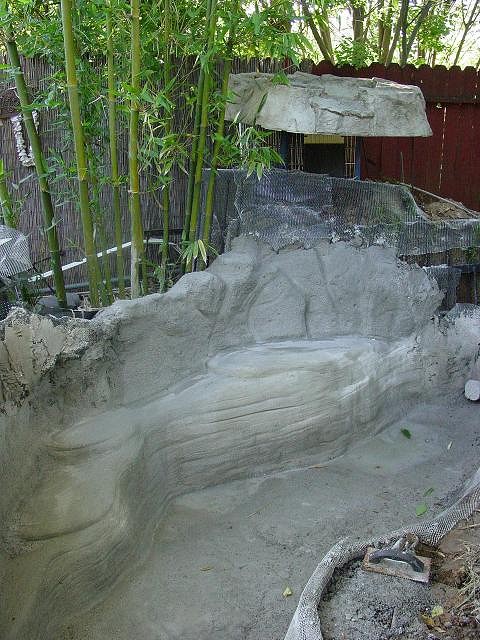
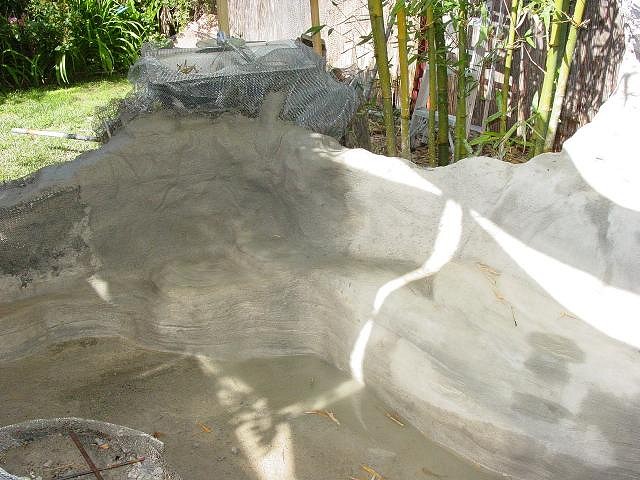
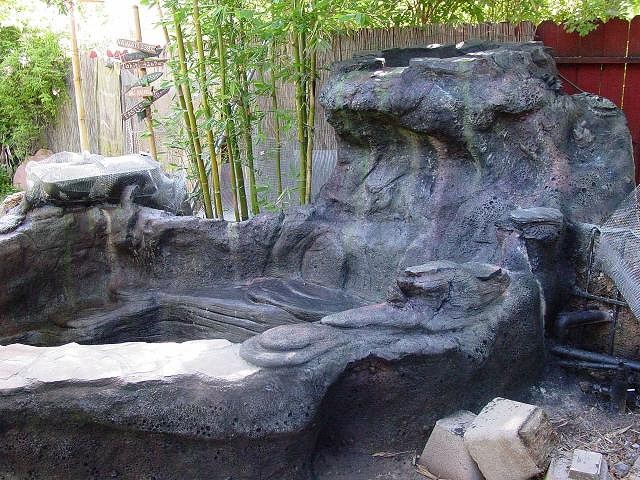
Tony came over yesterday and we poured most of the back wall section. It took quite a bit of concrete, but it's SOLID! Then later in the afternoon when it set up I started sculpting the lava texture. So in this picture, you can see the seat which will be underwater, and the transition to lava texture on the wall section. I'm happy with the way it looks. So I've used all 35 bags of my concrete now. I'll have to get some more next week. |
|
V

VampiressRN
Posted
posted
on
Sat, May 19, 2007 12:32 PM
Wow....that is looking awesome Paul. It will be a great place to cool off in the summer heat. Good idea about the cocktail placeholders. Will you have access to muzak....some Les Baxter would be good to the sounds of your waterfall. :) Here are some fish for your pond. Keep those pictures coming....and love the bamboo surrounding the pond. |
|
QK

Queen Kamehameha
Posted
posted
on
Sat, May 19, 2007 9:17 PM
Paul, its really nice, I like the natural flow of it, and considering how talented you are in your art, I suspect this will be just as amazing! Amy |
|
P
pariartspaul
Posted
posted
on
Mon, May 28, 2007 5:02 PM
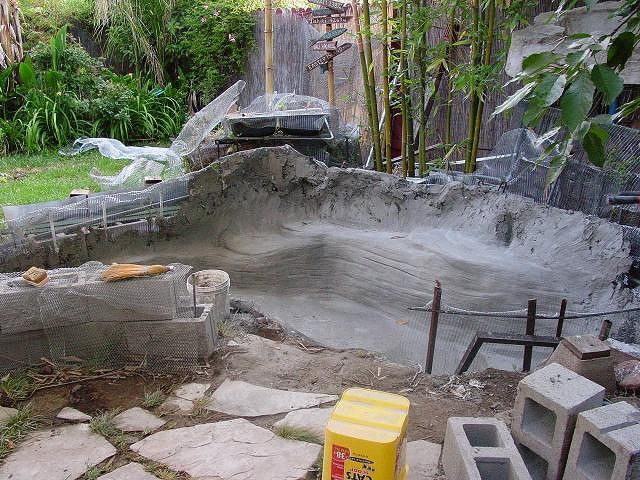
We got a lot done in the last week. Yesterday some friends came over and (between martinis) we managed to get the entire back wall poured! |
|
SF

Slacks Ferret
Posted
posted
on
Wed, May 30, 2007 9:11 PM
Wow! that looks so good. I'm interested in doing something like this once my boy's old enough to not drown himself in it. For now, I get to vicariously live through you as you complete this project. Oh and thanks for all the information, and the progress photos, I'm sure it will all come in handy one day! |
|
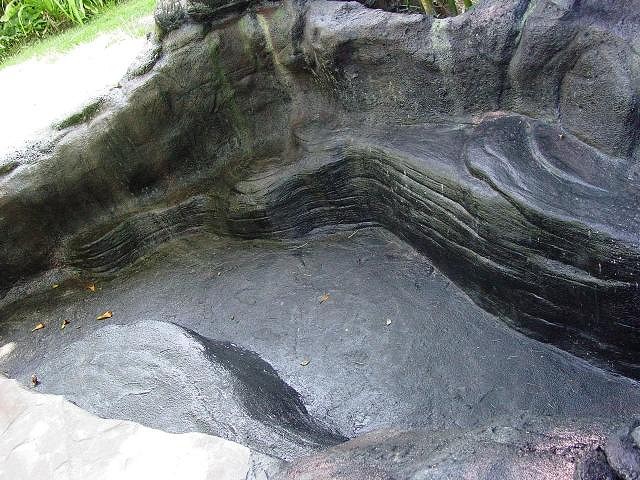
P
pariartspaul
Posted
posted
on
Wed, Jun 13, 2007 9:09 AM
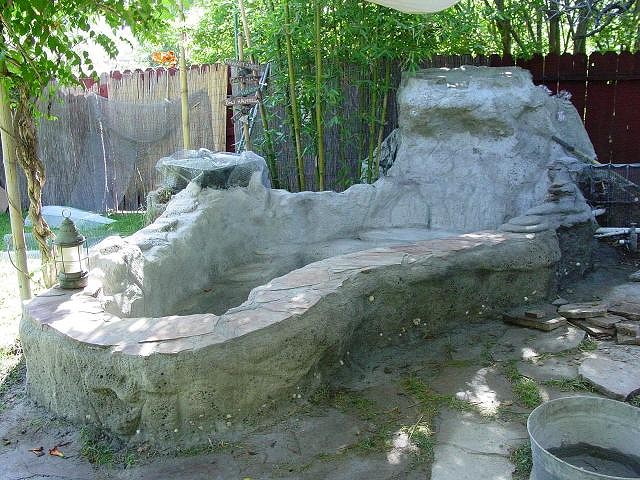
Well, lots of progress in the last couple of weeks! Yesterday we finished off the entire inside basin, and I laid all the flagstone around the edge... |
|
G

greentikipat
Posted
posted
on
Wed, Jun 13, 2007 10:33 AM
this is so cool. i too have a 3 yr old start of a pond in my backyard. tried sealing two pool liners, but the seal never held up completely. over the last two years, i keep hearing mixed pros and cons for linner vs crete. but i love the look of the old crete instalations, such as the Mai Kai and many others. after reading through yours, with the sculpting and such, my mind is made up. incredible use of found objects, Paul. this thread is a great insperation for me. thanks a lot! can't wait to see more. |
|
P

pwest71
Posted
posted
on
Sat, Jun 16, 2007 9:17 PM
Paul, GREAT job so far, watching this thread has been an inspiration to me, hopefully when my wife and I buy a different house I can convince her to let me do something like this, only with a "volcano waterfall" at one end. After seeing the quality of your work, I had to find out more and went to your site and read your bio, after reading it, I probably won't be surprised to find the amazing things you create. I can remember going to Disney and seeing many incredible things, and now know who was responsible for quite a bit of it, it's just a shame that there wasn't much info on the artists readily available(at least not that I can remember). Thank you!! Paul |
|
P
pariartspaul
Posted
posted
on
Sun, Jun 17, 2007 9:19 AM
Paint Issues! Well, I made a huge mistake with the paint. I just got the acrylic pool paint on Friday and went for it. I pressure hosed the pond 3 times, dried it, and then let it dry until it was white again. I sprayed on one coat of the paint (spray gun with compressor) and let it dry. I went into the pond to spray the 2nd coat and the 1st coat started to come up in sheets wherever I walked!! Uh-o! |
|
F

frostiki
Posted
posted
on
Mon, Jun 18, 2007 9:09 AM
I think the black looks good in the pictures. BTW nice article on you guys in Atomic Ranch. |
|
M
McTiki
Posted
posted
on
Mon, Jun 18, 2007 9:54 AM
We slopped on H&C Crete sealer that was tinted for us @ Home Depot. That stuff has remained tight for 2 yrs now. It dries like crete. You'll get there! Lookin Good ! Mahalo McTiki |
|
P
pariartspaul
Posted
posted
on
Sat, Jun 23, 2007 11:03 AM
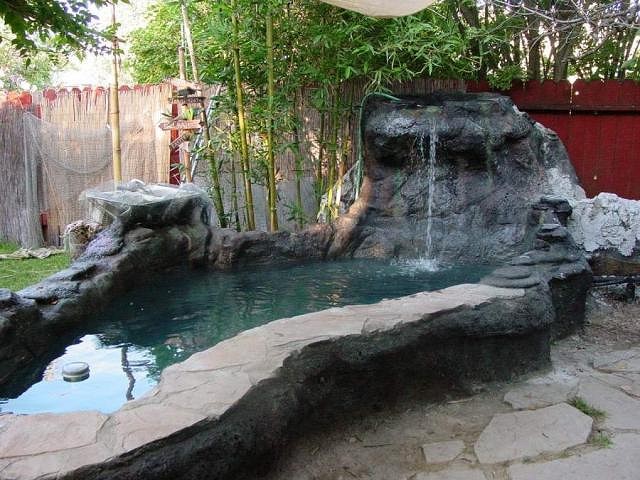
It's been a week of disasters! We let the acrylic pool paint dry for a few days and filled the pond. Guess what? It leaked like a sieve, all over the place! When I emptied it, we discovered some holes in the concrete in the deep end wall that were the culprits. At the same time, portions of the pool paint kept coming up. To top it off, I primed the pump and tried it when the pool was filled... and nothing happened! It just got hot. Disaster all the way around. This picture below is from last night when we filled it up the second time. We had the hose in the upper waterfall basin just to see what it might look like. Well, the next day we ground off most of the pool paint we could and cemented and mortared the holes. After doing some more research I came up with this two part epoxy product from TAP Plastics call 'Coat-It'. It's a thick, durable epoxy made for coating ponds and boat hulls and it's a dark grey color. It took four gallon kits to cover the entire bottom and most of the sides. I would have put more on but by that time I got sick. I don't know if it was the fumes or exhaustion or if I got the flew from somewhere else, but right after I collapsed with a terrible 102 fever and was down for two days. By yesterday I was feeling better. The epoxy was cured so we filled the pond up again expecting the worse.... well, no leaks this time!! I called the pump manufacturer and he said sometimes if new pumps aren't used for a while, the impeller gets stuck and you have to free it up by hand. I did it and it started right up! I tried the pump when the water was filled and it works fantastic. Whisper quiet, and it puts out a great volume of water. It's running through the cartridge filter and the water is nice and clear. So my next step is to run the piping to the big waterfall. Then more sculpting with mortar to finish off the smaller waterfall. Whew! It's been a long, hard process. But it's starting to look like the pond I hoped it would be. So listen to Uncle Paul's hard earned advice all you would-be pond builders.... NEVER use acrylic pool paint over raw concrete! The product is crap - a total waste of time and money. The epoxy sealer worked out beautifully so far. That's the latest! |
|
P

pappythesailor
Posted
posted
on
Sat, Jun 23, 2007 12:57 PM
I'm overcome by jealously. Congrats on not dying and getting the job done to boot. Rest up so you can post more pics. |
|
CS
Capt'n Skully
Posted
posted
on
Sun, Jun 24, 2007 12:33 PM
Great job and sorry to hear about all the trials along the way! It looks wonderful and relaxing. If you do end up repainting the bottom again, I think you can add a bit of fine sand in the paint to give it some grit so it's not slippery.. Also- Did you use a pond-style pump or a pool pump? The electricity and water can be dangerous.. |
|
P
pariartspaul
Posted
posted
on
Sun, Jun 24, 2007 3:45 PM
Ahoy thar, Capt'n Skully! You're right about adding sand to the epoxy. I skipped that step because I just wanted to get it sealed up first. But it says on the can that you can sprinkle it on as its curing to give it some grit. Next year or sometime when I re-coat it I will definitely do it. It's kind of slippery now. I used a pond style waterfall pump. You can see it here: http://www.mdminc.com/Sequence_750.htm |
|
V
VampiressRN
Posted
posted
on
Sun, Jun 24, 2007 8:45 PM
You sure have put a lot of effort into your project and have shared so much here. I just know it is going to be awesome when you finally finish it. Keep on ponding!!! |
|
CS
Capt'n Skully
Posted
posted
on
Mon, Jun 25, 2007 10:01 PM
I've heard great things about sequence pumps from ponders.. Reliable brand and more cost-efficient to run being external as opposed to the submersibles. Hope the water level is still holding strong for you. |
|
P
pariartspaul
Posted
posted
on
Tue, Jun 26, 2007 8:00 AM
It seems to have a slow leak somewhere in the top eight inches or so. If I fill it, the next day it will be eight inches lower, but then it will stay at that level. So I think I need another coat of epoxy on those sides. With my first coat I kind of faded it at that area. Anyway, for now I think it's fine until I get time to do recoat it. Practically, it's working just great at this level, there's still plenty of depth and it looks good. But if we have people over or something, we'll fill it for the day. The filter is working beautifully. We've had the waterfall on most of the day the last few days, and I'm in it 4 times or more throughout the day when I take a workshop break - really cools you off! It really is like a mini pool. And I did it all for under $2000!! I sure learned a lot during this experience. [ Edited by: pariartspaul 2009-02-10 14:58 ] |
|
P
pariartspaul
Posted
posted
on
Wed, Jun 27, 2007 8:59 AM
Well, ya know they say design is an evolution... yesterday I decided to go ahead and give the entire basin another coat of epoxy while the weather is still relatively cool. So I used the pump to drain it for the first time, and it only took 15 minutes! So that means the entire water volume of the pond gets filtered and recycled 4 times an hour when its running - and that's pretty great. So I got some play sand from Home Depot and sprinkled it on while the epoxy was still wet. It set up overnight and I think the finish turned out great. It's totally non-skid now. Maybe later today I'm going to start mortaring that secondary waterfall while the water is still out of the pond. I'm aiming for Friday or Saturday to refill it now. It should be totally watertight at this point, so I should be able to fill it with no slow leaks this time. We're having some company over on Saturday - so I'll take some more pictures then of the finished pond with both waterfalls running if all goes well. That's the latest! |
|
V
VampiressRN
Posted
posted
on
Wed, Jun 27, 2007 8:11 PM
Labor of love...it's looking good!!! :) |
|
QK
Queen Kamehameha
Posted
posted
on
Thu, Jun 28, 2007 2:48 PM
Paul, the pond and fall is amazing, you did a great job and I love the step by step, love the picture where your "on break" lol cute! Amy |
|
P
pariartspaul
Posted
posted
on
Mon, Jul 9, 2007 9:40 AM
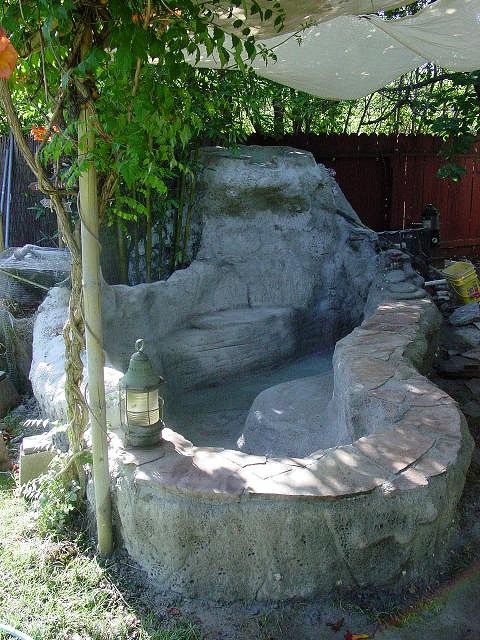
Well.... SUCCESS! Everything is up and running fine. The pond has totally changed the feeling of our backyard. It used to be on really hot days, we'd spend only a little time back there and then head back into the air conditioning. But now, with the sound of the waterfalls and taking a little dip from time to time we can spend the whole day out there if we want. So we've created our own mini-pool! Love it! |
|
V
VampiressRN
Posted
posted
on
Mon, Jul 9, 2007 7:37 PM
Looks fabulous and the sand around outside was a brilliant idea....it looks very beachy. :) |
|
P
pariartspaul
Posted
posted
on
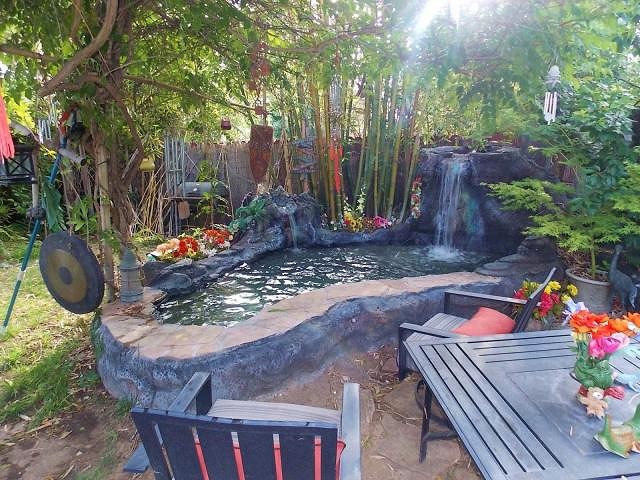
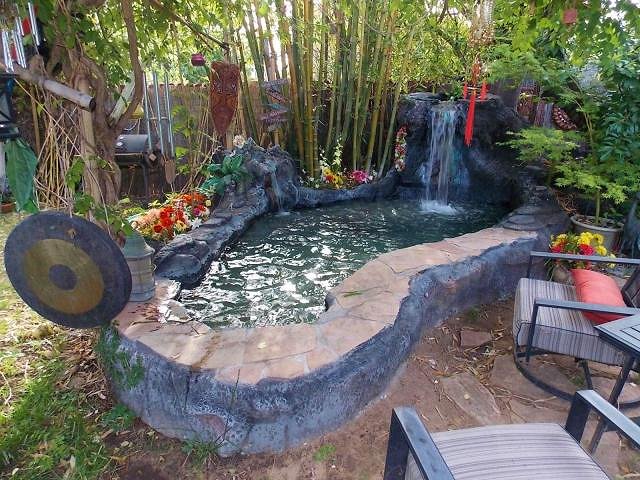
Mon, May 5, 2014 8:17 AM
Aloha everyone! I haven't been here in a long long time but I thought I'd post a few new pictures of the pond seven years later! It's held up great over the years. I just upgraded the equipment to a proper "in-ground" mega pump and filter and I tell you, those waterfalls are gushing like never before!
|
|
G

Gwen
Posted
posted
on
Mon, May 5, 2014 8:25 AM
It looks absolutely great!! I am much impressed by your lava texture. Is there a thread anywhere here where you discuss the specifics of how you did that? |
|
P
pariartspaul
Posted
posted
on
Mon, May 5, 2014 8:30 AM
Hey Gwen, this is the thread that shows pictures of the construction. Scroll back to page one and read through it. For the actual lava texture, I made a mixture of mortar mix, concrete and a little lime smoothed onto metal lathe. One the first coat was set up, I scooped on the second coat and that's the coat I textured. I used a rough broom to stamp in an overall texture, then came back in with sticks to poke/carve in bigger holes. I sculpted the underlying rough shapes with a trowel. It was fun but a lot of work. Ultimately very worth the effort though. |
|
D

danlovestikis
Posted
posted
on
Mon, May 5, 2014 8:45 AM
Somehow I miss this the first time around. I really enjoyed going back to see all of your photos. What a beautiful place to hang out. Being able to sit on the edge is over the top wonderful. I want to put my feet in there too. Wendy |
|
G
Gwen
Posted
posted
on
Mon, May 5, 2014 12:12 PM
Thanks, Paul! |
|
LSTB

Lucky Star Tiki Bar
Posted
posted
on
Wed, Oct 15, 2014 1:29 PM
Wowo that is amazing. You did a great job. Now I want to build something like that next to my tiki bar. Thanks for the great idea |
|
LSTB
Lucky Star Tiki Bar
Posted
posted
on
Wed, Oct 15, 2014 4:02 PM
It should be known that I just showed this post to my wife. She likes the idea. We may start building in the spring. Did you have any idea how to do this? Where did you get the knowledge for this kind of build. I am just learning about using cement on a completely different hobby (Garden Railroading) Any good books you can steer me too? thanks |


Pages: 1 37 replies