Pages: 1 6 replies
|
AJ

Aloha John
Posted
posted
on
Sat, Dec 29, 2007 10:09 PM
OK I think I am going to go for it. I have been reluctant to do the pour with stuff in it for fear of getting new postcards etc and not being able to add them, but I think I just going to go for it...and the time is now.
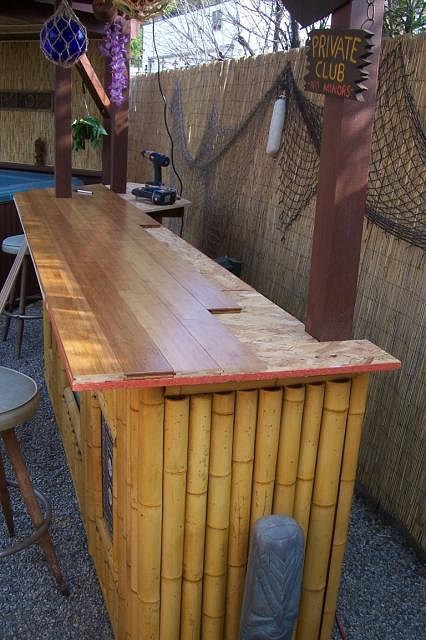
This is a newly built, covered outdoor bar, about 12' long and 2' deep. I have bamboo flooring laid on top of 1/2" chipboard/plywood. I'm going to add trim to the edge so the trim sticks up about 1/4" above the bar surface. This will contain the epoxy. Is this a reasonable thickness to achieve?? Before I put down the postcards, etc onto the top - I cover them in white glue? Do you do this elsewhere and just squeeze it on so it covers the top of the postcard only and let it dry, then put it on the bar? Versus lay them on where I want them on the bar and pour glue over them, let them dry, and pour the glaze on? Do I need glue on the back of the postcards too? Can I get the postcards laminated as an alternative to the glue to prevent the epoxy from ruining them? What about Mod Podge? I really don't want to screw this up... Thanks is advance for any info... |
|
CAA

Chip and Andy
Posted
posted
on
Sun, Dec 30, 2007 5:44 AM
Mod Podge is the way to go! It dries clear and is easy to work with. DO NOT LAMINATE! anything to be encased in resin. The postcard will continue to age in the pocket the lamination creates causing the lamination to cloud up with the end result being strange fuzzy spots in your bar top. |
|
AJ
Aloha John
Posted
posted
on
Sun, Dec 30, 2007 9:49 AM
OK thanks! I just found some info online that answers most of my questions. If anyone has any extra advice, I'm listening. : ) I hope it's not too cold outside to do this (upper 60s). I guess I'll see what the package says. I just checked the weather and we are supposed to get Santa Ana winds here Mon and Tues. This project may have to wait. I don't want dust and leaves stuck in my bar top... Info for Kleer Koat Table Top Epoxy-
From another website- Seal the image with either tape or an acrylic medium. To prevent your image from blurring or breaking down due to direct contact with the epoxy, seal the image with decoupage glue, acrylic matte medium, or clear packing tape. If you use glue or matte medium, use a paintbrush to coat the front, back, and edges of the image [1]. If you use tape, cover both the front and back of the image, burnish it with a burnisher. |
|
T

tikiskip
Posted
posted
on
Sun, Dec 30, 2007 10:52 AM
I used Elmers glue. First glue the back of paper item. |
|
C

croe67
Posted
posted
on
Sun, Dec 30, 2007 11:56 AM
Beautiful, tikiskip!!! Looks just GREAT! I'll be revisiting this thread before we do our bar top.....thanks a ton for the tips :D |
|
T
tikiskip
Posted
posted
on
Sun, Dec 30, 2007 2:19 PM
Thanks croe67. |
|
AJ
Aloha John
Posted
posted
on
Sun, Dec 30, 2007 10:42 PM
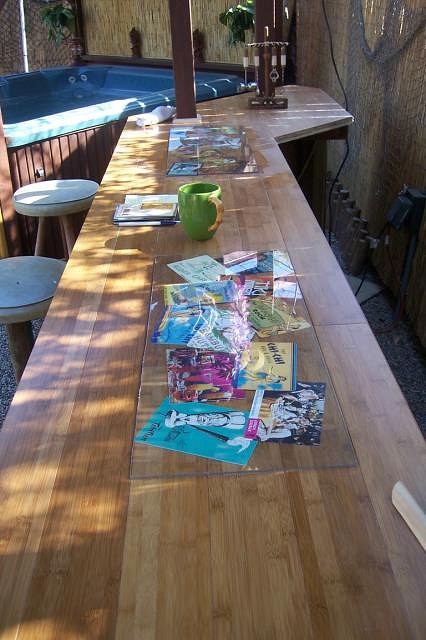
Good info TikiSkip, thanks! However I think I have decided to go back to plan A. In addition to reasons already discussed I am also hesitant to try the pour on something so big for my first, and also due to reflections from the sun. I decided to do a test this afternoon. I had some scrap plexi that I cut into 2 rectangles (12" x 28" each - it's all I had left). I placed them on the bar with postcards underneath. I think I like the look of the postcards confined to one area, or 2, under glass. However there was a nasty glare that made the postcards hard to see from certain angles.
So I am going to cut out 2 sections of the flooring each 15" x 30". I will then get 2 pieces of glare reducing glass cut at 14 3/4 x 29 3/4. I will lay lauhala and postcards in the holes and shim it up with pieces of luan under the matting until the glass is flush with the flooring. Then add silicone into the 1/8" gap around the glass and add some skinny wood trim with small screws into the siliconed area to finish it off. I know spills will go through the tongue in groove joints on the flooring and reach my chipboard base, but I am hoping that I can simply keep spills limited with a bar towel, and keep sweaty glasses on coasters. I know I can get solex tempered glass cut at auto glass places...I assume they have glare reducing glass at generic glass places too? |

Pages: 1 6 replies