Tiki Central / Tiki Carving
Seagoat's pieces *update 10/31/16- p.5
|
S

seagoat
Posted
posted
on
Wed, Jan 2, 2008 10:12 AM
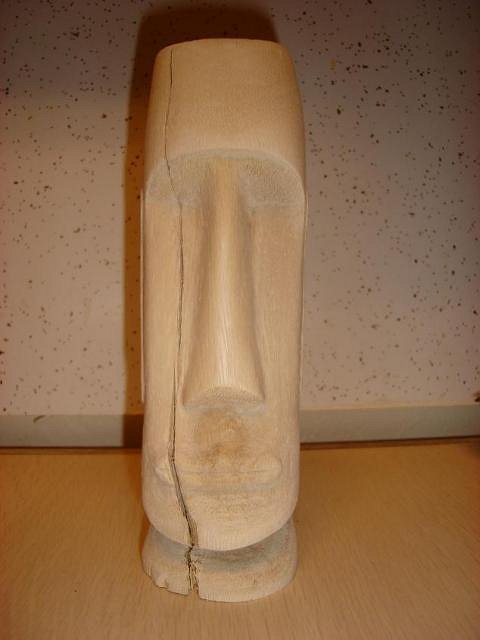
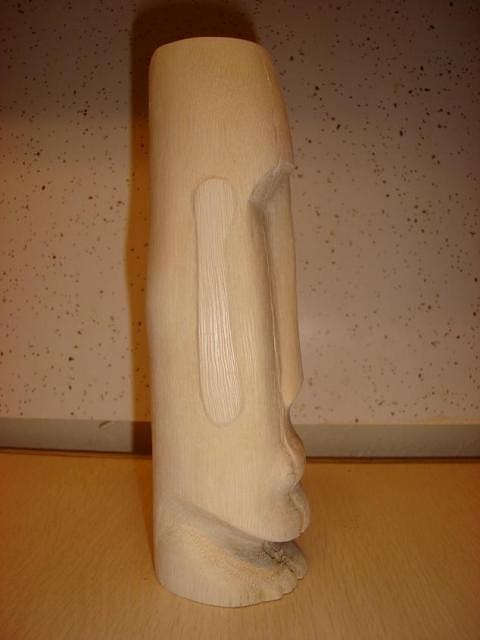
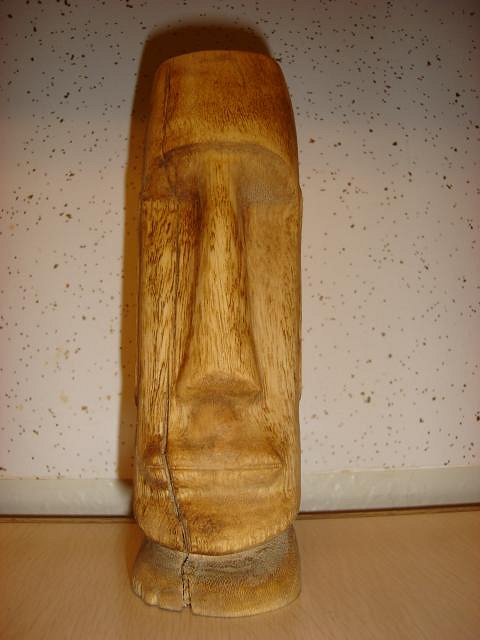
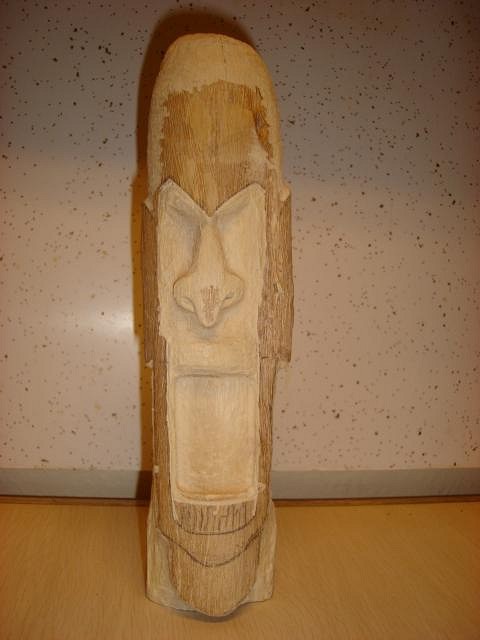
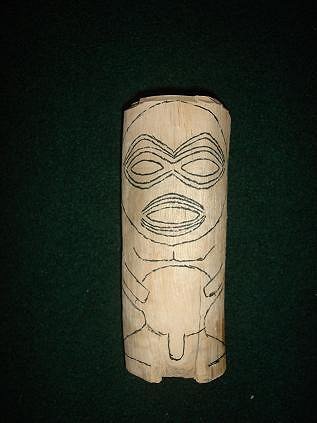
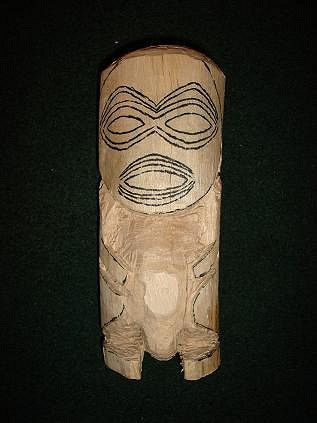
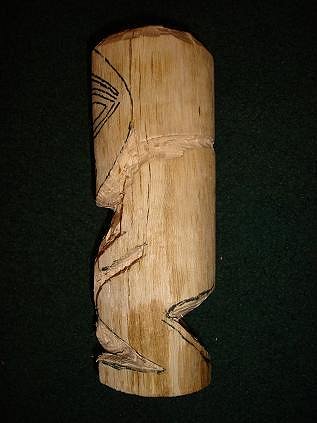
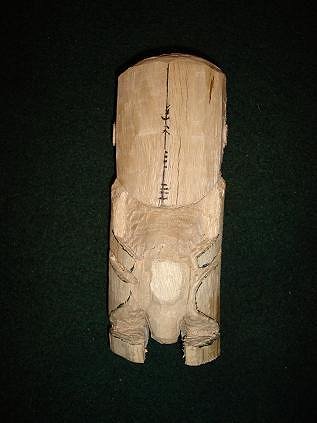
Hello, I originally posted this in Benzart's 'need more carving's' thread but I thought I'd start another with it and to ask some other questions. Hope this isn't against etiquette. Hi everyone, first time poster here. I've been browsing these forums off and on and figured it was time to sign up and add a few photos. I've done a couple tiki related pieces and have looked on here for ideas and inspiration. Figured I'd add them to Benzart's request thread to get started. There is a lot of great work on here and I have a long way to go if I keep up with this. Anyway, here are a couple photos of a small moai that I did recently out of eucalyptus branches that had been trimmed nearby. I grabbed another piece about this size and 3 others that are maybe about 2-2.5 times this size. So I have four more branch pieces to start working with. It was all done using a dremel and then hand sanded. Debating on painting it or not but by the looks of other pieces on here, looks like I should color it.
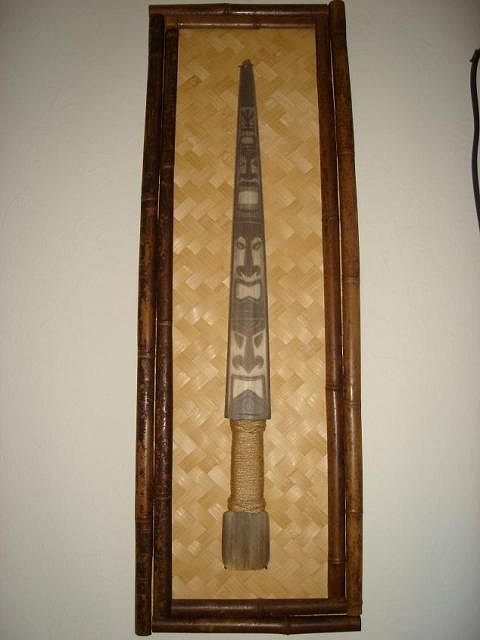
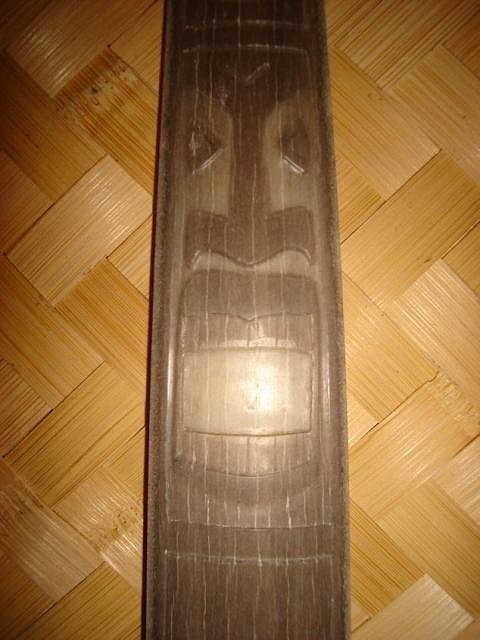
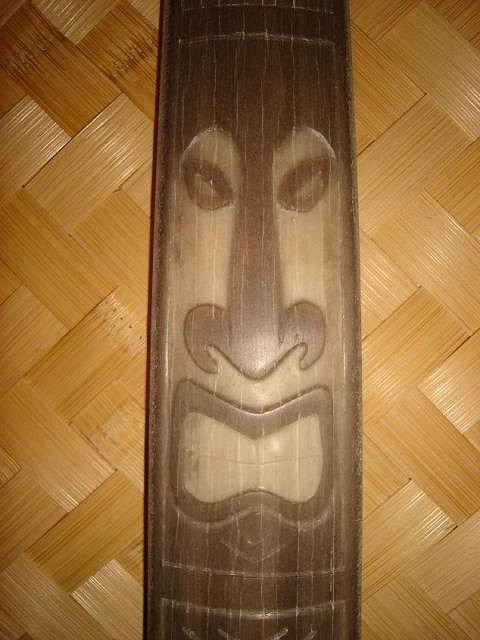
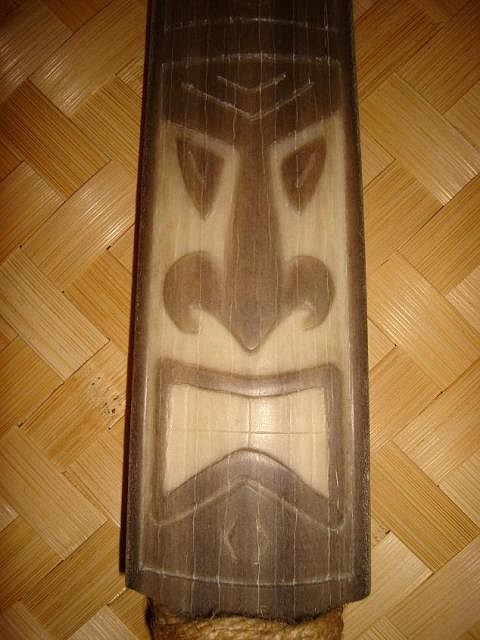
The first tiki thing I tried was a tiki totem on a swordfish bill back in Aug. 2004. I sanded the whole bill down, carved the handle in it, then carved the tikis with the dremel and polished it all up. Decided it needed to be mounted on something so built a backing frame for it it with plywood and bamboo. Here is one full shot and close-ups of each tiki.
I think I saw in one of GMan's threads that he had a photo of a bunch of dried swordfish bills. If so, Gman, have you done anything with them yet? From the looks of your wood pieces, I'm sure yours will turn out a lot nicer. Then again you also have more experience at this. Thanks to everyone for the cool forums and sharing the artwork. So if I color the Moai, would gray spray paint work well or do you all have other recommendations? Also, I'm trying to learn what the different styles are from the different island regions, etc. but can't seem to find a list or book that show the different examples of the styles. I found this thread but some of the old links are dead and a bunch of the images on the purple jade tiki site are down as well. So I'm curious if anyone has some new links, books, etc that they can recommend or a good thread that I am overlooking. I'm also browsing the "Old guys" thread for advice. I realize that it comes down to research and possibly buying multiple books if there is no one stop shop of styles for beginners. Thanks in advance for any help and advice. [ Edited by: seagoat 2013-11-11 14:34 ] [ Edited by: seagoat 2014-01-30 10:44 ] [ Edited by: seagoat 2014-05-12 12:49 ] [ Edited by: seagoat 2014-08-13 14:34 ] [ Edited by: seagoat 2015-10-02 12:30 ] [ Edited by: seagoat 2016-10-31 11:48 ] |
|
S

seeksurf
Posted
posted
on
Wed, Jan 2, 2008 10:40 AM
Welcome seagoat, WOW outstanding first tikis your a natural. |
|
S
seagoat
Posted
posted
on
Thu, Jan 3, 2008 1:48 PM
Thanks seeksurf and Benzart (other thread). Benzart, thanks for the stain idea. I was trying to come up with something that would give it that stone look but a good stain would look nice. I'll post an update once I get it done. |
|
M

mieko
Posted
posted
on
Fri, Feb 29, 2008 9:51 AM
Wow, swordfish bills?!? It looks great! How was it to carve compared to the eucalyptus? I wonder if marlin bills would be the same, I have access to those a lot more. I missed your thread before, if you're still looking for books with different traditional styles, Oceanic Art by Meyer is really good (and BIG). There's not a lot of any one style, which can be a bummer, but it does have stuff from pretty much everywhere. Keep up the great work! |
|
S
seagoat
Posted
posted
on
Mon, Mar 3, 2008 10:09 AM
Mieko, Thanks for the info. As far as the carving between the two items goes, we are comparing bone to wood. So the eucalyptus is softer overall and the bone is harder and allows for a cleaner edge. The bill took some time to do because it was my first time doing anything like that and I didn't know how deep to go. I probably could have gone a bit deeper on them but there is a big hollow area at the base of the bill and a hollow tube that goes up along each edge that holds a vein, so I didn't want to go too deep and cut into the hollow areas. I just used a variety of dremel bits to cut away the larger areas, the fine lines, sanding and polishing, etc. I think the marlin bill would be carvable as well but it wouldn't be quite the same. The swordfish bills are longer and are flatter than the marlin spike which are thinner and rounder. So there is less surface area to work on with the marlin spike but there are people here that have done tikis and other pieces with much smaller material. I think the marlin spikes are a lot rougher than the swordfish bill to start with. I have done a lot of sanding on the bills to get all the rough stuff and outer layer of skin off the bill to get it to the smooth finish, so you may have to do that with the marlin as well. Guess it all depends on how you want it to look at the end. I've stained the Moai, just haven't taken any photos of it yet. Still need to start working on either another piece of wood or another swordfish bill. Not sure either will be tiki related though. |
|
S
seagoat
Posted
posted
on
Thu, May 22, 2008 12:46 PM
Hey everyone, So here is the update of my first Moai with the stain added. I think I only did one coat and I don't remember what color I used. Does it work or does anyone have suggestions/recommendations?
Even though it isn't a tiki, here is the latest one I'm working on with another small piece of eucalyptus. The design came from a face on a t-shirt that I bought years ago. I always thought it looked cool and thought it would be another nice practice piece since it is more detailed than the moai.
After this, I have three pieces of eucalyptus that are a little larger that I plan on trying some different tiki styles on them. Unfortunately they have some decent cracks in them so we'll see how it goes. I'm also thinking of getting some small chisels since I don't think the dremel would be too effective on the larger pieces of wood and would take even longer. Thanks. [ Edited by: seagoat 2008-05-22 12:47 ] |
|
S
seagoat
Posted
posted
on
Thu, Feb 5, 2009 11:55 AM
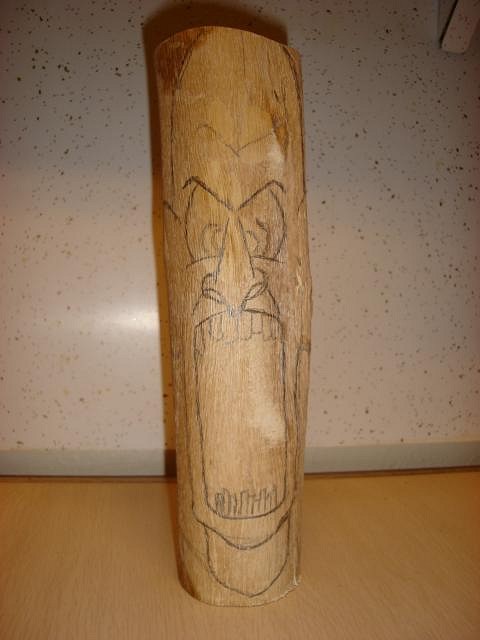
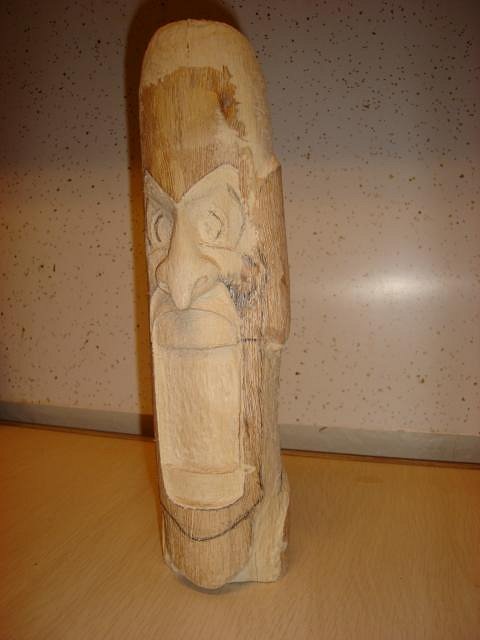
Hey everyone, so I've mostly finished this latest carving. Took way too long to get around to finishing. I need to work on this stuff more often and/or faster. I may try to fix up a couple things but this is pretty much it so I can move on to the next. So here are some different photos because I have a question. Dry wood w/flash Dry wood w/no flash Wet wood w/flash Wet wood w/no flash So I'm trying to figure out what to use for a finish. I still have the stain that I used for the Moai, but I don't think I want to color both of those the same. I rinsed the face to get the dust off after the sanding and thought it looked good with the wet look of the natural wood. So does anyone have a recommendation of some type of clear coating that will bring out the color a little bit but not darken it too much? Thanks for the help. Haven't decided if I'm going to start another piece of eucalyptus or another swordfish bill next. [ Edited by: seagoat 2009-02-05 11:56 ] |
|
BD

big daddy
Posted
posted
on
Thu, Feb 5, 2009 12:42 PM
hey seagoat, can't help you with the finish as i've used what i had on hand - tung oil and also a stain wax and haven't done any research. love the moai with the crack. happen before or after the carve? the new one is fiendishly cool. keep it up. bd |
|
B

Benzart
Posted
posted
on
Thu, Feb 5, 2009 1:57 PM
I Love how your Moai turned out and think this Awesome New guy would look great with the same finish.. I really love the excellent detail and features of this one! |
|
S
seagoat
Posted
posted
on
Fri, Feb 6, 2009 9:21 AM
BD - Thanks. Yeah, the crack was there to begin with. The other three bigger pieces of eucalyptus that I have all have some decent cracks in them as well so we'll have to see how they work out. Benz - Thanks. I may end up using the same stain since it would be easier since I already have it but I'm going to keep doing some research to see what else might work. Thanks guys. |
|
A

AlohaStation
Posted
posted
on
Fri, Feb 6, 2009 10:39 AM
That Face is excellent!! I would love to see you use subtle color to highlight and shade the piece. A flat stain may not give you the accents this piece screams for - extreme expression. I usually paint the shadow areas to add depth in a well-lit area. Here's the technique (ALWAYS DO A TEST PIECE FIRST): Finish sanding and applying any stain you desire. Once the wood is the shade you want, you will need to seal it. Sealing the wood allows you to paint on the surface without the paint being soaked into the wood (allows you to fix any screwups). I use a mixture of 50%/50% boiled linseed oil and turpentine (ancient woodworkers formula). Brush on generously, allow to dry for 15 minutes then wipe off the excess - let dry for at least 1 hour. Then you are ready to paint (I use Water-based Acrylics but you can use Oil Paint as well - oil paint takes longer to dry). It will stink so keep it in a well ventilated area. Mix the colors you want - starting with lights colors and progress to dark. Mix your paint with water/thinner till it is very thin. The goal of this technique is to add color while keeping the natural beauty of the wood. Brush on the thin paint till you reach the level of opacity that you want. While painting keep a clean, wet rag with you to remove any paint that you may not want. Allow to dry. Brush on the 50/50 mix and wipe clean. Repeat this process till you are happy with the result. Allow the piece to dry completely and finish with a clear coat (I like the wipe-on Poly). This technique will give you subtle color variations that can make the piece look more 3 dimensional, even in crappy light. I did not make this up - it actually came from an article in Wood Carving Illustrated http://www.woodcarvingillustrated.com/issue42/realistic-skin-tones.php Good luck. I'm sure no matter what you finish it with its gonna come out killer!! |
|
S
seeksurf
Posted
posted
on
Fri, Feb 6, 2009 12:46 PM
Great Face seagoat love the expression you have captured with this guy. |
|
S
seagoat
Posted
posted
on
Wed, Feb 11, 2009 10:08 AM
AS - Thanks for all that info. I didn't really think of painting it but I'll look through the link and give it some thought. Still haven't made the final touches and haven't decided how to finish it. Seeks - Thanks, didn't turn out quite like the image I based it on but still pretty happy with it. |
|
S
seagoat
Posted
posted
on
Wed, Feb 25, 2009 10:22 AM
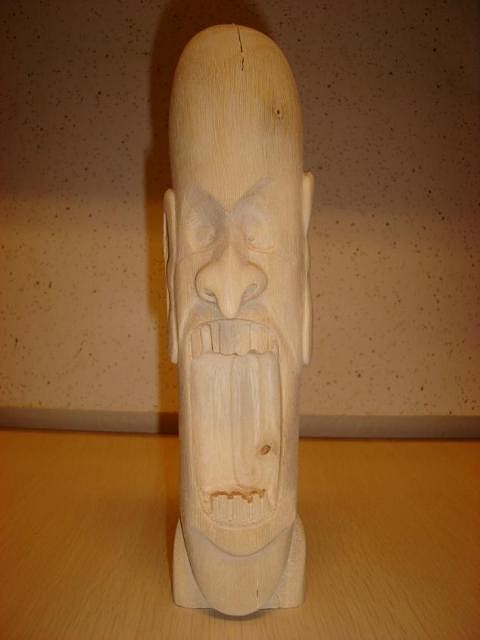
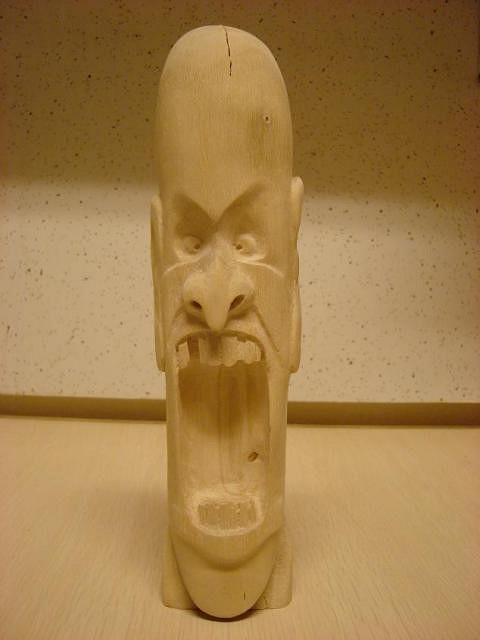
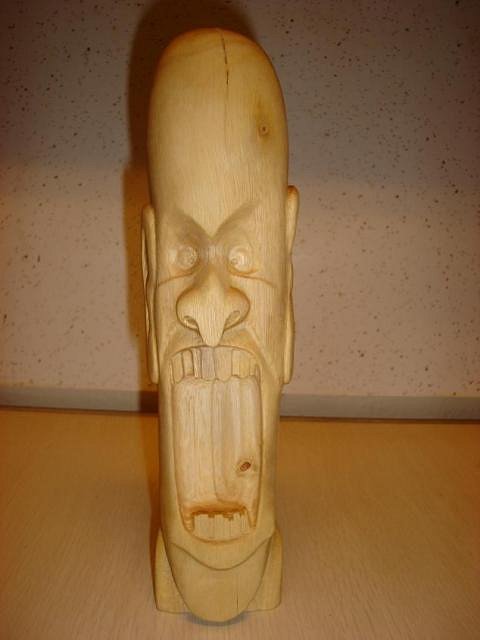
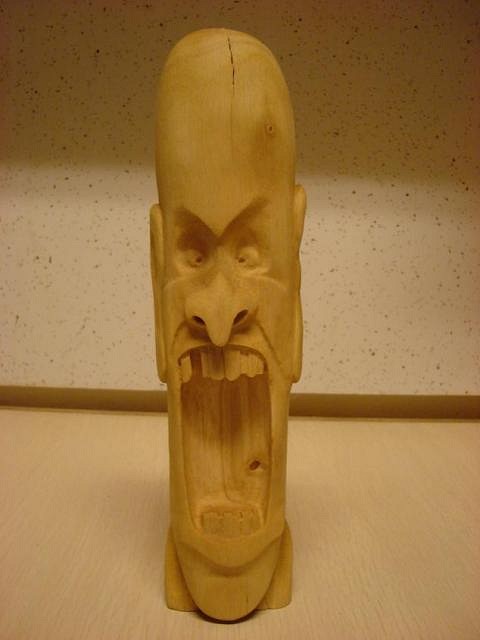
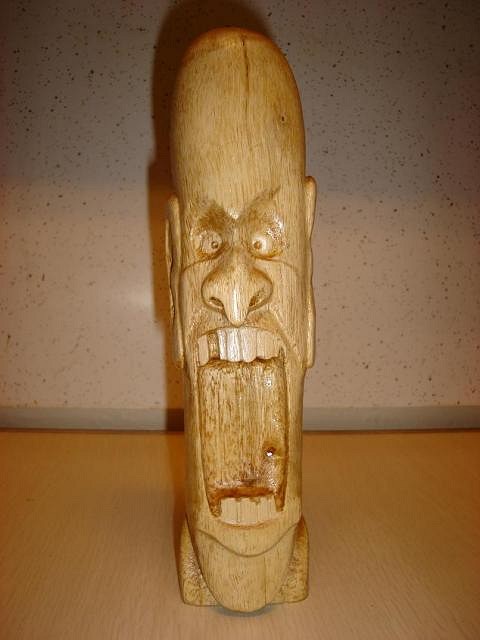
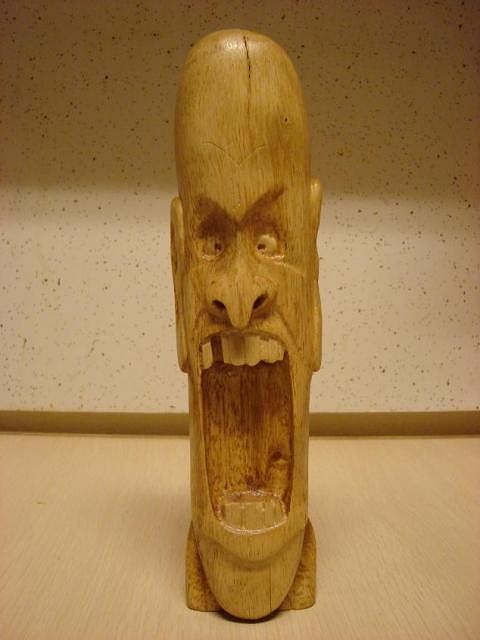
So I finished this guy up. I ended up first giving it a couple coats of General Finishes satin top coat and then a blend of Minwax Natural and Puritan Pine. I did multiple layers in a couple areas to try to darken it a little more. The Puritan Pine is what I used on the Moai with no top coat. I didn't want it to be that dark so I did the blend. Turned out alright I guess. I almost think I should have done the stain first with the Natural and then put the top coat on later. Oh well, this is what it is. On to something else. Flash / No flash
|
|
T

TheBigT
Posted
posted
on
Wed, Feb 25, 2009 11:45 AM
Scary good! I love it. Thanks for describing your finish process. I'm still trying to figure all that out myself. |
|
BD
big daddy
Posted
posted
on
Wed, Feb 25, 2009 12:16 PM
well done seagoat. tiki vampire? really like it. bd |
|
T

tikisbytyler
Posted
posted
on
Wed, Feb 25, 2009 2:00 PM
Very cool, Seagoat! lotta character there. Big expression. How tall are these pieces? You'll get tons of advice on here - take watcha like - leave watcha don't. You've got a really unique style, man. Tyler |
|
S
seeksurf
Posted
posted
on
Wed, Feb 25, 2009 2:58 PM
I like the natural look you have going here. |
|
A

Aweulekuula
Posted
posted
on
Wed, Feb 25, 2009 6:40 PM
Oh my God! Okay, the Moai was already cool, and the eucalytpus seems to be an awesome medium for you. But the composition and energy in the vampire tiki blows me away completely. I mean, you get a sense that this guy will actually leap out at you at any moment. Aloha! Marcus |
|
L

laojia
Posted
posted
on
Wed, Feb 25, 2009 10:13 PM
certainly, from here I can hear his scream :o !!!
Every time stain (water or alcohol) before coat, wax or oil finished.Be careful to the correlation between stains and top coat, sometimes it's surprising, does not hesitate to make test.Don't forget a little sanding with 400 or 600 grits between every layer of finishing, varnishes, top coat or oil, for "break" the pores of the wood that is get up. continue good work,your carve biting!!! :wink: |
|
S
seagoat
Posted
posted
on
Thu, Feb 26, 2009 3:01 PM
Wow, I'm up to two pages. ha ha. Thanks for the comments and feedback everyone. Still learning this stuff so it always helps. Big T - No problem. Hope it helps on what or what not to do. Think I'll stain first next time. BD - Not sure if I'd consider it a vampire. As mentioned before, it is based on a graphic from a t-shirt I bought ages ago. Didn't turn out exactly the same but oh well. :wink: seeks - Well, it can't be too hard considering how killer your pieces turn out. Tyler - The moai is probably around 7" and the face is around 8-8.5". Thanks for the finishing tips. So what oil finishes do you recommend? Marcus - Well, the eucalyptus is what I just happen to have on hand due to some local tree trimming a while back. :) Figured it would be good to start on and experiment with and if things go decently then maybe move on to some larger pieces. Then again, I already have problems figuring out where to keep them and work on them in a one bedroom apt. laojia - I'm pretty sure I understand. Thanks for the tips. So I have three other branch pieces that are taller and larger diameter than these first two. I may try a marq or a tang next. I also have some other projects in mind with other stuff (more swordfish bills) so I don't know how soon I'll get to them. Thanks again everyone. |
|
S
seagoat
Posted
posted
on
Wed, Oct 14, 2009 11:33 AM
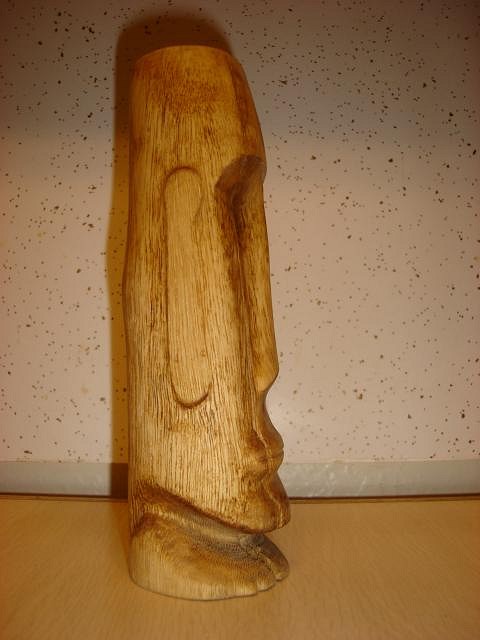
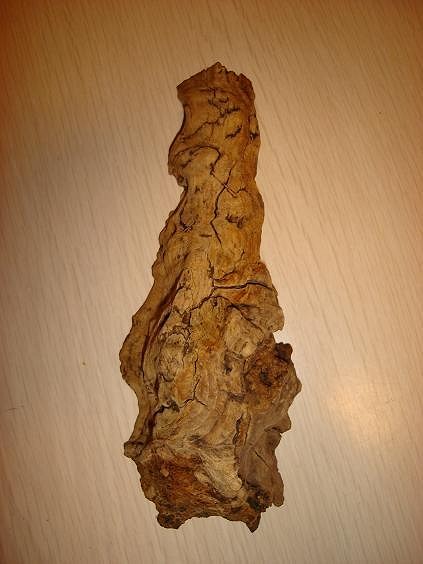
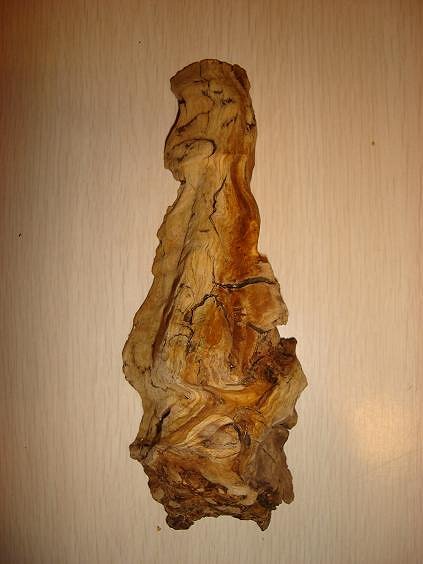
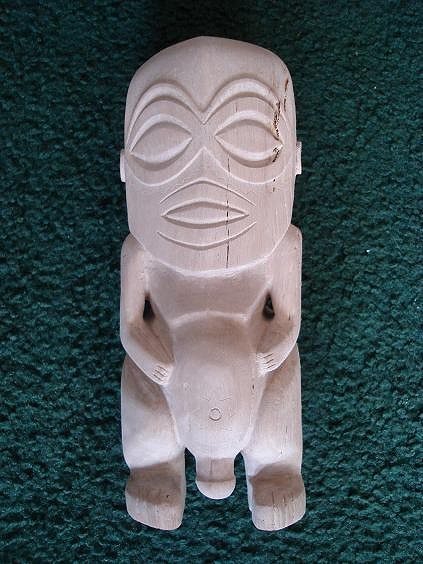
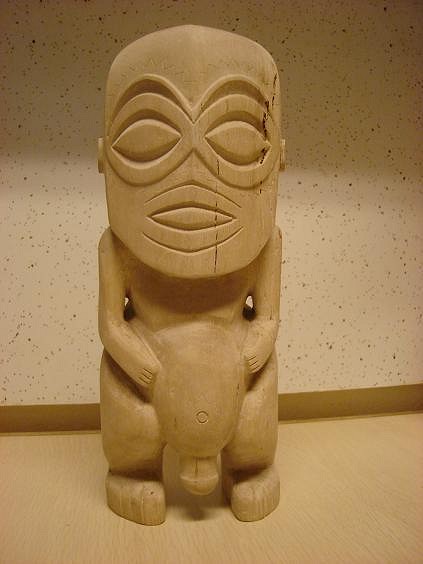
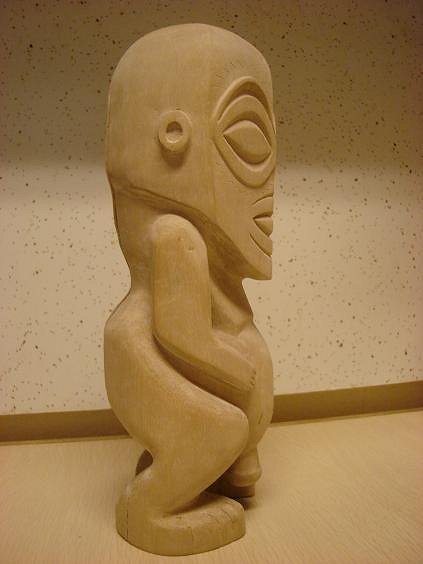
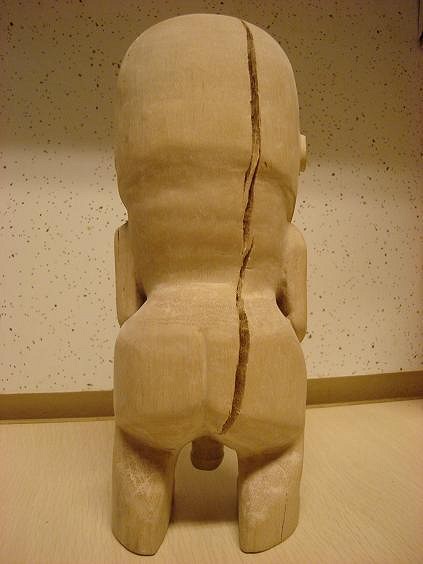
Hey everyone, well another small update here. I had a random piece of driftwood that I ended up making into a wine bottle holder. This is a piece that I cut off in the process and held onto to do something with later.
To me, it looked kind of Moai, so I went with that and tried to bring it out. Here is one mid point photo;
Done carving, and after some sanding;
and with a finishing coat;
After looking at these head on photos I realized it is a little hard to see some of it so here is one with a bit of a bottom angle and one of a 3/4 profile.
So it's not much but a little something I decided to do with some scrap wood. Still need to get to the eucalyptus and swordfish bills someday. Thanks for looking. |
|
BTS

BIG tiki scott
Posted
posted
on
Wed, Oct 14, 2009 7:57 PM
seagoat!!! aloha! very cool stuff! luvin that tiki/face you just did ! its three d man! and the sword fish bill is the bomb! cheers! big tiki scott. [ Edited by: BIG tiki scott 2009-10-14 19:57 ] |
|
B
Benzart
Posted
posted
on
Thu, Oct 15, 2009 3:22 AM
Excellent stuf here seagote, the Swordfish bill is Sick and the last maori face is really Cool to . love the subtle look. Thanks for posting. |
|
S
seagoat
Posted
posted
on
Mon, Oct 19, 2009 10:12 AM
Thanks B.T. Scott and Benzart. Need to keep working on these things and get better at it. Until next time. |
|
S
seagoat
Posted
posted
on
Wed, Mar 24, 2010 1:26 PM
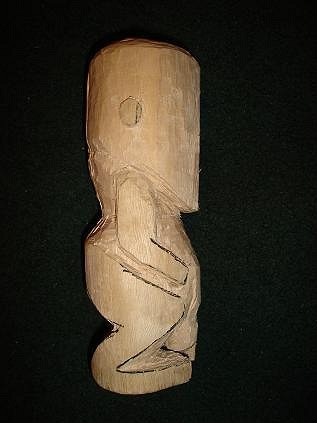
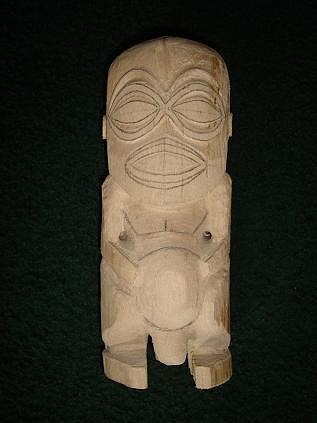
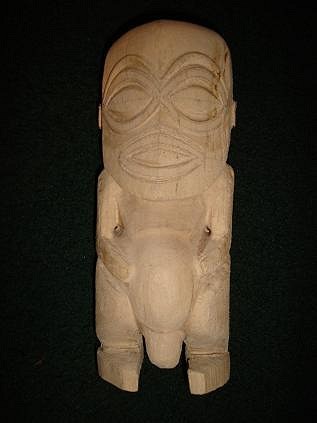
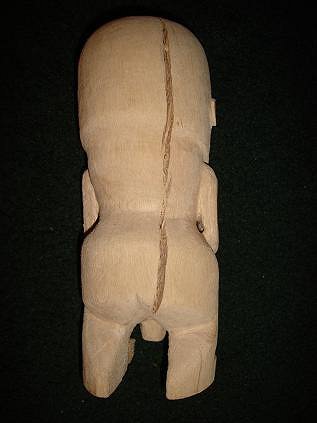
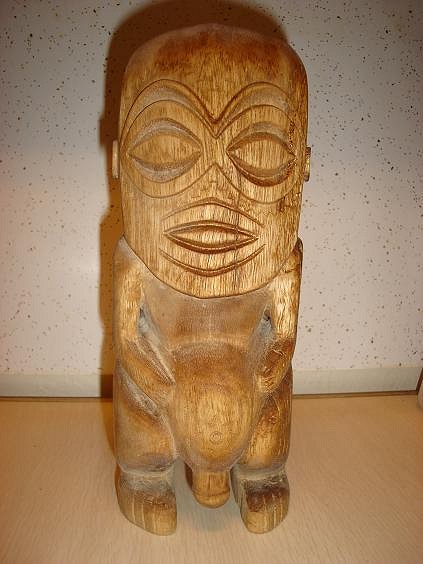
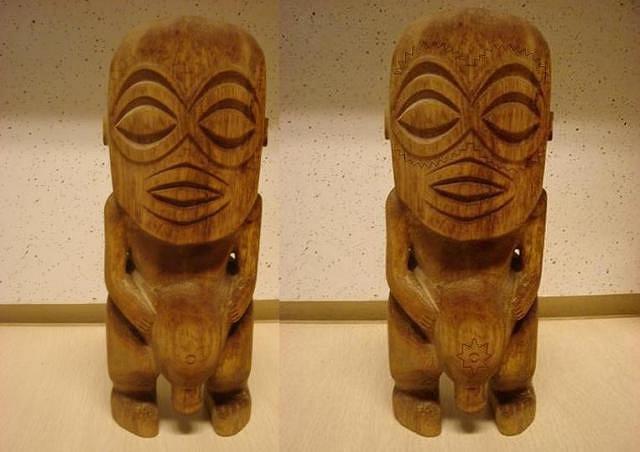
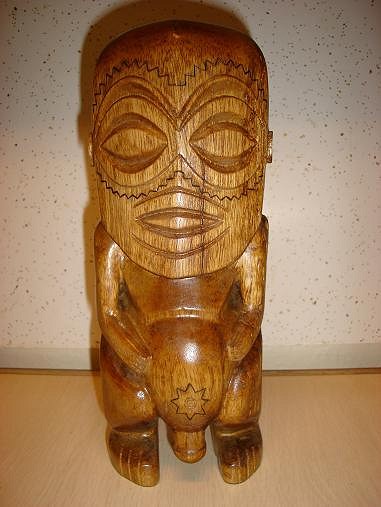
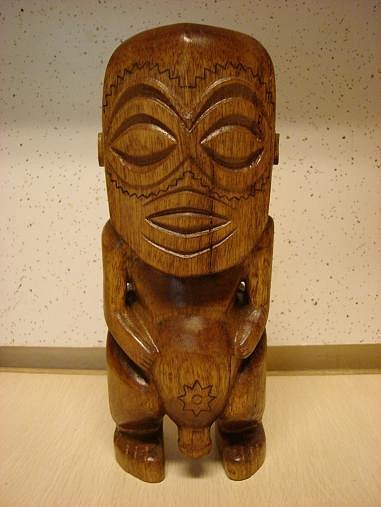
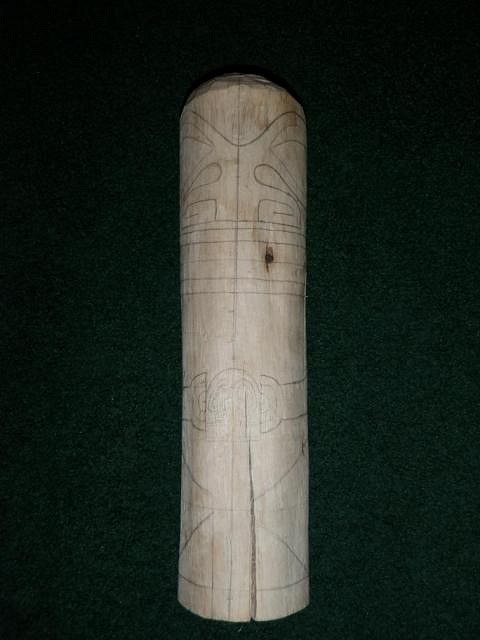
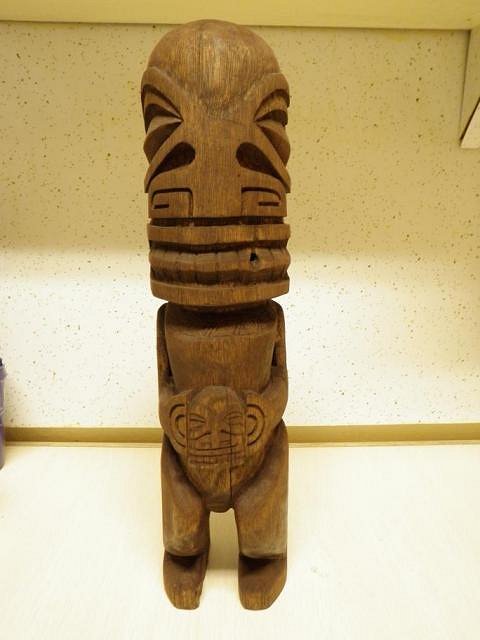
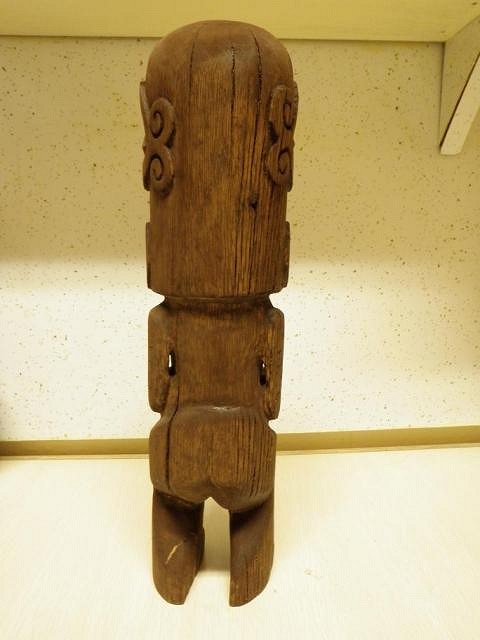
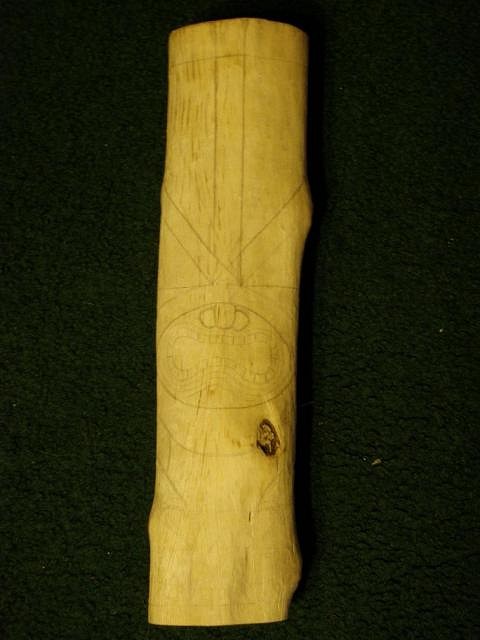
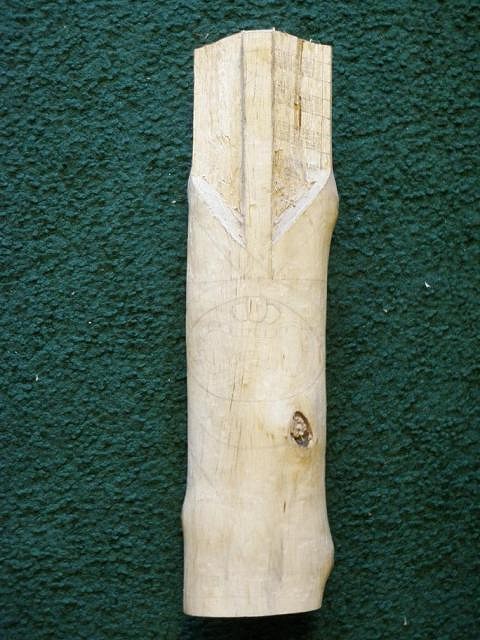
Hey everyone, finally finished another piece. Well, almost finished. Figured I'd post some photos and do a bit of a write up again. This is a Tangaroa done out of another one of those eucalyptus branches. I tried looking at a bunch of different pictures of these and figure out what to do so hopefully I didn't step on any toes for style or anything, just trying to figure out how to do this. So this is the first one I started with chisels. This piece was a little to big to only use the dremel with, so I thought I'd try chisels. It wasn't easy, somewhat due to my lack of equipment and workspace, but it was fun to work on and figure out. At a certain point I felt if I went any further with chisels I would mess something up and switched back to the dremel for starting to work on the detail. I used different burrs and cutters for the shaping and cutting and some diamond tip to start sanding/smoothing out. Here are some small photos of the process and a few larger ones of the more finished piece. After all of the sanding, I did one coat of stain on it. You might be able to see a small sun/star 'tattoo' around the navel, and some zig-zag 'tattoo' around the eyes. They are not very deep so the stain didn't darken it as much as I wanted. Now I'm trying to decide if I should re-carve those a little deeper and re-stain the area, but I'm worried about messing it up. Or I'm thinking of maybe just putting a faint line of black paint in those lines and then putting a coat of poly on the whole thing. Overall, I'm pretty satisfied with it. Always being critical of my own work, I think the legs are ok, I should have made the shoulders a little farther back and the forearms/hands a little bigger, and maybe made the ears a little bigger. Since I'm trying to learn from doing this, what would you more experienced/experts on here do differently/better? Any thoughts on the 'tattoos', carve deeper or a little paint? Thanks for looking again.
|
|
S
seeksurf
Posted
posted
on
Wed, Mar 24, 2010 8:57 PM
I'm also very critical of my own work. I think this sucker looks great. Take what you learned and go at another one. |
|
T

tikigodz
Posted
posted
on
Thu, Mar 25, 2010 7:36 PM
seek is right never continue when you dont konow |
|
S
seagoat
Posted
posted
on
Mon, Mar 29, 2010 1:03 PM
Seeksurf and Tikigodz - Thanks for the feedback. I decided to give it another coat of stain because some areas dried faster/more than others, so I did another to even it out. Still haven't decided if I'll add a touch of paint to the 'tattoos', I'll wait and see how the latest round of staining evens out. Thanks again guys. |
|
S
seagoat
Posted
posted
on
Tue, Mar 30, 2010 2:41 PM
I did a quick test with MS Paint by filling in the 'tattoo' with a faint black line to maybe get a better idea of how it would look if I actually paint it. I think I may paint it in but still deciding. Thoughts??
|
|
S
seeksurf
Posted
posted
on
Tue, Mar 30, 2010 10:45 PM
I like the tatts highlight. |
|
B
Benzart
Posted
posted
on
Wed, Mar 31, 2010 5:36 AM
Your Moai is WAY Excellent. You had a Good eye to see him in that disfigured piece of beautiful wood He is Incredible! |
|
S
seagoat
Posted
posted
on
Mon, Apr 5, 2010 1:06 PM
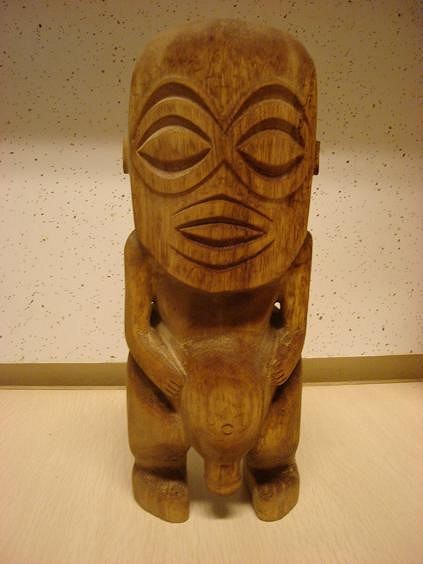
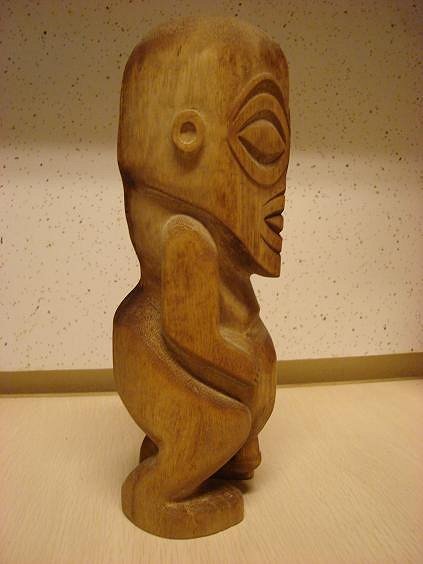
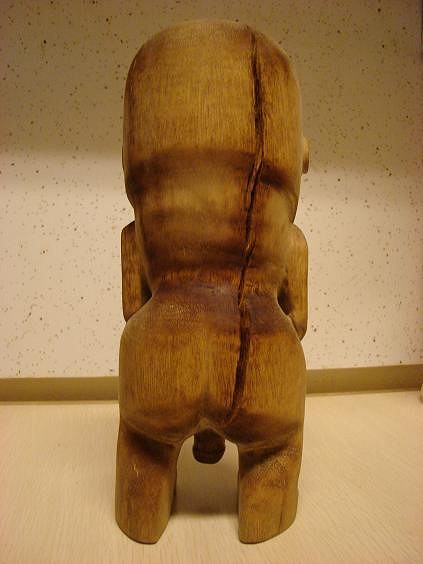
Seeksurf and Benzart, thanks for the comments. Here is the latest and final. I gave him another coat of stain to even the blotching out and then gave it a few coats of a protective topcoat. The stuff really soaked in along all of the end cut areas so I had to go over those a few times. Decided to go ahead with the black tattoos as well. Here are the flash and no flash photos. Done with this guy, on to something else.
Thanks for lookin'. |
|
S
seagoat
Posted
posted
on
Mon, Dec 6, 2010 12:53 PM
Hello, We'll here is my latest carving. I've done some other things since my last update in April, just not tiki stuff. Anyway, tried a Marquesan style. Here are a few progress shots and mostly done with stain. There are some arm and chest 'tattoo's that are kind of hard to see in these. Might fill them in with black like the last one. I'll probably put a protective coat on later in the week like I did with the Tang.
|
|
G

GROG
Posted
posted
on
Tue, Jul 12, 2011 1:36 PM
Nice Tangaroan and Marquesan tikis. GROG like. |
|
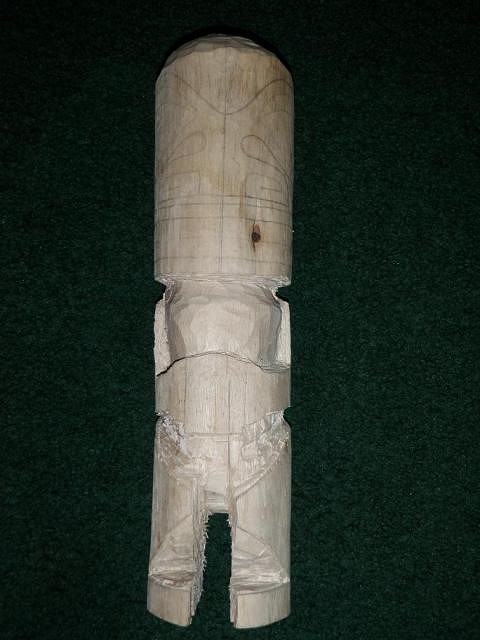
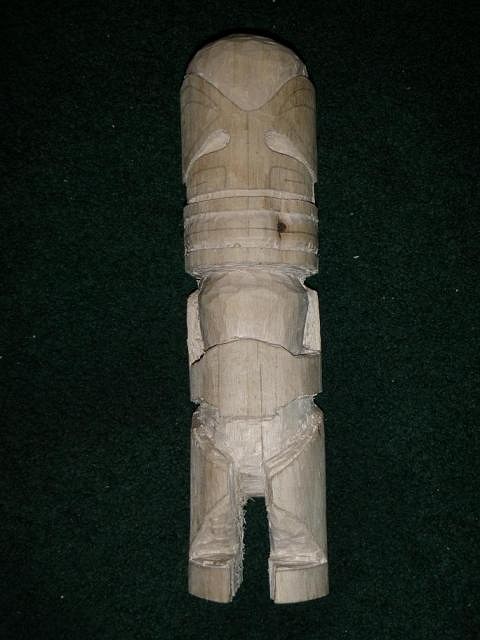
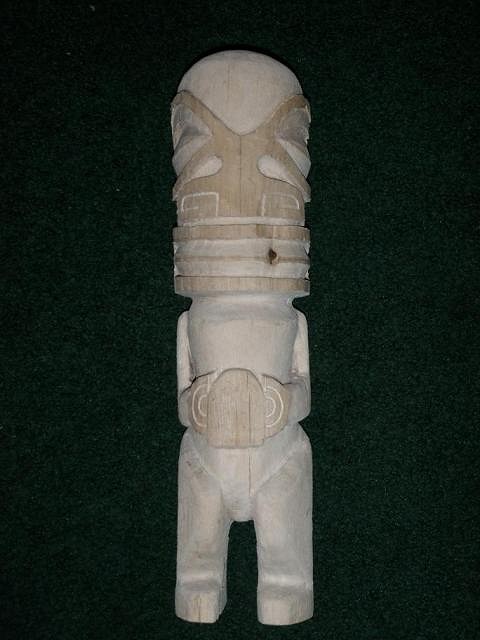
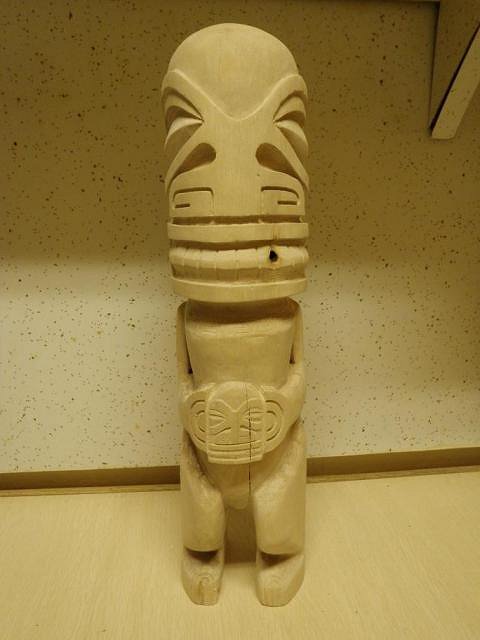
S
seagoat
Posted
posted
on
Tue, Nov 15, 2011 11:39 AM
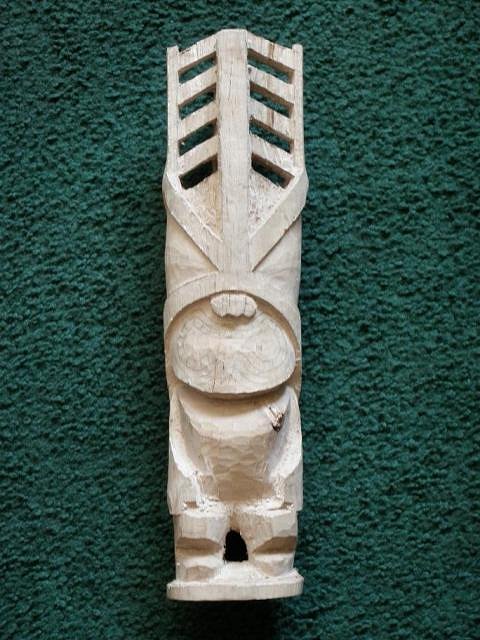
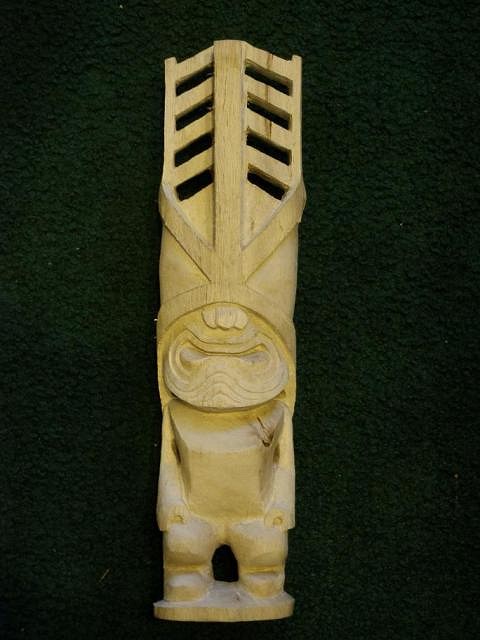
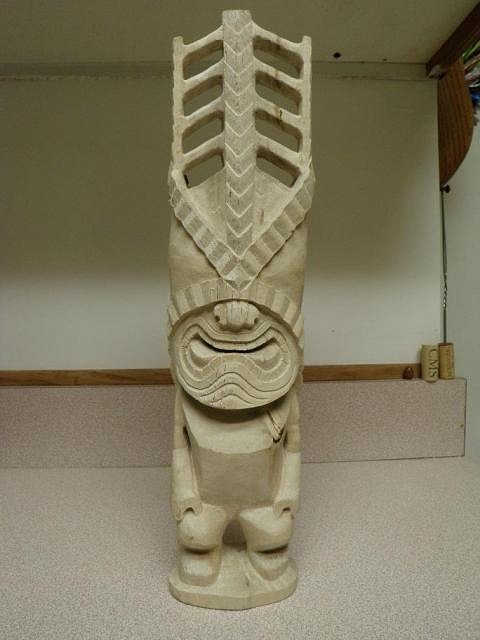
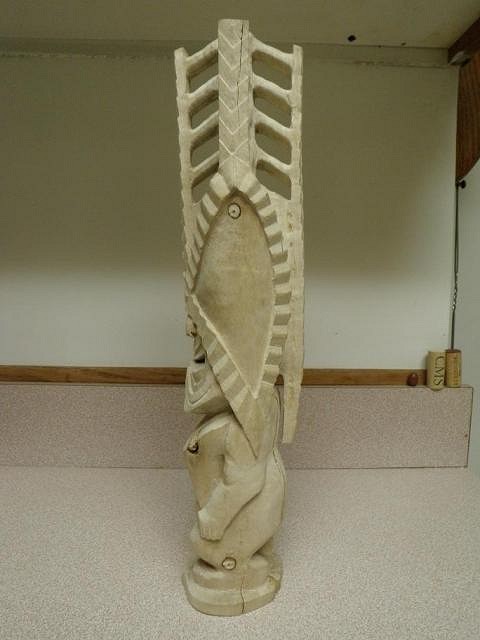
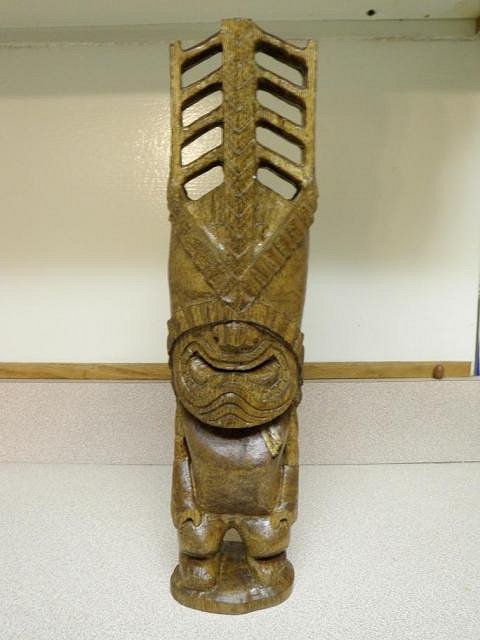
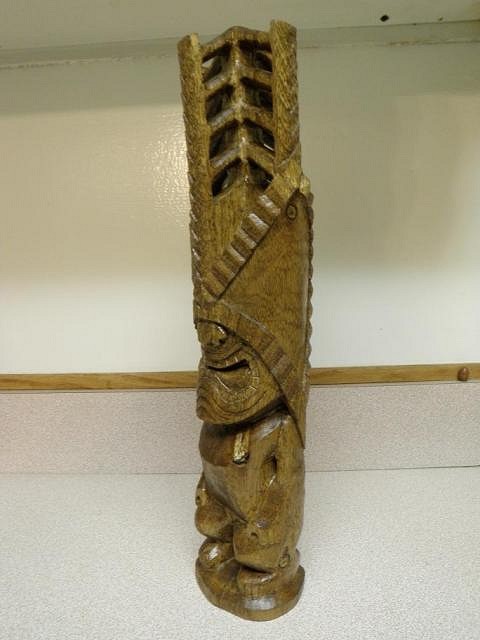
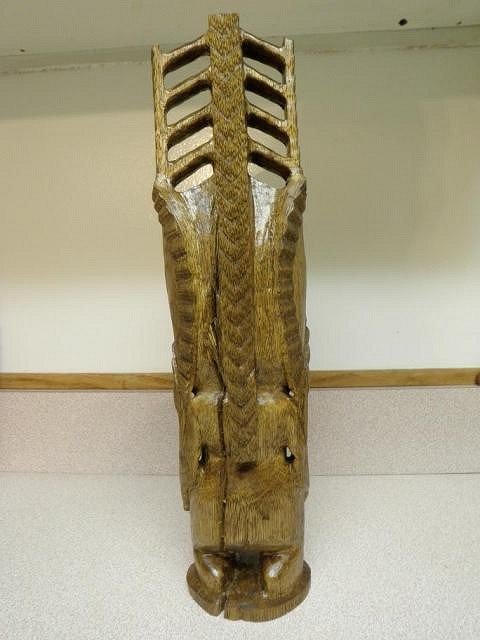
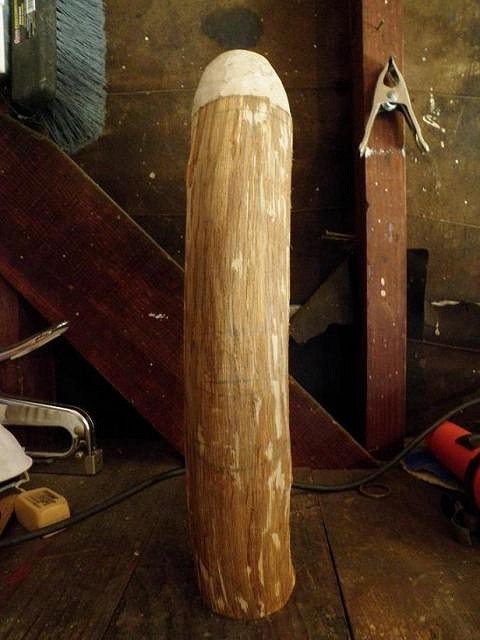
Thanks Grog. Finally time for another update. Took a little time off before finishing up this Lono due to moving. Finally found time to finish off the detailing and staining. Here are a number of progress pics and then the finished piece. Same routine as the last two, roughed it out with chisels and then worked on the fine tuning and detailing with the dremel.
Pretty happy with it overall. Did one coat of the light stain and then one coat of dark stain over that to make the coloration a little different than the other two. Covered it with the poly and then did a layer of natural stain on top of that to smooth out any discoloration from the poly. Need to figure out how to make the arms a bit beefier and probably spend more time working on the details of the hands and feet. Not sure what my next project will be. Thanks for looking. |
|
N

NIxxon
Posted
posted
on
Tue, Nov 15, 2011 2:41 PM
This is the first time I have seen your thread...all three of those look fantastic! Great work, awesome detail, and the finishes look great as well. |
|
CC

Creative Chimp
Posted
posted
on
Wed, Nov 16, 2011 5:05 AM
WOW!!!! very nice...i love all three........the marq is my favorite |
|
P

pjc5150
Posted
posted
on
Wed, Nov 16, 2011 5:56 AM
good stuff man! Digging the lono.... |
|
S
seagoat
Posted
posted
on
Wed, Nov 16, 2011 4:09 PM
Thanks guys, appreciate it. Cheers. |
|
A
AlohaStation
Posted
posted
on
Thu, Nov 17, 2011 10:27 AM
That Lono is the bomb. Whats next? |
|
WP

Watango productions
Posted
posted
on
Thu, Nov 17, 2011 1:42 PM
Hey Seagoat,fantastic stuff with these last three, cant pick a fav but I really dig the cracking on the marq |
|
S
seagoat
Posted
posted
on
Mon, Nov 21, 2011 12:19 PM
Thanks Aloha and Watango. Not sure what's next. Maybe some non-tiki ideas I have depending on the wood supply. A friend gave me some 3-4 foot chunks of palm, so maybe I'll try a larger tiki for the new backyard. I kinda want to work on another swordfish bill though, so we'll see... |
|
M

McTiki
Posted
posted
on
Mon, Nov 21, 2011 5:03 PM
I love the accuracy of these. Very tight work sir. I am curious of what tools you use. Keep em coming.... Thanks for sharing. Mahalo! McTiki |
|
H

hang10tiki
Posted
posted
on
Tue, Nov 22, 2011 3:39 AM
wow...great work...sweet detail |
|
S
seagoat
Posted
posted
on
Wed, Nov 23, 2011 10:44 AM
Thanks McTiki and Hang10. As far as the tools go, I bought a basic set of 5 chisels from Lowes. Nothing special or high end since I hadn't used chisels before and just wanted to get something and figure out how to use them. Once I rough out the shape then I'll switch to the dremel. I have various cutting and sanding bits to smooth things out and add the details and depth. And time. Lots of time plugging away at it, deciding to take a little more off here and there, try to fix this and that until I decide, 'Alright, that's enough.' Now to come up with the next project... |
|
S
seagoat
Posted
posted
on
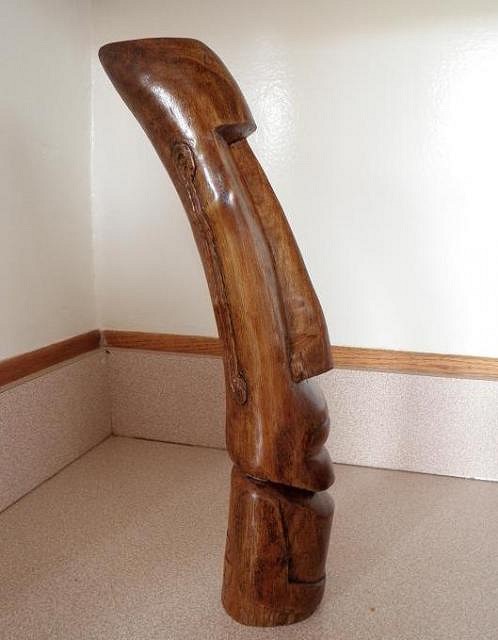
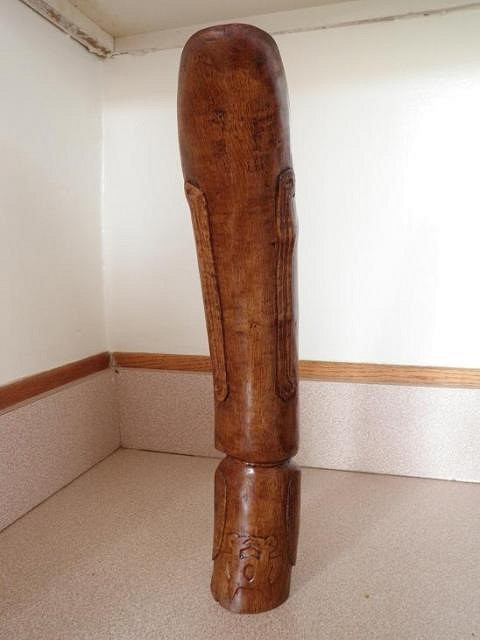
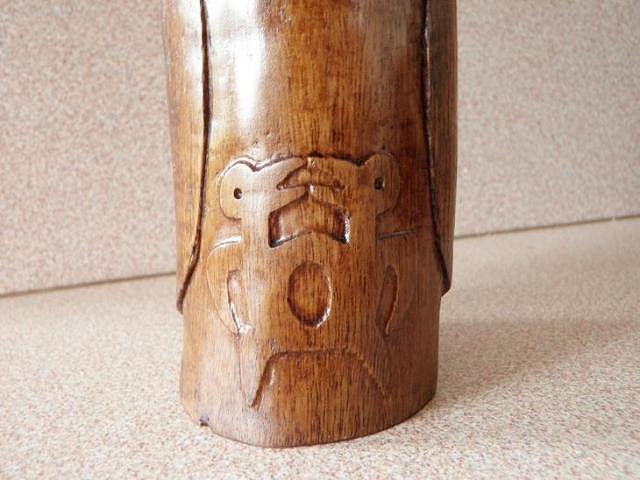
Mon, Jun 4, 2012 11:52 AM
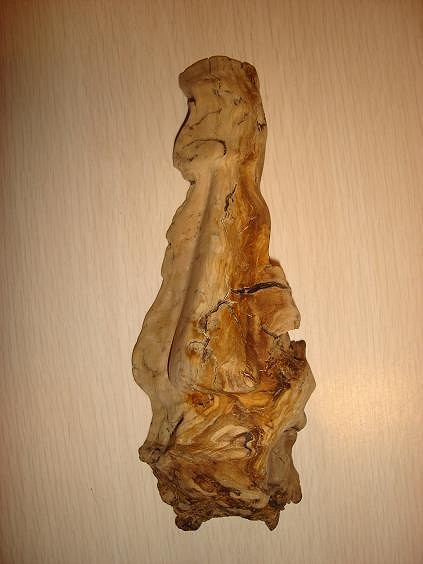
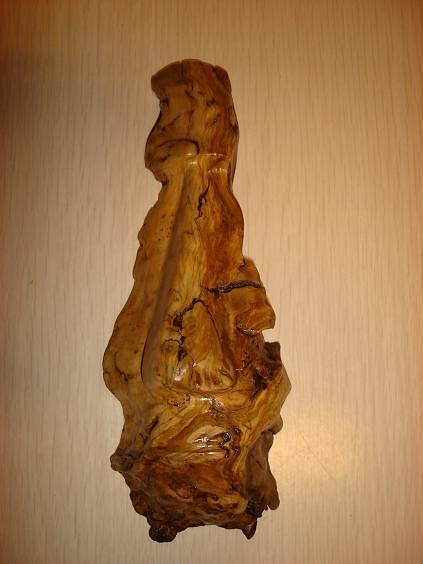
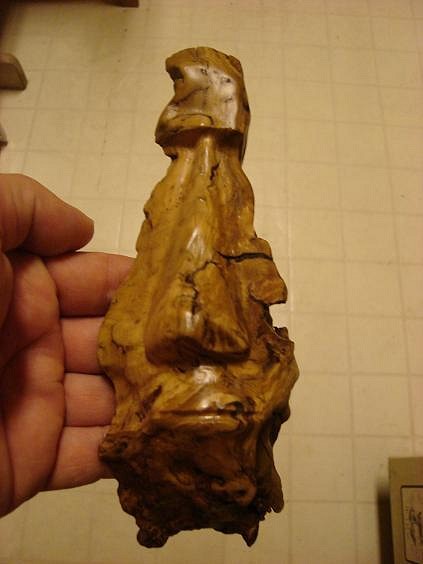
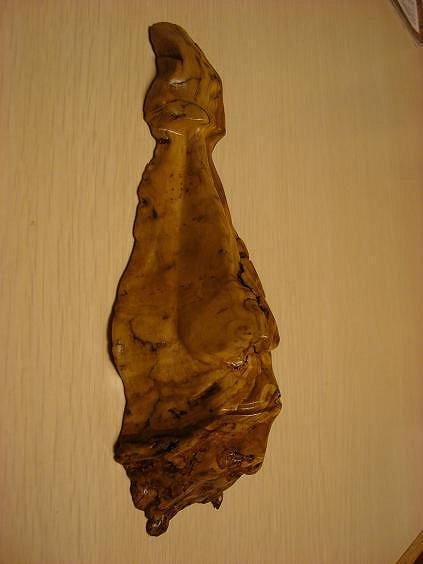
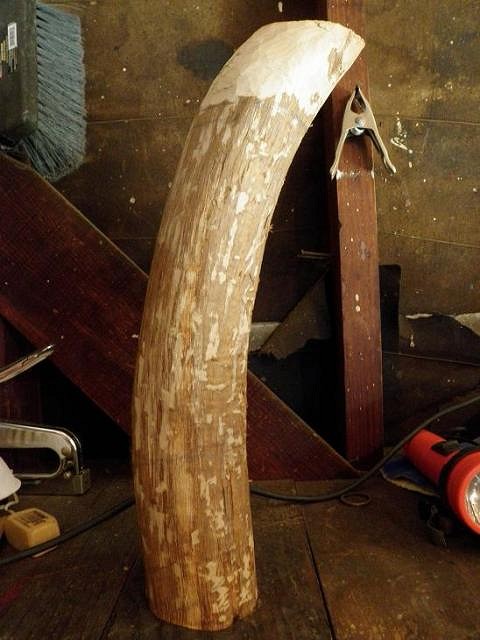
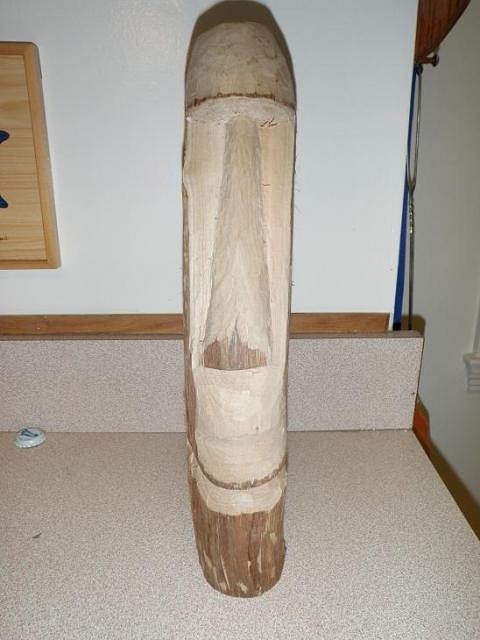
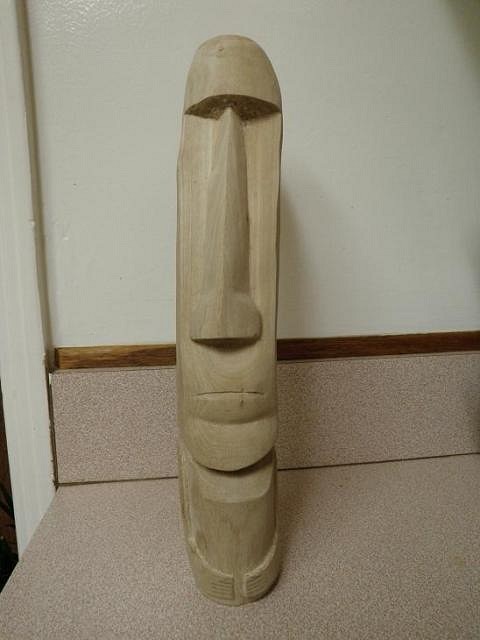
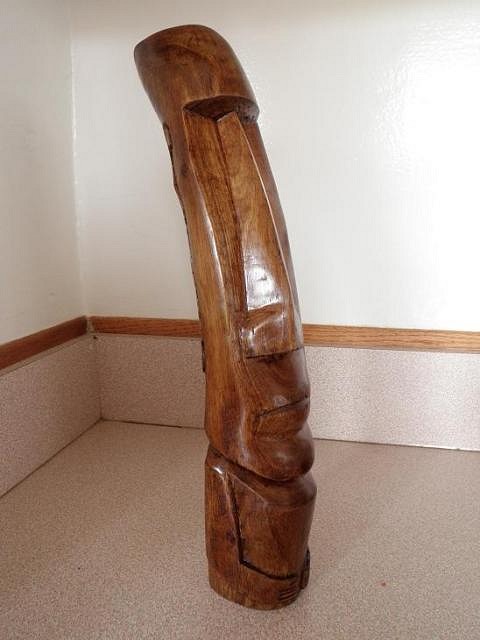
New Moai done. Unknown type of wood found along a sidewalk. Couple coats if different color stain, no poly this time but boy is it shiny. |
|
A

amate
Posted
posted
on
Mon, Jun 4, 2012 12:37 PM
Nice use of bent wood. |