Tiki Central / Tiki Carving
blindy the pirate and his attempts of tiki
|
BTP

blindy the pirate
Posted
posted
on
Mon, May 26, 2008 8:03 AM
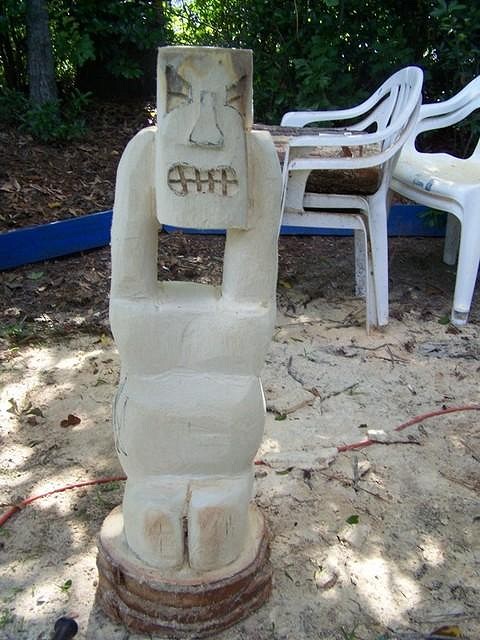
Here is a new tiki I've been working on. It still has a lot of work to be done, but it is finally starting to take shape. Front: Back: Put out those tapa paintings this morning. Put this one next to the tiki bar 2 blocks from my house. This pic didn't turn out very well, but it shows the street in the background. It is a fairly busy intersection during the week. |
|
A

AlohaStation
Posted
posted
on
Tue, May 27, 2008 7:22 AM
I'll be in the neighborhood the weekend after Hukilau. I am driving thru on my way to the Panhandle and will be stopping to ride my bike at Tom Brown Park - do you still have one there? |
|
M

MadDogMike
Posted
posted
on
Wed, May 28, 2008 6:08 PM
Blindy-the-no-eyed-pirate, you inspired me to pick up the trowel. I bought a cheap ($4) vaccuum-formed plastic tiki from Party City and re-inforced the gaudily painted side with some plaster of paris and burlap. When it had set, I flipped it over and poured it full of concrete. I used about 30 lbs of mortar mix (half a 60 lb bag, but probably could have used 20 lbs) I added a small bag each of white & black epoxy coated aquarium gravel (Walmart) After it set (several hours), I emptied it out of the mold and hosed it off good to help expose the colored gravel. Looks somewhat like granite, 30 inches tall and weighs about 30 lbs. PS I like the headless Tiki from Sleeping Hollow Anything worth doing, is worth doing to the point of wretched excess. [ Edited by: MadDogMike 2008-05-28 18:11 ] |
|
BTP
blindy the pirate
Posted
posted
on
Thu, May 29, 2008 6:39 AM
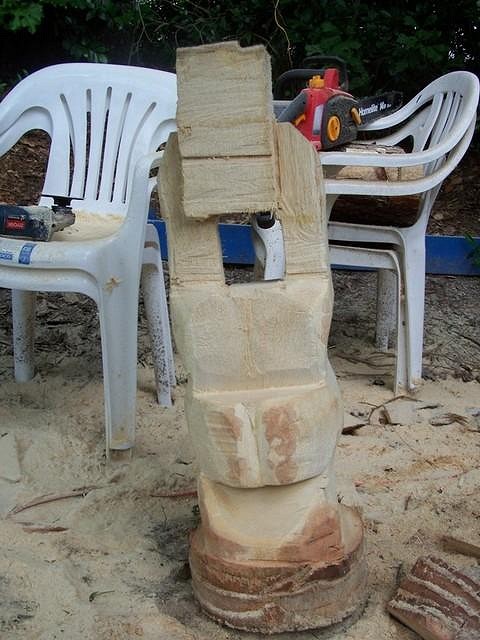
AlohaStation-- I never put a tiki up at Tom Brown Park. That place is so big and it crawls with full time staff. I tend to put my stuff out closer to my house. If you have some place down south that needs a tiki, let me know and I'll give you one to put up. MadDogMike-- That's definitely the best use of that garish party city thing. Here is part of a thread that has a bunch of them. The latest tiki I've been working on has seemed to dry out rock hard. It doesn't want to sand at all with the grinder without burning the wood. It seems to be telling me that it wants to be done. I'm going to do some final sandings then stain it. Anybody know what kind of palm this is? |
|
A
AlohaStation
Posted
posted
on
Thu, May 29, 2008 7:50 AM
The log is probably a Sabal/Cabbage Palm. Native to the area. You will need to strip the outer layer to get to the meat of the log. Carves nice, but does not hold alot of detail - very stringy. |
|
M
MadDogMike
Posted
posted
on
Thu, May 29, 2008 8:48 PM
Oh man!! I thought I had formulated an original ideas :( |
|
S

seeksurf
Posted
posted
on
Thu, May 29, 2008 9:02 PM
Nice work on the head over the shoulders guy. |
|
BTP
blindy the pirate
Posted
posted
on
Mon, Jun 2, 2008 2:01 PM
Hadn't done a tiki in cement in a while. This one is for AlohaStation to put out on his South Florida mountain bike trail.
|
|
S
seeksurf
Posted
posted
on
Mon, Jun 2, 2008 5:03 PM
Right On blindy keep up the good fight. |
|
BTP
blindy the pirate
Posted
posted
on
Mon, Jun 9, 2008 10:27 AM
Stained the headless tiki this weekend. I did it so dark for a few reasons. First, it was stain I sitting around the house. Plus the dark color hides a lot of the imperfections. I added a red stain on top to have a bit of reddish twinge to it. I found a stack of oak logs someone had stacked up for the garbage truck. I pulled about 9 good sized logs out of it. Three of which are about 15 inches across and 2 1/2 feet tall. Hopefully, something good will come out of a few of them. I'm sitting on around 20 logs of various sizes right now. :D :D This is the finished tiki for AlohaStation. |
|
A
AlohaStation
Posted
posted
on
Mon, Jun 9, 2008 10:33 AM
SWEET! I have a spot picked out that is perfect. Everyone will be able to see it from SW10th Street in Deerfield, just before getting on the Sawgrass Expressway. You might want to think twice about carving that Oak. If it came from your area it is probably Live Oak which is very hard! Not a friendly carving wood - it burns quite nice in the fireplace! There is a alot of Camphor (sp?) in your area, ask around and you will find it along with some other species (i.e. Cypress or Sabal Palm). Also the Pine in your area isn't that great either, slash/sugar/yellow pine - yuck. [ Edited by: AlohaStation 2008-06-09 10:42 ] |
|
S
seeksurf
Posted
posted
on
Tue, Jun 10, 2008 10:57 PM
Nice work I still have a hard time with the stain process. Aloha gets a cement creation COOL! |
|
A
AlohaStation
Posted
posted
on
Wed, Jun 11, 2008 10:11 AM
This guy is going to placed at a local park for everyone to enjoy!! |
|
BTP
blindy the pirate
Posted
posted
on
Wed, Jun 11, 2008 7:44 PM
Seeksurf- Its funny, I paint and stain for work all the time, yet, staining tikis is a whole 'nother animal. Next time you end up on the southeast side of the country, I'll hook you up. You have been a huge inspiration and a great booster. AlohaStation- I'm stoked. Words don't really describe it. You'll have to post pics of the placement. Working on a couple of simple wall hangings now. Will post pics later the week. |
|
S
seeksurf
Posted
posted
on
Wed, Jun 11, 2008 9:36 PM
Right on, you have to love this TC. |
|
BTP
blindy the pirate
Posted
posted
on
Sat, Jun 14, 2008 6:40 AM
I've had a band saw for about a year, but I really haven't used it, so I figured I would try a few tikis with it.
The one on the left still needs some sanding and stain. I am sending to my cousin because it is from his design. I figured I've used the design a few times and he should at least get something for that. The one on the right is going to the bar at the end of my block. Now they will be able to truthfully call their back bar a tiki bar. It isn't as shiny as the picture shows it. |
|
S
seeksurf
Posted
posted
on
Mon, Jun 16, 2008 10:51 PM
Im impressed they look great! |
|
BTP
blindy the pirate
Posted
posted
on
Tue, Jun 17, 2008 6:37 PM
What can fix a shitty day at work?
Lucky my wife likes it, because its going next to the wedding pictures on the wall :wink:. |
|
S
seeksurf
Posted
posted
on
Tue, Jun 17, 2008 9:36 PM
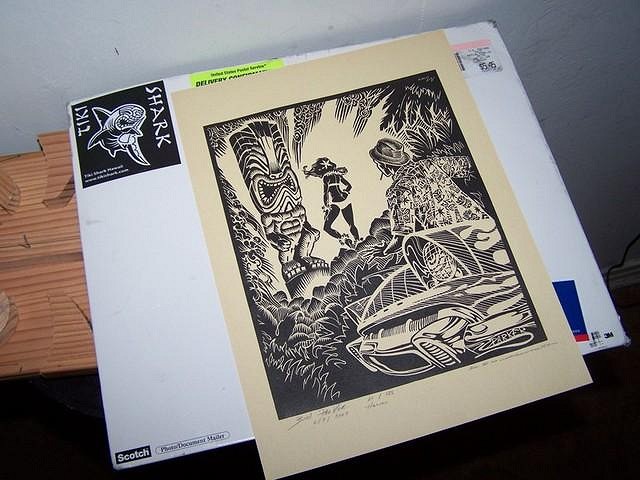
Right on Tiki Shark stuff you have to love his work! |
|
B

bgizzy
Posted
posted
on
Wed, Jun 18, 2008 10:19 PM
Wow, that's a nice print. I likey the wall carvings too. I'm almost done with your painting, gonna post some new pics on my thread. |
|
CS

Capt'n Skully
Posted
posted
on
Sat, Jun 28, 2008 9:47 AM
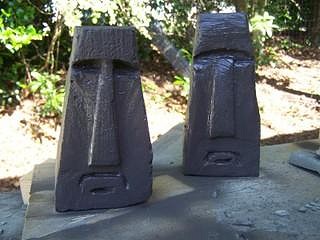
Ahoy Blindy!! Posting to let you know that I am now in possession of the Moai on the left above! Ratzaroony went to Hukilau and stopped at the Polynesian Resort on his way down.. So I told him of your hidden tikis and he was kind enough to find him for me. He didn't take both though- One the other was still there if no one else has grabbed it yet! I'm a sucker for a good treasure hunt, and this one was great!! He's found a good home and will actually fit in well with my Kahiki artifacts (kinda resembles the Kahiki fireplace). MAHALO Blindy and Ratz! |
|
R

Ratzaroony
Posted
posted
on
Sat, Jun 28, 2008 11:35 AM
Yeah, thank you Blindy for making it, and thank you Skully for telling me about it! It was really funny finding it, because pushing up on the ceiling and pulling out a mysterious package wrapped in paper must have looked really shady to the workers who walked by. One actually came over and asked what I was doing. I asked permission to continue pushing up on the ceiling tile to get it, and he said what you do when I'm not here doesn't matter, at which point he grinned and walked away, not looking back :wink: It really was a great thing to do in the hotel, and it had a great reward as well. I geocache, so this type of thing is right up my alley. So again, thank you Blindy for taking the time to make the tikis, and then for giving them away in such a cool fashion. Also, thank you Capt. Skully for telling me about it. |
|
BTP
blindy the pirate
Posted
posted
on
Sun, Jun 29, 2008 8:19 AM
Its funny, I was just thinking about those tikis, wondering if I needed to add them to a Disney thread or something. Congrats Capt'n Skully and Ratzaroony, hope it was as fun finding them as it was hiding them. Which one did you get? The one in the Rapa Nui building by the TTC, or the one in the Fiji building by the marina? There is still another out there, for anyone who wants it. |
|
BTP
blindy the pirate
Posted
posted
on
Mon, Jul 7, 2008 9:18 AM
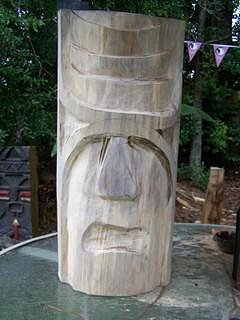
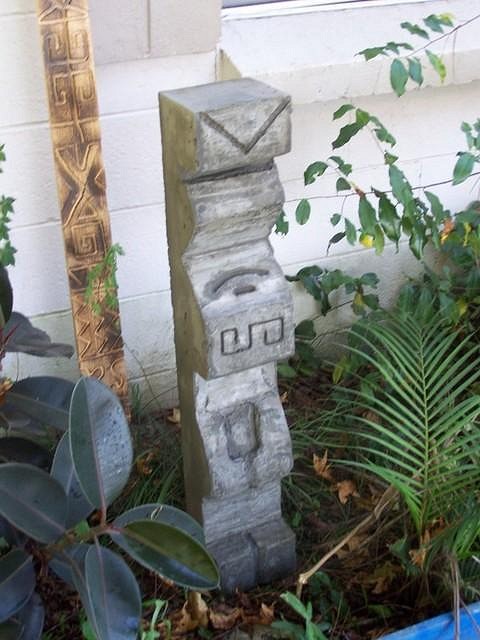
Between working on converting a barn into living space and the never ending rain down here, I haven't had as much time to carve as a would like. So I spent most of July 4th outside. This is a Witco wannabe modeled after a design I saw on page 261 of Tiki Modern. It is 3 ft tall and has a fluorescent fixture in it and a cool blue glow when its on. While it isn't exactly the same, I think it has the spirit. Trying to get down to Daytona (The Hawaiian Inn) sometime this summer to see the real one (if it is still there).
Decided to try a copy of one of the tikis in Adventureland in the Magic Kingdom. Mostly for practice and it is a pretty easy design. Its ready for sanding now. More pics after staining.
|
|
BTP
blindy the pirate
Posted
posted
on
Tue, Jul 15, 2008 10:08 AM
Still suck at staining. Twice I have gotten stain that turns out to be another color entirely.
I was going for a brown and gray coloring that looked weathered. I going to leave this one out on the blacktop for a while, hoping that nature can help it look weathered for me now. Started this one today. I just used the grinder with a 36 grit pad on it. Now that it is roughed in, I'll start to make it a little more symmetrical.
|
|
BTP
blindy the pirate
Posted
posted
on
Sun, Aug 3, 2008 4:50 PM
ITS TOO HOT!!! Too hot to do anything. Then a breeze starts, and in ten minutes, its raining. 20 minutes after the rain stops, it gets even HOTTER! So, in an attempt to not spend ALL my money in the bar, I've been buying some tools. Finally got a router (one of my favorite tools as a kid). Had a 1x4 piece of cedar left over from a job and decided to reacclimate myself to the tool.
You can see the two logs behind it that are half finished tikis, just waiting to be completed. Hopefully sooner then later, the weatherman is predicting a heat wave in the coming week :x |
|
A
AlohaStation
Posted
posted
on
Mon, Aug 4, 2008 8:12 AM
Wanted to drop you a line about the tiki for the MTB trail. The paint you used is peeling off (Rustoleum). For future projects you may want to use either a concrete stain or some type of outdoor latex. I have power washed the old paint and will be painting him sometime soon. The Trail will have a tiki garden as wplugger is craving a massive tiki and I will also be adding one in there. If there is anyone else that would like to contribute please contact me. Its good to see you starting branch off into wood. Keep them comin. |
|
S
seeksurf
Posted
posted
on
Mon, Aug 4, 2008 7:55 PM
Nice to see ya keeping at it! Looking good. |
|
S
seeksurf
Posted
posted
on
Mon, Aug 4, 2008 7:55 PM
Nice to see ya keeping at it! Looking good. |
|
BTP
blindy the pirate
Posted
posted
on
Mon, Sep 1, 2008 9:46 AM
Between all the rain I had a little time to break out the router. These were done on scrap 3/4" plywood and I'll place them on telephone poles around town when I get a chance.
(a lot of the one on the right came from the Trader Vics Mai Tai glass) |
|
S
seeksurf
Posted
posted
on
Tue, Sep 2, 2008 7:09 PM
Nice keep up the sly work |
|
BTP
blindy the pirate
Posted
posted
on
Fri, Oct 3, 2008 2:23 PM
Finally finished this one from July. Well, not so much finished as cleaned it up a little and stained it.
The weather has become much more manageable, so I created this guy yesterday. I wanted to do something with a mod look. It has a rough look to it, like it was carved out of stone. It came out pretty good.
|
|
S
seeksurf
Posted
posted
on
Sat, Oct 4, 2008 6:35 AM
I also like this guy simple good lines with new twist NICE! |
|
BTP
blindy the pirate
Posted
posted
on
Wed, Nov 26, 2008 10:00 AM
I've been slacking on creating tiki. I made this with some scraps I had lying around. It stands 5 ft tall and 27" wide. I hooked up a blue rope light behind it so it 'floats' off the wall and behind the shapes on the bamboo.
|
|
D

drgoat456
Posted
posted
on
Wed, Nov 26, 2008 10:44 AM
Blindy, |
|
BTP
blindy the pirate
Posted
posted
on
Wed, Dec 3, 2008 7:39 PM
Thanks drgoat456. The cubistic tiki idea had been floating around my head for awhile when I carved it. I thought it was going to be a simple, quick, and easy design that could be copied in little time (like cutting out Moai heads from 2x6's). Something I could slam out and install around town. But the weight of cement made it more difficult than expected, still I enjoyed making it. Now that college football season is nearing an end, I might be able to be less hungover and spend more time creating. :lol: |
|
BTP
blindy the pirate
Posted
posted
on
Thu, Dec 18, 2008 1:03 PM
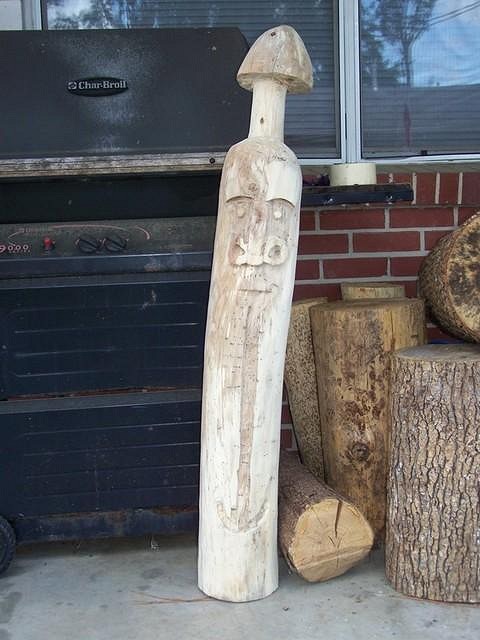
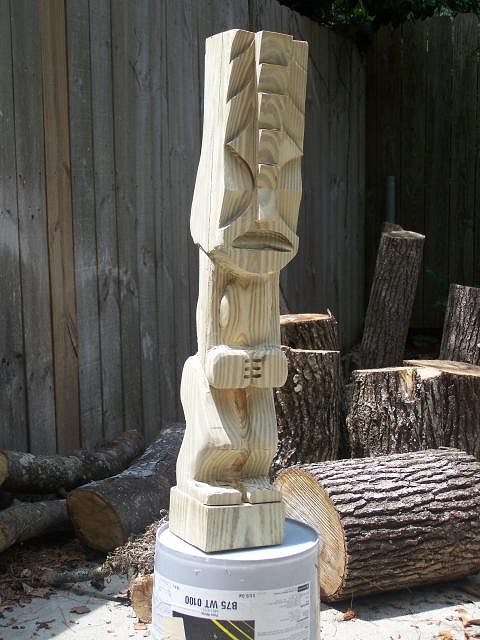
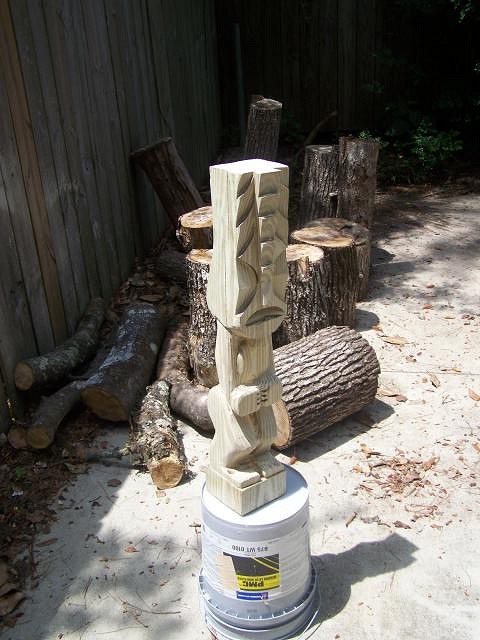
My Mom told me that my Dad wanted a tiki for Christmas. They live down in Orlando and have a tropical yard that a tiki would fit very well in, so I was stoked. I've been converting a barn into living space at work lately and found a 6x6 pine post. Working in square stock was nice. Going to have to check the lumber yards to see if they have any 6x6 or 8x8 non-pressure treated posts. I am happy (finally) with the staining. I used a wall tiki from the Kona Kai Apartments http://www.tikicentral.com/viewtopic.php?topic=27645&forum=2&start=0 as the design, because they are also square stock and very tall. This bastard stands 6 ft. 6 in.
|
|
A
AlohaStation
Posted
posted
on
Thu, Dec 18, 2008 1:15 PM
Look for turned Pine posts. You may find them up there. I heard the long leaf/sugar pine that is commercially grown in that area is hard to carve because it is full of sap. You may find some that has been kiln dried, ask for white pine. |
|
M

moondoggie
Posted
posted
on
Tue, Mar 24, 2009 4:12 PM
Loving your stealthy tiki drops :D |
|
BD

big daddy
Posted
posted
on
Wed, Mar 25, 2009 9:15 AM
blindy, i love the idea of scattering around treasure. how long do your "shields" last on the telephone poles? here in houston the city is pretty hardcore about removing signage from telephone poles almost as fast as they go up. they have trucks that drive around just for that purpose. great idea on beautifying tallahassee. bd |
|
BTP
blindy the pirate
Posted
posted
on
Fri, Mar 27, 2009 10:40 AM
Thanks Moondoggie, I just moved into a new house, so everything has been crazy this month. Of course, the first thing I set up is the garage as a work shop. I already put up an outside bar and making tiki torches and the wifey wants an inside bar and some built-in bookshelves, so the garage has already seen a lot of work go through it. I just put up the 'witco wannabe' yesterday and it is begging for a friend, so that's gone on my list. Big Daddy, it is a crap shoot on which paintings stay up. I drive by ones that have been up for years now, but I've also had ones that disappeared the day after I put them up. I use 3 1/2 inch spiral nails, so I don't make it easy to get the plywood off (the wood will break around the nail before the nail pulls out of the pole). I make sure it doesn't obstruct any ones line of sight and usually one pole back from an intersection. I've noticed the graffiti disappears quickly, but my piece close by will stay. Tallahassee is very supportive of the arts, so maybe the city 'gets it', I don't know. I would give it a try in Houston, the worst thing that could happen is it gets taken down. I've always gone out weekend mornings around 9:00. Walking around with a hammer at night might raise suspicion. |
|
M
moondoggie
Posted
posted
on
Sat, Mar 28, 2009 10:58 AM
Don't forget to put a pic up of 'the friend' when you're done - it sounds like you've got a lot to do first though :) |
|
S
seeksurf
Posted
posted
on
Mon, Mar 30, 2009 4:25 PM
Nice work on this fella. You stretched him out well and |
|
BTP
blindy the pirate
Posted
posted
on
Fri, May 15, 2009 12:16 PM
It has been a while since I've posted here, so I figured I'd give an update. I don't know how I did it, but I convinced the wife that the garage isn't for cars, it is a work shop. From there, I have had a place to work without having to worry about rain. I figured I'd do the backyard Disney style. Something with a name and story behind it with scenery to match. I wanted something that can include tikis, pirates, and still be open enough to include anything else that might pop up in the future. I settled on the name 'Sargasso Shore'. Here is a little back story I came up with to explain the 'scene': TALE OF THE SARGASSO SHOREBehold, ye have entered the mysterious shore of the Sargasso Sea. A place found on no map, the Sargasso Shore can be found only when invited by the ghost pirate who calls this shore his home. In a sargassum deep within the Bermuda Triangle, the Sargasso Sea is the only sea not bordered by land. The 'Sea of Lost Ships' as it is known, has been haunted for hundreds of years by the notorious Blindy the pirate. Legend has long told of a strange coast devoid of sand or water. It is from this mystical shore Blindy and his ghost krewe have terrorized ships that dared sail the cursed waters of the Sargasso Sea. Many mysteries inhabit this shore. Tiki idols from an ocean half a world away to hidden skull and crossbones, one can never be too sure just what to expect from the Sargasso Shore.Because of the story (in my mind at least), I can now add almost anything and have it fit a common theme. It hasn't been three months yet, so there will be much more added in time, more tikis and whatnot.
If I had my way, I don't think I would leave any grass in the yard. It would be filled with tiki huts, streams, and waterfalls. |
|
S
seeksurf
Posted
posted
on
Fri, May 15, 2009 9:33 PM
Right on looks like you have a project. Nice work on the garage. |
|
T

Tikigoob
Posted
posted
on
Sat, May 16, 2009 9:52 PM
I found this bit of Blindy The Pirate loveliness on the wall at Bird's Aphrodesiac Oyster Shack in Tallahassee... The shirts are for sale on this website... |
|
BTP
blindy the pirate
Posted
posted
on
Sun, Jul 5, 2009 12:15 PM
Have been working on this one for a little while. Finished the rough in and started to use the Dremel for some detail and clean up. But the Dremel burned up after the first ten minutes (second one in a year). So, for now, this guy is gonna have to be done.
|
|
T

TikiMango
Posted
posted
on
Sun, Jul 5, 2009 2:46 PM
That's looking great for making a tiki from a post. It that Douglas Fur? Are you going to finish with stain or burning, or something else? |