Tiki Central / Tiki Carving
Skinny Dog Design Tabu Tikis Jewelry
Pages: 1 12 replies
|
SD

Skinny Dog
Posted
posted
on
Tue, Apr 1, 2008 7:58 PM
Since a few asked I'll post photos and explain how we get such a huge amount of detail in such small pieces of jewelry First we find a willing subject
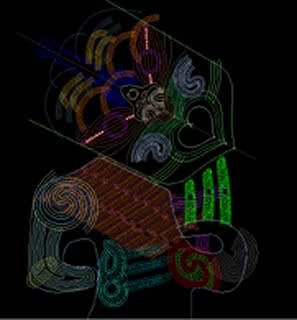
Then we import it into the computer and begin to build line work of basic model.
Then we begin to build the curve that will form the 3d part of the model. Here is a isometric view of the model
This is a before and after of the line work changing to a 3d model
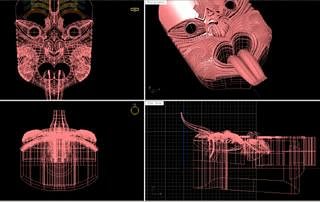
Then Jen uses a computer aided carving tool to digitally CARVE the tiki in the computer !!
When Jen finishes building / carving she sends the computer file to me at the mill. To build this model took 36 hours for a person with 20 years of computer graphics experience, so don't try this at home HAAHAHAH. Thus ends part one
[ Edited by: Skinny Dog 2008-04-01 20:03 ] |
|
T

Tamapoutini
Posted
posted
on
Tue, Apr 1, 2008 8:02 PM
My distant ancestors did a similar thing in the beginning stages of producing their Tikis too, only they used stone tools.. :lol: *Thanks for sharing this incredible process - the end results speak for themselves. Cant wait to see how its done.. Tama :) |
|
H

harro
Posted
posted
on
Tue, Apr 1, 2008 8:28 PM
Wow interesting stuff - especially for a graphics/modelling nerd like me (being a structural engineer after all). I have been staring at your signature pics for some time now, wondering firstly exactly what are those things (rings?) on the 2 right pics, and 2ndly how the detail was possible!? That's what I love about TC - learning new things and techniques all the time. Look forward to more of your posts and explanations. harro. |
|
V

VampiressRN
Posted
posted
on
Tue, Apr 1, 2008 8:47 PM
What a great thread...the pictures are priceless. Looking forward to Part 2. :) |
|
B

Benzart
Posted
posted
on
Tue, Apr 1, 2008 8:57 PM
WOW, Really Great Piece guys. |
|
B

Babalu
Posted
posted
on
Tue, Apr 1, 2008 9:43 PM
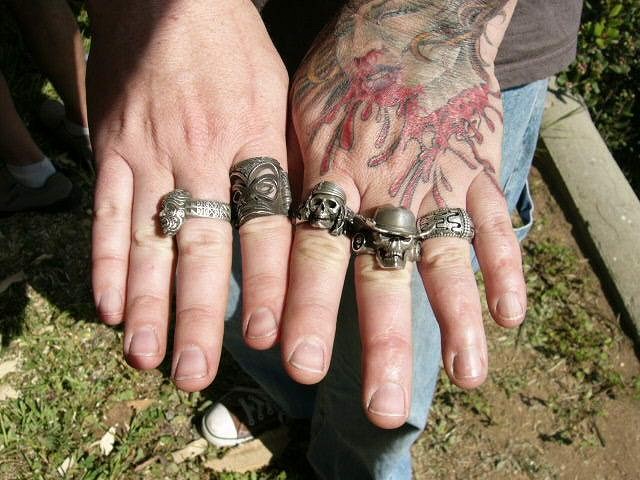
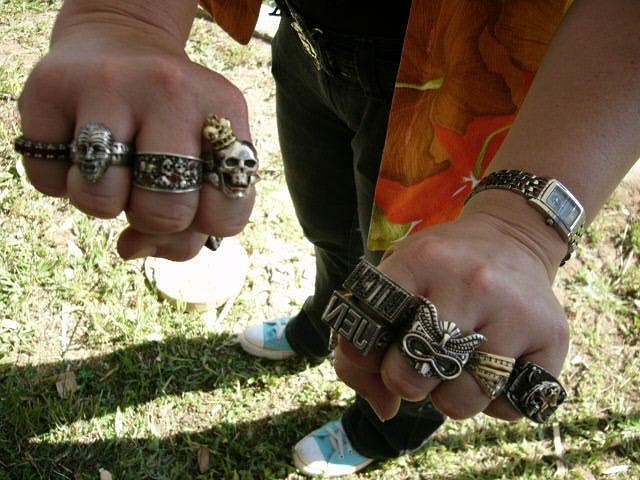
Hey you twos...your going to light this house up. You make a great team! The Cad work is great. The finish work is top end....smokin! Hope you don't mind me sharing the work you had on your hands at this last Chop. Let's get log in your hands at the next one :)
|
|
R

Robin
Posted
posted
on
Wed, Apr 2, 2008 9:03 AM
Great thread. I had no idea of this process. Beautiful work...that swap piece is over the top. |
|
PNTOEW

Polly Neezsa the one eared Whaine
Posted
posted
on
Wed, Apr 2, 2008 10:52 AM
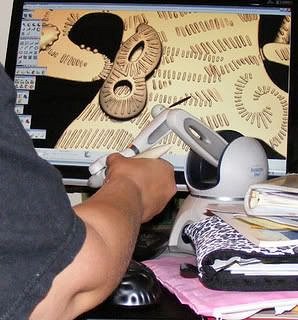
Hello All, Jen here, the female side of Skinny Dog (I guess that would make me the bitch!), I have never posted before. YIKES!!!! Thanks Tama, Robin and VampiressRN for the props. Thanks Babalu for posting the photos of our wares! Bezart, isn't it amazing where jewelry has gone? And Harro, glad to find another modeling geek. Just to expand on Scott's descriptions of my end of the process a bit... WARNING, WARNING, ONLY INTERESTING TO GEEKS!!!!!!!!!!!!!!! The reference is placed in Rhino3D (check out there website to see all of the cool applications of the software) and a NURB model is built using polylines which you convert into polysurfaces using the 4 isometric views. We use the Matrix plugin which is for jewelry and allows you to place stones (and has a bunch of builders that I don't use). Then for sculpting the 3dm is exported as an stl to ClayTools which turns the model in to virtual clay using voxels (volumized pixels). In claytools I use the haptic arm to digitally sculpt the virtual clay. Then export the clay out of ClayTools as and obj and import back into Matrix/Rhino to tweak and sprue to write a g-code file (Desk Proto is the program that is ghosted in Matrix as a builder) which is downloaded to our CNC wax mill. It is not that easy to use existing 3d models that you can purchase online because our jewelry world is done with tolerances up to .001mm. Not to mention that they have to be little engineered structures to support stones, hang properly, be castable, etc. So that's what you get when you put a toy designer (me) and a master goldsmith (Scott) together. And they thought 3-stone rings would come out! Jen |
|
PNTOEW
Polly Neezsa the one eared Whaine
Posted
posted
on
Wed, Apr 2, 2008 10:54 AM
By the way, does anyone know if I can correct the spelling on my user name. Scott did it for me and mis-spelled earred and wahine. Thanks. |
|
PNTOEW
Polly Neezsa the one eared Whaine
Posted
posted
on
Wed, Apr 2, 2008 10:58 AM
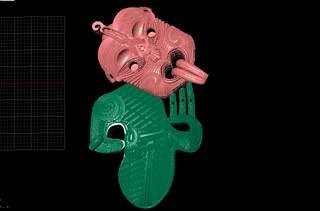
I got so geeked out I forgot to answer Harro's question. The tikis in the right two photos are a pendant and a ring. They are modeled from a tiki that our friend Adam brought back from Moorea. Took isometric photos and built the pendant as a Christmas gift from his girlfriend Erica. This one was fun to build. I built the log then built cutters and cut from the digital clay log. So, it was a totally subtractive tiki. Sometimes I like to amuse myself when building models. Jen |
|
B
Benzart
Posted
posted
on
Wed, Apr 2, 2008 11:11 AM
WOW! |
|
M

mieko
Posted
posted
on
Wed, Apr 2, 2008 2:32 PM
Thanks Scott and Jen for all the screen shots and photos, it really helps fill in the blanks from what you guys showed me at the chop. Really amazing stuff! [ Edited by: mieko 2008-04-02 14:32 ] |
|
M

MooneyTiki
Posted
posted
on
Sat, Apr 5, 2008 10:14 AM
Aloha Skinny Dog! |


Pages: 1 12 replies