Tiki Central / Tiki Carving
SDshirtman's first carve Finished 11/6/09
|
S

SDshirtman
Posted
posted
on
Sun, Oct 18, 2009 11:50 AM
I've been working on my first tiki for several weeks. I did lots of research for design ideas here on TC and its been a great resource. Been doing lots of reading and studying on the artform. I'm an artist by trade but have never worked in 3d or carved before. I'm already getting addicted to it. So here goes. Here are the logs as delivered. I have a tree trimming friend who hooked me up on logs. I wish I would have specified logs with out the husk.
I shaved the log down with a ryobi hand planer I got from home depot. $65 I roughed out my design and dug in. I had it in my head to carve my first using only hand tools. I'm using standard chisels and one gouge I bought from rockler for $65 (ouch) Soon after I started I realized I didnt shave the log down enough so everything I drew got erased when I reshaved the log. Here is the progress after a week or so. I bought a ryobi mouse sander for $30. I roughed out the teeth. I was going to do simpler teeth but thought throwing a tongue in there would be more of a challenge. Here it is after some more work on the teeth and some work on the nose. I wasnt really sure what to do on top so I went with a sort of crown design. I'm probably being a little too meticulous but I'm using a small sanding block to flatten the bevels on the nose and crown. I should be taking more pictures but here it is as of Friday night. I roughed out his "crown" and have his eyebrows done. I'm thinking of making the notches over his eye brows into little pyramids but I havent decided yet. Late Friday night I roughed in the body. I didnt leave myself much room to work so I had to simplify.
Thats all I have so far. My wife is working today and my Daughter is babysitting so I have all Sunday to drink beer and carve. I'll post more pictures as it progresses. [ Edited by: SDshirtman 2009-10-22 13:17 ] [ Edited by: SDshirtman 2009-10-28 01:20 ] [ Edited by: SDshirtman 2009-11-06 15:29 ] [ Edited by: SDshirtman 2009-11-23 22:31 ] [ Edited by: sdshirtman 2009-11-26 11:00 ] |
|
4

4WDtiki
Posted
posted
on
Sun, Oct 18, 2009 12:23 PM
Progressing nicely, John! Good decisison on carving in a tongue, rather than giant teeth! |
|
D

drasticwagon
Posted
posted
on
Sun, Oct 18, 2009 1:23 PM
Impressive , Nice job |
|
T

tikigodz
Posted
posted
on
Sun, Oct 18, 2009 1:30 PM
very clean for your 1st carve you already look like a pro what ook u so long to start awesome job ill have a beer with u buddy yeah c mon!!! |
|
L

laojia
Posted
posted
on
Sun, Oct 18, 2009 2:14 PM
Very neat work! Waiting for the rest... J. |
|
A

amate
Posted
posted
on
Sun, Oct 18, 2009 3:50 PM
Your apprehension about posting was completely unfounded. Very nice work! |
|
S

sneakyjack
Posted
posted
on
Sun, Oct 18, 2009 3:54 PM
keep it up! |
|
T

TikiMango
Posted
posted
on
Sun, Oct 18, 2009 4:38 PM
Lookin' really good! Me thinks you've done this sort of thing before... Keep it up. |
|
BTS

BIG tiki scott
Posted
posted
on
Sun, Oct 18, 2009 5:39 PM
WOW,WOW,WOW!!!!!! you are awsome!!! that is the stuff right there my freind!!!! cant wait to see this sucker dun !!! looks like youve been doin this for years!!! hell of a first!!cheerz!! go,go,go,go!...... |
|
S
SDshirtman
Posted
posted
on
Sun, Oct 18, 2009 11:10 PM
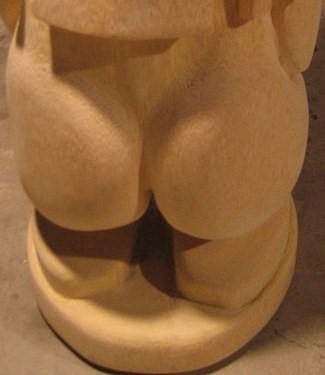
Thanks for all the kind words. I'm getting more comfortable with and used the chainsaw in conjunction with the grinder to work on the body today. It didnt come out exactly how I wanted but pretty close and I think it will work. I might have cut into the legs a bit too deeply and think I might have compromised the strength of the base. His hind quarters are starting to take shape as well as the arms. I'm still thinking about how I'm going to finish the hands. Back side.
|
|
M

MadDogMike
Posted
posted
on
Mon, Oct 19, 2009 3:08 AM
Cute butt :D Looks great Shirtman! |
|
B

Benzart
Posted
posted
on
Mon, Oct 19, 2009 8:04 AM
Welcome too Tiki Central SDshirtman, it seems you will fit in nicely here and your first carvings are really Impressive. It looks like you have done this kind of thing before? |
|
T

Tahitiki
Posted
posted
on
Mon, Oct 19, 2009 8:33 AM
Nice lines dude, this looks awesome. |
|
C

CK
Posted
posted
on
Mon, Oct 19, 2009 5:53 PM
WOW! Great job!!! I'm really impressed. |
|
BTS
BIG tiki scott
Posted
posted
on
Mon, Oct 19, 2009 5:57 PM
the more i look the better he gets !! excellent balance!!! doin great!!! keep it up!! cheerz!! |
|
S

surfintiki
Posted
posted
on
Mon, Oct 19, 2009 6:48 PM
A man after my own heart...LOTS of sanding perfection! |
|
T
tikigodz
Posted
posted
on
Mon, Oct 19, 2009 8:25 PM
nice!!!!! |
|
H

hottiki
Posted
posted
on
Mon, Oct 19, 2009 8:56 PM
looks like some type of aquatictiki, maybe from neptune's lounge...wherever he's from, he's one cool tiki...can't wait to see his buddies !!! |
|
S
SDshirtman
Posted
posted
on
Thu, Oct 22, 2009 1:25 PM
I had a chance to work on his body a little more. Thank god for grinders. I'm thinking about making his toes hang over the edge of his pedestal but we'll see. I sanded his hindquarters. This is officially my wife's favorite part.
Overall I'm pretty pleased with the progress so far. I'm thinking about if I want to do any designs on his arms or legs. [ Edited by: SDshirtman 2009-10-22 13:26 ] [ Edited by: SDshirtman 2009-10-22 13:28 ] [ Edited by: SDshirtman 2009-10-22 13:33 ] |
|
C

congatiki
Posted
posted
on
Thu, Oct 22, 2009 2:05 PM
Excellent design and carving....very nice. |
|
B

benella
Posted
posted
on
Thu, Oct 22, 2009 2:42 PM
WOW, unbelievably amazing ! Benjamin. |
|
S

seeksurf
Posted
posted
on
Thu, Oct 22, 2009 3:53 PM
Sweetness! love the lines you have brought out and |
|
D
drasticwagon
Posted
posted
on
Thu, Oct 22, 2009 4:04 PM
MAN O MAN O MAN! What a great job, You was born to make tikis. |
|
T
TikiMango
Posted
posted
on
Thu, Oct 22, 2009 4:10 PM
He's coming along nicely! As for airbrush or other, that's your prerogative (your creation), depending on what you want him to look like in the end. I've seen spray paint, torch, stain... all used to achieve a different look and feel. Surprise us! |
|
BTS
BIG tiki scott
Posted
posted
on
Thu, Oct 22, 2009 4:55 PM
sdshirtman!!! WOW!!! THAT IS ONE SWEET TIKI!!!! smooth as your tikis butt on a summers day and clean crisp lines WOW! as drastic wagon stated you were born to do this!!! and as for air brushing or burning or a combo its your tiki and as far as i can see you will do a great job w any!!! always remember its sumthin you created make sure you do what your mind thinks is right!!! cheerz!! [ Edited by: BIG tiki scott 2009-10-22 16:56 ] |
|
S
SDshirtman
Posted
posted
on
Wed, Oct 28, 2009 1:44 AM
Here are the latest pics. I think I'm almost done. Seems like I have a million hours in him so far. I wish i would have taken more pics of my first carve progress. My wife has some on here camera. Anyways here's what I have. I used a dremel to do the lines in his hands. I haven't broken out the dremel much the entire carve except for this and a tad around his tongue.
I made the lines a little deeper and sharper with a chisel. I'd love to know how everyone else is doing it. Here's a few to show a 360ish view. In retrospect I would have done a few things different on the back but I'm cool with how this came out.
Here are some close ups. I did a small burn in his mouth to get a feel for the torch. Was kind of nervous about the eyes but now that its done I'm wondering what I was worried about. So I think I still have some more sanding to do then I can think about staining him. If anyone can advise me I'm wondering if I should stain him all at once or do him in sections. Its been 15 years since I stained anything and he's a decent size at 44". Now that I'm this far into it I dont want to botch the last step. Thanks for all the kind words of encouragement so far. [ Edited by: SDshirtman 2009-10-28 01:49 ] |
|
B
Benzart
Posted
posted
on
Wed, Oct 28, 2009 6:42 AM
Wow shirtman, this is an Awesome carving. The sills you have demonstrated are far beyond entry level and show great control and use of the tools at hand. Personally I would Not burn the details as yours are crisp and sharp and leave plenty surfaces for the shadows to show the real detail. I think if you burn it you lose that shadow interaction. Originally the burning was to smooth out the chainsaw tracks and combined with a wire brush was very effective at smoothing which we do now with a grinder and sanding papers. Stain could go either way, he is a very contemporary looking tiki so going with too dark a stain cold go against that. But it's OK to or not to stain. |
|
A

AlohaStation
Posted
posted
on
Wed, Oct 28, 2009 7:12 AM
Nice carve! I would not burn him and would think about not staining him as well. Palm get MUCH darker when you put Polyurethane it. You may be happy with the natural color as opposed to staining him. Get a scrap piece and do some experimenting, especially if its been a while since you used stain. Either way it is still a cool tiki! |
|
C

claq50
Posted
posted
on
Wed, Oct 28, 2009 7:47 AM
Very cool, like where its heading. |
|
S
SDshirtman
Posted
posted
on
Wed, Oct 28, 2009 11:51 AM
Thanks again. The complements really mean a lot to me coming from you guys. The suggestions not to stain have me second guessing what I'm going to do. At the same time I think I'm going to do it anyways. I'll do some test pieces beforehand though. I am going to heed Benzart advice and put the torch away. I'll post some pics after I get some color on him. |
|
4
4WDtiki
Posted
posted
on
Wed, Oct 28, 2009 11:53 AM
I vote for stain. Something light to medium. Stain makes a carving 'pop'. |
|
T

TheBigT
Posted
posted
on
Wed, Oct 28, 2009 12:08 PM
VERY nice. I do like the teeth and the ridge of the nose. Outstanding work. Don't know about staining palm as I haven't tried it. If I didn't know any better I would have tried to stain it all at one time though. You might try a sealer coat of clear shellac first. Then build your coats of stain on top of that until you like it. |
|
A
amate
Posted
posted
on
Wed, Oct 28, 2009 2:05 PM
very clean carving . . . can't wait to see the finished product. |
|
T

Tikilizard
Posted
posted
on
Wed, Oct 28, 2009 3:03 PM
He's looking really nice. Can't wait to see him finished. Question for you, wouldn't it take less time if you waited to sand at the end of the carving? Unless you don't carve back over any area you have already sanded. Just a though. Keep'em coming and where all enjoying your progress posts. |
|
S
seeksurf
Posted
posted
on
Wed, Oct 28, 2009 10:42 PM
Sick sick sick! Well done. Go with the stain. |
|
B
Benzart
Posted
posted
on
Thu, Oct 29, 2009 4:01 AM
I'm glad you put the torch away Shirtman and I think your tiki will be happy too. Btw, Where is he, Not done YET? |
|
L
laojia
Posted
posted
on
Fri, Oct 30, 2009 1:03 AM
Very nice carve shirtman! clean lines, good finishing and already your own style. hat's off!
For my part I made this kind of detail only with chisel or gouges and carving knife... Well pursuit to finish this beautiful piece! J. |
|
D

domin
Posted
posted
on
Fri, Oct 30, 2009 1:07 PM
really nice carve, so clean and smooth, and as for finishing, heck you could just throw random colors of paint at him and he would still look great. |
|
S
SDshirtman
Posted
posted
on
Wed, Nov 4, 2009 2:36 PM
Hello everyone. I haven't updated this in a few days as its been a busy week. Had a lot of work to do plus Halloween falling on the weekend left me little time for working on my tiki. So here is an update. I finished sanding him and got him ready to stain. I bought some walnut minwax and did some samples on a separate piece of pine. They turned out WAY too dark so I exchanged the walnut for some lighter golden oak. (Thanks for the tip Bill) I was also wanting to to some kind of tribal design work on parts of him. I found some traditional patterns I liked on the interwebs. I was going to use one of those acrylic paint pens but after some test I abandoned that idea. The main reasons were that the paint bled too much, the color sucked and the line width was too fat. It was also incompatible with the poly I tested it with. When I hit the dry paint pen with the poly it melted like I just poured acetone on it. Late last night I was going to give him a coat of satin poly before I realized I bought the indoor stuff instead of the outdoor spar poly. [ Edited by: SDshirtman 2009-11-04 14:42 ] |
|
B
Benzart
Posted
posted
on
Fri, Nov 6, 2009 1:53 AM
Well I just can't Wait to see how the burning works out. Some of my BigBenzarts had the details burned in much like you are doing and they turned our really nice.
YES, What were you Worried about for sure. It seems to me the level of fine detail you re capable of would be better shown in a nice piece of Hard wood and I'm sure it would not be so worrisome? What kind of art have you been doing the last 20+ years, I saw that in another post? Got Pictures? |
|
A
AlohaStation
Posted
posted
on
Fri, Nov 6, 2009 11:13 AM
Can't wait to see some new pics. Testing stain on anything other than Palm is not good. Palm has a unique grain that is nothing like Pine. Walnut stain is dark, but on Palm it would definitely be different than on Pine. Also, Palm can be painted quite nicely - after you seal the wood. Palm is too porous as raw wood and will soak up your paint causing major bleeding. Seal with Poly and then paint - you may get the results you want. Looking really good! |
|
S
SDshirtman
Posted
posted
on
Fri, Nov 6, 2009 1:41 PM
Ok here's a better update with lots of pictures. Putting on some stain.. I liked the color when he was wet but when he dried the next day he lightened up quite a bit so I hit him again. After the second coat of stain was dry I did some design work on him using a wood burner. I also hit him with a coat of oil based spar urethane. He soaked up quite a lot of the spar. I considered letting him fully cure so I could sand him again but didnt like the I still have to seal the bottom once he cures a little harder as he's going to live in my backyard. I'm calling him finished. My wife took WAY too many pictures of this project but here are some of the final shots. Sir-Mix-A-Lot would be proud. I like the way the satin finish mellowed out. I was worried that it was going to stay super glossy. [ Edited by: SDshirtman 2009-11-06 13:42 ] [ Edited by: sdshirtman 2009-11-23 22:46 ] |
|
S
SDshirtman
Posted
posted
on
Fri, Nov 6, 2009 2:01 PM
I was thinking some of you might be interested in the tools I used. I had to acquire a lot of these specifically for this project.
Things I had to buy for this. So it seems I've invested about $260 in tools and such. Everything else I already had on hand. I'd like to again thank everyone here who has contributed ideas, thoughts, advice and encouraging comments. TC is an excellent resource. |
|
C
congatiki
Posted
posted
on
Fri, Nov 6, 2009 3:13 PM
Absolutely fabulous! What a great and original carve. I love the "burned" Congratulations....step to the head of the class! [ Edited by: congatiki 2009-11-06 15:13 ] |
|
C

Clarita
Posted
posted
on
Fri, Nov 6, 2009 4:01 PM
Very smooth work, nice! |
|
H
hottiki
Posted
posted
on
Fri, Nov 6, 2009 4:24 PM
This tiki carving is way nice, I think it's really too nice for the backyard...you don't have a tiki room, living room, den? You might try on scrap wood doing the woodburning first then staining with 24 hours between coats and way cured like a few days before puting clearcoat on. It's tough not to be in a hurry when one is so close to being done. If you do put it in the backyard I hope you got a big dog to watch over it. Really nice job. |
|
4
4WDtiki
Posted
posted
on
Fri, Nov 6, 2009 4:45 PM
That's probably the best first tiki I've ever seen. I wouldn't be in any rush to seal the bottom, especially if there's any doubt about the wood being fully dried. It can still be outside in the yard, just don't have it sitting in dirt, or a hard surface that pools water at all. Best thing would be to have spacers under it so it can 'breathe', or finish drying. Good job! |
|
B
Benzart
Posted
posted
on
Fri, Nov 6, 2009 5:28 PM
YES! He definitely finished up Beautifully. Your burn works are Great but would have been better done before the finish, You are probably right about some reaction, the heat brings the moisture up, the burn rempves the finish and the opening sweats out gunk. It will eventually cure but Should be (cough,cough) sanded over the burns and allowed to dry or the moisture may bring on the mold!. Hurry and start another one and tell your wife Not to skimp on the photos next time. :D Looks like some heavy duty vac-u-form equip, silk screen stuff and print stuff maybe? Cool machines. Very Well Done! |