Tiki Central / Tiki Carving
My First Carving or What I spent my night doing.
Pages: 1 24 replies
|
N

nicholauslee
Posted
posted
on
Thu, Nov 19, 2009 12:07 AM
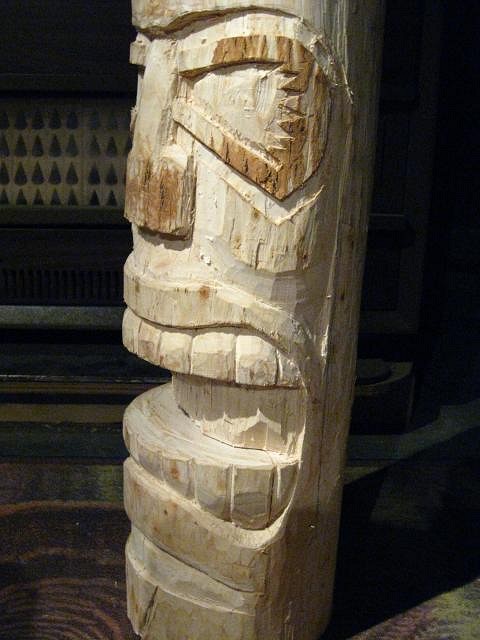
I decided to try my hand at carving finally, this is my first attempt at wood carving in general. So I cut down a try using nothing but some handsaws and a couple hatchets... and it took way too long. Then tonight, I started carving away, this is what I have so far.
Obviously it's just the beginning of a long task. I already learned one thing, and that is I need to learn more about trees and the types of woods. |
|
C

Customkiis
Posted
posted
on
Thu, Nov 19, 2009 9:06 AM
That is too funny about the Ash. Yes, it is going to be horrors on your arms and tools, but it might out live you. :). You might want to cut it in half and just finish the bottom that you started. Let the top portion cure somewhere out of the weather. I would peel the log, unless you are trying to incorporate the bark into the carving. What I have found to be the easiest way to peel a log is to use a 1" flat chisel and remove a strip of bark running the length of the log. Then, start peeling the log around it's circumference. Once you get the chisel under the bark it usually comes off pretty easy. Sometimes you can luck out and it will come off in large pieces. It works for me |
|
B

Benzart
Posted
posted
on
Thu, Nov 19, 2009 11:24 AM
Welcome to TC Nicholauslee, Glad you found us. Love your first carving, looks like you've done it before. Yes the Ash IS very hard but you should be able to get lots of tight detail. Good luck,, we'll be waiting for more progress shots. |
|
A

amate
Posted
posted
on
Thu, Nov 19, 2009 5:28 PM
Stay at that hard wood and complete it. The ash has has a beautiful grain when finished with natural stain. |
|
BTS

BIG tiki scott
Posted
posted
on
Fri, Nov 20, 2009 3:59 PM
welcome!! and i cuncure w all!!and this is a great start!!keep it comin!!! git r dun!! lol! cheerz!! |
|
N
nicholauslee
Posted
posted
on
Fri, Nov 20, 2009 10:08 PM
First, I'd like to say thank you all for the kind words. I'm pretty happy with the way this thing is turning out so far. hopefully things will continue to work out okay for me, and I won't mess everything up with a single stroke.
|
|
N
nicholauslee
Posted
posted
on
Mon, Nov 30, 2009 12:51 PM
Just thought I'd post an update as to how this is coming along. Still a long way from being finished, but I'm pretty happy with it so far. Any suggestions or critiques are welcome.
|
|
T

TheBigT
Posted
posted
on
Tue, Dec 1, 2009 11:02 AM
It's getting better and better as you go along. Gonna be a nice one. |
|
A

Aweulekuula
Posted
posted
on
Tue, Dec 1, 2009 5:00 PM
Ooooooh! I like the way this guy is going. Sometimes the best work is the one we are forced to do slowly. It usually gives the finished tiki a whole different feel and meaning. Awesome work so far! Aloha! Marcus |
|
T

Tikilizard
Posted
posted
on
Tue, Dec 1, 2009 5:20 PM
Lookin good so far. Great start. Get a little more depth around the eyes and nose and I think you'll be really there. |
|
N
nicholauslee
Posted
posted
on
Tue, Dec 29, 2009 9:59 PM
So, this is why I haven't updated on this in a while. I went out one day to continue working on Lono, and behold, a beautiful crack had started right up the middle of his face.
This is the matching crack up the back and side.
|
|
T

TIKIVILLE
Posted
posted
on
Wed, Dec 30, 2009 11:09 AM
crack shmak...it looks cool ! |
|
A
Aweulekuula
Posted
posted
on
Thu, Dec 31, 2009 11:13 AM
Many a good log will split while being carved. Heck, I saw a few replica tikis at Hawai'i's City of Refuge in Honaunau while they were being carved and the logs were already splitting already. Keep on it and just see the cracks as part of the character for the finished piece. Aloha! Marcus |
|
J

JohnnyP
Posted
posted
on
Thu, Dec 31, 2009 1:28 PM
Hey, cracks happen. Look at any art book about south Pacific carvings and you will see a lot of them. Keep carving and you will be surprised how well the crack fits in with the primitive look when you are done. JP |
|
B
Benzart
Posted
posted
on
Fri, Jan 1, 2010 11:14 AM
yeah, just keep carving before it drys all out. You notice the deeper your details get the better he looks? Carve Deeper. See how little his nose sticks out from the face? Just drop the upper lip down at least an inch and work that out all around and you'll see his nose grow and everything will start to pop. Don't worry about the cracks or "Checks" as wood workers call them. Keep up the good hard work, it's obvious you are having a great time and showing reaL Progress. |
|
A
amate
Posted
posted
on
Sat, Jan 2, 2010 5:59 AM
I feel your pain because this is very frustrating when it happens to me. I now try to carve only well seasoned wood. At least you can choose where you want the cracks to be. I also brush on a coat of linseed oil after every carving sesson. I don't know if the oil helps but it makes me feel better. |
|
C
Customkiis
Posted
posted
on
Sat, Jan 2, 2010 9:24 AM
the disadvantage of carving a "green" log. The benefit is that it is a lot easier to carve and you are less likely to get tear out. "Seasoned" logs will not crack like that. For future reference. If you want to carve it green, keep your carving wet. Either soak it in between carving sessions or cover your carving with wet, burlap sacks. Once the carving is done then you can store it in a cool dry place for curing. You may still get cracks, but not as bad . If you want to cure a log. after it is cut seal the end with an end-sealer, like Anchorseal. I have heard wood glue (Titebond, Elmers) and paint work too. The log will lose most of the moisture throught the ends. Think of it as a bundle of straws. Some of the moisture will come out the sides, but most of it comes out the ends. If you choose to carve it and store it rubbing it down with an oil might be a great idea to stop it from cracking. Regardless, it looks killer! Nice work. Keep 'em coming. |
|
N
nicholauslee
Posted
posted
on
Tue, Jun 1, 2010 7:59 PM
I know it's been a long time since I updated this post, but it's been a hectic chaos filled winter. Trying to get back at him now that the sun is finally back out in Michigan and I can work on it without a hat and gloves.
It's still a long way from done, but it's getting there. |
|
4

4WDtiki
Posted
posted
on
Tue, Jun 1, 2010 9:13 PM
Good to see that you're back at it! |
|
T
TheBigT
Posted
posted
on
Wed, Jun 2, 2010 10:55 AM
Yep, looking good. You're gonna have a nice tiki there. |
|
A
amate
Posted
posted
on
Wed, Jun 2, 2010 3:43 PM
Is that the same one that had a crack? How did you fix it? |
|
D

drasticwagon
Posted
posted
on
Wed, Jun 2, 2010 4:47 PM
Nice use of the length. I like it. |
|
N
nicholauslee
Posted
posted
on
Wed, Jun 2, 2010 4:56 PM
Thanks guys for the nice words. |
|
S

seeksurf
Posted
posted
on
Wed, Jun 2, 2010 9:06 PM
Well done. Looks like your biggest crack is in the back. That's the |
|
P

pjc5150
Posted
posted
on
Thu, Jun 3, 2010 11:04 AM
Cracks add character. Roll with it bro! |


Pages: 1 24 replies