Tiki Central / Home Tiki Bars
Tiki Hut Roof Design Help
Pages: 1 16 replies
|
R

rterry
Posted
posted
on
Thu, Jul 14, 2011 10:39 AM
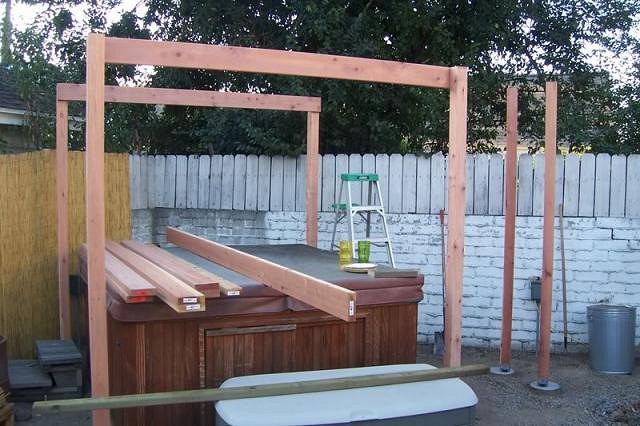
Hi, I am building a 10 foot span by 6 foot tiki bar (dimensions from end/corner posts) The posts are 4 by 4 and the height is 7 feet... I am wondering the best way to build the roof... I plan on just doing a simple gable with rafters and thatch but not sure how to create the ledger or frame for the roof... I have seen a couple things, "2 by" material framed and lag screwed around the posts or 4 by 4 on top of the posts... If anyone with experience could advice the best way to do this for a 10 foot span I would appreciate it! |
|
S

sur2baja
Posted
posted
on
Thu, Jul 14, 2011 6:49 PM
Try these, they are some of the best here: http://www.tikicentral.com/viewtopic.php?topic=5793&forum=18&hilite=backyard%20bali%20hai http://www.tikicentral.com/viewtopic.php?topic=18053&forum=20&hilite=yard%20kitchen http://www.tikicentral.com/viewtopic.php?topic=24936&forum=18 http://www.tikicentral.com/viewtopic.php?topic=24818&forum=20&hilite=corrugated http://www.tikicentral.com/viewtopic.php?topic=27675&forum=18&hilite=backyard |
|
R
rterry
Posted
posted
on
Thu, Jul 14, 2011 10:48 PM
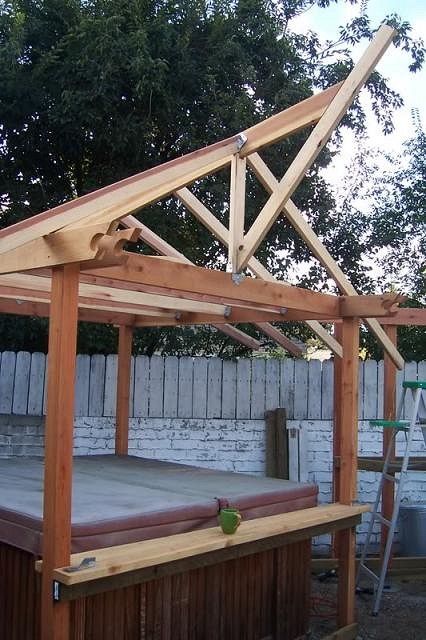
Thanks for the help :) I really would like to to a basic frame like the one in this picture but not sure of the best way to go... it looks like his might be 8 ft by 8 ft maybe post to post and then the main frame around the posts 2 by 6 materials? Think for a 10 foot span (10 by 6 post to post) that 2 by 6 would be safe or would I need 2 by 8 maybe?
Just want to be safe and I have little experience with structural engineering... Thanks for any help!~ |
|
S
sur2baja
Posted
posted
on
Thu, Jul 14, 2011 11:32 PM
No worries! I suggest emailing the person posting the pics and asking him/her the specifics you would like to know. One other suggestion is to contact your local building department and request the requirements for a patio cover/recreational structure. This is a .pdf file and is usually available on line. It spells out most of the information you need. Some of the more complicated structures like the "Rincon Room" require a permit and that's a whole other ball of tiki wax. |
|
S
sur2baja
Posted
posted
on
Thu, Jul 14, 2011 11:44 PM
Here is an example of San Diego County's requirements. For your local jurisdiction, just google it! |
|
R
rterry
Posted
posted
on
Fri, Jul 15, 2011 11:37 AM
Thanks for the help Sur! I definitely do not want to have to getting into pulling permits, I am trying to keep it small, just a 4 post tiki hut on a ground level deck... I checked basic permit stuff for my area (NJ) and it seemed anything less then 200 sq feet less then 12 ft high and off the house did not require a permit so I am moving ahead... Like I said though having minimal engineering experience I just want to here someone in the "know" verify the best way to do it before I get started... I really love the look of the one you posted that I reposted the pic of... I'll take your suggestion and try to send him a message! Thanks again for the help! |
|
S
sur2baja
Posted
posted
on
Fri, Jul 15, 2011 2:27 PM
Good luck with your project and post progress pics! That's how we all learn. I'm getting ready to start something similar to the Kentucky Bali Hai so watch for my pics as well! |
|
M

MadDogMike
Posted
posted
on
Fri, Jul 15, 2011 3:23 PM
Guys, thanks for the thread and the links. I'm getting ready to build a small hut shade over a planter - now I don't have to dig around for those pics :D Good luck with your build rterry |
|
K

kalenatiki
Posted
posted
on
Fri, Jul 15, 2011 8:14 PM
Greetings, The 2x6's should be fine. I work for a smaller building center/ lumber yard. I agree with the above comments, Do check and make sure of your building size allowed without a permit. Mine is only 120 sqr ft, so around 10x12 max or you need a permit. easy to check now before there's problems. If you look at the picture you posted, you will notice that he used dbl. 2x6's on the sides. This give you alot of support, and looks cool with the cut outs. The rafters are 2x6's going across to suport the frame from side to side motion. The ridge is set in the center, as high as you want the roof to be, and then the rafters are cut to fit the angle or pitch that you have built. Remember, the taller the roof, the harder it will be to thatch or cover because of the steepness. A quick check with a local building shop (not home depot type) will give you someone local to help you out some. just remember, saftey first. |
|
S
sur2baja
Posted
posted
on
Fri, Jul 15, 2011 8:39 PM
Check this site, it talks about basic roof framing. The rest of the website has a lot of good info on basic carpentry that may be of help. MY only other advice is to try to screw and bolt when possible and avoid nails. |
|
R
rterry
Posted
posted
on
Fri, Jul 15, 2011 9:23 PM
Thanks guys/gals... I will post pics... to the one post... look closer... he did not use double 2 by 6... he used only 1 beam but created an illusion i believe for ascetic purposes but perhaps it provides some structural factor tieing everything in at that post... the beam does not run the span though... If you look there is no way he could because the original beams he put up would dissect along with every other ceiling joist there after... He just placed that Double" with the cutout off the end joist/ plate beam to stick out alongside the end of the main beam... I looked many times on do not believe the inside beam runs that span... Would like to hear this versified though... [ Edited by: rterry 2011-07-15 21:24 ] [ Edited by: rterry 2011-07-15 21:26 ] |
|
R
rterry
Posted
posted
on
Fri, Jul 15, 2011 9:44 PM
Just to try to clear up my above post and make it more clear... if you look at how he started the frame... the inside "double" beam could not run through those and out without being broken up... and then if you look at later pics all the rafters sit on only the outside beam with no 2nd beam there...
[ Edited by: rterry 2011-07-15 21:44 ] [ Edited by: rterry 2011-07-15 21:48 ] |
|
S
sur2baja
Posted
posted
on
Fri, Jul 15, 2011 10:41 PM
The posts are attached footings with a post base (PB). Use a raised PB to keep the wood off the ground. It looks like the posts have 2x8 cross beams (left to right) that are attached to the inside. On the outside of the posts he has attached 2 more 2x8 beams (front to rear) that support the 2x6 rafters. He then attached 2-2x6 vertical supports that are attached to the cross beams. Attached to the vertical supports is a 2x8 ridge beam. Typically a ridge beam is one size up from the rafters you use. That is the structural part of the roof. Everything else is for decoration. |
|
R
rterry
Posted
posted
on
Fri, Jul 15, 2011 11:11 PM
Thanks Sur for a very good detail... My problem now is still the same in away... if he used 2 by 8 materials to fraim the joist/ top plate (rafter sit on) for an 8 by 8 structure I still stress a bit on using 2 by 8 for a 10 foot span since it seems all the "sheer" will fall on them at the center... also, do the corner brackets not support the structure in some way? are they really purely decoration? Maybe a third post , just not sure... thanks for the help again |
|
K
kalenatiki
Posted
posted
on
Sat, Jul 16, 2011 4:08 PM
Ah.. should have looked up the old post for the starting pics :) I stand corrected on the dbl 2x6's but that said, it's not a bad way to go. many shade covers use a dbl beam of smaller wood ,say 2 2x6's, instead of a single 4x6. and yes lag or bolt them things down! you can always cover them up with some rope or such. |
|
R
rterry
Posted
posted
on
Sat, Jul 16, 2011 7:40 PM
Ya ka'lenatiki, it is a bit deceptive but thanks to the guy for really showing clear pics of what he did... anyway, you originally said 2 by 6 single for a 10ft by 6 ft structure should be okay... you think if I did 2 by 8 for the basic roof frame/top plate/ ceiling joist (whatever you want to call it) would definitely be sufficient? Thanks for your help :) On a side not, I am not doing a full roof, i have minimal snow load to deal with and just throwing thatch and felt paper across the rafters... not doing the full roof that he did... |
|
S
sur2baja
Posted
posted
on
Sat, Jul 16, 2011 10:57 PM
In the East and Midwest, people tend to double up 2X's but on the West Coast we tend to use the bigger lumber and not double up. I have no idea why. Now I don't have to deal with snow loads being on the left coast but I would I suggest refer to your local building requirements, look at your span table and use what is required by code. Again, go heavier than anticipated. You wont have sagging or deflection. |
Pages: 1 16 replies