Tiki Central / Other Crafts
First Mug First Mold Progress: THE MOLD IS DONE!!!!
Pages: 1 32 replies
|
TT

Tiki Tonie
Posted
posted
on
Fri, Feb 24, 2012 9:06 AM
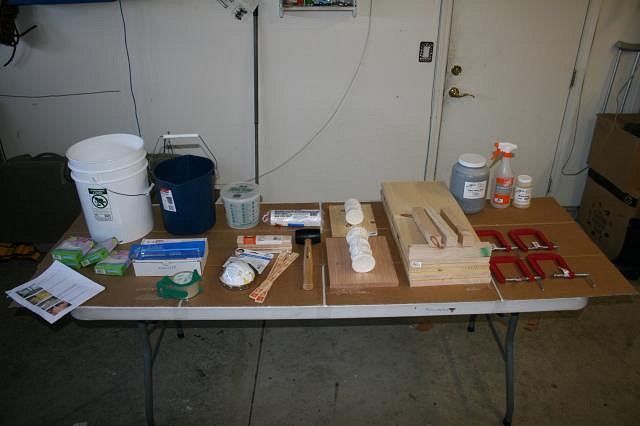
Hi Everyone, I'm going to post photos from the very beginning in case there are any other newbies out there. Thanks Again!
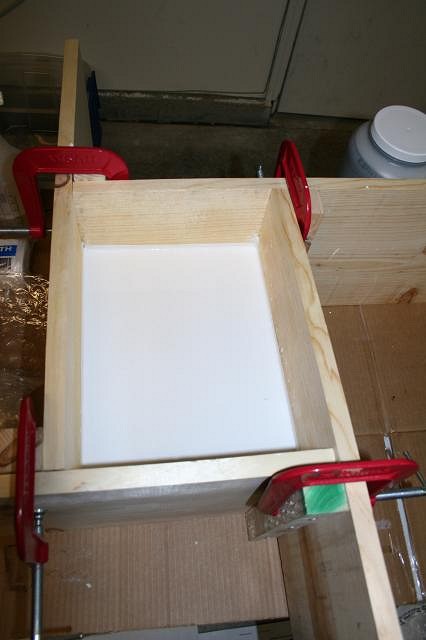
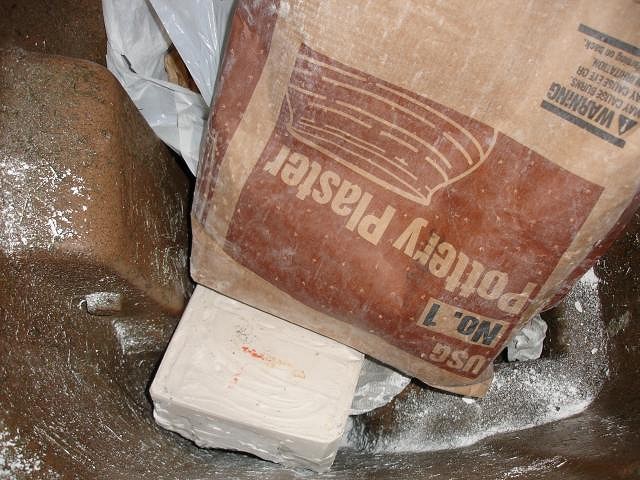
Make sure you've built or acquired a mold form of the appropriate size. In addition to everything below you'll need clear, fresh water. Remember not to dump plaster down the drain! If you do you'll no longer have a drain! You'll need:
Update 02//27/12***************************************************
!!!!!!! PLEASE SEE WENDY'S INSTRUCTIONS ON MAKIN THE SIDE SECTIONS, MUCH MORE EFFICIENT!!!!!!****
Stay tuned, Making the last 2 pieces tomorrow. UPDATE 02/29/12*****************
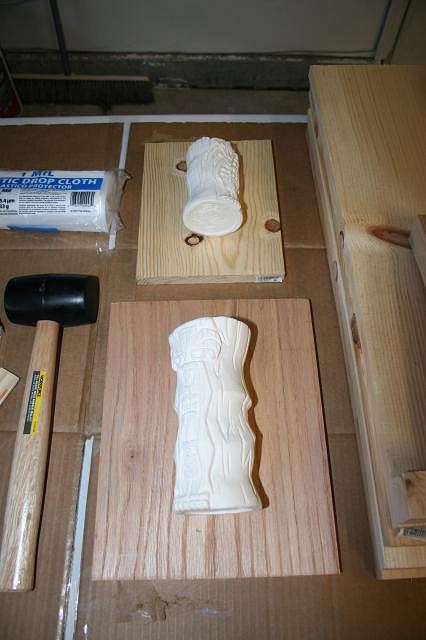
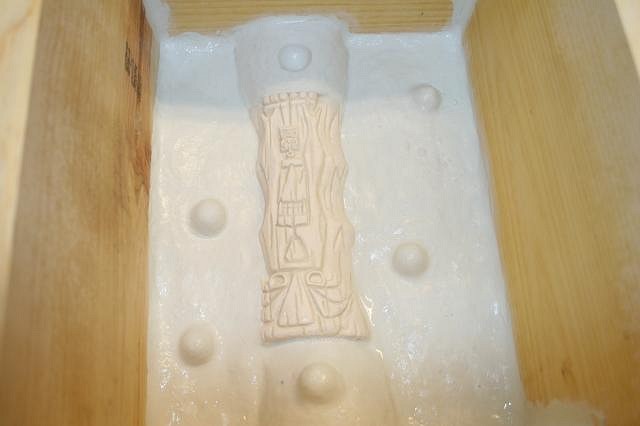
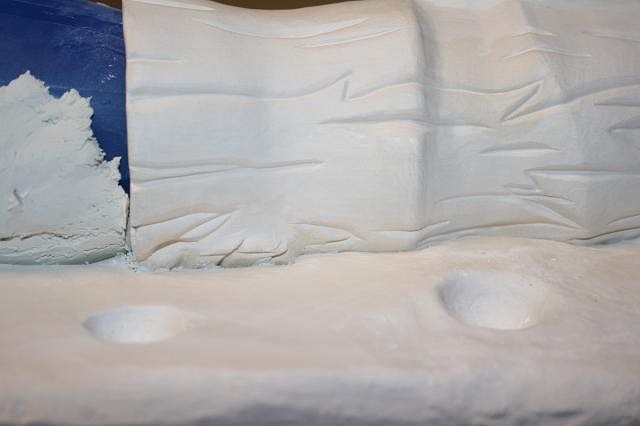
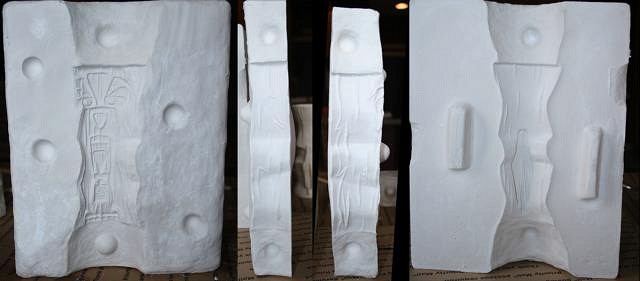
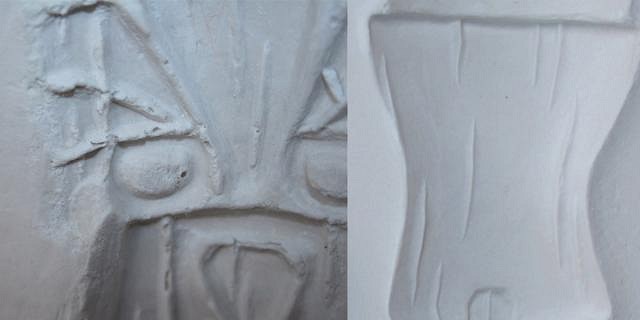
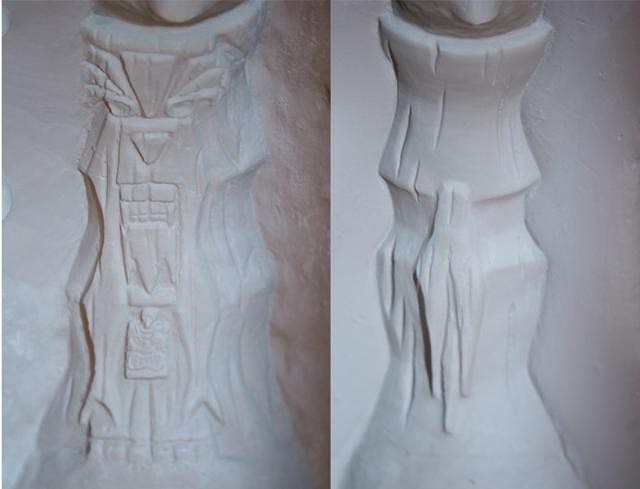
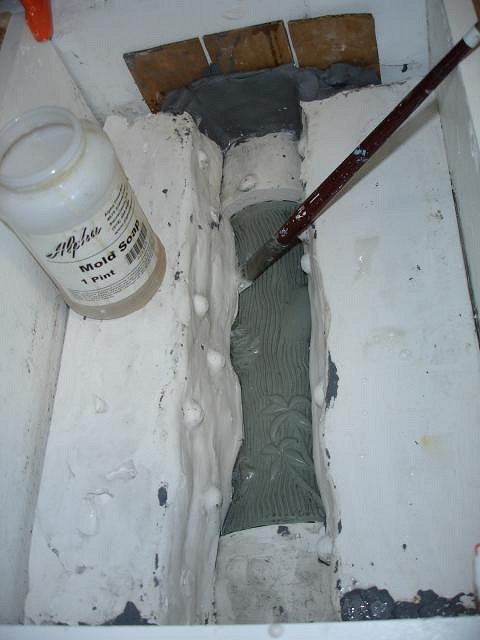
I was actually very disappointed with how the front came out. If I have any advice to give, it's make a practice mold first. From the first pour to the last pour, I learned so much and got a little better each time. You'll see a drastic difference in the close up below.
So I was kind of sad, thinking I would have to have a do-over. That is until...
I'm going to go back and watch my plaster dry out enough to pour the slip now. What do you think, 3-4 days? Again, any advice is good advice! [ Edited by: Tiki Tonie 2012-02-27 01:05 ] [ Edited by: Tiki Tonie 2012-02-27 09:29 ] [ Edited by: Tiki Tonie 2012-02-27 09:54 ] [ Edited by: Tiki Tonie 2012-02-27 23:01 ] [ Edited by: Tiki Tonie 2012-02-29 12:46 ] |
|
K

KokoKele
Posted
posted
on
Fri, Feb 24, 2012 12:06 PM
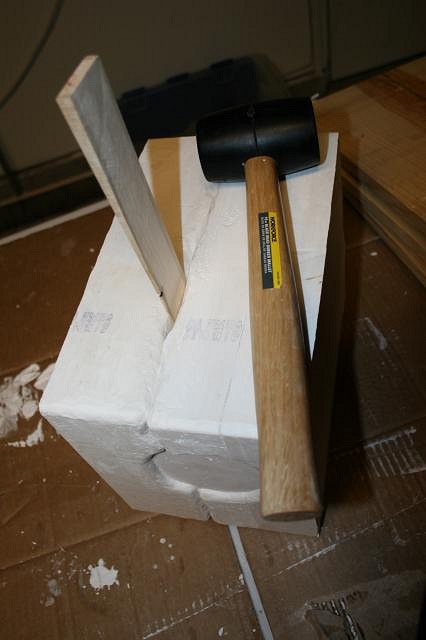
Good luck with the mold! First step is to review this valuable tutorial: Make sure you've built or acquired a mold form of the appropriate size. The one shown in the tutorial will work great. I'm listing equipment and materials only. Refer to the tutorial above for handy hints and expert guidance. I'm not that good at this but have done it a few times. In addition to everything below you'll need clear, fresh water. Remember not to dump plaster down the drain! If you do you'll no longer have a drain! You'll need: Safety equipment! A dust mask for sure, rubber gloves if you're concerned about the effects of plaster on skin! Drop cloths as needed Paper towels or shop towels as needed Clay-Soft, oil-based clay Filler - you can use wood strips or some other material to act as filler so you don't have to use as much clay A variety of tools to help you smooth the clay and get into corners and crevices Stir sticks or a cage mixer and drill motor Pottery plaster (ceramics shop have the perfect type; plaster of paris also works)- Buy a lot. It's cheap. A couple of plastic scoops for getting plaster from the bag to the containers. A kitchen-type scale for weighing your materials. You can use a fairly cheap one, but make sure you can "tare" it (set it to zero when something is sitting on it). Several lightweight plastic containters for holding plaster and water when you measure them. Half-gallon or gallon should be fine. A few cheap paint brushes (I use the throw-away types) Orange shellac (optional) Spray bottle for mold soap (optional) Mold soap (found at ceramics shops; I believe you can use other media also) A clean, good-sized plastic bucket (one gallon minimum? I use larger) A wooden wedge to help part your finished mold parts A rubber mallet for gently whacking your wooden wedge Did I miss anything? [ Edited by: KokoKele 2012-02-24 12:07 ] [ Edited by: KokoKele 2012-02-24 12:22 ] [ Edited by: KokoKele 2012-02-24 13:57 ] |
|
D

danlovestikis
Posted
posted
on
Fri, Feb 24, 2012 12:32 PM
Kokokele where were you when I was just starting out. Good job. |
|
W

WestADad
Posted
posted
on
Fri, Feb 24, 2012 12:36 PM
A clone of Dan Cevola to help you!! :) |
|
K
KokoKele
Posted
posted
on
Fri, Feb 24, 2012 1:31 PM
Oops! Forgot! WEIGHING YOUR MATERIALS! I'm pretty literal about following the instructions on the pottery plaster bag, so I have a scale that you can tare (set to zero) and some measuring containers - one for water, one for plaster. My scale was pretty cheap and goes up to ten pounds. Once you put the measuring bucket on the scale set it back to zero and add your water according to instructions. Do the same thing for your plaster then use the sprinkle-sprinkle method to add the plaster to the water in the large bucket and mix 'em all up. |
|
TT
Tiki Tonie
Posted
posted
on
Fri, Feb 24, 2012 1:56 PM
THANK YOU SOOOOOO MUCH KOKOKELE!!!!! That is exactly what I needed. I think you listed 5 things I had no idea I needed and great details on all the rest. I'll be sure to watch the tutorial before I begin. Thanks to Wendy too! I'll be following along with the printouts I copied from you thread. I'll let you all know how it went on Sunday! Tiki Tonie |
|
K
KokoKele
Posted
posted
on
Fri, Feb 24, 2012 1:58 PM
Glad to help. I edited the first list to include the scale and other materials so you'll have everything on one list. Best of luck! Be patient! |
|
L

LoriLovesTiki
Posted
posted
on
Fri, Feb 24, 2012 4:00 PM
Good luck! |
|
K
KokoKele
Posted
posted
on
Fri, Feb 24, 2012 4:00 PM
Totally! |
|
TT
Tiki Tonie
Posted
posted
on
Fri, Feb 24, 2012 6:04 PM
About how many bags of plaster does it take to make a for an regular size mug, like 8" tall and 3" diameter mold? |
|
K
KokoKele
Posted
posted
on
Sat, Feb 25, 2012 2:55 AM
Last time I bought pottery plaster it was around twenty bucks for a forty pound bag. That was enough to ruin my first two attempts at making a mold, and still enough for my third successful attempt with some left over. One of the first things I did when buying plaster was to immediately transfer it to a plastic storage box - "totes" I believe they're called - with a lid that clamps on fairly securely. This made it easier to scoop out the plaster and it kept it nice and dry. If you're going to use plaster of paris I'd think in terms of getting three five-pound boxes. Better to buy too much than run out in the middle of the project. I'd really try to get pottery plaster, though. It's much better. Does that sound about right to everyone else? |
|
K
KokoKele
Posted
posted
on
Sat, Feb 25, 2012 8:42 AM
Oh, my, I think I might have been a bit dense about answering your last question. I'll bet you wanted to know how much plaster to actually mix up for each pouring for a mold your size. Right? I always just guessed. But if you're a genius, which I'm not, you can always use actual calculations! After you get your answer, below, be sure to follow the instructions that come with the plaster exactly! The shop I buy mine from has an alternate instruction sheet that they give you, which they developed after years of trial and error, and it works great. If your shop gives advice like this, follow it! Now, fun with math: If your original piece is 3 inches by 8 inches, your mold box needs to be adjusted so that there is plenty of plaster around it after pouring. So you're filling a mold box that should be around 6 inches tall by, say, 12 inches long by six inches wide. Six times 12 times 6 is 432. That's the VOLUME of the mold box if those are your measurements. Now subtract the volume of the mug. That's a bit tougher. The formula for volume is pi times radius squared times height. Pi is roughly 3.14, and the radius is half the distance across the center of the mug, or 1.5 inches. So your formula for the mug volume is 3.14 times (1.5 times 1.5) times 8. The answer is 54 cubic inches. So 432 minus 54 equals 378 cubic inches. BUT you only want to make enough plaster to fill up half the mold box, right? That means you only need enough to fill 189 cubic inches. To get the number of quarts you need, divide your cubic inches by 58. 189 divided by 58 equals about 3.3 quarts. Since plaster takes up about twenty percent of the volume, I'd say you need about three quarts of water and about nine pounds of plaster. That should make more than you need. So I guess you're making about a gallon of wet plaster. Sounds about right. I'll bet some of the more seasoned mold makers out there have other methods for estimating their plaster needs. Hope this was helpful! |
|
K
KokoKele
Posted
posted
on
Sat, Feb 25, 2012 8:52 AM
Here's a tutorial with a nice lady named Holly actually mixing plaster live and in person, just for you: |
|
D
danlovestikis
Posted
posted
on
Sat, Feb 25, 2012 9:12 AM
It would have to be a clone of Dan because I'd never give him up. We are headed to our 34 wedding anniversary in May. I was told to mix in the piaster until it sticks to your hand like buttermilk. That has worked every time for me. Remember that the plaster sets up fast. So as soon as it gets to this stage be ready to pour. Don't take long to mix in the plaster either. It's all as fast as you can go. You can't really stop to take photos during this time unless you have a helper to do it. Finger crossed for you, Wendy |
|
TT
Tiki Tonie
Posted
posted
on
Sat, Feb 25, 2012 9:13 AM
That was great! So many things to know. Thank you for the math too! You have been super helpful. Ok, here I go, Wish me luck! |
|
P

poptiki
Posted
posted
on
Sun, Feb 26, 2012 3:31 AM
M [ Edited by poptiki on 2022-10-12 03:13:30 ] |
|
TT
Tiki Tonie
Posted
posted
on
Mon, Feb 27, 2012 1:38 AM
Thanks Poptiki! |
|
D
danlovestikis
Posted
posted
on
Mon, Feb 27, 2012 3:13 AM
Tiki Tonie, Those are really nice images and I enjoyed reading your comments. You are doing a great job. It would be nice to keep everything that you do on one thread. Each time I add photos to mine I go back to page one. I go to the bottom of my first post and choose edit. I then update my title to what I'm currently posting with the days date. That way no one has to look for old posts that get lost when no one looks at them. I'm looking forward to your next one. Wendy [ Edited by: danlovestikis 2012-02-27 03:39 ] |
|
TT
Tiki Tonie
Posted
posted
on
Mon, Feb 27, 2012 7:34 AM
Thanks Wendy! I'll be sure to do that. I'll hopefully be posting more tonight :o) |
|
K
KokoKele
Posted
posted
on
Mon, Feb 27, 2012 9:36 AM
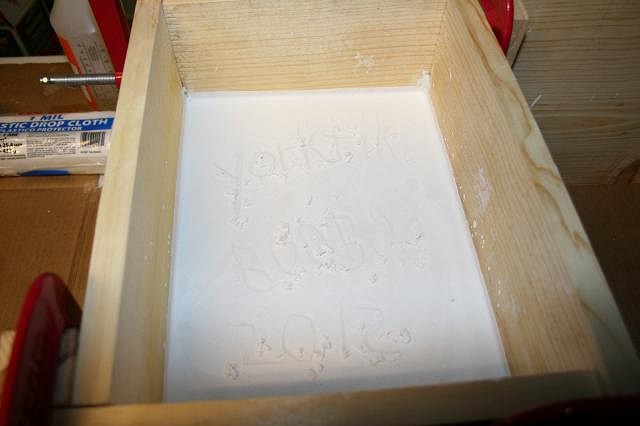
Very nice! Thanks for the photos, and thanks for sharing your "learning opportunities" (you call them "mistakes") with us. You may end up inspiring many more people to take up the fine craft of tiki-mug-making! Great work! |
|
TT
Tiki Tonie
Posted
posted
on
Mon, Feb 27, 2012 10:02 AM
Thank you KoKoKele! I absolutely positively could not have done it without you and Wendy and all the kind Tiki people on Tiki Central. Getting ready to start the next section! |
|
K
KokoKele
Posted
posted
on
Mon, Feb 27, 2012 6:32 PM
Our pleasure, I'm sure. Wendy is a rock star, so it's great that she's watching your progress and giving you tips. Keep it up, and thanks again for posting pics of your first experience. You are teaching at the same time you're learning, and that's awesome! |
|
TT
Tiki Tonie
Posted
posted
on
Mon, Feb 27, 2012 11:19 PM
Thank you KoKoKele. It's very comforting knowing you two are following along coaching me through it. It really tones down the scare factor. I greatly appreciate the feedback and tips. By the way, how should I have make the side sections? |
|
K
KokoKele
Posted
posted
on
Tue, Feb 28, 2012 8:21 AM
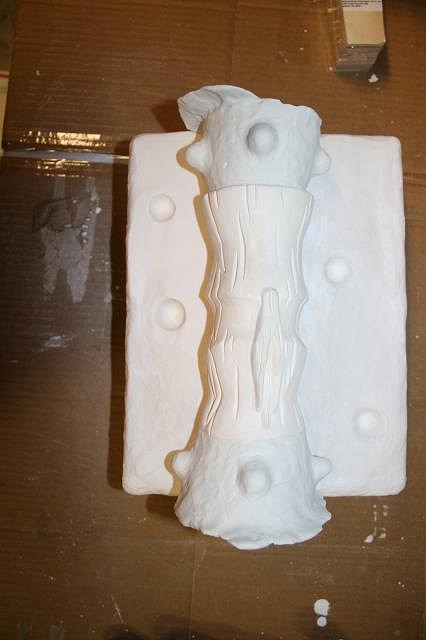
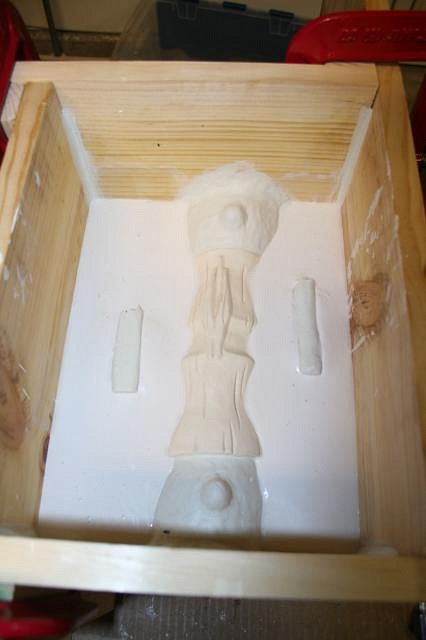
Regarding your undercut, I think you could have brought your clay about half-way up on that little bump before you poured your plaster the first time and you would have been okay and ended up with a four-piece - or maybe three piece? - mold. I might have placed the graining effect slightly higher on the bump to keep from creating a lock also, but not to worry. Don't forget that you can make keys after the plaster cures by digging into it with a melon scoop or some other tool, but your solution of putting keys in your wet plaster should work fine. You'll probably want to tool them a bit before your next pour. I think you're on the right track. After all, a mold is just a thing to hold your slip in place. You'll have some seam lines to clean up, but that's par for the course. Wendy will probably give you much better advice on this one. I've only done a few of these and she's done bunches, so this is all second nature to her. Keep it up! |
|
D
danlovestikis
Posted
posted
on
Wed, Feb 29, 2012 7:42 AM
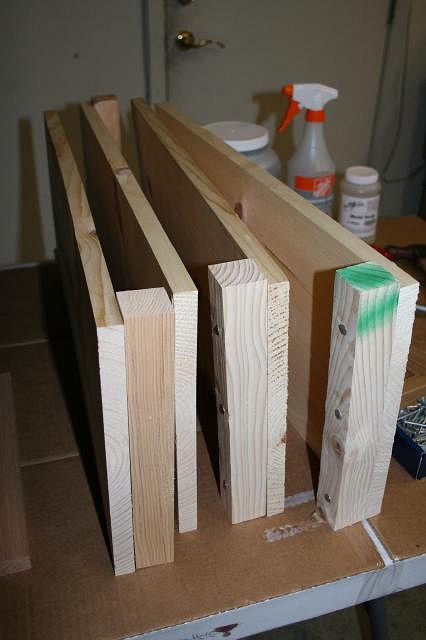
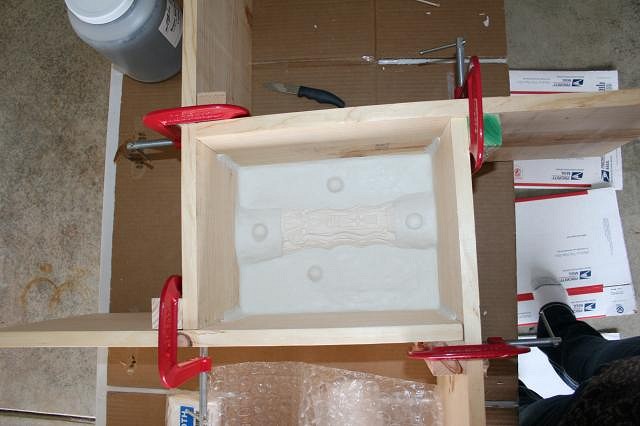
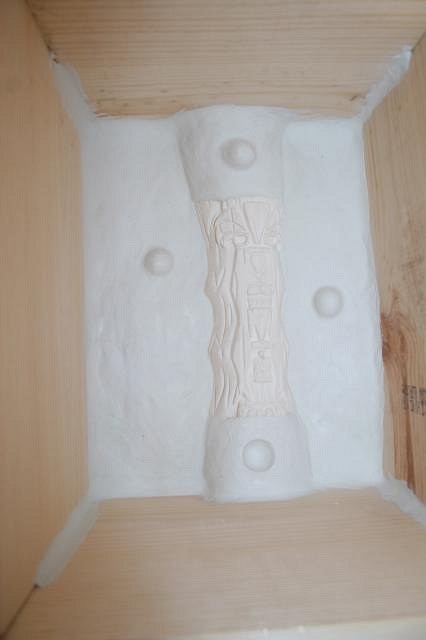
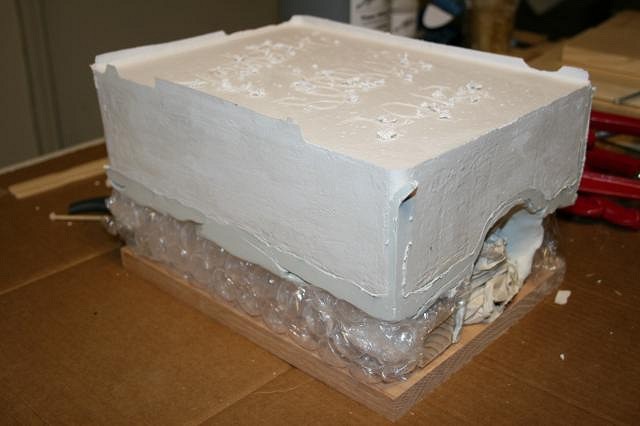
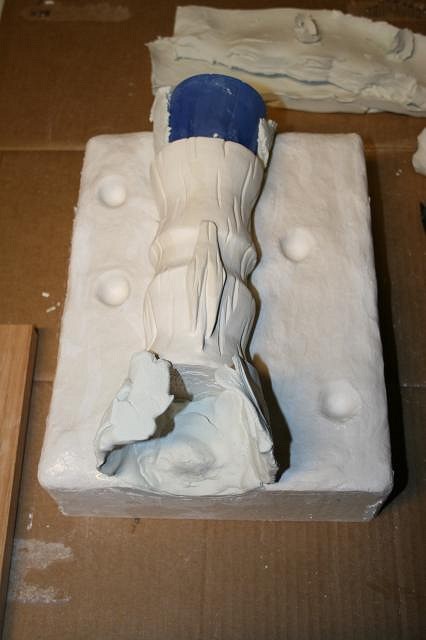
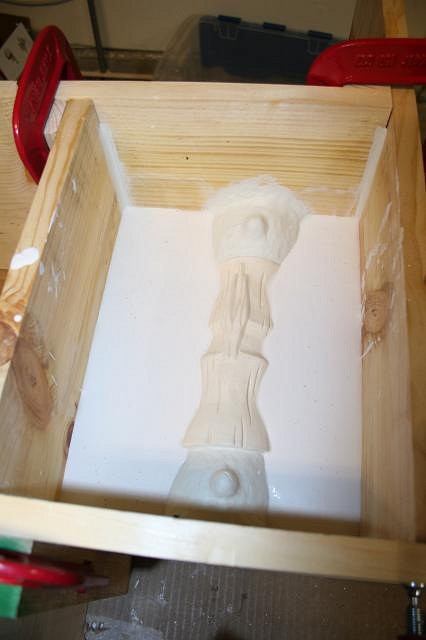
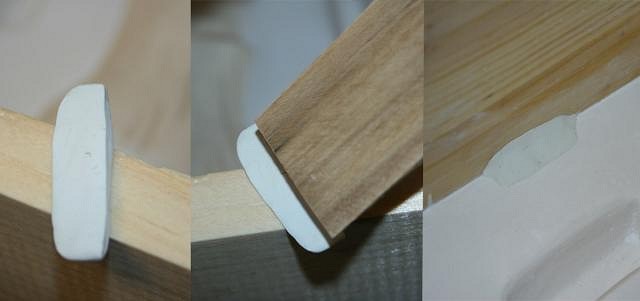
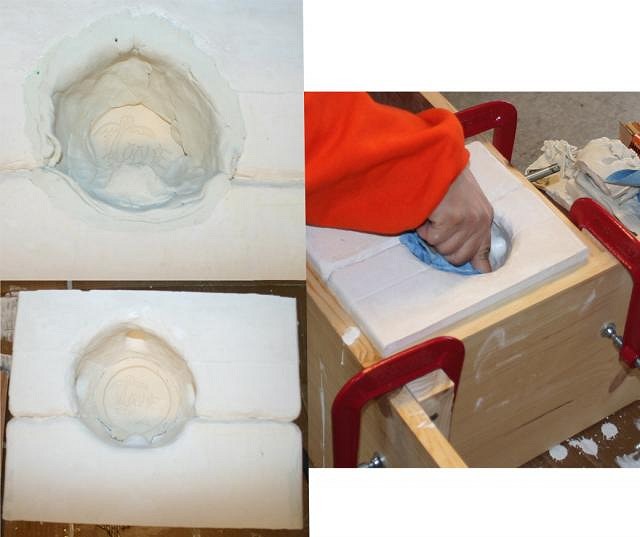
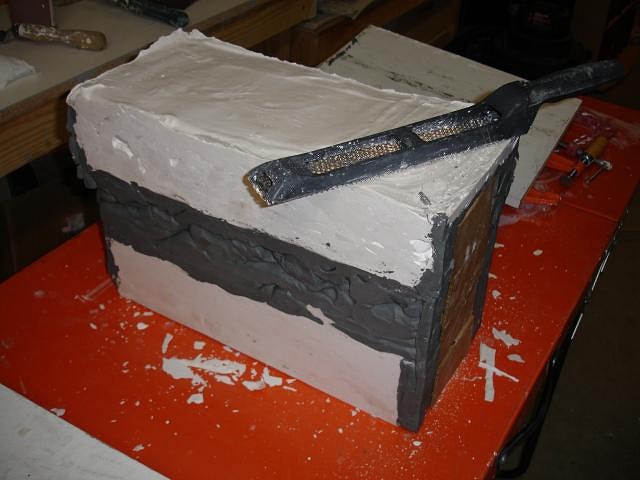
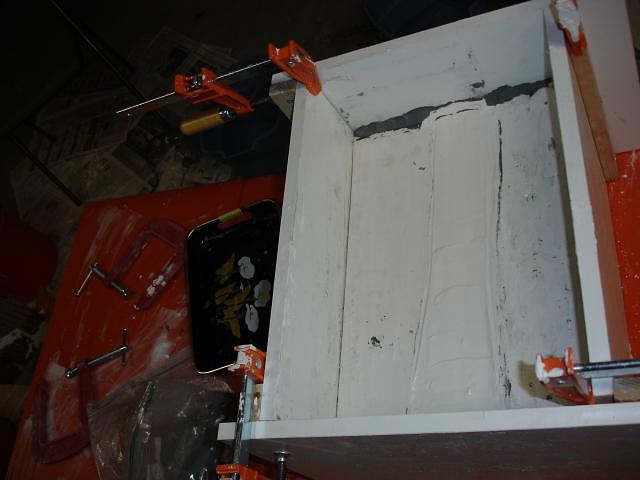
Hi Tiki Tonie, I have two things to show you about making the molds. First the easiest way to make a four piece mold is to make the top, flip it and make the bottom. Next turn it on its side and use a lot of mold soap and pore that side, then flip it and pour the other. See photo as I pull the clay out of one of the sides.
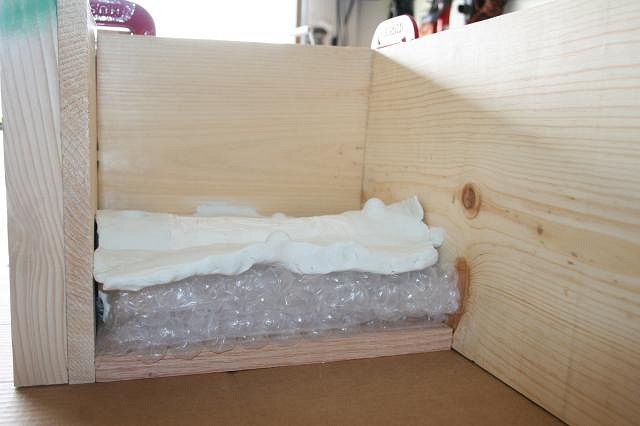
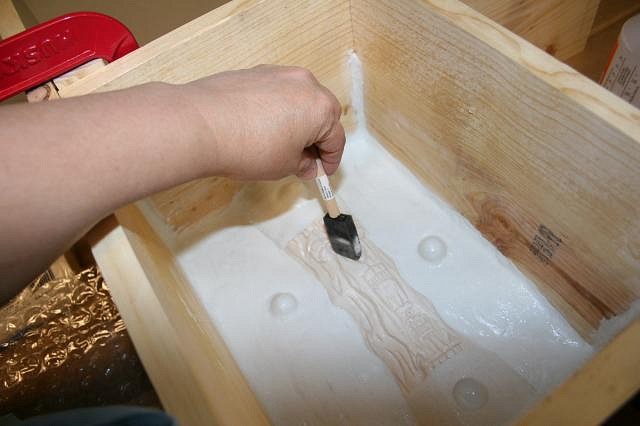
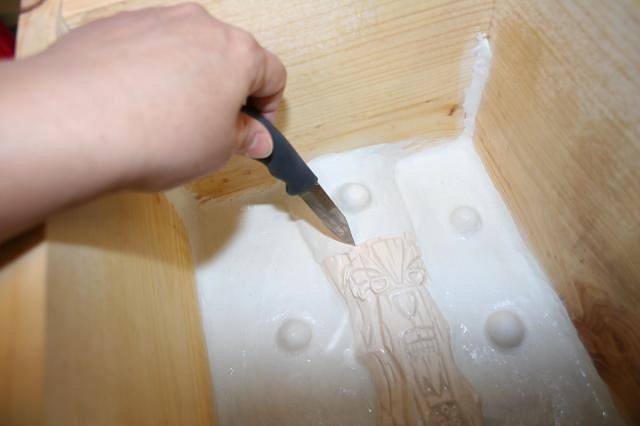
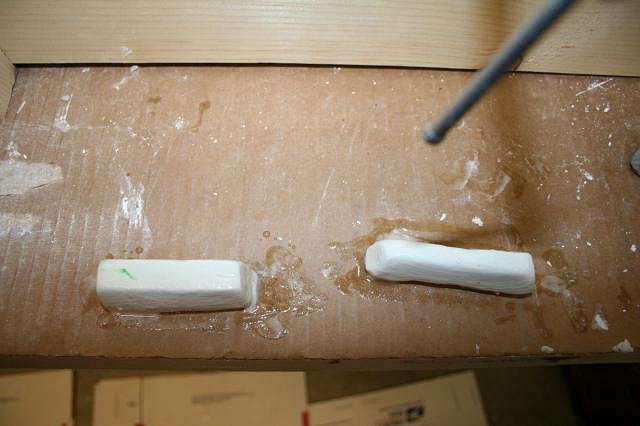
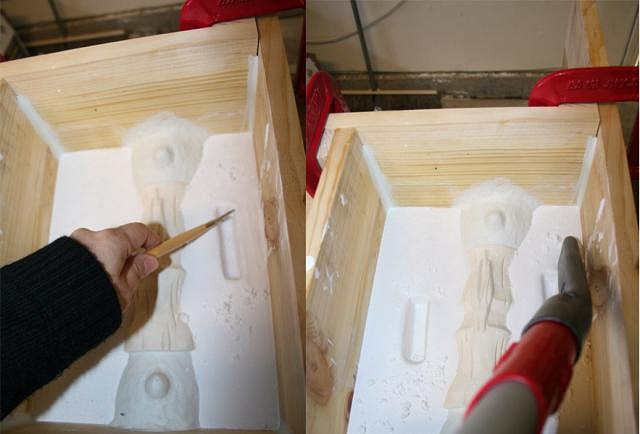
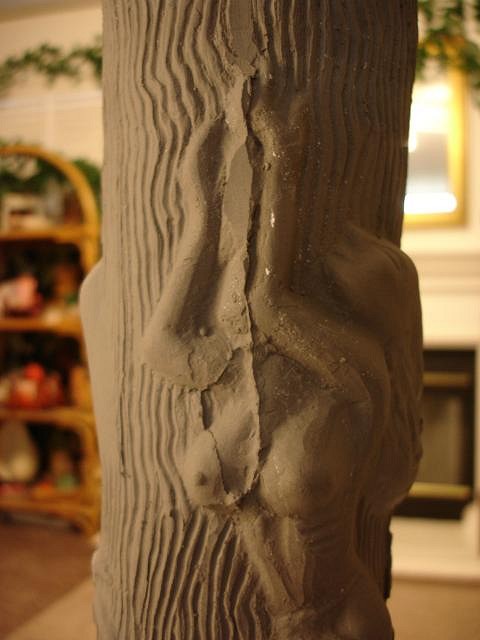
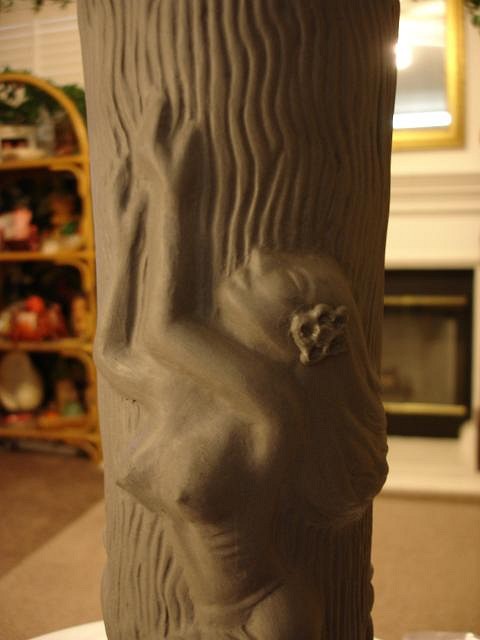
Next Sometimes you just can't get a mold right and you have to keep the plaster out of an undercut by filling it with clay. then after you pour you just re-sculpt the area.
Once out of the mold you can add clay too. Once you pour a mug you may see a hole from an air bubble. Make that hole larger until you see it all then fill it with clay. You can't fill a tiny hole with glaze it will always show. Your are doing a wonderful job and I love your photos, Wendy |
|
TT
Tiki Tonie
Posted
posted
on
Wed, Feb 29, 2012 8:42 AM
I sure wish I was a little more patient and waited for your tutorial. I opened my mold last night and a little piece broke off, that section that I said was going to give me trouble. I was hoping that I could just let it fill in with slip and re-sculpt it after, so that's good to hear that you can. When you say, add clay to the slipped piece, is that the regular clay (out of the bag)? |
|
D
danlovestikis
Posted
posted
on
Wed, Feb 29, 2012 8:49 AM
Hi Tiki Tonie, regular bag clay workes but it is better if it has more water content. So I put clay in a bag and then I pour in some slip and mush it up a bit. I keep it on hand all the time. It's possible to fix any project if you take the time. Wendy I just thought of one more tip. Let your mold completely dry out before you pour a mug. This will cure your plaster so that the mold will last longer. I use a high grade mold plaster that is $36 per bag. I hope your choice will work well for you. [ Edited by: danlovestikis 2012-02-29 12:51 ] |
|
K
KokoKele
Posted
posted
on
Wed, Feb 29, 2012 2:54 PM
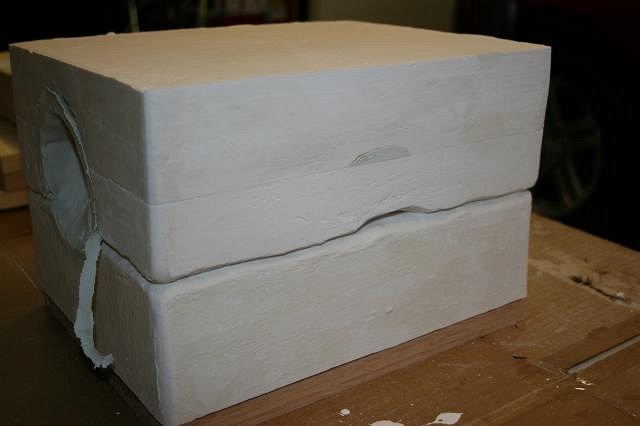
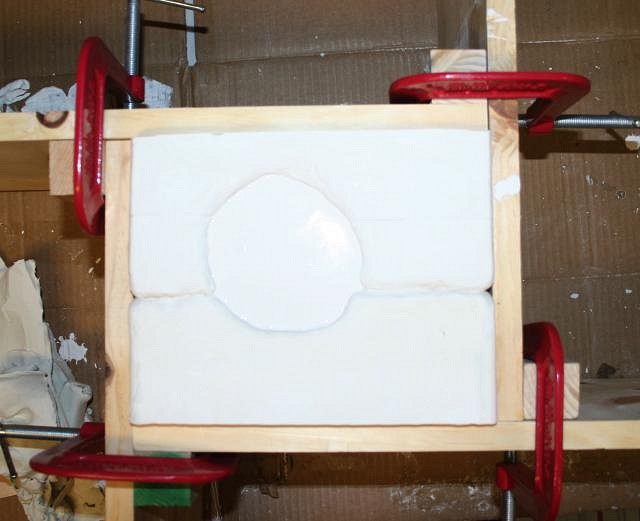
Yaaaay! Your first try and you got a winner! Way to go! Can't wait to see your first mug! P.S.: You are now better at this than I am, so when I want to pour my next mold I'll be asking you for advice! [ Edited by: KokoKele 2012-02-29 14:56 ] |
|
D
danlovestikis
Posted
posted
on
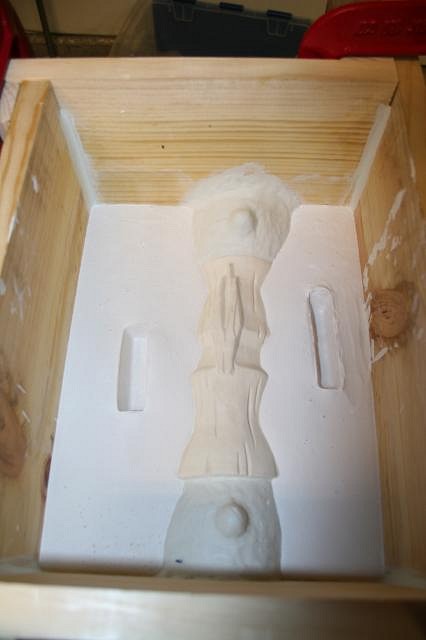
Wed, Feb 29, 2012 3:27 PM
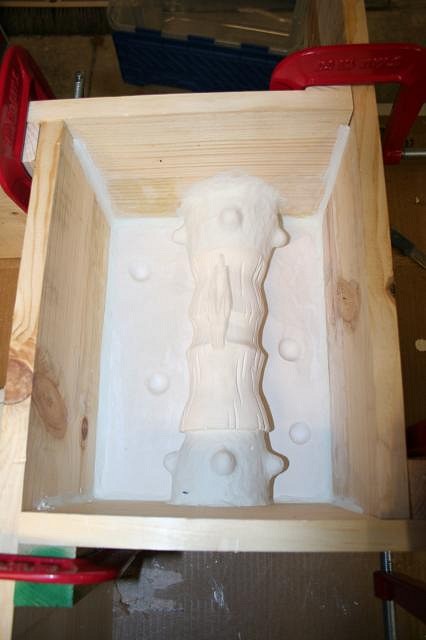
Your mold looks really clean. Excellent. It takes 3 to 4 days in hot weather to dry out a mold. 4 to 7 in cold weather. If you put a high speed fan on it 24 hours a day (I do that) it will dry much faster. The first time you pour have some clay ready to block leaks. Even perfect molds can leak. Or you can pour in some slip and then lay your mold on its side and turn it 360 degrees (roll it to each side). That will plug it also. Go slow to prevent air bubbles. I would just try it once to see if it does leak. Put the belts on as tight as you can do them. Best wishes, Wendy |
|
TT
Tiki Tonie
Posted
posted
on
Wed, Feb 29, 2012 3:58 PM
Wendy - I used the same plaster so I'm super happy to hear it's a good brand. I live in Northern Cal, it's been so dry all winter, but the second I opened my mold of course a storm rolls in. Guess I better not complain about the rain because we need it, but looks like I better wait 7 days (how about 5 days) to pour my first mug. That gives me time to make the other two molds anyway. Thanks again for your tips. I ordered 10 lbs of clay that should be here today so I'll be set to plug any leaks. If you think of anything else I need to know, by all means sock it to me! KokoKele - You're hilarious!!! |
|
K
KokoKele
Posted
posted
on
Fri, Mar 9, 2012 1:07 PM
Something tells me we're only a few days away from seeing that first mug . . . |
|
D
danlovestikis
Posted
posted
on
Tue, Mar 13, 2012 8:00 AM
Have you poured? We are on pins and needles waiting. Wendy |
|
L
LoriLovesTiki
Posted
posted
on
Wed, Mar 14, 2012 8:43 AM
I can't wait for an update either!!!! |


Pages: 1 32 replies