Tiki Central / Tiki Carving
Burning Help Needed
Pages: 1 21 replies
|
HT

Hale Tiki
Posted
posted
on
Wed, Oct 3, 2012 9:50 AM
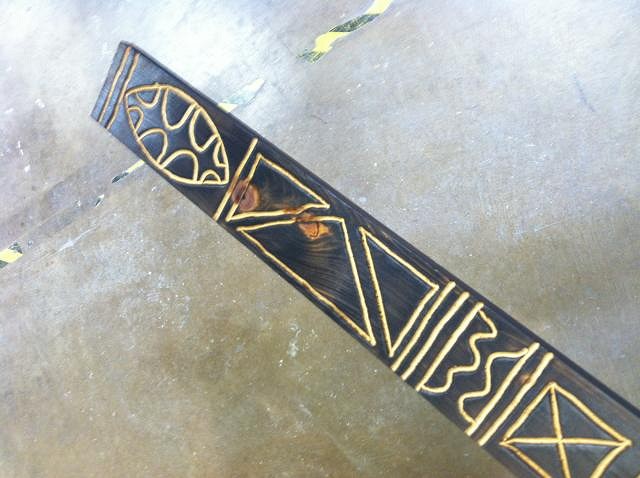
So, I've begun construction on The Aku Aku Room, officially. I've started with the trim. Some of you may see where I got my inspiration from. And by inspiration, I mean an exact copy. Great artists steal, right? Anyway, it's my first attempt at routing trim. It's been a long time, and as The Aku Aku room progresses, I'll venture off into my own designs, but for now, I've decided to pay homeage to Bosko by turning his 8' pole pattern into 4" trim around the top of the room. There's a seam at 8ft, and I need something good to cover it up. Now to my question. This is the first time I've done any burning, and it's not coming out properly. That is to say, the routed parts are still white. Am I just not burning things long enough? I'm being gentle with it, and just getting it to a nice patina, as you can see in the photos. I've got some small areas that I let burn longer that started to catch, and immediately blew out. I'm hoping Ben or some of you other experts out there will lend some advice. Oh, and since Redwood is damn near impossible to get locally, it's pine. Mahalo.
|
|
ATP

Atomic Tiki Punk
Posted
posted
on
Wed, Oct 3, 2012 10:33 AM
What kind of torch are you using, the wood is untreated right & you have not applied I use a hand torch, I get them at my local Ace or Home Depot for under $20 You are doing multiple passes of burning, then a light scrapping to get the right look? |
|
WC

Will carve
Posted
posted
on
Wed, Oct 3, 2012 10:35 AM
You could try a polyurethane coat. |
|
HT
Hale Tiki
Posted
posted
on
Wed, Oct 3, 2012 10:42 AM
Thanks Will, going for burnt though. ATP: Mapp Gas. Hand torch. Stainless steel brush. Should I be brushing immediately after burning? |
|
A

AlohaStation
Posted
posted
on
Wed, Oct 3, 2012 10:49 AM
Experiment on a scrap piece of wood first. Do you want it burnt for the smell? or for the texture? Paint and stain can be use in combination with the flame. If done right you should not be able to tell the difference. I suggest stain/painting first and then burn and brush. |
|
HT
Hale Tiki
Posted
posted
on
Wed, Oct 3, 2012 10:53 AM
Texture/color. I've never stained then burned. Hmmmmm. |
|
ATP
Atomic Tiki Punk
Posted
posted
on
Wed, Oct 3, 2012 11:27 AM
Paint/Stain first then burn, VERY BAD IDEA! unless you want a flaming mess. If you want a "Bosko" finish, you apply a burn coat, then scrape the ash with a wire brush |
|
L

Lukeulele
Posted
posted
on
Wed, Oct 3, 2012 12:15 PM
If the pine is still "green," that may be why you are having trouble as well. |
|
HT
Hale Tiki
Posted
posted
on
Thu, Oct 4, 2012 3:54 AM
Next step is a smaller torch and more burning... |
|
ATP
Atomic Tiki Punk
Posted
posted
on
Thu, Oct 4, 2012 7:24 AM
Sorry I forgot to answer your last question, yes you can scrape the wood right after burning, the more times you |
|
HT
Hale Tiki
Posted
posted
on
Thu, Oct 4, 2012 7:38 AM
Hot damn! Thanks ATP! |
|
HT
Hale Tiki
Posted
posted
on
Thu, Oct 11, 2012 6:18 PM
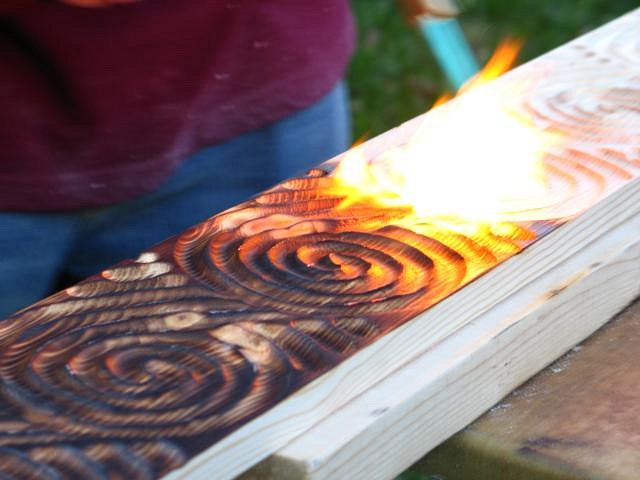
Well. Here are the results. Thanks for your help. I think I've found my groove. Here's the first one. I burned too many times, too gently, and didn't carve deep enough:
Here's the second ones, being laid out:
Here's me getting ready to have at it, while wearing my best mustache and Ed Roth Helmet:
Carved:
First burn. Can't be afraid to have at it. And stop if it catches fire. Blow it out. Continue.
After the first burn. Make sure the wood cracks.
Brushed very hard, sideways with the brush, with the grain.
Second burn. After vacuuming. Lost some detail on the thin spots, no biggie.
Final product, brushed gently, vacuumed. Waiting to have a finish applied. I'm not sure if I'm going to spray, or varnish, or what.
Thanks again for your help ATP. More photos to follow. |
|
ATP
Atomic Tiki Punk
Posted
posted
on
Thu, Oct 11, 2012 6:57 PM
Looks like you are getting the hang of it & you are welcome! Note:if you want to keep more detail don't burn so deep |
|
P

pjc5150
Posted
posted
on
Thu, Oct 11, 2012 7:15 PM
I have some matches.... |
|
TT

Trailerpark Tiki
Posted
posted
on
Thu, Oct 11, 2012 8:19 PM
Very interesting... I think I'll go burn one. |
|
S

Swanky
Posted
posted
on
Fri, Oct 12, 2012 9:49 AM
First issue is the routed lines are very small and the torch won't want to burn in there. You will have to burn at an angle, right on the lines to even hope to get it going. Going with the wider lines and a rounded bit helped you out on your next attempt. Second, After you torch, take a tire brush with semi-soft bristles and work the char into your lines. That is your best chance to get some color in there. Brush it all off, but you also work it in and polish at the same time. Third, take a rag and wipe it down to get an even smoother look and cleaning/polish it. Forth, in your second attempt, you over torched it. You really just want to barely blacken the surface, not catch it on fire and burn it away. Use it like a spray painter, turning it brown. Fifth, you'll also notice on your first piece the knots in the wood screwed up your lines and that sap in the knots burns like crazy. Cherry pick your wood stock to have no knots in the carving surface.
[ Edited by: Swanky 2012-10-12 09:57 ] |
|
B

Benzart
Posted
posted
on
Fri, Nov 16, 2012 5:52 PM
Use a small soldering iron unless you can find a wood burning kit at a hobby store! |
|
UI

Unkl Ian
Posted
posted
on
Fri, Nov 23, 2012 9:00 AM
Different species burn at different rates. |
|
HT
Hale Tiki
Posted
posted
on
Tue, Nov 27, 2012 12:10 PM
I should be doing more next week, with more patterns. We'll see how those go! |
|
B
Benzart
Posted
posted
on
Sun, Dec 30, 2012 8:01 PM
Try some Burning sticks! start your charcoal grill and on top of the coals stick in some hard wood sticks same diameter as your grooves and don't worry about rounding them off yet. When the sticks are red hot pull'em out a bi and start with one stick just rubbing it in the groove until the groove looks burned enough or until the fire goes out of the stick, then back in the grill and re heat it and take another one to use till it cools down,,, you get the idea The system has much better control and a nice consistent color can be had using a fine wire brush preferably brass or stainless. Might take a few grooves to get the hang of it but the fire sticks will do the best in the end |
|
T

TheBigT
Posted
posted
on
Thu, Jan 3, 2013 7:38 PM
Neato! Never would have thought of this method! |
|
HT
Hale Tiki
Posted
posted
on
Thu, Jan 3, 2013 8:40 PM
Well Benzart, looks like I've got a another method to try! |


Pages: 1 21 replies