Tiki Central / Other Crafts
New Journey into Tiki Mug
Pages: 1 16 replies
|
2

2n
Posted
posted
on
Sat, Jan 16, 2016 9:13 PM
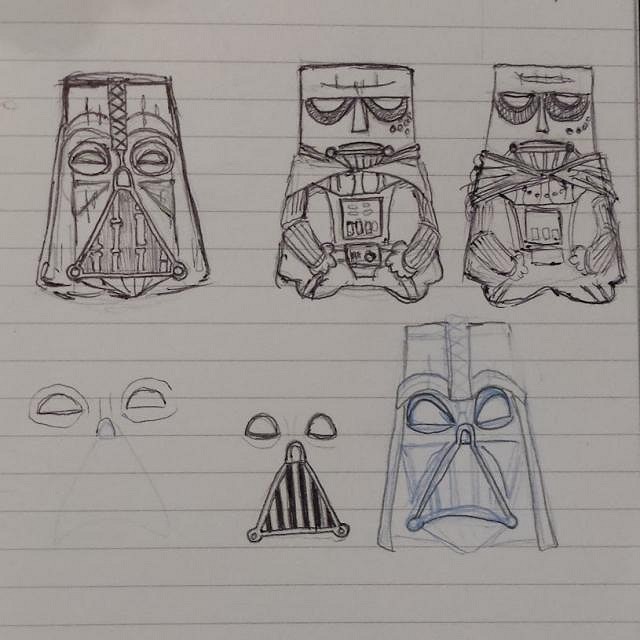
Hello all!, This is my first time posting, but I've been visiting the site for a while for all the great tutorials and tips. A few month back, a buddy of mine had asked me to make him Tiki mug. Finally getting some free time during the holidays, I was able to spend some time working on it. It was also around the time of the new Star Wars movie hype. Drawing inspiration from that, I decided to do a mashup of these two great themes. Here are some pictures from this fun little project. Sketch of the idea.
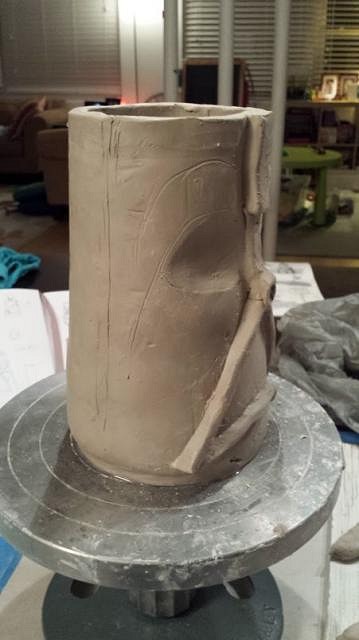
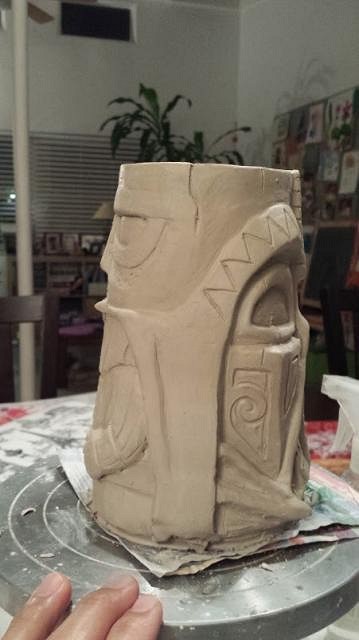
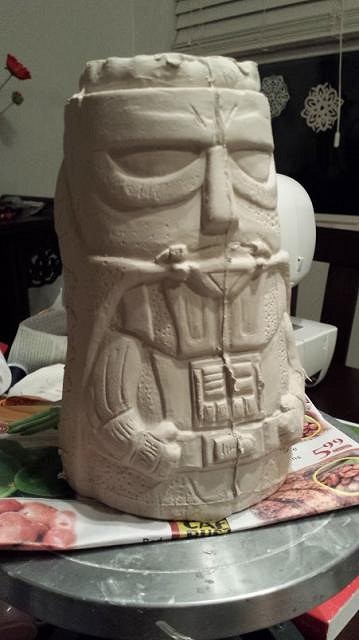
Started the sculpting process:
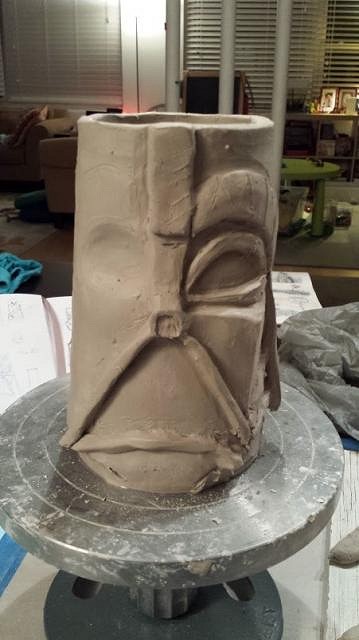
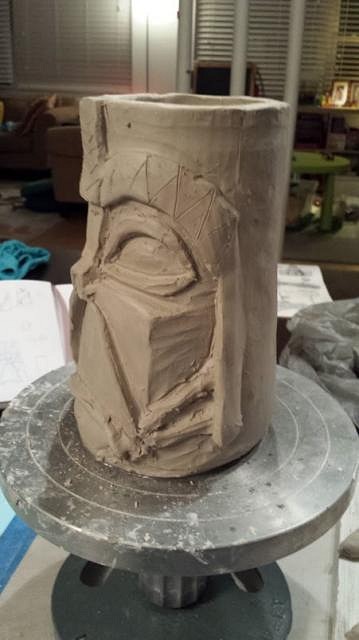
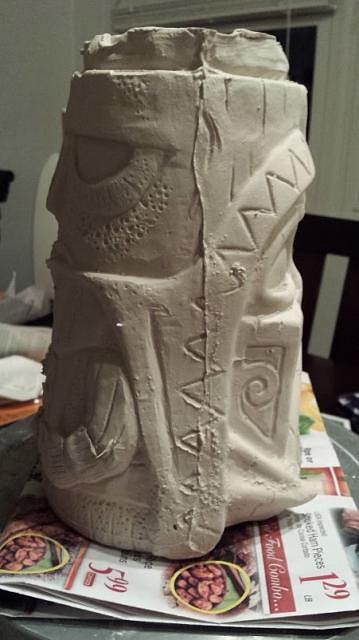
Almost finish: The designed evolved as I was working on it.
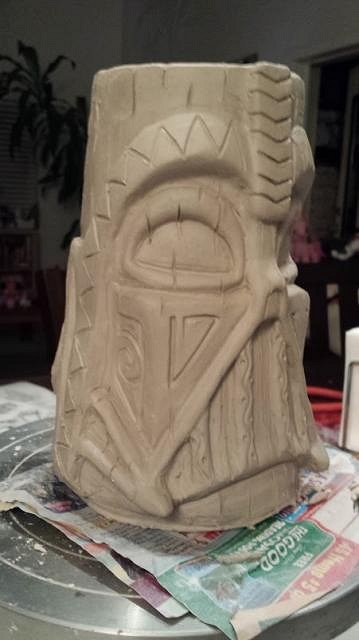
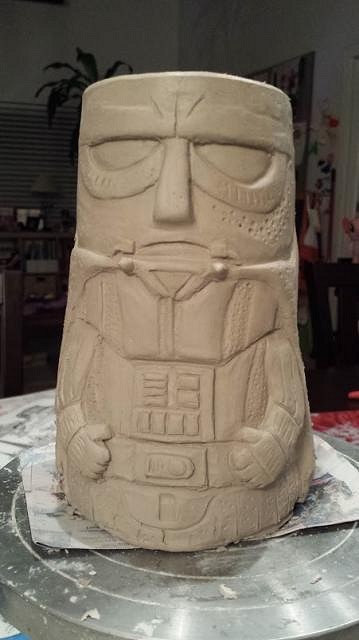
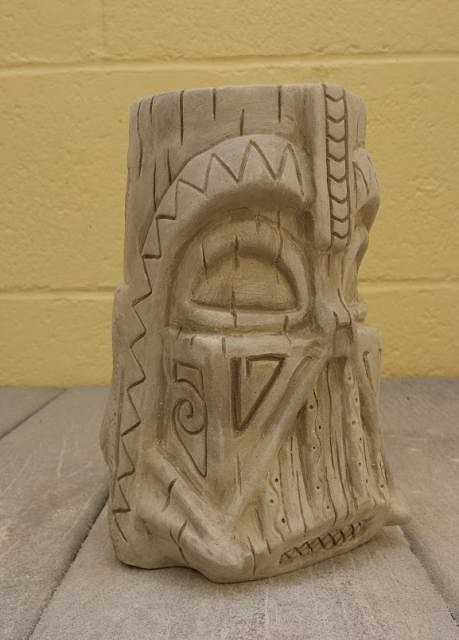
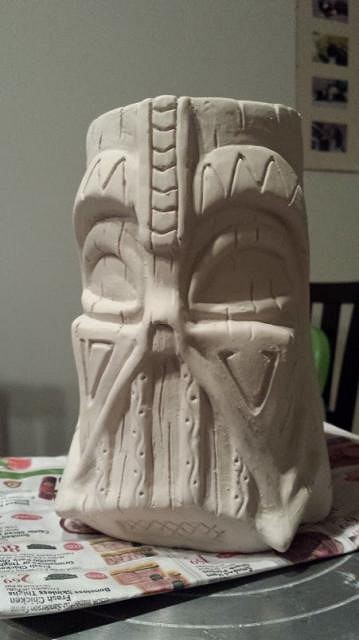
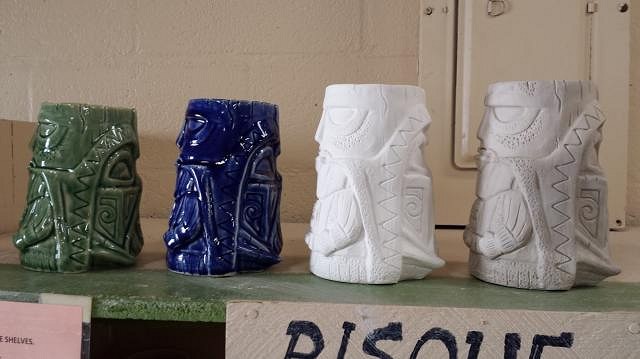
Finished piece: Greenware
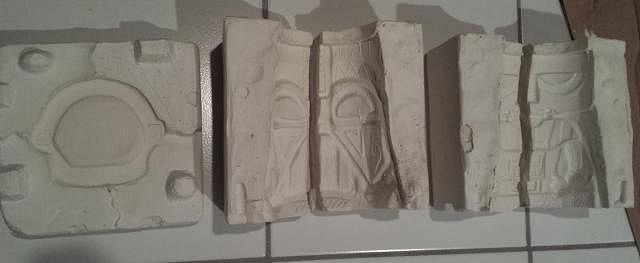
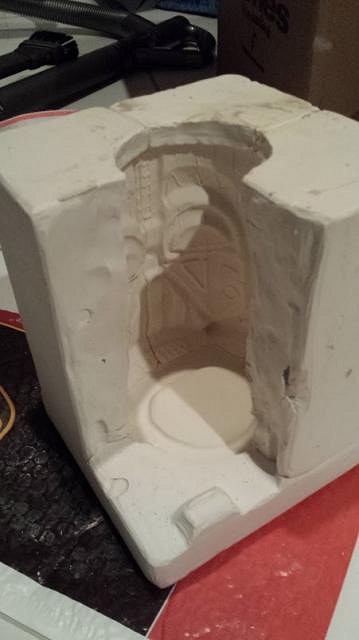
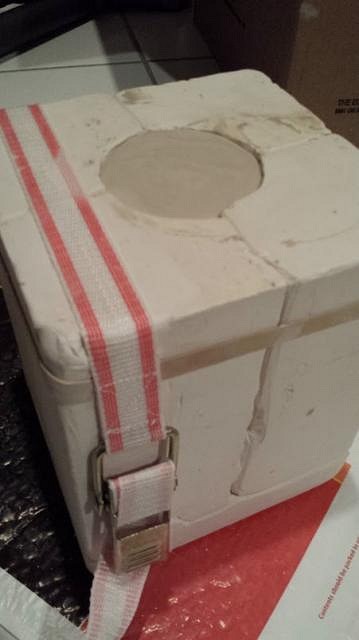
I've been doing ceramic for a few years now, so I'm pretty comfortable working with clay. However, I have never done mold making or slipcasting so that was a new experience for me. Thanks to Wendy Cevola, Bowanana and Babalu, and TikiTonie, and everyone else for the great tutorials! It took me a while to decide whether to mold the piece in greenware (dried clay) or bisque. I decided on molding the greenware so I have a higher chance of de-molding it from the plaster mold. I don't have any picture from the making of my mold, but I will say it was somewhat disastrous. Because of all the detailed on the mug and some of the undercuts I had, I decided to make a 5 piece mold. It was probably overly ambitious for my first time mold making. Even with the mistakes, I was luckily able to salvage the plaster mold I made. Finished Mold:
Next part, SlipCasting fun! Made some mistakes on the first two mugs. First one was too thin, and second one was too thick. Had to figure out the wait time.
Removed from the mold. Lots of seams on the piece.
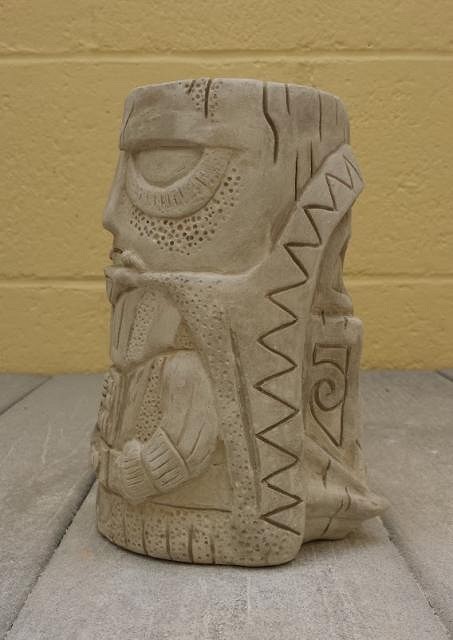
Vader with Hair!
Spend about an hour to clean up all the seams and fixed the details lost.
I think if I had plan the seams better on the mold, I would have less cleanup and fixes to do on the final piece. Overall it's been a great learning experience. I'm currently eagerly waiting for the final glazed piece to come out of the kiln. [ Edited by: 2n 2016-01-17 18:55 ] |
|
H

hang10tiki
Posted
posted
on
Sun, Jan 17, 2016 8:57 AM
Wow |
|
T

TikiAno
Posted
posted
on
Sun, Jan 17, 2016 8:00 PM
Wow- great sculpt and congrats on the mold making. I didn't realize people slipcast greenware (due to danger of breakage). I had a bad experience with my first (last?) mold-making attempt. Ha. Look forward to seeing this glazed! |
|
D

danlovestikis
Posted
posted
on
Mon, Jan 18, 2016 8:39 AM
I loved looking at all of your photos. You are a terrific sculptor and your cast wasn't any worse than most of mine. If you can clean up a mug in an hour you are doing really well. I've had mug runs where every mug took 2 or more hours to perfect. I like the design. It's a great mug and I look forward to watching your thread. Thank you for the shout out, Wendy |
|
H

hiltiki
Posted
posted
on
Mon, Jan 18, 2016 10:05 AM
Nice work, like how your design is different and new, keep us posted. |
|
2
2n
Posted
posted
on
Tue, Jan 19, 2016 2:41 PM
Thanks for the kind words. The reason I didn't mold with the bisque piece is because I was afraid I wouldn't be able to de-mold the plaster mold off around the Vader's mask's lower "jawline" area. With Greenware, I knew it would come off even if I had to damage the piece. And the piece did have some minor breakage after the de-mold, but it was small enough that I was able to fix it. I've decided to leave the original sculpt in Bisque form, in-case I ever want to make a mold of it again. What happened during the mold-making process was I used old clay (a little hard), instead of new, softer clay to divide the Mug into 4 sections in the wood cottle boards. Mistake #1. That left some unseen gaps in the clay and cottle board. Mistake #2, my first batch of plaster was a bit too watery. So when I pour the plaster into 1 of the 4 sections, it started leaking into the section next to it. The bottom of the cottle boards was also leaking. There was a moment of freaking out over plugging up the leaks and adding more plaster. I also had to quickly add more plaster powder to my mixture to thicken the plaster. That's seem to help. Once the plaster was dried, I removed the boards, and clean off all the disastrous plaster leaked pieces. Also had to fix up part of the sculpture. The other sections worked better once I learned to make a thicker plaster mixture. It was truly a terrible experience! :) I almost gave up on the whole thing. |
|
L

LoriLovesTiki
Posted
posted
on
Tue, Jan 19, 2016 5:00 PM
I'm amazed that that was your FIRST mug and mold making experience. I know you felt frustrated but I'm beyond impressed. You are very talented. |
|
2
2n
Posted
posted
on
Tue, Jan 19, 2016 8:08 PM
Thanks, I was definitely very relieve when I de-mold the plaster and everything was intact. I was pleasantly surprised at how much detail plaster molds can capture. Wendy: Thanks for the info on the cleanup time. I wasn't sure what to expect. I guess I thought most people make "perfect" mold that required very minimal cleanup time. :) It's good to know I wasn't exactly off. |
|
2
2n
Posted
posted
on
Tue, Jan 19, 2016 9:48 PM
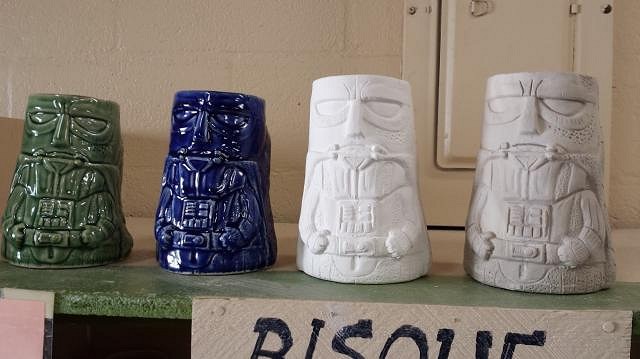
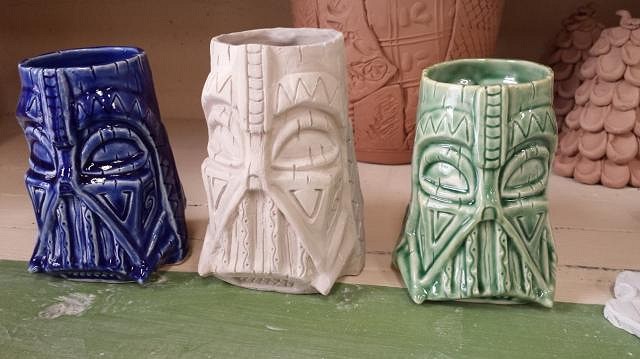
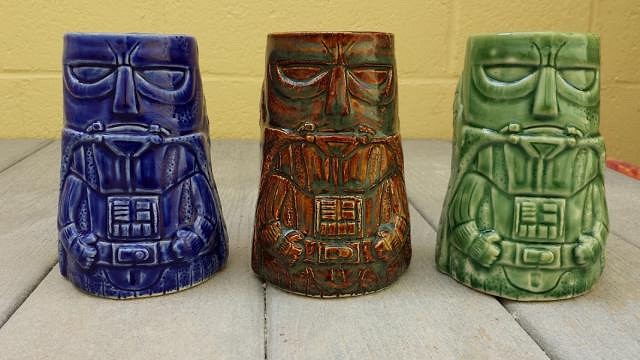
So here are the glazed test mugs that came out of the kiln. I'm lucky that there's local pottery studio in the city I live in. They do all the firing for me which makes it pretty convenient. On the left is a translucent green and blue glaze mug. Then there's the bisque and greenware. It shrank a little more than I thought it would. The green mug was the first slipcast piece I did. Being overly excited, I removed it from the mold too soon and it collapsed onto itself. I did my best to save it. It does look a bit deflate, and sad. :) Or as some would say, it's got character! It holds about 20 oz of rum!
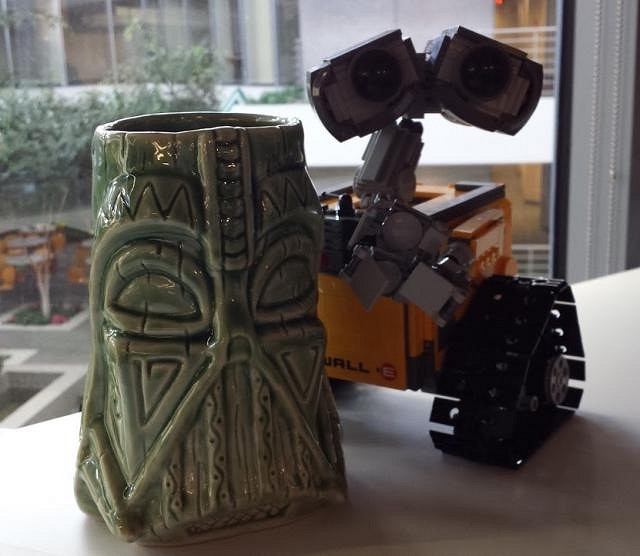
He went that way!
Hanging out with a friend at work.
Overall, they turned out pretty good. I think the green glaze accentuates the details more. The blue glaze is a bit dark and heavy. I might try spraying it next time instead of dipping. Get a thinner coat. I also try a brown glazed next to see how that looks. |
|
T
TikiAno
Posted
posted
on
Wed, Jan 20, 2016 10:50 PM
Congrats! I think all of the pieces look great, and look forward to seeing more of your work. Always interesting to see the side by sides re: shrinkage in bisque/ glaze firing. |
|
M

mikehooker
Posted
posted
on
Thu, Jan 21, 2016 10:20 AM
Do you plan to sell these? Friend of mine is a Star Wars fanatic and would love to get his hands on one. Mike. |
|
2
2n
Posted
posted
on
Fri, Jan 22, 2016 8:57 AM
I haven't thought much about it, but I have been getting inquires. Currently I've only been making them for friends. However, if you are seriously interested in one, PM me. Please know that it won't be a fast process since I only make them when I have time and it takes a day to make one. Jobs always get in the way of fun! |
|
D
danlovestikis
Posted
posted
on
Fri, Jan 22, 2016 10:12 AM
I am really enjoying your thread. The mugs look great. I have never used a translucent glaze so you showed me just how they look, thank you. Wendy |
|
2
2n
Posted
posted
on
Fri, Jan 22, 2016 7:46 PM
TikiAno: Thanks. I'm always surprised to see how much they shrink in the firings. Sometimes I forget to compensate and make my pottery piece bigger. Wendy: Really? I thought most of your Tiki pieces used translucent glazes? At least they look like translucent glazes to me. I thought if I used opaque glazes, it would cover up all the details. I was going to test out a few opaque glazes on my tiki mug, but with a light coat to see how they turn out. |
|
D
danlovestikis
Posted
posted
on
Fri, Jan 22, 2016 8:36 PM
I have one jar of black that says translucent and so I have avoided using it. All the glazes that look like yours with the detail highlighted are Duncan In glazes. They don't say translucent on them. I thought that translucent was used when the clay has spots that you want to show through the glaze. That was my guess. Wendy |
|
2
2n
Posted
posted
on
Wed, Jan 27, 2016 8:31 AM
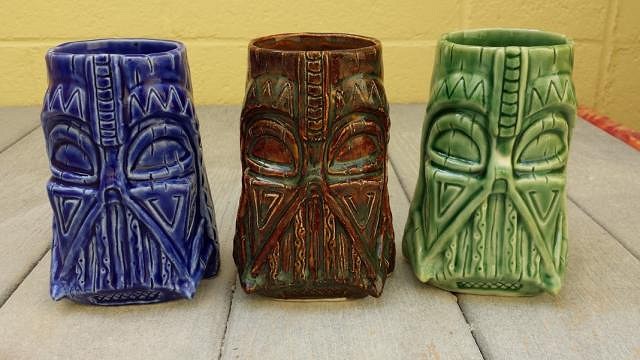
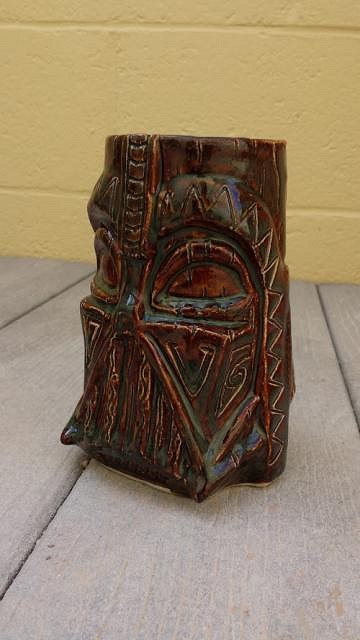
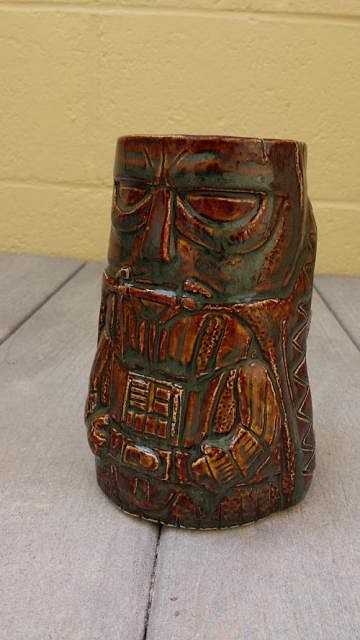
Here are pictures of some new fired pieces. I was finally able to try out the brown glaze. It came out darker than I would like and it pooled in some areas. I might have to try a thinner coat of it next time.
|
|
H
hang10tiki
Posted
posted
on
Wed, Jan 27, 2016 8:58 AM
Lookin good |


Pages: 1 16 replies