Pages: 1 2 3 4 5 6 276 replies
|
W

W8N2Surf
Posted
posted
on
Thu, Oct 25, 2018 2:44 PM
Although French Polynesia has much to it's appeal and history, many are not aware of the importance and cultural significance that belonged to the infamous Loma Kai Yacht Club. Founded in 1946, LKYC became the mecca for all those who traveled the South Pacific via sailing crafts, located strategically on a reef protected atoll. Local Polynesians adapted Western and European sailing innovations to their own designs, and pacific sailing was forever impacted, including many design features evident in today's I14 class. Races, regattas, trading, and of course great camaraderie around the famous LKYC bar made LKYC a South Pacific treasure. But then, as many of you know, tragedy struck in 1958 with the great Cyclone known as "Tuha Mou'a" (which I believe translated as "Spitting Mountain"). LKYC along with the atoll itself was completely devastated, as the overwhelming monsoon erased what so many had come to love. The tales and renown of Loma Kai were relegated to legend, spoken of fondly by those where were there. We are then, most understandably, thrilled to report that remnants, flotsam, and artifacts that have been unmistakably traced to the Loma Kai have just washed up on shore in a cove at Sunset Cliffs, in San Diego. My very own brother, know here at Tiki Central as "Commodore" (who I am sure will be chiming in here shortly), originally made the discovery just a few short months ago. Out of a sense of responsibility, duty really, Commodore has taken it upon himself to recreate a portion of the LKYC, which will now and forever be known as the The Loma Kai Sailing Club and Grotto. Stay tuned for something special, I will post pics of the re-build shortly, and I think you will agree Commodore (Terry) has done a masterful job at bringing back the LKSC&G, a true tiki home for the South Pacific Waterman (or Wahine). [ Edited by: W8N2Surf 2020-03-25 07:06 ] [ Edited by W8N2Surf on 2022-07-17 07:02:46 ] |
|
W
W8N2Surf
Posted
posted
on
Thu, Oct 25, 2018 3:30 PM
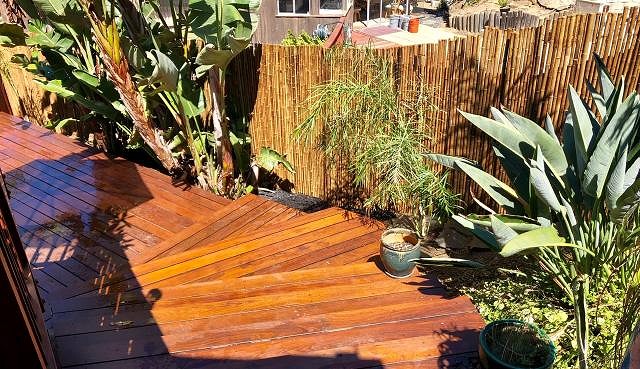
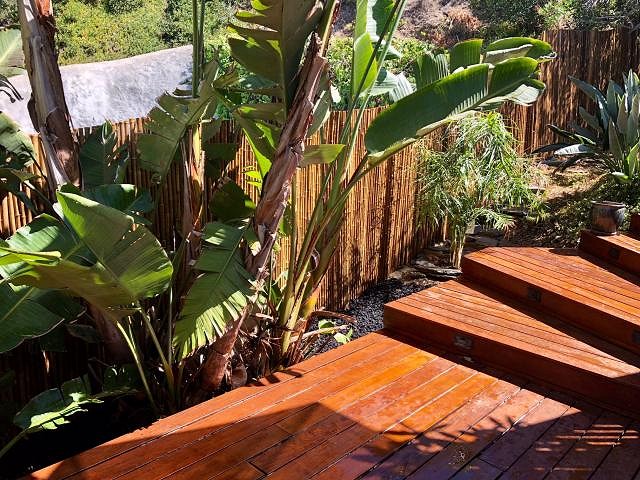
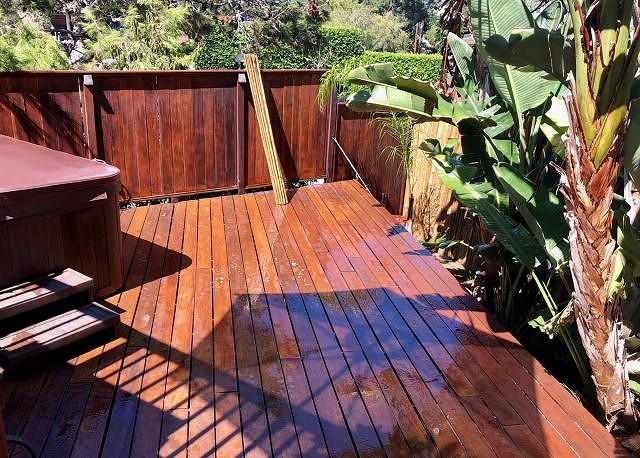
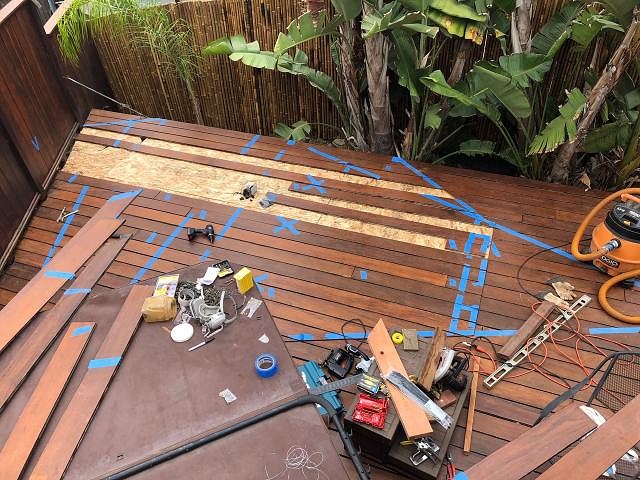
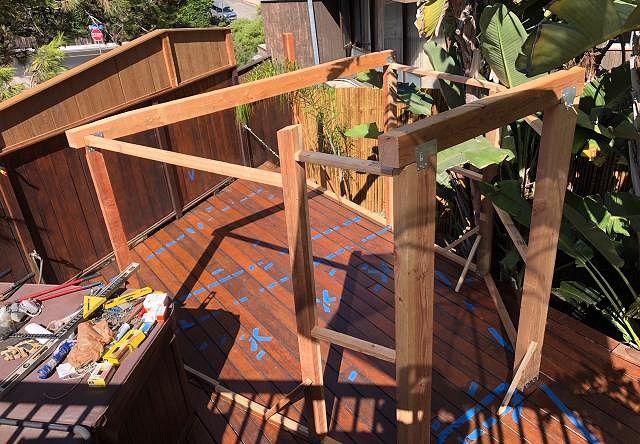
Okay, just by way of introduction, My name is Tim and I love this forum, although I don't post a whole lot but occasionallyI do. My brother Terry (Commodore) is the master mind behind this build, as well as the labor. So far, it's just him doing all the work. Terry has a 2 tier back deck made out of a rock solid Brazilian hard wood. The bottom tier has the jacuzzi on it, but the rest is open....room for the Loma Kai! The first thing he did is cover the regular fence with some bamboo screening. Here you can see the steps going down to the future platform for the Loma Kai. Already got some good tropical foilage goin' on!!
|
|
W
W8N2Surf
Posted
posted
on
Thu, Oct 25, 2018 3:36 PM
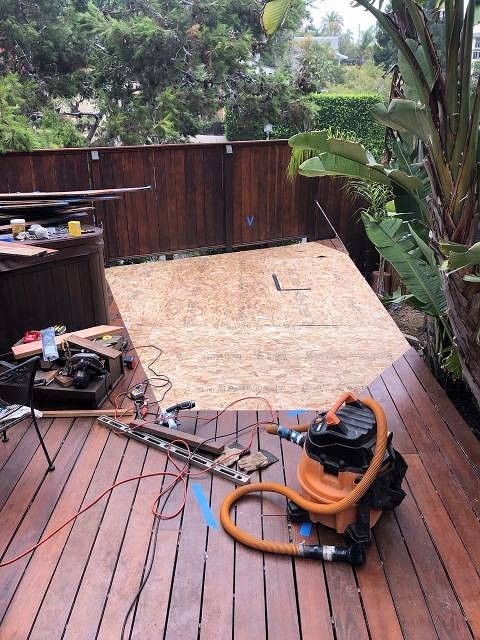
The next task was to reinforce the deck supports themselves. This deck could now support an African elephant. After that, Commodore cut out the floor area of the bar to install an underlayment which will make the room sealable, no bugs, maintain temperature.
He then laid the original decking back down, it's great wood so we want that as our floor for sure. Gaps will be filled, and the result will look like boat decking to some degree.
Note that we laid out the floor plan in tape. The 3 x's are bar stools, and the 2 lines on the right at the bottom of the triangle will be the front door. More to come, and Commodore himself should check in here shortly. [ Edited by: W8N2Surf 2018-10-26 06:55 ] |
|
S

Sandbartender
Posted
posted
on
Thu, Oct 25, 2018 3:57 PM
By "Brazilian Hardwood" do you mean Ipe (sometimes called "Ironwood", although there are several woods that wear that nickname)? If so, you've got an amazing start. I built my deck out of Ipe, - a bomb could hit the house dead center and that deck would be the last thing standing after the fire dept put out the inferno. It's hard as hell, and won't rot or get eaten by anything. [ Edited by: Sandbartender 2018-10-25 15:59 ] |
|
C

Commodore
Posted
posted
on
Thu, Oct 25, 2018 4:11 PM
Oh man, its on now! Yes SandBartender, that wood is Ipe' or Ironwood - so dense that a plank sinks if you put in water (I've tried)... but it has a great color and makes for a fantastic base. Really want the LKSC&G to be special place for family and friends and will be taking the time to do it right - hopefully you all enjoy the journey - its not big, but will have some very cool features to it for sure! Mahalo! |
|
S
Sandbartender
Posted
posted
on
Thu, Oct 25, 2018 7:01 PM
Awesome! It sure looked familiar. What are you using to cut/drill? I bought a tungsten carbide circular saw blade and ended up going through about $130 worth of hardened drill bits when I did my deck (which is quite large, about 420 sqft) Absolutely exhausting. I'll tip back something cool and refreshing tonight in your honor. :wink: |
|
W
W8N2Surf
Posted
posted
on
Fri, Oct 26, 2018 7:10 AM
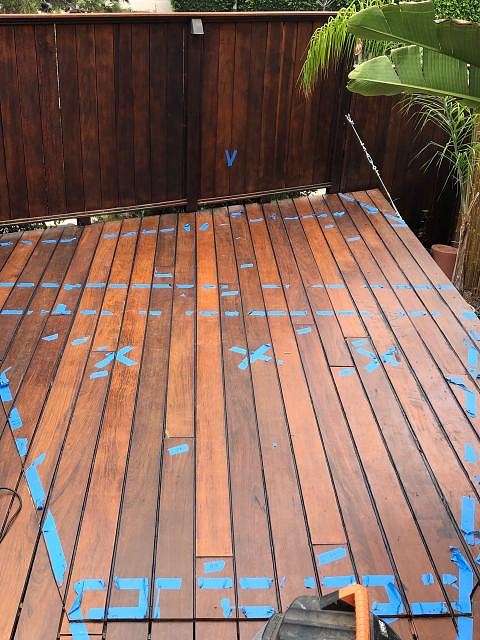
Okay, let's share some progress. Time to put some bones up.
With the floor decking relaid, here's the tape layout. Again, you can see the 3 barstools at the X's, sitting in front of the 2 lines that represent the bar. Back bar is near the fence, and at the bottom of the picture is the front door. There's the space!
Why the triangle in front of the front door? Hmmm, we shall see.
View from the top part of the deck. Great progress in a relatively short period of time. |
|
C
Commodore
Posted
posted
on
Fri, Oct 26, 2018 8:23 AM
@Sandbartender - We built the original deck in 2004 (when Ipe was 5X less than it is now!) and went through a ton of saw blades... even had some of them shatter - that wood is so wickedly solid. For our fasteners we found some that held the boards down along the sides and thus didn't have to drill through - which leaves a really clean look and for the bar will make it much more boat decking like. Cheers! |
|
PP

Prikli Pear
Posted
posted
on
Fri, Oct 26, 2018 8:28 AM
FANTASTIC start, Tim! You've already got the tropical foliage in place, which is something most people tackle once the construction is completed. And spa tubs are completely tiki-appropriate! I think I've sussed out your mystery triangle, but I'd never be so rude as to steal your thunder. :wink: Looking forward to watching this progress! |
|
W
W8N2Surf
Posted
posted
on
Fri, Oct 26, 2018 10:30 AM
Jayme I hope your are right in your prediction, it will be an "unusual" feature for a home bar build, to be sure! Soon to be revealed! Other plans: Terry is installing a cold water supply, so we will have a full wet bar here with an ice machine. The Commodore is indeed known for his craft level cocktails (his homemade orgeat is top notch) so a full functioning bar cannot be compromised on. Also considering a sliding door/entry on the side facing the jacuzzi, so the bar can have an open "party" feeling if we so desire. You could then also see into the bar from the top deck area, more of an inclusive feeling, yet, the doors can be shut for the classic cozy escapist tiki vibe that characterizes so many classic tiki establishments. All work to date is a one man show, and he is feeling it! |
|
C
Commodore
Posted
posted
on
Sat, Oct 27, 2018 6:48 AM
Good call W8N2Surf - full wet bar for sure - one of the many reasons for this bar is to store my burgeoning rum/rhum collection... (read: get it out of the house) and have a better place for all of those syrups and magic sauce ingredients that make tiki cocktails so good - so a complete workspace is a must and will likely plan to have all the rum separated by styles and countries - but that's still a ways off. We will do 2 lockable sliding doors will for sure go in on the starboard side of the bar - and as stated that will give direct access to the hot tub... err.... grotto... and will for sure look great from the upper deck and likewise will really open the bar up for larger events. Big bar build day today - need to make some progress! Mahalo! Commodore |
|
W
W8N2Surf
Posted
posted
on
Sat, Oct 27, 2018 11:09 AM
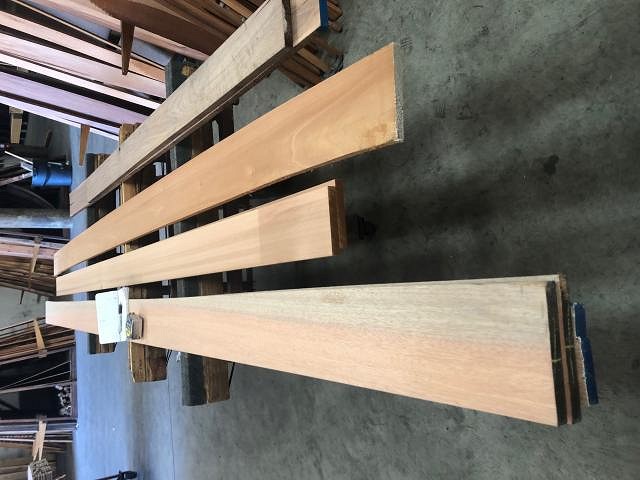
Update for today- we have procured wood for the major architectural feature of the Loma Kai. How about some Philippine Mahogony, walnut, and cedar (which will be stained). Let's see what Commodore can do with this.
As a side note, materials are not the only budget consumers here! A project like this will make one realize that we need new tools! [ Edited by: W8N2Surf 2018-10-27 11:11 ] [ Edited by: W8N2Surf 2018-10-27 11:12 ] |
|
W
W8N2Surf
Posted
posted
on
Sat, Oct 27, 2018 12:14 PM
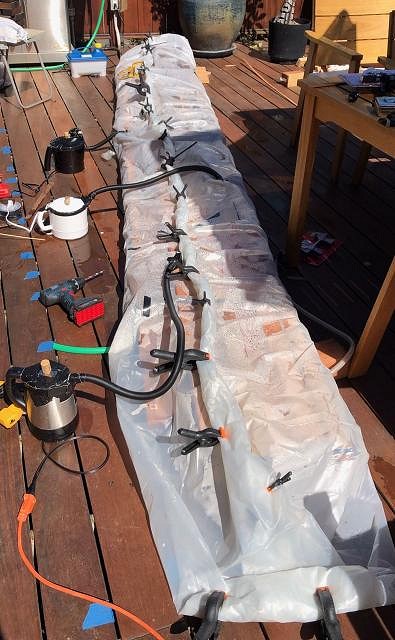
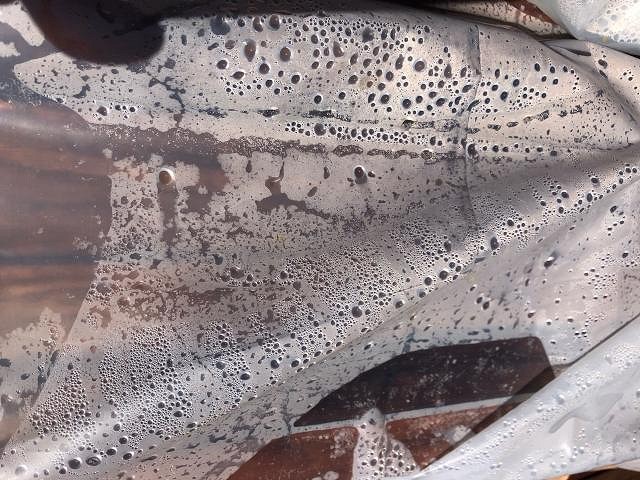
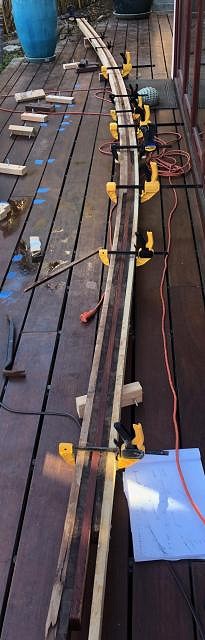
OKAY! It's around lunch time, so let's make a sandwich. Then, let's use some very expensive, cutting edge technology to apply some heat and steam.
Plastic sheeting, clamps, and electric steam pots. Will it work?
Gotta constantly monitor and make sure we are keeping the temperature up there! Holding at 190 degrees.
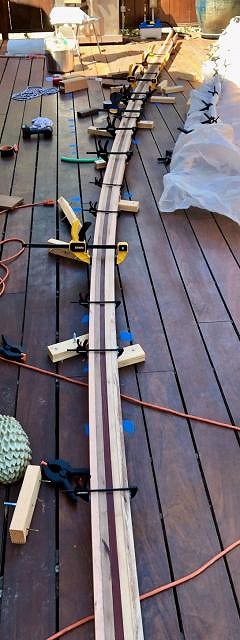
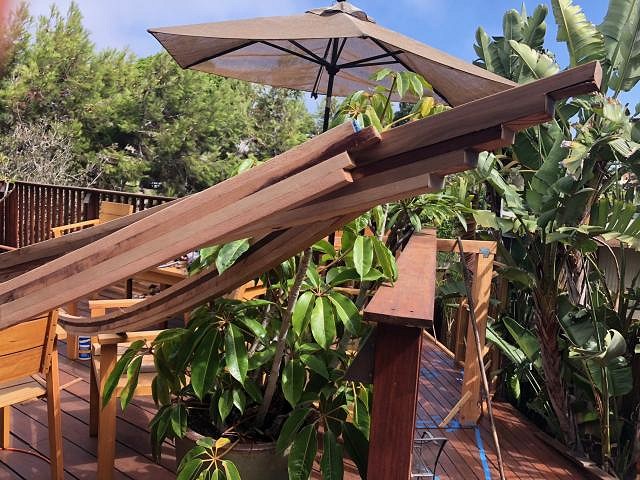
Steamy sweaty wood gets a little messy. Time for Commodore to apply some backyard engineering! Using the top deck as our big "workbench", he used clamps and blocks and shims to lay out the arc for this CRAZY AWESOME CENTER BEAM!
ALRIGHT!! Let's glue and clamp this bad boy up!!!!! See the clamped wood in the back right? Yeah, let's do it again 2 more times! |
|
C
Commodore
Posted
posted
on
Sun, Oct 28, 2018 5:43 AM
Some additional notes here - all the hardwood were then cut on the tablesaw to about 1 1/2 and 2" strips depending on which beam they would apply to. Heating the wood up took a number of tries to get right - I threw one home made contraption out and went to Rockler and got a proper steam producer made for such a thing (its in the top of the photo with the hot pots)... as awesome as that was I found it wasn't enough so went and bought three $15 hot pots and with some duct tape and hose we were able to produce quite a LOT of steam and heat. Its hard to steam up that many 14' long sections at once and so had to make sure all of the pieces were spaced out properly inside the bag. Ideally want the wood to get up to 212F for an hour for each inch of thickness on the wood. (The goal is to melt the sap or glue inside the wood - so when it bends and dries it will hold the bend shape - tricky for sure) The thermometer shows 195 or so - but thats as high as it went so I'm pretty sure I got the wood to 200+ and it became very pliable. Tricky setting the forms up, but it worked (finally) and after some mildly burnt fingers the end result as you'll see is awesome (IMHO). Mahalo! |
|
W
W8N2Surf
Posted
posted
on
Sun, Oct 28, 2018 7:15 AM
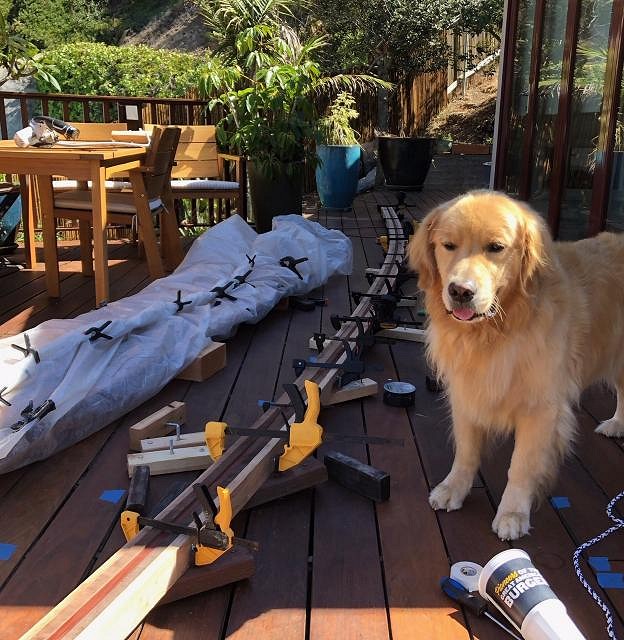
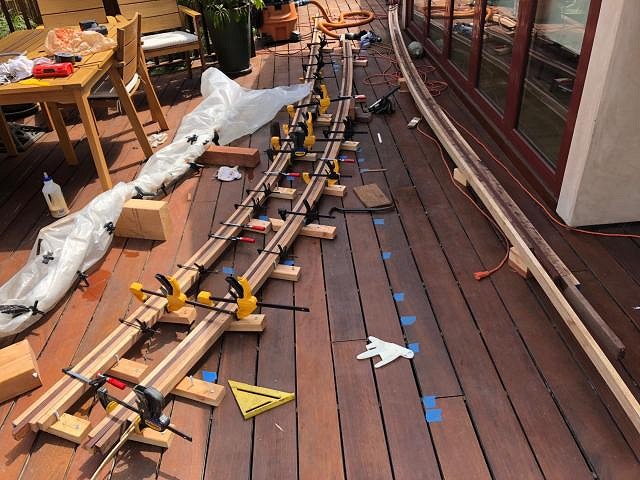
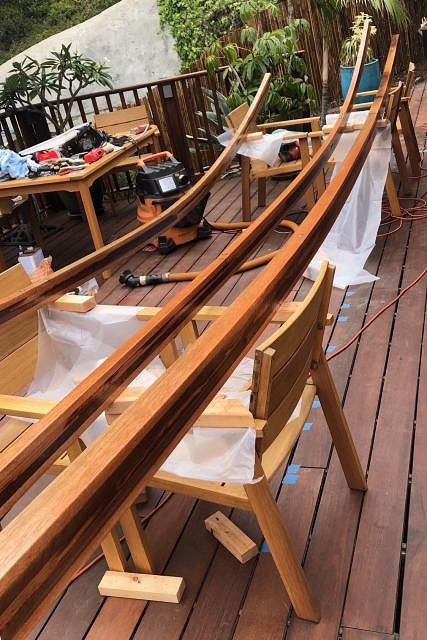
Bending and steaming at the same time. Fortunate to have this flat deck to work on!
When I said Commodore was performing all the work solo, I lied. He has had a faithful assistant the whole time.
|
|
W
W8N2Surf
Posted
posted
on
Sun, Oct 28, 2018 7:57 AM
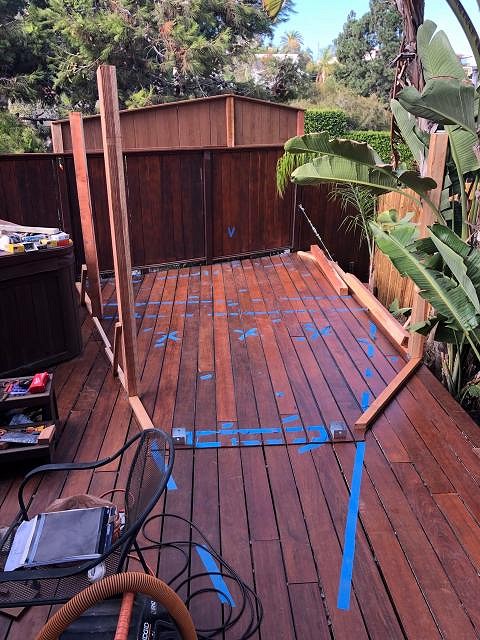
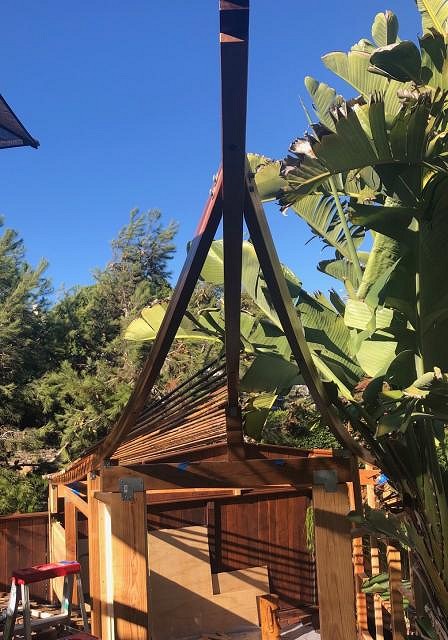
So, as I think you can see by now, this build is intended to be a humble nod to the architectural style that we all know and love in a space about as big as a backyard shed.
Won't be easy to pull off. The main center beam weighs....a.....lot. @Prikli Pear, you can see now that the triangle in front of the front door showed the roof beams coming together. Was that close to what you were thinking? [ Edited by: W8N2Surf 2018-10-28 08:00 ] |
|
W
W8N2Surf
Posted
posted
on
Sun, Oct 28, 2018 8:04 AM
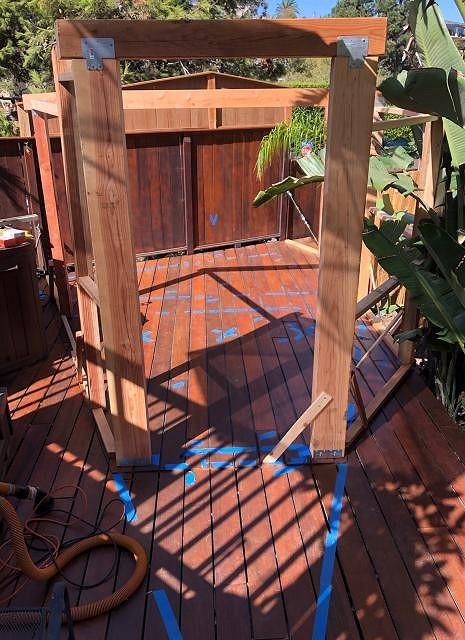
Getting the angle of the beam locked in!
Now here are the 2 side beams, out of the sauna and onto the chiropractor table.
|
|
W
W8N2Surf
Posted
posted
on
Sun, Oct 28, 2018 8:10 AM
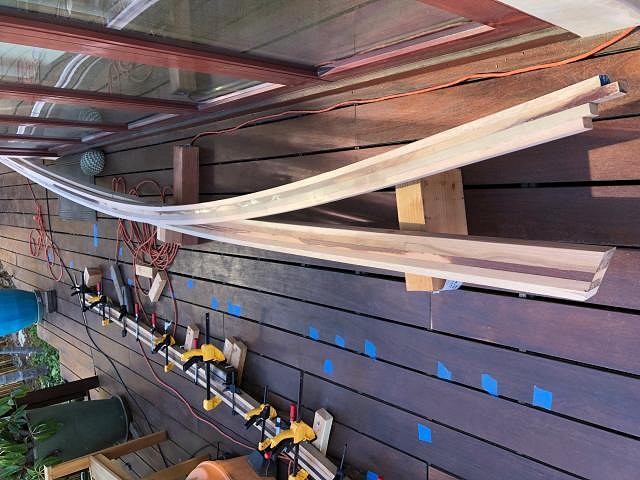
One of the side beams on top of the main beam, pretty much ready to go.
With both side beams done, time for a bit of a test fitting up on the top deck. Looking good, and exceeding expectations!!!!
|
|
W
W8N2Surf
Posted
posted
on
Mon, Oct 29, 2018 6:31 AM
A dry run at some further test fitting, up on the top deck work space. Got some stuff to figure out here.
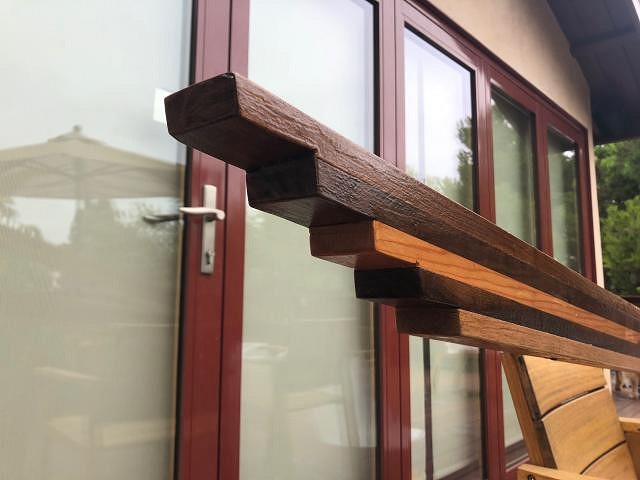
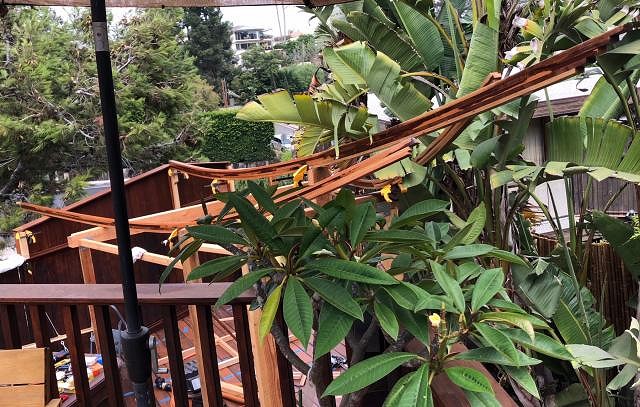
Here are the 3 beams; the large center beam and the 2 side supporting beams. Getting some finish on.
Extension to the back of the main beam, after thought alteration
Here's the profile of the center beam, which will be extending out
[ Edited by: W8N2Surf 2018-11-01 05:54 ] |
|
W
W8N2Surf
Posted
posted
on
Mon, Oct 29, 2018 6:43 AM
And after some herculean effort, still solo, we have the center beam(s) in initial positions. The center beam is resting on posts, that are on the buildings cross beams.
Lot's of work before we can call this stage complete. Commodore's back is talking to him.
|
|
C
Commodore
Posted
posted
on
Mon, Oct 29, 2018 7:32 AM
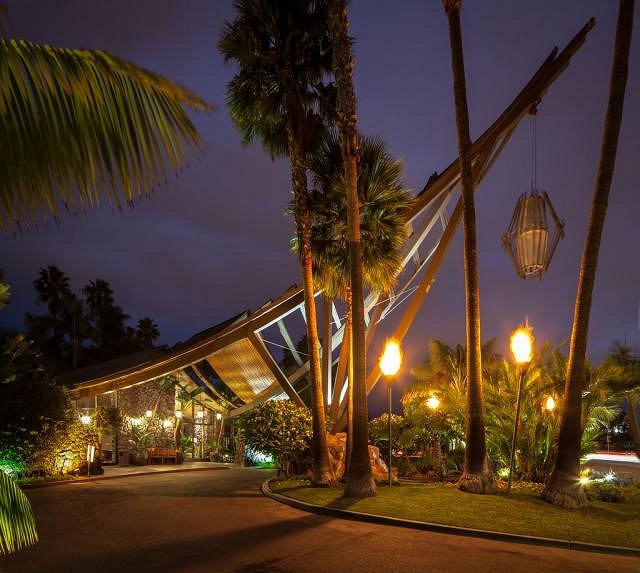
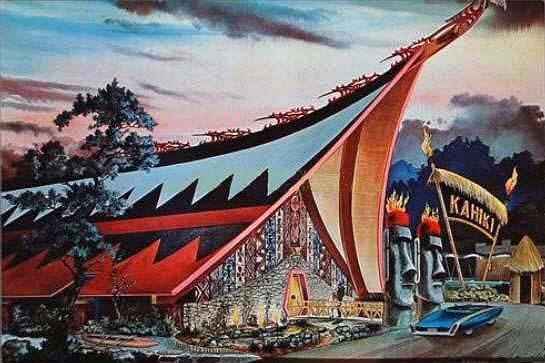
Some photos of a lot of work there - I think it took a full week+ to get all three of those beams bent correctly and glued up. One of those photos up there shows the main beam laying on its side all glued and looking good, a side beam in the forms being bent, and another in forms being glued up... that felt good to get to that stage. On the overall shape - grew up in San Diego and live in Pt Loma and absolutely love walking my dogs down and around Shelter Island - nothing better than walking under the huge arches at Half Moon Bay Inn and checking all the Poly architecture of Humphreys, Bali Hai and even some of the other places - Totally what I had in mind when drawing this up and hoping that the Loma Kai gives a good tribute to them... ok - back to work! Mahalo! |
|
T

tikiskip
Posted
posted
on
Mon, Oct 29, 2018 8:01 AM
Wow! this is looking really good! Hey I don't know what you were thinking about a light hanging down from the edge of your beam, or maybe a fish float. BUT, if you are going with a light now would be a good time to run elec cord on top of that beam. I know you may have already thought of this but I always get my ideas after I am done and need to go back and do it the hard way after I am finished. Good Luck! |
|
C
Commodore
Posted
posted
on
Mon, Oct 29, 2018 8:19 AM
thanks TikiSkip - much appreciated - definitely a light out front is is part of the plan - but not sure how big or what type of light - but it will need to be able to survive outdoors. I have the electrical plan drawn up and working that out is a goal for this this week as I move to getting walls up and need to have it all in place - its coming together! |
|
S
Sandbartender
Posted
posted
on
Mon, Oct 29, 2018 9:02 AM
Wow! This is looking amazing! Talk about an epic build-out! |
|
H

Hakalugi
Posted
posted
on
Mon, Oct 29, 2018 10:59 AM
Totally Awesome. This is so great! |
|
PP
Prikli Pear
Posted
posted
on
Mon, Oct 29, 2018 12:42 PM
Yes, indeed. But I didn't anticipate this scale! :o You guys really took that saying, "Go big or go home" to heart, didn't you? |
|
T
tikiskip
Posted
posted
on
Tue, Oct 30, 2018 6:48 AM
Hey going to blow your mind and keep you up at night thinking about this, BUT if you put rattan in your hot tub for 5 - 6 hours it to can be bent and hold it's shape just like those beams. Ha! Looked up Kooboo rattan and four of my lights is on there. Kooboo rattan... I can help you with a light if you need it as well. IF you make a light yourself contact me before you buy stuff as I can give a few tips there as well. Sorry I went too far again, trying not to get too into other builds and freak people out. Per our PM talk... |
|
H

Hamo
Posted
posted
on
Tue, Oct 30, 2018 7:52 PM
That roof is unbelievable. Thanks for sharing this here. I'm excited to see more. |
|
W
W8N2Surf
Posted
posted
on
Wed, Oct 31, 2018 5:11 AM
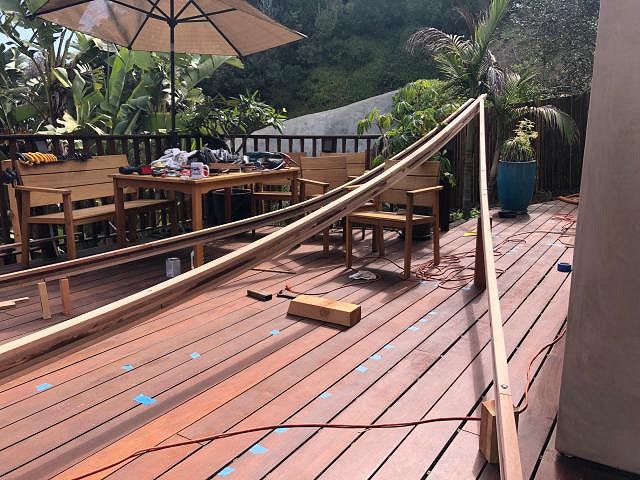
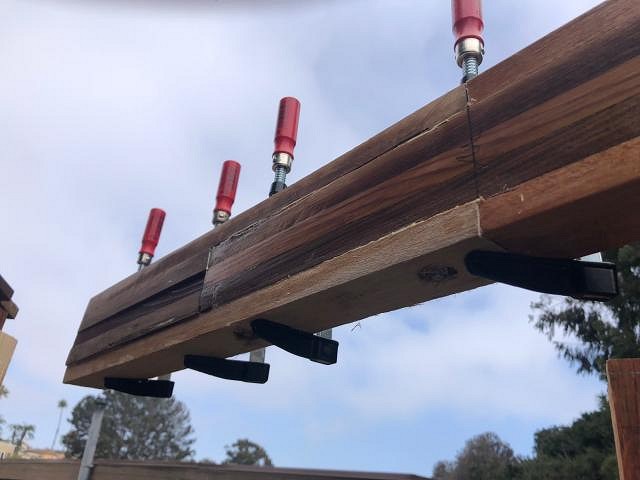
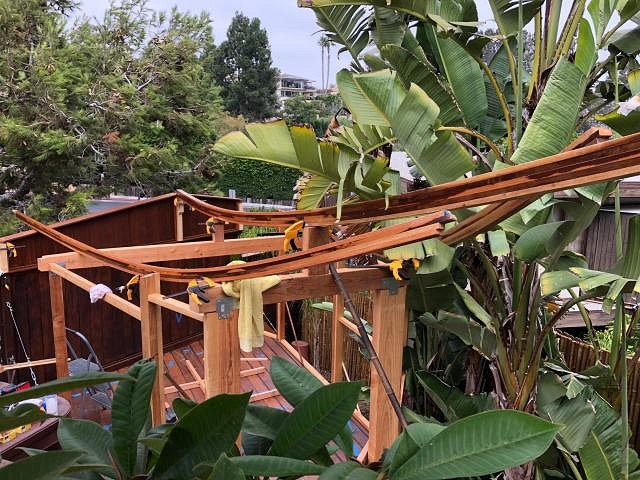
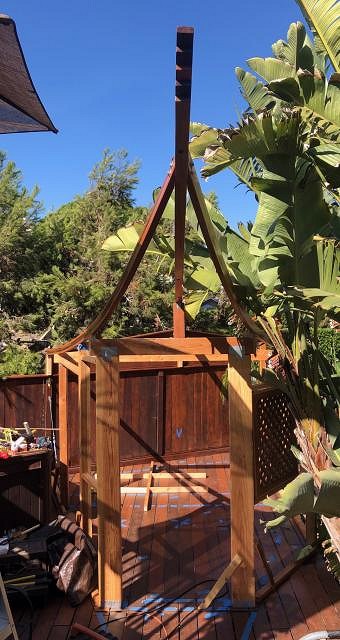
Good morning Tiki people! Quick update for the day, the beams are in their final position and being permanently secured! The main beam is holding up nicely, we did have a drop of a few inches in the original bend, but we expected that.
Mahalo for the comments, this forum continues to inspire! [ Edited by: W8N2Surf 2018-10-31 05:13 ] |
|
C
Commodore
Posted
posted
on
Wed, Oct 31, 2018 7:46 AM
Such a great moment - one thing that came up on this is I realized the main beam didn't 'poke' out enough... not sure how that happened with my measure 72x cut once methodology - but I'm sure the curves threw it off... anyway - so to make it 'right' I had to splice in about 2 feet of beam at the back of the main section and then bring it further out and up - wasn't sure if that would throw all the curves off, but with some pressure it worked... in this photo you can see a bunch of red clamps at the back of the main beam... Anyway... looking good and thanks for checking it out! [ Edited by: Commodore 2018-10-31 07:48 ] [ Edited by: Commodore 2018-10-31 07:52 ] |
|
W
W8N2Surf
Posted
posted
on
Wed, Oct 31, 2018 9:43 PM
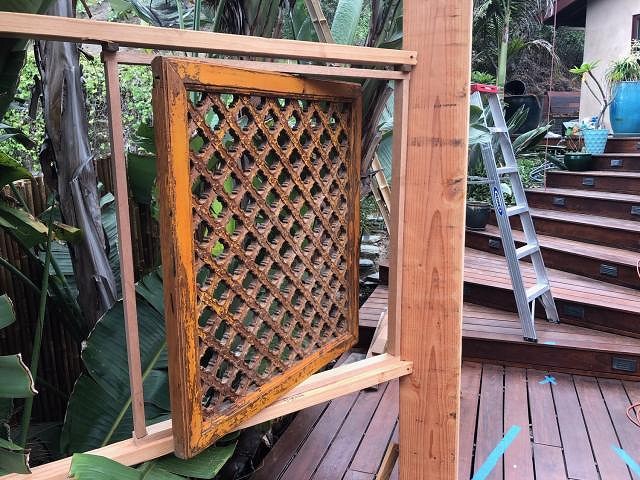
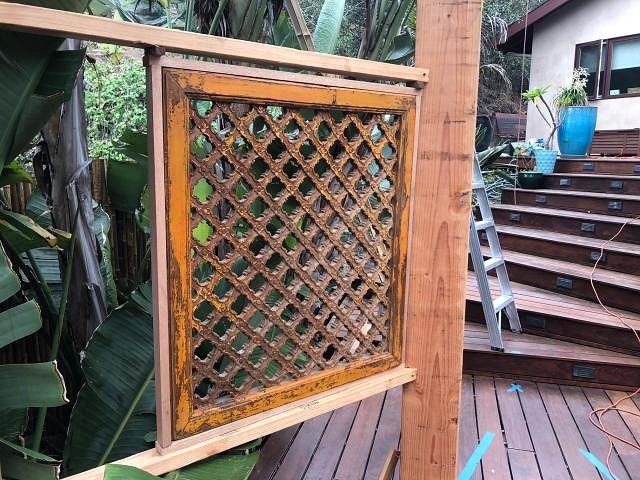
A little "less strenuous" update. We acquired this vintage piece (from the washed-up wreck) and will incorporate it into the wall. Thinking to add a translucent panel on the outside, so that it becomes part of the wall.
|
|
C

coldwarspacemonkey
Posted
posted
on
Thu, Nov 1, 2018 4:04 AM
Mind: Blown! |
|
C
Commodore
Posted
posted
on
Thu, Nov 1, 2018 6:38 AM
Aren't these panels great? I was able to get two of them - the one shown will be a window that opens as you can see - the other (not shown) will be an access panel along the 'port' wall.. What is really cool is that there is already lighting on the plants behind these which will show though the windows at night. Having fun with this - hope you all are as well! Mahalo! -Commodore |
|
H

hiltiki
Posted
posted
on
Thu, Nov 1, 2018 8:59 AM
Great job, having fun following you step by step. |
|
T
tikiskip
Posted
posted
on
Thu, Nov 1, 2018 9:33 AM
That is a super cool panel! Looks like a great place for a bottle bottom wall next to that panel. I bet if you asked for colored bottles from TC members you could get them in no time. |
|
M

mikehooker
Posted
posted
on
Thu, Nov 1, 2018 10:37 AM
Love what's happening here! |
|
W
W8N2Surf
Posted
posted
on
Fri, Nov 2, 2018 3:44 PM
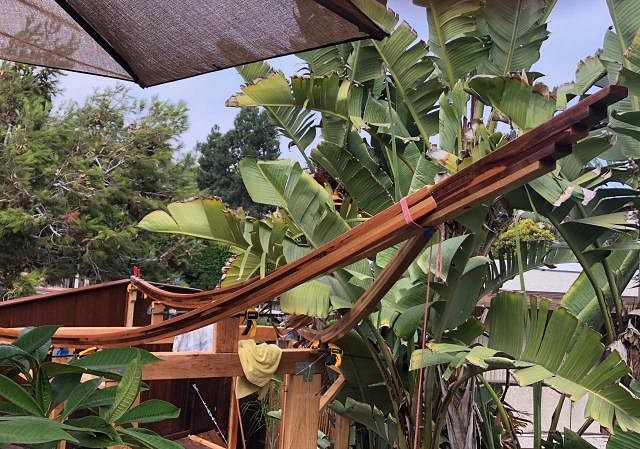
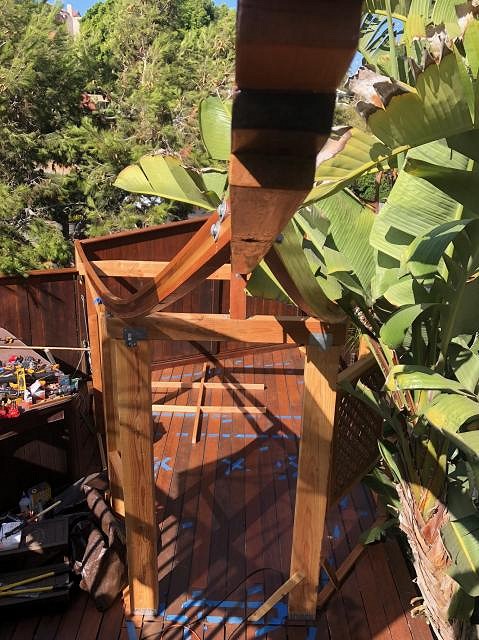
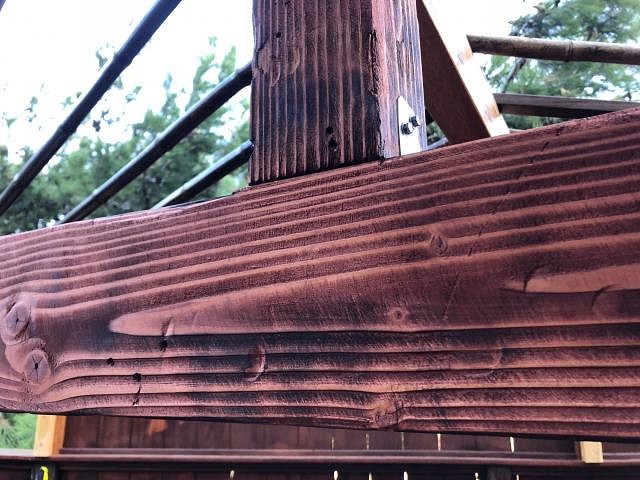
Happy post-halloween Friday everyone. Just a quick update from the Loma Kai - Here you can see the side beams now bolted to the main arched beam. You can also see some of the metal straps being used to secure the timbers as well. Kind of ....unattractive...no? Not to worry, we have a solution planned for that. More to come shortly.
|
|
W
W8N2Surf
Posted
posted
on
Sat, Nov 3, 2018 7:05 AM
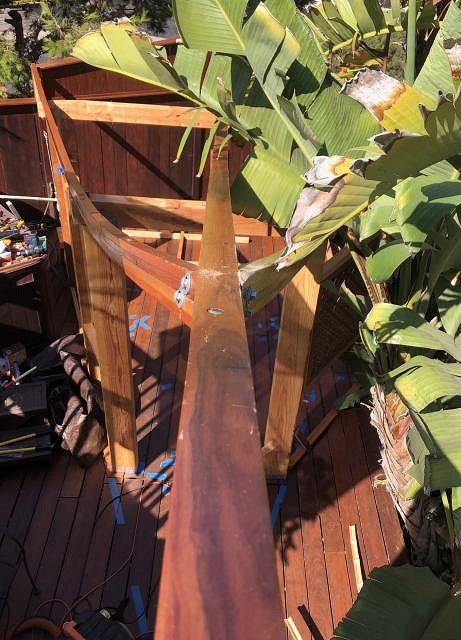
Here's a shot from under the main beam
|
|
W
W8N2Surf
Posted
posted
on
Sat, Nov 3, 2018 7:18 AM
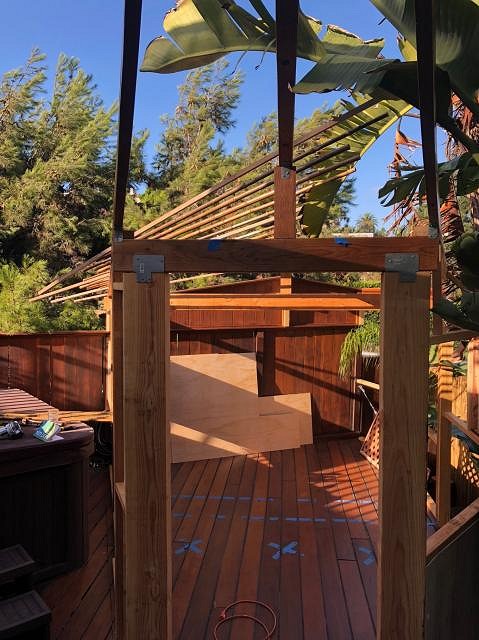
We next turn our attention from the 3 beams back to the structural integrity of the building, and employ a bit of "strong wall" construction in the project. These rigid panels contribute to make the structure even more load bearing and stronger all the way around.
The front entrance is framed nicely, hmmmmm, what can we find for a front door? Also notice the bamboo sticking in on the right side there? How will that be incorporated? More very cool and exciting updates planned to be coming your way soon! Keep working Commodore!!! |
|
W
W8N2Surf
Posted
posted
on
Sun, Nov 4, 2018 4:35 PM
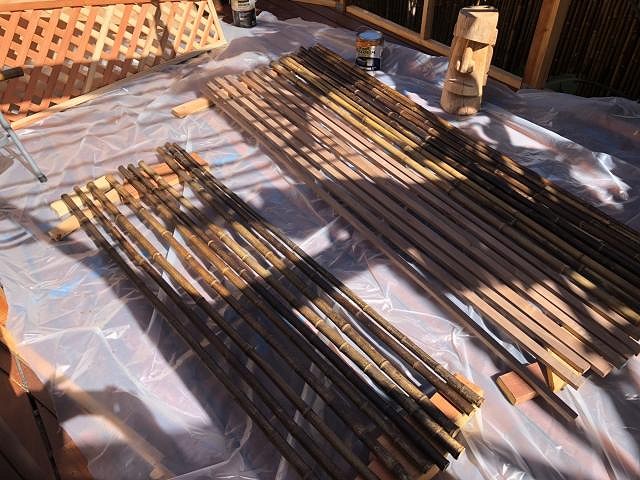
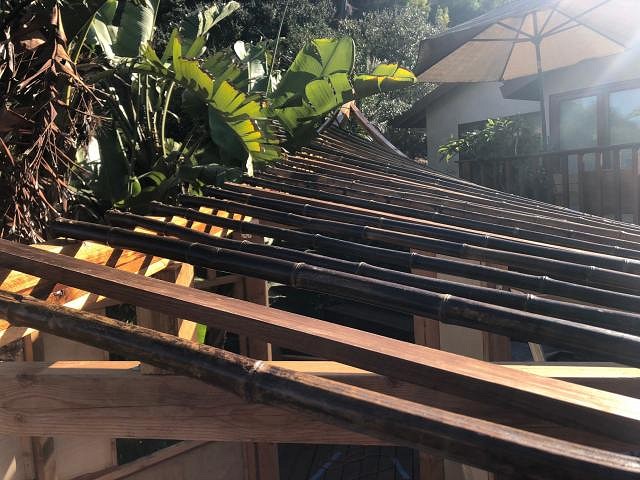
Laying out some materials. Let's get that bamboo in place!
Yes, we are NOT going to use bamboo for decorative purposes only, but implement it for structural functionality! Bamboo rafters!
Never as easy as it looks, but let's get it on. This will not be a light weight roof, so this bamboo needs to perform!
|
|
C
Commodore
Posted
posted
on
Sun, Nov 4, 2018 9:02 PM
the bamboo was laid out and then a coat of varnish top and bottom to protect and keep it from discoloring - if you notice there is some wood laid up there as well. The 1 inch black bamboo is spaced about 6 inches apart and every 6th slat is a piece of black walnut. the walnut looks good - is the same color as the black bamboo more or less, good strength/weight ratio and will provide something solid to attach the other roof layers on to... all good! |
|
T

tikitube
Posted
posted
on
Mon, Nov 5, 2018 11:52 AM
Holy crap, what a build idea!! I've been busy with Zombies all month, so I'm mostly lurking. But damn...I just had to comment on this! Really incredible. Only thing I'd add as a caution is to make sure you caulk around that base really good. It looked like you set a layer of OSB under the decking and in my experience if that stuff gets wet it can swell pretty bad and eventually rot and disintegrate. But this is such an amazing ambitious project, so kudos to you!! That prow roof shape is going to be awesome. Jeff |
|
C
Commodore
Posted
posted
on
Mon, Nov 5, 2018 2:48 PM
Thanks Tikitube - and good call on the caulking - I do need to go back and do that and some other areas. It does have great ventilation underneath so it should be good from an overall moisture perspective. Getting there! |
|
W
W8N2Surf
Posted
posted
on
Tue, Nov 6, 2018 8:25 PM
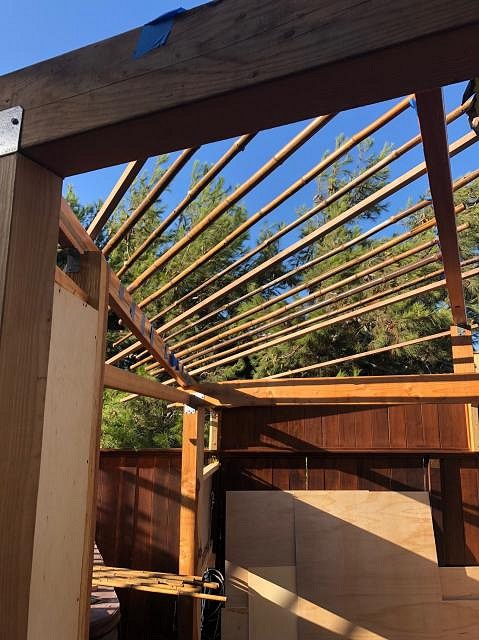
Just a couple pictures of our rafters, almost done.
|
|
W
W8N2Surf
Posted
posted
on
Wed, Nov 7, 2018 5:19 AM
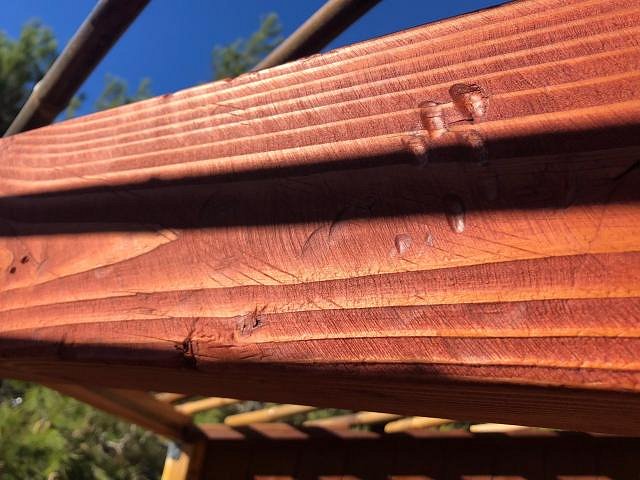
Since all of the beams and construction in general is going to be exposed, before we can go much further we need to do some "rustification". Here's a sample of a starting timber, stained, and completed.
|
|
W
W8N2Surf
Posted
posted
on
Thu, Nov 8, 2018 6:15 AM
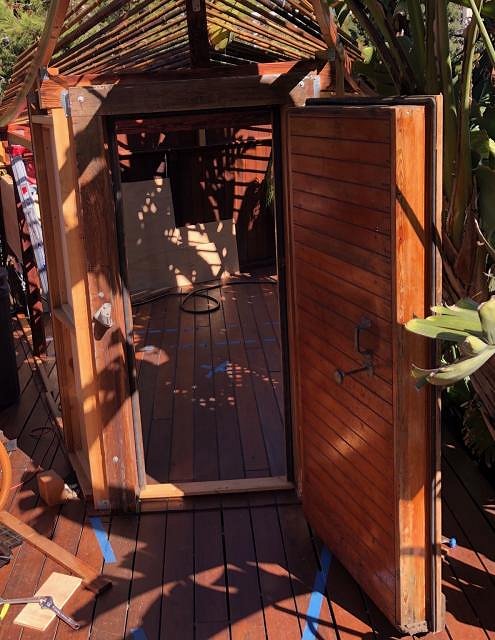
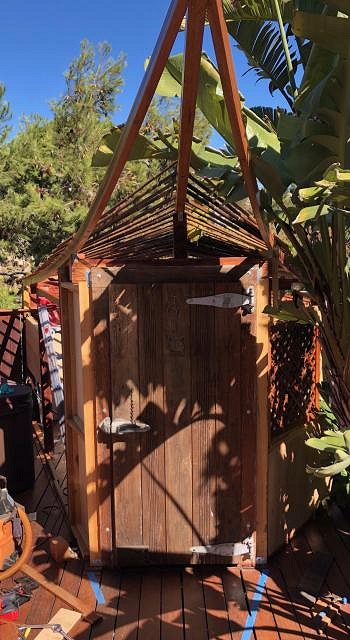
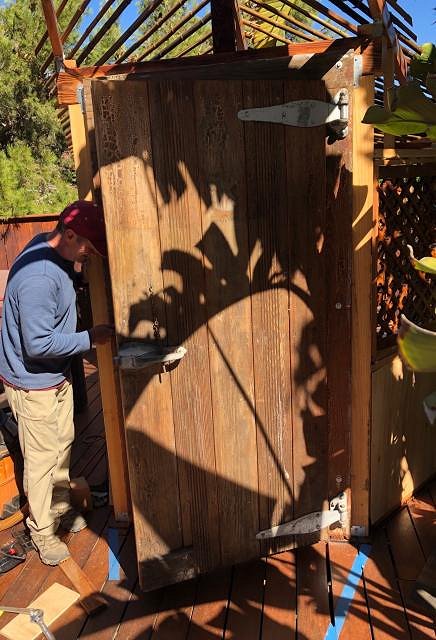
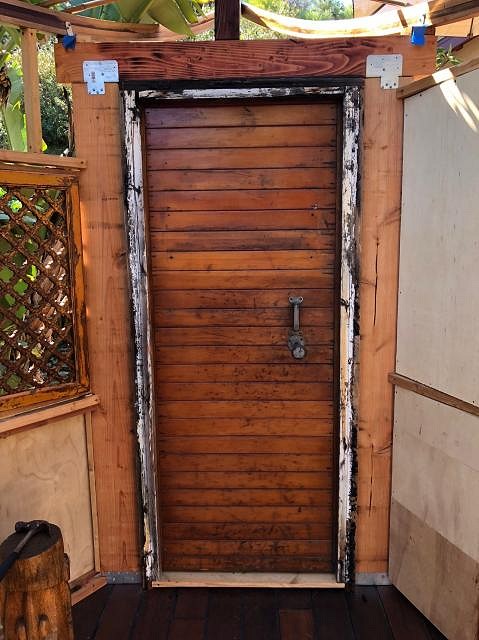
Hey thank you Ohana for the encouragement. This remains a one-man energized project, so the motivation is appreciated. We need to keep Commodore going! Big addition to share today!! A key Loma Kai artifact that came to us was this amazing, original walk-in refrigerator door! Cool! If there was ever a worthy front door for the new Loma Kai, this is it!! Check out the original hinges, the interior push-open plunger latch, and the thickness! Those Mai Tai's are going to stay cold!
This bad boy weighs a LOT, so we had to make sure the door posts were rock solid (they are)!
View from inside. Flashing is visible at this point of course, but love the natural wood finish on this amazing piece.
|
|
W
W8N2Surf
Posted
posted
on
Thu, Nov 8, 2018 6:17 AM
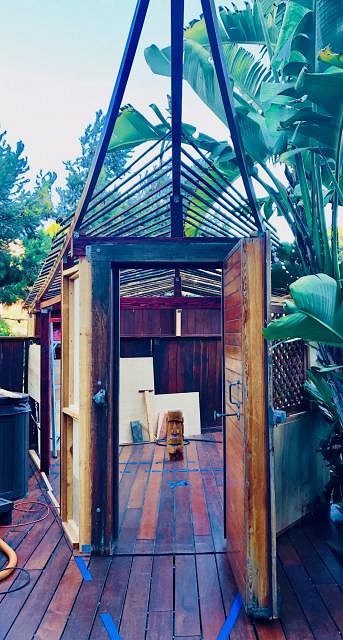
The Loma Kai is welcoming you!!!!!
|
|
C
Commodore
Posted
posted
on
Thu, Nov 8, 2018 7:30 AM
Ok... LOTS of work on this last page or so... super tedious putting up the bamboo slats - each were varnished and then cut into place to fit - then drilled and mounted to the beams. Because they are structural I put them about 6" apart and so used a lot of them (I think around 84 or so?)... but they look killer. On the door - had to have help for this... I think it weighs about 300 lbs or so - so it took me, my friend "Contractor Mike" (in photo and who will help with electrical in near future), and a dolly to fully manhandle that door to get it in place. Door is solid and I really had to beef up the structure with the strong walls so we could mount it and not have the structure sway at all. We are sitting good - door is fully balanced and there's not even a creak anywhere when you open the door. Mahalo and really appreciate the support! -Commodore [ Edited by: Commodore 2018-11-08 07:32 ] |