Tiki Central / Other Crafts / Shake Yer Booty update Jan. 22 Materials: Where to get 'em!
Post #278618 by Bowana on Sat, Jan 13, 2007 10:48 AM
|
B

Bowana
Posted
posted
on
Sat, Jan 13, 2007 10:48 AM
Here is how I go about pouring a mold such as this.
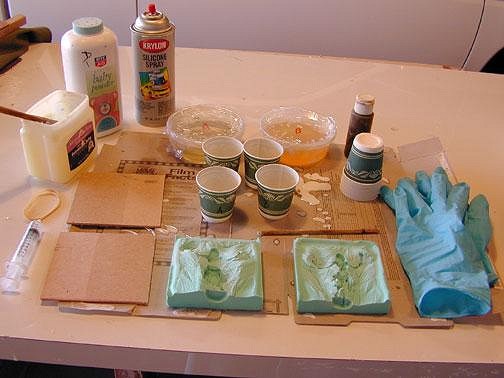
Things you will need (clockwise from top left corner): Okay! Got all that stuff?
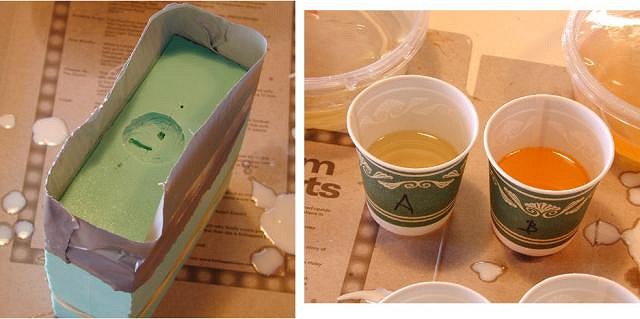
Some silicones tend to not release the casting as well as others. A shot of silicone release spray on both sides of the inside of the mold will help prevent this. This needs to be done between every few castings or when you feel the castings are beginning to stick. Allow the silicone spray to dry (5-10 min), then dust the inside of the mold (both halves) with baby powder or talc. This prevents pinhole sized bubbles from occurring on the surface of the castings. I don't know the physics of how it works, I just know that it does! Sprinkle it on, then blow it off to leave a fine dust on the surface of the mold. Do this before each casting. Carefully align the mold halves and fit them together as in the first picture. Sometimes depending on the size and shape of the mold, a couple of thin pieces of wood are needed to sandwich the silicone to help hold it together. In this case I found that rubber bands were all that was necessary. Duct tape was then wrapped around the top edge of the mold to prevent spillage while pouring (do this only if you are a neat-nut!). The second picture shows two evenly measured portions of the urethane parts A and B poured into Dixie cups. Some urethanes require measurement by weight, and some by volume, but they are always a 50/50 ratio. Make sure you know which type you have. Be sure to label the cups A and B. (Oh yeah, and put on your gloves) Prepare the syringe by brushing some Vaseline onto the rubber plunger. Cured resin will stick to it if you don't.
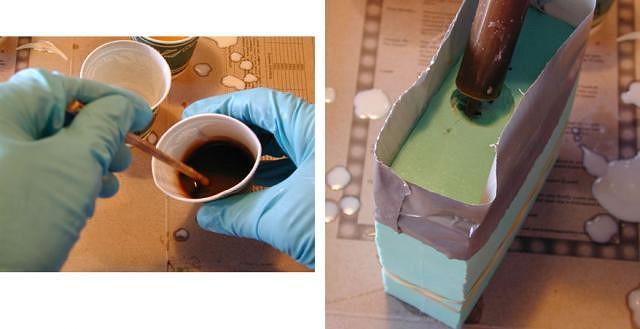
Pour the contents of part A into a separate Dixie cup. I like to add some resin tint to give it some color. Otherwise the castings are white and it's hard to read the surface. Mix the tint into part A until there are no swirlies. Add only a drop. In the picture it looks really dark, but when the resin sets it will be much lighter. Now add part B to the mix. Mix throughly until no swirlies. Stick the business end of the syringe into the cup and pull back the plunger to fill it with resin. Insert it into the mold cavity and fill the resin at a slow to moderate pace. Sometimes it's good to fill a little bit, then turn the mold slightly on it's side and rotate it, then continue filling. Do this until the mold is full. Urethane has a working time of 5-10 minutes depending on the room temperature so you will have to work quickly. Yeah, I know. Go slow, but fast.
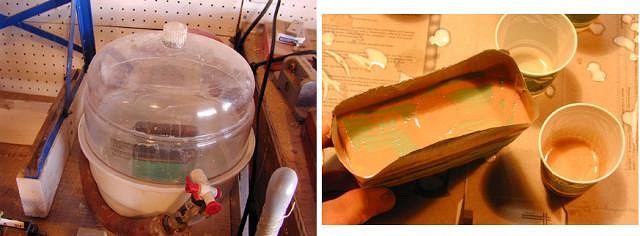
In this case I used a vacuum chamber to cast. The vacuum chamber pulls all the air out of the mold causing it to bubble and froth. (yummy) If you don't have one, you can still successfully cast. Just use the fill and rotate method. I happen to have one, so I use it. I don't want to get into talking about vacuum chamber casting too much because most people do not have them. The next picture shows how the duct tape contained the spillage. (If you are not using the vacuum it probably will not be this messy). You can also see how light in color the resin turned after setting. Untinted resin normally turns white after setting, so it would be the same as if a little bit of dark brown color was added to a big bit of white color. The result would be a light brown.
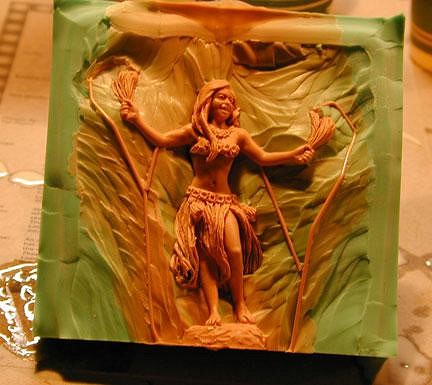
Wait about 20-30 minutes for the resin to completely set before opening the mold. Undo the rubber bands and carefully work the mold apart. You don't want to just pull it open because it may break the casting, depending on what it is. A simple shape like a Moai will be much easier to de-mold than a human figure. Flex the side of the silicone that is holding the casting to help loosen it. After the piece is carefully removed from the mold, trim away the vents and flashing around the figure with an X-Acto knife. I hope this has been helpful. I'm looking forward to seeing the results of anyone who posts them. Try it! :) |