|
B

Bowana
Posted
posted
on
Fri, Nov 24, 2006 6:34 PM
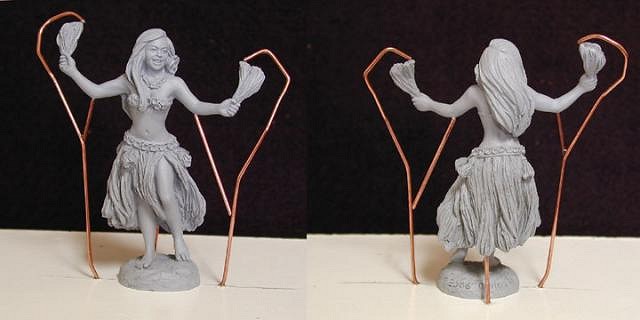
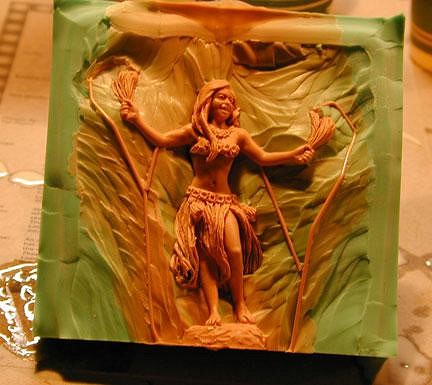
Here are some shots I took of the casting process for this tiny figure.
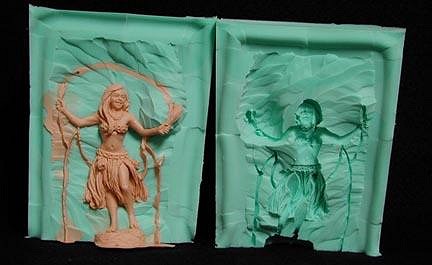
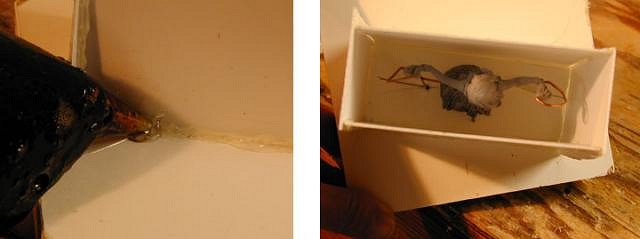
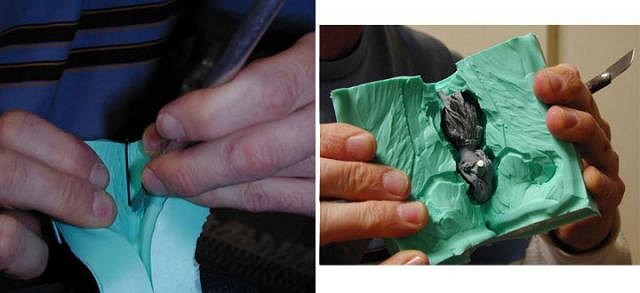
This is the silicone mold just after opening. The front side has been removed from the piece. The casting is urethane resin. That weird looking stuff around her sides are vents cut into the mold to allow air to escape from the elbows and hands as the resin is being poured in. The resin fills in these cavities too and are trimmed off later.
This is the casting after the back of the mold was removed. The grass reeds in her right hand broke off as a result of an air bubble caught in that area. My vent failed me!
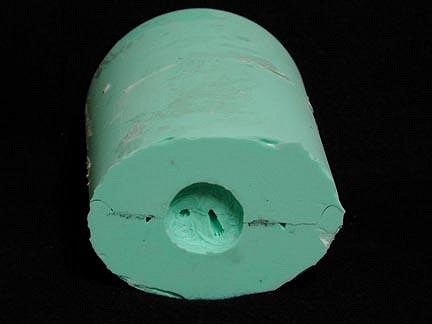
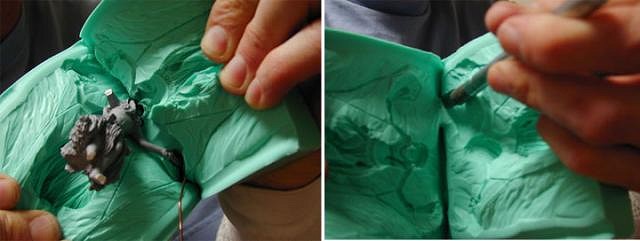
This is the mold showing the base of the figure (those holes are her feet). While this is the bottom of the figure, it is actually the top of the mold. The cavity pictured is where the resin is poured into. In this case, the piece is so small that I had to employ a syringe to inject the resin.
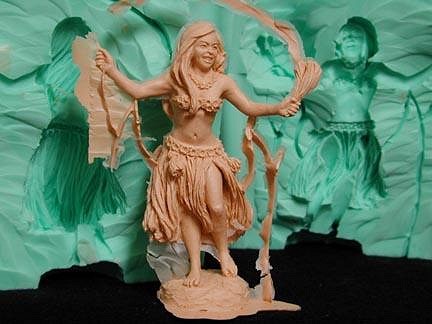
The cleaned up casting. The pom-pom (does anyone know the proper name for these things?) in her left hand broke off as well. I repaired them with some epoxy putty, and also patched up a few other flaws. Now that I have a hard copy of the piece, I can do some further detailing by carving into it with an X-Acto knife or Dremel. Then comes the paint! [ Edited by: Tikidav 2006-12-16 14:22 ] [ Edited by: Tikidav 2006-12-21 21:07 ] [ Edited by: Tikidav 2007-01-01 19:19 ] [ Edited by: Tikidav 2007-01-13 10:50 ] [ Edited by: Tikidav 2007-01-22 21:11 ] |
|
H

hewey
Posted
posted
on
Fri, Nov 24, 2006 7:14 PM
kool, thanks for the step by steps |
|
P

Paipo
Posted
posted
on
Fri, Nov 24, 2006 7:27 PM
Very nice, I know all too well the perils of air bubbles. I haven't yet made a two piece mold though. Did you just pour one big block of rubber and hack it in two with a sharp blade? Will you make a new mold of the "refinished" hula girl? |
|
B
Bowana
Posted
posted
on
Sat, Nov 25, 2006 8:56 AM
Thanks, Hewey and Paipo. The mold was made by cutting out the bottom of a Dixie Cup and sticking it down on the board around the figure, securing it with the use of a hot melt glue gun and plaster bandages. I always try to make the attachment to the board as bulletproof as possible. If the cup were to pop off after it's full of silicone, it makes a god awful mess. The mold is cut open first around the edges 1/2"-3/4" deep with a curved key-knife. This knife makes a "c" shaped cut that will allow the two mold halves to match back together without sliding around. Next an X-Acto knife is used to cut around the model and free it from the silicone. I find it helpful to draw a simple diagram of the figure with notes pointing out where vents and various features are before pouring the silicone. Once you start cutting, you are operating blind and it's easy to get lost. I don't know yet if I'll make a second mold or not on this figure. She might be just fine as she is. |
|
4

4WDtiki
Posted
posted
on
Sat, Nov 25, 2006 1:42 PM
Tikidav, are these something that will be available to us? (pleaseohpleasepleaseplease):D |
|
B
Bowana
Posted
posted
on
Sat, Nov 25, 2006 5:44 PM
4WD: It's possible that they could be available. Glad ya like her so much. She's really difficult to cast though and at this point I've only managed to get one almost perfect casting.
They want to keep coming out like this :up:, which breaks my heart because that means that I must put them out of their misery. |
|
T

Tamapoutini
Posted
posted
on
Sat, Nov 25, 2006 10:43 PM
'Vahine De Milo'? :lol: Great explanations on your process. Awesome pics too! Tama :) |
|
TM

Tipsy McStagger
Posted
posted
on
Sun, Nov 26, 2006 10:39 AM
..try using a mold release agent that you spray into the mold before casting....this will loosen her up faster than a couple mai tais....in the future, consider making the pom-poms a separate mold...this way you can use a pin to locate them in her hands and epoxy them after you cleaned up the castings.... ..also, i recommend getting a small pressure pot to help get rid of the bubbles if your vents fail....they aren't too expensive these days... for those of you that want to experiment at home i reccommend using the stuff dentists use for casting teeth....it's a soft silicon and less expensive that the usual blue silicone....it's great for making small quickie molds, however it is more brittle than the blue silicon so don't expect to get many castings out of it.....ask your dentist where you can purchase some of it.... [ Edited by: Tipsy McStagger 2006-11-26 10:45 ] |
|
V

VanTiki
Posted
posted
on
Sun, Nov 26, 2006 2:14 PM
I second Tipsy on the pressure pot - or if you want to get even more elaborate (I am sure you know all this already - sorry!) you can set up a vacuum pump and chamber. Depending on the cure time of your resin/polyurethane you can mix it, evacuate it, pour it, then evacuate a second time in the mold. Great sculpture! VanTiki |
|
B
Bowana
Posted
posted
on
Sun, Nov 26, 2006 6:04 PM
|
|
TM
Tipsy McStagger
Posted
posted
on
Mon, Nov 27, 2006 9:10 AM
...if you can't use a pot...try tapping on/around the bottom of the mold after you pour the resin...this will loosen any air bubbles and cause them to rise up your vents...sometimes bubbles like to cling to the sides..... |
|
C

Clarita
Posted
posted
on
Mon, Nov 27, 2006 10:27 AM
Aloha Tikidav your hula gril is so cool!! and so little! and I've been thru http://members.aol.com/kelea98/dave/ too you do a lot of incredible stuff! I loved montezuma he is really great too! Congrats! Keep us posted about your progresses,Greetings! |
|
B
Bowana
Posted
posted
on
Wed, Nov 29, 2006 8:23 PM
Tipsy: (BTW, that's a great name!) Yep, tapping on the mold will certainly loosen bubbles. Don't think I haven't tried! A light dusting of talc helps to prevent surface bubbles, and after some experimenting I found that talc mixed into the resin makes it set somewhat slower (that, combined with colder weather) so I've been having better luck. Clarita: Glad you liked my site. Thanks for checking it out. Montezuma was one of my favorite sculptures. I sculpted it for a company called Castagna of Italy. Castagna was started by Jack Lucchesi who is mentioned in the article about the Universal Statuary Tikis in the latest issue of Tiki Magazine. |
|
RD

Rum Demon
Posted
posted
on
Wed, Nov 29, 2006 9:24 PM
She's a beaut! Now. MAKE AN ARMY OF THEM!!! Also, I will totally take your one-armed hula girls. PLEASE don't throw them away. I'll reimburse you for shipping. Nice work. -Joe |
|
RD
Rum Demon
Posted
posted
on
Wed, Nov 29, 2006 9:31 PM
Also, Mrs Demon (pro mold maker extraordanaire) says that the key to getting that right arm problem fixed is plugging up the arc vent that goes over her head. Not sure why that's there to begin with. Anyway, the air from that "rainbow" there is trying to escape through her right arm. Other than that your venting looks great. Just plug up that rainbow with some oil clay or something. I hope the solution is really that simple. Good luck! yaay hula girl! -Joe Web site updated!! Now more updated than ever!! [ Edited by: Rum Demon 2006-11-29 21:33 ] |
|
P

pdrake
Posted
posted
on
Wed, Nov 29, 2006 9:39 PM
um, as a new caster, i'd just like to chime in. "vent"???"huh"??"der"??"what"?? help, please. |
|
V
VanTiki
Posted
posted
on
Thu, Nov 30, 2006 10:05 AM
Aloha - I just got my newest issue of MAKE magazine, and there is a great article on silicone mold making and resin casting. Check it out! MAKE vol. 8 if they don't have it at your local bookstore, order one at: the sister magazine CRAFT is also great |
|
B
Bowana
Posted
posted
on
Fri, Dec 1, 2006 7:33 AM
Thanks for the tip, Rum Demon and Mrs. The rainbow vent was to let the air escape from the tips of the pom poms (still waiting to hear the proper term for those things!) but after further examination I realized that the air had nowhere to go. In the vacuum chamber it wasn't a problem, but casting w/o the vacuum there were problems. I've got the master for this figure pretty much sanded and smoothed to perfection and will make a second mold on it(with revised venting of course!). Glad ya like the figure so much that you'd take an amputee! They've all gone to their graves though and I'd hate to part with flawed work! Pdrake: A vent is an escape route for air inside of a mold. When material is poured into a mold it displaces the air already inside of it. A mold of an object shaped like a Tiki mug has a ready made escape route because of the wide aperture of the object (the perimeter of the bottom of the mug). A mold of a shape such as a human figure has a maze of small cavities that the casting material must find it's way into, such as arms, ankles, and the like. Vents in strategic locations throughout the piece help the casting material flow to where it needs to be. I know it's hard concept to grasp from reading about it. Seeing it actually happen will make it much more understandable. Hope this was helpful to you. Now, as far as "huh??","der??", and "what??", these are things I say on a frequent basis myself. :) |
|
C
Clarita
Posted
posted
on
Fri, Dec 1, 2006 9:38 AM
Hey Tikidav!It's so cool that you're experimenting here in real time!!I'm so proud of you!And I have a question, are we talking about poliester resin? I thought that it don't catalize at less than 25 degrees (I don't know how you guys measure temperature) Here that gets very cold we needed to put heaters all around or it didn't get solid...Greetings, keep up the great work! |
|
RD
Rum Demon
Posted
posted
on
Fri, Dec 1, 2006 3:17 PM
You silly person. Yeah, all the rainbow "vent" did was create more air that needs to escape... right into her arm as it happens. It's probably not necessary to make another mold. Just carefully plug up the ends of the rainbow with a smidgen of oil clay. Katie and I are pretty confident that's all you need to do. No worries about the amputees. I understand the desire to bury "mistakes", no matter how cool they are. Best of luck, Edit: Ah, this wasn't the finished master that you had cast. Got it. Reading AND comprehension. Must remember that. Web site updated!! Now more updated than ever!! [ Edited by: Rum Demon 2006-12-01 15:19 ] |
|
S

squid
Posted
posted
on
Sat, Dec 2, 2006 9:26 AM
Hey pdrake, register on this web forum for casting, sculpting, moldmaking info: |
|
B
Bowana
Posted
posted
on
Sat, Dec 2, 2006 7:16 PM
Clarita: I'm using urethane resin. It's more durable than polyester and sets up in a few minutes. Something else I found out about mixing talc into the resin is that it makes it brittle if too much is added. Gotta be careful! As far as temperature, I just use the thermometer on the wall. If it's below about 65 degrees, I know the resin will take longer to cure. In the summertime when it's 100+ I know it's going to set off pretty quick.
Rum Demon: You silly person! |
|
B
Bowana
Posted
posted
on
Sat, Dec 16, 2006 2:56 PM
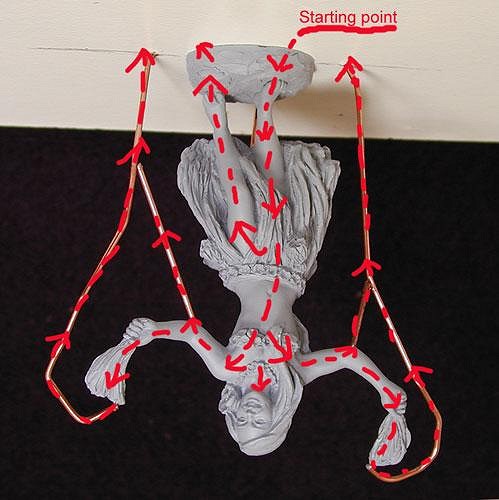
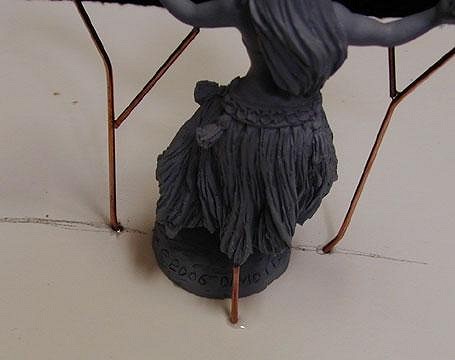
Here is the master casting of the figure primered and prepped for final mold making. The venting was done in a different manner this time. Wire was cut, shaped and put in place with Super Glue to represent the vents. Using this method as opposed to cutting vents into the silicone is far more tedious (I Superglued the vents to my fingers plenty of times before I got them to stick where I really wanted them), but is much more accurate. Another advantage is that the wires also serve as guides when cutting the mold open. Always make sure that vents as well as the figure are secured down to the board or else they could float off somewhere after the silicone is poured!
In this picture I've illustrated the path in which the resin will flow while pushing out the air inside the mold.
I put it upside down to better show the position of the mold when in the pouring stage. The resin is introduced into the right foot area of the mold where it will flow directly to the head, arms, hands and out the vents on pom poms and elbows. The elbows are a high spot that could trap air, and the ends of the pom-poms leave nowhere for the air to escape if not vented. The left leg also acts as a vent, so care must be taken to not pour resin down both leg cavities at once.
This vent on the back of the skirt was necessary to let air out also. Since this one is off the separation line (see pencil mark on board) a separate lateral cut must be made to free it from the mold. The pencil mark on the board serves as a guide when cutting open the mold as it transfers to the silicone after it has set. It's very easy to get lost when cutting open molds so anything that can be done ahead of time to make it easier is a good idea. More pictures later as the process progresses......... |
|
F

finkdaddy
Posted
posted
on
Sat, Dec 16, 2006 3:02 PM
This is an amazingly helpful post! I'm anxiously waiting for more info. Thank you for doing this! |
|
T

tikigap
Posted
posted
on
Sat, Dec 16, 2006 7:48 PM
Yeah, this is pretty good. Cant wait to see more. |
|
B
Bowana
Posted
posted
on
Thu, Dec 21, 2006 9:04 PM
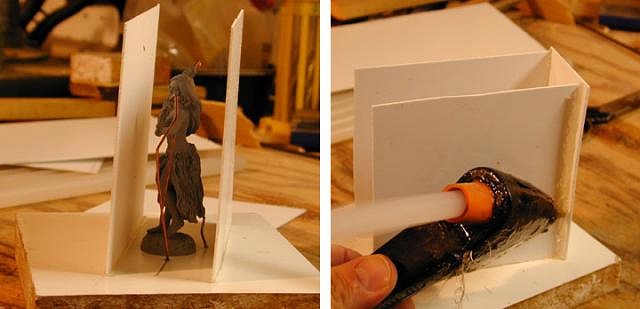
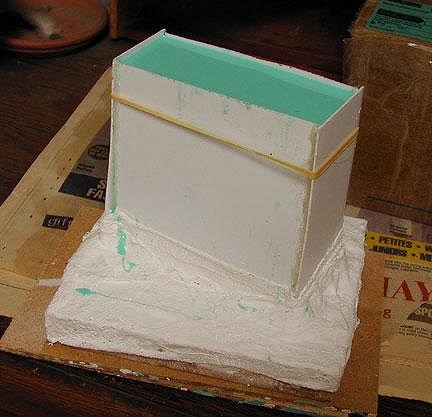
Thanks guys. Glad you are enjoying it! The next step is to build a box around the figure to contain the silicone. Any number of materials can be used. Plywood, clay slabs, cardboard, etc. I used some scrap styrene.
I cut the front and back pieces the width of the figure plus about 3/4" on each side. I spaced them about 1/4" away from the front and back of the figure. I then attached them and the two end pieces to the board with hot melt glue.
Make sure the hot melt glue "welds" are pretty beefy so that the box will be sturdy. Check for any small areas that may have been missed. Silicone will find the smallest holes and leak out like crazy. I regret that I was not able to get any shots of the silicone being poured, but I couldn't do both at once! (I'll have to save that part for another time, but if there's any questions about silicone, go ahead and ask.)
Here is a picture of the filled mold. Notice that I reinforced the attachment of the box to the board with some plaster bandages as a fail-safe method of preventing the box from popping off after it's full of silicone . (It's happened to me before and it's not very pretty!) Also notice the rubber band around the box as added support. Whether or not it needed it I'll never know, but sometimes the weight of the silicone in a full mold will burst open a box that up until that point seemed to be sturdy enough. Better to be safe than sorry! The silicone must now set for about 18 hours. More later........ |
|
B
Bowana
Posted
posted
on
Mon, Jan 1, 2007 7:18 PM
The silicone is set, so now it's time to open 'er up.
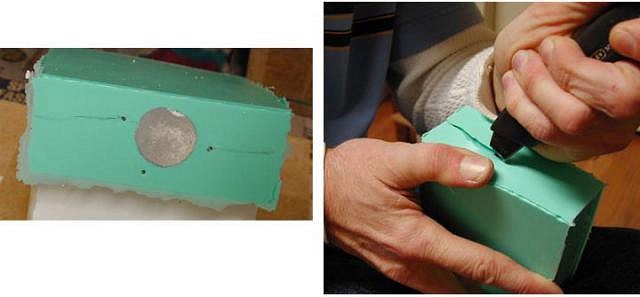
The plaster bandages, styrene box, and board are removed leaving the silicone by itself with the figure inside.
The picture on the left shows the bottom of the mold and how the pencil mark described earlier has transferred onto the silicone. This mark serves as a starting point and guide for where the separation line needs to be cut. Also visible are three small dots, which are the ends of the wire vents. These are also used in guiding the cuts. An initial cut with a key knife around the perimeter of the mold is the first cut to be made.
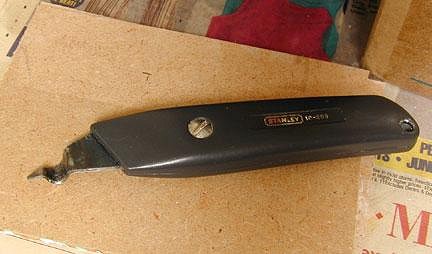
A key knife has a C-shaped, curved blade that will leave a channel in the silicone that will make the two halves of the mold re-align once separated in two. I got this key knife from a ceramics supply company.
Once the key has been cut all the way around the mold, a deeper cut must be made by following the route of the key cut. This next cut will eventually go all the way to the figure inside. Using an X-Acto knife, the mold is very carefully cut a little bit at a time, while spreading the halves with your fingers. Make sure the cut goes directly (or as close as you can) down the center of every part of the figure, including the vents. Since they are so small, it's easy to cut right past a vent without seeing it. Take your time doing this part. This mold took me about half an hour to open.
As the figure is slowly released from the mold, it will become easier to see where the cut line is to be made. Having a photo or a sketch of the figure is helpful because it's sometimes hard to remember where exactly everything inside the mold is. When molding a part made out of a hard material (in this case urethane resin) it is sometimes necessary to have to break off pieces of it as the mold is being cut open in order to see where you are going. If you can avoid it or if it's a piece that must not be broken, by all means try to work your way around it. With this figure, it was difficult to see around the base and the first arm as I was cutting, so I had to snap them off. (Sorry about that, Lil' Honey!)
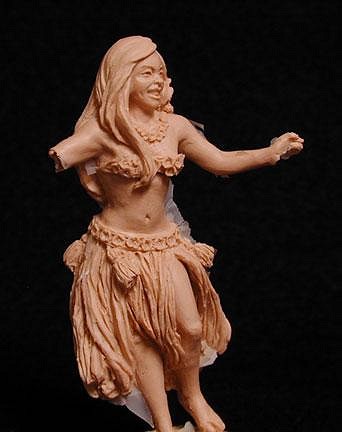
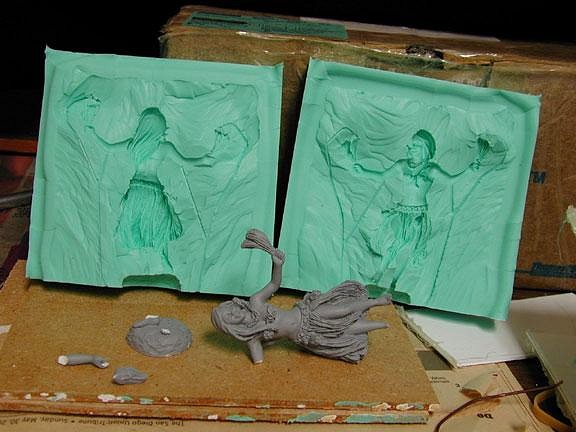
Here is the opened mold and what was left of the master. |
|
G

GROG
Posted
posted
on
Mon, Jan 1, 2007 10:14 PM
Awesome step by step photos and instructions.Thanks alot. GROG like. |
|
RD
Rum Demon
Posted
posted
on
Mon, Jan 8, 2007 10:01 AM
And? And? AND!?... How does it pour? I've never seen it explained so well in words and pictures. Very nice work. Would have come in handy when I learned this stuff. Despite being able to watch professionals at work, I still could have used graphic explanations of the whole venting process. Never used a key knife. We were taught to use a surgical scalpel all the way, cutting in tiny zigzags, giving the mold a "diamond" pattern until just before hitting the sculp. This way the whole damn thing is a key. Your way looks easier on the wrist. Excellent work. Can't wait to see these babies painted and lined up in a row. -Joe |
|
B
Bowana
Posted
posted
on
Tue, Jan 9, 2007 8:00 PM
Thanks GROG. Glad GROG like! Hey RD! I planned another segment showing how the pour works, but I got busy with another thread and this one went cold. I got kinda bored wth it. I'll have to get back on this one, then!. Thanks for looking! |
|
T
tikigap
Posted
posted
on
Tue, Jan 9, 2007 8:06 PM
Yes! Please dont get too bored with it just yet! We're all hangin' on to see what happens! I want to try this and your graphics and explanations are a very useful tutorial! Thanks! |
|
P
pdrake
Posted
posted
on
Wed, Jan 10, 2007 6:40 PM
your box is much prettier than mine.
i have to say i don't recommend foam board. i heard that legos were the shizzit. easy up/easy down oh, well. hopefully it will work out. what's your move on cutting a mold off of a wood piece you want to save, other than "veddy carefuwy"? |
|
F
finkdaddy
Posted
posted
on
Wed, Jan 10, 2007 6:49 PM
My neighbor does tons of very high-end, professional casts and he uses logos for almost everything. He also shoves cut-up pieces from old molds into the new mold when he pours it to take up space and use less product. He does the same with the actual resin. |
|
B
Bowana
Posted
posted
on
Wed, Jan 10, 2007 8:33 PM
Tikigap: Glad it's useful to you! Sorry I've been slacking. Pdrake: All right! You made a mold! Is this your first time? I've not tried foamcore board. How did it work (or not)? Have not tried Legos either. They're probably very sturdy. My advice on cutting open a mold and not harming the piece is to be vewy cawful! Is it a hook you've got in there? Using a photo or sketch of the piece is extremely helpful as reference. It's easy to forget where everything is when cutting, especially when you have to do it pretty much blind. Take your time. Stop and think if you get lost before you cut any further. Please post some pictures when you get it open. I want to see how you did. The three most important words to remember are: TAKE YOUR TIME. Good luck! Finky: I've also seen people use chunks of cured silicone as filler. I've never tried it myself because of the threat of delamination of the old silicone from the new. I'm too chicken to try it and risk losing a mold (especially one I'm being paid for). How has it been working for your neighbor? |
|
P
pdrake
Posted
posted
on
Wed, Jan 10, 2007 8:38 PM
it's my second attempt. the first was semi successful. see here . . . . http://www.tikicentral.com/viewtopic.php?mode=viewtopic&topic=21129&forum=7&start=45 i'll be extra careful. this is a moai carved from brazilian rosewood. it looks just like the moai on the cover of the BOT. foam board, not so good. too thick. it is sturdy, but i think i'm going to invest in legos. [ Edited by: pdrake 2007-01-10 20:39 ] |
|
B
Bowana
Posted
posted
on
Wed, Jan 10, 2007 9:12 PM
Looks like that one came out of the mold okay?
If the aperature for the pour gate was bigger it would help eliminate air pockets when pouring. You can widen it with an X-Acto. Also, when casting you can tip the mold and rotate it around to burp out any air bubbles. Pour a little, rotate, pour a little more, rotate. Like doing a little dance with it! :) |
|
B
Bowana
Posted
posted
on
Sat, Jan 13, 2007 10:48 AM
Here is how I go about pouring a mold such as this.
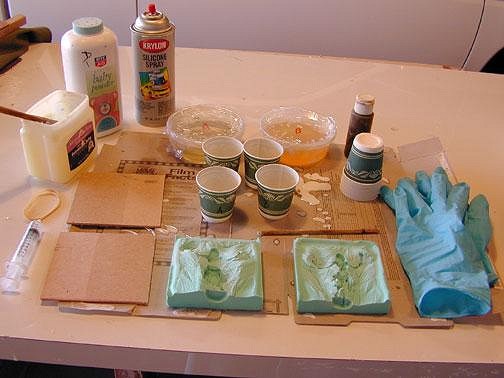
Things you will need (clockwise from top left corner): Okay! Got all that stuff?
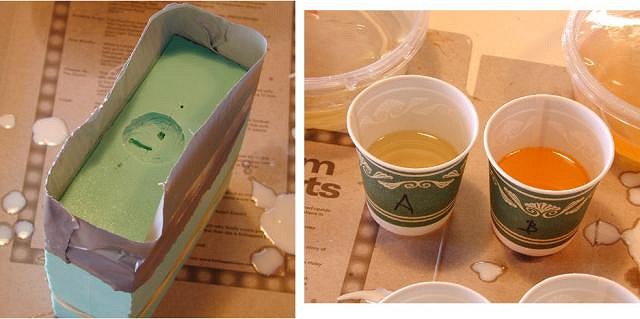
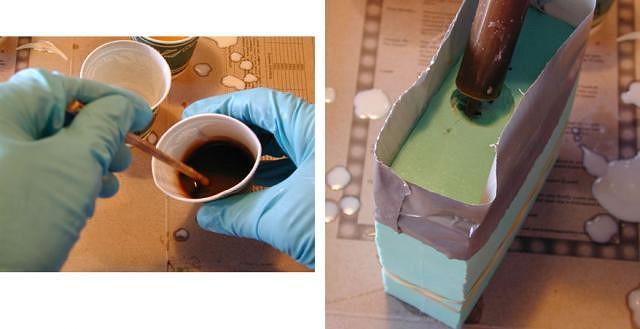
Some silicones tend to not release the casting as well as others. A shot of silicone release spray on both sides of the inside of the mold will help prevent this. This needs to be done between every few castings or when you feel the castings are beginning to stick. Allow the silicone spray to dry (5-10 min), then dust the inside of the mold (both halves) with baby powder or talc. This prevents pinhole sized bubbles from occurring on the surface of the castings. I don't know the physics of how it works, I just know that it does! Sprinkle it on, then blow it off to leave a fine dust on the surface of the mold. Do this before each casting. Carefully align the mold halves and fit them together as in the first picture. Sometimes depending on the size and shape of the mold, a couple of thin pieces of wood are needed to sandwich the silicone to help hold it together. In this case I found that rubber bands were all that was necessary. Duct tape was then wrapped around the top edge of the mold to prevent spillage while pouring (do this only if you are a neat-nut!). The second picture shows two evenly measured portions of the urethane parts A and B poured into Dixie cups. Some urethanes require measurement by weight, and some by volume, but they are always a 50/50 ratio. Make sure you know which type you have. Be sure to label the cups A and B. (Oh yeah, and put on your gloves) Prepare the syringe by brushing some Vaseline onto the rubber plunger. Cured resin will stick to it if you don't.
Pour the contents of part A into a separate Dixie cup. I like to add some resin tint to give it some color. Otherwise the castings are white and it's hard to read the surface. Mix the tint into part A until there are no swirlies. Add only a drop. In the picture it looks really dark, but when the resin sets it will be much lighter. Now add part B to the mix. Mix throughly until no swirlies. Stick the business end of the syringe into the cup and pull back the plunger to fill it with resin. Insert it into the mold cavity and fill the resin at a slow to moderate pace. Sometimes it's good to fill a little bit, then turn the mold slightly on it's side and rotate it, then continue filling. Do this until the mold is full. Urethane has a working time of 5-10 minutes depending on the room temperature so you will have to work quickly. Yeah, I know. Go slow, but fast.
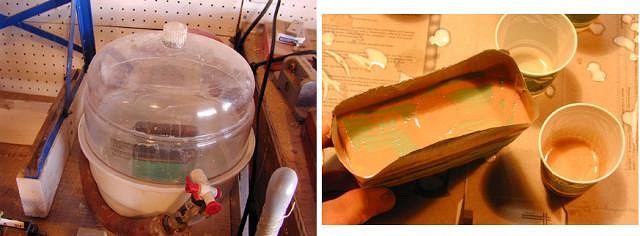
In this case I used a vacuum chamber to cast. The vacuum chamber pulls all the air out of the mold causing it to bubble and froth. (yummy) If you don't have one, you can still successfully cast. Just use the fill and rotate method. I happen to have one, so I use it. I don't want to get into talking about vacuum chamber casting too much because most people do not have them. The next picture shows how the duct tape contained the spillage. (If you are not using the vacuum it probably will not be this messy). You can also see how light in color the resin turned after setting. Untinted resin normally turns white after setting, so it would be the same as if a little bit of dark brown color was added to a big bit of white color. The result would be a light brown.
Wait about 20-30 minutes for the resin to completely set before opening the mold. Undo the rubber bands and carefully work the mold apart. You don't want to just pull it open because it may break the casting, depending on what it is. A simple shape like a Moai will be much easier to de-mold than a human figure. Flex the side of the silicone that is holding the casting to help loosen it. After the piece is carefully removed from the mold, trim away the vents and flashing around the figure with an X-Acto knife. I hope this has been helpful. I'm looking forward to seeing the results of anyone who posts them. Try it! :) |
|
P
Paipo
Posted
posted
on
Sat, Jan 13, 2007 12:11 PM
I wish this thread had been around a few months ago! I searched high and low on TC for info on casting to no avail. A couple of questions - I've noticed that whenever I use the mold release, it forms a glaze on the mold when it dries, and the dye seems to form little blotches where this occurs, so I get patchy colour on my casts, and they also come out quite shiny, which I don't like. Maybe it's the wrong sort of mold release? Does the talc not stick or get mixed into the resin? The only reason I haven't tried it is I'm afraid of having white dust stuck on the show side of my casting. Anyway, thanks for adding another definitive post to the TC knowledge base - I'm sure this thread will be of immense use to future efforts. |
|
B
Bowana
Posted
posted
on
Sun, Jan 14, 2007 7:06 PM
Hey Paipo- I use Krylon Silicone Spray when a release is needed. I've never had a problem with it causing the dye to blotch. It will however, put a slight gloss on your first few castings. Most of the molds I work with don't need any release. I only use it if I find that the flashing is sticking. What are you using as a release? Have you tried casting without it? Maybe you don't even need it. And what kind or resin are you pouring? I've never seen any evidence of talc leaving a white dust appearance on anything I've cast. |
|
P
Paipo
Posted
posted
on
Sun, Jan 14, 2007 7:17 PM
OK, I'll try the talc for sure...I think the mold release I'm using is the one you are meant to use for two part silicon molds (so the silicon doesn't stick to itself) - I asked for mold release when I ordered my supplies and that's what I ended up with. So, it's probably wrong for what I'm using it for. It does help with air bubbles, but it sounds like the powder does a much better job. I'm using alumilite regular for casting. The castings do come out looking nice with no mold release, but with air bubbles where the detailing is very fine. |
|
V
VanTiki
Posted
posted
on
Mon, Jan 15, 2007 11:11 AM
This thread is fantastic! I did a TON of molding and casting when I was working in LA - and I second all of the advice given above. I have always used foam core for making small molds - and it was the material of choice in the FX shop I worked at. The key I learned to make it easy is to use one strip of foam core that is scored only half way through 3 times to aid in folding it into a square. Tough to describe - mayhap this photo will explain better:
Talcum powder is great stuff for breaking the surface tension while casting - and I have found that drawing a cut line on the foam core inside the mold before pouring the silicone can help when cutting open complicated molds. Finally - the "roto-cast" method rules if you don't have a vacuum chamber! I would pour the resin, cap the pour hole, and GENTLY rotate the mold until the resin has set. I'd get a great surface every time - you just have to be sure to do it gently - and make sure the pour hole is plugged well! I had urethane pour down my arms and all over my watch on a sad occasion or two! |
|
P
Paipo
Posted
posted
on
Mon, Jan 15, 2007 12:56 PM
What brand of silicon is that? Mine's pink.... and what are you using to hold the foamcore to the base...hot glue? Any recommendations on materials would be good, as it's terribly expensive here so I want to make sure I'm getting the best results for my hard-earned money. v TC Thread v [ Edited by: Paipo 2007-01-16 16:23 ] |
|
V
VanTiki
Posted
posted
on
Mon, Jan 15, 2007 5:04 PM
Hey there - I use hot glue to stick the foam core to the base (which was discarded pergo floor shorts in this case - they make great little work tables!). The silicone in the photo is Silicones Incorporated GI 1000 - fabulous stuff that is also fabulously expensive. Lasts a long time, tho. They have several formulas depending on your application. I always freak out when I have to order silicone! I did just use some clear stuff lately that was not too pricey and held up really well.
I'll have to crawl around in the studio for the manufacturer's label... You can check out my "how to cast wax parts" section of my geocaching site here: http://www.geotiki.com/geotiki/studio.html Casting is always an adventure! |
|
B
Bowana
Posted
posted
on
Mon, Jan 15, 2007 9:08 PM
GI-1000 is my personal fav too. I've been using it for a good 14 years now. VanTiki speaks the truth that it's expensive though! The green silicone I used here is Rhodersil V-2025 made by Rhodia. It was available to me so I tried it. It's cheaper, but not as flexible as GI-1000. Plus, I was having some difficulty with the flashing sticking to the mold which never happened with GI-1000. Yes, I should be a sales rep for Silicones Incorporated. :) |
|
P
pdrake
Posted
posted
on
Tue, Jan 16, 2007 3:23 PM
mold making and casting videos . . . http://www.freemansupply.com/moldmaking.htm a little thing i found on the web while searching for supplies. some good info and pictures are always nice. |
|
B
Bowana
Posted
posted
on
Mon, Jan 22, 2007 9:09 PM
I have not used any of Freeman Supply's products, but they appear to be of good quality. In the San Diego/ So Cal area materials can be obtained from the following establishments: Diversified Materials Company (DMC) DMC has a website that for reasons unknown makes my computer screen freeze, so I'll not be posting the link. It's up to you whether you want to Google it and take a chance! Anyways, they carry silicone, urethane resin, and fiberglass, among other things. I have used their Silcast brand urethane resin. It's less expensive than some I've used, and I've never had a problem with it. Two drawbacks that I didn't care for though were that it's slightly translucent, which makes the surface detail of the castings difficult to read. I had to add some tint into every mix. (DMC also sells tint) The other thing I didn't like was that while most urethanes I've worked with are mixed equal amounts by volume, Silcast is mixed equal amounts by weight. You'll need a gram scale to weigh it out. If these two points don't bother you, then Silcast is a fine choice. I've not used their silicone, so I can't say anything about it except that it's called Silpak and I believe they sell it in 1 gallon kits. If anyone has used it or is going to use it, I'd be interested in how it worked. The majority of my experience with moldmaking silicone has been with a type called GI-1000 made by Silicones Incorporated. It's available through Circle K Products (not the convenience store) located in Temecula. Circle K Products They do not have a website that I have been able to track down, but if you give them a call they have a few very nice ladies who will answer all questions. They sell GI-1000 in 1 gallon kits, but you will get much more bang for your buck if you get a 5 gallon bucket. Just be sure that you are going to be making a lot of molds, or go in on it with your friends. It costs bucks! I'm very fond of it because in my 15 year career as a sculptor/moldmaker it has never let me down. If you order some, they will send it UPS to your door usually the next day. The casting resin I use most is available at Vagabond Corporation http://www.vagabondcorp.com/ (finally a website!) in Warner Springs. I use their Oderless White resin. Some resins are stinky, this stuff is not. You can buy it in two pint kits, two gallon kits, etc. It produces opaque castings and is measured by volume (which means you can pour out equal parts of A and B into Dixie cups for your mix. A scale is not necessary. It's more expensive than Silcast. Walco Materials http://www.walcomaterials.com/main.html in the LA area also carries a variety of silicones and resins. I've used their Mark II resin and have been very satisfied with the results. I see no difference between it and the Oderless White discussed earlier. (Hiltiki, this is for you) If you are looking to get some rifflers like I was using at the Chop-Chop, check out Sculpture House http://sculpturehouse.com/ and go to the rasp sets link in the wood carvers section. They also have a ton of carving chisles (Mieko, this is for you) http://www.sculpt.com/ The Compleat Sculptor is where you can order Magic-Sculpt. Have you tried some yet? They also carry carving tools. Hope this is useful. :) |
|
CS

Capt'n Skully
Posted
posted
on
Mon, Jan 22, 2007 9:44 PM
This is great info- Thanks! The local RC/Model-building shop's casting guru turned me on to Vagabond's model-cast.. He couldn't say enough good things about it for a first timer like me. I hadn't bothered looking them up online, but I'm glad you posted their link- Think I'll be ordering some color tint! |
|
P
pdrake
Posted
posted
on
Tue, Jan 23, 2007 8:26 AM
thanks dav. can you give me some more information about the tinting? your piece is very light, i'd like to go a dark brown or dark reddish brown. is there a better, more opaque tint? can you add too much to the resin so it won't set? just thought i'd pick your brain before going off into experiment land. thanks! |