LLT

Joined: Jun 12, 2006
Posts: 7757
|
LLT
Hello Everyone! Finally finished a Pyrographical Wonder this Week!
And the BEST PART.......
is that each stage was recorded so I could give all my friends a lil' walkthrough
concerning how to create one... My hope is that this inspires you all to create wonderful pieces,
as well as revive an often glossed over tool to create Art!
Ready?
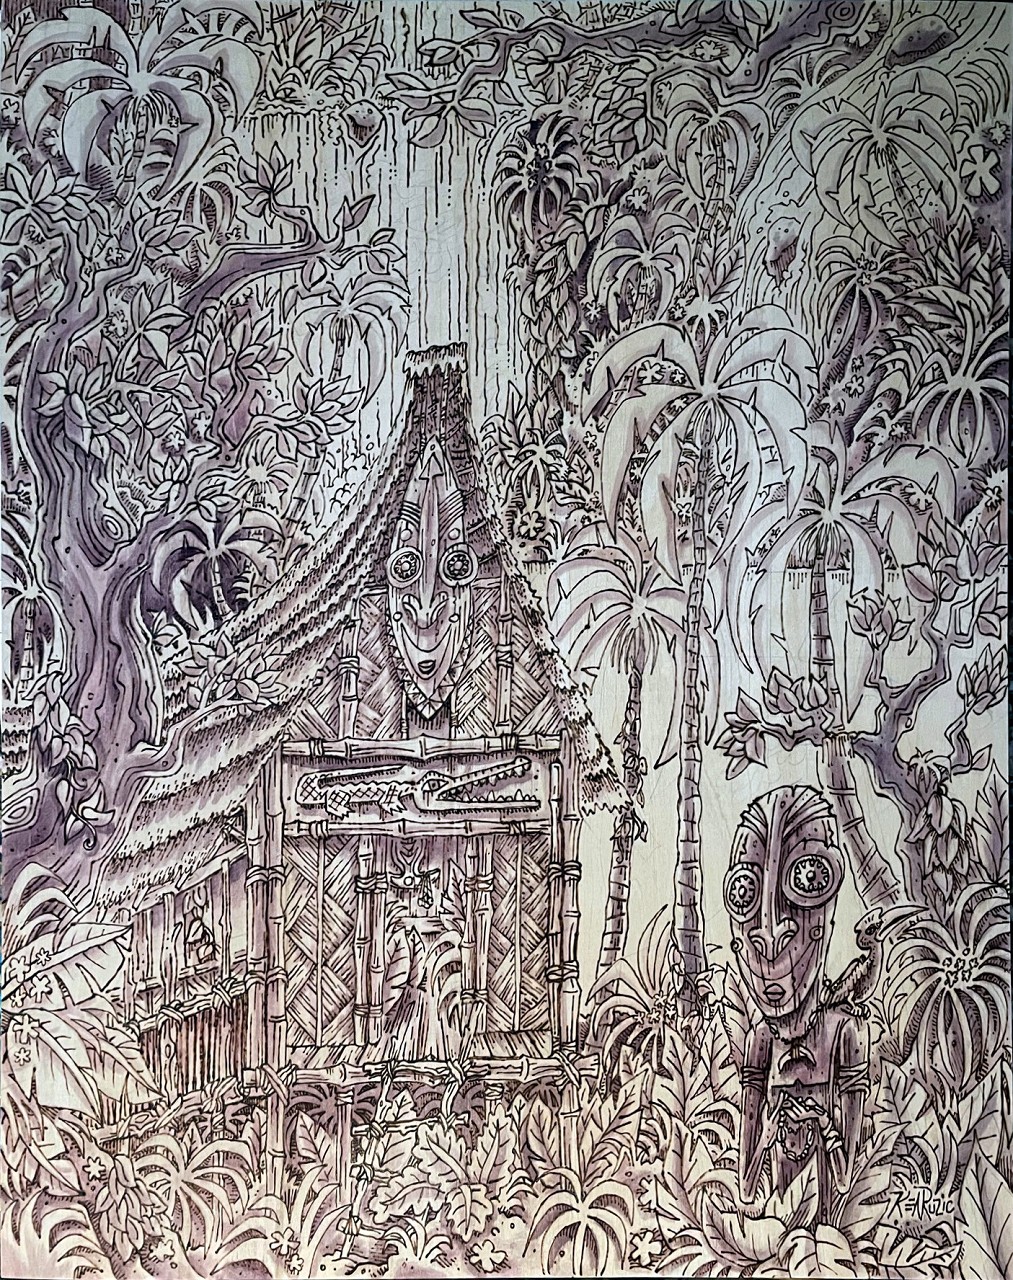
" Listening to the Waterfall" 16 x 20" pyrography and acrylic tinting on wood
Heeeeeeere We GO!
First off, you need some Wood!
Maple is the BEST but $$$$$
Poplar is a great less expensive substitute
and Basswood is pretty forgiving....
I mostly burn on Basswood,as it has a Light grain and when I turn up my temp on the woodburn
it feels like I'm just drawing, which is a great comfort zone for me when wielding a red hot instrument of art!
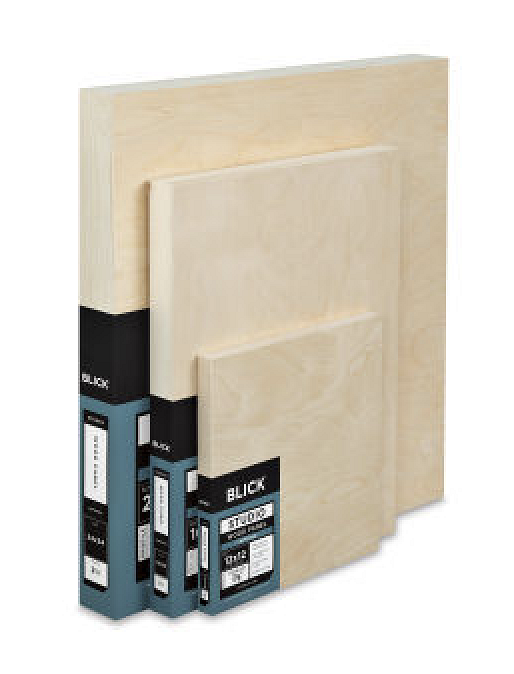 Blick has a range of sizes of pine wood cradled Basswood panels
that are worth the purchase....
a 16 x 20" one will run you around 25 bucks
so I suggest buying a 4 x 6" one for around $6 as a "practice surface"
or just a panel of basswood ,if you have a lumberyard/wood shop nearby.....
STEP ONE: Lightly sketch what you want to burn onto the surface
a soft lead, and a light touch is encouraged, as you're gonna have to erase it after you finish the
Blackline/woodburnt stage.....
Here's the entire fast sketch...No real reference, just me having some fun and putting the instinct on autopilot....
Blick has a range of sizes of pine wood cradled Basswood panels
that are worth the purchase....
a 16 x 20" one will run you around 25 bucks
so I suggest buying a 4 x 6" one for around $6 as a "practice surface"
or just a panel of basswood ,if you have a lumberyard/wood shop nearby.....
STEP ONE: Lightly sketch what you want to burn onto the surface
a soft lead, and a light touch is encouraged, as you're gonna have to erase it after you finish the
Blackline/woodburnt stage.....
Here's the entire fast sketch...No real reference, just me having some fun and putting the instinct on autopilot....
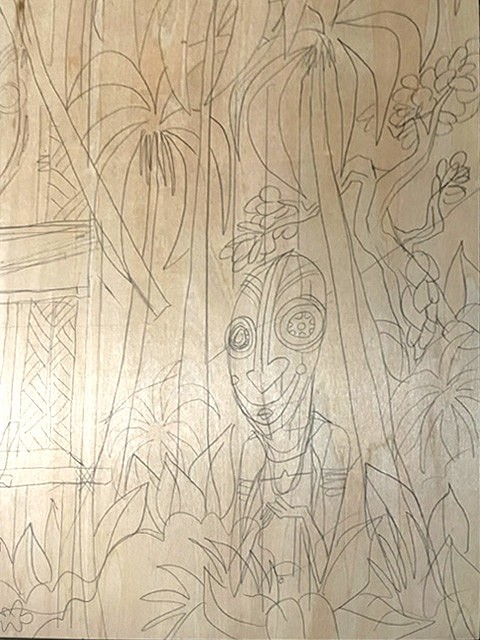
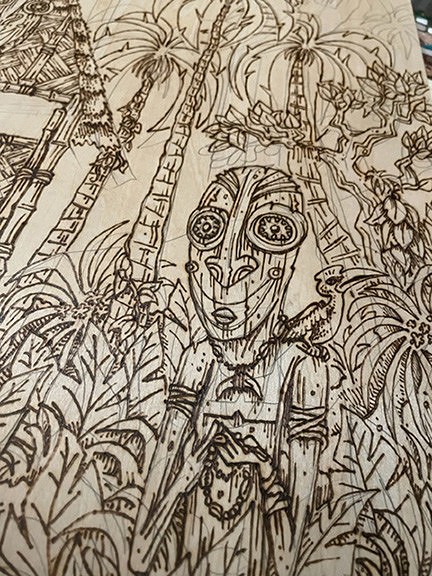
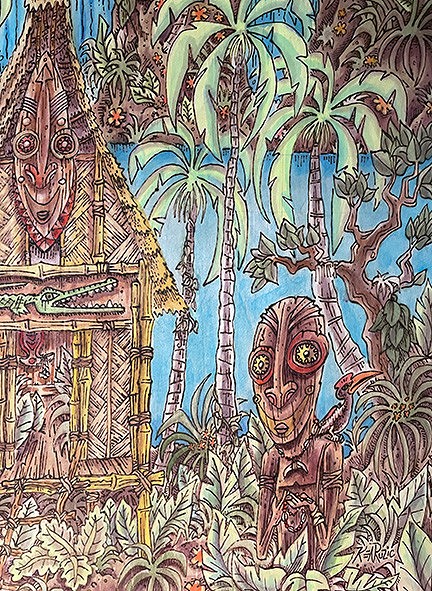
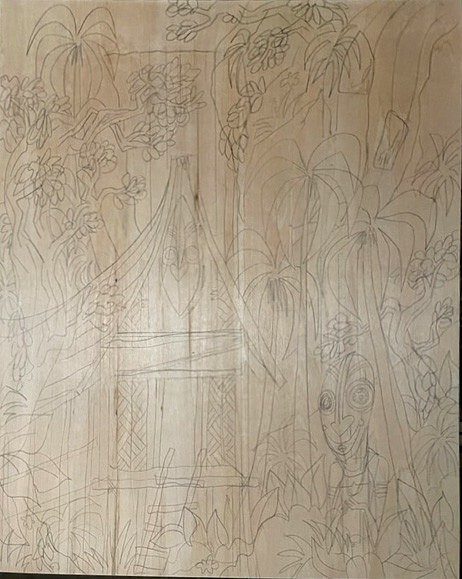 HAVE to add a Tiki to this pieces I sketched out this little gent
and wanted to give him a little story/something deeper than just a wooden sculpture hangin by a hut.
SO...it was decided by the inner-council to put some strung beads in his hands... And with that infamous Papua New Guinea "stare" He begins to appear to be contemplating something...in the zone, if you will.
Really having no title at this stage, this guy was the birth of the title....in a way....
HAVE to add a Tiki to this pieces I sketched out this little gent
and wanted to give him a little story/something deeper than just a wooden sculpture hangin by a hut.
SO...it was decided by the inner-council to put some strung beads in his hands... And with that infamous Papua New Guinea "stare" He begins to appear to be contemplating something...in the zone, if you will.
Really having no title at this stage, this guy was the birth of the title....in a way....
 All sketched up lightly....time for PYROGRAPHY!!!!
I used to work with one of those 20 buck kits ,until overuse one day
caused the tip to actually melt a bit! Not good! Fire hazard!
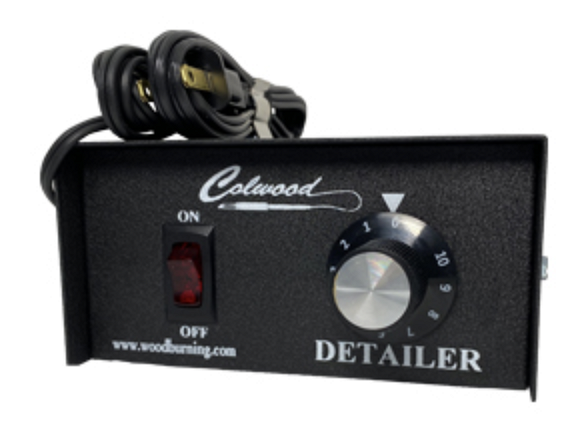
A dear friend sent me a ColWood kit that provided a wonderful learning curve
and prevented any mishaps.... I wouldn't be capable of such works without this
and I am forever grateful!
All sketched up lightly....time for PYROGRAPHY!!!!
I used to work with one of those 20 buck kits ,until overuse one day
caused the tip to actually melt a bit! Not good! Fire hazard!
A dear friend sent me a ColWood kit that provided a wonderful learning curve
and prevented any mishaps.... I wouldn't be capable of such works without this
and I am forever grateful!
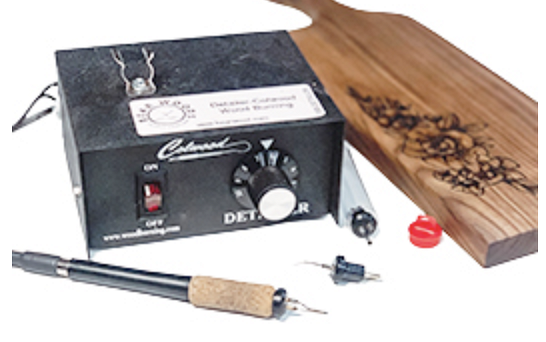 Being able to adjust the temperature of the tip, one can adjust it so it feels like sketching and drawing....
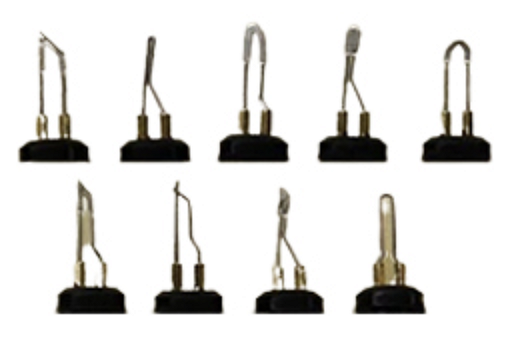
 Also, some kits come with a range of tips for different textures/etc.
For some reason,...I've just used ONE tip about 99% of the time...go figure!
Also, some kits come with a range of tips for different textures/etc.
For some reason,...I've just used ONE tip about 99% of the time...go figure!
 Enough Logistics!
Let's get down to BIZZNAZZ!
I like to work Left to Right with woodturning.
Now that doesn't mean I always start on the far left hand side...
If started in the middles draw to the right... I think it's so I can SEE the progression...
The temp dial is usually around 7-8 for my comfort zone.....
tho if I dropped the pen on my lap, comfort wouldn't be the end result...YOWz!
That being said: ALWAYS REMAIN VIGILANT when woodturning...
and turn off the pen when you want a break AND always be aware of the tip IS....
There's a lil clamp on the temperature dial boxes I always place it there and check that the unit is off...
Remember...you're drawing with FIRE!
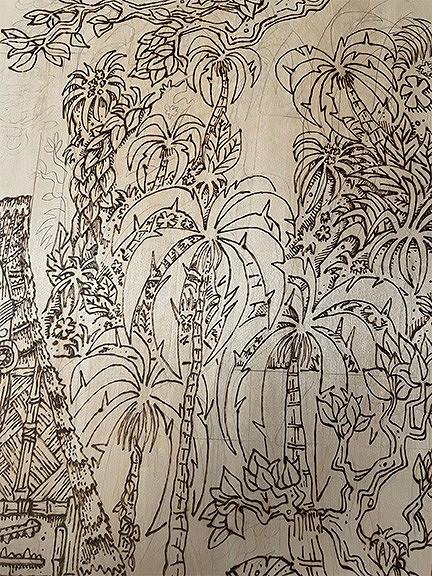
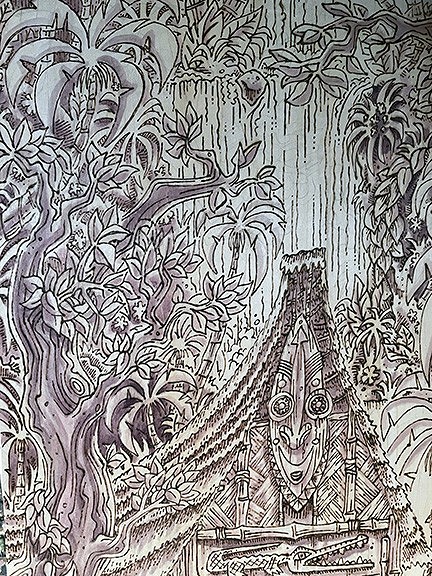
Here's some vegetation ,a tree, and some hut...
it's always good to start with "minor" elements
to warm you up before the good Stuff!
no pun intended...
Enough Logistics!
Let's get down to BIZZNAZZ!
I like to work Left to Right with woodturning.
Now that doesn't mean I always start on the far left hand side...
If started in the middles draw to the right... I think it's so I can SEE the progression...
The temp dial is usually around 7-8 for my comfort zone.....
tho if I dropped the pen on my lap, comfort wouldn't be the end result...YOWz!
That being said: ALWAYS REMAIN VIGILANT when woodturning...
and turn off the pen when you want a break AND always be aware of the tip IS....
There's a lil clamp on the temperature dial boxes I always place it there and check that the unit is off...
Remember...you're drawing with FIRE!
Here's some vegetation ,a tree, and some hut...
it's always good to start with "minor" elements
to warm you up before the good Stuff!
no pun intended...
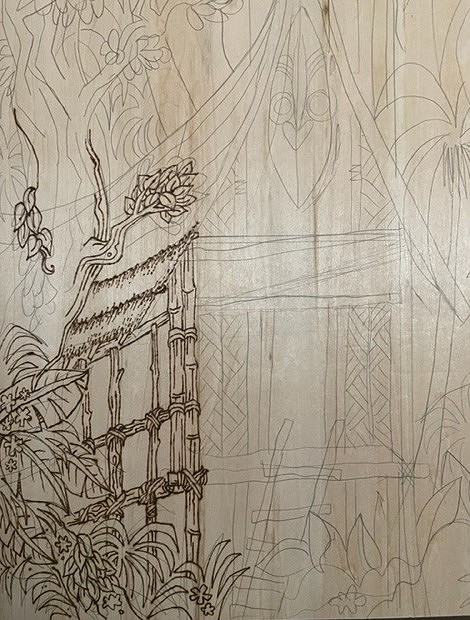 Here's a close-up to show the light pencil work...
The fun part is erasing the pencil in areas you have burned..
Then you are able to see your work without that "underpainting" thang....
Here's a close-up to show the light pencil work...
The fun part is erasing the pencil in areas you have burned..
Then you are able to see your work without that "underpainting" thang....
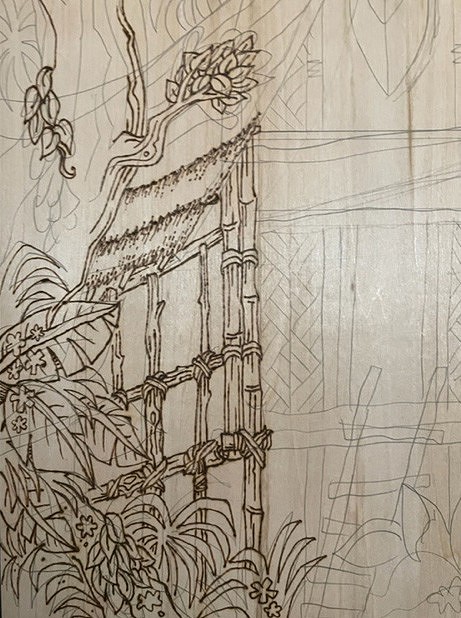 More Progress
The Cool thing about this technique is that you can pencil in additional details later
to make it more lusher to add something that a muse has handed you...
You'll see this later underneath the hut, when leaves and brush are added...
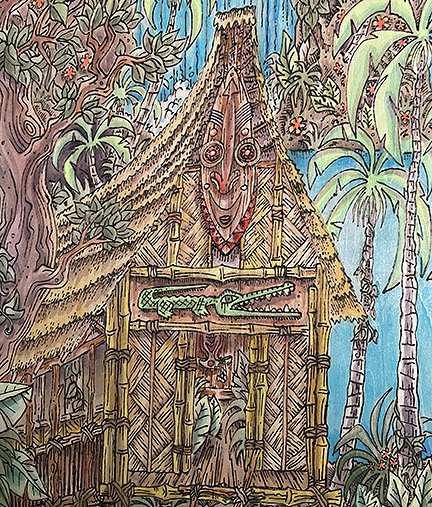
And LOOK! a Ladder! Didn't think I'd make a hut without a way for you all to get into it, eh?
More Progress
The Cool thing about this technique is that you can pencil in additional details later
to make it more lusher to add something that a muse has handed you...
You'll see this later underneath the hut, when leaves and brush are added...
And LOOK! a Ladder! Didn't think I'd make a hut without a way for you all to get into it, eh?
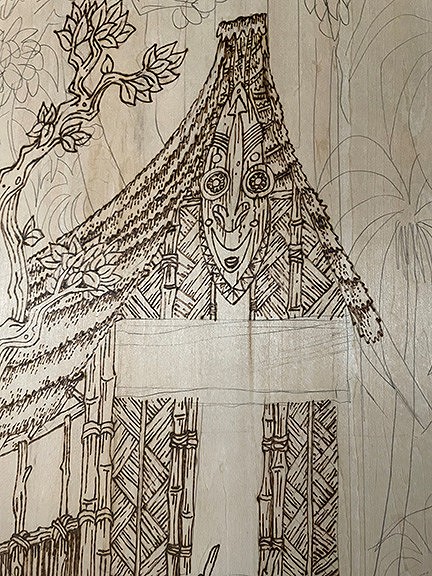
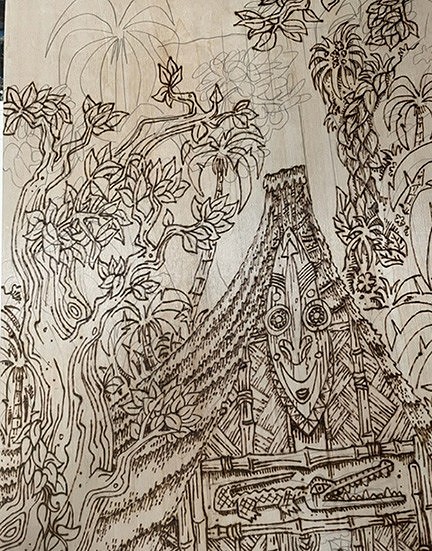
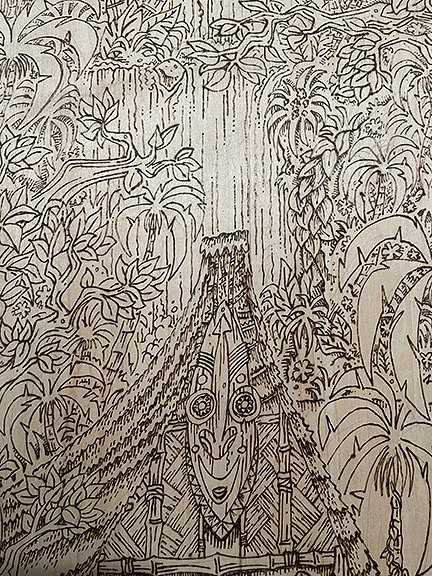
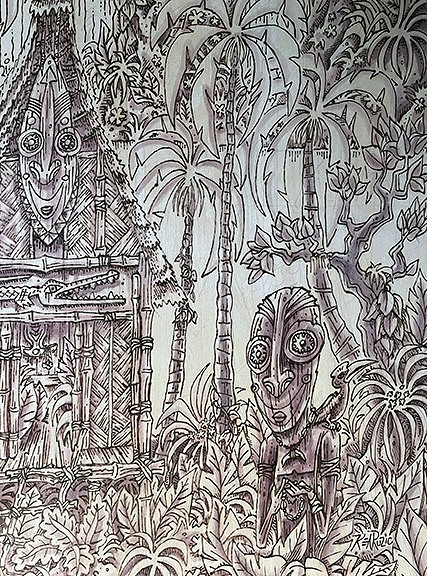
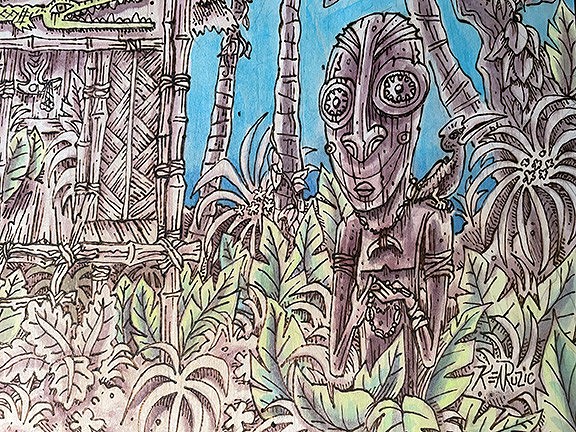
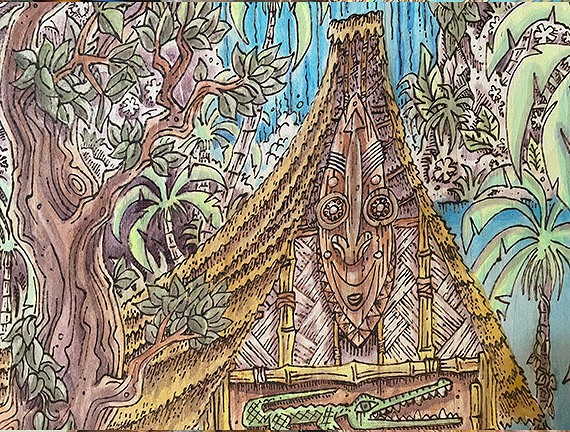
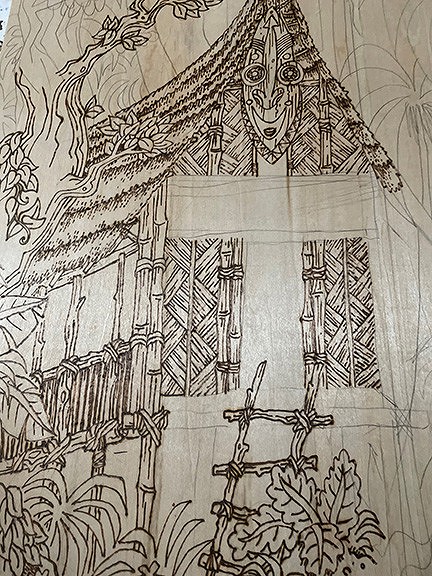 Who doesn't love a HUGE mask over the Doorway?
The direction and position of the mask Could or Couldn't denote a conversation/relationship between the two tiki carved objects.... Will have to wait and see what happens...
When you've been creating art for 30 some years, sometimes it's fun to let a piece speak to you
and tell you where to journey onward...That surprise always helps to revive that artistic apprehension and excitement of earlier years...
Who doesn't love a HUGE mask over the Doorway?
The direction and position of the mask Could or Couldn't denote a conversation/relationship between the two tiki carved objects.... Will have to wait and see what happens...
When you've been creating art for 30 some years, sometimes it's fun to let a piece speak to you
and tell you where to journey onward...That surprise always helps to revive that artistic apprehension and excitement of earlier years...
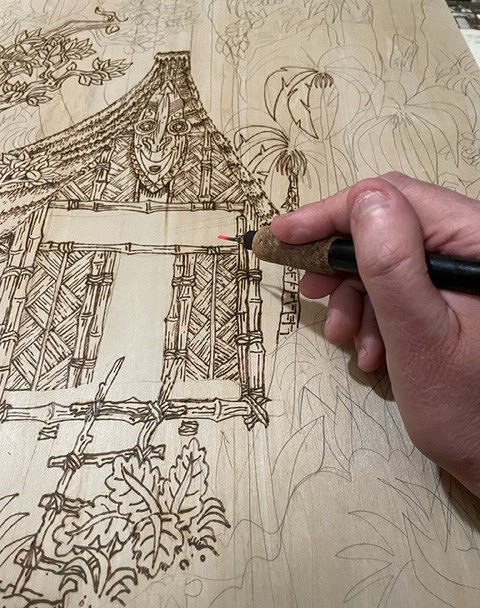
 Here's a picture in ACTION!
Note the red hot tip...
ALWAYS REMAIN VIGILANT!
Here's a picture in ACTION!
Note the red hot tip...
ALWAYS REMAIN VIGILANT!
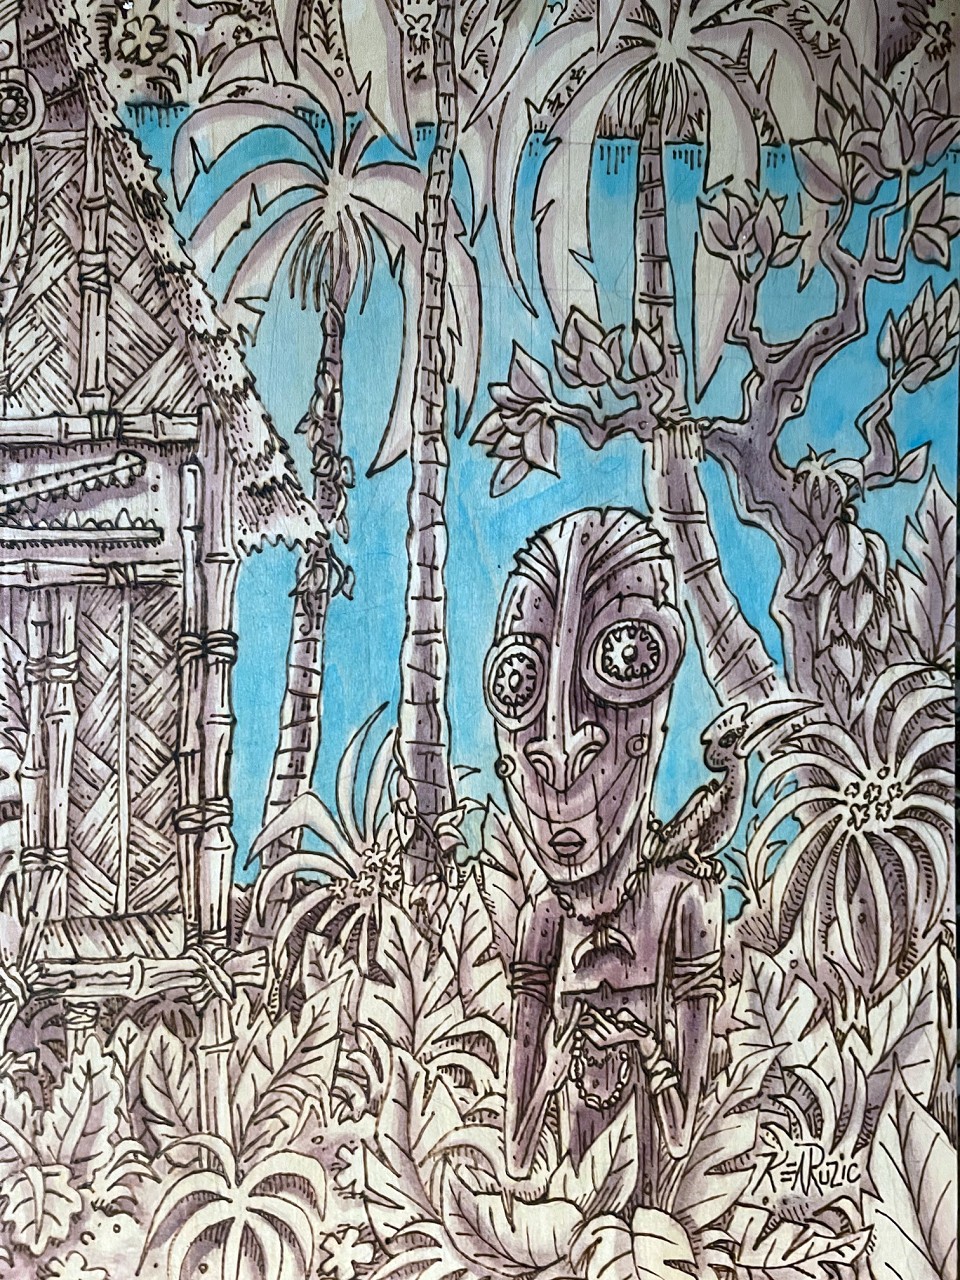
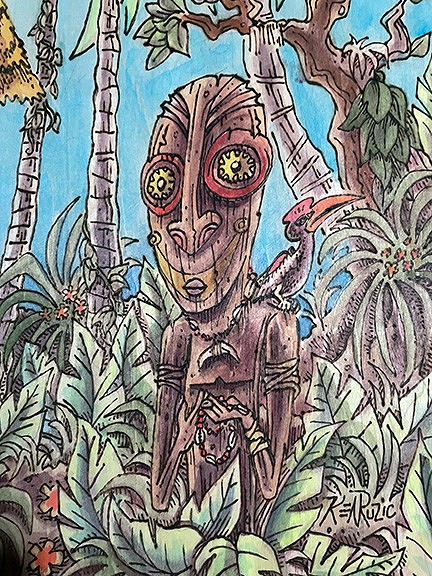
 Here he is!
With a hornbill on his shoulder and mindlessly fighting with the beads...
What has caught his attention?
Here he is!
With a hornbill on his shoulder and mindlessly fighting with the beads...
What has caught his attention?
 Panning back to give you a sense of what has been done thus far....
 And a closeup of this fellow...
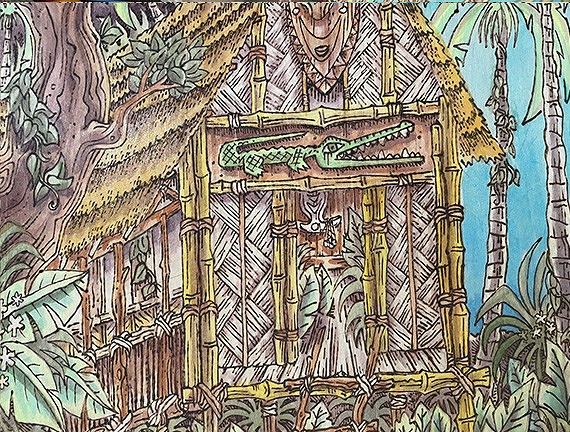
 Decided to throw a Carved Croc on the front panel of the hut.
and if you note...There are very few areas of deep shading
a heavier line here, some tics and lines to denote overlapped roof palm leaves or grass
but not much. this is because one has to think into the future!
Why do I say that? because this is only the first step...
COLOR ...adding Color will take care of the shadows and dimension...
this woodburn "drawing" is only the frame to assemble the rest of the structure...
unnerstand?
Decided to throw a Carved Croc on the front panel of the hut.
and if you note...There are very few areas of deep shading
a heavier line here, some tics and lines to denote overlapped roof palm leaves or grass
but not much. this is because one has to think into the future!
Why do I say that? because this is only the first step...
COLOR ...adding Color will take care of the shadows and dimension...
this woodburn "drawing" is only the frame to assemble the rest of the structure...
unnerstand?
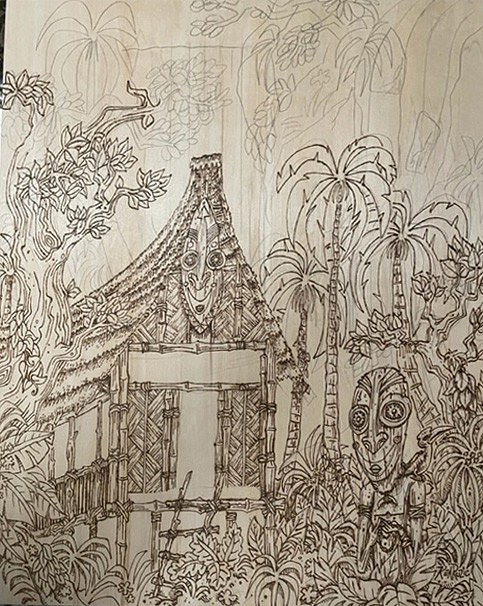
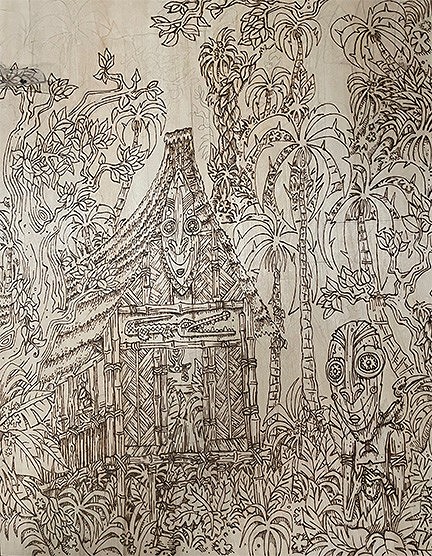
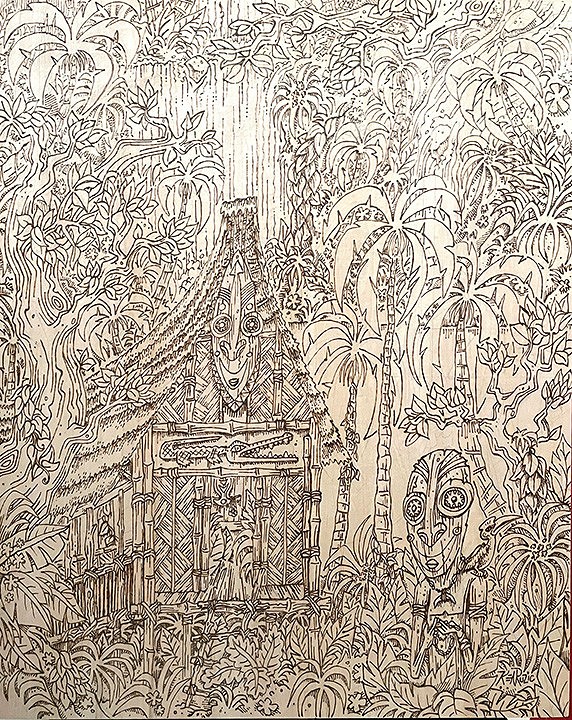
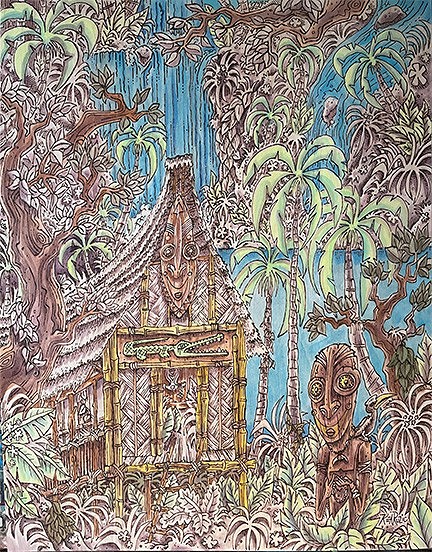
 Here's the whole piece
As you can see, I took care of under the hut, Right now it looks like a chaotic mess
but wait til COLOR...Color will help create the illusion of cool vegetation 'neath the hut!
Here's the whole piece
As you can see, I took care of under the hut, Right now it looks like a chaotic mess
but wait til COLOR...Color will help create the illusion of cool vegetation 'neath the hut!
 AND this is when the title popped in...
"Listening to the Waterfall"
That's why they are zoning off into the distance...
These tikis are just thinking and enjoying the coolness and sooting sounds of the distant waterfalls!
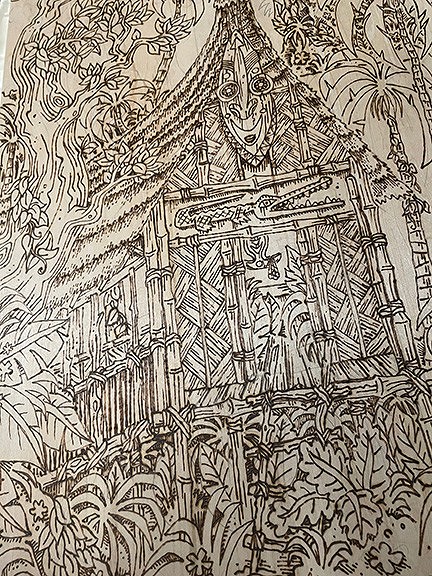
Here's some of the interior of the hut....
Now here's where I took some artistic liberties concerning dimension and logic.
I try to keep it wonky and uncertain when it comes to perspective and the actual dimensions of the hut.
I did this to be a straight shot INTO the hut for the viewer, an easy way to enter "beyond" what the piece shows....Sometimes ,creating a world ,and then bending that world's logic, creates a dream-like landscape where logic may not always be in charge....
AND this is when the title popped in...
"Listening to the Waterfall"
That's why they are zoning off into the distance...
These tikis are just thinking and enjoying the coolness and sooting sounds of the distant waterfalls!
Here's some of the interior of the hut....
Now here's where I took some artistic liberties concerning dimension and logic.
I try to keep it wonky and uncertain when it comes to perspective and the actual dimensions of the hut.
I did this to be a straight shot INTO the hut for the viewer, an easy way to enter "beyond" what the piece shows....Sometimes ,creating a world ,and then bending that world's logic, creates a dream-like landscape where logic may not always be in charge....
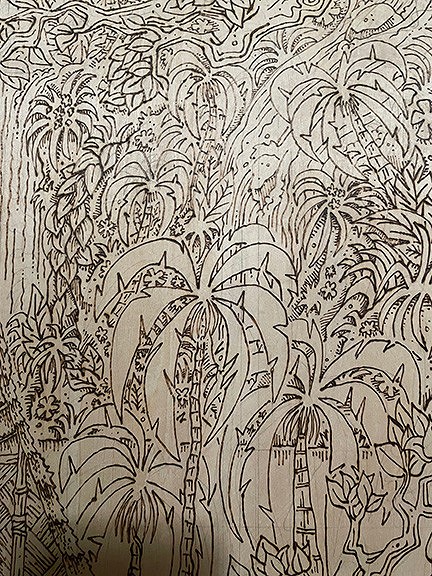
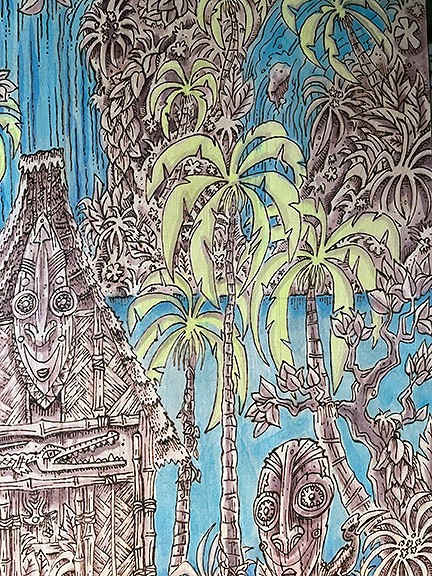
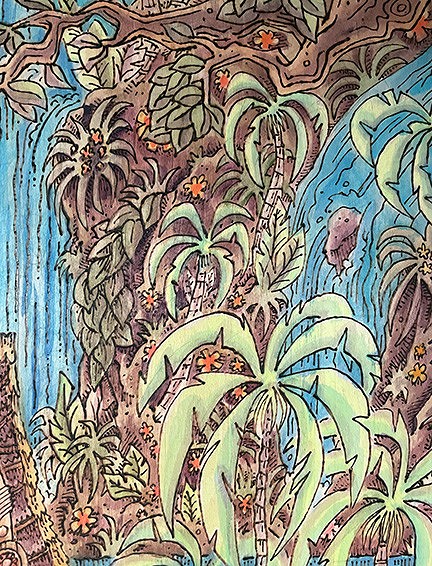
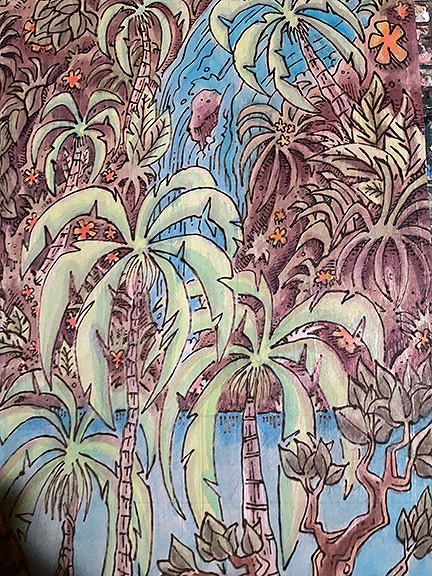
 Here are the palms, and the areas awaiting water.
Decided to lay low on details for the palm leaves...
Between that and the water, the eye will have a place to "rest" after hacking their way thrush jungle...
Here are the palms, and the areas awaiting water.
Decided to lay low on details for the palm leaves...
Between that and the water, the eye will have a place to "rest" after hacking their way thrush jungle...
 Aaaaaaaaand DONE! With this phase, at least......
 Here's the water, the waterfall, some rocks....
 I used a clear t-square to pencil in straight vertical lines to denote the flow of the water in the waterfall.
if I didn't do that, it would impede the flow of the water....
I used a clear t-square to pencil in straight vertical lines to denote the flow of the water in the waterfall.
if I didn't do that, it would impede the flow of the water....
 Right before I started applying the Maroon underpainting
(I use Angelus leather paints or Acrylic (both are Acrylic) paints watered down and applied very lightly
to indicate the shadows... if you go thick with the paint, you will COVER your woodburn,which may be okay when building up transparencies and stuff, but mostly it should be light washes so the wood burnt lines don't vanish.... Remember that once the paint seeps into the wood and dries
that it will lighten. So best advice during this stage is to complete a whole area, let it dry and then repeat until the whole first application/layer) of underpainting is done.
From there, you can deepen arras that require more shadows
(behind the hut/under the hut/under some brush..etc)
Right before I started applying the Maroon underpainting
(I use Angelus leather paints or Acrylic (both are Acrylic) paints watered down and applied very lightly
to indicate the shadows... if you go thick with the paint, you will COVER your woodburn,which may be okay when building up transparencies and stuff, but mostly it should be light washes so the wood burnt lines don't vanish.... Remember that once the paint seeps into the wood and dries
that it will lighten. So best advice during this stage is to complete a whole area, let it dry and then repeat until the whole first application/layer) of underpainting is done.
From there, you can deepen arras that require more shadows
(behind the hut/under the hut/under some brush..etc)
 Close-ups....
 And now, after all the shadows/lighting is resolved for this stage....
time for COLOR!
Let's start with BLUE,which I apply some water to the surface and THEN apply the watered down pigment to the wet surface (Avoid wetting the surface too close to the boundary of that color.keep it about 1/2 inch from there's you can brush the wet pigment up to that boundary without it bleeding beyond it..
Don't let it discourage you if it bleeds beyond that boundary....Wood is porous, just keep that in mind...
And art is hand-made.... and inconsistencies and flaws are the human part of us seeping out...
Aint no shame in that...
And now, after all the shadows/lighting is resolved for this stage....
time for COLOR!
Let's start with BLUE,which I apply some water to the surface and THEN apply the watered down pigment to the wet surface (Avoid wetting the surface too close to the boundary of that color.keep it about 1/2 inch from there's you can brush the wet pigment up to that boundary without it bleeding beyond it..
Don't let it discourage you if it bleeds beyond that boundary....Wood is porous, just keep that in mind...
And art is hand-made.... and inconsistencies and flaws are the human part of us seeping out...
Aint no shame in that...
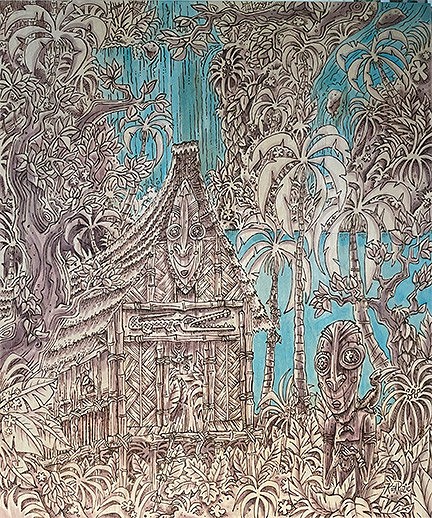 Closeup of the blue against the uncolored area
while the surface is wet, you can slowly add up pigments to create darker values of that color....
Closeup of the blue against the uncolored area
while the surface is wet, you can slowly add up pigments to create darker values of that color....
 Started on the palms.....
Note that by using "washes" of color, it allows the maroon underpainting to show thru
which gives them more of a dimensional feel, like they're rustling in the wind!
Also, if you look near the waterfall, you'll see a few areas where the "water" blue color seeped into the palms...
like I said....it's hand-made!
:)
Started on the palms.....
Note that by using "washes" of color, it allows the maroon underpainting to show thru
which gives them more of a dimensional feel, like they're rustling in the wind!
Also, if you look near the waterfall, you'll see a few areas where the "water" blue color seeped into the palms...
like I said....it's hand-made!
:)
 Another advantage of washes ,is that you can overlap colors to create new ones,
or just to balance out the colors in the piece... I added some blue wash to the leaves to give them a more gradual "curl" when viewed....it also reinforces the cool of that area.... being in the shade and all...
Another advantage of washes ,is that you can overlap colors to create new ones,
or just to balance out the colors in the piece... I added some blue wash to the leaves to give them a more gradual "curl" when viewed....it also reinforces the cool of that area.... being in the shade and all...
 started on the wood parts and a bit of the bamboo...
 Here you can see where I added the wood color to the hut and bamboo areas to make them "related" , a cohesive unit.... Also on the tree, i have added washes of the brown to further enhance the maroon underpainting...
 Top O' the Hut to Ye!
 a little more work on the wonky interior....
 Slooooowly coming together....
 Began to color in other leaves, from the citron green to a light and dark olive...
also added a DASH of red orange, which looks more red than orange here....
for details on the tikis/the hornbill.and the yellow flowers...
Also started on the maroon ground, to tie the whole thing together with a bow!
Began to color in other leaves, from the citron green to a light and dark olive...
also added a DASH of red orange, which looks more red than orange here....
for details on the tikis/the hornbill.and the yellow flowers...
Also started on the maroon ground, to tie the whole thing together with a bow!
 some waterfall action....
 And here it is....Pretty much done!
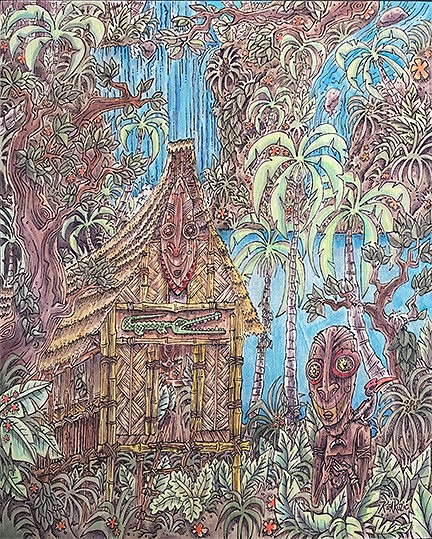 the HUT!
 Here's the mask with his expression....
 And a close-up of the Faraway Thoughts Tiki!
 And a final closeup of the source of their solace....
a Waterfall!
And a final closeup of the source of their solace....
a Waterfall!
 Thanks so much for visiting ,and I hope this has inspired you to do some great things involving woodburning! Can't wait to see them!
Any questions or whatnot, please put them down here and I will answer to the best of my ability!
Hope you had as much fun as I had sharing this!
We shall Chat SOON!
Thanks so much for visiting ,and I hope this has inspired you to do some great things involving woodburning! Can't wait to see them!
Any questions or whatnot, please put them down here and I will answer to the best of my ability!
Hope you had as much fun as I had sharing this!
We shall Chat SOON!

|