Pages: 1 2 3 4 5 6 7 8 9 10 11 12 13 14 15 16 17 18 19 20 21 22 23 24 25 26 27 28 29 30 31 32 33 34 35 36 37 38 39 40 41 42 43 44 45 46 47 48 49 50 51 52 53 54 55 56 57 58 59 60 61 62 63 64 65 66 67 68 69 70 71 72 73 74 75 76 77 78 79 80 81 82 83 84 85 86 87 88 89 90 91 92 93 94 95 96 97 98 99 100 101 102 103 104 105 106 107 108 109 110 111 112 113 114 115 116 117 118 119 120 121 122 123 124 125 126 127 128 129 130 131 132 133 134 135 136 137 138 139 140 141 142 143 144 145 146 147 148 149 150 151 152 153 154 155 156 157 158 159 160 161 162 163 164 165 166 167 168 169 170 171 172 173 174 175 176 177 178 179 180 181 182 183 184 185 186 187 188 189 190 191 192 193 194 195 196 197 198 199 200 201 202 203 204 205 206 207 208 209 210 211 212 213 214 215 216 217 218 219 220 221 222 223 224 225 226 227 228 229 230 231 232 233 234 235 11,235 replies
|
T

TikiHula
Posted
posted
on
Fri, Feb 7, 2014 2:02 PM
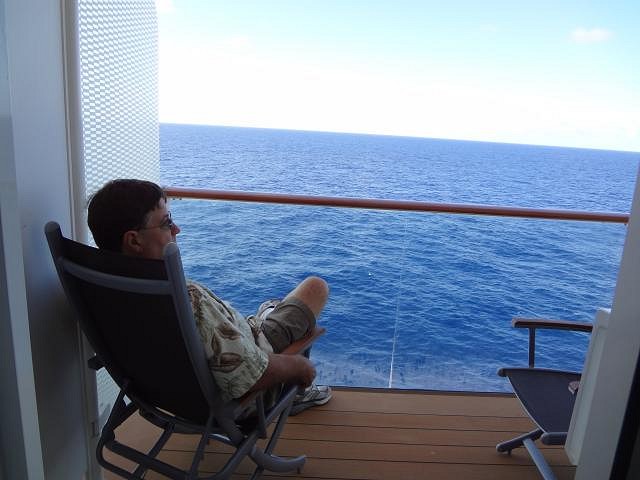
I can't get over the size of the ship! And that looks so relaxing just hanging out there on a private balcony overlooking the vast Caribbean Sea... Dan is one sharp dressed man :)
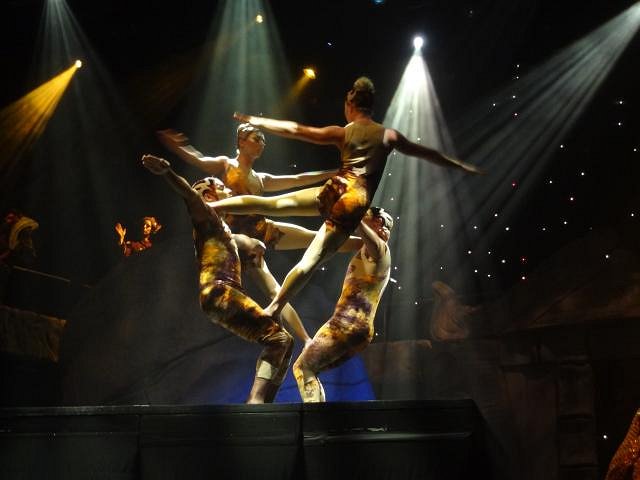
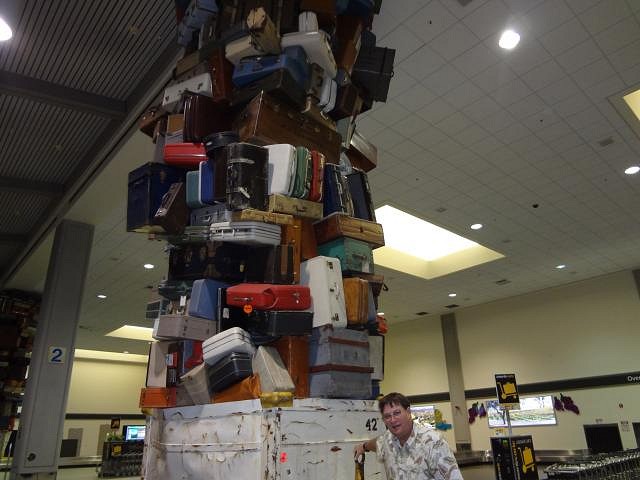
Now I'm picturing a fish circus :) The airline additional luggage charge must have been enormous! Mahalo, Dan and Wendy, for all the great photos and for taking us along on your adventure :) |
|
T
TikiHula
Posted
posted
on
Fri, Feb 7, 2014 2:06 PM
Did you get CJ seven layer cake to go with the seven layer sandwich? Love CJ |
|
D

danlovestikis
Posted
posted
on
Sat, Feb 8, 2014 10:35 AM
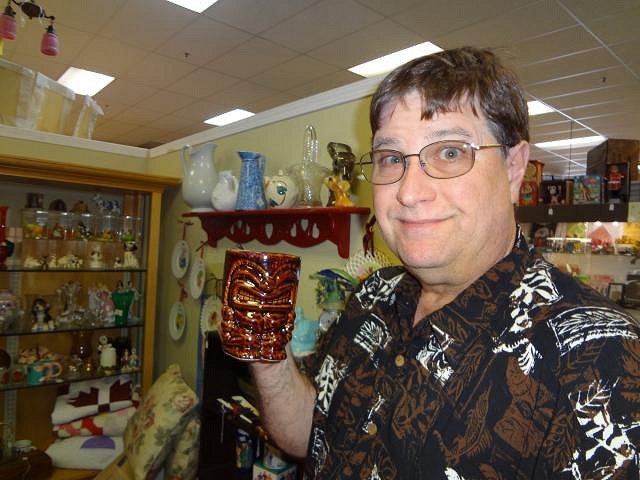
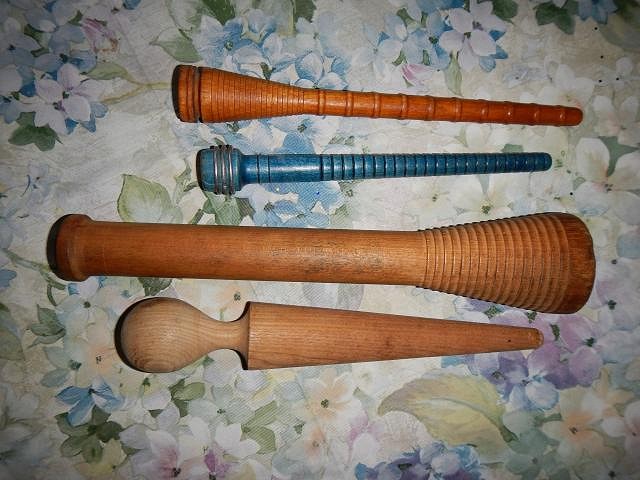
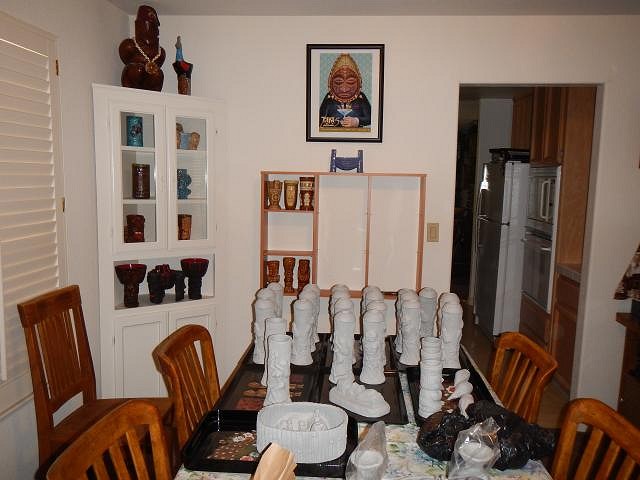
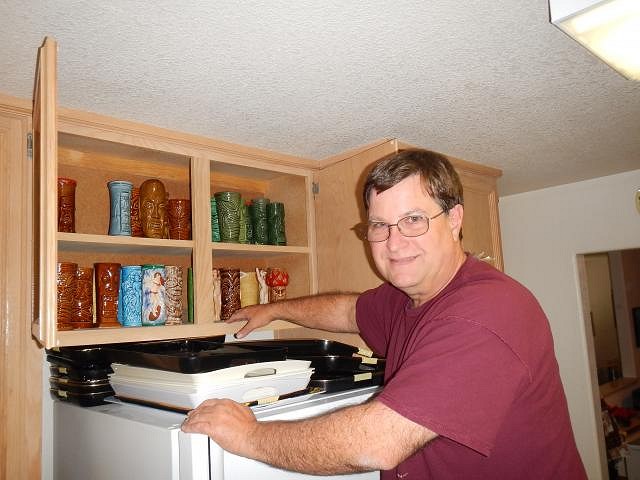
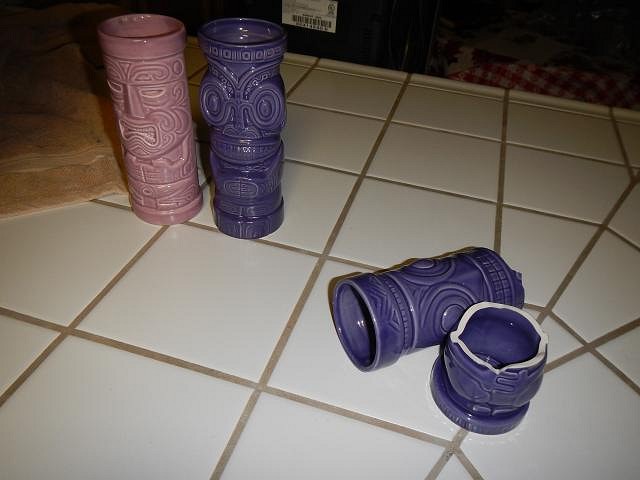
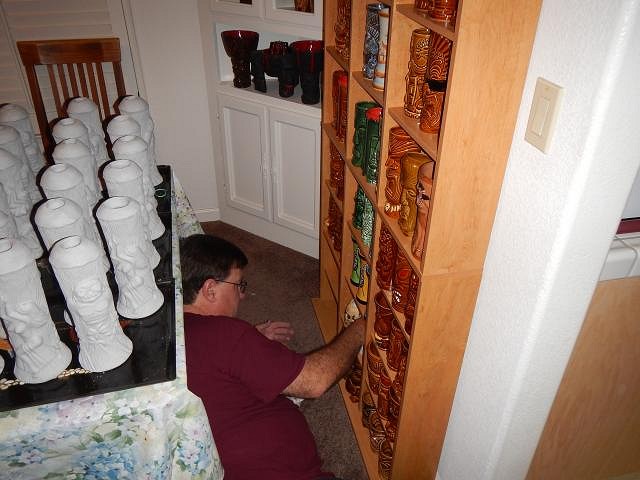
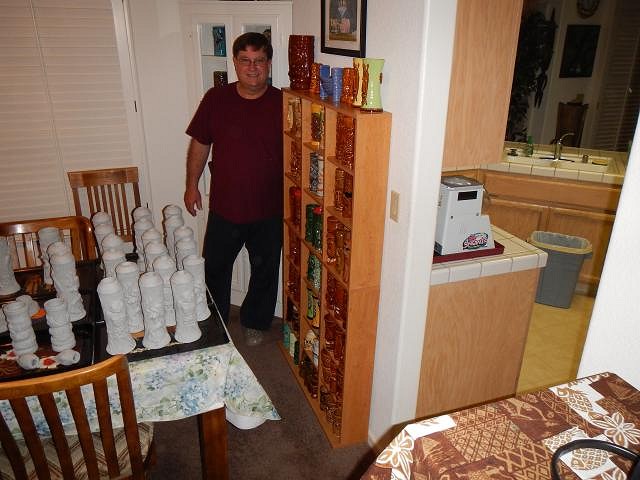
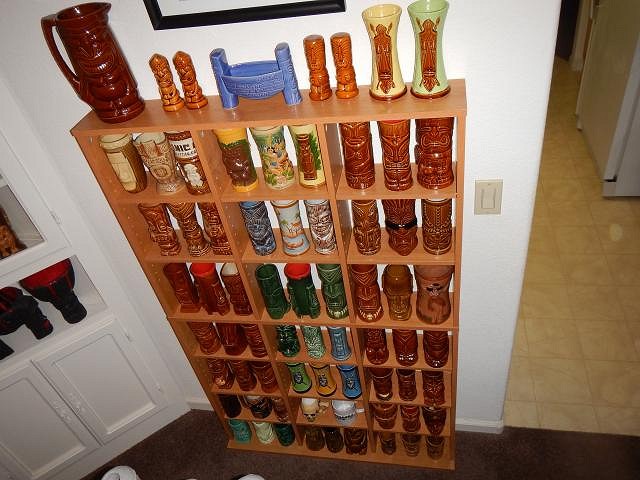
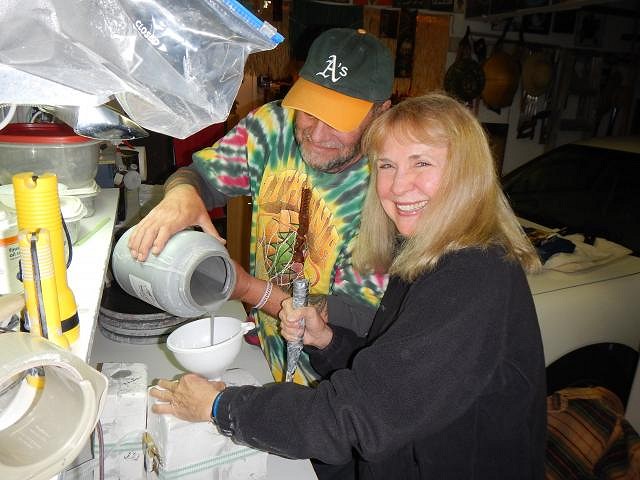
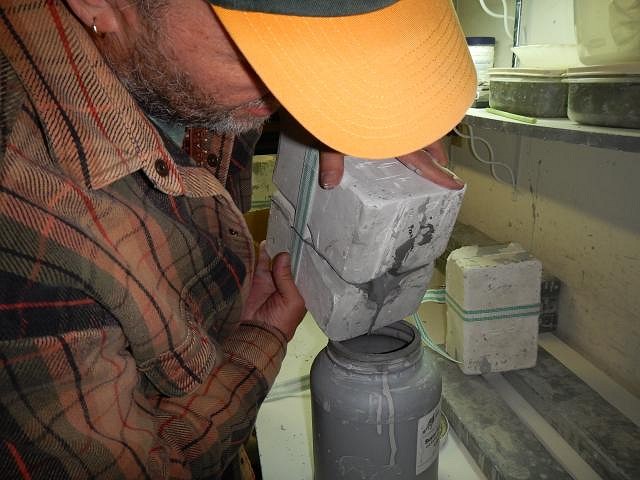
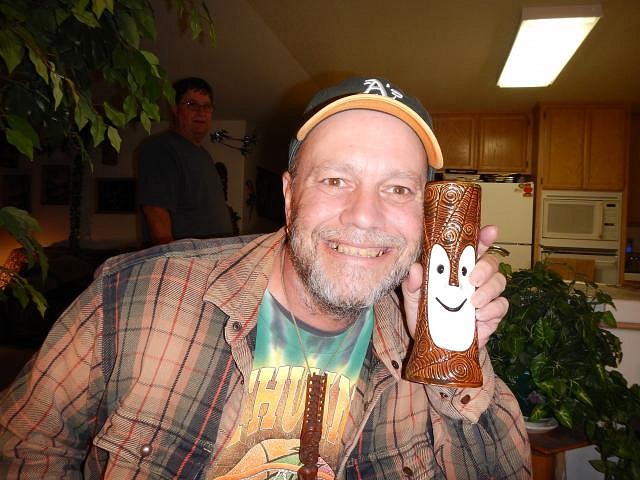
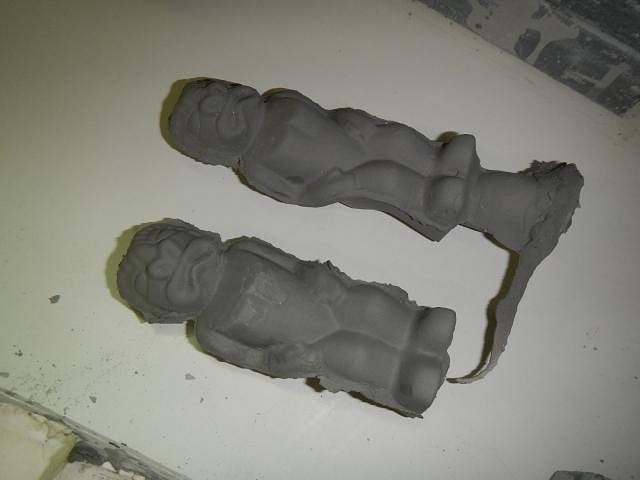
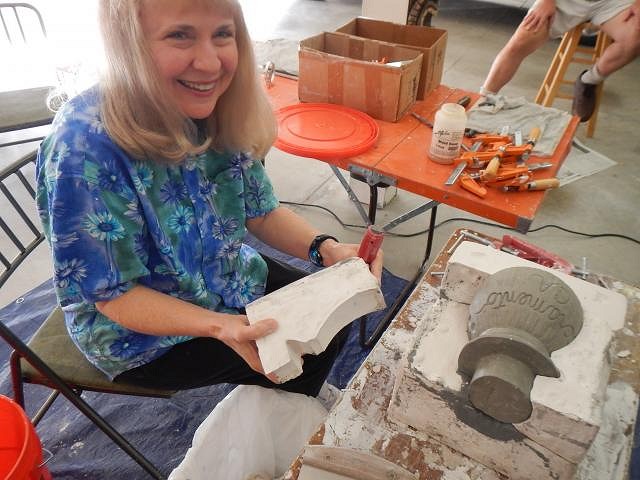
Tiki Hula, Dan said no cake because he's trimming. =================================================== later Dan found a new, most likely made in china mug. It was heavy so he decided to purchase it. I like old wooden items I can use with clay. These are the ones I bought this same day. When we were in a Cancer Society store I found a wonderful CD rack for $40. I told Dan I had to have it. He said we had no room for it and I told him we did. We brought it home and I surprised him by putting it in the newest tiki room and by telling him it was for him to fill up. He started by pulling tiki mugs out of the cupboards in the kitchen. Oops he was so sad when he dropped one. He started filling up the new unit. He had such fun. All done. =============================================================== A Clay Day with Bullet aka Kingstiedye Bullets Wish List request was a set of Frankoma Salt and Pepper shakers. You can find the story of these on Page 1 of this thread. Making these is a special gift from Joniece Frank a dear friend. Always a thank you to Traveling Jones for introducing us so many years ago. Step one, pouring slip into the mold. Step two, wait an hour and pour the slip out. Let it sit over night to completely drain upside down. Bullet told me a description of a Bob he would like me to make. I had exactly what he wanted, color and carvings, in my personal collection. We made a trade so that Dan would be having a fun day too. Step three, shave your head and face until completely nude. Return to open the molds. Step four, gently remove them. Step five, admire your work. Step six, clean off the mold lines. One done one to do. Barrow a set of Frankoma salt and pepper shakers so that we could match up the holes on the tops. Done. Happy Camper. Thank you always for the visit, cheers, Wendy PS rain in California we rejoice [ Edited by: danlovestikis 2014-02-08 10:58 ] |
|
T
TikiHula
Posted
posted
on
Sat, Feb 8, 2014 1:09 PM
Dan, looks like your rain dance worked! KTD, it's fun working with Wendy, huh. |
|
V

VampiressRN
Posted
posted
on
Sat, Feb 8, 2014 1:21 PM
Way to go Bullet...looking good, can't wait to see the finish product. Hey Dan...in that tux, you could be the next Bond!!! |
|
L

LoriLovesTiki
Posted
posted
on
Sat, Feb 8, 2014 5:30 PM
Wendy, That lobster and Beef Wellington dinner looked YUMMY! I love LOVE lobster! As well as most other seafood, as well. Due to your cruise report I'm putting Celebrity on my list. No cruise for us this year but one day I want to go on a Carribean Cruise. This year we're remodeling our kitchen, enjoying our tiki backyard and if we're really lucky, maybe going to St. Thomas with the kids. Mahalo for sharing! |
|
D
danlovestikis
Posted
posted
on
Sun, Feb 9, 2014 9:36 AM
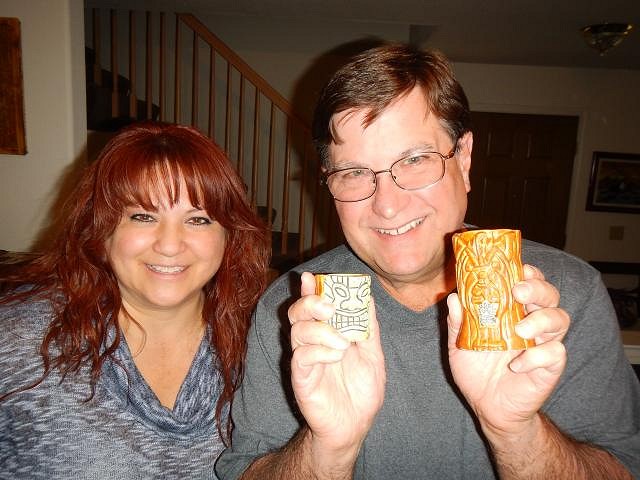
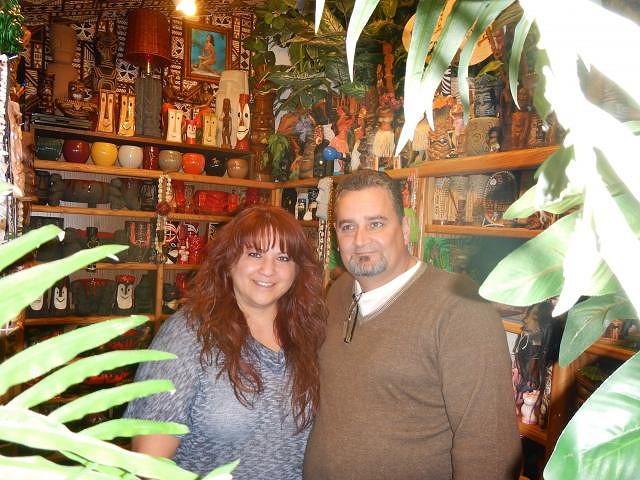
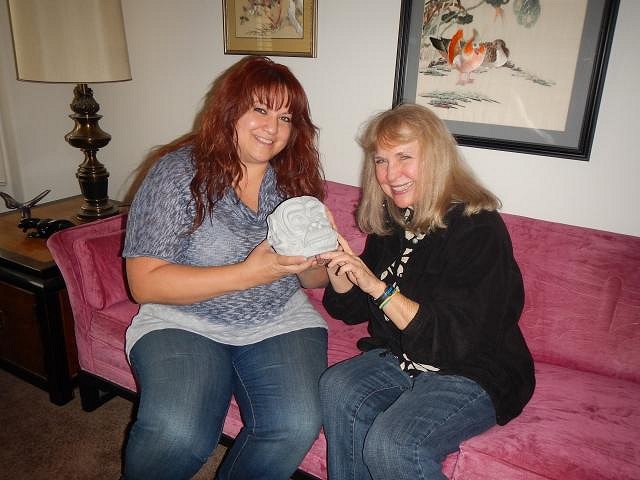
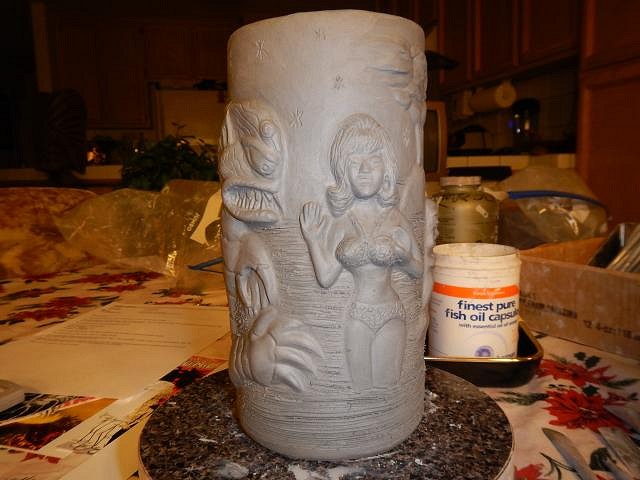
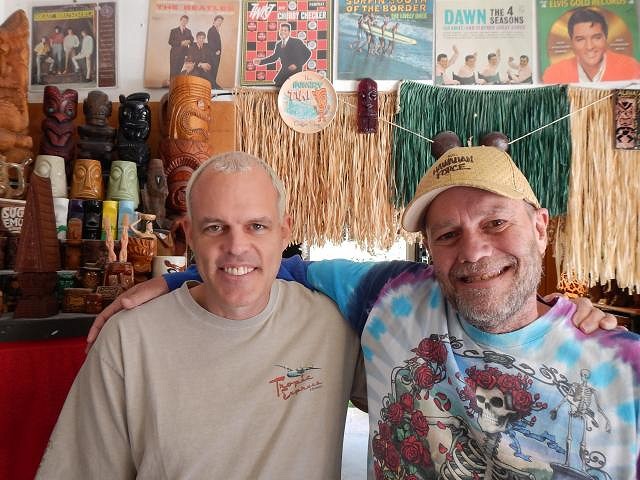
TikiHula I took a photo of Dan during his rain dance. Here it is. VampiressRN two cute guys into tiki. LoriLovesTiki ST. THOMAS is a good choice. ================================================================== Today I stopped by facebook to see what's happening there. I saw a beautiful post by Dale to his lovely wife Tiki Tonie. I believe that they are having their 22 wedding anniversary today. One week ago Tiki Hula and they came to our home for a visit. She brought Dan three of her tiki mugs. She is a skilled ceramic artist and you'll be seeing her work on this section of Tiki Central under Tiki Tonie. Dan was admiring her logo on the bottom of the mug while her husband and Tiki Hula watched. My photos don't do these justice they are terrific. The larger mug is their dog with a tiki necklace. After they gave us the gifts we took them for a tour of Dan's collection.
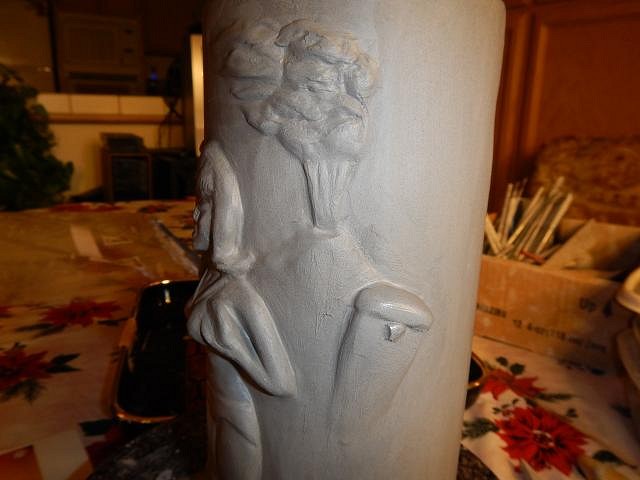
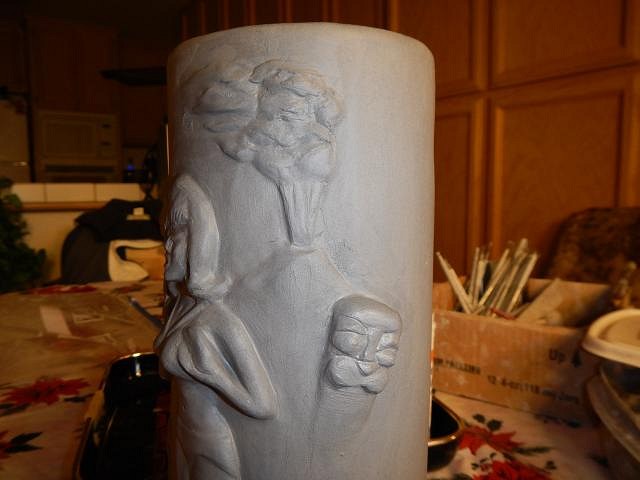
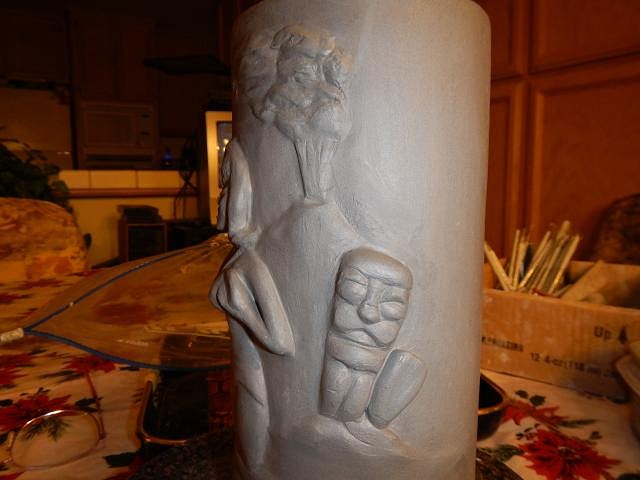
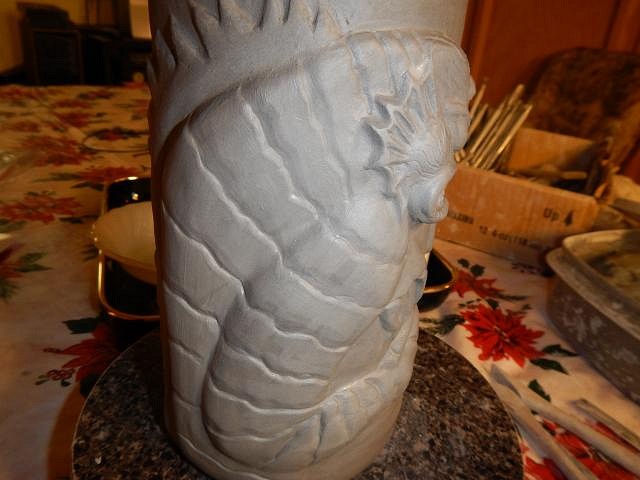
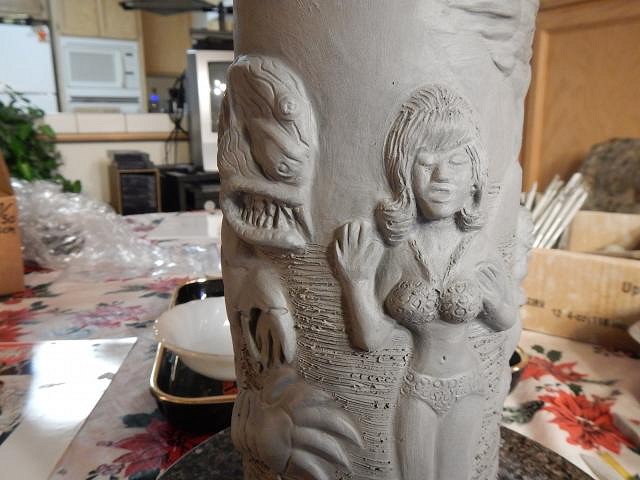
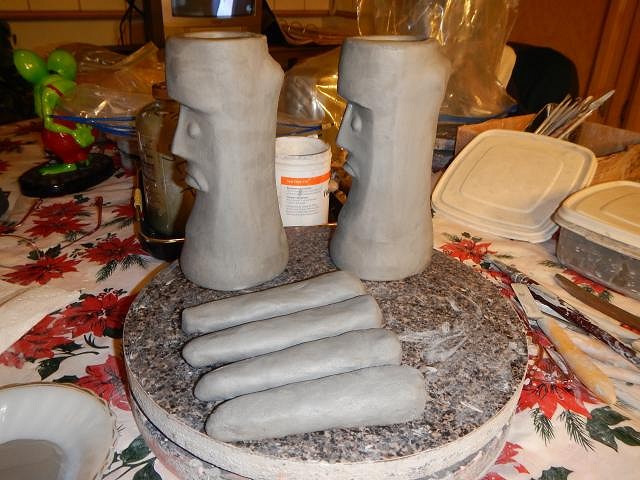
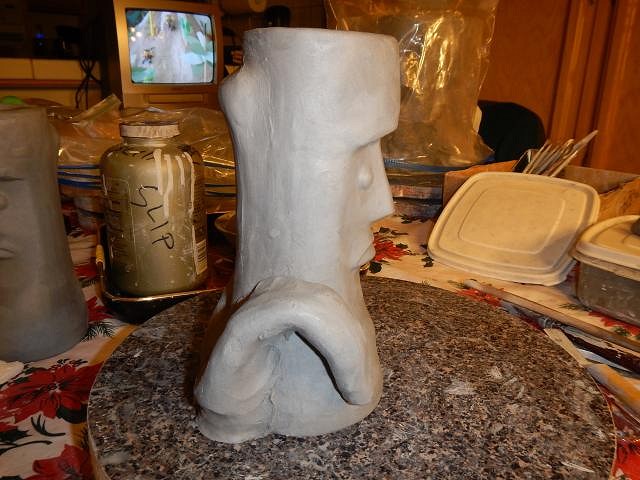
After the tour we went over her latest creation based on Planet of the Apes. She'll be posting when she begins the mold process. Thank you again Tiki Tonie and Dale for the wonderful gift. =========================================================== I started with a the addition of a volcano and tikis from the Mark Rydon (sp?) photo she had sent to me. One tiki then two tikis on a rock. Next I worked on the head fin and the body scales. Face detail added and then using water I smoothed the body scales. I carved out clay from the back fin and then smoothed it with water. ===================================================== Shortly Tiki Hula will be here for another clay day. Cheers, Wendy |
|
H

hang10tiki
Posted
posted
on
Sun, Feb 9, 2014 6:47 PM
The new items are lookin good.... |
|
D
danlovestikis
Posted
posted
on
Mon, Feb 10, 2014 8:01 AM
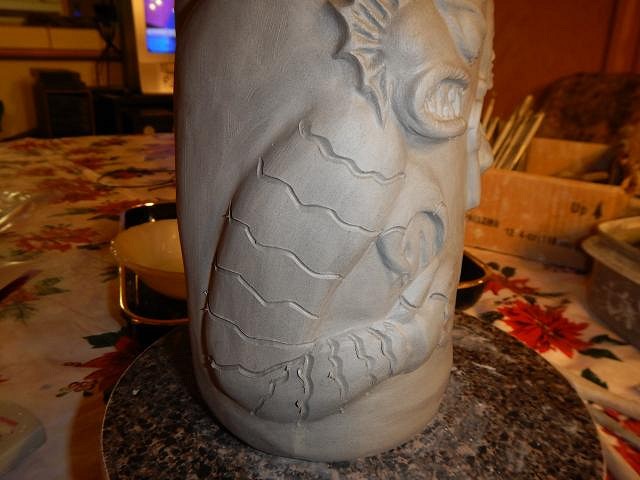
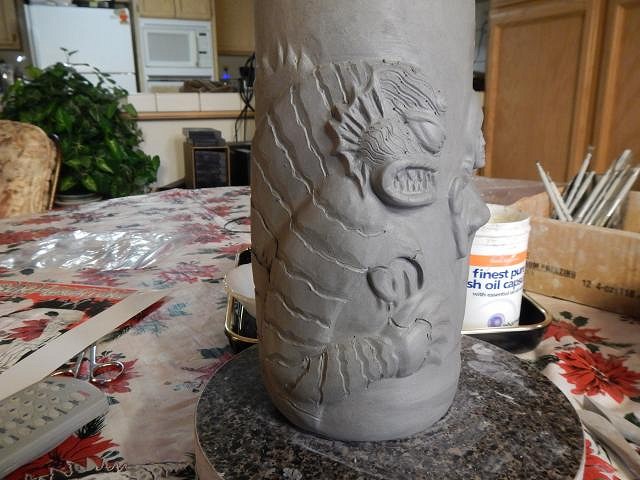
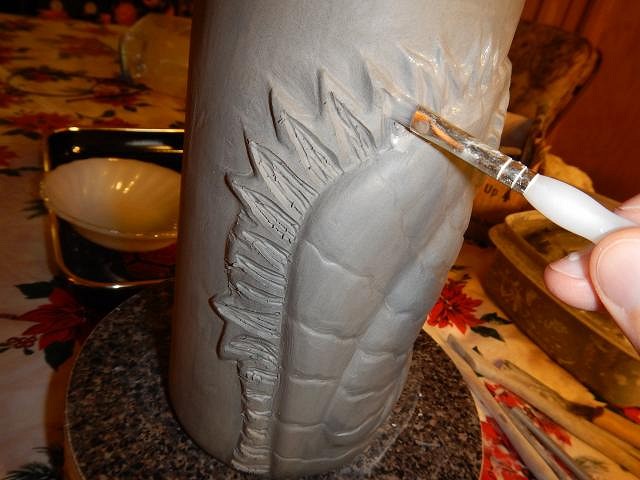
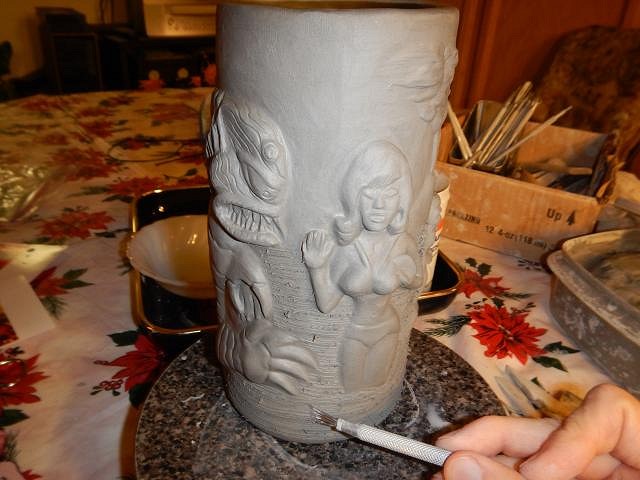
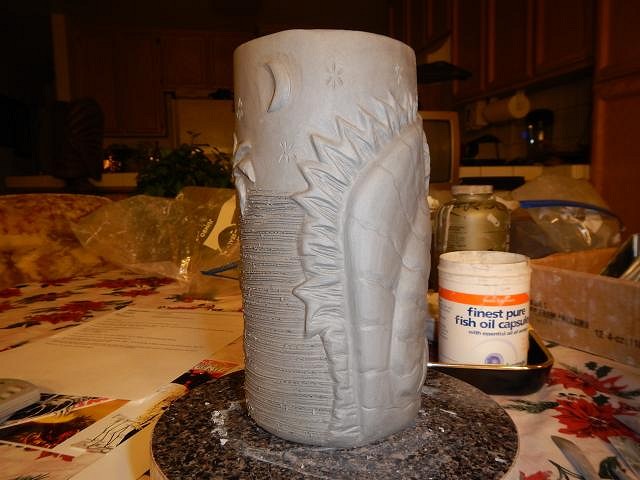
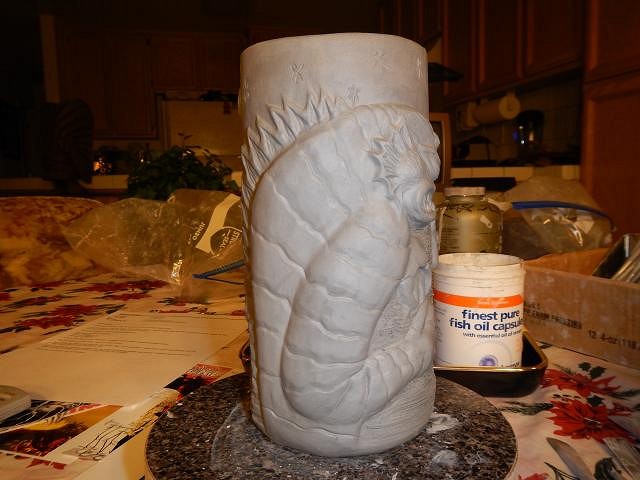
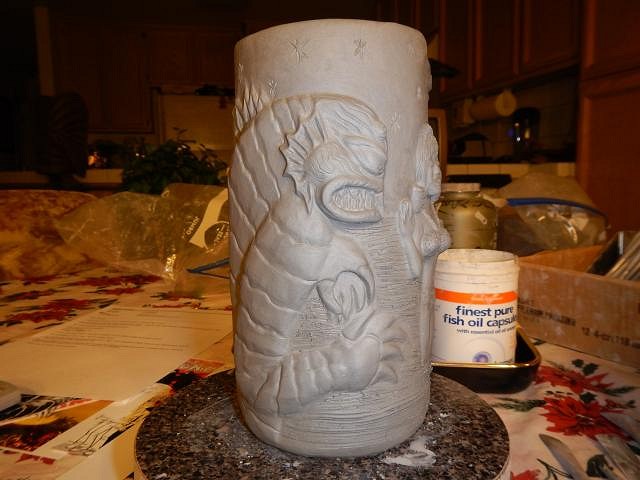
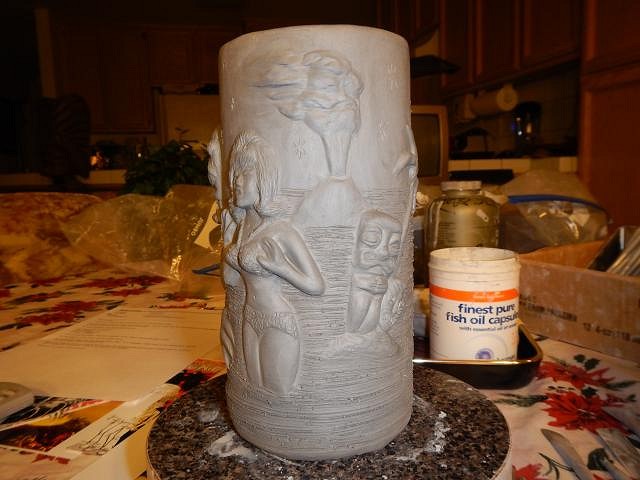
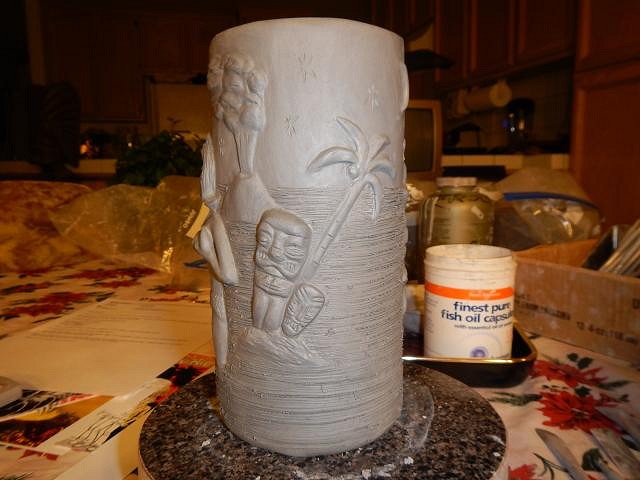
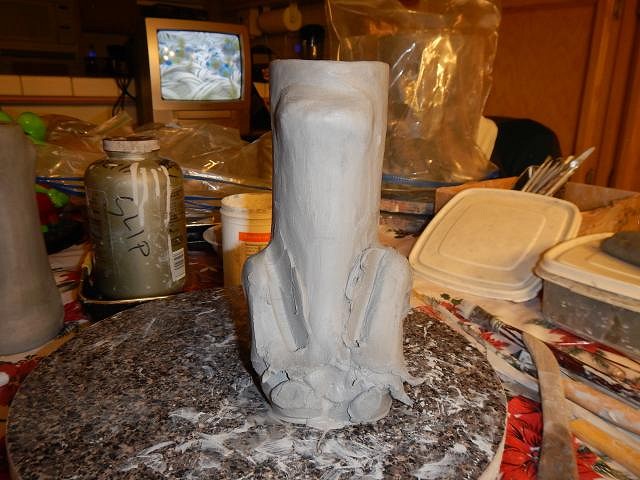
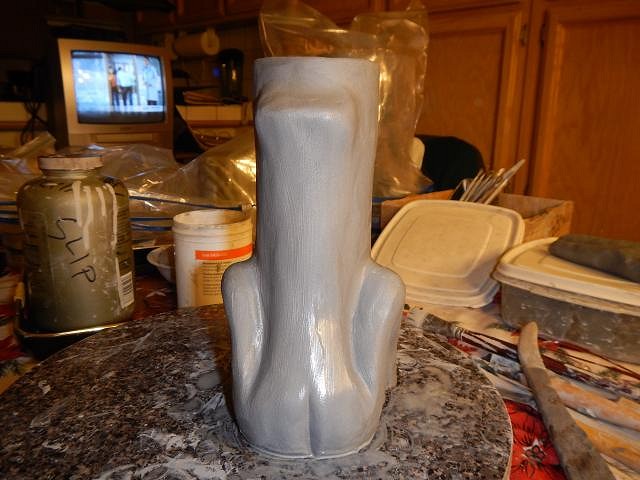
Thank you hang10tiki.We had a visit from Tiki Hula. We had a fun day with he and Dan playing music and movies while I worked clay. We took a break for a walk and ================================ Here I added lines to simulate ocean water. I finished the tiki faces. Detail added to the hair, hands and swimsuit. Moon and stars.
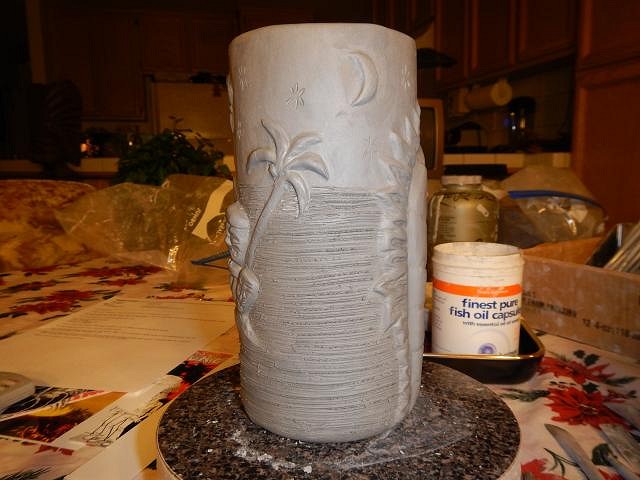
Palm tree.
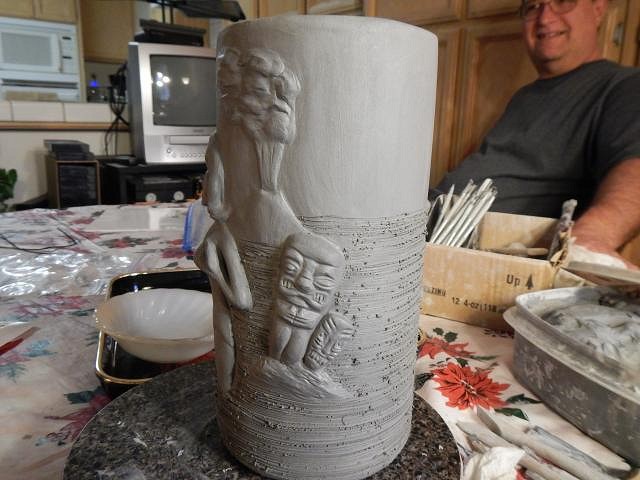
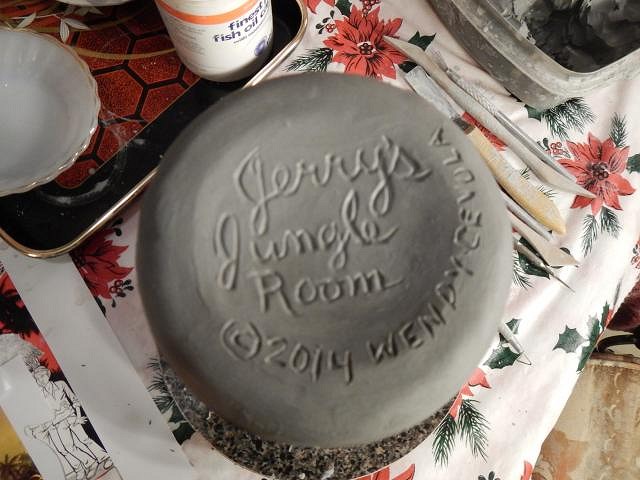
The mugs bottom. ====================================================== I've got a good start on the Wish List. Some of you I will be contacting for more direction soon. Today Polynesian Paddy and his wife are coming for a visit. They find me up to my elbows in clay. Please note that all the times I wrote Polynesian Pattie on my thread I was incorrect. He never Cheers, Wendy |
|
D

DooWop
Posted
posted
on
Mon, Feb 10, 2014 8:24 AM
The mug looks SO good! Thank you, Wendy! And the touch with the "Jerry's Jungle Room" just makes it perfect! |
|
T

TikiRootsRocka
Posted
posted
on
Mon, Feb 10, 2014 11:55 AM
Your sculpting is amazing, Wendy! |
|
D
danlovestikis
Posted
posted
on
Tue, Feb 11, 2014 10:51 AM
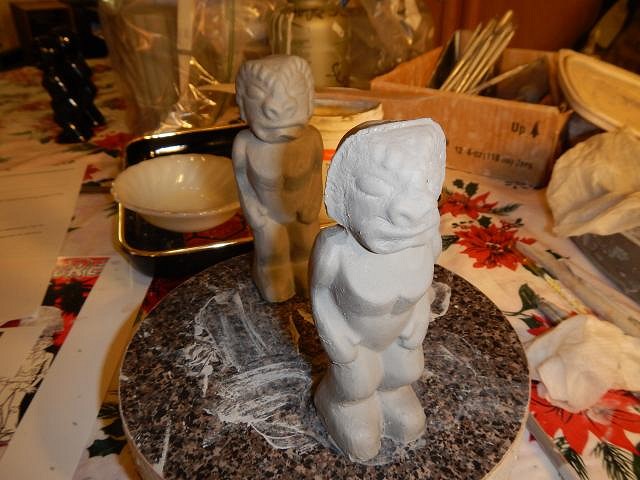
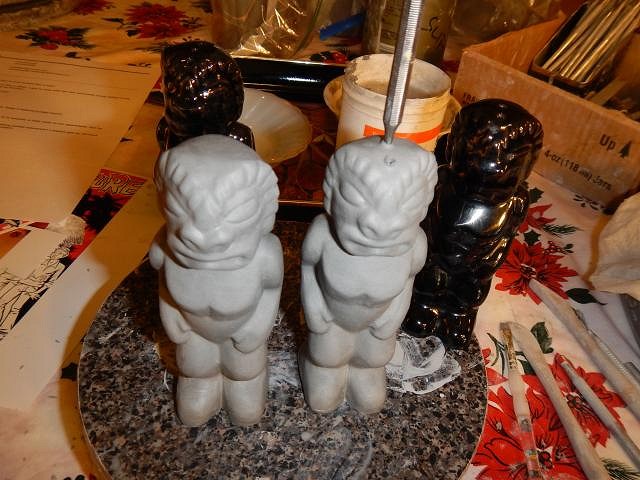
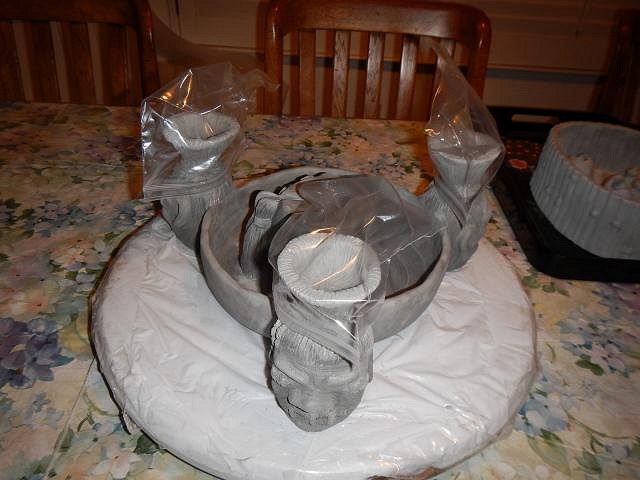
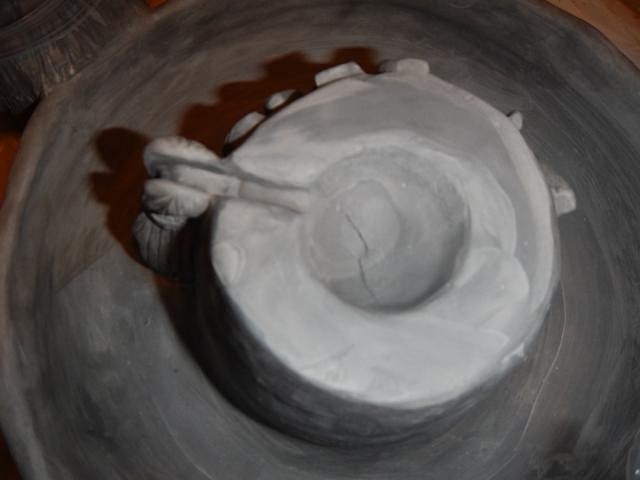
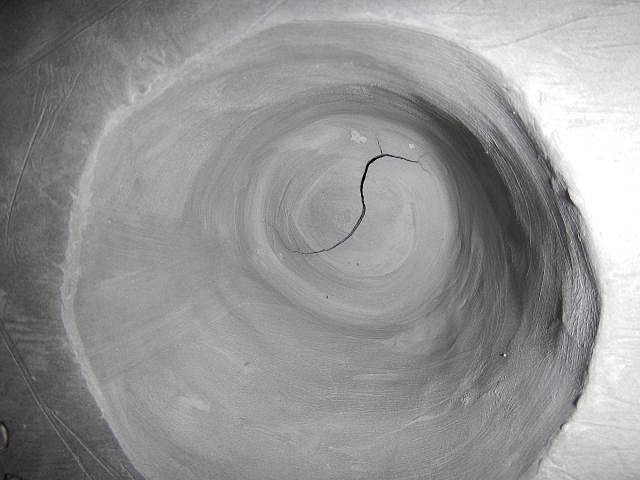
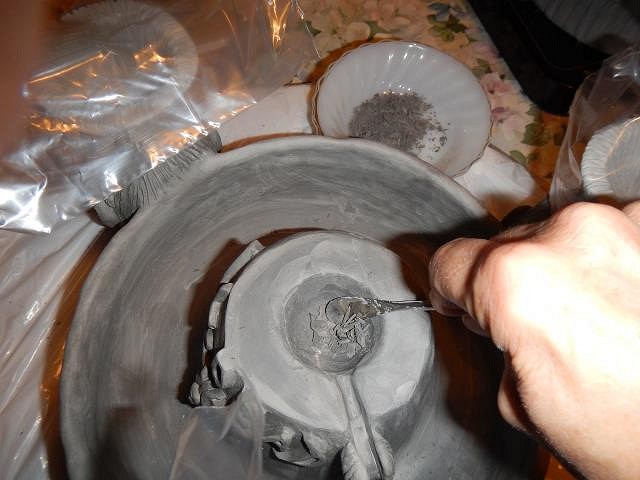
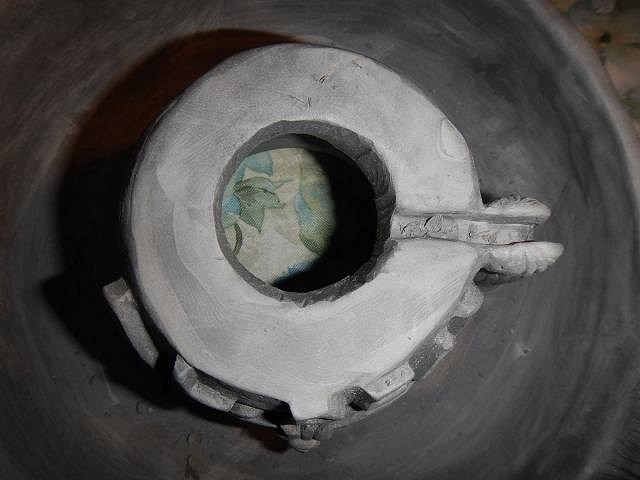
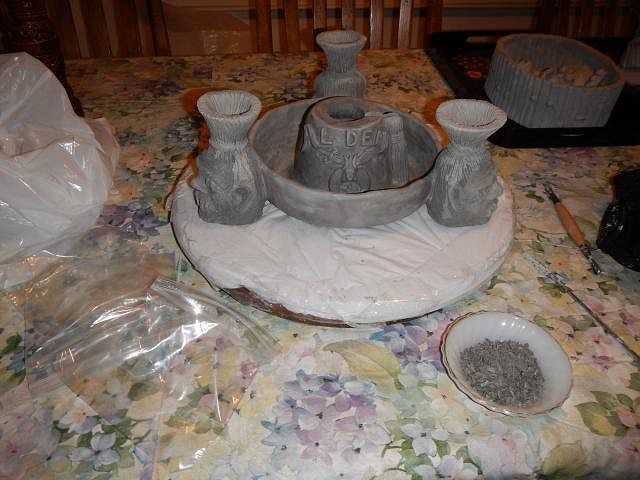
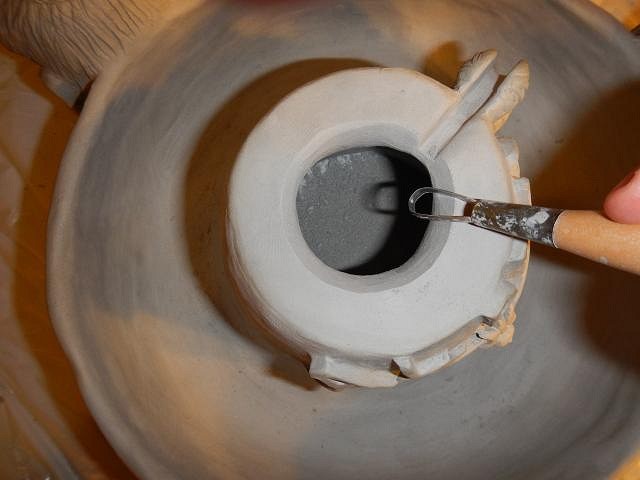
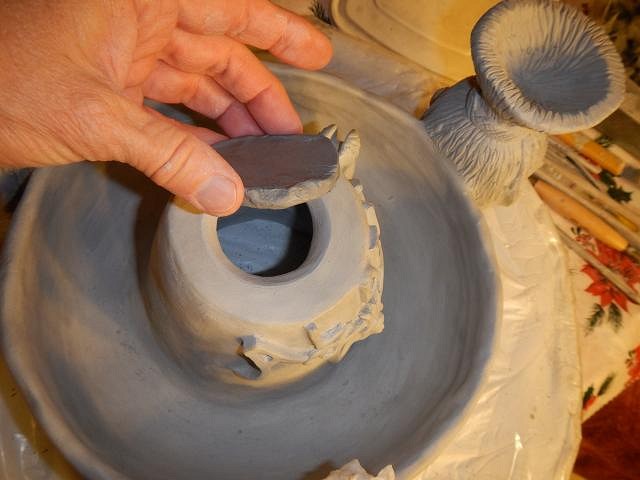
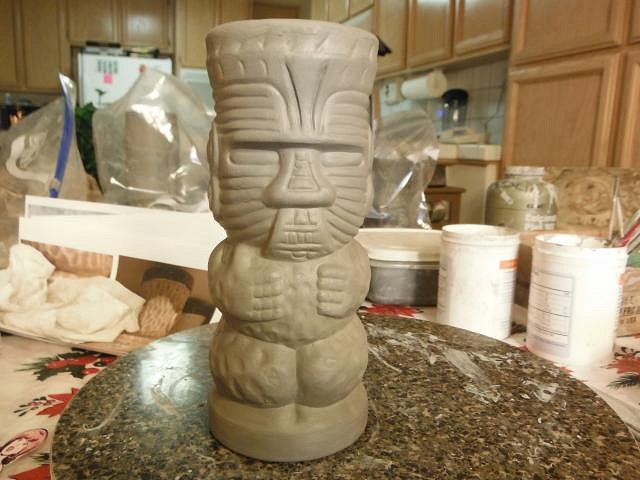
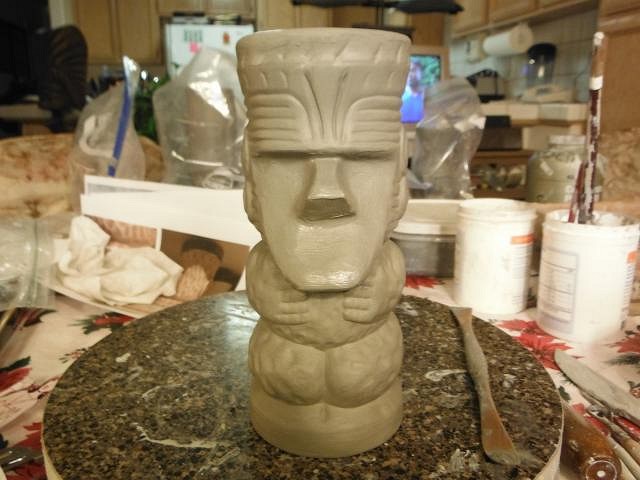
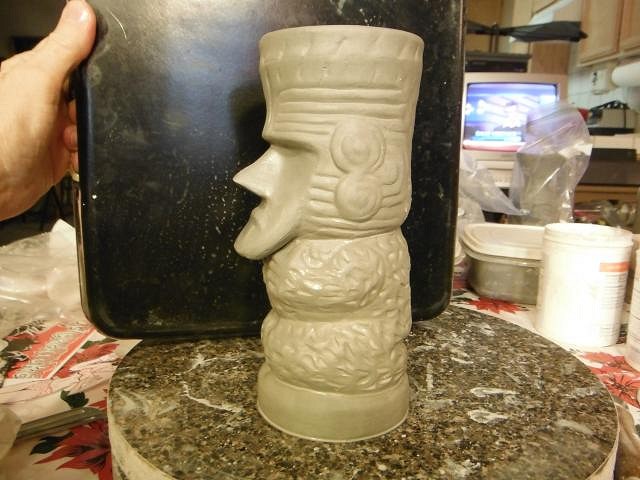
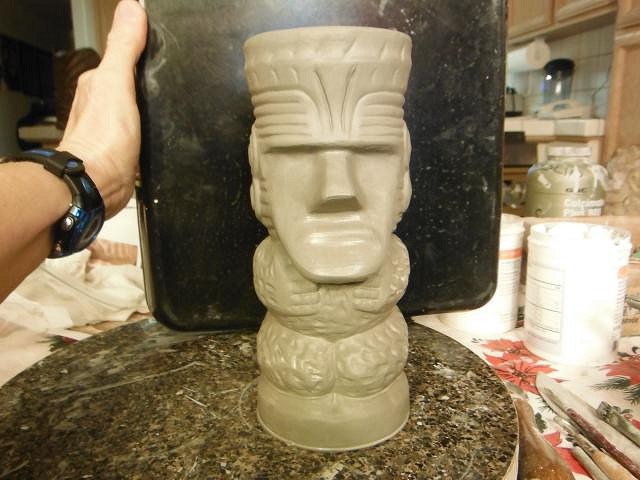
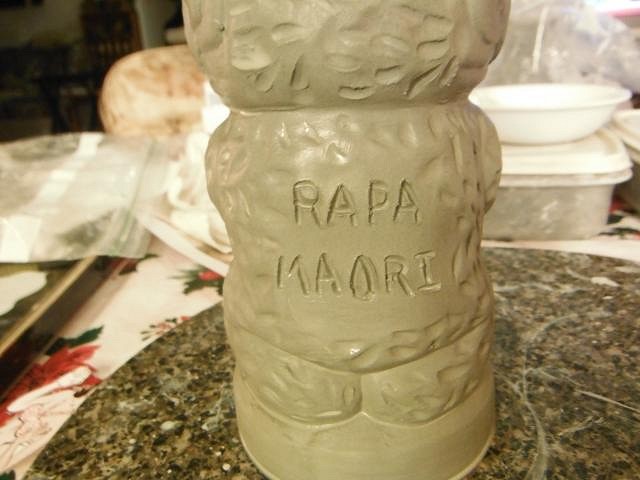
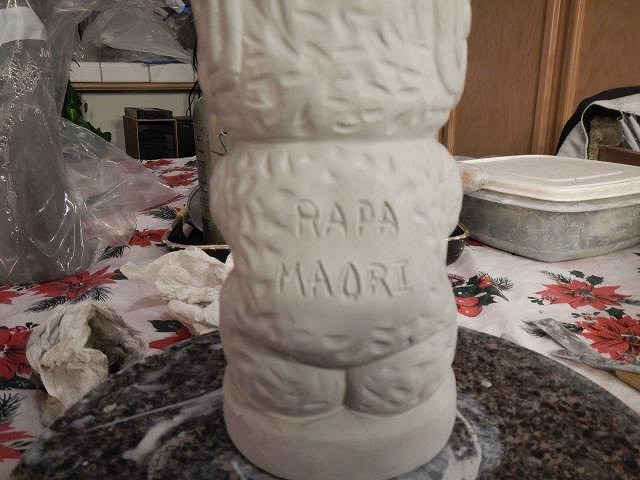
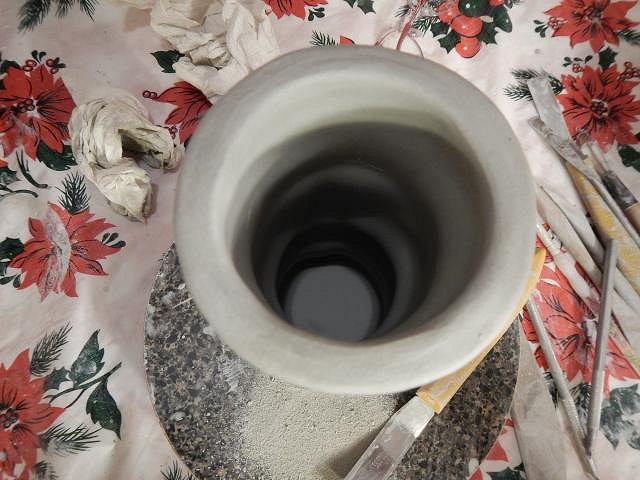
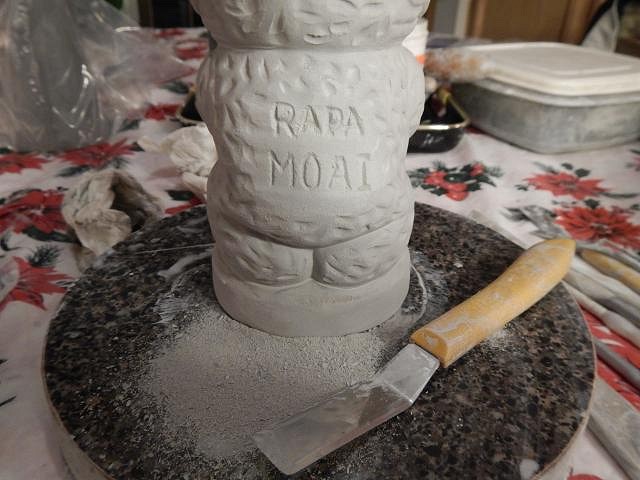
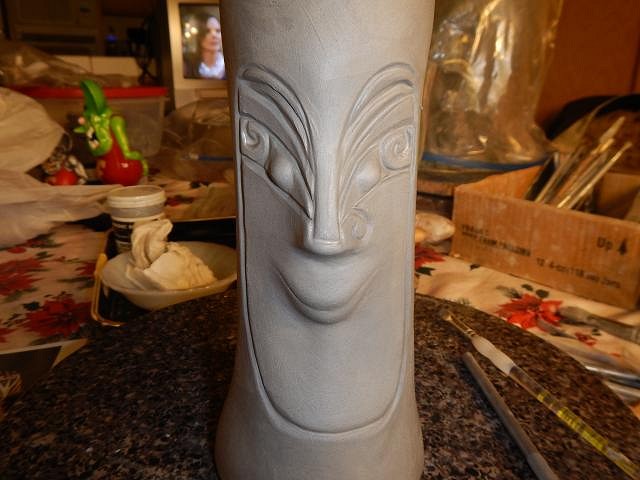
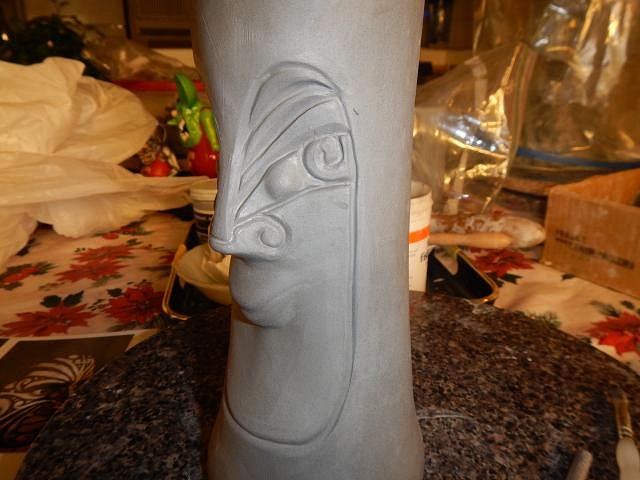
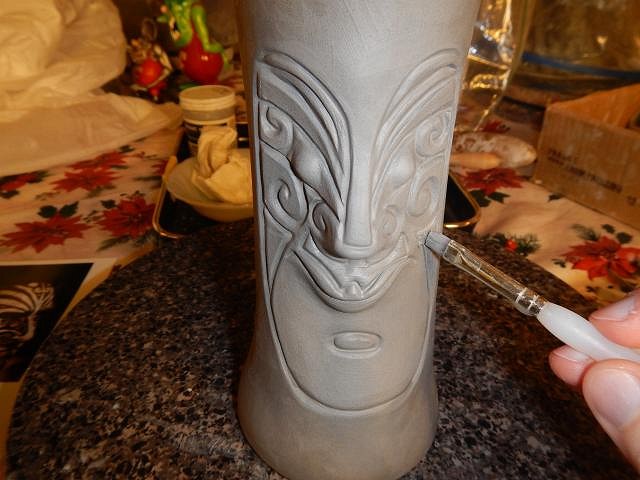
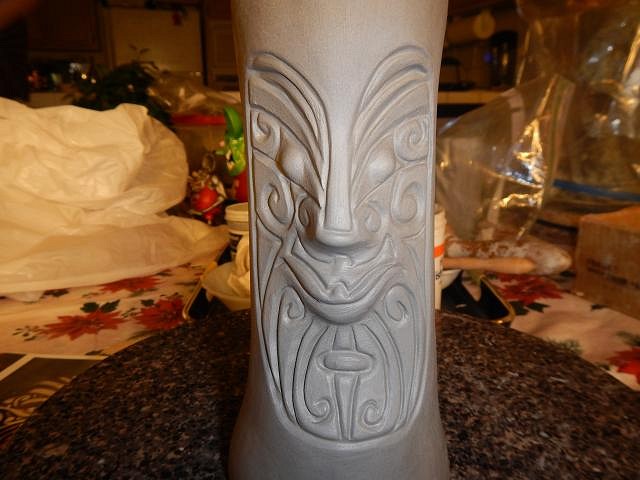
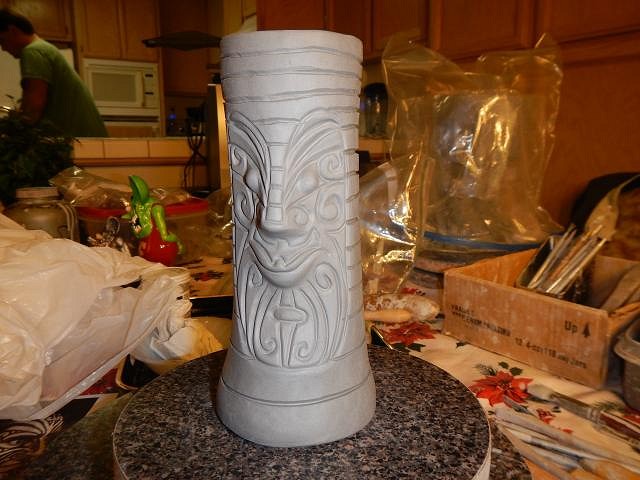
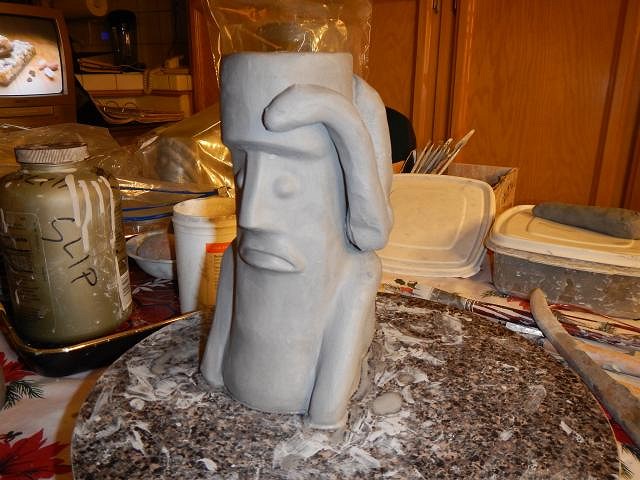
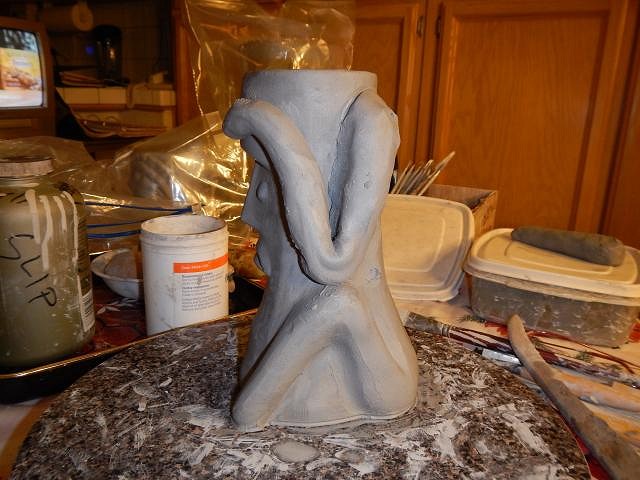
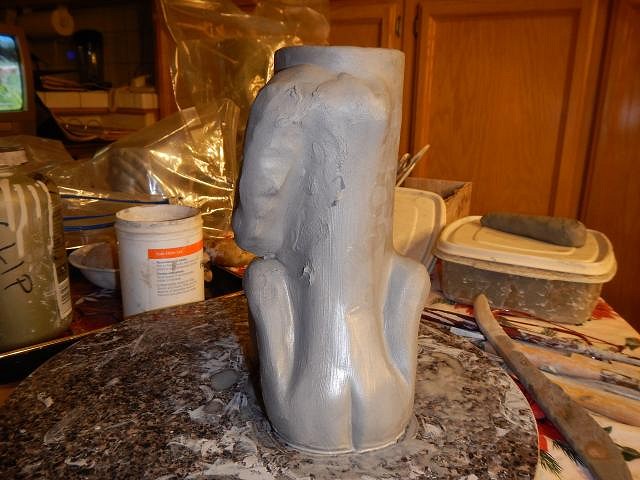
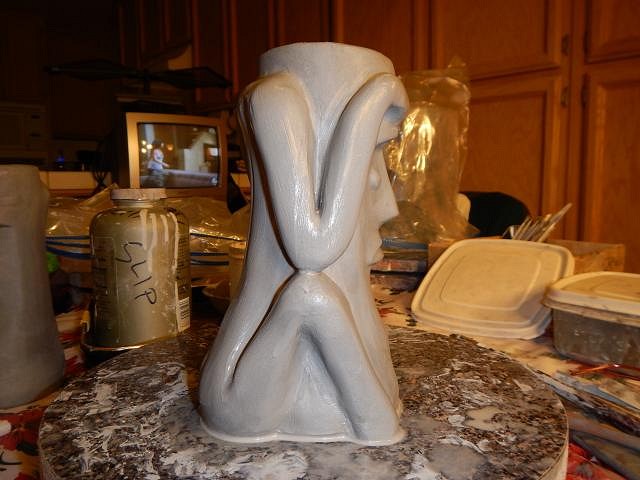
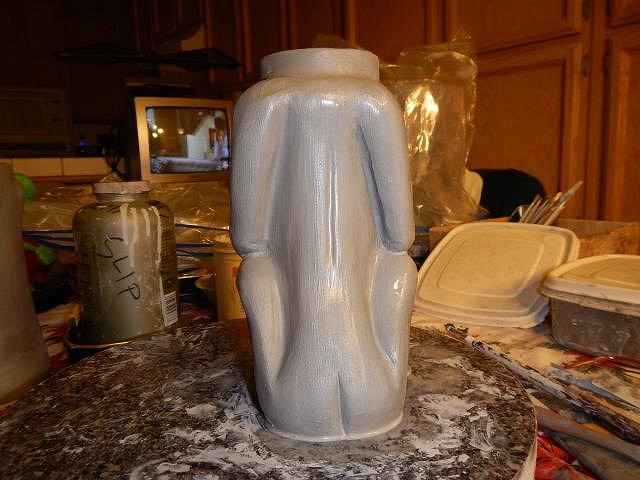
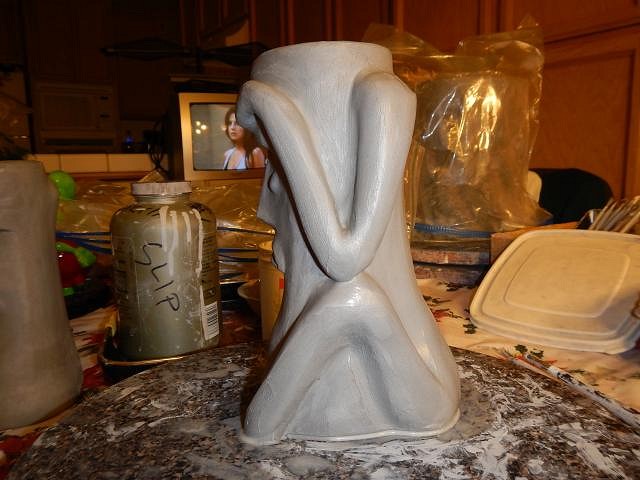
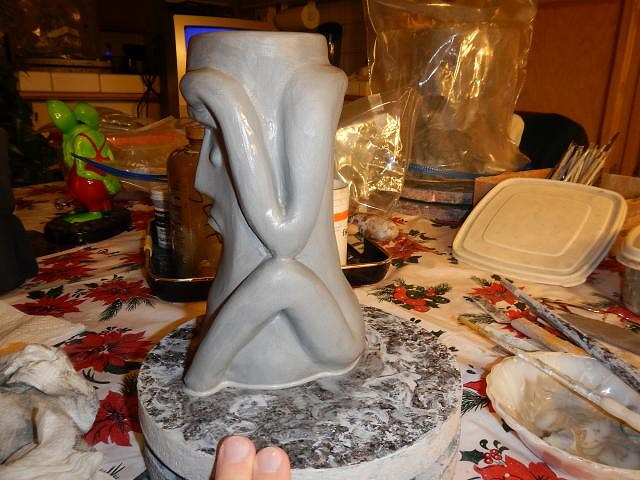
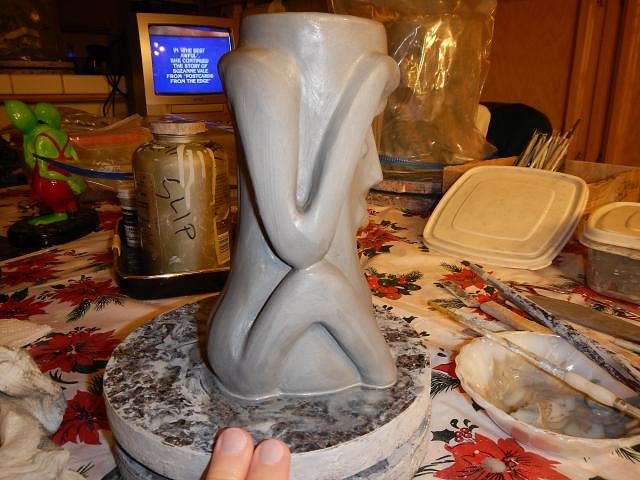
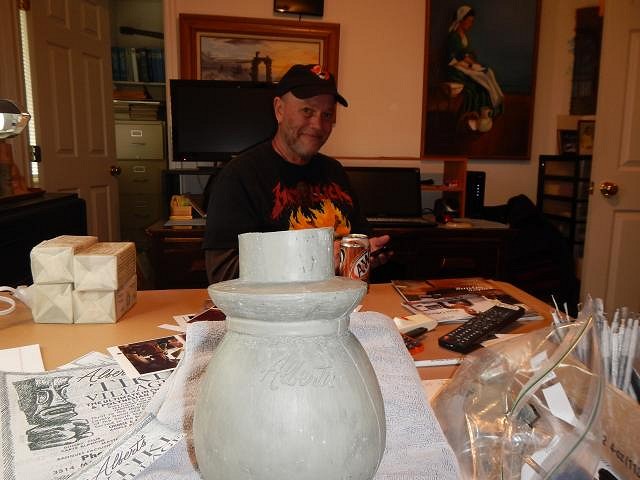
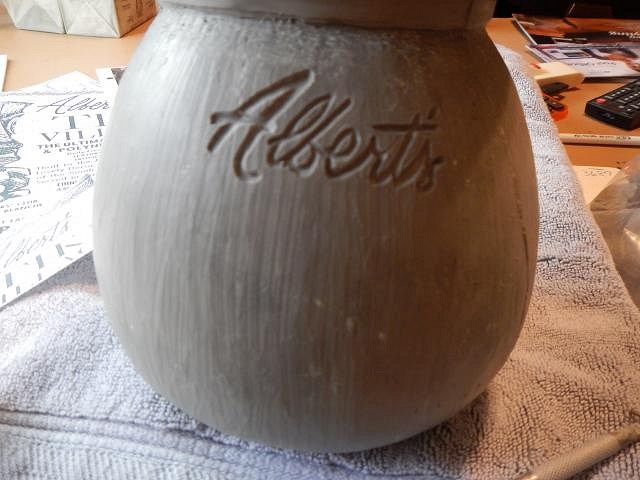
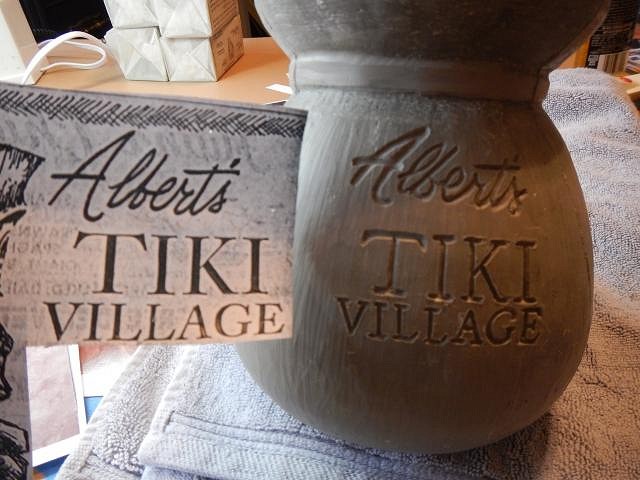
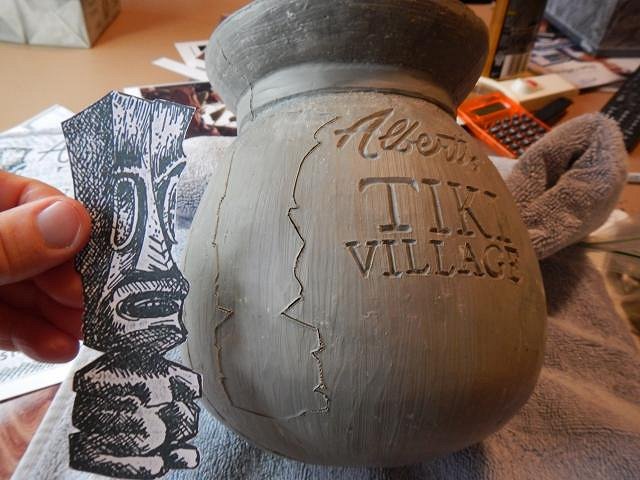
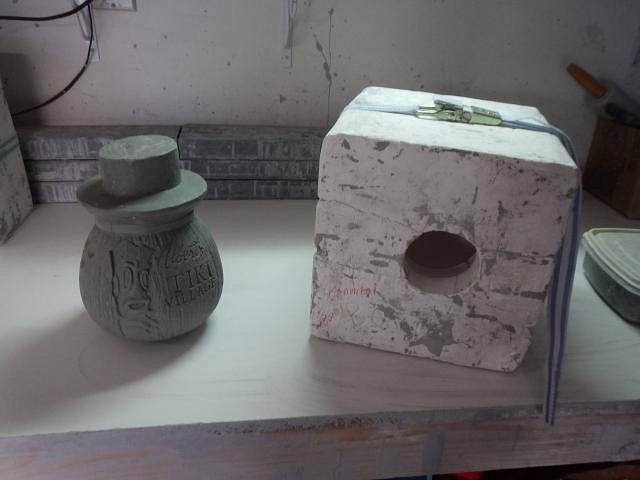
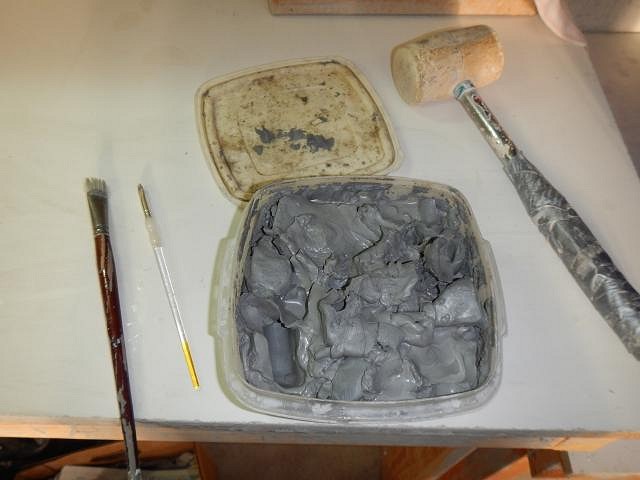
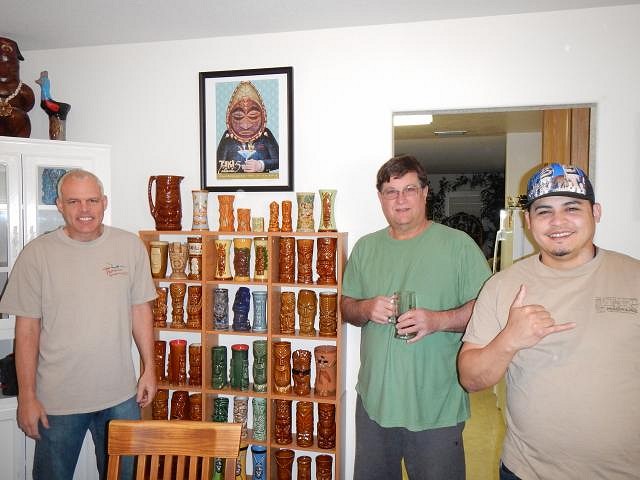
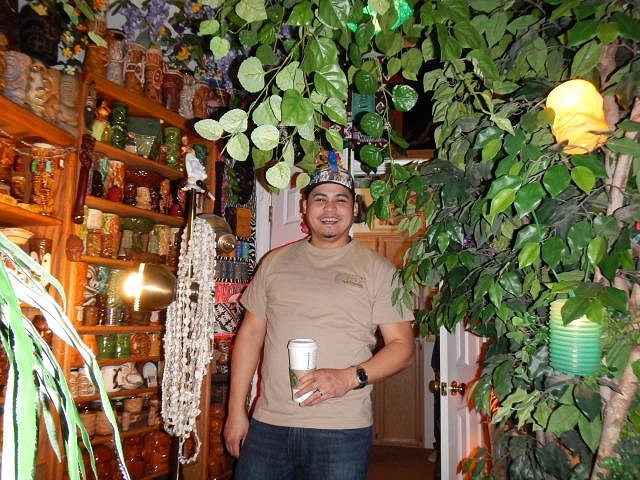
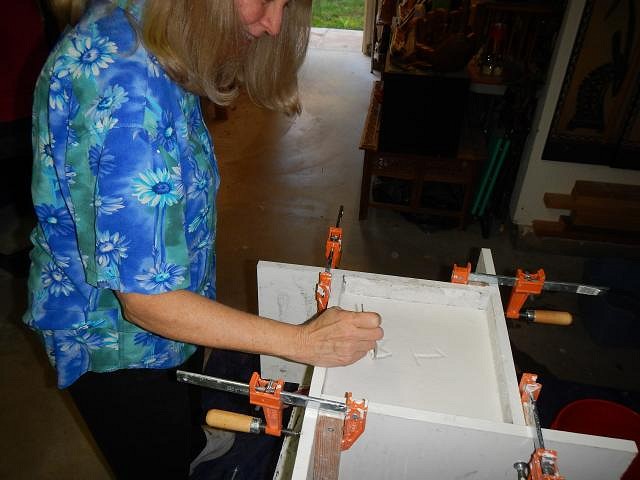
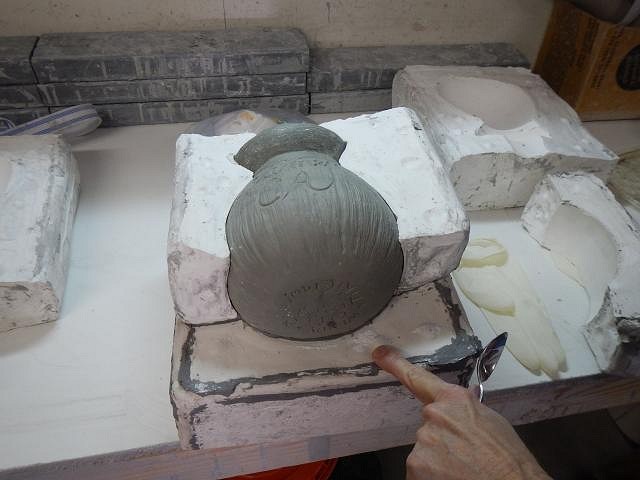
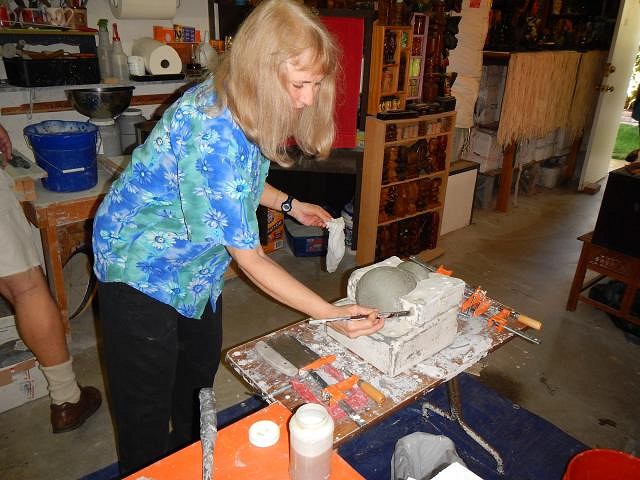
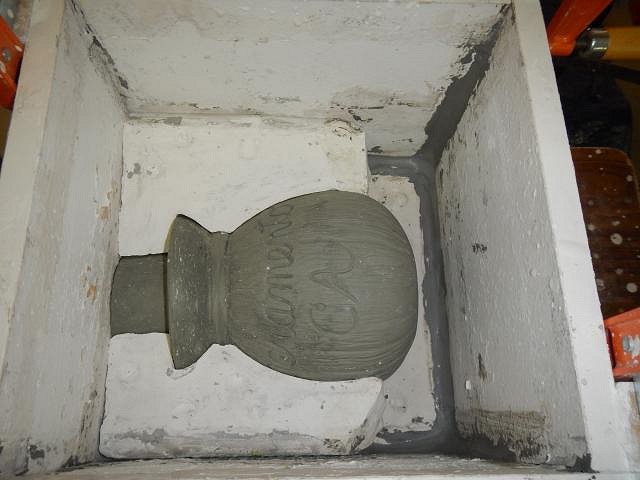
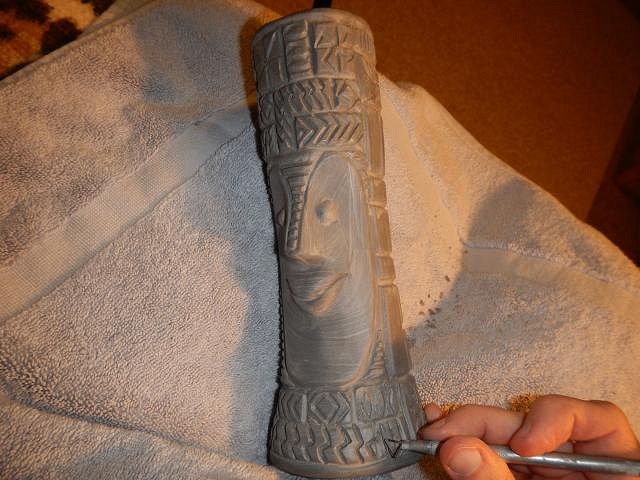
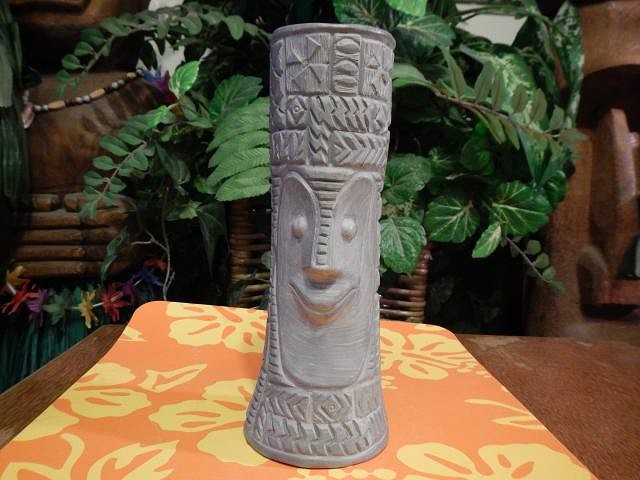
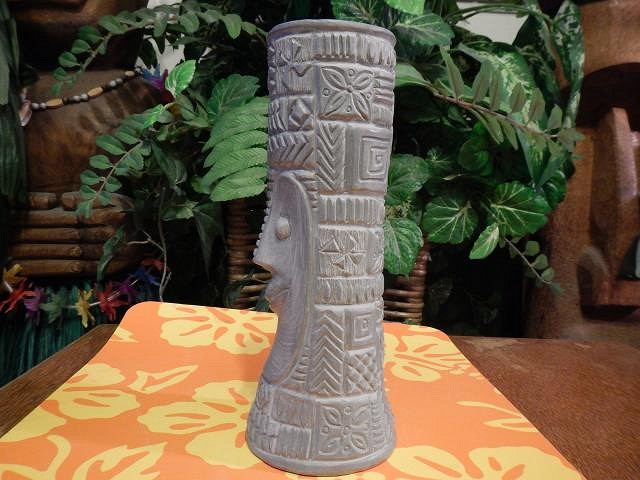
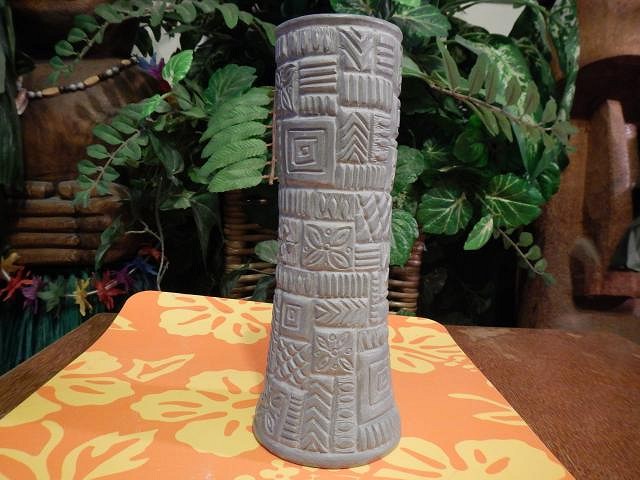
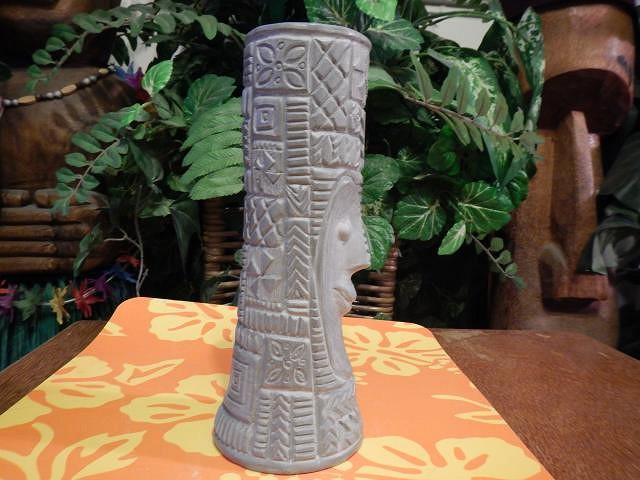
DooWop I'm so happy that you are pleased. These posts make my day. Speaking of today, Ginger/Tina Louise who is on the mug turns 80 today. Imagine that. TikiRootsRocka thank you, your sculpting skills are terrific and you can do anything you want to do. I hope we see you on the 8th. ================================================================== The AL DEAD bowl has been drying for weeks. To prevent cracking due to one part drying faster than another I put extra baggies over the hair. I would uncover the bowl for an hour and recover in over and over again. Then one morning I found a crack on the top of the Fez. Flipping it over I found that, as suspected, it went clear through. I love this dental tool. I use it for so many things. Here I dig out the crack. If I left it alone until the entire bowl was dry it is possible that it would have continued to grow. I dug this much clay out a little at a time. No you can see clear through to the table top. I continued to dry the bowl day after day, covered and uncovered. Once the bowl was close to being dry throughout I carved the opening into a slope. I made a piece of clay that is concave like the original area. I made it larger so that it can shrink. I am now slowly drying this piece but keeping it covered and uncovered and flipping it over and back. Once everything is perfectly dry I will have more steps to share.When hang10tiki requested a Peanut Mug for his Honu Hideaway I cast one for Dan and one for Mahalo Tiki (it's his mold that I borrowed). I decided to alter Dan's into something new. Introducing the Rappa Maori mug copy write 2014! The original out of the mold from Mahalo Tiki. Adding on clay. View One. View Two. His Back. Well once again I need to get back to the clay to work on Wish List number four. I hope you are having a good day and that something joyful finds you. Cheers, Wendy PS what did I tell you about photos help to catch mistakes. I just saw a big one. I better fix it. RAPA MOAI is the right name. Did someone named iuzzifeli just highjack this thread? What's up with this? [ Edited by: danlovestikis 2014-02-11 14:27 ] |
|
H
hang10tiki
Posted
posted
on
Tue, Feb 11, 2014 9:51 PM
Rapa Moai lookin good |
|
T
TikiHula
Posted
posted
on
Tue, Feb 11, 2014 10:33 PM
Love hanging out with you two crazy kids as always. It was great to meet Dale and Tonie as well and I absolutely love her POA sculpt. I'll buy one! I had more fun following them around your house tour and seeing their reaction as each room got more and more impressive - you mean there's MORE?? :wink: The Jerry's Jungle Room mug is looking sweet and mahalo for fixing up the Al Dead bowl :) |
|
M

MadDogMike
Posted
posted
on
Wed, Feb 12, 2014 12:37 PM
I can't believe you caved and allowed Tikis in the living room :lol: |
|
D
danlovestikis
Posted
posted
on
Wed, Feb 12, 2014 1:13 PM
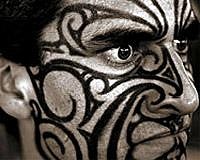
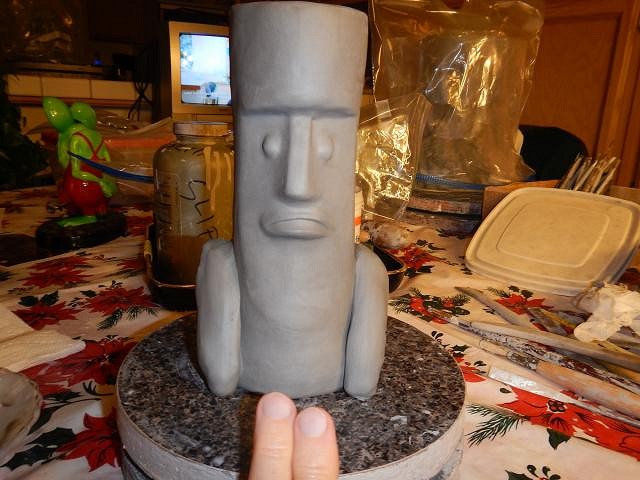
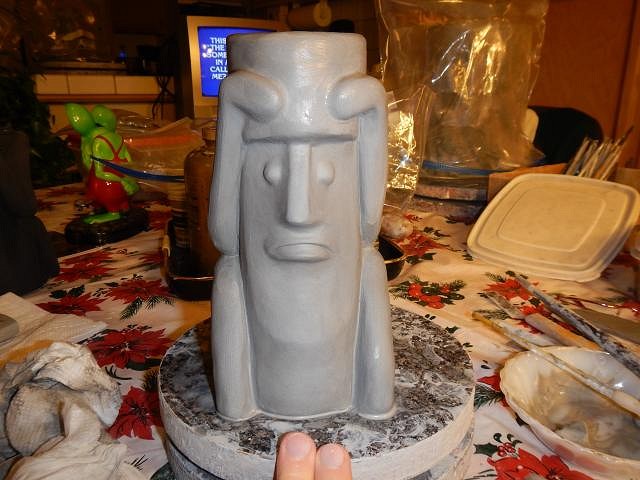
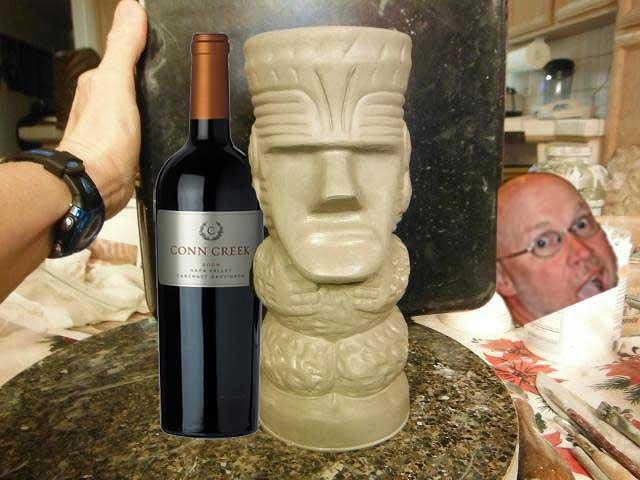
hang10tiki I bet you noticed that I passed 900,000 views. Now comes the countdown to a million and a contest that I'll have to think up. Thank you and everyone for all the views. I love numbers and tiki friends. I fixed RAPPA MOAI, see below. TikiHula the disc is dry and ready to carve to fit the top of your AL DEAD bowl. We love all our tiki buddies and that was a special day. Bullet just called and he's on his way here. Thank you always for liking my art. MadDogMike there are no tikis in the living room. It's the dining room that he has now taken over with my blessing. All I have left is the master bedroom, Egyptian, and the living room, Asian. So far I'm holding out on those.RAPPA MOAI FIX I don't know where my head was when I wrote the second misspelled wrong word. The good part is that I cast everything really thick so there's wiggle room. I shaved off both words and carved the correct words over again. SAVED!!! ================================================================== Chippy has a thing for Tiki Bob. He requested a Maori Bob. I've done lots of PNG Bob's but this is the first Maori. I used this photo as a guide. I started to carve. Another view. I used a wet brush to smooth the edges. A sharp edge will not glaze. I finished the face and then I carved the classic Tiki Bob rings. All done. Chippy let me know if you approve. =================================================== Bullet has arrived and now it's time to play. Cheers, Wendy |
|
C

Chippy
Posted
posted
on
Wed, Feb 12, 2014 2:28 PM
Oh my goodness! (Insert sound of my jaw hitting the floor) Wendy, once again you have gone above and beyond anything I could have asked for. Thank you!! |
|
PG

Professor G
Posted
posted
on
Wed, Feb 12, 2014 6:01 PM
Did Wendy just class up a classic and make it more classic-er? It's so good it knocked the grammar right out of me. |
|
Z

zerostreet
Posted
posted
on
Wed, Feb 12, 2014 6:17 PM
That is pretty awesome! |
|
H
hang10tiki
Posted
posted
on
Wed, Feb 12, 2014 11:18 PM
Wow |
|
ATP

Atomic Tiki Punk
Posted
posted
on
Wed, Feb 12, 2014 11:57 PM
I have been wanting to commission a Maori Bob mug for sometime |
|
D
danlovestikis
Posted
posted
on
Thu, Feb 13, 2014 8:06 AM
Chippy that makes me so happy. Each step will be posted. Right now for all the Wish List projects it's make them and let them dry. You mug will have a big #1 on it but I will make similar ones in the future. Professor G U B Cute. I hope my art is in collections and that Dan and I are remembered after we are gone. We are trying to be like Louie B or Spurlin. It will take 50 or more years but one can always hope. zerostreet your new design is looking really good. Thank you. hang10tiki he gets #1. Atomic Tiki Punk I haven't forgotten that you wanted one when you were ready. Chippy's will be numbered #1 and it will go from there. Dan wants one too. So when you are ready let me know even if it's years from now. =================================================================================== ebTiki and White Devil your Bastard Bobs have been made. I will be tweaking them as they firm up and praying that with so much added clay that they don't blow up in the kiln. I try hard not to add in air bubbles but you never know. I need to know if you want any designs carved into the mugs like I did for Dan's version. I'll get back to you about colors when I get to that step a long time from now. Here is the link to his mug. I took a couple of days to make these at the same time. Step two cave back the noses. Add clay to the foreheads. Side view shows how much. Add clay to build the back shape. Both done. I worked with this sticky clay to remove the air bubbles. It takes four per Bob. I rolled them into shapes for the arms and legs for Bob 1. Leg. Legs and Butt. Placing the arm. Arm. Arm. Arm. Arms and Hands so the first Bob is as done as can be on day 1. Side. Backside. Side. Day two it's time to finish off the second Bob. Adding legs. Arms and Legs are done and this one is finished for now. Side. Backside. Side. Once these have firmed up I go and fine tune the shapes. I hope you all have a nice day with lots of smiles. Cheers, Wendy [ Edited by: danlovestikis 2014-02-13 08:47 ] [ Edited by: danlovestikis 2014-02-13 08:48 ] |
|
T

TikiAno
Posted
posted
on
Thu, Feb 13, 2014 8:56 AM
I missed a few days due to work, and I missed a whole lot! Let me know if Dan doesn't like Rapa Moai... or Rapa Napa Moai:
|
|
H
hang10tiki
Posted
posted
on
Thu, Feb 13, 2014 9:19 AM
Nice to see the suffering Bob family grow |
|
E

ebtiki
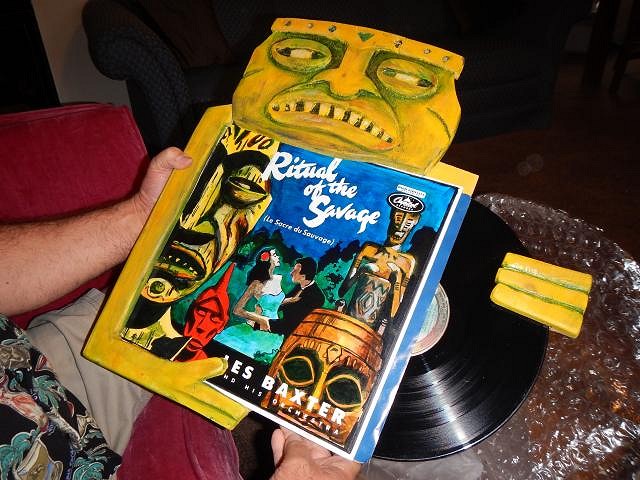
Posted
posted
on
Thu, Feb 13, 2014 5:40 PM
Sweet - love the pix! |
|
D
danlovestikis
Posted
posted
on
Fri, Feb 14, 2014 1:43 PM
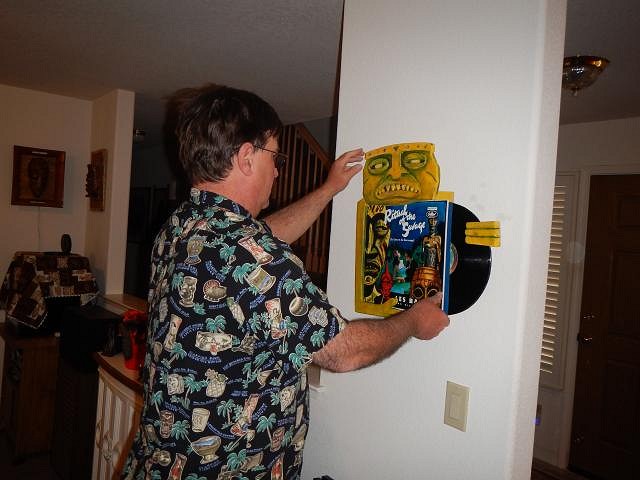
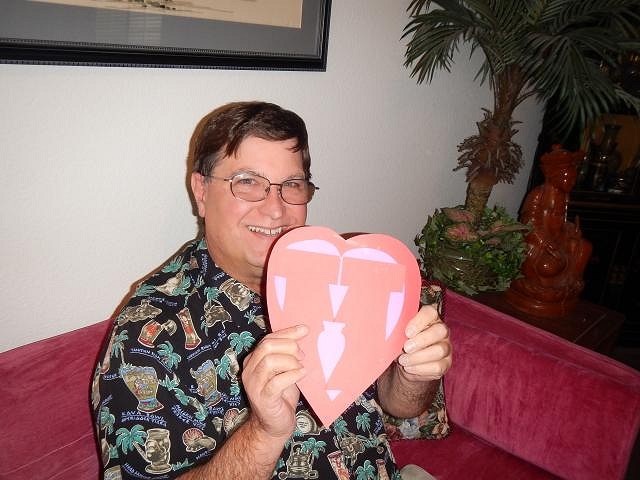
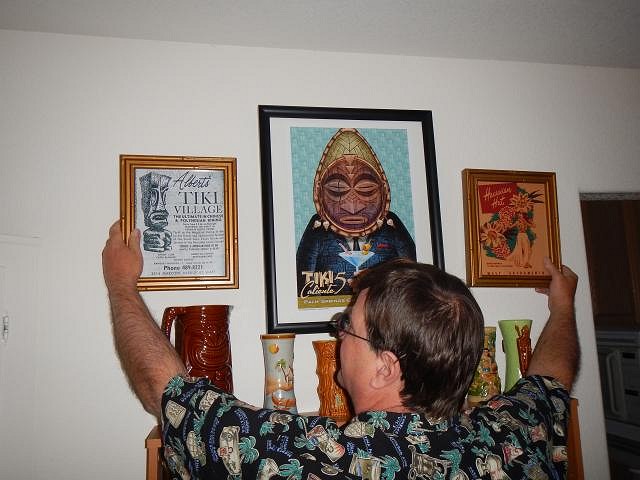
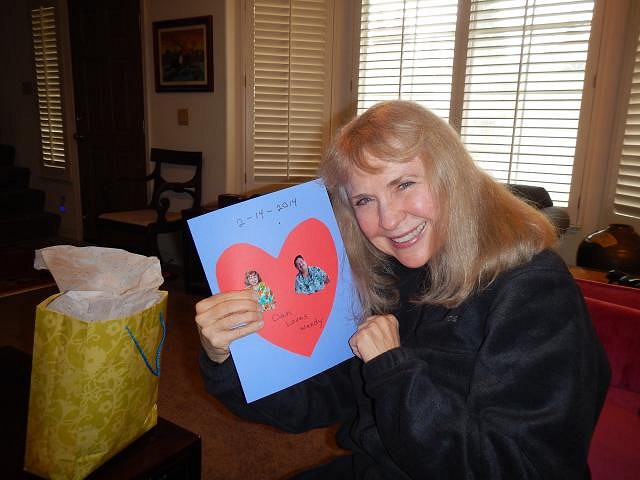
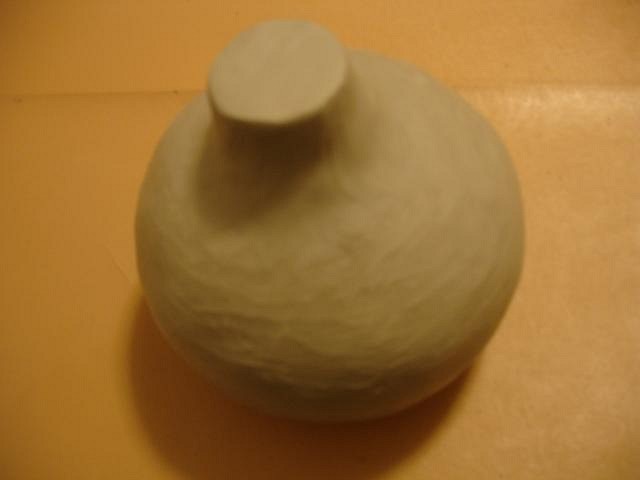
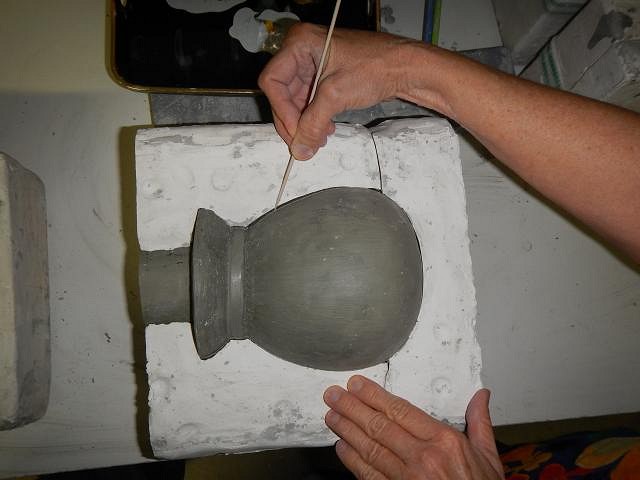
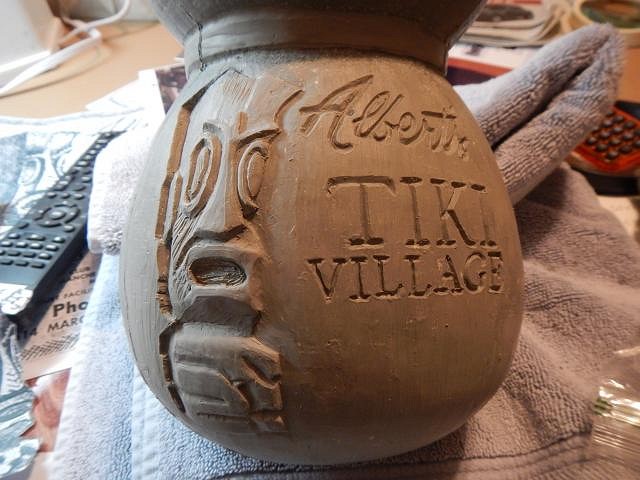
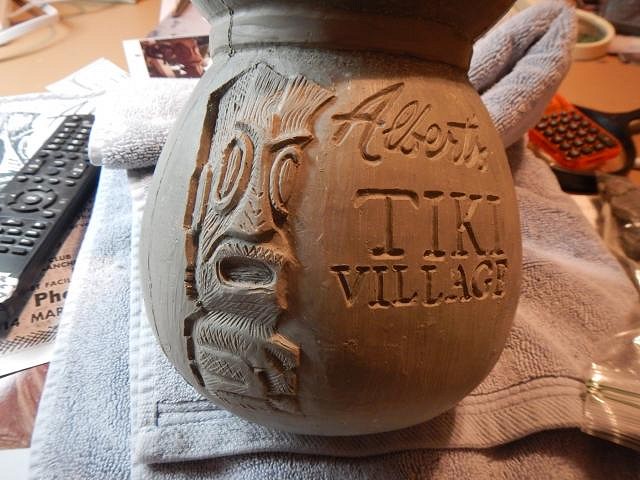
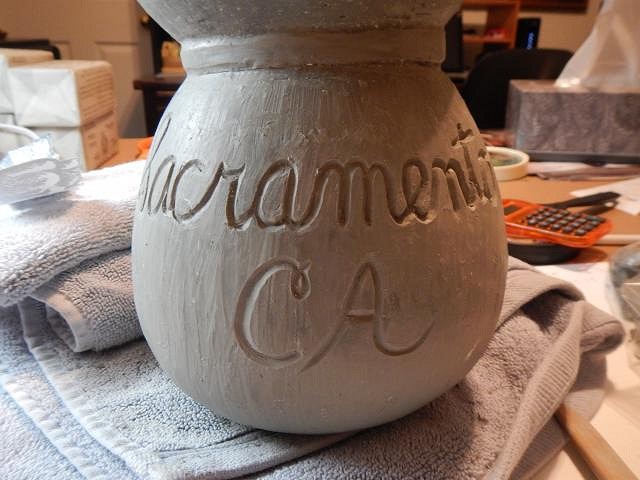
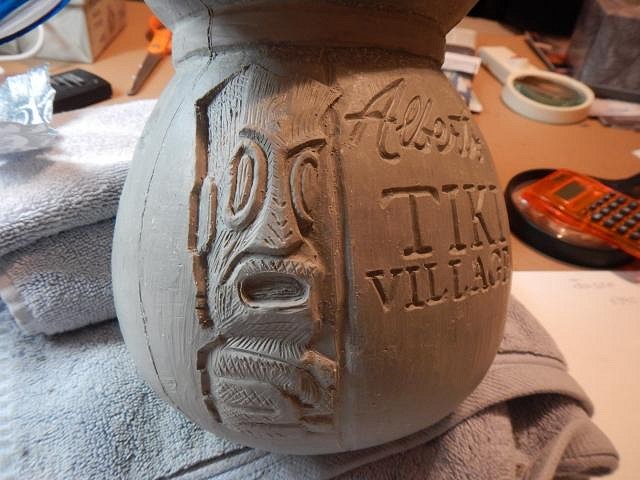
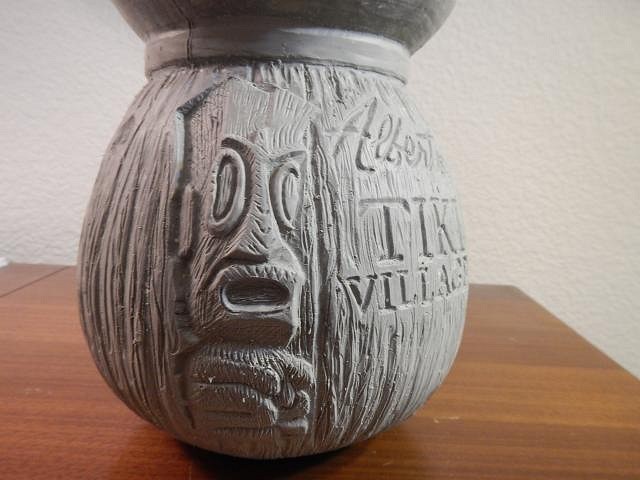
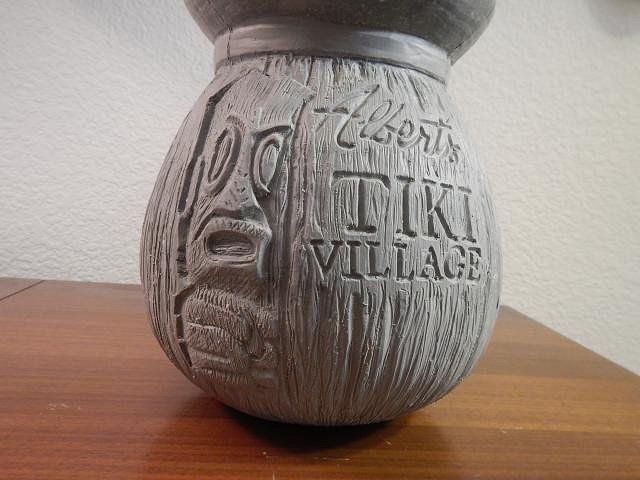
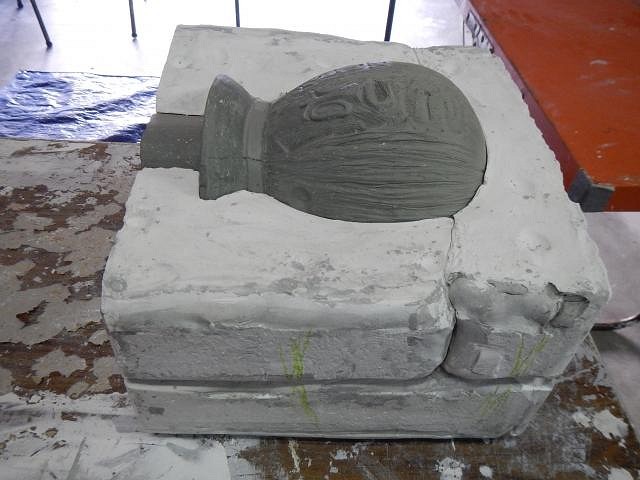
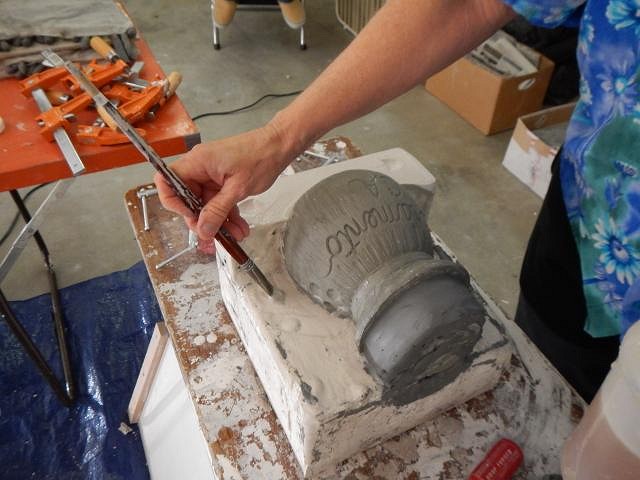
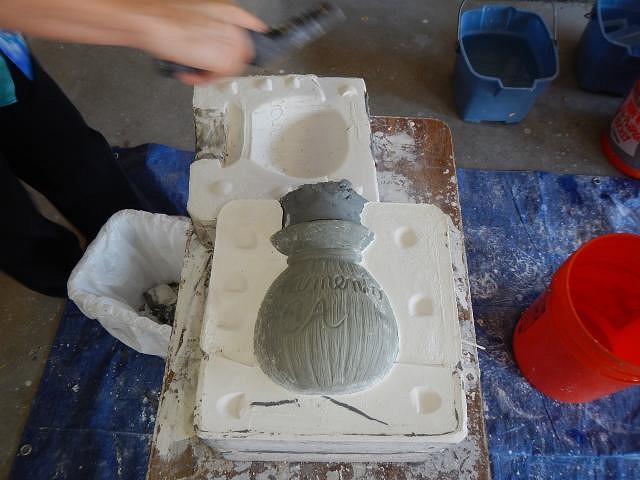
TikiAno well welcome back, I missed you. We like Napa. So many mugs that could be made and so little time. GROG where are U? hang10tiki and you started it all. I wish MP would get his up and going because Dan's number one and the order list. I'm happy to make them until he starts. MP where are U? ebtiki let me know if you want it plain or carved like Dan's. Glad you like it. ================================================================================= Last year Tiki Atari had $85,000 in orders for his first mug. Imagine that! Now he's got his second mug off the ground with Tiki Farm making the run. I'll be doing some 1/1's and add on's in color and clay for his project. That's why I've been working furiously on all the Wish List Projects and the Sacramento Crawl mug. If you scroll down his kickstarter page you'll see my bio and photo with lorikeets my favorite bird. https://www.kickstarter.com/projects/jchaffin/the-innsmouth-fogcutter-tiki-mug-from-horror-in-cl/ ================================================================================= Today for Valentine's Dan and I exchanged presents and since some are tiki I'm going to share with you. I was swap partners with CY and today I let Dan open the box. His work of Tiki Album Art now hangs in our newest tiki room. We love it, thank you CY. We always make our cards for each other. I made a Moai head doily card for Dan. I printed and framed the pictures I've used for 2013 and 2014 crawl mugs. He's holding them where they will hang in his newest tiki room. My art projects are all over the table drying. This is the card Dan made for me. Inside was a coupon for a 20 second kiss. I used it right away but didn't remember to take a photo, the kiss was that good! We wish you all a very Happy Valentine's. ============================================================= Next up THE SACRAMENTO CRAWL MUG for 2014 October. I've started taking orders and they are about to be posted on page one of this thread. Here's how I made the sculpt in professional sculptors Romo Clay number 3. I used a bowl as a base shape and then I melted this clay and added it to the bowl. Once it was in this shape I molded it and used it for project. 19tikichef62 came along and wanted a cannibal bowl so I got it out and added the top portion. It took days and lots of melted clay. When the shape was as he requested I then molded the bowl and have used it in projects. Now it's time for the next Crawl mug and I decided I wanted to do a large coconut mug/bowl. The Thank you 1961Surf for the thread on this place. I'm using your post for my mug. All of us hate making molds so if you can find a short cut then we take it. So I decided that I'll use the mold to make a mold. By using the mold sides I won't have to build up pounds of clay as shown in the photo above. So I marked the first mold piece on the clay. This line will be my boundaries for the front of the mug as I sculpt it. I printed pages from 1961Surf's thread in different sizes until I found what I knew would work for the mug. Bullet/Kingstiedye came for a visit while I was working. I started by tracing the letter's. Then I began to carve. It's important to not have any undercuts or the plaster will break off from the mold when it is pulled apart. Then I outlined the tiki with a sharp point. As a coconut mug the top will be cut off just below the ring. Now I outlined the features of the tiki. I'm wearing out so I'll stop here. I'll post more tomorrow. Thank you all for the visit. I'm going to set up page 1 of this thread for orders. You do not have to attend the crawl to buy a mug. I will ship after the crawl has ended. Thank you always for the visit. Wendy [ Edited by: danlovestikis 2014-02-14 14:23 ] |
|
T
TikiHula
Posted
posted
on
Fri, Feb 14, 2014 3:04 PM
Happy Valentine's Day you two :) Wendy, the crawl mug is off to a good start! |
|
D
danlovestikis
Posted
posted
on
Sat, Feb 15, 2014 11:09 AM
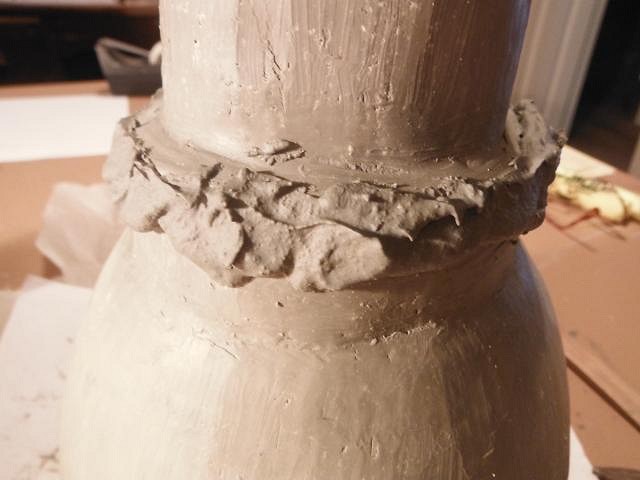
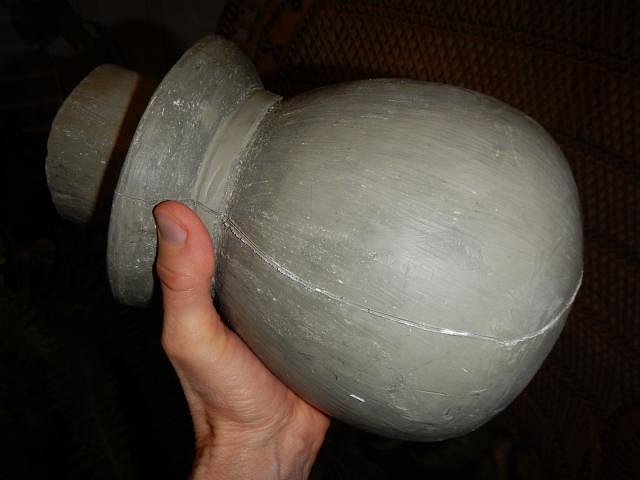
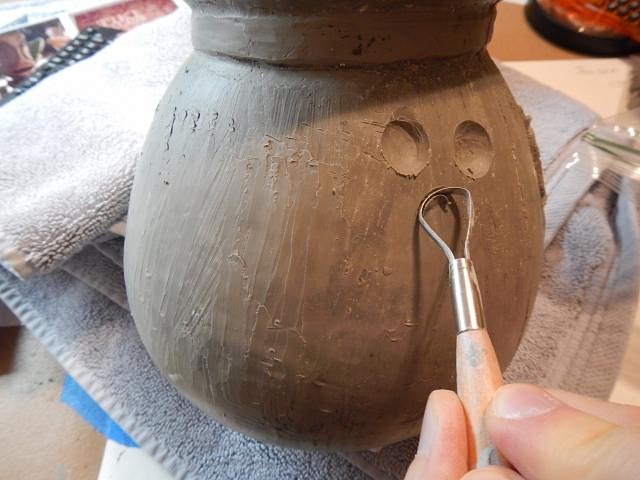
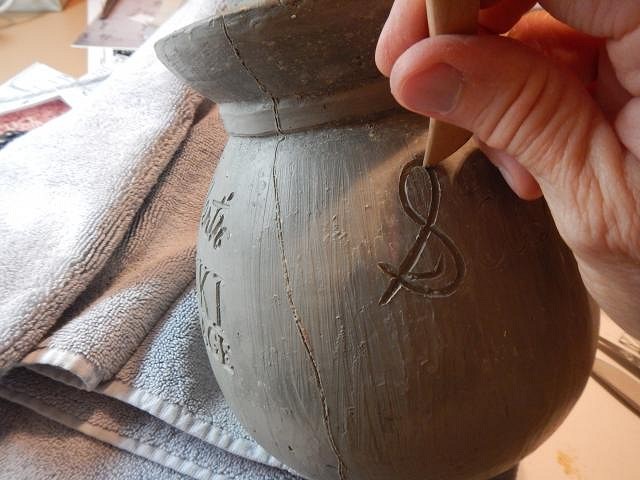
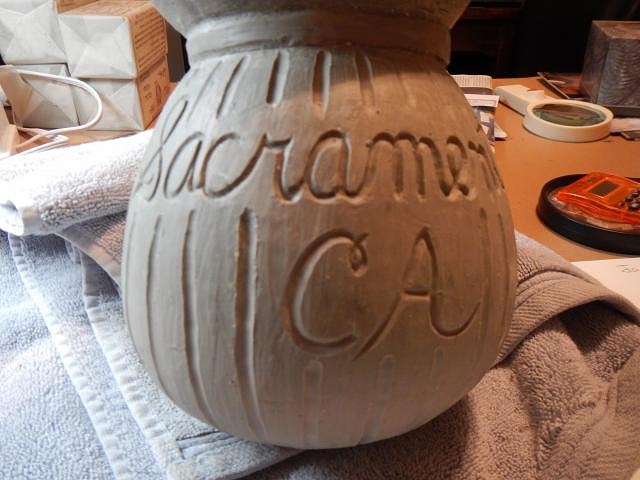
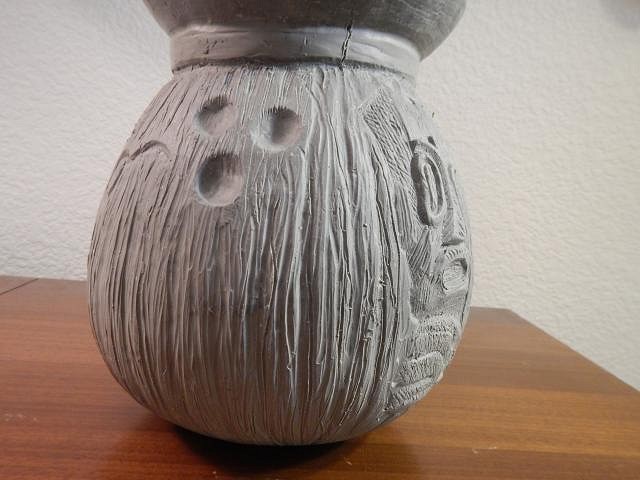
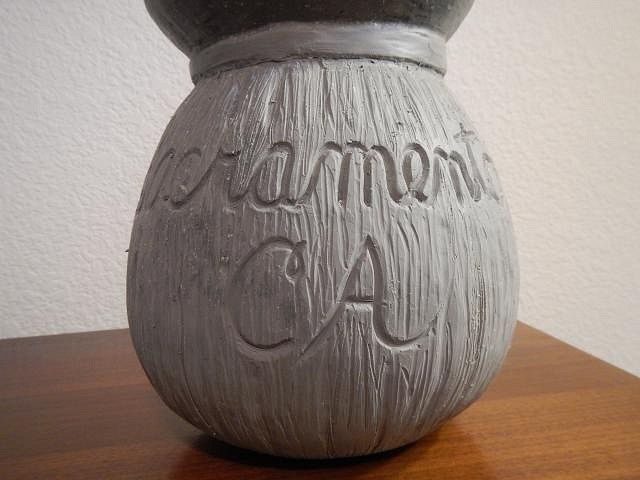
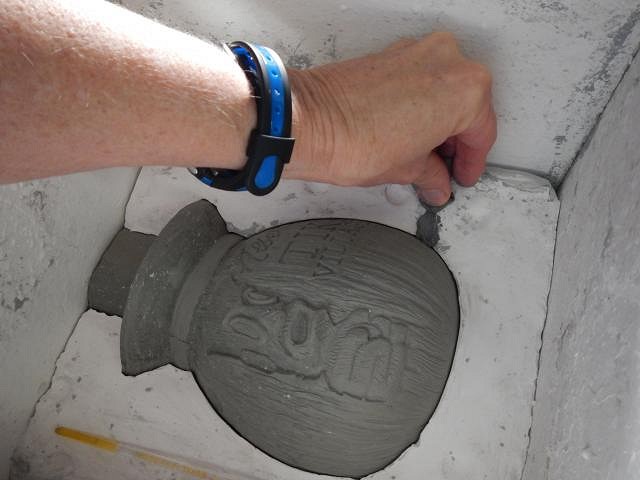
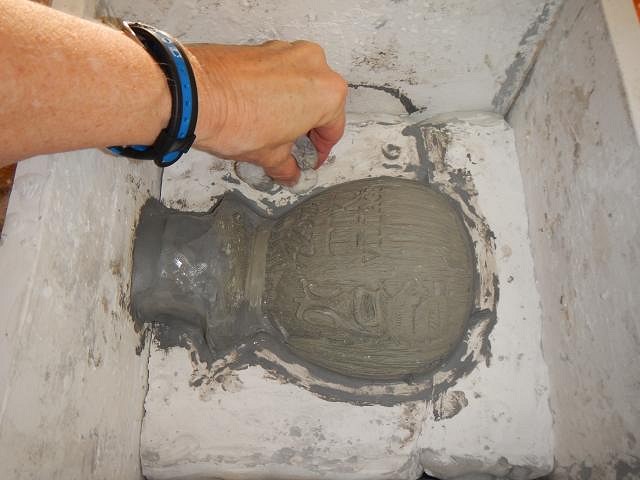
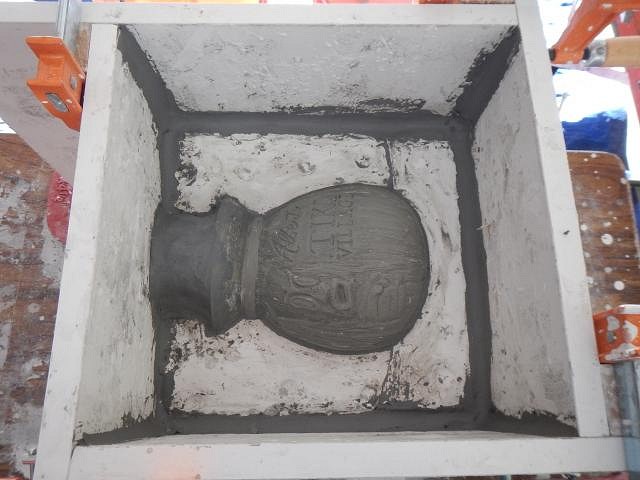
Tiki Hula were on for molding tomorrow. ======================================= Here are the rest of the steps for making the Sacramento Crawl mug for 2014. PM me with orders please. I Buzzy just scored a matchbook from this place. I decided to cut into the coconut to give the side some depth. Then I added clay to do the same on the front of the tiki. I'm trying to match the picture as close as I can while keeping it mold friendly. I doubt that all the scratches will show up and I'll have to add them to each mug by hand. What's a coconut without its three dents? Next for the back I decided to make Sacramento CA and to make it huge. Done. Dan helps me all the time so I'm adding his name to the Crawl mugs as a thank you. I started to add indentations. At this point Dan said I thought you were making a coconut not a pumpkin. See how much I need him. Ok so I fixed it.
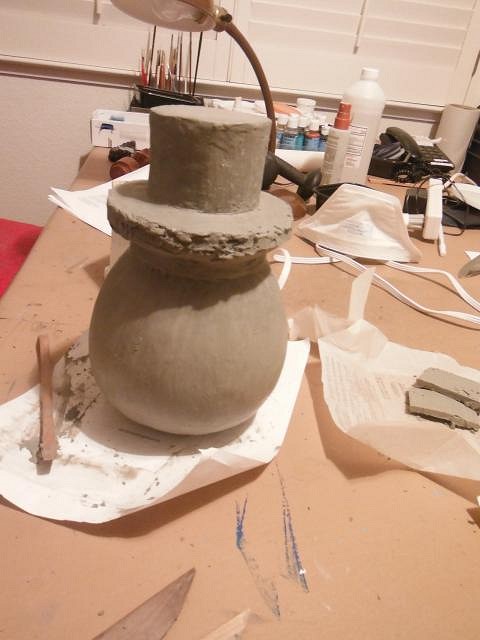
I put my hand in this photo so you can judge size. It will shrink 10 percent in drying and firing. Pinup photos of the five years of crawl mugs in order. 2010, 2011, 2012, 2013, 2014. In these photos I've wrapped cloth around the top that will be cut off.
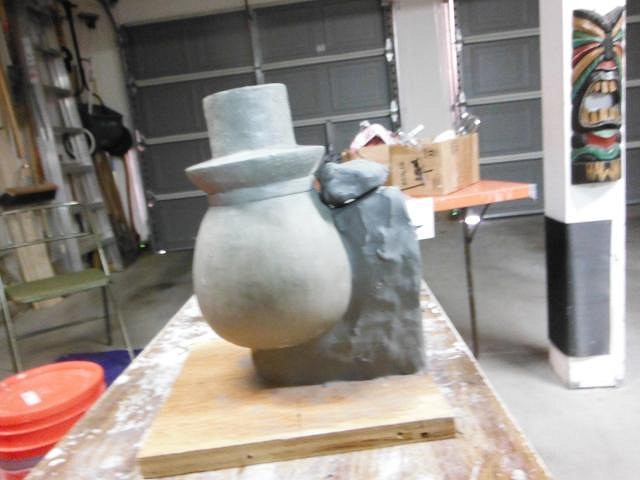
I've already made 10 tweaks to the mug. I removed the deep groove next to the tikis face and I've fine tuned the face and body. Tomorrow we will mold this mug and I'll have more photos for you then. Cheers, Wendy [ Edited by: danlovestikis 2014-02-15 11:27 ] [ Edited by: danlovestikis 2014-02-16 09:40 ] |
|
L
LoriLovesTiki
Posted
posted
on
Sat, Feb 15, 2014 3:29 PM
I love the newest crawl mug! |
|
BK

Big Kahuna
Posted
posted
on
Sat, Feb 15, 2014 6:50 PM
Love it! The Tiki, itself, would make a great mug, too! |
|
T
TikiHula
Posted
posted
on
Sat, Feb 15, 2014 7:41 PM
Another fabulous sculpt Wendy - love it! |
|
H
hang10tiki
Posted
posted
on
Sat, Feb 15, 2014 8:04 PM
The new mug looks cool Ps- it was Buzzy who found the matchbook... |
|
K

kingstiedye
Posted
posted
on
Sat, Feb 15, 2014 10:42 PM
looks great, wendy. i love the crawl mugs so much. i love the celebration of past sacramento tiki establishments. the only other sacramento tiki items i have are a tiki bob mug & shakers and a zombie hut matchbook. |
|
D
danlovestikis
Posted
posted
on
Sun, Feb 16, 2014 9:39 AM
LoriLovesTiki thank you so much. Big Kahuna it's a Witco tiki and the grandson has made it into a mug. We have a couple in our collection. TikiHula hi Mike it's funny that I'm answering your message and you are standing next to me working on my camera. hang10tiki thank you, Ill fix that. kingstiedye is also here along with LloydHHHA. Dan is having fun showing his jungle room. We have started the mold and as each piece hardens we take a break. It's time to work on the next piece! Cheers, Wendy [ Edited by: danlovestikis 2014-02-16 09:41 ] |
|
C
Chippy
Posted
posted
on
Sun, Feb 16, 2014 1:23 PM
Just checking back on the thread. Thank you just doesn't seem to be enough. I cannot wait to display this guy, and I may need to order another. (Especially if ATP is gonna get one) |
|
Z
zerostreet
Posted
posted
on
Sun, Feb 16, 2014 3:54 PM
Wendy! Thanks so much for the gifts you sent my girls! The squeals of delight as I opened the boxes were deafening! They know of your love for a silly pic, so they took these for you. Thanks again!
|
|
V
VampiressRN
Posted
posted
on
Sun, Feb 16, 2014 6:05 PM
That Wendy is a swell gal!!! The 2014 Sac Crawl mug looks awesome...thanks for snagging my number and one for Sandy. |
|
M

MaroneTiki
Posted
posted
on
Sun, Feb 16, 2014 7:27 PM
Hi Wendy, the mug looks great as usual. Please sign me up for the next two numbers. Thanks, Monty |
|
E
ebtiki
Posted
posted
on
Sun, Feb 16, 2014 7:52 PM
Not sure how I missed that your new crawl mug is a coconut ... I'm super-excited now! |
|
T
TikiAno
Posted
posted
on
Mon, Feb 17, 2014 4:27 PM
Wow... the new crawl mug looks great- makes me want to work on my texturing (you're a master at it) more. (Belated message)- love the the Suffering Bobs! (and trying to read the clues on Jeopardy...) :wink: |
|
D
danlovestikis
Posted
posted
on
Tue, Feb 18, 2014 8:10 AM
Hello Friends, I'm back. I took a day off after making the molds because I was beat. I couldn't lift my arms. I did manage at the end of the day to go through the zillion photos that Tiki Hula took during the process and the just choose the best to share here.Chippy I haven't heard from ATP again. See you in a couple of weeks. zerostreet these pictures are wonderful. Please thank the girls. From now on they will be considered models for fun. We often talk of how great it was to visit you and Benzart in Florida. We still need to find a Cuban restaurant here. Thank you for these photos I love them (the girls of course)you have a beautiful family. VampiressRN you run the show, without you there would be no crawl mug or ultimate party. We thank you dearest friend. MaroneTiki gottcha and gottcha. Thank you. ebtiki it's my first coconut project so I'm looking forward to making it. I love thinking of you with a big smile. TikiAno I see bits of jeopardy as I sculpt. I would totally fail on anything sports related. ================================================= Breakfast then I'll be back to post photos. |
|
D
danlovestikis
Posted
posted
on
Tue, Feb 18, 2014 10:19 AM
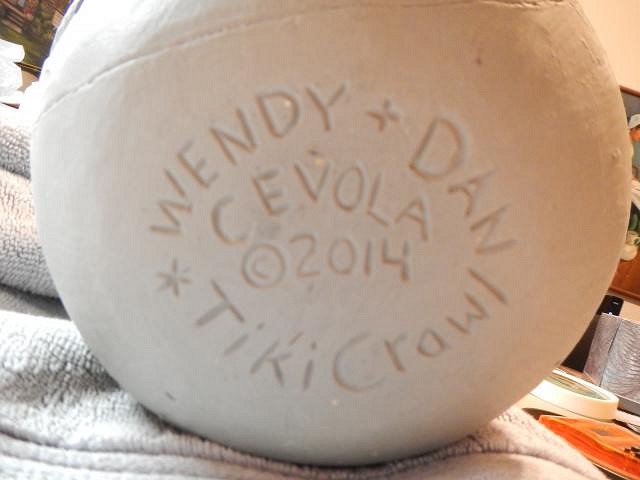
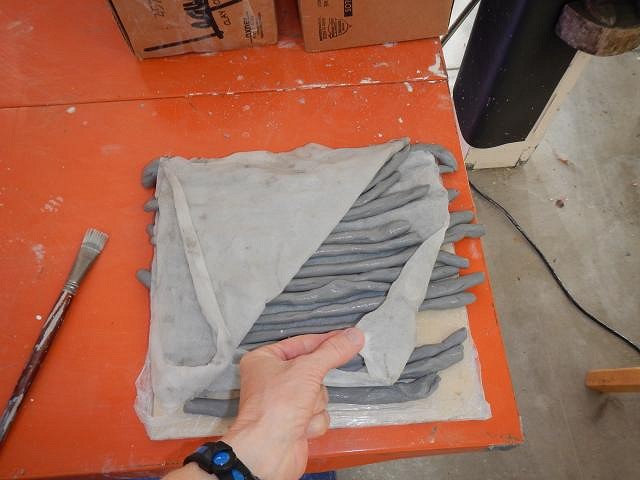
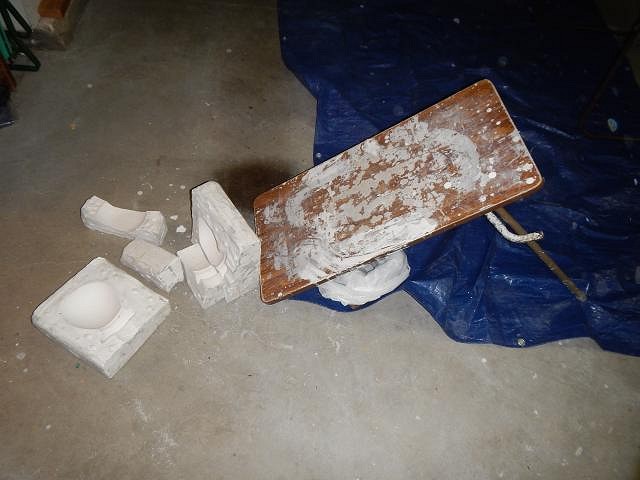
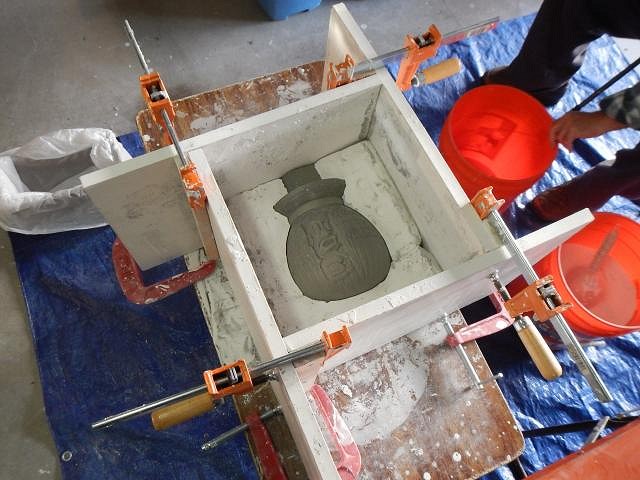
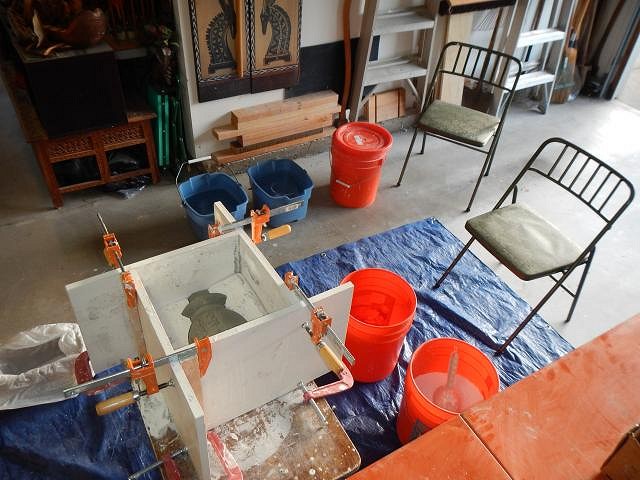
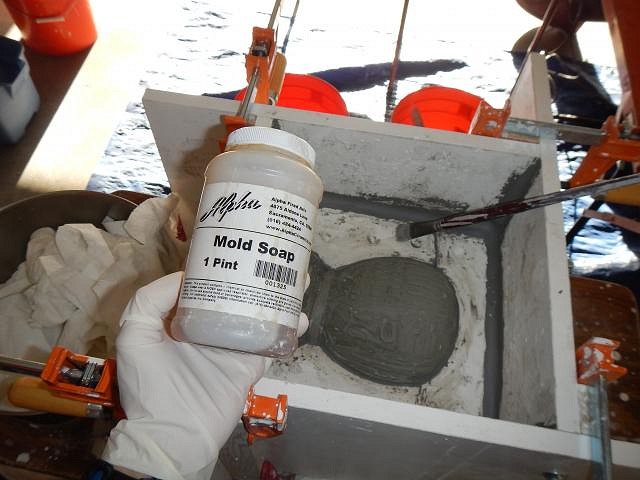
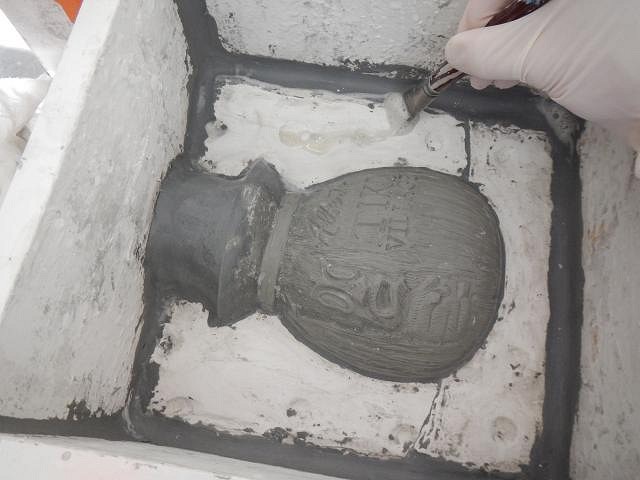
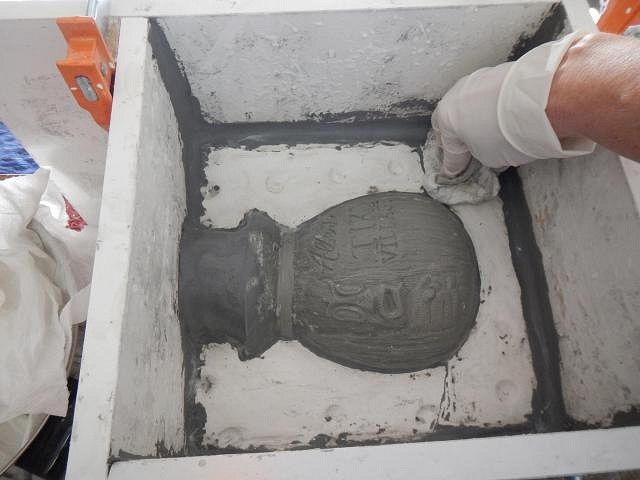
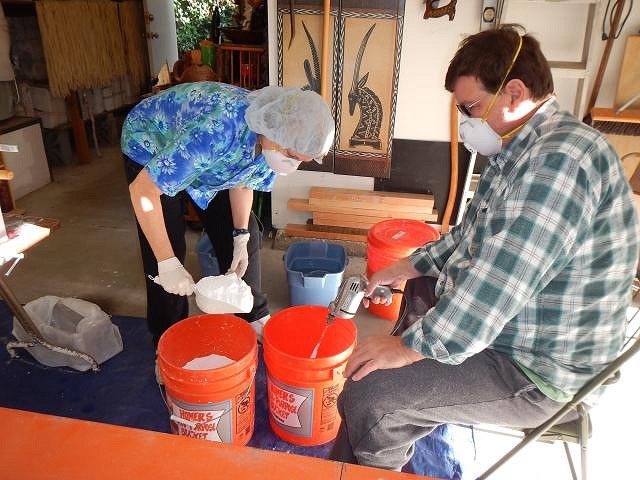
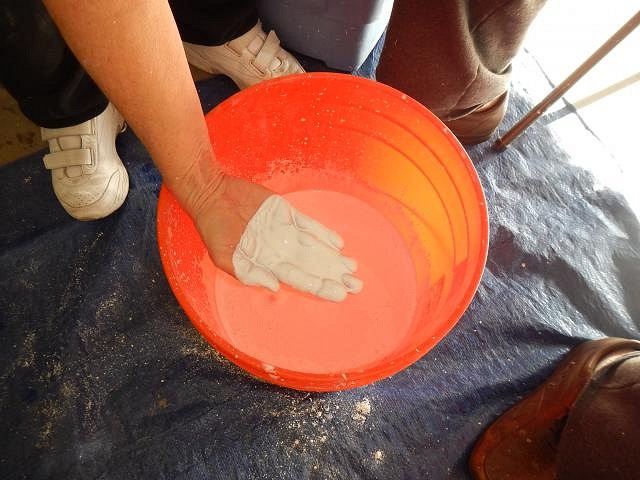
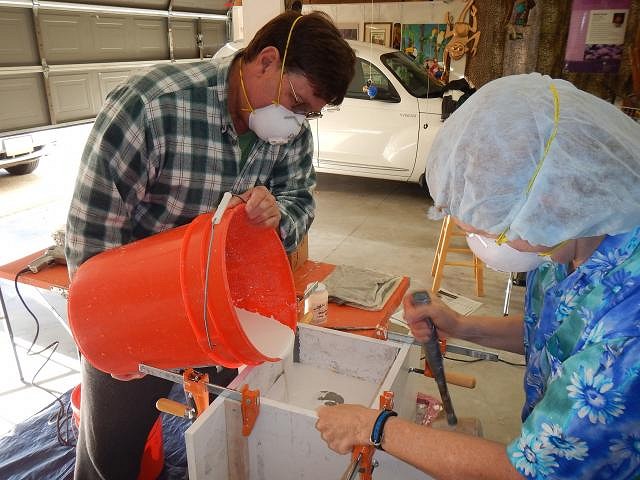
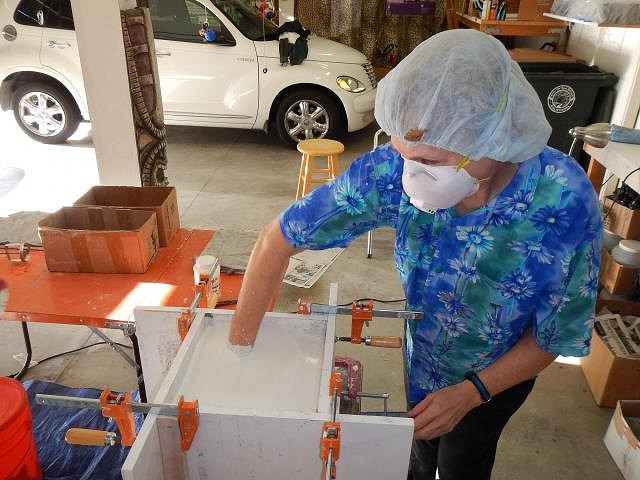
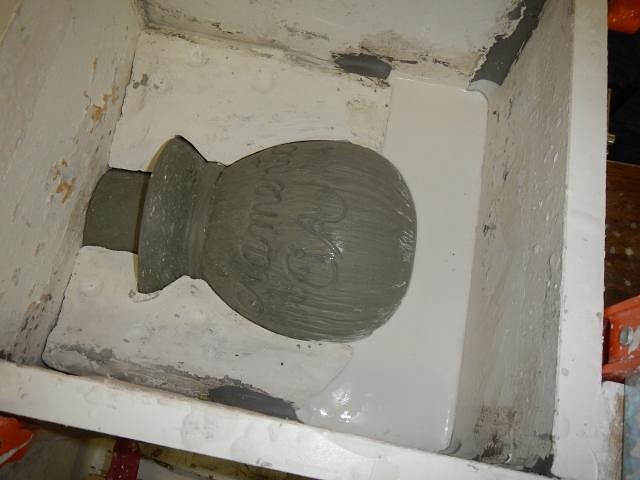
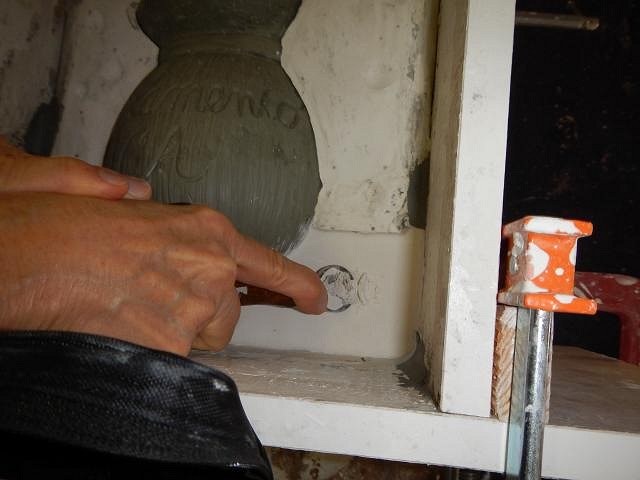
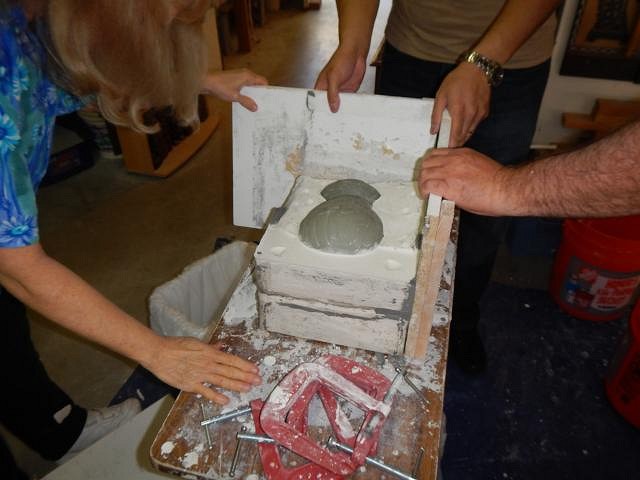
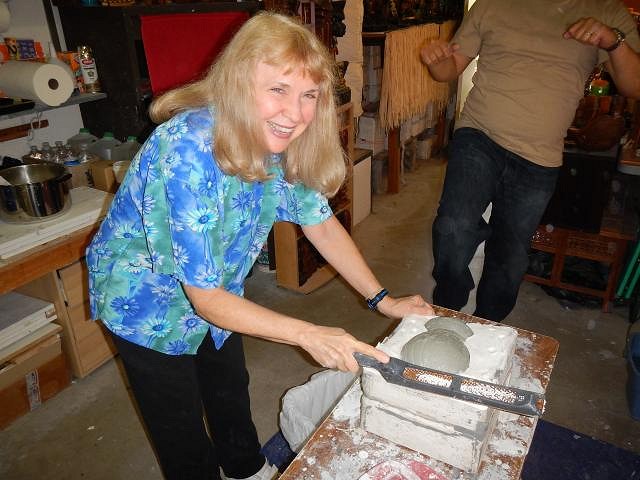
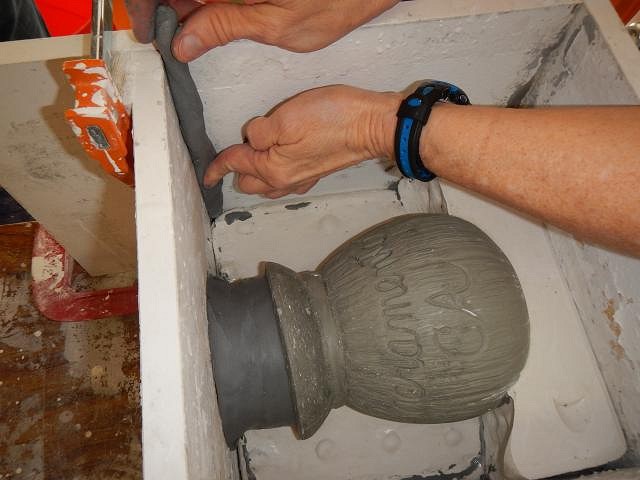
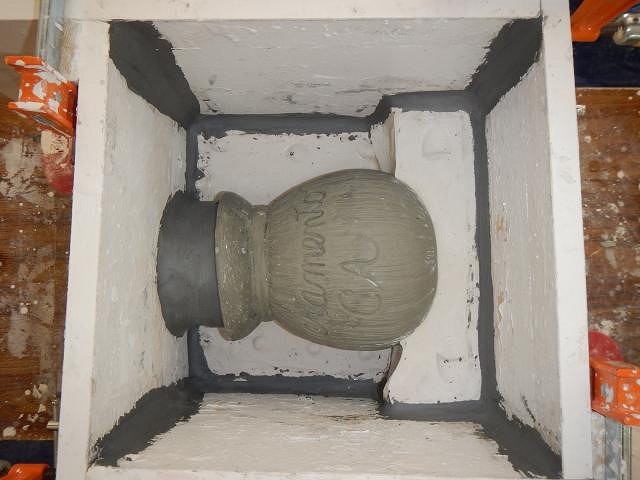
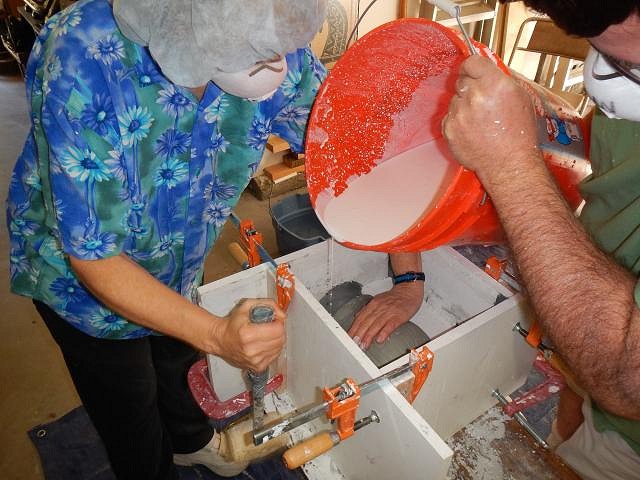
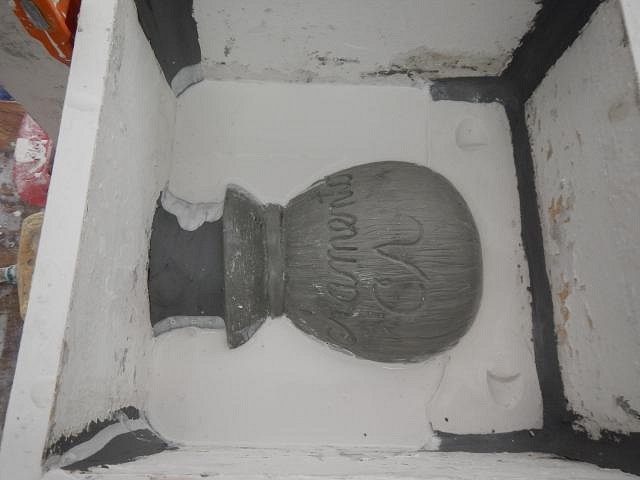
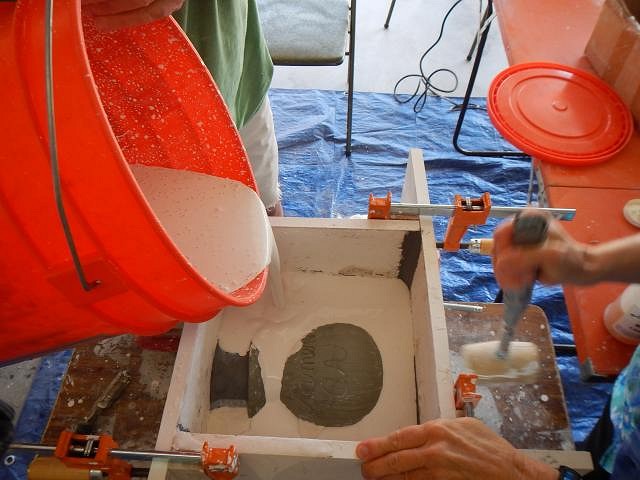
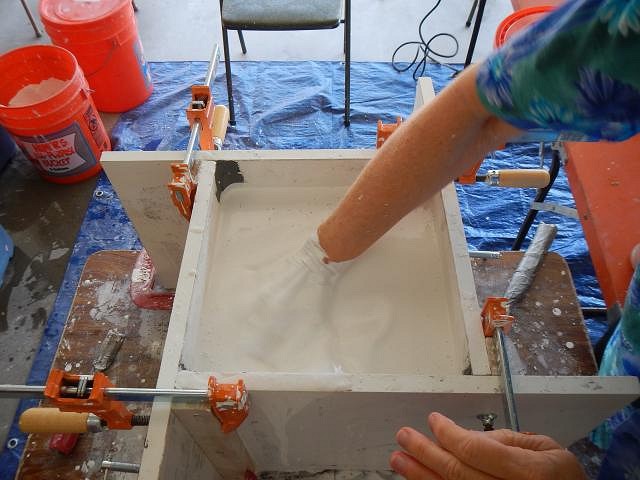
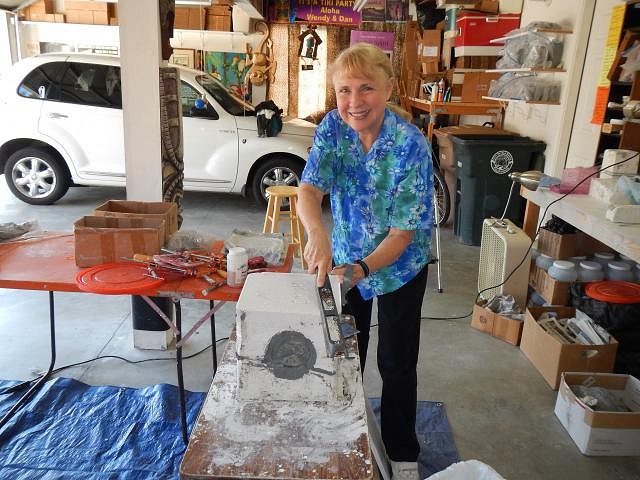
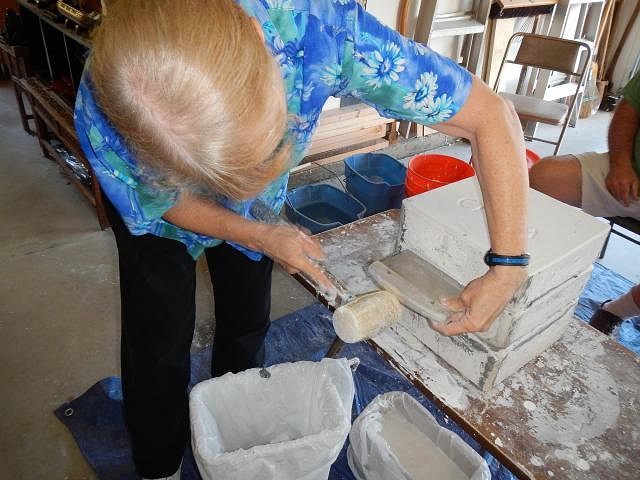
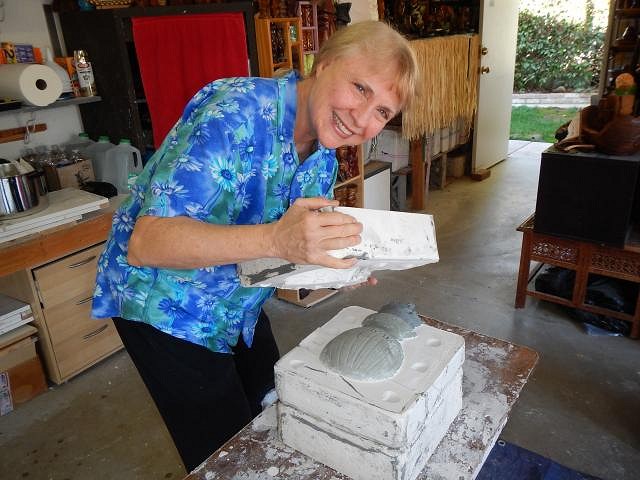
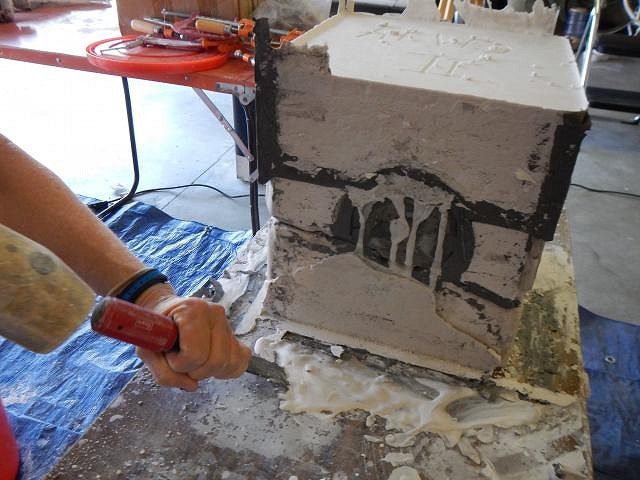
SACRAMENTO CRAWL MUG 2014 OCTOBER 3RD, 4TH AND 5TH. MAKING THE MOLD WITH Tiki Hula, KingsTieDye and LloydHHHA observing. After Dan set up the room with all the tables, tubs of water, mixer, wood, c clams etc.. I put him to work making snakes. I put these on a board with wet paper towels so that they stay sticky for patching inside the mold. This time I am able to use the mold I made for the Cannibal Bowl since I used that sculpt to make this coconut. Our first horror of the day was when the table collapsed but luckily it only chipped the corners of the mold. That's why I make them thick. I planned this out so that all the bottom pieces still fit. That way I didn't have to build up this amount of clay around the sides. We put the box in place and tightened the clamps. This is our set up for mixing the plaster. Now it's time to plug the leaks. For the small areas around the coconut I used sticky clay. I push it in around the coconut. Then I wiped the extra away with a wet washcloth. I also placed clay at the top to make the opening larger. Then I used Dan's snakes to close the gaps between the boards. Mold soap prevents the plaster slabs from sticking to each other. I paint it on and blot it off. This is done three times. Now it's time to mix the plaster. Always wear face masks. Plaster dust will harden in your lungs and it's permanent. and I stick in my hand. When the plaster has the consistency of buttermilk it's time to stop adding plaster. After a 2 second mix we pour it into the box while I pound the sides with a rubber mallet. This removes air bubbles. Next I stick in my hand and pump it over the coconut to knock loose any more air bubbles that may have stuck to the sculpt. It takes 20 to 45 minutes to harden completely so during that time we gave LloydHHHA a tour of Dan's tiki collection. Here LloydHHHA sees the jungle room for the first time. kingstiedye arrived for the show so here are all four guys together. I carved into the top I CM 2014 to identify the mold. Next we removed the box and flipped over the mold onto the new mold piece. I removed the next piece of the old mold that we will not mold. So that I could get under the coconut with the mold soap I painted it on before we put the box back together. Once the box was back on I used the snakes to block leaks between the boards. We poured in the plaster. Another break. This time after the plaster hardened I cut into the surface to make locks. These are just simple indentations. Again it's nice to have extra hands to remove the clamps and box sides. I clean off clay and plaster each time we take it apart. I use a rasp to smooth the edges of each new piece while Lloyd does his happy dance! No I removed the two side pieces. Yippy we get to pour two at the same time. I built up the opening to be larger with clay for this new side. Again I used the mold soap three times. With the box back in place I added the snakes. The snakes are all done. We needed to remember that we are only pouring to the top of the bottom mold piece. I covered the words on the sculpt while he poured in the plaster and I pounded the side with the rubber mallet. Both are filled. Time for a break. Back again I cut into the surface to make more locks. These keep the pieces lined up when using the mold. After putting on the mold soap we poured the last piece, the whole top slab. Again I put in my hand to pump out the air bubbles from the writing on the coconut. Tiki Hula and kingstiedye smiling for the camera and for all their friends. Rasping the edges. Using my favorite chopper to open the mold. Success the mold piece comes off easily. Here you can see that the locks and how they work. From set up until this point it took five hours. Now we started over again to make a second mold. After we put the box back on, did the snakes and mold soap we poured piece number one of mold II. Time for a well deserved break. kingstiedye and LloydHHHA had headed home. Tiki Hula, Dan and I headed to On The Boarder. Remember how much Tiki Hula likes deserts he still does. Back from lunch and another four hours later I have a second mold. When you are tired you make mistakes. I didn't make the seal around the top good enough and I had a leak. It didn't effect the mold other than to make a mess which I cleaned up with a chisel. HERE IS A HUGE LESSON. WE THOUGHT WE HAD FOUND A SPECIAL EFFECTS BUTTON ON MY CAMERA FOR SNOW. I DID A HAPPY DANCE (I LEARNED FROM LloydHHHA) BECAUSE I WAS THE ONE WITH A FACE MASK STILL ON. ALL THE RULES SAY MOP, DO NOT SWEEP, EVER, EVEN WITH A FACE MASK THERE WILL BE PARTICLES IN THE AIR THAT YOU WILL BREATH AND THAT WILL RUIN YOUR LUNGS. IT WASN'T A SPECIAL EFFECT IT WAS THE FLASH SHOWING UP THE PARTICLES. So be safe wear face masks. Dan mopped as soon as we figured out what the snow really was. Thank you for the visit. I hope this will help you all become mold makers in the future. Wendy |
|
T
TikiAno
Posted
posted
on
Tue, Feb 18, 2014 3:08 PM
Thank you- great step by steps. Hopefully will try this out on of these days myself! |
|
T
TikiHula
Posted
posted
on
Tue, Feb 18, 2014 9:09 PM
Had a blast with yall and finally got to see the mold making process firsthand! It's a lot of work but is well worth it. |
|
K
kingstiedye
Posted
posted
on
Tue, Feb 18, 2014 10:56 PM
i had fun but i learned nothing about mold making. but that's my fault, cuz i spent the whole time shootin' the breeze and looking at dan's collection. thanks for inviting me. |
|
L

Lloyd*AloHHHa
Posted
posted
on
Tue, Feb 18, 2014 11:09 PM
LOL! My "happy dance"! I love it!!! Much mahalo to Dan & Wendy for everything and for letting me explore your hale'! You all are such great friends. :) |
|
H
hang10tiki
Posted
posted
on
Tue, Feb 18, 2014 11:17 PM
Wow Jon |
|
D
danlovestikis
Posted
posted
on
Wed, Feb 19, 2014 8:22 PM
TikiAno what I found out is that you can make a basic mold that you can change into dozens of designs. I made a cylinder mold that was only two pieces because I kept the bottom flat and plain. When I use it I indent the bottom and add my name and copywrite. You would save so much time. Just get vase from a thrift store and mold it. You'll have so much more time to make more art. TikiHula I hope to see you on Sunday. muskrat is coming over for a tour. I don't know the time yet but you should be here by 11 am. its time to plug the FEZ. kingstiedye let us know when we can come visit you. I'll try not to get seasick swiveling my head to look at all your tikis. It was great to have you over. Lloyd*AloHHHa I missed your happy dance while working but it was fun to catch it in the photo. You are our newest friend. hang10tiki I think I wore Tiki Hula out calling for photos. When we made the second one he said can we skip them this time. Yep the steps were the same and I'm not talking about happy dances. The molds are drying with a fan on them 24/7. ====================================================================== So what's up with the Wish List #4? This is another Tapa Bob which was ordered by Mondo-by-the-bay. I started by carving boxes all over Tiki Bob. Finished with the boxes. I used a small brush to smooth each edged. Next I used a large brush to smooth all of the surface evenly. Now that Bob was looking good I let him and I rest overnight. I got out some photos of tapa that looks good on Bob. I put a towel on my lap and turned on the TV. Carving the tapa designs took me through 3 hour long TV shows. Finished and posing for photos.
Cheers, Wendy |


Pages: 1 2 3 4 5 6 7 8 9 10 11 12 13 14 15 16 17 18 19 20 21 22 23 24 25 26 27 28 29 30 31 32 33 34 35 36 37 38 39 40 41 42 43 44 45 46 47 48 49 50 51 52 53 54 55 56 57 58 59 60 61 62 63 64 65 66 67 68 69 70 71 72 73 74 75 76 77 78 79 80 81 82 83 84 85 86 87 88 89 90 91 92 93 94 95 96 97 98 99 100 101 102 103 104 105 106 107 108 109 110 111 112 113 114 115 116 117 118 119 120 121 122 123 124 125 126 127 128 129 130 131 132 133 134 135 136 137 138 139 140 141 142 143 144 145 146 147 148 149 150 151 152 153 154 155 156 157 158 159 160 161 162 163 164 165 166 167 168 169 170 171 172 173 174 175 176 177 178 179 180 181 182 183 184 185 186 187 188 189 190 191 192 193 194 195 196 197 198 199 200 201 202 203 204 205 206 207 208 209 210 211 212 213 214 215 216 217 218 219 220 221 222 223 224 225 226 227 228 229 230 231 232 233 234 235 11235 replies